

Page 1
Page 2
CONTENTS
Description of Machine...........................................................................
1
. To Wind the Bobbin.......................................................................... ^
2. Inserting new Needle.............................................................................
3
. To Thread the Bobbin Case....................................................................
4
. To Insert and Remove the Bobbin Case..................................................0
5
. To Clean the Snap-Out Race..................................................................
6. To Thread the Machine & Needle...........................................................
7
. To Prepare for Sewing
8. To Commence Sewing................................................................... 0
9
. To Remove the Work
10
. To Regulate the Thread Tension............................................................^
11
. To Regulate the Stitch Length...............................................................
12
. To Regulate the Pressure of the Presser Foot
13
. To Use the Drop Feed Dial.....................................................................
14
. To Oil Sewing Machine................................................................................
15
. Some Useful Sewing Hints...........................................................................
16
. Correction for minor Difficulties.............................................................
17
. How to Use the Zigzag Regulators.........................................................q
18
. How to Change the Presser Foot............................................................
19
. To Make Buttonhole............................................................................... ^
20
. To Sew Buttons...................................................................................... ^
21
. To Make Hem......................................................................................... ^
22
. How to do Felling............................................................... ^
23
. To Sew Braid and Raised Applique Stitches
24
. To do Quilting........................................................................................ ^
25
. Cloth Guide & Thumb Screw..................................................................
26
. Hemming with the Zigzag Stitch
Needle and Thread S ize
.................................................................................
.......................
..............................................
........................................
...........................................
...........................................................
0
......
(§)
......
......
......
......
......
......
......
......
......
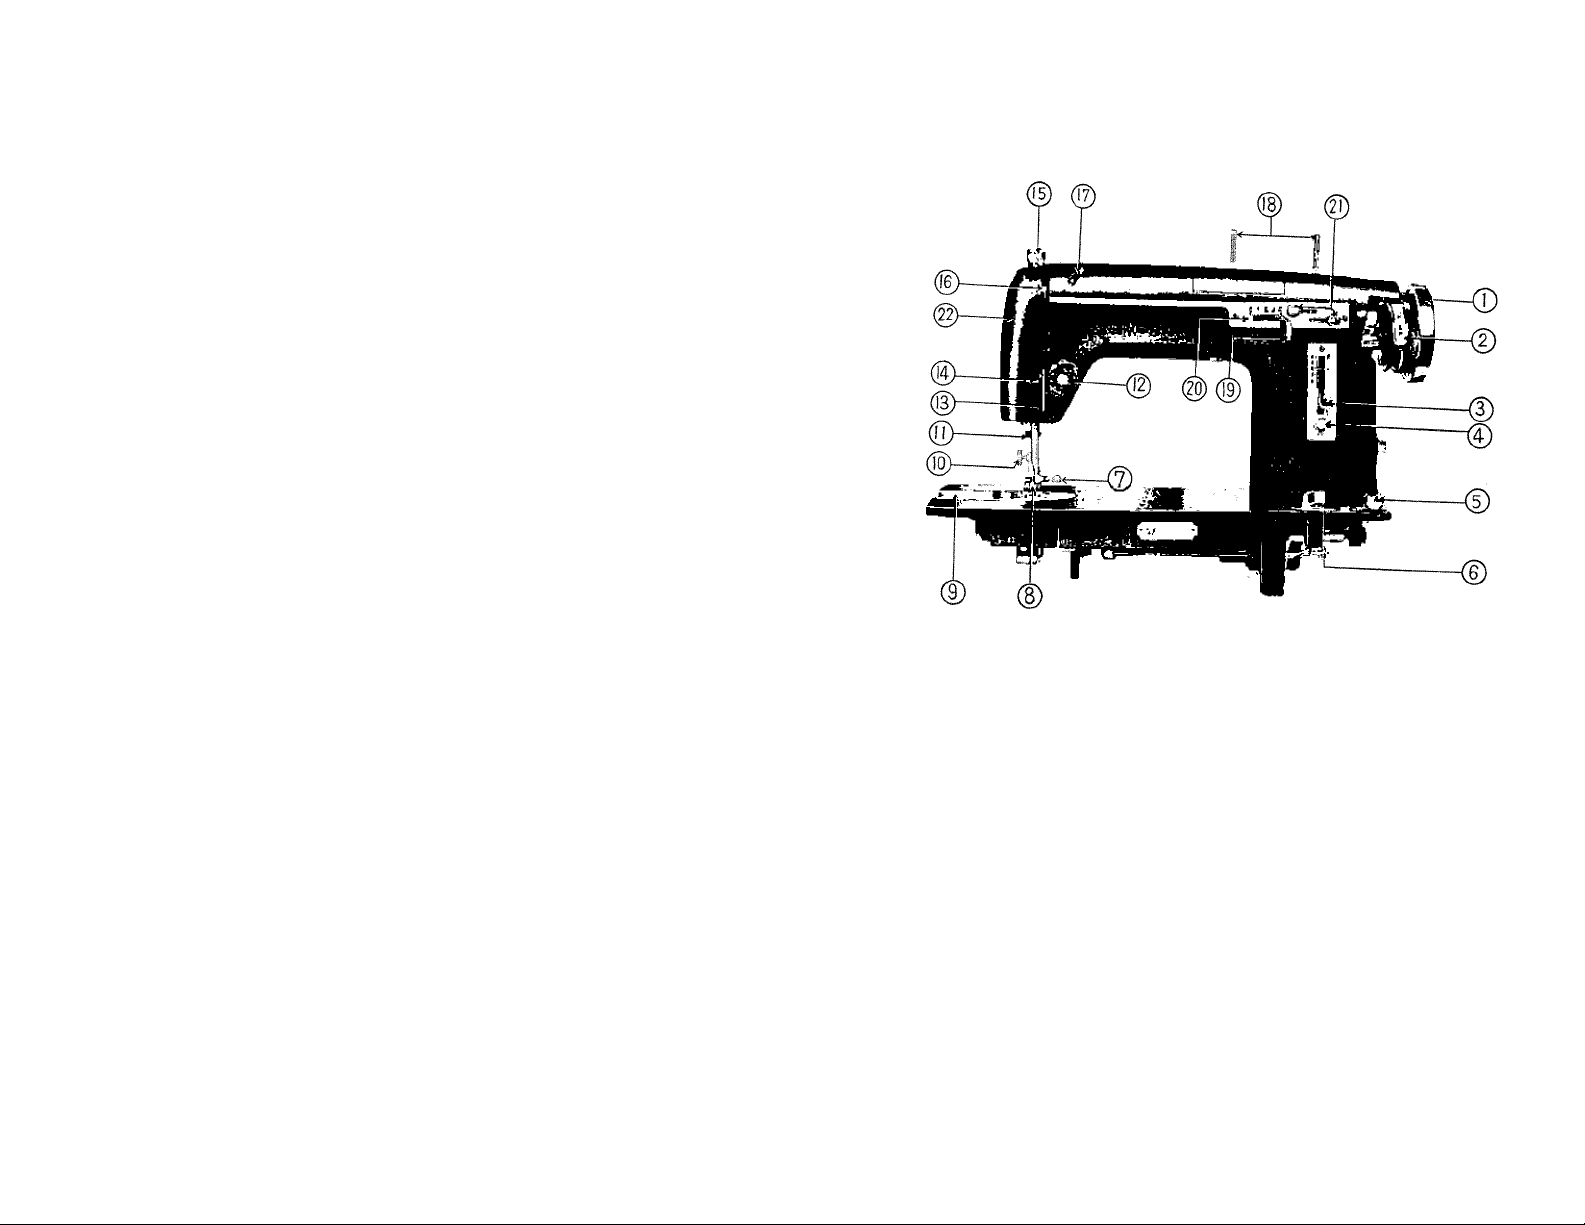
1.
Balance wheel
2.
Bobbin winder
3.
Stitch regulating lever
4.
Stitch length look
5.
Bobbin winder thread
tension bracket
6.
Drop feed dial
7
Needle clamp
8.
Presser foot
9.
Hinged plate
10.
Presser foot thumb .screw
II.
Thread cutter
Thread tension regulator
DESCRIPTION OF MACHINE
13. Slack thread regulator
14. Face plate thread guide
15. Patch-o-matic darner
(Pressure regulator)
16. Thread take-up lever
17. Arm thread guide
18. Spool Pins
19. Zigzag regulating lever
20. Indicator for stopping
lever No. 19
21. Lock screw for indicator No.20
22. Face plate
(Dial tension)
C 1 )
Page 3
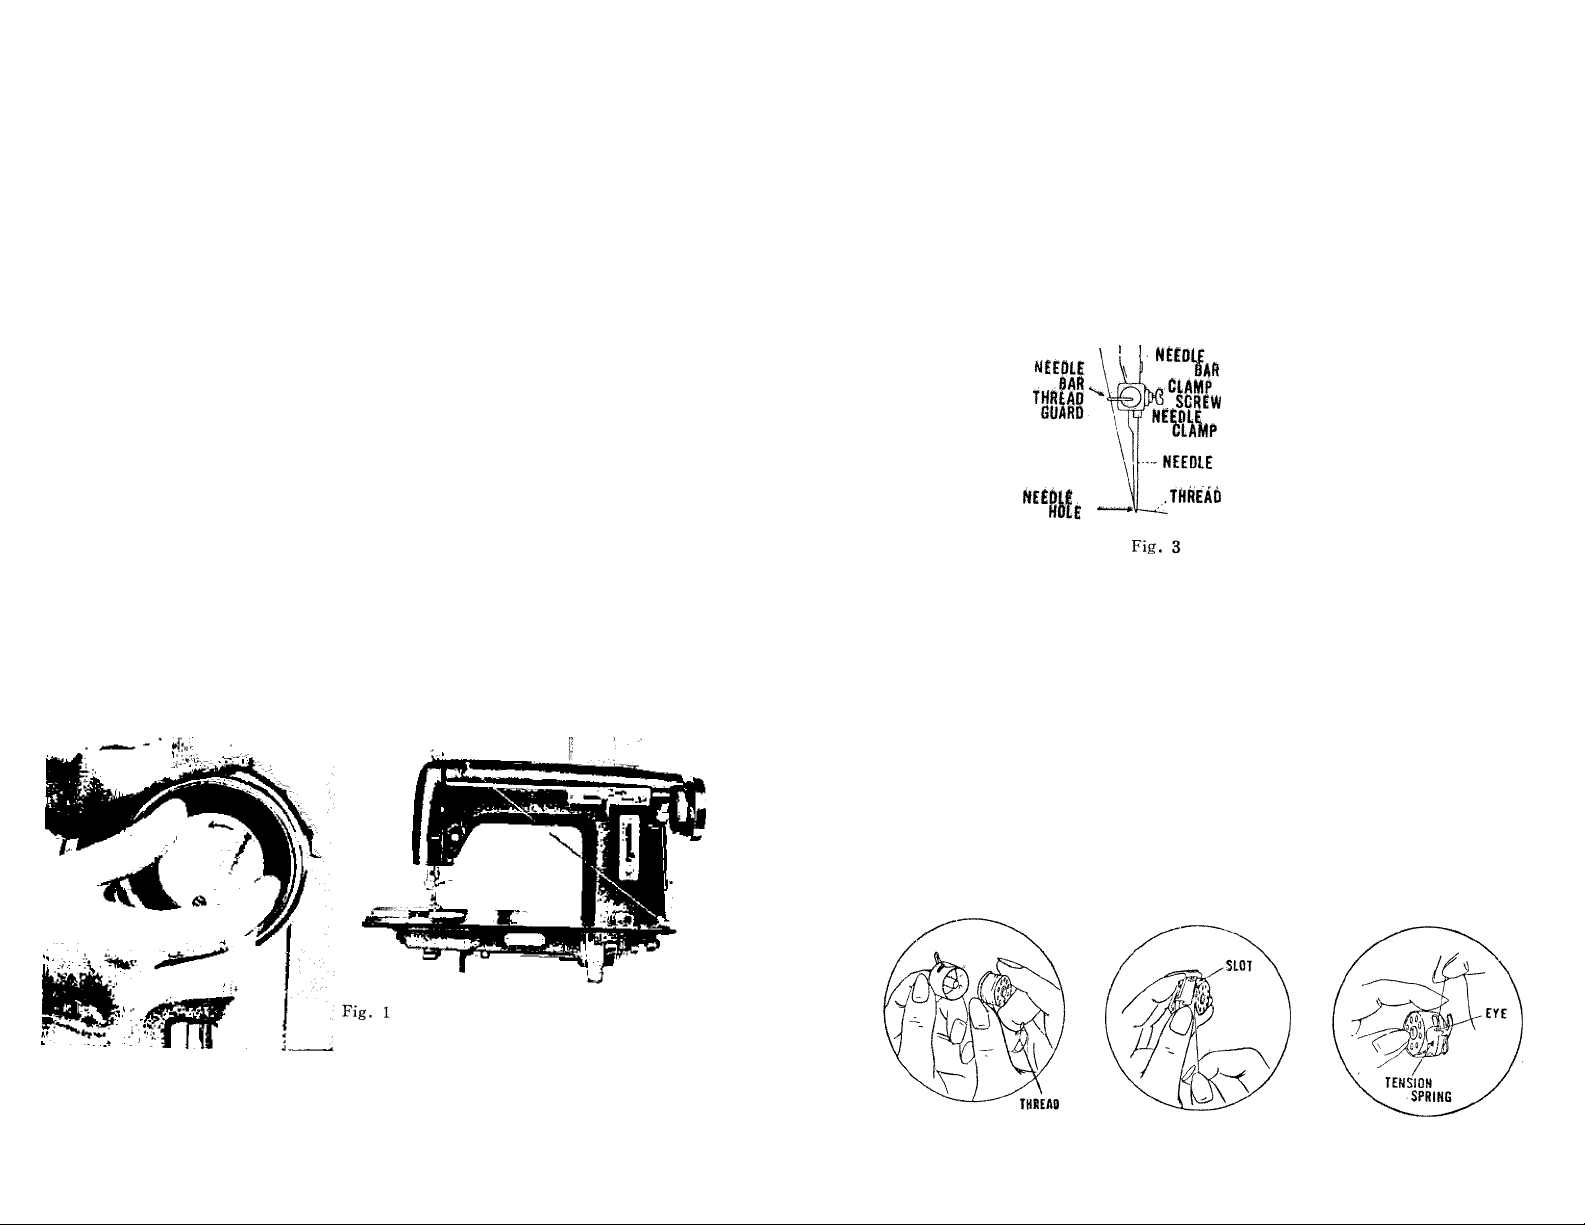
1 To Wind the Bobbin
1. To wind the bobbin the balance wheel must te disconnected from the stitching
mechanism. Hold the balance wheel with your left hand and turn the stop
motion knob (Fig. II toward you with your right hand. This will permit the
balance wheel to turn treely while the needle bttr remains motionless.
The balance wheel is now disconnected for the bobbin winding operation.
2. Place a spool of thread on the spool pin (Fig. 2), Draw thread from the spool
over guide then down-ward across machine from left to right.
3. Pass the thread through the tension device at the right corner of the base of
the machine.
4. Now wind the end of the thread around an empty bobbin seven or eight times
and place the threaded bobbin on the spindle of the bobbin winder.
5. By pressing on bobbin winder lever, the small rubber wheel is brought in con
tact with the balance wheel. To lock into position, press bobbin winder lever
until a click is heard.
Now .set the machin in motion, and when the bobbin is completely full it will
stop turning automatically. Slip tobbin from spindle. Hold balance wheel
irmly with your left hand and with the rigth hand turn stop motion knot
away from you until it can not be moved any further and the needle bar
moves with the turning of the balance wheel.
2. Inserting New Needle
1. Turn the balance wheel toward you, raising needle bar to its highest position,
and loosen the needle clamp screw. .
2. Hold the needle in the left hand with the point down, and insert the needle
up into the needle clamp as far as it will go, with its flat surface to the right,
then retighten the clamp screw (Fig. 3).,
fliEOLf
FLAT
SURFACE
3. To Thread the Bobbin Case
1. Hold the bobbin case with your left hand and put the bobbin into the bobbin
case with your right, leaving about two inches of the thread end unwound (Fig.
4). As the bobbin is being inserted in the bobbin case, thread flow is clockwise.
2. While holding the bobbin case as before, grasp the thread end with your right
hand, and guide it into the cross slot (Fig. 5).
3. Then pull it through under the tension spring of the bobbin case (Fig. 5) until
it enters the delivery eye (Fig. 6).
( 2 )
Fig. 2
Fig. 4
Fig. 5
( 3 )
Fig. 6
Page 4
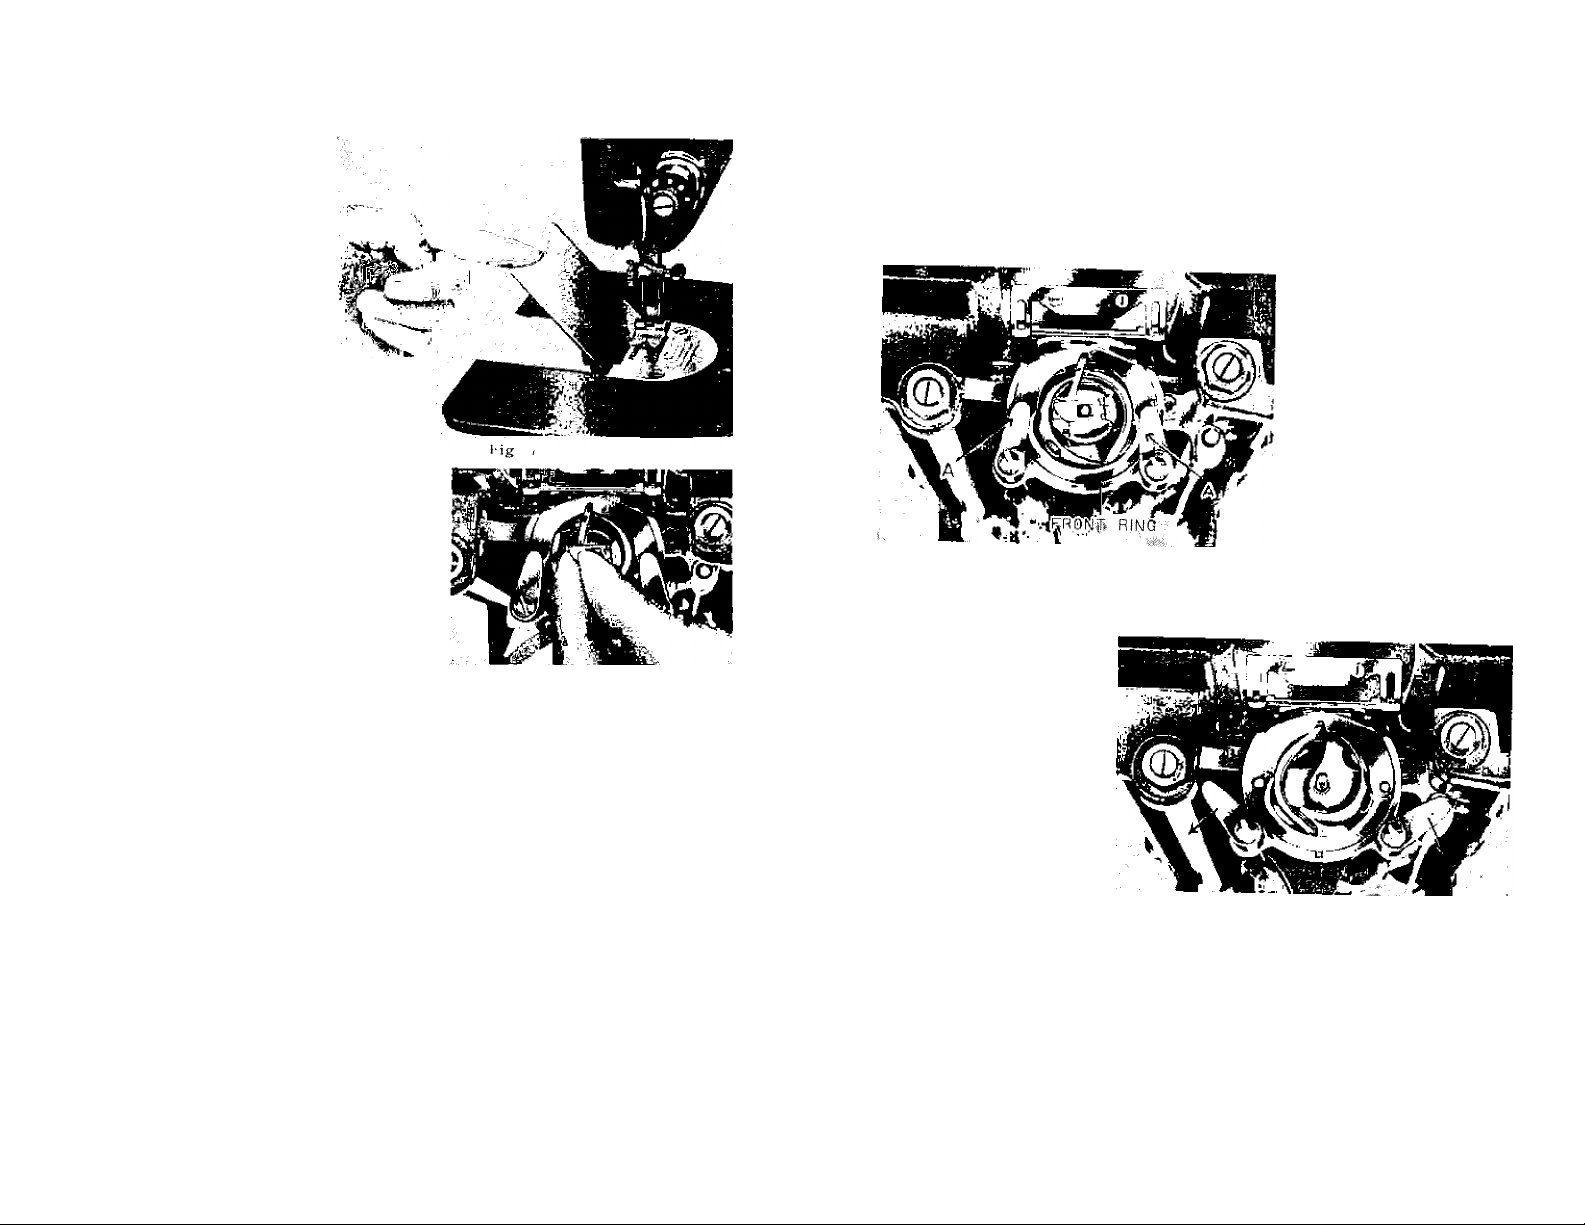
4. To Insert and Remove the Bobbin Case
1. Raise the presser bar
by lifting the presser
bar lifter,
2. Raise the needle bar
to its highest position
by turning the balance
wheel toward you.
3. Spring up hingal plate
CFig- 2),^
4. After threading the
bobbin case, hold its
latch between the thumb and forefinger
of left hand, with its position finger
opposite the notch at the top of the
shuttle race, replace it on the center
stud of the shuttle ( Fig. 8).
5. Then release the hitch and press the
bobbin case in until the latch catches
the groove ncttr the end of the stud
waih a click that can be heard.
6. Allow the end of the thread to hang free about 2 to 3 inches.
7. Snap back hinged plate. To remove the bobbin case do ailahe above in revers.
order.
Fig. 8
3. After shuttle-race and shuttle have been cleaned, put all of them back in
reverse order.
4. Snap lever into place as seen in Fig. 9.
Fig, 9
5. To Clean the Snap-Out Race
When the thread is tangled in the race or dust gets into the space between the
shuttle-race, follow this procedure.
1. Raise the needle bar to its highest position and take bobbin ctise cut.
2. Release the l.EVER (A) on both sides of shuttle race by turning them down
ward. Then take .out the front ring and the shuttle body wuh your fmgers
(Fig. 9. 10). ^
f 4 )
Fig. 30
6. To Thread the Machine & Needle
1. Turn the balance wheel toward you to raise the needle bar to its highest
position.
2. Place a spool of thread on the spool pin.
( 5 )
Page 5
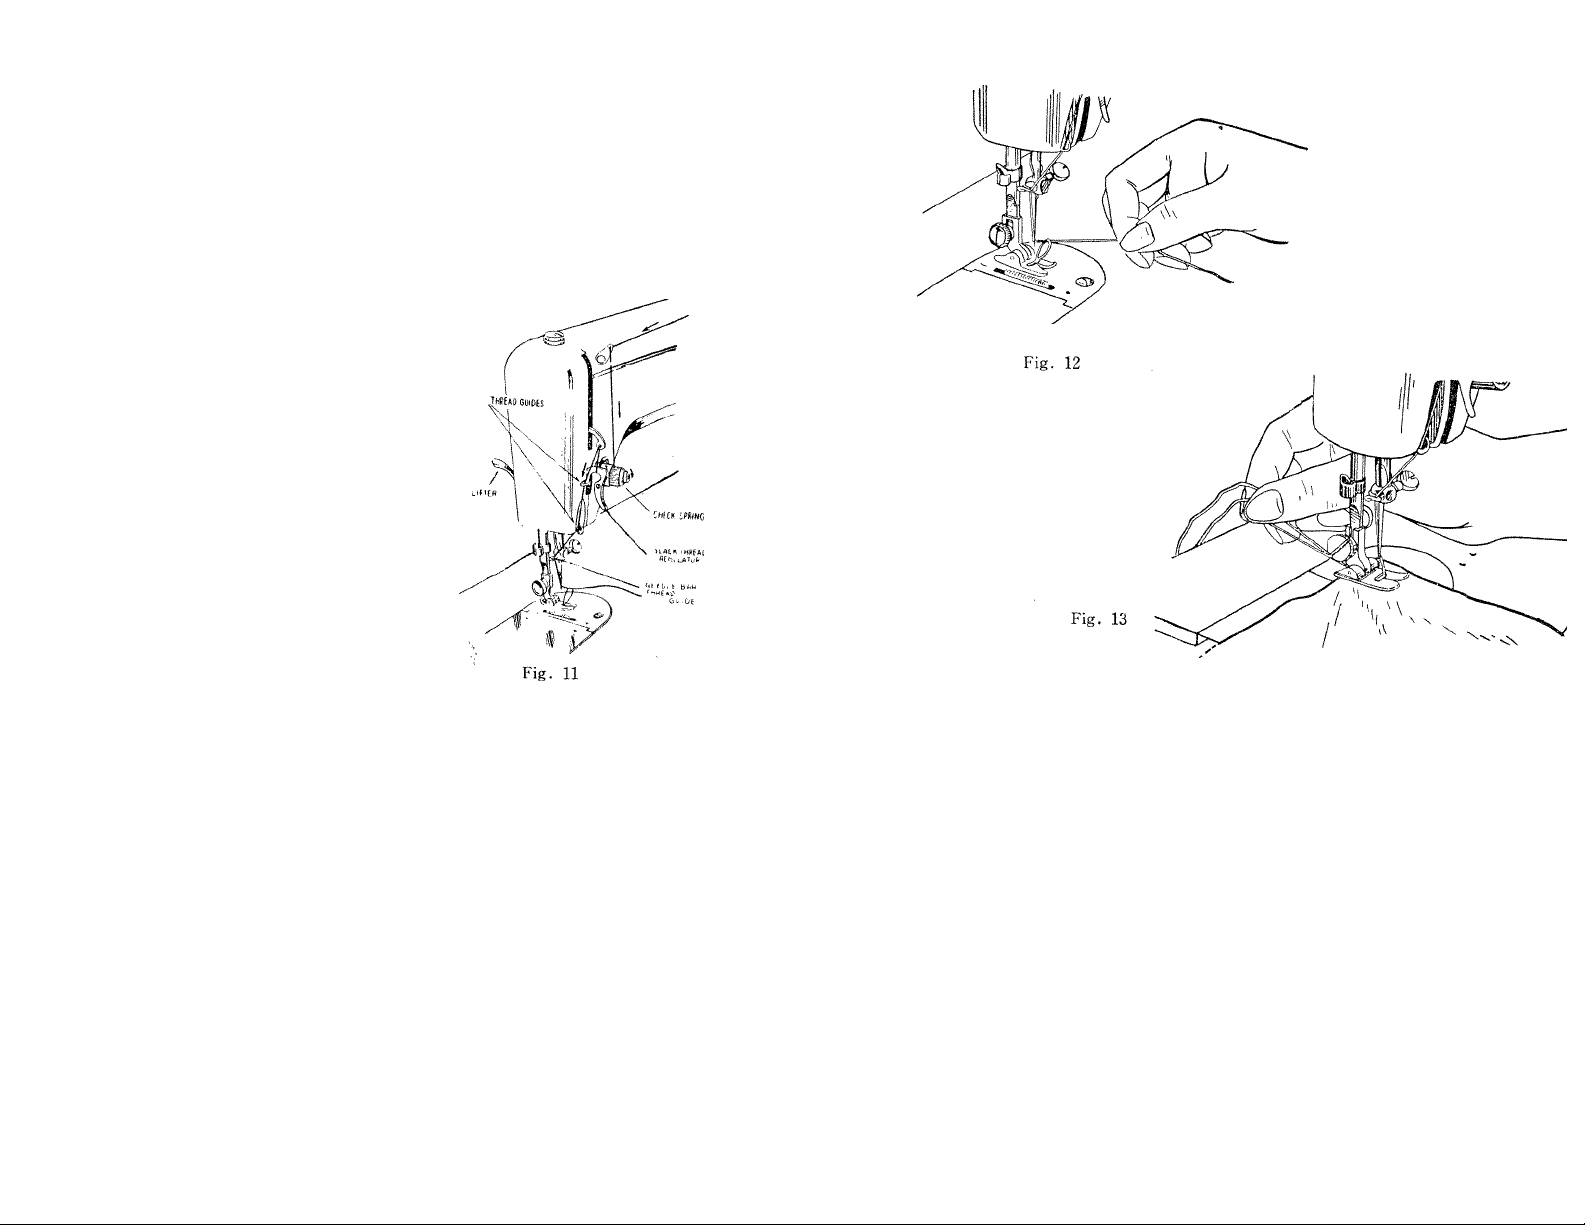
Lead the thread through the arm thread guide (Fig. 11).
Run the thread down from the ihrettd guide to the tension discs and around
them from right to left and up. Draw the thread up through the check
spring.
5.
Then downward again around the underside of the slack thread regulator and
up through the eye of the thread take up lever from right to left.
Now run the thread down through the
face plate guides and then through the
loop of the needle bar thread guide
from the back.
7.
Finally, run the end of the thread thr
ough the eye of the needle from LEFT
to RIGHT, drawing it through about
3 or 4 inches.
You are now ready to sew.
8. To Commence Sewing
7. To Prepare for Sewing
1.
Hold the end of upper thread loosely, leaving it slack from the needle.
Turn the balance wheel toward you until the needle goes down and rises to its
2.
highest position.
Pull the thread you are holding, and lower thread will be brought up with it
through the hole in the needle plate, as shown in Fig. 12.
Place both ends of the upper and lower thread behind the presser foot (Fig. 13)
4.
( 6 )
1. Place the fabric to be sewn beneatth the presser foot.
2. Lower the prestser foot by lov/ering the presser bar lifter.
3. Commence sewing by slowly turning the balance wheel in direction toward you
while gradually pressing the lever of the foot or knee control. Always turn
balance wheel toward you and not away from you.
9. To Remove the Work
1. Raise the needle bar to its highest position, by turning the balance wheel toward
you.
2. Lift the presser foot by lifting the presser bar lifter.
3. Move the fabric back to the left and cut off the thread by passing it over the
thread-cutter above the presser foot,
4. Leave both ends of the thread a few inches long, under and to the back of
the presser foot
( 7 )
Page 6
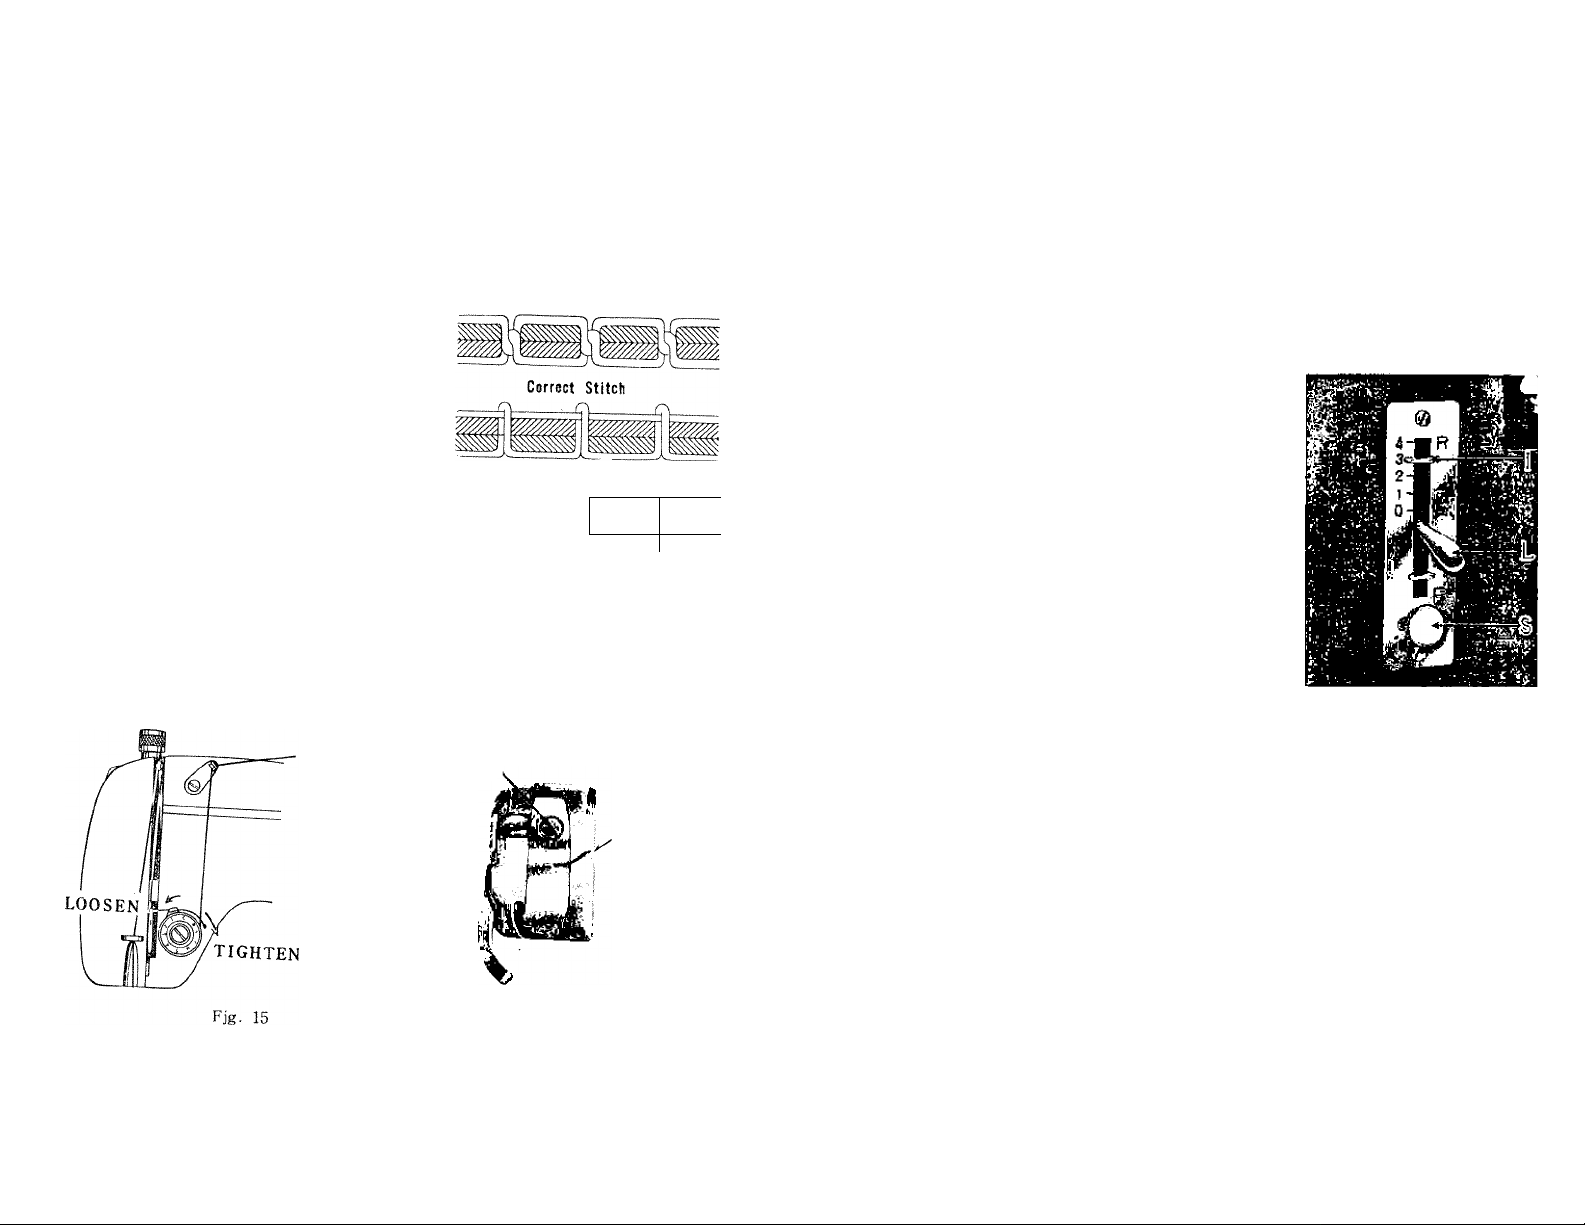
10. To Regulate the Thread Tension
11. To Regulate the Stitch Length
For ordinary stitching the tension of the upper and lower threads should be
equal so as to lock both threads in the center of the material (Fig. 14.). If one tension
IS stronger than the other, imperfect stitching will result. Fine materials require
a light tension, while heavy materials require more tension to obtain a perfect stitch.
TO INCREASE the tension, turn the thread tension dial (Fig. 15) clockwise.
TO LESSEN the tesion, turn the thread
tension dial in the opposite direction. (When
regulating always have the presser foot down.)
As all machines are correctly adjusted before
leaving the factory and readjusted before the
dealer delivers them to yo, the lower tension
seldom needs to be altered, but, if this be
Needle Thread Tension too strong
comes necessary, tighten the screw in the
tension spring on the outside of the bobbin
case for more tension, or loosen the screw
■slightly for lesser tension (Fig. 16).
Needle Thread Tension too weak
Rg,14
'У/^
Ь' - ■
NOTE; Do not turn screw in either direction more than about one-quarter turn at
a time. Then check for results.
The length of stitch can be changed by adjusting the stitch length regulating lever
“L” (Fig. 17).
When the lever is at O, the niiUcriai is not being fed througli the machine.
To change stitch length, loosen lock .screw “S” by turning n to the left.
Now move the lever gradually downward lo feed material forward and to lengthen
stitch.
The indicator “I" indicates the length of stitch. Set lever to desired length of stitch
and lock the screw by turning to the right.
To sew backward move stitch regulating
lever upw'ard past O until it stops.
Machine automatically maintain same length
of stitch forward and backwttrd.
Fig 1 /
( 8 )
TENSION REGULATING
SCREW^
Fig. 16
SLOT
12. To Regulate the pressure of the presser Foot
You can regulate the pressure of the presser foot by using the automatic darner.
To loosen the pressure for darning and embroidering, press release latch down as
shown in Fig. 18.
To increase the pressure push the cap down (Fig. 19).
While you are pushing the cap it can be set at whatever position required. For
sewing very light fabric light pressure is needed. For heavier material you must
have greater pressure on the fabric.
Make sure the prc.sscr foot is down when regulating pressure.
( 9 )
Page 7
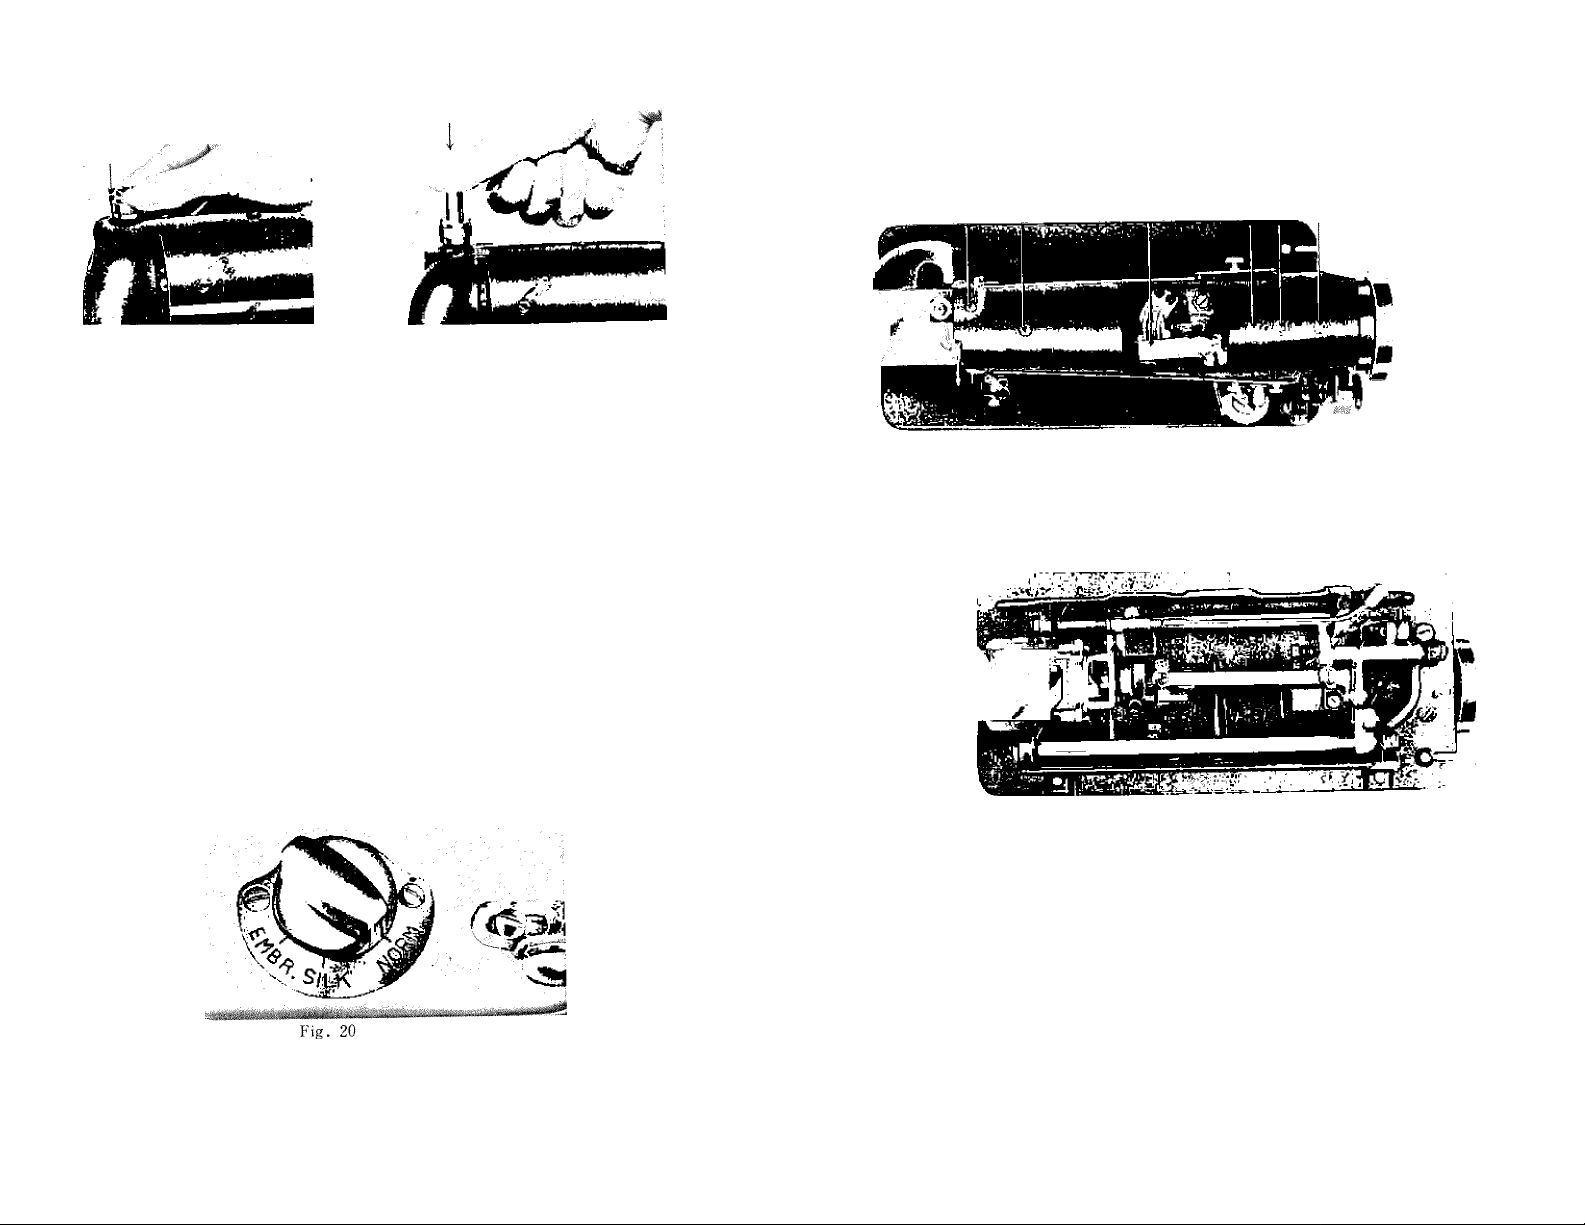
t4. To Oil Sewing Machine
Fig. la
Fig. 19
is. IJrtfp* Fefetf'Dial
By using the drop feed dial you may adjust the feed dog for sewing different
tyix of material and for embroidering or darning (Fig. 20).
1. For sewing very light fabric, move indicator to “SILK” for heavier favric to
“NORM”.-
2. When the indicator is at the “EMBR” position, the feed dog will be lowered
below the surface of the needle plate.
This is embroidering and darning, and you will be able to move your work
freely about in any direction you choose.
3. For embroidering and darning, first reduce pressure of presser foot (Fig. 18).
Fig. 21
To see that your machine is always in smooth running condition you must keep
it oiled at ail times. No greas is required. Just a drop of oil is sufficient at each
time of oiling. Points to be oiled are illustrated in Fig. 21. To oil your machine
thoroughly, it will be necessary for you to remove the small cover plate on top of
the arm. Turn the machine over to get to parts underneath the bed.
After-oiling, run the machine at high speed for a few minutes to get oil to penetrate
( 10 )
to air’parts.
( 11 )
Page 8

I 5. Some Useful Sewing Hints
16. Corrections for minor Difficulties
TO TURN CORNERS;
I, Stop the machine while needles still in the material,
U Raise the presser foot and turn the fabtic using the needle as a pivot.
Lower the presser foot and resume sewing.
TO SEW ELASTIC FABRICS :
in sewing such elastic materials as jeiseys, bias cut cloths, etc., it is advisable
to sew them with reduced upper thread tension, otherwise the thread will break
when the sewn materials arc stretched.
TO SEW VERY THIN CLOTH:
When sew'ing very thin cloth which tends to gather as you sew, place a sheet
of newspaper or any other thin paper underneath the mateial and sew with the
shortest stitch laossible. This will keep your work from gathering.
BASTING:
Reduce the tension of the upjxi thread and employ the longest stitch possible.
The stitches may then be easily removed by pulling the lower thread.
TO KEEP YOUR MACHINE IN PERFECT CONDITION:
Keep all moving parts of the machine constantly oiled and clean.
Always turn balance wheel toward you.
3.
Do not run machine without fabric under the needle.
4, When sew'ing, do not pull the material otherwise you will bend the needle.
The machine is designed to feed the material automatically.
5.
Do not operate machine when the presser bar lifter is raised.
BREAKING OF THE UPPER THREAD:
Incorrect threading.
2.
Upper thread tension too tight.
3.
Defective needle, or needle inserted incorrectly.
4.
Needle rubbing against pre.s.ser foot or other attachments.
5.
Needle eye too small for thread used.
6.
Knots in .sewing thread.
7.
Stitch hole in needle plate damaged and rough.
BREAKING OF THE LOWER THREAD:
1. Incorrect threading of the bobbin case.
2. Lower thread tension too tight.
3. Bobbin being wound too full.
BREAKING OF THE NEEDLE:
1. Pulling the fabric while machine is sewing thus causing the needle to strike
the needle plate.
2. Using bent needle.
SKIPPING STITCHES;
Using bent or blunt needle.
Needle inserted incorrectly.
Needle threaded improperly.
Using wrong size needle.
Pressure of presser foot insufficient, especially when sewing heavy material.
UNEVEN STITCHES;
1. Pre.sser foot not resting evenly on material.
2. Feed dog not adjusted high enough.
3. Too short stitches used.
4. Pulling the cloth while the machine is sewing.
5. Needle too fine for material or thread too coarse.
( 12 )
( 13 )
Page 9

17. How to use the Zigtag Regulators
18. How to chancre the Presser Foot
1. Rai.se the needle to its highest position by turning the balance wheel toward you
2. Raise the pres.ser foot by lifting the presser bar iilter.
3. Loosen the presser foot thumb screw and remove the fool (Fig. 23),
4. Place the groved side of the desired foot against the flat of the presser bar
5. Tighten the thumb screw.
mm
Fig. 22
Fig. 23
Your zigzag sewing machine, by virtue of its design, permits you to do zigzag
sewing and numerous other kinds of work requiring a similar stitch. The controllers
for the zigzag stitch are located on the arm of the machine, as may be.seen on
Fig. 22. Notice lever “A” which adjusts the width of the zigzag seam. For
ordinary straight sewing this lever must be set to the left of O on the dial plate.
By moving this lever gradually to the right toward 4 the machine will sew a zig
zag seam of increasing width, depending on the posi ion of the lever. For the
purpose of reverting to a previously used width of zigzag stitch after having done
some straight sewing, or for special types of work such as sewing buttons or mak
ing tacks, indicators “B” and “C” will be found useful. These indicators serve
as the STOPPERS for lever “A”. To sef “B” ("C”), loosen lock screw “D”
(“E”). hiring it to the left. You then will be able to slide same sideways which,
at the .same time, moves indicator “B” (“C”) to the desired marking. Tighten
lock screw “D" (“E”) by turning it to the right. Thus, when you want to
alternate between narrow and wide zigzag stitch, you use both indicators “B” and
“C”. For example, set indicator “B” at 1 and indicator “C” at 3, tightening
the lock screws. This will assure you of being able to always revert to the same
narrow and wide zigzag seams. You will find this feature especially convenient
when making buttonholes.
( 14 )
19. To make Buttonholes
Attach the Buttonhole Fixit.
Set the Zigzag Lever at marking 2 and tighten lock "B .
2.
Set the Stitch at 1 (Page. 9), or near O,
3.
Insert “Gimp" if desired through hole under the foot (Fig. 24).
'4,
Sew to desired length and turn the material diametrically as shown in Fig, <
5.
Set the Zigzag Lever at 4, sew several stitches, then reset the^ Zigzag L
6.
at 2 and sew the other side of buttonhole as shown in Fig. 25-C & D.
Set the Zigzag Lever at 4, sew several stitches.
7.
Now you must cut the material between both sides of the seam of the bu
8.
hole with the buttonhole cutter (Fig. 25-F).
A B c D E F
Fig. 25
( 15 )
Page 10

Notice: You can make the buttonhole without braid or gimp in the same way as
front page.
4. At first, it might be necessary for
you to lead the material until
beginning of the hem is just be
20. To sew Buttons
1. Change the presser foot to the Button Foot.
2. Turn the Drop Feed Knob to “EMBR".
3. Place material or garment with button under the foot, so that holes in button
line up with oblong hole in the foot (Fig. 26)_.
4. Adjust the Zigzag Lever so that width
of zigzag stitch permits needle to pass
through center of holes in button.
5. Sew several stitches and remove mate
rial from machine and snip thread.
Fig. 26
Notice: When attaching four-holes button, first sew one set of two holes, then
stitch into second set of two holes and lock thread with two or three
plain stitches in last hole as described above.
low the needle.
5. Fewer presser foot and begin to
sew.
6. Keep guiding the material, so
that the scroll is filled all the time (Fig. 27).
Notice: Do not crowd the material into scroll and do not leave scroll only partly
filled by the material. Feed just enough material into the hemmer foot
to fill out the scroll. Instead of a straight stitch, you can also use a
zigzag stitch, width of the zigzag stitch-to be as wide as the hem
itself. Using a long stitch and tight tensions will produce a shell stitch.
Fig. 27
22. How to do Felling
The hemmer foot can also be used for felling. Proceed in the lollowing manner:
I. Lay two piece.s of doth one top of the other with their RIGHT sides facing
each oihc. The right edge of the bottom piece must extend about 18" beyond
the right edge of the top piece. See Fig. 28,
21. To make Hem
1. Use the Hemmer Foot.,
2. Clip the corner of the material td be hemmed, so that it will be easier for
you to insert the material in the hemmer foot.
3. Feed the clipped edge of the material by curling it into the spiral tongue or
thè- scroll of the foot. '
( 16 )
( 17 )
Page 11

2. Sew both both pieces of closh together, using thè hemmer foot like a regular
presser foot. Use the right edge of long toe of hemmer to guide the bottom
piece of material, while the left edge of the toe serves as a guide for the top
piece of material. Fig. 28 shows this detail.
3. Open and spread out material and put back on machine right sides down
ward. Make sewn edges of material stand up.
4. Fold over the edges to the left and insert them into the scroll ol the hemmer
foot. Sew as you would do ordinary hemming. Use left edge o( long toe of
the hemmer foot as guide, having original seam run alongside of it (Fig. 29).
23. To Sew Braid and Raised Applique stitches
25. Cloth Guide & Thumb Screw
Fig. 32
This is an attachment designed as a guide for straight stitching when making
wide hems, deep tucks or seam widths which are greater than the presser foot
1. Attach the Cording Foot.
2. Set the Zigzag Lever at lor 2 according
to width of cord or gimp you are using.
3. Insert the cord or gimp through the
hole of under foot.
4. Sew slowly and follow the design care
fully (Fig. 30).
24. To do Quilting
The Quilter helps you to sew equidistant
lines on padded fabrics without any marking
them in advance.
1. Attach the Quilter.
j 2. Adjust the quilter to spacing desired and
1
let it touch the material.
3. Sew the material so that quilter follows
the previous stitching (Fig. 31).
( 18 )
Fig. 30
Fig. 31
allows (Fig. 32).
It is attached to machine as illustrated
..............
a very simple operation.
26. Hemming with the Zigzag Stitch
1. Fold the material to the size of hem desired, with 1 16 operlap on tl >
bottom fold as shown in Fig. 33-A.
2. Make the stitch as shown in Fig. 33-B.
3. After stitch is finished, unfold the material as shown in Fig. 33-C. You will
have practically invisible stitching.
Fig. .33
B
( 19 )
Page 12

MEMO
NEEDLE-THREAD-FABRIC-STITCHIN6 GUIDE
Fabric
Extremely heavy
tarpaulin, sacking,
canvas, duck, etc.
Heavy upholstery
fabric, ticking.
denim, leatherette
Medium heavy
drapery
fabric, velveteen.
suiting, felt, terry.
etc.
Medium broadcloth,
percale, gingham.
linen, chintz.
taffeta, sheer
wool, shantung, etc
Needle
No.
4
3
2
1
Machine
Stitches
Per Inch
6
to
8
8
to
10
10
to
12
12
to to
14
Cotton
Thread
10
to
30
30
to
40
40
to
60
60
80
Mercerized
Thread
Heavy Duty
Heavy Duty
Heavy Duty
50
Silk
or
Nylon
A
Sheer voile, lawn.
dimity, crepe,
handkerchief linen,
plastic film, etc
Very sheer chiffon,
batiste, lace.
organdy
ninon, net, marqu
isette, etc
00
0
1 4
to
16
(Plastic film)
8 to 10
16
to
20
oU
to
100
100
to
150
50
50
...
A
A
 Loading...