

Page 1

INSTRUCTION MANUAL FOR
SEWING MACHINE
3
*
h1
...fa.
.............
'( ii fmi Yi 'A
f
UIHIT«
Page 2

WHITE SEWING MACHINE COMPANY
Record in space provided below the Serial No. and
Model No. of this appliance.
The Serial No. is located on Bed Plate.
The Model No. is located on Rating Plate.
Serial No.
Model No.
Retain these numbers for future reference.
Page 3

CONTENTS
Name of Parts................................................................................................................................2 & 3
Accessories........................................................................................................................................... 4
Before sewing (Power supply and Sewing lamp)................................................................................5
Winding the bobbin................................................................................................................................6
Removing bobbin case and bobbin......................................................................................................7
Inserting bobbin into bobbin case....................................................................................................... 7
Inserting bobbin case into shuttle race........................................................................................... . .8
Threading upper thread & Twin needle threading........................................................................... 9
Drawing up bobbin thread................................................................................................................... 10
Changing sewing directions.................................................................................................................10
Control dial & Adjusting thread tension.....................................................................................11 & 12
Regulating the presser foot pressure................................................................................................13
Drop feed................................................................................................................................................13
Changing needle............................................................................................................................... 14
Fabric. Thread. Needle table............................................................................................................ 15
Sewing (pattern selector) and operation table...................................................................................16
To start sewing .....................................................................................................................................17
To finish seam..................................................................................................................................... 18
Straight stitch........................................................................................................................................19
Zigzag sewing...................................................................................................................................... 19
Overcasting............................................................................................................................................20
Stretch stitch......................................................................................................................................... 20
Blind stitch
Button sewing...................................................................................................................................... 23
Binding................................................................................................................................................ 23
Zipper sewing........................................................................................................................................24
Button hole sewing............................................................................................................................. 25
Hemming
Twin Needle............................................................................................................................................27
Embroidery.......................................................................................................................................... 27
Quilter.....................................................................................................................................................28
Seam guide............................................................................................................................................28
Maintenance (Cleaning and oiling).....................................................................................................29
Checking Performance Problems WHAT TO DO
.................................................................................................................................21 & 22
............................
...................................................................................................................26
..............................................................................
30
Page 4
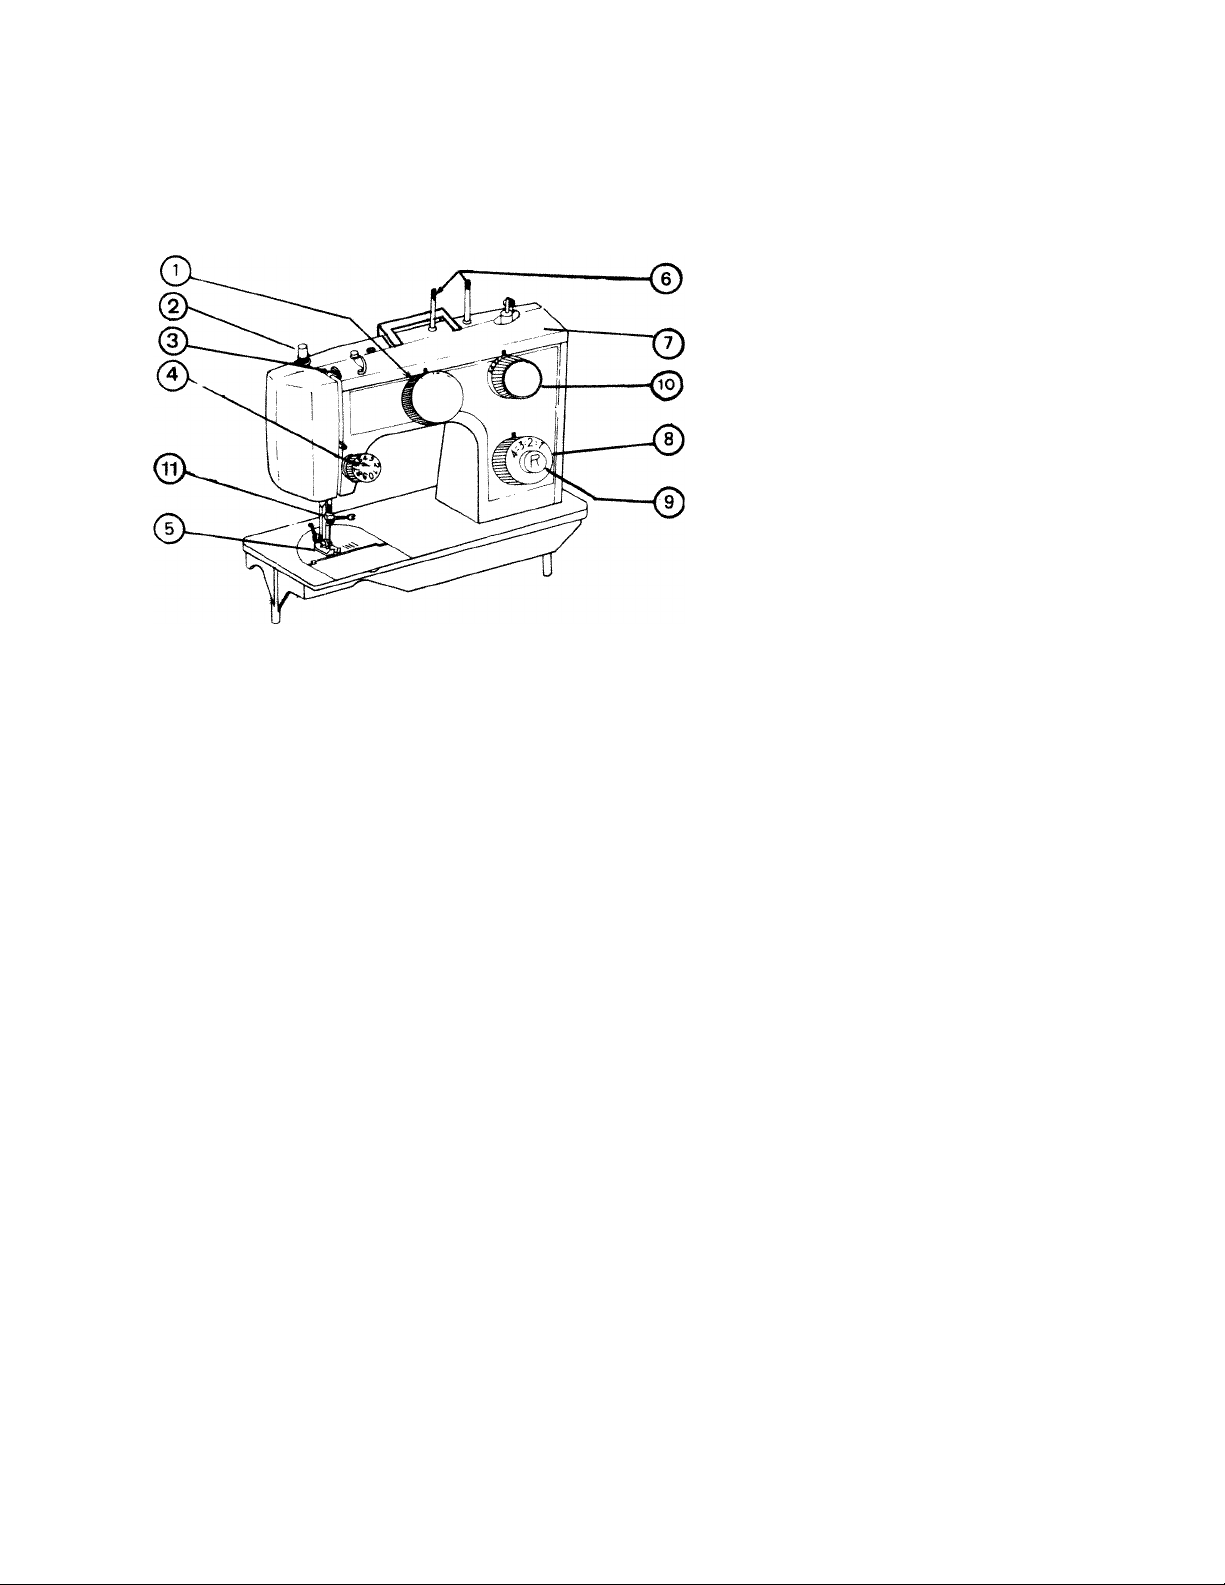
NAME OF PARTS (FRONT VIEW)
1 Pattern selector dial
2 Pressure regulator
3 Take up lever
4 Thread tension dial
5 Presser foot
6 Sub-spool pins
7 Top cover
8
Zigzag width dial
9 Stitch length dial
1 0 Reverse button
O Thread guide for upper threading
Page 5
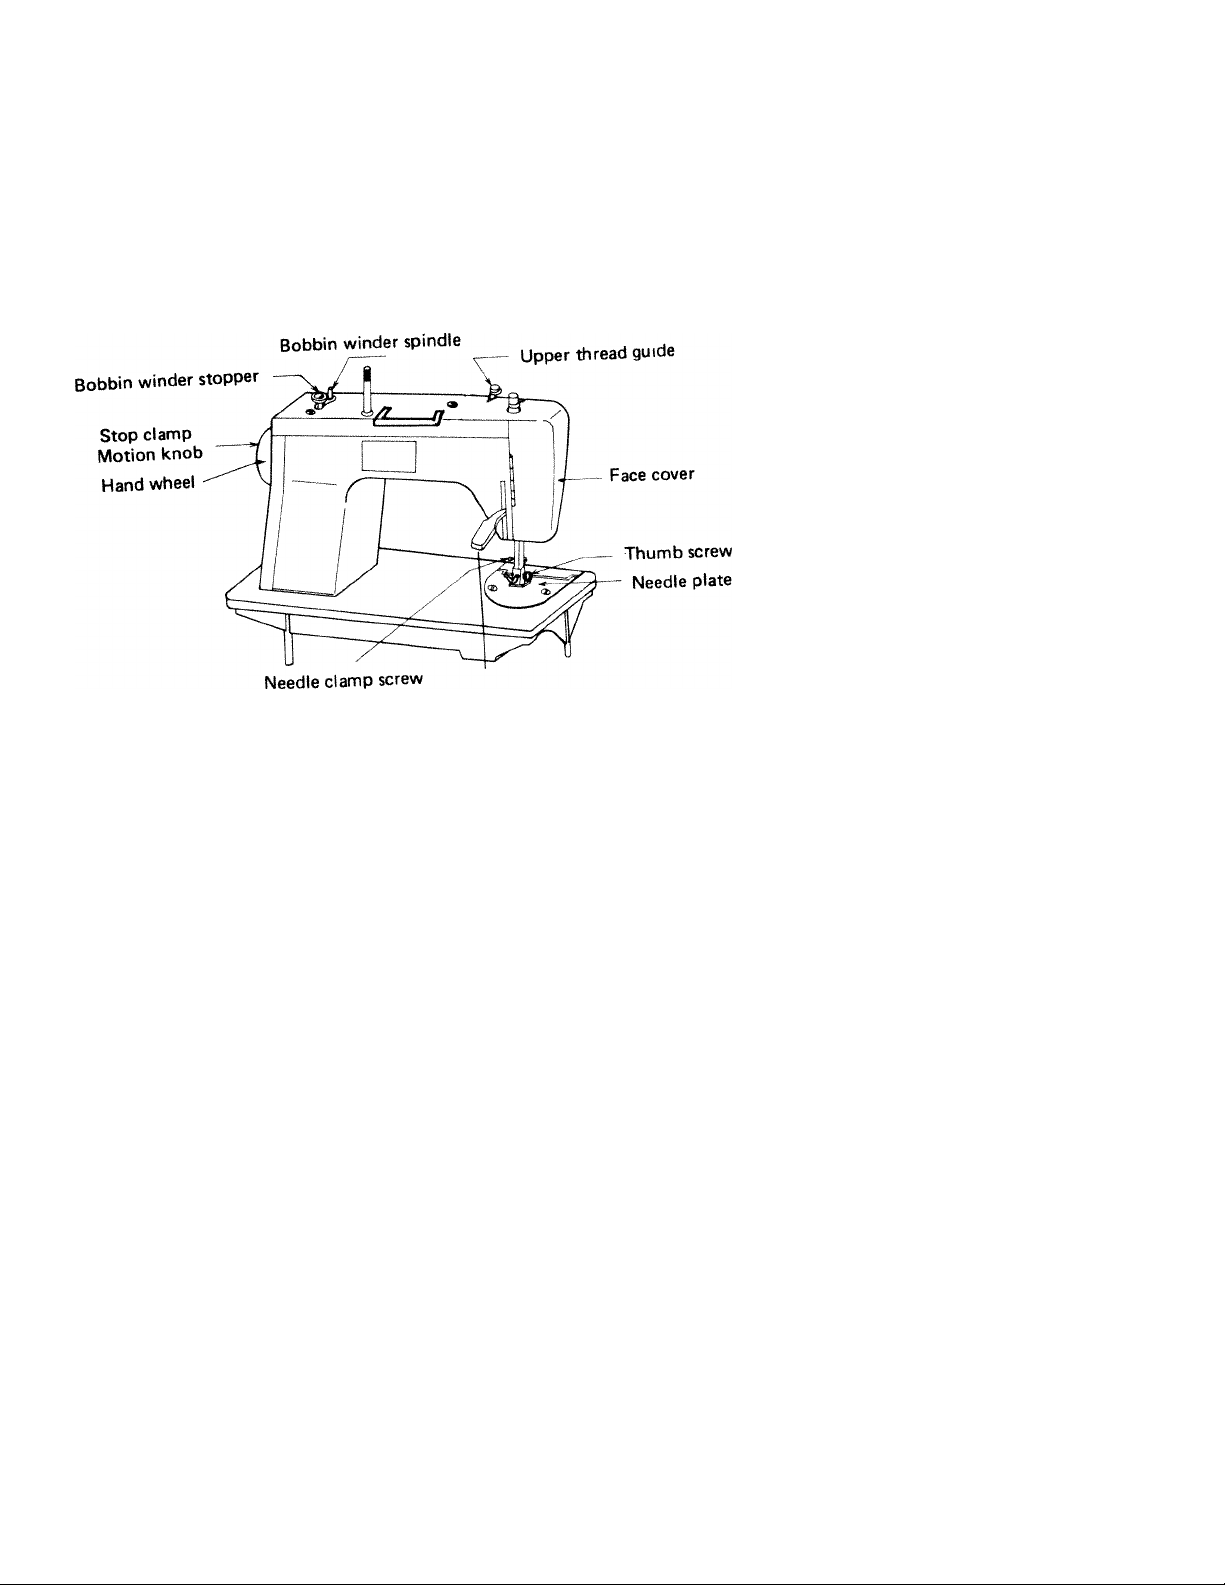
(REAR VIEW)
Presser foot lever
Page 6
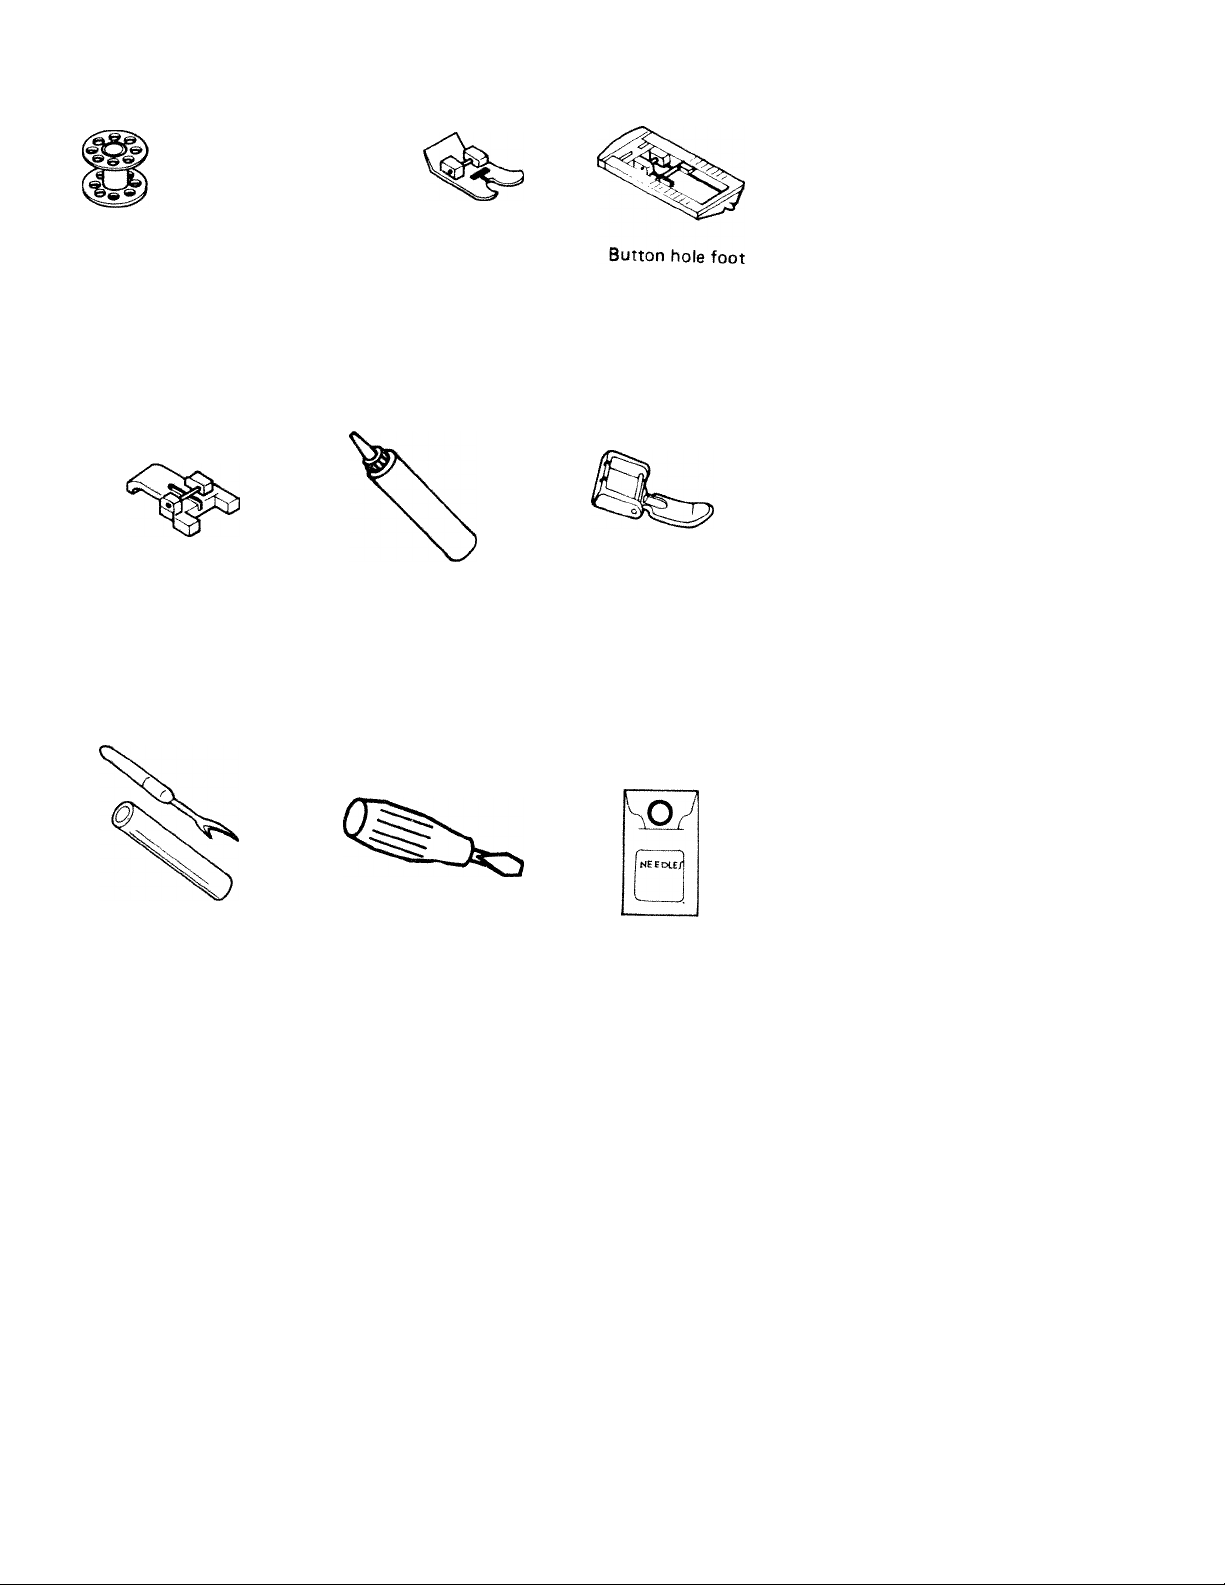
accessories
Bobbin
Button foot
Felt
Zigzag foot
(On machine)
Machine Oil
Zipper foot
Button hole cutter
Screw driver
Needle
#11 #14
Page 7
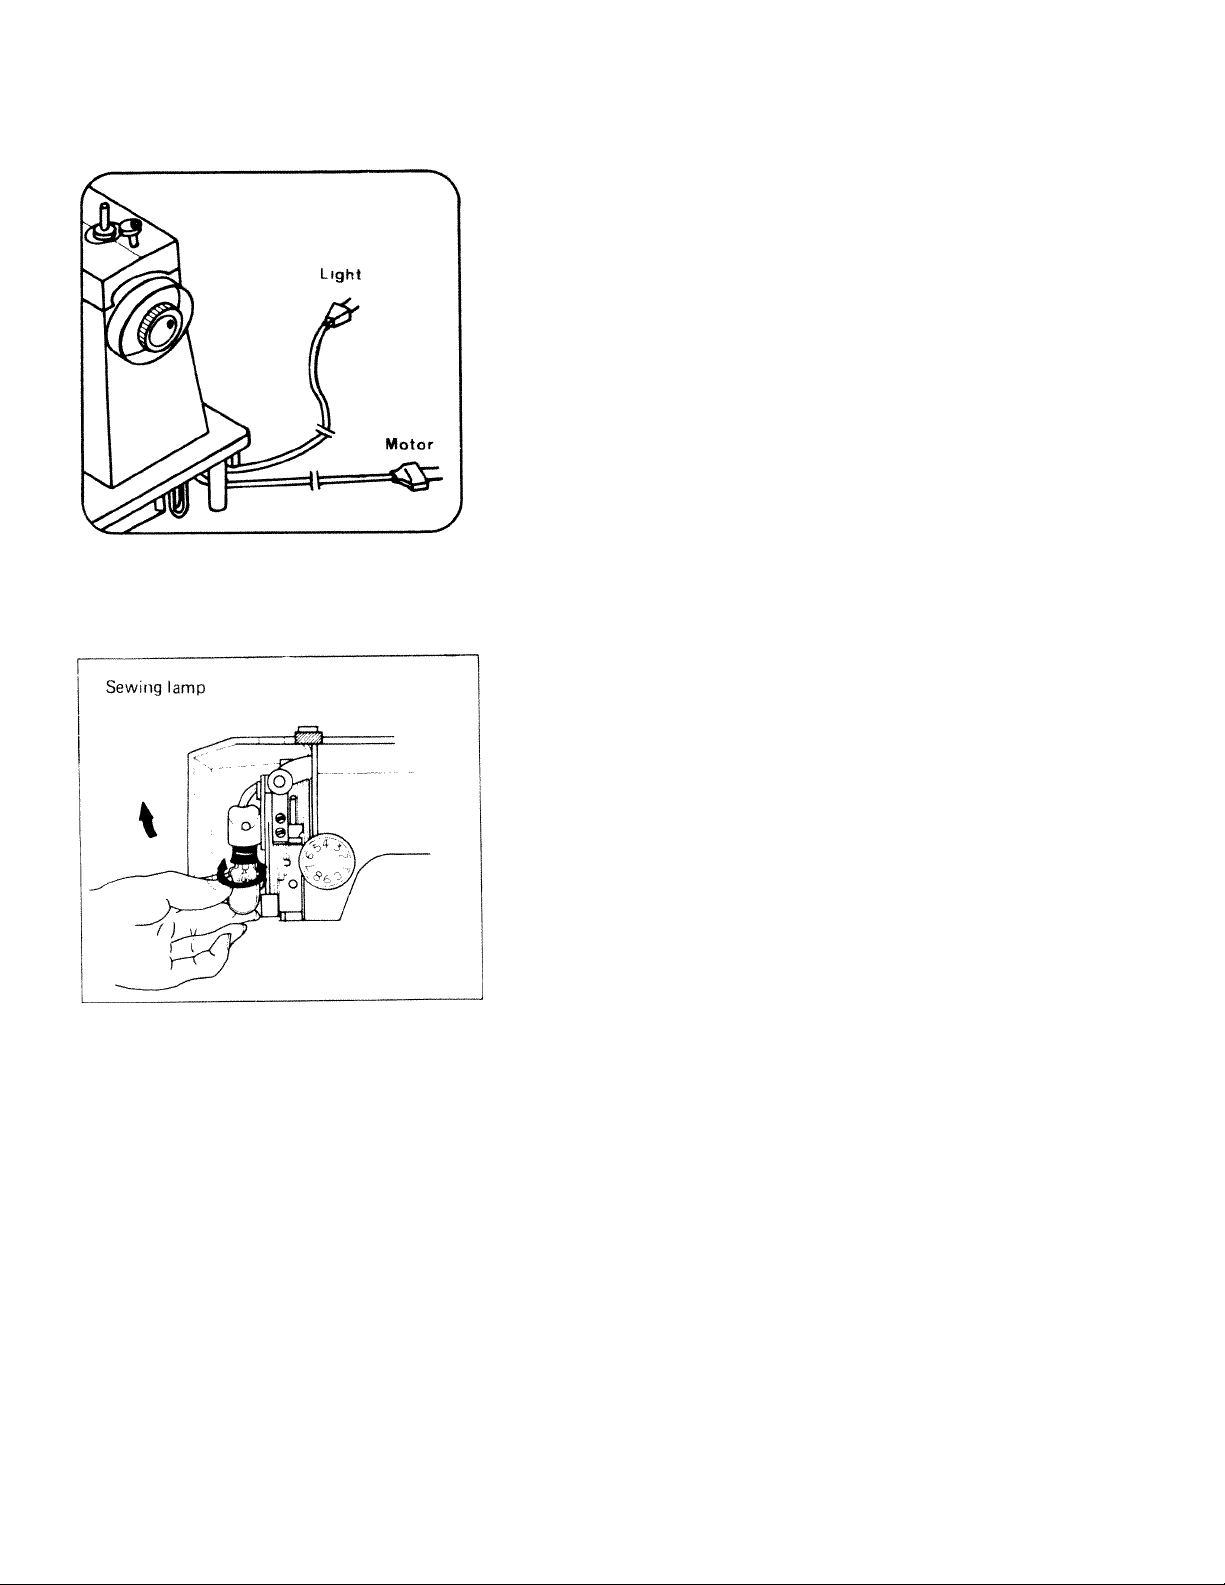
BEFORE SEWING
Connect light cord, motor
wire 2 plugs into power
supply separately.
1. Remove or install bulb from
inside of face cover.
2. Open face cover in direction
of arrow,
3. Remove bulb by unscrewing
it counter clockwise.
4. Install a new bulb by screw
ing it in clockwise.
5. Use a screw type bulb with
120V/15W. (Max)
Page 8
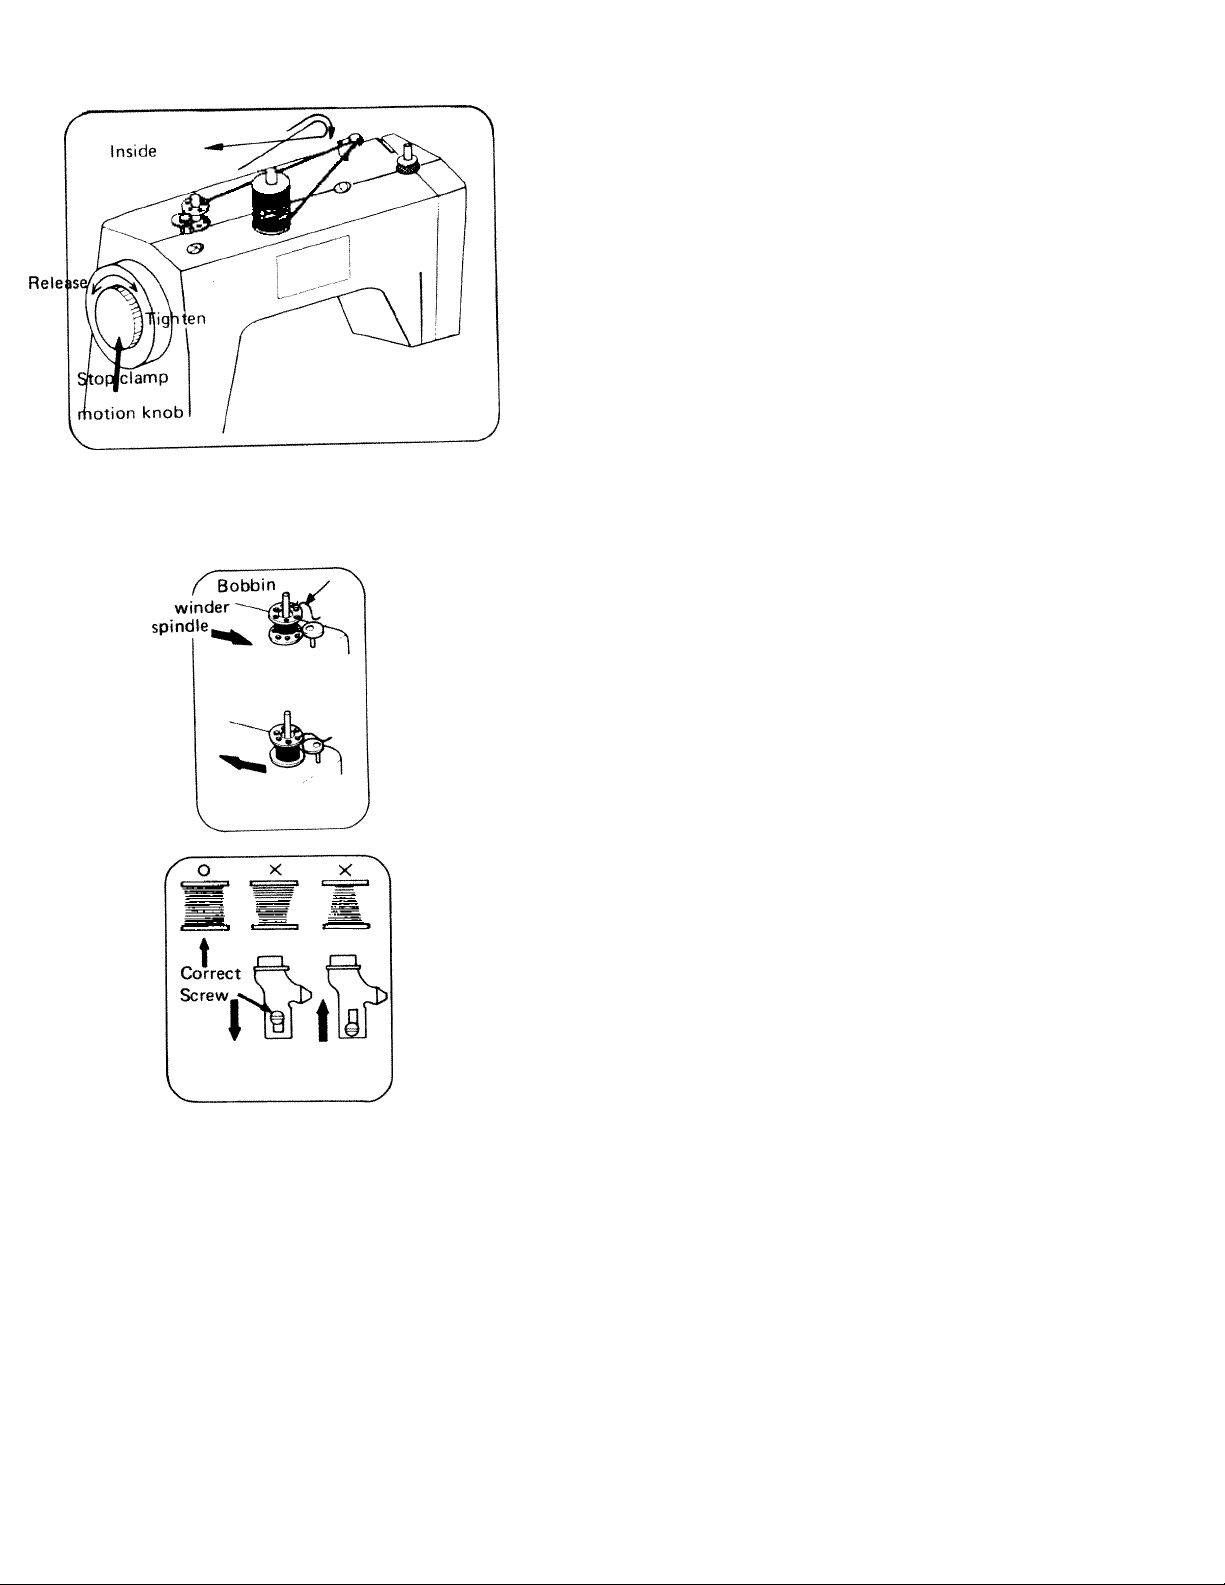
WINDING THE BOBBIN
1. Release stop motion knob.
2. Thread as shown.
3. When bobbin is filled,
tighten stop motion knob.
5cm thread
Push bobbin winder spindle
in direction of arrow.
When bobbin winding is com
pleted return s'pindle to
original position.
When bobbin winding is in
correct, release the screw of
upper thread guide and ad
just up or down until bobbin
winding is balanced.
Page 9
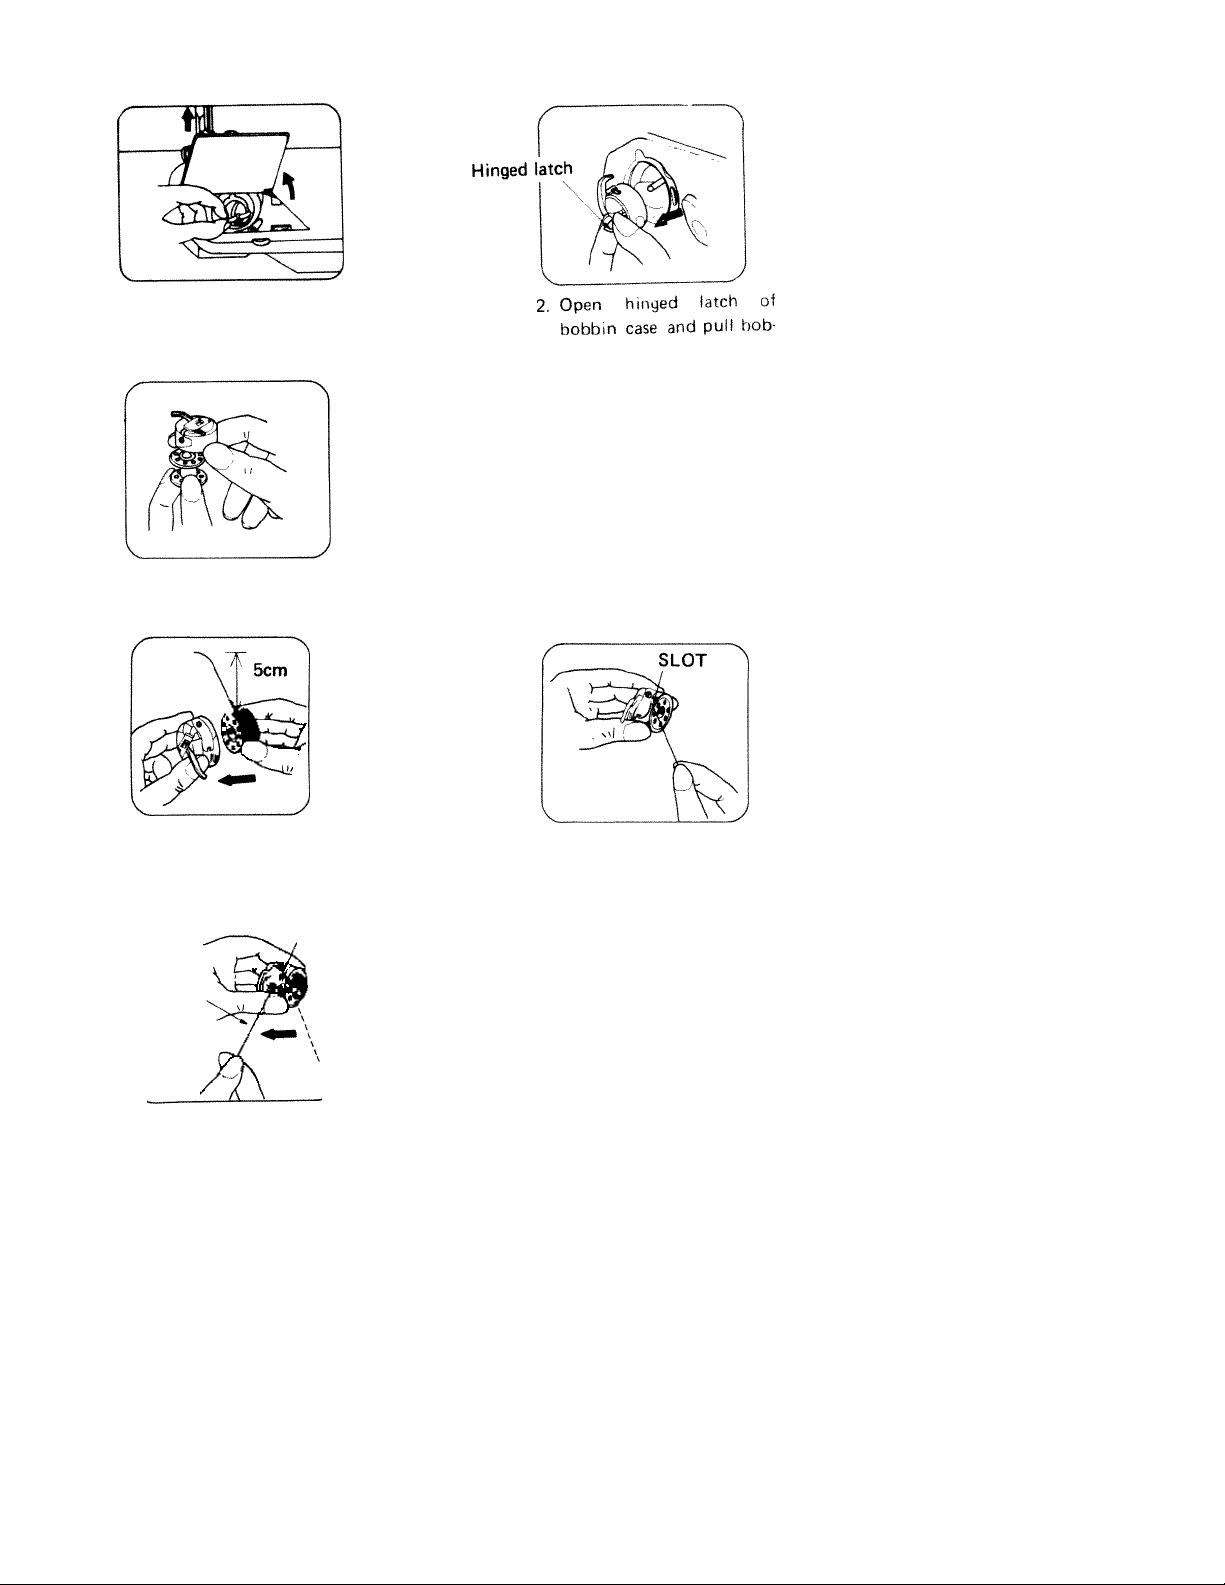
REMOVING BOBBIN CASE AND BOBBIN
1. Raise needle to its highest
position and open the
shuttle race cover. bin case out of machine.
3. Release the latch and bob
bin will fall out easily.
INSERTING BOBBIN INTO BOBBIN CASE
1. Pull off 5cm of thread
from iiobbin a >d insert it
n o bobbin case as shown.
Tension spring
3. Puli into slot and under
10cm
2 Guide the
into si- i
tension spring and draw
out about 10 cm of
thread.
nd o* th ead
Page 10
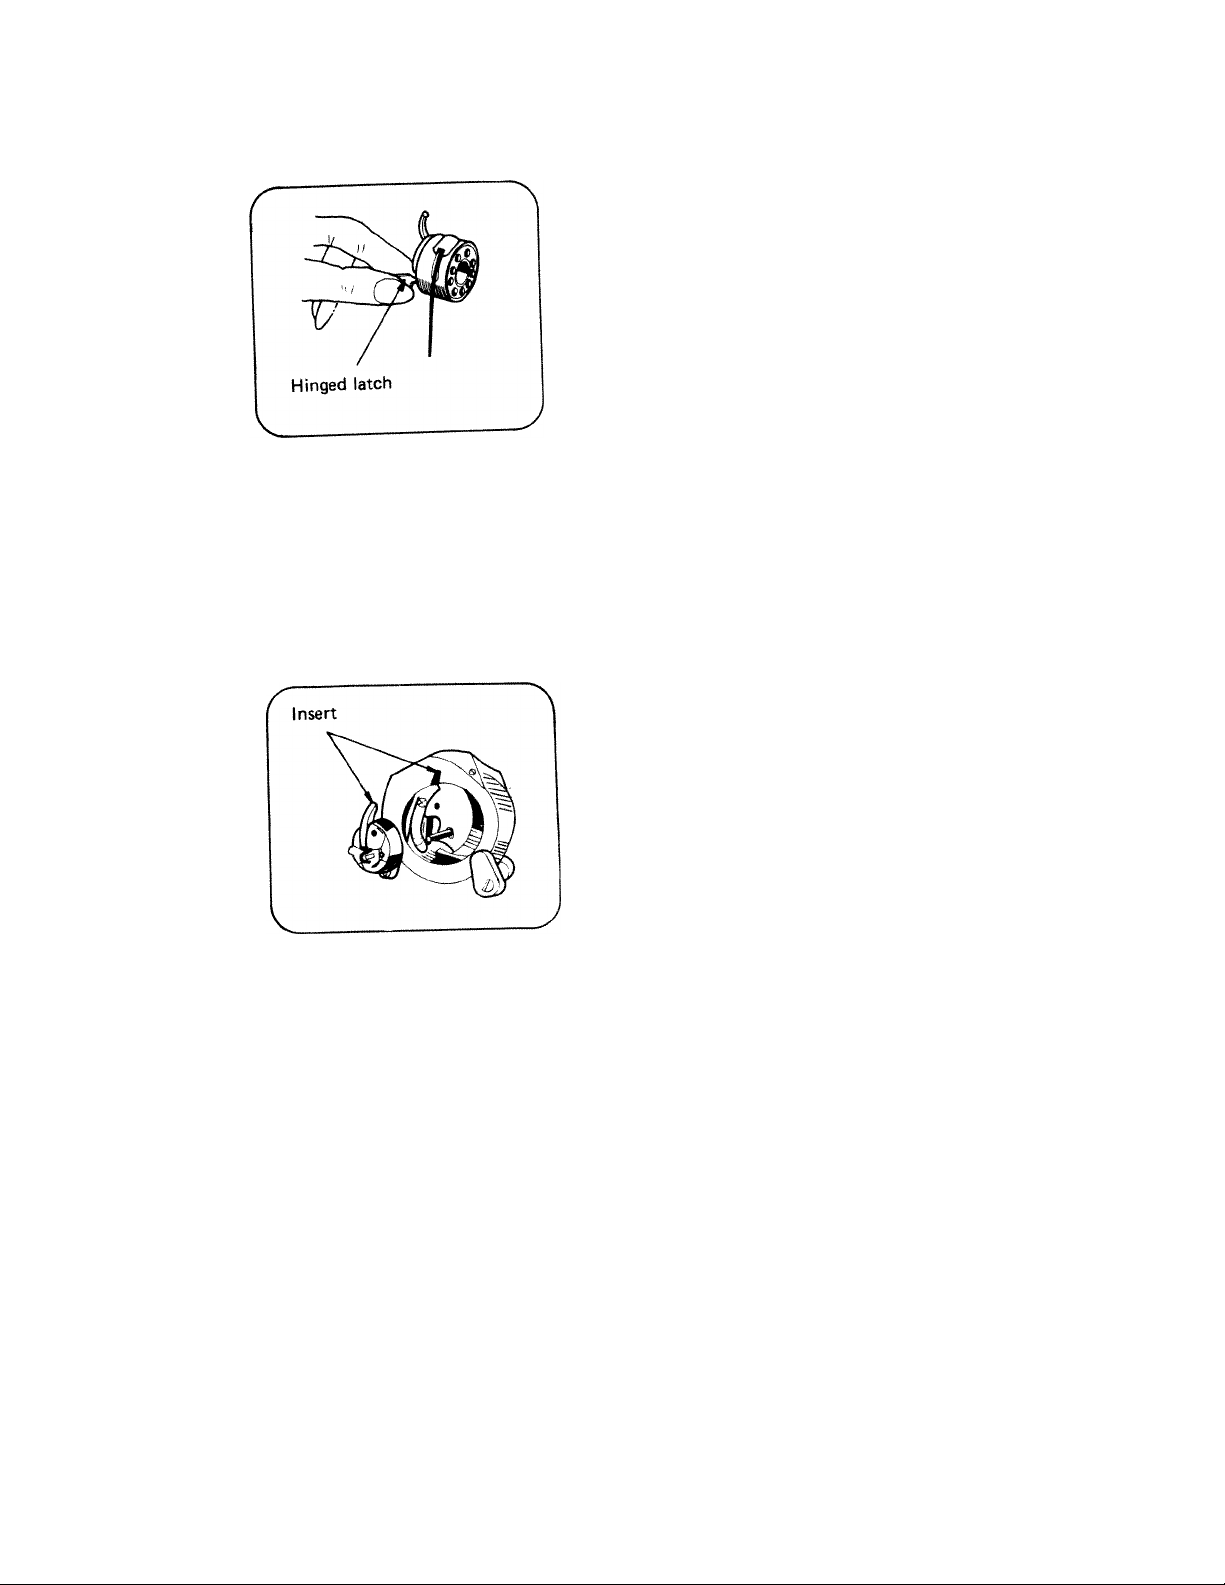
INSERTING BOBBIN CASE INTO SHUTTLE RACE
1. Raise needle to its highest position, pulling
thread to the front, open the latch of bobbin
case and hold it.
2. Holding latch open, place bobbin case onto
centre pin in shuttle and release latch
Page 11

THREADING UPPER THREAD
Twin needle threading
Page 12

DRAWING UP BOBBIN THREAD
Hold upper thread with left
hand, turn the hand wheel
slowly towards you until the
needle goes down and comes
up. Then stop the hand
wheel when the takeup lever
is at its highest position.
Lightly draw up the upper
thread will be brought up in a
loop.
2. Pull out both threads and
place them together under
presser foot to the rear of
machine.
CHANGING SEWING DIRECTIONS
Lower needle down into fabric and
raise presser foot, pivot the fabric
around the needle to change direction
as desired.
•10
Page 13

CONTROL DIAL
1. Pattern selector dial
2. Thread tension dial
3. Zig-zag width dial
Stitch length dial
5. Reverse button
11
Page 14

ADJUSTING THREAD TENSION
Correct
Weak
Upper thread tension
may be adjusted by
turning the thread
tension dial.
Strong
Incorrect
Fabric
Inside of fabric
Upper thread
Upper thread
Bobbin thread
12 -
Lower thread tension can
be adjusted by turning
screw on bobbin case
slightly to the right
(clock-wise) to increase
tension. (Anti-clockwise)
to the left to decrease
tension.
Page 15

REGULATING THE PRESSER FOOT PRESSURE
1. Push down inner pin (A) to increase pressure.
(Light to medium fabrics).
2. Push down outer ring to release pressure. (Heavy
fabrics)
3. Insufficient pressure may cause poor feeding,
skipped stitches, or difficulty in guiding the fabric.
4. No pressure adjustment is required when darn
ing or sewing embroidery.
DROP FEED
There are a few times when you want to control the feeding of fabric by your
self. .
Raise needle bar to its highest position and raise presser foot, place daring plate
over needle plate aligning two pins of darning plate with holes of needle plate.
You may then determine the movement of the fabric by yourself. See page 20
for button sewing application - 13 -
Page 16

CHANGING NEEDLE
1. Raise needle to its highest position.
2. Loosen needle clamp screw and remove old needle.
3. With the flat side of the needle facing away from you,
insert needle as far up as it will go.
4. Tighten the needle clamp screw securely.
■14
Page 17

FABRIC THREAD ■ NEEDLE TABLE
Please note that the following list is a guide when sewing different fabrics.
15
Page 18

0>
1
2
3
Straight stitch
Zigzag
Full auto /ig-zag
SEWING (PATTERN SELECTOR) AND OPERATION TABLE
Pattern
Zigzag width
Stitch length
4jLp
! 1
; 1
1; >-
y'
/<<3>>v
2>1
Presse? foot
3rop fee«
4
5
6
7
Zig-zag
Button hole
Twin needle
EmbrOHleiy
III
III
111
an E
except button hole
II
■o
/<rN
513
Qk
%3
I No need
Page 19

TO START SEWING
Important Hints.
1. Raise the take-up lever to its highest position when starting and stopping
sewing.
2. Hold both threads about 10 cms to the rear of machine for the first two to
three stitches.
3. Sufficient fabric should be placed under needle before lowering presser foot.
4. Depress foot/Speed control and start to sew.
5. Test the machine stitches on a scrap of fabric you plan to use, adjusting the
machine for the length of stitch and tension suitable to your fabric.
Attenttion.
1. When turning the hand wheel manually, always turn it toward you.
2. Guide the cloth gently with your hand.
3. To prevent breaking needle always stop with the needle out of the fabric.
17
Page 20

TO FINISH SEAM
1. Sew to the edge of seam.
2. Push the reverse button and sew m reverse
for about 3—4 cms.
3 Raise needle to its highest position.
4, Lift presser foot and pull out the fabric to
rear of machine.
18
Page 21

STRAIGHT STITCH
1. This type of stitching is the one used most frequently.
2. The zig-zag presser foot can be used for both straight and zig-zag sewing.
3. For sewing light fabric, use smaller stitch size and left needle position.
(Refer to page 15 for dial setting).
ZIGZAG SEWING
Pattern selector position
1
t
1
t
iL
11
A
©
Satin stitching can be used for sewing initials,
patterns, applique, etc.
19
Page 22

OVERCASTING
'v'.
STRAIGHT STRETCH STITCH
Use these stitches for oversewing rough
edges.
Hi
Mi
Use this stitch with knitted, tricot or
other stretchy fabrics.
The stitch enables your seam to stretch
without breaking the thread.
It is also a very strong straight stitch for
areas under stress.
20-
Page 23

BLIND STITCH
1. Fold fabric as shown.
2. To finish seam as shown.
21
Page 24

Adjust width and needle position
to obtain correct seam.
Needle is not piercing
edge of fold at all.
Correct seam
Needle is pierces edge
of fold too much.
-22
Page 25

BUTTON SEWING
(Use darning plate see page 11)
1. Lower drop feed.
2. Use button presser foot and attach firmly.
3 Place button between presser foot and fabric and lower presser foot.
4. Manually turn hand wheel towards you ensuring that the needle enters
into both holes of button without obstruction.
(Increase or decrease width setting).
5. Sew about 7 stitches.
6. Pull both threads to the underside and tie together.
BINDING
To sew fabrics edge to edge select
the multi zig-zag stitch.
23
Page 26

ZIPPER SEWING
Select straight stitch.
1, Fold the fabric about 2cm and
place fabric under foot.
2. Zipper foot is designed to sew close
to a raised edge preventing sewing
on zipper.
1. To sew the left side of the zipper,
set the zipper foot on the left side
of the needle.
2. To sew the right side of the
zipper bring the foot to the right
side of the needle.
sew as illustrated.
24-
Page 27

BUTTON HOLE SEWING
Select stitch length dial in area indicated.
Pattern
selector dial
c
n
Steps
Settings
1. Set dial to "1" position.
2. Sew left side.
3. Raise the needle
4. Set dial to "2" position.
5. Sew 5-6 stitches.
6. Raise the needle
7. Set dial to "3" position.
8. Sew right side.
9. Raise the needle
10. Set dial to “4" position.
11. Sew 5-6 stitches.
12. Raise the needle
Before sewing fit button-hole foot
as shown.
Cut buttonhole along centre with
cutter as shown.
25
Page 28

HEMMING
3, LOW., <ье ,„0 ,„о» „ .о run into .K.
4. Durning sewing, tola me
hemmer foot, ^ ^|,^g foot. The
" bt -t: ,n.o ,n. .c,o„ o. ,n. nen,™, .u„,c,en.„ .0 ,n.. .П. wor.
piece edge run, freely trough the groo.e unrier the foot,
on,, to,table meteti.f, c,n be used end .onte pr.ctlce nray be neceae.r, ,0 eche,..
, u fwKrif- rlnes not move under the rignt na
best results.
26
Page 29

TWIN NEEDLE
T.™.d .«hln. as .or oorroa, sawio, pass.o, both .breads <bro„,b .be s.rde
L“11'b, wid.b sbodid no. eeceed .be .bird »ides, s.i.cb »id.b, a«.adib, .bis
will result in breaking of needles.
embroidery
l^owetTeTdorand'mw^^^^ fabric slowly to form the desired effect.
27
Page 30

QUILTER
1 Insert supporter of quilter.
2. Move quilter and adjust stitch distance.
28
Page 31

MAINTENANCE (CLEANING AND OILING)
1. Raise needle to its highest position.
2. Take out bobbin case.
3. Turn latch knob A as illustrated.
4. Take off shuttle race cover.
5. Take out shuttle hook.
6. Clean and oil shuttle race and hook,
then replace in the reverse order.
Cleaning shuttle race
(Al Latch knob
(B) Shuttle race cover
(Cl Shuttle hook
Open face cover and oil points
indicated.
Open top cover and oil points indicated.
29
Page 32

CHECKING PERFORMANCE PROBLEMS WHAT TO DO
PROBLEM
Feed dog down.
Fabric not
moving
Machine not moving.
Stitch length dial in 0 position
Light pressure on presser foot.
Incorrect setting of needle.
Needle bent
Breaking Needle
Pulliny fabric ,
Incorrect using needle, thread and abric
Incorrect position of zigzag width dial.
Improper threading
Breaking Upper
w
o
Thread
Tight upper thread tension
Breadkm Bobbin
Th ead
PROBABLE CAUSE
Needle bent,
Nicks or burrs on shuttle
Tight bobbin thread ten on
Incorrect setting of need e.
Improper threading.
Dust and thread n shuttle
......
Raise feed dog.
Moving stop motion.
Mov ng dial to 1-4.
Increase piessure on pi
Reset needle.
Replace new needle.
Do not pull fab ic.
Correct using needle, thread, and fabr c.
Moving to correct position.
Rethreai-i machine.
Loosen upper thread tension.
Replace new eedle.
Replace shuttle oi pol sh off burrs
comp etely
Loosen bobbm thread tension
Reset needle.
Rethread mach ne.
CORRECTION
sser foot.
Machine Jamming
Knocking Noise
Puckering
No oil
Dust and thread in shuttle
Tension too tight.
Sewing foot pressure too strong.
Incorrec us'ng fab ic needle, and thread
Need o I
Clean shuttle
Reset.
Regulatin sewing foot pressure.
Correct using fabric, needle and thread.
 Loading...