

Page 1
INSTRUCTION MANUAL
MANUAL DE INSTRUCCIONES
WHITE
(735
Call Toll Free
Llame gratis
800-331-3164
www.whitesewinq nnm
Page 2

IMPORTANT SAFETY INSTRUCTIONS
Read all instructions before using
(this sewing machine) .
DANGER To reduce the risk of electric shock:
An appliance should never be left unattended when plugged in. Always unolua this
appliance from the electric outlet immediately after using and before cleaning
Always unplug before relamping, Replace bulb with same type rated 15 watte'.
WARNING To reduce the risk of burns.fire, eiectric shock,or
injury to persons:
2. Use this appliance only for its intended use as described in this manual. Use only
attachments recommended by the manufacturer as contained in this manual
nrnnori°J’^'^^/h ^ 3 damaged cord or plug, if it is not working
properly. If It has been dropped or damaged, or dropped into water. Return the
ap^ance to the nearest authorized dealer or service center for examination repair
electrical or mechanical adjustment. ' " '
4. Never operate the appliance with any air openings blocked,Keep ventilation openings
loose controller free from the accumulation of lint, dust, and
5. Never drop or insert any object into any opening.
6. Do not use outdoors.
'' teintadmiSSid ™ “ra“ “
q f," (“0”) position,then remove plug from outlet
in °° by pulling on cord. To unplug, grasp the plug, not the cord. '
machiSe^dT^
ll: HeSe"”'“'' “““ •» *>'»“■
¡4 uL'inn th” It may deflect the needle causing it to break
terSnn h adjustments in the needle area, such as
threading needle, changing needle, threading bobbin, or changing presserfoot etc
15. Always unplug sewing machine from the electrical outlet when removing covers '
msSSmruaT ™ntloned id Ihe
SAVE THESE INSTRUCTIONS
Page 3

CONTENTS
Name of parts....................................................................... 5-6
Accessories.................................................................................7
Before sewing (Power supply and sewinglamp)
Removing extension table
Free-arm sewing....................................................................... 9
Winding the bobbin .................................................................10
Removing bobbin case and bobbin
Inserting bobbin into bobbin case
Inserting bobbin case into shuttle race................................... 12
Threading upper thread & Twin needle threading
Drawing up bobbin thread........................................................14
Changing sewing directions
Levelling machine ................................................................. 15
Adjusting thread tension.......................................................... 16
Regulating the presserfoot pressure....
Drop feed..................................................................................17
Changing needle.......................................................................18
Fabric-Thread-Needle-table
Sewing (pattern selector) and operation table
To start sewing
How to finish stitches...............................................................23
Straight stitch
Zigzag sewing
Stitch width
Overcasting...............................................................................25
Straight and zigzag stretch stitches
Blind stitch..........................................................................26-27
Button sewing...........................................................................28
.....................................-....................................
...........................................................................
..........................................................................
..............................................................................
......................................................
............................................
...
...........................................11
.....................................................
.................
...................................................
........................................
.......................
9
...................
.TVL.:
...........
19
............................
25
8
13
14
24
24
24
11
17
21
22
Zipper sewing...........................................................................29
Buttonhole sewing....................................................................30
Hemming................................................................................ 31
Twin needle
Embroidery...............................................................................32
Quitter
Seam guide...............................................................................33
Maintenance (Cleaning and oiling)
Checking performance problems-Troubleshooting
...................................................................-...........
.....................................................................................
.........................................
.................
33
34
35
32
Page 4

CONTENIDO
Piezas principales
Accesorios
....................................................................................7
....................................................................
5.0
Antes de coser..............................................................................8
Uso de la mesa ajustable para coser tejidos de gran superficie
Coser a brazo libre (freearm)..
......................................................
....
Bobinar...................................................................................... 10
Retirar el casquillo de la bobina y la bobina
Colocar la bobina en el casquillo de la bobina
Colocar el casquillo de la bobina en la guia del agarrador
..............................
...........................
.........
Enhebrar el hilo superior............................................................13
Subir el hilo de rosca inferior.....................................................14
Cambiar la dirección de costura.................................................14
Estabilidad de la máquina
Ajustar las tensiones del hilo de rosca
Regular la presión del pie prénsatela
..........................................................
....................................
.........................................
15
16
17
Avance en la posición hundida...................................................17
Reemplazo de la aguja............................................................. 18
Tabla de tejidos-hilo-aguja
Tabla de costura, selector de diseño
........................... ’...........................
..........................................
2I
Comienzo de la costura.............................................................22
Remate de la costura................................................................;.,.23
Puntada recta.............................................................................24
Coser en zig-zag........................................................................24
Anchura de puntada
..................................................................
24
Sobrehilar................................................................................ 25
Costura recta elástica
................................................................
25
Costura oculta......................................................................26-27
Cosido de botones.....................................................................28
Ribeteado (de borde a borde)....................................................28
Costura de cremalleras....................................................... .....29
Costura de ojales....................................................................... 30
Ruedos, orlar..............................................................................31
Doble aguja................................................................................32
Bordados....................................................................................32
Acolchado...................................................................................33
Guia de costura...........................................................................33
Limpieza
Posibles problemas de funcionamiento y soluciones
....................................................................................
...............
34
36
9
9
11
11
12
20
Page 5
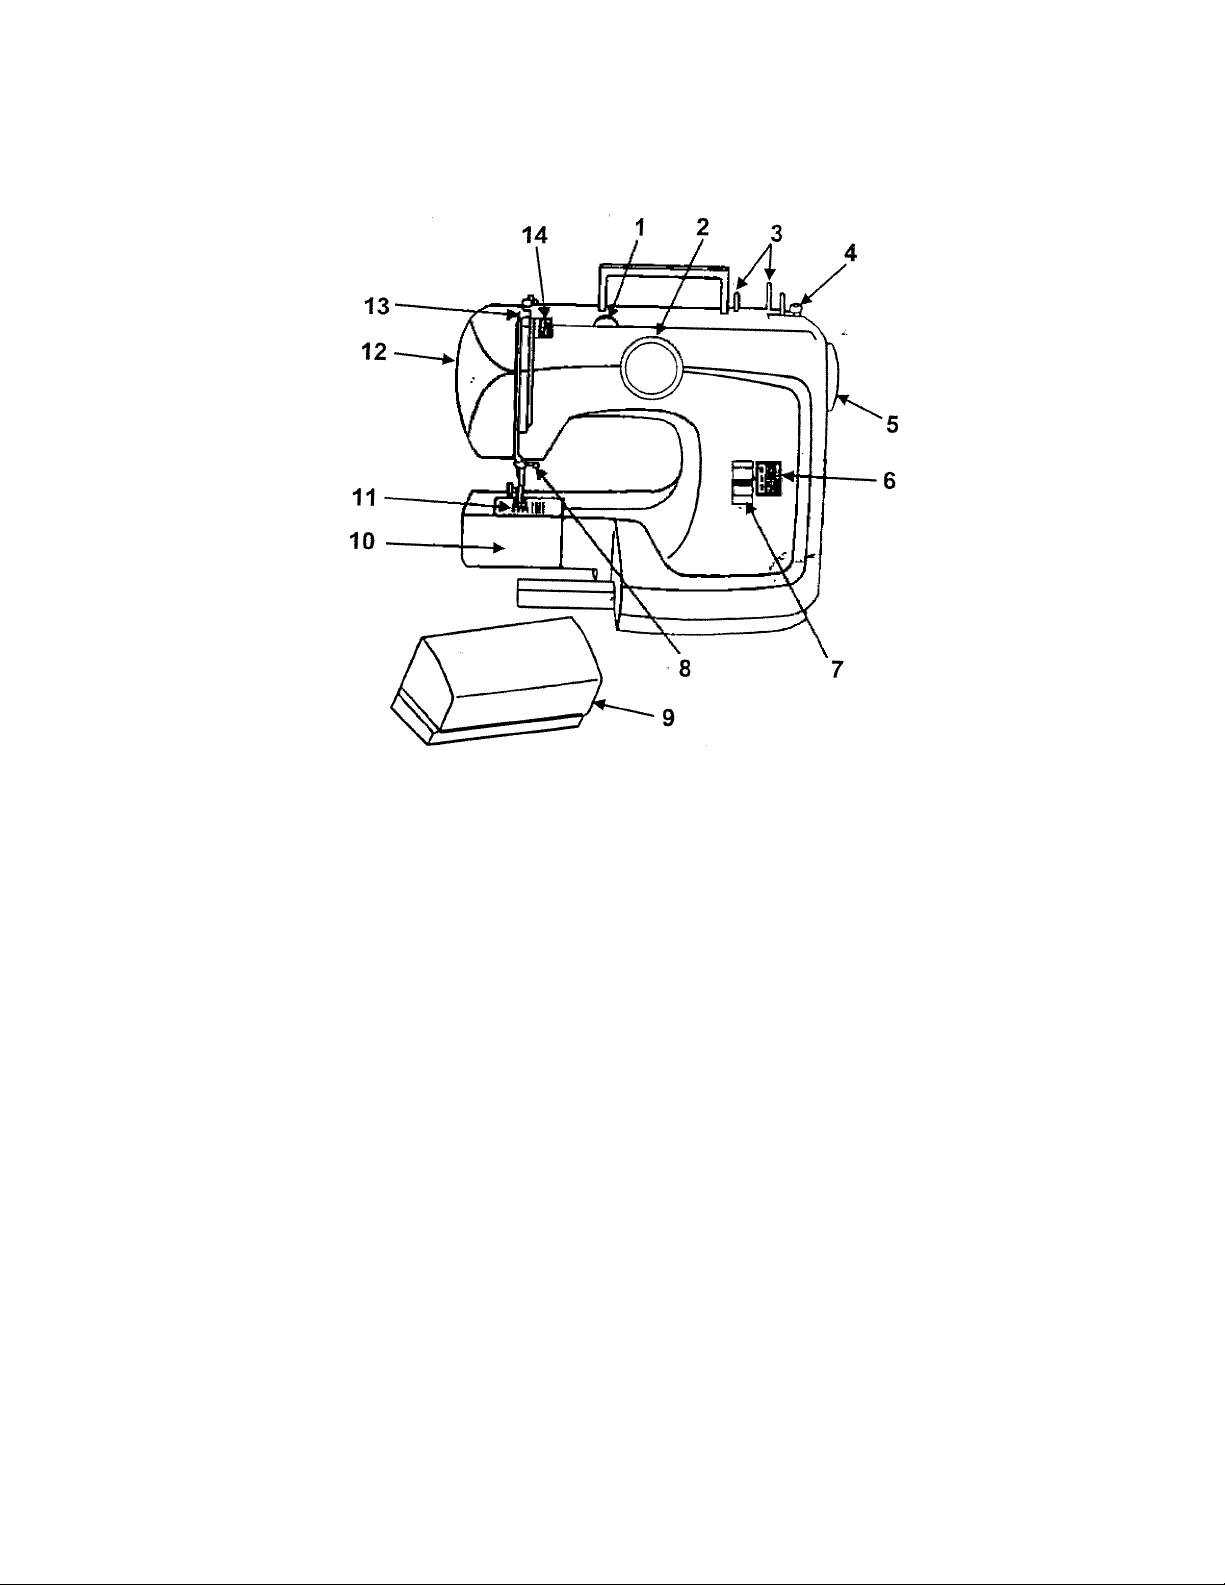
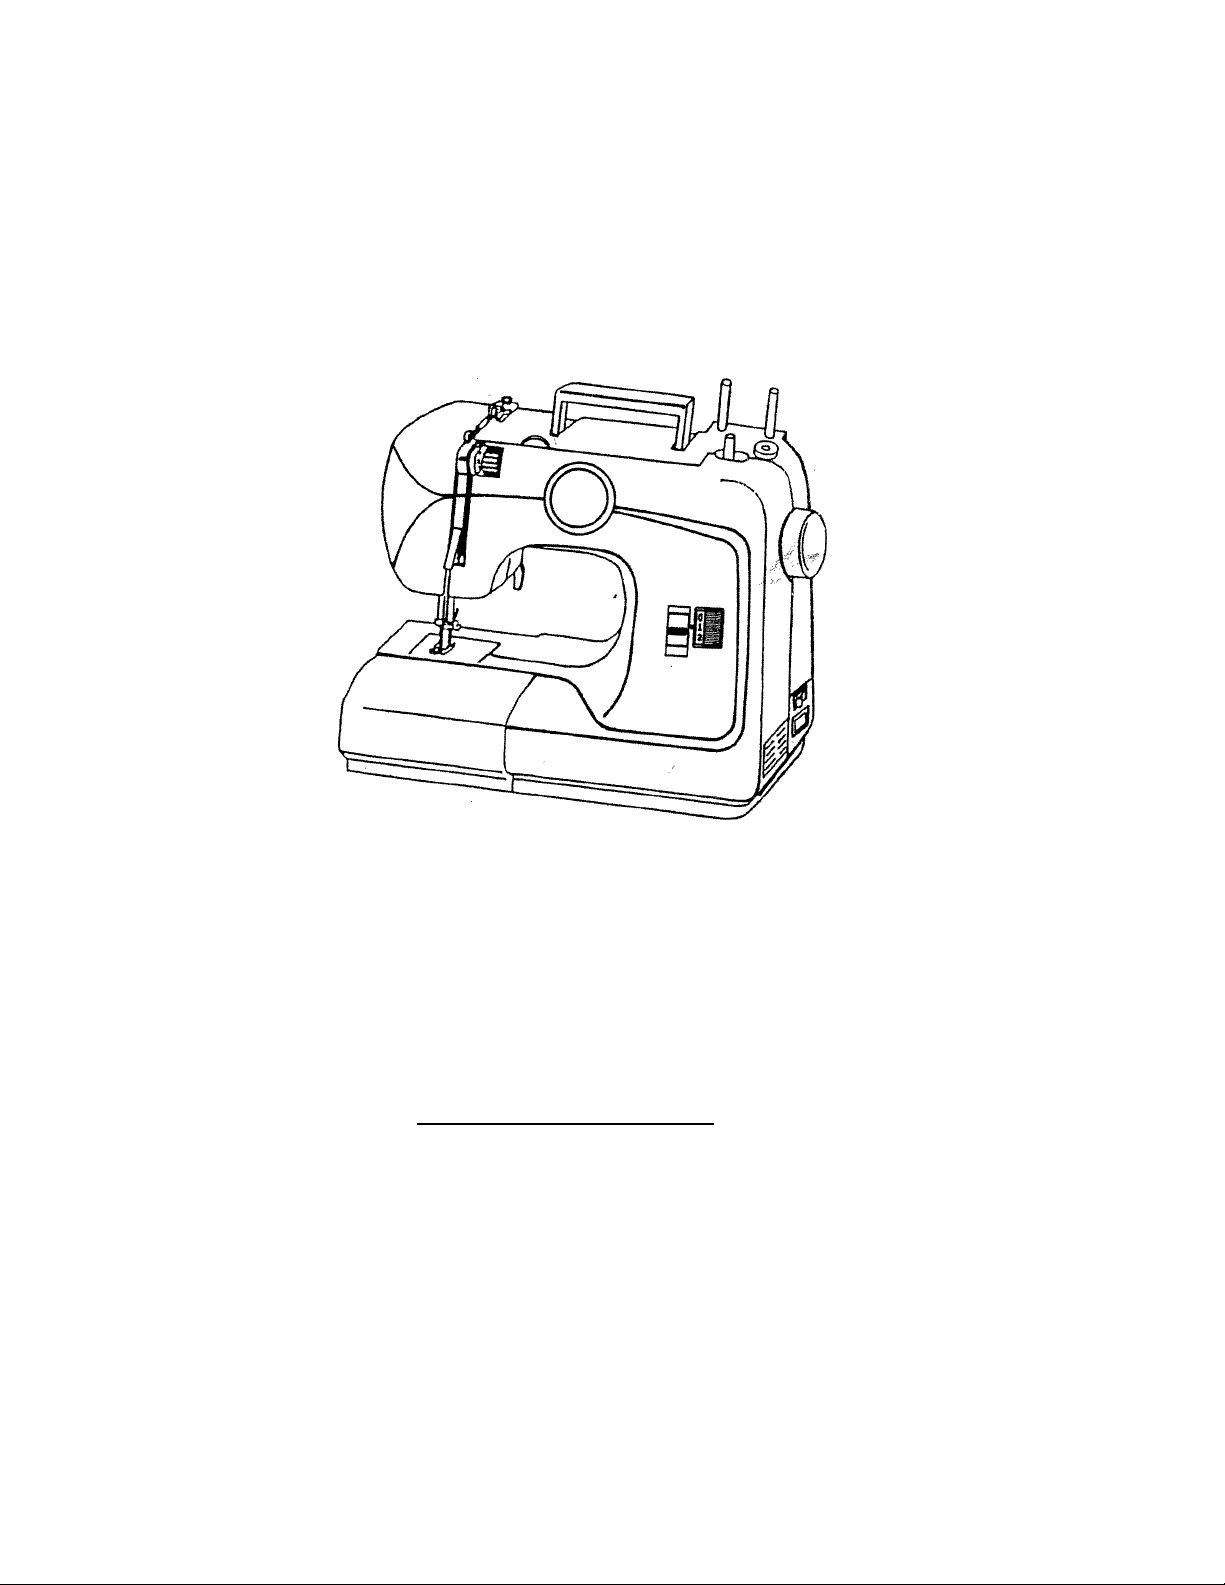
NAME OF PARTS (FRONT VIEW)
PIEZAS PRINCIPALES (PARTE DELANTERA)
1,
Stitch width control
2.
Pattern selector dial
3.
Spool pins
4.
Bobbin winder stopper
5.
Hand wheel
6.
Stitch length dial
7.
Reverse button
8.
Thread guide and needle clamp
9.
Extension table
10.
Shuttle cover
11.
Presser foot
12.
Face cover
13,
Take up lever
14.
Thread tension dial
■5 -
1.
Botón de anchura de cosido
2.
Botón de tipo de cosido
3.
Portador de bobina extraíble
4.
Stop de bobina
5.
Manubrio ,
6.
Rueda de longitud de cosido
7.
Palanca de marcha atrás de cosido
8.
Abrazadera de la aguja
9.
Base de cosido
10.
Cubierta del brazo de ajuste
11.
Pie de costura
12.
Cubierta delantera
13.
Palanca de compensación
14.
Botón de la tensión
Page 6
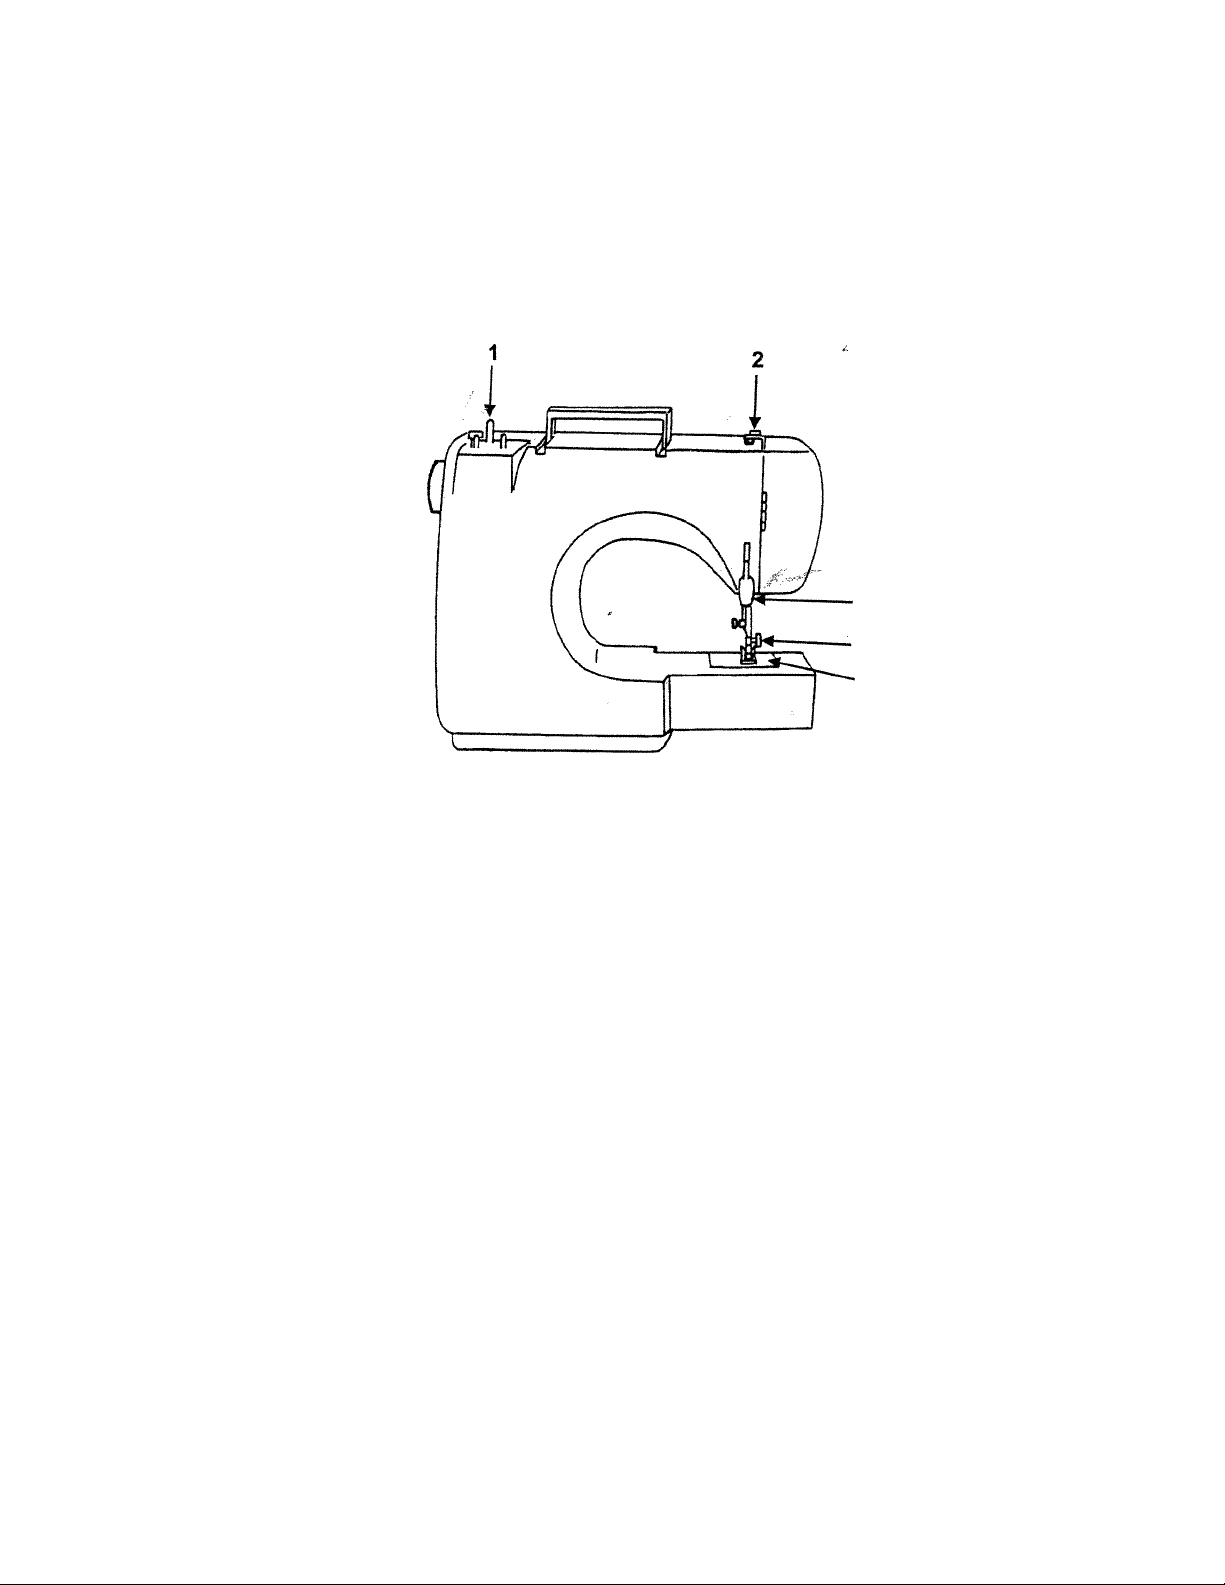
REAR VIEW
VISTA POSTERIOR
3
4
5
1. Bobbin winder spindle
2. Upper thread guide
3. Presser foot lever
4. Thumb screw
5. Needle plate
1. Huso de la bobina
2. Guia de hilo de rosca superior
3. Palanca del pie
4. Tomillo que afianza la abrazadera
5. Placa de la aguja
Page 7

ACCESSORÍES
ACCESORIOS
Bobbin
Bobinas
Machine oil
Tubo de aceite
Felt ;
Discos del fieltro
Blind hem foot
Pie de costura
oculta
Zigzag foot
(on machine)
Buttonhole foot
Pie para ojales
Pie de zig-zag
(en la máquina)
Button foot Zipper foot
Pie para botones Pie para cremalleras
Buttonhole cutter
Abridor de costuras
y ojales
Screw driver
Destornillador
'7-
Needle
Agujas
Page 8
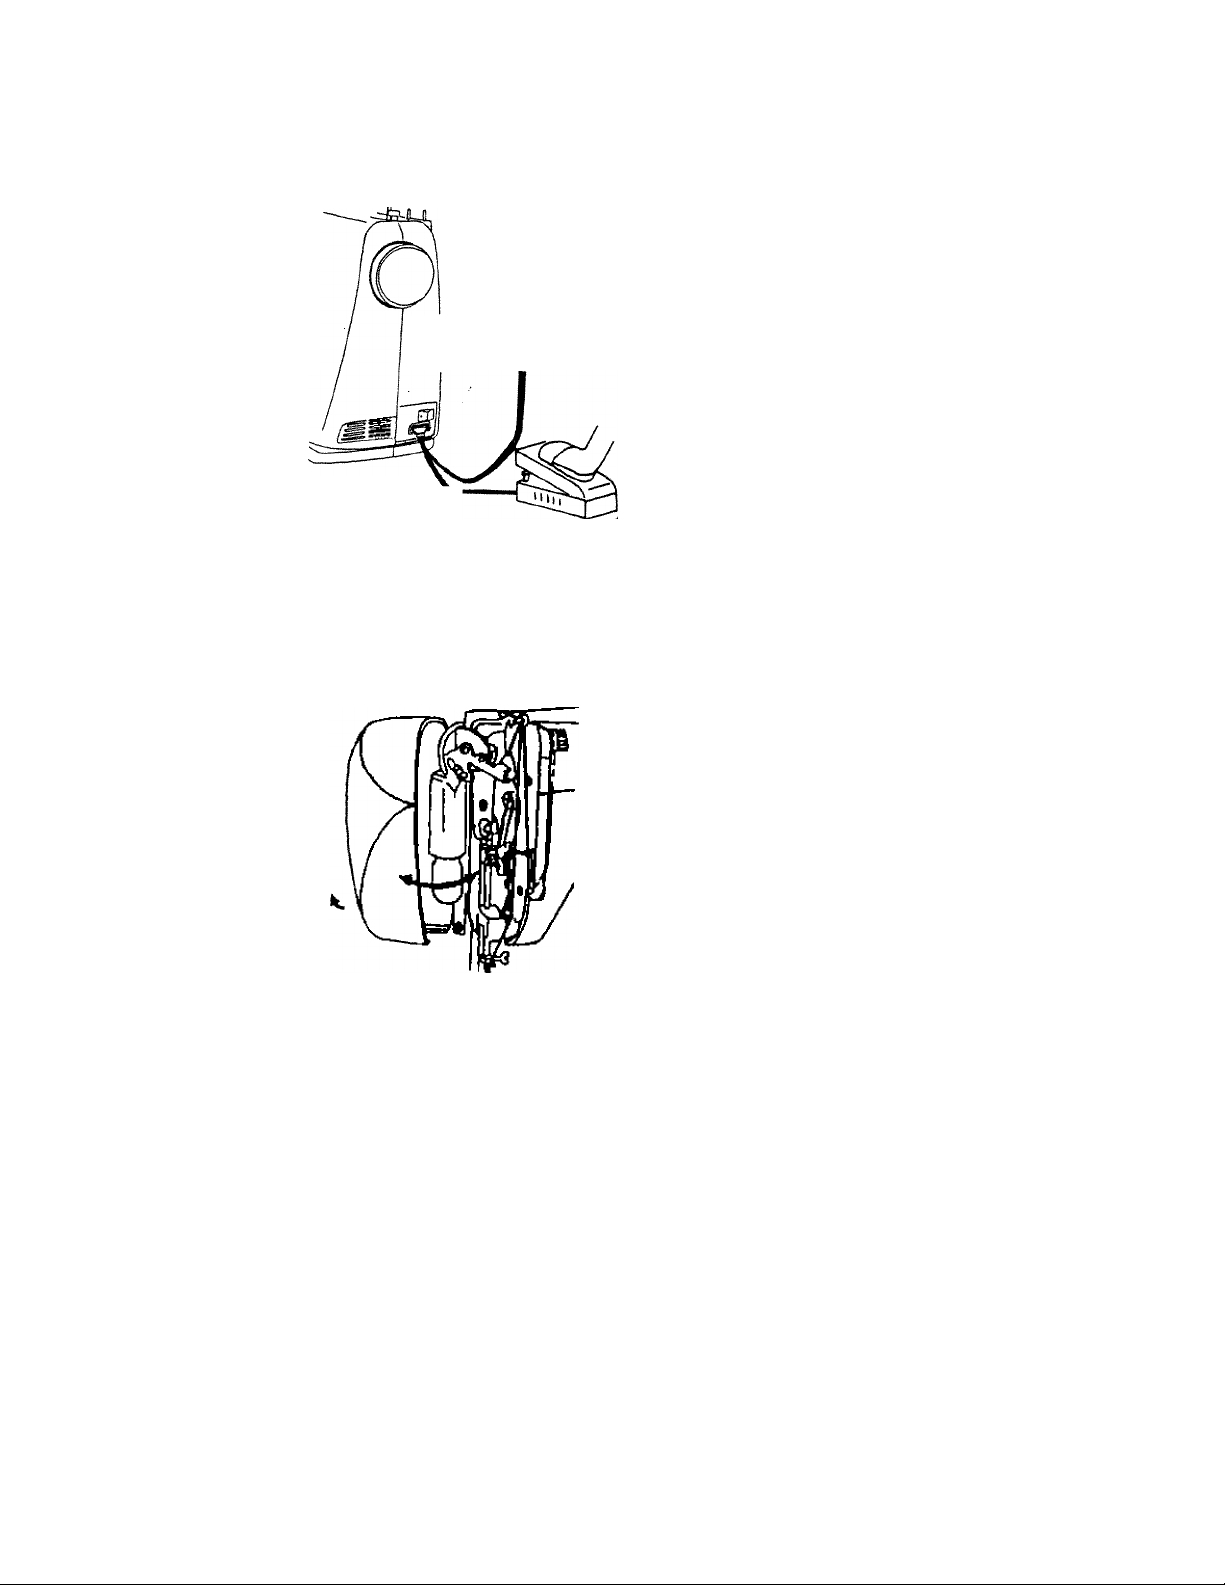
BEFORE SEWING / ANTES DE COSER
Power supply / Power supply plug N
Conexión de la fuente de alimentación
Power supply
Enchufe^de pared
1. Fit plug into the machine.
2. Insert plug into the mains socket.
3. Sewing speed can be varied by the foot
control.
Use only VGK model E2-168Afoot controller
with sewing machine.
Plug-receptacle machine plug
Conexión de la máquina
Speed Controller
J^edal
1. Enchufe el cable a la máquina de coser
2. Conecte el enchufe a lá toma de corriente '
3. La velocidad de costura se ajusta mediante
el pedal.
Esta máquina está equipada con un cable de
conexión especial, que, si se dañara debería
ser sustituido por otro idéntico. Podrá adquirir
un cable igual en su distribuidor.
^®9ulador de pie del Modelo
oK EZ“168A para mapuina de coser.
Bulb replacement:
1. Open face cover in direction of arrow.
2. Remove bulb by unscrewing it
anti-clockwise.
3. Install a new bulb by screwing it in
clockwise.
4. Use a screw type bulb with 15W. (max)
Reemplazar y/o colocar la bombilla.
1. Para abrir el compartimiento de la bombilla
deberá destornillar los tornillos como se ’
indica.
2. Desenrosque la bombilla hacia la izquierda
(en el sentido contrario a las agujas del
reloj). '
3. Enrosque-la bombilla hacia la derecha ( en
el sentido de las agujas del reloj).
4. Utilice solamente bombillas de 15 W de
rosca El2.
5. Después de cambiar la bombilla y de
cerrar el compartimiento, atornillar el
dispositivo de cierre como se indica.
Page 9
REMOVING EXTENSION TABLE
USO DE LA MESA AJUSTABLE PARA COSER TEJIDOS DE
GRAN SUPERFICIE
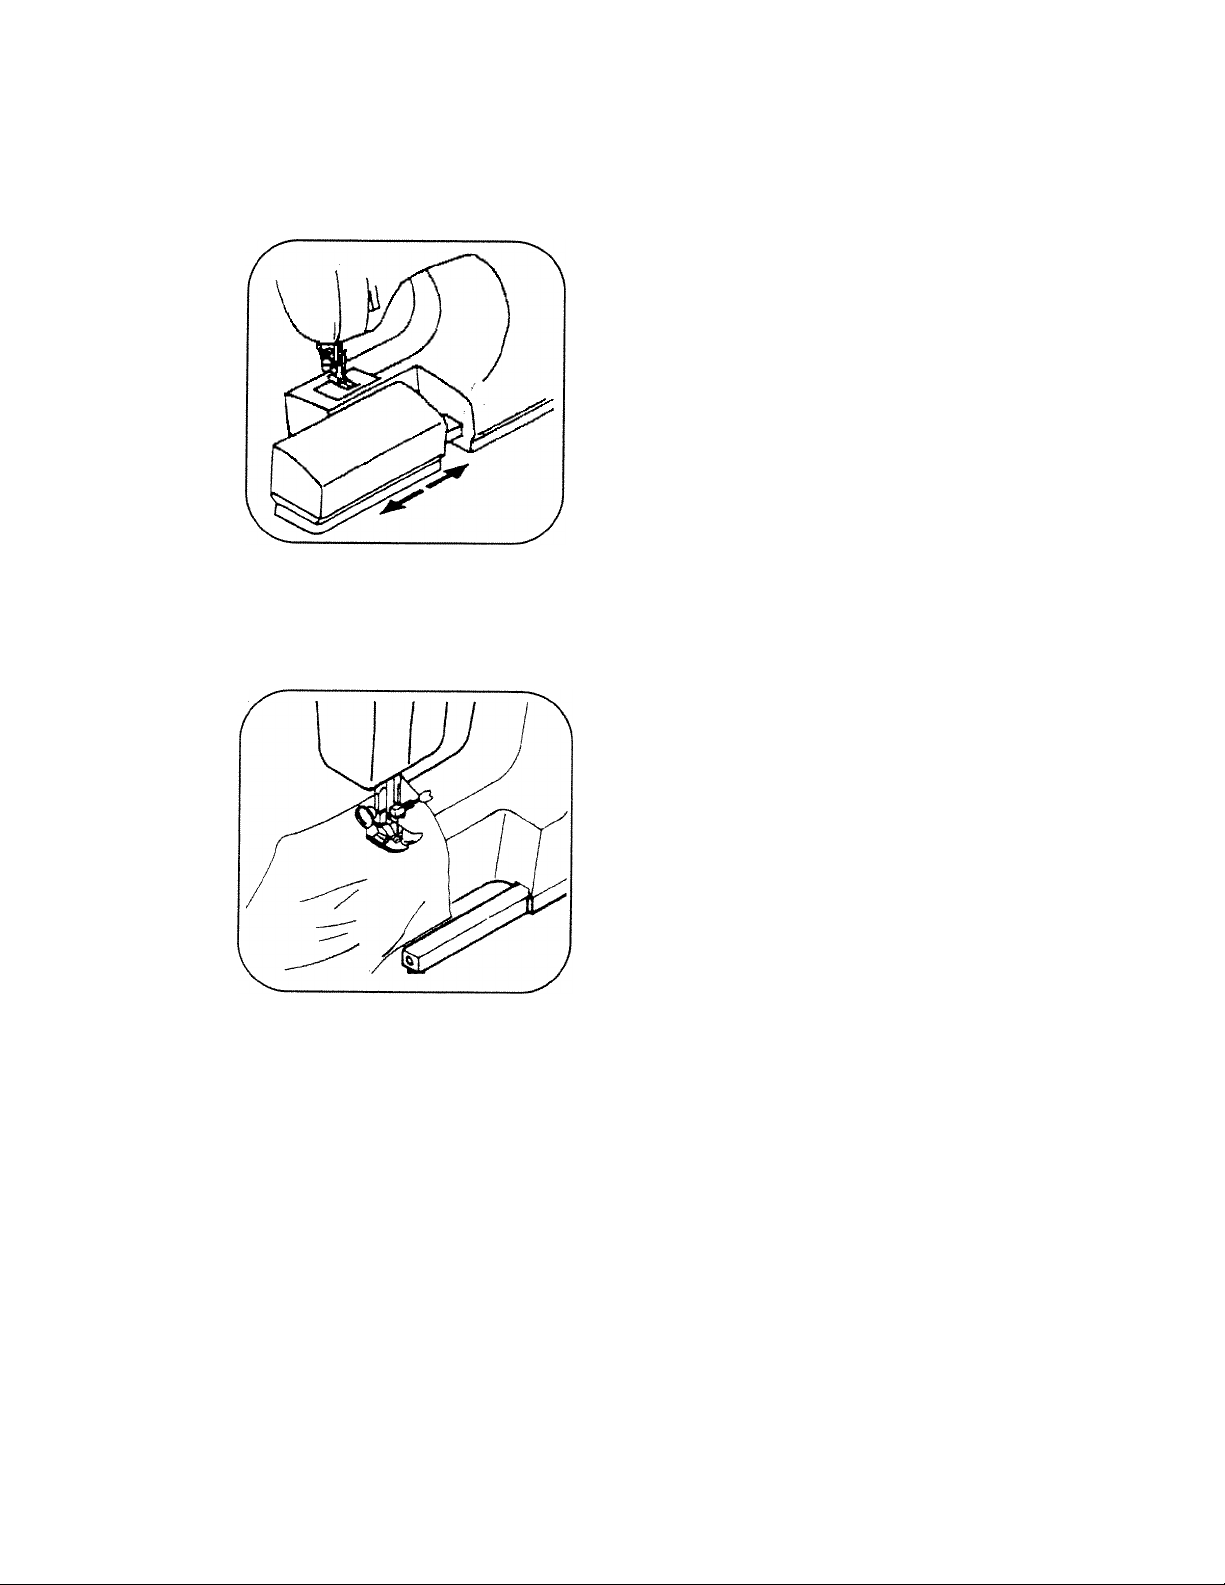
Hold the left end of the table and puli it
out in direction of the arrow.
La mesa ajustabie se puede colocar o
retirar tirando de ella en el sentido que
indica la flecha.
FREE-ARM SEWING
COSER A BRAZO LIBRE (FREEARM)
1. This sewing machine can be used as
a flat bed machine but easily converts
to a free arm machine by removing
the extension table.
2. Especially useful for sewing sleeves,
pant, legs, tubular fabrics etc. more
easily.
3. To sew tubular items just slip the
sleeve or leg of pants on the free arm
as shown on the illustration.
El brazo libre es indicado para coser
mangas, costuras de pantalones, tejidos
tubulares, etc.
Para coser tales piezas desplácelas
sobre el brazo libre, como se indica en
la ilustración.
Page 10
WINDING THE BOBBIN
BOBINAR_____
___
_
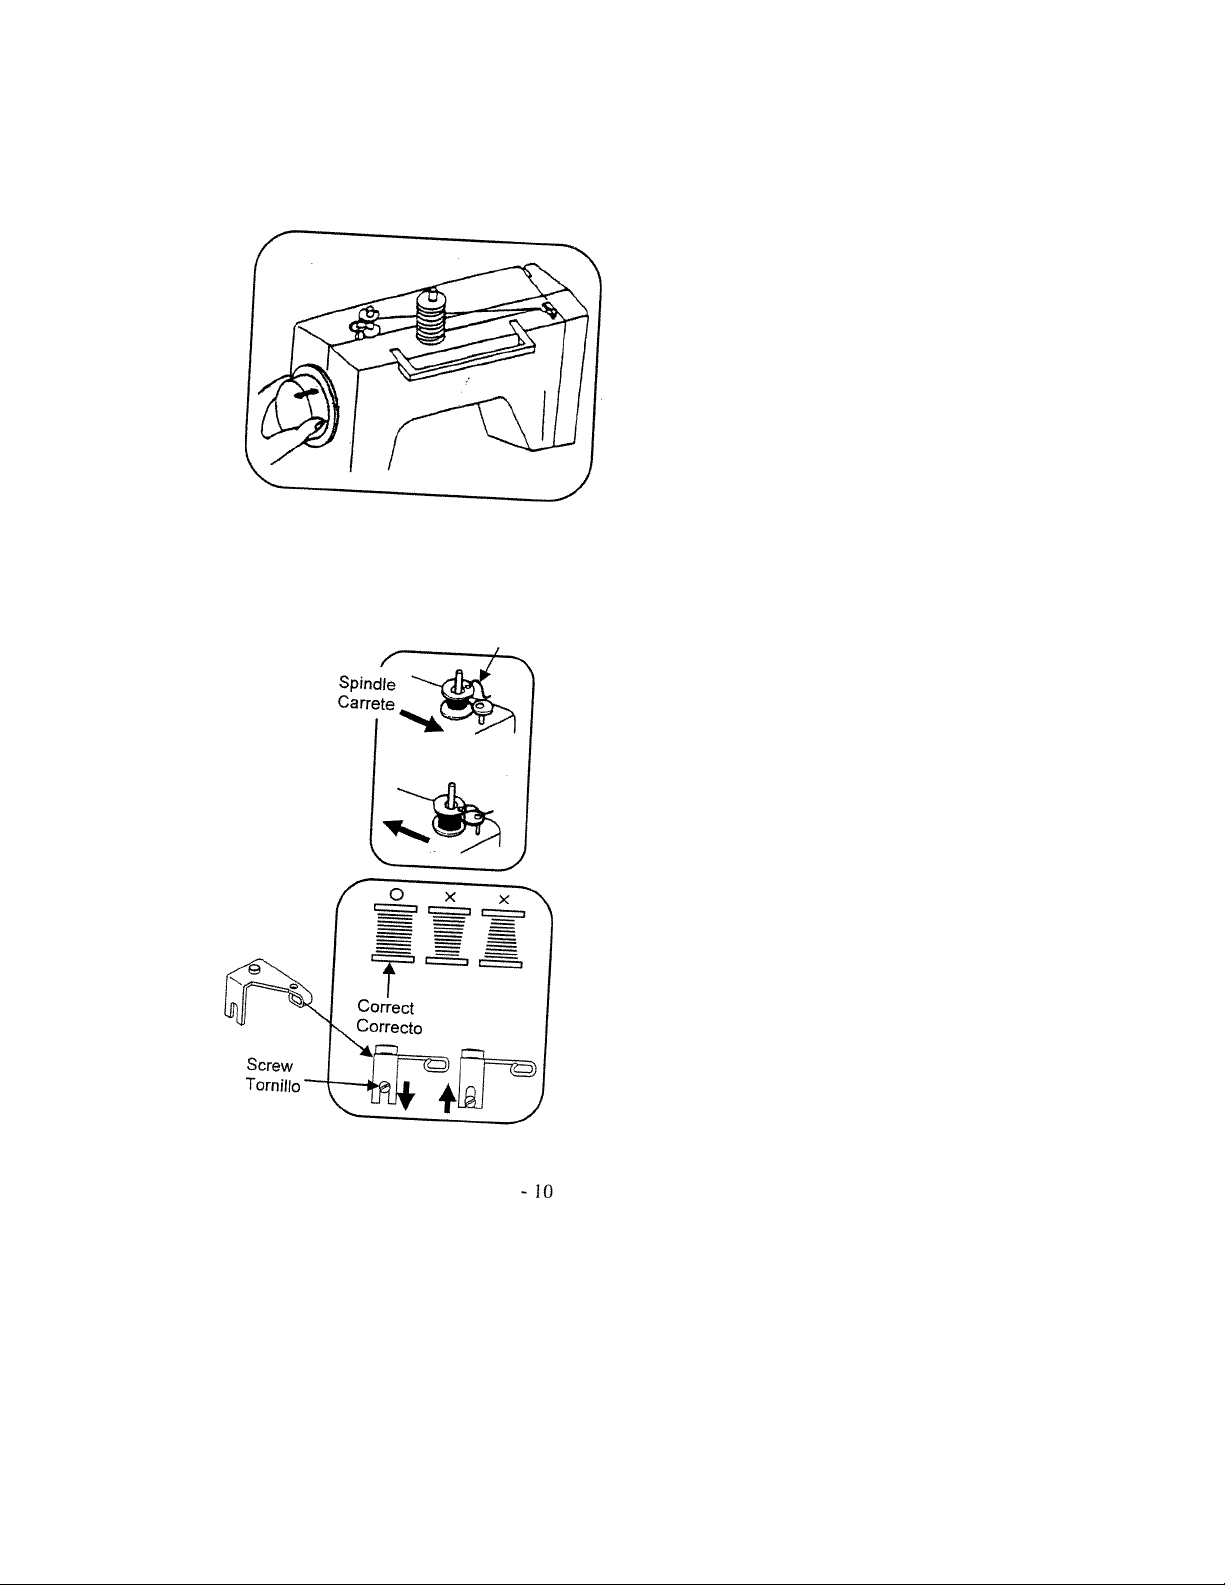
5 cm thread
1. Release coupling knob.
2. Thread as shown.
When bobbin is filled, re-engage
coupling knob. , “
1. Aflojar el volante.
^ dibujo máquina como indica el
3. Una vez que la canilla esté lista
volver a conectar el volante.
Push bobbin winder spindle in direction of
the arrow. When bobbin winding is
A la izquierda, en la cubierta del brazo se
encuentra la tensión de bobinado Éste se
puede ajustar como se describe, si la
maquina no enrollara de manera uniforme.
When bobbin winding is incorrect, release
adjust up or down until bobbin the
winding is balanced.
Si el bobinado no es uniforme, afloje el
tornillo de la tensión de bobinado y
que bobine uniformemente.
°
Page 11
REMOVING BOBBIN CASE AND BOBBIN
RETIRAR EL CASQUILLO DE LA BOBINA Y LA BOBINA
‘j:
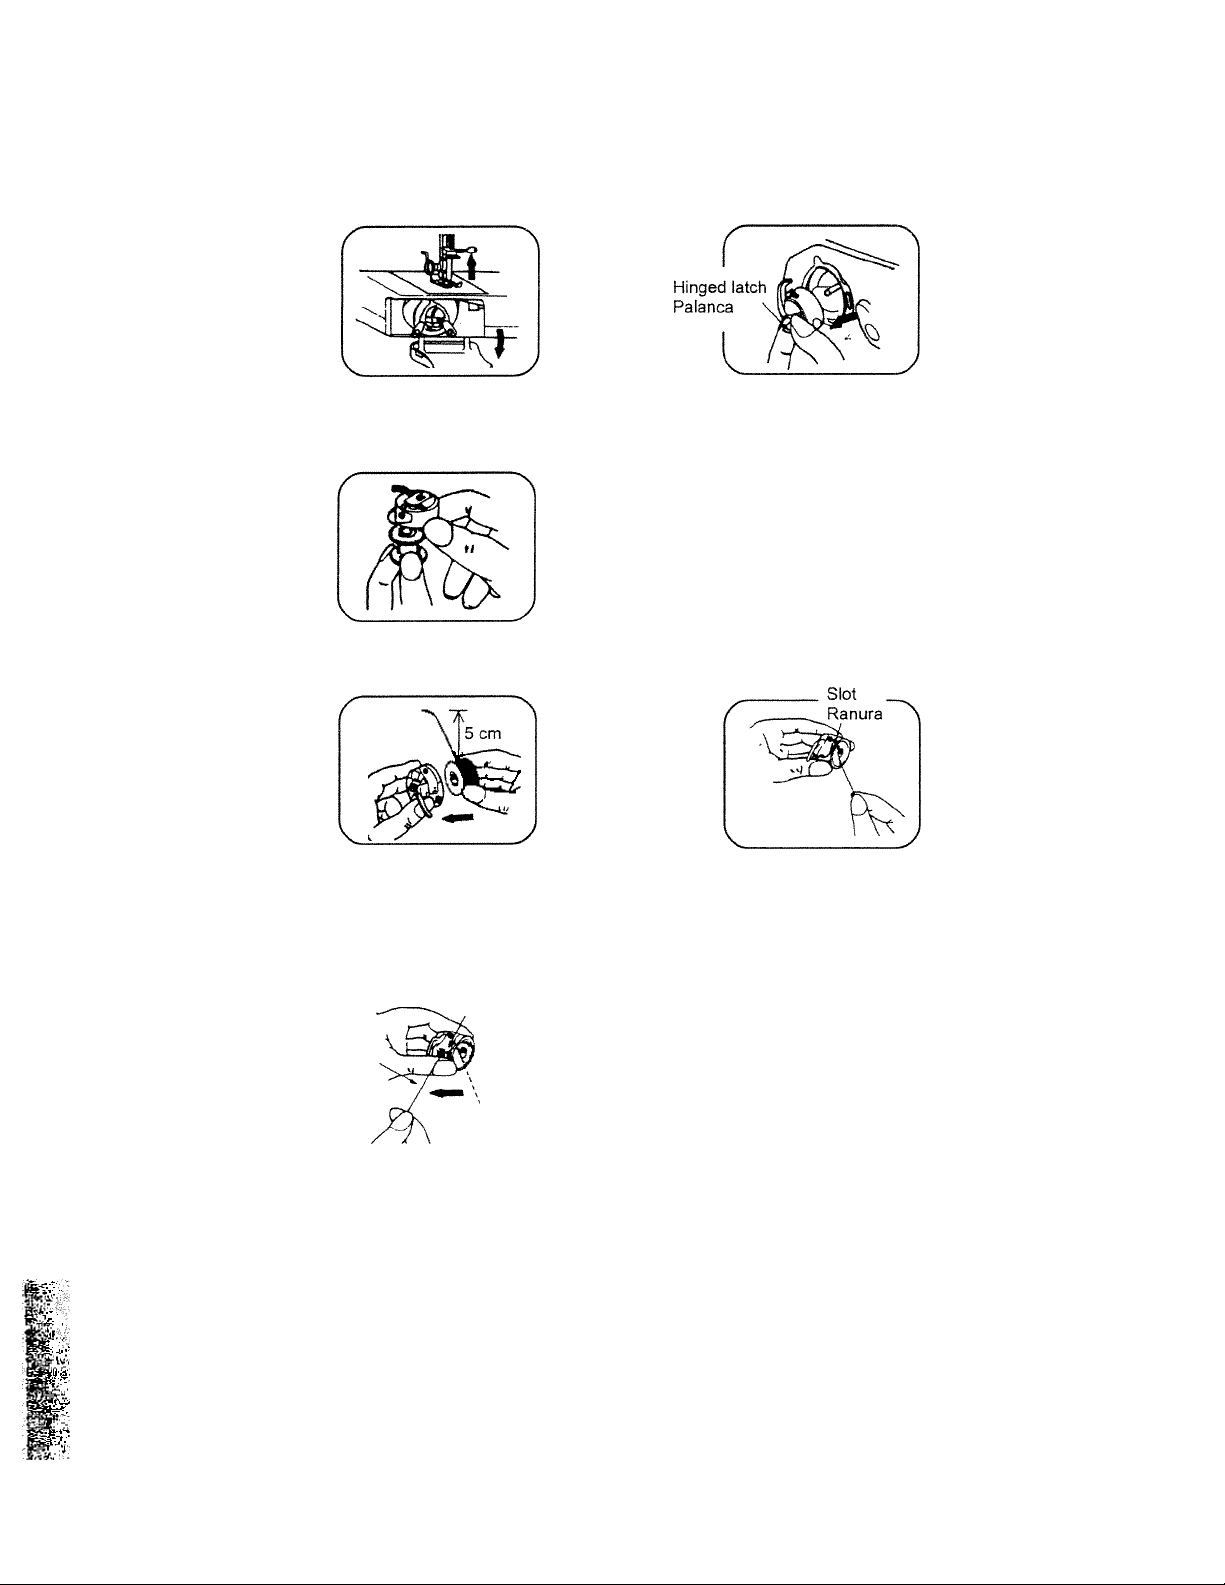
1. Raise the needle to its highest
position and open shuttle race cover.
1. Coloque la aguja en la posición más
alta y abra la cubierta del ajuste.
2. Open the hinged latch of the bobbin
case and pull the bobbin case out of the
machine.
2. Abra la palanca del casquillo de la
bobina y retírelo de la máquina.
, Release the latch and the bobbin will fall out
easily.
, Si usted deja la palanca, la bobina caerá
automáticamente del casqüíiloC' '
INSERTING BOBBIN INTO BOBBIN CASE
COLOCAR LA BOBINA EN EL CASQUILLO DE LA BOBINA
1. Pull 5 cm of thread from bobbin and
insert it into bobbin case as shown.
1. Cuando coloque la bobina en el
2. Guide the end of thread into the slot.
2. Conduzca el extremo del hiló de
rosea por la ranura.
casquillo, deje 5 centímetros de
hilo de rosca de más. ( Véase
ilustración)
______
Tension spring
Resorte de tensión
10 cm
3. Pull the thread through the slot and under the tension
spring and draw out about 10 cm of thread.
3. Tire del hilo de rosea por la ranura y por debajo del muelle
de tensión y tire aproximadamente 10 centímetros de hilo.
11
Page 12

INSERTING BOBBIN CAQc iki-m
COLOCAR EL CASQUILLO DeTa^rÍ^^*"^
agarrador ^ BOBINA EN LA GUIA
DEL
1 • Cerciórese de
delante. Abra la
QUe la aguja esté
palanca y sostenga
en la posición más alta. Tire
the thread to the front
el casquiiio.
open the latch of
del hilo de rosca hacia
releas.'<>'>» l>ebbín cas.
bebo agarre al lns.Ííín'™'¿°™c“ "«o^ raebio, d. modo gu.
- 12-
Page 13

THREADING UPPER THREAD ENHEBRAR EL HILO SUPERIOR
Pass the thread from A to G as shov,/n.
Enhebre el hil según se indica de A-G
Twin needle threading.
La aguja melliza enhebrando.
Page 14

thread
goes .down and comes^un^Th^ needle
whee|,when the
position. ^ highest
icSht,” Si’i: s™*?"“'’' “’'*
1. Sostenga ei hiio superior con ia mano
™'" Drought up in a loop.
:S“SSj3?
55=HSS?i=
3 Place Su é "p?eSeT
lower pressure foot
4. Start to sew..
"■ Sat ?el ^ Sotelos juntos por
debajo del pie de costura hacia atrás
- 14.
Page 15

LEVELLING MACHINE ESTABILIDAD DE LA MÁQUINA
Down
Hacia abajo
Up
Hacia arriba
- 15-
Page 16

ADJUSTING THREAD TENSION
AJUSTAR LAS TENSIONES DEL HILO DE ROSCA
Normal upper thread tension: 4-6
Tensión normal del hilo superior; entre 4 - 6
Correct
Correcto
Upper thread tension may be adjusted
by turning the thread tension dial.
La tensión máxima puede ser
regulada girando el botón de tensión.
Fabric
Tejido
í ( Oj Hilo inferior
Incorrect
Incorrecto
Inside of fabric
Upper thread
Lado interior del tejido,
hilo superior
Lower thread tension can be increased
by turning the screw of the bobbin case
slightly to the right (clockwise). Turning it
to the left (anti-clockwise) decreases
tension.
Upper thread
Hilo superior
t__ Bobbin thread
La tensión del hilo inferior puede ser
regulada girando el tornillo del casquillo
de la bobina ligeramente hacia la
derecha (en sentido a las agujas del reloj)
para aumentar la tensión y hacia la
izquierda (en el sentido contrario a las
agujas del reloj) para disminuir la tensión.
Page 17

REGULATING THE PRESSER FOOT PRESSURE REGULAR LA PRESIÓN DEL PIE PRENSATELA
. Push down the lever for the desired pressure; for light fabrics set lever atX set at 2 for
medium fabrics and at yfor heavy fabrics-^
. Insufficient pressure may cause poor feeding, skipped stitches or difficulty in guiding the fabric.
To adjust the presser foot pressure, use the lever behind the cover of the lamp. Loosen the
stop screw of the lamp cover to open it.
. When darning or sewing freehand embroidery, release the pressure by setting the lever to O.
After adjusting the presser foot pressure and closing the lamp cover, tighten up the stop screw.
The lever is usually adjusted at 2.
1. Coloque la palanca en la posición adecuada, según si son tejidos ligeros (3), tejidos medios
(2) o tejidos pesados (1).
2. Una presión demasiado baja provoca que se omitan puntos ó haya dificultades para zurcir el
tejido. '
El ajuste de la presión del pie prénsatela se consigue con la palanca que se encuentra detrás
del compartimiento de la bombilla. Afloje el tornillo de fijación de el compartimiento de la
bombilla. Abra el compartimiento.
3. Cuando se zurce o en costura a mano libre, la presión de la palanca tendrá que estar en la
posición “0“, para que no se ejerza ninguna presión.
Cuando haya modificado la posición de la palanca, cierre el compartimiento de la bombilla y
vuelva a colocar el tornillo. La palanca normalmente está en la posición 2.
W!)
DROP FEED
AVANCE EN LA POSICIÓN HUNDIDA
A. Push feed lever down to drop feed below needle plate for darning, embroidery, and
button sewing,
B. Push feed lever up to raise feed above needle plate for normal sewing.
A, Empuje la palanca del avance para bajar el avance por debajo de la placa de la aguja
para zurcir, bordar y coser botones.
B. Empuje la palanca del avance hacia arriba para elevar el avance pox encima dela aguja
para coser de manera normal.
Page 18

CHANGING NEEDLE REEMPLAZO DE LA AGUJA
1. Raise the needle bar to its highest position
needle clamp screw and remove the old needle
' up L it win go insert the needle as far
4, Tighten the needle clamp screw securely.
1. Ponga la aguja en la posición más alta. *
l có?>nLl?""'i'° "“J° 1 fl“!» la aguja vieja.
aSa eomolTpSiSe'““’“ "> »»«>
4. Apriete muy bien el tornillo de la abrazadera.
Page 19

FABRIC-THREAD-NEEDLE-TABLE
Please pay attention to the following list as a guide for sewing different types of fabric.
it
- 19-
Page 20

TABLA DE TEJIDOS-HILO-AGUJA
■20-
Page 21

SEWING (PATTERN SELECTOR) AND OPERATION TABLE TABLA DE COSTURA, SELECTOR DE DISEÑO
Stitch patterns
Costura, diseño
Straight stitch
Puntada recta
Zigzag
Zig-zag
Blind hem
Costura oculta revertida
B
Box stitch
Caja puntada
Three step zigzag
stitch
D
Zig-zag con 3 pasos
Blind stitch
Costura oculta borde
ciego
Buttonhole
Ojal
F-H
Single overlock stitch
Costura Jersey
Honeycomb stitch
Costura batin
Slant over edge
Sobrehilo inclinado
K
Zigzag stitch
Costura estirada zig zag
Ili
Stitch length
largo de
puntada
1
3 I—'
0.5-1
3 —I
ÎD
0.25
1
Presser foot
Pie
Drop feed
Avance
t iMét
Ì gas
t
Straight stretch stitch
Costura estirada recta
Double overlock stitch
Puntada de cierra doble
M
Free-hand embroidery
Bordado freehand
III
III
III
Without
No necesario
■21 -
Page 22

TO START SEWING
COMIENZO DE LA COSTURA
■:;í
il'
i
■ ì'
Important hints:
1. Raise the take-up lever to its highest position before starting and after stopping
sewing.
2. Hold both threads about 10 cms to the rear of the machine for the first two or three
stitches.
3. Sufficient fabric should be placed under needle before lowering the presserfoot
4. Depress foot/speed control and start to sew. '
5. Test the machine stitches on a scrap of fabric you plan to use, adjusting the machine
for the length of the stitch and tension suitable to your fabric.
Attention:
1. When turning the balance wheel manually, always turn it toward you.
2. Guide the cloth gently with your hand.
3. To prevent breaking needles, always raise the needle out of the fabric when you stop
sewing,
Notas importantes:
1. Al empezar o terminar una costura levantar el tirahilos a la posición más alta.
2. Retenga ambos hilos aproximadamente 10 centímetros hacia atrás de la máquina
durante las primeras dos o tres puntadas.
3. Asegúrese de que el tejido está debajo de la aguja antes de empezar a coser y pisar
el pedal.
4. Presione el pedal y comience a coser.
5 Pruebe las puntadas en un trozo de tejido de muestra, para asi poder ajustar la
longitud de puntada y la tensión
Notas:
1. Gire el volante siempre en su dirección.
2. Conduzca el tejido suavemente con la mano.
3. Para evitar que se rompa la aguja, deje de coser desplazando la aguja hacia arriba y
no dejándola en la tela.
-22-
Page 23

HOWTO FINISH STITCHES
REMATE DE LA COSTURA
1. Sew to the edge ofseam^
2. Push the reverse button ana sew ni levc
3. Raise needle into out of the back of the machine.
4. Lift the presser foot and pull tne taonc
* 3 = 4a«ma,r„s .ada .»as.
i prSrJdTsplaS .s iela Pacia I. par» p.-tariorde I. mapuipa.
5, Cut threads as shown on the thread cutter.
5. Corte los hilos con el cortahilos.
• 23
Page 24

STRAIGHT STITCH
PUNTADA RECTA
1. This type of stitching is used most frequently.
2. The zigzag presser foot can be used, for both straight and zigzag sewing.
3. For sewing light fabric, use a smallepstitch size. (Refer to page 19 for dial setting).
1. Es el tipo de cosido más frecuente y utilizado.
2. El pie zig-zag puede usarse tanto para la puntada recta como para el cosido en zig-zag.
3. Para coser telas finas utilice tamaños más pequeños de puntada.
(la elección apropiada está ilustrada en la página 20 ).
ZIGZAG SEWING
COSER EN ZIG-ZAG
Pattern selector position
Posición del selector
Satin stitching can be used for sewing
initials, patterns, appliqué, etc.
f
\¥'
STITCH WIDTH ANCHURA DE PUNTADA
¡£i:
1
1
__
>.
qI
i
1
1
1
i
i
E
1
Using this dial, you can adjust the stitch width in an
infinitely variably between 0 and 5.
ATTENTION: When using the twin needle, adjust the
stitch width to maximally 3. Adjusting the stitch width to
a higher number causes the needle to break.
Con este dial puede escoger la anchura de punta desde
0 a 5 progresivamente.
NOTA: Si usted trabaja con doble aguja, regule la
anchura de puntada en la posición 3 como máximo. Una
regulación más alta puede causar la rotura de la aguja.
La puntada en zig-zag es una puntada
universal.
Para coser satén, los puntos de la
costura están muy juntos y la longitud de
puntada es muy corta. Normalmente se
utiliza para coser iniciales, siglas, dibujos
o similares.
-24-
Page 25

OVERCASTING
SOBREHILAR
Use these stitches for oversewing rough
edges. " ’
Con estas puntadas se evita que se
deshilen de los bordes.
STRAIGHT AND ZIGZAG STRETCH STITCHES COSTURA RECTA ELÁSTICA
III ^
Use this stitch with knitted, tricot or other
stretchy fabrics.
The stitch enables your seam to stretch
with out breaking the thread.
Use esta puntada para telas tejidas, de
tricot y otras telas elásticas.
Este tipo de costura permite ser estirada
sin que el hilo se rompa.
La puntada recta elàstica también es muy
resistente en una costura recta.
-25'
Page 26

BLIND STITCH
COSTURA OCULTA
<
1. Fold fabric as shown.
1. Doble el tejido como se muestra.
2. Finish the seam as shown.
2. Ejecute la puntada oculta como se muestra.
-26-
Page 27

Adjust the width to obtain the correct seam.
Utiiice el pie oculto de costura. Ajuste el ancho y la
posición de la aguja mientras cosa para obtener una
costura correcta.
Wrong; Needle is not piercing edge
to fold at all.
Incorrecto: La aguja no cose el
dobladillo.
Correct seam.
Costura correcta.
Needle pierces the edge of fold too much.
Aquí la aguja entra demasiado en el
dobladillo.
Page 28

BUTTON SEWING
COSIDO DE BOTONES
Match
Fósforo
(Use drop feed see page 17)
1. Lower drop feed.
2. Place button presser foot in position and attach it firmly.
3. Place the button between presser foot and fabric and lower the presser foot.
4. Manually turn hand wheel towards you, ensuring that the needle enters into both holes
of button without obstruction. (Increase or decrease width setting^.'
5. Sew about 7 stitches. .■» -. -
6. Pull both threads to the underside and tie them together.
(El uso que zurce plato ve página #17)
1. Cover alimentar con zurcir plato. •
2. Coloque el pie para botones
3. Coloque el botón entre el pie y la tela y baje el pie prénsatela.
4. Gire manualmente la rueda volante hacia usted, asegurándose de que la aguja
penetre en ambos agujeros del botón sin ninguna obstrucción. Si es necesario, ajuste
la anchura de zig-zag. ,
5. Cosa aproximadamente 7 puntadas.
6. Tire de ambos hilos y átelos. -
BINDING
RIBETEADO (DE BORDE A BORDE)
To sew fabrics edge select the multi-zigzag
stitch.
Para coser telas de borde a borde, seleccione
la puntada multi zig-zag o la puntada smok.
28'
Page 29

ZIPPER SEWING
COSTURA DE CREMALLERAS
Select straight stitch.
1. Zipper foot is designed to sew close to a raised edge,
thus preventing sewing on zipper.
2. Place zipper foot in position and attach firmly.
3. Fold the fabric about 2 cm and place the fabric
under foot.
Seleccione ia puntada recta. ^ -
1. Doble la tela aproximadamente 2 centimetres y
colóquela debajo del pie.
2. El pie para cremalleras está diseñado para coser
cerca del borde levantado, evitando que se cosa
sobre la cremallera.
1. To sew the left side of the zipper, set the zipper on
the right side of the neetfe.
2. To sew the right side of|he zipper, set it on the left
side of the needle.
1. Para coser el lado izquierdo de la cremallera, fije el
pie de la cremallera en el lado izquierdo de la aguja.
2. Para coser el lado derecho, el pie de cremallera
debe estar a la derecha de la aguja.
Sew as Illustrated.
Cosa de acuerdo con la ilustración.
-29'
Page 30

BUTTONHOLE SEWING / COSTURA DE OJALES
Set the stitch length dial.
Utilice el pie para ojales
Ajuste el selector de longitud de puntada en el área deseada.
Pattern selector dial
Modelo del selector
c
s
a
□
Steps
Pasos
1
Settings
1. Set dial to „1 “ position •
2. Sew left side
3. Raise the needle
1. Coloque el selector en la posición 1
2. Cosa el lado izquierdo
3. Levante la aguja
4. Set dial to „2“ position
5. Sew 5-6 stitches
6. Raise the needle
4. Coloque el selector qpJa posición 2
5. Cosa de 5 a 6 puntadas
6. Levante la aguja
7. Set dial to „3“ position
8. Sew right side
9. Raise the needle
7. Coloque el selector en la posición 3
8. Cosa el lado derecho
9. Levante la aguja
10. Set dial to „4“ position
11. Sew 5-6 stitches
12. Raise the needle
10. Coloque el selector en la posición 4
11. Cosa de 5 a 6 puntadas
12. Levante la aguja
Posición
___________
_______
Before sewing, fit buttonhole foot as
shown.
Antes de empezar a coser ajuste el pie para
ojal del botón como muestra la figura.
■30-
Cut buttonhole along centre with cutter
as shown.
Corte el agujero del botón con el
cortador, como muestra la figura.
Page 31

HEMMING (Optional)
RUEDOS, ORLAR (Opcional)
it
1. Raise the foot and the needle to its highest position. Replace the foot with the picot foot.
2. Fold over the fabric edge by about 3 mm and place it under the foot. Secure the folded
edge with a few stitches. Take out the workpiece and draw the hem into the picot foot
through pulling the threads.
1. Levante el pie y la aguja en su posición más alta. Cambie el pie por el pie especial para
ruedos.
2. Doble la tela aproximadamente 3 milímetros y colóquela deb|jp.del pie.
Dé unas cuantas puntadas. Seguidamente levante la aguja j eí pie de cosido.
Introduzca el ruedo en el pie de ruedos.
3. Lower the foot and sew the hem.
4. While sewing fold the fabric to the left a little and allow it to run into the hemmer foot.
5. Make sure that the fabric does not move under the right half of the foot. The fabric must
• I
be fed into the scroll of the hemmer sufficiently so that the workpiece edge runs freely
through the groove under the foot
Only suitable materials can be used and some practice may be necessary to achieve
the best results.
3. Baje el pie y cosa el ruedo
4. Durante el cosido, doble un poco la tela hacia la izquierda para que corra bien por el
pie de ruedos
5. Asegúrese de que el tejido no se deslice debajo de la mitad derecha del pie.
La tela debe ser guiada por debajo de la curva del pie de tal forma que el dobladillo de
la tela pueda correr libremente.
Sólo se pueden utilizar tejidos adecuados y será necesario un poco de práctica para
lograr resultados óptimos.
31
Page 32

'li
TWIN NEEDLE DOBLE AGUJA
I
tíereídteTaíierthrS^^^^ ‘° P-^g
"°‘ 3® this wj« break the
li:
Enhebre la aguja como si fuera a coser norrhal, para ello pase ambos hilns nnr i=.c
guias hasta la aguja donde se enhebran por separSo
agSt°d?ra“mpJse° """" tercios de la anchura máxima, puesto que la
EMBROIDERY
BORDADOS
(Use drop feed see page 17)
Remove the presser foot and lower feed dog
Sc'h’fbS roS“ — Oo
(El uso que zurce plato ve página #17)
Baje el avance y mueva la tela en el aro lentamente para formar el efecto deseado.
-32
Page 33

QUILTER (Optional)
ACOLCHADO (Opcional)
SEAM GUIDE (Optional)
Page 34

I'i'
Ss
.
.V'* i
li; ^
It ;■
Íí: ■
■:Г-
MAINTENANCE
limpieza
Cleaning shuttle race
(A) Latch knob
(B) Shuttle race cover
(C) Shuttle hook
Limpie la lanzadera
(A) Botón picaporte
(B) Тара de la lanzadera
(C) Gancho de la lanzadera
1. Raise needle to its highest position.
2. Take out the bobbin case.
3. Turn the latch knob A as illustrated.
4. Take off shuttle race cover.
5. Tike out shuttle hook.
6. Clean and oil shuttle race and hook,
thereafter replace all parts in reverse order.
1. Levante la aguja a su posición más alta
2. Saque la caja de la bobina.
3. Gire el picaporte (a) como se muestra en la
dirección de la flecha.
4. Aleje la tapa de la lanzadera.
5. Saque el gancho de la lanzadera
6. ümpie y engrase el gancho de la lanzadera
luego vuelva a colocarla en su lugar.
; .
Abra la cubierta de la lanzadera y engrase
los puntos indicados.
-34-
Limpie los dientes alimentadores
con un cepillo.
Page 35

CHECKING PERFORMANCE PROBLEMS - TROUBLESHOOTING
Problem
Fabric does not
move
Breaking needle
Breaking upper
thread
Breaking bobbin
thread
Machine
jamming
Probable cause
- Feed dog down «4
- Stitch length dial on „0“
- Light presser foot pressure
- Incorrectfnsertion of needle
- Bent needle
- Fabric is being pulled
- Needle, thread and fabric do
not match
- Faulty adjustment of zigzag
width
- Improper threading
- Tight upper thread tension '
- Bent needle
- Scratches or nicks on shuttle
- Tied bobbin thread tension
- Incorrect insertion of needle
- Improper threading
- Lint or thread in shuttle
- Excessive tension
- Presser foot pressure to strong
- Needle, thread and fabric do
not match
What to do
- Raise feed dog
- Set dial between 1 and 4
- Increase pressure
- Re-insert needle
- Replace needle
- Do not pull fabric
- Use correct needle and thread
- Re-adjust zigzagfWidth
- Re-thread maBhihe
- Reduce upper thread tension
- Replace needle
- Polish or replace shuttle
- Reduce bobbin thread tension
- Re-insert needle
- Rethread machine
- Clean shuttle
- Readjust tension
- Change pressure accordingly
- Choose proper needle and
thread according to type of '
fabric
■35.
Page 36

POSIBLES PROBLEMAS DE FUNCIONAMIENTO
Y SOLUCIONES
Disturbio
I
La tela no se
I
mueve
Rotura de la
aguja
Rotura del
hilo superior
(Rotura del
hilo de la
bobina
Probable causa
- La máquina no cose, sólo el
volante rueda
- El selector de largo de puntada
esta en la posición “0"
I - Poca presión en la tela
- Colocación incorrecta de la aguia
I “ La aguja está doblada
- Hala de la tela
I - Uso incorrecto de aguja, hilo y
tela ’
-Posición incorrecta dglselector
de ancho de zig-zag
- Enhebrado incorrecto
- Demasiada tensión del hilo
superior
- Aguja doblada
' ■ Hendiduras y raspaduras en la
lanzadera
- Demasiada tensión del hilo e la
bobina
- Colocación incorrecta de la aguja
- Enhebrado incorrecto '
- Polvo e hilo en la lanzadera
Solución
I - Tire del botón de embrague
- Mueva el selector de 1-4
- Aumente la presión del pie
prénsatela
■ Coloque la aguja de nuevo
Cambie la aguja
No hale de la tela
Uso correcto de aguja, hilo y tela
-Mueva el selector a la posición
correcta
' An^'^1 a enhebrar correctamente
- Afloje la tensión del hilo superior
■ Cambie la aguja
Cambie la lanzadera o lime las
raspaduras
■ Afloje la tensión del hilo de
bobina
■ c ^9uja de nuevo
- tnhebre correctamente
- Limpie la lanzadera
La tela se
ondula
- La tensión es demasiado alta
- La presión del pie de costura es
excesiva
- Uso incorrecto de aguja, hilo y
tela
36-
- Vuelva a ajustar la tensión
■ Regule la presión del pie de
costura
teta ^9uja, hilo ¡
 Loading...