

Page 1
Page 2

You are now the owner of a new zigzag sewing machine, the most versatile type of its kind
you can possess.
thU i“*' by "*¡”6 design discs provided will.
Buttonholes, monogramming, overcasting and creative embroidery are done with ease and speed
and pobtemmg the greatest performance from your new machine this book on its care
and use has been written for you.
with many hours of trouble-free, creative sewing.
comrinrt'T "'“bments such as ruftlers, binders, edges,itchers, cording feet and soforth to
complement the accessories furnished w.th your machine .are available from the store where you
purchased your machine.
^ thorough understanding of your machine will reward you
WHITE CONSOLIDATED INDUSTRIES, INC.
CLEVELAND 11, OHIO
WHITE CONSOLIDATED INDUSTRIES, LTD.
Toronto 16, Ontario, Canada
Page 3

1 N D
Features and Parts
Needle and Thread Chart
Setting the Needle
Winding the Bobbin
Threading Bobbin Case
Plocing Bobbin Case in Shuttle
Upper Threadina
Stroight Stitching ..........................
Changing Foot and Plate ...................
Setting the Stitch Length ..................
Stitch Length Chart
Sewing in Reverse
Adjusting the Tensions
Adjusting Pressure and Fee,4
General Sewina ...................
Light Weight Fabrics
Doming and Monogramming
Weparing to Sew
Removing the Work
k-reafive Embroidery ..................
Satin Stitch
¿igzog Sewing
Automatic Zigzag Sewing
Automatic zigzag Patterns
Blind Hems
Embroidery With a Hood
...................
................
....................
..................
...................
...................
....................
.................
.......................
...................
.............
......................
.......................
...................
.............
................
..................
..............
..........................
...............................
.................
.................
................ 19
......
...........
........
........
........
.......
14 !
15 ;
17
18
Page
® i
10 1
Darning
............................
Making Bufionholes
Sewing on Buftons
How fo Use Accessories
Narrow Hemmer .......................................... ^2-23-24
Lace Trimmed Hem ............................................ ^2
Lace Edge .............................
French Seam
Flaf Felled Seam ............................................... 2^
Hand Rolled Effect
Quilting Guide .................................................. 23
Seam Gauge ............................... ...................... 23
Care and Maintenance
Oiling ............................................................. 24
Cleaning and Oiling Shuttle
Accessories
Trouble Charts
Attachments ................................................ 28-29-30
Attachment Foot
Edgestitcher
Binder ............................................................ 33
Hemmers ........................................................ 34
Darning Spring .................................................. 35
Ruffler
Cording & Zipper Foot
Sewing on Zipper
..................... ...................................
.........................................................
.......................
........................
....................... .............................
............................................
.............................................
..................... ..............................
.............................
............................. .......................
................................................
Роде
.........................
.Г.!!!!.!
...............
..................................
..........................
^2-33-34-35-36-37
...........................
22 o]
.......
26
33
35
........
27
37
^9
22
23
Page 4
CM
Page 5

/ 73 o 3
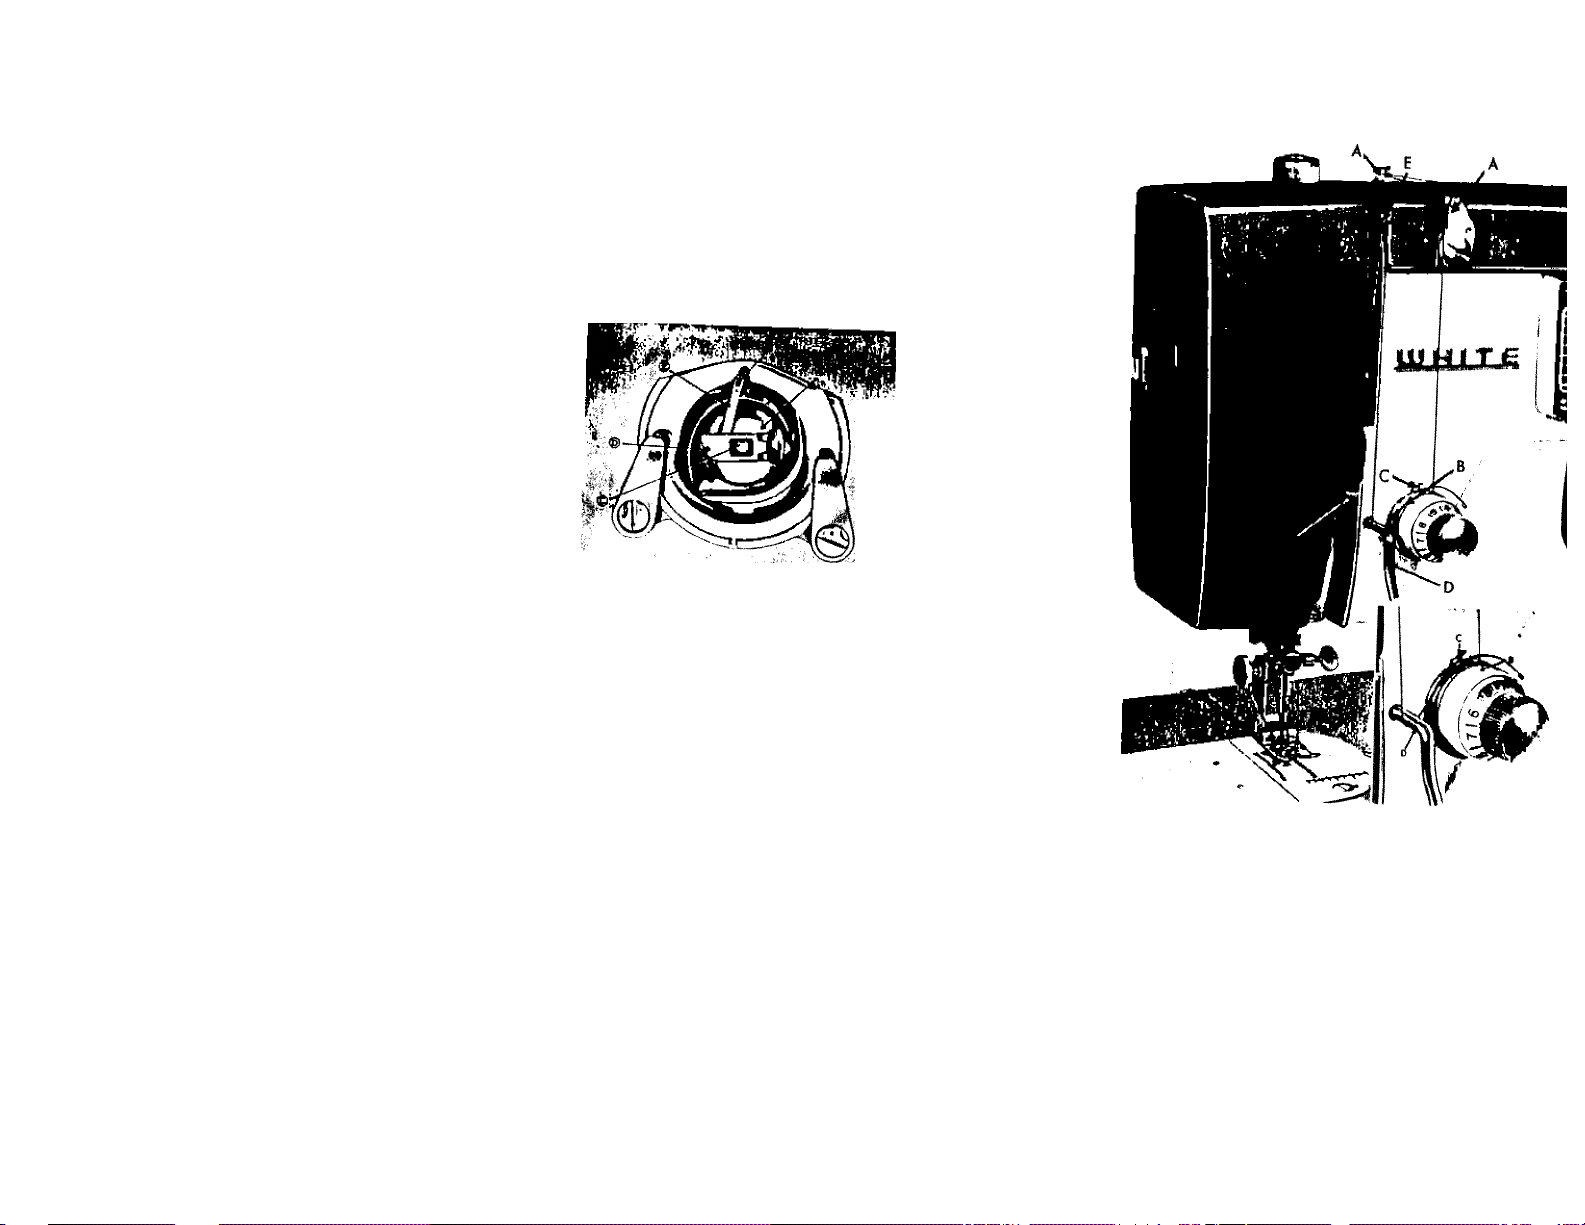
FEATURES AND PARTS
(Front View)
1 Button hole rantrol knob.tTn/^ #<>yf /
- Zig-zag width control knob.
3 Lock knob for Zig-zag width. y'
I
I f
4 Hand wheel. nd&o
5 Wheel clutch.
6 Bobbin winder. 7
7 Stitch length dial. j *y^ ^ ^
^ push button. / “J^
9 Bobbin winding tension.
19 Drop feed knob /73C, /
11 Cover plate.
1-i Needle plate-Seam guide.
'T-t-
13 Presser foot.
14 Needle clamp and screw.
15 Attachment and foot thumb screw.
Ifi Needle thread guide.
17 Thread guide. TJl'JS'
18 Tension regulator.
19 Light switch.
20 Thread take up lever.
21 Pressure release darner.
22 Arm thread guide.
“9 Pattern selecting dial. ^
24 Zigzag-width window.
Page 6
FEATURES AND PARTS
(Back View)
25 Spool pins.-7^(1^
26 Thread cutter.
27 Feed
28 Belt
29 Presser l)ar lifter.
30 Motor.
Page 7

NEEDLE - THREAD - FABRIC - STITCHING GUIDE
FabricExtremely heavy
tari)aulin, sacking,
canvas, duck, etc.
Heavy uiiliolstery
fabric, ticking,
denim, leatherette
Medium heavy drapery
labric, velveteen,
suiting, felt, terry, etc.
Medium broadcloth.
percale, gingham, linen,
chintz, taffeta, sheer
wool, shantung, etc.
Sheer voile, lawn,
dimity, crepe,
liandkerchief linen,
plastic film, etc.
Very sheer chiffon,
batiste, lace, organdy,
ninon, net, marquisette, etc.
Needle
No.
4
3
2
1
0
00
Machine
Stitches
Per Inch
fi
to
8
8
to to
10
10
to
12
12
to
14
14
to
16
(Plastic film)
8 to 10
16
to
20
Cotton
Thread
10
to
30
30
40
40
to
60
60
to
80
80
to
100
100
to
150
Mercerized
Thread
Heavy Duty
Heavy Duty
Heavy Duty
50
50
50
Silk
or
Nylon
A
A
A
Page 8
SETTING THE NEEDLE
See Pig. Raise tfie needle bar A tn n i - i
point, turning wheel toward you by ha„d
i len loosen the needle clamp screw' B and thp
№ Lr", rli',‘il“""; I'l“» «iic
" In "r*.,'
Afl.r than,r„g „„dl, „„I,, „„pie,,
HOW TO WIND THE BOBBIN
Disengage the hand wheel 4 (Fin 4^ from ,■ i •
l>y turning the clutch 5 toward you'or coumeridcwlse.'"^ tnechanism
pins, lead thread through the upper thread
lensS, Z "T,,“ r •
machine^ Run end of thread through a hole
sniniie C on
on bobbin over small pin on spindle Push
fll
FLA'
-SURI
SIDE
Turi'clm when it is filled
Break off loose thread end used to strriTlie winding.
yortur^thrilrTlTeel“'’"'"^
I'i«.
Page 9
fi.at
'SIIRFA(
;L‘d so that
S|
THREADING THE
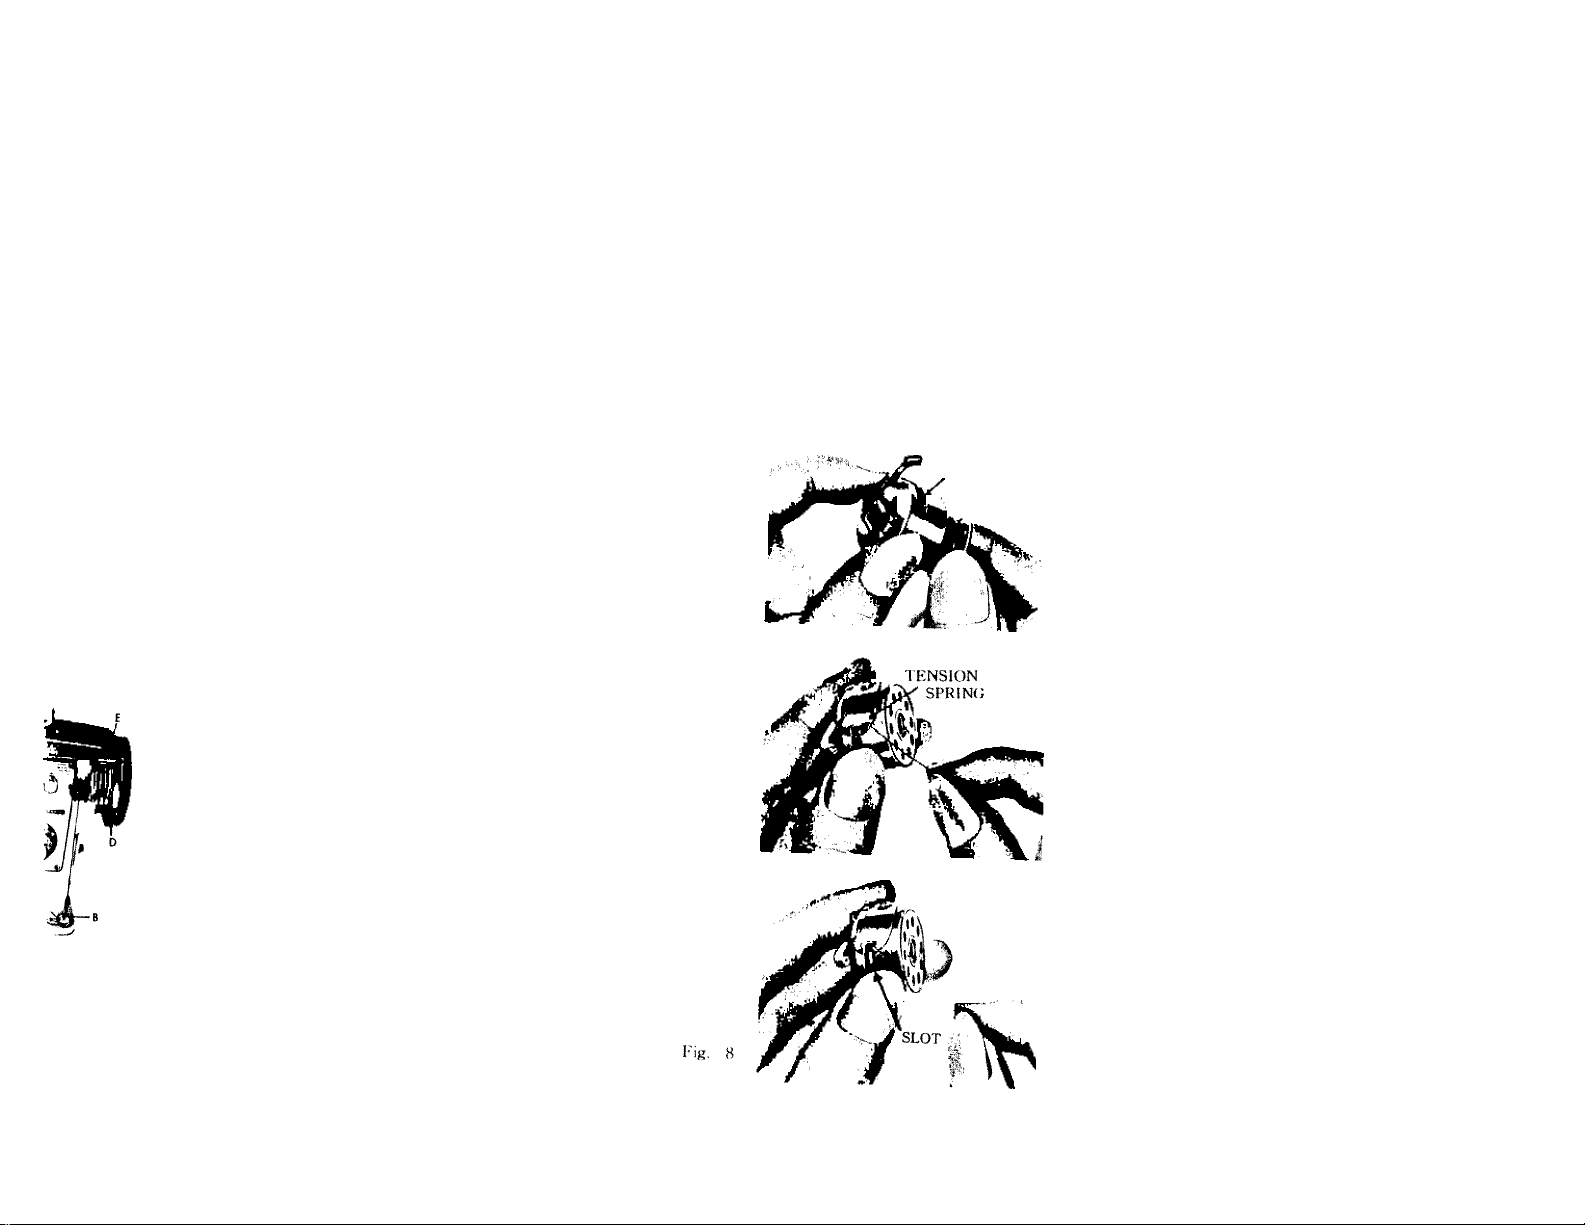
BOBBIN CASE
Step 1 (illustrated in Fig. 6).
Hold bobbin case between thumb and
forefinger of left hand, so that the slot
ill the edge of the bobbin case is on top.
Гаке the bobbin between tliumb
and forefinger of right hand so that the
thread on top leads from left to right.
Step 2. In.sert bobbin into bobbin
case, pull the thread into the slot of the
bobbin case as shown in Fig. 7, and draw
It under tlie tension spring and into the
fork-shaped opening of the spring as
shown in Fig. 8.
SLOT
Fig. 6 (
Fig. 7
Page 10
PLACING BOBBIN CASE IN SHUTTLE
Open hinged cover ¡jlate left of the needle
(See 11, Fig. 1) Flold the bobbin case latch, (D)
F.g. between the thumb and forefinger of thi left
and, with at least three inches of thread running from
le op of the bobbin case to the right. Insert and center
he bobbin case on the stud of the shuttle body, (C).
Be sure the bobbin
case finger, (E),
enters the shuttle
race notch, (A).
Press the bobbin case
(B) into the shuttle
as far as possible until
latch catclies on the
center post of the
9 shuttle.
THEN release the bobbin case latch, (D)
Press bofibin case again after latch has b^en released to
make sure the bobbin case is locked securely i„ place,
Close the cover plate.
Fig. 10
Page 11

UPPER THREADING
(Fig. 10)
1) Place spool of thread on upper spool pin,
2) lead thread through arm thread guide A
3) down and around tension discs B from right to left
4) into the check spring C over threaded discs.
5) then pull thread under bar D (See insert, P'ig. 10)
6) up into take-up lever E from right to left
7) down into thread guide P' on face plate
8) tlirough the needle bar thread guide G
9) and into needle from left to right. Pull three or four inches of thread through needle
Mold the end of upper thread loosely and turn hand wheel toward you until the needle goes all the
way down and comes back up. A loop (Fig. 11) will he formed over the lower thread whicli then can be
pulled out straight. Place both thread ends under the slot of the presser foot and draw toward the back
of the machine, leaving both threads three or four inches long.
Fig. 11
Page 12

10
STRAIGHT STITCHING
For straight sewing on fine fabric or very soft material,
you may want to use the straight stitch presser foot and the
straight stitch needle plate which are included in your accessory
box. Botli have narrow needle slots.
■gffANGlNG THE FOOT AND PLATE. To change
presser foot (13, Fig. 1) loosen thumbscrew (15, Fig. 1) and
remove zigzag foot.
Replace with hinged narrow foot and tighten screw securely.
To change Neelde plate (12, Fig. 1) remove it after you
pull out slide plate to the left (Fig. 12 A) and then you can
change needle plate to straight stitch plate.
—^ stitch width at 0 or the needle will
break in striking the foot or plate.
Fig. 11’A
I'ig. 11 H
Page 13

£tJLy
7 '7^> tf-
SETTING THE STITCH LENGTH
Tlie lengh of the stitch is regulated by knob 7 shown in h'ig. 12-B. Near 0 is the shortest length and
4 is the longest. Turn the knob to the left to lengthen and to the right to shorten the stitch.
STITCH LENGTH CHART (Approximate)
11
Figures on indicator ' ()
Number of stitcbes per inch No Feeding
24
1
12
2
3
8
4
6
SEWING IN REVERSE
When you wish to sew in reverse to tie the thread at the beginning or the end of a seam, press in
the reverse button 8 Fig. 12-B as far as it will go. Tbe machine will sew backward as long as the button
is held in. Only 3 or 4 stitches are needed to tie a seam securely.
ADJUSTING THE TENSIONS
Always adjust the upper tension with the presser foot down, as the
tension is automatically released when it is raised. To increase the
tension on the upper thread, turn dial (Fig. 13) to the right, or
clockwise. To decrease, turn to the left. The higher the number on the
dial the tighter the tension. Before adjusting lower tension be sure that
the machine is threaded properly.
\\ hen necessary' to chatige the bobbin tension, turn small screw
(Fig. 11) on side of the Itobbin case clockwise to tighten, counterclock
wise to looseti. Fig. i:t
Page 14

12
When the upper and under tensions are properly balanced,
a perfect stitch will be formed with both threads interlocking
in fabric (Fig. 15). ^
When the upper tension is too tight, the lower thread is
pulled up over the upper thread which is lying flat on the
fabric (Fig. 16)
When the upper tension is too loose the up,,er thread
forms loops over the lower thread lying flat on the fabric
(hig. 17).
ADJUSTING PRESSURE
AND FEEDING OF FABRIC
“tt «"fTís Í7
.
..........
..
Fig. la. ■ ‘'"'I' i» ......................
Fig- 15
Fig. 16
Fig. 17
ig. IH
■'ig. H
oil.
Page 15

;»p or
sition.
SEWING THIN OR LIGHT WEIGHT FABRICS
When lighter pressure is required to sew satisfactorily on thin silk
or filmy material, the pressure cap should be about halfway down.
Release all the way by pressing the snap lock, A. Fig. 20, and
then press cap B down again to halfway spot. Lower the feed slightly
by turning the red arrow on the knob to "LOW” Position.
DARNING AND MONOGRAMMING. In order to move the
fabric freely in any direction for darning, mending and certain kinds of
free-hand embroidery, release the pressure cap B completely by pressing
down on the snap lock. A, Fig. 20. Turn the knob to "DOWN” position,
which drops the feed well below the needle plate. To return feed to
normal, return knob to "HIGH”.
Fig. 20
PREPARING TO SEW
Have take-up lever at highest point before starting to sew. Do not try to help the feeding by pulling
the material as this may deflect the needle and cause it to break.
NEVER run machine without material under presser foot.
Place material and threads in position under the presser foot and lower the presser foot.
lurn tlie hand wheel toward you until the needle is at its highest point. You are now ready to
begin sewing. By having the needle at its highest point, it is not necessary to touch the hand wheel to
start the machine. You merely press the control. The speed of the machine is regulated by increasing or
decreasing the amount of pressure exerted on the control.
15
Page 16

14
REMOVING THE WORK
Be sure to stop the machine when the thread take-up lever
and needle bar are located at the highest position.
Now raise the presser foot and draw the fabric l,ack and to
the left, Fig. 21-A and B, and pass the threads over the thread
cutter.
Pull down slightly, holding thread in both hands, so as not to
bend the needle.
Leave the ends of thread under the presser foot.
CREATIVE EMBROIDERY
jg ^Цгe zigzag presser foot and zigzag needle plate are in place
The SATIN STITCH, Fig. 22,
which is really just a very short
zigzag stitch, and the basis for most pj 2‘>
embroidery, is obtained by setting the stitch lengUi as near 0 as
po-ssible without stopping the feeding action.
1 he width may he set anywhere from just ¡)ast 0 to the
widest, 4.
-
-----------------------------
f-i«. -I H
Page 17

'ìr^"
ZIGZAG SEWING
Your zigzag sewing machine, hy virtue of its
design, permits you to do zigzag sewing and
other kinds of work requiring a similar stitch.
The zigzag width control knob (A) is located
on right side of zigzag panel adjusts the width
of zigzag seam. For ordinary straight sewing,
zigzag width indicator (C) must he set at "0”
position on the window.
By moving this control knob (A) gradually
toward ”4” (as direction of arrow) the machine
will sew a zigzag stitch increasingly. (Fig. 22).
p'or special type of work such as sewing button
making tacks etc, zigzag width restricting knob (B)
will be useful.
To restrict the minimum width, turn restricting
knob (B) clockwise to tighten.
To release the locking of zigzag width, release
this knob then control knob (A) returns to "0”
position automatically.
15
Fig. 22
Page 18

16
AUTOMATIC ZIGZAG SEWING
Also this machine can sew the most beautiful decorative
and embroidery stitches AUTOMATICALLY by means
of various cams built-in-machine, and obtained 9 l,asic
patterns by turning the pattern selecting dial (A)
1) Turn tlie zigzag width control knob (C) clockwise
until indicator shows "AUTO” in the window (13),
and hold the zigzag control knob (C) in the position.
(Fig, 2d).
2) Then turn the pattern selecting dial (A) counter
clockwise to the point of pattern you want.
NOTE If the dial (A) is turned to the right as far as
possible, then turn it counter-clockwise.
I'or ordinary straight and manual zigzag sewing, pattern
selecting dial should be indicating "NORMAL STITCII”
I'ìr. L’,!
Page 19

1) AUTOMATIC ZIG ZAG PATTERNS
17
Page 20

18
BUND HEMS
Prepare the garment in the same manner as for hand hemming.
Step 1. (Fig. 24) If hem with folded edge is used make first fold 3/8" deep.
Step 2. Turn hem the depth desired and baste 1/4" from upper edge. Press into place.
Step 3. Fold hern back toward right side of garment leaving 1/4" extended.
Step 4. Place material under presser foot and sew blind hem automatically.
Blind hem completed.
Turn automatic pattern selecting dial counterclockwise so that Blind Stitch | section of the
dial comes to the red triangle mark on the zigzag plate.
Set needle position to LEFT and stitch length regulator to M.5.
COM I> LET Er
The blind „¡ich .1 CENTER ,,r RIGHT needle pnsilinn |, reenm„,e,„l„l bee,,,,,,, n,,,
often tends to break the needle.
Page 21

embroidering with a hoop
19
OM I’LETED
m of the
tuse this
It is easy to follow a stamped design or to work free
hand when embroidering or monogramniing.
(See Fig. 25). Release the pressure from the foot by
pressing down the snap look on the automatic darner.
Turn drop feed knob to DOWN position (see Fig. 19).
Stretch the fabric in an embroidery hoop, and place
under the needle after removing the presser foot.
Set the stitch width at the size you prefer and lower
the presser bar lifter. Then operate the machine at a rather high speed while moving the
with both hands. Work carefully and be sure to keep fingers out of the path of the needle.
Fig. 25
hoop slowly
DARNING
Release pressure from foot and drop feed as directed above.
Place fabric to be mended under foot, and stitch around hole, moving the fabric firmly and
slowly in any direction. To fill in the hole, stitch from center outward, completing and stitching
in fabric.
Page 22

20
MAKING BUTTON HOLE
No.l
Right side
row
(reverse)
No.2
tacking
No.3
Left side
row
(forward)
No.4
tacking
^ Your zigzag sewing machine stitches button lióles automatically by
' mBfiSw means of buttonhole knob, without turning the fabric.
1st step: Set the needle position lever to LEFT.
2nd step: Turn the regulating knob (A) clockwise until mark 1 (over the
knob) comes to the arrow-mark printed on face plate.
Sew with desired length, (a little longer than button size) as Fig.No.l.
3rd step: Turn the knob (A) to mark 2. Sew 4 or 6 stitches as Fig. No. 2.
Fig. 26
4th step: Turn the knob (A) until mark 3. Sew with power same length
(tacking).
as 1st reverse sewing, as Fig. No. 3.
5th step: Turn the knob (A) to mark 4. Sew 4 or 6 stitches as F'ig. No. 4.
(tacking). Before starting to sew button holes on cloth, try one or two times on a separate piece of material.
After finishing button-holes, lift the presser foot, take out the fabric, then cut off inside of the button
hole pattern with seam ripper in the accessories box.
NOTE (1) Do not set stitch length control knob to “0” position, where machine does not feed material,
must be at “1” or longer position.
(2) In sewing second row of stitches, (3rd step), Fig. No. 3, be sure to guide first row of
stitches in groove provided for it one bottom face of button hole foot, then both row of
pearl stitches will be spaced apart properly. This also prevents row edge after the space
between these rows of stitches have been cut open.
tari
hefi
wid
Page 23

lacking
iioinatically by
Ik 1 (over the
ate.
e) as Fig.No.l.
as Fig. No. 2.
r same length
as Fig. No. 4.
ce of material,
of the button-
feed material,
ie first row of
I both row of
liter the space
If you plan to make Iruttonholes on sheer or soft material, place
tarlatan or paper, which can be torn away after stitching, under the fabric.
And it is always wise to make several buttonholes on scraps of fabric
before working on the garment.
For narrower buttonholes, set the stitch width at 1У2 and move stitch
width lever to 3 for bar tack.
SEWING ON BUTTONS
Remove hinged presser foot and attach button sewing foot. (See
Fig.27-A, B and C).
Turn drop feed knob to “DOWN”
Move zigzag width lever to “0” position or to the extreme left. Place
the button so that its left hole comes directly under the needle, then
gently lower the presser foot. Move the zigzag width lever to the right
until the needle comes exactly over the right hole of the button. Turn
the balance wheel slowly by hand to be sure the needle clears both
holes of the button. Correct width if necessary.
When needle goes into the center of each hole, run the machine at
medium speed, making five or six stitches, stopping with the needle in
the left hole.
To lock the zigzag stitch and prevent ravelling, set the
stitch width at 0, and take a few stitches in the same
hole. If you wish you may place a rounded toothpick
over the button, between the two holes, and sew
button to fabric in regular way.
log. 27-C
21
Page 24

22
Remove the toothpick and wind thread under button,
forming a shank. Fasten.
Apply the above method to sew on buttons with four
holes, hooks, and snaps, etc.
If a four hole button is to be sewn, follow the same
procedure above for the two hole button.
Now lift presser foot slightly and move fabric to permit
stitching the remaining two holes.
Hooks, snaps, etc., are sewn to the fabric with the
same procedure as for sewing two hole buttons.
HOW TO USi ACCESSORIES
NARROW IIEMMER. With the needle at its highest
postiton, replace regular presser foot with narrow hemmer
(Fig. 28). For a plain narrow hern, make a 1/8 inch double
fold for about two inches along edge of fabric. Hold each
end of the two inch fold, slip underneath hemmer. Bring
fold up into the scroll of hemmer, draw forward to end
and fasten with point of needle. Lower presser bar lifter.
Gently pull ends of thread as you start stitching.
Guide material slightly to right, and it will automatically
take a double turn through scroll.
LACE TRIMMED HEM. To sew a narrow hem
and attach lace in one stitching, insert lace in the slot next
to needle (Fig. 29). Sew hem as above, guiding lace
under needle and hem into scroll.
Fig. L'H
Fig. 21»
I.
of fahi
Fi
feedinj
F
lower
Fdgcsl
И
the na
Ql
pronge
Page 25

25
Fig. :i(i
Fig. ,il
LA(,E EDGE Will! INVISIBLE STITCHING. Hold lace 1/8 inch from raw edge on right side
ot labric. Insert both in scroll as for plain narrow hem (Fig. 30). Let hem roll over and sew in lace
Press lace out flat along edge with hem turned up. It is possible to have a little fullness in lace hy
leedmg it Ireely under scroll.
HiENCH SEAM. With right sides together, place top piece of material 1/8 inch inside edge of
scroll, allowing hem to roll over and sew in top fabric, making French seam.
l<L,Ai LELLEU SEAM. Open out hrench seam and insert rolled edge in scroll of hernmer
Edgestiich to lay seam flat.
HAND UOELED EFFECT. Use a narrow zigzag stitch, just wide enough to catch both edges of
the narrow, rolled hem.
QUHH’ING GUIDE. This guide for making parallel rows of stitching is attached by placing the
pronged holder between the presser foot and the pressar foot thumb screw (Fig. 31).
Page 26

24
Adjust the curved bar to press lightly on the fabric.
By letting the guide ride on the first stitching line,
successive rows will he an equal distance apart.
When the har is attached so that the curved part
is to the right of the needle, it may also serve as a
seam width guide.
SEAM GAUGE OR CLOTH GUIDE. Use the
seam gauge as a guide for straight seams and even
rows of top stitching along edges of fabric. Fasten
gauge with accompanying screw in threaded hole in bed
of machine (Fig.32). Adjust to seam width desired.
CARE AND MAINTENANCE OF
YOUR MACHINE
HOW TO OIL YOUR MACHINE
Your machine should he oiled occasionally to keep
it operating smootlily how often depends on the amount
of sewing you do.
Before oiling the upper part of the sewing unit at
points indicated by arrows in Fig. 36, turn hand wheel
toward you until the take-up lever is at its lowest point.
Remove top cover by loosening two screws on cover.
Fig. :?2
Fig. :!:i
Page 27

Fig. 34
Avoid over-oiling only a drop is needed at each point.
To oil p„„, onde, ,l,e bed of d,e .„.chine, ,ip .he n„i, Innck on i.s hinges and apply , drop of oil
at each point indicated in Fig. 34
25
Fig. 35.
To oil .„oving p,r.a inside the (ace pl.ne, „hid, only rarely re<,„ire oiling, open pla.e.
Oil at spots indicated in Fig. 35.
Page 28

26
CLEANING AND OILING THE SHUTTLE
(See Figs. 36 and 37)
The stitch forming mechanism occasionally becomes clogged with loose threads and lint. This will
interfere with the efficient operation of the machine. Cleaning and removal of the lint will safeguard the
performance. To remove the shuttle assembly, proceed as follows.
1. Turn the balance wheel until the needle reaches its highest position. Tilt head back on its hinges.
2. Remove bobbin case (A), Fig. 37.
3. Turn the two shuttle race cover clamps (B) outward and remove the shuttle race cover (C) and
shuttle body (D).
1/
Fig. .'!6
i
Fig. :n
Page 29

Clean the shuttle race, the shuttle, and shuttle race cover by removing all threads, lint, etc.
A|»ply a drop of oil with finger tip to outer edge of shuttle.
When the cleaning has been completed, proceed as follows to replace the shuttle assembly:
1.
I urn the balance wheel until the needle reaches its highest position.
2.
Place shuttle Itody, (D), against shuttle driver and adjust into position.
3.
Replace shuttle race cover, (C), fitting pin at lower edge into notch, and lock into position with
shuttle race cover clamps, (B), making certain the clamps have been snapped securely into position.
4.
Put bobbin into the bobbin case.
5.
Put the bobbin case into the shuttle race, fitting tongue into notch(E)of race cover.
ACCESSORIES
27
10 H
14
1 Large screw driver
2 Small screw driver
3 Ripper
4 Quilter guide
5 Presser foot for
straight sewing
6 Buttonhole Fooi^tV-f
7 Thumb screw
16
o„o
8 Cloth Guide
9 Small Heinmer Foot
10 Cording Foot
11 Button sewing Foot
12 Package of Needles
13 Needle plate for
straight sewing
14 Sew Light Bulb
15 Plastic Oiler
16 Bobbins (3)
17 Felt Washers
(for spool pins)
Page 30

28
TROUBLE CHARTS
Trouble
If machines
bind
Probable Cause
Thread or lint in race way
Correction
L- With take-up lever in highest position, tilt
head back on hinges and remove hohljin
case.
BOBBIN
CASE BOBBIN
NOTCH n*CE
RACE COVER CLAMPS
2. - Turn clamps downward and remove r:icc
cover.
3. - Remove hook.
4. Clean thread and lint from all parts, including
race.
5. - Run a drop of oil along rim of hook.
6. - Replace hook, then race cover. Snap clamps
into place.
7. Grasp threaded bobbin case by latch iuid
replace, fitting tongue into notch of race
cover.
Page 31

29
Trouble
Bent needle
Skipping
stitches
Irregular
stitches Improper threading
Uneven
stitches
Needle placed incorrectly in
clamp
Too fine a needle for thread
being used
Upper thread tension too
loose
Bobbin not wound even
Pulling or holding material
Not enough tension on
upper thread
Poor quality thread
Needle too fine for thread
being used
Probable Cause
Correction
Discard and replace.
See instruction page No. 6.
See needle and thread chart, page No. 5.
Tighten upper tension.
See threading instruction, page No. 9.
Rewind bobbin
Avoid pulling or holding material, just guide it.
Increase tension
Try different thread.
See needle and thread chart, page No. 5.
Page 32

50
Trouble
Upper thread
breaking
Material
puckering
Probable Cause
Improperly threaded
Too much tension
Starting with take up in
incorrect position
Improper setting of needle
Eye of needle to sharp
Bent or blunt needle
Tensions too tight
Dull needle
Stitch length too long
Correction
Refer to threading instructions see page
and rethread machine.
Loosen tension on u[)per thread by
thread tension knob to lower number.
Always start sewing with take up k
highest position.
Refer to needle setting instructions
page No. 6
Try a new needle.
Discard all blunt or bent needles and
with new.
See tensions adjustment page No. 11.
Change needle.
Reduce stitch length.
No. 9
turning
’ver in
see
replace
Page 33

Your sewing machine comes equipped witl, the basic set of accessories
described earlier in this book.
The following pages illustrate additional time saving attachments that have
)een designed specifically for your machine. They are available at modest
cost rom your dealer. If your dealer cannot supply you with these items
ask him to order them for you by part number. Then you will be’
assured of receiving tlie genuine part designed for best performance with
your machine.
51
If a sewing machine dealer is not available
directly to:
WHITE CONSOLIDATED INDUSTRIES, INC
CLEVELAND II, OHIO
In Canada:
WIIITH CONSOLIDATED INDUSTRIES, LTD.
111 BERMONDSEY ROAD
TORONTO 16, ONTARIO, CANADA
mail your inquiry
Page 34

52
SOME OF THE ATTACHMENTS AVAILABLE FOR YOUR MACHINE
PART #76553
PART ^
Attachment Foot
PART «4403
Ruffler
PART #76552
PART 11990
Darning Spring
PART #74159
Binder
Hem
mers
PART #76551
I’AKT #76551
Edgestitcher
PART «76550
1Î
Si
fa
Page 35

ATTACHMENT FOOT
In order to attach the binder, edgestitcher and the hemmers,
It IS necessary to remove the jjresser foot and replace it with
the attachment foot. Fig. 38.
Mount binder, edgestitcher or hemmers sliding the attach
ment to the left as far as possible and tighten screw.
I he mounting slot enables you to sew as close to or as far
away from the edge as desired, just move the attachment to
the correct position before tightening the mounting screw.
Fig. 38
THE EDGESTITCHER
The edgestitcher is used in making lace
insertions, edgings and pipings. The slots
serve as guides. To sew lace edging to
fabric, place the material you want on top
in slot. Fig. 39, and other piece in slot 4.
To irio, will, 0 wide pipiog, p|.,„ ¡„ slo, d
53
b (t o may he used as a guide m stitching a french seam.
Page 36

54
BINDER
This attachment folds bias binding, applies it to the edge of
material in one operation. Slots on scroll of the binder are for
corresponding widths of commercial folded bias binding.
The open mouth of binder scroll is used for unfolded bias
strips cut 15/16 inch wide.
FOLDED BINDING (Fig. 41)
Cut a point of folded binding, insert in appropriate slot. Draw
through slot and under binder with strong pin. Sliding binder
slot to right or left.
TWO-TONE BINDING (Fig. 41)
Two bindings can be sewn on fabric edge also in one operation.
When two are used, always skip one size between widths,
inserting each in correct size slot.
HAND-CUT BIAS BINDING (Fig. 42)
Cut 15/ 16 inch bias binding fold in half for a couple of
inches. Cut Binding diagonally toward end, almost to fold.
Slip fold into center of binder. Draw back until cut opens
and binding encircles open end of scroll. Test stitching to be
sure it is on the edge adjust if necessary.
:‘ig. 4 1
Fig. 4 2
IS
ill!
un
ho
Io(
e;u
of
yoi
HO
V/M
Page 37

THE SET OF HEMMERS
Before attacliiiig any of the hemmers, be sure bobbin thread
is pulled up. Then, with bemmer in place, bold top thread loosely
and turn handwheel one full turn toward you, making a loop
under bemmer. Cirasp bobbin thread with both hands and slip
horizontally under bemmer toward back. Bobbin thread will catch
loop and carry upper thread to back of bemmer.
bold material in 1/8 inch for two iticbes along edge, bold at
each end of fold. Slip fold into guide and up over spoon. (Fig. 43).
bold hem in material back of bemmer. Draw forward to end
of hem and fasten with point of needle. Pull on threads gently as
you start stitching.
DARNING SPRING
now TO ATl'ACn
Remove presser foot, unthread needle, place darner spring,
on needle and slip book up over bub on needle clamp.
35
Fig. 4.-i
PATCHING AND MONOGRAMMING
See page. No. 18 Fig. 44.
Page 38

56
R U F F L E R
' v::='
Fig. 45
Fig. 46
The ruffler will produce yards of delicate ruffling or precision pleating.
Ruffling can also be done and sewn to another piece of fabric at the same time.
This highly versatile attachment despite its wide range of use, is simple to use.
Use the ruffler for making aprons, curtains, pleating a skirt, adding fullness to the bodice of a dress and etc.
Fig. 47
ins(
eitl
ove
so
adji
con
Page 39

THE ADJUSTABLE CORDING
and ZII’PER FOOT
'riiis attachment is used to make and
insert covered cording, and to sew in zippers.
Loosen thumb screw to slide foot to
either right or left of needle.
CORDING. Fold bias strip of fabric
over cord. Loosen thumb screw and set foot
so needle is centered in needle hole.
Machine baste cord in place (Fig. 48).
lo sew covered cord to material, reset
adjustable foot so needle stitches closer to
cord, and on edge of base fabric.
57
3 i, J 7
Fig. 48
SEWING IN A ZIPPER
Loosen thumb screw and slide foot so needle enters
center of needle hole. Guide metal of zipper along edge
of foot (Fig. 49). Stitching should be close to zipper
to allow easy opening and dosing. Adjust to sew iron
either right or left side, whichever is more convenient.
Fig. .19
Page 40

 Loading...