

Page 1
'TIM, /CSíf
Page 2

IMPORTANT SAFETY INSTRUCTIONS
When using en elec,rice, appliance, basic sale,, precauhons should always be loliowed, including ,be lollowing-
(this appliance).
UMIMVacK —To reduce the risk of electric shock-
™ Jdt;T,y,erul?::dielo1lruT
shock, or injury to
1.
Lrreit positbii ' " s«*tch(located at the bottom of sewing machine) at the
Do not allow to be used as a toy. Close attention is necessary when this appliance is used bv or near rhilrirnn
thTman 'f''. it® intended use as described in this manual. Use only attachments recommended by
the manufacturer as contained in this manual. rs^ummciiueu uy
mdam^n^r “'7 " P“ d damaged cord or plug, i, i, is not working properly, if i, has been dropped
Lmlnalfon reL °.7c, ° '» '"a "aares, authorized dealer or service center lo,
examination, repair, electrical or mechanical adjustment.
5.
foot controller free from the accumulation of lint, dust, and loose cloth. ^
6.
Never drop or insert any object into any opening.
7.
Do not use outdoors.
8.
Do riot operate where aerosol (spray) products are being used or where oxygen is being administered
9.
To disconnect, turn all controls to the off (“0”) position, then remove plug from outlet
10.
Do not unplug by pulling on cord. To unplug, grasp the plug, not the cord.
appliance with any air openings blocked. Keep ventilation openings of the sewing machine and
Page 3

DANGER
1 Always unplug before relamping. Replace bulb with same type rated 15 watts.
2. Do not reach for an appliance that has fallen into water. Unplug immediately.
3. Do not place or store appliance where it can fall or be pulled into a tub or sink.
Do not place in or drop into water or other liquid.
WARNING
1. Keep fingers away from all moving parts. Special care is required around the sewing machine needle.
2. Always use the proper needle plate. The wrong plate can cause the needle to break.
3. Do not use bent needles.
4. Do not pull or push fabric while stitching. It may deflect the needle causing it to break.
5 Switch the sewing machine off ("O”) when making any adjustments in the needle area, such as threading needle,
changing needle, threading bobbin, or changing presser foot, etc.
6. Always unplug sewing machine from the electrical outlet when removing covers, lubricating, or when making any
other user servicing adjustments mentioned in the instruction manual.
7, Never operate on a soft surface such as a bed or couch where the air openings may be blocked.
SAVE THESE INSTRUCTIONS
Page 4

TABLE OF CONTENTS
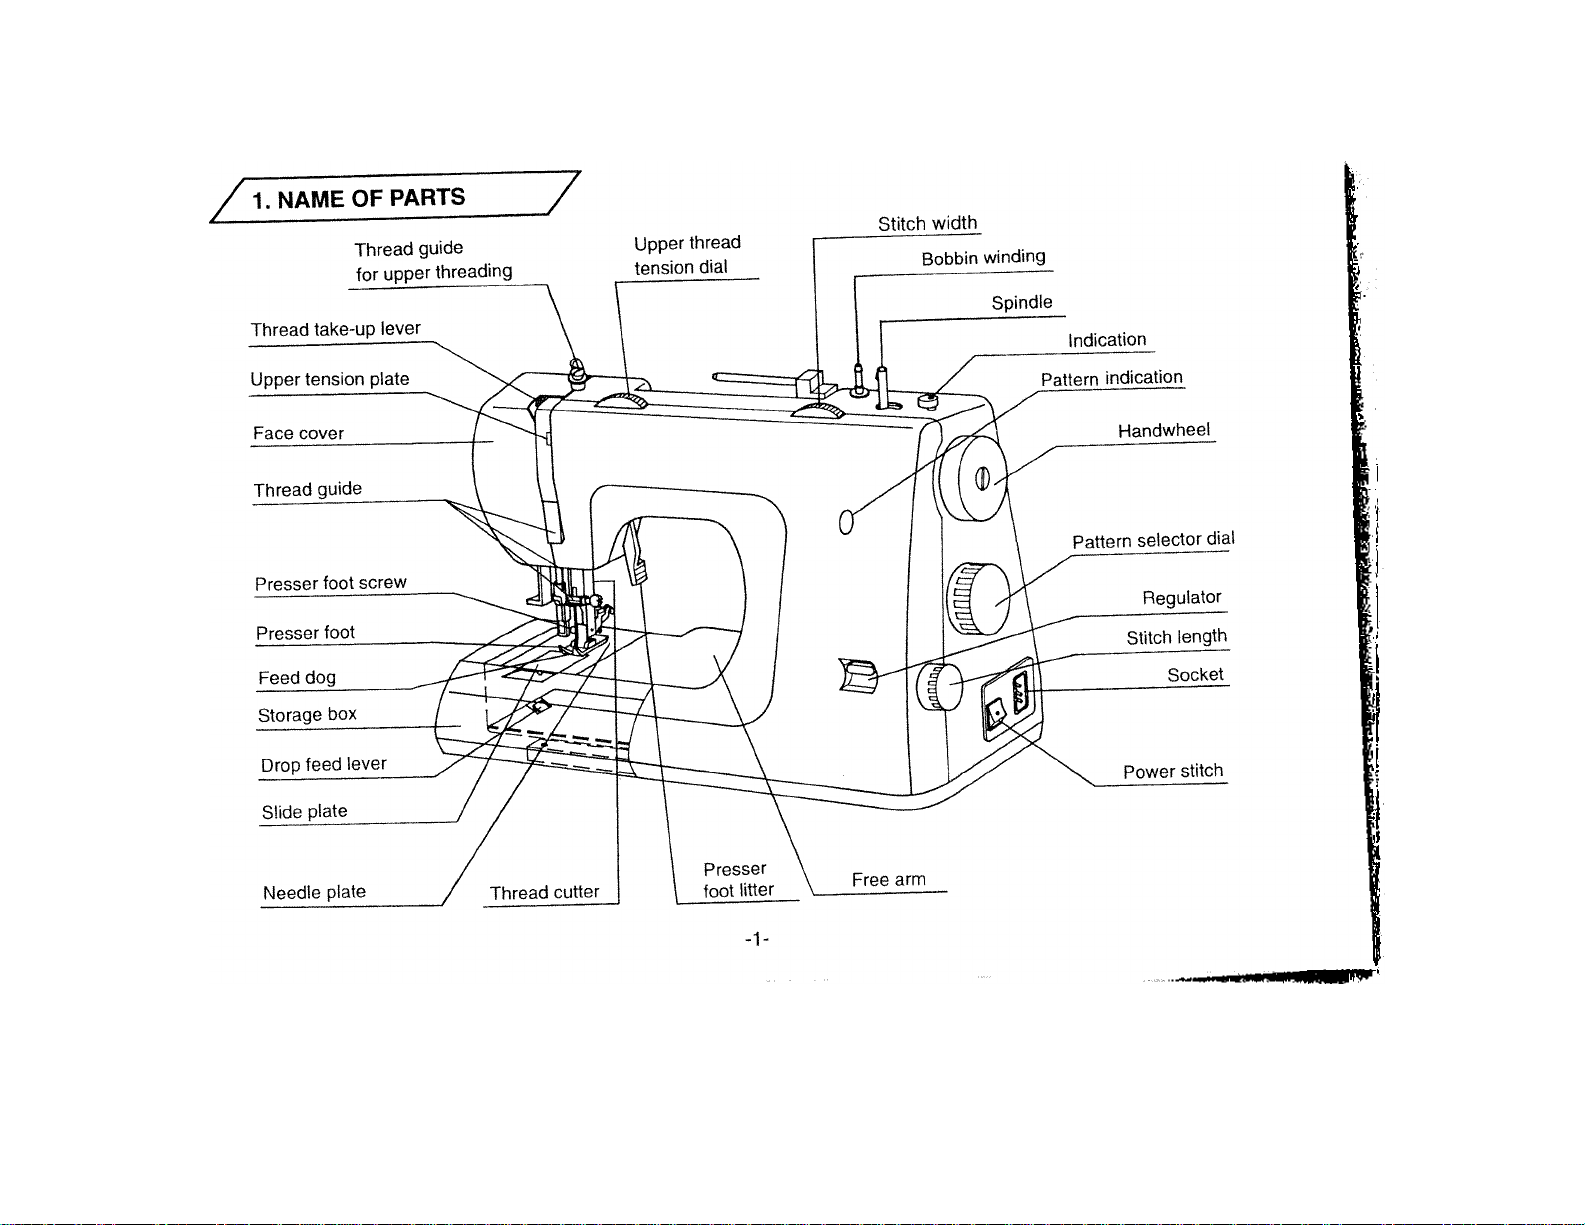
1. NAME OF PARTS........................................................................1
2. ACCESSORIES ............................................................................2
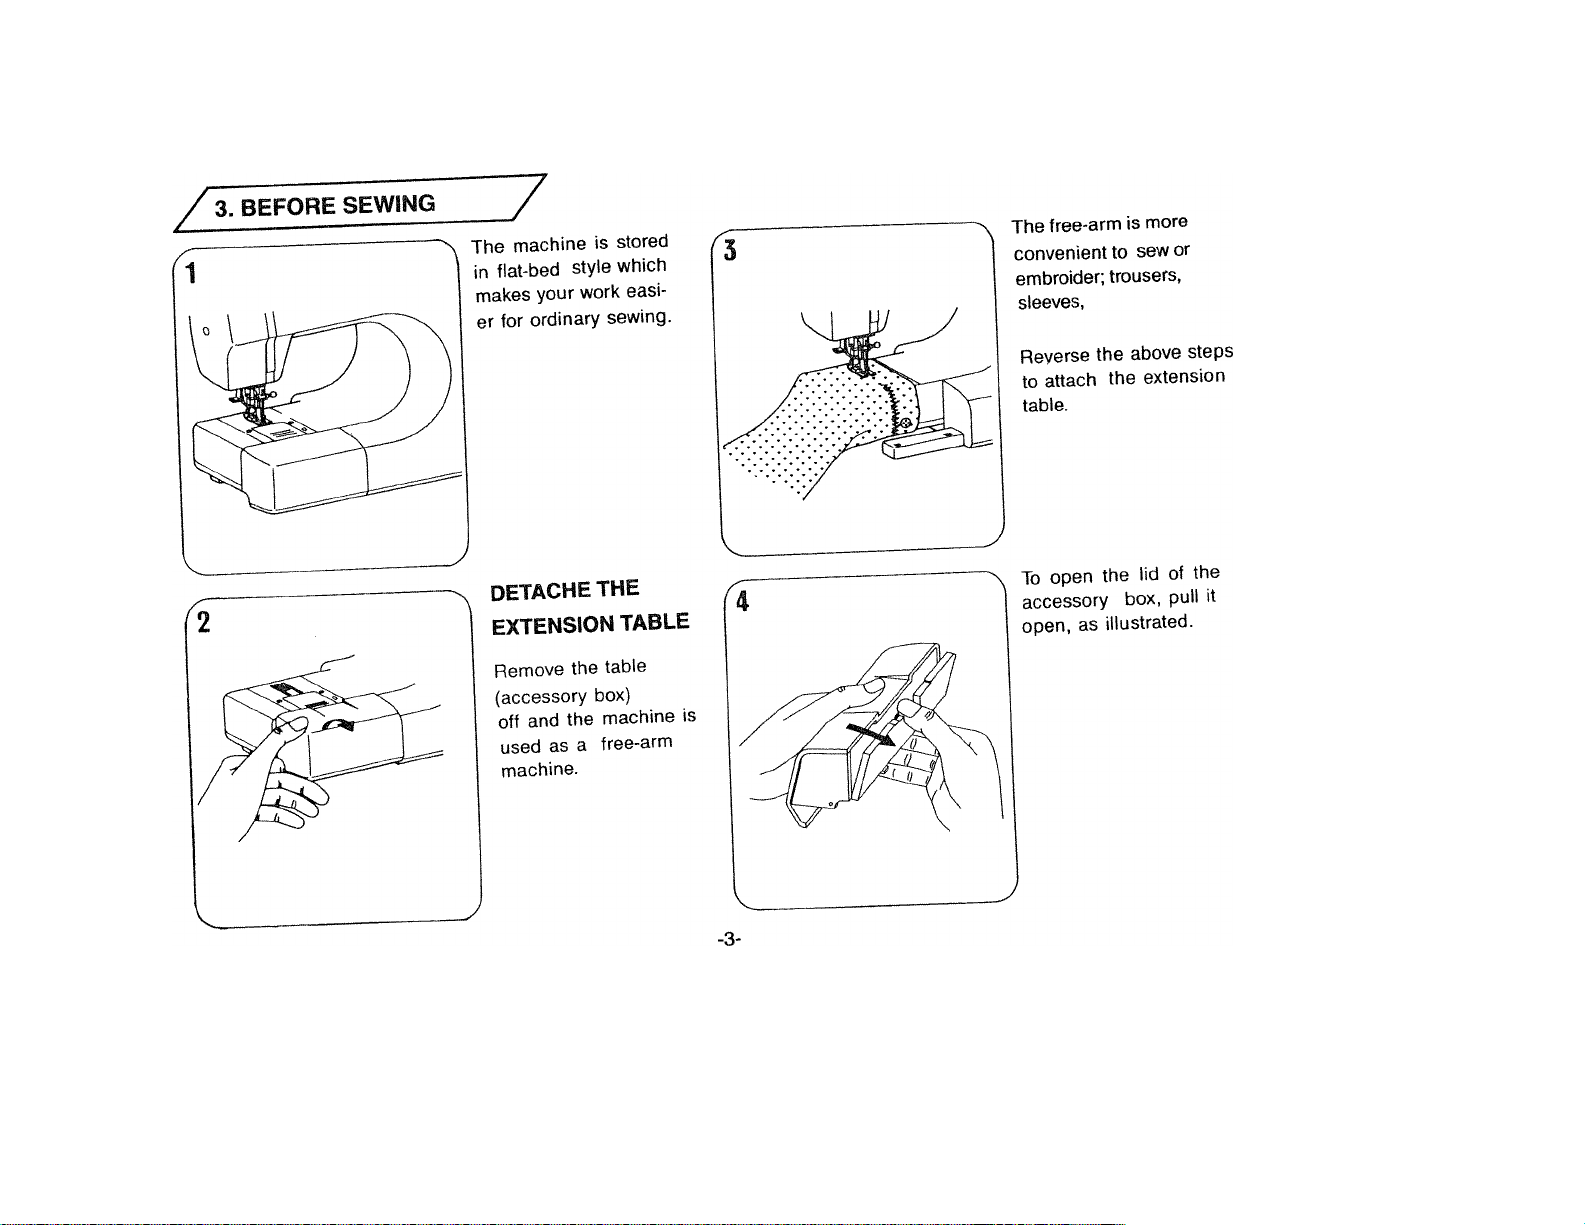
3. BEFORE SEWING
Detachable extension table...........................................................3
Connecting foot controller and power cord
Threading upper thread..................................................................3
Using needle threader....................................................................3
Drawing up lower thread
Trial sewing ....................................................................................®
Adusting upper thread tension
Lower thread tension adjustment
4. STARTING TO SEW
Drop feed lever............................................................................^ ^
Take out the bobbin...................................................................... ''''
Bobbin winding..............................................................................^2
Inserting bobbin............................................................................^3
Changing needle
Fabric, thread and needle table..................................................15
Pattern selection dial....................................................................15
Stitch length dial............................................................................^5
Reverse sewing
Turning a square corner
Stitch width dial.............................................................................
Thick fabric sewing......................................................................'•3
Double presser lifter
......................................................................
...............................................................
......................................................
...............................................
..........................................................................
..............................................................
....................................................................
.................................
16-17
10
14
17
^3
5. BASIC SEWING
Straight sewing............................................................................20
Zigzag sewing
6. UTILITY STITCH
4
^
9
Blind hem stitch...........................................................................21
Overcasting...................................................................................22
Buttonhole sewing...................................................................23-24
Zipper sewing
Mending .......................................................................................26
7. STRETCH STITCH
Overlooking................................................................................... 27
Heirloom stitch..............................................................................28
Feather stitch................................................................................29
Tripple straight stitch....................................................................30
Tripple zigzag stretch stitch
8. DECORATIVE STITCH
Scallop stitch................................................................................32
9. APPLIQUE ...................................................................................53
10. EMBROIDERY............................................................................34
11. MAINTENANCE
Cleaning, oiling
Changing the light bulb...............................................................37
12. TROUBLE CHART................................................................38-39
..............................................................................
...............................................................................
........................................................
.....................................................................
20
25
31
35-36
Page 5
Page 6

2. ACCESSORIES
^(D
Buttonhole foot
(D
Zipper foot
^ Straight stitch foot
Optional accessory.
Accessory may differ from
Bobbins ( 2 pcs.)
©
Oiler
Felts (2 pcs.)
country to country.
@
.....
V—-Jaaaaa» iSmaii;
(large)
Screw drivers
Spool pin Spool pin cap
cap (small) (large)
-2-
D
Buttonhole opener
with brush
-=»==—ip-i—^—,
Ordinary needles
# 14 (3 pcs.)
---------------------------------------------y
Page 7
Page 8
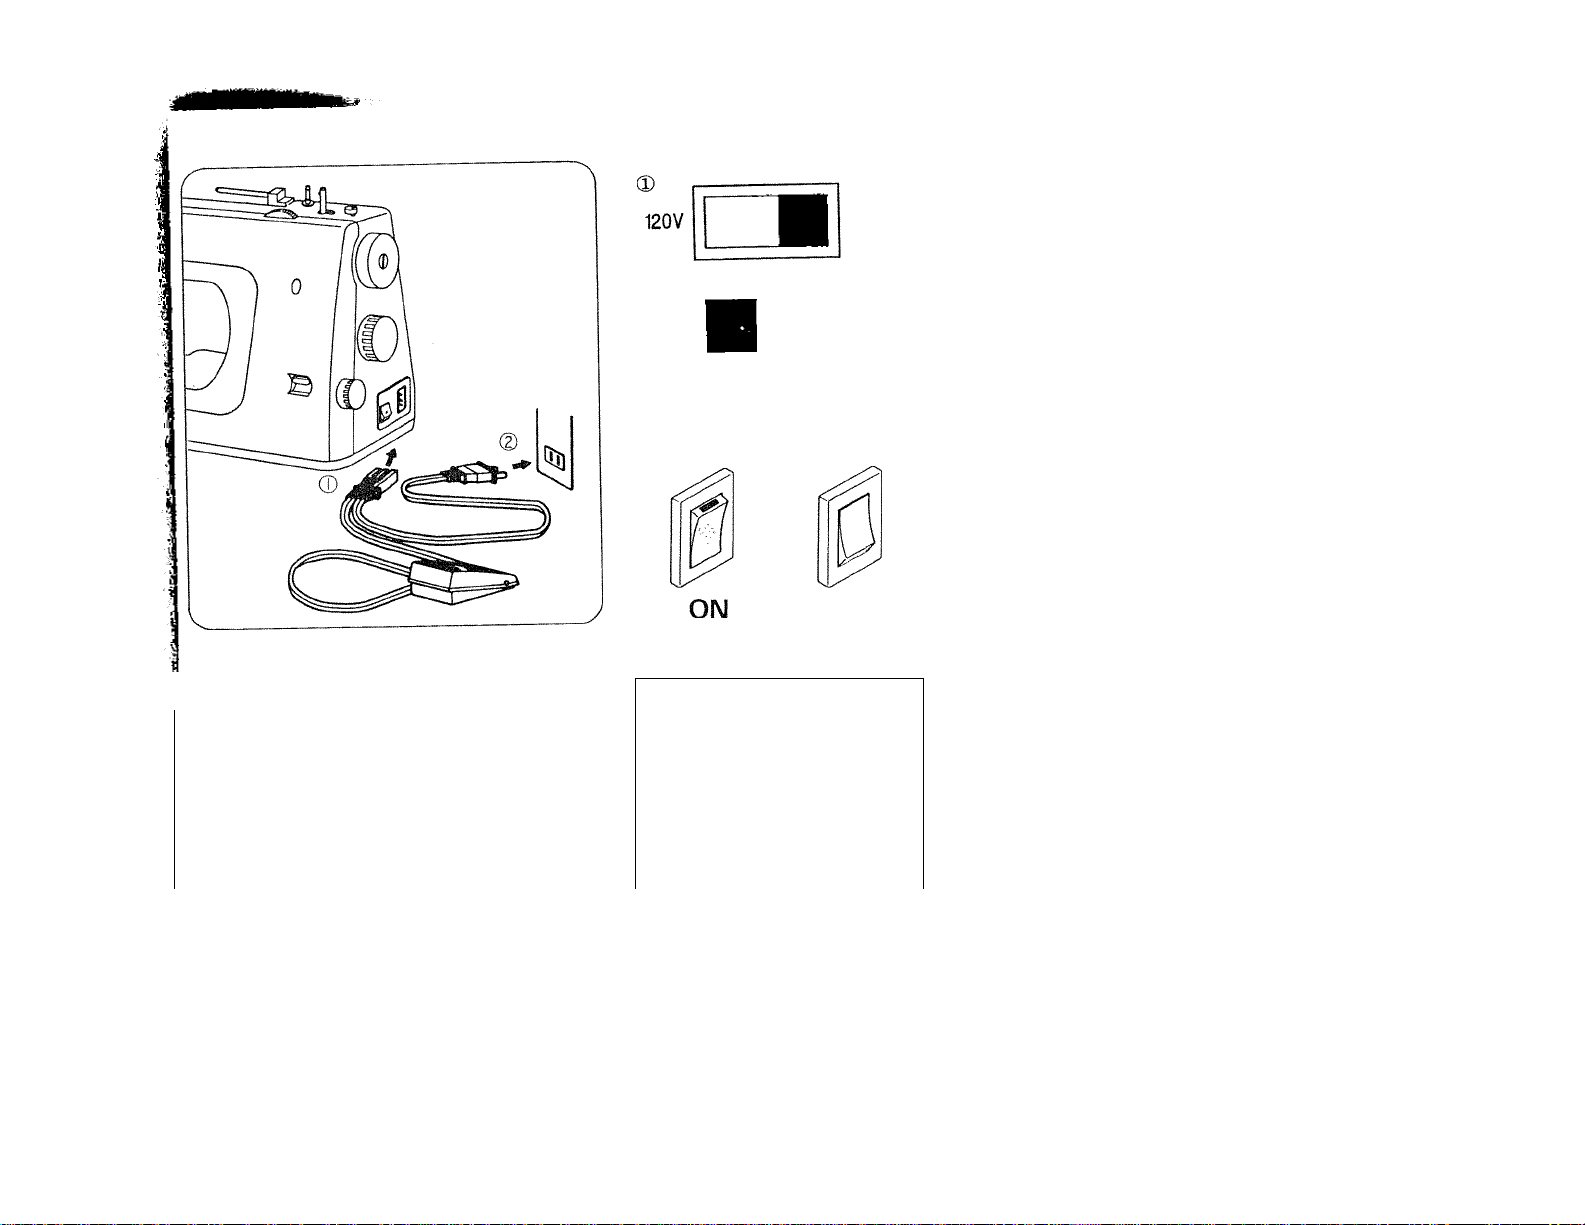
CONNECTING FOOT CONTROLLER
1 AND POWER CORD
f '
120V
OFF
220V
220V
Confirm the socket is 110V or
220V, then be sure the position
of voltage selection Swith correct,
or not? If not, use screwdriver
to adjust the switch.
(DWhen electricity voltage on 220V.
(2)When electricity voltage on 120V.
Switch on, power to the machine
and turn on the sewing light.
Switch off, power off to the machine
and turn off the sewing light.
J
The more you press foot controller,
the faster the machine runs.
Connect foot controller and power cord ®
Before plugging in your machine, be sure that
i the voltage is same as that of your machine.
\ (written on a plate at back of machine)
\
£ y" /
Page 9
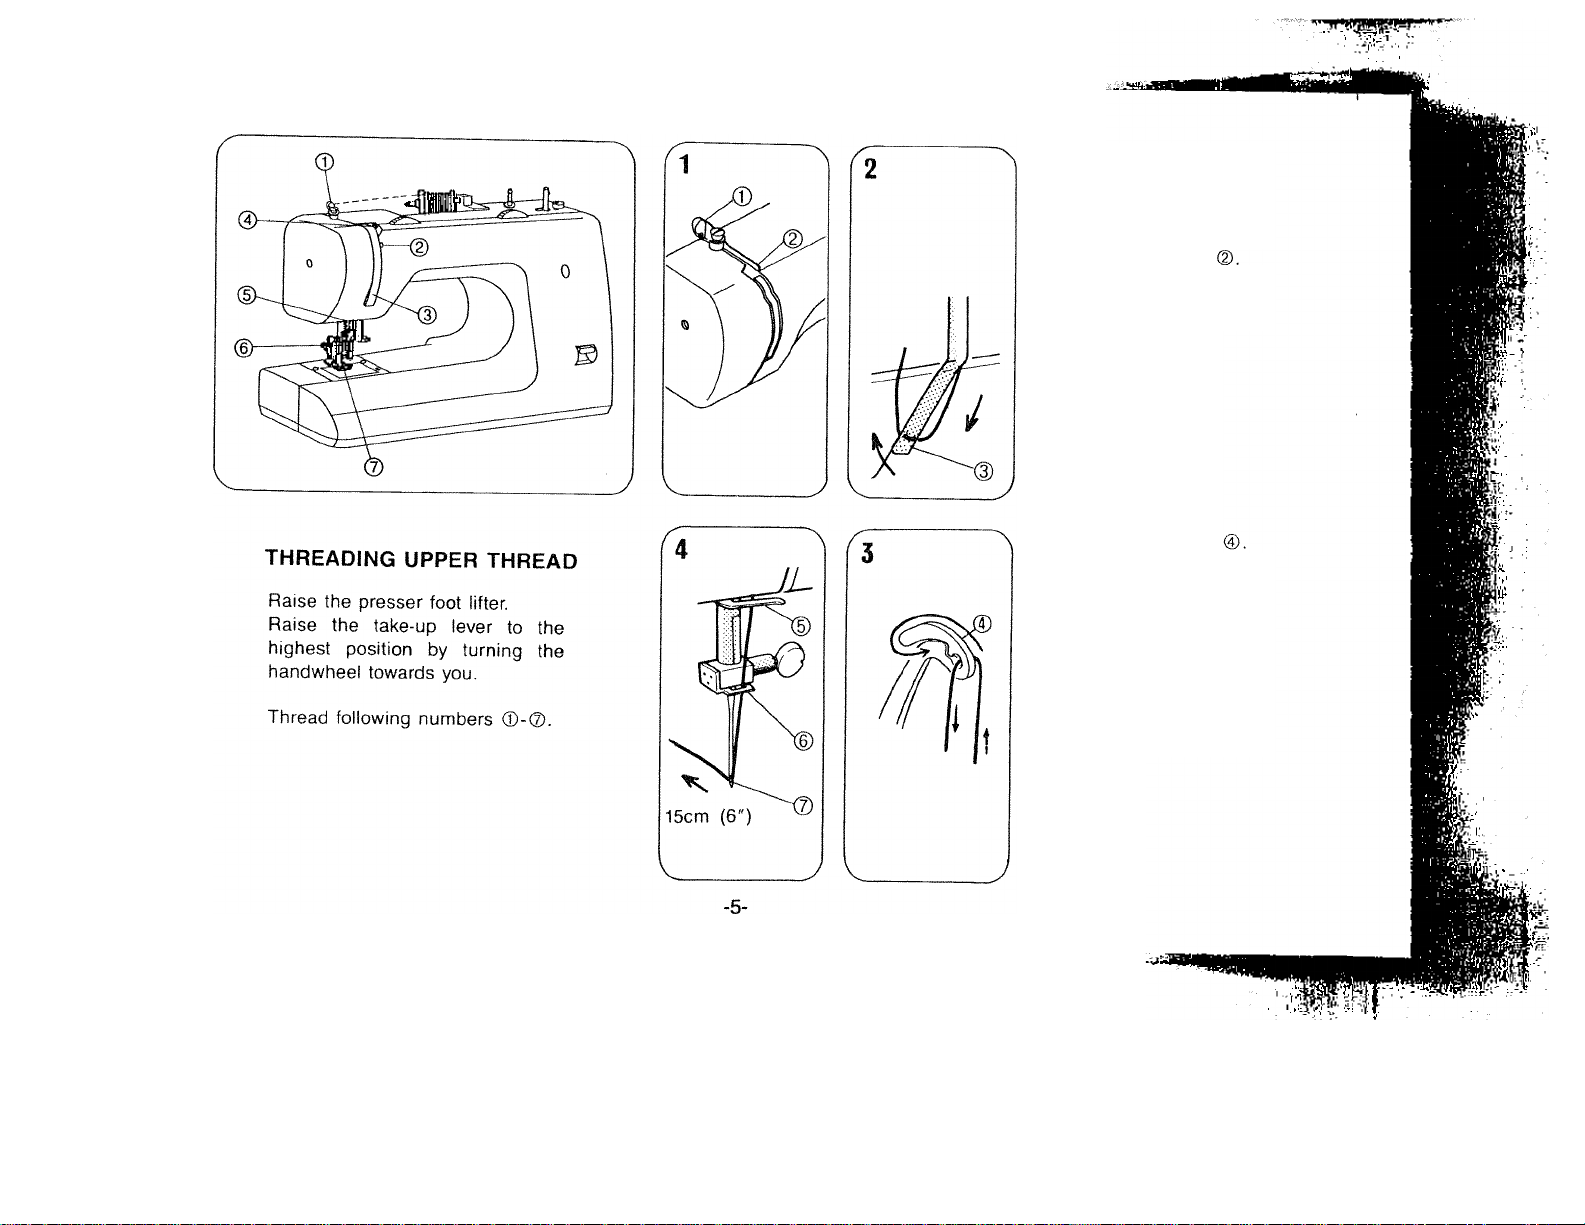
Pass the thread through
guide ©.
Lead thread through either
side of tension disc
Hook the thread under the
guide ® as shown.
Thread take-up lever
Pass thread through thread
guide ®, and thread
guide ® then
through the needle eye
® from front to back.
Allow about 15cm (6") of
thread extra.
Page 10

USING NEEDLE THREADER (When the machine is equipped with a needle threader)
Needle threader
The needle threader can be used to thread the needle
more easily.
Lower the presser foot lever. Make sure the needle is at
highest position.
Lower the threader slightly and position the thread under
the guide.
Release the threader, this causes the threader to deliver
the thread through the eye of the needle.
____________________________________
L
Guide
Move the threader to its lowest position and guide the
thread under the hook to pass through the eye of the
needle.
.
Page 11
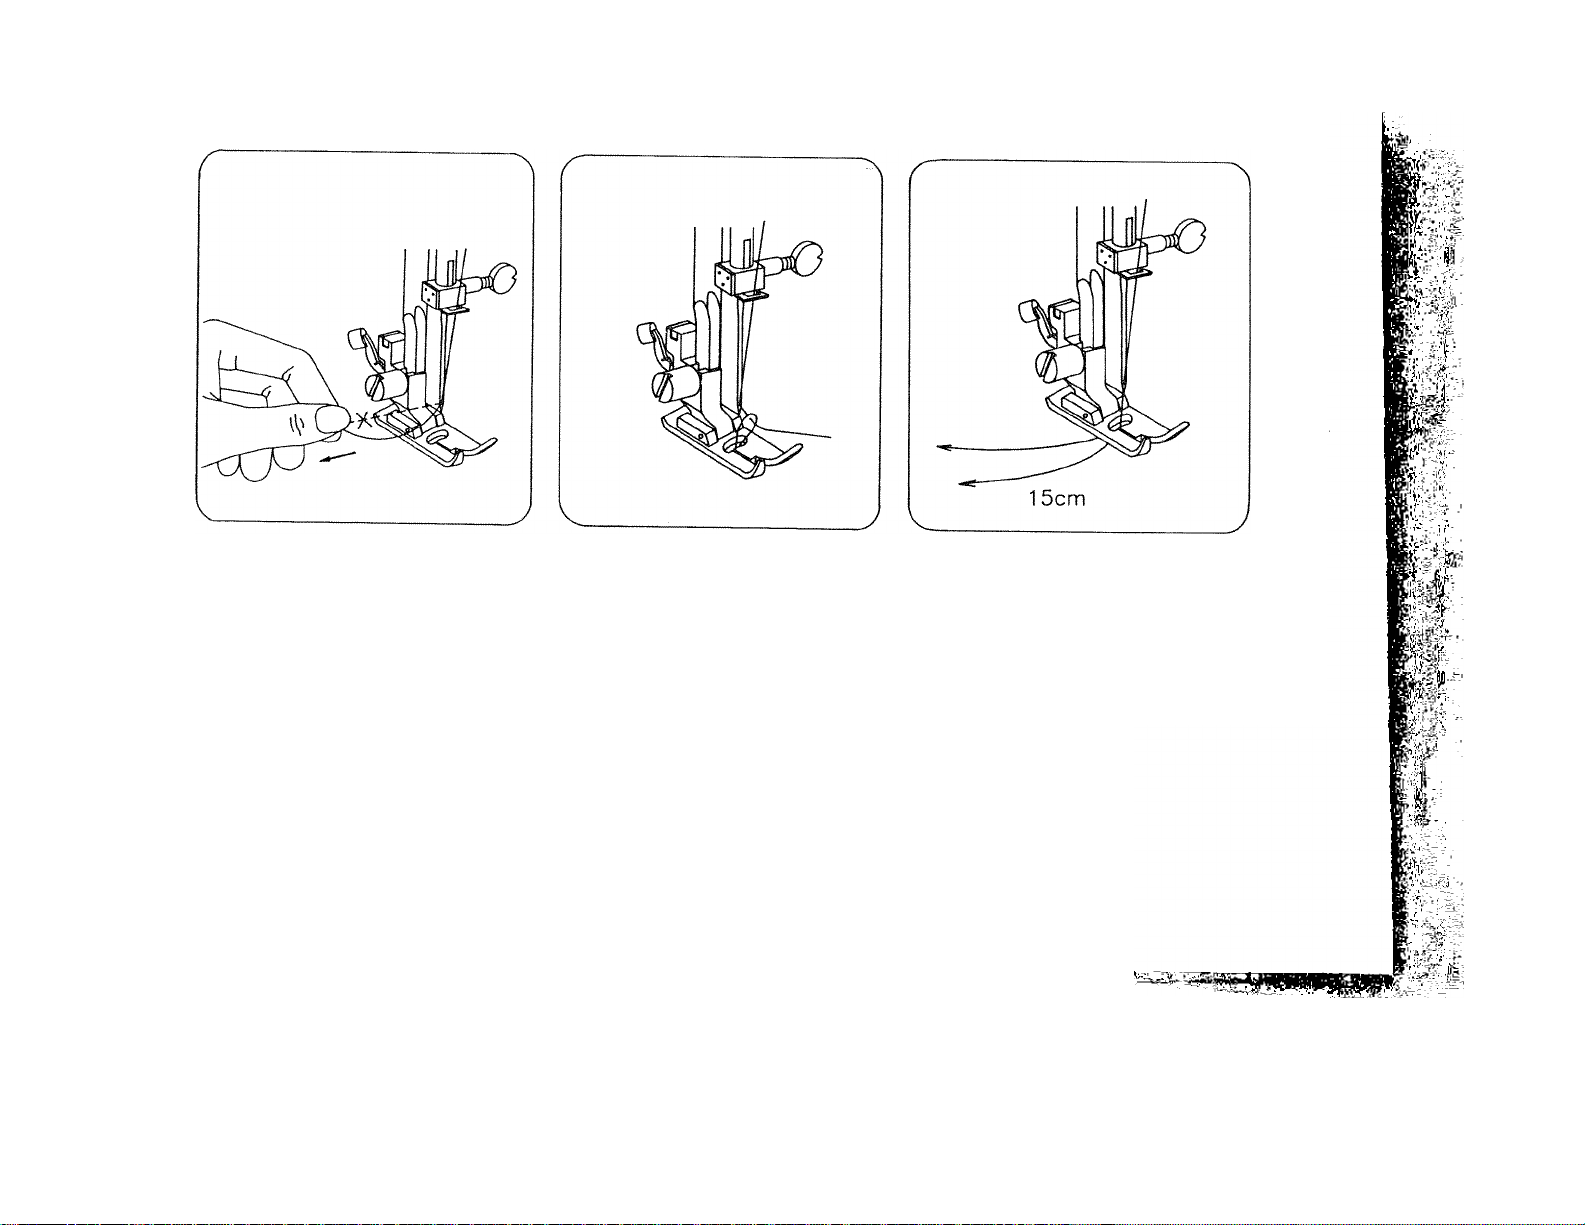
DRAWING UP LOWER THREAD
Hold the end of the upper thread
with the left hand as illustrated.
Turn the handwheel slowly towards
you until the needle moves down
and up again into its highest
position.
Pull the upper thread slowly and
the lower thread will be brought
up in a loop.
Pull out both threads to about 15 cm
(6") and place them together at
the left under the presser foot.
Page 12
° 1
D -
.
J
TRIAL SEWING
Inow that, you have finished the
first steps (page 1-7). you are familiar
with the controls on your machine
and \with the accessories provided
lior the machine you are ready to
start to sew with your new sewing
Imachine.
- Let's try to sew straight stitch. -
|l. Make sure your machine is set
I
completely as illustrated.
?2. Pattern selection dial to { | )■
V
3. Upper thread tension dial to 4.
4. Place fabric under the presser
foot.
4= Fabric should be placed under
the presser foot with the bulk of
the material to the left of the
needle and the right edge of the
material placed on the appropri
ate seam allowance.
5. Lower presser foot lifter.
6. Press foot controller lightly and
commence forward sewing guid
ing the fabric by hand as it is fed.
Never push or pull the material.
-8-
* The more you press the foot
controller, the faster the machine
runs.
7. Draw out fabric to left when sew
ing is finished.
* Always finish sewing each seam
with the needle at its highest
position. ^ ^ ,
* Leave at least '15cm (6") of thread
behind the needle so that :t will
not be drawn out of the eye of
the needle when next sewing.
8. Cut threads with thread cutter
behind the presser bar.
Page 13
ADJUSTING THREAD TENSION
Test stitch performance on a scrap
of material you are going to use.
With correct tension { @), upper
and lower threads tension is equal
and strong enough to lock both
threads in center.
If upper tension is too tight (loose),
upper (lower) thread lies straight
along upper (lower) surface of fabric
( ®' © )■ Correct by turning
tension dial.
* Always check the balance of
upper and lower tensions by test
sewing using fabric, needle,
threaj and stitch pattern you
plan to use.
(Correct combinations are
described on page 13.)
-9-
Page 14
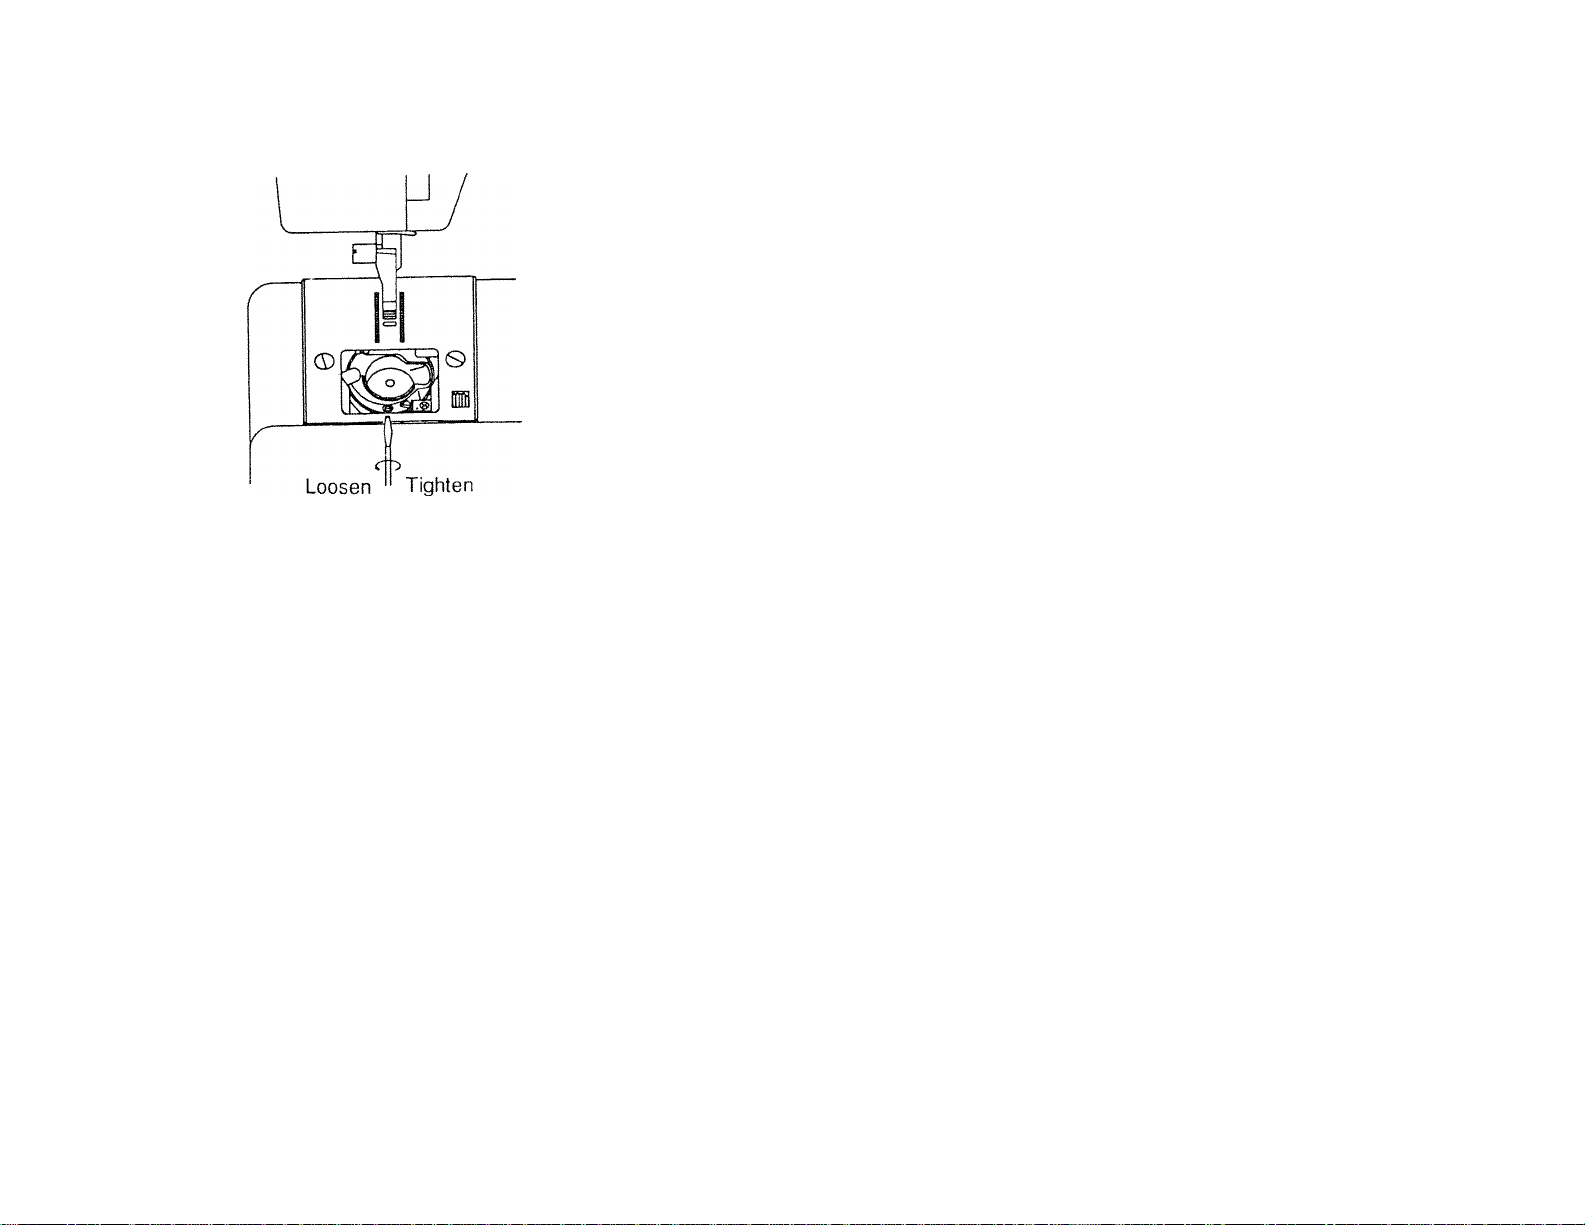
LOWER THREAD TENSION ADJUSTMENT
I.Open the hinged latch of the
bobbin case and pull the bobbin
case out of the rriachine.
lipsiii!»
-10-
Page 15

/ 4. STARTING TO SEviT
Drop Feed Lever
-AAA-
0 Push lever in direction
of arrow. Engage
feeding for normal
sewing
“AAA~
@ Push lever in direc
tion of arrow. This
position is used for
button sewing, damn
ing and embroidery.
A TAKE OUT THE BOBBIN
1. Trun hand wheel toward
yourself for set needle
on the highest position.
2. One side place the hand
on left side of slide plate
another side press the
release button to right &
take out the slide plate.
-11-
Page 16

BOBBIN WINDING
Pull up spool pin.
Put spool on spool pin. Draw thread from spool
pin through thread guide.
Push bobbin towards handwheel and press
down foot controller.
Do not put your fingers near needle as needle
may move a little when starting to wind bobbin.
Never push spindle towards handwheel while
sewing.
When bobbin winder spindle at right position,
handwheel does not turn by hand.
Page 17

Pull the thread about 10cm,
then cover the slide plate.
Fi:
r,;
ir
I
i...
Page 18

CHANGING FOOT
Raise presser foot lifter.
Set needle in the highest
position by turning handwheel towards you.
CHANGING NEEDLE
Set the needle in the
highest position by turning
the handwheel towards
you. Loosen needle clamp
screw and take out nee
dle. With the flat side
away from you, insert a
new needle into groove of
needle bar.
Push needle into clamp
until it reaches stop
per @ and tighten
needle clamp screw
firmly.
(DPush lever of holder
towards you and foot will
come off.
(b) Position a new foot by
aligning holding groove of
shank with pin of foot.
Lower presser foot lifter
so that holder catches
presser foot.
Always use a straight
needle with a sharp
point.
Using defective or worn
needles not only causes
stitch skipping, breakage
of needles or snapping
of thread; it also can
damage shuttle and
needle plate.
Note: Always use needle
type 15x1/705
-14-
Page 19

FABRIC, THREAD AND NEEDLE TABLE
FABRIC
VERY SHEER: Lace, \*ile, Chiffon, Net
SHEER: Blouse Crepe, Lawn, Organdy, Taffeta
LIGHT-WEIGHT: Crepe, Wool, Brocada, Velvet
MEDIUM: Wool, Silk, Linen, Velveteen, Cotton
HEAVY: Denim, Duck, Sailcloth
IKNITS)
LIGHT-WEIGHT: Tricot
MEDIUM-WEIGHT; Jersey, Double Knit,
HEAVY-WEIGHT; Double knit
FAKE-FURS, VELOURS
(LEATHER]
VINYLS FILMS
lightto-medium- weight
HEAVY LEATHER
(DECORATIVE TOUCHES]
TOP STITCHING
MACHINE EMBROIDERY
European
Cotton
70
50-70
30
30
30
50-70
30
30
30
30
30
30
Silk twist
Size 50-70
THREAD
Mercerized
Cotton
60
60
50
50
Heavy Duty
60
50
50
Heavy
Duty
50
50
Heavy Duty
Cotton
Covered
Polyester,
Silk, Nylon
Silk Nylon
Silk Nylon
Silk
Silk
C.C.Poly.
Silk
Nylon
Silk Nylon
C.C.Poly.
Silk Nylon
C.C.Poly.
C.C.Poly.
C.C.Poly.
C.C.Poly.
C.C.Poly.
European
705
65-70
65-70
75-80
80-90
too
70
70-80
80-90
90-100
90
90-100
100-110
100-110
65-80
NEEDLE
U.S.Size
15x1
9
9
11
11-14
16
9
9-10
11-14
14-16
14
14-16
16-18
16-18
9-11
Point
style
Regular
Wedge
Wedge
Wedge
Regular
Regular
REMARKS
Loosen up
per tension
one or two
points
-15-
Page 20

a
\nm ' <
U U i ^ ^
X.
PATTERN SELECTION DIAL
Turn dial to choose pattern.
Dial can be turned either to up or to down.
* Always make sure needle is in the highest
position when operating dial.
Ill
III
III
III
STITCH LENGTH DIAL
For a longer stitch, turn it
up. For a shorter stitch,
turn it down. For normal
sewing, it is set between
2 and 3.
REVERSE SEWING
(Starting to sew)
Place fabric under foot
about 1 cm (0.4") inside
the edge.
Lower presser foot lifter.
(Reverse sewing)
To reinforce seam, sew
backwards to the edge
of fabric by pushing
reverse sewing button.
Release button and
commence forward sewing
guiding fabric by hand as
it is fed.
Never pull material.
-16-
Page 21

V
J
Sew reverse stitches for reinforce
ment at end of seam.
Draw fabric to left when sewing is
finished.
-17-
TURNING A SQUARE
CORNER
To turn a square corner 1.6cm (5/8")
from the fabric edge, stop stitching
with the needle tip piercing the
fabric, when reaching the cornering
guide as shown. Raise the presser
foot, turn fabric. New stitching line
will align with 1.6cm (5/8") seam
guide on side of needle plate. Lower
the presser foot and begin stitching
in new direction.
Page 22

STITCH WIDTH DIAL
The stitch width may be adjusted by the stitch width dial or
sTcrS°" "“■* 'o »^e
THE HIGHER THE NUMBER, THE WIDER THE STITCH.
-18-
Page 23

Direction of needle
I
Direction of cloth
:i^
THICK FABRIC SEWING
(Particularly denim)
For thick fabric sewing, it is impor
tant to follow the instructions
carefully.
Make sure that the sewing is set
flat. Needle must be perpendicular
to the seam so that it penetrates
the cloth properly.
Direction of needle
Direction of cloth
K
Improper setting causes deflection
and possible breaking of the nee
dle. For sewing of very thick cloth,
sew gently, maintaining the cloth
perfectly by hand.
Breaking a needle is not a mechan
ical problem, but simply misuse.
DOUBLE PRESSER FOOT LIFTER
In order to obtain a larger opening
when using very thick materials,
firmly push presser foot lifter up as
far as it will go.
-19-
Page 24

5. BASIC SEWING
7
The desired stitch will be obtained
by turning the Pattern Selection
Dial.
^ When operating the selector,
make sure that needle is in the
highest position.
STRAIGHT SEWING
Set machine as shown.
ZIGZAG SEWING
Set machine as shown.
To prevent seam ends unravelling,
set machine for straight stitch and
sew in reverse at beginning and
ending of seam.
3 kinds of zigzag patterns can be
selected as shown.
Stitch
Selector
ww
VW
W
Zigzag
Width
2mm
3mm
5mm
Stitch
Length
1mm
2mm
4mm
Thread Tension for Zigzag Stitch
Better-looking zigzag stitching
requires less upper tension than
straight stitching.
Loosen upper tension slightly.
-20-
Page 25

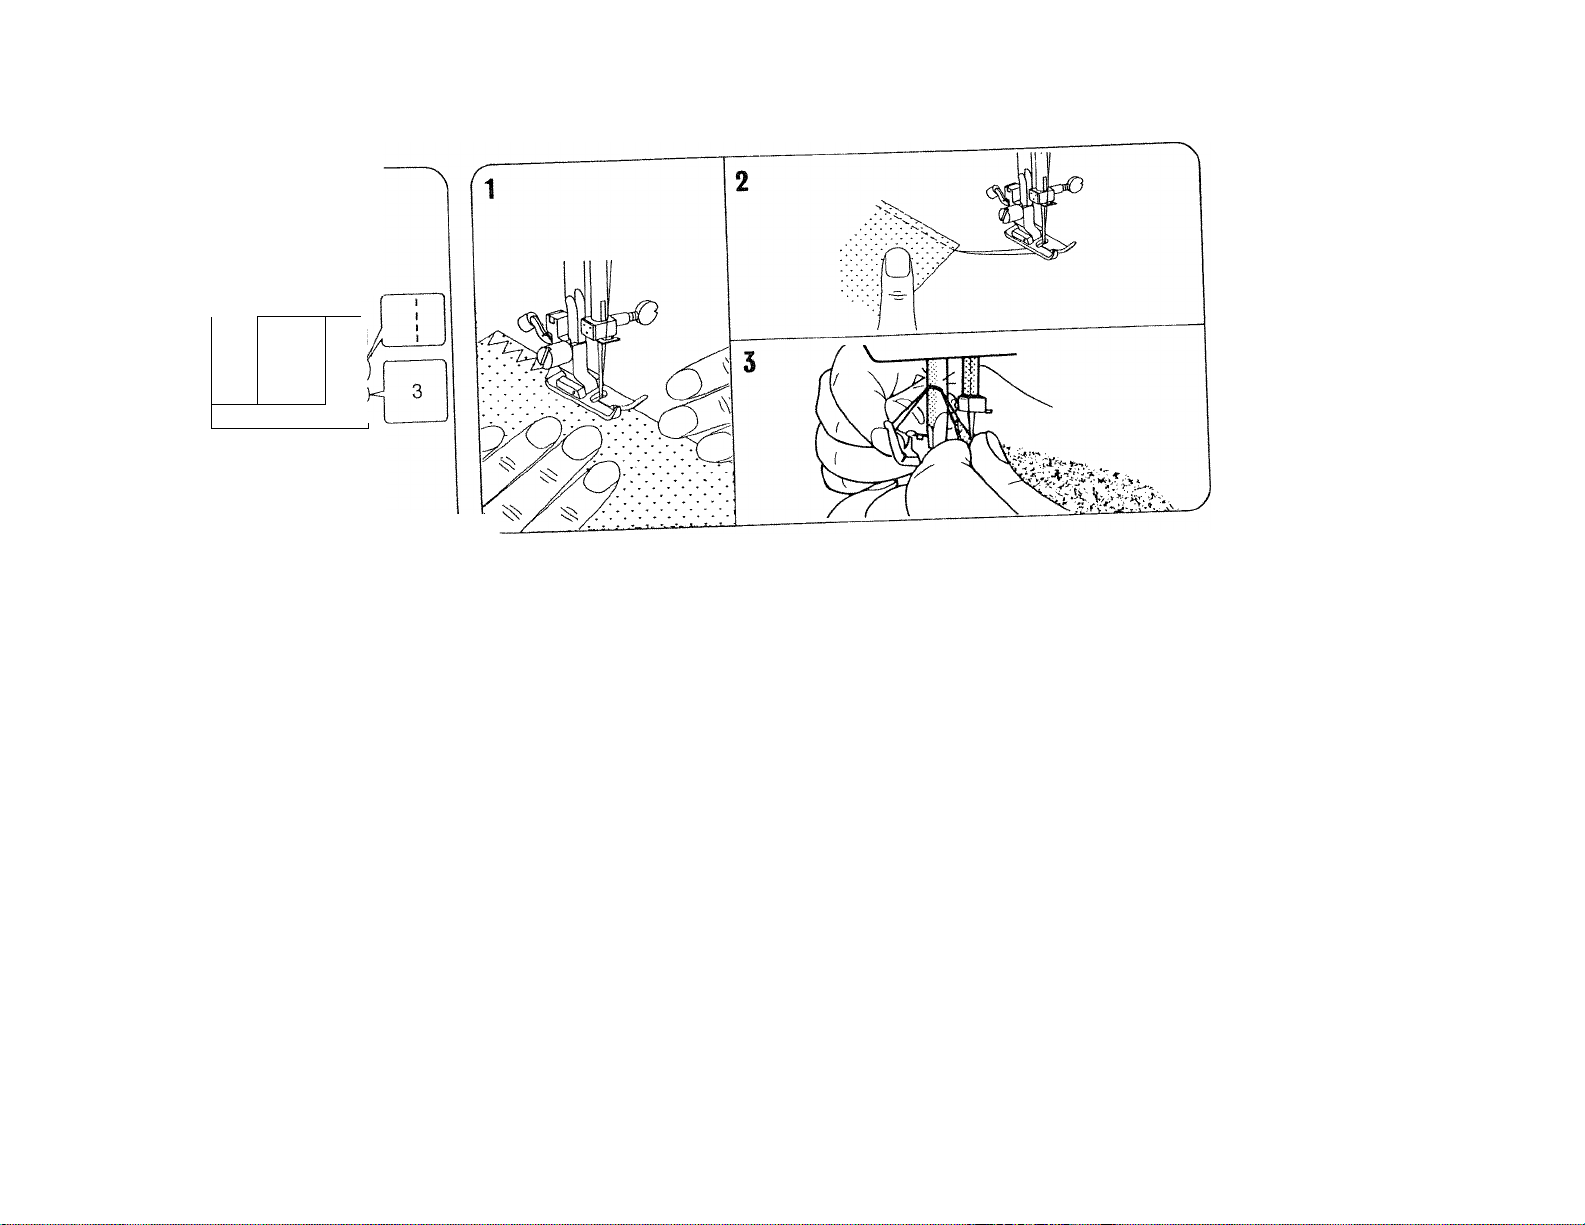
Fold material as shown and place
it under foot.
For a neater finish, it is preferable
to baste or iron hem beforehand.
Sew carefully, so that straight
stitches are made on hem edge,
and slanting stitches pierce only one
or two threads of fold.
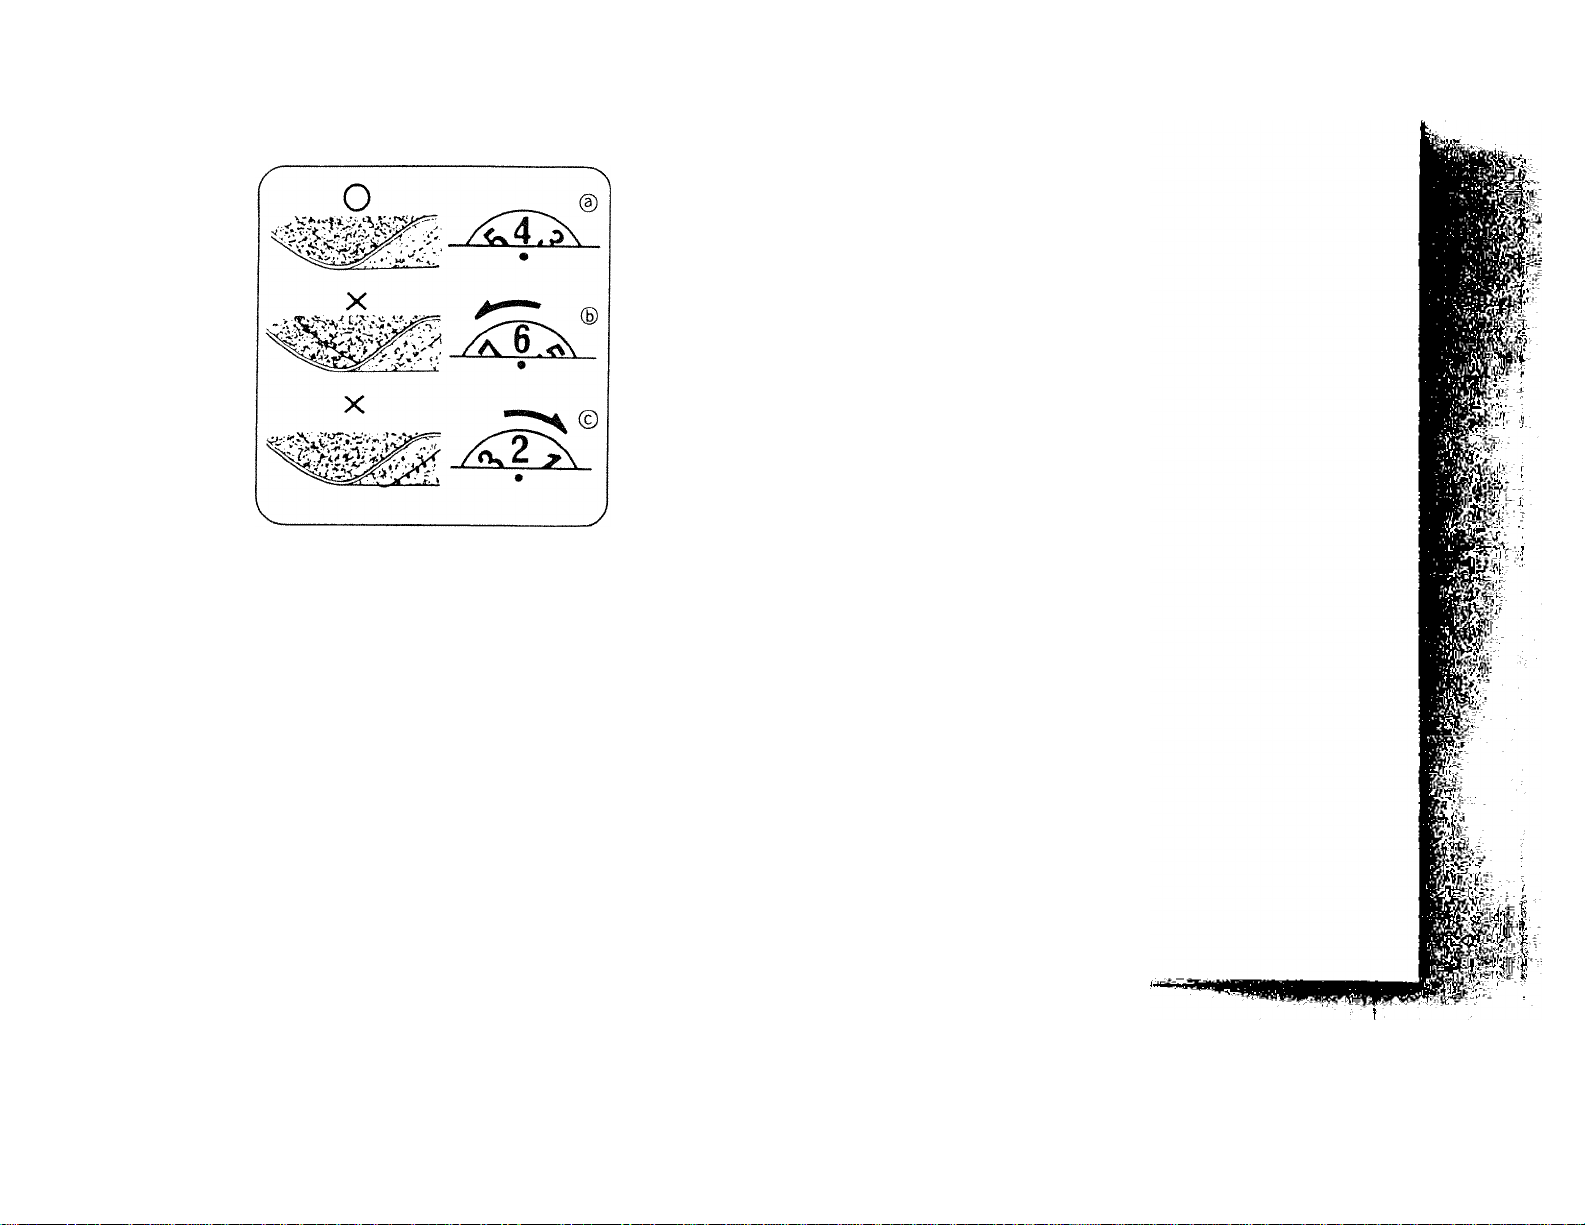
(D Correct seam.
(D Needle is catching edge of fold
too much.
© Needle is not catching edge of
fold at all.
Page 26

OVERCASTING
For light weight material:
Set machine on zig zag as shown
Overcasting prevents edge of fabric
from fraying and produces neat
finish.
Place the seam allowance under
the presser foot with the edge of
the seam in line with the side of
the presser foot as illustrated.
Trim the fabric to the stitch line.
-22-
For thick and elastic, and also
very fine material:
Set machine on tricot stitch as shown
Sew in the same way as above.
Page 27

BUTTONHOLE SEWING
SET SIZE OF BUTTONHOLE
Pull the buttonhole holder to the back
until the end, place the button in it,
push the stopper backwards trapping
the button in between the buttonhole
holder and stopper, and fully tighten
by fixing the screw. Remove the
button.
ATTACH BUTTONHOLE FOOT
Draw up the lower thread.
Pull the thread of the needle thread through
the needle hole of the buttonhole foot, attach
the buttonhole foot and draw both needle
thread and lower thread to the left. Insert the
fabric under the foot, and lower the needle
at the starting point.
Than lower the buttonhole foot.
Page 28

Bar tacking: Set pattern selection
dial( I ) and sew 5-6 stitches.
Bar tacking: Change pattern to
( Q ) and sew 5-6 stitches. ,
Right Side: Change pattern to ( Q )•
Sew side from front to back until it
reaches the end line.
Adjusting The Density
Adjustment of the density of the
stitches may be required according
to the different kinds of fabrics.
-24-
Left Side: Change pattern to ( |j )■
Sew left side from back to front until
it reaches the end line.
r
Cutting Buttonholes
Stick a needle or pin through bar
tacks to prevent over-cutting.
Cut buttonhole along center with
buttonhole cutter.
Page 29

ZIPPER SEWING
Set machine as shown.
By using a special zipper foot,
zipper sewing can be easily done
without turning the fabric.
Set zipper foot on the right of the
needle.
Sew right side of zipper guiding
fabric carefully so that right side
teeth of zipper are parallel with left
edge of foot.
-25-
Re-set zipper foot to the left of the
needle.
Sew left side of zipper in the same
way.
Page 30

MENDING
Set machine as shown.
Place the patch over the worn part.
Pull thread ends toward back or left
when starting sewing. Sew along
the edge of the patch on the right
side. Trim away the worn part close
to the seam on the wrong side.
-26-
Mending a Rip
Set machine in the same way as for
patching.
Sew the edges of tear together first.
Then sew two more seams on either
side.
A piece of gauze can be placed
underneath to reinforce the rip.
Page 31

ft
7. STRETCH STITCH
OVERLOCKING
Overlooking stitches make it possi
ble to sew and overcast seams at
the same time.
Set machine as shown.
Put two pieces of cloth together
with right sides facing and sew.
To prevent edges from fraying, sew
so that right side stitches drop
outside the edge of material.
In some case overlooking stitches
can be used for overcasting.
ft
Sfk-
IvO
-27-
Page 32

HEIRLOOM STITCHES
Set machine as shown.
These are versatile stitches
for decoration and
embroidery.
1. Always make a practice design on a scrap
of the fabric you plan to use.
2. Start with a full bobbin and plenty of thread
on the spool to avoid running out of thread
in the middle of your design.
3. Reduce the top thread tension slightly.
4. On a very soft fabric you may want to use
a tissue paper backing or organdy that can
be cut away afterwards.
-28-
Page 33

FEATHER STITCH
Set machine as shown.
Use the Feather Stitch as a decorative
top stitch or when hemming blankets,
tablecloths or draperies or when
embroidering.
1. Place the fabric right side up and sew 1 cm (3/8“)
from the edge of the fabric.
2. Trim close to the stitching.
The stitch will prevent the fabric from unravelling.
-29-
Page 34

TRIPPLE STRAIGHT STITCH
Set machine as shown.
Tripple straight stitch is as
reinforced straight seam, which
can be used for joining seam in
stretch fabrics.
Reinforced straight stitch is
stronger than ordinary straight
stitching.
Reinforced straight stitch is also
preferable for sleeve insertion and
for crotch seams which are subject
to considerable strain, even in non
stretch fabrics.
-30-
Page 35

TRIPPLE ZIGZAG STRETCH STITCH
Set machine as shown
This stitch can be used to sew
heavy weight stretch fabrics
whenever a zigzag stitch could be
used. The triple zigzag stretch
stitch can be also used as a
decorative stitch.
-31-
Page 36

8. DECORATIVE STITCH
^ r
SCALLOP STITCH
Set machine as shown
Scallop stitch may be used as a
decorative edging. Sew the scallop
stitch along the edge of the
material. If desired, trim around the
scallop with scissors to create a
scalloped edge. Be careful not to
cut the thread.
-32-
Scallop stitch may be also used on
decoration of women's blouse.,
curtains and bed-clothes.
Page 37

Draw design on material to be
used as an applique and cut it oub
Place cut-out on base material and
baste it.
Sew around the outline with zigzag
stitch adjusting stitch length and
width according to shape and size
of cut-out and type of base material.
To change direction at corners, or
to sew very small circles, stop
machine, positioning needle just
away from edge of cut-out. U t
presser foot and turn material.
Lower presser foot and continue
sewing.
Page 38

10. EMBROIDERY
Set machine as shown.
Remove foot, and holder screw.
To avoid lower thread being pulled up,
reduce upper thread tension.
^ i
Pull up lower thread by turning handwheel towards
you while holding upper thread lightly.
Lower presser foot lifter.
Grasp lower thread then make two or three stitches,
snip off excess threads.
J
The lever © is in the right side of shuttle cover.
For normal sewing, push the lever tO-AAA-position.
To lower feed dog, push the lever to-^AA"
position.
This position is used for button sewing, darning
and embroidery.
Start sewing along outline of design with satin stitch.
Continue sewing with guiding hoop by hand.
To finish filling, sew several straight stitches.
Lay typewriting paper underneath when embroider
ing sheer fabric.
-34-
Page 39

11. MAINTENANCE
(Important) Disconnect power supply before carrying out for maintenance on machine.
’ Your machine requires regular cleaning and oiling for satisfactory sewing perfoirnance.
A machine which is used for a few hours a day needs to be cleaned and oiled once
a month.
CLEANING
Remove foot and needle.
Remove needle plate.
Brush off all dust and
lint on feed dog with a
cleaning brush.
-35-
Page 40

CLEANING SHUTTLE RACE
Lift up the bobbin case as picture
shown, the bobbin case is than taken
out.
touch the reverse stopper and put in
the bobbin case.
Clean shuttle with brushes.
slide plate.
-36-
Apply few drops of oil to the part of
shuttle where friction occurs.
Page 41

CHANGING LIGHT BULB
Unplug the machine
Loosen the screw ® as shown and
open face cover as shown.
Remove the bulb by unscrewing it
in a counterclockwise direction.
Install a new bulb by screwing it
in clockwise.
-37-
Page 42

f PROBLEM
Breaking upper
thread
PROBABLE CAUSE
• Incorrect threading
• Thread jams inside the shuttle.
• Incorrect needle inserting.
• Upper tension too tight.
• For the fabric used, the thread is too thin.
CORRECTION A
P.5
Remove thread
P.14
P.9
P.15
Breaking lower
thread
Skipping stitches
The material
puckers
The thread makes
loopers
• Thread not wound sevenly on the bobbin or not drawn up correctly.
• Lower thread tension too tight.
• Lint stuck in the bobbin case and inside the tension spring.
• Needle not fully inserted.
• Needle bent
• Size or type of needle and thread not suitable for the material.
• Incorrect upper threading.
• Too much oil on the shuttle.
• Upper or lower thread tension too tight.
• Stitch too long for mterial
• Thread too thick
• Incorrect threading of upper or lower thread.
• Incorrect setting of bobbin case
• Incorrect threading.
• Unbalance tension of upper and lower thread.
-38-
P.12 P.13
P.10
Remove lint and
clean coit a brush.
P.14
P.14
P.15
P.5
P.36 and remove
excess oil.
P. 9 P.10
P.16
P.15
P. 5 P.13
P.36
P.5
P. 9 P.10
Page 43

^he material not fed
correctly
• Incorrecting setting of stitch length.
» Lint on the feed dog.
P.16 ^
P.35
Breaking needle
Heavy torque or
noise
Machine doesn't run
V
For any other problems occured, or exchange of the parts, please consult with your dealers, or stores from which machines are
purchased.
• Needle not correctly inserted.
• Needle bent
• Needle clamp screw too loose.
• Upper thread tension too tight.
• Needle too fine for the material.
• Dials have been changed while needles was down on the material.
• Lint inside the shuttle race.
• Lint on the feed dog.
• Power plug is not plugged correctly.
• Bobbin winder spindle is on right position, (under bobbin winding position)
• Thread jams inside the shuttle race.
........................................
...
...................................................................... ...................................
P.14
P.14
Tighten needle
dame
P.9
P.15
Exchange needle
P36
P.35
P.4
P.12
P.36
____
J
-39-
Page 44

760000001
 Loading...