

SINGER W1600 User Manual
MSTRUCTION MANUAL
rpe^.
\\T%
MODEL 1600

INTRODUCTION
THANK YOU FOR CHOOSING OUR OVERLOOK MACHINE'
This overlock machine can stitch dependable seams on all kinds of fabric, both light and heavy,
including cotton, wool, rayon, tricot, jersey, and knits.
You do not need a special table for this portable machine.
We suggest that you read this instruction manual carefully before you start to operate the
machine.
;:S;:W;li
■■■
■ :-V-5
; ¿-::i
FOR YOUR SAFETY
1. Keep your eyes on the needles when operating the overlook machine. Do not touch the
handwheel, the cutter or the needles when the machine is running.
2. Turn off the power switch,and pull out the plug from electric socket in the following cases;
‘When you have finished your sewing.
‘When you leave the serger temporarily.
‘When replacing the parts.
‘When cleaning and adjusting the machine.
.................... .................
' '
.......
.
BEFORE YOU USE'
1. Wipe dust and oil off the machine to avoid any stains on the sewing materials.
2. Test sew by using the same sewing materials you intend to sew.
3. Read this instruction manual thoroughly before replacing the cutters and the needles. Follow the
instructions for correct replacements and adjustments.
_ 1 _

TABLE OF CONTENTS
NAME OF MAIN COMPONENTS........................................................................................3
SETTING UP YOUR MACHINE.......................................................................................4~8
The position of thread pole..............................................................................“4
Spool holders ....................................................................................................4
Spool caps ........................................................................................................ 4
Connecting the foot control
Controlling sewing speed..................................................................................5
Safety switch .................................................................................................... 5
Attaching the waste catcher............................................................................ 6
ACCESSORIES...................................................................................................................6
USING THE MACHINE ...................................................................................................... 7
Handwheel ........................................................................................................ 7
Front cover......................................................................................................... 7
Free arm
LOOPER THREADING.................................................................................................... 8
NEEDLE THREADING........................................................................................................9
TEST SEWING ................................................................................................................ 10
ADJUSTING THREAD TENSIONS ........................................................................... 11~12
Needle thread tensions
Looper thread tensions ................................................................................ 12
MACHINE ADJUSTMENT CHART.................................................................................. 13
CHANGING THE THREAD ............................................................................................ 14
BUILT-IN POCKET HANDLE...........................................................................................14
ADJUSTMENT OF STITCH LENGTH
CUTTING WIDTH ............................................................................................................ 18
CHANGING THE NEEDLE............................................................................................... 17
REPLACING THE BULB ................................................................................................ 17
REPLACING THE CUTTERS...........................................................................................18
THREE THREAD NARROW OR WIDE .......................................................................... 19
FREE ARM SEWING........................................................................................................20
CONVERTIBLE PRESSER FOOT--’-...............................................................................20
ROLLED AND NARROW EDGE.................................................................................21-22
DIFFERENTIAL FEED .............................................................................................. 23-24
Differential feed mechanism
Adjusting the differential feed........................................................................23
Gathering ....................................................................................................... 24
Stretching ....................................................................................................... 24
TROUBLE SHOOTING GUIDE........................................................................................25
CLEANING AND LUBRICATING.....................................................................................26
SPECIFICATION OF MACHINE .................................................................................... 26
...........................................................................................................
.............................................................................
...................................................................-.............
..............................................................................
..........................................................................
12
5
7
15
23
- 2 -
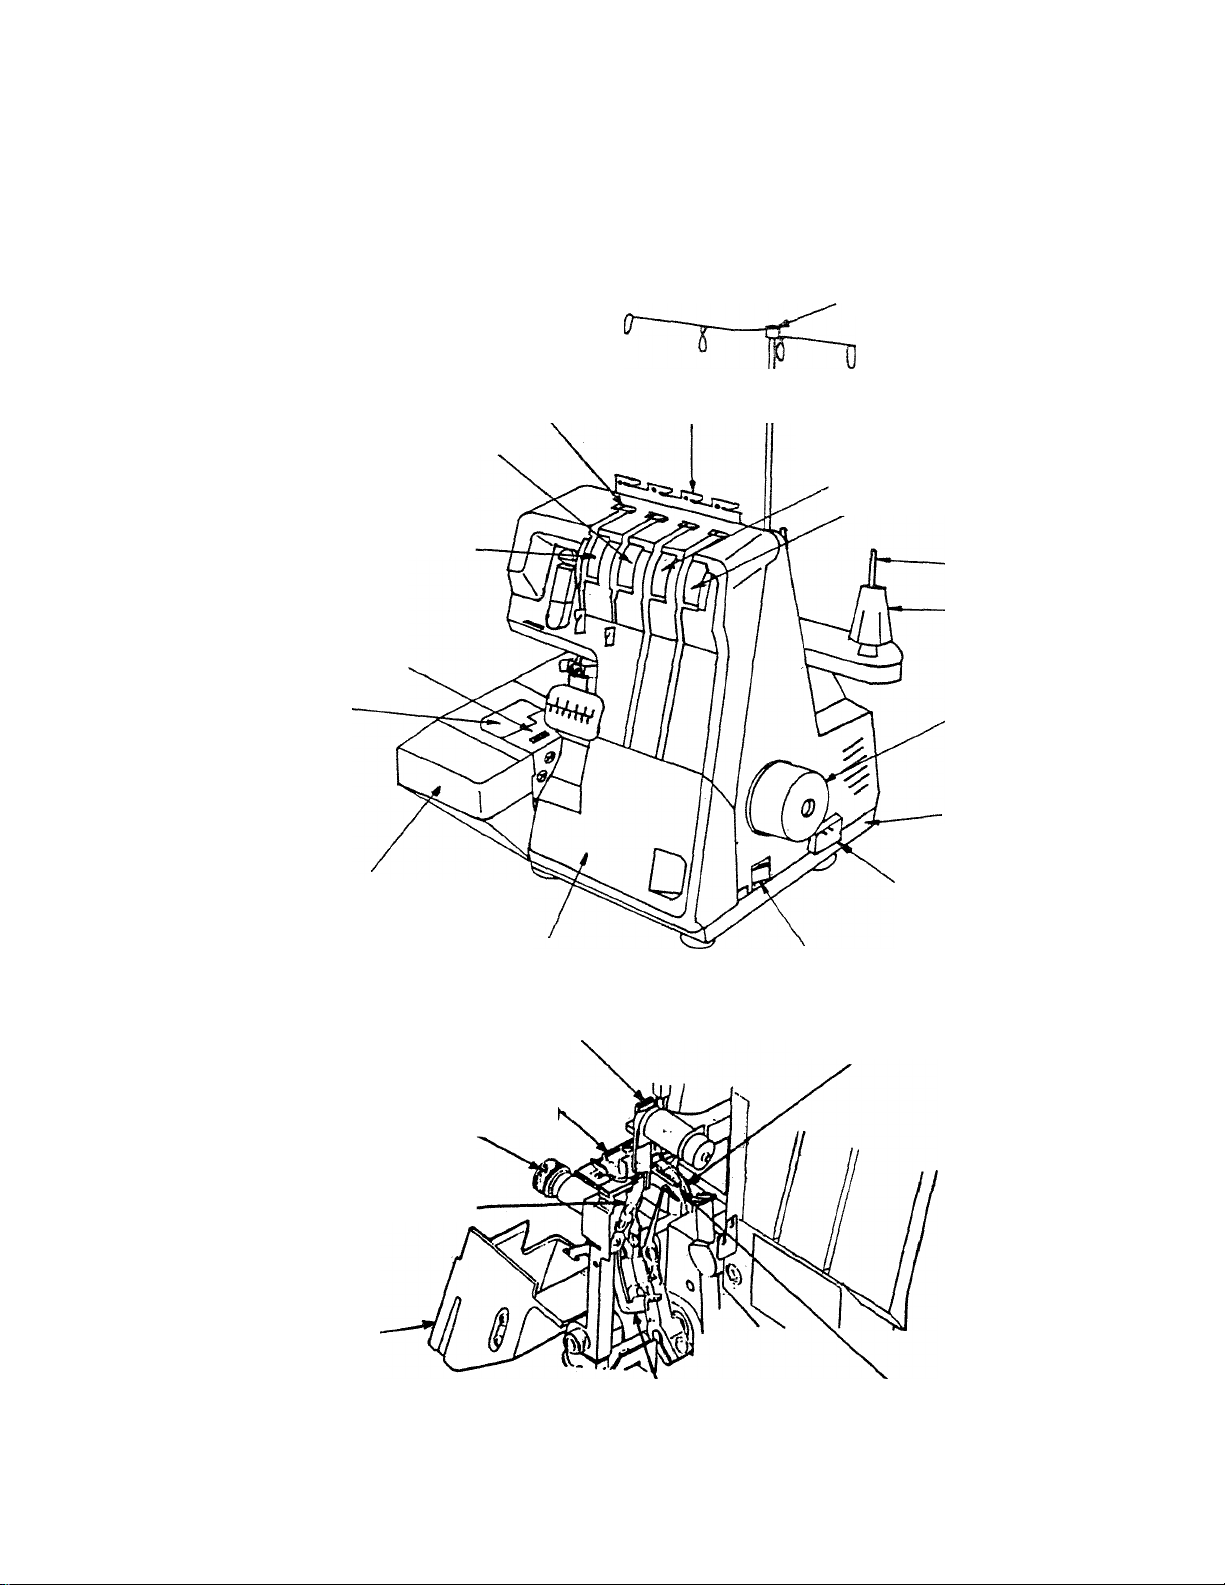
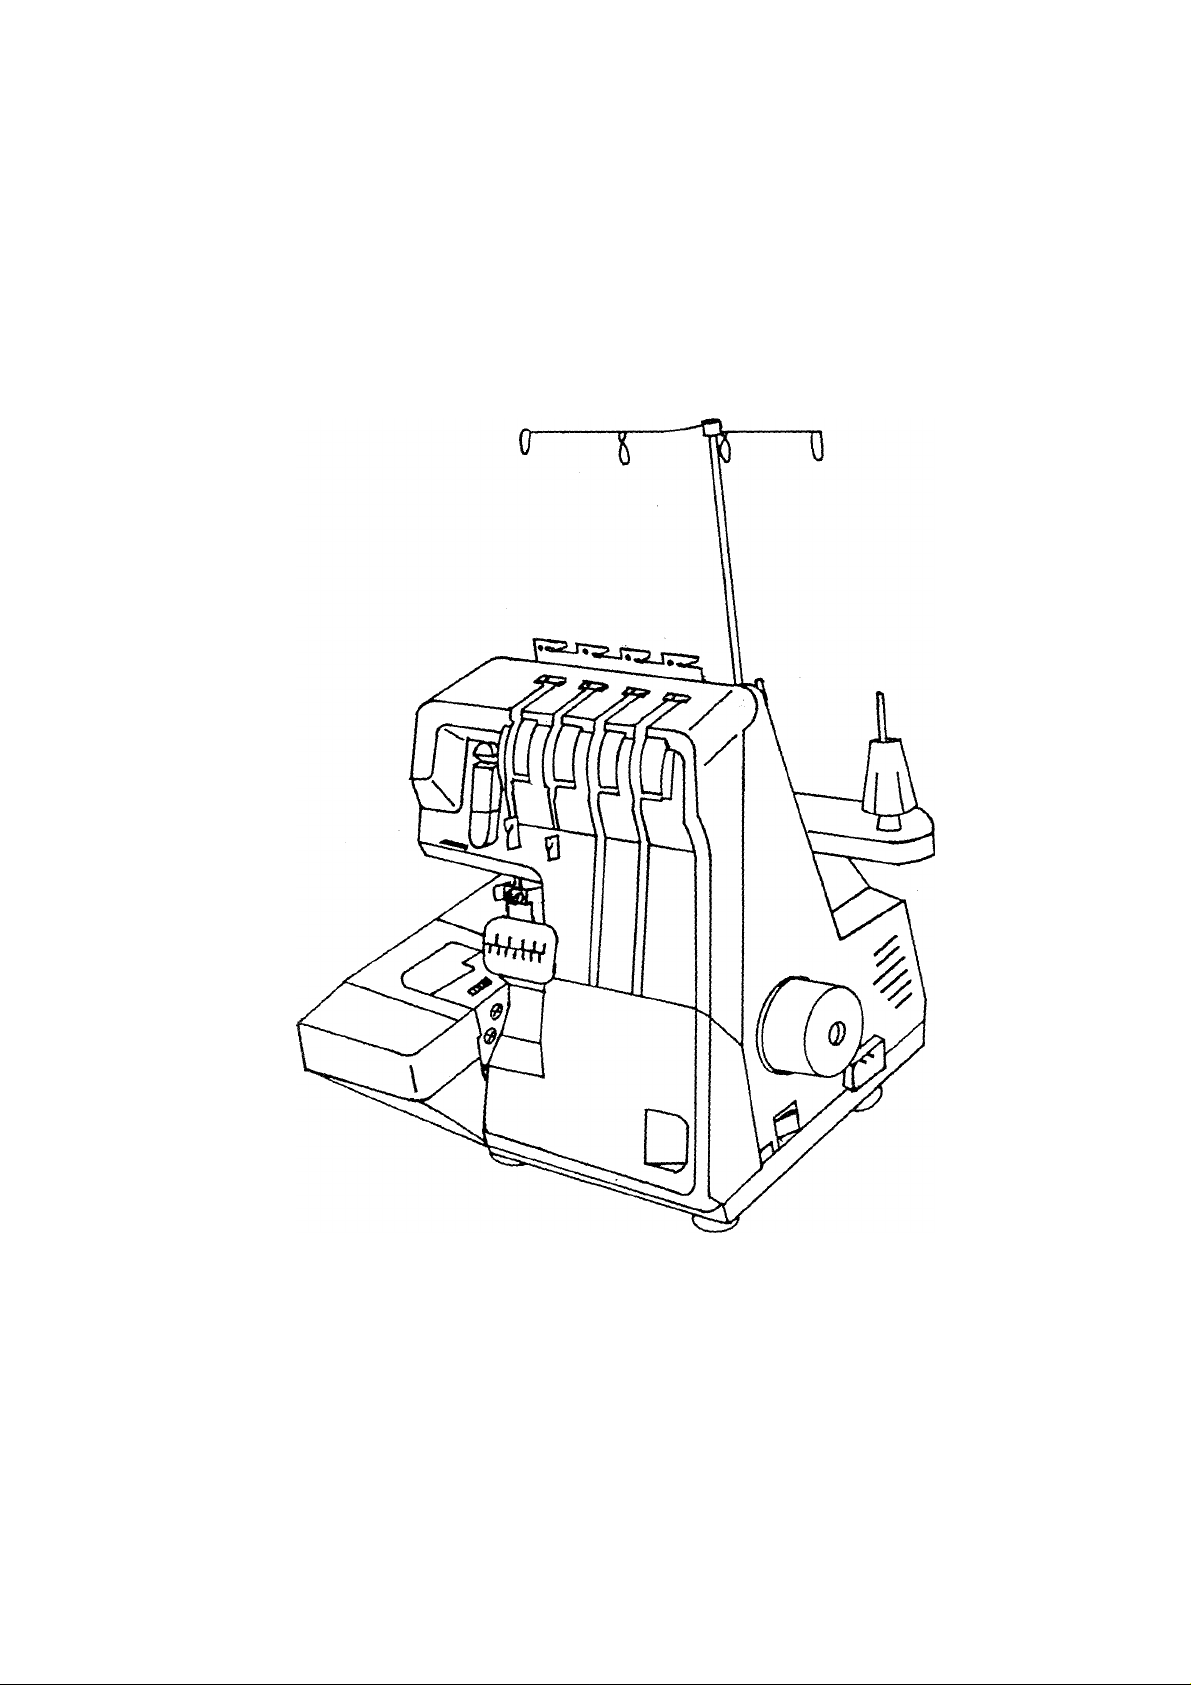
MAME OF MAIN COMPONENTS
Thread guide Thread guide plate
Right needle thread tension dial
Thread pole
Upper looper thread tension dial
Lower looper thread tension dial
Left needle thread tension dial
Needle plate
Free arm
Support bed
Cutting width adjustmentknot
Front cover
Upper knife
Presser foot
Spool pin
— Spool holder
Handwheel
Base
Machine socket
Power switch
Upperlooper
-•.-'-.-VX-.--
Lower knife
Free arm-
Free arm release lever Lower looper
- 3
SETTING UP YOUR
MACHINE
Set your Overlook machine on a sturdy flat
surface.
____________
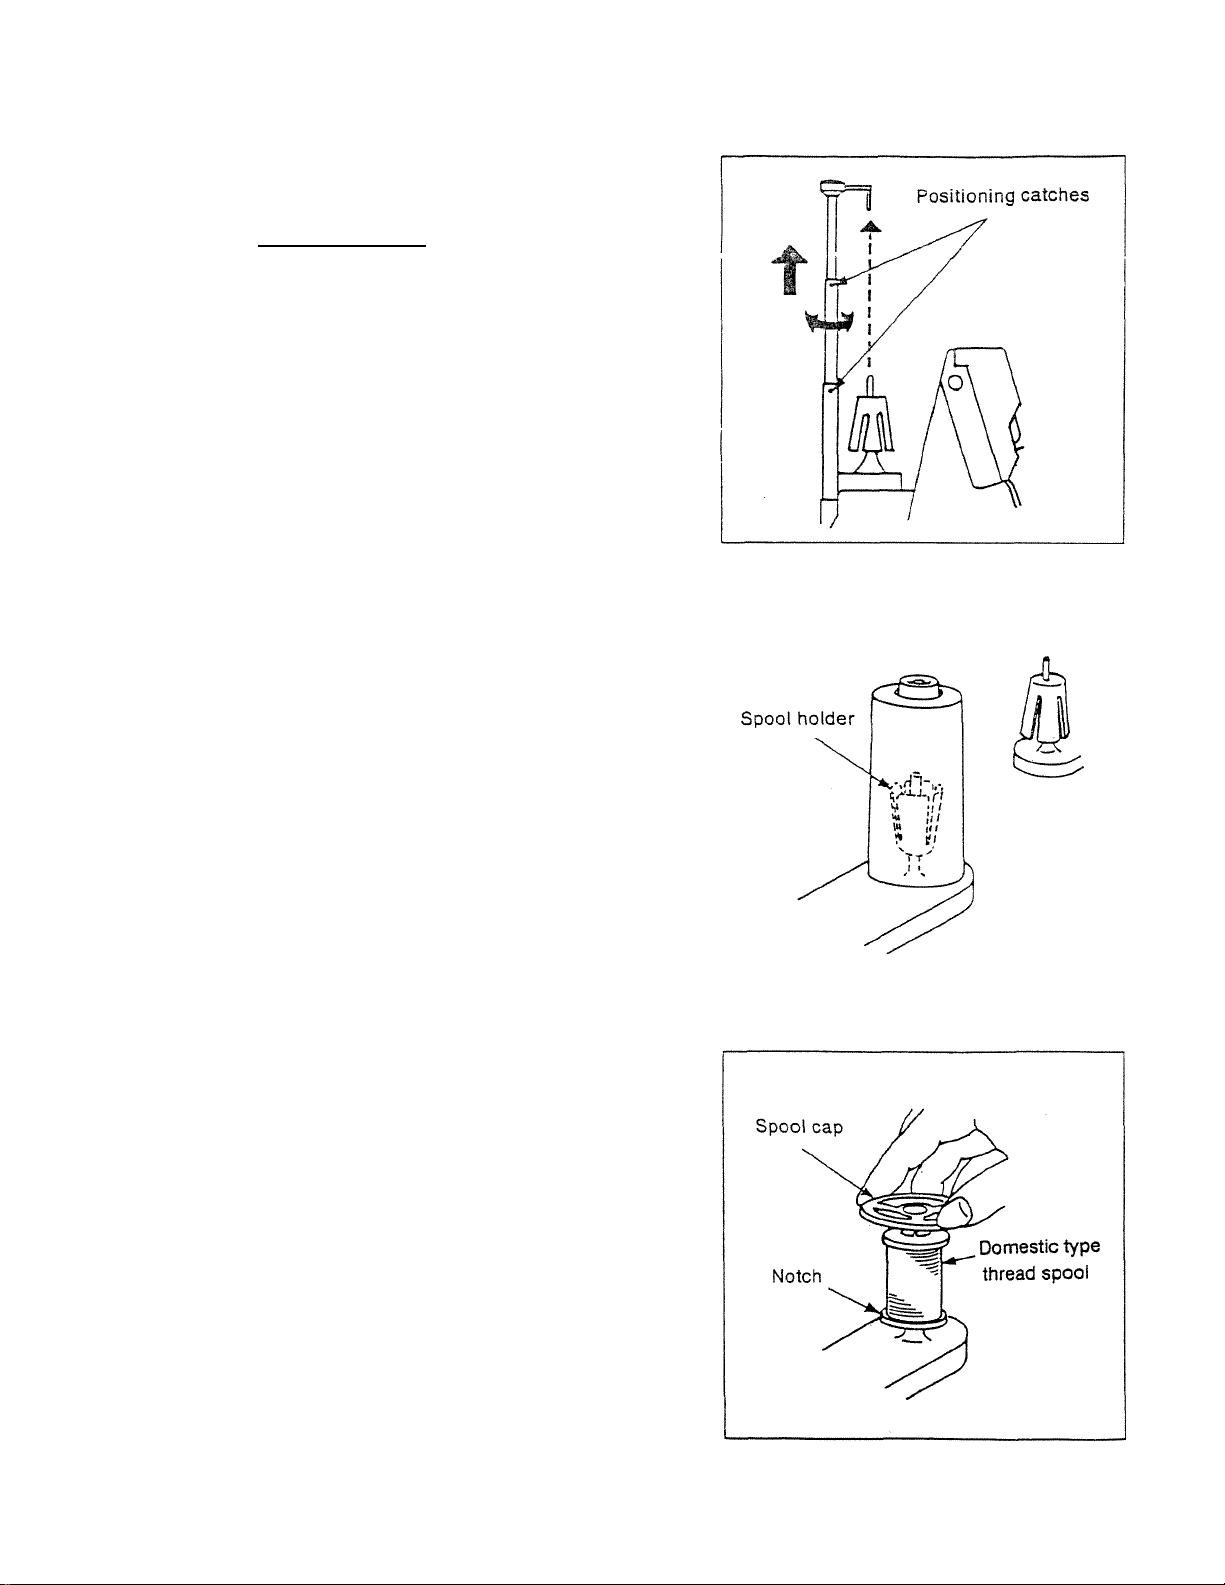
[THE POSITION OF THREAD POLE]
Pull up thread pole to its highest point before
threading.
Turn the thread pole so the thread guides come
right above the spool pins.
[CONE HOLDERS]
Both industrial cones and domestic type thread
spools can be used on this machine.
For large diameter industrial cones use the cone
holders with the large end at the top. For small
diameter cones, use the same cone holders with
the small end at the top.
Normal
[SPOOL CAPS]
When using domestic type thread spools, remove
the spool holders and place spool caps over,the
thread spools.
-a
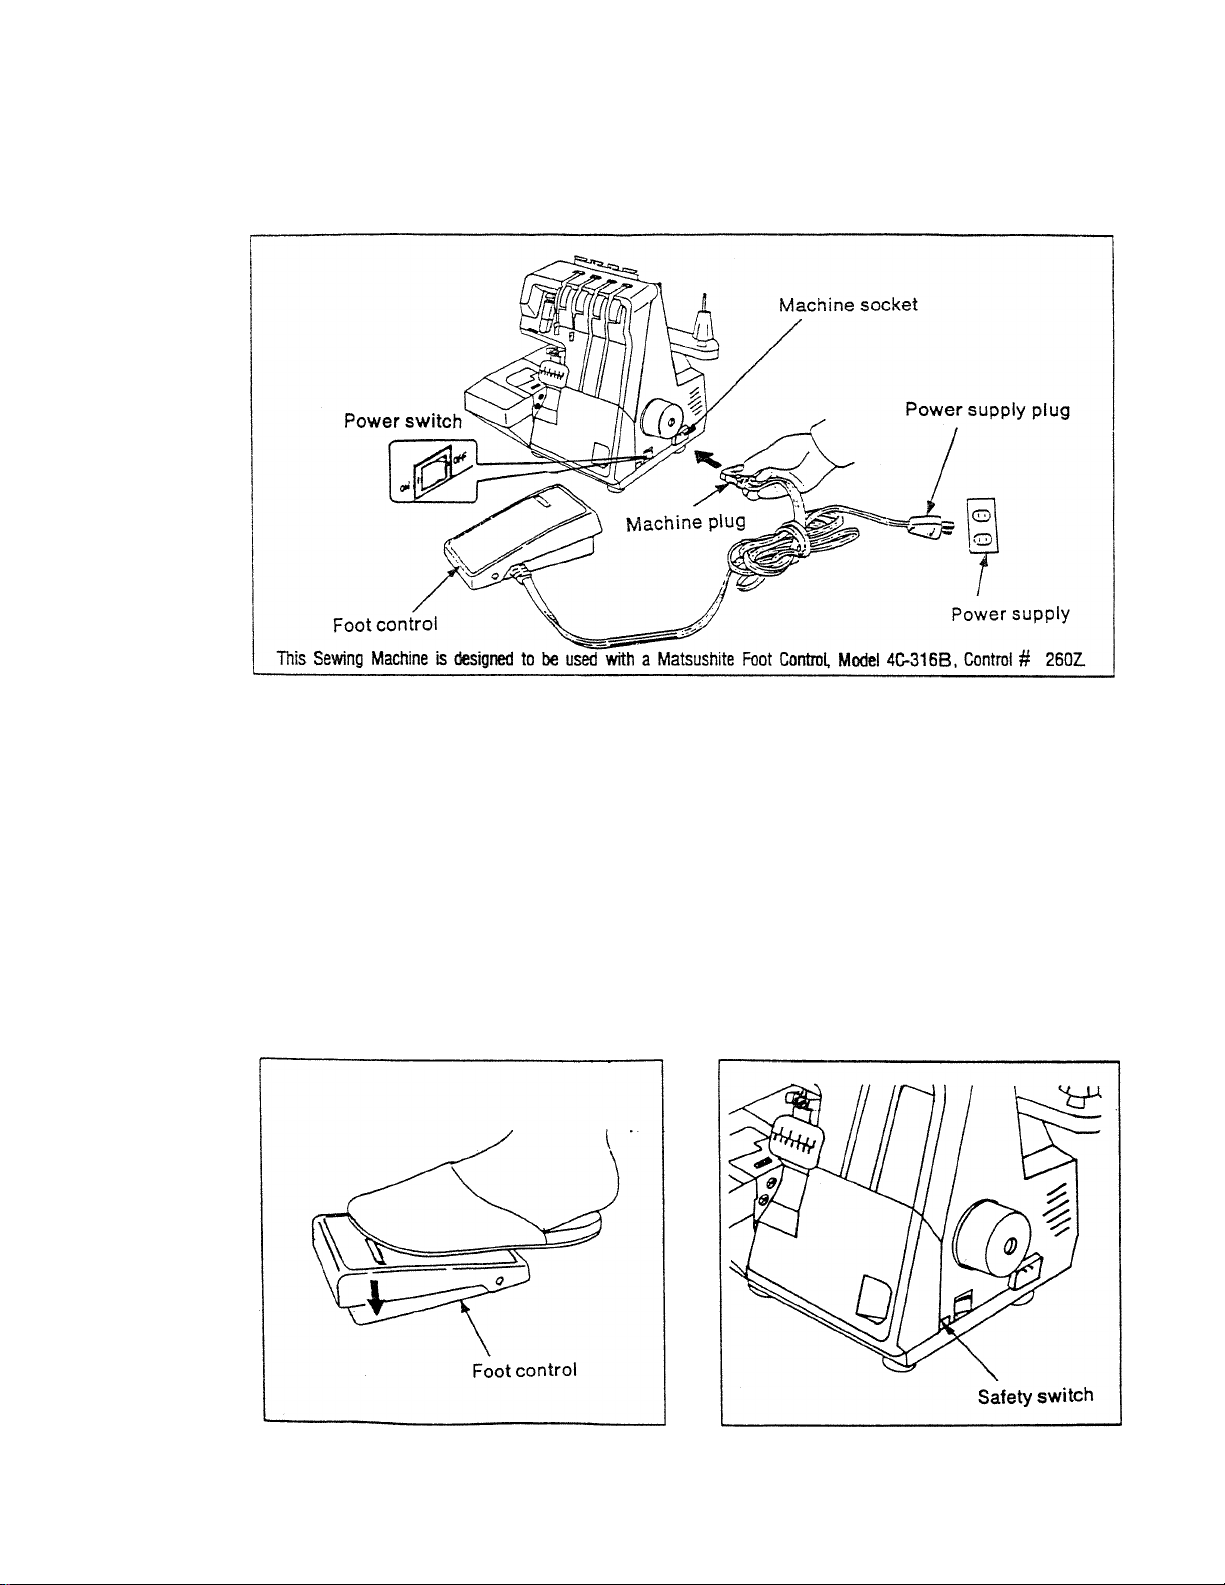
[CONNECTING THE FOOT CONTROL]
Push foot control plug into the machine socket and then into main socket.
Turn on the power switch. This power switch controls both the machine power and sewing light.
^ This appliance has a polarized plug (one blade widerthan the other). To reduce the risk of electric
shock, this plug is intended to fit in a polarized outlet only one way, if the plug does not fit fully in the
outlet, reverse the plug. If it still does not fit, contact a qualified electrician to install the proper outlet.
Do not modify the plug in any way.
[CONTROLLING SEWlNG SPEED]
The foot control regulates the sewing speed.
The sewing speed can be adjusted by
increasing or decreasing the pressure on
the foot control.
[SAFETY SWITCH]
This machine is equipped with a micro
safety switch.
The machine is automatically cut off from
the electricity supply if either the free arm
or front cover is open.
Close both free arm and front cover before
you start sewing.
- 5 -
•. ‘
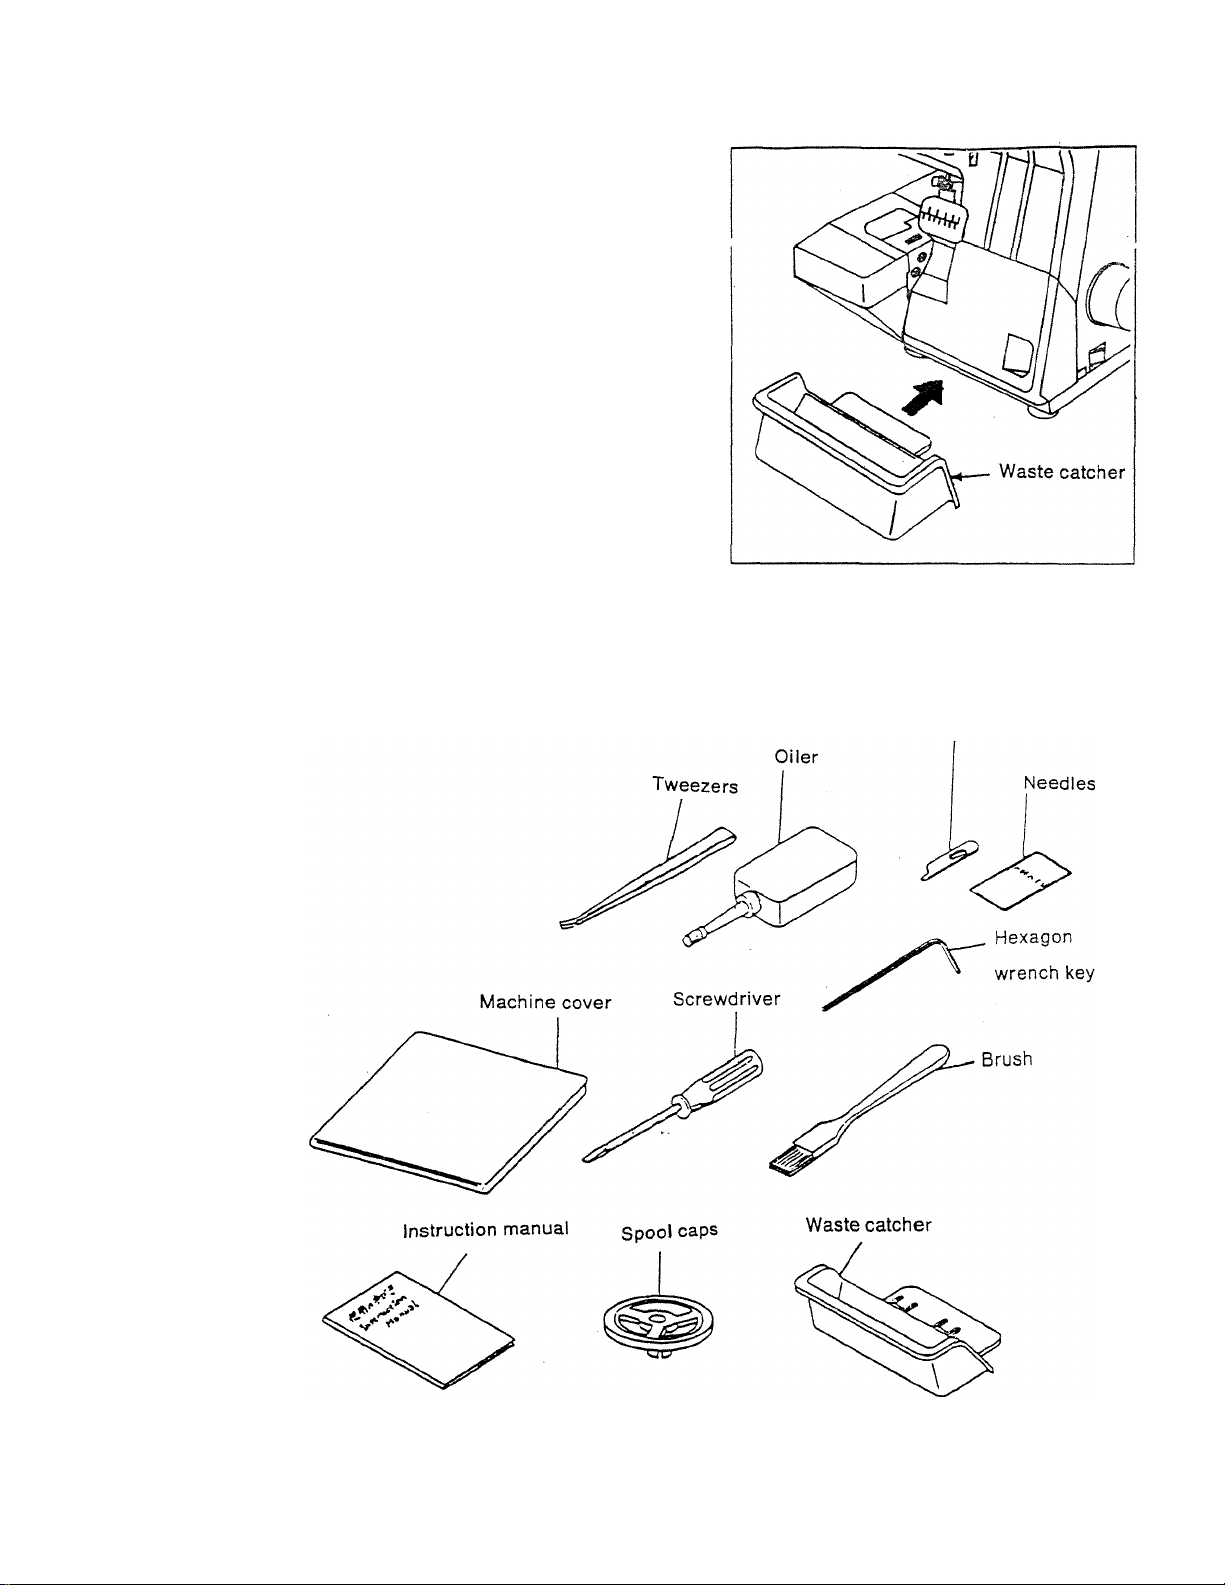
[ATTACHING THE WASTE CATCHER]
The waste catcher catches the cut-off fabric as
you sew, keeping your working area clean.
Place the waste catcher between the machine
and table.
ACCESSORIES
Spare upper cutter
wm, - -
- 6 -
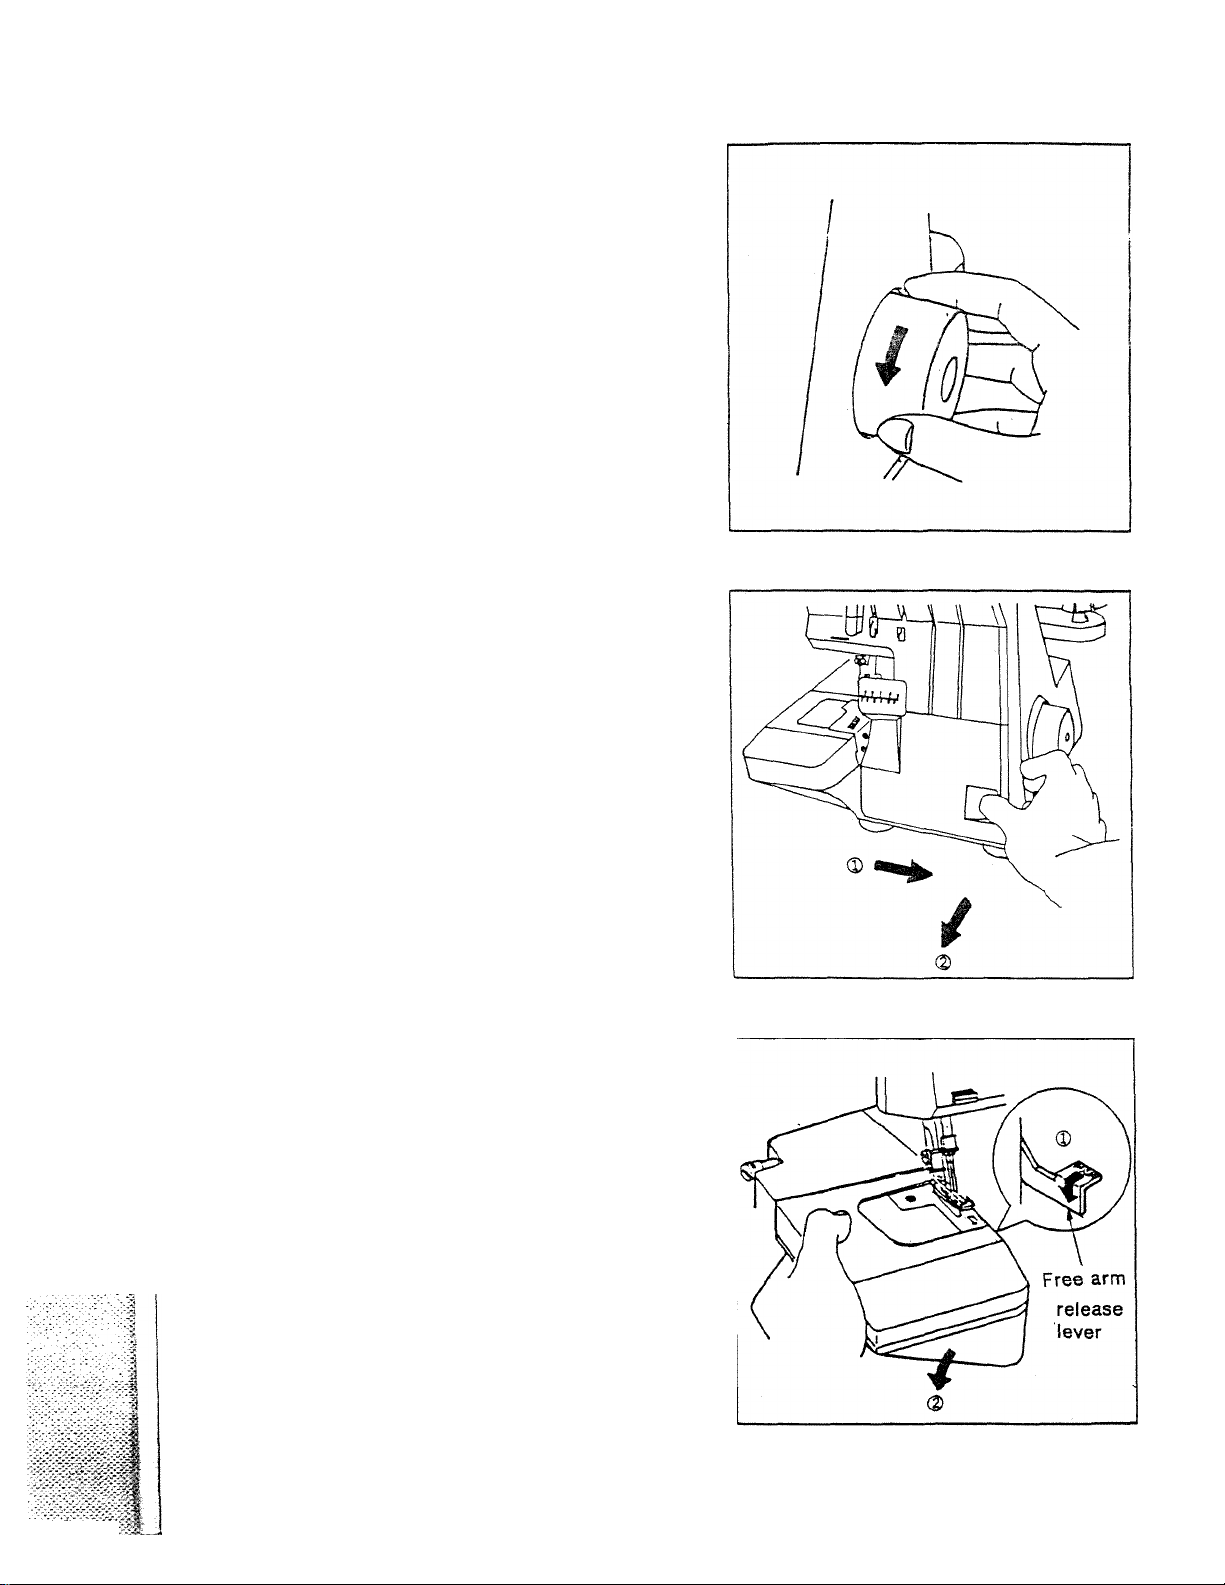
USING THE MACHINE
[HANDWHEEL]
Always turn handwheel toward youj.e. the same
direction as on a household sewing machine.
[FRONTCOVER]
To open front cover, slide the hollow to the right
as far as it will go then pull front cover toward
you.
The front cover won’t close while the free arm is
open.
[FREE ARM]
Open the free arm for threading.
Open the front cover first.
While pushing the release lever, push the free arm
down ward with your left hand.
- 7 -
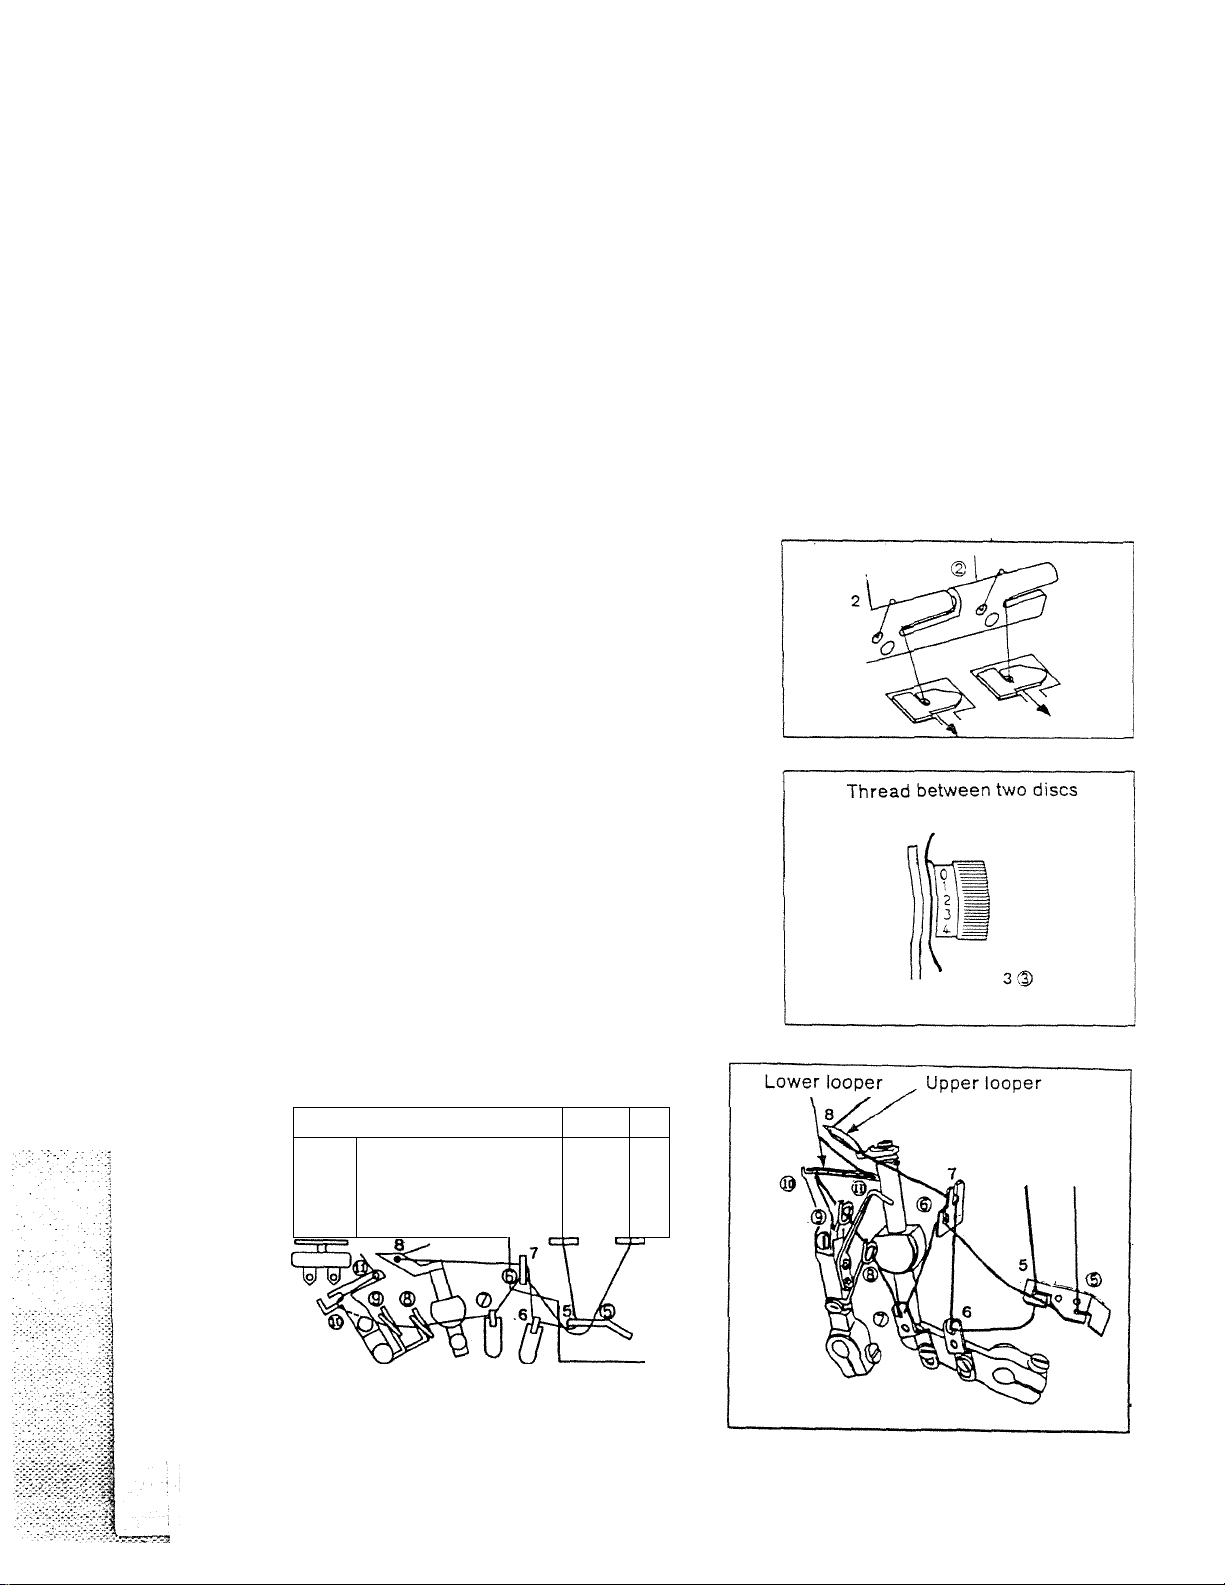
LOOPER THREADING
Correct threading is important otherwise uneven stitches or thread breakage may result
A convenient threading chart is placed on the front panel inside the front cover,
in addition, each thread guide is colored for threading
indication.
To help in threading, tweezers can be found in the
accessory box.
Threading must be carried out in the
following sequence.
I.FIRST................Upper looper
2.SECOND
3. THIRD
4. F1NALLY
l.Open the front cover and free arm.
2. Turn the handwheel toward you until, the
looper comes to best position for
threading.
3. Pass the upper looper thread and lower
looper thread as illustrated,
important; The thread must lie correctly
between the two discs inside the tension
dials.
4. Pull out the thread end about 10 cm
(4") long from the looper eyes. Raise the
presser foot and place threads under it,
then lower the presser foot.
...............
.............
.............
Lower looper
Right needle
Left needle
^ ^ V
7
V®
Upper looper thread Lower looper thread
,0
o a'0 grzdJ a
__Q
_____
O 0
n D D
J D 0
C2CiJ */<
3
4
i f
- 8 -
 Loading...