

SINGER W1577 User Manual
dean.:
3EWIi*«IG MiSiiCHiMS

WHITE SEWING MACHINE
Record in space provided below the Serial No,
and Model No. of this appliance.
The Serial No. is located Rear of arm.
The Model No. is located Rear of arm.
Serial No. _______
Model No. 1577
Retain these numbers for future reference.

1
CONTENTS
мТЗ О? PAr'.VS
i ;. лсС ТС 30 н: нз..........................................................................................................
S3V*'::iG
L'elr.chrb:.i Е;:.ч1П£:сп Table
Oo.iner.irìg Foci Ccntroller and Power Cord .................................r
Changing Feci.
Changing i ’оэ-..1а
ЬоЪ'.У'г, *• /¡..Д’.од
:.c.' V, i i',: i:..- ; :r Д
AdjucTing Lowsr Thread
Vhr:;00i;,c L-rror "r Tread,......................................................................................
Drawing Up Lc'./ir Thread.........................'.'.'I.'.'.'.'.'.’.".’.’.’!.’”!!.’
l Oci Frcs.'Uio
.-abrio, i hrasd and Needle Table
c. S ! RAiGHT SIWMG
Fatie.Yi n'j^ecLon Di-a!.................................. .......................................................
Siiioh Lencrh Diai
C arting it- Sii'.v................................. .
Drubie Pre.':' :r Fi ri Lifter..............’.’.’.’’’’.'.'
ravc.rs- Sc /ii:;;......................................... .............................................................
Adjnsiing 'in,4£d Tension.....................................................................................II
3. :;:;g7,4G SEVvibj-. ... ...................................................................
Zigzag V^idth Control
Thread Tension for Zigzag Stitch ..........................................................................
6. OVERCASTING
..............................
7. PJAKING BUTT0NH0LESy.3.ZZ'.’.’.’.’.’.'.’.’.
Determine Length..................................................................................................
Determine Width
Left and Right Side Balance of Buttonhole
Cutting Buttonholes
.........................
.................................................................................................
..................................................
................................................... ....................................................
...............................
.............................
................................................................................................
........................................................................................
.................................... ...................................................................
.......
...................................................
...........................................................................
............................................................ ".
.............................................
. ’.........................................................
.............................................................
..............................
..................
..................It
...................................
........................ .....................................
.........................................................
..............................................
.............................................................
....................................................
....................................................................................................
...............
....................
.................................
.........................................
8. BLIND HEM STITCH.....................................................................................
Elastic Blind Hem Stitch .... ....................................................................
9. SHELL STITCHING
............
.........
..............................................
10. MENDING........................................ ............................................................
Patching.......................................’
Mending a Rip......................
11. APPLIQUE WORK
12. EMBROIDERY
13. MAINTENANCE
Cleaning
Oiling
...................
..................
............................................. ..................................................................
................................ ....................................................................................
................................................................................
.......................................................................................
.........................................................................
3.Z3.3’.'.’.’.’.’.’.....................................................
.................................................................
14. TROUBLE CHART..".’.".’.".’.’.3.’.’.’.’.’.’.’.’.^’.’.'’.’.'.".'.’.........................................
Changing Light Bulb..............................................................................................ол
"I0
]1
..
..
..
..
..
..
..
]л
..
..
^
..
®
..
'Г
'-.s

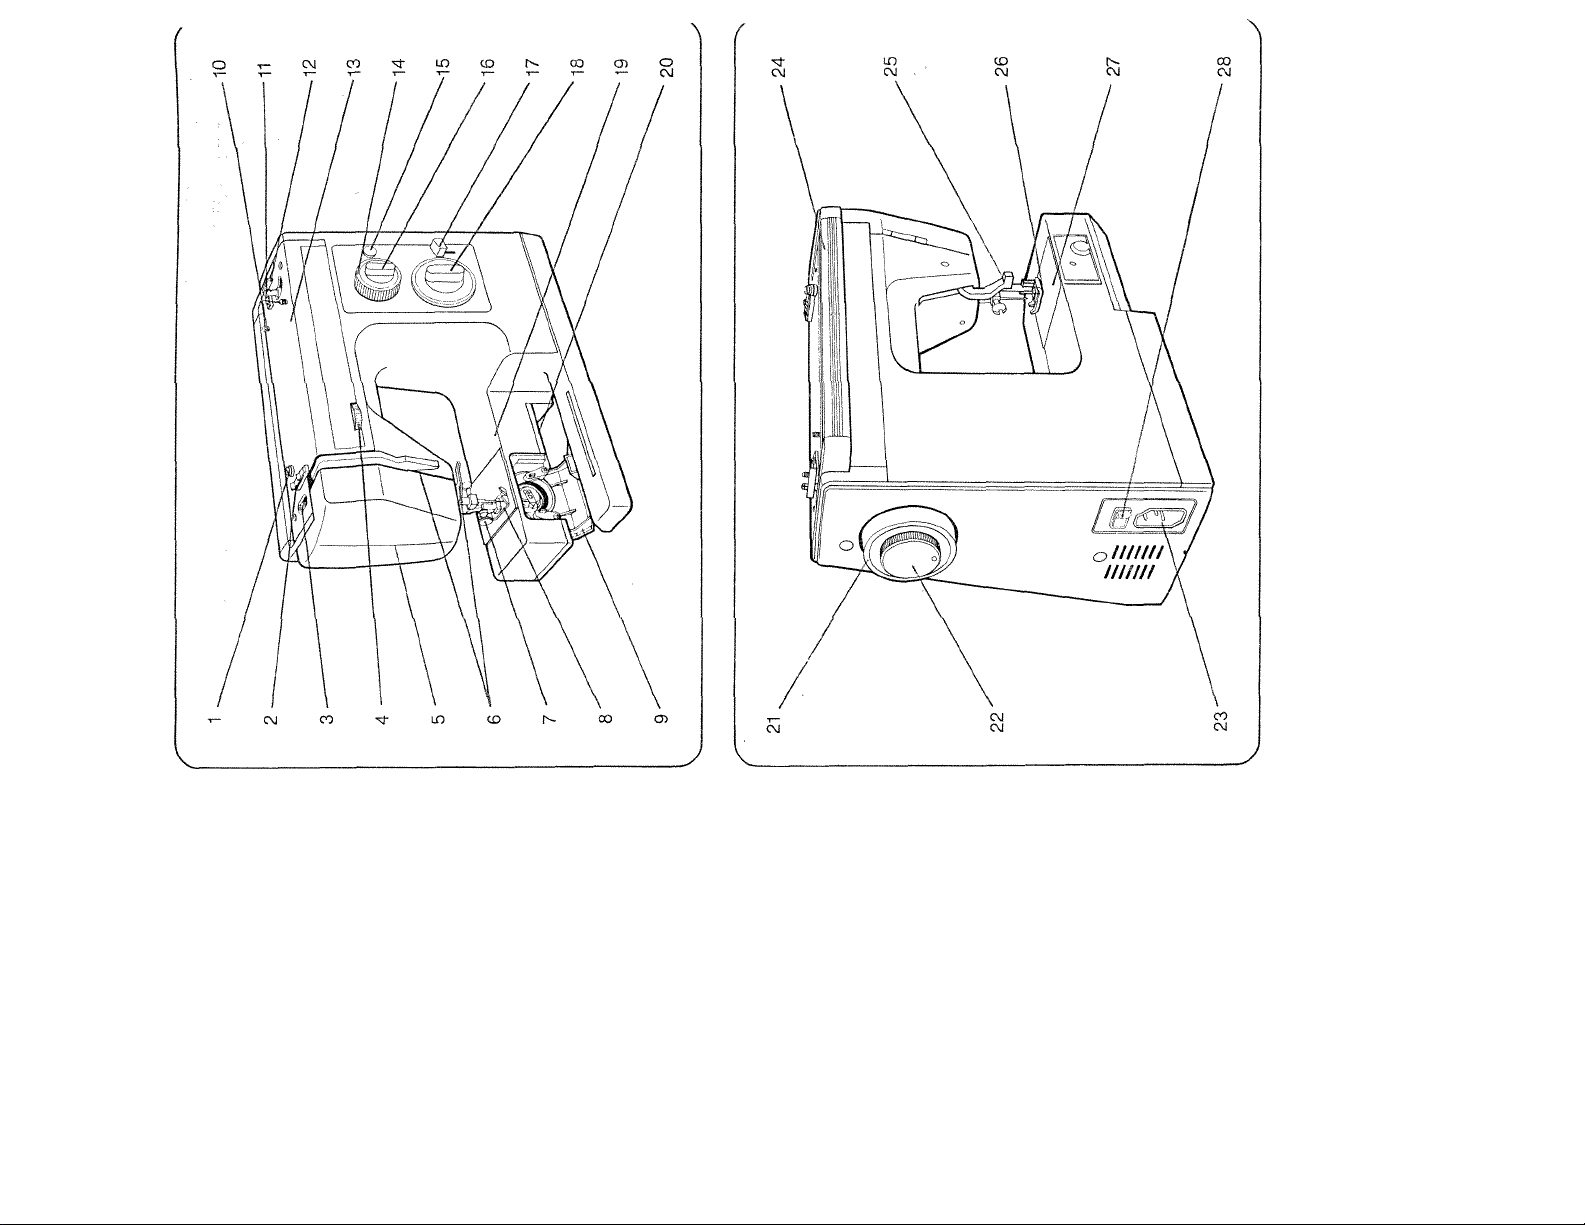
I. NAMES OF PARTS
1. Thread guide for bobbin winding
2. Thread guide for upper threading
3. Foot pressure regulator
4. Upper thread tension dial
5. Face cover
6. Thread guide for upper threading
7. Presser foot thumb screw
8. Presser foot
9. Shuttle cover
10. Spool pins
II. Bobbin winding spindle
12. Bobbin winding stopper
13. Top cover
14. Zigzag width control
15. Special buttonhole adjustment
16. Stitch length dial
17. Reverse sewing lever
18. Pattern selection dial
19. Free arm
20. Drop feed lever
21. Handwheel
22. Stop motion knob
23. Socket
24. Handle
25. Presser foot lifter
26. Feed dog
27. Needle plate
28. Switch

2. ACCESSORIES
3. BEFORE SEWING
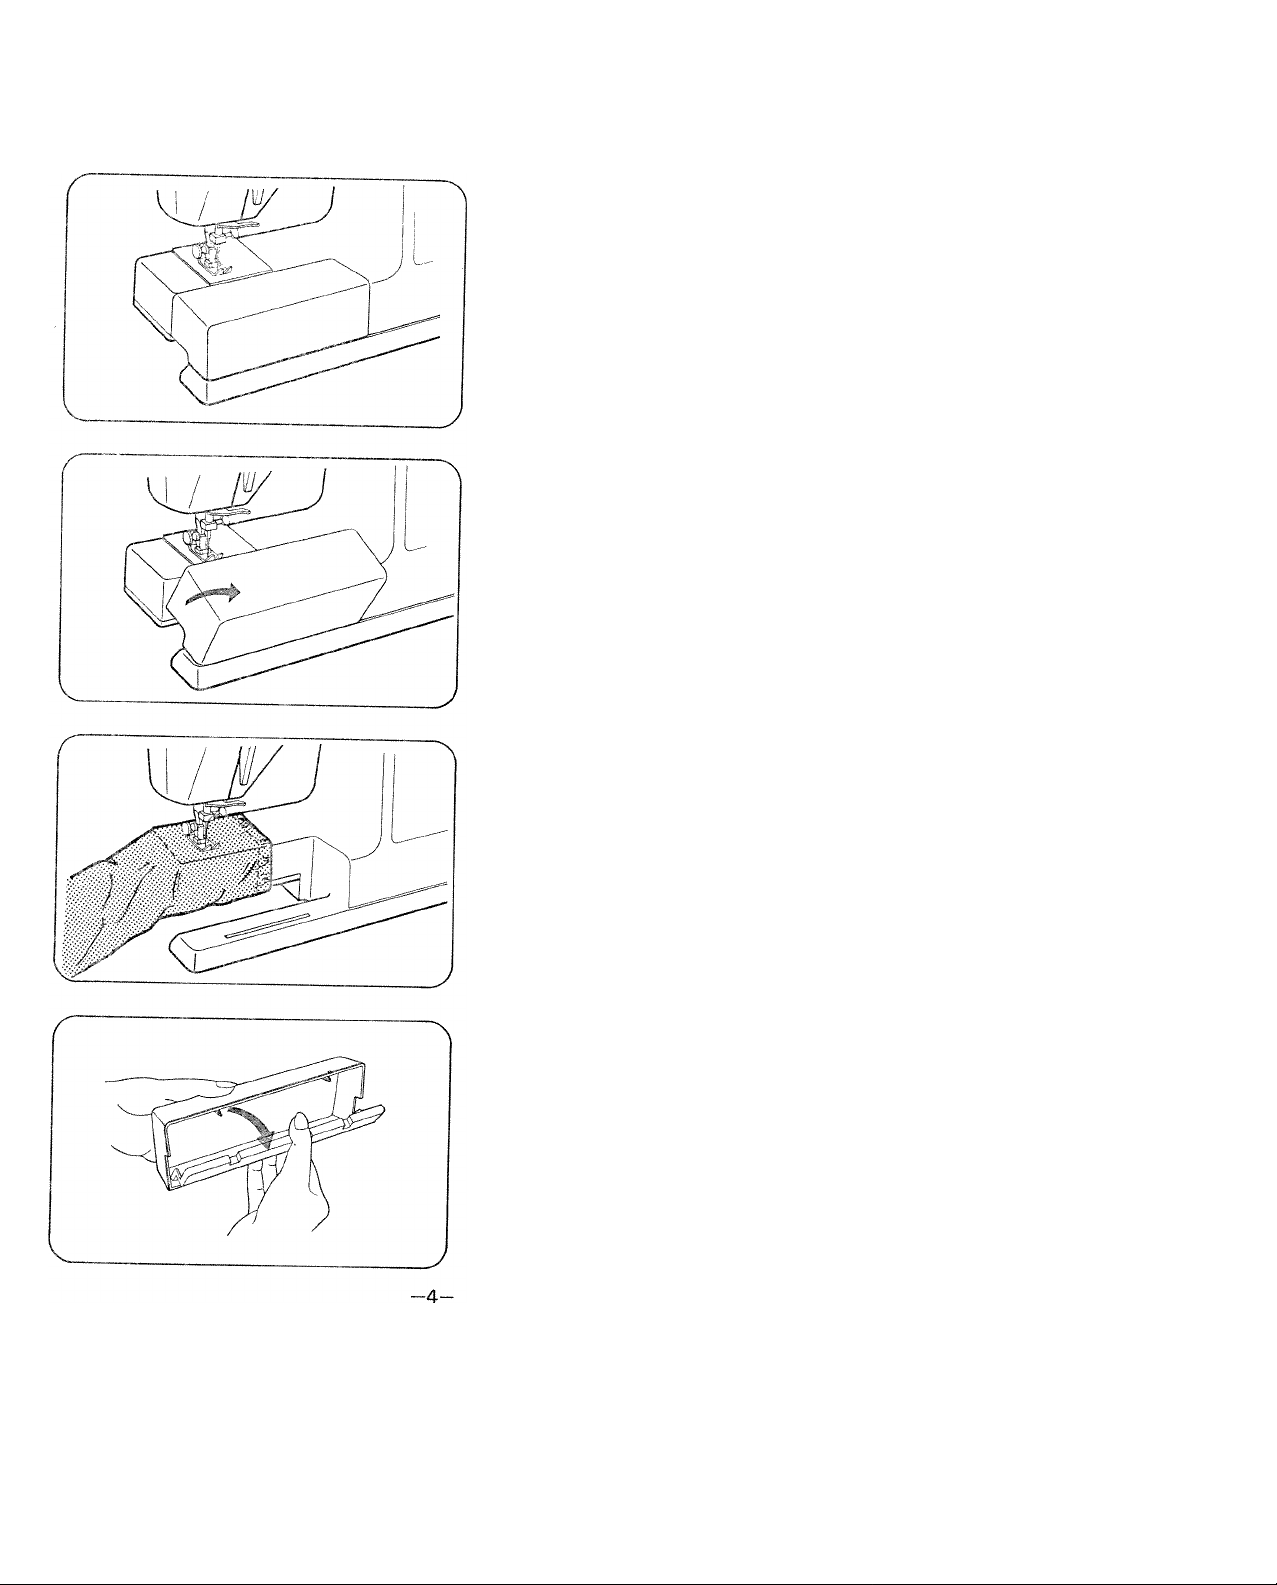
The machine is stored in flat-bed
style which makes your work easier
for ordinary sewing.
Detachaiale Extension Table
Remove the table (accessory box)
and the machine is used as a
free-arm machine.
The free-arm is more convenient to
sew or embroider; trousers, sleeves,
cuffs of T-shirts, blouses, etc.
Reverse the above steps to attach
the extension table.
To open the lid of the accessory
box, pull it open, as illustrated.
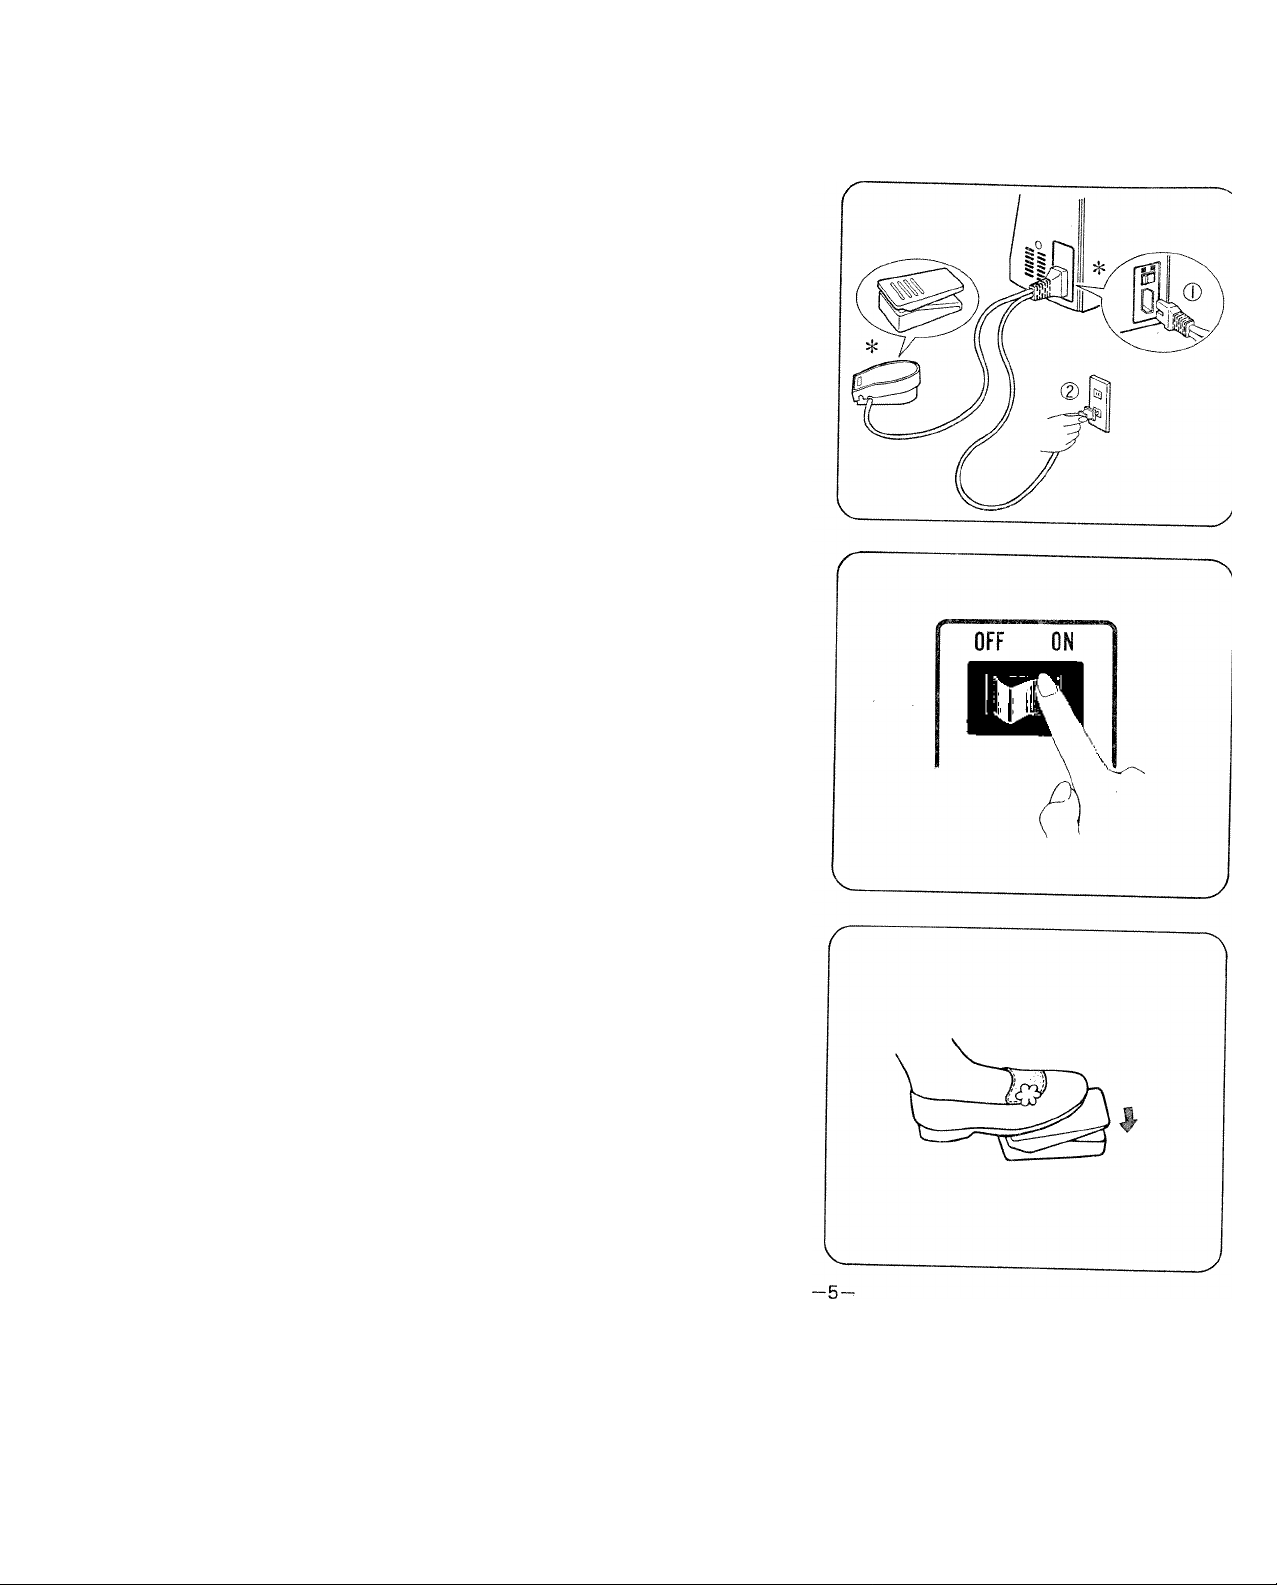
Connecting Foot Controller and Power Cord
Connect foot controller and power
cord ® @ .
Before plugging in your machine, be
sure that voltage is same as that of
your machine (* written on a plate
at back of machine)
* Specifications vary from country
to country.
Put power switch on the machine
and turn on the sewing light.
Always switch off or unplug
machine when not in use.
The more you press foot controller,
the faster the machine runs.
CAUTION: When machine is not
In use always detach plug from
wall outlet.

Changing Foot
Raise presser foot lifter.
Set needle in the highest position by
turning handwheel towards you.
Remove foot by loosening screw
with screwdriver.
Replace screw-snap type presser
foot and tighten screw.
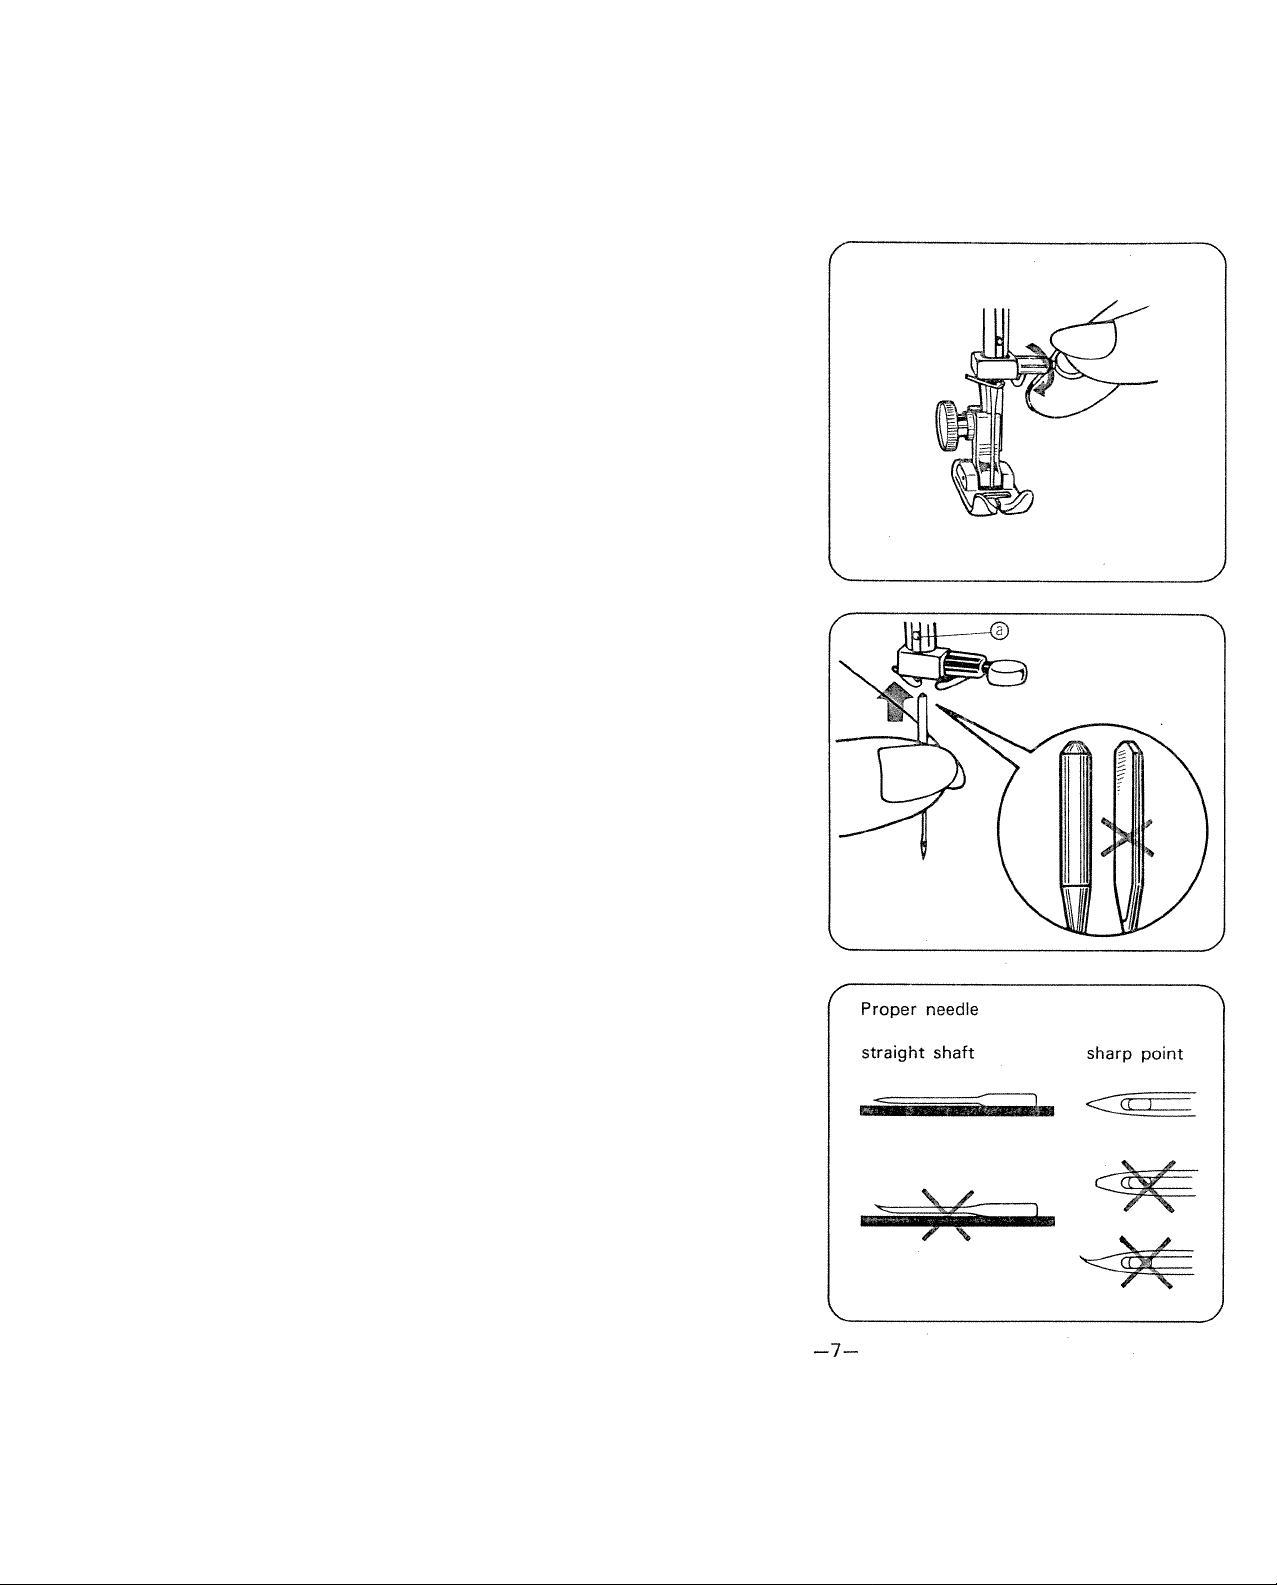
Changing Nesdie , ■ ■
Set needle in the highest position
by turning handwheel towards you.
Loosen needle clamp screw and
take out needle.
With flat face away from you, insert
a new needle into groove of needle
bar.
Push needle until it reaches stopper
@ and tighten needle clamp screw
firmly.
Always use a straight needle with a
sharp point.
Using defective or worn needles not
only causes stitch skipping, break
age of needles or snapping of
thread; it also can damage hook
and needle plate.
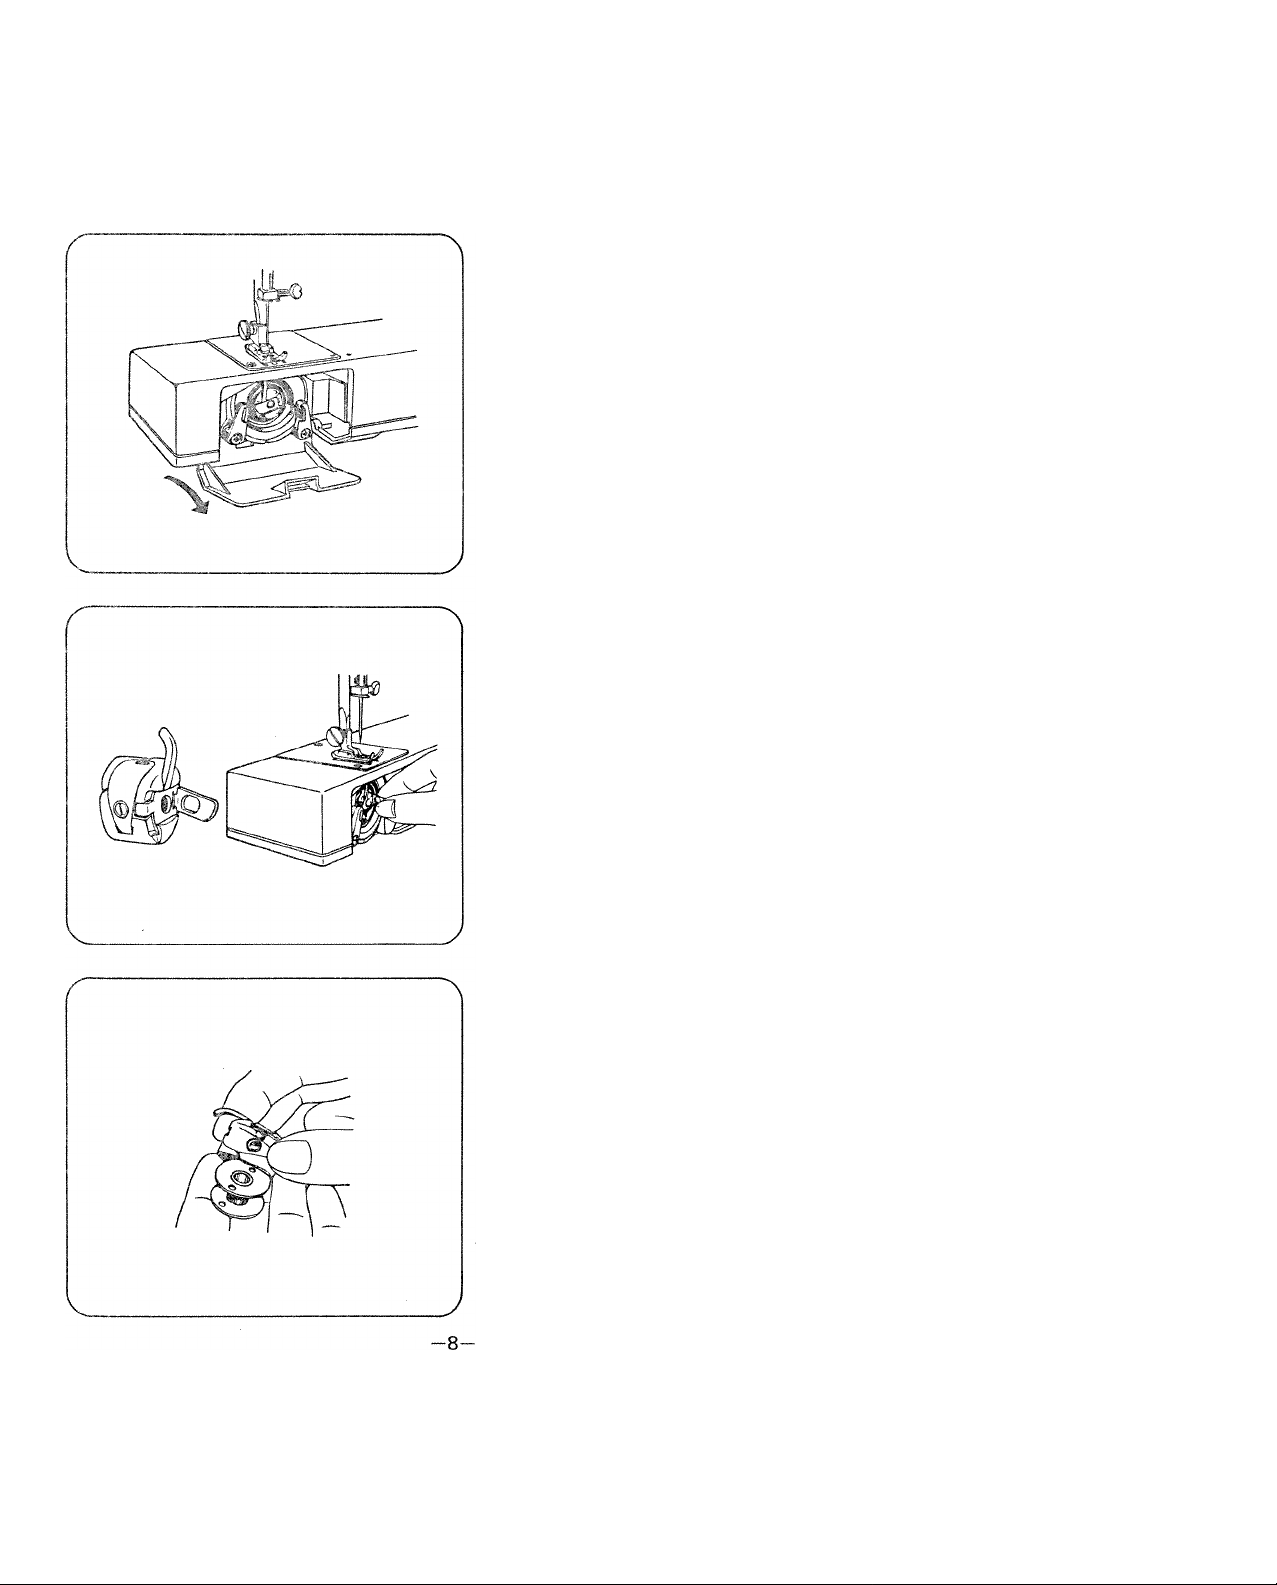
Bobbin Winding
Set needle in the highest position by
turning handwheel towards you .
Open shuttle cover.
Open latch of bobbin case and
remove case.
Release latch of bobbin case and
bobbin comes out easily.
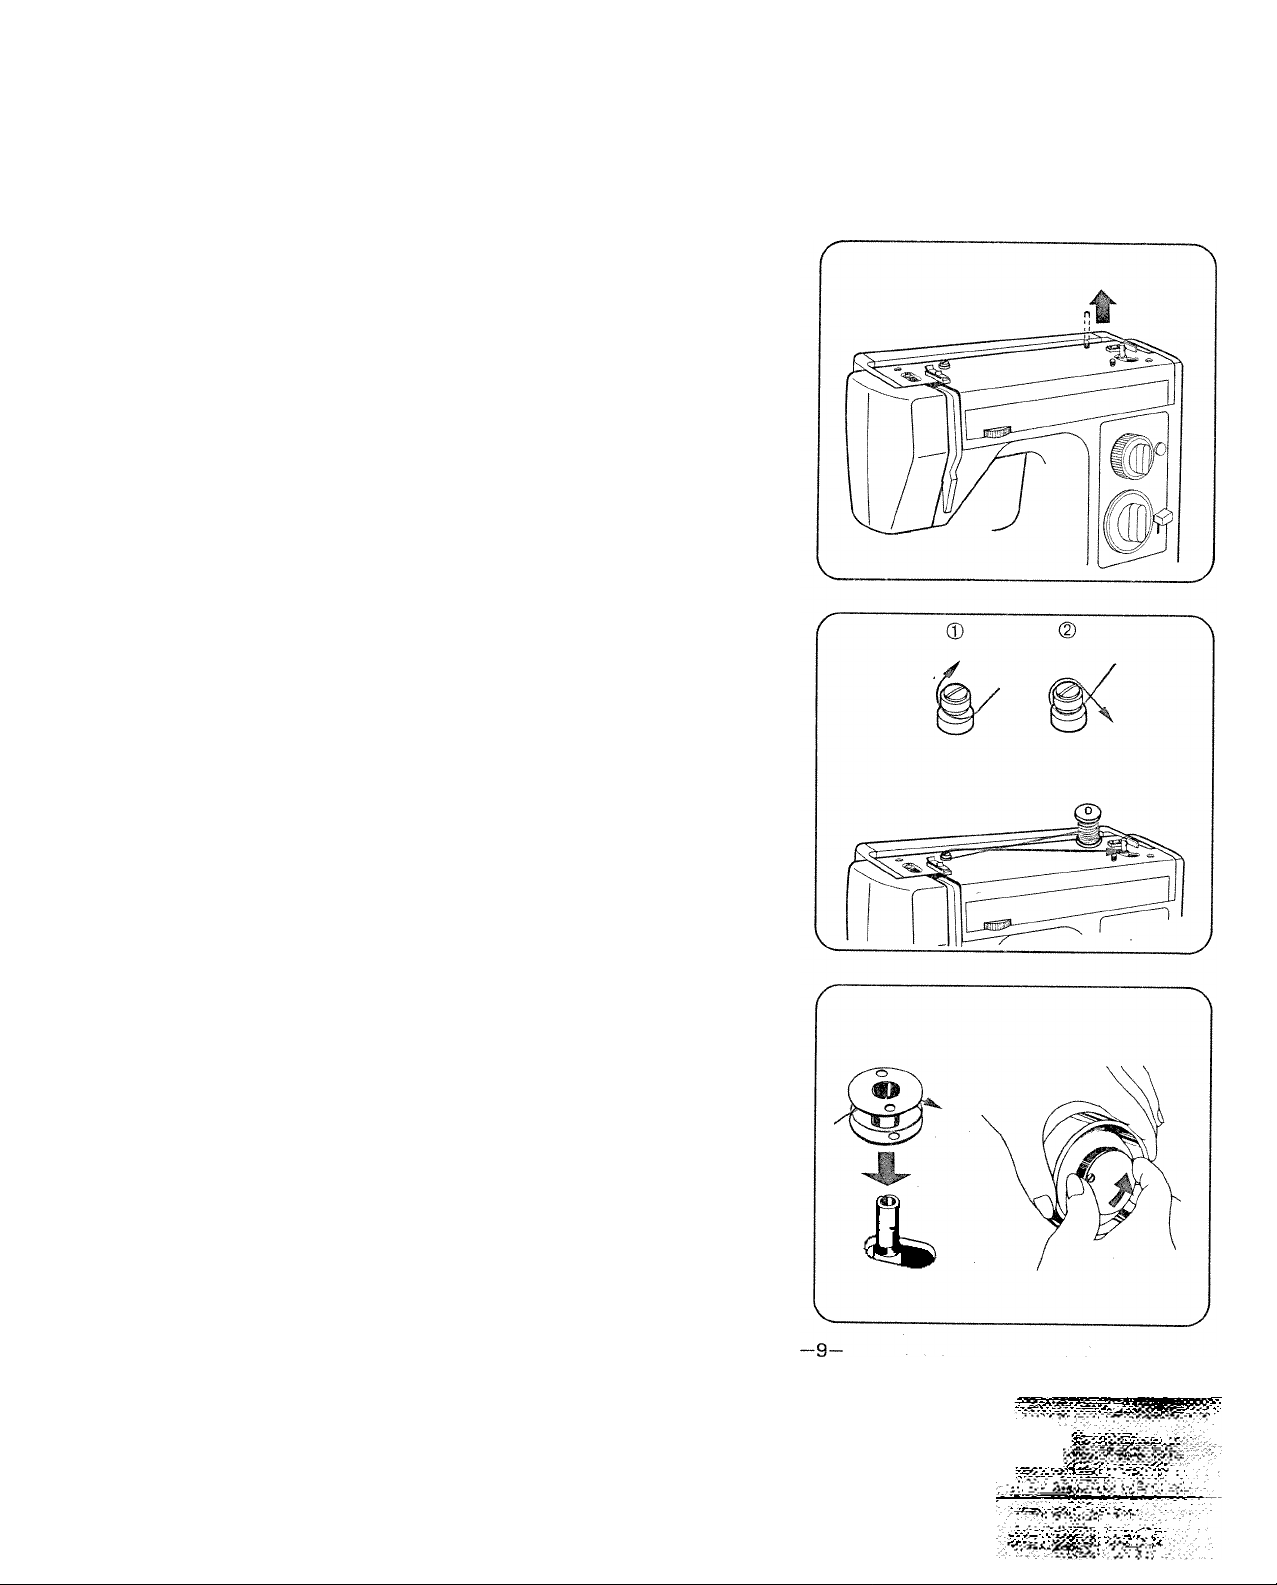
Pull out spool pin and put a felt
on spool pin.
Put a spool on spool pin.
Draw thread from spool pin
through thread guide and pre
tension device, following numb
ers © and (2).
Wind thread clockwise around
bobbin several times.
Push bobbin on to spindle.
Holding handwheel with your left
hand disengage handwheel by
unscrewing stop motion knob.
 Loading...