

Page 1
',4j;,r'SÍ- ■-■ ■■ . -.. ' -
?■ ' ; ■ ;^ V:-.' ■■ " ' ■■ ■ L - ■
'ШШШЧ' ^ 'л; ^
■ ■ l
-. ■■ ■^,;..■ ,1- ;. .I- ■
■ - I
< : - '
s.ii --V"
<
INSTRUCTIGN
i -^Ììf'; 'Г-- .¡г^ --.--^ . -
'Áí -■- - i.«'.- 'j.bfi-'P , ■ :. .,
ílfllÉÉiHMSlHÉHHlíBtí^awiraSsfiRú^fSJi^^^Bttib—^V *
. .-^tri,’#;
î;ïMî‘*^^ jiÿ - -Г'
>y^v- /V,
Page 2

“IMPORTANT SAFETY INSTRUCTIONS” '
‘When using an electrical sewing machine, basic safety precautions should always be followed,
including the following.”
“Read all instructions before using this sewing machine.”
“This sewing machine is designed for household use.”
“DANGER- TO REDUCE RISK OF ELECTRIC SHOCK:”
“A sewing machine should ne¥er be left unattended when plugged in. Always unplug this
sewing machine from the electrical outlet immediately after using and before cleaning.”
“Warning- To reduce the risk of burns, fire, electric shock or injury to persons...”
1. “Do not allow to be used as a toy. Close attention is necessary when this sewing machine is
used by or near children.”
2. “Use this sewing machine only for its intended use as described in this manual. Use only
attachments recommanded by the manufacturer as contained in this manual.
3. “Never operate this sewing machine if it has a damaged cord or plug, if it is not working
properly, if it has been dropped or damaged, or dropped into water. Return the sewing
machine to the nearest authorized dealer or service center for examination, repair,
electrical or mechanical adjustment.”
4. “Never operate the sewing machine with any air openings blocked. Keep ventilation
openings from the sewing machine and foot control free from the accumulation of lint,
dust, and loose cloth.”
5. “Never drop or insert any object into any opening.”
6. “Do not use outdoors.”
7. Do not operate where aerosol [spray] products are being used or where oxygen is being
administered.”
8. To disconnect, turn all controls to the off [“0”] position, then remove plug from outlet.”
9. “Do not unplug by pulling on cord, To unplug, grasp the plug, not the cord.”
Page 3
i;»
A.
A. Sewing Machines
10.
‘Keep fingers awav
machine needle."
f
-.i- ■
:t - .
j.
j#-:.
:P
11.
12.
1.^
14.
15.
16.
■ fiwtf ©f
-s,
------ w.. L ^ j »»noil iiiafMiiy any ctujusimenis m ine needle
area, such as threading needle, changing needle, threading bobbin, or changii
presser foot and the like.”
“Always unplug sewing machine from the electrical outlet when removing covers,
lubricating, or when making any other user servicing adjustments mentioned in
the instruction manual.”
-
‘SAVE THESE INSTRUCTIONS’
I
Page 4

CONGRATULATIONS!
As the new owner of a Stretch Stitch Sewing Machine, we hope you will take a
few minutes to read through this booklet before using your machine for the first
time.
Experiment with the many stitches. See how easy it is to dial the stitch patterns,
stitch width, and stitch length. '
Become aquainted with all the special features such as built-in button-holer,
automatic bobbin winder, and twin needle sewing.
As you go through this booklet, you will discover how these and many other
features will simplify your sewing. Additional advice on the operation and care
of your machine is always available through the Toil Free number.
We believe our machine is simple and fun to use. We hope you will have many
years of successful sewing.
-i ' ■ •
Page 5
TABLE OF CONTENTS
part I
KNOWING YOUR SEWING MACHINE
Know the parts.
Front View .... o
Back View
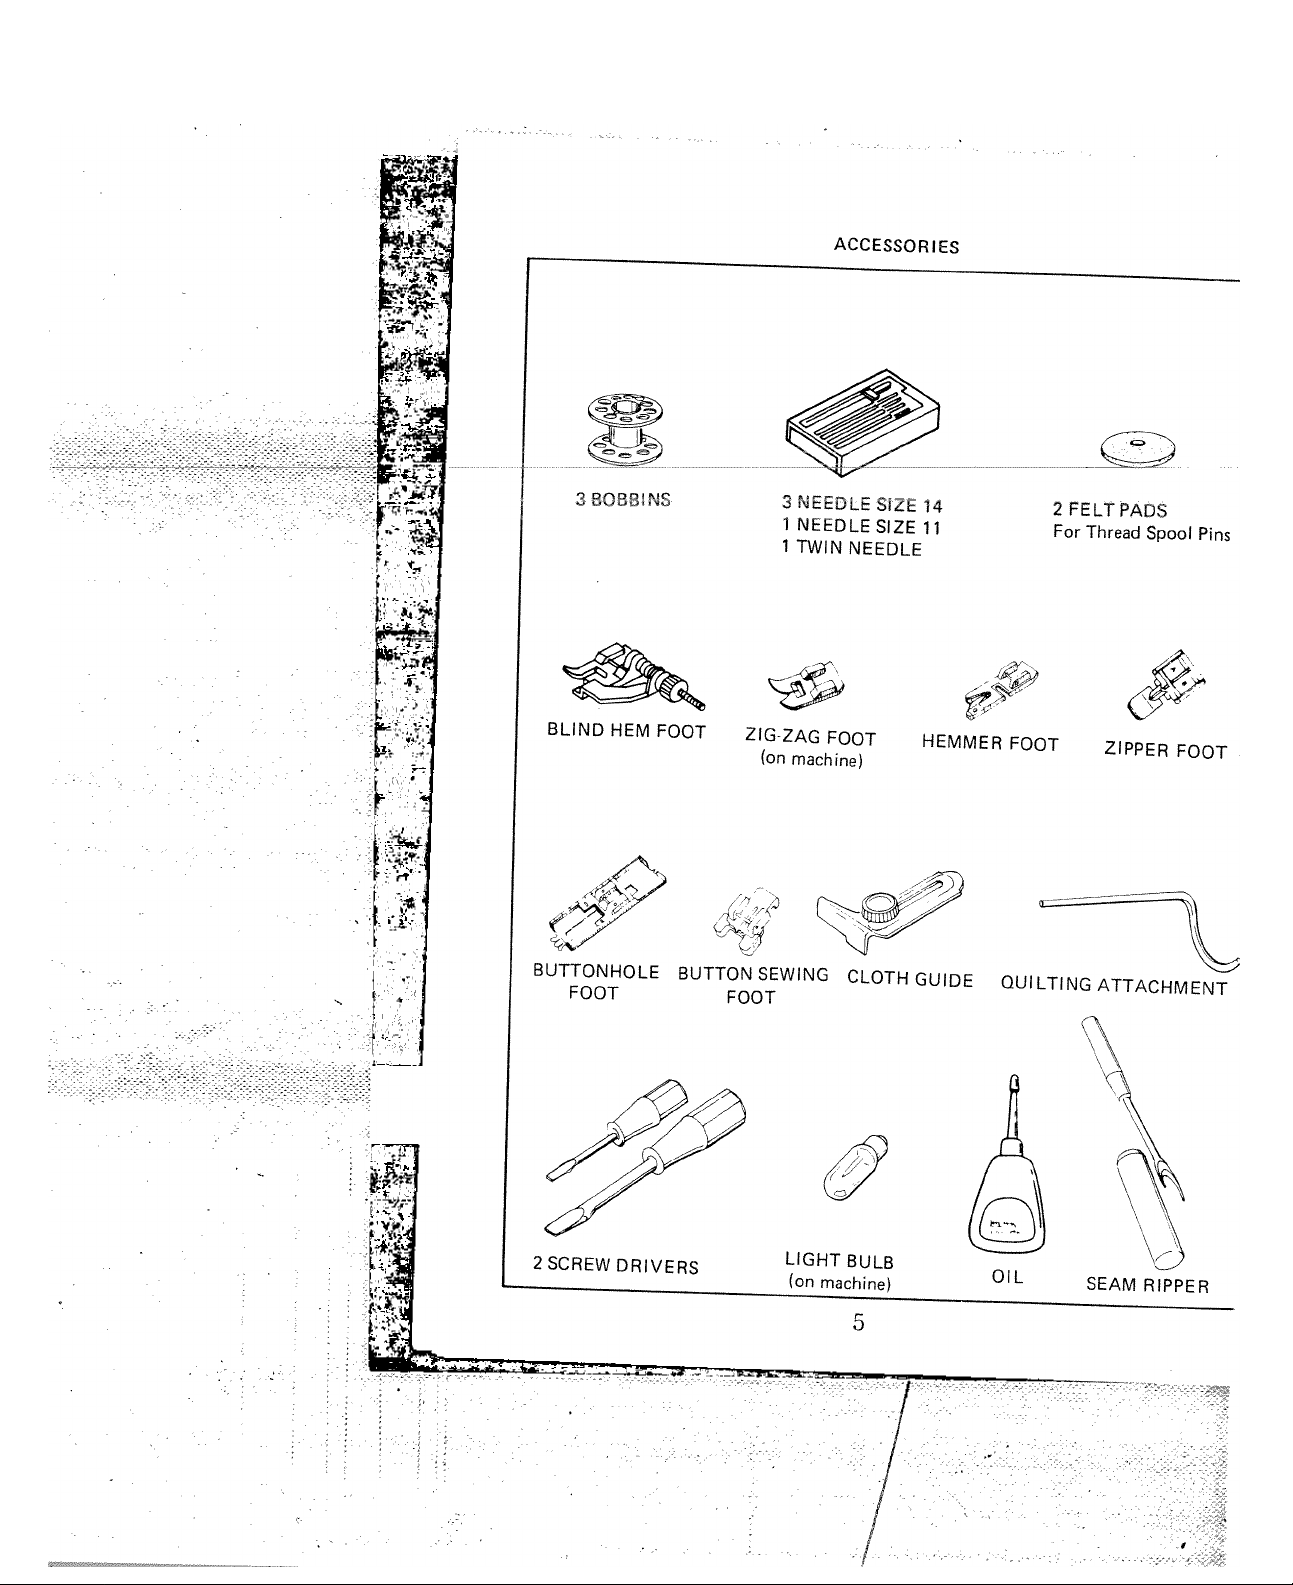
Accessories. . ir
Speed control dIuq. .
Light switch....
Sewing light. ' g
Foot control. ... G
Installing extension table
Needle, thread and fabric chart
Changing the needle. . . ,
To select a suitable needle.
Removing and attaching the oresser font
Winding the bobbin .
Adjusting bobbin winder.
Threading top thread . n
Threading the bobbin case. .
Picking up bobbin thread
Pattern selector
* Selecting stretch stitch.
Stitch length dial, reversing button
and dropping the feed dog
Adjusting top thread tensions
Adjusting bobbin tensions
Regulating the presser foot pressure
(Patch-O-Maticj ....
Presser foot lever. ... in
.................
........................
/t
ir
..........................D
tjiS
^ ’
1
i V
m
1
&
VW '« Him
PART II
START SEWING
Keeping stitching straight..........................................
Straight stitch. . . .
Basting
..........................................
Staystitching ....
Changing sewing directions . . .
Fastening seams ....
............
on
..........21
...................
23
Page 6

Zigzag stitching.................................................................................. 24
Overcasting
Interfacing darts
Checking tensions........................................................................ 25
.
.................
Shell stitching..................................................................................... 25
........................-.^.-.^...-............-............-............-............
..................................................................................
...........................................................................
......................................................................................................................................................................................
24
24
g:>><:;g:g$4
:■!
Appliqueing,....,.
Bar tacking..................................................................................... js
STRETCH AND UTILITY STITCH SEWING
Stretch stitching................................................................................. 27
Triple straight stretch stitch
Rickrack Stitch.................................................................................. 27
3-Step stretch zig-zag stitch.............................................................. 28
Smocking stitch................................................................................ 23
Overlook stitch................................................................................... 29
Sewing with a twin needle
Sewing buttonholes
Buttons.............................................................................................. 22
Sewing blind hems............................................................................ 33
Double action stitch.......................................................................... 3^
Double overlock stitch....................................................................... 3^
Sewing zippers . .............................
Hemming. .
Mending and Darning ■ • • •
Embroidery
PART III CARING FOR YOUR MACHINE
Cleaning feed dog and shuttle
Oiling............................
Problems — and Probable causes
Shuttle cleaner. ... ^1.42
^ Og
Mending
Darning . ,
............................
^ ............................................................................
.....................................................................................
............................................
...............................................................
.................................................................
...................................................
.....................................................................
.....................................................................43
.....................................
.............................
............
^ 25
27
29
30 31
.........................
...............
...............
38
Page 7
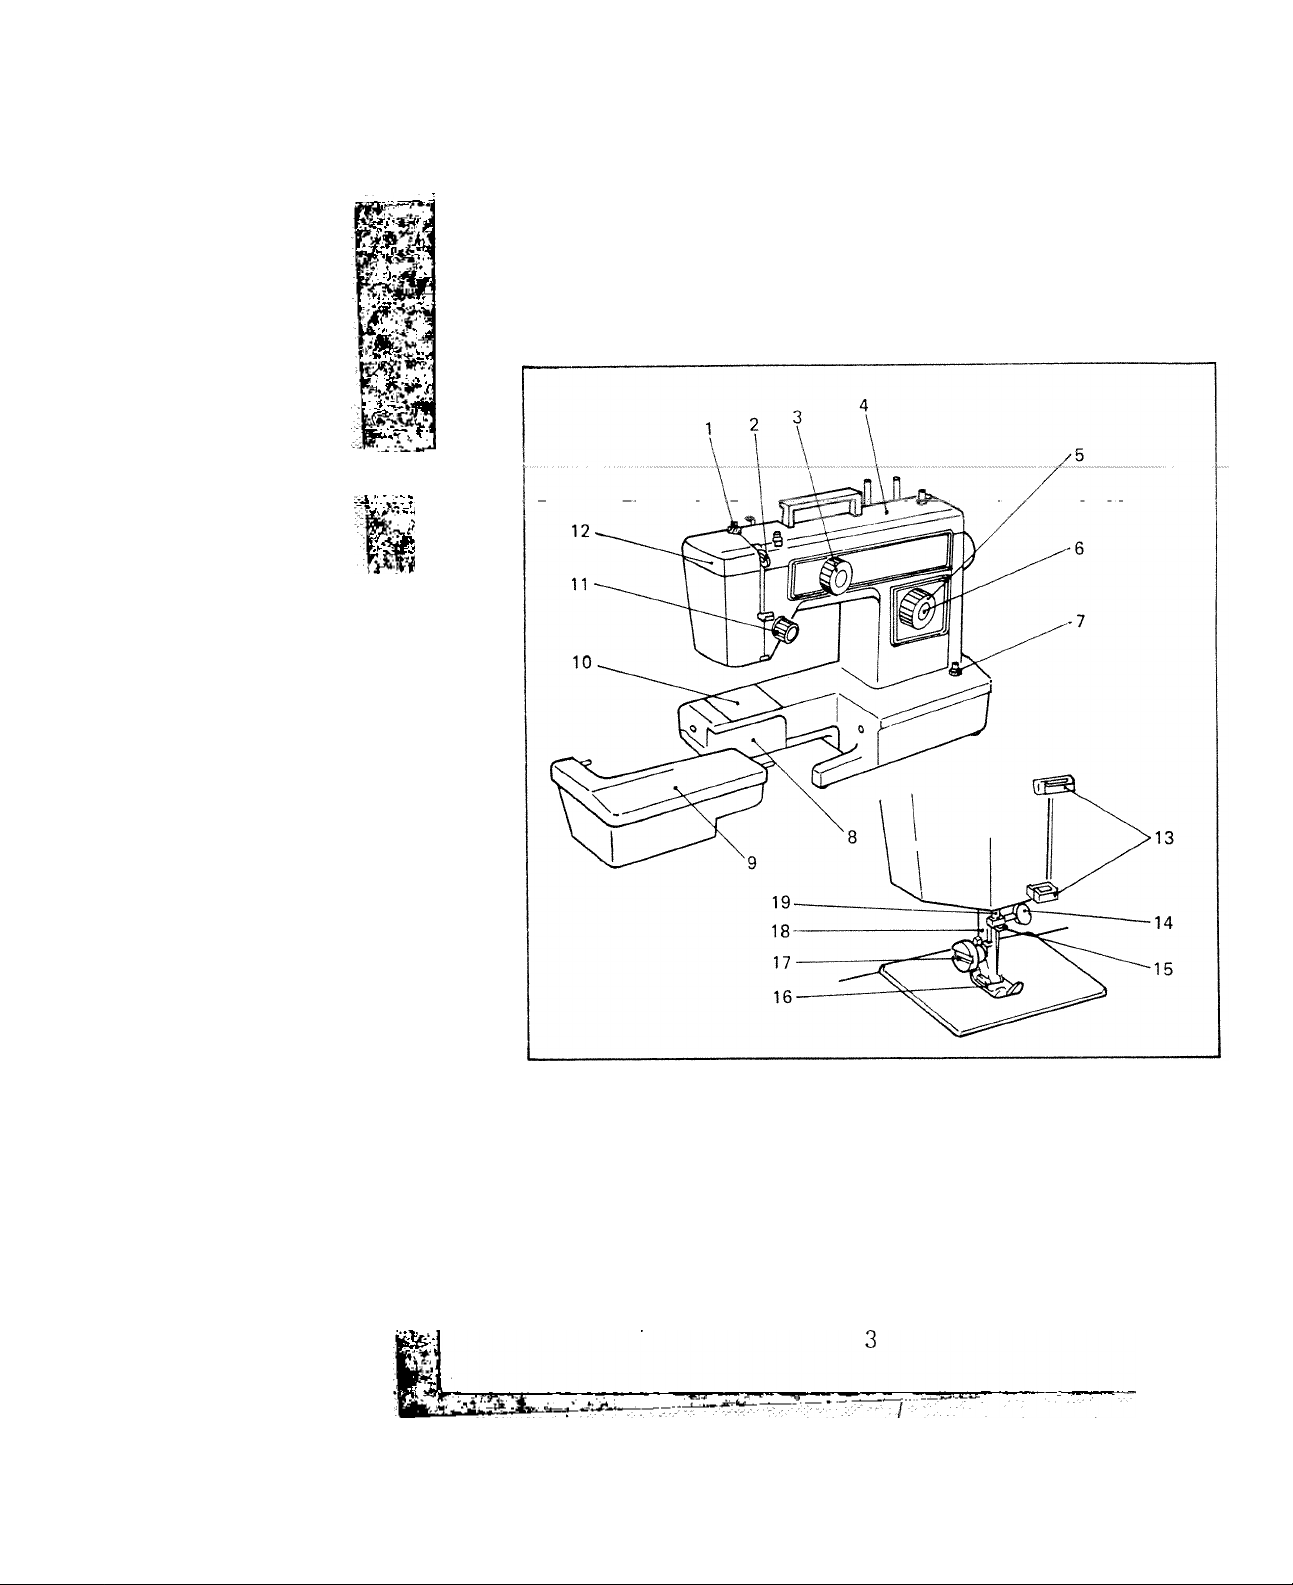
PARTI KNOWING YOUR SEWING MACHINE
KNOW THE PARTS
FRONT VIEW
i
1. Pressure regulator (Patch-GMatic)
2. Thread take-up lever
3. Pattern selector dial
4. Top cover
5. Stitch length dial
6. Reversing button
7. Switch
8. Shuttle cover
9. Extension table
10. Needle plate
11. Thread tension dial
12. Faceplate
13. Face piate thread guides
14. Needle damp and screw
15. Needle bar thread guide
16. Presser foot
17. Presser foot bracket thumb screw
18. Presser bar
19. Needle bar
Page 8
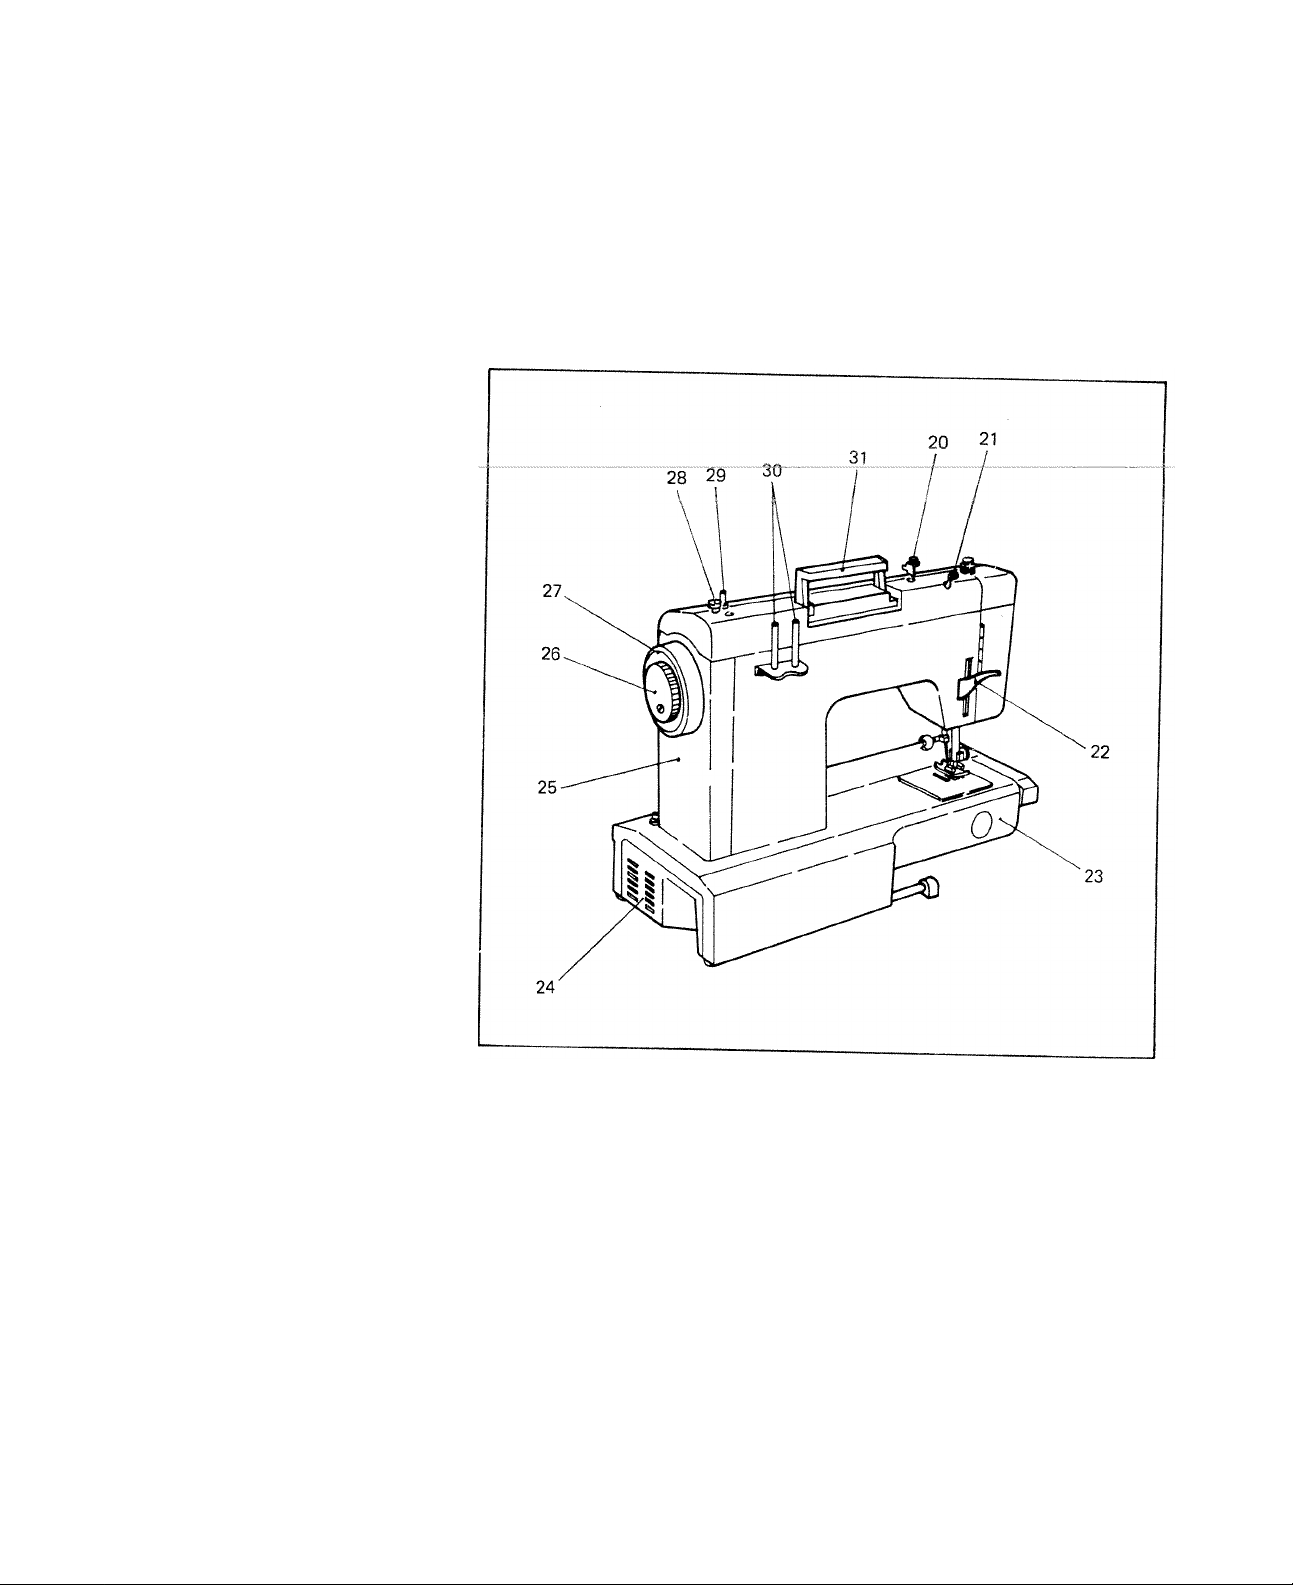
BACK VIEW
i;:-"ii.
-i i-.
20. Bobbin winder thread guide
21. Upper thread guide
22. Presser bar lifter
23. Free arm
24. Terminal cover
25. Belt cover
26. Clutch knob
27. Hand wheel
28. Bobbin winder stopper
29. Bobbin winder spindle
30. Spool pins
31. Carrying handle
a
Page 9
Page 10
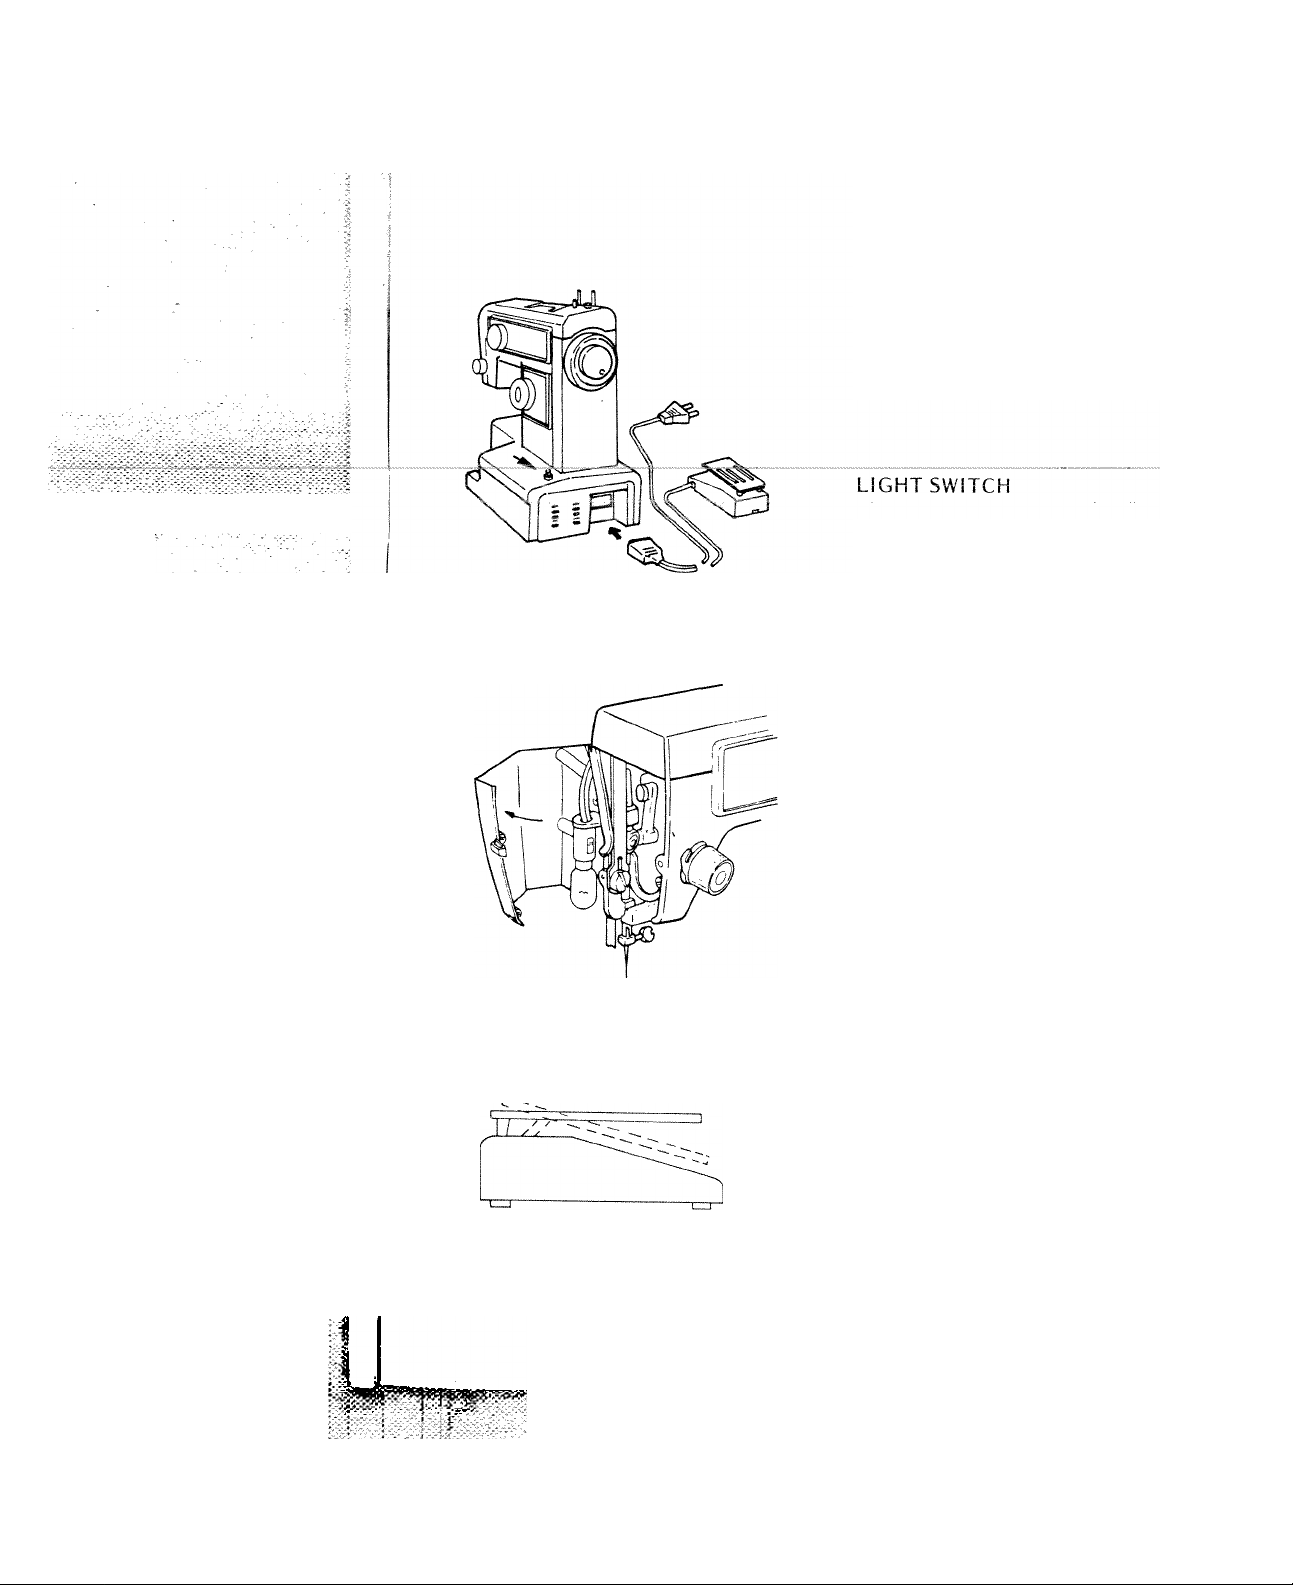
ELECTRONIC SPEED CONTROLLER
Push the speed control plug onto three
prong connector.
Plug machine cord into any 110 ~ 120
volt wall outlet.
Turn light on and off by pushing light
switch.
SEWING LIGHT
The sewing light is located in the face
cover as shown. To replace the bulb,
turn the light off and open the face
cover. Push the bulb up and turn the
bulb counter-clockwise and remove d
from the socket.
Push a new bulb m and turn it clockwise.
NOTE:
First, unplug the machine prior to re
moving and replacing the bulb. Be
aware that the light bulb may be warm.
FOOT CONTROL
Step on this control to start tosew. The
harder you press on the control, the
faster the machine will sew. Slow down
by reducing foot pressure on the control.
You may want to practice your speed at
different levels when you first use the
machine.
Page 11
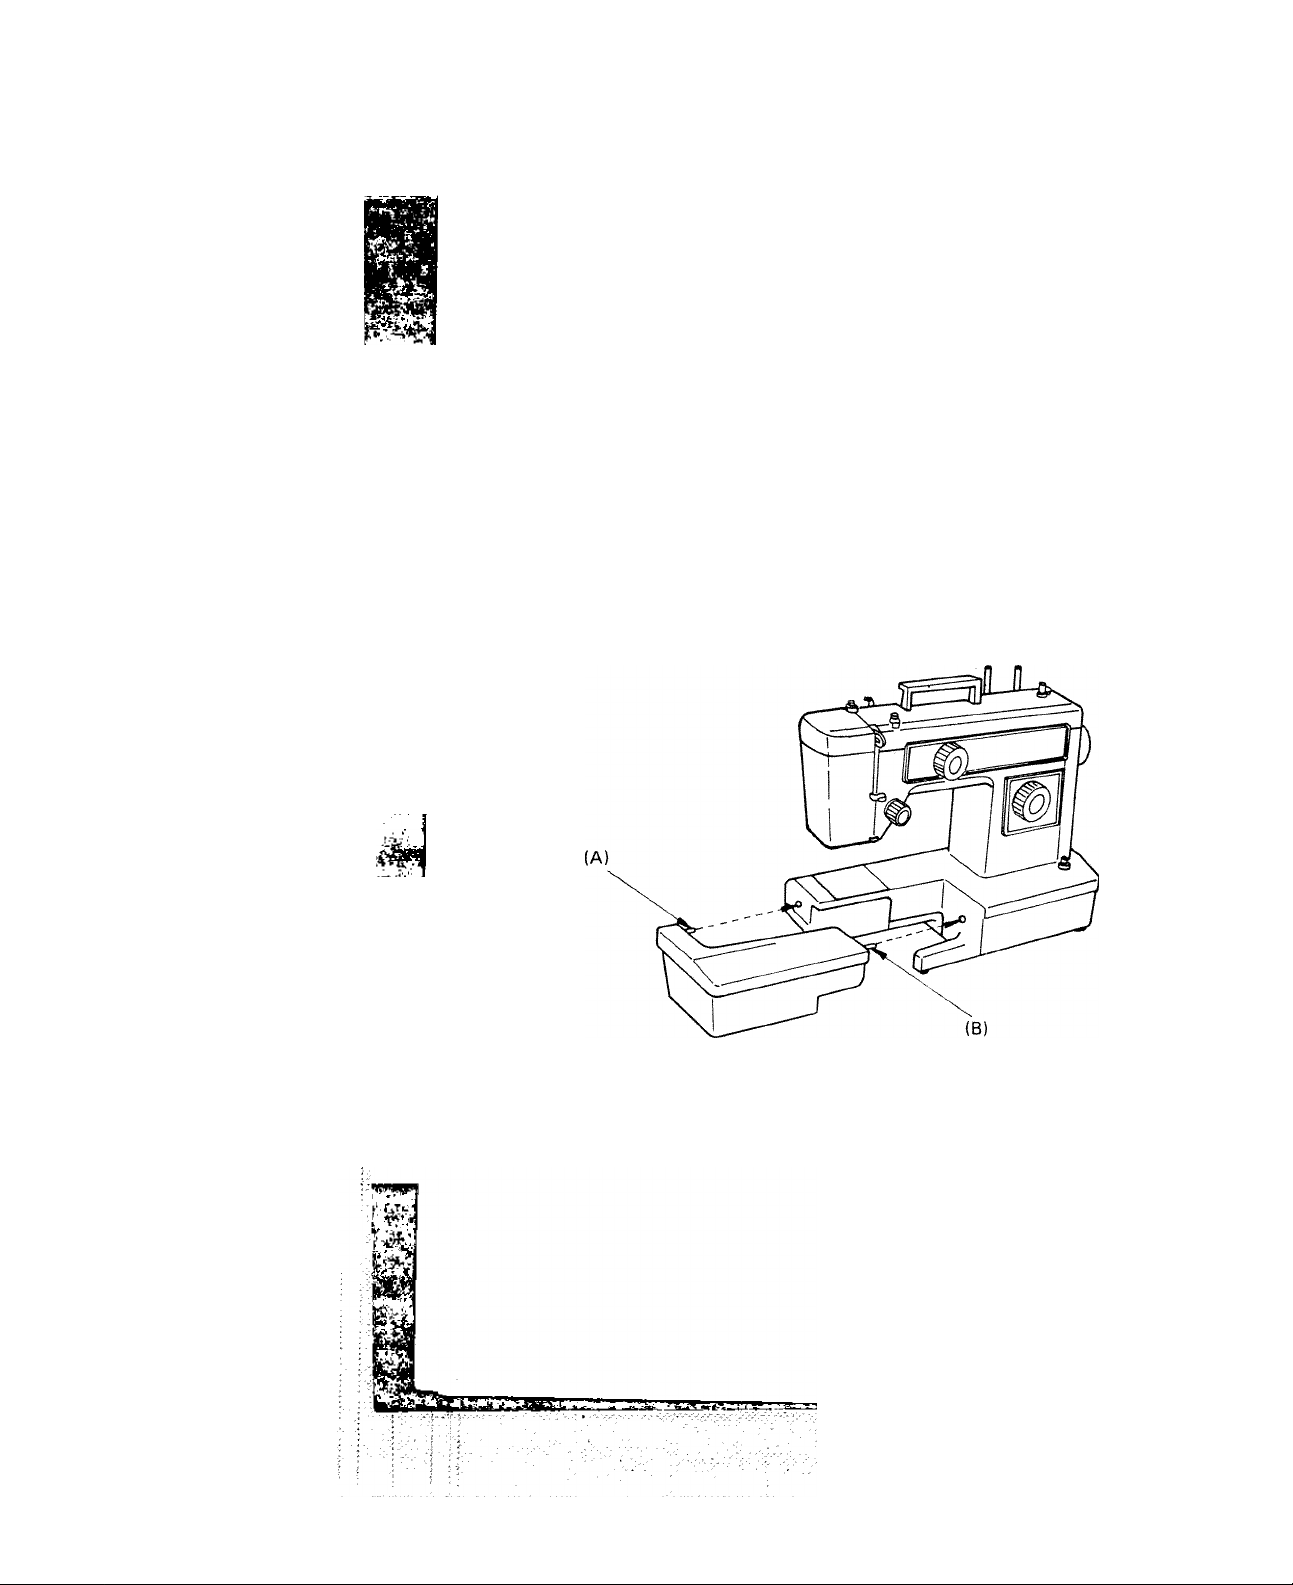
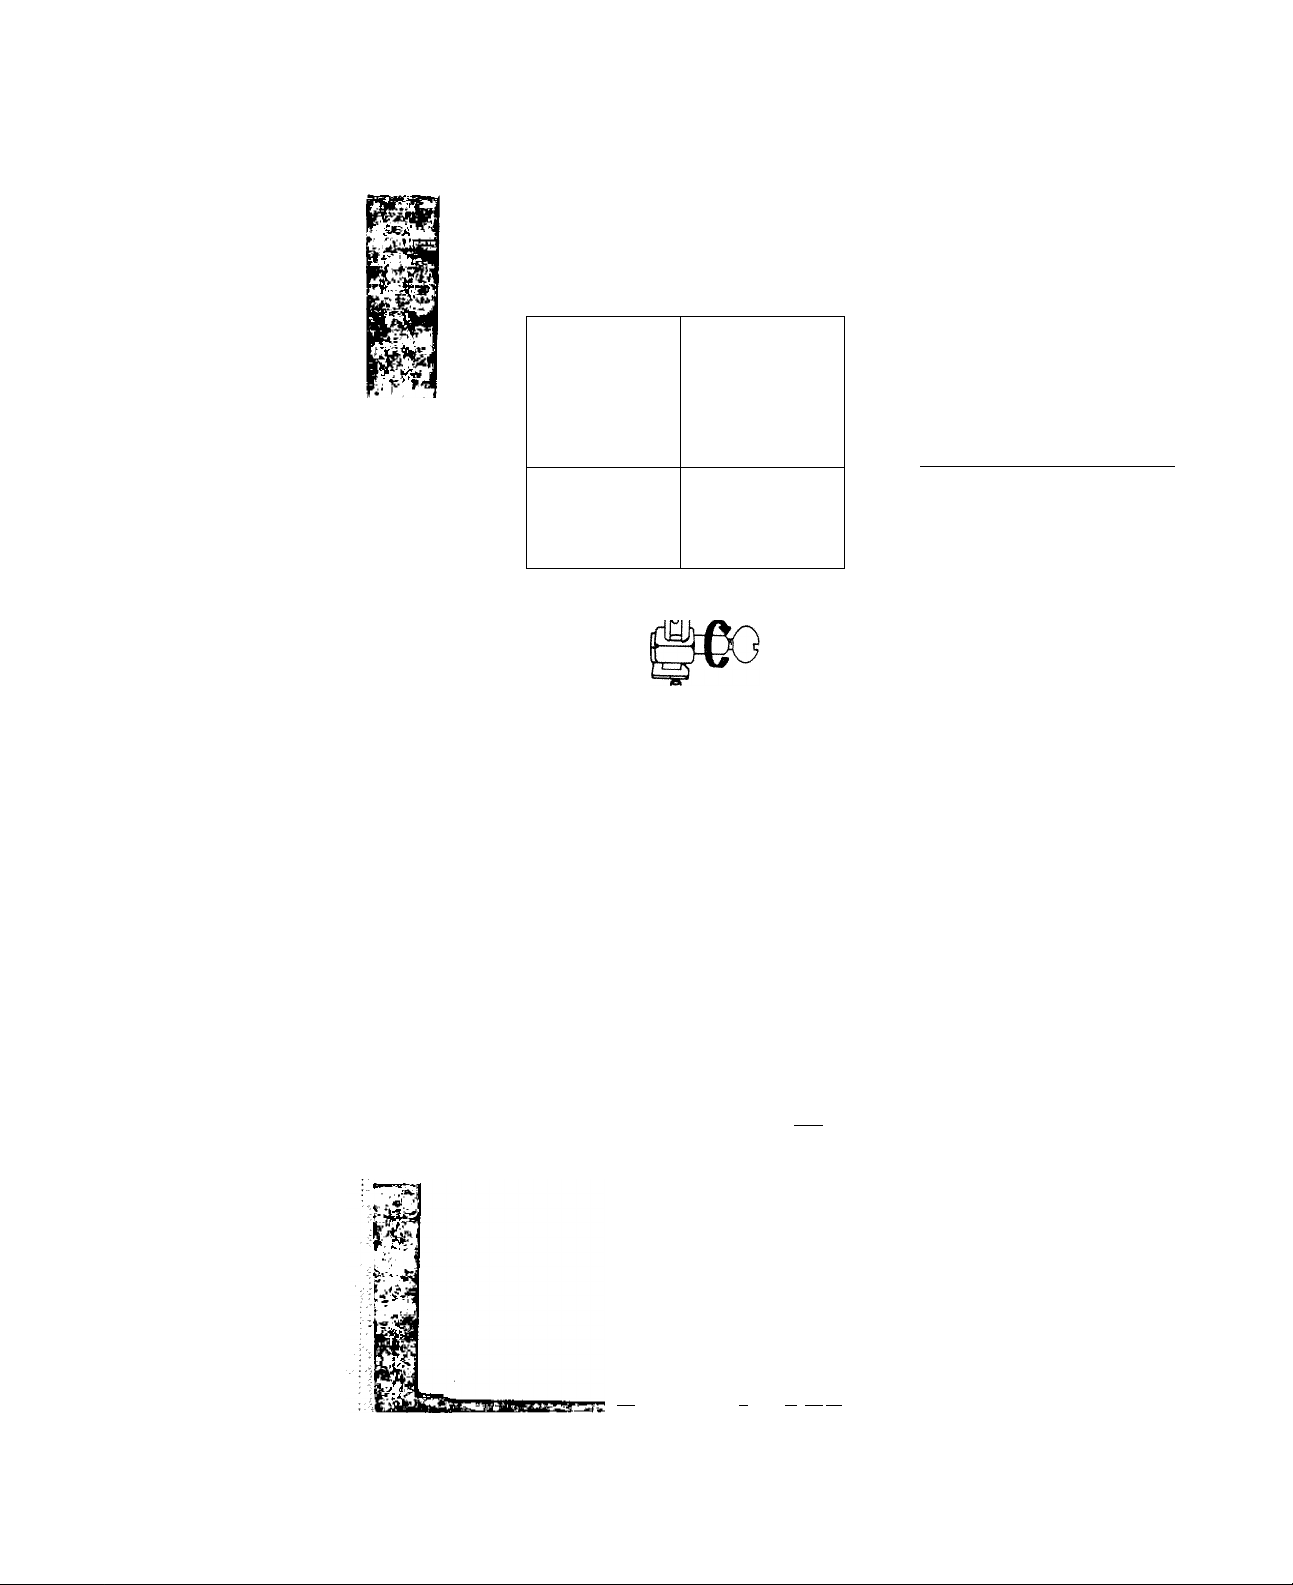
INSTALLING EXTENSION TABLE
For all flat-bed sewing use the extension table provided with the machine. To
install the extension table, simply slide the table along the free arm until the two
Pins (A) and (B) enter fitting holes in the machine.
Lower the support leg.
^To ^tension
.table .from the machine .by puIJing-itTo-thefeft.
.................................................
Page 12

NEEDLE, THREAD AND FABRIC CHART
The needle and thread you choose depends upon the fabric you are stitching.
The correct needle size is important to avoid damaging the fibers of light weight
or tightly woven fabrics, and to prevent needle breakage when stitching heavy
or stiff fabrics.
Needle
size
9 * cotton covered polyester
fine "fine mercerized cotton |70-100| organdy
11
light "mercerized cotton (50-60)
■ ■ ■ - 'i 14
medium
■ ;■ .--i
■ ■■ ^ ^
- ■■■■—■; ->■ ■
' -T
■ • ' . ' ■' • ,
.............
16
heavy
Thread
potyeifer
"silk A
"polyester
"cotton covered polyester
"silk A
"polyester
"cotton covered polyester
"mercerized cotton (50)
"silk A
"polyester heavy wools, corduroy, felt.
"cotton covered polyester
"mercerized cotton (40-50) and drapery fabrics
"heavy duty mercerized (40)
"silk D (buttonhole twist for top-
stitching)
trrcot, lingeriefatincs, chtffoTi,
net, voile, sheer lace, fine silk.
light weight knits, jerseys, silk.
batiste, taffeta, satin, lace, crepe
double knits, linen, poplin.
gingham, pique, seersucker, fine
corduroy, velveteen, light weight
wools
terrycloth, canvas, upholstery
Fabric
1 * Always use same type and size of thread in both needle and bobbin.
* Always
the fabric. Chemical finishes and man-made fibers blunt the needle faster.
Never use a bent needle.
If your machine is skipping stitches, replace the needle before looking for
trouble elsewhere.
When sewing very fine fabrics, use tissue paper underlay to prevent yarn distor
tion.
When sewing stretch, very fine fabrics and synthetics, use a BLUE TIPPED
needle. The blue tipped needle effectively prevents skipped stitches.
use a sharp needle. A blunt point
can cause skipped stitches or snag
8
Page 13
(3)
{___
i
CHANGING THE NEEDLE
1. Turn the hand wheel towards you
until the needle is at is highest posi
tion.
2. Loosen the needle clamp screw by
turning its top edge towards you.
Remove the needle from the damn
I
(4)
.......
3. Place the new needle into the needle
clamp with its flat side facing away
from you. Push the needle up into
needle clamp as far as possible.
4. Tighten the needle clamp screw
firmly.
V
.............
I -^1
TO SELECT A SUITABLE NEEDLE
Stem
T—)
a'l-lt I —f: ■ ri^V 'iL.lL--
A number indicating the size of
needle is marked on the stem. The
higher the number, the thicker the
needle.
Do not use any needle which is bent
or blunted.
Page 14
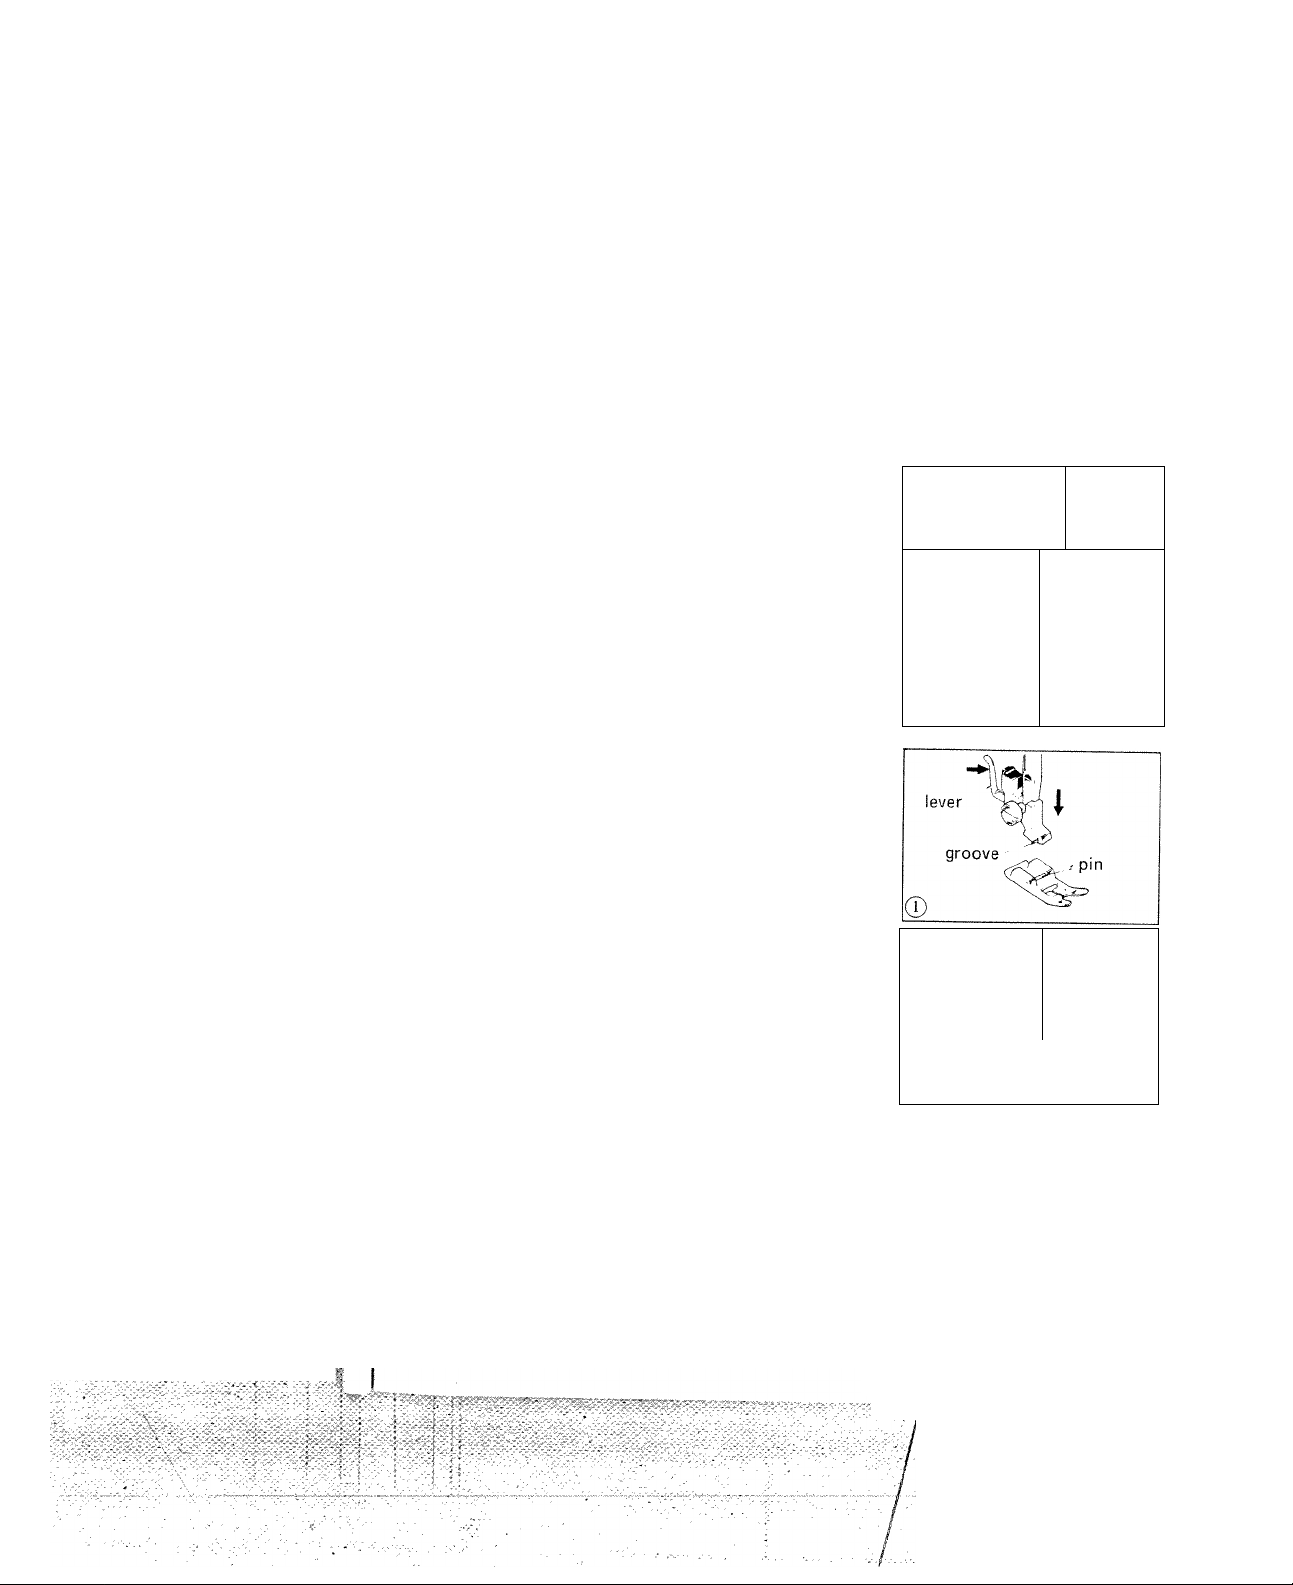
REMOVING AND ATTACHING THE PRESSER FOOT
To Remove;
1. Turn the hand : wheel towards you until
the needle is at its highest position. Raise
the presser foot by lifting the presser foot
lifter.
^ 2. By lifting the^Jeveron^he back of the foot
holder, the presser foot will drop off.
Note: *Do not force the presser foot to
remove it.
To Attach:
1. Place the presser foot so that the pin on
the foot lies just under the groove of the
foot holder. Lower the foot holder.
2. When the presser foot lifter is raised
you'll find the presser foot is locked in
place.
1 ^ ' foot
(D '
Presser -^ / |
1
1
....
10
(D ^
Page 15
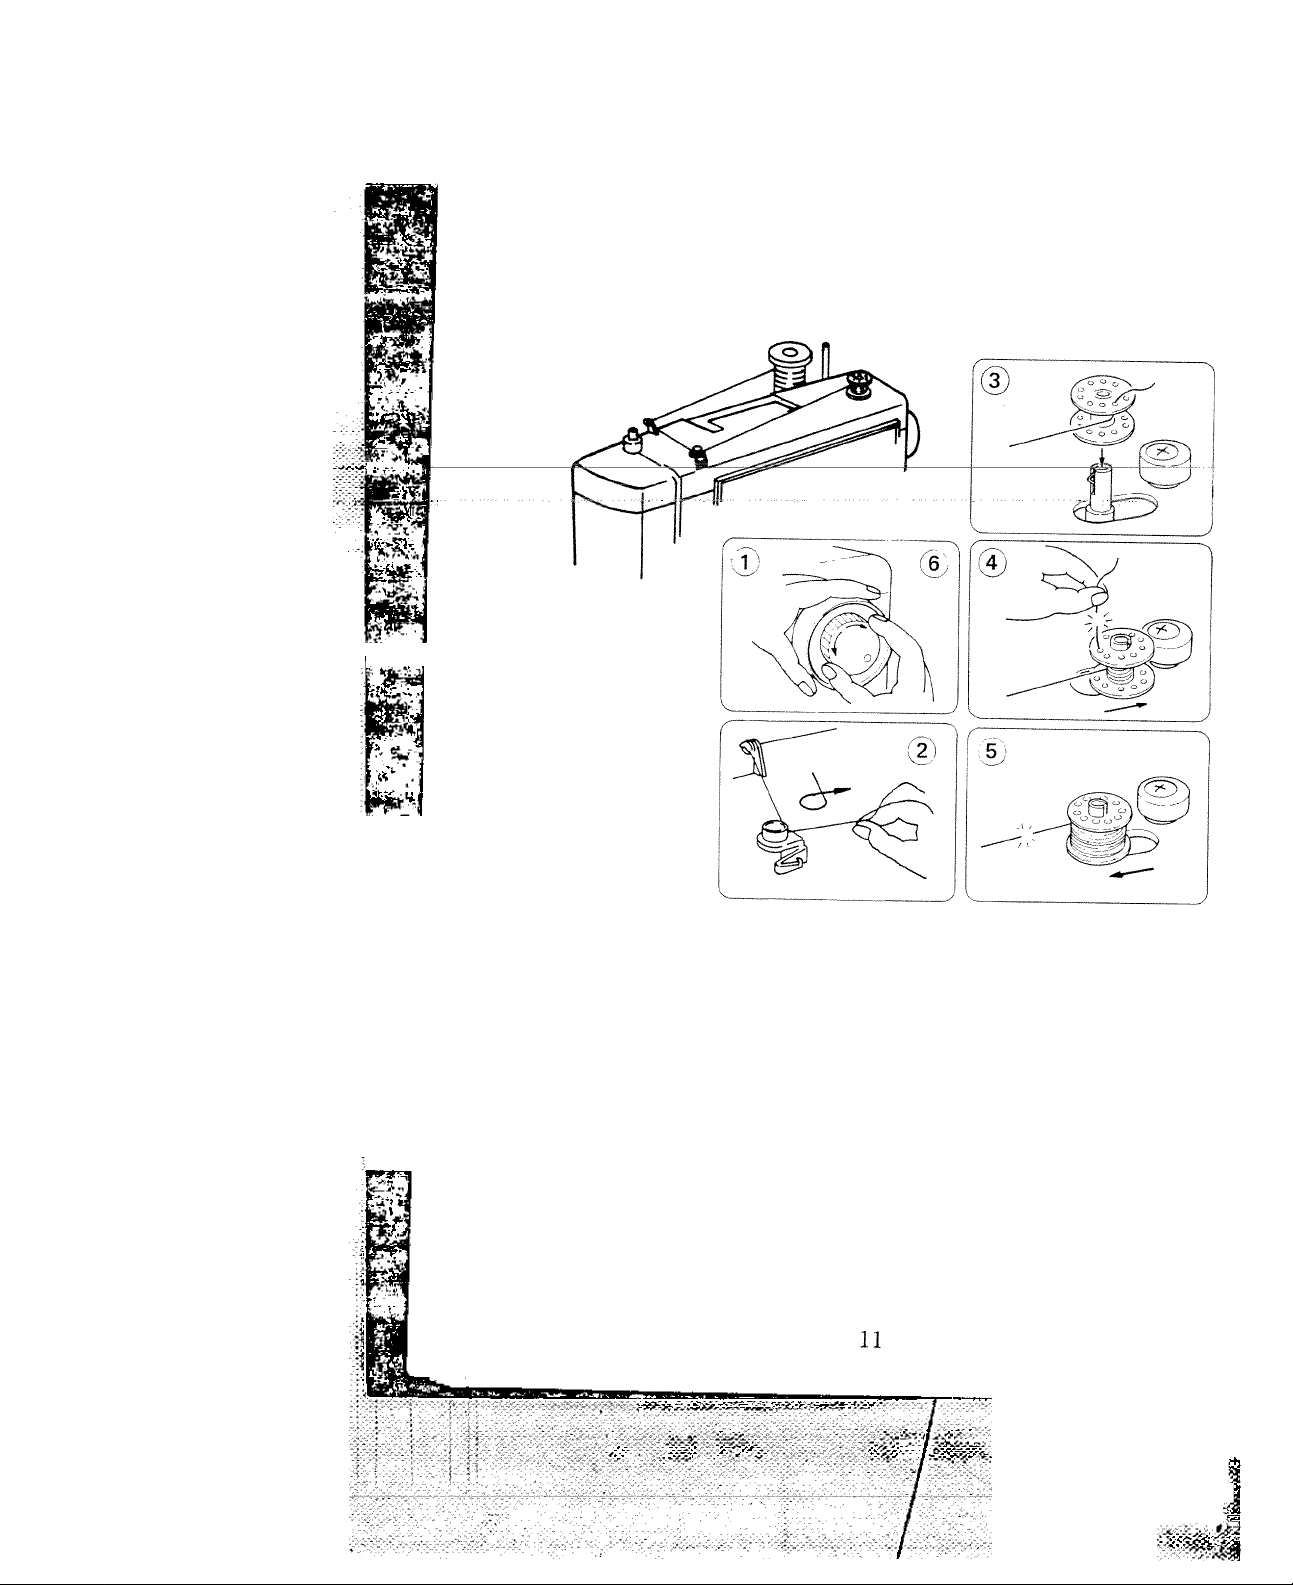
WINDING THE BOBBIN
1. Release clutch by turning clutch
knob toward you.
2. Draw thread from spool through
bobbin winder tension disc as shown.
3. Pull end of thread through hole in
bobbin as shown.
4. Place bobbin onto bobbin winder
shaft with end of thread coming
from the top of the bobbin. Push
bobbin winder shaft to the right
until it clicks. Holding onto end
of thread, start machine. When
bobbin is slightly filled, snip off
end of thread.
5. Wind thread until winder stops.
Remove bobbin. Clip thread.
6. Tighten clutch knob.
■ -A
'
Page 16

1
ADJUSTING BOBBIN WINDER
Correct
The thread must be wound onto the bobbin
evenly.
- - - - - ■ . - ■ , ■ -
':y
■ I
I
1
Incorrect
Incorrect
Bobbin winder thread guide
Fixing screw
Set the winder stop so that the bobbin is
filled to about % with thread. The bobbin
must stop turning when the required amount
of thread is wound. If the amount of
thread is not correct, loosen the screw and
move the winder stop as shown in the
illustration at the right.
If the thread piles up at the bottom, loosen
the fixing screw of the winder tpruipn and
set the tension a little higher.
If more thread is wound on at the top of the
bobbin, push the winder tension down a
little.
After adjustment, do not forget to tighten
the fixing screw!
To locate fixing screw, open face plate. This
screw is directly under bobbin winder thread
guide inside the top cover.
bobbin
winder
stopper
LESS MORE
12
/
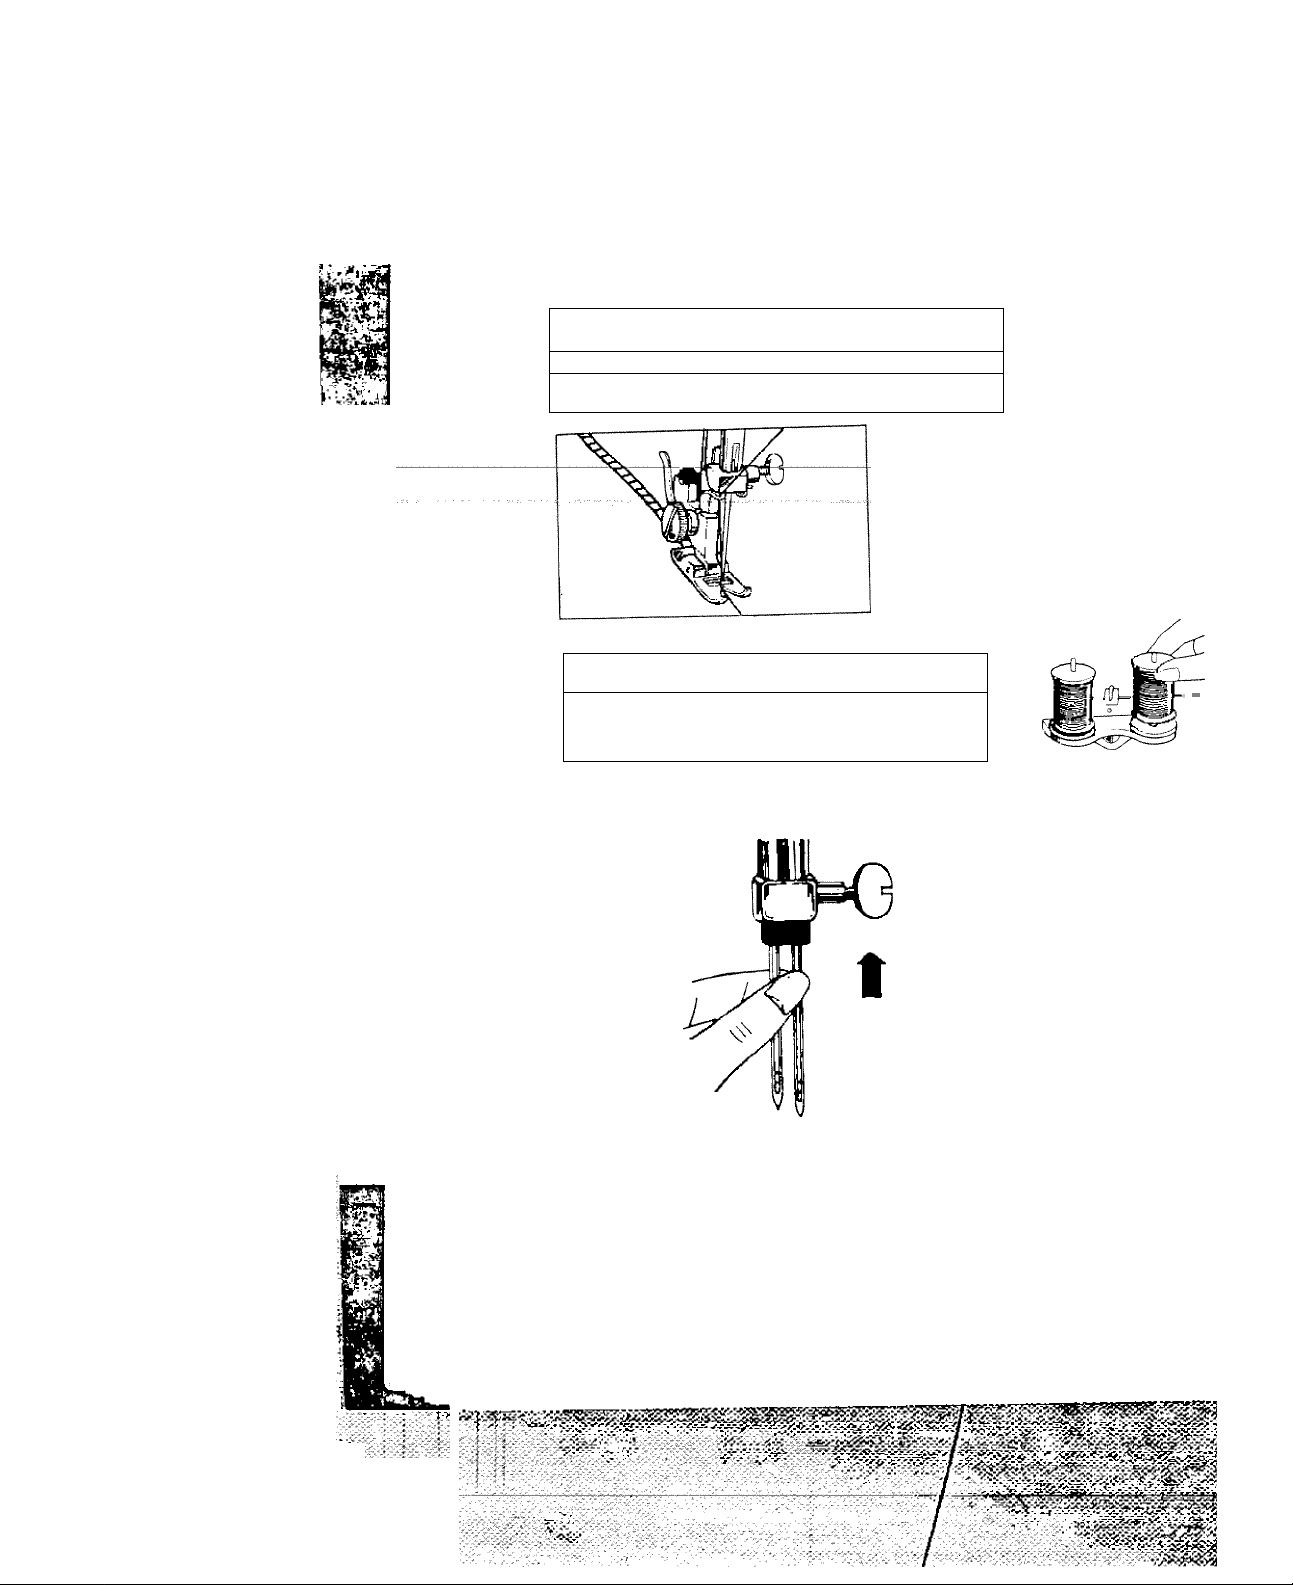
Page 17

i®
(DM
------------------
1
N
Place spool on spool pin as shown, with
thread coming from the back of the
spool.
Draw thread through top thread guides.
Holding spool stationary with right
hand, pull the end of the thread between
the tension discs as shown above (3).
Pull the end of the thread taut with left
hand. This will pull the spring wire up
and past the end of the hook. The
thread will then slip into the hook when
the spring is released as in (4i.
V
Release spool of thread and thread
machine through take-up lever (5) and
thread guide (6i as shown above. Thread
then passes through guides (7) and (8).
Thread needle (9) from front to rear.
13
J
Page 18

THREADING THE BOBBIN CASE
. ' - V I.
■> v:-:'5
- ‘ :
; ■
‘ 7 :
: =
-4- -4
■ -
"r'-TC-
..
1. Remove the extension table from the
machine by pulling it to the left
Open the shuttle cover by pulling
down the embossed part on the left
side of the cover.
2. Raise needle to its highest position
by rotating hand wheel toward you.
3. To remove bobbin case from shuttle,
pull open latch of bobbin case.
4. Pull bobbin case straight out
shuttle.
-i
.VC7
5. Insert bobbin into bobbin case
making sure thread is coming from
bobbin as shown.
6. Pull thread through slot of case as
shown.
7. Pull thread under tension spring.
8. Holding latch open, position case
into shuttle, and release latch. Case
of
should lock into place when latch
is released.
14
Page 19

PICKING UP BOBBIN THREAD
1. Raise presser foot iever. Hold needle
thread loosely in left hand and rotate
hand wheel toward you one complete
turn.
2. Bring bobbin thread up by pulling
upper thread.
3. Pull both threads under and to the
back of the presser foot, leaving 3
to 4 inches of thread clear.
If you cannot pick up bottom thread
by following steps given above, then
check:
1. Is needle threaded from front to
back?
2. Is thread tangled around needle?
3. is there 3 to 4 inches of thread com
ing from the bobbin case?
4 Is thread from bobbin case tangled?
Page 20

THE PATTERN SELECTOR
The desired pattern can be selected by turning
the pattern selector dial. The marks on the dial
correspond to the patterns shown on the panel
respectively, as follows:
A( cJD ) straight stitch, middle needle posi
tion
Bi ) straight stitch, left needle position
ilgzagTIitch with variable width
) 3-step-stretch-zigiaf-stitch - - -
E(
^ ) stretch blindstitch
F(
^ ) double action stitch
G(
^ ) reverse blindstitch
m ^ m automatic buttonhole sewing
Selecting Stretch Stitch:
When sewing stretch stitch, set the stitch length
dial at "S.S."
When you release the "S.S.” engagement on the
dial, the stretch stitch mechanism will be off
automatically.
A( cSd ) triple straight stretch stitch, middle
needle position.
B( ) triple straight stretch stitch, left
needle position.
C( Avwv ) triple zigzag stretch stitch or rick-
^ rack stitch
D( ^ ) smocking stitch
E( ^ ) fancy stretch stitch or blanket
stitch
F( 0 ) double overlock stitch
G( ^ ) overlock stitch
If you use a twin needle,
zigzag stitch width should
be in the range " ”
(zigzag width less than
" ff " mark).
Note:* Raise the needle to its highest position
before turning the pattern selector.
16
Page 21

STITCH LENGTH L„AL, .EVERS,NG BUTTON AND DROPPING T,
lO r'hanno +u« i_ .1 _
Jo change the length of the stitches
proceed as follows:
Turn the dial so that the number for the
required stitch length is at setting mark.
sl tr-hT T approximate
stitch lengths in mm. The lower the
reverse STITCH;
Press center of the stitch length dial
reversing button) and hold for reverse
feldi ™"^®diately start
feeding backwards. Release button and
machine will resume normal forward
sewing.
.'!,ddrf“"r
andd„Bw„h„d,ha.in8,„,ie,h,„ds
and for strengthening seams. '
dropping the feed DOG:
Embroidering and darning are best
carried out with the feed mechanism
disengaged. This is done by setting the
tie f drops
he feed and allows the material to be
moved freely under the needle
The feed starts its normal function again
as soon as you turn the stitch length
dial to 0" or beyond it.
stitch leng
.■w/-- * •
Page 22

ADJUSTING TOP THREAD TENSIONS
Probably the most important control on
your machine is this one that regulates
your top thread tension.
There are many reasons for having to
reset your tension. The best tension for
one fabric may not be correct for
another. The recjulred tension depènds
upon the stiffness of the fabric, thickness
of the fabric, numbers of layers of fabric
being sewn, as well as the type of stitch
you are making.
It is best to test the stitching on a scrap
of the fabric you are using before starting
to make a garment. Use the straight
stitch function as shown at the right.
ADJUSTING BOBBIN TENSIONS
An ideal straight stitch will have
threads locked between the two
layers of fabric.
TJppenttreaaTooTfgfrr
Decrease Tension ( o
Upper thread too loose
Increase Tension
Bobbin tension requires adjusting less
frequently than the upper thread ten^
sion.
If the stitch is satisfactory but the seam
is puckered, it may be necessary to
loosen the tension on both the top and
bottom threads. Be sure to balance
them.
When adjusting the tension on the bobbin
case, make slight adjustments with a
screw driver.
DECREASE TENSION
18
Page 23

REGULATING THE PRESSER
FOOT PRESSURE (Patch-O-Matic)
To release the pressure, push ring (A)
downwards. The machine is now free
from any pressure of the presser foot.
For sewing medium or light materials, push
regulator (B) down just a little to provide
"^freffglrt^esstife-reqtttfed:
If you are sevvirig ,thick or heavy materials,
push the regulator (B) farther down to
increase the pressure on the material.
---------------------------
ring (A)
-top®f
regulator
PRESSER FOOT LEVER
To aid you in the placement of heavy
fabrics under the presser foot, the lever
can raise foot beyond the normal "up"
position. This is also an aid in changing
your presser feet.
19
Page 24

PART II START SEWING
Now that you are familiar with the controls on your machine and with the acces
sories provided for the machine, you are ready to start to sew with your new
sewing machine. Below are some good habits to follow each time you sit
down to sew:
..
...........
-tlr#.n66(jl6
the correct size for the fabric and thread being used. Do not be afraid to change
your needle frequently. Many of the new fabrics made of synthetic blends tend
to dull the needles more easily than fabrics made of natural fibers.
2. Before placing the material on the machine, see that the ends of the threads have
been drawn about 4 inches to the rear of the machine. Hold on to threads
during the sewing of the first 3 or 4 stitches of the seam.
3. Test the machine stitch on a scrap of fabric you plan to use. The fabric should
be double thickness. Adjust the machine for the length of stitch and tension
suitable to your fabric.
4. Fabric should be placed under the presser foot with the bulk of the material to
the left of the needle and the right edge of the material placed on the 5/8” seam
marking on the needle plate when making a simple seam.
5. Run the machine at a slow even speed. The more pressure you put on the foot
control, the faster the machine will sew.
....
it gh0y|r|
.....
1^9 Strsight, prOpSfly SSt SHCJ $fl3fp Qfl
.......................
poiflt. SofSCt
.........
6. Fasten each seam by back tacking at the beginning and end of the seam.
7. Always finish sewing each seam with the needle at its highest point.
8. Guide the fabric gently with your hand in front of the needle. Never pull or
hold the fabric in such a way that the normal feeding is altered.
9. When turning the hand wheel manually, always turn it toward you.
20
Page 25

-nm
Keeping Stitching Straight
Your machine has three aids to help
keep your stitching straight, whether
stitching seams or doing decorative
stitching.
* Numbered guidelines on the right
side on needle plate.
Numbers indicate distance, in eights
L
of an inch, form the needle. For 5/8"
seam, line up your fabric with the
' numbered 5/8" ^guideline.
Cloth guide attachment
Use for stitching seam widths that
are wider than markings on needle
plate, and for making wide hems.
Also use as a guide for blindstitching.
Fasten cloth guide to machine by
inserting thumb screw into hole in
bed of machine. Adjust cloth guide
to desired distance from needle and
tighten screw.
Quilting attachment
Use for stitching parallel lines with
out marking fabric when quilting
shirring, smocking, or making rows
of decorative stitches.
Insert bar (A) into hole in the Foot
Bracket (B). It is movable from side
to side to set it at the desired position.
Pin Basting
Place pins at right angles to presser foot
with pins just nipping into fabric at
stitching line. Never place pins on
underside of fabric in contact with
fabric feed or so presser foot ride;
over head of pin.
21
.....
.
Page 26

STRAIGHT STITCH
Presser foot
Pattern selector
Stitch length dial.......................0.3 ^'4 '
Ypu..will
temporary and parmanent ‘ “
'■ .mg:rray„TSpTo°’Thf' »"»' «»"= “ =
M^Tof ti'h®' '^'^'=hing that holds the garment together
iipt“Sdr.r:^t's«re:;,fj^
.a“m™;-rSam'° S“ rriaalTra^“”'" '-ra o,
.............................
.......................
...
find
...in..
gaimfini
Sng ° temporary stitching are:
Stay stitching
Guide line marking
Common two layer seams
Curved two layer seams
Top stitched three layer seams
Top stitched four layer seams
zigzag foot
A{ C±D ) or B( dZ3 )
..
----------
---------
'»'P“ »»<"9-
zigzag foot
rx X nXioraorLxxxxCarsir
Starting Sewing
1. Be sure both the threads are drawn
back under the presser foot.
2. While holding the threads with your
left hand, turn the hand wheel
toward you to bring the needle into
the fabric where you wish to start
sewing.
3. Lower the presser foot, and press the
speed controller gently, then start
Page 27

fWM
Basting
Machine basting is very useful for join
ing seams for trial fittings, marking
construction guidelines, and basting
pleats and hems.
Use longest stitch possible, setting
stitch length at 4. Loosen tension on
upper thread. Choose thread color to
.
conttast.with.y our. fabric.so.it.can.he
easily seen.
Basting ^ stitches can be'removed ^easily
by clipping upper thread, then pulling
out lower thread.
Staystitching
Staystitching prevents stretching and
acts as a guideline for clipping and
joining curved edges. Staystitch any
edge that might stretch during handl
ing before the final stitching.
Staystitch on a single layer of fabric;
always stitching in the direction of the
grain. Place stitching 1/8" away from
seamline in the seam allowance. Use
12 stitches per inch for most fabrics.
Changing Sewing Directions
1. Stop the machine, and turn the
hand wheel toward you to bring
the needle down into the fabric.
Raise the presser foot.
2. Pivot the fabric around the needle to
change direction as desired.
3. Lower the presser foot and continue
the sewing.
Fastening Seams
1. For fastening the ends of seams,
press down the reversing button and
sew several reverse stitches.
2. To remove the fabric, raise the presser
foot and draw the fabric away from
you.
3. Sever threads on thread cutter at the
rear of presser bar or with a pair of
scissors.
Leave about 15 cm (6 inches) of
thread hanging from the needle eye.
23
Page 28

ZIG-ZAG STITCHING
Presser foot
Pattern selector ....
Stitch length dial. .. .
This type of stitching greatly expands the use of your machine. This is the feature
.
tOBl 6D.3.Dl.fiS- y-.Qii- .i.Q_Qy.firjC3$t $63015, 3ppIi QU6 3D.Q-Oil Dii-t.t.OQS,-—Us ftn.& T3ITQ6
of widths as indicated on the pattern selector, you can sew any width you desire.
Since this is a range, you may set the dial between the illustrated widths.
................
.........
zigzag foot
. . . . . C( Ì
.........
0.3 - 4
OVERCASTING
This is one of the more frequently used
zigzag stitches in garment construction.
You may want to overcast along the raw
edge of each seam allowance or fold the
raw edge toward the garment and stitch.
Fig. 1 shows the raw edge finished.
Fig. 2 illustrates the folded edge stitched.
Stitch so the needle pierces the fabric
just short of the outside edge. Raw or
worn edges of older garments can be
overcast to prevent further raveling.
INTERFACING DARTS
To reduce bulk of interfacing darts, cut
interfacing down center between dart
lines. Overlap cut edges, matching dart
lines. Zigzag stitch along marking line
from point to wide end of dart. Trim
both raw edges close to stitching.
24
Page 29

CHECKING TENSIONS
The easiest way to check tensions is to
sew a medium zigzag stitch on the fabric
you will be using.
Use the appropriate type of thread and
needle. Use different colors of thread
ohtfieDdiDDirram^
Sew a line of medium zig-zag stitches.
The bobbin thread should not show on
the top of the fabric.
Adjust the top tension if necessary to
achieve the stitch formation mentioned
above.
SHELL STITCHING
Presser foot
Pattern selector. . . .
Stitch length dial. . .
...............
. . . zigzag foot
■ ■■ -G(
.................
1.5
UNDESIRABLE
TOP SIDE OF FABRIC
DESIRABLE
..M
When sewing this stitch, allow needle to
just clear the right edge of the fabric
when it zigzags.
NOTE:
You may need to increase your tension
slightly to achieve the shell affect.
Page 30

SATIN STITCHING
Presser foot
Pattern selector.. . .
Stitch length dial. . .
Closely spaced zigzag stitches are called satin stitches. This is an attractivfi stitrh
used for appliqueing, bar tacking or sewing on buttons.
Whenever you^ are ustnf this stitch/ft is weff-to' remember to loosen^WeheHsioft of ^
the top thread slightly. The wider the stitch sewn the looser the tension.
If you are stitching on a very soft fabric, it is well to use a backing of tissue paper
or interfacing for a well formed stitch. Puckering of the material will be eliminated
and the bobbin thread will not be visible on the top side of the fabric.
It is best to practice a sample design on a fabric scrap before sewing design on
garment.
..............
.. .zigzag foot
. . .C( M/Vw )
.. .0.3 to 1
APPLIQUEING
SETTINGS
Same as with Satin Stitching
Select an applique design to be applied
to your garment and baste it in place.
Satin stitch around the raw edge of the
applique completely covering the edge.
You may want to do this with a con
trasting color of thread or self color.
BAR TACKING
This stitch is similar to a very short satin
stitch and is used to reinforce points of
strain such as corners of pockets and
straps on lingerie.
Sew 4 to 6 zigzag stitches.
Page 31

STRETCH AND UTILITY STITCH SEWING STRETCH STITCHING
When sewing knitted or stretch fabrics, choose one of the stretch stitches which
allows the seam to stretch with the fabric without breaking the thread. Select
polyester or cotton covered polyester thread which has an extra amount or give
and is designed for knits and stretch fabrics.
“IrisT'ecorrffTOTTdedTT/yherr^sewlTTg^^stretch^TatencsTTIiM^T^speciailTTeedle^wTth
.shaft,is,,used.„..This..will.preMent.skipping,stitches..,.Also,.refer.,ta.Meedl.e, Thread
and Fabric Chart on page 8 to be sure that you use correct size needle and thread.
TRIPLE STRAIGHT STRETCH STITCH
Presser foot................................................zigzag foot
Pattern selector...........................................A( rtth)) or B ( dt!~) 1
Stitch length dial.........................................S.S.
Stretch straight stitch is a triple lock
stitch, combining stretchability and
strength. Use for stitching regular
seams in knits and stretch fabrics.
Use for stitching seams in woven fabrics
that receive a lot of strain when worn,
such as side seams, crotch seams, and
armholes in sportswear and children's
clothes.
Also use for topstitching when you
want a heavier row of stitching with
out using buttonhole twist.
Guide fabric gently allowing machine
to make the back-and-forth stitches
that gives stretch to the seam.
..........
blue
RICKRACK STITCH
Presser foot................................................zigzag foot
Pattern selector
Stitch length dial..........................................S.S.
Rickrack stitch can be used as a heavyduty all-purpose stretch stitch. Each
zig-zag stitch consists of three threads
or stitches, giving strength and perma
nence.
..........................................
C( AVvw )
27
Page 32

3-STEP STRETCH ZIG-ZAG STITCH
Presser foot
Pattern selector
Stitch length dial
SMOCKING STITCH
....................
...................
....................
3-Step stretch zig-zag stitch gives added
.
.......... ..
Use to overcast edges of seams, facings
and hems to prevent raveling and to
keep lightweight knits from rolling.
Besides knits, use for edges of thin,
easily frayed fabrics which have a
tendency to pucker when overcast
with ordinary zig-zag. Also suitable for
overcasting heavy fabrics such as wool
ens and terrycloth.
Use for attaching elastic. Mark elastic
and garment waistline in fourths. Place
elastic over fabric and pin together at
the markings. Take a few stitches to
anchor elastic to fabric, then stretch
elastic between pins as you sew.
Mend tears and patches on knits and
light weight fabrics with stretch zig
zag rather than regular zig-zag.
Presser foot................................................zigzag foot
Pattern selector
Stitch length dial
.........................................
.........................................
pj ^ j
5,3. -
With a narrow strip of fabric directly
under the line of gathering, stitch
over the gathers. The design will be a
series of small diamonds.
When smocking a garment, the stitching
should be done before the piece is sewn
into the garment.
Page 33
( Л — -tf I
OVERLOOK STITCH
Presser remove foot
Pattern selector
Stitch length dial
SEWING WITH A TWIN NEEDLE
Presser foot
Pattern selector
Stitch length dial
................
.......................
......................
..................
............
............
.........
...........
.............
..............
...............
zigzag foot
^ lAVVW'
0.5 to 1
zigzag foot
G( к )
S.S.
Overlook stitch is used for finishing
~seam “gdgesTrr’fetfrrcs^itralrstretott...-Ais-o ■■■
can be used to replace both straight
stitching and zig-zag overcasting in
knitted sports wear, lingerie, and handknitted garments. Makes a thin, flexible
seam that stretches.
Set the pattern selector in the range
1.
of "0-3", otherwise needle may hit
the needle plate and break.
Insert the twin needle in the same
way as a single one (flat side away
from you).
Place two spools of threads on the
spool pins.
Thread machine, taking care that the
3.
two strands of thread are separatee
as much as possible when placini
them in the holes of the threae
guides and the tension discs.
Be sure to place the two round felt
provided in the accessories over th
spool pins.
To turn a corner with a twin needle
stop stitching when right hand needl
just pierces fabric. Raise presse
foot, turn fabric half a turn pivotin
fabric on tip of needle. Lowe
presser foot and take one stitci
Raise presser foot again, complei
turn, and begin stitching in ne’
direction.
29
Page 34

SEW I NG BU T TO N HO L ES
Ths buttonhoie mschanism buiit'in this machine makes it possibie to sev\/ button
holes in a short time without turning the material.
N311 A
Presser foot
Pattern selector
Stitch length dial
...................................
..............................
.............................
buttonhole foot
0.3 to 1
PREPARATION
1. Change the presser foot with buttonhoie foot.
2. Push the sleigh to the bottom end, than put
button between nail A & nail B, fix the button
by the fixing screw (Drawing B)
3. Take away the button from buttonhold foot,
you than get the identical buttonhole size, start
to sew and pull the sleigh all the way forward
to the fixing screw.
*The yellow mark on the stitch length
dial shows range of buttonhole sewing.
An adjustment can be made by setting
the mark, as shown.
coarse
stitches
for heavy
fabrics
n
< <>
> <•
p
iJ
Fixing scrc>N
iOir.wng AS
(Draiving ¡3)
dense
stitches
for light
fabrics
(CONTINUED)
Page 35

f
SEW I NG BU T TO N HO L ES ( co n tin ue d )
1. Set the pattern selector at " C - Then
pass the needle thread through the
opening in the buttonhole foot and draw
both needle and bobbin threads to the
left side. Turn the hand wheel towards
you until the needle comes to the point
TIT ^
Lower the foot and srv'/ slowly until a
desired length is sewn, then stop the
machine at (2).
Raise the needle and set the pattern
selector at " Ш ". Then sew several
stitches of bar tack until the needle
is at point (3).
4. Raise the needle and set the pattern
selector at " H ", then sew the right
side of buttonhole just as the same length
as the left side of buttonhole. Stop the
machine at (4).
5. Raise needle and set the pattern selector
at " Q] ", then sew several stitches of
final bar tack. Stop the machine with the
needle at point (5). To lock threads, set
the pattern selector at "B Izero point of
zigzag width)” and sew a few stitches.
6. Cut the buttonhole open carefully using
a seam ripper, taking care not to damage
the bar tacks.
Place a pin across each end of buttonhole
to protest end stitching.
Page 36

1
BUTTONS
::
0
1
Presser foot.........................
Pattern selector
Stitch length dial
...................
..................
...............
#
1. Align two holes of button with slot
of presser foot and lower foot to
Button foot
hold the button securely.
27Turri hind wheel riTariuaiiy untlT
....
needle-'PoInt' butiofiv
3. Adjust stitch selector so needle enters
right hole of button.
4. Turn hand wheel by hand so needle
enters second hole. The stitch selector
may need to be adjusted again. Stitch
a number of times.
NOTE:
You may find it helpful to use trans
parent tape to position your button
and to keep it in place during sewing.
Tear away after stitching.
5. Finish sewing with an extra two
inches of thread remaining. Draw
these threads to reverse side of gar
ment and tie.
Holes of button
Thread Shank
Sew-through buttons on coats and
jackets should have a thread shank to
make them stand away from the fabric.
Place a straight pin or sewing machine
needle on top of button between the
holes, and sew over the pin or needle.
Pull thread to back of button and wind
around stitches to form a firm shank.
Tie thread ends securely.
Page 37

SEW I NG BL IN D H EM S
Presser foot
Pattern selector.'‘
Stitch length dial
- .............
... .................................................. to 3
........................................
anrpfei^TfFi^TJj
2. Fold hem back against the right side of
the garment with top edge of hem extend
ing about 4 mm (1/6 inches) to right
side of garment fold. (Fig. 2)
3. Place the garment under the foot so that
Z ='»"=
guide and lower the foot
Sew for better control, making
I stitches will fall
on the hem edge and wide zigzag stitches
w II just catch one thread of folded edge.
.........
, ^
il'h" have a
blindstitch hem (Fig. 4)
33
(Fi
Page 38

DOUBLE ACTION STITCH
Presser foot
Pattern selector
Stitch length dial
m
DOUBLE OVERLOCK STITCH
.......................................
.................................
................................
zigzag foot
F ( ^ )
1 to 2 5
This is a good, stitch
or binding elastic fabrics and stretch
lace, lingerie stretch knit. The stitch is
decorative as well as useful.
DECORATIVE EDGING
Turn the raw edge under 2" and press.
Place the fabric right side up with the
middle of the turnover under the center
of the presser foot, so that the stitch
sews on to the fold and just over the
raw edge underneath.
...to..
u,se-^4^n-att3chio^^
i
Presser foot.......................................zigzag foot
Pattern selector
Stitch length dial
.................................
................................
F ^ ^ I
S. S.
Use this versatile stitch to insert elastic
in garments. Simply stitch elastic into
place, making sure it is evenly spaced.
To do this, mark the correct length
piece into quarters, then match these
markings with center front and isde
seams.
Page 39
V. •
t:r 1.
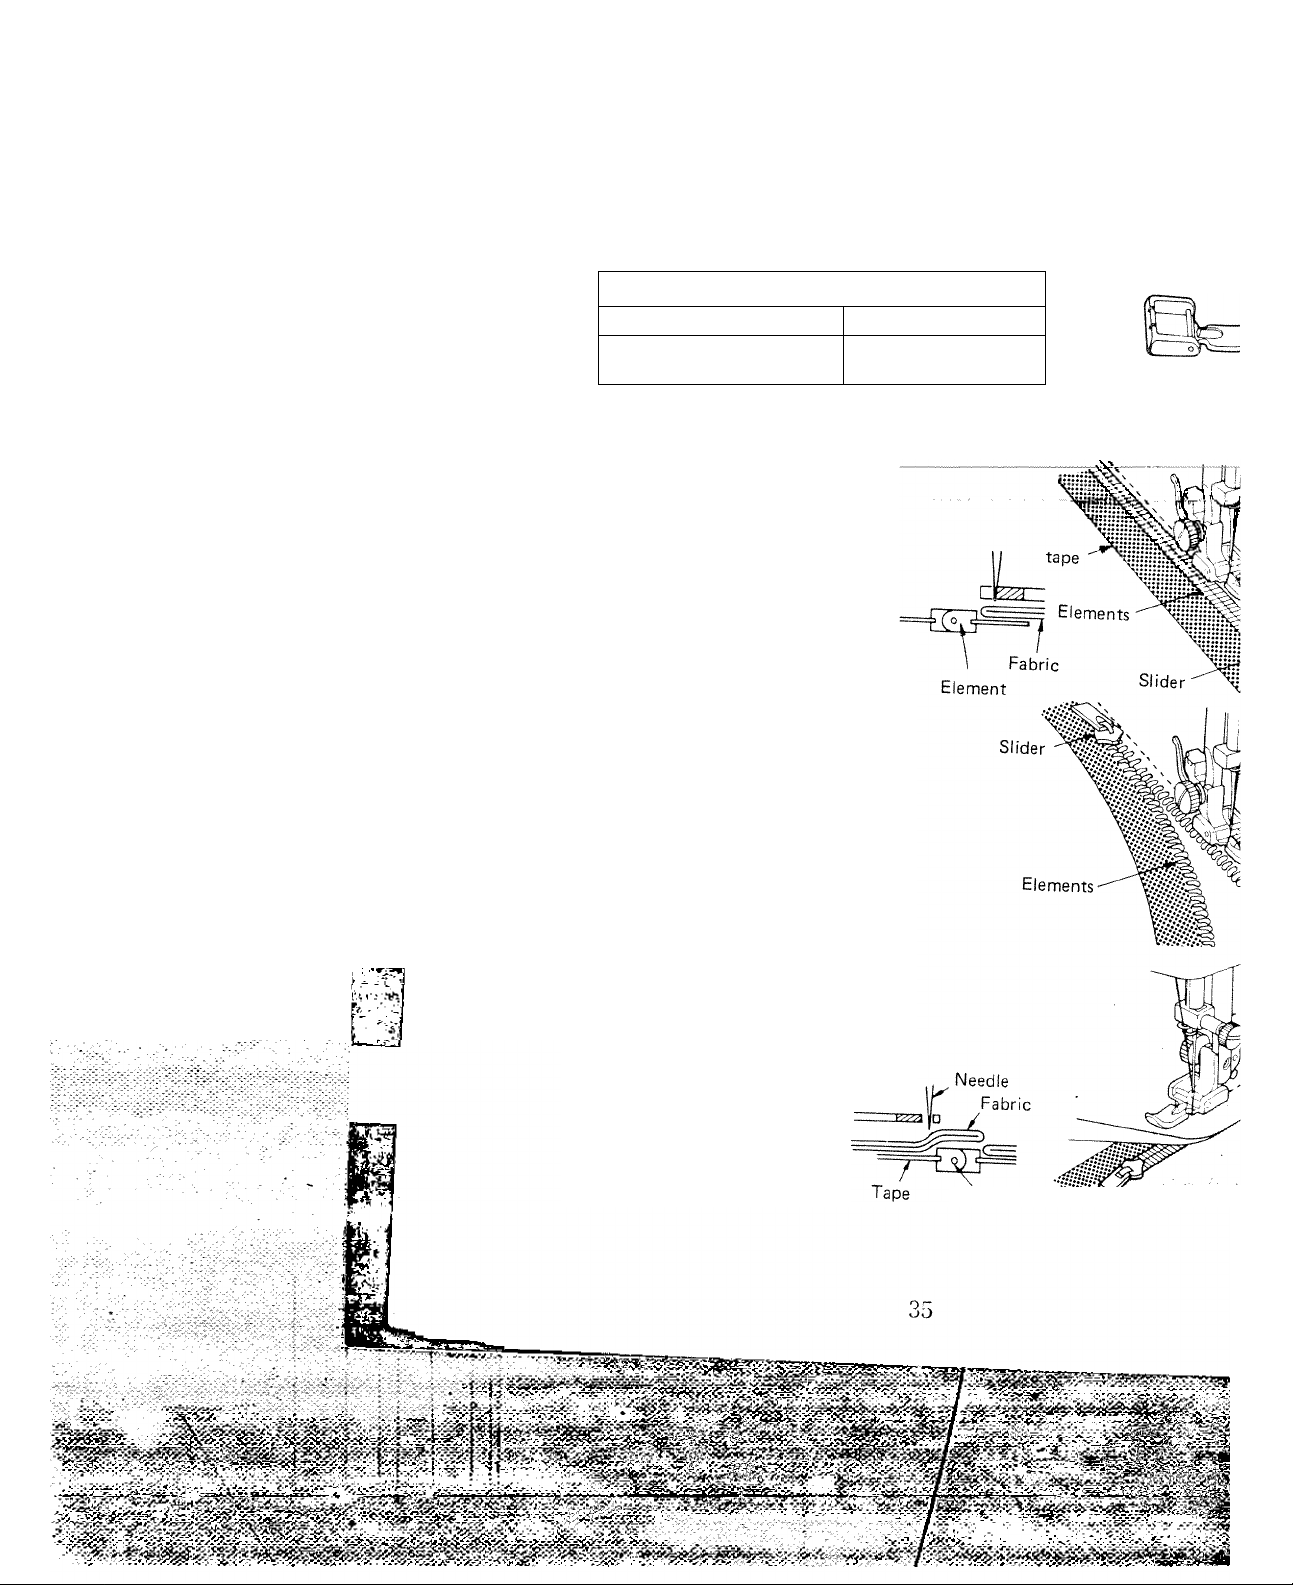
SEW I NG ZIP P ER S
Presser foot. . . ■ ,
Pattern selector..
Stitch length dial.
Zipper foo
Raise the foot. Raise needle to its
highest position by turning the hand
jAfieL^owards^you^^Repface-tfre-f00T
with the zipper foot.
T. Pin or baste the zipper tape to the
fabric and place the work-piece in
position under the foot.
Attach snap on zipper foot so that
the needle passes on its left hand
side.
When starting to sew, both needle
and bobbin threads ends should be
drawn under the foot.
2. Sew on the right side of the zipper
by guiding zipper teeth as close as
possible to the needle drop. Before
the foot reaches the slider on the
zipper tape, raise the foot and open
the zipper by keeping the needle in
the fabric.
Lower the foot and sew on the
remainder of the seam.
3. To sew the left side of zipper change
position of foot to bring the foot
to the left side of the needle. Sew
in the same way as on the right
side of zipper.
Zipper foot
\
Element
Page 40

HEMMING
- . . ; ... -. . .
Presser foot
Pattern selector
Stitch length dial
..................
............
............
.........
A{ C±D )
Raise the foot. Raise the needle to its
highest position. Replace the foot with
the hemmer foot.
Trim and straighten fabric edge. For
easy insertion of fabric in hemmer
foot, first cut off corner of fabric. Then
fold edge of fabric over about 1/8", then
fold it over again for a length of 2".
Insert fabric fold into spiral opening of
hemmer foot. Move fabric back and
forth until the fold forms a scrolled
shape. Draw fabric toward you until
beginning of hem is underneath needle.
Lower foot.
Stitch slowly as you guide fabric into
hemmer foot. Do not push or pull fabric.
If edge of material tends to slide out of
hemmer, guide it to the right. If too
much material enters hemmer, draw
fabric to the left.
hemmer foot
Page 41

MENDING
ME ND IN G A N D DA R N IN G
Presser foot
Pattern selector................................................D( )
Stitch length dial
.....................................................
............................................
zigzag foot
1 to 2
To repair a straight or three-cornere
tear, position the tear under the need
in such a way that the stitching catchi
both sides of the tear. When mending
three-cornered tear, stitch from eac
end to the center. It is well to use
piece of fabric under the tear fc
reinforcement.
t tl t V !
DARNING
Presser foot
Pattern selector. ,
Stitch length dial
.............
. .zigzag foot
■ A( cb
.2 to 3 '
Push down the outer ring of the pressur
regulator. This will release the pressur
on the presser foot.
Stretch fabric between embroider
hoops with hole centered. Lower presse
bar and sew at a slow speed movin
fabric back and forth with a stead
rhythm to cover darning area. When i
is covered, turn fabric 1/4 a turn an.
sew layer of stitching across first layer
If fabric is thin or badly damaged i
hole area, you may want to put a separat
piece under the hole for reinforcemeni
Be sure to return pressure on presse
foot to original adjustment after darr
ing.
Page 42

EMBROIDERY
Remove presser foot
Pattern selector
Stitch length dial........................................^
Place the fabric in an embroidery hoop.
........................................
^^SeTTPTFltrfchTengfR^lJiS^^a^
Lower the-presser foot lifter.'-' 'Held""the
embroidery hoop firmly with your hand.
While sewing the desired pattern, move
the embroidery hoop slowly and do not
allow your fingers to get near the needle.
*Set the needle thread tension a little
looser so that the bobbin thread is
not pulled through to the right side
of fabric.
*lt is recommended to mark the required
embroidery pattern on the right side of
the fabric with a pencil ortailor'schalk.
A( C{D
_ •■" •■• •, "1,5“' r */
.-' •
............
•■^:- • •;■ V.--< .. ■ ■. ■
■
38
Page 43

PA RT II I C A RI NG FO R Y OU R M A CH IN E
CLEANING FEED DOG AND SHUTTLE
Lever
Shuttle Assembly
Lever
Fig. 1 Cleaning the feed dog wi
brush.
To insure the best possible open
of your machine, it is necessary to
the essential parts etean ' at all ti
Using a small brush, remove the lint
accumulates in the shuttle area
around the feed dog.
Fig. 2 Parts of the Shuttle Assembly
To Clean the Shuttle Area:
1. This area must be kept free of i
lint and occasional tangled thi
Raise the needle to its highest
point and remove the bobbin i
2. Push levers of shuttle race aside
lift shuttle race cover and shuttle
3. Clean the shuttle race with s
brush.
4. Put a drop of oil on the center p
the shuttle and shuttle race,
arrows).
A-. --V-
l-.-i
Shuttle Race Cover
Pointed
hook
Shuttle
Shuttle driver
To Replace Shuttle Assembly;
1. Position shuttle race as illustrate
that race is forming halt moor
the left side of the machine.
2. Hold shuttle by center pin and :
tion shuttle so as to form a half r
on the right side. Pointed hook
be on the bottom.
3. Place shuttle race cover into t
over shuttle assembly.
4. Snap the levers into position.
* See additional shuttle cleaner infe
tion on page 43.
Page 44

OILING
As is the case with all precision machinery, it is necessary for maximum efficiency
to properly oil and clean at reasonable intervals. Even though the machine is not
in constant use, it is important to oil your machine since the oil will dry after
standing over a period of time. Use a good grade of sewing machine oil.
NOTE: Before oiling, clean away all lint or foreign matter. One or two drops of
oil are sufficient at each point.
The machine should be oiled at the arrow points shown. After you have
cleaned and oiled your machine, it is advisable to run the machine at high
speed so that the oil will penetrate all moving parts.
: After cleaning and oiling machine, wipe away all excess oil and sew on a
scrap of material to be sure machine sews cleanly.
Inside Face Plate
Sewing face plate open and
oil all moving parts at
friction points.
Page 45

PROBLEMS — and PROBABLE CAUSES
In most cases poor sewing results are due to a damaged needle. Always examir
needle first before checking other items.
1. SKIPPING STITCHES
* bent or blunt needle
* wrong size needle
* needle inserted incorrectly
* upper thread tension too tight
pressure on presser foot too light
2. UNEVEN STITCHES
* bent or blunt needle
* wrong size needle
* incorrect threading
pulling fabric while sewing
* upper thread tension too loose
* pressure on presser foot too light
* loose presser foot
* bobbin wound unevenly
bobbin inserted incorrectly in case
3. NEEDLE BREAKS
* bent needle touches needle plate or presser foot
* needle inserted incorrectly
pulling fabric while sewing
* loose presser foot touches needle
needle too fine for fabric
turning Pattern Selector dial with needle in fabric
* *
............................................................................
4. UPPER THREAD BREAKS
* bent or blunt needle
* incorrect threading
* upper tension too tight
needle inserted incorrectly
needle touches presser foot
* needle eye has sharp edges
* poor quality thread
* knots in thread
* starting to stitch too fast
...........
Page 46

Mi
5. lower thread breaks
* inh?" incorrectly
^ bobbin wound too fu ll
* bobbin tension too tight
* "®®dle plate hole has sharp edges
^ bent bobbin ^
* poor quality thread
^ bent or blunt needle
I upper thread tension too tight
. upper and lower tensions too tight
(use tissue paper underlay)
7. machine does not feed fabric
, stitch length dial set at 0
^ pattern selector on "
thread knotted under fabric
S^CHINGOF THREAD UNDER FABRIC
upper and lower thre^^dc n + ^
* pattern selector on '• i P^^^^er foot
■ '■ M
9. BOBBIN DOES NOT WIND PROPERLY
* r k! 3^'^" uot properly adjusted
* positioned correctly
bobbin winder stnn • correctly
top not positioned correctly
T‘r«'NE runs SLUGGISHLY
; dir!"!,™ '“■*
, machine needs oiling
stop motion knob not tightened
11- machine WILL NOT SEW
* oord not plugged into outlet
Totor belt too toot, ot b.oL.!
42
^ i-
v'>'i
l'Si
Page 47

CLEANING THE SHUTTLE
Note;
If the machine turns hard, has a bind, or
becomes noisy, these are all symptoms of
thread tangled in the shuttle mechanism
or an accumulation of dust and lint that
is interfering with the smooth action of
the shuttle, A thorough cleaning usually
corrects the problem.
SHUTTLE CLEANER
cleaner which removes accumulated lint
and thread from the shuttle race to help
keep it clean and prevent jamming.
If thread gets caught in shuttle by turning
hand wheel backwards or stitching without
fabric in the machine, the thread will break
and be swept out of the shuttle. The
machine will not jam. If machine becomes
stiff for a moment, turn hand wheel toward
you to free it.
Should the shuttle cleaner jump out from
the race, insert cleaner in space A, with
the protrusion B fitting in slot C, forming
a perfect half circle with the driver D.
TO REMOVE SHUTTLE:
Raise needle to its highest position anc
remove bobbin case. Turn levers awa^
from shuttle and lift our retaining ring anc
shuttle, by grasping center pin.
Clean the reverse side of feed dog with a
small brush. Remove line and thread from
all parts of shuttle and wipe with a lightly
oiled cloth.
TO REASSEMBLE:
Hold shuttle by center pin and fit careful
ly back into shuttle race, forming perfect
circle with shuttle driver.
Replace retaining ring polished side out,
making sure the bottom pin fits into notch.
Lock retaining ring by turning levers back
into position. Refit bobbin case with bobbin.
 Loading...