

Page 1
Page 2
INDEX
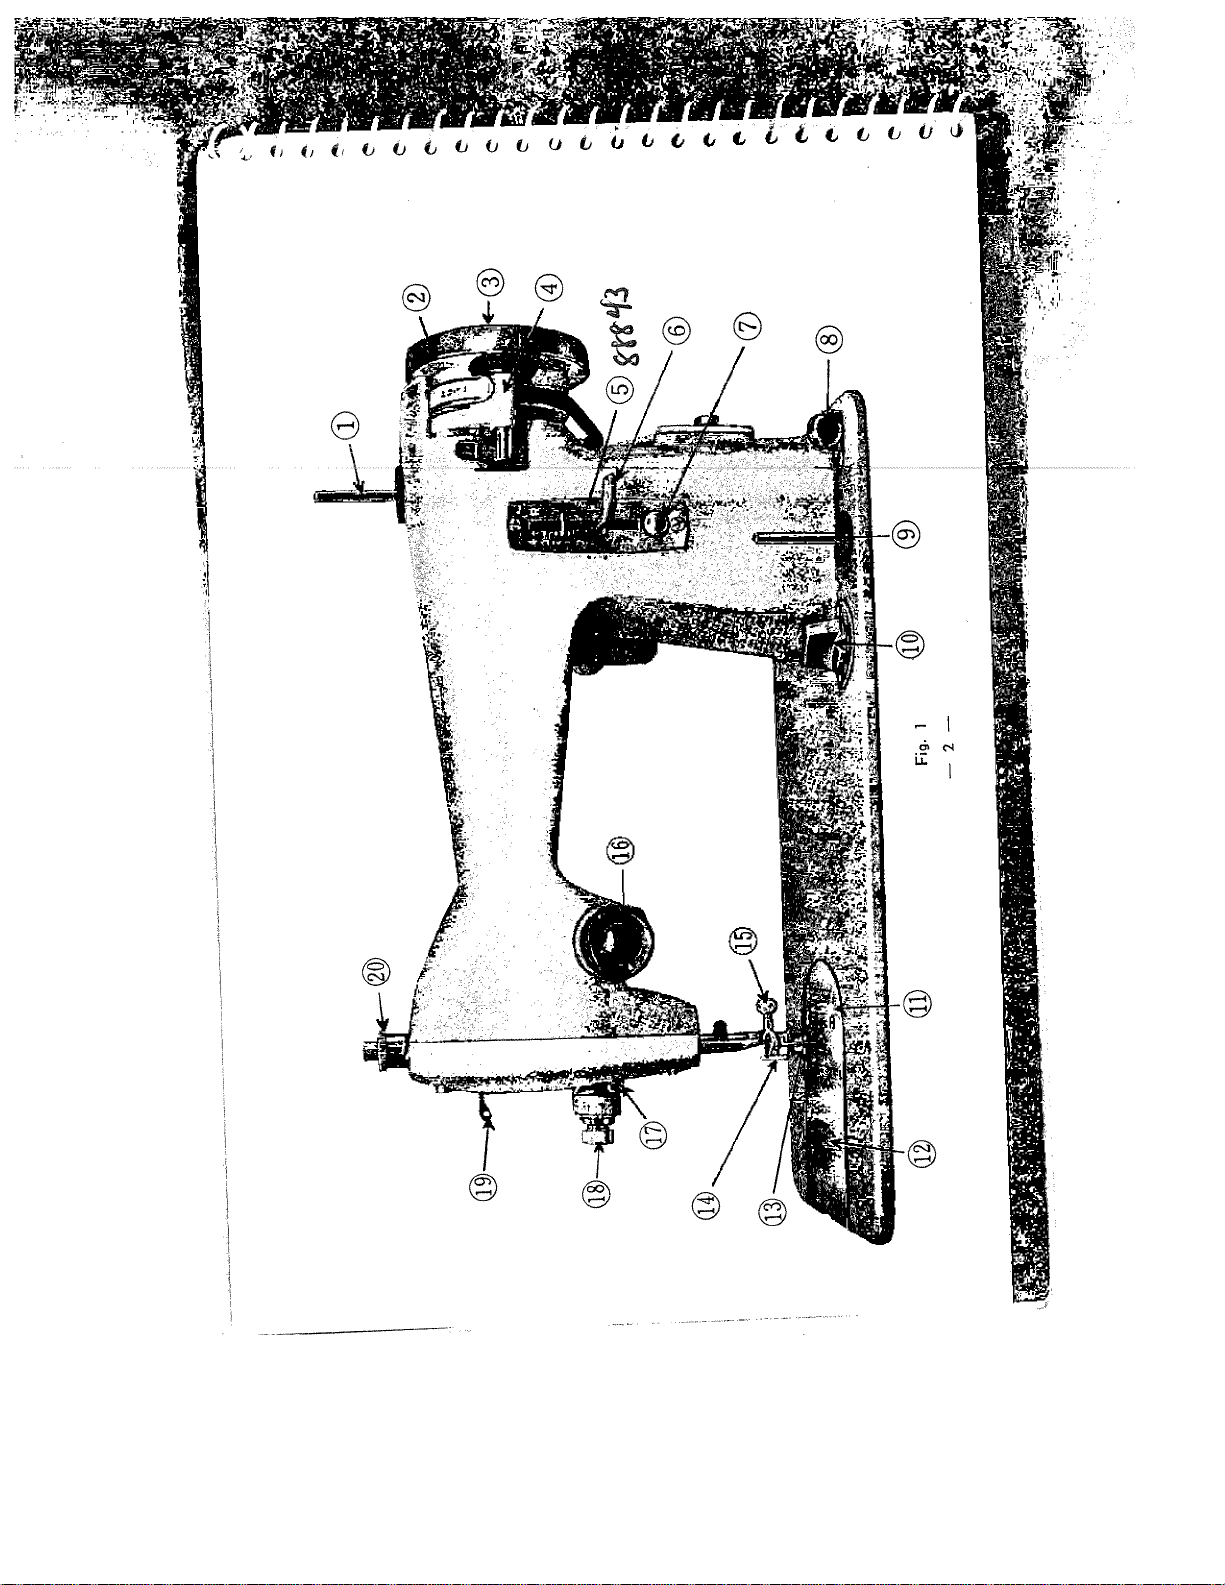
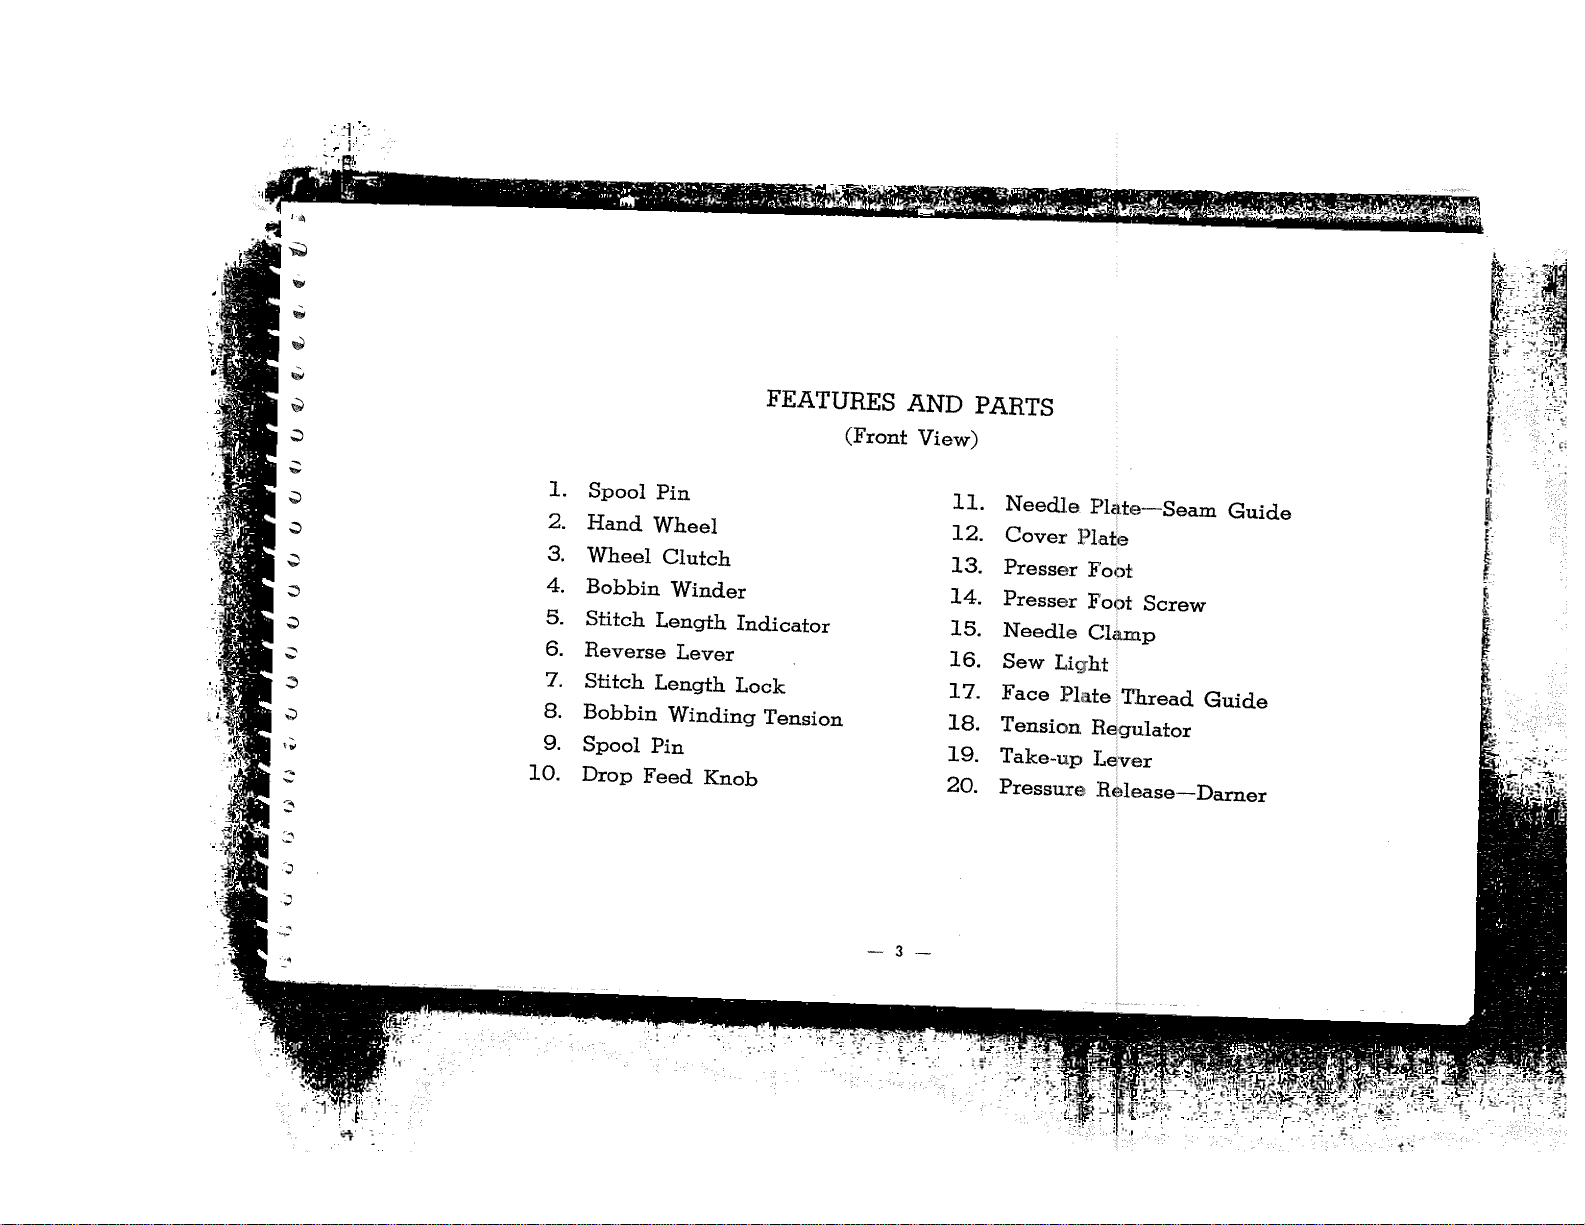
Features and Parts
Setting the Needle............................................................
Needle-Thread-Fabric-Stitching Guide
How to Wind the Bobbin
How to Thread the Bobbin Case
Placing Bobbin Case in Shuttle ..............................
Upper Threading
Setting the Stitch Length ................................................
Adjusting the Tensions....................................................
How to Use the Darner, Adjusting Pressure
Drop Feed Adjustment
Preparing to Sew
Removing the Work
Care and Maintenance of Your Machine
How to Oil your Machine
Cleaning and Oiling the Shuttle
How to Replace Light Bulb .............................................................i...........................
To Replace Belt
Check Up for Smooth Sewing
...........................................................
..........................
...............................................
.....................................
.............................................................
............................................
.............................................................
.......................................................
18
Page 3
Page 4
Page 5
Page 6
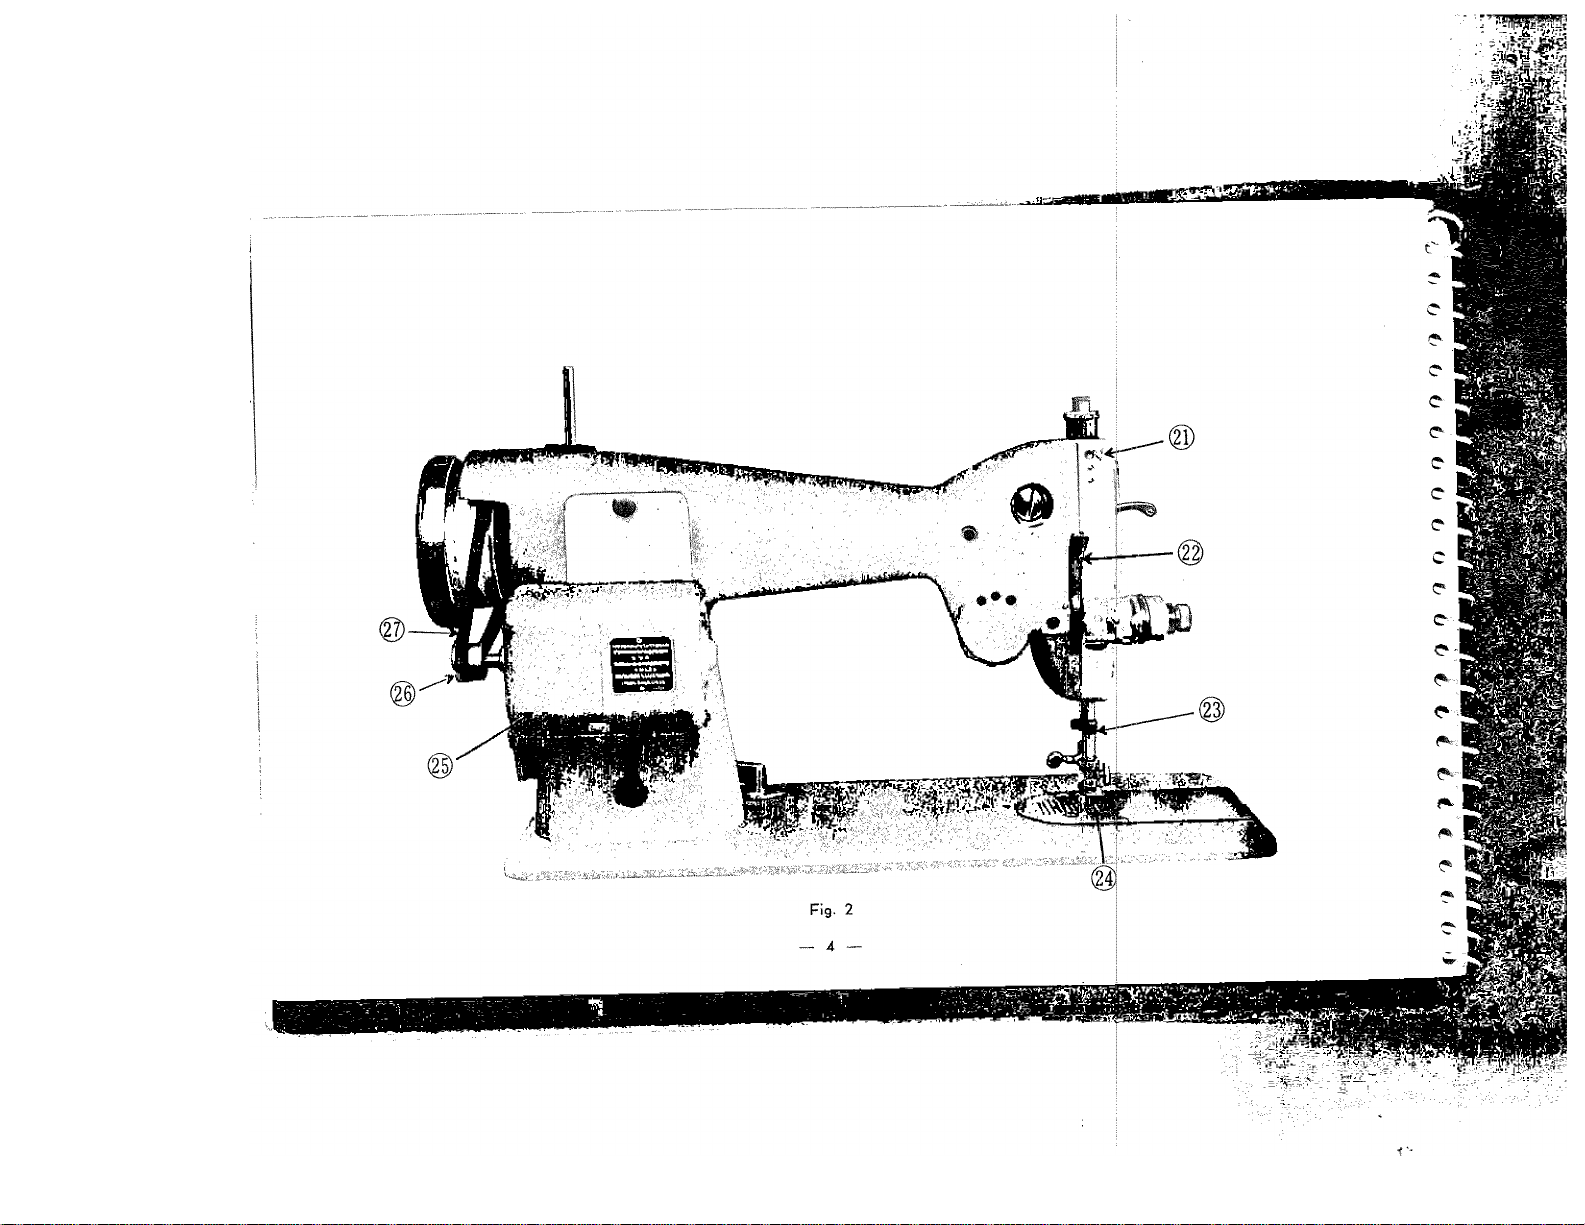
FEATURES AND PARTS
(Back View)
21. Arm Tkread Guide
22. Presser Bar Lifter
23. Thread Cutter
24. Feed
25. Motor
26. Motor Pulley-
27. Belt 1
Page 7

Page 8

tte following fnble will show the ei.e of needles generally used with v„ious sizes of tineed.
NEEDLE-THREAD-FABRIC-STITCHING GUIDE
"fi.
V^iii'
Fabric
ExtrsmBly iiBavy
tarpaulin, sacking,
canvas, duck, etc.
Heavy uphoistery
fabric, ticking,
denim, iBatherettB
Medium heavy
drapery fabric, velveteen,
suiting, felt, terry, etc.
MediunTbroadc^
percale, gingham, linen,
chintz, tafieta, sheer
wool, shantung, etc.
Sheer voile, lawn,
dimity, crepe,
handkerchief linen,
plastic film, etc.
NbbcIIb
No.
MachiuB
StitchBs
Psr Inch.
6
to
8
Cotton
Thread
10
to
30
rtercerized or
Silk
Lread Nylon
I^avy Duty
Hjeavy Duty
Page 9

HOW TO WIND THE BOBBIN
Turn the clutch in the center of the hand, wheel (Fig. 4)
toward you to disengage the sewing mechanism. Place
a spool of thread on the spool pin on the bed of the
machine (Fig. 5). Pass thread through tension disc A.
Insert thread through a hole on edge of bobbin and
^ace bobbin on spindle (B) of winder. Be sure that
the notch in the bobbin fits over the small pin on the
spindle. Place pulley (C) against hand wheel by press
ing lever (D) and
set machine in
motion. When
the bobbin is
fully wound, the
action of the
winder stops
automatically.
Remove from
spindle and cut
off loose thread
end used to start
winding.
If the bobbin winds unevenly, ad
ing tension disc (A) to the right
the screw. When the disc is in
tighten screw. Before starting
clutch by turning it away from
'!KrnaiLi^mrig[W№;!W!W-.-ry.:j:
Page 10

HOW TO THREAD THE BOBBIN CASE|
Refer to Figs. 6, 7 and 8 to familiarize yourself with the procedure. Hold the bobbin
case in your left hand with the tongue pointing up. Let about two inches of thread
hang free from the bobbin, and insert bobbin into case so that tljiread will be rotating
counter-clockwise.
Guide the thread end through the slot on the side of the case aid under the tension
spring until it enters the small notch on the edge of the spring.
.. -:i
■■'I
-.■m
^W'
Fig. 6
Fig. 7
Fig. 8
Page 11

PLACING BOBBIN CASE IN SHUTTLE
Raise needle bar to highest position, hnd. lift hinged
cover plate. Hold the bobbin case latch, (D), Fig.
9, between the thumb and forefinger of the left
hand, with at least three inches of thread running
from the top of the bobbin case to thfe right. Insert
and center the bobbin case on th
shuttle body, (C). Be sure the bobfiin. case finger,
(E), is opposite the shuttle race notcir, (A). Press
the bobbin case (B) into the shuttle
sible until latch catches on the ceni
Fig. 9
shuttle. THEN release the bobbin case latch, (D).
Press bobbin case again after latch has
to make sure the bobbin case is lo
in place. Close the cover plate.
10
Page 12

■ '■ ->.- r 'V';''
1) Place spool of tliread on spool pin.
2) Lead thread through upper thread
guide A on back of face plate
3) down and around tension discs B
from back to front
4) into check spring C
5) then tug on thread to pull it into
hook D Cs®® insert, Pig. 10)
6) up into take-up lever E from back
to front
7) down into thread guide F on face
Tii. ¿i*
n
plate
8) through the needle bar thread
guide G
9) and into needle from left to right.
Pull three or four inches of thread
through needle.
Fig. 10
Page 13

Hold the end of upper thread loosely and turn hand wheel toward
you until the needle goes all the way down and comes back up.
A loop ^^Fig. 11) will be formed over the upper thread which
then can be pulled out straight. Place both thread ends under the
slot of the presser foot and draw toward the back of the machine,
leaving both threads three or four inches long.
SETTING THE
STITCH LENGTH
The length of the stitch
and reverse sewing are
both regulated by the
lever A, Fig. 12.
Button B locks the stitch
length for both forward
and reverse.
To adjust stitch length,
turn button B to the left,
then move lever A past
the zero mark until bar
C is opposite the num
ber stitch length re
quired. (4 is the longest
stitch, near 0 the
Fig. 11
stitch length. Then push lever A down against bar D. To sew in
reverse push lever A upward against bar C.
shortest.) Turn button
B to the right to lock the
12
V
I r
;r-
Page 14

ADJUSTING THE TENSIONS
Always adjust tlie upper tension, with, the presser
foot down, as the tension is automatically released
when it is raised. To increase the tension on the
upper thread, turn dial (iigj 13) clockwise, or
toward you. To decrease, turn iaway from you. The
higher the number on the dial the tighter the ten
sion.
Before adjusting lower tension be sure that the ma
chine is threaded properly. When necessary to
change the bobbin tension, tum small screw (Fig.
14) on side of the bobbin case clockwise to tighten
counter-clockwise to loosen. ’
When the upper and under tensions are properly
balanced, a perfect stitch will be formed with both
threads interlocking in fabric (|Fig. 15).
When the upper tension is too ti^ht, the lower thread
is pulled up over the upper thread which is lying
flat on the fabric.
When the under tension is too tifht, the upper thread
forms loops over the lower thread lying flat on the
fabric.
1
'Salii:
Upper thread tension too tight
Fig. 15
13 ^
Under thread tension too tight
Page 15

HOW TO USE THE DARNER, ADJUST PRESSURE
To release the pressure from the presser foot so the material
can. be moved freely for darning and mending, press down
snap lock (A, Fig. 16) and cap B will pop up.
To return pressure to normal, push darner cap B all the way
down again.
For a slighter pressure when sewing thin materials, push
darner only part way down. Test for correct position on a
scrap of fabric.
DROP FEED ADJUSTMENT
The height of the feed can be adjusted to suit the fabric or
type of work being done. Turn knob A, Fig. 17, to SILK
position to sew on thin materials, or all the way to DARN
position for darning. Turn dial to the right to return feed
to NORM, or normal. Consult the following chart to deter
mine the level of the feed and darner for various t3/pes of
sewing.
Type of Sewing
Sewing thin material
Darning
Sewing thick material
Page 16

PREPARING TO SEW
Have take-up lever at higiiest point before starting to sew. Aft^r threading, NEVER run
machine without material between presser foot and feed.
Place material and threads in position under presser foot and low^ the presser foot. Turn
the hand wheel toward you until the needle is at its highest poinf. You are now ready to
begin sewing.
The speed of the machine is regulated by increasing or decreasing the amount of pressure
exerted on the control.
REMOVING THE WORK
Be sure to stop the machine when the thread take-up lever and needle bar are located at
the highest position. Now raise the presser foot and draw the fabric back and to the left,
and pass the threads over the thread cutter. Pull down slightly, holding thread in both
hands, so as not to bend the needle. Leave the ends of thread under the presser foot.
CARE AND MAINTENANCE OF YOUR MACHINE
HOW TO OIL YOUR MACHINE
Your machine should be oiled occasionally to keep it operating smoothly—how often de
pends on the amount of sewing you do.
Oil the upper part of the sewing unit at points indicated by anlows in Fig. 18. Avoid
overoiling—only a drop is needed at each point.
— 15 —
Page 17

Fig. 18
Fig. 19
Ki^
■V'.i
IviCK,
Fig, 20 ^
thema-
and ar^rF bact; on its hinges
inicSSii n^^lt °“ *‘
DlLte^Lv°I“^^i ihside the face
reSoVri^a? ®ly tequire oiling,
¿ce ltti *n-i°i of the
Fig. 20 * indicated in
— 16
Page 18

CLEANING AND OILING THE SHUTTLE
The stitch forming mechanism occasionally
becomes clogged with loose threads and lint.
This will interfere with the efficient operation
of the machine. Cleaning and removal of the
lint will safeguard the performance. To remove
shuttle:
1. Turn the balance wheel until the needle
reaches its highest position. Tilt head
back on its hinges.
2.
Remove bobbin case (Ä), Fig. 21.
3.
Turn shuttle race cover clamps B down
ward and pull hinged shuttle race cover,
C, down and remove shuttle D.
4.
Clean the shuttle race, the shuttle, and
shuttle race cover by removing all threads,'
lint, etc.
5.
Apply a drop of oil with finger tip to Pig.
outer edge of shuttle.
21
When the cleamng has been completed, proceed as follows to replac# Üie shuttle assembly ;
. lum the balance wheel until the needle reaches its highest position.
. shuttle JD, Fig. 21, agamst shuttle driver and adjust iatol position.
A. p hinge bracket, replace with polished side out.
4. Fut bobbin into bobbin case A.
position by turning clamps B upward
5. Put the bobbin case into shuttle race, fitting tongue into notch E of race cover.
_ 17 _
■ÖfaiF:
Page 19

Page 20

CHECK UP FOR SMOOTH SEWIN0
Although your sewtng uraohin, is designed for nraxtoun. efficienoy, should any of the
followrug diflioulties occur they o«r be remedied with minor adjustments.
Upper Tiiread. Breaks
Be sure needle is inserted properly.
Ckeck on correct way to thread machine.
Use correct needle size for thread.
Do not have upper tension too tight.
Lower Thread Breaks
Check correct method of threading bobbin case.
Be sure lower tension is not too tight.
Needle Breaks
not tug or pull on the fabric while sewing as this will
break the needle.
Be sure presser foot is firmly attached to bar.
19
bend and eventually
 Loading...