

SINGER W150-FL User Manual
INTRODUCTION
CONTENTS
name of each part
SPECIAL FEATURES
TO SET THE NEEDLE . TO WIND THE BOBBIN
TO THREAD THE BOBBIN CASE
TO REPLACE AND REMOVE THE BOBBIN CASE TO CLEAN SNAP OPEN R.rr
-HREAOTHT«..,,^, ™Eo"““LenCESEW,NO
- ™ ««ATE THE STITCH LENOTH
TO REGULATE THE PRESSURE OF THE PRESSER FOOT
BUILT-IN LIGHT
NEEDLE AND THREAD SIZEs"
....
' ■ '
TO OIL SEWING MACHINE
i?AU||f JOrcUMMUN UII-HUWLIItS i:
TO USE THE DROP FEED DIAL
..............
- -
..............
...........
-

MAIN PLANT

INmOI>UCTION
lis booklet is your guide to sewing pleasure with your new machine,
contains the names of the major parts and identifies them for ready reference,
le special features of this machine are explained and detailed instructions for its
iccessful operation are set forth. The booklet also lists the various items of maintenance
icessary to avoid wear or damage and explains how to diagnose or discover errors
nd possible trouble.
our new machine is a smart, well-built machine with two tone color made by a reliable
■m with over seventy years of experience. It was designed to be attractive, accurate
id easily regulated.
lis machine is the first non-commercial machine to incorporate an automatic lubricating
evice as a convenience to the user.
is o precise and highly efficient machine capable of producing the desired stitches
ther backward or forward, regardless of material weight, with a minimum of effort by
e operator. Prior to leaving the factory this machine was subjected to a rigid test
I a special sound-levelling apparatus which reduces noise and vibration to a minimum.
3U may well take pride in your selection of this attractive, precise and efficient
ochine. Its quiet operation, unique features and reasonable price will provide you
fh more satisfying sewing hours per dollar than any other selections you might have
□ de.
INTRODUCTION

CONTENTS
INTRODUCTION
NAME OF EACH PART ...................................................................................
SPECIAL FEATURES .....................................................................................
1. TO SET THE NEEDLE
2. TO WIND THE BOBBIN ................................................
3. TO THREAD THE BOBBIN CASE .................................
i. TO REPLACE AND REMOVE THE BOBBIN CASE ..
5. TO CLEAN SNAP-OPEN RACE
6. TO THREAD THE MACHINE & NEEDLE ...............................................
7. TO PREPARE FOR SEWING
8. TO COMMENCE SEWING ......................................................................
9. TO REMOVE THE WORK
10. TO REGULATE THE THREAD TENSION ..............................................
11. TO REGULATE THE STITCH LENGTH .................................................
12. TO REGULATE THE PRESSURE OF THE PRESSER FOOT
13. TO USE THE DROP FEED DIAL
14. BUILT-IN LIGHT
15. TO OIL SEWING MACHINE
16. SOME USEFUL SEWING HINTS .................................
17. CAUSES OF COMMON DIFFICULTIES
......................................................................
.......................................................
...................................................... ..
........................................
................................
...............................................................
........................................
.................
NEEDLE & THREAD SIZES ...........................................................................
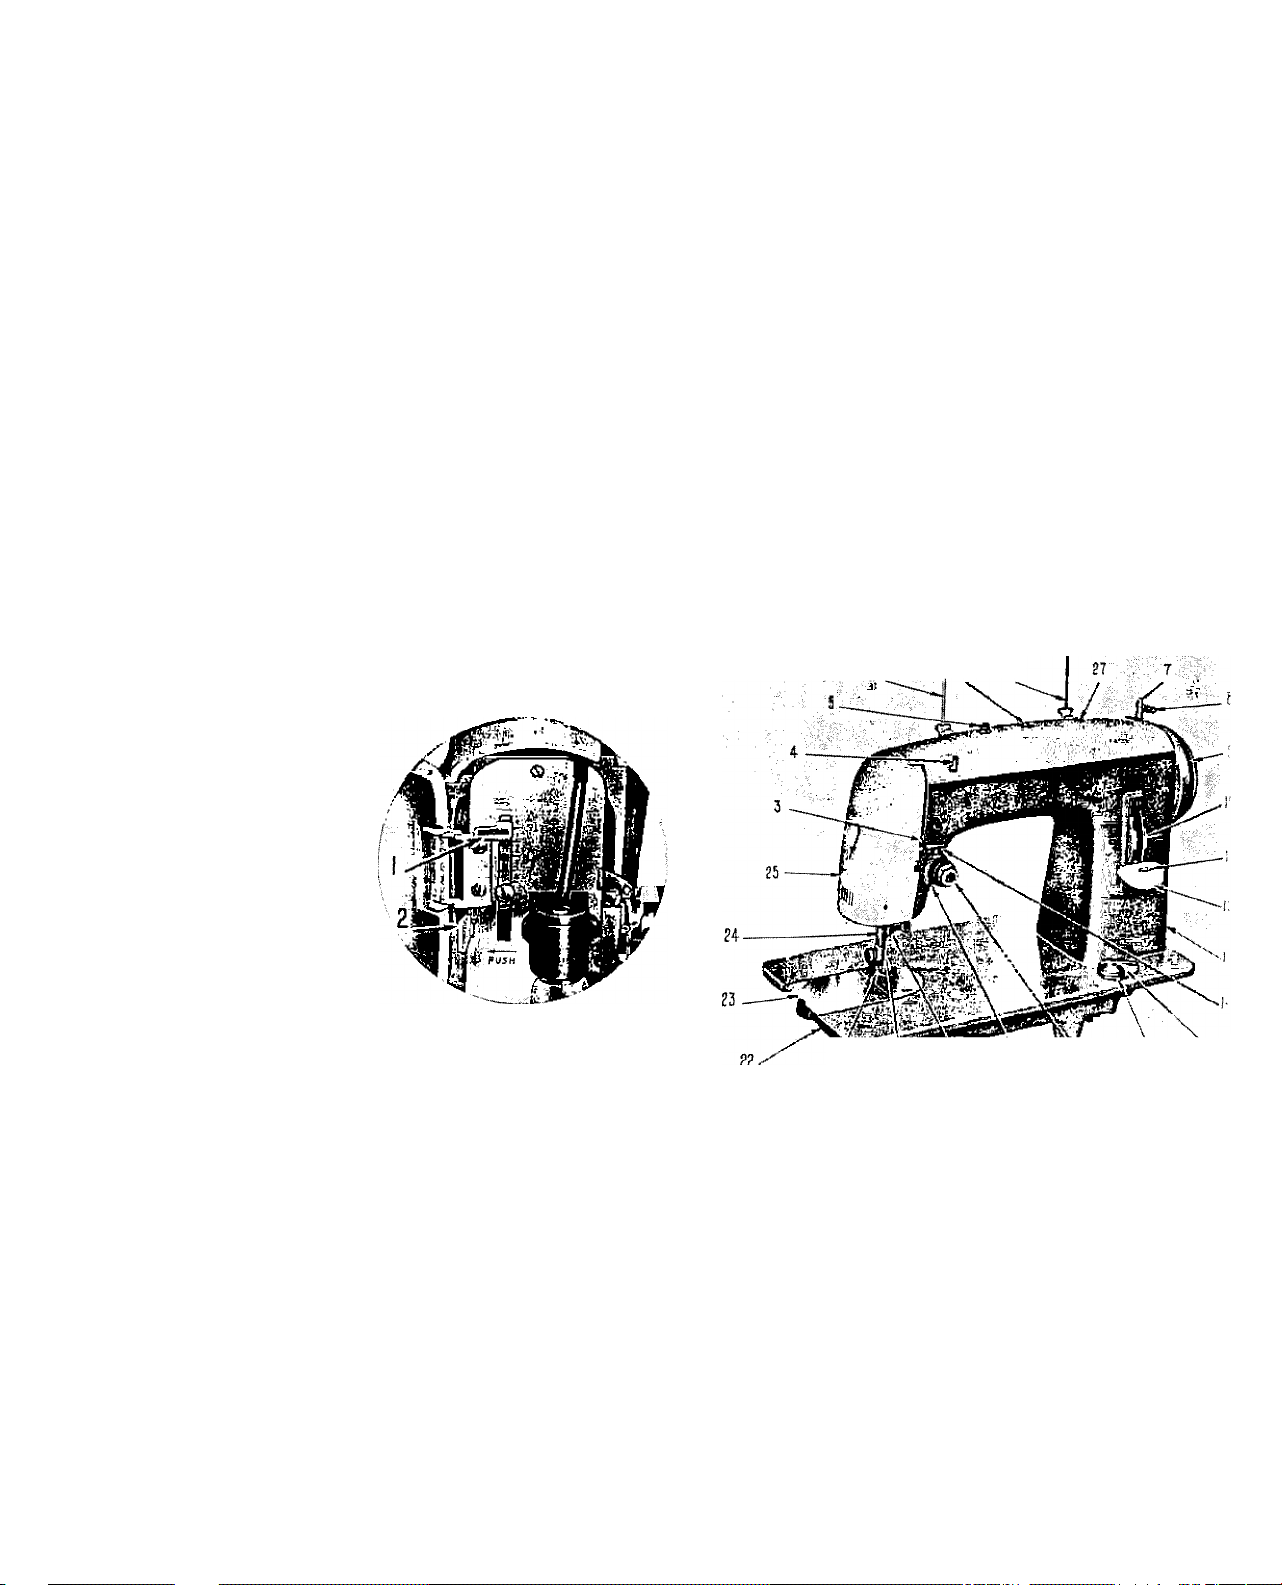
MÁME OF EACH PART
/21 Í2ÍI \|3 \|8 \t?
28 B
1. Built-in darner (Regulating plate)
2. Built-in darner (Release lever)
3. Thread take-up lever
4. Arm thread guide
5. Bobbin winder thread guide
6. 6’. Spool pin
7. Bobbin winder spindle
8. Bobbin winder stop latch
9. Balance wheel
10. Graduation plate
11. Feed regulating lever stop screw
12. Feed regulating lever
13. Light switch
nnUTFMTC UáUC nr mru DADT
14. Thread guide
1 5. Drop feed indicator
16. Drop feed dial
17. Calibrated upper thread tension régulât
18. Thread take-up spring
19. Needle bar
20. Needle
21. Presser foot
22. Shuttle race
23 Slide plate
24. Presser bar
25. Presser foot lifter
26. Oiling button
27. Plastic viewer

SPECIAL FEATURES
iUILT-lN DARNER - is the first of, its kind. It enables you to dial the exact
ssure you desire according to the kind of material you are sewing. The
bers on the graduator tell you how much pressure you have. -
5TITCH REGULATOR - not only regulates your stitch length, but also controls
,vard and backward sewing. It helps you to select your stitch size with ease
I accuracy.
5U1LT-1N AUTOMATIC BOBBIN WINDER - winds your bobbin and stops auto-
ically when your bobbin is filled. Its mechanism is built inside the arm to
[form with the manufacturer's wish to present you with a machine of the
irtesf design.
lALlBRATED UPPER THREAD TENSION REGULATOR - allows the tension of
upper thread to fce easily and accurately adjusted according to thread and
erial weight differences.
)ROP FEED DIAL - regulates the position of your feed dog for embroidering
darning and for different weights of fabrics.
5U1LT-IN LIGHT - illuminates your work for better and efficient sewing with-
glare. Light bulb is easily changed.
.NAP-OUT RACE - is so constructed that cleaning it or eliminating any
Dlications arising within it is made very simple and quick.
LOATING PRESSER FOOT - glides over pins and bastings or any other ir-
ularity in your work, so you will be able to sew over these as smoothly
if they were not there.
dJTOMATlC LUBRICATING DEVICE - applies the oil to the vital parts auto-
ically. - ; • ■ ■
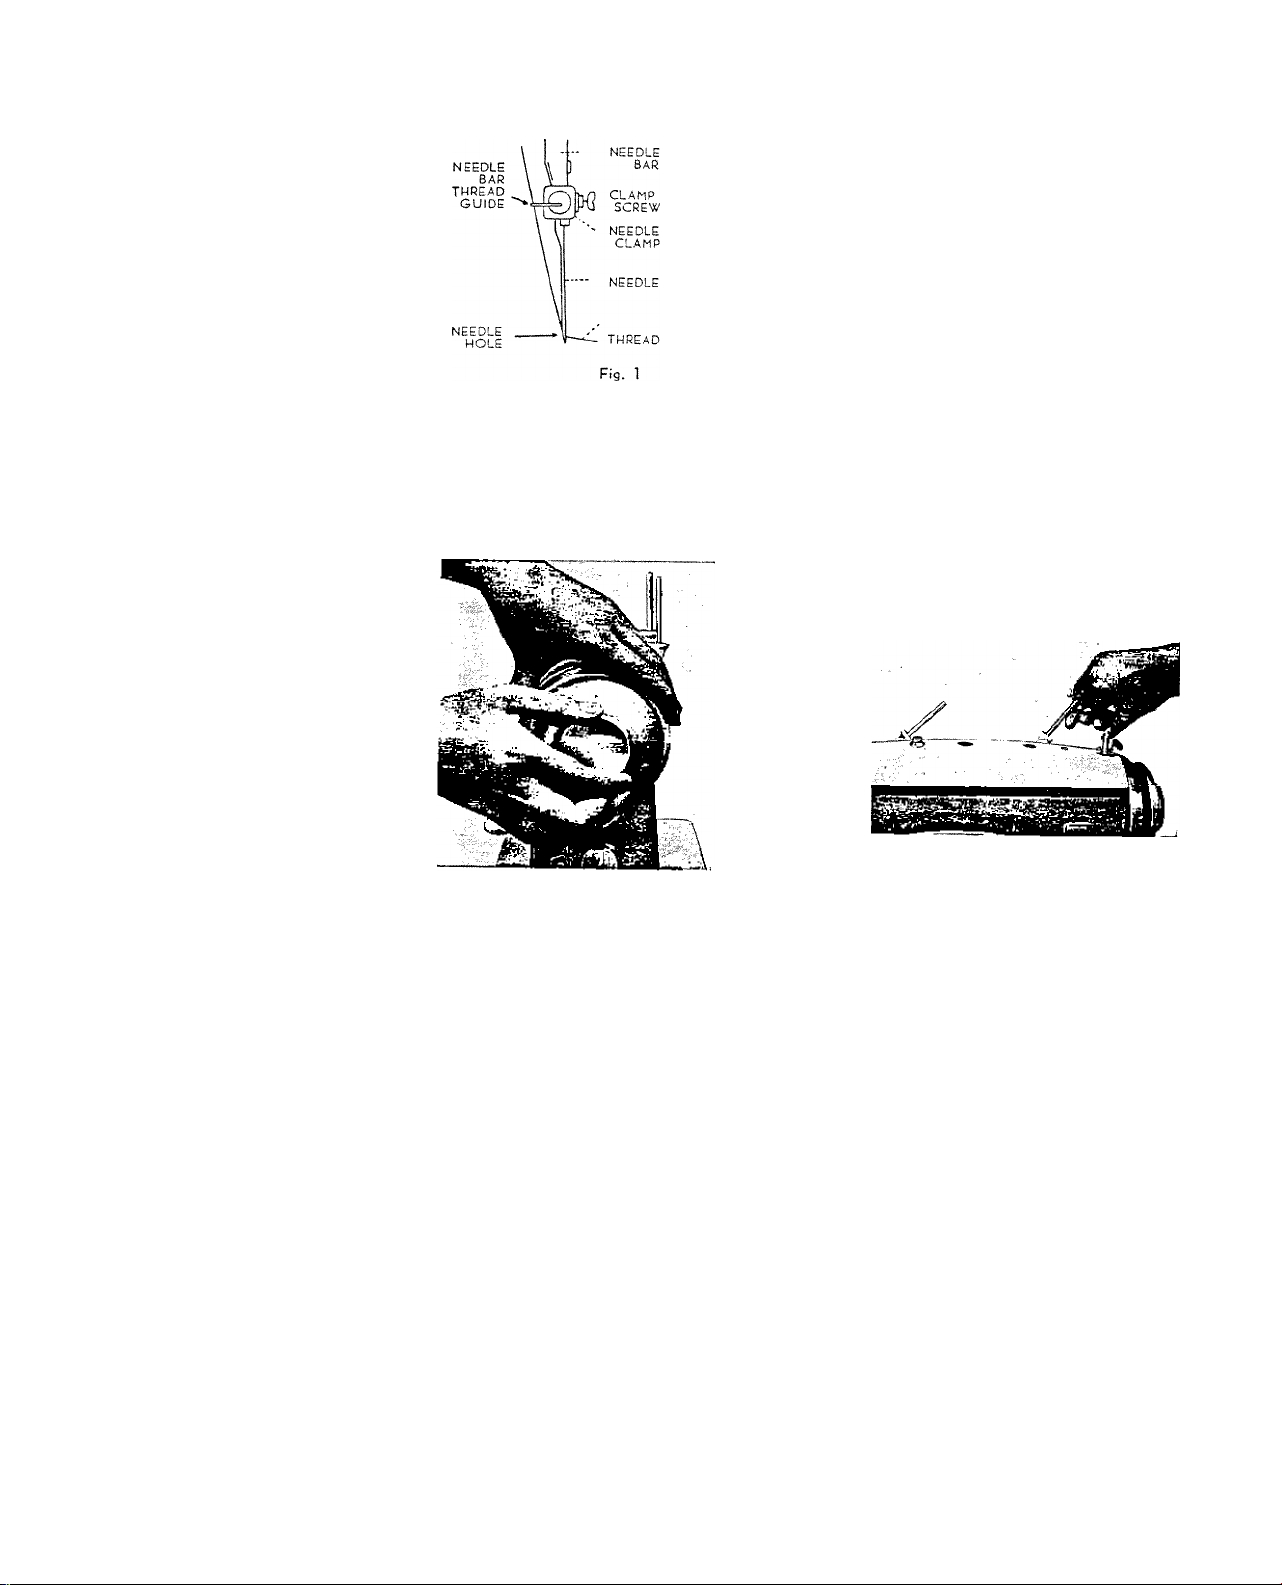
1. TO SET THE NEEDLE
NEEDLE
FLAT
■SURFACE
(1) Turn fhe Balance wheel toward you,
raising needle bar to its highest point,
and loosen the needle clamp screw.
(2) Hold the needle in the left hand with
the point down, and insert the needle
clamp as far as it will go, with its flat
surface to the right; then retighten the
clamp screw (Fig I)
2. TO WIND THE BOBBIN
0) Disconnect the balance wheel from the stitching mechanism by holding the balance
wheel with your left bond- and turning fhe sfopmotion knob COUNTERCLOCKWISE
with your right hand. - (Fig. 2)
(2) Raise the folded spool pin (6) and place a
spool of thread on it. (Fig. 3)
Fig 2
Fig. 3
SPECIAL FEATURES
TO SET THE NEEDLE • TO WIND THE BOBBIN
TO THREAD THE BOBBIN CASE
TO REPLACE AND REMOVE THE BOBBIN CASE TO CLEAN SNAP-OPEN RACE
TO THREAD THE MACHINE & NEEDLE TO PREPARE FOR SEWING • TO COMMENCE SEWING
TO REMOVE THE WORK • TO REGULATE THE THREAD TENSION • TO REGULATE THE STITCH LENGTH
TO REGULATE THE PRESSURE OF THE PRESSER FOOT TO USE THE DROP FEED DIAL
BUILT-IN LIGHT TO OIL SEWING MACHINE
SOME USEFUL SEWING HINTS CAUSES OF COMMON DlFFrCULTlES
'NEEDLEliND^HREAD^SiZES ^ ^ ^
 Loading...