

SINGER W1499 User Manual

r
INSTRUCTION MANUAL
FOR
SEWING MACHINE
fel
ET
WHITE
1®
V
,9

WHITE SEWING MACHINE COMPANY
Record in space provided below the Serial No. and
Model No. of this appliance.
The Serial No. is located on Bed Plate.
The Model No. is located on Rating Plate.
Serial No.
Model No.
Retain these numbers for future reference.

IMPORTANT SAFETY INSTRUCTIONS
When using an electrical appliance, basic safety precautions should always be
folowed, including the following:
Read all instructions before using
(this appliance)
To reduce the risk of electric shock:
An appliance should never be left unattended when plugged in. Always unplug this
appliance from the electric outlet immediately after using and before cleaning.
WARNING To reduce the risk of burns, fire,
electric shock, or injury to persons:
1. Do not allow to be used as a toy. Close attention is necessary when this appliance
IS used by or near children.
2. Use this appliance only for its intended use as described in this manual. Us# only
attachments recommended by the manufacturer as contained in this manual.
3. Never operate this appliance if it has a damaged cord or plug, if it is not working
properly, If It has been dropped or damaged, or dropped into water. Return the
appliance to the nearest authorized dealer or service center for examination, repair
electrical or mechanical adjustment. ’
4. Never operate the appliance with any air openings blocked. Keep ventilation open
ings of the sewing machine and foot controller free from the accumulation of lint
dust, and loose cloth. ’
5. Never drop or insert any object into any opening.
6. Do not use outdoors.
7. Do not operate where aerosol <spray) products are being used or where oxvoen is
being administered.
8. To disconnect, turn all controls to the off (“0”) position, then remove plug from
outlet. ”
9. Do not unplug by pulling on cord. To unplug, grasp the plug, not the cord
DANGER
1. Always unplug before relamping. Replace bulb with same type rated 15 watts
2. Do not reach for an appliance that has fallen into water. Unplug immediately.
3. Do not place or store appliance where it can fall or be pulled into a tub or sink
Do not place in or drop into water or other liquid.
SAVE THESE INSTRUCTIONS

WARNING
1. Keep fingers away from all moving parts. Special care is required around the sewing
machine needle.
2. Always use the proper needle plate. The wrong plate can cause the needle to break.
3. Do not use bent needles.
4. Do not pull or push fabric while stitching. It may deflect the needle causing it to
break.
5. Unplug the sewing machine when making any adjustments in the needle area,
such as threading needle, changing needle, threading bobbin, or changing
presser foot, etc.
6. Always unplug sewing machine from the electrical outlet when removing covers,
lubricating, or when making any other user servicing adjustments mentioned in the
instruction manual.
7. Never operate on a soft surface such as a bed or couch where the air openings
may be blocked.

CONTENTS
Name of Parts.......................................................................................................
Accessories..........................................................................................................
Removing the extension table..........................................................................3
Before sfewing ¡Power supply and Sewing lamp)..........................................4
Fitting shank and quilting seam guide. Fitting of presser feet
Winding the bobbin........................................................................................... 5
Removing bobbin case and bobbin
Inserting bobbin into bobbin case...................................................................7
Inserting bobbin case into shuttle race...........................................................8
Changing needle.................................................................................................g
Threading upper thread & Twin needle threading
Drawing up bobbin thread...............................................................................10
Changing sewing directions............................................................................10
Adjusting.thread tensions................................................................................11
Regulating the presser foot pressure............................................................ 12
Darning plate.....................................................................................................12
Fabric. Thread, Needle guide...........................................................................13
Sewing (pattern selector) and operation table...............................................14
To start sewing to finish a seam......................................................................15
Straight stitch zig zag stitch
Blind hemming..................................................................................................17
Three step zig-zag.............................................................................................18
Overcasting edges-binding
Straight stretch stitch......................................................................................20
Sewing on buttons...........................................................................................21
Sewing in zips...................................................................................................22
Button hole sewing
Hemming...........................................................................................................24
Twin needle-freehand embroidery..................................................................25
Cleaning of race.and shuttle hook
Cleaning and oiling
Trouble shooting guide....................................................................................28
..........................................................................................
..........................................................................................
............................................................................
.............................................................................
................................................................
..........................................
..................................................................
.......................
* *t
19
23
26
27
..
..
5
7
9
I6
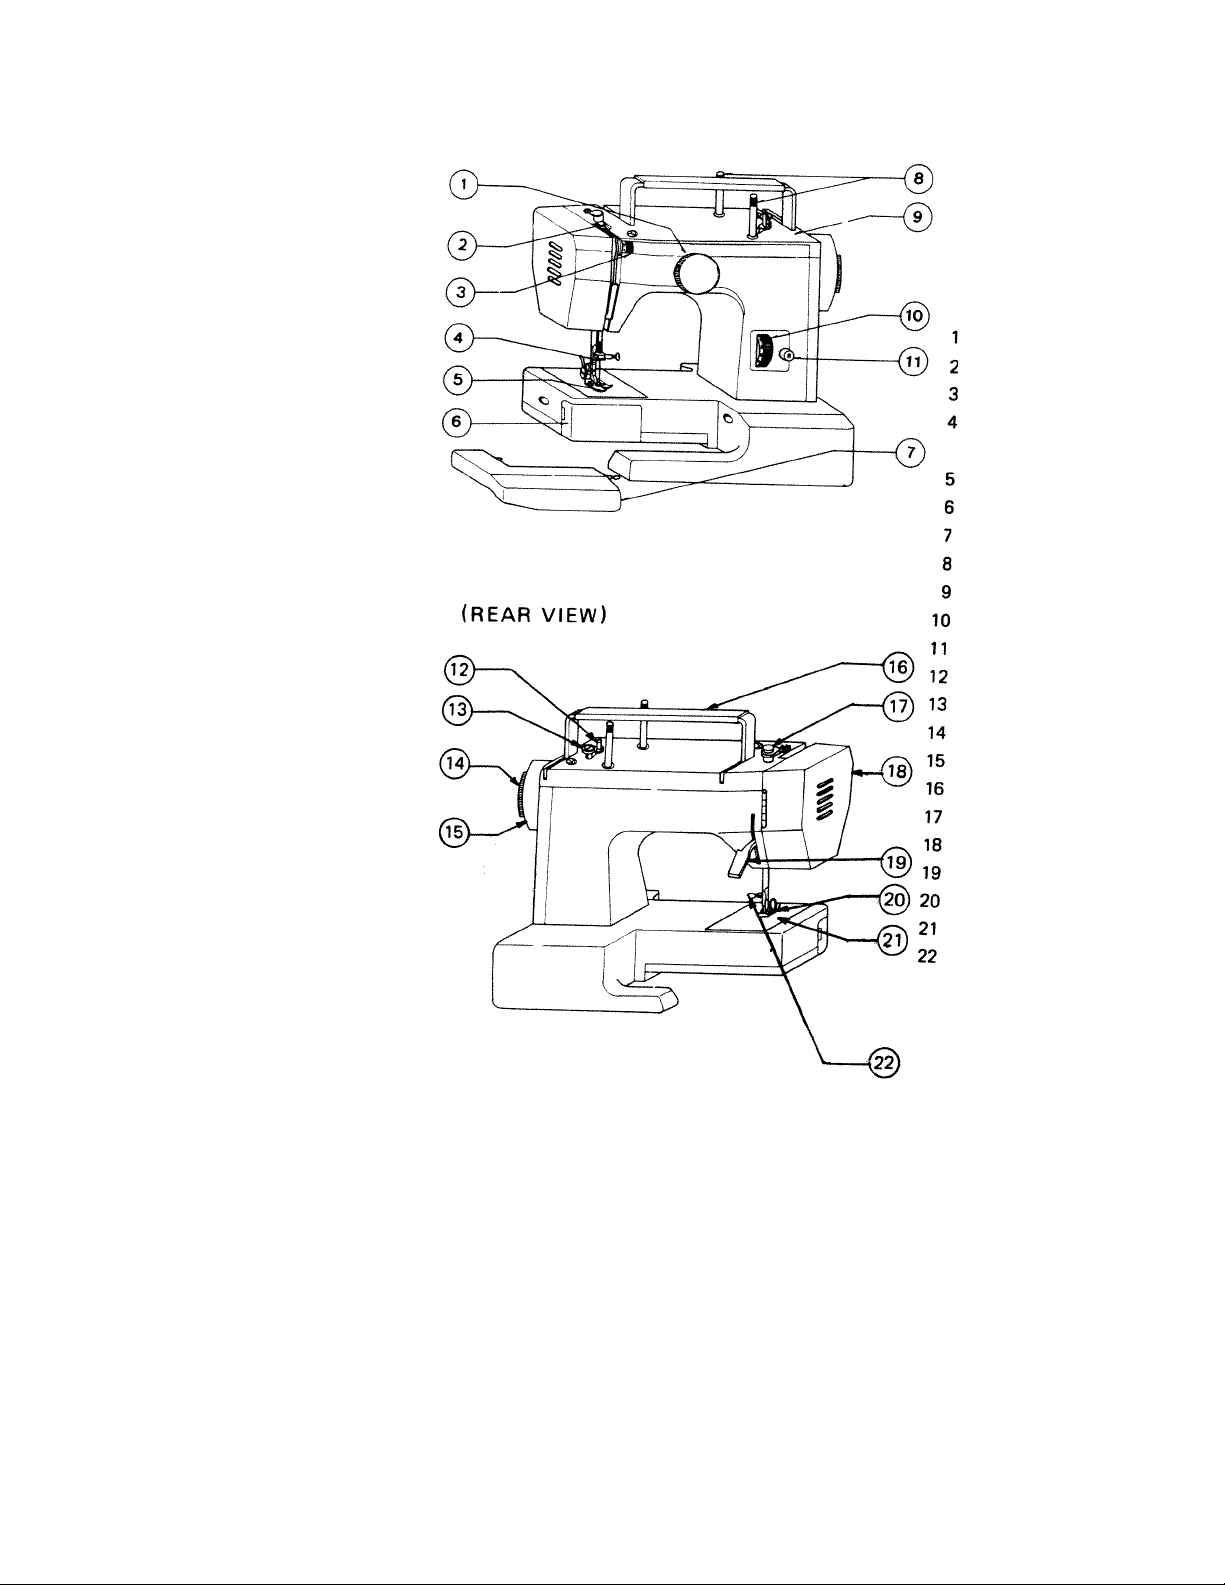
NAME OF PARTS (FRONTSIDE)
Pattern seJector dial
Take up lever
Tread tension dial
Tread guide for upper
threading
Presser foot
Shuttle cover
Extension table
Spool pin
Top cover t
Stitch length dial
Reverse button
Bobbin winder spindle
Bobbin winder stopper
Stop motion knob
Hand wheel
Handle
Upper thread guide
Face cover
Presser foot lever
Thumb screw
Needle plate
Needle clamp screw
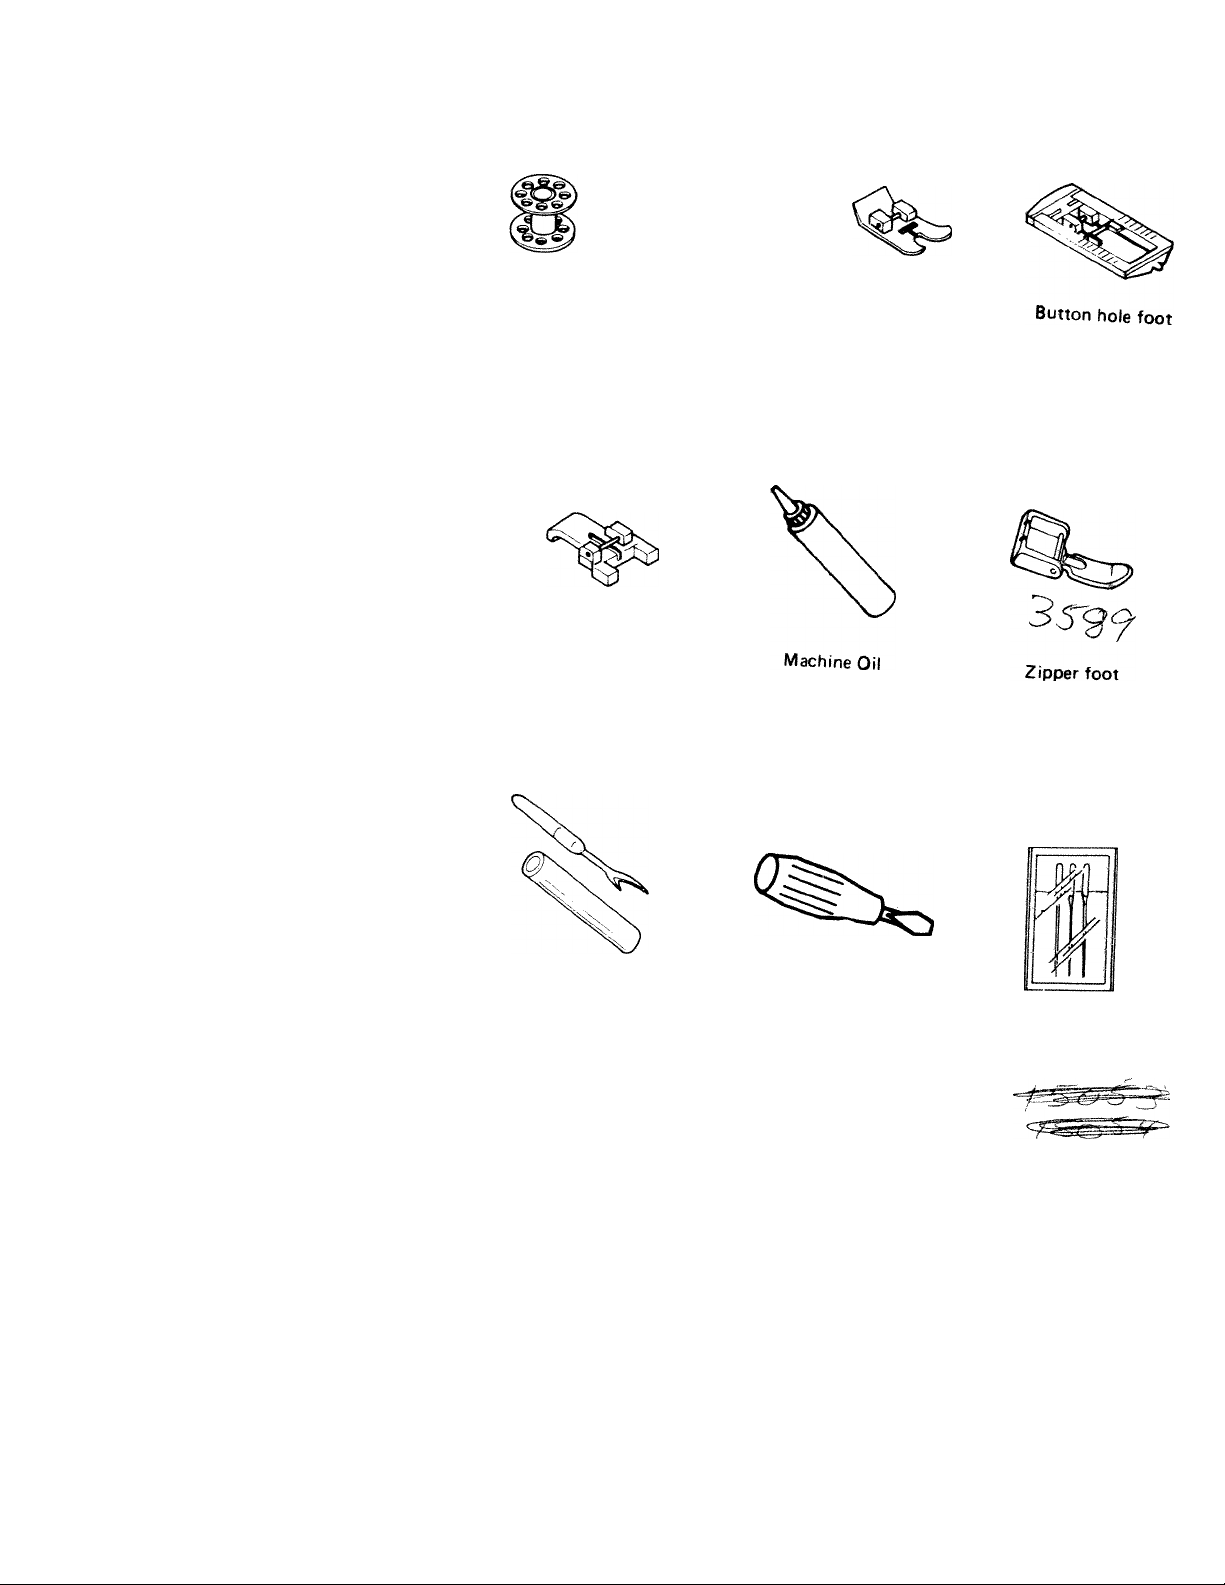
ACCESSORIES
Bobbin
1 toao
Button foot
O
il t'', *■/ à (/
Felt
Zigzag foot
(On machine)
h 9 ii '
I
u
S
Button hole cutter
r/ 7 ^
Screw driver
5
/ r- a /
Needle
#11 #14
\ \ "101
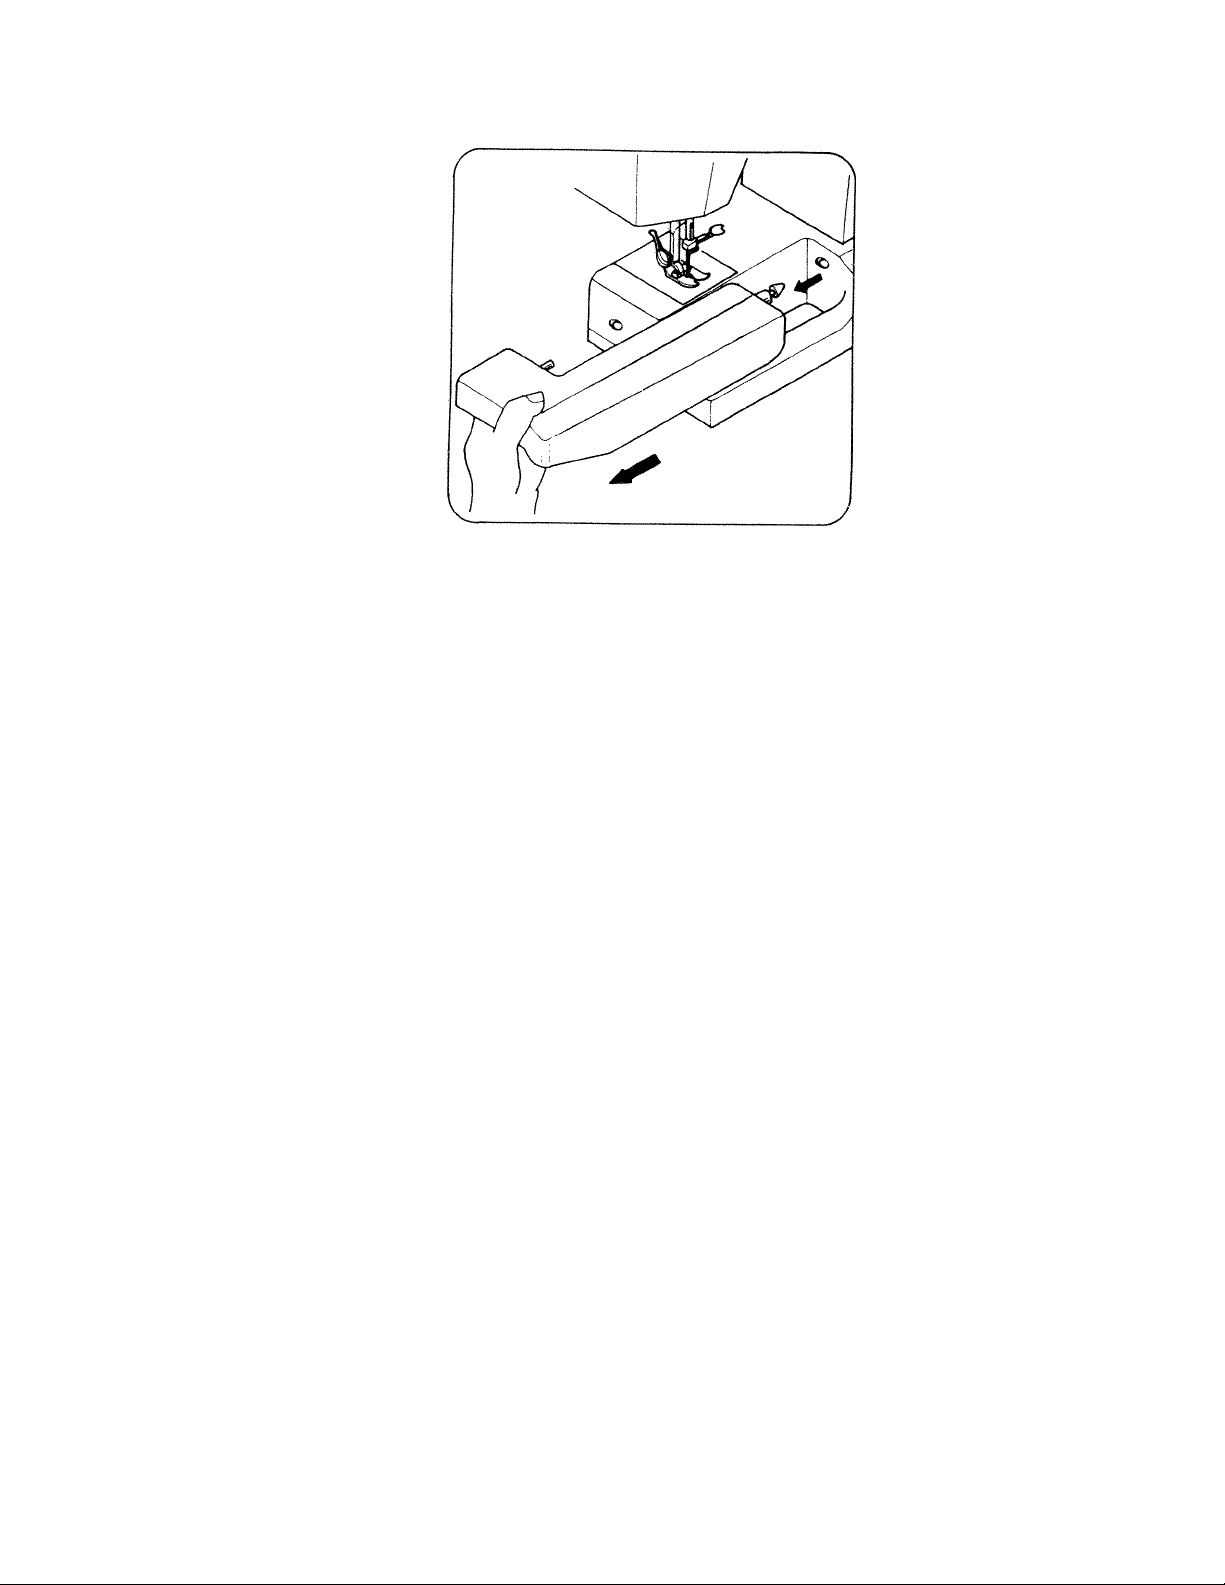
REMOVING EXTENSION TABLE
To convert the machine from flatHaed
to free-arm use simply remove the
tension table as shown.
THIS IS ONLY APPLICABLE TO MACHINES MANUFACTURED FOR THE UNIT€D KINGDOM
IMPORTANT
The wires in this mains lead are coloured in accordance with the following code:
BLUE - NEUTRAL
BROWN - LIVE
NOTE. As the colours of the mains lead of this appliance may not correspond with the coloured
markings identifying the terminals in your plug, proceed as follows:
Connect BROWN wire to terminal marked L or coloured RED.
Connect BLUE wire to terminal marked N or coloured BLACK.
FIT CORRECT PLUG TO POWER CORD
WHEN USING A B.S. 1363 FUSED PLUG, A 3 AMP. FUSE MUST BE FITTED.
If the terminals of the plug are unmarked consult a qualified electrician before use.
\Mien leaving the sewing machine unattended, the plug must be removed from the socket outlet
VWien servicing the sewing machine, or when removing covers or changing lamps, the machine or
the electrical set must be disconnected from the supply by removing the plug from the socket
outlet
THE MAXIMUM INPUT OF LAMP: 240 V 15 W.
THIS APPLIANCE CONFORMS TO THE STATUTORY RADIO INTERFERENCE
SUPPRESSION REGULATIONS.
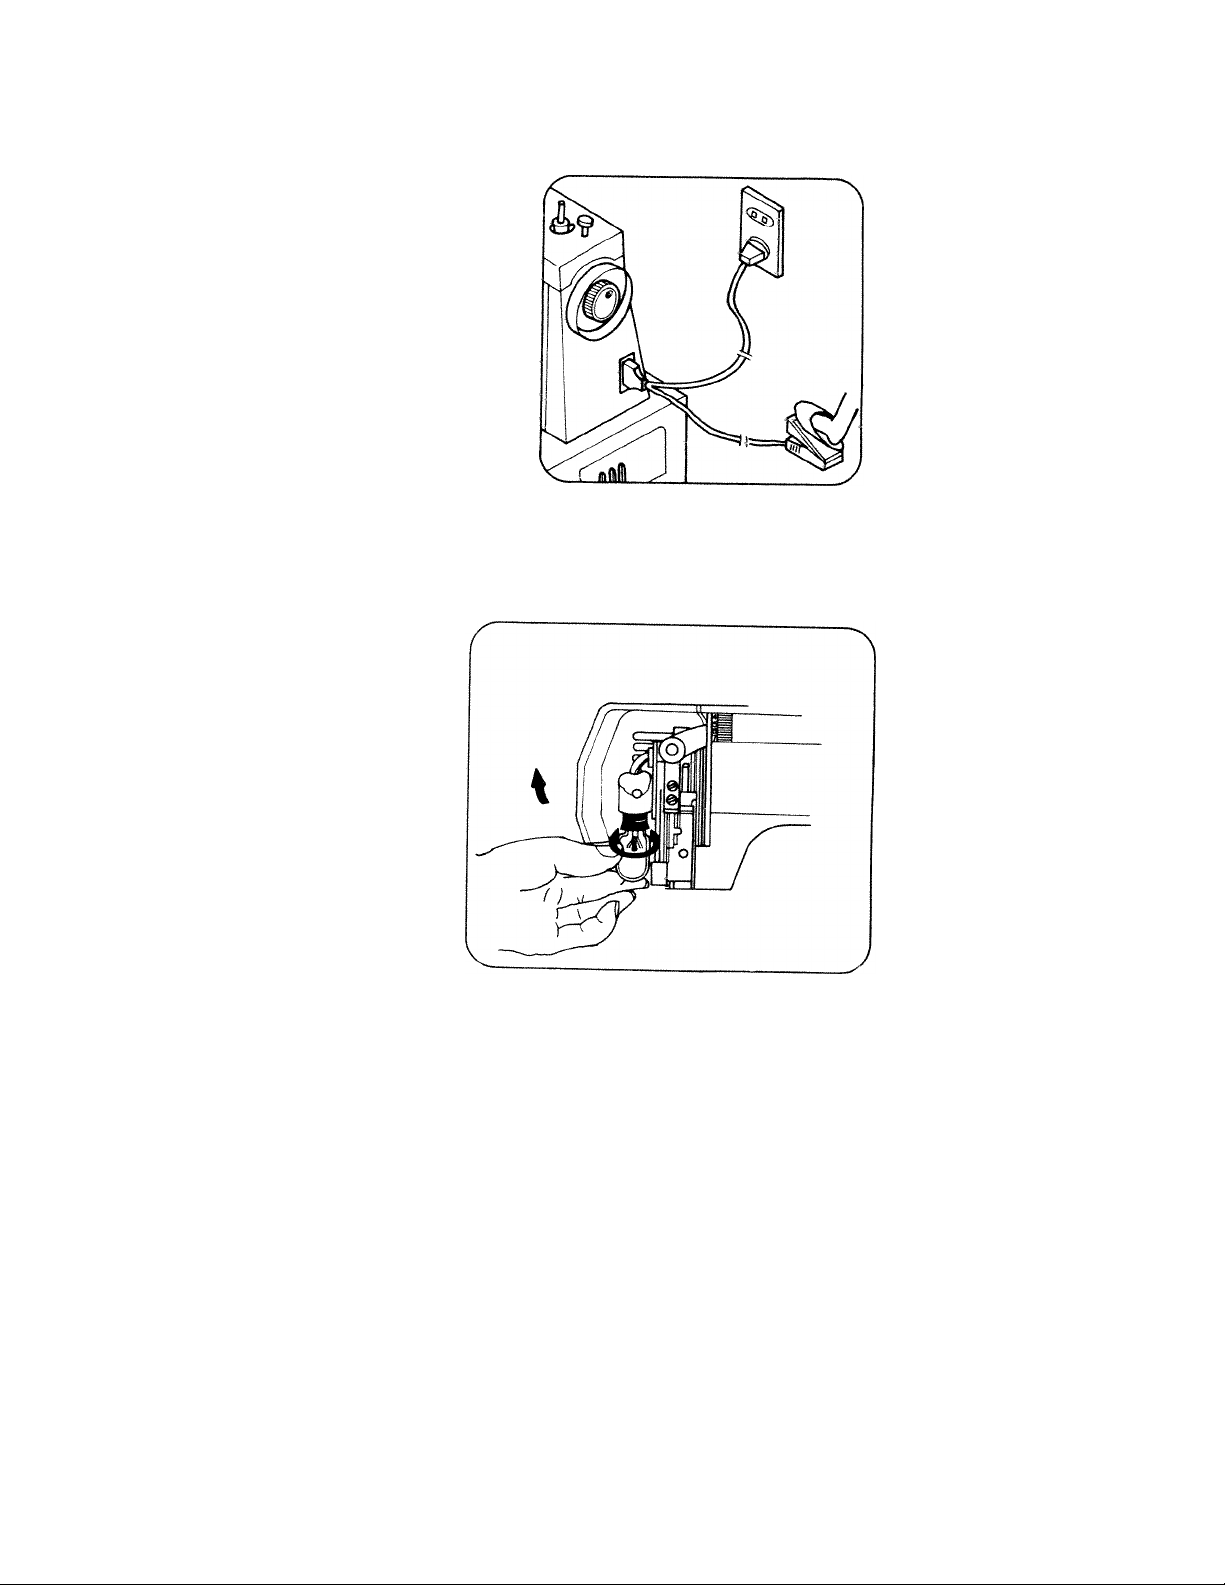
BEFORE SEWING
1. Fit the machine plug into
the machine.
2. Plug the machine to the
power supply.
3. Sewing speed can be varied
by the speed controller.
(BE SURE TO FIT A
CORRECT PLUG TO SUPPLY
CORD)
1. Remove or install lamp from
inside of face cover.
2. Open face cover in direction
of arrow.
3. Remove lamp by unscrewing
it counter clockwise.
4. Install a new bulb by screw
ing it in clockwise.
5. Use only a 120V » 1SW
(Max) "Hi-Light" brand re-
pl«:ement sewing machine
lamp. Available from your
Riccar stockist.
Important: When leaving the machine unattended, servicing, changing lamps
or removing covers, disconnect from the supply by removing
plug from the socket outlet.
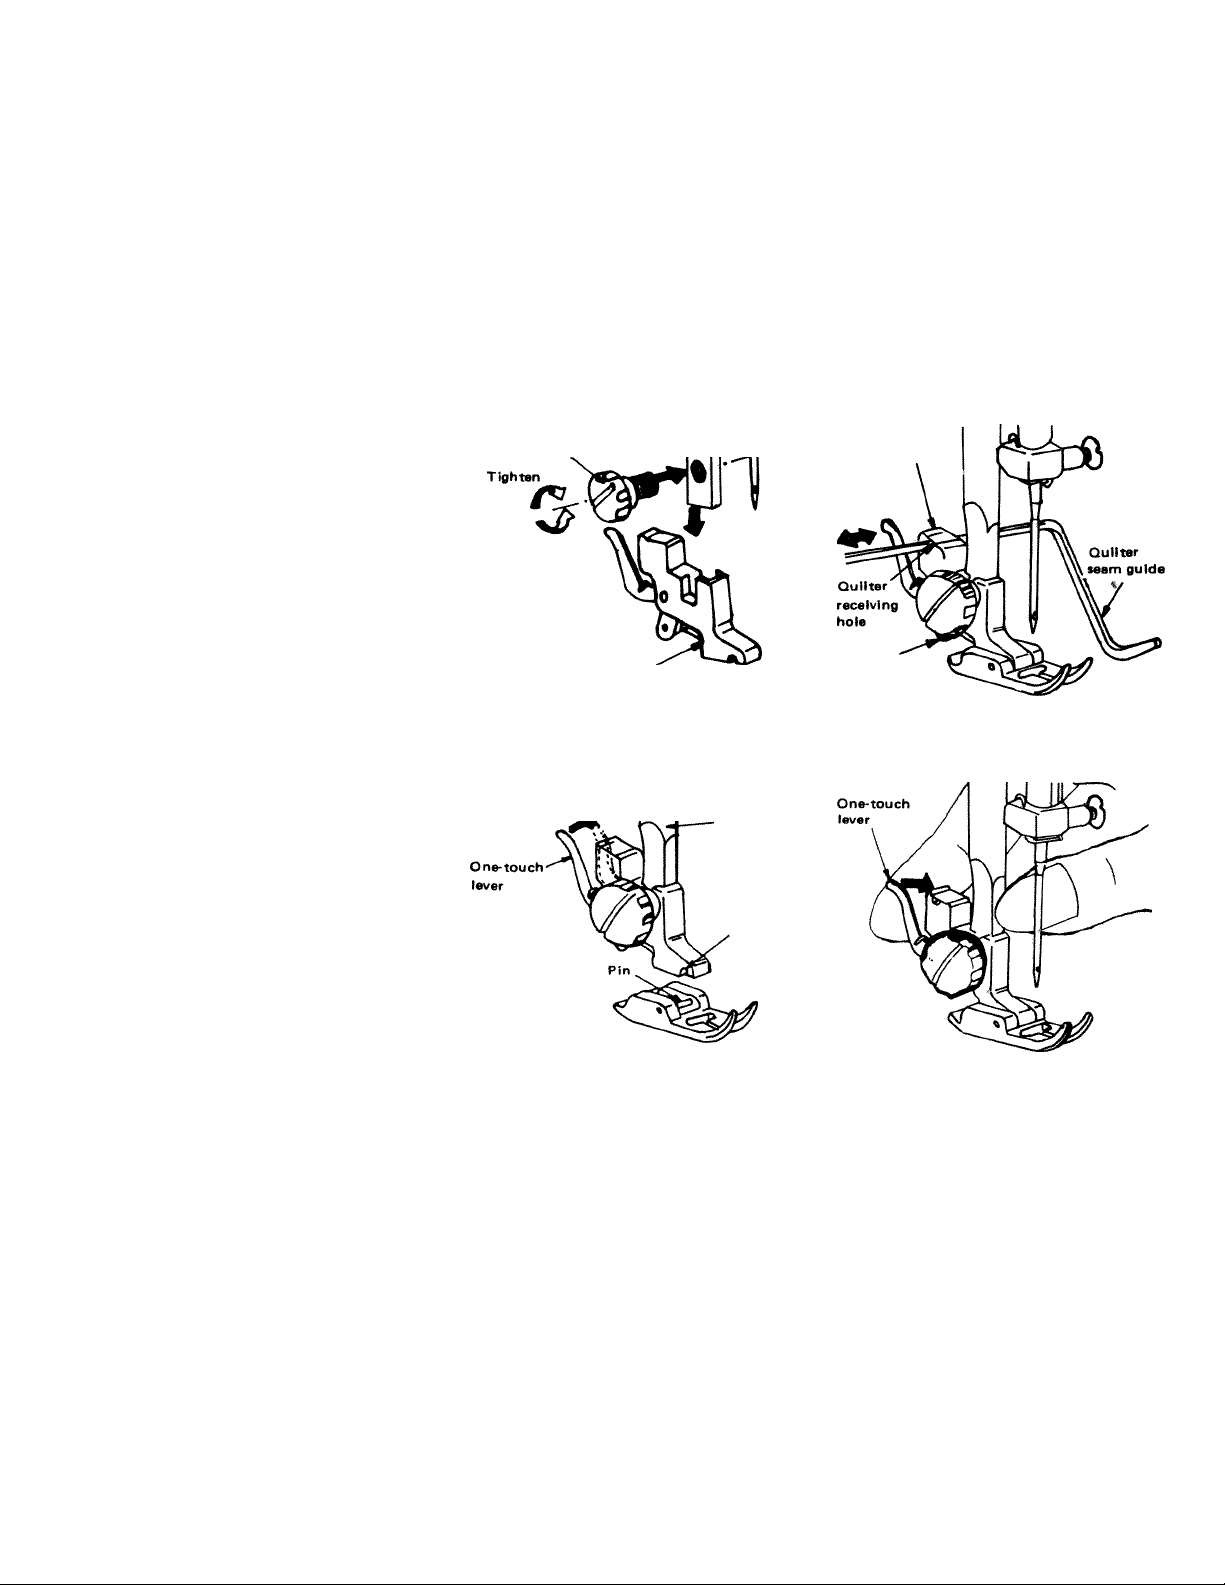
FITTING SHANK
AND
QUILTING SEAM GUIDE
Raise the presser bar and fit shank as
shown. (1) Insert quilting/seam guide
carefully so as not to damage the holding
spring. (2)
FITTING OF PRESSER FEET
Raise the presser foot. Pull the one-touch
lever towards you and the foot will be
released. Centre new foot under shank.
Lower shank until p'oove is directly
above and touching the pin. Pull onetouch lever towards you and the foot will
become engaged. (3, 4)
Shank tat tcraw
Loosen
Prewar bar
holding spring
Shank
Shank
"Presser bar
.Groove
J V
- 5 -
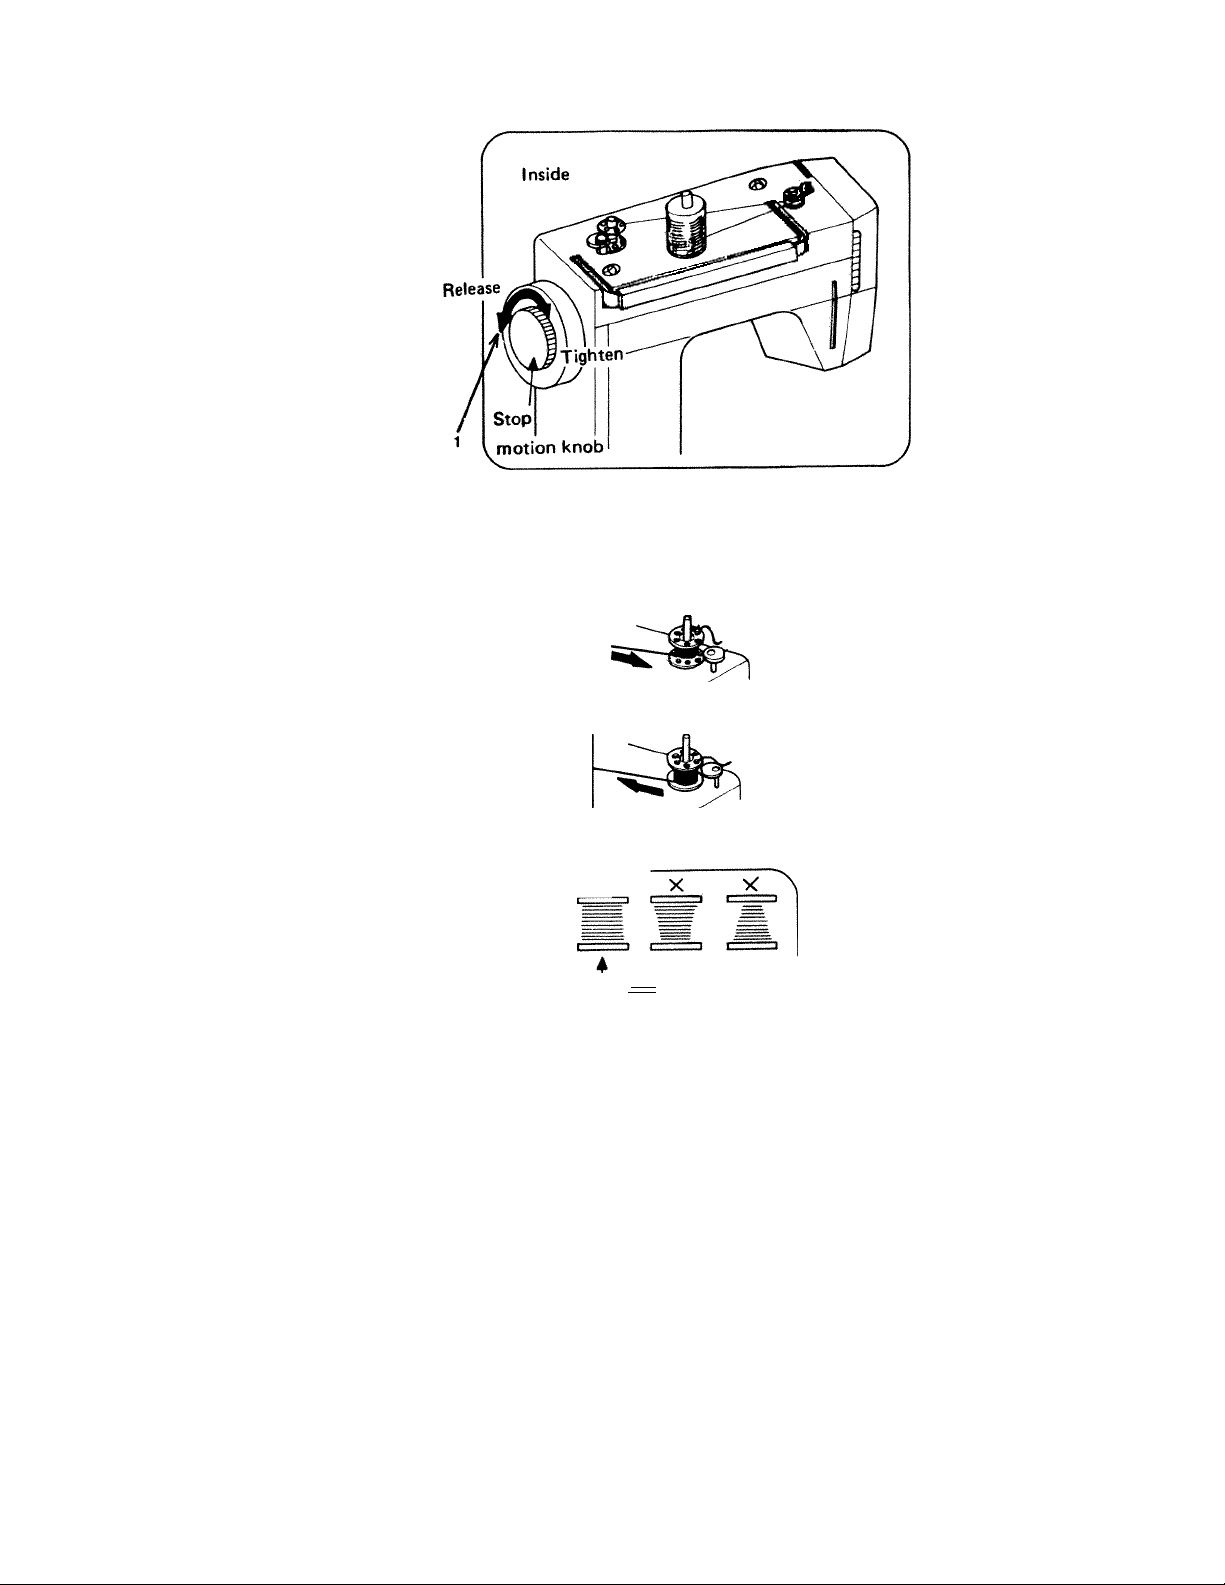
WINDING THE BOBBIN
1. Release stop motion knob.
2. Thread as shown.
3. Place bobbin onto spindle
and hand-wind thread onto
bobbin in an anti-clockwise
direction for 5 or 6 turns.
(When bobbin is filled re-tighten
stop motion knob)
Bobbin
winder
spindle
correct in m
screw
I H I
S l
4. Push bobbin winder spindle
against stopper, in direction
of arrow, and depress foot
pedal.
5. When bobbin winding is com
pleted return spindle to its
original position.
Note:
If the bobbin winding should be
uneven (it is factory set) the
thread guide can be raised or
lowered to achieve the correct
winding.
Remove the top cover and adjust
with a suitable tool.
 Loading...