

SINGER W1465 User Manual
K7 06 7
wmsjss^ ^*iiSS3B^ ffSf 1^3 WM^
^iSpp^tasMSr ¿»21 Kep
SEWING MACHINES
.....
„ ,

I
N D E X '
Accessories
Attachments.................................................................. 22
Bind Hem ..................................................................... -jo
Bobbin
Buttonholes
Buttons-Sew On...........................................
Charts
Da ■ 28-29-30
ijanung and Monogrammincr
..............................................................
How to Use...................................................... 21
Hemmers.................................................. 21 22
Seam Gauge or Cloth Guide ............................ 23
Quilting Guide
Adjustable Cord and Zipper Foot -- 37
Attachment Foot
Binder .............................................................. 2^
Darning Spring ................................................ 3g
Edgestitcher ..................................................... 23
Hemmers
Huffier ......................................................
Placing in Shuttle ............................................... a
Threading ............................................................ j
Winding
Bound............................................................. ^2
Needle-Thread-Fabric- Stitching....................... 5
Stitcll LsHQ'iltl .............................................. TI
.............................................................
................................................................
................................................
..............................................
.........................................................
.....................................
^^27
.........
13
22
gg
p«
g
Embroidery .
Automatic........................................................ 17
CreativB
Hoop ............................................................... 21
Igatures and Parts (Frons View)
Installation-Head in Cabinet ..........................^
_ Head in Portable Case
Maintenance and Care ................................................. 23
Oiling Machine ............................................... 23
Replace the Belt ............................................. 24
Cleaning and Oiling Shuttle
Needle Position Lever ................................................. 14
Needle Setting
Pressure and Feeding of Fabric
General Sewing --Thin and Lightweight Fabrics
Removing the Work .................................................... 14
Reverse Sewing
Sewing Preparation
Stitch Width Adjusting
Straight Stitichina ......................................................... iq
Tensions Adjustment ..................................................... n
Threading-Upper
.................................................
...................................
(Back View)
..............................................................
..........................................
...........................................................
.....................................................
.............. .............................
................................................
............................................................
...................
......................
...........................
........................
15.61
..........
38-93-40
--- 4
12
13
14
13
ig
3
44
42
26
0
g
А
12 3 4
I к6 7 8 9
ÌL<^
Fig. 1

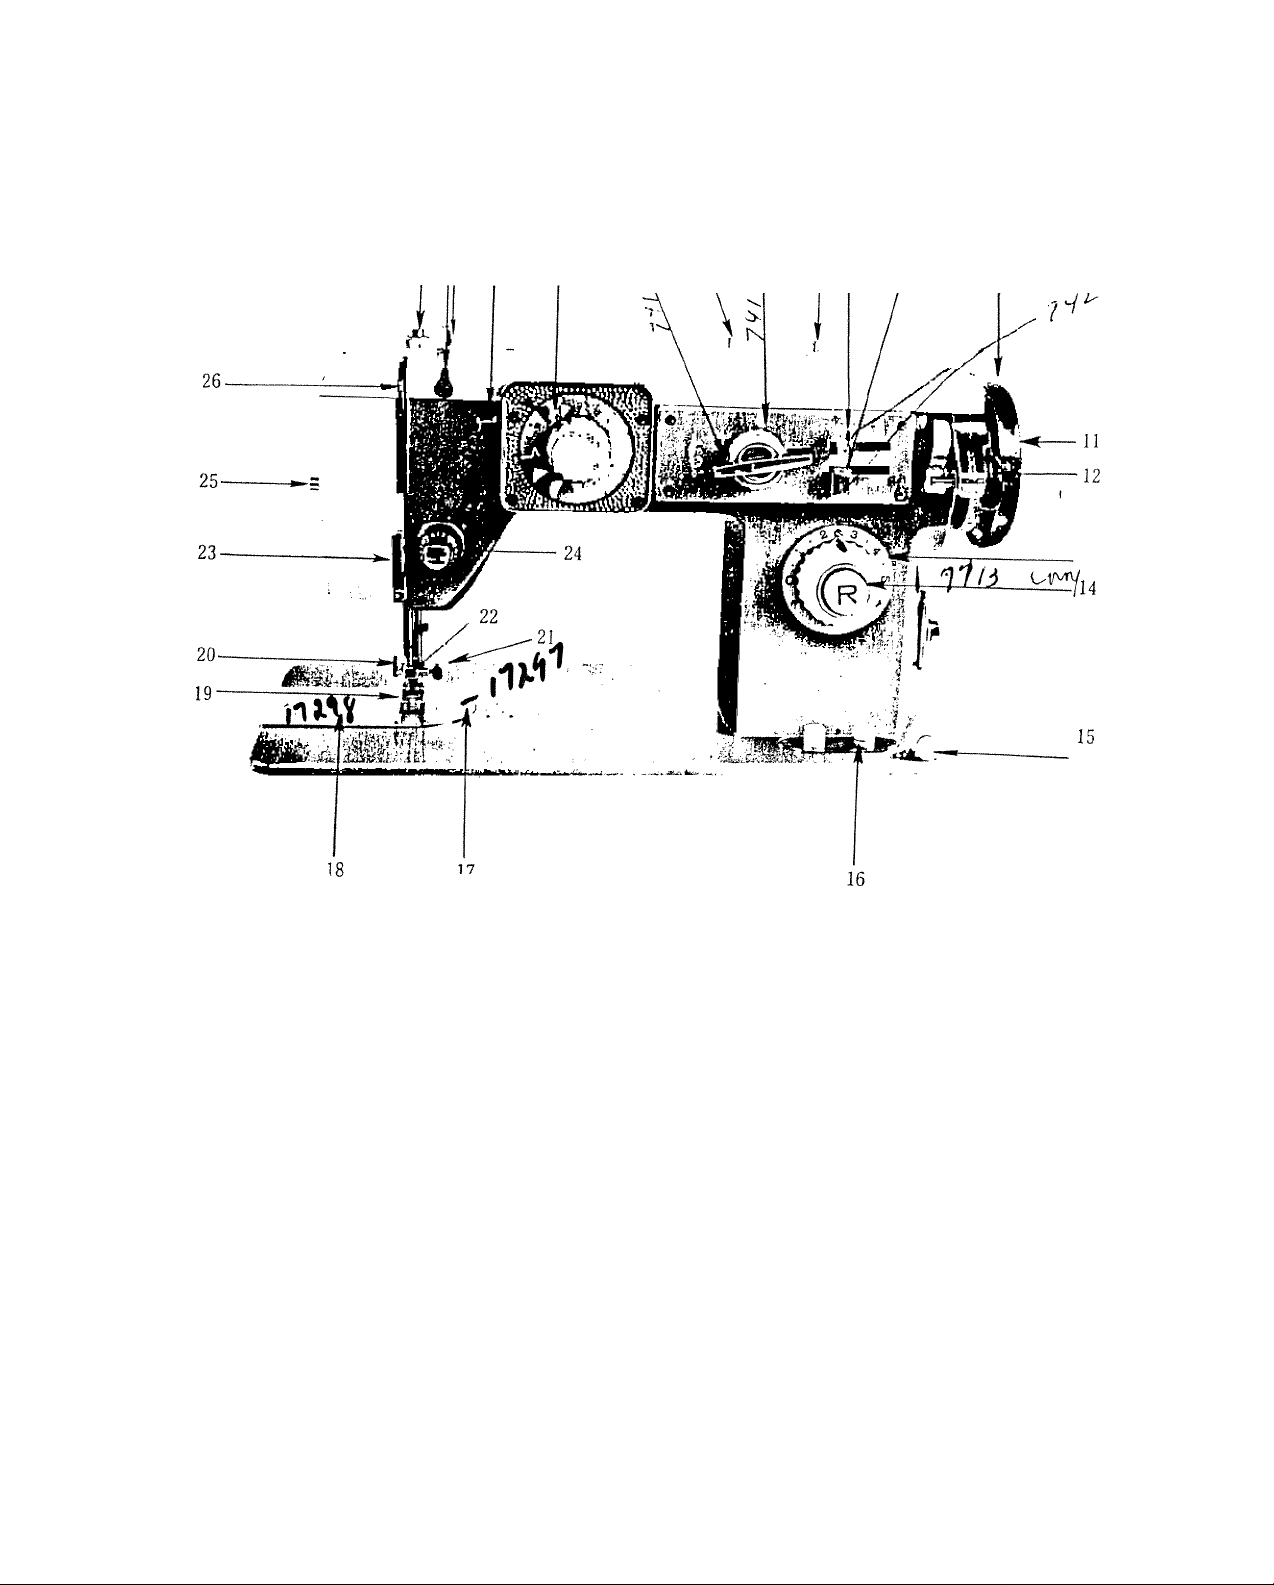
features and parts
(Front View)
Prsssure Release - Darner
2. Arm Thread Guide
3. Machine Release Lever
4. Decorative Switch Pattern Control
5. Stitch Width Control
6. Stitch Width Lock
7. Spool Pins
8. Buttonhole Lever
8* Needle Positioning Lever
10. Hand Wheel
11. Clutch Nut
12. Bobbin Winder
13. Stitch Length Control
14. Push Button Reverse
15. Bobbin Winder Thread Guide '
16. Drop Feed Buttons
17. Needle Plate
18. Cover Plate
19. Presser Foot
20. Attachment and Foot Thumb Screw
21. Needle Clamp Screw
22. Needle Bar Thread Guide
23. Thread Guide
24. Tension
25. Sew Lite Switch
26. Take Up Lever
r
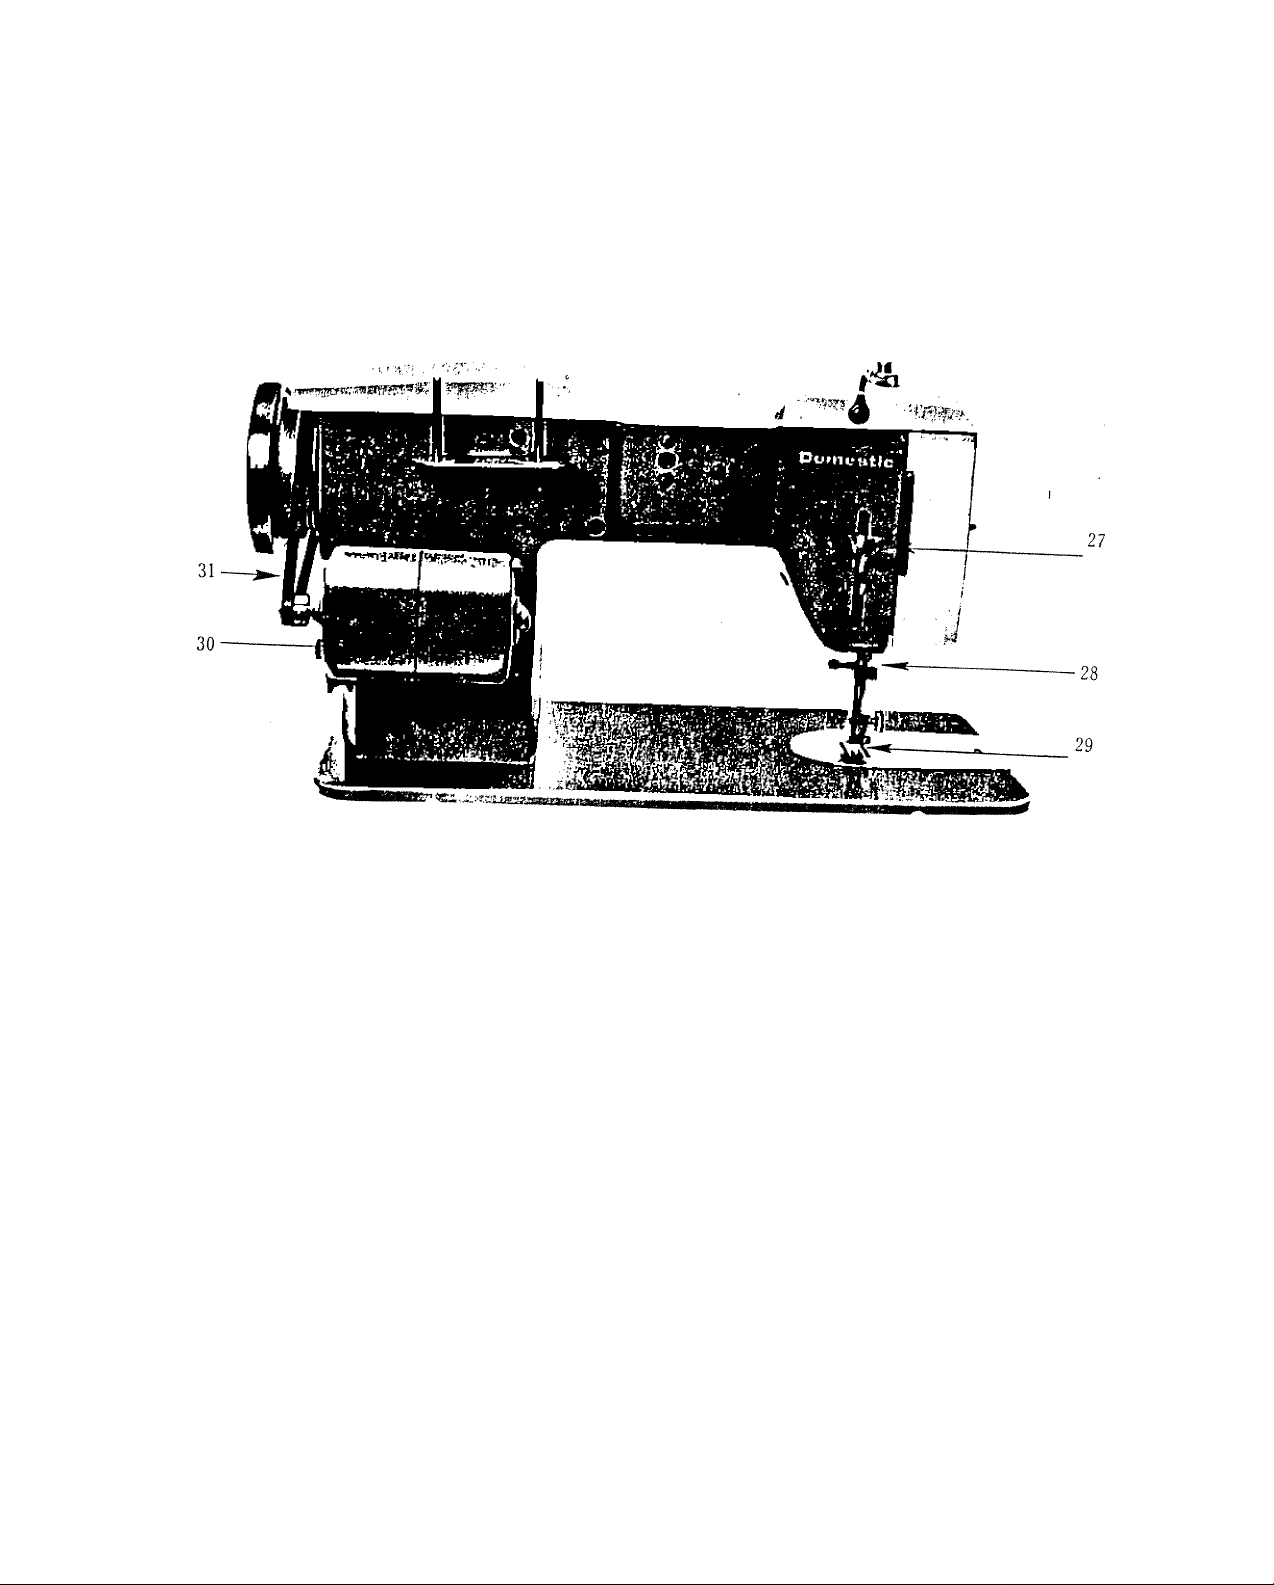
27. Presser Bar Lifter
28. Thread Cutter
Fig. 2
29. Feed
30, Motor
31. Belt
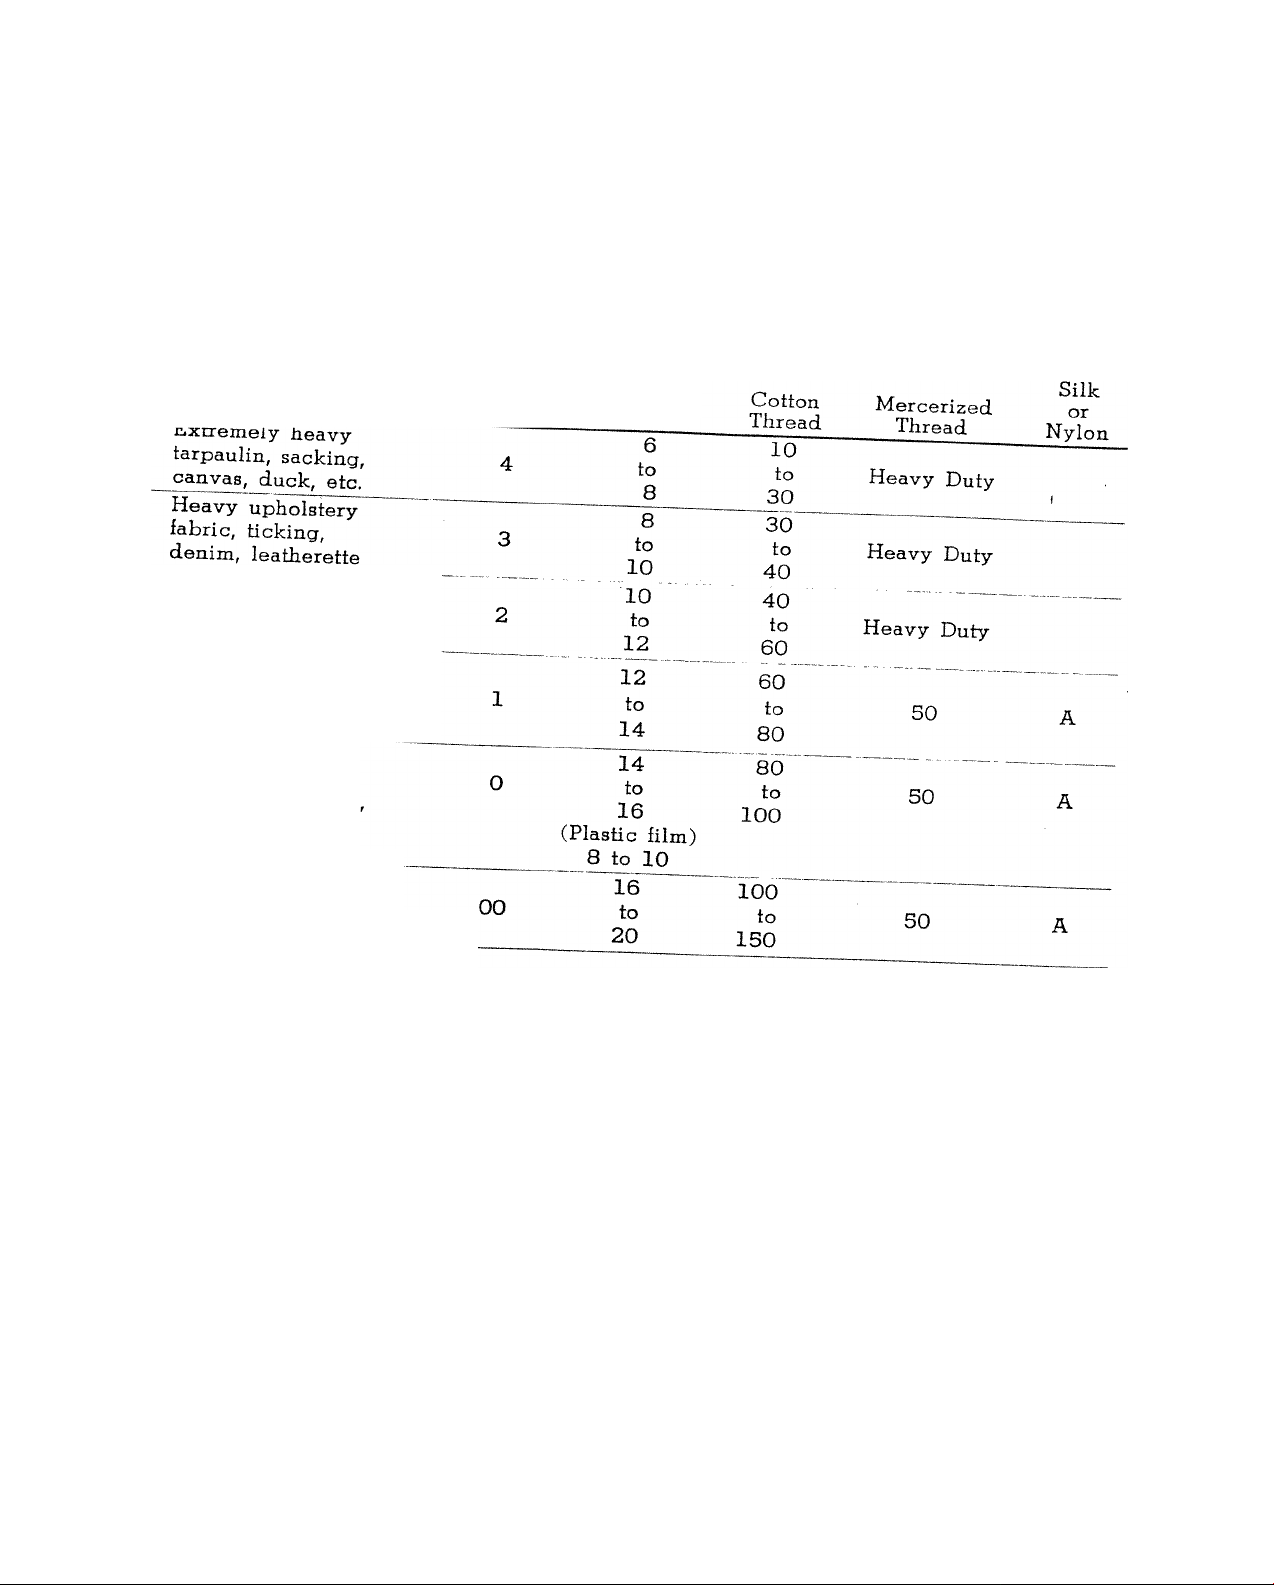
needle - THREAD - FABRIC - STITCHING GUIDE
Fabric
Medium heavy drapery
fabric, velveteen,
terry, etc.
Medium broadcloth,
percale, gingham, linen,
cniritz, taffeta, sheer
etc-
Sheer voile, lavra,
dimity, crepe,
handkerchief linen
plastic film, etc.
Very sheer chiffon,
batiste, lace, organdy,
ninon, net, marquisette, etc,
Needle
No
Macbine
Stitches
Per Inch

SETTING THE NEEDLE
See Fig. 3. Raise the needle bar A to its highest
point, turning wheel toward you by hand.
Then loosen the needle clamp screw B and the
needle can be inserted into clamp C. Place needle
(ilat side to right) in the needle clamp and push it
upward as far as it will go into the needle clamp hole,
tightening the needle clamp screw securely with a
screw driver.
After changing the needle, make one complete
revolution of the balance wheel by hand to be sure
the needle is in the correct position.
Flat surface
of needle
shank
Fig. 3
Fig. 4
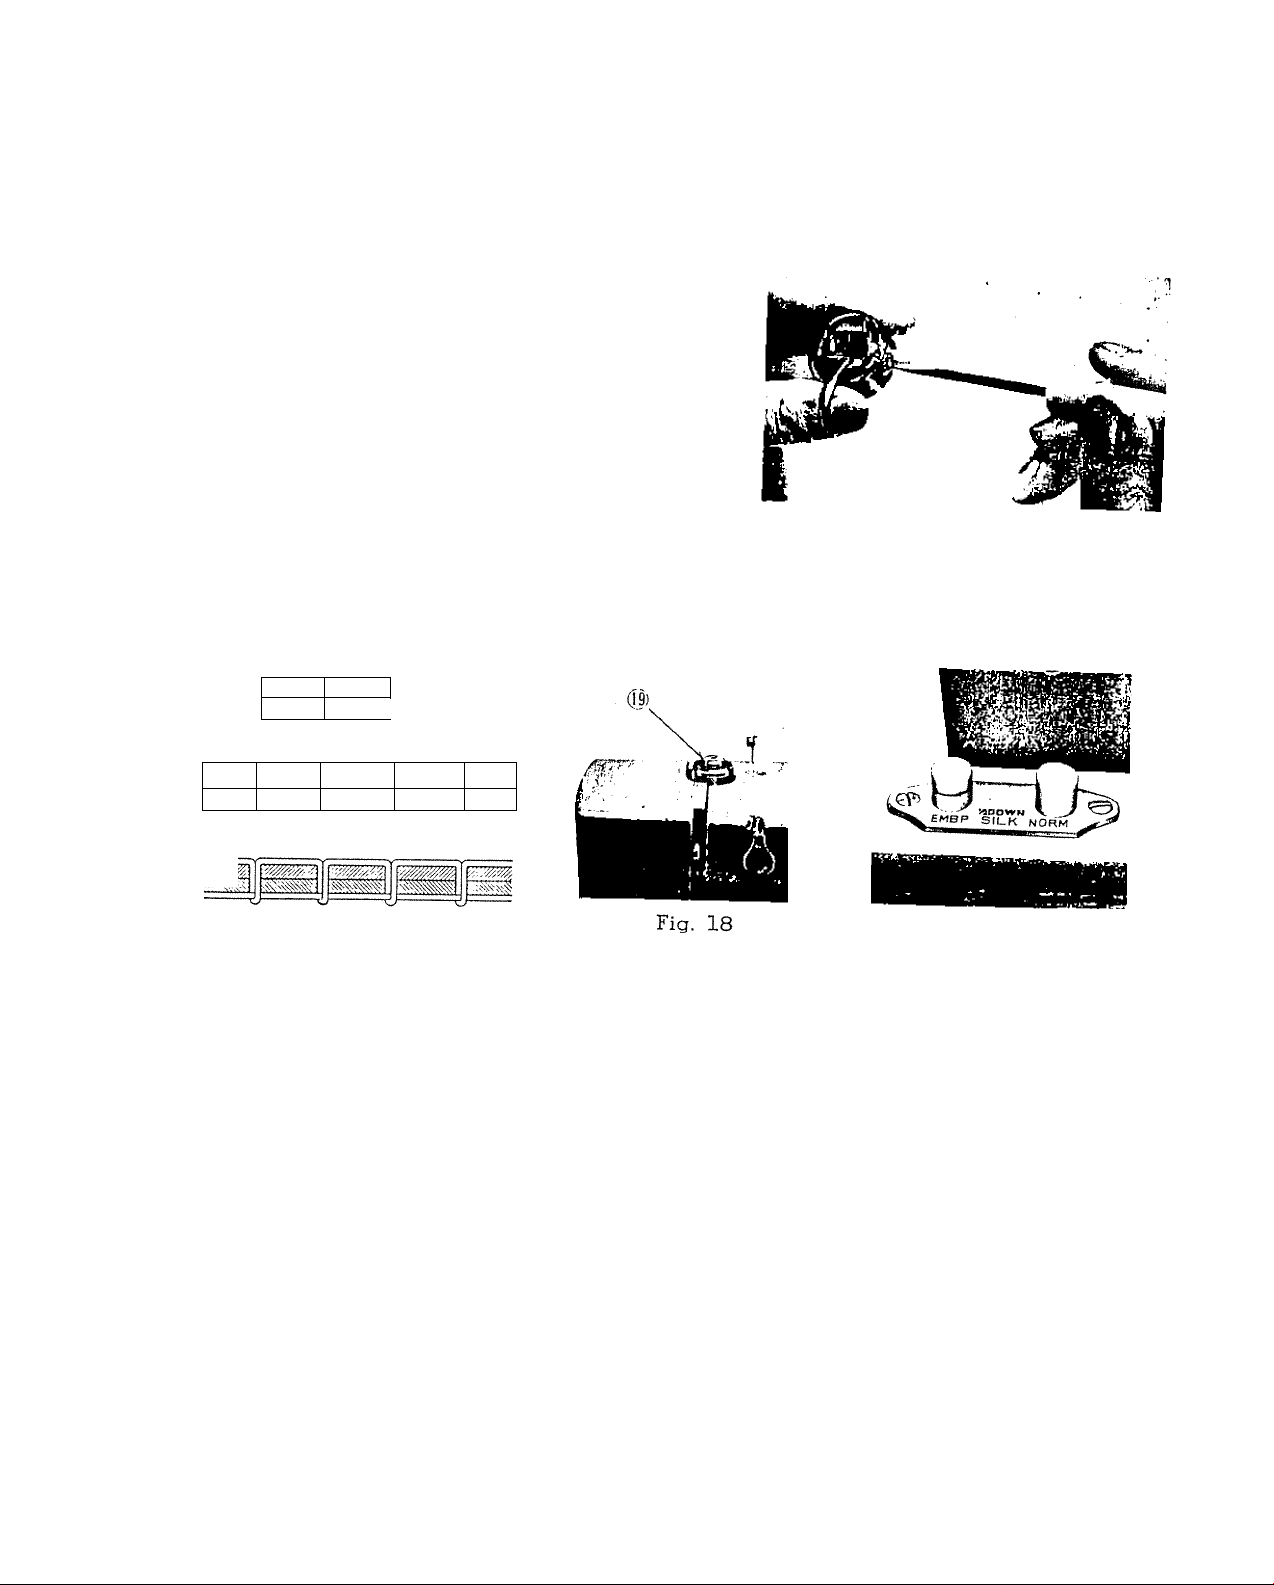
WINDING THE BOBBIN
Disengage the hand wheel (5, Fig. 4) from the stitching mech
anism by turning the clutch (6) toward you or counter-clockwise.
Place a spool of thread on one of the spool pins, lead thread
through the upper thread guides on the arm, and down through
the tension disc (10, Fig. 5) at the base of the machine. Run end
of thread through a hole in the bobbin edge and place bobbin B
on spindle of bobbin winder (8) fitting the notch on bobbin over
small pin on spindle. Push bobbin winder pulley against hand
wheel. Hold thread end loosely and start machine slowly.
Bobbin will stop winding when it is filled. Turn clutch away
from you until sewing mechanism is again engaged so that needle
moves when you turn the hand wheel.
Break off loose thread end used to start the winding.
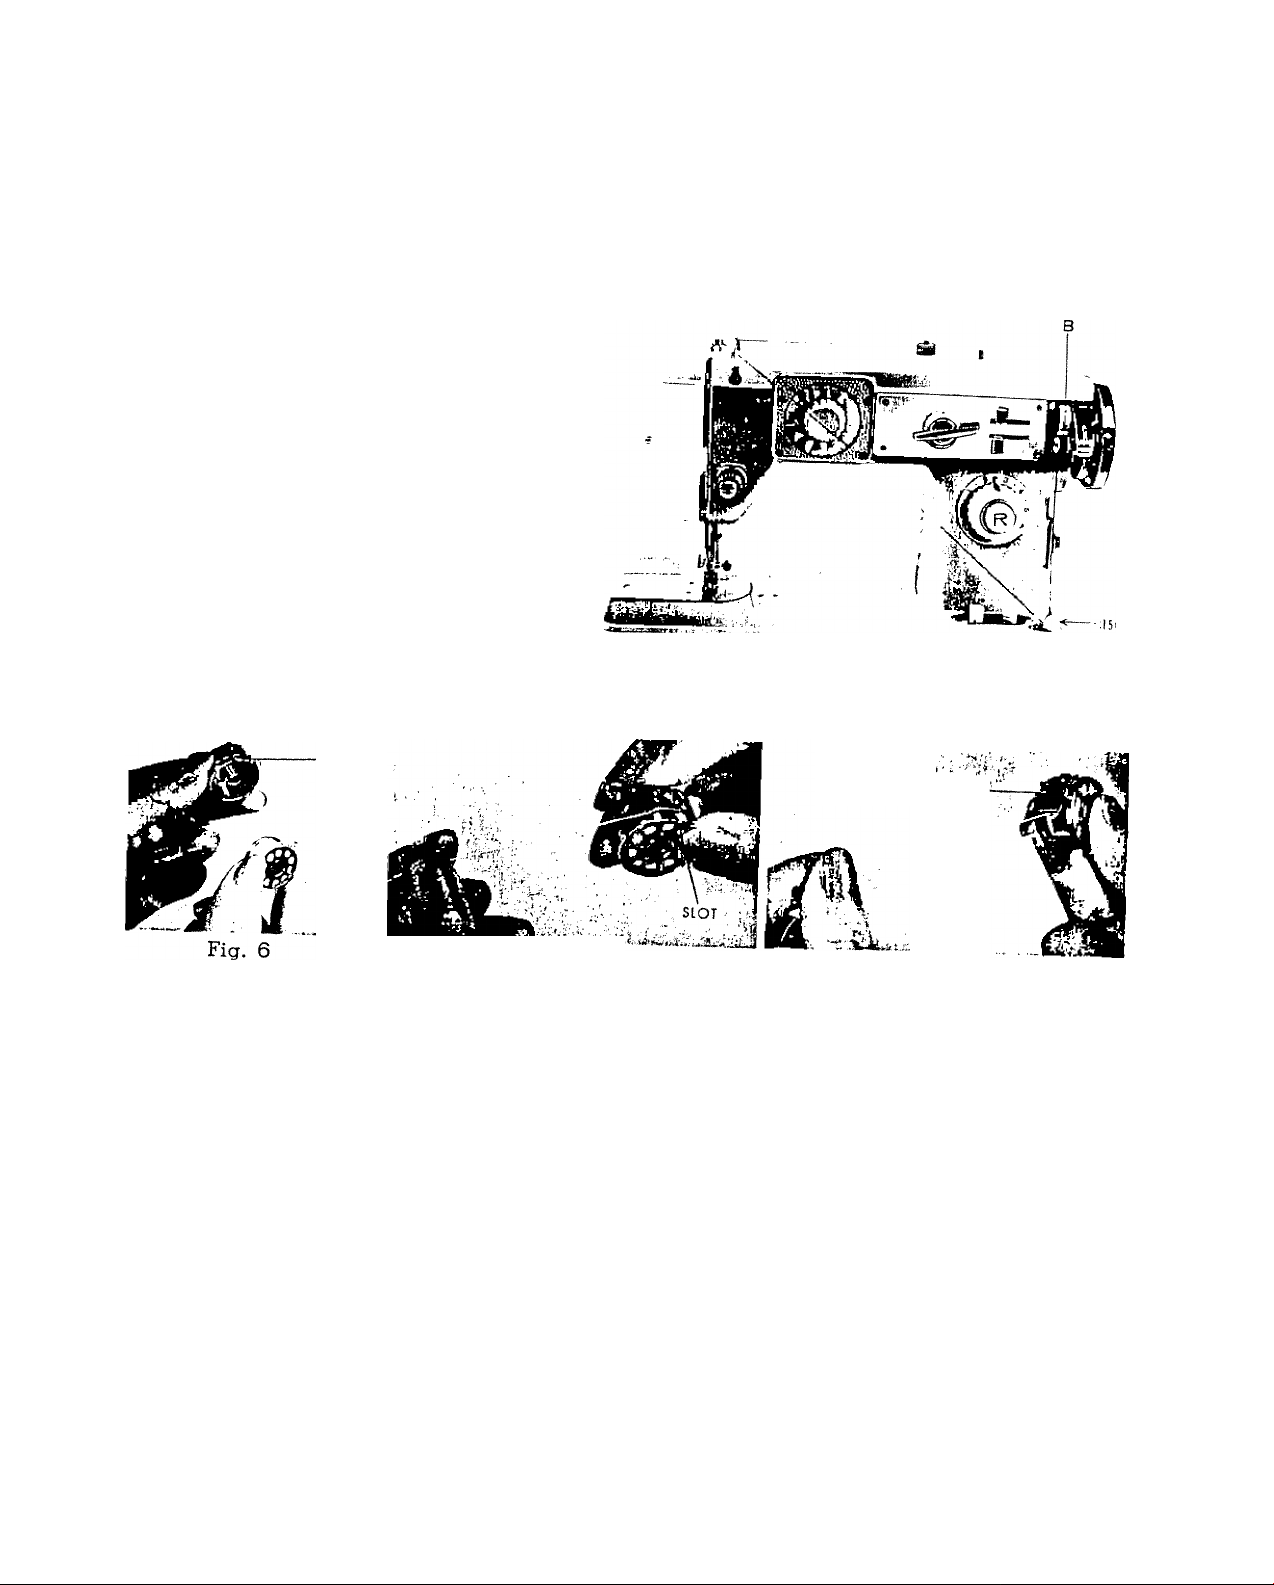
THREADING THE
BOBBIN CASE
Step 1 (illustrated in Fig. 6).
Hold bobbin case between thumb
and forefinger of left hand, so that
the slot in the edge of the bobbin
case is on top. Take the bobbin
between thumb and forefinger of
right hand so that the thread on
top leads from left to right. Step
2. Insert bobbin into bobbin case,
pull the thread into the slot of the
bobbin case as shown in Fig. 7, and
draw it under the tension spring
and into the fork-shaped opening
of the spring as shown in Fig. 8.
SLOT
-12:
Fig. 5
TENSION SPRING—i
Fig. 7
Fig. 8
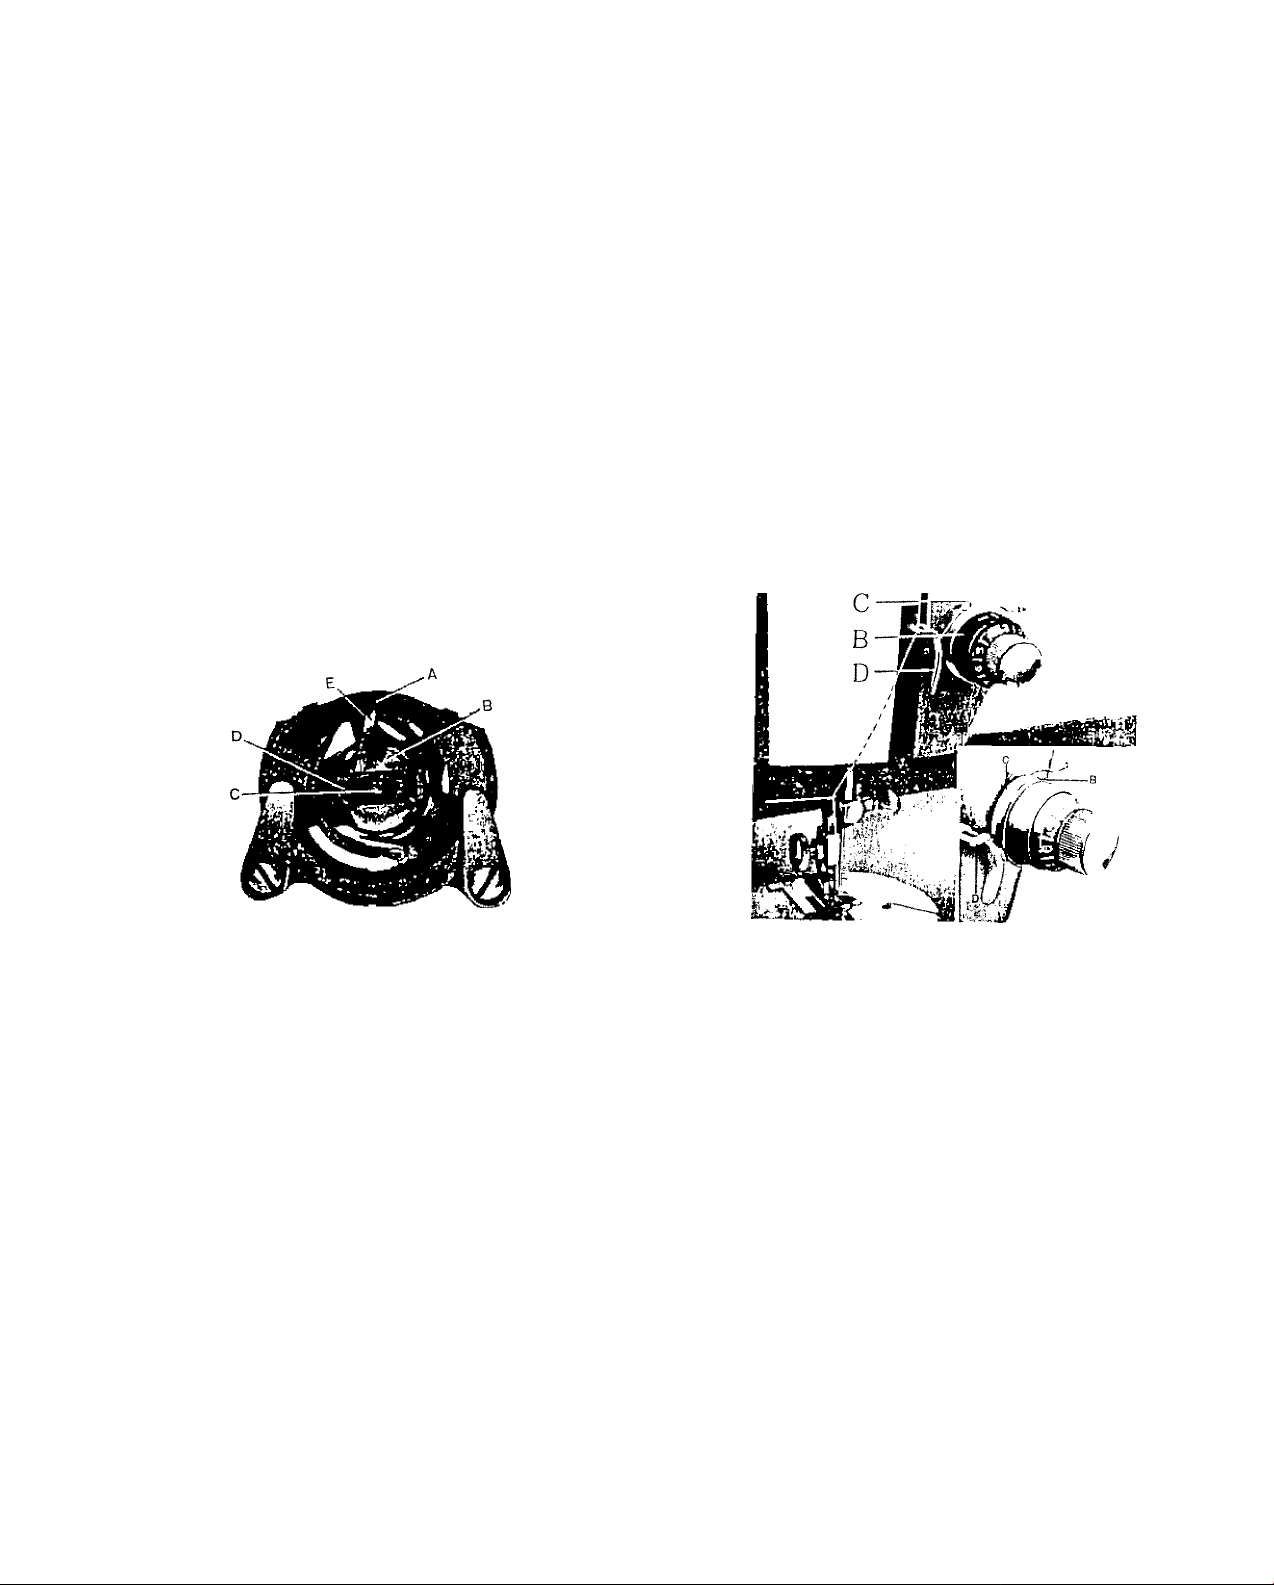
PLACING BOBBIN CASE IN SHUTTLE
Open hinged cover plate left of the needle.
(See 11, Fig. 1) Hold the bobbin case latch, (D),
Fig. 9, between the thumb and forefinger of ttie left
hand, with at least three inches of thread running
from the top of the bobbin case to the right. Insert
and center the bobbin case on the stud of the shuttle
body, (Cj. Be sure the bobbin case linger, (E),
is opposite the shuttle race notch, (A). Press the
bobbin case (B) into the shuttle as far as possible
until latch catches on the center post of the shuttle.
THEN release the bobbin case latch, (D). Press
bobbin case again after latch has been released to
make sure the bobbin case is locked securely in
place. Close the cover plate.
E
riJlii:/-
■: i.
IW'T ■
A
'■ r.
Fig. 9
Fig. 10
UPPER THREADING
(Fig. 10)
1. Turn the hand wheel toward you to raise the takeup lever and needle to their highest position.
2. Place spool of thread on the spool pin nearer the
needle.
3. Lead thread through rear and front arm thread
guides A.
4. Down and between tension discs B from right to left
5. up and around into the notch on check spring C
over tension discs
6. Down under thread guide bar and into guide D
7. up into take-up lever from right to left E
8. down through guide D in thread bar again
9. into thread guide F
10. through needle clamp guide G and into needle from
left to right pulling three to four inches of thread
through needle.
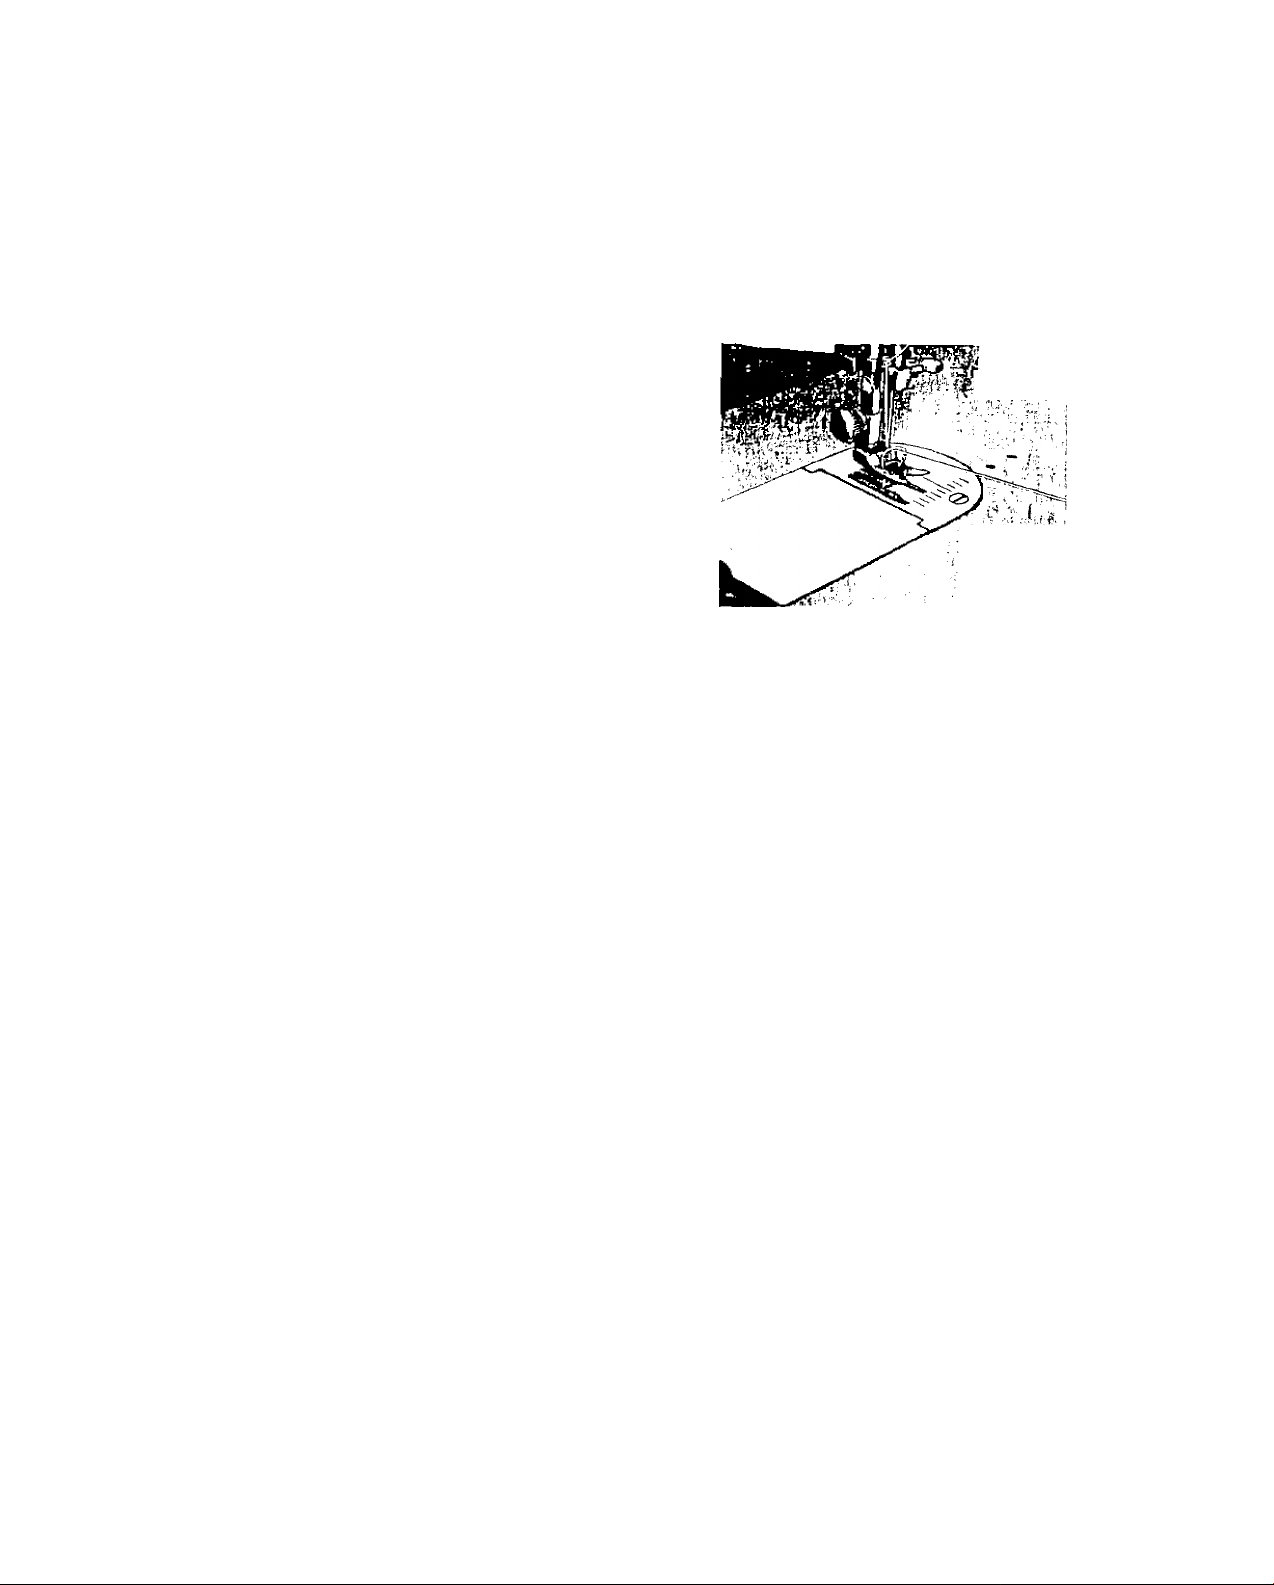
Hold the end of upper thread loosely and turn hand wheel toward you until the needle
goes all the way down and comes back up. A loop will be formed over the upper thread
which then can be pulled out straight (Fig. 11). Place both thread ends under the slot of
the presser foot and toward the back of the machine, leaving both threads three or four inches
long.
Fig. 11
-'i'- ^
Kil:; i
: e! . <*1 u'l
10
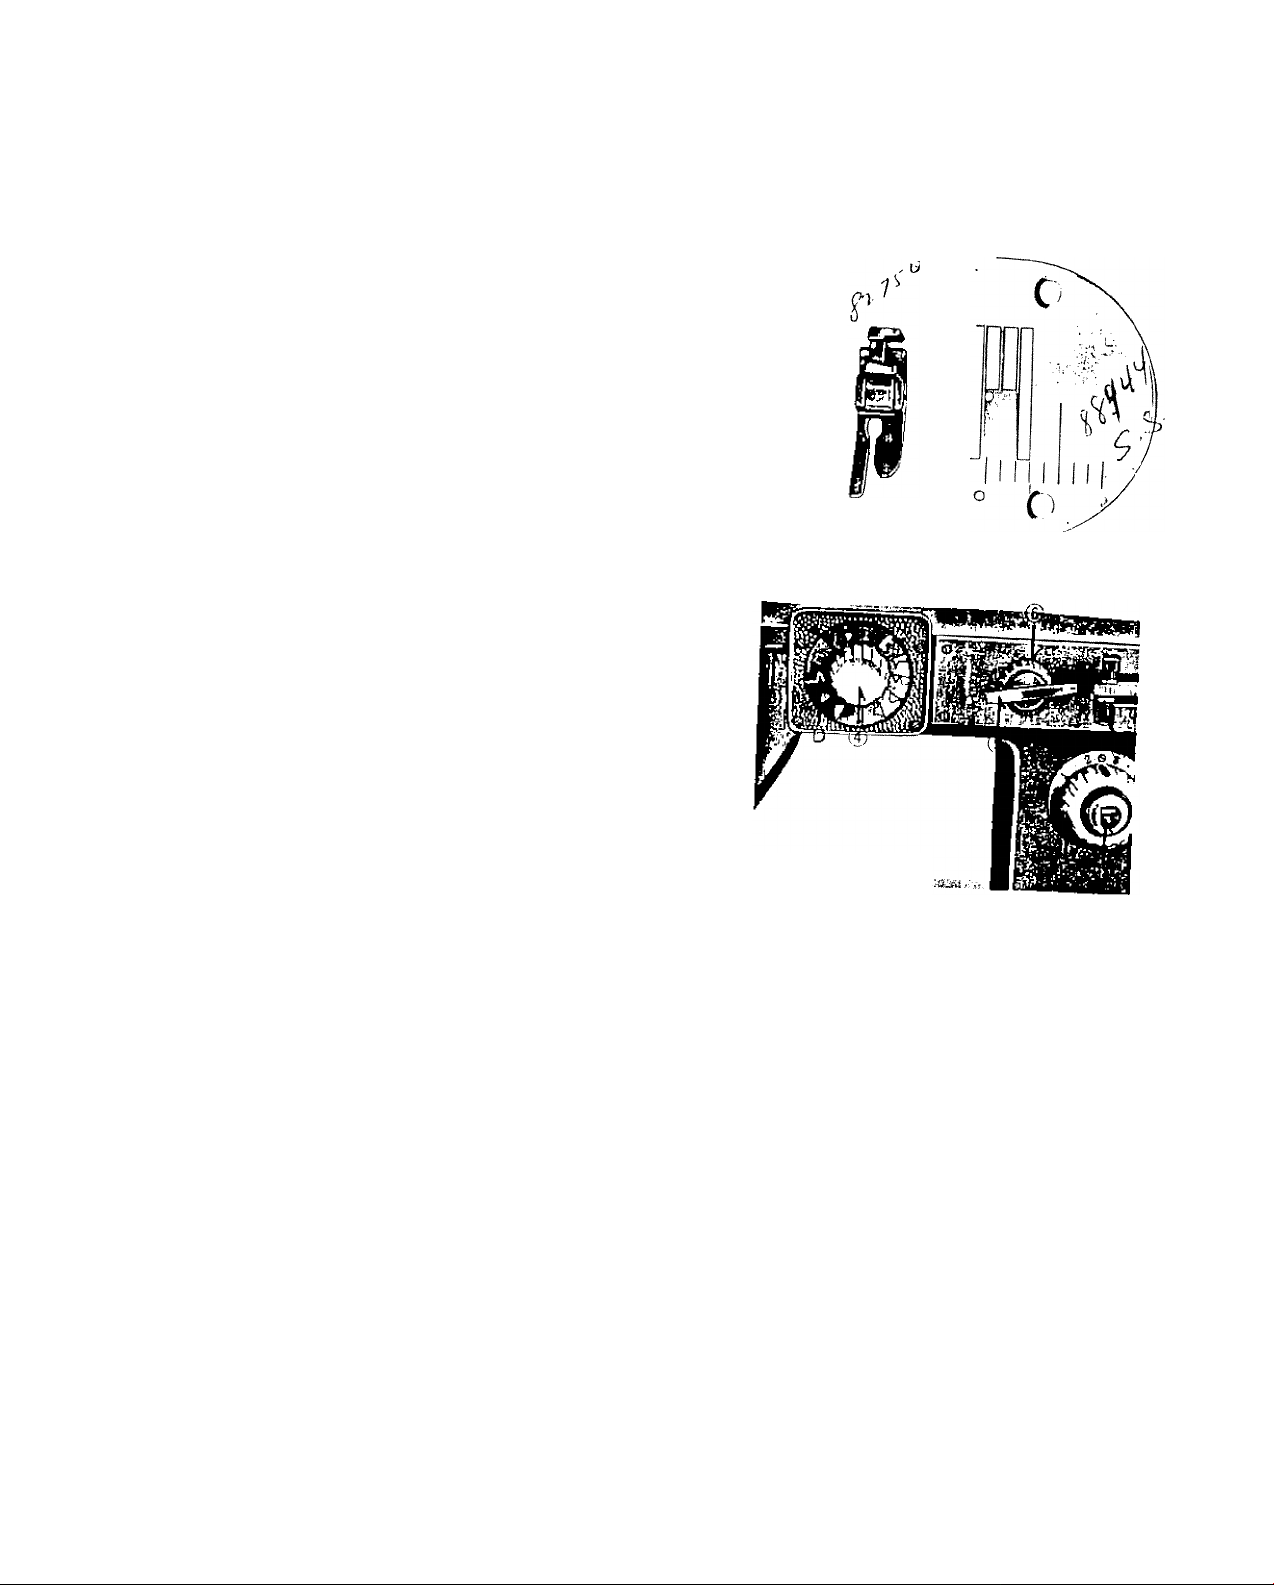
STRAIGHT STITCHING
For straight sewing on fine fabric or very soft material
you xnay want to use the straight stitch presser foot and
the straight stitch needle plate which are included in
your accessory box. Both have narrow needle slots.
Changing the Presser Foot and Needle Plate :
Cl) Presser Foot
CA) Loosen thumb screw 20, Fig. 1 and remove
zigzag presser foot.
CB) Replace with straight stitch presser foot, Fig.
(2) Needle Plate
CAl Slide cover plate 18, Fig. 1, to the left as
far as possible.
(B) Remove screws holding needle plate 17, Fig.
1, to bed plate. ' '
(C) Remove zigzag needle plate
■ (D) Replace with straight switch needle plate 12B.
the M selection knob 4, Fig. 12C at
the M position, zigzag stitch width control 5 at 0, and the
need e positioning lever 9 in the left hand position or the
needle will break in striking the foot or needle plate
Fig. 12-A
Fig
Fig. 12-B
V.
C
i
t
r
c

SETTING THE STITCH LENGTH '
The lengh of the stitch is regulated by the dial, 10, shown in Fig. 12-C. Near 0 is the
shortest stitch and 8 is the longest, but the dial may be set at any spot between markingr for
a variety of lengths. Turn the dial to the left to lengthen and to the right to shorten the
stitch. The number of the stitch length you choose should appear under the red line of the
indicator window.
STITCH LENGTH CHART (Approximate)
11
}
. r*'
J
J
,1
i
I
{
I
I
Figures on indicator
Number of stitches per inch
When you wish to sew backward to tie the threads at the beginning or the end of a seam,
press the R button (14 Fig. 12-C) down as far as it will go. The machine will sew backward
as long as the button is held in.
ADJUSTING THE TENSION
Always adjust the upper tension with the presser foot down,
as the tension is automatically released when it is raised. To
increase the tension on the upper thread, turn dial (Fig. 13) to
the right, or clockwise. To decrease, turn to the left. The higher
the number on the dial the tighter the tension. Before adjusting
lower tension be sure that the machine is threaded properly.
When necessary to change the bobbin tension, turn small
screw (Fig. 14) on side of the bobbin case clockwise to tighten,
counterclockwise to loosen. Fig.
No Feeding
0
SEWING IN REVERSE
1
30
2 3
25 15
4.
8
5
6
12
When tile upper and under tensions are properly
balanced, a perfect stitcii will be formed witb both,
threads interlocking in fabric (Fig, 15).
When the upper tension is too tight, the lower
thread is pulled up over the upper thread which is
lying flat on the fabric (Fig, 16).
When the upper tension is too loose, the upper
thread forms loops over the lower thread lying flat on
the fabric (Fig. 17j.
ADJUSTING PRESSURE
AND FEEDING OF FABRIC
or straight sewing and zigzag stitching, the pressure bar cap
Fig. 14
"Hr positS°Fr), lli. '‘“P
Fig. 15
pi
____
Fig. 16
Fig. 17 M
r
[ y/////y///y }
■'///yy/yA
Fig. 19
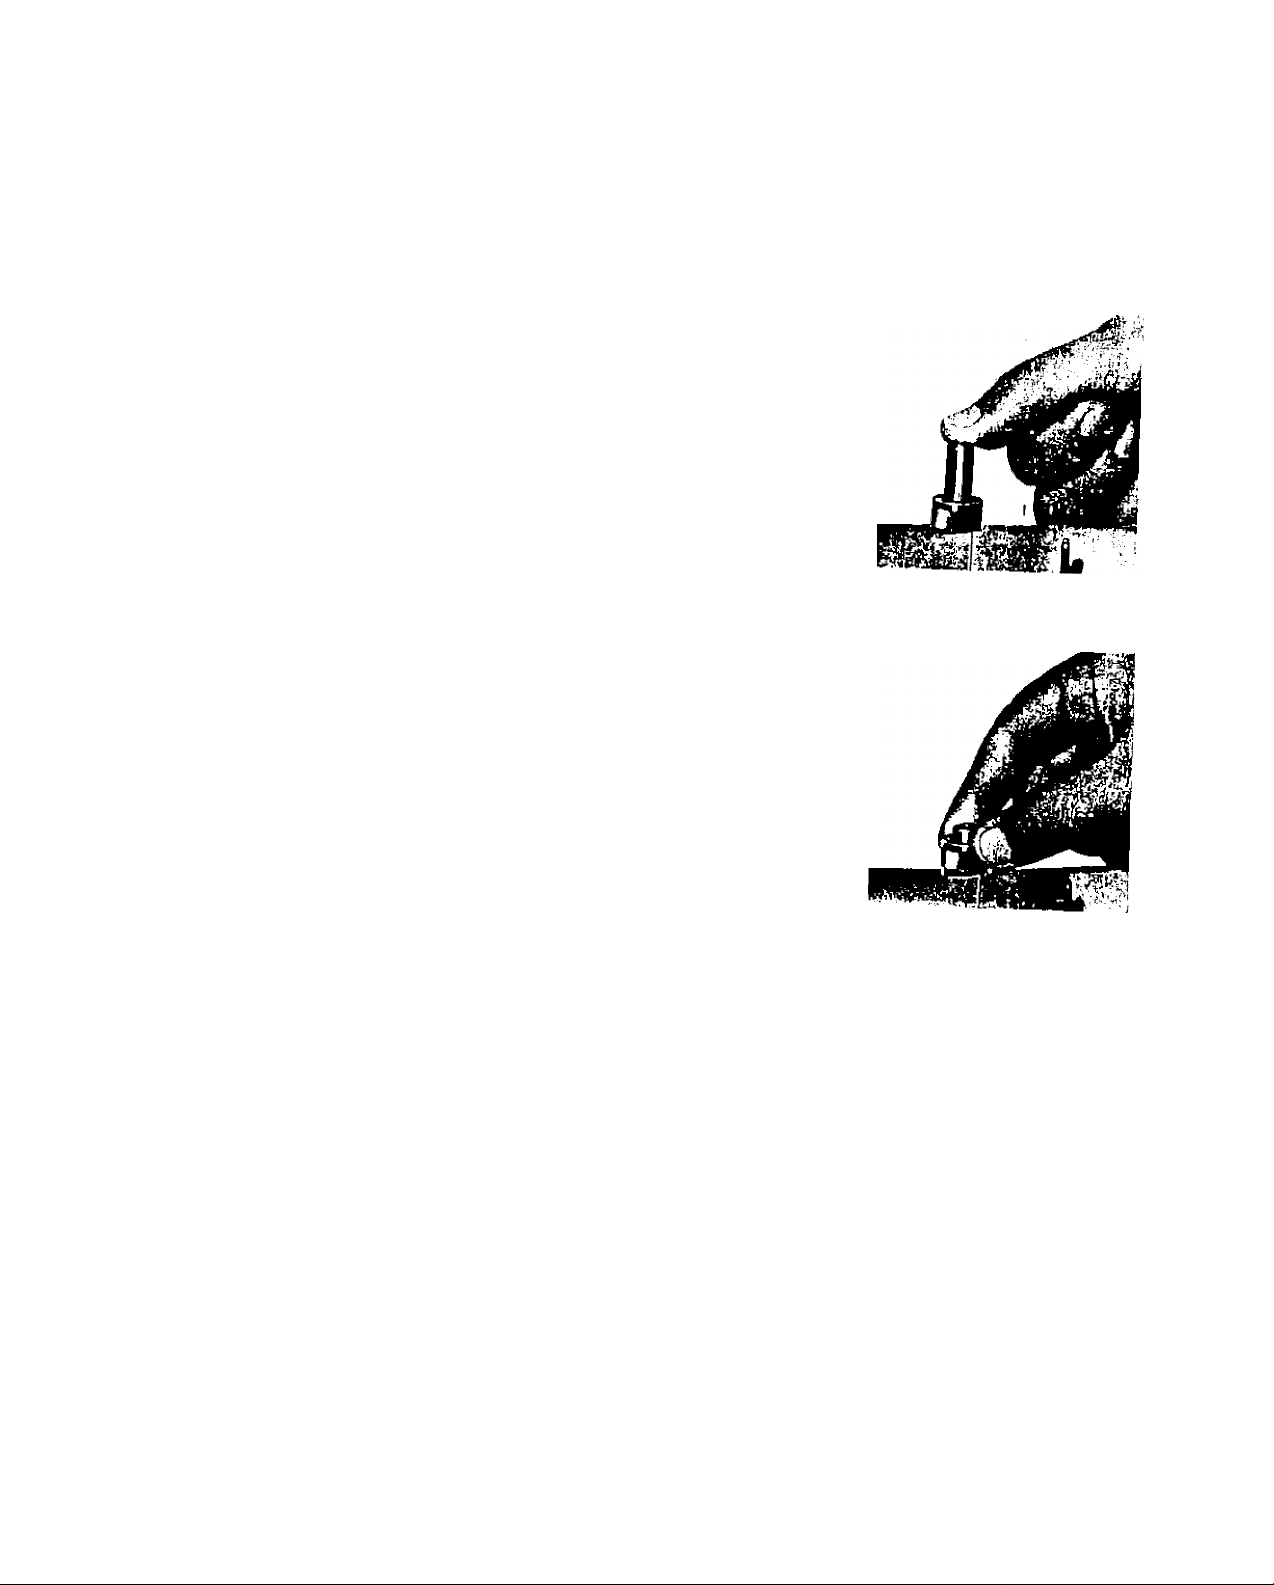
SEWING THIN OR LIGHT WEIGHT FABRICS
WRen lighter pressure is required to sew satisfactorily on thin
silk or filmy material, the pressure cap should be about halfway
down. Release all the way by pressing the snap lock, A, and then
press cap B down again to halfway spot. Lower the feed slightly
by pressing 'Darn" button halfway down. Fig. 19, 20 nad 20A
DARNING AND MONOGRAMMING. , In order to move the
fabric freely in any. direction for darning, mending and certain
kinds of free-hand embroidery, release the pressure cap B comp
letely by pressing down on the snap lock. A, Fig. 20. Press "Darn"
button all the way down, which drops the feed well below the
needle plate. To return feed to normal, press "Sew" button Fig. 19.
PREPARING TO SEW
Have take-up lever at highest point before starting to sew.
Do not try to help the feeding by pulling the material as this may
deflect the needle and cause it to break.
NEVER run machine without material under presser foot.
Place material and threads in position under the presser foot
and lower the presser foot.
Turn the hand wheel toward you until the needle is at its
highest point. You are now ready to begin sewing. By having
the needle at its highest point, it is not necessary to touch the
hand wheel to start the machine. You merely press the control.
The speed of the machine is regulated by increasing or decreas
ing the amount of pressure exerted on the control.
13
Fig. 20
Eig. 20A
14
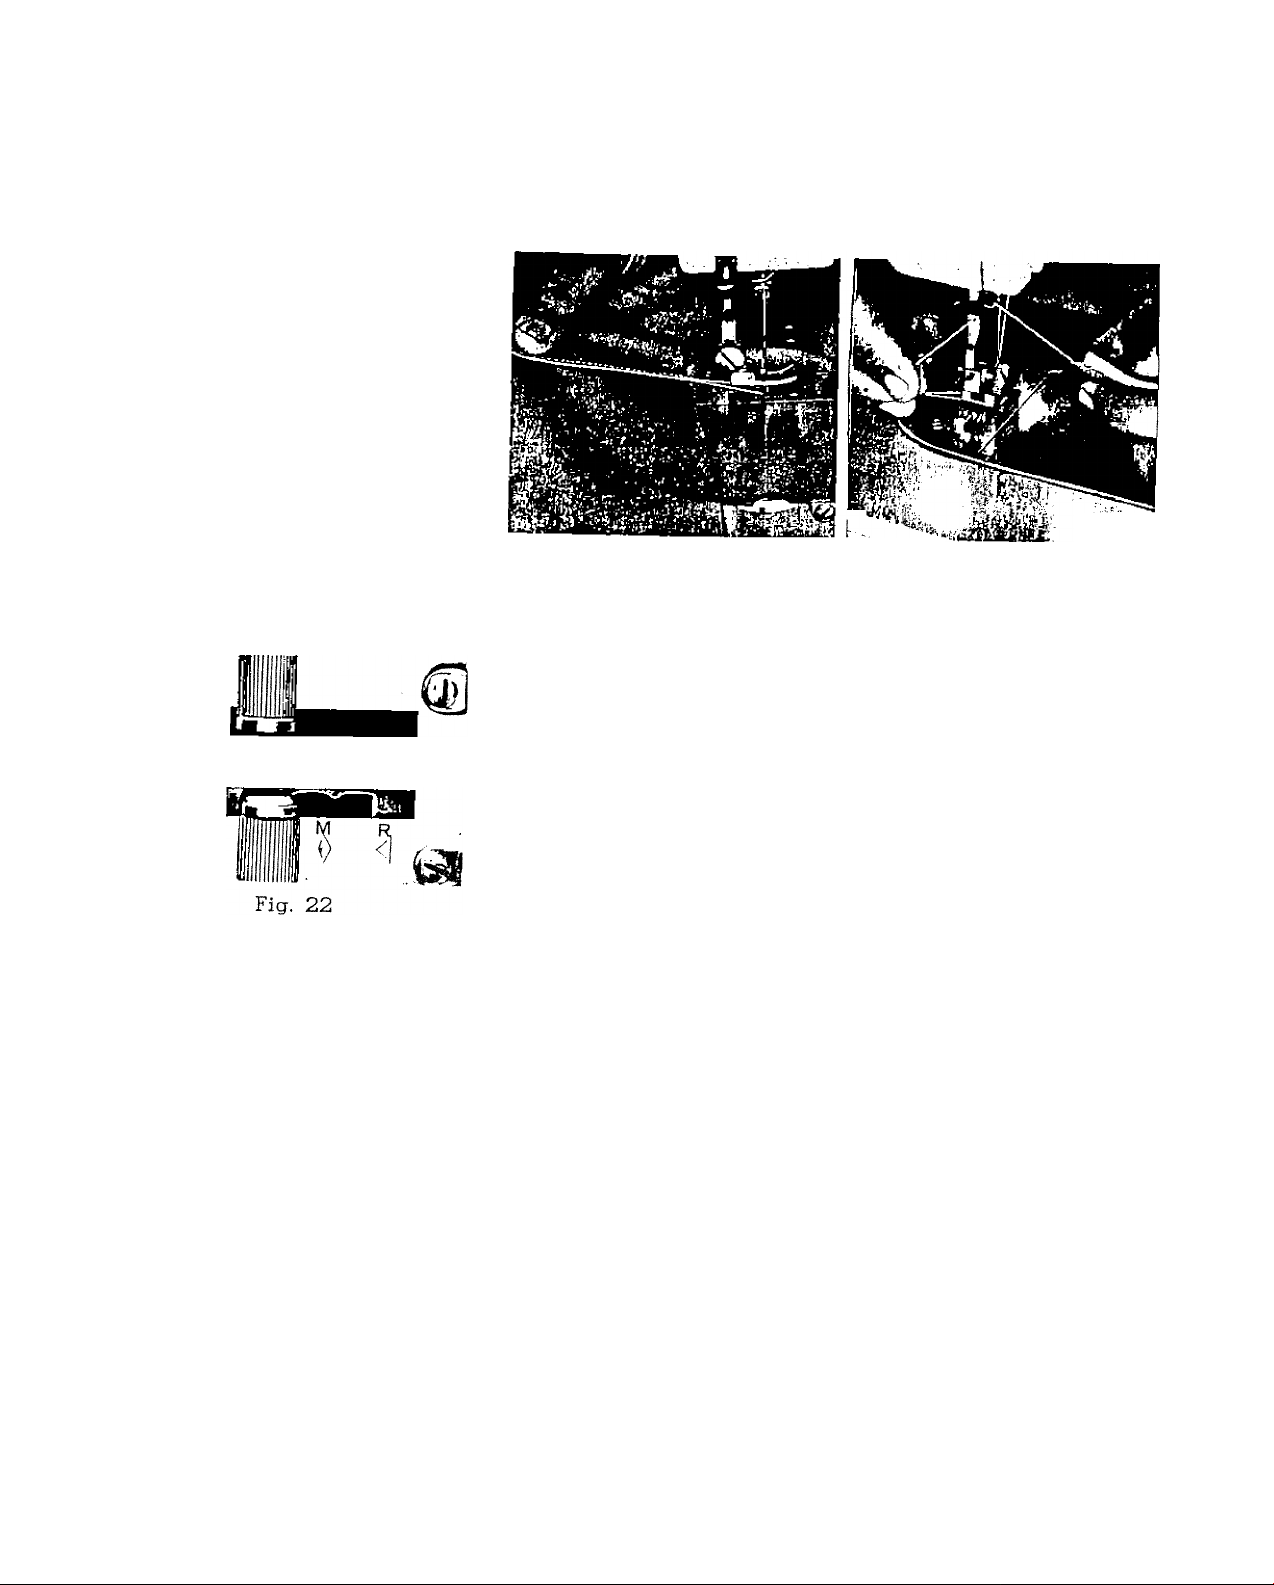
REMOVING THE WORK
Be sure to stop the machine
when the thread take-up lever
and needle bar are at the high
est position.
Now raise the presser foot
and draw the fabric back and
to the left, Fig. 21-A and B. and
pass the threads over the thread
cutter.
Pull down slightly, holding
thread in both hands, so as not
to bend the needle.
Leave the ends of thread
under the presser foot.
1—
Fig. 21-A Fig. 21-B
NEEDLE POSITION LEVER
The machine has three basic needle positions and a
control which will convert it to a multiple position machine,
whichever you may choose.
To obtain the indicated points for the basic needle
positions which are left (L), Center (C) and right, (R) press
down on lever 9, Fig. 22, to release the latch and move it
to the right or left by a pressure on its side. This will
cause the lever to catch in a spring notch for the center
position.
^ To obtain the multiple needle position, machine a
slight downward pressure on knob 9 when moving it in
either direction.
 Loading...