


1444
INSTRUCTION MANUAL
FOR
SEWING MACHINE
iLi
UIHITE

POLARIZED PLUGS CAUTION
i® ^ polarized alternating
me nmlrTтh'^^ i® tha^n
the other). This plug will fit into the power outlet onlv
oneway. This is a safety feature, if you are unaNeti
insert the plug fully into the outlet, try reversing the plug
If the plug should still fail to fit, contact an electrician
purpose of the polarized plug. ^
WHITE SEWING MACHINE COMPANY
Record in space provided below the Serial No. and
Model No. of this appliance.
The Serial No. is located on Bed Plate.
The Model No. is located on Rating Plate.
Serial No.
Model No.
Retain these numbers for future reference.
IIV
m
folov
Ri
An
appli
Aiwa;
elec
Opet
like.
1. Do
is t
2. Us<
att£
3. Ne<
pro
apF
ele(
4. Ne\i
ing:
dus
5. Nev
6. Do
7. Do I
beir
8. To c
OUtli
9. Do I
10. Keej
mac
11. AIwi
12. Do I
13. Do r
brea
14. Unp
such
pres
15. Aiwa
lubri.
instri

IMPORTANT SAFETY INSTRUCTIONS
When using an electrical appliance, basic safety precautions should always be
folowed, including the following;
Read all instructions before using
(this sewing machine)
iting
than
only
le to
Jiug.
dan
^fety
DANGER To reduce the risk of electric shock;
An appliance should never be left unattended when plugged in. Always unplug this
appliance from the electric outlet immediately after using and before cleaning.
Always unplug before relamping, Replace bulb with same type rated 15 watts.
WARNING To reduce the risk of burns, fire,
electric shock, or injury to persons:
Operate sewing machine only when mounted in sewing machine table, case, and the
like. See the installation instructions.
1. DO not allow to be used as a toy. Close attention is necessary when this appliance
is used by or near children,.
2. Use this appliance only for its intended use as described in this manual. Use only
attachments recommended by the manufacturer as contained in this manual.
3. Never operate this appliance if it has a damaged cord or plug, if it is not working
properly, if it has been dropped or damaged, or dropped into water. Return the,
appliance to the nearest authorized dealer or service center for examination, repair,
electrical or mechanical adjustment.
4. Never operate the appliance with any air openings blocked, Keep ventilation open
ings of the sewing machine and foot controller free from the accumulation of lint,
dust, and loose cloth.
5. Never drop or insert any object into any opening.
6. Do not use outdoors.
7. Do not operate where aerosol (spray) products are being used or where oxygen is
being administered.
8. To disconnect, turn all controls to the off (“0”) position, then remove plug from
outlet.
9. Do not unplug by pulling on cord. To unplug, grasp the plug, not the cord.
10. Keep fingers away from all moving parts. Special care is required around the sewing
machine needle.
11. Always use the proper needle plate. The wrong plate can cause the needle to break.
12. Do not use bent needles.
13. Do not pull or push fabric while stitching. It may deflect the needle causing it to
break.
14. Unplug the sewing machine when making any adjustments in the needle area,
such as threading needle, changing needle, threading bobbin, or changing
presser foot, etc.
15. Always unplug sewing machine from the electrical outlet when removing covers,
lubricating, or when making any other user servicing adjustments mentioned in the
instruction manual.
SAVE THESE INSTRUCTIONS
WHITE SEWING MACHINE COMPANY
Installing Sewing Head in Portable Case
Please read these important instructions
which were written to aid you in placing
your new sewing machine in its portable
case.
First, remove the foot control which is
fastened Inside the base to avoid damage
In shipping. After unpacking the sewing
machine unit, being certain to take out the
instruction book, guarantee and
accessory.box, lay the unit face down on a
table. You will see two clamping screws A
entering head hinge holes B on the
underside of the back.
On the base you will find two head hinges
C which will fit into holes B. Lower the
base onto the sewing machine fitting
hinges C into holes B. Tighten screws A
securely with a screw driver.
PORTABLE BASE
c
1
..
-pel
A^'%
UNDER SIDE OF
MACHINE
---------A
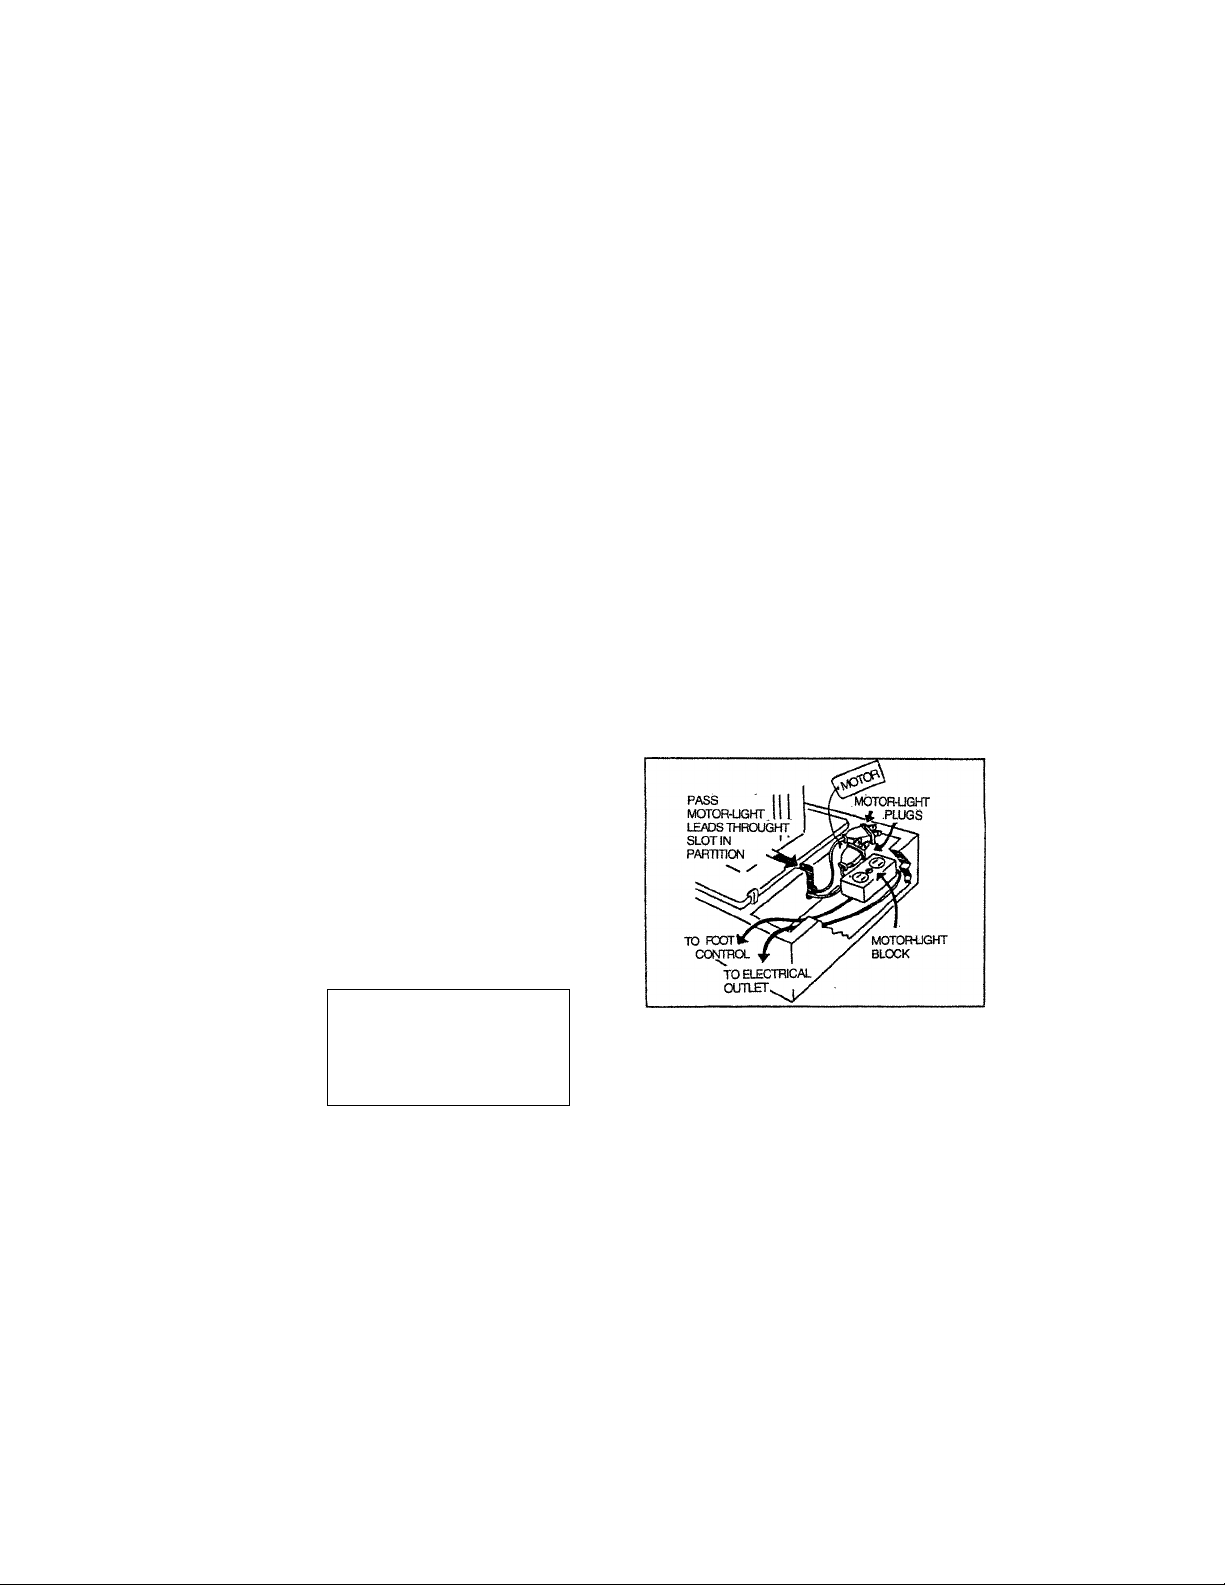
To make the electrical connection draw the
two wires through the. slot in the partition
of the base. Plug the cord labeled "Motor"
into the receptacle marked "Motor" on the
block attached to the outer section of the
base. Then insert the other cord into the
"Light" receptacle.
Place the foot control on the floor, insert
plug into a wall outet (110-115 volts) and
you are ready to sew. But first read the
instruction book to become familiar with
the threading of the machine, tension
adjustments and all the other features
designed to make sewing a pleasure.
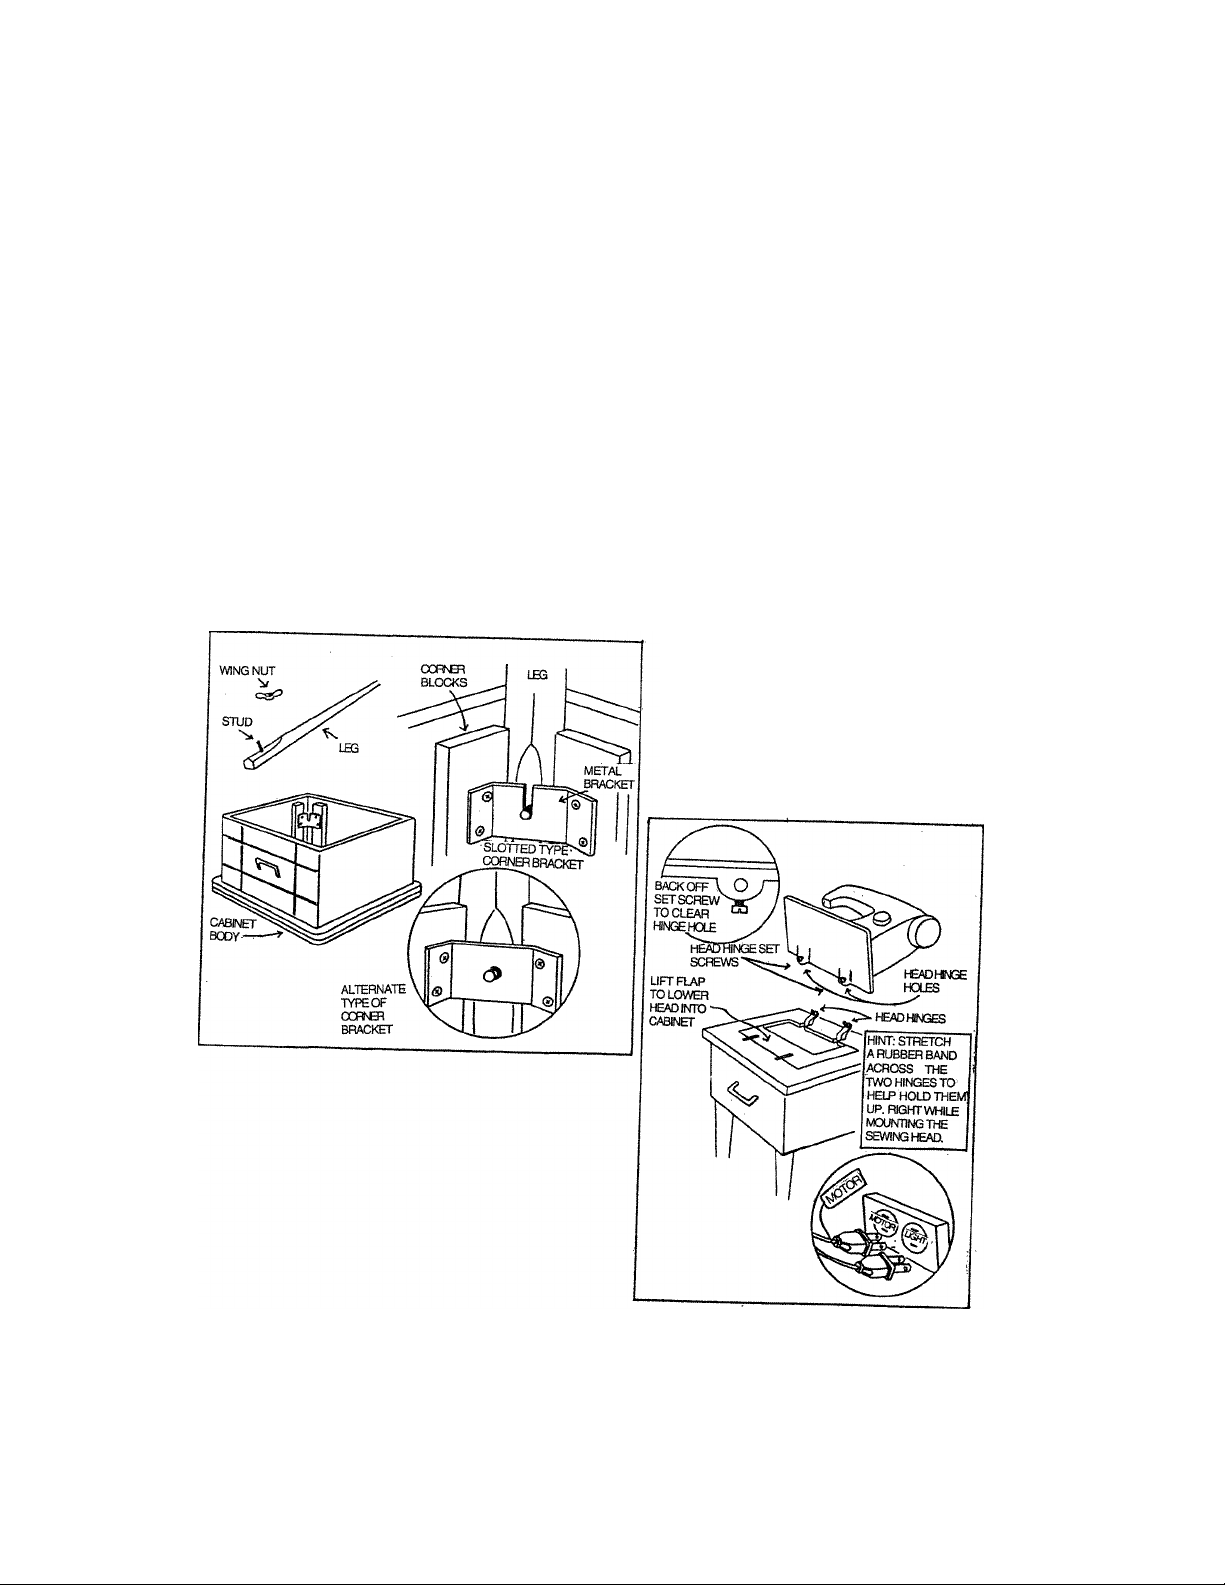
To Assemble Legs on
Cabinets
1. Place cabinet body upside down
on smooth level surface (use
packing material as cushion to
prevent marking top.)
2. Siip ieg into position between
corner biocks and down as far as it
will go with stud fitting into slot or
hole in metal bracket.
S.Add wing nut and tighten securely.
Installing Sewing Head in
Cabinet
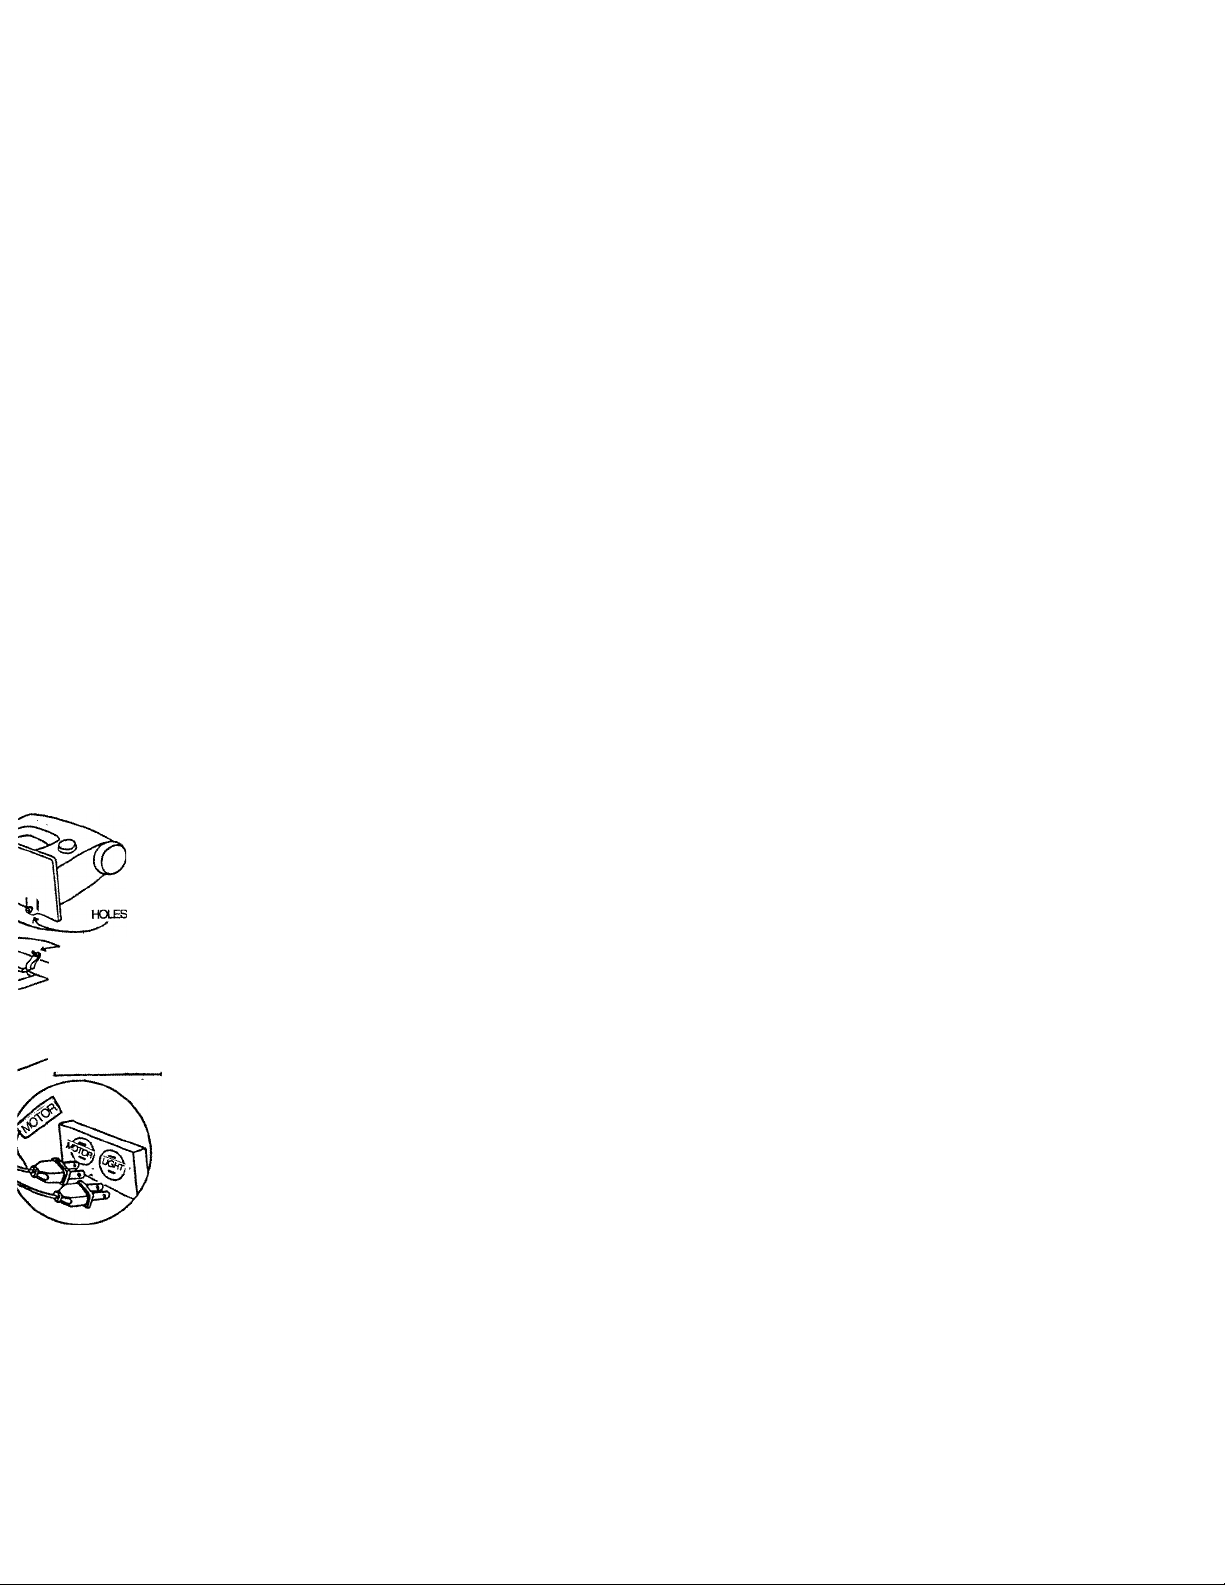
1. Back off both head hinge set screws
until head hinge hole is clear.
2. Tilt head hinge tongues up and
back as far as they will go.
3. Carefully slip head onto head hinges
making sure tongues are inser
ted as far as they can go into head
hinge holes.
4. Allow the head to rest in its tiltedback position.
5. Tighten both set screvys securely
with screw driver.
6.
Plug electrical leads into sockets
located inside cabinet. Cord indentified with “motor" tag must be
plugged into socket marked
"motor". Untagged cord goes to
"light" socket.
Name of Par
Accessories.
Before sewin
Winding the
Removing be
Inserting bob
Inserting bob
Threading u|
Drawing up b
Chariging sew
Control dial 8
Regulating thi
Drop feed . .
Changing neec
Fabric. Threac
Sewing (patter
To start sewini
To finish seam
Straight stitch
Zigzag sewing
Blind stitch .
Button sewing
Binding
.......
Zipper sewing
Hemming. . .
Twin Needle.
Embroidery .
Quilter ....
Seam guide. . ,
Maintenance ((
Checking Perfc
ig Head in
CONTENTS
Name of Parts..............................................................................................................2 & 3
Accessories........................................................................................................................... 4
Before sewing (Power supply and Sewing lamp)...................................................................
Winding the bobbin................................................................................................................5
...
nge set screws
is clear.
igues up and
III go.
rto Tiead hinges
jues are inser.n go Into head
est |n its tilted-
:rews securely
s into sockets
et. Cord inden
tag must be
icket marked
cord goes to
HesDHWGE
■ HINT: smecH
A RUBBER BAND
: ACROSS THE
TWOH№ESTO
HELP HCXO THEM
UP. FW3HT WHILE
M0UTT1M3THE
SEWING LEAD.
Removing bobbin case and bobbin.......................................................................................7
Inserting bobbin into bobbin case
.........................................................................................
Inserting bobbin case into shuttle race..................................................................................8
Threading upper thread & Twin needle threading................................................................ g
Drawing up bobbin thread................................................................................................... 10
Chariging sewing directions............................................................................................... 10
Control dial & Adjusting thread tension.........................................................................11 & 12
Regulating the presser foot pressure
..................................................................................
.|2
Drop feed............................................................................................................................ 13
Changing needle .,...............................................................................................................14
Fabric. Thread. Needle table ..............................................................................................15
Sewing (pattern selector) and operation table......................................................................16
To start sewing....................................................................................................................17
To finish seam.................................................................................................................... 18
Straight stitch. .
............................................................................................................
19
Zigzag sewing.................................................................................................................. 19
Blind stitch..................................................................................................................20 & 21
Button sewing.................................................................................................................... 22
Binding
...................
.............................
, • .......................................................................• 22
Zipper sewing.................................................................................................................... 23
Hemming............................................................................................................................24
Twin Needle........................................................................................................................25
Embroidery . .................................................................................................................... 25
Quilter................................................................................................................................ 26
Seam guide
.............................................................•........................................... 26
Maintenance (Cleaning and oiling).....................................................................................27
Checking Performance Problems WHAT TO DO ..............................................................
28
7
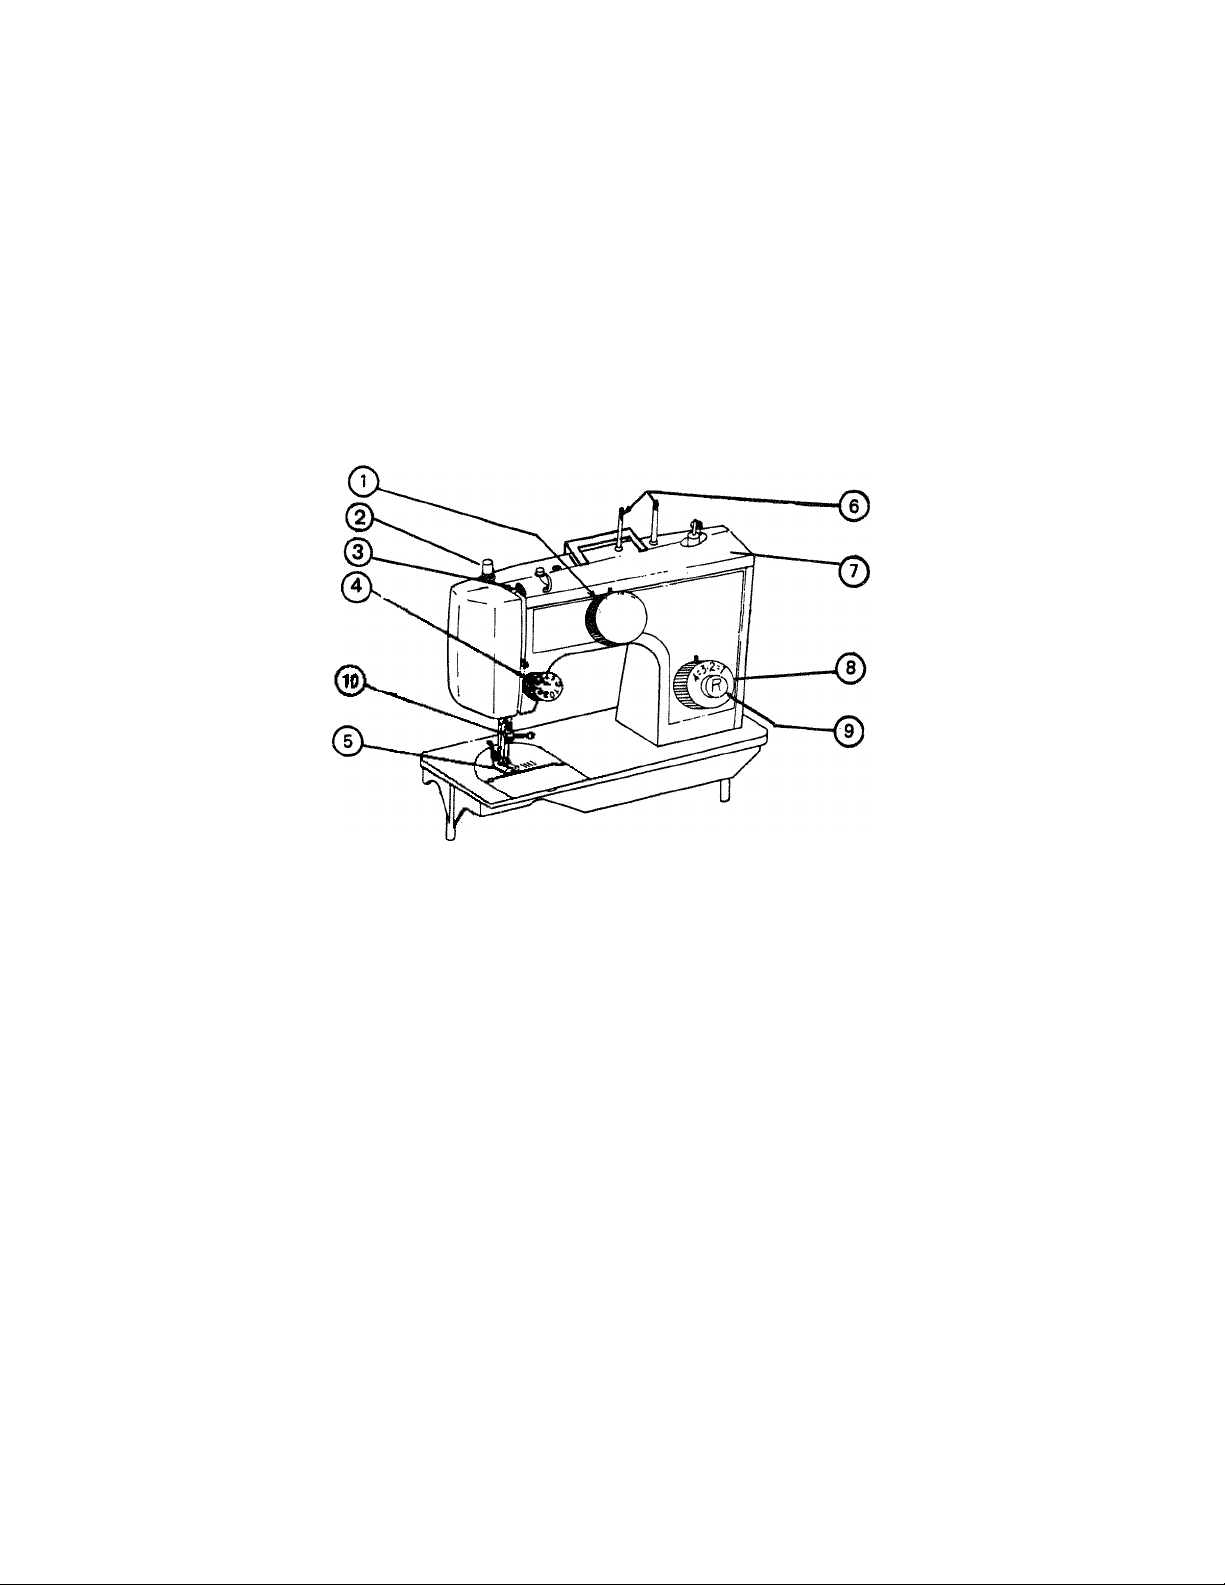
NAME OF PARTS (FRONT VIEW)
(R
Bobbin wi
Stop cl
Motion
Hand w
1 Pattern selector dial
2 Pressure regulator
3 Take up lever
4 Thread tension dial
5 Presser foot
6 Sub-spool pins 7 Top cover
8 Zigzag width dial
9 Stitch length dial
10 Thread guide for upper threading

(REAR VIEW)
1 reading
Presser foot lever
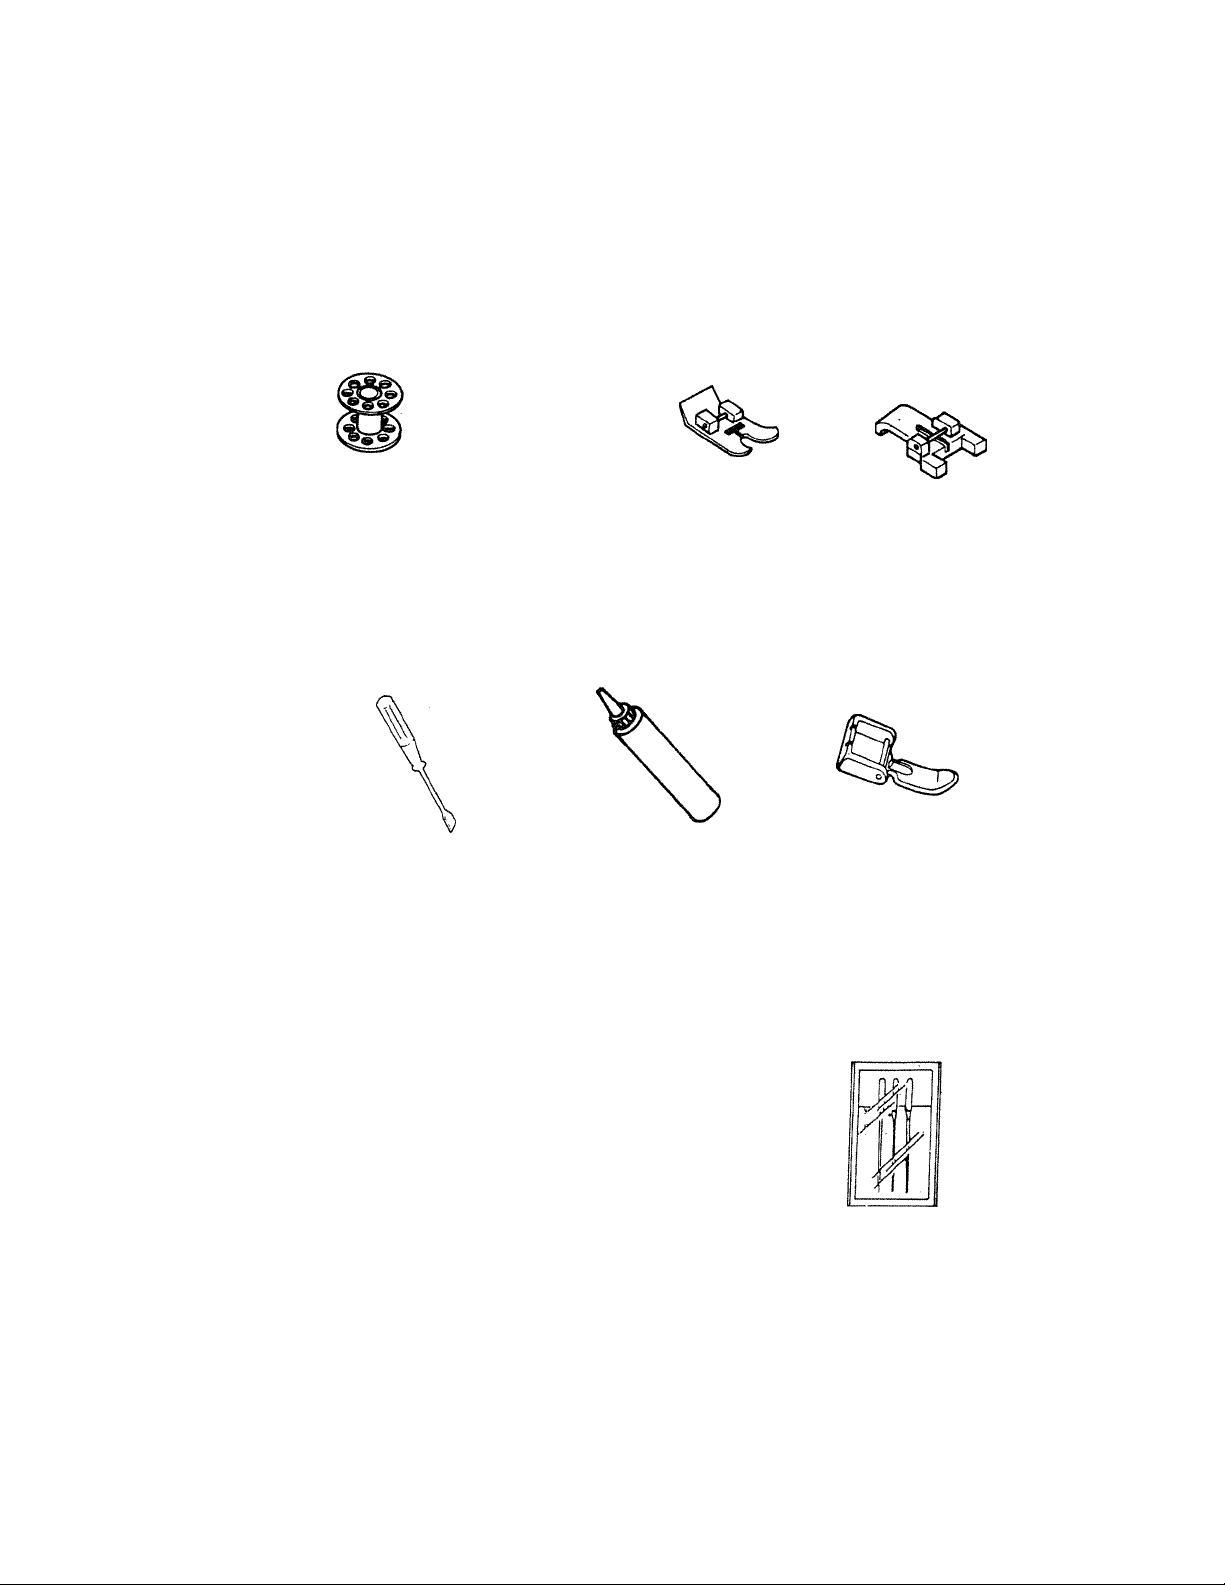
ACCESSORIES
Bobbin
Screw driver
O
Felt
Zigzag foot
(On machine)
Machine Oil
ri:
Button foot
Zipper foot
Se\
Needle
#11 #14
ton foot
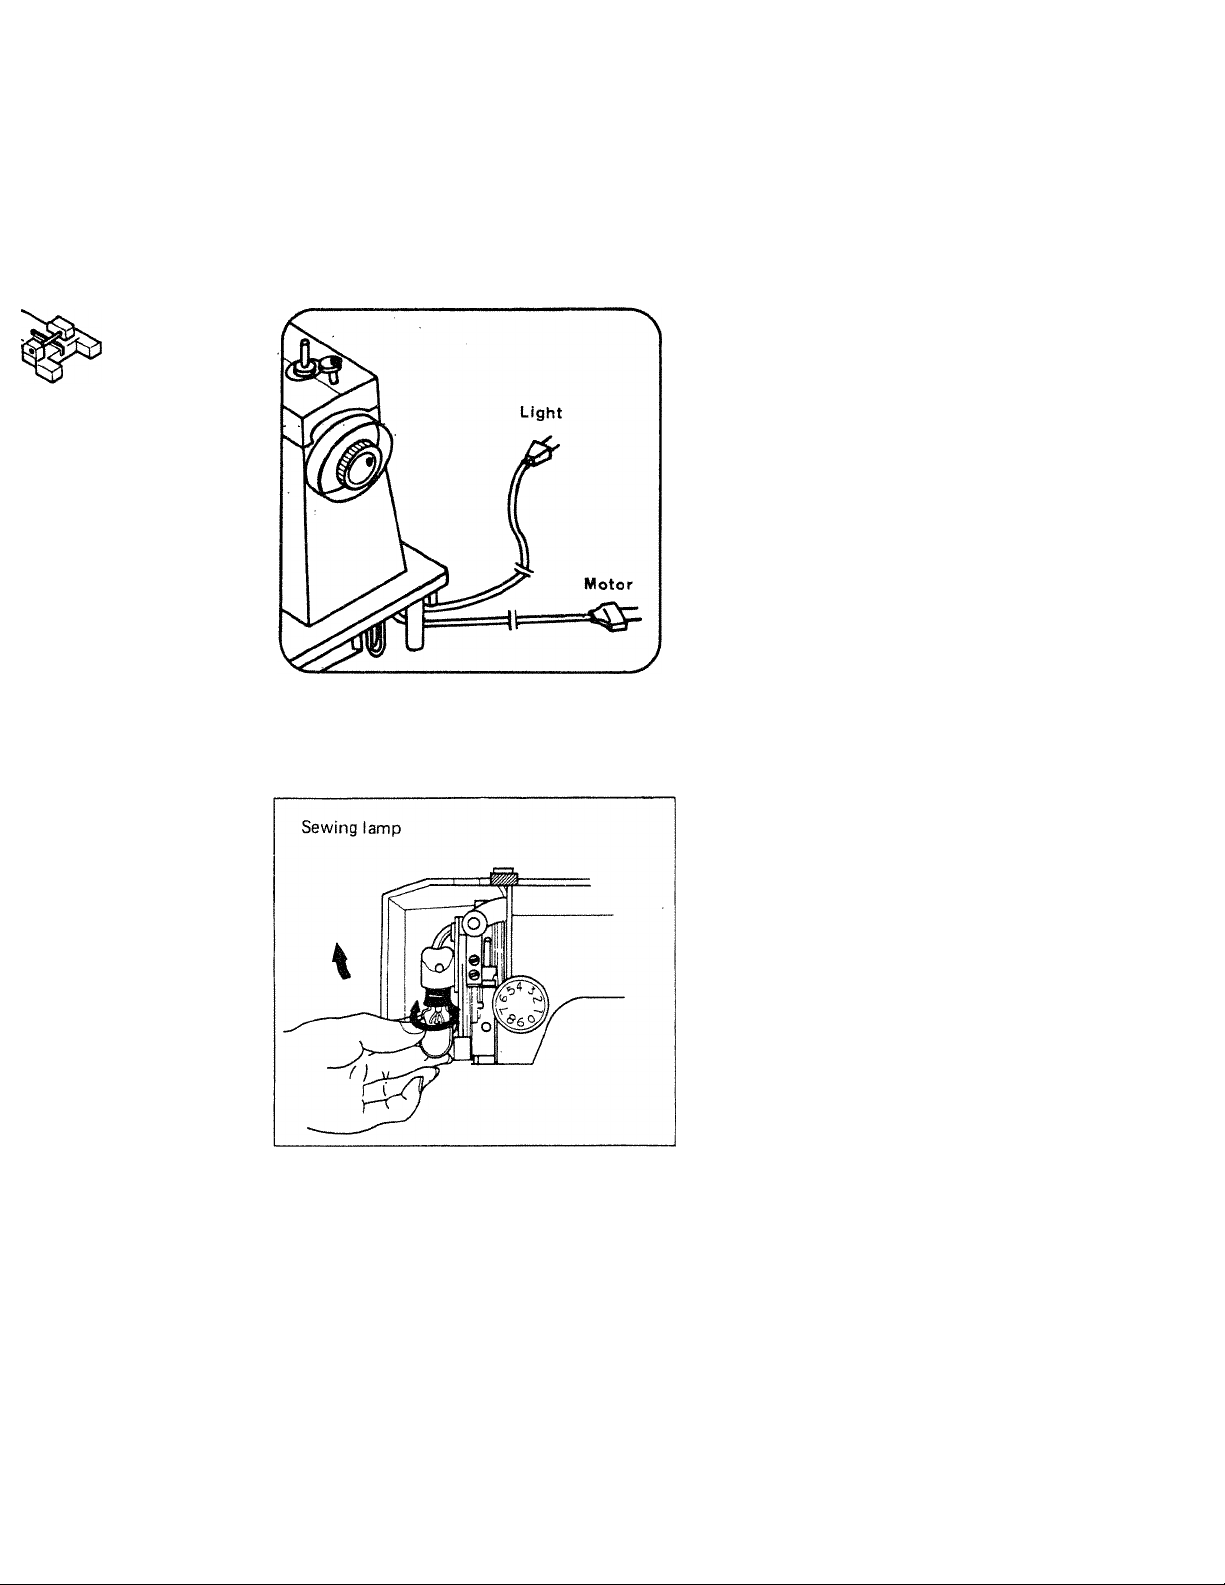
BEFORE SEWING
Connect light cord, motor
wire 2 plugs into power
supply separately.
r foot
adle
#14
1. Remove or install bulb from
inside of face cover.
2. Open face cover in direction
of arrow,
3. Remove bulb by unscrewing
it counter clockwise.
4. Install a new bulb by screw
ing it in clockwise.
5. Use a screw type bulb with
120V/15W. (Max)
 Loading...