

Page 1
INSTRUCTION MANUAL
FOR
SEWING MACHINE
3003
:.01
UIHITE
Call Toil Free
800-331-3164
'aaaaa/ whitesewinq.com
Page 2

IMPORTANT SAFETY INSTRUCTIONS
.(«nrical applmnce, Bas.c salW
Read all instructions before using
(this sewing machine)
danger To reduce the risk of electric shock:
,n.P«ancesnou.d never bale«
appS fro. the electric ou«et .ted 15 wads.
Always unplug before relamptng. Replace pu. ^
WARNING To reduce the risk of burns, tire,
is used by or near n-g gg described in this manual. Use only
2. Use this appliance only tor its , g^ gg contained in this manual.
attachments recommertded or plug, if it is not working
1 Never operate this appliance itot ^g,e. Return the
ings of the sewing machine and toot controller free from tn
dust, and loose cloth. „„oninn
5. Never drop or insert any object into any op g.
a Do not use outdoors. oroducts are being used or where oxygen is
7. Do not operate where aerosol (spray) products are y
being administered. position, then remove plug from
a To disconnect, turn all controls to the off ( 0 ) •
outlet. _ ..nnitin arasD the plug, not the cord.
9. Do not unplug by pulling on cor . ' , required around the sewing
ia Keep fingers away from all moving parts. Special care is requ
machine needle. cause the needle to break.
,1. Always use the proper needle plate. The wrong plate can cau
12. Do not use bent needles. Reflect the needle causing it to
13. Do not pull or push fabric while stitching. It may oeie
break. makina anv adjustments in the needle area.
’* needle, .«adin, dodbin, d, dd,n,in,
“ave these instructions
Page 3

CONTENTS
Names of Parts.................................................1 4 2
Accessories........................................................... 3
Before sewing (Power supply and Sewing Lamp). 4
Take out extension table, free arm sewing............ 5
Winding the bobbin................................................ 5
Removing bobbin case and bobbin
Inserting bobbin into bobbin case.......................... 7
Inserting bobbin case into shuttle race
Threading upper thread & Twin needle threading.. 9
Drawing up bobbin thread
Changing sewing directions..................................10
Control dial & Adjusting thread tension
Regulating the presser foot pressure
Drop feed..............................................................13
Changing needle
Fabric. Thread. Needle table
To start sewing
To finish seam.......................................................17
Straight stitch
Zigzag sewing
Button sewing.......................................................19
Zipper sewing
Hemming..............................................................21
Twin Needle..........................................................22
Embroidery............................................................22
Quilter & Seam guide........................................... 23
Buttonhole sewing
Maintenance (Cleaning and oiling)
Checking Performance Problems WHAT TO DO.26
..................................................
.....................................................
........................................................
.......................................................
.......................................................
....................................
................................................
.......................
..................
..........
]1 4 12
...................
................................
.......................
7
3
10
13
14
15
15
13
13
20
24
25
Page 4
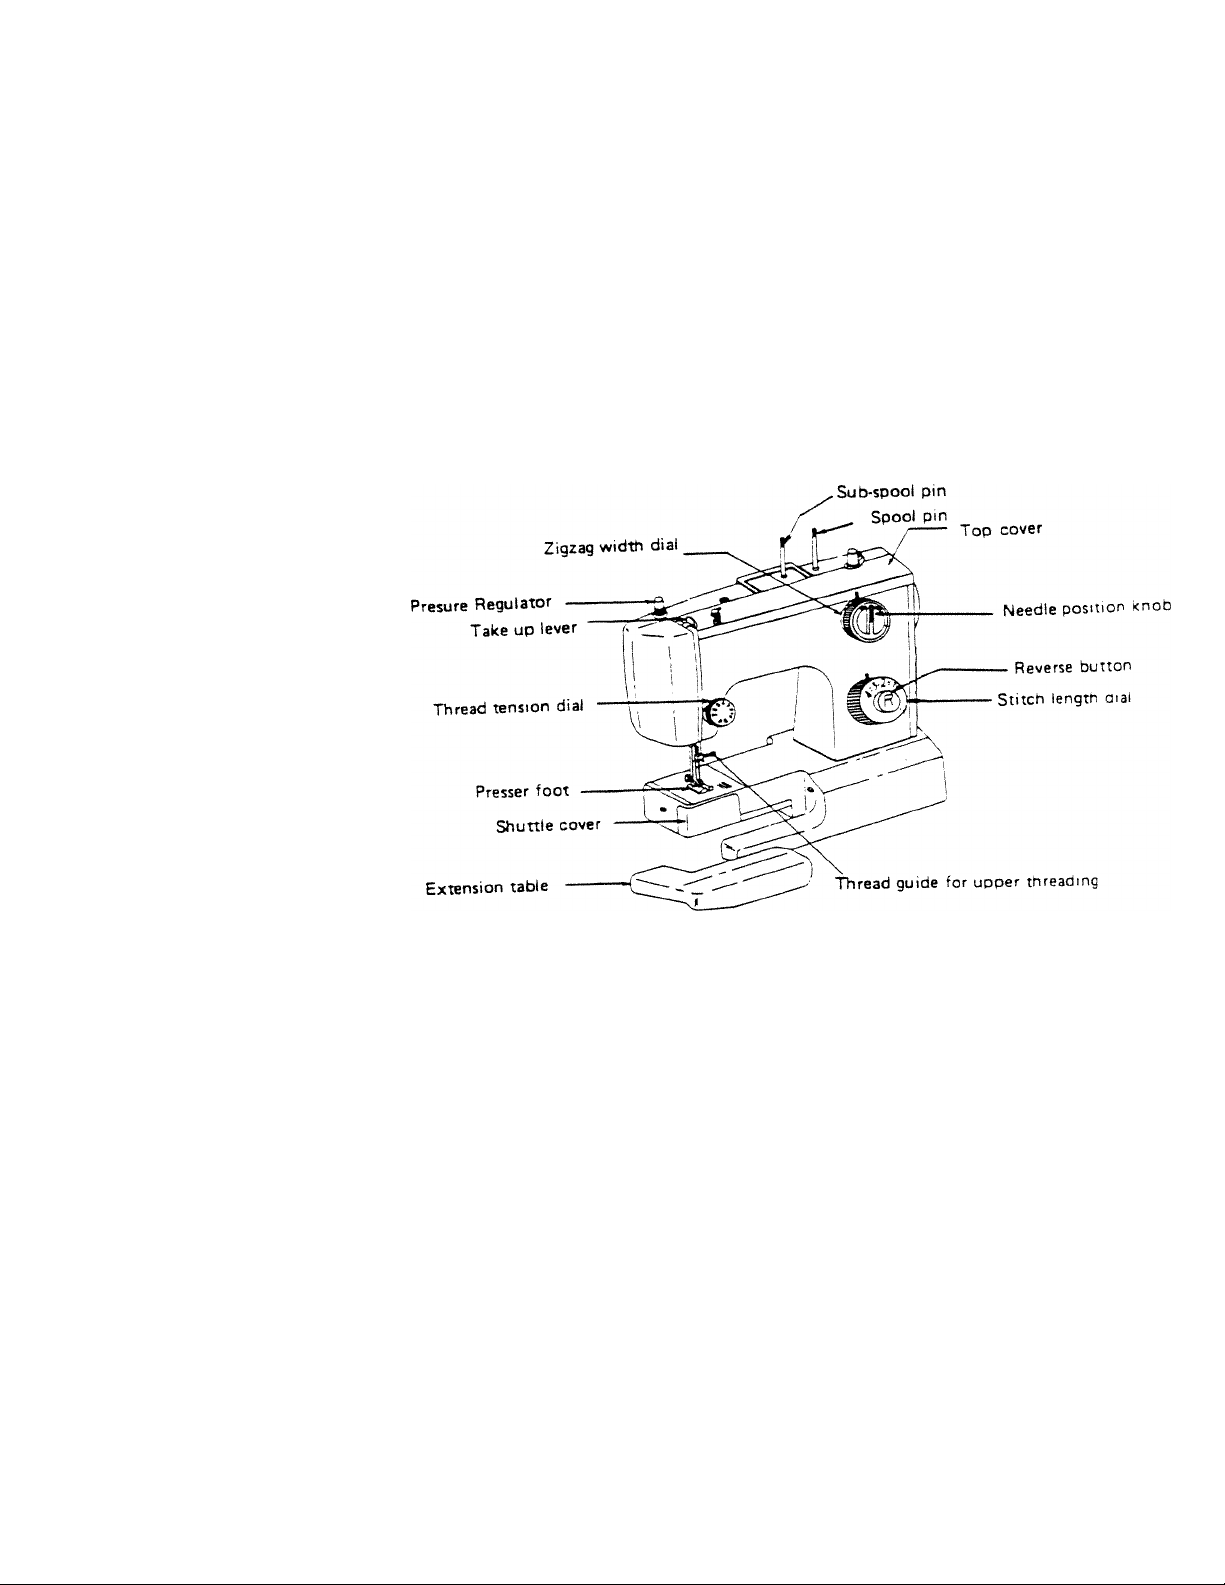
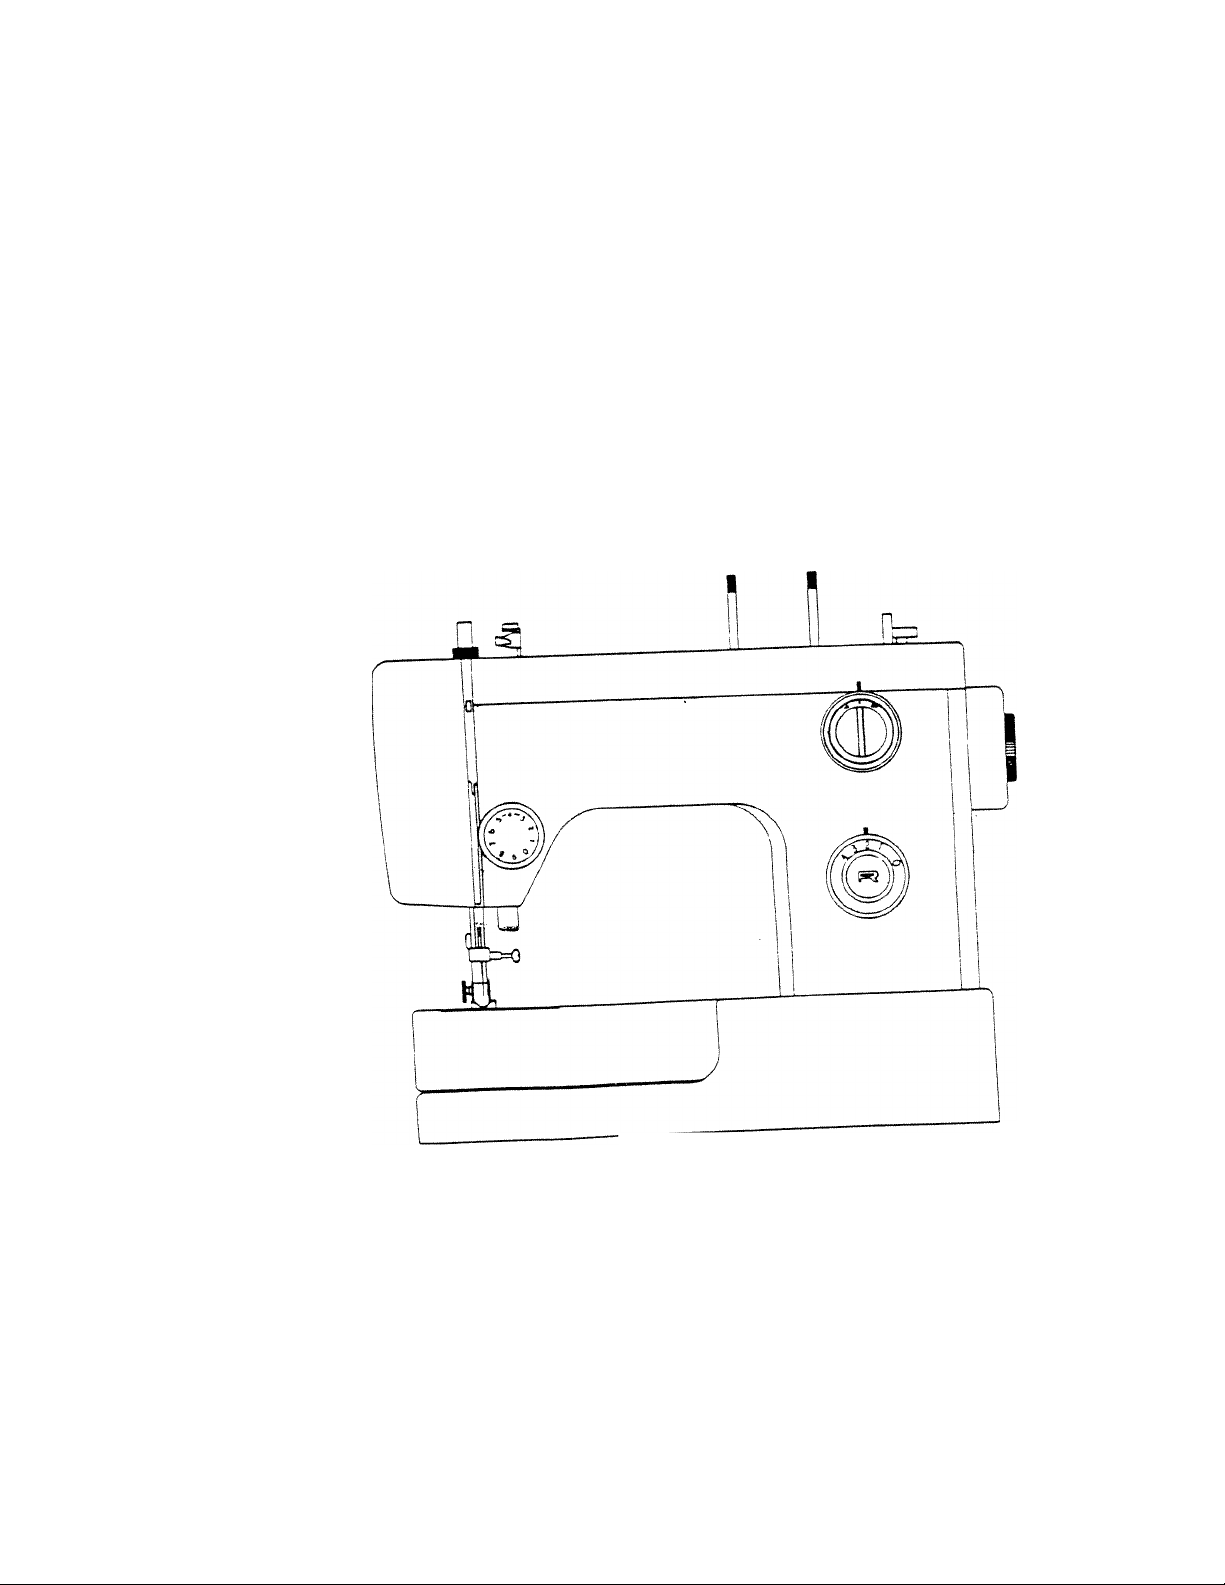
NAME OF PARTS (FRONT VIEW)
Page 5
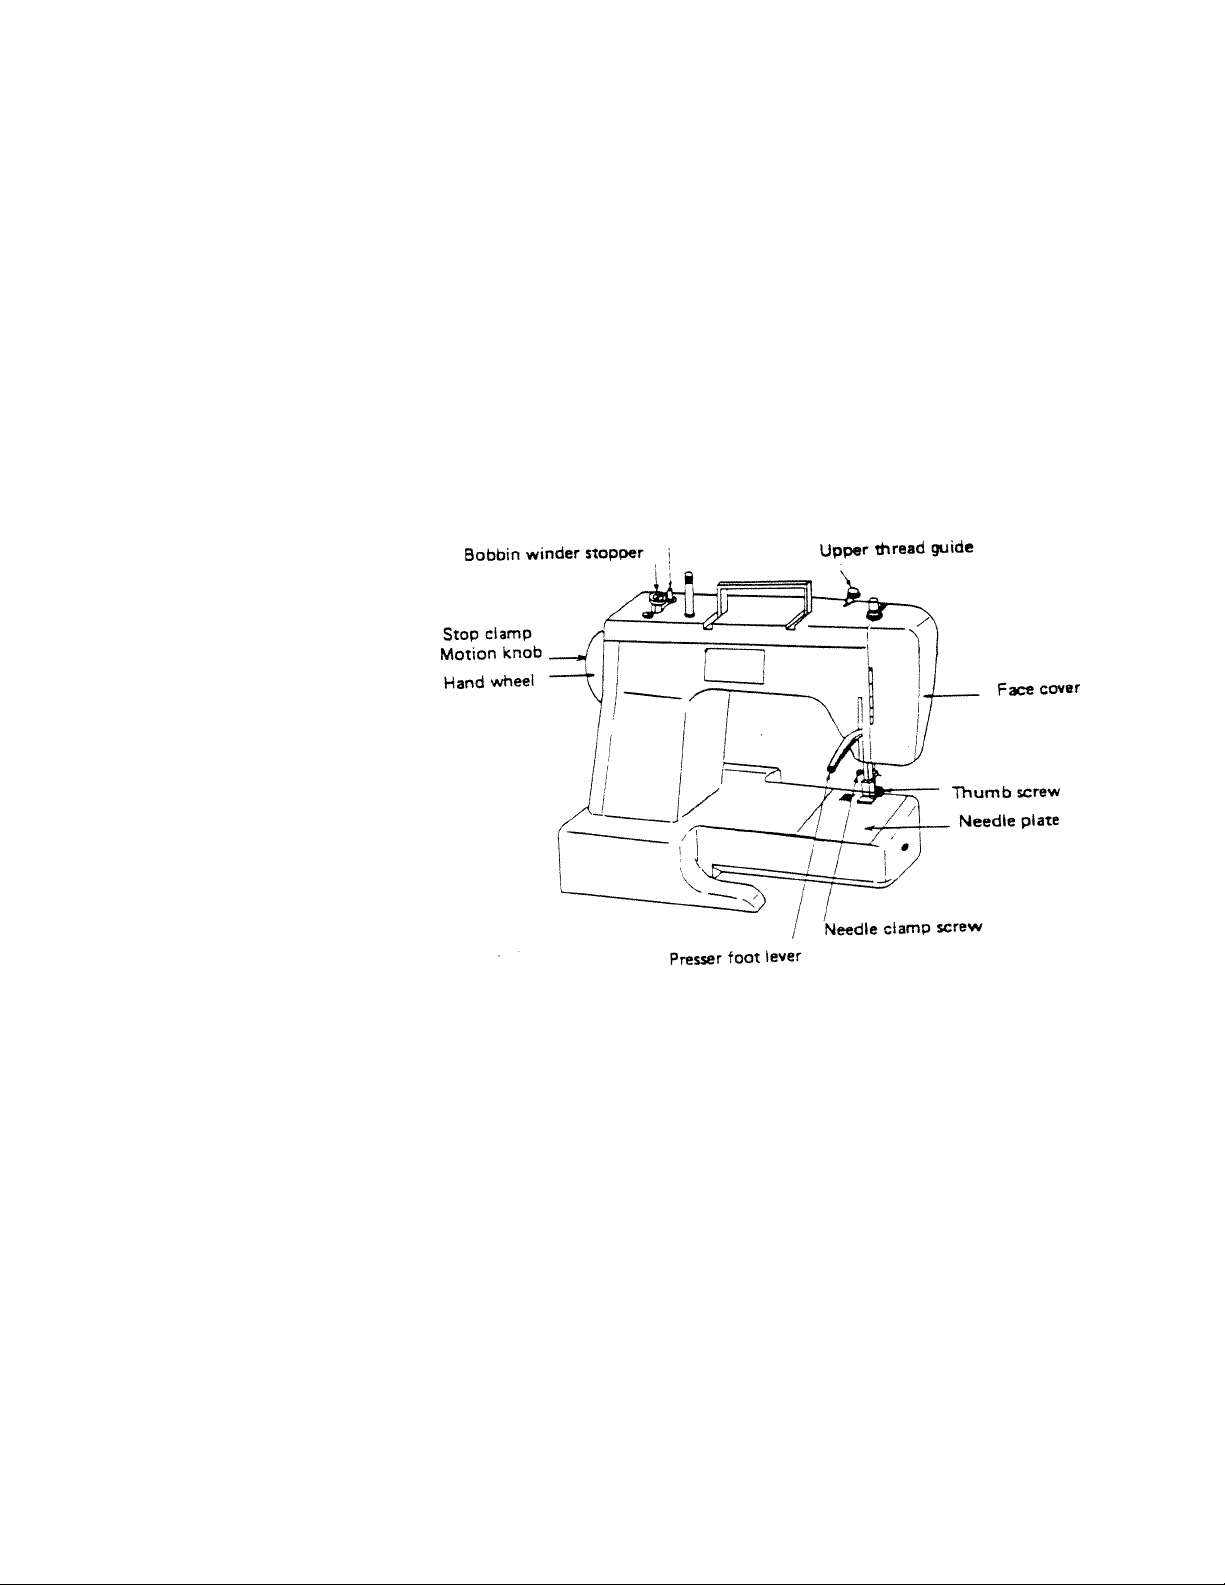
(REAR VIEW)
Bobbin winder spindle
Page 6
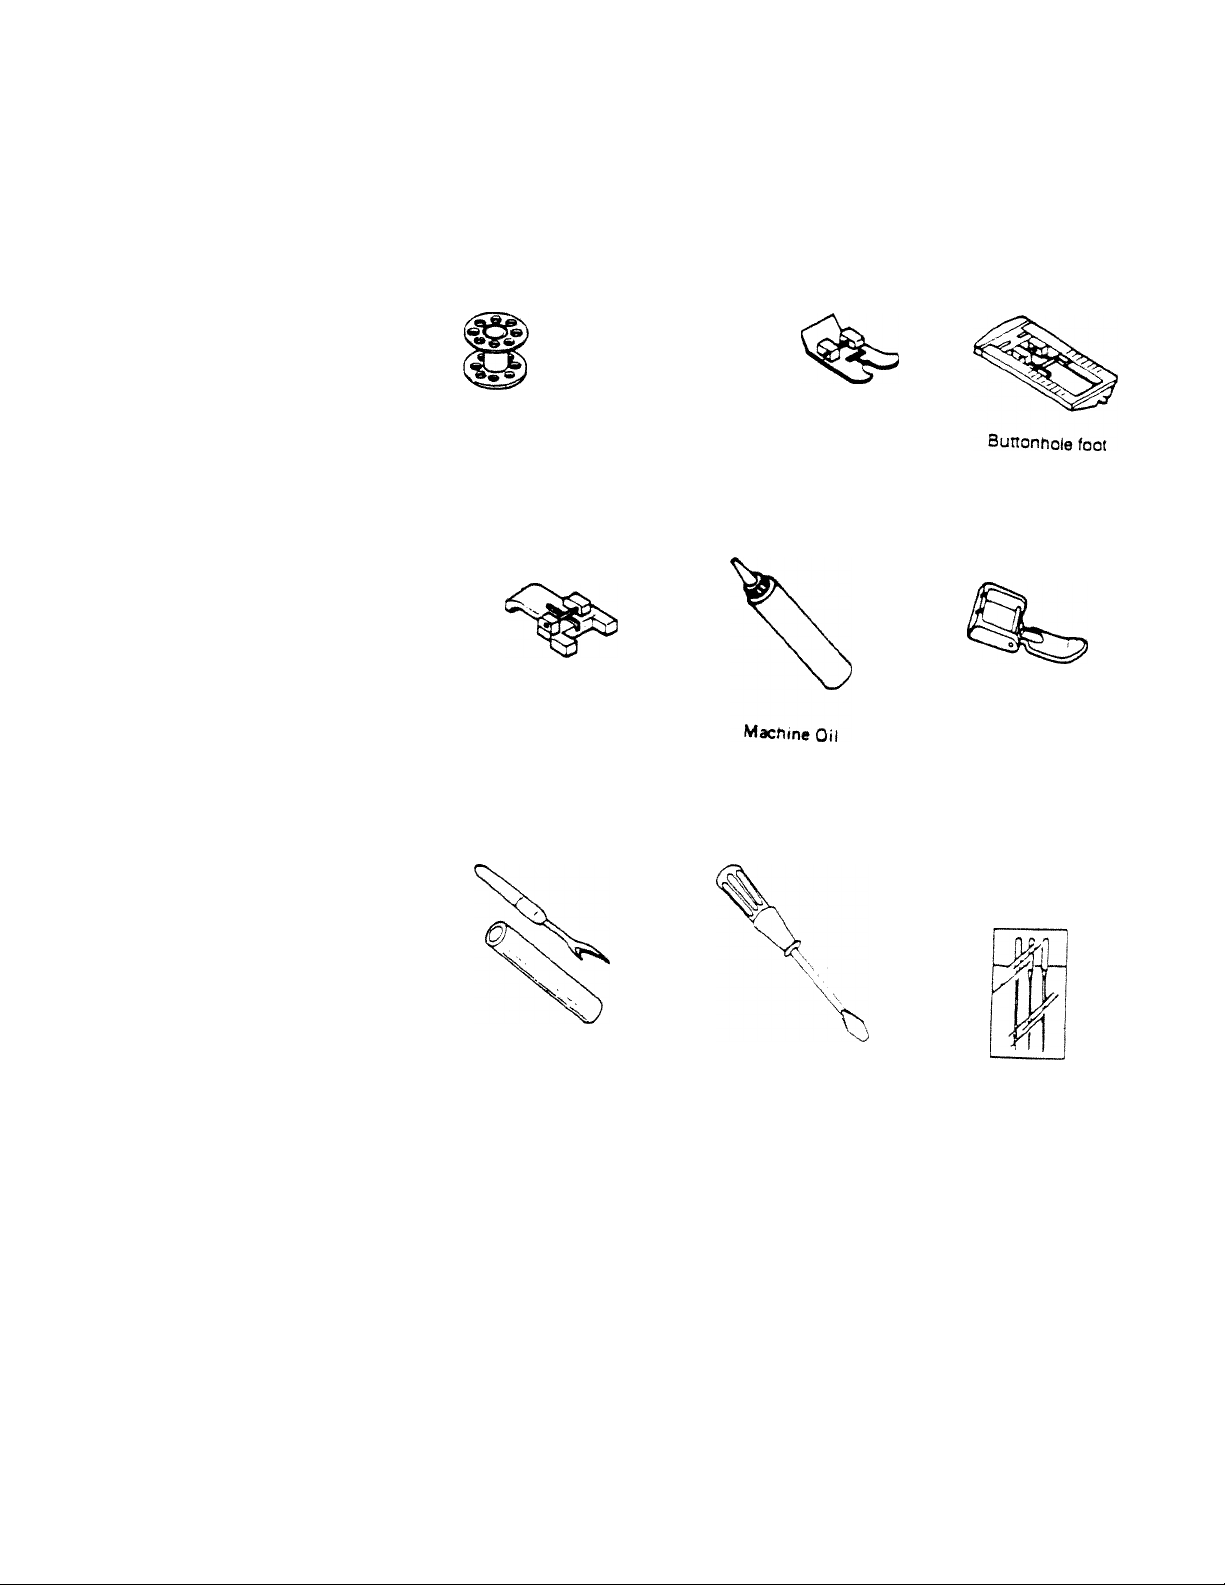
ACCESSORIES
O
Bobbin Spool pin fait
Button attaching foot
Zigzag foot
(On machine)
Zipper foot
Buttonhole cutter
Screw driver
Needle
#11 #14
Page 7
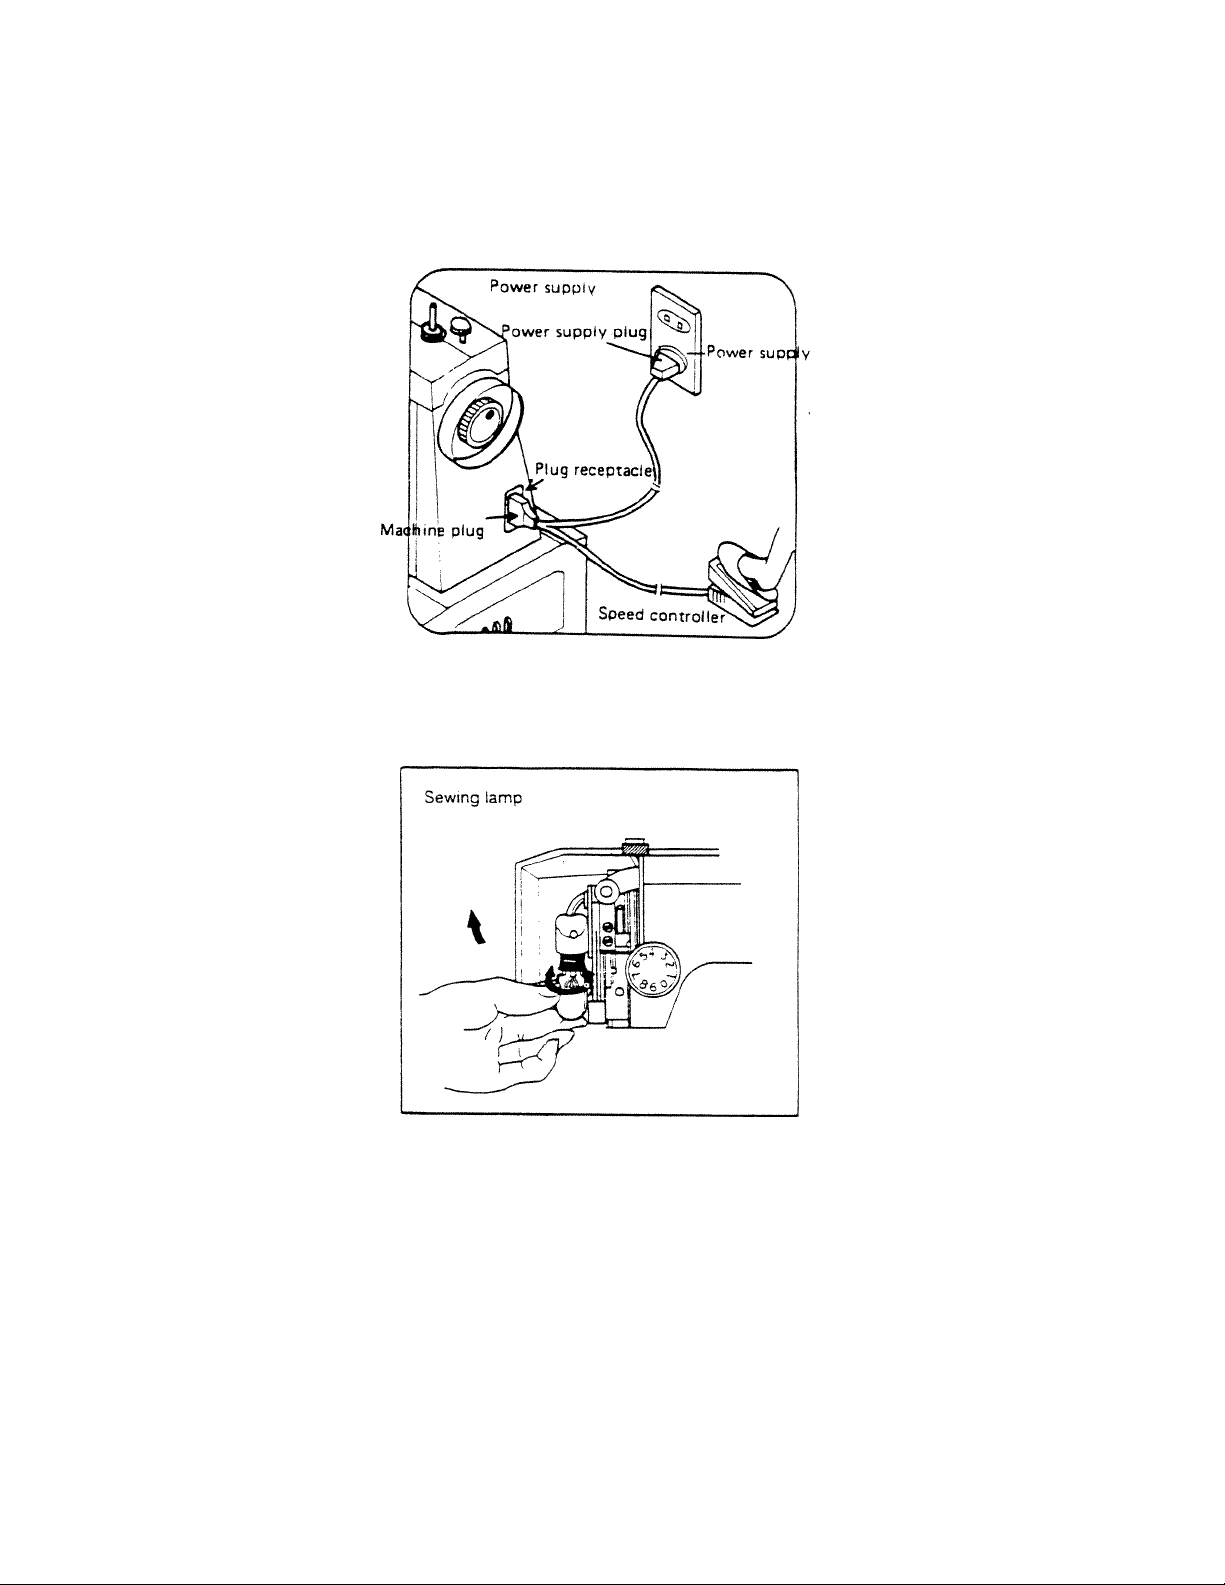
BEFORE SEWING
1. Fit plug into the machine.
2. Plug the machine to the power
supply,
3. Sewing speed can be varied by
the foot control.
REMOVE OR-INSTALL BULB
1. Open face cover in direction of
arrow.
2. Remove bulb by unscrew
ing it counter-clockwise.
3. Install a new bulb by screwing it
in clockwise.
4. Use a screw type bulb with
i20V/15W(Max).
IMPORTANT : When leaving the sewing machine unattended, the
plug must be removed from the socket outlet.
When servicing the sewing machine, or when removing covers or
changing lamps, the machine must be disconnected from the supply
by removing the plug from the socket outlet.
_ 4 -
Page 8
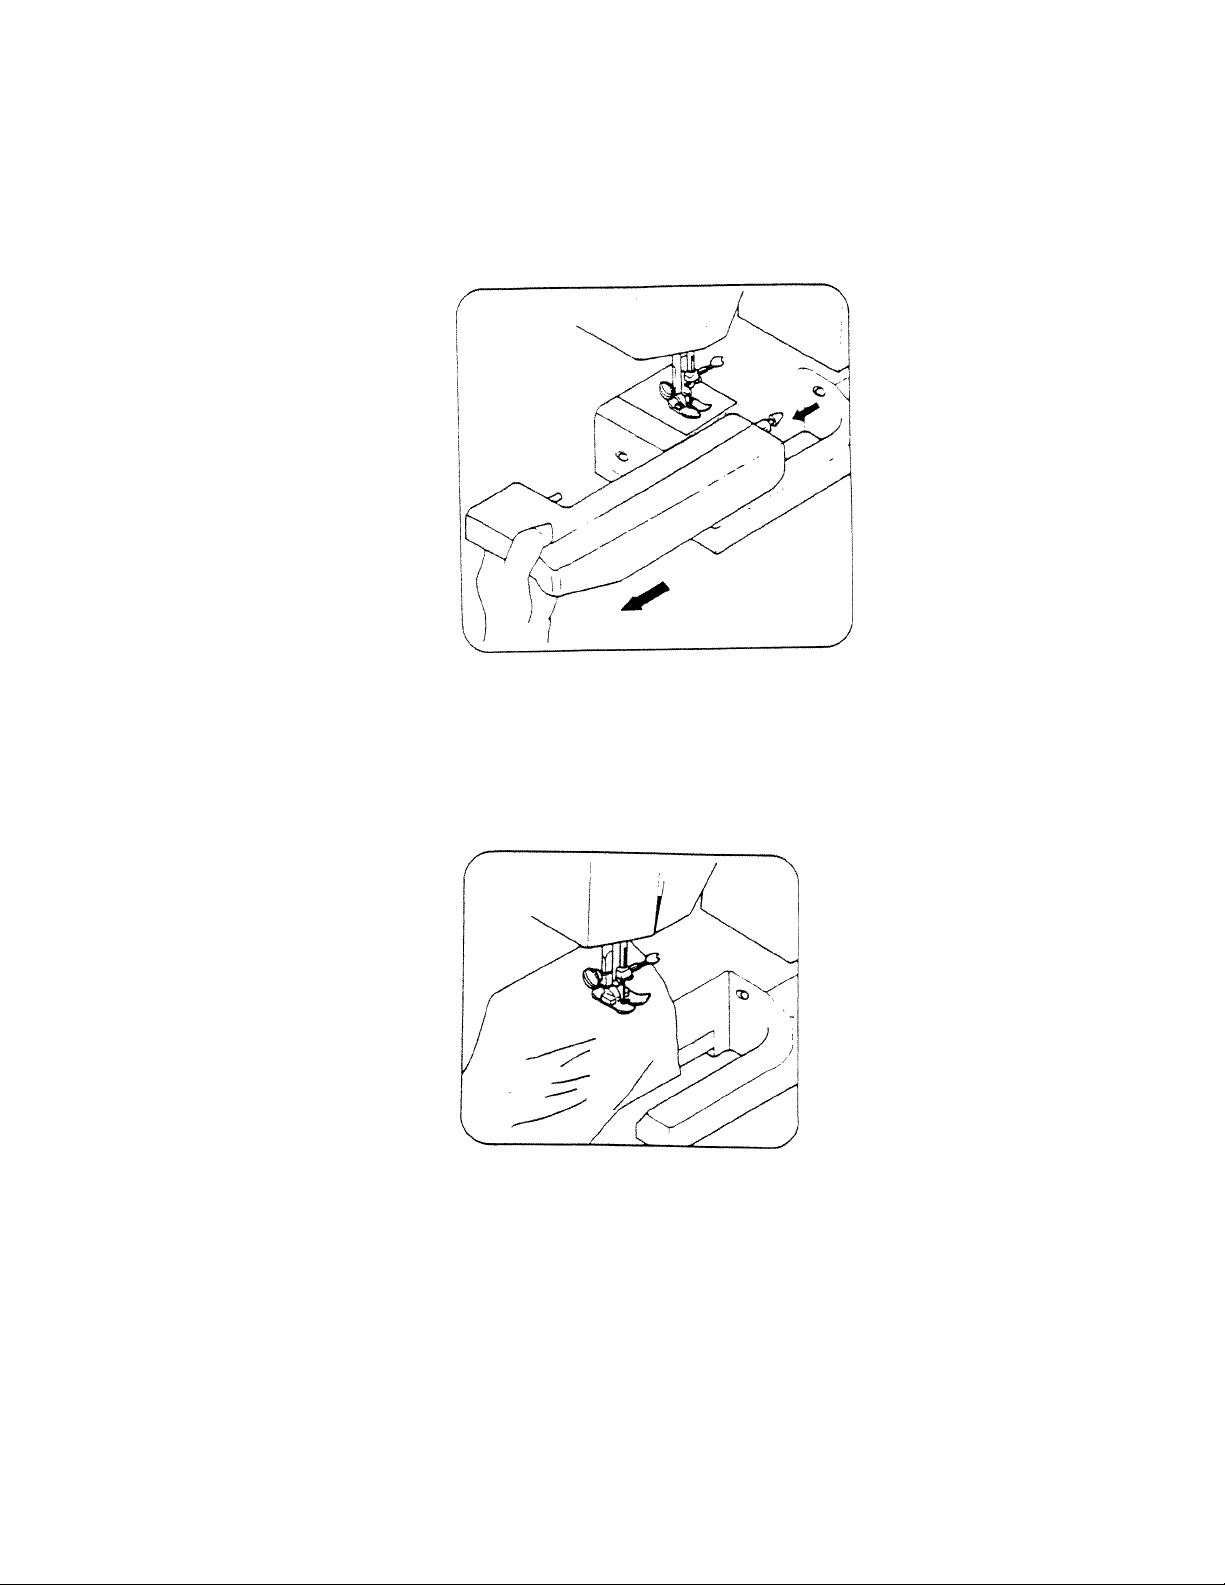
REMOVING EXTENSION TABLE
FREE-ARM SEWING
l.Hold the left and of table
and pull out in direction or
arrow.
1. This sewing machine can be used
as a flat bed machine but easily
converts to free arm machine by
removing the extension table.
2. Especially useful for sewing
sleeves, pant legs, tubular fabrics
etc., more easily.
3. То sew tubular )ust slip the sleeve
or leg of pants on to the free arm
as shown at side.
Page 9
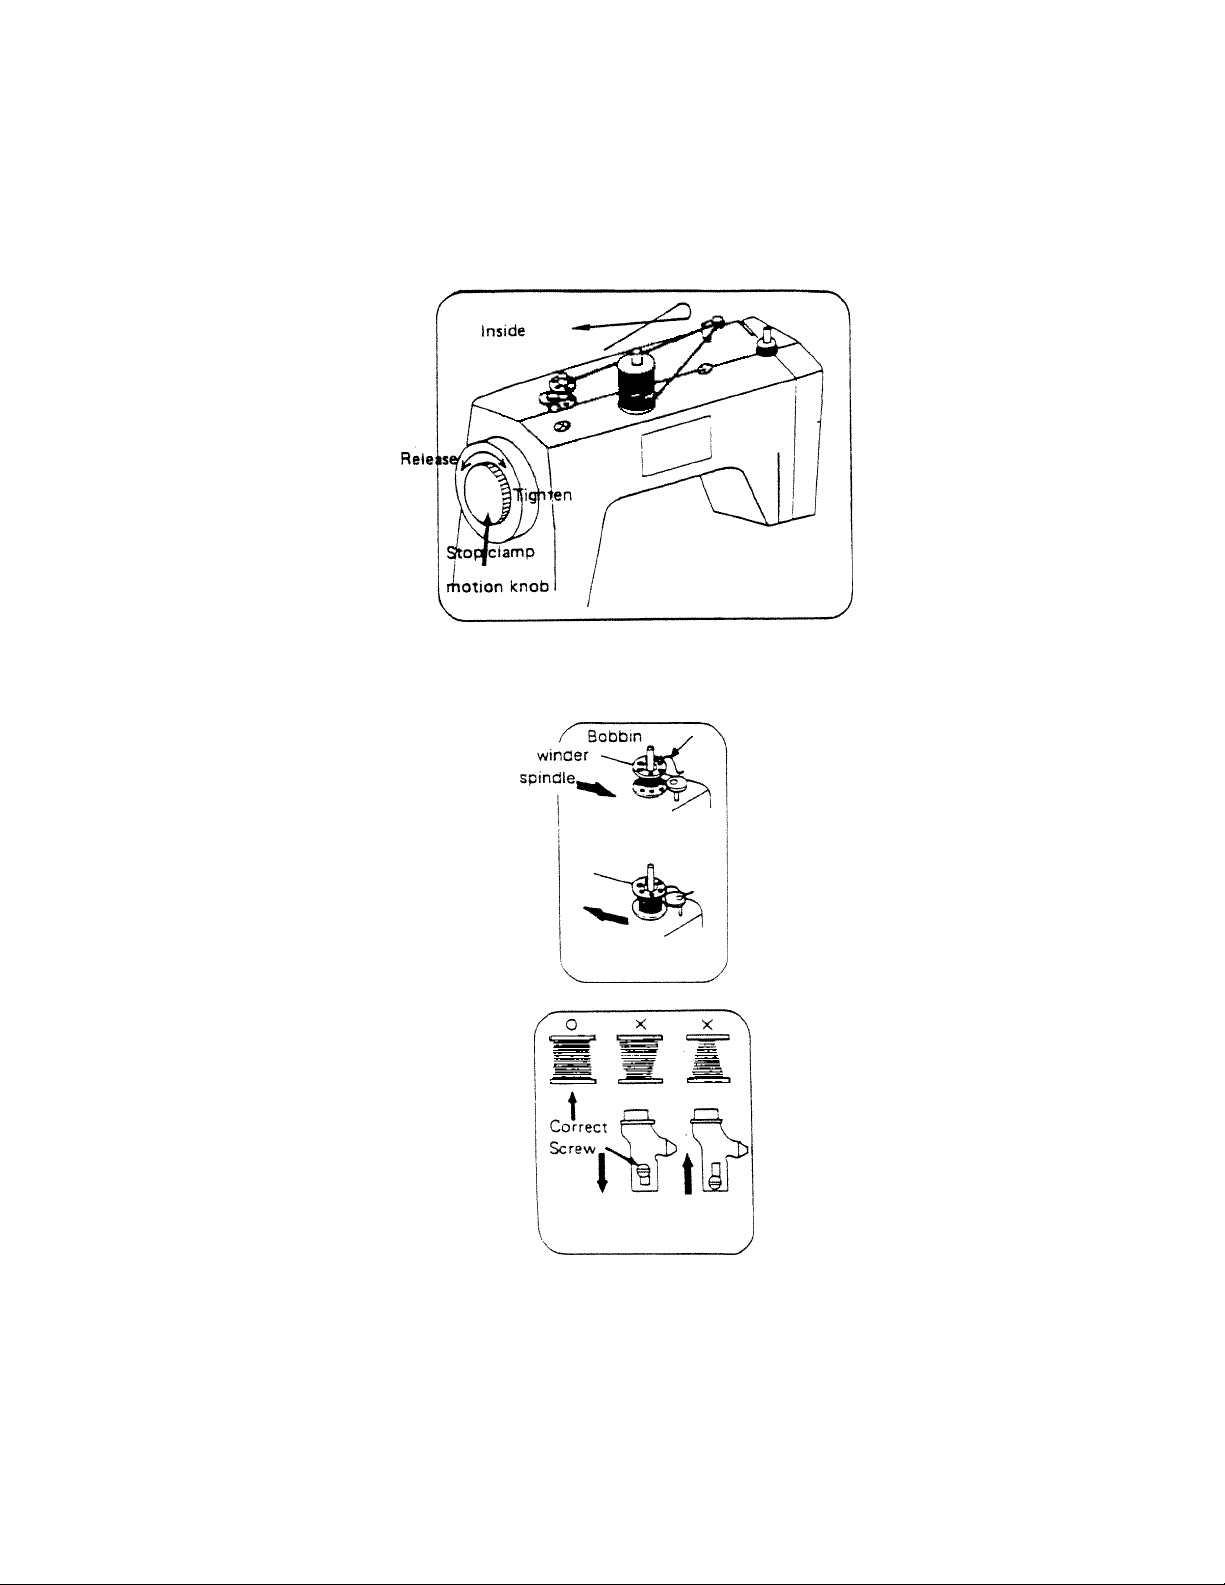
WINDING THE BOBBIN
1 .Release stop motion knob.
2.Threacl as shown.
a.When bobbin is fllled,
tighten stop motion knob.
5om thread
Push bobbin winder spindle in
direction of arrow.
When bobbin winding is com
pleted return spindle to
original position.
When bobbin winding is in
correct, release.the screw of
upper thread guide and ad
just up or down until bobbin
winding is balanced.
Page 10

REMOVING BOBBIN CASE AND BOBBIN
1.Raise needle to its highest
position and open the
shuttle race cover.
3.Release the latch and bob
bin will fall out easily.
INSERTING BOBBIN INTO BOBBIN CASE
I.Pull off 5cm of thread from
bobbin and insert it into
bobbin case as shown.
2. Open hinged latch of bobbin
case and pull bobbin case
out of machine.
2.Guide the end of thread into
slot.
spring
3.Pull into slot and under
tension spring and draw
out about 10cm of thread.
7 -
Page 11

INSERTING BOBBIN CASE INTO SHUTTLE RACE
1 .Raisa needle to its highest position,
pulling thread to the front, open the
latch of bobbin case and hold it.
2.Holding latch open, place bobbin case
onto centre pin in shuttle and release
latch
Page 12

THREADING UPPER THREAD
Twin needle threading
9 -
Page 13

DRAWING UP BOBBIN THREAD
. Hold upper thread with left
hand, turn the hand wheel
slowly towards you until the
needle qoes down and
comes up. Then stop the
hand wheel when the
takeup lever is at its highest
position. Lightly draw up
the upper thread and the
lower thread will be brought
up in a loop.
2. Pull out both threads and
place them together under
presser foot to the rear of
machine.
3. Place fabric under presser
foot from the front, lower
presser foot.
4. Start to sew
(see page 16)
CHANGING SEWING DIRECTIONS
1.Lower needle down into
fabric and raise presser foot,
pivot the fabric around the
needle to change direction
as desired.
2. Lower presser foot and start
to sew.
10 ■
Page 14

CONTROL DIAL
1 Reverse button
2, Zig-zag width dial
3, Thread tension dial
4 Needle position knob
5 Stitch length dial
11
Page 15

ADJUSTING THREAD TENSION
Correc!
Weak Strong
Upper thread tension
may be adjusted by
turning the thread
tension dial.
incorrect
raoric
nsioe of fabric
Upper thread
Upper thread
Bobbin thread
¿to)
12 '
LOWER THREAD TENSION
Lower thread tension can
be adjusted by turning
screw on bobbin case slight
ly to the right (clock-wise)
to increase tension. Turn
the screw (counter-clockwise)
to the left to decrease ten
sion.
Page 16

REGULATING THE PRESSER FOOT PRESSURE
1. Push aown inner pm (A) to increase pressure.
(Light to medium fabrics!
2. Push down outer ring to release pressure. (Heavy
fabrics)
3. Insufficient pressure may cause poor feeding,
skipped stitches, or difficulty m guiding the faoric.
4. No pressure adjustment is required wnen darn
ing or sewing embroidery.
DROP FEED Note; Darning plate can be purchased seoarateiy.
There are a few times when you want to control tne feeding of fabric by your
self.
Raise needle bar to its highest position and raise presser foot, place aarnmg plate
over needle plate aligning two pins of darning plate with holes of needle piate
You may then determine the movement of the fabric by yourself See page 19
for button sewing application - 13 —
Page 17

CHANGING NEEDLE
1. Raise needle bar to its highest position.
2. Loosen needle clamp screw and remove old needle,
3. With the flat siae of the needle facing away from you,
insen needle as far up as it will go.
4. Tighten the needle clamp screw securely.
— 14
Page 18

FABRIC ■THREAD • NEEDLE TABLE
Please note that the following list is a guide when sewing different faDncs.
15
Page 19

TO START SEWING
Important Hints
1. Raise the take-up lever to its highest position before starting and
after stopping sewing.
2. Hold both threads about 10 cms to the rear of machine tor me first
two or three stitches.
3. Sufficient fabric should be placed under needle before lowering
presser foot.
4. Depress foot and start to sev/.
5. Test the machine stitcnes on a scrap of fabric you plan to use.
adjusting the machine for the length of stitch and tension suitaoie
to your fabric.
Attention
1. When turning the balance wheel manually, always turn it
toward you.
2. Guide the cloth gently with ycur hand.
3. To prevent breaking needle always raise the needle out of the
fabric when you stop sewing.
1 o
Page 20

TO FINISH SEAM
1 .Sew !o the edge of seam.
2. Push the reverse button and sew in reverse for
3. Raise needle to Its highest position.
4. Lift presser foot and pull'out the fadric to rear of
about 3-4 cms.
machine.
17
Page 21

STRAIGHT STITCH
1 .This type of stitching is the one used most frequentiy.
2,The zig-zag presser foot can be
sewing.
3.For sewing light fabric, use smaller stitch size. (Refer
setting).
used for both straight and zig-zag
ZIGZAG SEWING
to page 15 for dial
igzag width position
Satin stitching can be used for sewing initialB, patterns, applique,
- 18 -
etc.
Page 22

BUTTON SEWING
1 .Lower drop feed.
2. Place button attaching presser foot in position.
3. Race button between presser foot and fabric and lower presser foot.
a.Manualty turn hand wheel towards you ensuring that the needle enters
into both holes of button without obstruction.
¡Increase or decrease width setting).
S.Sew about 7 stitches.
e.Pull both threads to the underside and tie together.
19
Page 23

ZIPPER SEWING
Select straight stitch.
1. Zipper foot is designed to
saw close to a raised edge
preventing sewing on zipper
2. Place zipper foot in position
and attach firmly
3. Fold the fabric about 2 cm
and place fabnc under foot
1. To saw the left side of zipper
set the zipper foot on the right
side of the needle.
2. To sew the right side of zipper
set the zipper foot on the left side
of the needle.
sew as illustrated.
20
Page 24

HEMMING Note: Hemmer foot can be purchased separately.
1. Raise the foot and the needle to its highest position. Replace the foot with the
hemmer foot.
2. Fold over the fabric edge by about 3mm and place it under the foot. Secure the
folded edge with a few stitches. Take out the workpiece and draw the hem
into the hemmer foot by pulling the threads.
3. Lower the foot and sew the hem.
4. Durning sewing, fold the faoric to the left a little and allow it to run into the
hemmer foot.
5. Make sure that the fabric does not move under the right half of the foot. The
fabric must be fed into the scroll of the hemmer sufficiently so that the work
piece edge runs freely through the groove under the foot.
Only suitable materials can be used and some practice may be necessary to acheive
best results.
21 -
Page 25

TWIN NEEDLE
Remove regular needle and insert twin needle. Thread both threads througn me
same path as for normal sewing. Separate tfireads before last thread guide above the
needle. Insert one thread into the nght needle of twin needle.
Note: Twin needle can be purchased separately
Insert other thread into the left needle of twin needle.
CAUTION:Do not set stitch width wider than number 2 setting. Exceeding this will
cause breaking of needle.
embroidery
Lower feed dog and move hooped fabric slowly to form the desired effect.
See Page 13 droo
■ 22-
Page 26

QUILTER Note; Quilt guide can be purcnased separately.
1. Slide arm through hole on top o( presser fool holder.
2. Move guide to reguired stitch distance.
SEAM GUIDE
Note: Seam guide can be purchased separately.
1. use seam guide when sewing a long seam of regular distance from
edge of matenal.
p Set duide hole on bed, at right ot needle plate, and adjust dis
tance from the needle to the guide for desired seam allowance.
3.Run machine with edge of material touching guide.
23
Page 27

BUTTONHOLE SEWING
1 MARK WITH A PENCIL OR CHALK THE EXACT LENGTH OF THE BUTTONHOLE ON THE FABRIC.
2. REMOVE THE REGULAR PRESSER FOOT AND ATTACH THE BUTTONHOLE FOOT & PUT THE FABRIC
UNDER THE BUTTONHOLE FOOT.
3. SET THE STITCH LENGTH KNOB ON 'O'. 2GZAG WIDTH KNOB ON 'E AND NEEDLE POSITION KNOB ON
CENTER POSITION, THEN SEW 3-S STITCHES AS FIGURE (1).,
4. SET STITCH LENGTH ABOUT 0.5, 2GZAG WIDTH KNOB ABOUT T NEEDLE POSITION KNOB ON LEFT
POSITION, THEN SEW AS FIGURE (2) UNTILL YOU REACHES THE END OF THE MARKING.
5 SET ZIGZAG WIDTH KNOB ON 'E THEN SEW 3-8 STITCHES AS FIGURE (3).
5. SET THE STITCH LENGTH KNOB ABOUT 0.5, ZIGZAG WIDTH KNOB ON 2, NEEDLE POSITION KNOB ON
RIGHT POSITION, PUSH THE ’R* BUTTON SEW UNTILL YOU REACHES THE END OF THE MARKING AS
FIGURE (4). „.............
7, REMOVE FABRIC FROM THE MACHINE AND OPEN THE BUTTONHOLE WITH A BL/TTONHOLE CUTTER
OR SEAM CUTTER. ■
(1 )
ir
Before sewing fit buttonhole foot
as shown.
Cut buttonhole along centre with
cutler as shown.
. 24 ■
Page 28

maintenance (CLEANING AND OILING)
1. Raise needle to its highest position.
2. Take out bobom case.
3. Turn latch knob A as illustrated.
4. Take off shuttle race cover.
5. Take out shuttle hook.
1. Clean and oil shuttle race and hook,
then replace in the reverse order.
Cleaning shuttle race
(Ai Latcn knob
(B) Shuttle race cover
(C! Shuttle hook
Open top cover and oil points indicated.
Open face cover and oil points
indicated.
Cleaning feed dog
Oil points indicated on underside of bed base.
- 25 -
Page 29

CHECWNQ PERFORMANCE PROBLEMS WHAT TO DO
PROBLEM
Fabric not
moving
Breaking NeerJie
m
1
Breaking Bobbin
Thread
Machine Jamming
Knocking Noise
Puckering
PROBABLE CAUSE
Feed dog down.
- Machine not moving.
- Stitch length dial in o position.
- Light pressure on presser loot.
- Incorrect setting ol needle.
- Needle bent.
Pulling fabric.
Incorrect use of needle, thread
or fabric.
- Improper threading.
- Tight upper thread tension.
- Needle bent.
- Nicks or burrs on shuttle.
- No oil.
- Dust and Ituead in shuttle.
Tension loo light.
Sewing loot pressure loo sliong.
- Incorrect use of labiic, and
lliiead.
CORRECTION
Raise feed dog.
- Tighten stop motion.
Moving dial to 1-4.
increase pressure on presser
loot.
- Reset needle.
- Fit now needle.
Do not pull fabric.
- Correct use ol needle, thread
or fabric.
- Re thread machine.
- Loosen upper thread tension.
- Fit new needle.
- Replace strutlle, or polish off
burrs completely.
Needs oiling
Clean strutlle.
Reset.
Adjust sewing fool pressure
Use correct fabric, needle and
Ihread.
Page 30

 Loading...