

Page 1

INSTRUCTION
FOR SEWING MACHINE
MZSiljaDi]
MODEL 1405
Page 2

“IMPORTANT SAFETY INSTRUCTIONS”
“When using an electrical sewing machine, basic safety precautions should always be followed, including the following.”
“Read all instructions before using this sewing machine!’
“This sewing machine is designed for household use.”
“DANGERto REDUCE RISK OF ELECTRIC SHO^lf
“A sewing machine should never be left unattended when plugged in. Always unplug ¡this sewing machine from
the electrical outlet immediately after using and before cleaning.”
u
Warning-To reduce the risk of burns, fire, electric shock or injury to persons|..
1. “Do not allow to be used as a toy. Close attention is necessary when this sewing machine is used by or near children! ’
2. “Use this sewing machine only for its intended use as described in this nianlal. Use only attachments
recommended by the manufacturer as contained in this manual!’
3 “Never operate this sewing machine if it has a damaged cord or plug, if it is notj working properly, if it has
been dropped or damaged, or dropped into water. Return the sewing machine to tl|e nearest authorized dealer
or service center for examination, repair, electrical or mechanical adjustment!’
“Never operate the sewing machine with any air openings blocked. Keep ventilatioi
machine and foot control free from the accumulation of lint, dust, and loose clot
1 openings of the sewing
Page 3

5 “Never drop or insert any object into any opening.”
6. “Do not use outdoors.”
7. “Do not operate where aeroso, (sprayj products ate beip, used or where ox,sen is betas adadniste^dr
8 Tb disconnect, tarn all controls to the off ro”] position, then remove plug from outlet.”
9. “Do not unplug b, pulling on cord. To unplug, grasp the plug, not the cord”
A. Sewing Machines
10. “Keep fingers away from all moving parts. Special care is required around the sewing machine needie”
11 "Always use the proper needle plate. The wrong plate can cause the needle to break."
12 “Do not use bent needle”
■3. “Do not pull or push fabric while stitching. ,t may deflect the needle causing it to break”
" lubricating, or when making
16. "Always unplug before reclamping. Replace bulb with the same rated 15 watts.”
“SAVE THESE
INSTRUCTIONS”
'-’’«’»«'mmmmmmm
Page 4

DO'S AND DON'TS
1. Always be aware of the up-and-down movement of the needle and do not turn your attention from the
machine while it is running.
2. When changing the needle, the presser foot, the bobbin or any other parts, always disconnect the machine by
pulling the plug out of the wall socket.
3. Do not place anything on the speed controller, otherwise the machine will start inadvertently,ter the controller
or motor may burn out. and could become a fine hazard .
4. The maximum permissible power for the sewing lamp bulb is 15 watts.
5. When using your sewing machine for the first time, place a piece of waste fabric under the prefer foot and run
the machine without thread for a few minutes. Wipe away any oil which may have appeared.;
I
I
Page 5

KNOWING YOUR SEWING MACHINE
Names of parts
How to connect the machine to
the power supply
How to use the speed controller.....................................6
Sewing lamp...................................................................6
Thread and needle chart
Changing the needle
To select a suitable needle
Raising or lowering the presser foot
Regulating the presser foot pressure (Patch-O-Matic)...9
Regulating the thread tension
Stitch length dial, reversing button
The pattern selector......................................................12
* Selecting stretch stitch
Removing the bobbin case and bobbin
..........................................................
............................................................
................................................
......................................................
.................................■..........
..............................
......................................
...............................
...............................................
........................
4^5
10
11
12
13
Winding the bobbin . .
Threading the bobbin case............................................15
Threading the needle th
Drawing up the bobbin
6
'ead.......................................16
thread
.................................
14
17
BASIC SEWING
7
8
8
9
Straight stitch and zigzag stitch.....................................I8
Starting sewing
* Changing sewing directions
Fastening seams
.......................................................
...................................
....................................................
18
19
19
UTILITY STITCHING
Sewing with a twin neerjlle.
Tricot zigzag stitch .
20
,21
Page 6

Sewing zippers..............................................................
Buttonholes.................................................................
Sewing on buttons.........................................................26
Hemming......................................................................27
Sewing blind hems
Embroidery...................................................................29
To dam do the following................................................29
.......................................................
MACHINE CARE AND TROUBLE SHOOTING
How to oil the machine..................................................30
Cleaning the feed dog
Cleaning the shuttle race
Free-arm sewing...........................................................33
Trouble shooting;
Causes and remedies
Accessories..................................................................36
POLARIZED PLUG INFORMATION.............................37
..................................................
..............................................
.............................................
34-35
22
28
31
32
Page 7
1 2 34
21 20 1918171615
Page 8

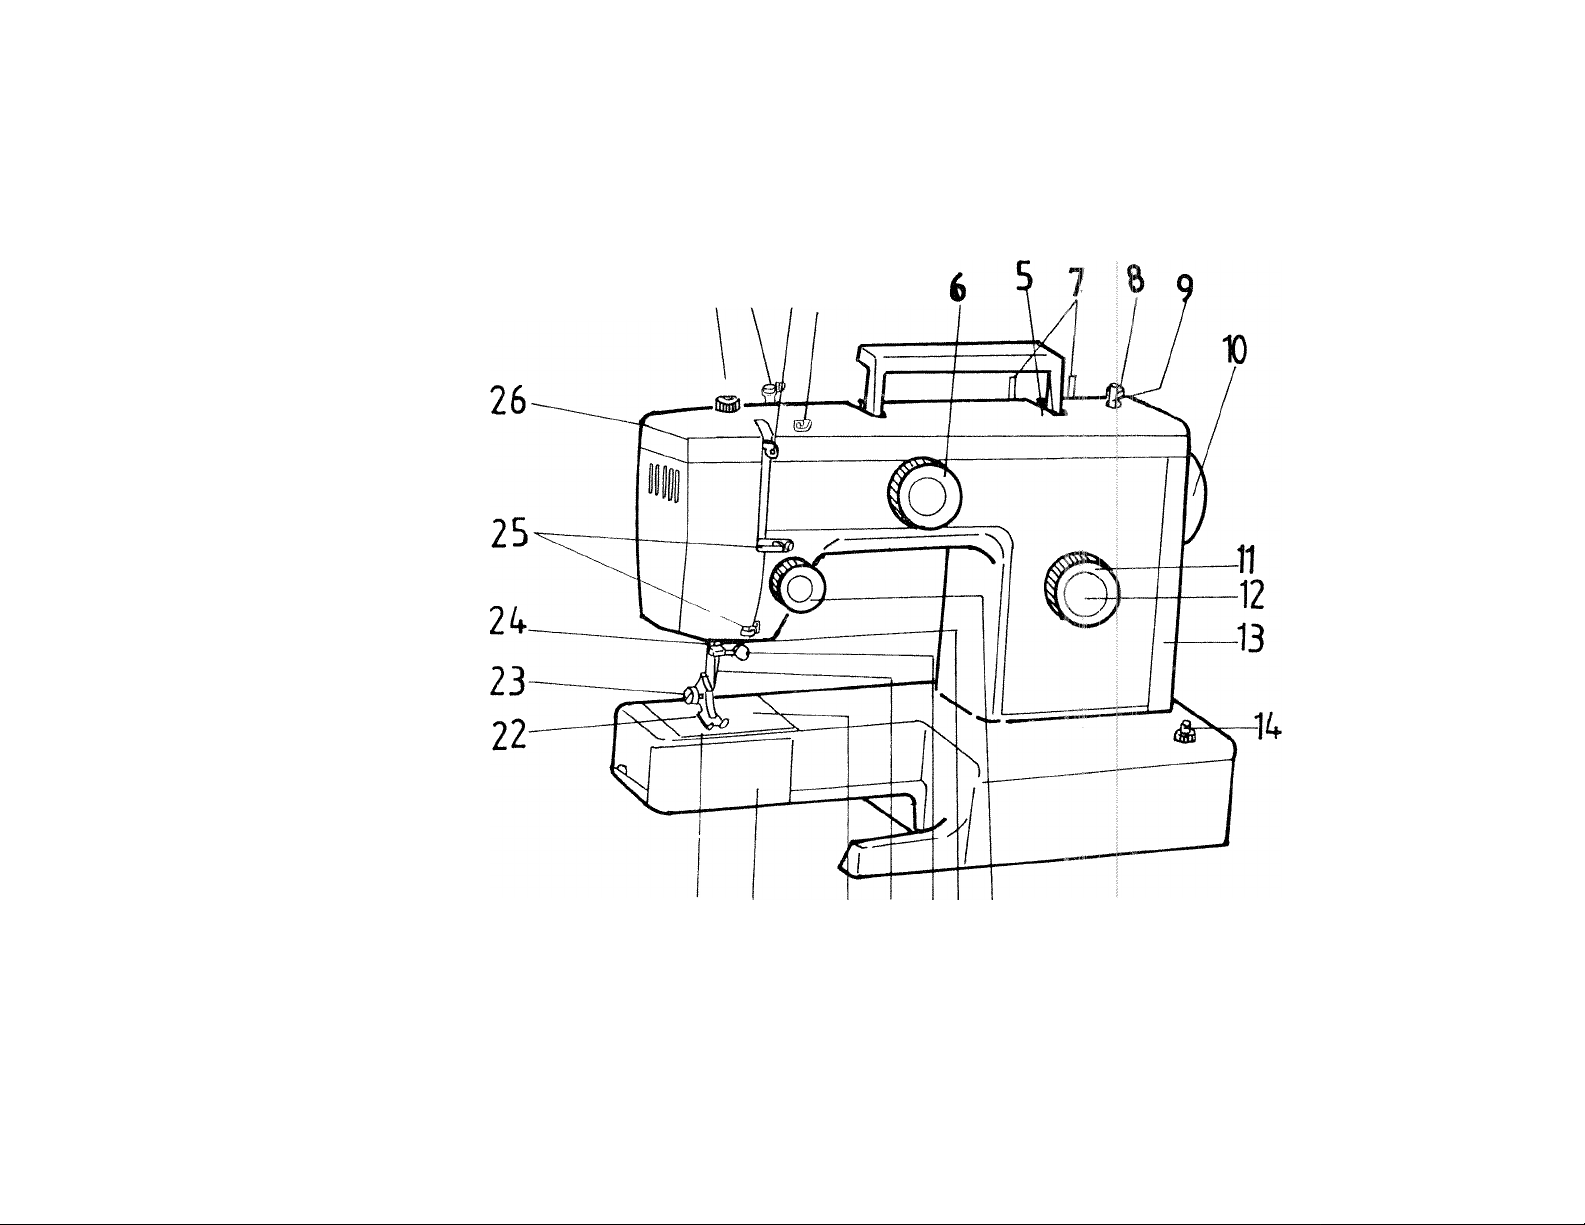
Names of Parts
1. Pressure regulator
2. Bobbin winder thread guide
3. Thread take-up lever
4. Thread guide
5. Top cover
6. Pattern selector dial
7. Spool pins
8. Bobbin winder stopper
9. Bobbin winder spindle
10. Balance wheel
11. Stitch length dial
12. Reversing button
13. Belt cover
14. Switch
15. Thread tension dial
16. Needle bar
17. Needle clamp ar’d screw
18. Needle
19. Needle plate
20. Shuttle cover
21. Feed dog
22. Presser foot
23. Presser foot thumb screvf
24. Presser bar
25. Face plate thread guides
26. Face plate
Page 9
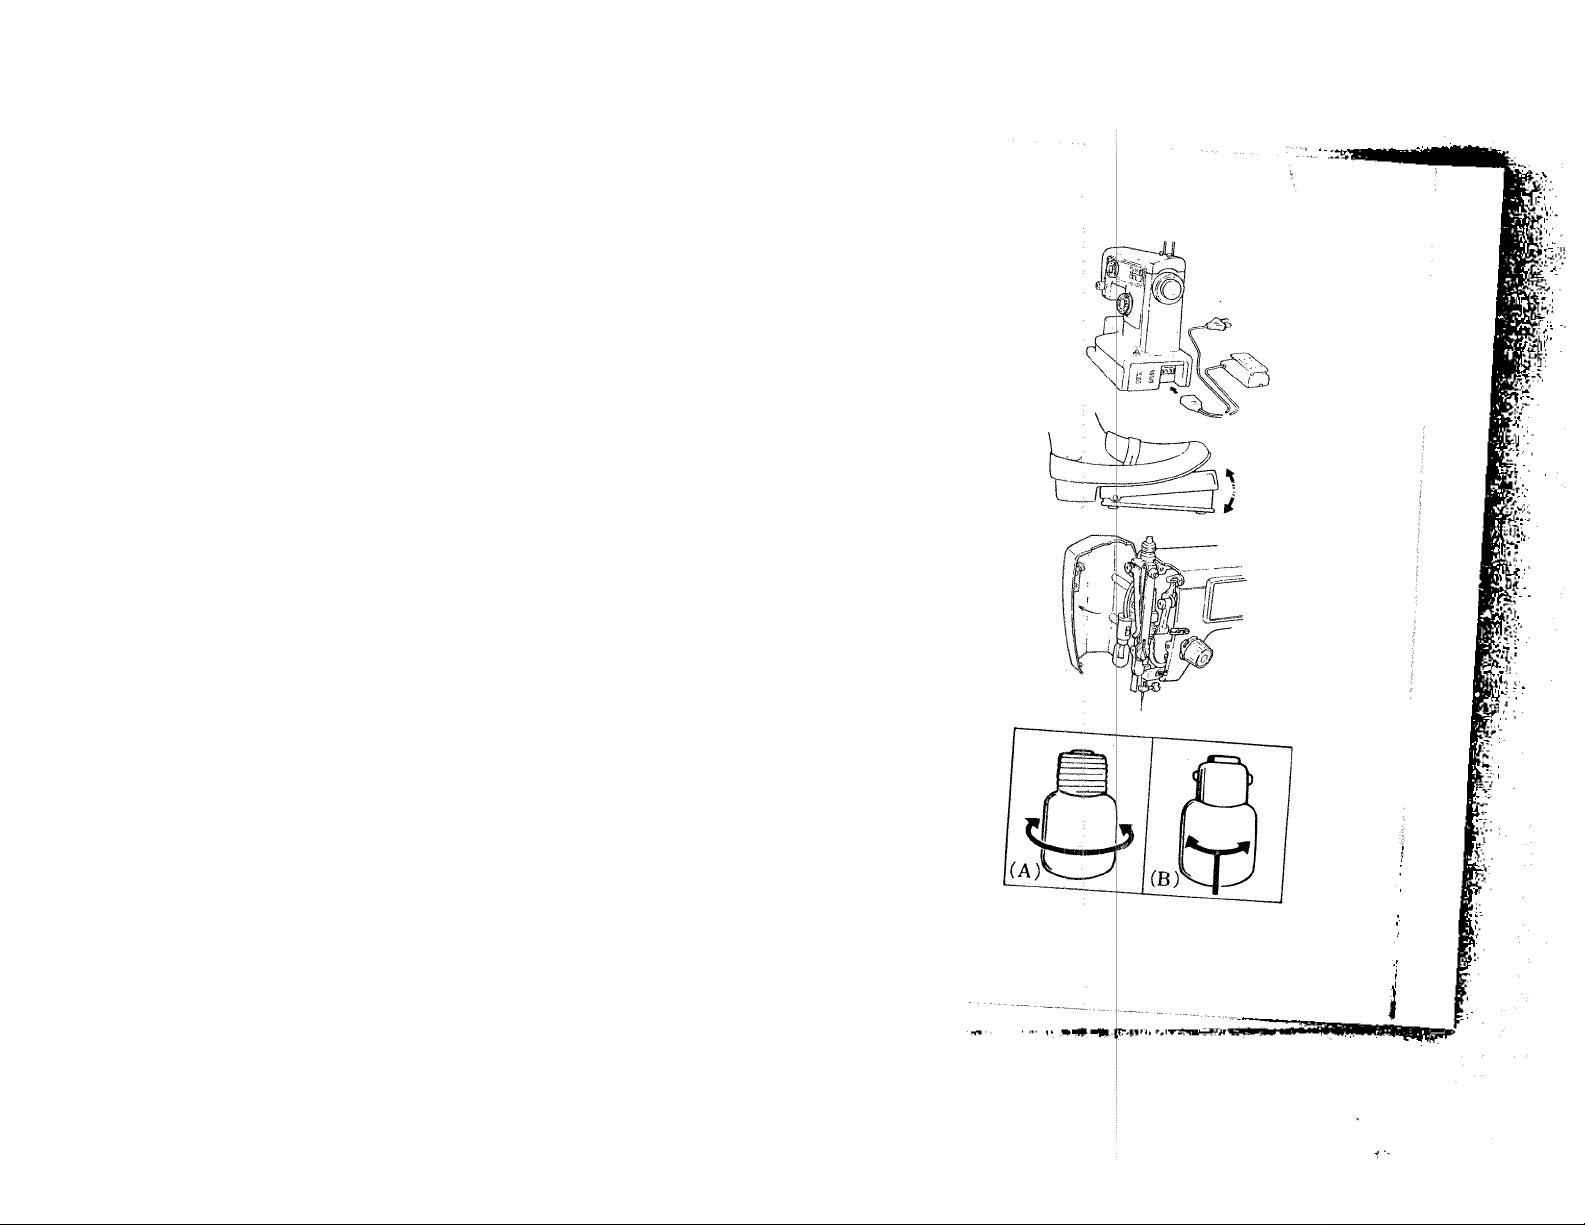
HOW TO COIMIMECT THE MAr*t-jiMr- -rr\
1. F^the .achl^ne p,„, ™WER SUPPLY
' "-Sr'^’cTorint.«? ir„r" ?■
power supply. ' ‘conformed to your electrical
HOW TO USE THE SPEED CONTROLLER
Sewing speed can be varied bv thp cn w
press on the controller the fasier thP ^ou
Note: *By releasing the con?ro,l r
matically. ' ® rriachine stops running auto-
witiiltthreadTnl'”"'''''"^ the speed
SEWING LAMP
The sewing lamp is located behind thp f. ,
BpibtvpsiB,. :í„^r:-
Note:-Before f,p„ei„, ,
power supply. liconnect the machine from the
W«?;™,“'“"“’" tofilere |u.,. ,5.
• To replace ”'pul w ‘=°onter-clockwise
Ne4Sr,itT„7?nteiiFF
Page 10

THREAD AND NEEDLE CHART
FABRICS
Fine Silk
LIGHT
WEIGHT
MEDIUM
WEIGHT
HEAVY
WEIGHT
Note: *ln general, fine threads and needles are used for sewing thin fabrics, and thicker three
Crepe de’Chine, Voile
Lawn, Organdy, Georgette, Tricot
Linens, Cotton, Pique
Serge, Double Knits, Percale
Denim, Tweed, Gabardine,
Coating, Drapery and Upholstery Fabric
used for sewing heavy fabrics. Always test thread and needle size on a small piec.e o
be used for actual sewing.
*Use the same thread for needle and bobbin.
*Wheri sewing stretch, very fine fabrics and synthetics, use a BLUE TIPPED needle
needle effectively prevents skipped stitches.
*When sewing very fine fabrics, sew over a piece of paper to prevent thread distortion
Fine Cotton
Fine Synthetic
Fine Cotton Covered Polyester
50 silk
50 to 80 Cotton
50 to 60 Synthetic
Cotton Covered Polyester
50 Silk
40 to 50 Cotton
40 to 50 Synthetic
Cotton Covered Polyester
THREADS
NEEDLE SIZE
9 or 11
11 or 14
14 or 16
ds and needles are
f fabric which will
The blue tipped
Page 11
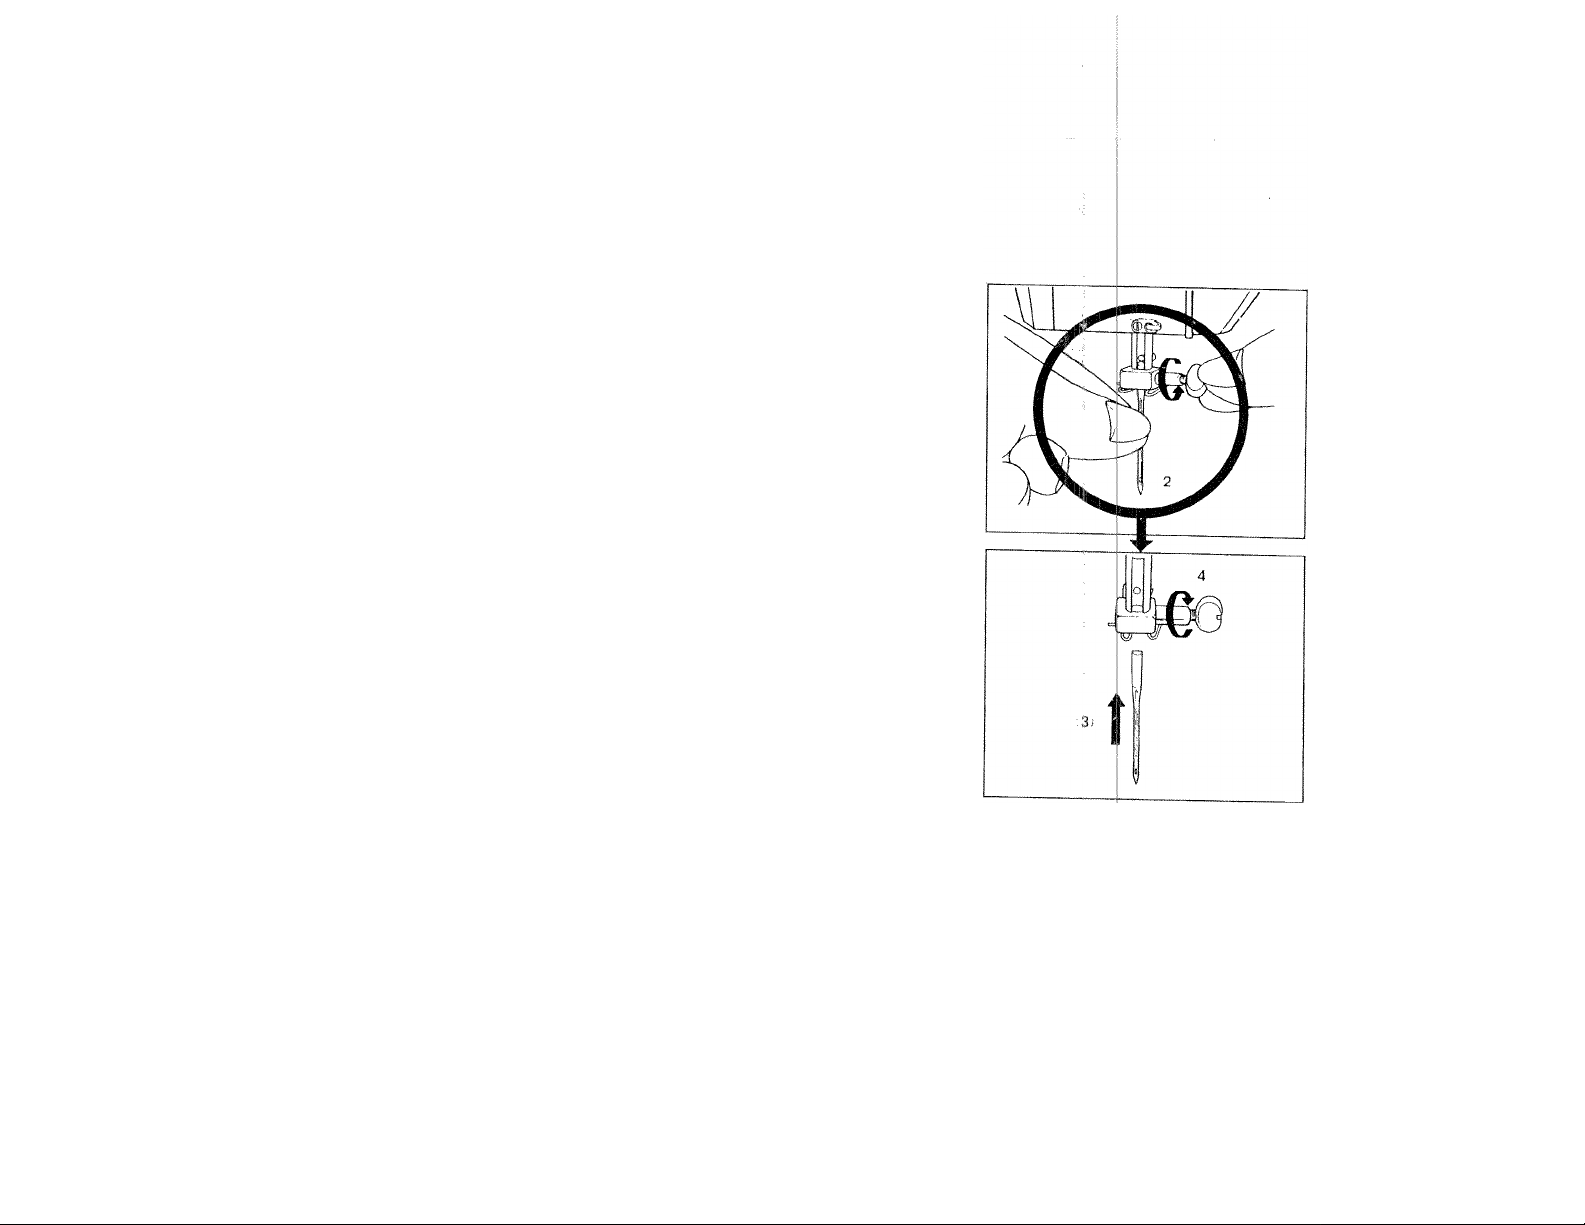
CHANGING THE NEEDLE
1. Turn the balance wheel towards you until the needle is at is
highest position.
2. Loosen the needle clamp screw by turning its top edge
towards you. Remove the needle from the clamp.
3. Place the new needle into the needle clamp with it's flat
side facing away from you.Push the needle up into needle
clamp as far as possible;
4. Tighten the needle clamp screw firmly.
TO SELECT A SUITABLE NEEDLE
A number indicating the size
of needle is marked on the
Stem
stem.The higher the number,
the thicker the needle.
z>
A BLUE TIPPED needle is
Blue tipped needle
supplied with the machine.
'Do not use any needle which
>
is bent or blunted.
Page 12
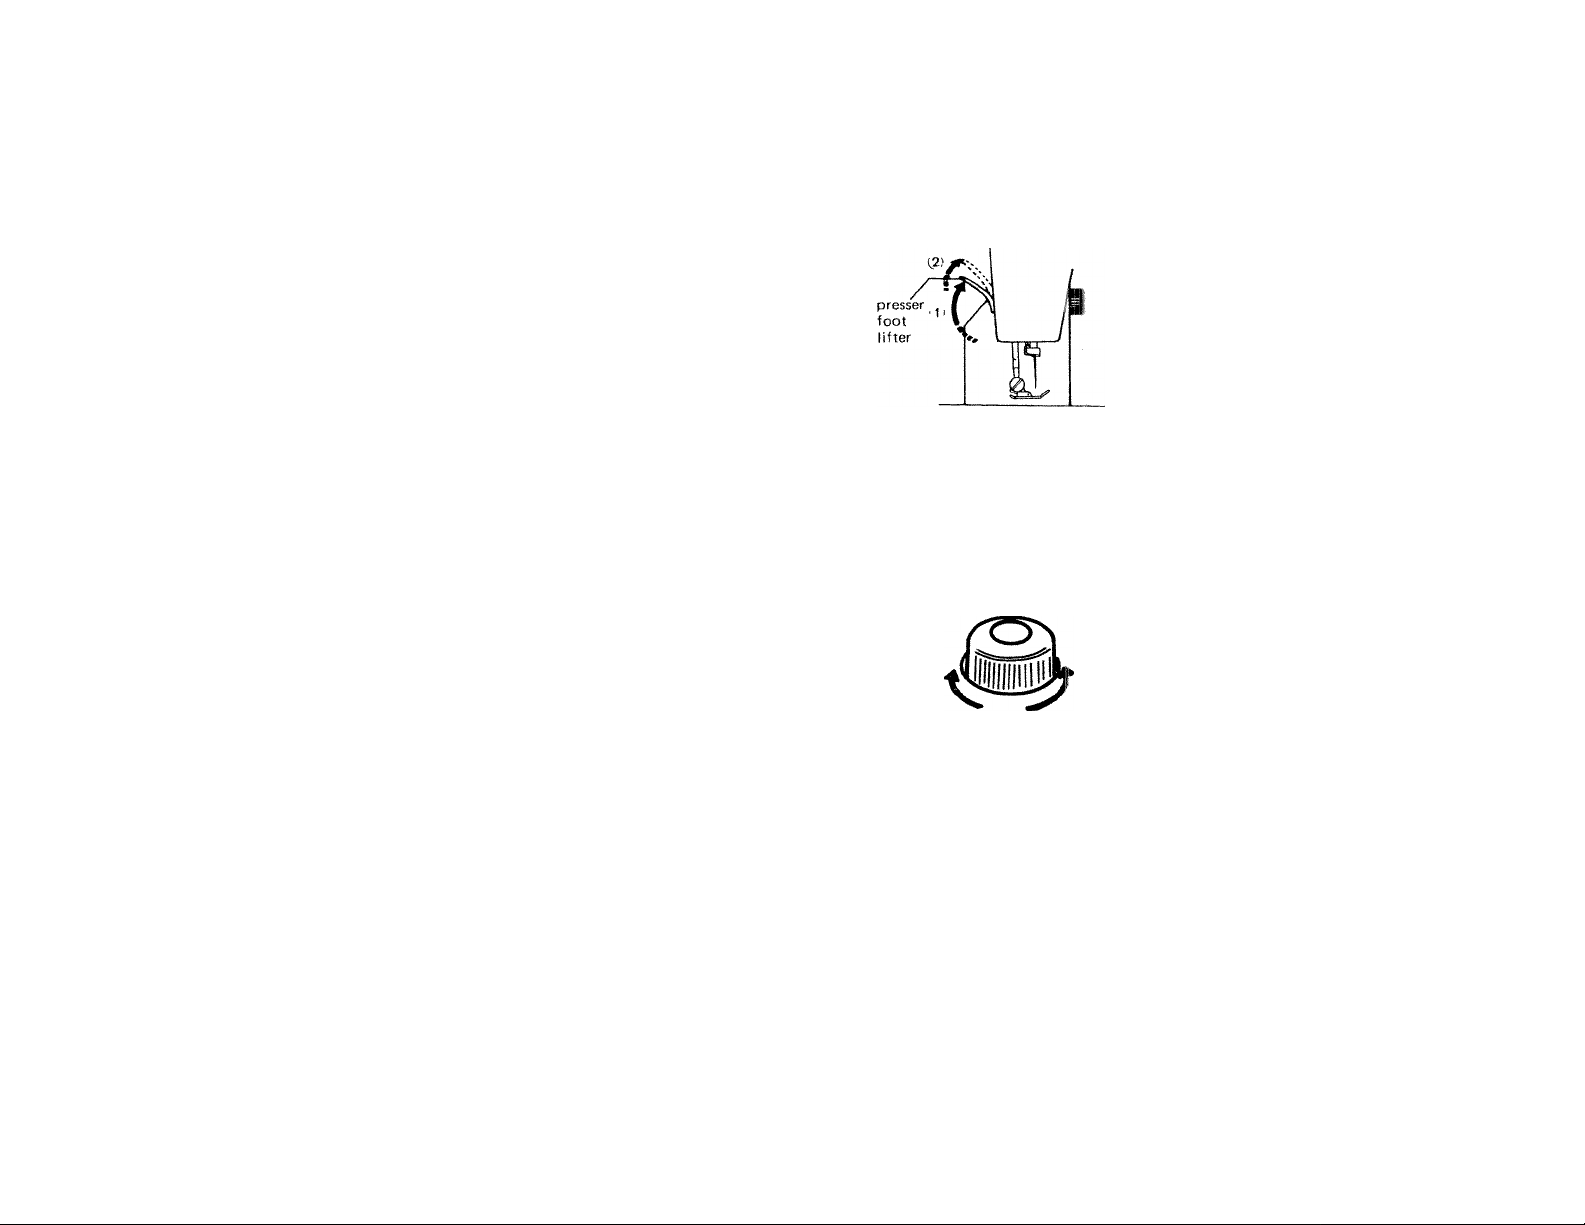
RAISING OR LOWERING THE PRESSER FOOT
1. By raising or lowering the presser foot lifter, the presser foot
goes up and down respectively.
2. For additional clearance, the foot lifter can be raised higher to
sew on heavy fabrics.
REGULATING THE PRESSER FOOT PRESSURE (Patch-O-Matic)
To release the pressure, push ring (A) downwards. The machine is now
free from any pressure of the presser foot.
For sewing medium or lightmaterials, push regulator (B) down just a
little to provide the light pressure required.
If you are sewing thick or heavy materials, push the regulator (B) farther
down to increase the pressure on the material.
Page 13

rfCULATING THE THREAD TENSION
thread tension should be controlled by gp"*Jor ^
Thread tension may be aojusxeu uy a
should .„K-rlocknn tfe сект ol lwo layers oMub
Properly adjustect thread
tension for straight sewing
Bobbin thread terjsion has been
' fabric. Bobbin
тччПе Ihrcid ihkMUv
iasasa
The bobbin
thread ap
pears on the
upper surlaee
of the fabnes
The needle thread is too
loose
________________—------
. -r-hp best tension for one fabric may
The needl
Ihread ap
pears on Ibe
underside of
the fabrics.
•TSere ar. many raaaons .or o, tabno, thiegrraaa o, ,ha fabric, n.
anothar. T'r''“»“"'^“™°J.t,peofatltchvooarem s,,„„parting to roak.
rstbirgU: »rap o, .be .abric yoo are osrng be,ora
Loosen the needle thread tension by
moving the dial u. the lower number.
Tighten the needle ihread Icnsion by
moving the sfwl W'he higher number.
-10-
How to adjust the bobbin
thread tension
r-To increase tension,
turn screw clockwise.
, „ decrease tension,
turn screw counter
clockwise.
, not be correct for
lumbers of layers of
a garment.
Page 14

STITCH LENGTH DIAL' REVERSING BUTTON AND DROPPING THE FEED
To change the length of the stitches proceed as follows:
Turn the dial so that the number for the required stitch
length is at setting mark. The numbers indicate the ap
proximate stitch lengths in mm. The lower the number
the shorter the stitch.
REVERSE STITCH:
Press center of the stitch length dial (reversing button) and
hold for reverse stitching. Fabric will immediately start
feeding backwards. Release button and machine will
resume normal forward sewing.
Very useful for fastening ends of seams and darts without
having to tie threads, and for strengthening seams.
-11-
Page 15

THE PATTERN SELECTOR
The desired pattern can be selected by turning the pattern selector dial. The marks on the dial correspond to the
patterns shown on the panel respectively, as follows;
A ( cTd ) straight stitch, middle needle position
B { Cl—) ) straight stitch, left needle position
CDEFG ( A/vvw ) zigzag stitch with variable width
(.j ( ilr' ) tricot stitch
I ! ) ^^retch blind stitch
J ( ^ ) reverse blind stitch
" iriMi if
12-
Page 16

REMOVING THE BOBBIN CASE AND BOBBIN
1. Raise the presser foot and turn the balance wheel towards
you until the thread take-up lever is at its highest position.
2. Open the shuttle cover.
3. Open hinged latch of bobbin case and pull bobbin case out of
machine.
Release the latch and the bobbin will fall out. As long as you
hold the bobbin case latch open, the bobbin cannot drop
out.
-13-
Page 17

WINDING THE BOBBIN
1. Release clutch by turning clutch knob
toward you.
2. Draw thread from spool through
bobbin winder tension disc as shown.
3. Pull end of thread through hole in
bobbin as shown.
4. Place bobbin onto bobbin winder
shaft with end of thread coming from
the top of the bobbin. Push bobbin
winder shaft to the right until it clicks.
Holding onto end of thread, start
machine. When bobbin is slightly
filled, snip off end of thread.
5. Wind thread until winder stops.
Remove bobbin. Clip thread.
6. Tighten clutch knob.
Page 18

THREADING THE BOBBIN CASE
Hold the bobbin between the thumb and forefinger of your right
hand and pull off about 15 cm (6 inches) of thread.
1. Hold the bobbin case in your left hand as shown and place
the filled bobbin inside.
2. Pull the thread into the slot in the edge of the bobbin case.
3. Now pull the thread under the tension spring and into the
thread eyelet.
To insert the bobbin case and bobbin
Ensure that about 15 cm {6 inches) of thread extends
out of bobbin. Hold the bobbin case so that long
finger on case points up. Open the latch of bobbin
case. Slip the bobbin case over the center pin of
hook and press in place until long finger of the
bobbin case enters notch. Release latch and press
down.
...........
-15-
Page 19

THREADING THE NEEDLE
Place spool on spool pin as shown, with
thread coming from the back of the
spool.
Draw thread through top thread guides.
Holding spool stationary with right hand,
pull the end of the thread b^een the
tension discs as shown above (3).
Pull the end of.the thread taut with left
hand. This will pull the spring wire up
and past the end of the hook. The thread
will then slip into the hook when the
spring is released as in (4) .
Release spool of thread and thread
machine throt^h take-up lever (5) and
thread guide (6) as shown abpw. Thrwd
then passes through guides (f) and (§).
Thread needle @ from front to rear.
[® ^
@ ^
r
J
Page 20

DRAWING UP THE BOBBIN THREAD
1. Hold the end of the needle thread with your left hand.
2. Turn the balance wheel slowly towards you with your right
hand until the needle goes down and comes up. Then stop
the balance wheel when the take-up lever is at its highest
position.
Lightly draw up the needle thread forming a loop with the
bobbin thread.
3. Pull about 15 cm (6 inches) of both threads away from you
under the presser foot.
-17-
Page 21

STRAIGHT STITCH AND ZIGZAG STITCH
Presser foot
Pattern selector
Stitch length dial
Starting Sewing
1 Be sure both the threads are drawn back under the presser foot
2. While holding the threads with your left hand, turn the blance
wheel toward you to bring the needle into the fabric where
you wish to start sewing.
3. Lower the presser foot, and press the speed controller gently,
then start sewing slowly.
*Sew a few reverse stitches by pushing reverse button for rein
forcing the end of seams.
•Raise the needle to its highest position before turning the
pattern selector dial and stitch width dial.
..............
C-G (for zigzag stitch)
...............
-18-
Page 22

Changing Sewing Directions
1. Stop the machine, and turn the balance wheel toward you to
bring the needle down into the fabric. Raise the presser foot.
2. Pivot the fabric around the needle to change direction as
desired.
3. Lower the presser foot and continue the sewing.
Fastening Seams
1. For fastening the ends of seams, press down the reversing
button and sew several reverse stitches.
2. To remove the fabric, raise the presser foot and draw the
fabric away from you.
3. Sever threads on thread cutter at the rear of presser bar or
with a pair of scissors.
Leave about 15 cm (6 inches) of thread hanging from the
needle eye.
19^
Page 23

SEWING WITH A TWIN NEEDLE -TWIN NEEDLE OPTIONAL
Pretty colored patterns can be made by sewing with a
twin needle and different-colored threads.
Presser foot........................................zigzag foot
Pattern selector
..................................
C, D, E
Stitch length dial
1. Set the pattern selector in the range of " C-E
otherwise a needle may hit the needle plate.
2. Insert ti e twin needle in the same way as a single
one (flat side away from you).
Place two spools of threads on the spool pins.
3. Pass both threads upto face plate thread guides as
for single needle stitching.
4. Separate the threads on needle bar thread guides and
needle eyes.
Note: 'Be sure to place thé two round felts provided in the accessories over
.......................................
the spool pins. To turn a corner with a twin needle, you have to take
the needles out of the fabric, otherwise the twin needle will break or
bend.
0-5 toi
-20-
Page 24

TRICOT ZIGZAG STITCH
This stitch is very suitable for darning tears. It can
also be used for reinforcing stretch materials and
sewing on fabric parts.
Presser fot
Pattern selector
Stitch length dial
.....................■...............
...............................
..............................
Note; *Use a BLUE TIPPED needle.
zigzag foot
H( *;» )
0.3 to 4
The blue tipped needle effectively prevents
skipped stitches.
-21-
Page 25

SEWING ZIPPERS -ZIPPER FOOT OPTIONAL
Presser foot........................................zipper foot
Pattern selector..................................A (ct))
Stitch length dial
...............................
1 to 4
Raise the foot and the needle to its highest position by turning
the balance wheel towards you. Replace the foot with the zipper
foot.
1. Pin or baste the zipper tape to the fabric and place the workpiece in position under the foot.
Attach snap on zipper foot so that the needle passes on its
left hand side.
* When starting sewing, both needle and bobbin threads ends
should be put away under the foot.
2. Sew on the right side of the zipper by guiding zipper teeth
as close as possible to the needle drop. Before the foot reaches
the slider on the zipper tape, raise the foot and operi the
zipper by keeping the needle in the fabric.
Lower the foot and sew on theremaider of the seam.
3. To sew the left side of the zipper, change position of foot to bring
the foot to the left side of the needle. Sew on in the same way
as you did on the right side of zipper.
Elements
Zipper foot
\
Fabric
Needle
Fabric
Fig. 3
Element
Page 26

MANUAL ZI6ZAG PATTERN SEWING
By manually adjusting the stitch length and zigzag width while running the machine,
some beautiful
ornamental stitches can be made as follows:
Patterns
AAAAA/WW
mmmmmmmmm
Stitch
Length
long
short
long
short
long
short
Width
Set to any point from B to G.
Gradually move the lever from
B to G and return to B. (repeat)
Very slowly move the lever from
B to G and return to B. Gradu
ally move the lever from B to G
and return to B. (repeat)
Patterns
_AAA7VAAA_
UUUi ÜUUÜ lÜl
Stitch
Length
long and
short
(repeat)
long
short
long
short
Set to any poi
Set to B.
.Quickly move
back to B. (re
Move the 1«
alternatively
from G to C.
lidth
nt from B to G..
the lever to G and
peat)
ver quickly and
from C to G and
TO REMOVE WORK
Raise the needle bar to its highest point, lift the presser foot, draw the fabric back ^nd cut the ends
of threads.
Leave the machine threads about four inches long to resume sewing.
-23-
Page 27

BUTTONHOLE SEWING
BUTTONHOLE FOOT OPTIONAL
1. Remove the regular presser foot and attach the buttonhole foot, (op
2. Set the zigzag width knob between “C” and “D.”
Set the stitch length regulator knob to obtain close stitches (satin s
3. Mark with a pencil or chalk the position and exact length of the b
-24-
(ional)
itch).
uttonhole on the fabric.
Page 28

' Lo3 I' ta'ald Z‘cirsl™ u' Ti:" '“"'Tr of »«-hole.
of the marking. (1) S e row of the buttonhole until it reaches the end
Stop the machine with nqedle on fabric at point A.
5. Lift the presser foot and using the heedle as a mVor »i r u •
to position (2). ^ to bring the buttonhole
6. Raise needle from fabric and set the stitch length knob to “0”
7. Se, .he zigzag width control hnob -G" and sew three or four stit'ches to make har-tack (2)
■ :;"nr.rrcZ:eZ\:zr^^
:0. .0 make the „„a. har-tack, again setting
. Return Zigzag w.dth to "O" and take two or three stitches to fasten ha, threads and pre.ent ral iing
12. Remove fahr.c fro the machtne and open the buttonhole with a hu.tonhold cutter or seam rtpper
(2)
-25-
and “D” (to its
Page 29

BUTTON SEWING
Fit the button sewing foot to the machine.
Wuh ,l.e bm,„„ fo„, ^
bu..„„ „„ fabric wi.h i,s hole., in a l.oncontal l.„e and
the left aide hole underneath the needle, and lotver the foot
upon it.
Set the stitch length dial to zero (O)
Set the zlgrag width control knob in accordance with the
distance between the holes in the button, so that the .needle
enters the right side hole.
Sew six or seven stitches by turnig the balance wheel with
your right hand.
To lock the thread, set the aigaag width control knob at “B"
button FO'
(OPTIONAL)
and make three or four stitches.
-26-
Page 30

HEMMtNG -HEMMING FOOT OPTIONAL
Presser foot.
Pattern selector .
Stitch length dial
■ hemmer foot
■AiCb)
.1 to 4
ri' r -
Fold over the fabric edge by about 3 mm i i /n • ,
under the fnnt c \ mm (1/8 inches) and place it
unaer the foot. Secure the folded edge with a few stitrh^c t c
out the workpiece and draw the hem in o th h '
pulling on the threads.
Lower the foot and sew the hem.
During sewing, fold the fabric to the left a litti« =. w ,,
run into the he„„e, “"“w '• to
r;- -
blind stitch
bem guide
-27-
Page 31

SEWING BLIND HEMS -BLIND HEM FOOT OPTIONAL
presser foot.....................................bind hem foot
Pattern selector
Stitch length dial
1.
Turn up the hem with the desired width and press. (Fig. 1)
2.
Fold hem back against the right side of the garment with
top edge of hem extending about 4 mm (1/6 inches) to the
right side of the garment folded. (Fig.2)
3.
Place the garment under the foot so that double-folded edge
runs along the hem[guide and lower the foot.
Sew slowly for better control, marking sure the narrow
zigzag stitches will fall on the hem edge and wide zigzag
stitches will just catch one thread of folded edge. (Fig. 3)
4.
Unfold the fabric and you will have a blind stitch hem
(Fig. 4)
..............................
.............................
I ( ^ )
1 to 3
-28-
Page 32

EMBROIDERY
Remove presser foot
Pattern selector..........................
Stitch length dial
Place the fabric with embroidery hoop. Lower the presser foot
lifter. Hold the embroidery hoop firmly with your hand.
While sewing the desired pattern, move the emoroidery hoop
slowly and do not allow your fingers to get near the needle.
*Set the needle thread tension a little looser so that the bobbin
thread is not pulled through to the right side of fabric.
*lt is recommended to mark the required embroidery pattern
on the right side of the fabric with a pencil or tailor's chalk.
...............................
..
. A ( l|j 1
0
TO DARN DO THE FOLLOWING
1. Turn the stitch length dial to zero.
2. Turn the zig zag to the desired width.
3. Release the pressure on the pressure foot.
29-
Page 33

HOW TO OIL THE MACHINE
The oiling points are marked with arrows in the illustrations.
Before oiling they should be wiped clean. Apply one or two
drops of a fine quality sewing machine oil. If the machine is in
constant use, this should be done every two or three days. If the
machine should not run well after being out of use for a long
period, apply a few drops of- oil to the oiling points and run the
machine fast with all covers on for about one minute. Before
using the machine again oil it'in the usual way.
*Do not forget to sew first on waste fabric, in order to soak up
any excess oil.
Page 34

CLEANING THE FEED DOG
It is necessary to keep the feed dog teeth always cleaned in order
to ensure smooth sewing.
Remove the needle and the presser foot.
Unscrew the needle plate set screws with a screw driver to take
off the needle plate from the machine.
With a brush, clean out dust and lint clogged on the feed dog
teeth.
Refit the needle plate.
-31^
Page 35

CLEANING THE SHUTTLE RACE
Unplug the machine from the power supply.
To remove shuttle:
Raise needle to its highest position and remove bobbin case.
Turn levers away from shuttle and lift out retaining ring and
shuttle, by grasping center pin.
Clean the reverse side of feed dog with a small brush. Remove
lint and thread from all parts of shuttle and wipe with a lightly
oiled cloth.
To reassemble;
Hold shuttle by center pin and fit carefully back into shuttle
race, forming perfect circle with shuttle driver.
Replace retaining ring polished side out, making sure the bottom
pin fits into notch . Lock retaining ring by turning levers back into
position. Refit bobbin case with bobbin.
.shuttle driver
-.32^
Page 36

FREE-ARM SEWING
The tree arm enables you to sew tubular types of pieces more easily.
Just slip the sleeve or pants leg on the free arm as shown above.
You will find many uses for this free arm feature such as:
1. Mend elbows and knees of garments more easily.
2. Sew in sleeves more easily. This is especially true when sewing
smaller garments.
3. Applique, embroider or hem around edges of cuffs or pants legs.
4. Sewing in elastic casings in skirts or pants at the waistiline.
-33-
Page 37

TROUBLE SHOOTING: CAUSES AND REMEDIES
CAUSE
Needle not properly threaded
Thread tension too tight
Something wrong with the needle
Thread it too heavy for needle
Thread check spring is broken
Needle not properly inserted
Needle plate, shuttle or sewing foot damaged
BOBBIN THREAD BREAKS
Bobbin thread entangled because of incorrectly wound bobbin
Bobbin thread not under tension spring on bobbin cáse
STITCHES ARE LEFT OUT
Needle not properly fitted on needle bar
Needle bent or blunt
Needle worn
Needle bent
Needle not properly fitted
Fabric too heavy or too hard
You are pulling on the fabric
NEEDLE BREAKS
Thread properly
Loosen tension
Replace needle
Change
Have a new spring fitted
Insert needle properly
Replace
Wind bobbin correctly
Thread bobbin correctly
Fit needle properly
Replace
Replace
Replace
Fit needle properly
Use needle of correct size
Do not pull
R
EMEDY
-34-
Page 38

TROUBLE SHOOTING: CAUSES AND REMEDIES
IF THREAD FORMS LOOPS
CAUSE
Thread tension not properly regulated
Needle thread not properly threaded and/or bobbin thread
not properly wound
Thread size not suited to fabric
Thread check spring not working properly
SHRINKING OR PUCK!
Tension too tight
Sewing foot pressure too strong
Needle and bobbin threads of poor quality
Bobbin thread unevenly wound
MACHINE DOES NOT RUN FREELY AND MAKES A NOISE
Machine needs oiling
Dust and thread in shuttle
Wrong oil used, has now clogged machine
Drive belt tension too tight
REMEDY
Read instructions for regulating rfeedle-and bobbin thread tension
Thread machine properly and/or wind bobbin thread correctly
See "Size of needle and thread"
Have spring replaced
ERING OF THE SEAM
Read instructions for regulating r|eedle-and bobbin thread tensions
Read instructions for regulating sjewing foot pressure
IRREGULAR STITCHES
Use top quality threads
Re-wind bobbin
Read instructions on how to oil I
Read instructions on how to cleajn shuttle race
Clean machine carefully and re-oil with top quality oil
Loosen tension of drive belt
-35-
Page 39

 Loading...