

SINGER W134 User Manual
ч
I
î
..
-"v ! '

T
\ '
y...
I
I
I:
I
• f}
I
1^
I
You are now the owner of a new straight stitch machine, the most versatile machine
of this type you can possess.
To aid you in obtaining the greatest performance from your machine this book on its
care and uses has been written for you. Read the instructions carefully as a thorough
understanding will reward you with many hours of trouble-free sewing.
Time-saving attachments, such as rufflers, binders, buttonholers, edgestitchers, cording
feet, decorators, and so forth to complement the accessories furnished with your machine,
are available from your dealer.
WHITE SEWING MACHINE COMPANY
11750 BEREA ROAD
CLEVELAND, OHIO 44111
WHITE CONSOLIDATED INDUSTRIES, LTD.
1470 BIRCHMOUNT ROAD
SCARBOROUGH, ONTARIO, CANADA
f
LA
■ ■- .pb -'J
A:
wv
■ 'V —
f'S;—; r/f 2* i'^'^-
11
/ o 0
// f p
li
I
ujHiTe seitf/ff^r
WASHI^'Lll
WE WARRANT to the original purchaser of this new White Sewing Machine (serial
number entered on reverse side) that it is built of first class materials and workmanship.
Should any part of this sewing mechanism (excepting needles, pulleys, belts, attachments or
electrical equipment) be found defective within twenty (20) years from date of purchase, it will
be exchanged for a new-- part, providing only that the machine is used under normal household
conditions and not damaged by tinkering, fire, water or accident.
. ■ ance with the standard practices covering household elec
ii«cE s'6 machines
ELECTRICAL EQUIPMENT is warranted in accord
trical equipment and appliances, i.e.. the exchange of any
defective electrical part ( excepting lamp bulbs) for a period
of one year from date of original purchase.
THIS WARRANTY is valid only if signed by an authorized
White Sewing Machine dealer after the serial number of
the machine and date of purchase have been entered in the
spaces provided.
This warranty is in iiei
the obligation under this
indirect or consequential
of any other warranties, express
arranty shaii not include ,iny iiab,
damages.
WHITE SEWING MACHINE COMPANY
WHITE CONSOLIDATED INDUSTRIES LTD.
CLEVLAND.OHiO
C^^F/CATt
mpiied, and
for direct.
If purchased in U.S.A.,
send this to
UJHITE SEWING MACHINE COMPANY
11750 BEREA ROAD
CLEVELAND, OHIO 44111

If purchased in Canada,
send, this to
WHITE CONSOLIDATED INDUSTRIES, LTD.
1470 BiRCHMOUNT ROAD
SCARBOROUGH, ONTARIO, CANADA
Certificate
and
Registration
for
NAME OF
ORiGlHAL
PURCHASER
MODEL
NUMBER
AUTHORIZED
DEALER
SIGNATURE
1 34
SERIAL
NUMBER
DATE
OF
PURCHASE

SERVICE POLICY
DATE OF PURCHASE.
COMPLETE MODEL NO.
Expert service for the sewing machine described above is available by
the undersigned dealer.
Standard charges for service at store, if machine is brought in, are con
siderably less than home calls.
Service without charge for
on dealer record, is due original purchaser if required.
DEALER _
CITY and STATE____________________________________________________________
SIGNED
........------------------------------------------------------------------------------------
________
____________
THIS PORTION TO BE RETAINED BY CUSTOMER ^
______
1 34
BRAND^
SERIAL NO.^
days from date written above, and
TITLE
WHITE
----
--------
--
DEALER RECORD
DATE SOLD
COMPLETE MODEL NO.
SOLD TO
1 34
BRAND.... UJHIT6
SERIAL NO.
address
ENTITLED TO FREE SERVICE FOR
DAYS.

Page
Features and Parts
Needle and Thread Chart ....................................... 5
Winding the Bobbin
Upper Threading...................................................
Setting the Needle ................................................. 10
Threading the Bobbin Case ................................. 11
Placing Bobbin Case in Shuttle
Setting Stitch Length
Stitch Length Chart
Sewing in Reverse
Adjusting the Tensions.................................... 14-15
Adjusting Pressure and Feed
General Sewing....................................................... 16
Light weight Fabrics
Darning and Mending........................................... 16
Removing the Work ......................................... 16-17
Care and Maintenance ..................................... 17-18
.............................................
............................................
..........................
............................................
................................................
.................................................
...............................
.............................................
2-3-4
6-7
12
13
13
14
15
15
D E X
I N
i Changing the Belt
i Cleaning and Oiling Shuttle
1
Accessories................................................................ 31
I Trouble Chart
I Attachments
I Attachment Foot
j
Edgestitcher
I Binder
\ Ruiiler ........................................................................ 39
I Cord and Zipper Foot............................................... 30
i
Hemmer
; Darning Spring ........................................................ 31
Buttonholer ............................................................. 32
Button Sew-On
Decorators ............................................................... 33
Blind Stitch Hemmer
.............................................................
..............................................................
........................................................................
. . . . . . . . . . . . . . . . . . . . . . . . . . . . . . . . . . . . . . . . . . . . . . .
.............................................
.................
.....................................................
......................................................
......................................................
............................................
Page
18-19
20-21
22-24
36
37
37
38
61
32
33
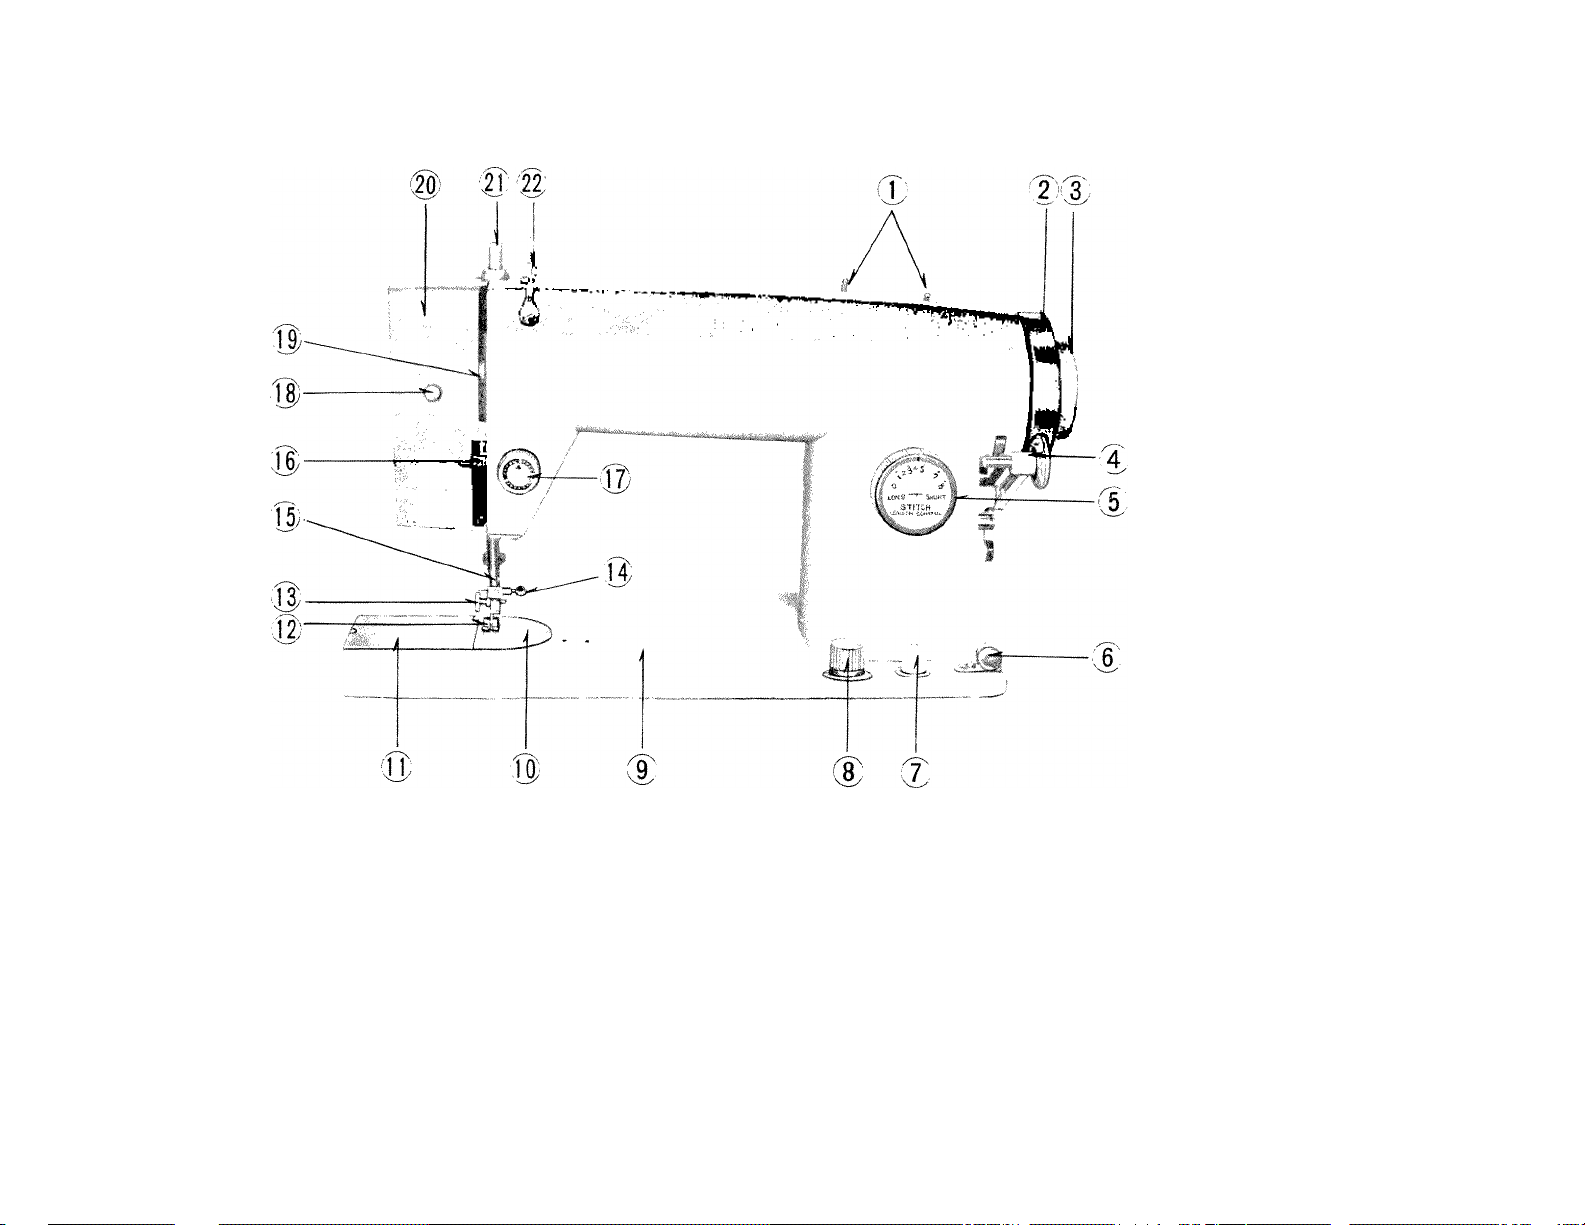
Fig. 1

FEATURES AND PARTS
(Front View)
1. Spool Pins
2. Hand Wheel
3. Wheel Clutch
4. Bobbin Winder
5. Stitch Length Dial
6. Bobbin Winding Tension
7. Push Button Reverse
8. Drop Feed Knob
9. Bed
10. Needle Plate-Seam Guide
11. Cover Plate
12. Presser Foot
13. Attachment and Foot Thumb Screw
14. Needle Clamp and Screw
15. Needle Bar Thread Guide
16. Face Plate Thread Guide
17. Tension Regulator
18. Sew Lite Switch
19. Take-up Lever
20. Face Plate
21. Pressure Release-Darner
22. Arm Thread Guides
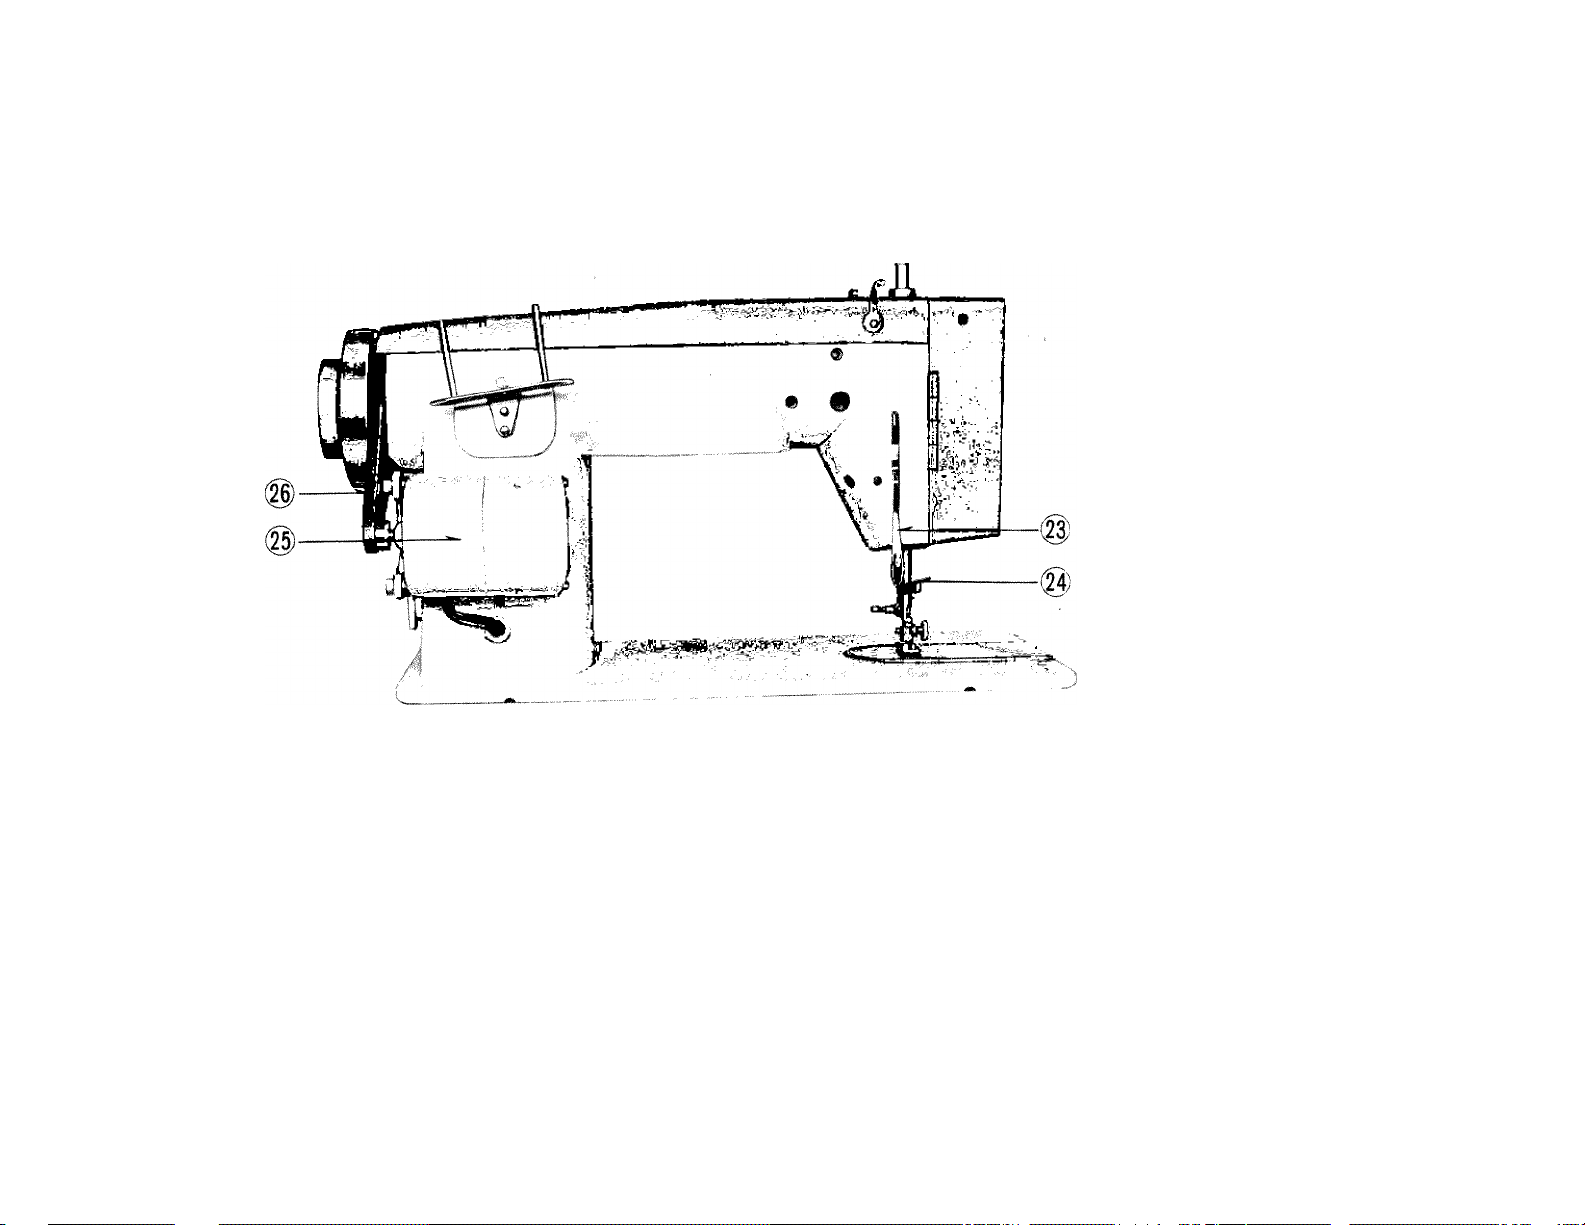
FEATURES AND PARTS (Back view)
L
Fig. 2
23. Presser Bar Lifter 25. Motor
24. Thread Cutter 26. Belt

NEEDLE -
THREAD
- FABRIC - STITCHING
GUIDE
Needle
Fabric
Extremely heavy
tarpaulin, sacking,
canvas, duck, etc.
Heavy upholstery
fabric, ticking.
denim, leatherette
Medium heavy drapery
fabric, velveteen.
suiting, felt, terry, etc.
Medium broadcloth.
percale, gingham, linen.
chintz, taffeta, sheer
wool, shantung, etc.
Sheer voile, lawn.
dimity, crepe.
handkerchief linen.
plastic film, etc.
Very sheer chiffon.
batiste, lace, organdy. 00
ninon, net, marquisette, etc.
No
4
3 to
2 to
1
1 to
0 to
Machine
Stitches Cotton
Per Inch
6
to
8
8
10
10
12
12
14
14
16
(Plastic film)
8 to 10
16
to to
20 150
Thread
100
10
to
30
30
to
40
40
to
60
60
to
80
80
to
100
Mercerized
Thread
Heavy Duty
Heavy Duty
Heavy Duty
bO
50 A
50 A
Silk
or
Nylon
*
A
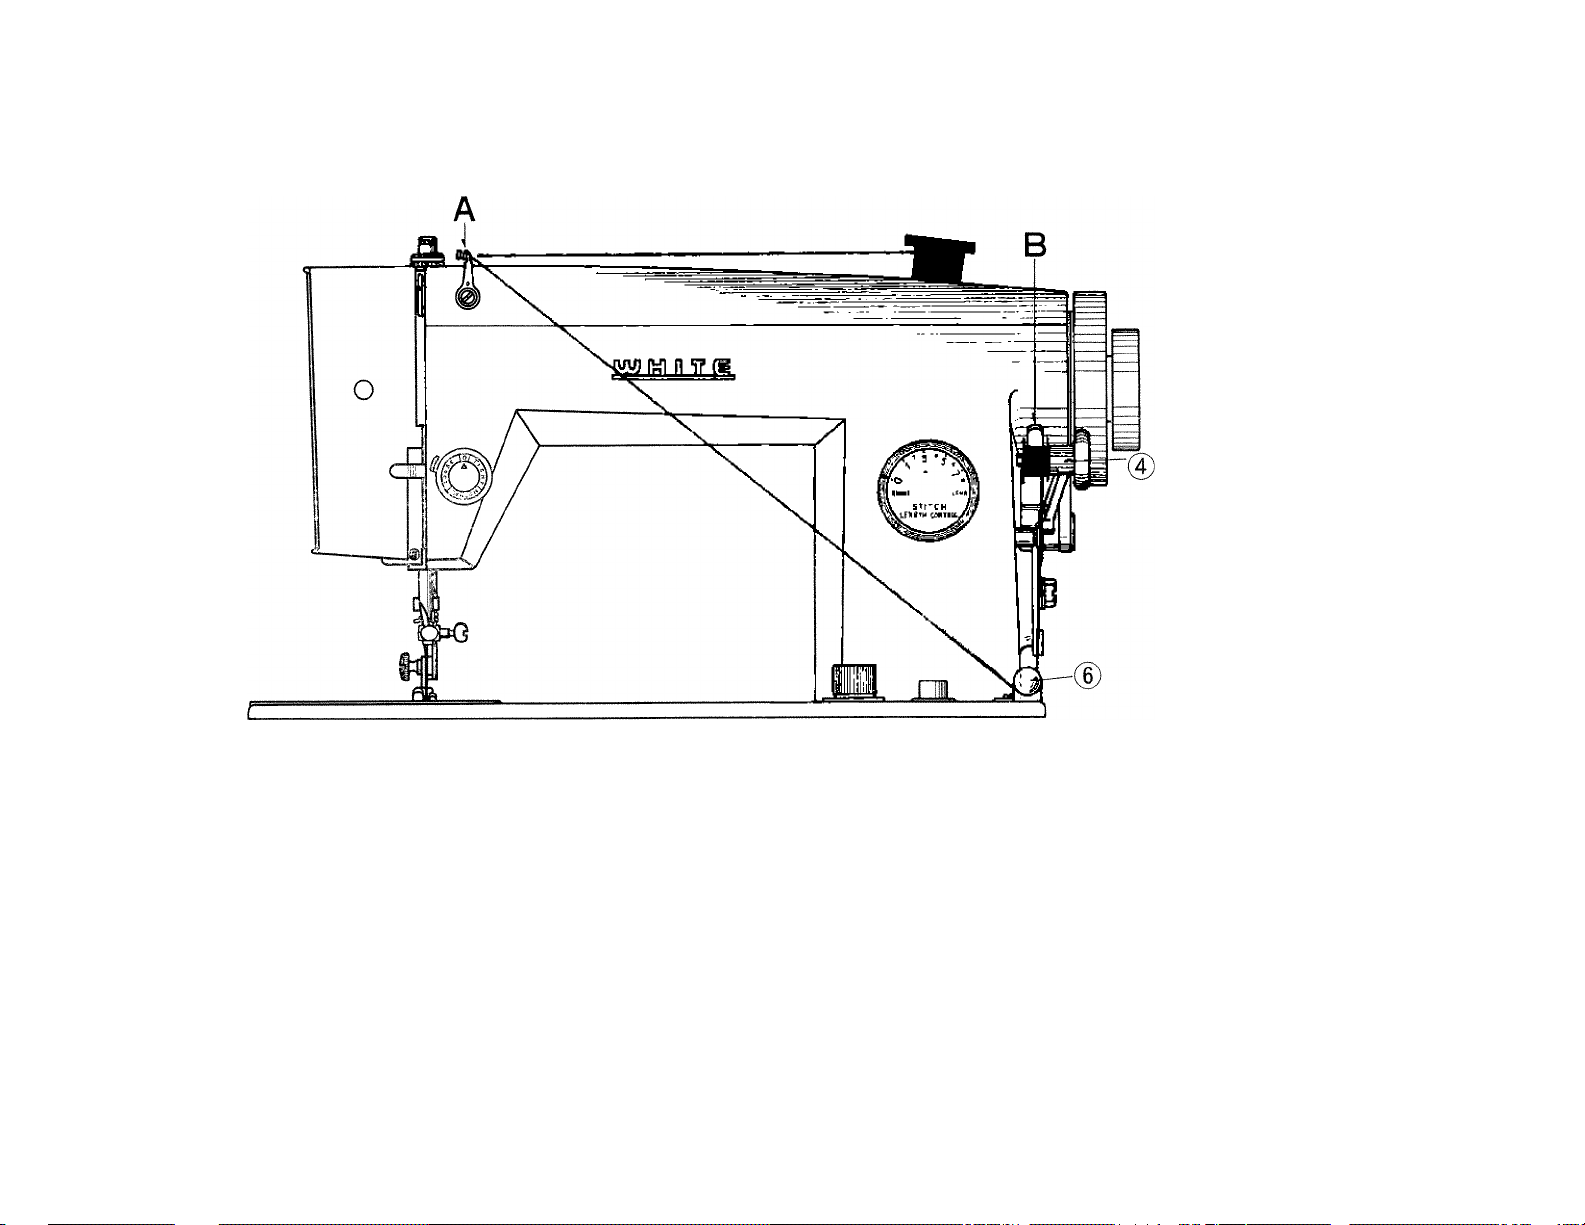
Fig. 3
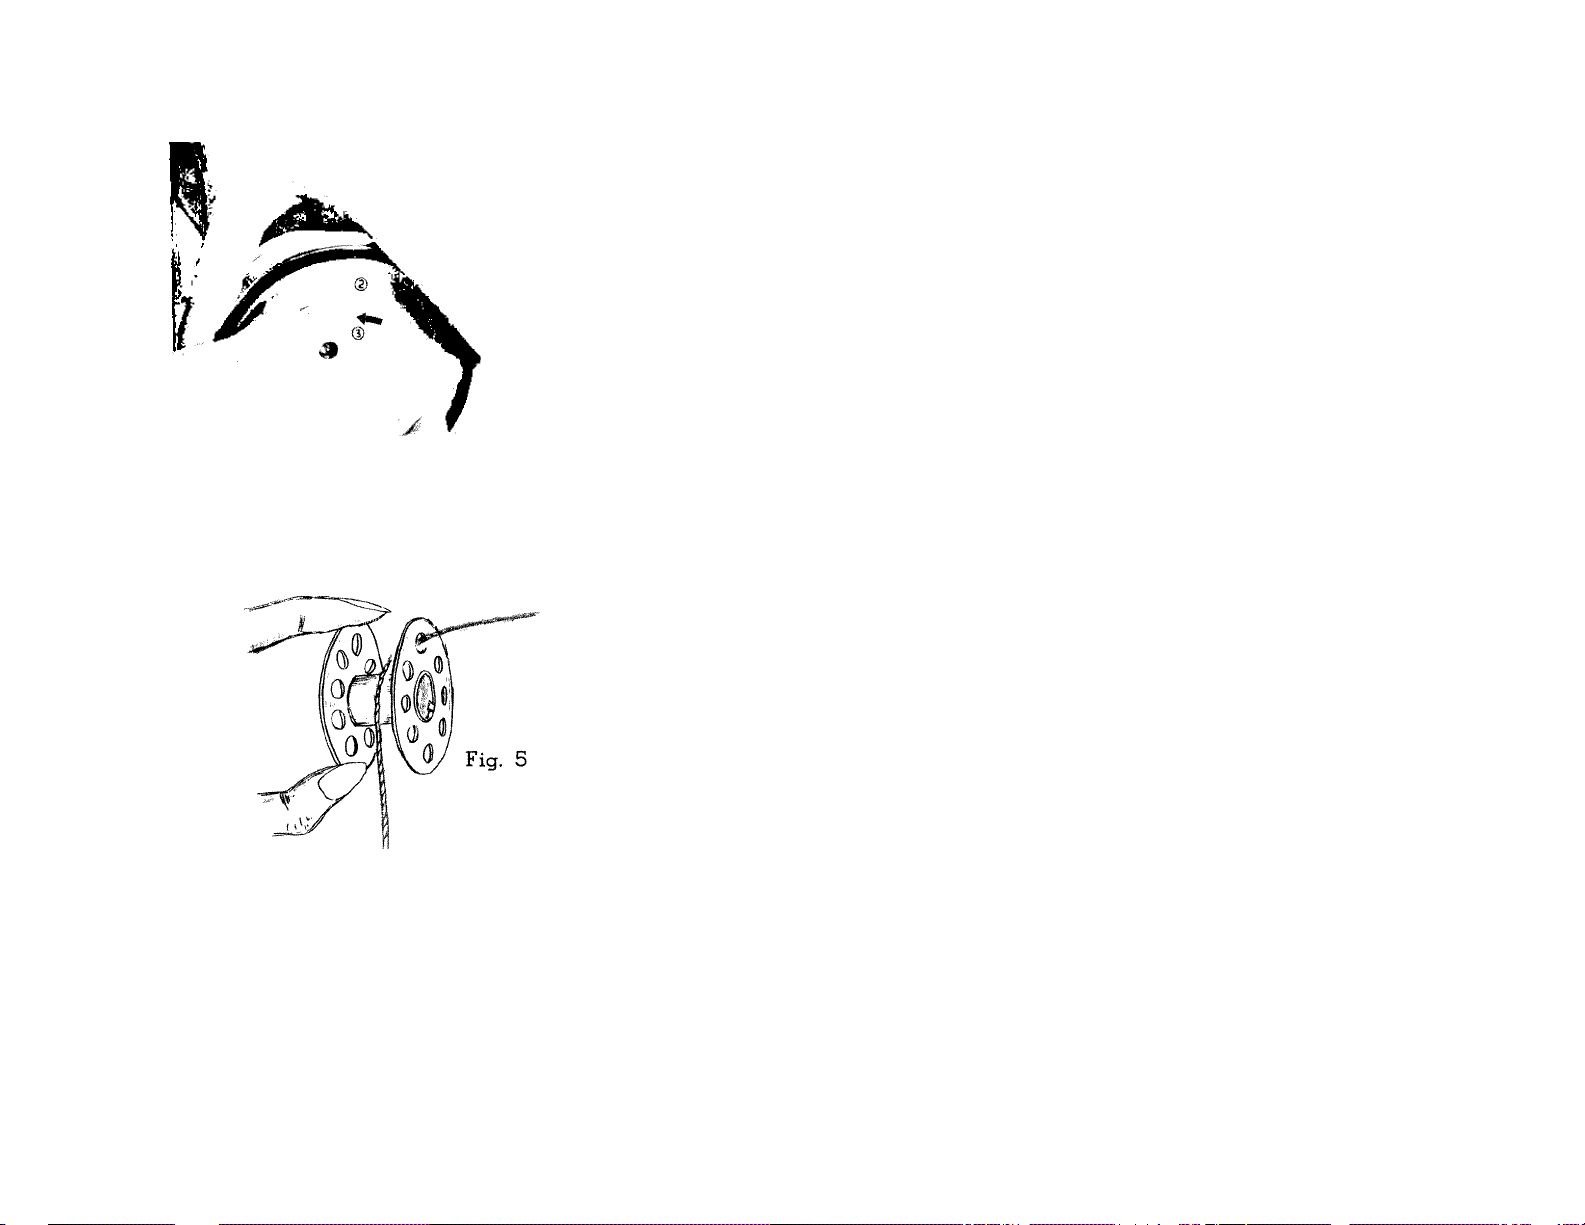
Fig. 4
WINDING THE BOBBIN
Disengage the hand wheel (2, Fig. 4) from the
stitching mechanism by turning clutch (3, Fig. 4)
toward you or counter-clockwise.
Place a spool of thread on one of the spool pins.
Lead thread through arm thread guides, (A, Fig.
3) and down between tension disc, 6, at the base
of the machine.
Put end of thread through a hole in bobbin
flange (Fig. 5) frcm inside to outside and place
bobbin, (B, Fig. 3) on spindle of bobbin winder (4,
Fig. 3) fitting the notch in bobbin over small pin
on spindle.
Push bobbin winder pulley against hand wheel.
Hold thread end loosely and start machine slowly.
Bobbin will be released when filled.
Hold the hand wheel and turn clutch away from
you until sewing mechanism is engaged so that the
needle moves up and down when you turn the hand
wheel.
Break off loose thread end used to start the
winding.
 Loading...