

SINGER W130 User Manual
Hc»w^ То^-
, •*;, *,►■■►—, 441*'. К,'
Zigzag Sewing Machine
¡i 1Й->'i.*v. ••■• ■ 1 • ':*5» •••’■• -•îÿ’-'Vÿ» ^, '¿-r*'
л> • u . t ■ ^ Î-'
....................
.....
. M: \ MODEL 130
r *TT—• * « V*

CONTENTS
MACHINE A.ND FEATURES.........(Front)
BELT ADJUSTMENT
...................................................................
REPLACING NEEDLE ..................................................................
RE.MOVING BOBBIN CASE .......................................................
WINDING BOBBIN .......................................................................
ADJUSTING BOBBIN WINDER ..................................................
THREADING BOBBIN CASE
......................................................
REPLACING BOBBIN CASE .......................................................
THREADING MACHINE
PREPARING TO SEW
..............................................................
..................................................................
ADJUSTING UPPER THREAD TENSION ..................................
ADJUSTING BOBBIN THREAD TENSION
13
ADJUSTING FABRIC FEEDERS
14
ADJUSTING PRESSURE OF THE PRESSER FOOT
15
REGULATING STITCH LENGTH
16
ZIG Z.AG SEWING
.................................................
Regulating Width of Stitch
Locking Zig Zag Regulating Lever
Making Patterns
.....................................................
CLEANING SHUTTLE AND RACE ASSEMBLY .'
18.
OILING MACHINE ........................................................................
BUILT IN LIGHT
19,
ACCESSORIES ..............................................................................
20.
.......................................................................
A. Needle Plate & Presser Foot for Straight Sewing
B. Cloth Guide ...............................................................................
C. Zipper Foot ................................................................................
D. Buttonhole Foot .........................................................................
21
BLIND HEMMING .........................................................................
nn
APPLIQUEING
23
EMBROIDERING AND MONOGRAMMING ............................
25
SEWING ON BUTTONS
26
NEEDLE SIZES ....................................................................
27
CAUSES OF COMMON DIFFICULTIES ...........................
28
MEMO ...............................
..............................................................
.....................................................
...............
..................................
(Back)
................................
................................
..............................................
..............................................
.................................
.................
13 &
....................
.....................
.
Pase
j>
"i
o
4
5
5
6
6
9
9
10
14
15
16
..
16
17
18
18
18
19
20
20
21
22
3&
24
25
26

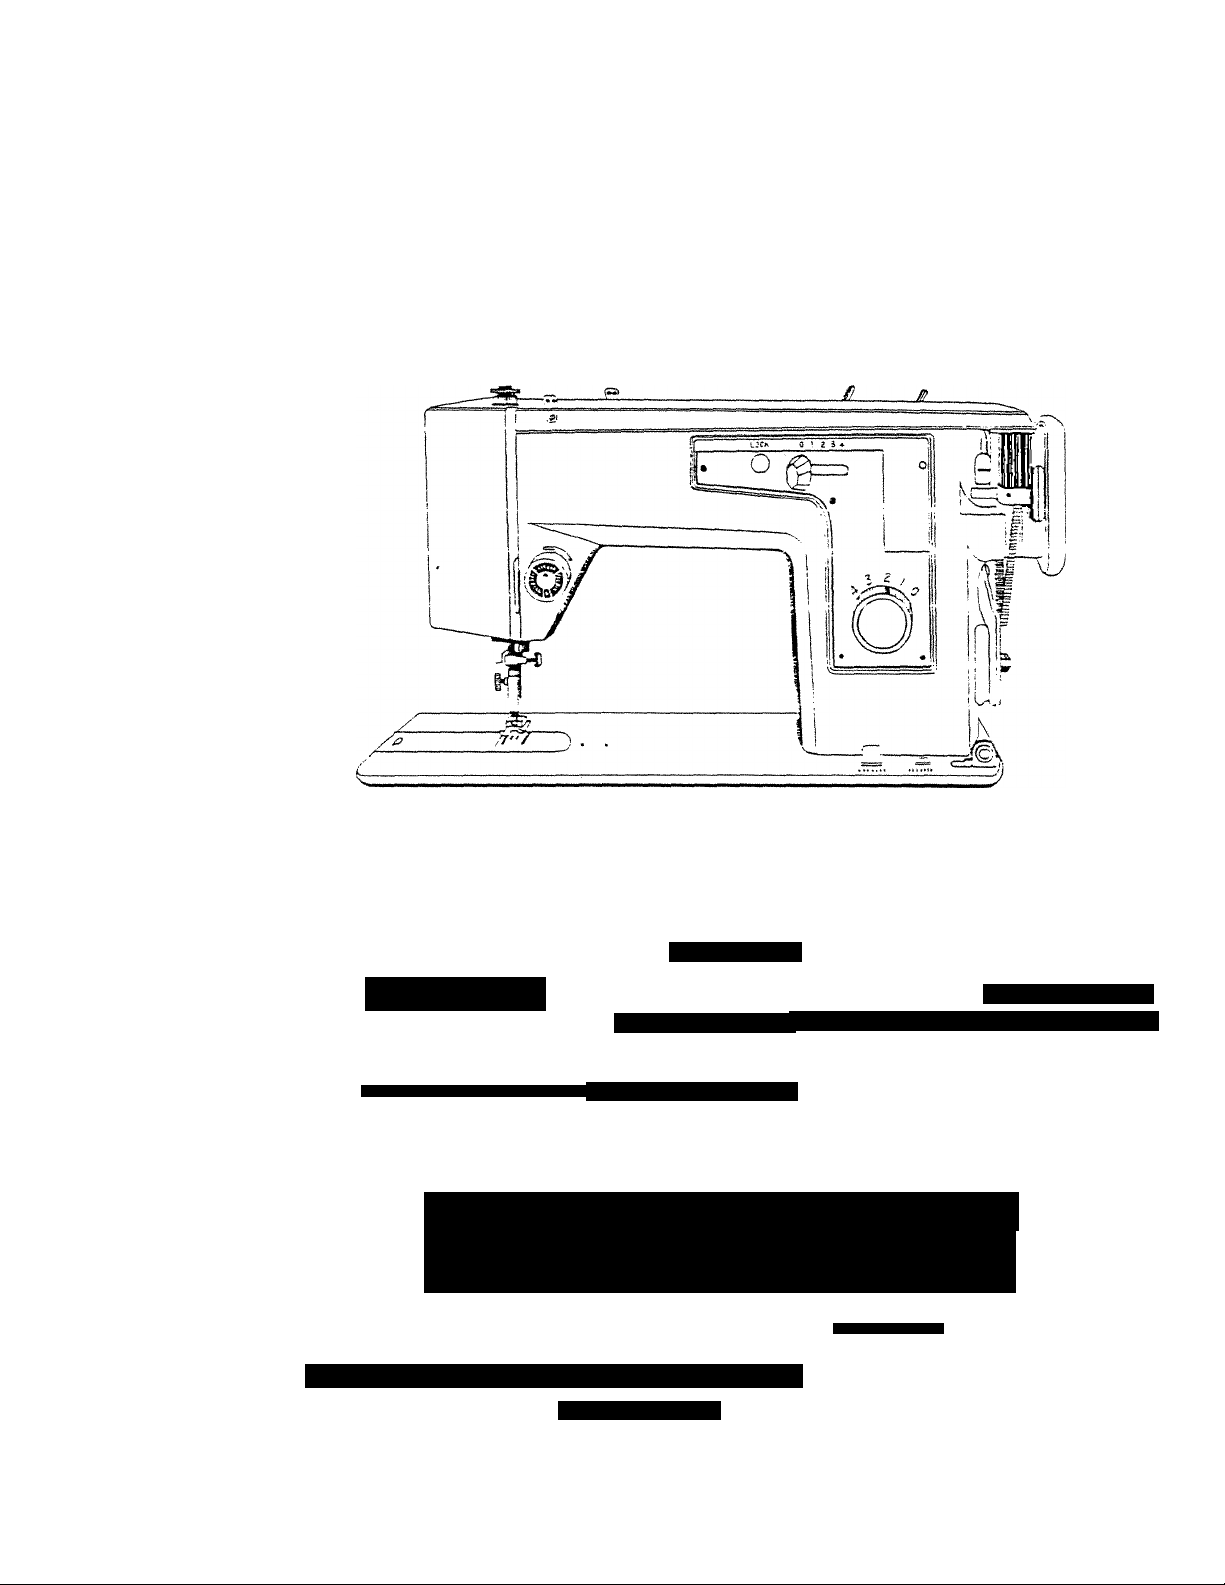
1. MA CH I NE A ND F EA TU RE S
®(D (D
U
•M-v
0 ®
Fic. 1
FRONT
Pressure release (darning)
1.
2.
Thread guide for top cover
Top cover 12.
3.
Zigzag indicator
4,
Bobbin winder
5.
Fly wheel
6.
Clutch nut
7.
Stitch length indicator
8.
Stitch length control dial
9.
10.
Reverse button
Bobbin winder tension
11.
Drop feed buttons
Needle plate
13.
Cover plate (Slide plate
14.
Thread guide
15.
Tension
16.
Take up
17.
Face plate
18.
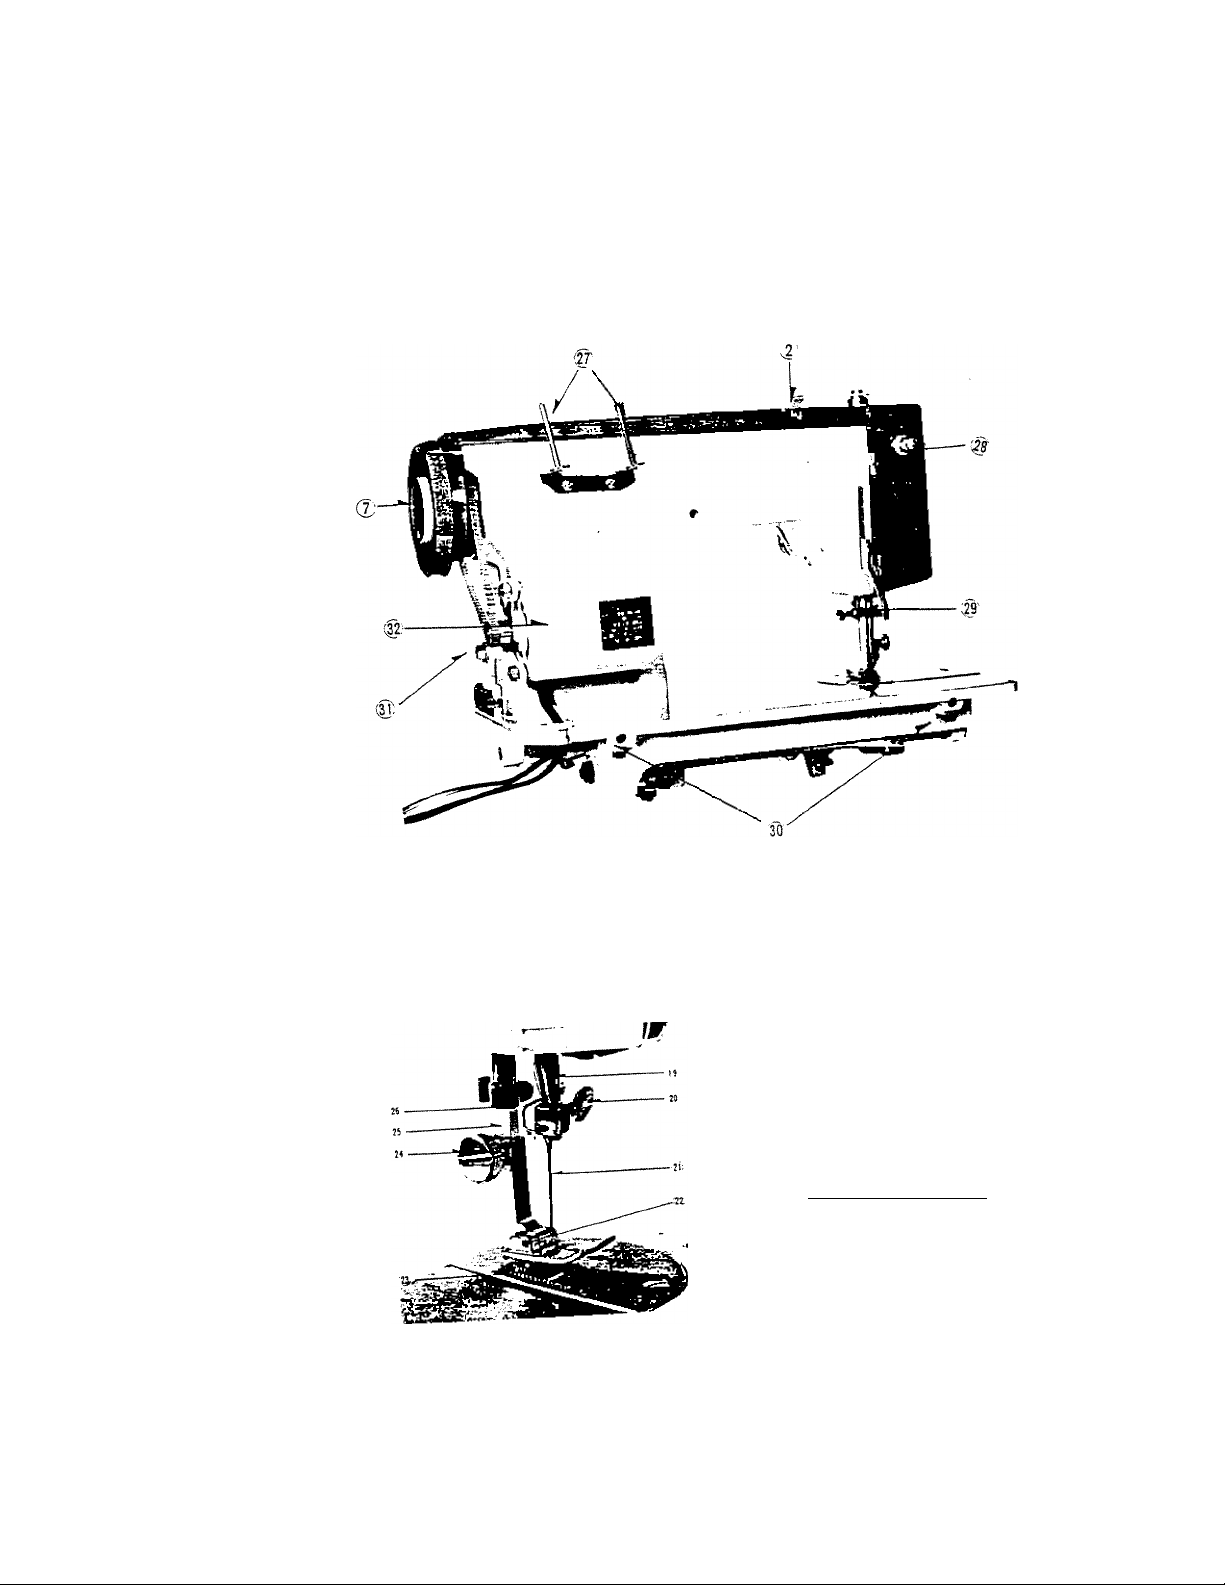
Fig. 2
Fig. 3
Fie.
19. Needle bar
20- Needle clamp
21. Needle
22. Presser foot
23. Fabric feeders
24. Presser fool clamp screw
25. Presser bar
26. Thread cutter
RACK (Fig. 3)
27. Spool pins
28. Li#U switch
29. Presser bar lifter
30. Head hinge mounting holes
31. Motor set screw
32. Motor
___
Fia. 4
2. BE LT A DJ US T ME NT
Loosen motor bracket screw (A).
Slide motor bracket down to tighten
- up to loosen.
CAUTION : Do not tighten belt
too tight.
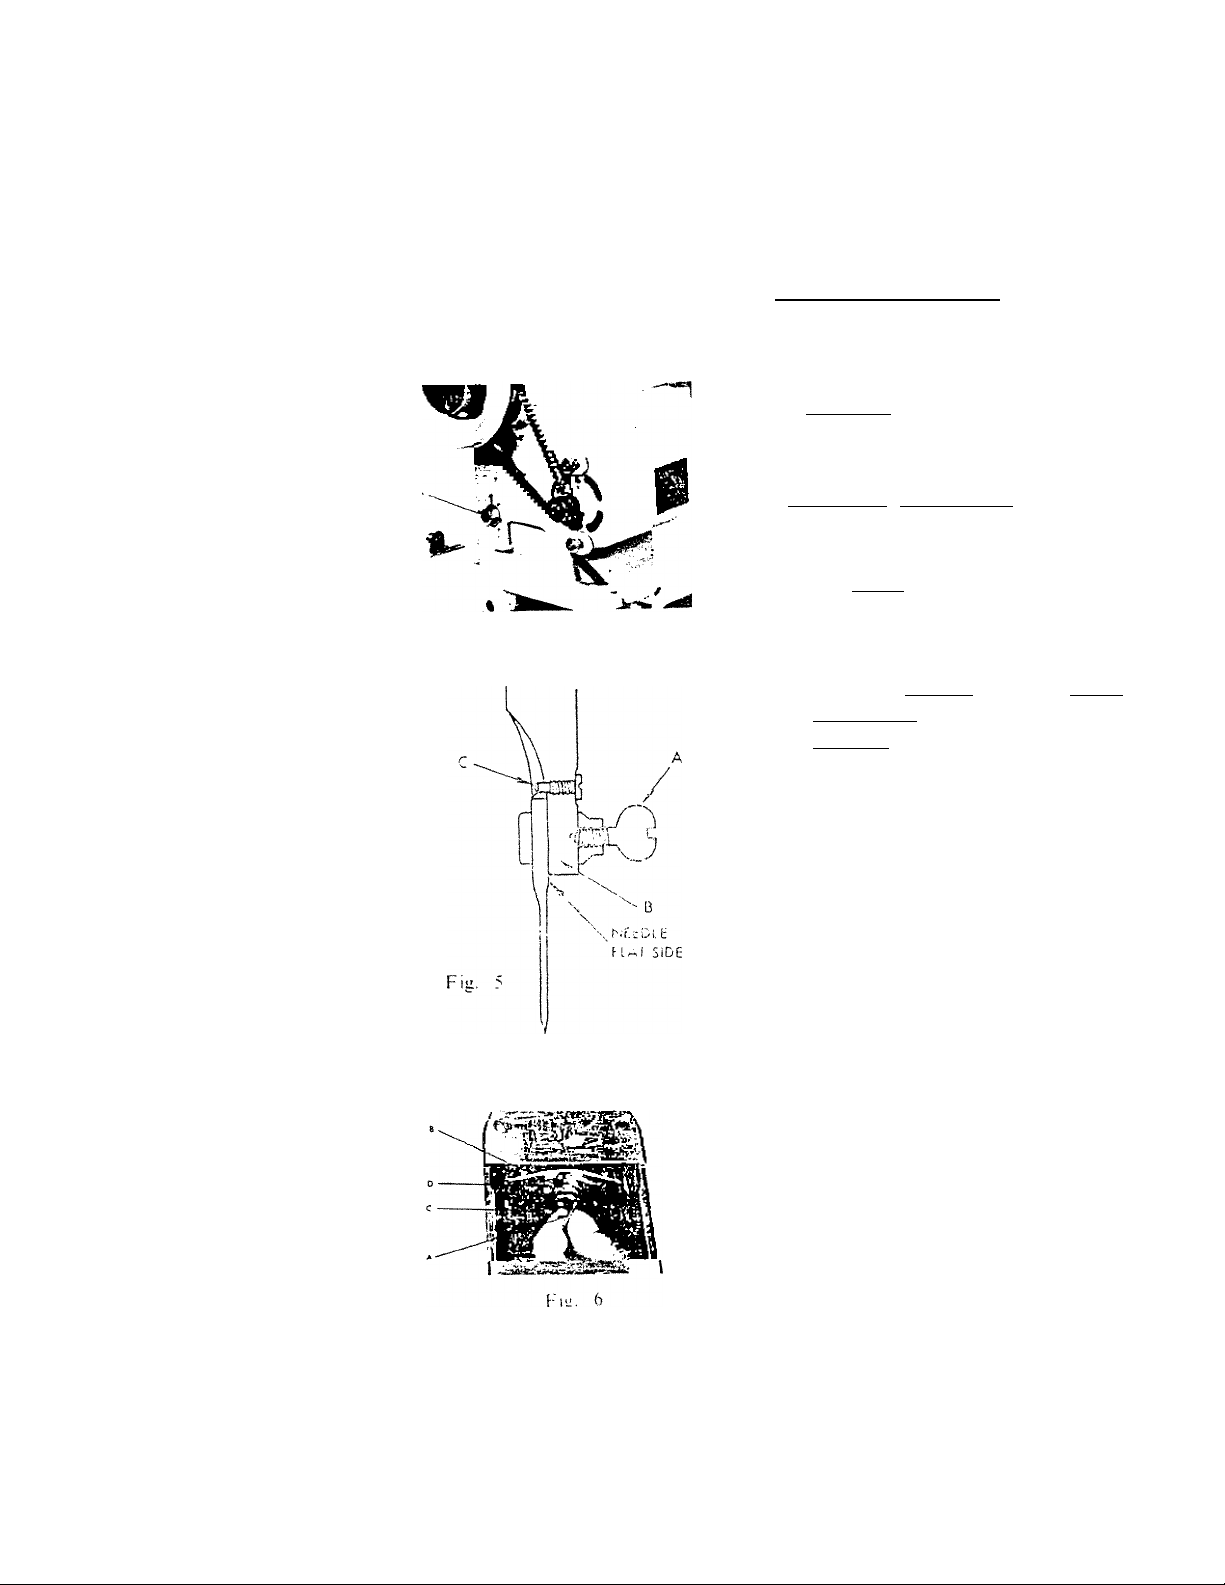
3. RE PL AC IN 8 N EE DL E
1. Raise the needle bar to its highest
position. (Turn the fly wheel by
hand toward you.)
2. Loosen needle clamp screw (A) and
remove old needle.
3. Insert the needle into needle bar (B)
with the flat side of the needle toward
the fly wheel.
C.AUTION ; Be sure the needle is
all the way up. It should rest against
the needle stop pin (C).
4. Tighten the needle clamp screw se
curely with screw driver.
C.AUTION ; Check needle and make
sure it is not bent or dull.
4
. m]mm
Raise ihe needle bar to its highest
position. (Turn the fly wheel toward
you b}' hand.)
thumb and forefinger, open the latch
(A) of the bobbin case (B).
Remove bobbin case from the spindle
post (C). (Pull to the left.)
NOTE : With the latch held open,'
the biihbin is locked inside the
bobbin case. To remove bobbin from
the bobbin case, release the latch.
b ob bi n c as e
Open slide plate. With the left
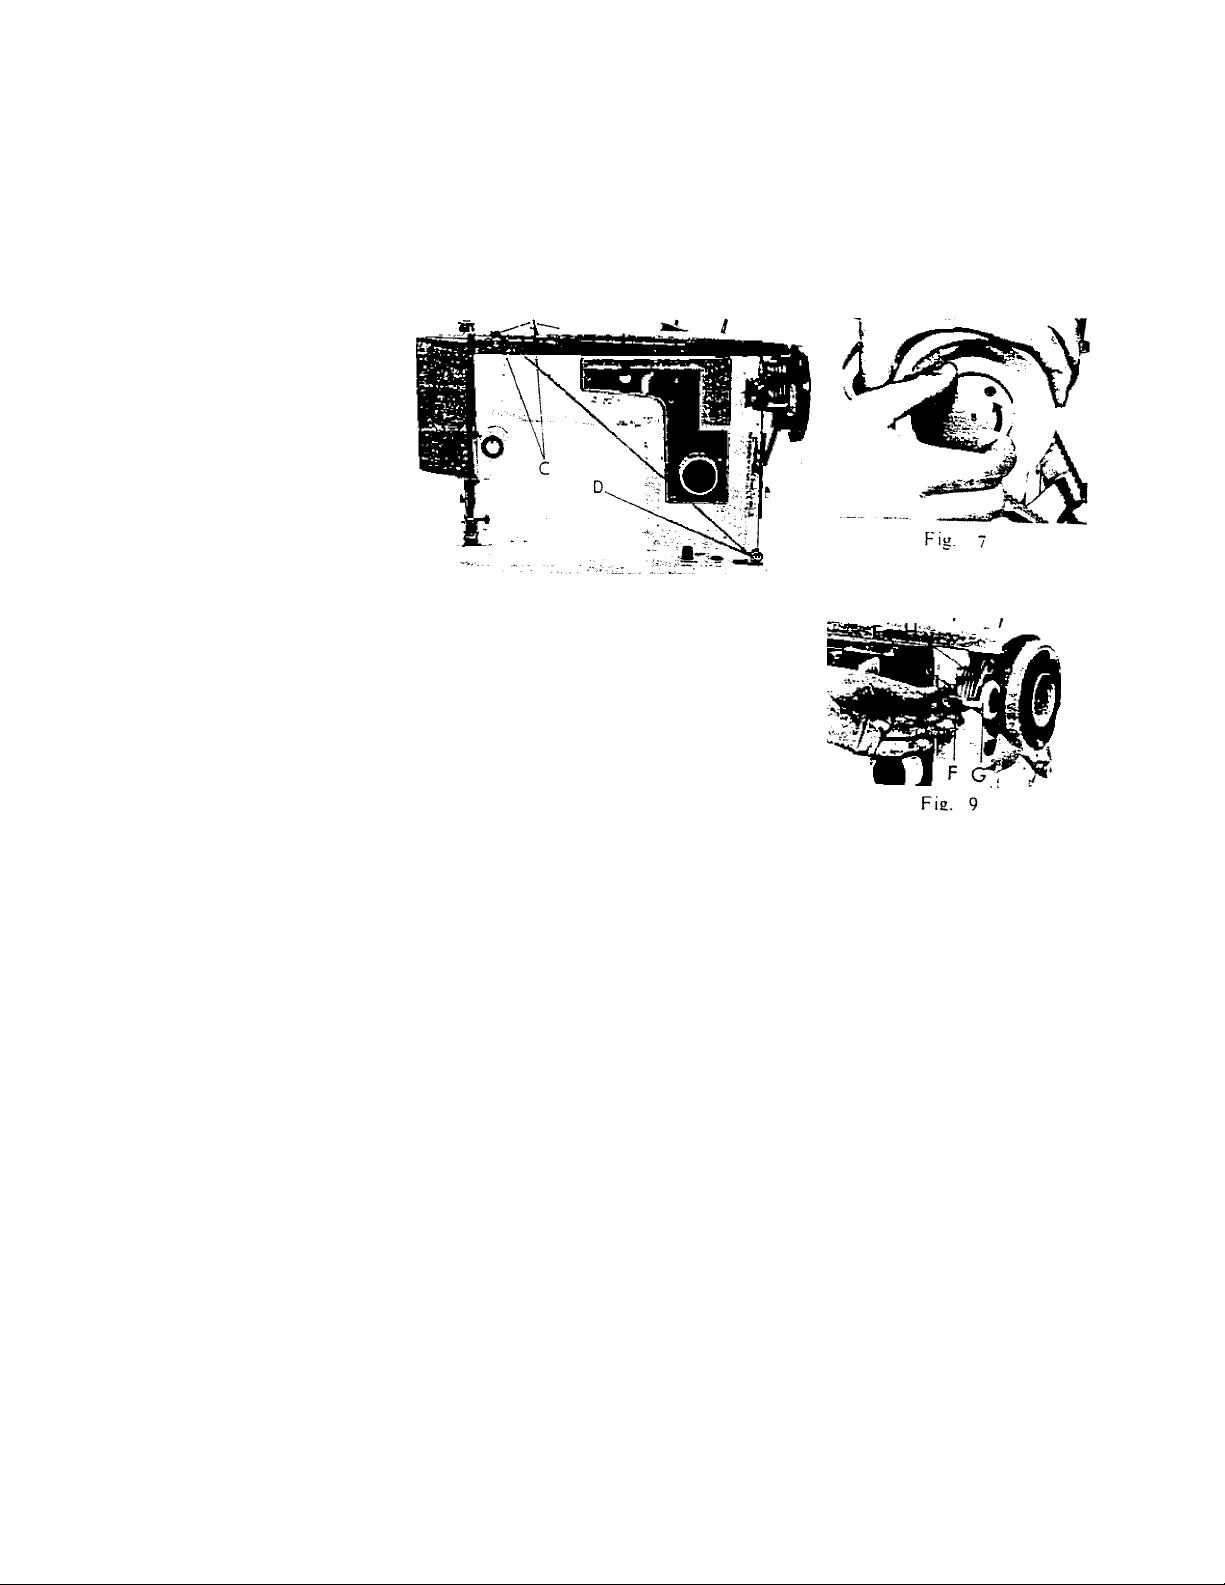
Fig. 8
5. W IN DI NG B OB BI N
1. Hold the fly wheel (A) Fig. 7 with the left
hand and turn the cluch (B) Fig. 7 toward
you to release the clutch. By doing this, the
fly wheel turns freely.
note : If the needle moves, the dutch is
not completely released.
2. Place thread on the spool pm and guide the thread through the upper thread
guide (C) Fig. 8. Then bring the thread across the machine and under the
bobbin winder thread guide (D) Fig. 8.
3. Wind the thread several times on the bobbin (E) Fig. 9. Now place the bobbin
on the spindle (F) Fig. 9 of the bobbin winder.
I^OTE : The lock spring on the spindle must fit into the slot in the bobbir
This IS done by holding the rubber ring (G) Fig. 9. with the right hand and
turning the bobbin with the left hand until the lock spring slips into the slot
ot the bobbin.
4. Pu.sh the cover fH) Fig. 9. of the bobbin winder down until the rubber ring
(G) Fig. 9 is brought in contact with the fly wheel.
5. Turn the fly wheel slowly, tov^ you; then operate the machine as in sewing
when the bobbin is full, it will stop,
6. Remove the bobbin from the spindle, then reengage the machine by holding
e fly wheel with the left hand and with the right hand turn the clutch away
irom you.
NOTE : Make sure you tighten firmly.
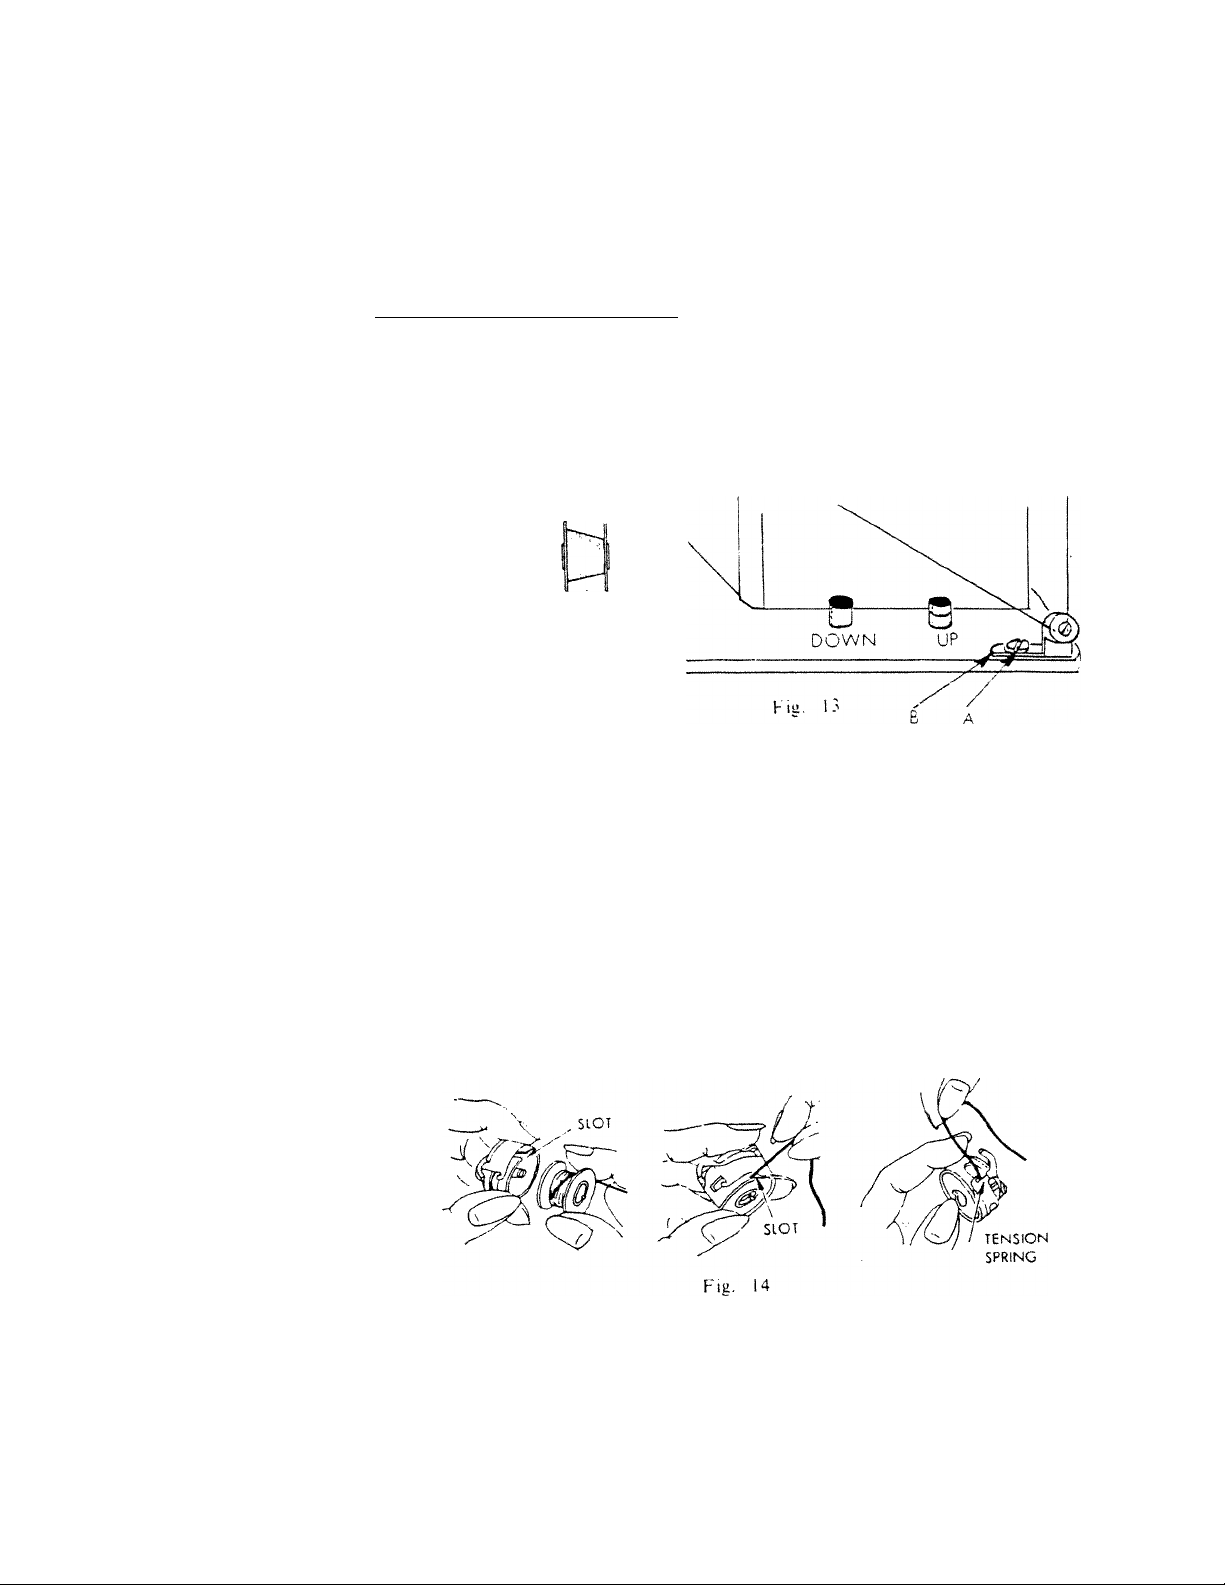
6. ftP iU ST IN G B OB BI N WI ND ER ,
1. If the thread winds unevenly on the bobbin as'shovvn in Fig. 11 and 12, loosen
screw (A) Fig. 13 and adjust the bobbin winder thread guide bracket (B) Fig. 13.
2. If the thread winds as in Fig. 11, move the bracket slightly to the left. If the
thread winds as in Fig. 12, move the bracket slightly to the right.
Fig. JO Fig. 11 Fig. 12
?. T HR EA D IN G BO BB IN C AS E
1. Hold the bobbin case between the left thumb and forefinger with the slot up.
With 5 or 6 inches of thread trailing in the palm, hold the bobbin between
the thumb and first two fingers of right hand.
2. Insert the bobbin into the bobbin case, then pull the trailing thread into the
slot, up to the loft until it enters the delivery eye under the tension spring.
There should be a slight tension on the thread as it pulls through the delivery eye.
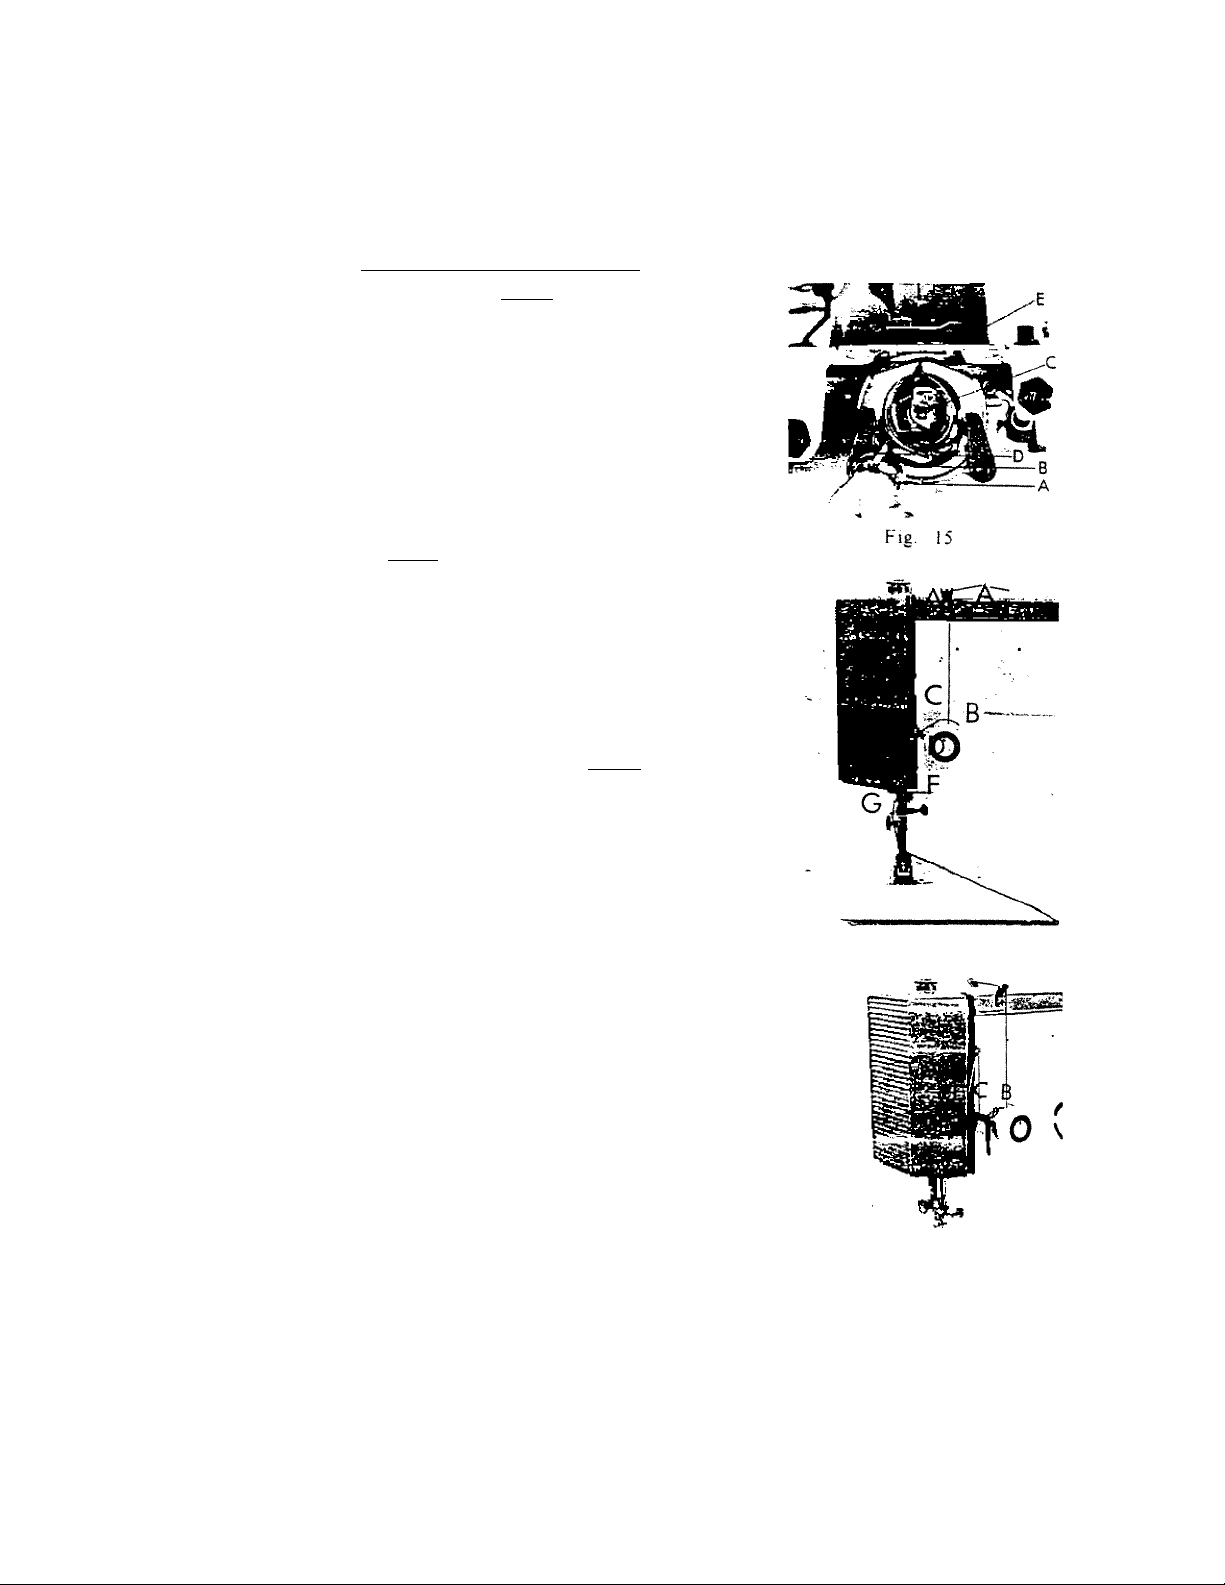
8. RE PL AC IN G BO BB IN CA SE
1. Turn fly wheel toward you by hand
until the needle bar is at its highest •
position, and open the slide plate.
Draw about 3 inches of thread from
the bobbin and let it hang loosely
from the bobbin case.
2. With the left thumb and forefinger,
hold the latch (A) of tlie bobbin case
(B) and place it on the spindle post
(C) . (Fig. 6)
NOTE : The protruding finger (D)
must slide into the delivery eye (E)
at the top of the shuttle.
3. Release the latch and press the bobbin
case to the right until it catches the
groove on the spindle post.
9. THREADING MACHINE
1. Turn the fly wheel toward you and
raise the take up lever (E) to its highest
position. Place thread on the spool pin
and bring the thread through the upper
thread guide (A).
2. Bring the thread down through the
thread guide to the tension disc (B)
from right to left and up. Then pull
the thread up through the thread take
up spring (C).
3. Bring the thread under the thread
tension guide (D) and thread the take
up lever (E) from right to left.
4. Bring thread down througli the thread
guide (F) at the opening in the face
plate, and through the needle bar
thread guide (G) from behind. Thread
the needle from left to right, leaving
about 5 or 6 inches of thread.
Fig. 16
F ig. 17
10 . P R EP AB iN G TO S EW
1. Hold the loose end of the needle thread
in your left hand, and turn the tly
wheel toward you by hand until the
needle moves down through the needle
plate and up again to its highest position.
Pull the needle thread gently, and the
bobbin thread will come up with it
through the hole in the needle plate.
Then place both ends of the thread
back between the toes of the presser foot.
NOTE : It the bobbin thread does
not rise, check to see if there is at
least 3 or 4 inches of bobbin thread
hanging loosely from the bobbin case.
2. Pull the two threads at least 5 inches
behind the presser foot. Place material
under presser foot, and lower the foot
with the presser bar lifter. Regulate
the stitch to the desired size and sew.
TO REMOVE MATERIAL, raise the
needle to its highest position and raise
the foot with the presser bar lifter, then
pul! the fabric back and to the left.
Cut the thread with the thread cuitcr
behind presser bar, leaving a few indies
of thread behind the presser foot.
 Loading...