

Page 1
Page 2

Table of Contents page
1. Features and Parts
Principle Parts.............................................................1-2
Accessories
U. Installation of Machine Head
Portable Case................................................................. 4
Cabinet
..........................................................................
III. Preparing Machine to Sew
Winding the Bobbin...................................................... 5
Lower Threading
Upper Threading........................................................... 6
rv. Choosing the Right Needle ........................................7 — 9
Types of Needles .......................................................... 3
Needle — Thread — Fabric Chart
Changing the Needle..................................................... 9
Changing the Needle Plate
V. Getting to Know Your Sewing Machine. . . iQ-14
Adjusting the Stitch
Stitch Length Dial
Reverse Button
Stitch Width Lever
Relating Stitch Length to
Stitch Width .......................................................10
Pattern Selector
Needle Position
Adjusting for the Fabric.......................................12—13
Feed Dog Control
Pressure Control
Tension Dial ......................................................13
Adjusting the Tension
The Proper Presser Foot ..............................................14
Changing the Foot
The All Purpose Foot
The Straight Stitch Foot......................................14
The Embroidery Foot
The Buttonhole Foot ..........................................14
VI. How to Sew
Pinning ........................................................................15
Placement of Fabric/Starting a Seam....................15
Guiding the Fabric ......................................................15
Etched Seam Guide............................................15
Cloth Guide .......................................................15
Presser Foot as a Guide......................................15
Holding the Fabric ......................................................15
Turning Comers...........................................................16
Curved Seams .............................................................16
Sewing Across Heavy Seams
Ending a Seam/Removal of Fabric
VII. Applications of the Straight Stitch
Seams ..........................................................................12
Basting/Topstitching....................................................17
Darning........................................................................17
Elastic Thread Shirring................................................17
VIII. Applications of the Zigzag Stitch
Overcasting..................................................................18
Seaming Knits
Sewing on Buttons ......................................................18
Forming a Thread Shank
Satin Stitching .............................................................19
Tanerins ......................................................................19
............................................ 1 - 3
.................................................................
.........................................
.........................................
..........................................................
..............................
......
....................................
............................................
..............................................
...................................................
.............................................
..................................................
..................................................
..............................................
................................................
........................................
..............................................
........................................
.........................................
........................................................
.....................................
..............................
.............................
.........................
.............................................................
.............................................
5 — 6
10—11
15—16
3
10
10
10
11
11
12
18-21
Manual Embroidery Designs
Freehand Monogramming
Applique............................................................................20
4
4
5
8
9
12
13
14
14
14
16
16
17
18
18
Gathering Over a Cord.....................................'................21
Lace Application
Flutter Hem ......................................................................21
DC. Buttonholes
Preparation........................................................................22
Built-in Buttonhole...........................................................22
Tum-around Buttonhole
Corded Buttonhole............................................................24
Stretch Buttonhole............................................................24
X. Applications of the Blind Hem Stitch
Hemming .........................................................................25
Shell Tuck.........................................................................26
Decorative Effects
XI. Applications of the Multiple Stitch Zigzag. . .27-28
Overcasting.......................................................................27
Patching............................................................................27
Mending a Tear/Daming
Elastic Application ..........................................................28
Understitching Facings .................................................. 28
Decorative Effects............................................................28
XII. Applications of the Overlock Stitch .........................29—30
Seams
...........................................................................
Nylon Tricot Seams..........................................................29
Applying Elastic ..............................................................29
Ladder Stitch
Hemstitching
Topstitching ................................................................... 30
XIII. Applications of the Straight Stretch
Stitch................................................................................31
Seams ..............................................................................31
Topstitching .....................................................................31
XiV- Applications of tne oiira Siretcn Stucn
Seams
..............................................................................
Elastic Application ..........................................................31
XV. Use of the Accessories
Twin Needle Sewing Effects ...........................................32
Pin Tucks
Decorative Designs ................................................32
Yam and Cord Sewing.....................................................33
Zipper Foot/Zippers/Cording ..........................................33
Quilting Guide
;AA. ..c.iaumoZpcc:;.: ..c.cs .....................................................34
Roller Foot
Overcast Foot
Blind Hem Foot................................................................34
Rolled Hem Foot .............................................................34
Fringe Foot.......................................................................34
XVn. Care and Maintenance of Your
Sewing Machine
Changing Needles ...........................................................35
Cleaning...........................................................................35
Procedure for Oiling
Changing the Light Bulb
XVin. Minor Problems and Their Solutions................................37
..............................................................
..............................................................
............................................................
....................................................................
....................................................................
...............................................................
.................................................................
.......................................................................
...................................................................
......................................................
............................................
................................................
...................................................
......................
.................................................
...........................
.............................................
........................................................
......
..........................................
page
19
20
21
22—24
23
25—26
26
27
29
30
30
31
31
32—33
32
33
34
34
35—36
35
36
Page 3
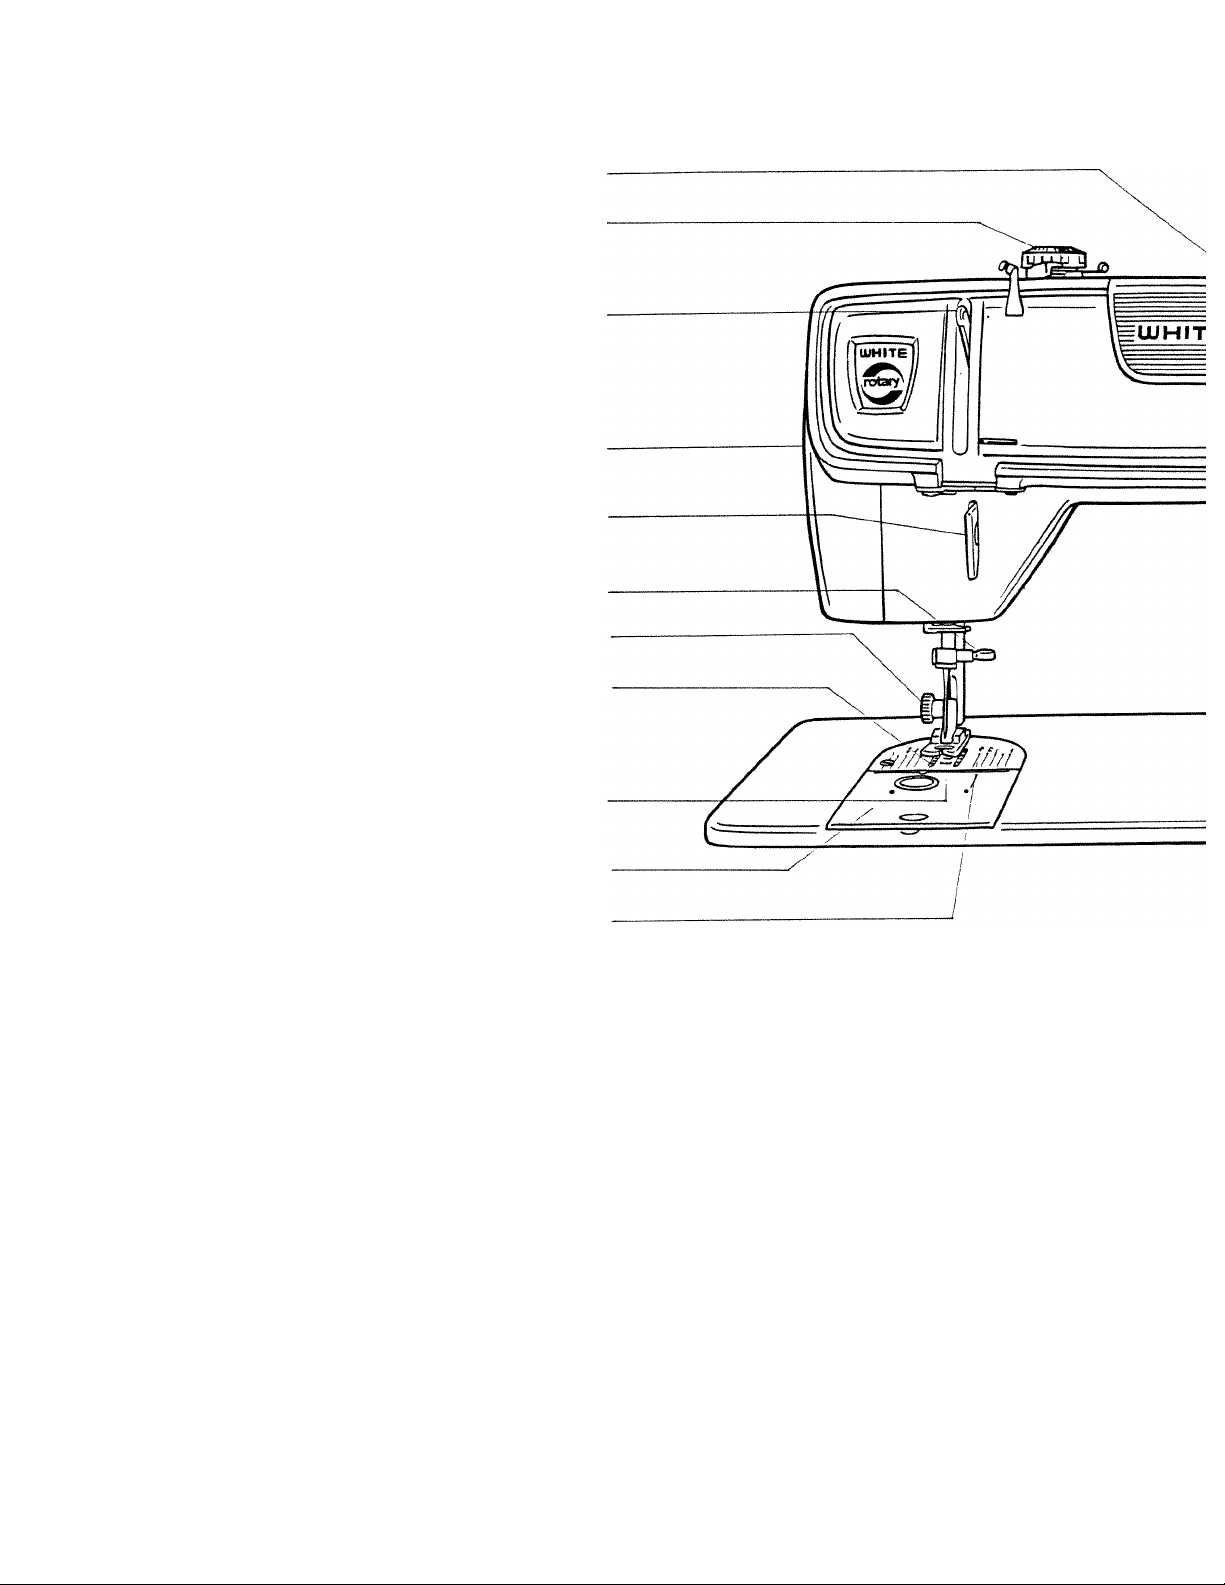
I. Feattires and Parts
Principle Parts
Picture Window
pictures the stitches and allows for easy selection.
regulates the amount of tension on the needle
thread.
regulates the flow of thread throu^ the needle.
It has an open-slot to simplify threading. The take
up lever should always be in its highest position
when beginning or ending sewing.
Descriptive Tension Dial
Take-Up Lever
opens to the left. Allows easy changing of the
light bulb.
helps control the flow of thread through the
needle.
Needle Clamp Screw
holds the needle in place.
holds presser foot in place.
Diamond Point Feed Dog
moves the fabric after each stitch is formed. The
diamond points give a gentle feed for delicate
fabrics as well as an accurate feed for heavy
fabrics.
holds the fabric in place for sewing. Various feet
are given in the accessory box.
slides open for changing the bobbin.
has guide lines on the left and right for greater
sewing accuracy.
Face Plate
Check Spring
Thumb Screw
Presser Foot
Slide Plate
Needle Plate
controls the raising and lowering of the presser
foot. It has an extra lift for the placement of
heavy fabrics.
is located on the back of the presser bar for
convenience.
hold aU types of spools effectively and eliminates
over-spin of lightweight spools.
Presser F oot Lever -
Thread Cutter-
Spool Pins and Caps
Page 4
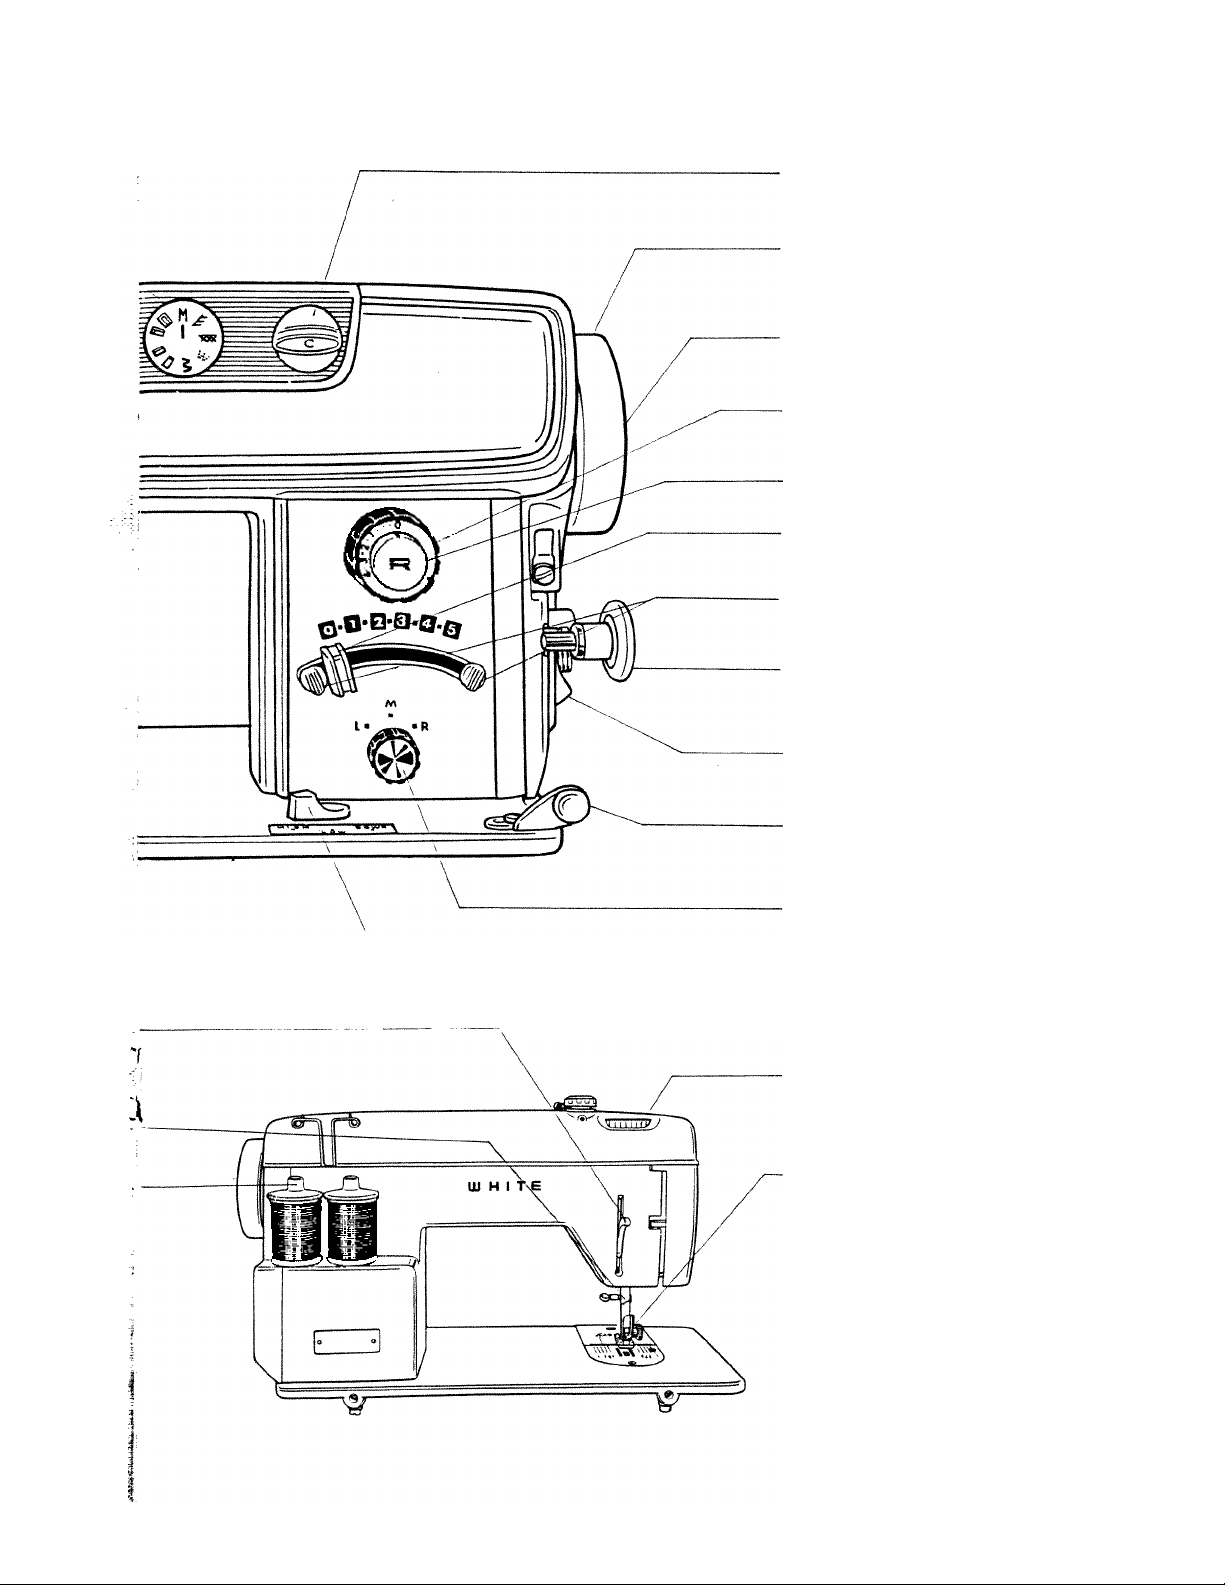
Pattern Selector
selects the stitch shown above the indicator in the
picture window.
Hand Wheel
controls the up and down movement of the needle
bar. Always turn it toward you.
Coupling Wheel
releases the movement of the needle bar in order
to wind a bobbin.
Stitch Length Dial
allows for precise adjustment of stitch length from
very fine to very long.
Push Button Reverse
allows for easy backtacking to lock thread ends.
Stitch Width Lever
allows for precise adjustment of zigzag stitch
width as well as tapering.
Zigzag Width Lever Stops
left lock determines the minimum width stitch,
while right lock controls the maximum.
Bobbin Winder
automatically disengages from hand wheel when
bobbin is filled to the proper level.
Power Switch
turns on both the motor and light simultaneously.
Allows selection of high or low speed.
Bobbin Winder Tension Disk
controls the tension on the thread as the bobbin
is being wound.
Needle Position Dial
is variable and may be set in any position from the
left to the right.
ecu iyog ^oiUiO.
adjusts the height of the feed dog for special
sewing applications.
Pressure Control
controls the amount of pressure on the fabric. It is
numbered to make adjustment easier. Normal
pressure is # 5.
Foot Holder
holds the foot. It is easy to exchange the sole.
Page 5

Accessories
Your new White Rotary sewing machine comes equipped
with the following set of accessories to make your sewing
easier.
Four Metal Bobbins
The bobbins have holes in
one side for convenient bobb
in placement.
Needles
light ball point needles, two
each of sizes 11, 14 and 16
are provided. Two twin need
les are also included.
TSvo Felt Washers and Spool
Caps
Place felt washers on spool
pins under the spools and
place caps over the spools
tightly for best stitching re
sults.
(jilting Guide
Helps make parallel rows of
stitching.
Buttonhole Foot
Is adjustable and regulates
proper buttonhole length
every time.
Button Sewing Foot
To hold button in place for
stitching.
Cording and Zipper Foot
For stitching very close to the
edge of a cord or zipper.
Screw Drivers
Small one for use on bobbin
tension. Large one for use
on thumb screw, needle clamp
screw, etc.
Qoth Guide with Screw
Aids in creating straight
seams.
AU Purpose Foot & Zigzag
Needle Plate
For all utility sewing.
Straight Stitch Foot and
Straight Needle Plate
For straight stitching on
sheer or , very lightweight
materials where extra control
is needed.
Embroidery Foot
Has a wide groove on the
bottom which allows the foot
to pass over dense stitches,
such as satin stitches or other
decorative stitches. Do not
use this foot for normal
sewing of lightweight fabrics.
O
1** A
111
b=c
X
* —^
Tubed Oiler
For use in oiling the machine.
See page 34.
Seam Ripper
For cutting the openings in
buttonholes and for removing
stitches.
Bobbin Extractor
For easy removal of bobbin
from the bobbin case.
Lint Brush
For removing all lint.
Page 6
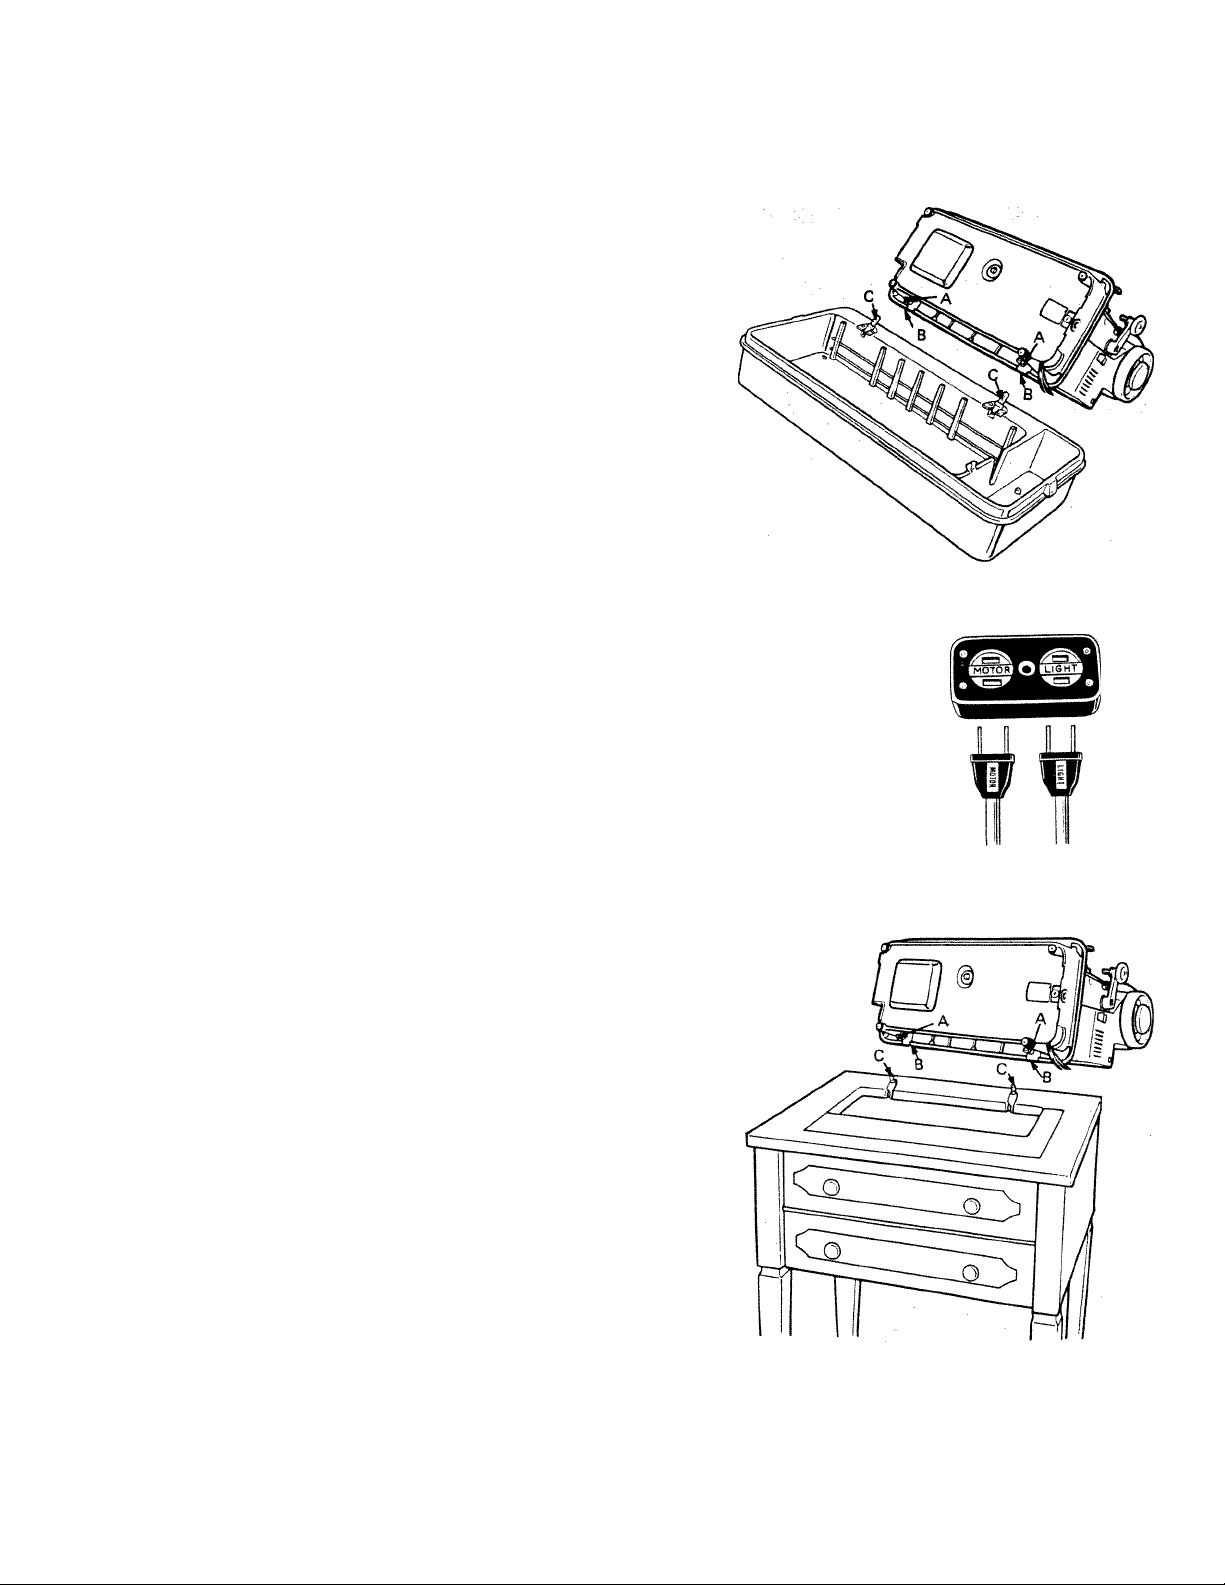
n. Installation of Machine Head
Portable Case
Lay the sewing machine unit face down on a
table. On the underside of the back of the
sewing machine are two clamping screws (A).
These enter the head hinge holes (B). Release
the clamping screws.
On the base of the portable case are two head
hinges (C). Lower the sewing machine onto
the base, fitting the hinges (C) into the holes
(B). Tighten the clamping screws securely
with a screw driver. Place machine in an
upright sewing position. Machine will snap
under portable case clamp securing it in
correct position.
Draw the two electrical leads through the slot
in the base. Plug cord labeled motor into the
receptacle marked motor on the block attach
ed to the outer section of the base. Insert the
other cord into the receptacle marked light.
Insert plug into a wall outlet. (110-115 volts)
Cabinet
Lay the sewing machine unit face down on a
table. On the underside of the back of the
sewing machine are two clamping screws (A).
These enter the head hinge holes (B). Release
the clamping screws.
On the cabinet are two head hinges (C). Tilt
them up and back as far as they will go.
(Hint: Stretch a rubber band across the two
hinges to help hold them upright while
mounting the sewing machine unit.)
Carefully lower sewing machine onto the
head hinges, making sure to insert the hinges
as far into the hinge holes as they will go.
With the sewing machine in its tilted position,
tighten both clamping screws securely with a
screw driver.
Plug the electrical leads into the sockets
located inside the cabinet. Plug the cord
labeled motor into the receptacle marked
motor on the block attached to the inside of
the cabinet. Insert the other cord into the
receptacle marked light. Insert plug into a
wall outlet. (110-115 volts)
NOTE: Where three wire grounding is
provided connect the plug from the sewing
machine to the connection leading from the
control. One prong is larger than the other
three, eliminating the possibility of error.
Insert plug into wall outlet. (110-115 volts)
Page 7
Ш. Preparing Machine to Sew
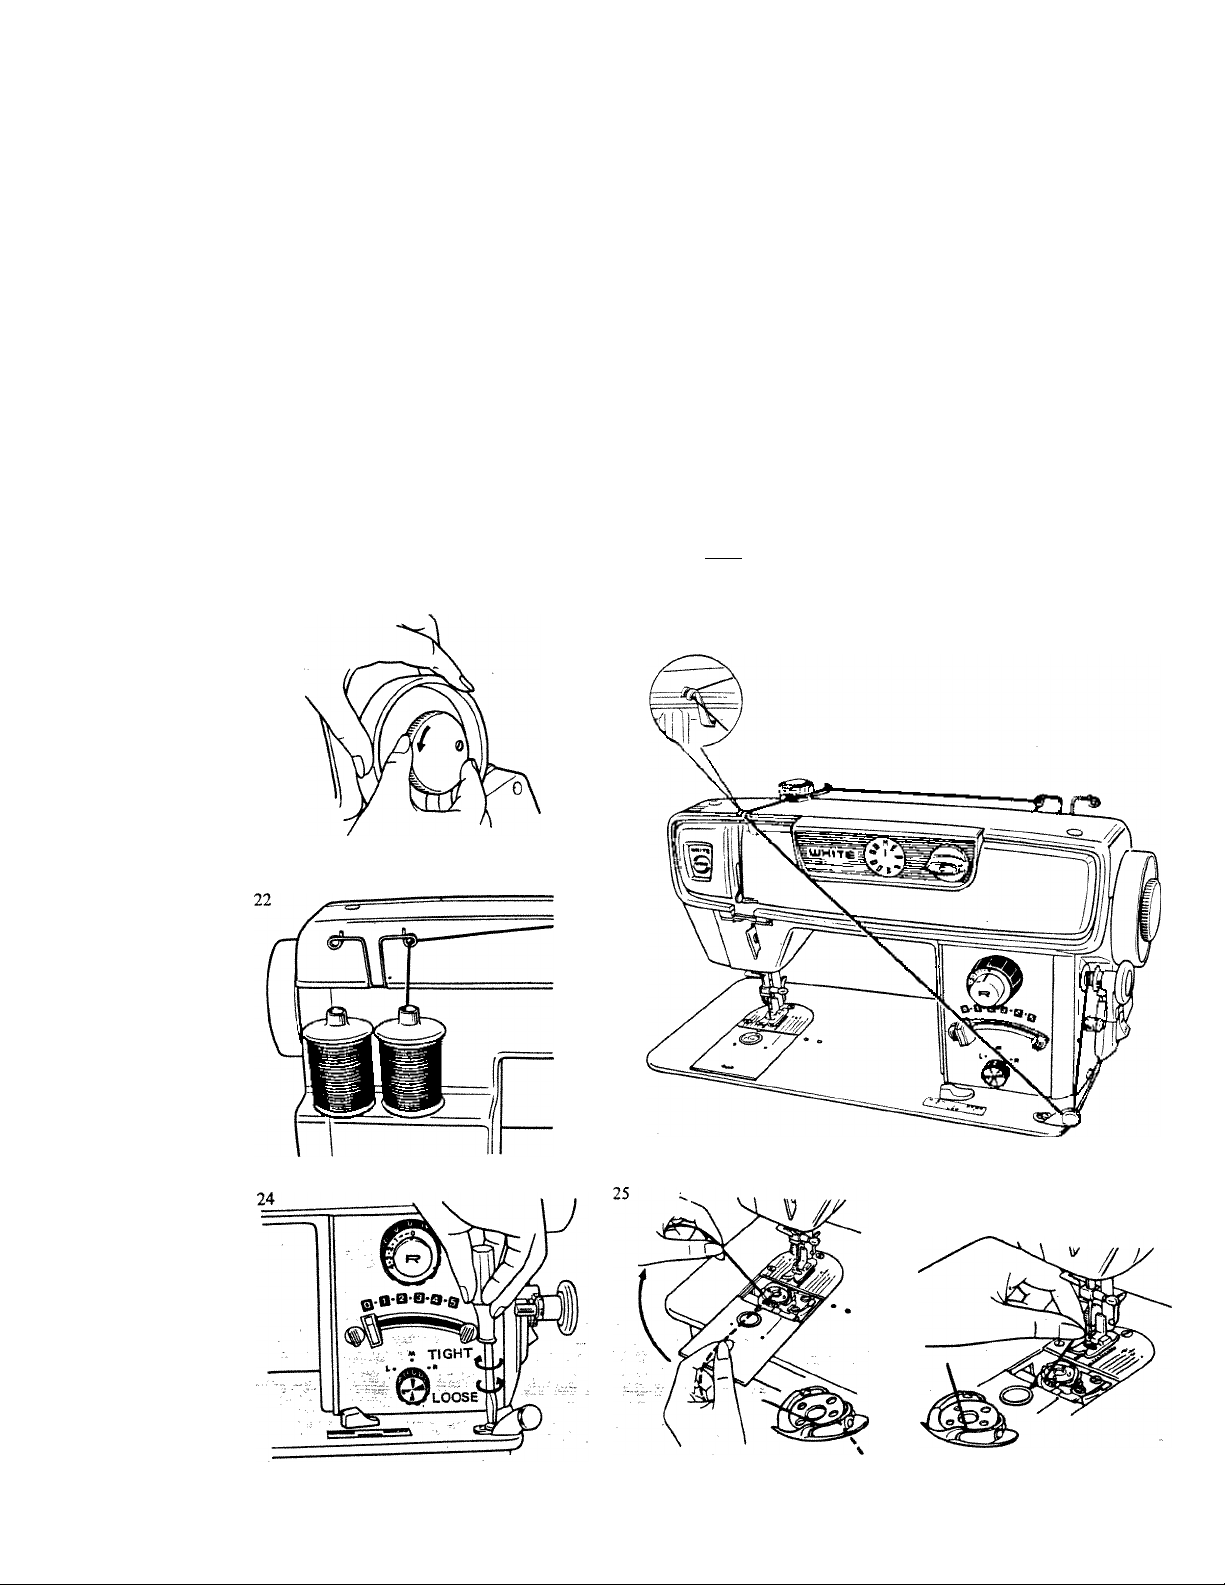
Winding the Bobbin
Disengage the hand wheel by holding it
tightly with your left hand and turning the
coupling wheel toward you with your right
hand. (Fig.21) Place spool on spool pin,
leaving about one foot of thread free, then
place spool cap over spool as shown (Fig. 22)
until it holds the spool in place. Lead thread
as illustrated. (Fig. 23) Run the end of the
thread through the single hole on one side of
the bobbin, and place bobbin on spindle of
bobbin winder with the four holes of the
bobbin facing to the right. Turn the bobbin
until it clicks into place.
Lift bobbin winder until it makes contact
with the hand wheel. Hold thread end
securely and run machine slowly. Bobbin will
stop turning when filled. Always break off
loose thread end used to start the winding.
Tighten the coupling wheel by turning it away
from you as you hold the hand wheel in
21
...........
■ 23
place. The needle should now move when you
turn the hand wheel.
Note: If the bobbin winds unevenly, adjust
bobbin winding tension disc to the right or
left by loosening the screw and sliding it.
When disc is in proper position, tighten screw.
(Fig.24)
Lower Tlireading
Drop the bobbin, with four holes on top, into
the hook and be sure the bobbin rotates
counter clockwise. Draw the thread through
the slot and toward the left into the clearance
between hook and spring. (Fig. 25) Put the
thread through the notch at the end of the
spring and leave the thread about three or
four inches long. Close the slide plate
allowing the thread to emerge through the
notch above the window. Thread should cross
from the left across the top of the bobbin.
Note: For satin stitching, drop the feed dogs
to down and slip the thread into the clip at
the back of the hook. (Fig.26)
26
Page 8
Upper Threading
1. Turn hand wheel toward you to raise the
take-up lever to its highest position. Presser
foot should be in the raised position.
2. Lead thread from the spool as illustrated,
(Fig. 22) being sure to place the spool cap
so that it holds the spool securely. Draw
the thread between the tension discs and
around toward the right until it emerges
under the finger like projection. Bring the
thread through the succeeding points as
illustrated. Thread the needle from front to
back and leave the thread about three or
four inches long. (Fig. 27)
3. Hold upper thread down on slide plate and
turn hand wheel toward you one complete
revolution. Pull the loop which has been
formed through to the upper surface. (Fig.
28)
Place both thread ends under the presser
foot and draw them toward either the right
or left leaving both threads about four
inches long. (Fig.29)
27
r
28
29
Page 9
rv. Choosing the Right Needle
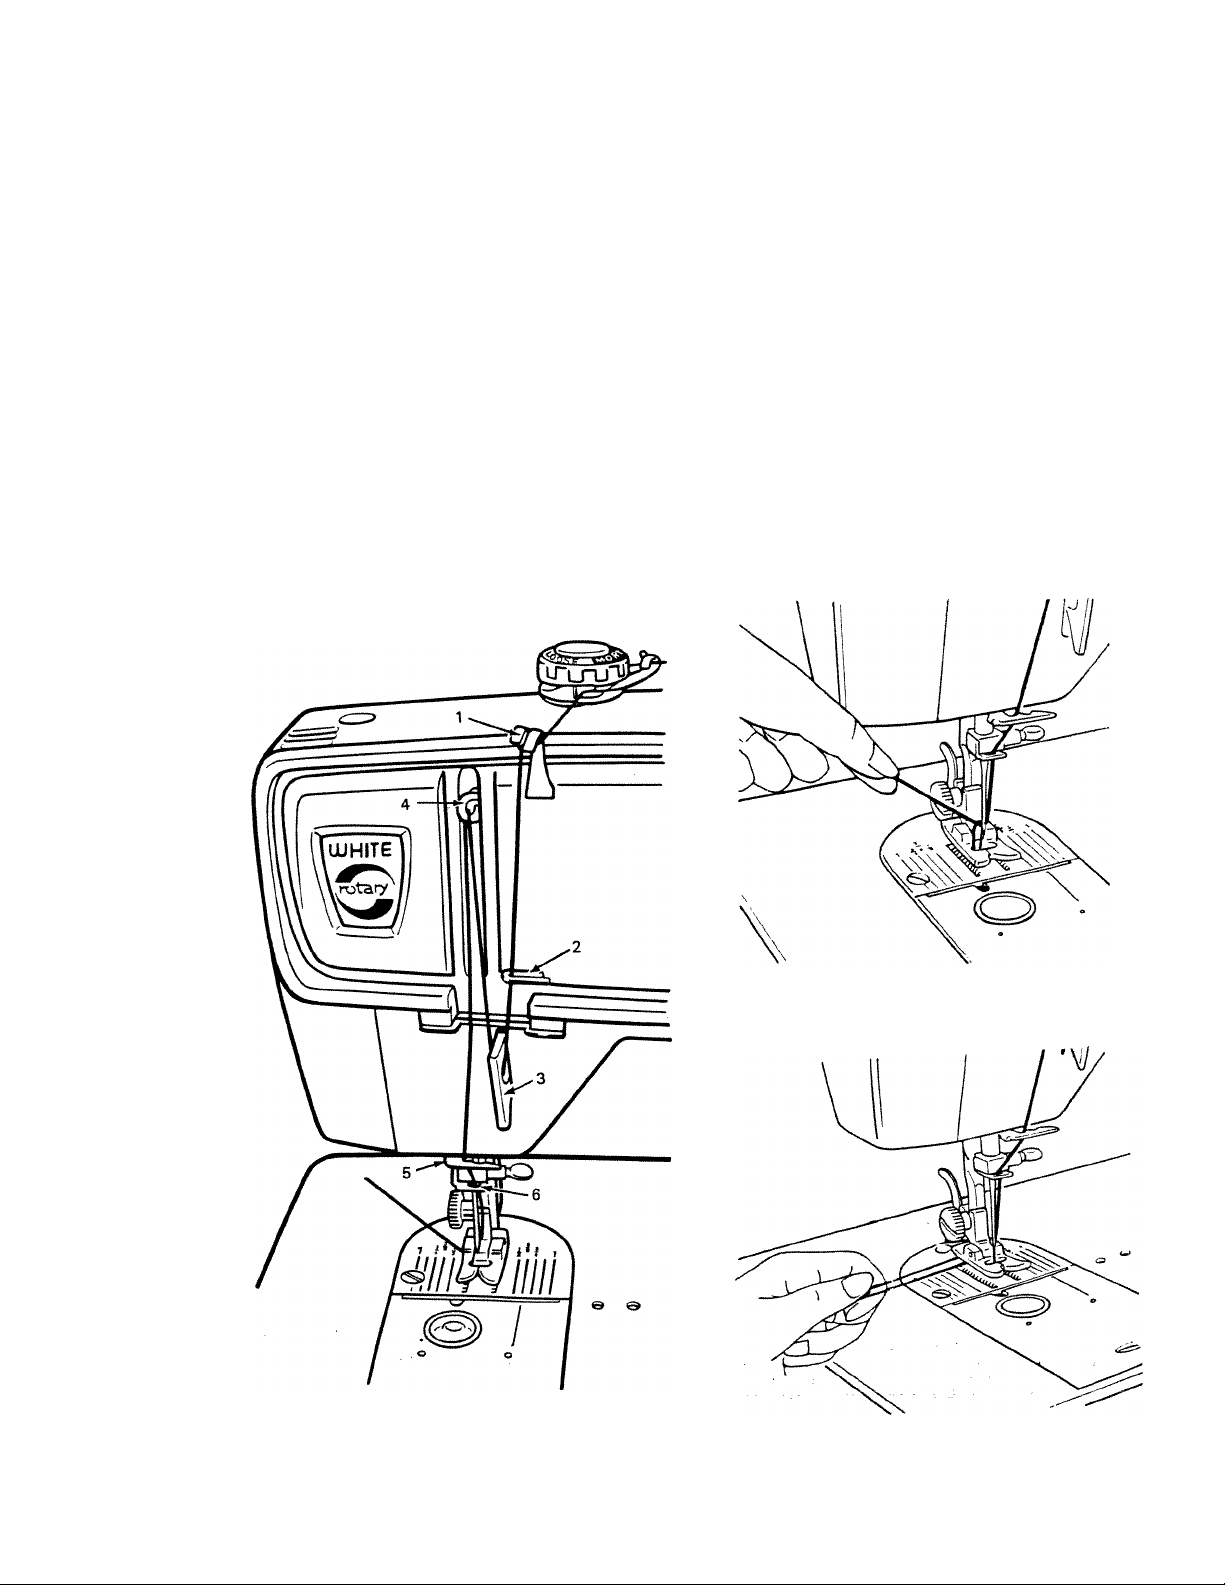
Types of Needles
The correct selection of needle to suit the
thread and fabric being sewn gives the best
stitching results. Fine fabrics should be sewn
with fine needles, heavier fabrics with heavier
needles. For best results, sewing machine
needles should be replaced when they become
even slightly dull or bent or at the completion
of every other garment.
A regular needle is suggested for use with
woven fabrics. Needles, style 15x1, (Euro
pean equivalent System 705) are used on the
majority of household sewing machines. They
range in sizes from 8 to 20 with the lower
number indicating the finer needle. The most
commonly used sizes are 11 and 14.
A ball point needle is recommended for use
with tricots, jerseys, lingerie and power nets.
Unlike sharp, pointed needles, which pierce
fibers of knit fabrics, destroying elasticity, the
ball point sUps between fibers, preventing
damage to fabric and skipped stitches. These
are available in fine, medium, and heavy ball
points.
A wedge point needle is recommended for use
with leather and leather-look vinyls. A wedge
cutting point pierces leather more easily than
ordinary sewing machine needles, resulting in
more satisfactory stitching.
An all purpose needle is designed to handle
knits as well as woven fabrics. It eliminates
skipped stitches and the slight ball will not
damage delicate fabrics. This is the needle
provided with your sewing machine and will
be used for most of your sewing. A larger ball
point may still be necessary for certain knits,
such as bathing suit fabric or power net.
Page 10

Needle
Stitdiing
Guide
The correct selection of needle and thread to suit the
fabric will result in more satisfactory stitching. Fine
fabrics should be stitched with fine needles, fine thread
and short stitches.
For best results on heavier fabrics, use coarser needles,
heavier threads and longer stitches. Replace the
machine needle when it becomes even slightly dull or bent.
Consult
this chan whi'iiever
a difjereiit /17«'
of fai)rw
is lo he stili heil.
Thread
and needle .sizes
for various
kinds and weights
of fabrics.
KNITS
WOVEN
LEATHER
DECORATIVE
STITCHING
type of fabric
LIGHT WEIGHT
Tricot, Power Net
MEDIUM WEIGHT
Jersey, Double Knit, Power Net
HEAVY WEIGHT
Double Knit, Power Net
FAKE FURS ^VELOURS
VERY SHEER
Lace, Net, Chiffon, Voile
SHEER
Lawn, Taffeta, Blouse Crepe, Organdy
DRESS WEIGHT
Crepe, Wool, Brocade, Velvet
MEDIUM
Wool, Silk, Linen, Pique,
Faille. Velveteen, Terrycloth
HEAVY
Denim, Duck, Sailcloth
EXTRA HEAVY
Canvas, Upholstery, Awning
VINYLS-ITLMS
LIGHT TO MEDIUM WEIGHT
Leathers & Suedes
HEAVY LEATHER
MACHINE EMBROIDERY
TOP STITCHING
METALLIC EMBROIDERY
mchine i
U.S. Size
European
15x1
9
9-10
11-14 80-90
14-16
9-11
11 80
16
19
14-16
16-18
9-11
16-18 100-110
70-80
90-100
9 70
9
14 90
90-100
100-110 Leather (Wedge)
11 80
705
70
70
70-80
100
120
60-80
cedles
Point Style
Light Ball
Light Ball to
Medium Ball
Medium Ball to
Heavy Ball
Ball or Sharp
Sharp
Sharp
Sharp
Sharp
Sharp
Sharp
Leather (Wedge)
Leather (Wedge)
approxiuiate
straight
stitches
per inch
20
12
10-14
10
16-18 10
14-16
12
12
10
8
10
8
6-8 3
hand
needles
10
9
4-5
4-5
10
9
7-8
6-7
3 4
7-8 50
3-4
ihrcac
i
Mercerized
Cotton
60
50
50
Heavy Duty 30
60
60
50
50
Heavy Duty
Heavy Duty 30 YES
50
Heavy Duty
Cotton Embr<
Silk Buttonhole Twist Size D
Metallic Thread
European
Cotton
50-70
50-70
>idery Thread Size 50-70
Polyester
NO
30 YES
30
70
30 NO
30 NO
30 YES
30
30 YES NO
30
YES
YES
NO
NO
YES
YES NO
Siìk
Nylon
A-Silk
Nylon
A-Silk
Nylon
A Silk
Nylon
NO
A-Silk
Nylon
A-Sìlk
Nylon
A-Silk
A-Silk
NO
NO
NO
attachments
Roller Foot
Roller Foot
Roller Foot
Roller Foot
Roller Foot
Roller Foot
Roller Foot
Page 11
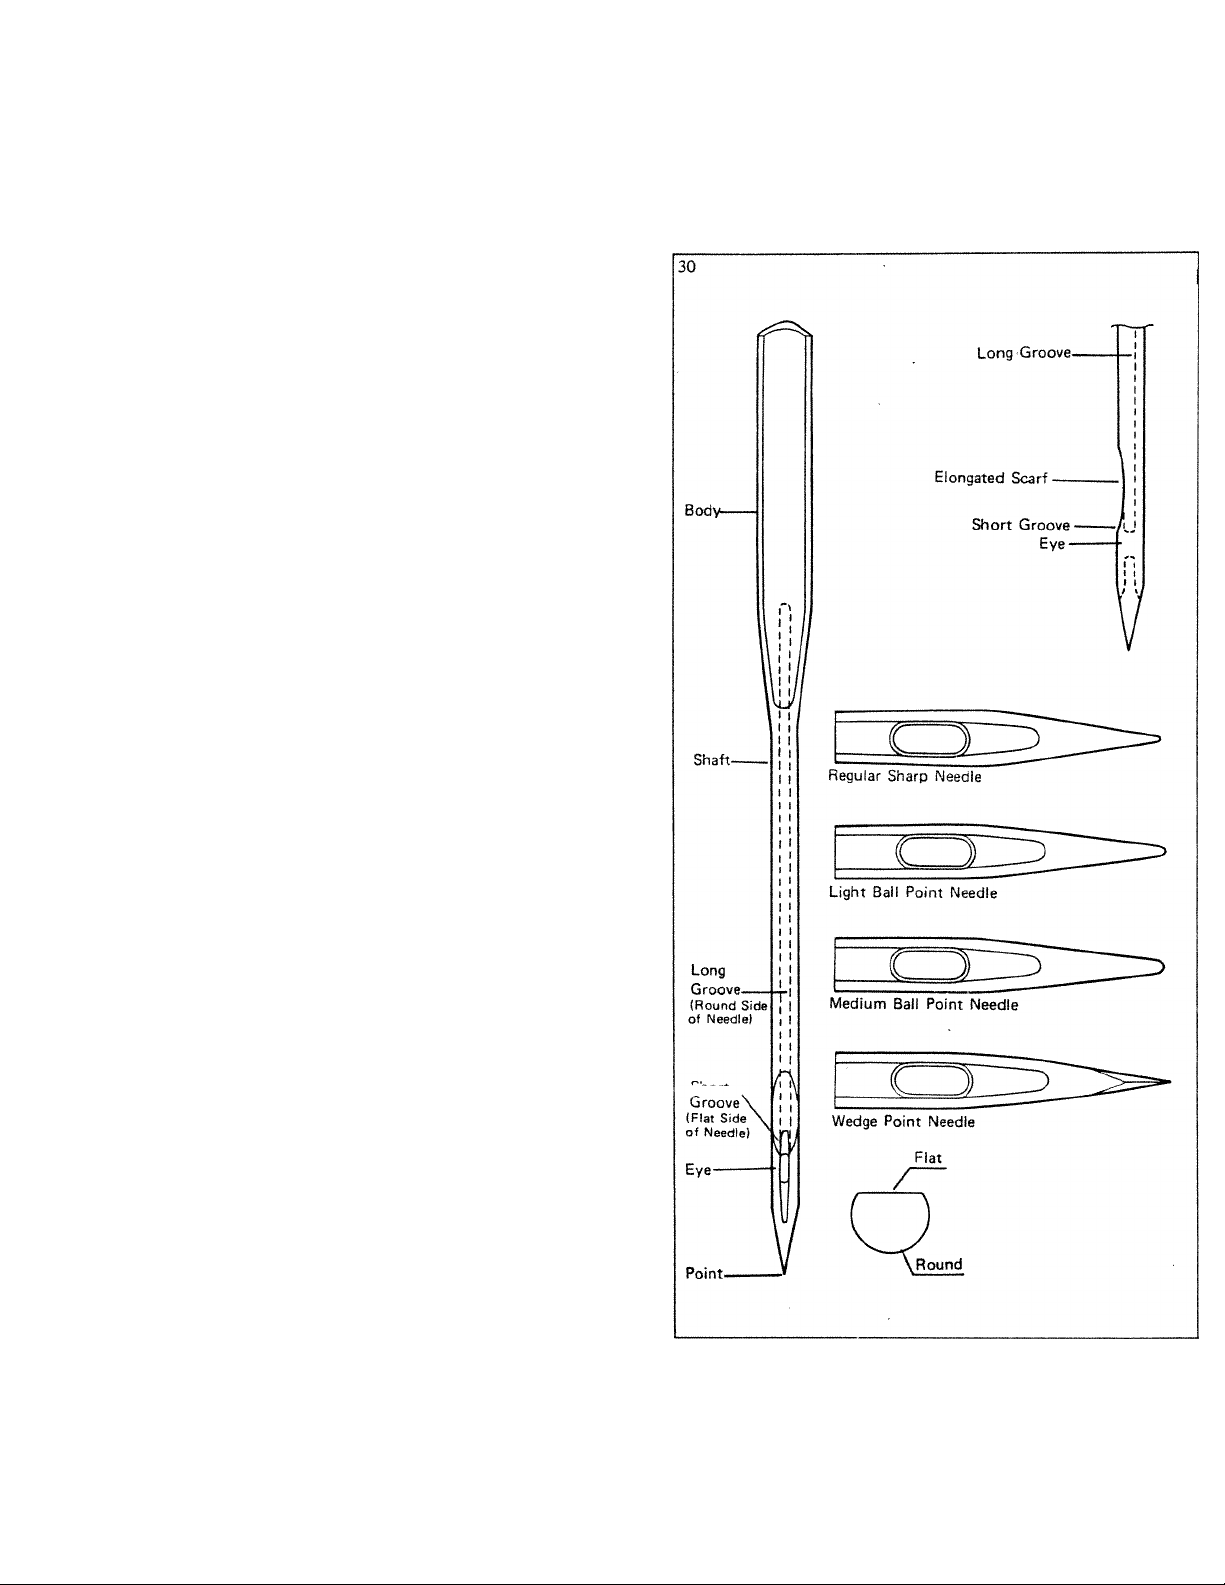
Qianging the Needle
Always change the needle after every other
garment especially when sewing on polyester
and nylon fabrics which dull needles much
faster. When needles are dull or bent, they
damage both your fabric and the machine.
A general rule when replacing sewing
machine needles is that the flat side of the
needle is placed to the back of the machine,
when the bobbin is put in from the front. If
the needle is inserted incorrectly, the
stitches will not form.
To change the needle
1. Raise the needle bar to its highest
position by turning the hand wheel
toward you.
2. Loosen needle clamp screw to remove
the needle. (Fig.31)
3. Place needle (flat side to the back and
long groove toward you) (Fig.31) in the
needle clamp and push it upward as far as
it will go, tighten clamp screw.
4. After changing the needle, make one
complete revolution of the hand wheel
by hand to be sure the needle is clearing
the needle plate.
31
32
Changing the Needle Plate
To change the needle plate, simply slide the
cover plate toward you. Remove the needle
and the presser foot. Remove the two screws
holding the needle plate in place, lift the
needle plate. Replace the needle plate.
The needle plate is removed for cleaning the
lint which may pile up between the needle
plate and the feed dop. The straight stitch
needle plate is used for sewing very fine or
soft materials. The zigzag needle plate can be
used for almost all of the normal sewing.
Page 12

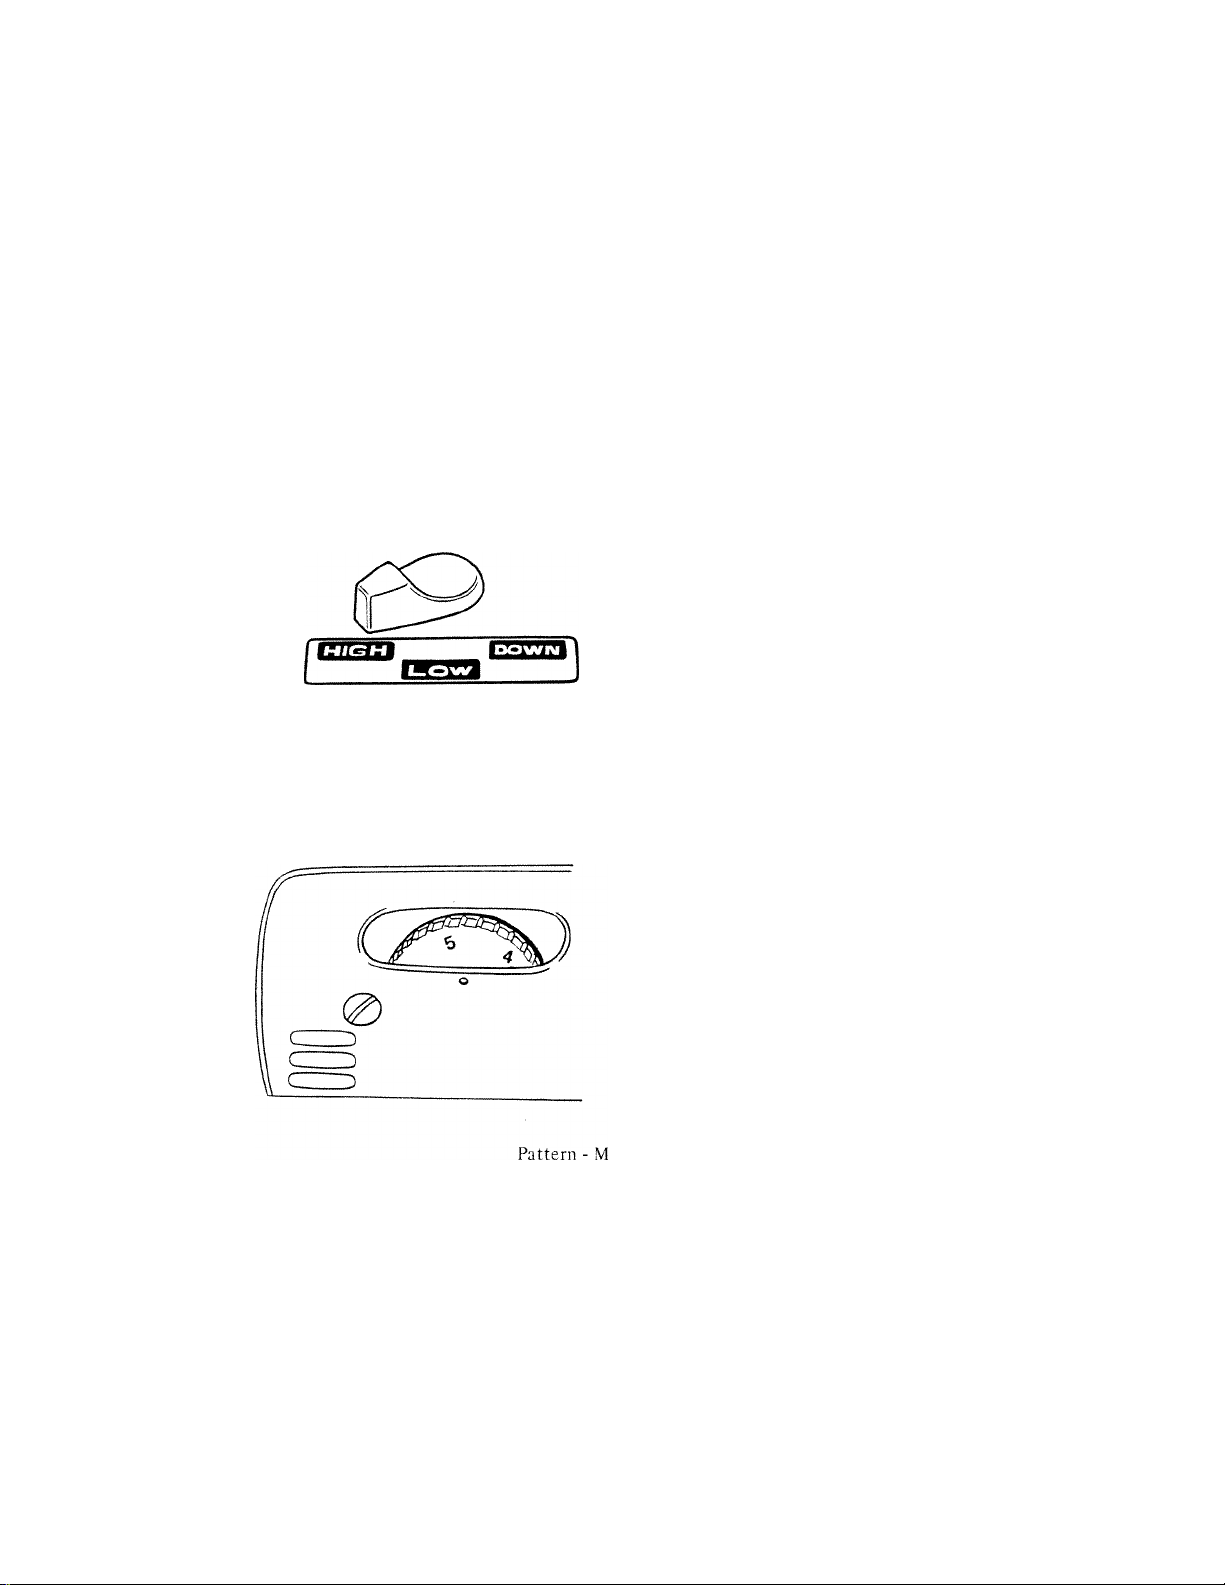
V. Getting to Know Your Sewing Machine
Adjusting the Stitch
33
35
Reverse Button
1 2 3 4 5
34
Stop Lever
Pattern - M
Length - 0-4
Width - 0
Needle Position - M
Feed Dog - High
Pressure — 5
Foot - All Purpose
Pattern — M
Length - 2
Width - 0-5
Needle Position - M
Feed Dog - High
Pt-essiire - 5
Foot - All Purpose
Stop
Stitch Length Dial
This dial (Fig.33) controls the forward
feeding of the fabric. At 0, the fabric does
not feed at all. As the numbers increase so
does the length of the stitch. Turn the blue
dial so that the desired number is above the
blue line on the white button.
Reverse Button
The white button in the middle of the stitch
length dial (Fig.33) will cause the feed dog
to feed the fabric backwards. This button
may be used at the beginning and end of
sewing to lock the threads.
To backstitch, simply push the button in
and hold for the desired number of stitches.
It is advisable to tie thread ends instead of
backstitching on soft sheer fabrics to avoid
puckering.
Stitch Width Lever
This lever (Fig.34) controls the swing of the
needle from left to right for various width
of stitches. At 0 the needle does not swing,
therefore a straight line of sewing results no
matter which pattern is selected.
At 1, the needle takes a narrow swing
resulting in a narrow column of stitching. At
5, the needle takes a large swing resulting in
a’wide column of stitches. (Fig.35)
Slide the blue lever to the desired number
then push in the left hand stop (Fig. 34)
and slide it over to the blue lever. The stop
will hold the lever in place.
36
Pattern - M
Length - 0-4
Width - 5
Needle Position - M
Feed Dog - High
Pressure - 5
Foot - All Purpose
Relating Stitch Length to Suich Width
When the width lever is engaged at one
particular width (such as 5), the stitch length
dial will now control how close those stitches
come together. At length 0, the fabric does
not move, resulting in a ball of stitches
formed one on top of the other, as is used
in button sewing. At about length 14, the
feed pulls the fabric through slowly, resulting
in a dense column of stitches called a satin
stitch. At length 4, a very long open zigzag
results. (Fig.36)
10
Page 13

Pattern Selector
This dial (Fig. 37) selects the stitch pattern
to be made according to the pictures shown
at the blue indicator. Turn the silver selector
dial to the right and the picture of the stitch
to be formed will be shown in the top
position. The stitches shown are as follows:
1. M stands for manual position which
gives the standard straight stitch when
the width is at 0 and the standard zigzag
when the width is engaged.
2. Black boxes - indicate buttonhole steps
for four step buttonholes to be explain
ed on page 22.
3. Blindhem ( $ ) - stitches forward then a
zigzag bite to the left for use in
hemming, shell tucking, and other ap
plications. See page 25. Width 0 will
give a straight stitch, all other widths
will give the blind hem stitch.
4. Multiple stitch zigzag ( iS ) - takes three
stitches from side to side for use in
overcasting, applying elastics and mend
ing as shown on pages 27. Width 0 will
give a straight stitch, width 5 is the best
choice for use of the multiple stitch
zigzag. _
5. Overlock stitch ( e ) - takes one stitch
to the left, one stitch backwards and then
one stitch to the right to form a straight
seam and overcast all in one operation.
This is excellent on both knits and
wovens for Vi inch seams on width 5,
and for the straight stretch stitch at
width 0. See page 29. Straight stretch
stitch is discussed on page 31.
6. Ultra stretch stitch { } - takes stitches
then back on a diagonal. This stitch has
the greatest strength and elasticity and is
excellent for loose or bulky knits, such
as sweater knits, bathing suit, and
cotton knits. Use it at width 5 for
completed V* inch seams on knits. This
stitch is never used on width 0. See page
31.
Pattern -
Length - 2
Width - 5
Needle Position - M
Feed Dog - High
Pressure - 5
Foot - All Purpose
37
38
M
M
O' U O'
M
Needle Position
This dial controls the location of the needle
in relation to the presser foot. (Fig. 38)
Never move the needle position dial while
the needle is in the fabric because it will
bend or break the needle.
The needle may be used in any position
between the left and right even though only
three positions are labeled. L -Left M -
Middle R - Right
The etched guide lines on the needle plate
are measured from the needle in the middle
position.
Pattern - M
Length - 2
Width - 0-2
Needle Position - L, M, R
Feed Dog - High
Prcbiuic - D
Foot - All Purpose
Page 14
When straight stitching with the all purpose
foot, the needle may be moved to get closer
to an edge or to make guiding of the fabric
more convenient, as in topstitching. The
needle can also be moved in relation to the
zipper foot in order to take full advantage
of the feed dog.
Caution: When using the straight stitch foot
use the M position of the needle only.
39
40
Pattern - M
Length - 2
Width - 5
Feed Dog -
Pressure - 5
Foot - All Purpose
Adjusting for the Fabric
Feed Dog Control
This lever (Fig. 39) will raise or lower the feed
dog as indicated. Since the feed dog carries
the fabric through the machine, this lever
allows the feed to be regulated for various
materials and types of sewing.
High: For the greatest height of the feed dog
and best grip on the fabric. This is the
position used for most sewing.
Low: For less height of the feed dog and
more gentle hold on the fabric. This position
is used for sewing delicate fabrics.
Down: In this position, the feed dog is
completely below the needle plate surface and
therefore does not move the fabric at all.
Length - 2
Width - 0
Needle Position - .M
Feed Dog - High
Pressure -
Foot - All Purpose
Pressure Control
This control (Fig. 40) regulates how heavily
the presser foot rests upon the fabric. It is
numbered from 0-5 with .stops at the half-way
points as well. The higher the number the
heavier the pressure. The lower numbers give
lighter pressure. Zero gives no pressure.
Lighter weight fabrics need more pressure for
better hold against the feed, whereas heavier,
bulkier fabrics require less pressure to
eliminate pushing on the top layer of fabric.
Normal pressure is 5.
12
Page 15

Tension Dial
The top tension (Fig.41) consists of discs
between which the thread passes. The
descriptive tension dial regulates how tightly
the thread is being held. When necessary,
adjust the top tension in relation to the red
line, turning toward “loose” or “tight” as
needed. The top tension is engaged only when
the presser foot is down for sewing.
The bobbin thread tension is controlled by
the left small screw on the front edge of the
bobbin case. (Fig.42) This screw may be
turned with the small screw driver resting in
the notch of the slide plate. Turn to the right
to tighten and to the left to loosen.
Adjusting the Tension
The tensions may have to be adjusted for
certain fabrics. Before adjusting your tension
make sure that the machine is properly
threaded with identical thread on both
top and bobbin. Use a new needle the correct
size for the thread and fabric being sewn. (See
chart page 8.)
41
Pattern - M
Length - 2-3
Width - 0
Needle Position - M
Feed Dog - High
Pressure - 5
Foot - All Purpose
42
It is best to test the tension on a scrap of the
fabric you are using for construction. Always
use a double thickness and always sew on the
bias when testing tension.
The tensions are correct when the upper
thread and lower thread interlock between
the two layers of fabric with the loops not
showing on top or bottom. (Fig. 43)
Adjust as follows;
If the seam is puckered both top and
1.
bobbin tensions are too tight. Loosen
both tensions slightly. (Fig.43)
If top thread lays on the fabric with
2.
bottom thread looping over it, the top
tension is too tight. (Fig. 44) Loosen the
top tension slightly.
If the bottom thread lays on the fabric
3.
with the upper thread looping over U, top
tension is too loose. (Fig. 45) Tighten
top tension slightly.
43
Page 16

The Proper Presser Foot
46
Changing the sole
Pull presser foot shank lever toward you, to
remove the sole. (Fig.46 Step 1) Place desired
sole under shank and lower presser foot
lever onto the sole. (Fig.46 Step 2) Sole
will be locked in automatically. (Fig.46 Step
3)
Step 1
Step 2
The All Purpose Foot
This foot (Fig.47) is flat on the bottom and
has a wide hole to accommodate wide
stitches. This foot should be used for all of
your normal sewing so that you can use any
stitch without changing the foot. This foot is
fine for straight stitching. (If fabric is pulled
down with the needle, use left needle position
for more control.)
The Embroidery Foot
This foot (Fig.48) has a wide groove carved
out on the bottom. This groove allows the
foot to pass over dense stitches such as the
satin stitch without catching on the stitch.
It is transparent to make stitch placement
easier. Do not use this foot for normal sewing
of lightweight fabrics. Since it is grooved, it
will not hold the fabric taut enough to
produce a good stitch.
The Straight Stitch Foot
This foot (Fig.49) is flat on the bottom and
has only a narrow hole to accommodate only
straight stitching. It may be used on sheer or
soft fabrics for more control when the all
purpose foot allows the fabric to be pulled
with needle. When using this foot, the needle
position should always be on “M”, and
the width on “O” to avoid hitting the foot
and breaking the needle.
49
50
The Buttonhole Foot
This foot (Fig.50) has a frame. This frame
holds the fabrics taut enough to produce a
good buttonhole.
14
Page 17

VI. How to Sew
Pinning may be used as a time saver instead of
hand basting. Place your pins at right angles
to the edge of the fabric with the pin head at
the raw edge. It is possible to sew over pins,
but for best results it is recommended that
the pins be removed as you approach the
presser foot. Sewing over pins can result in
damaged needles.
Placement of Fabric/Starting a Seam
Before placing fabrics under the presser foot,
make sure that the take-up lever is at its
highest position. Place your fabric so that
its raw edge is even with the back edge of
the presser foot.
When placing a heavy, bulky fabric under the
foot push up on the presser foot lever for
extra lift while you are positioning the fabric.
(Fig.51) Place the thread ends, which are
3-4 inches long, under the presser foot and
either to the left or to the right. Be sure that
both thread ends are under the presser foot.
Always lower presser foot before sewing.
Press in the reverse button so that the
machine sews a few stitches backwards to the
edge of the fabric to backtack, then release
the button allowing the machine to continue
sewing forward.
Guiding the Fabric
Etched Seam Guide
The etched seam guides on the needle plate
are graduated in 1 /8 inch divisions measured
from the middle needle position. In order to
use the etched guides effectively, let the edge
of the fabric follow the line selected for the
seam. Therefore, for a 5/8 inch seam, place
the raw edge of the fabric on the line marked
“5/8”. (Fig.52) In order to sew a straight
line, let your eye follow the etched lines, not
the needle.
Cloth Guide
This guide may be placed on the machine for
extra help in keeping seams straight. It will
allow you to guide seams from 1/4 inch to
1-1/2 inch in width, so that it is useful for
seams of unusual widths. (Fig.53)
Presser Foot as a Guide
Straight Stitch Foot - for a 1/4 inch seam,
guide fabric using the first etched mark on
the right side of feet. (Fig.54)
All Purpose Foot - for a 1/4 inch seam, use
the left needle position and guide the fabric
along the right side of the needle hole. (Fig.55)
All Purpose Foot - for a 1/8 inch seam, use
the middle needle position and guide the
fabric along the right side of the needle hole.
(Fig.56)
Holding the Fabric
For most fabrics, it is not necessary to hold
the fabric in both front and back. Merely
guide the fabric with one hand from the
front.
Page 18

57
For the fine delicate fabrics, such as chiffon,
georgette, and tricot, the best results will be
attained by holding the fabnc in front and
back of the needle without pulling on it.
Turning Corners
To pivot at a comer, (Fig.57) leave the needle
in the fabric while on the upswing so that the
stitch is almost completed, thus preventing
the possibility of skipped stitches m the
comer. Lift the presser foot and pivot the
fabric. Then, lower the presser foot and
continue sewing.
Curved Seams
On a curved seam (Fig. 5 8) use a slightly
shorter stitch length than you are using for
the rest of the seams. For example, if length 2
is being used for the seams, a 1-1/2 stitch
length would be preferred for curves. A
smaller stitch length will add strength and
elasticity to the seam.
When guiding the fabric, keep your fabnc
edge on the etched seam guide line directly
across from the needle rather than on the
forward part of the line. The seam guide may
be used on an angle as shown.
Sewing Across Heavy Seams
When approaching a heavy seam, (Fig.sy)
hold the fabric upwards on an angle so that
the heavy seam falls under the upward curve
of the foot. This will help feed the heavy
seam through the machine.
Ending Seam/Removal of Fabric.
Stitch to the edge of the fabric, then hold m
the reverse button and backstitch for a few
stitches to reinforce the end of the seam.
Turn the hand wheel until the take up lever is
in its highest position so that the «titc i
completed and the threads will P^ll freely^
Lift the presser foot and
by drawing the threads to the left and back
kLping them under the foot so as to not
bend the needle. Cut the threads with the
thread cutter on the back of the presser bar.
Leave the thread ends three to four inches
long.
16
Page 19

Vn. Applications of the Straight Stitch
Seams
The normal stitch length for most fabrics is 2,
but the length chosen should depend on. the
fabric and area of usage. Usually, heavier
fabrics require longer stitches, and lighter
weight fabrics require shorter stitches. For
curved seams and bias cut areas use a shorter
stitch length to add strength and elasticity to
the seam.
basting/ lopstitching
Sewing a seam with a longer stitch is useful
for temporary seams prior to fitting. Basting
stitches also may be used when gathering in
fullness.
Topstitching can be done very effectively
with the long straight stitch. For a bolder
stitch, two threads of the same type can be
threaded through one needle (size 14 or 16).
A heavier thread such as buttonhole twist
may be used for topstitching, but be sure to
use a larger needle (size 16 or 18). (Fig.60)
Darning
Worn spots or small holes can be darned very
easily. Use of an embroidery hoop is optional
depending on the fabric. (Fig.61) A fine
thread is recommended so that the fabric
and thread will blend together invisibly. When
you use a fine thread, loosen upper thread
tension slightly.
Trim the ragged edges from the area to be
darned. Hold the threads to start, then move
the fabric slowly backwards and forwards
while running the machine very fast to fill the
area. More professional results will be attained
by moving the fabric in a figure eight pattern
while sewing. After filling in the area
lengthwise, reweave with crosswise stUches in
the same manner.
Elastic Thread Shirring
Wind elastic thread onto bobbin, (Fig.62) as
shown, letting the thread pass through your
fingers. The thread should be wound smooth
ly without stretching. Place bobbin in case as
usual, being sure that the elastic is drawn
through the tension. Use regular thread on
the top of the machine. Do a trial run on the
chosen fabric to test length of stitch. Lay a
piece of paper under the fabric to keep it
from gathering up as you sew. This will
enable you to sew many parallel rows of
stitching without difficulty. Afterwards tear
out the paper and the fabric will be gathered.
(Fig.63)
Pattern - M
Length - 1 -3
Width - 0
Needle Position - M
Feed Dog — High or Low
Pressure - 3-5
Foot - Straight Stitch or
,411 Purpose
Pattern - M
Length - 4
Width - 0
Needle Position - L or M
Feed Dug — Highi or Low
Pressure - 3 — 5
Foot - All Purpose
Pattern - M
Length - 0
Width - 0
Needle Position - M
Feed Dog - Low
Pressure - 0
Foot - All Purpose or
Embroidery
Pattern - .M
Length 2
Width - 0
Needle Position - M
Feed Dog - nign
Pressure - 5
Foot - .411 Purpose
...........
a
60
62
1
.......
.....■....
63
...
17
Page 20

Vin. Applications of the Zigzag Stitch
66
64
65
Pattern - M
Length - I-3
Width — 5
Needle Position — M
Feed Dog - High
Pressure — 5
Foot - All Purpose
Pattern - M
Length - 1
Width - 1
Needle Position - M
Feed Dog - High
Pressure — 5
Foot - All Purpose
Pattern - M
Length - 0
Width 2-5
Needle Position - L
Feed Dog — Down
Pressure - 5
Foot - Button Sewing
Overcasting
Place the e^dge of the material underneath the
opening of the sewing foot and guide raw
edge along the center groove of the foot,
allowing stitch to form half on and half off
the fabric. (Fig.64)
The multiple stitch zigzag is a wiser choice for
most fabrics. See page 27.
Seaming Knits
The narrow zigzag can be used in seams of
firm knits for added strength. After sewing,
open seam and press flat. Tiny zigzag stitches
can hardly be seen and the seam will give
when stretched. (Fig.65)
Sewing on Buttons
Zigzag stitching is a very easy and convenient
method of sewing on buttons without a
shank. (Fig. 66)
Place the button so its left hole comes
directly under the needle, then gently lower
the button sewing foot. Take a stitch into
the hole.
Raise the needle from the left hole, and move
zigzag width lever to the right until the needle
comes down exactly over the right hole in the
button.
Note: Be sure the needle clears the holes of
the button by moving the wheel by hand
before running the machine fast.
67
Usually 6 to 8 stitches are adequate for
securing a button in place. Stop with the
needle in the left hole. To lock the threads,
set the stitch width at 0, and take a few
stitches in the left hand hole.
Forming a Thread Shank
Buttons* sewn on coats or jackets should have
a thread shank to make them stand away
from the fabric. (Fig.67) To form a thread
shank, sew over the blade of a regular sewing
machine needle. Insert needle into hole on
the front side of foot.
After stitching the button to the fabric,
remove work from under the presser foot
leaving threads about six inches from fabric.
Remove needle. Pull the threads to back of
button and form a shank between button and
fabric by winding threads tightly around the
attaching stitches. Pull threads to back of the
fabric and tie thread ends securely. (Fig.67)
Page 21

Satin Stitching
This is useful for decoration such as tapering,
manual designed embroidery, monogramming,
and applique. (Fig.68)
The satin stitch, which is really just a very
close zigzag stitch, is obtained by setting the
stitch length as near to “0” as possible
without stopping the feeding action. The
setting will vary for different fabrics. It may
be desirable to loosen the upper tension
slightly to cause the threads to lock under
neath, in order to make the top surface look
especially smooth. For lightweight fabrics,
place paper underneath the fabric while
sewing for best results.
Tapering
Tapering is done by gradually increasing and
decreasing the stitch width while sewing.
(Fig.69) By this method, tapered monograms
and other interesting designs can be created.
(Fig.70) For tapered monogram run the
machine fast while sliding the width dial lever
slowly from narrow to wide and from wide
to narrow.
Pattern - M
Length - ‘4
Width - 1^5
Needle Position ^ M
Feed Dog — High
Pressure 5
Foot -- Emhroiderv
,'n
Length
Width - 0
Needle P'o
Feed Dog
root — tr
0-L
Hiuh
troidi
69
First, learn this stroke by letting the fabric
guide straight and trying different needle
positions. Then, learn to pivot the fabric as
you are tapering by holding the fabric at one
point. Various strokes can be combined to
form letters and designs. Variegated thread
can give attractive results.
Manual iimoroiGer
Desiiins
Different designs can be made by sliding the
stitch width lever control (disengaging both
stops) between 0 and 5. By running the
machine at a constant speed and sliding the
lever in a definite rhythm, various designs
can be created. (Fig.71)
Pattern - M
Leneth - O-M
Width ^0^5
70
A M
W ^
. %
1 i
f \
71
1
1
Feed Dog — High
Pressure - 5
Foot - Embroidery
Page 22

72
Pattern — M
Length - 0
Width - 1-5
Needle Position - M
Feed Dog - Low
Pressure — 0
Foot - Embroidery or
All Purpose
Step 1
Pattern — M
Length — 1
Width - 0-1
Needle Position - M
Feed Dog - High
Pressure - 5
Foot - Embroider^'
Step 2 ,
Pattern - M
Length - '/4—'/2
Width - 2-4
Needle Position - M
Feed Dog - High
Pressure - 5
Foot - Embroidery
Freehand Monogramming
For giving garments and linens a personalized
touch, first transfer the design to the right
side of the fabric. An embroidery hoop is
recommended especially for soft fabrics and
toweling. (Fig.72) When you monogram
loosen upper thread tension slightly.
In order to monogram, you must move the
fabric slowly and run the machine rapidly.
Monogramming is like writing by moving the
paper under a stationary pen. Guide the fabric
slowly so that the zigzag falls close together
like a satin stitch, but be careful that the
stitches do not pile up. When guiding from
side to side, move fabric slightly faster to
avoid a heavy area.
Practice by forming loops. Once this is
accomplished any letter is easy.
Sometimes the use of paper or non-woven
interfacing under the fabric may make guiding
the fabric easier. The paper or interfacing may
be tom or cut away at the completion of the
monogram. When monogramming towels,
plastic film placed on the top will help cover
loops and make the monogram smooth. Pull
or cut away remaining plastic film when
finished.
Applique
Applying decorative shapes of fabric scraps to
household articles and colthing is a very
interesting way of trimming an otherwise
plain article. First, trace the design on fabric
to be appliqued, then pin or baste it securely
in place on garment. With a small straight
or L
stitch or narrow zigzag, sew around the
transferred design. (Fig.73)
After excess fabric is trimmed away, sew
around the applique with a satin stitch. For a
smooth curve, stop frequently at the inside
edge of the curve to pivot the fabric slightly.
Corners look much better when the point is
stitched by pivoting rather than just turned.
As with all decorative stitches, paper may be
used to give more body to the fabric when
stitching and can be torn away when the
applique is completed. (Fig.74)
Note: Bobbin thread should be placed
through the clip for all operations described
on page 19 and 20.
Page 23

Gathering Over a Cord
Ordinary gathering with a basting stitch often
breaks while pulling in fullness. A small zigzag
across a cord such as crochet thread or carpet
thread, gives a much stronger cord for
gathering fullness into fabrics. (Fig.75) Once
the gathers have been stitched in place, the
cord can be pulled out in order to eliminate
bulk. (Fig.76)
Pattern - M
75
Length - 2
Width 3—4
Needle Position - M
Feed Dog - High
Pressure - 5
Foot - Embroidery
Lace Application
.Attaching laces or trims adds a special touch
to lingerie, dresses, or linens. Pin or baste lace
in place easing or mitering comers where
necessary.
A straight edged lace or braid has a
convenient line to follow when sewing.
(Fig.77) When using a scalloped edged lace
follow the design of the lace for an almost
invisible application. (Fig.78)
Lettuce Hem
An unusual way of hemming or finishing
edges of tricot or soft knits is by a lettuce
edge. (Fig.79) Hemming in this manner is just
like overcasting an edge, but the fabric is
stretched in back and in front of the needle
as you sew. For best results, pull the fabric
equally, making sure the needle goes over the
edge. (Fig.80) When you stop to reposition
your hands, keep the needle in the fabric.
Pattern - M
Lenath —
'/2
— 1
Width -1-2
Needle Position. - M
Feed Dog - High
Pressure - 5
Foot - .A.I1 Purpose
77
Fatte
M
78
80
Page 24

81
85-1
Step 1
Step 2
Pattern - UlL_
Length — '/4
—/'2
Width — 3 — 5
Needle Position - M
Feed Dog - High
Pressure - 5
Foot - Buttonhole
Built-in Buttonhole
This buttonhole eliminates the need or
pivoting the fabric. It is used most often on
light and medium woven fabrics.
1 Set pattern selector dial for the first
’ buttonhole position. Lower needle into
the mark at the end of buttonhole. Lower
presser foot and take a few stitches to
bartack. (Fig.85-1 Step 1)
5 With needle out of the fabric, turn pattern
“■ selector dial to second picture. Sew up
left side of buttonhole until the white
nylon slide runs into the back of lip of
the foot. At this position, the machine is
feeding in reverse. (Fig.85-1 Step 2)
IX. Buttonholes
Various fabrics require various methods of
sewing buttonholes. Four different methods
are given below, with suggested uses. If you
are in doubt as to which method is best for
vour fabric, test the methods in question and
choose the best according to the finished
appearance. ,
preparation
For the best results, a good quality
mercerized cotton thread should be used.
Polyester threads often result in puckered or
heavy unattractive buttonholes. The tiner
your fabric is, the finer your cotton thread
should be.
An interfacing should be used under the
buttonholes to give body, to strengthen, and
to help them withstand wear.
To establish the correct length of the
buttonhole, add the diameter of the button
(A) plus the thickness of the button (B), plus
l/g’inch for the bartacks. (Fig. 81) The length
may be marked on the garment with a basting
stitch, tailor’s chalk, or transparent tape.
Another way to make sure that all button
holes will be the same size is to cut a piece
of cardboard as wide as the buttonhole foot
and long enough to make the distance
between the toe of the white slide and the
cardboard the size buttonhole needed. (Fig.
82) This method works for buttonholes up
to 1 1/8 inches long. Horizontal buttonholes
should extend 1/8 inch beyond the center line
of the garment. (Fig. 83) Vertical buttonholes
are placed so that the cutting space of the
buttonhole is directly on the center line.
(Fig. 84)
Always make a practice buttonhole on a scrap
of the garment fabric before making any
buttonholes on your garment. On your test
sample, duplicate the thicknesses found in
the garment and be sure to include the
interfacing. The test sample should help
determine the length needed for the button to
pass through the hole easily, as well as the
stitch length needed for the particular fabric.
As with the satin stitch, the stitches should be
close together, but not so close that they pile
up. Be sure to use the buttonhole foot.
01
Page 25

3. With the needle up select the third
buttonhole picture on the pattern selector
dial. Sew a few stitches to bartack. (rig.
85-1 Step 3) . , . .
4 With the needle out of the fabric, turn
' to the final buttonhole picture on the
pattern selector dial and complete he
riaht side of the buttonhole. White nylon
slide will run into cardboard so you
cannot go beyond first bar tack. (Fig.so
1 Step 4)
5. To lock the stitches, make sure the needle
is out of the fabric and set width at 0.
Then take a few stitches.
6. Score the buttonhole with the back edge
of the seam ripper several times. To
prevent cutting through the bartack,
insert a straight pin through the bartack.
Cut buttonhole open with the seam
ripper. (Fig.85—2)
Turn-around Buttonhole
Turning the fabric for buttonholes gives
better results in certain situations. This memod
may be desirable for making the top button
hole at the neck or waistband near thick
enclosed seam allowances. It is also excellent
to use when repairing worn buttonholes on
ready-made garments, or
the stitches have been cut accidently when
cutting open the buttonhole. When using tlus
method over a buttonhole which has already
been slit, be sure to hold the buttonhole open
and allow the needle to go off the edp of the
fabric at the right. On soft or stretch fabrics,
use paper underneath.
1 Set the needle position to the left. With
■ zigzag width at 2V2, start at the end of
the buttonhole marking. Sew down the
left side of buttonhole until you reach the
end marking. Leave the needle m fabnc
at the right side of the stitches. Lift the
presser foot and pivot the fabric around
until the first row of stitching is directly
in front of the presser foot. (Fig.86)
Slide buttonhole foot up to the end of
foot, so the other side of buttonhole
can be made.
2. Lower presser foot and raise the needle.
Move width to 5 and take several stitches
on top of one another to bartack. Hold
the fabric to prevent feeding. Stop needle
in fabric at the left side of stitches. (Fig.
87) . .
3. Raise the needle and return zigzag to in
width. Complete second side of button
hole, stopping the needle in the tabnc
at the left of the end marking, or when
the nylon slide runs into cardboard insert.
(Fig.88) .
4. With needle up, move width to 5 again
and take several stitches while holding the
fabric to prevent feeding. (Fig.89)
5. Lock threads by stitching a few stitches
at 0 width. Cut buttonhole as indicated
93 previously, (page 23)
85-1
Step 3
Pattern — M
Length — Vi—’/2 _
Width -2Vi-5-2y2-5-0
Needle Position - L
Feed Dog - High
Pressure - 5
Pool - Buttonhole
85-2
Page 26

90
I’attcrn - M
Lcnuth - '4 -'4
Width -- 2'2-5-2'2-5Needle Position — L
Feed Dog ^ High
Pressure — 5
Foot — Buttonhole
Pattern -
Leneth — 4—0Width - 2H-5-2'
Needle Position Feed Dog - High
Pressure — 5
Foot — Buttonhoit
-0-0
-5-0
L Uli i iOiilUhC
Cording gives a reinforced raised buttonhole.
It is excellent for use on bulky, woven fabric,
or knits in which the stitching often gets
buried and makes cutting difficult. On knits,
a corded buttonhole will help keep the fabric
from stretching out of shape.
Choose a heavy cotton crochet thread or
buttonhole twist to use for cording. Proceed
as for the built-in buttonhole (Page 22) - Loop cord around the front prong and under
the presser foot in such a way that the zigzag
stitch covers the cord.
At the completion of the buttonhole snip the
excess cord close to the bartack on woven
fabrics. For knitted garments, always pull the
cords to the wrong side by using a darning
needle or needle threader and knot the cord
ends before clipping.
Stretch Buttonhole
This buttonhole is used on knit fabrics when
it is desirable to omit interfacing or cording.
This buttonhole will stretch and return to
shape unlike an ordinary zigzag buttonhole.
The ifisX pattern of the stitch makes the bu
ttonholes nearly invisible when using match
ing thread. It is excellent to use on jerseys,
double knits, and sweater fabrics. (Fig.91)
I I
Set the needle position to the left. With
the width at 2'/2, start at the end of the
buttonhole marking. Sew down the left
side of buttonhole until you reach the
end marking or cardboard insert. Leave
needle in fabric at the right side of the
stitches, lift the presser foot. Pivot the
fabric and slide sole up to the end of foot
so the other side of buttonhole can be
made. -
Lower the presser foot and raise the
needle. Move the stitch length to 0 and
the width to 5. Sew several stitches to
bartack. Stop the needle in fabric at the
right side of stitches.
3.
With the needle up, move the stitch
length back to 4 and the width to IVi.
Complete the second half of the button
hole, stopping the needle in fabric at the
left of the end marking.
4.
With the needle out of the fabric, move
the stitch length to 0 and the width to 5.
Bartack several stitches.
5,
With the needle up, slide the stitch width
to 0 and take several stitches to lock the
threads. Cut buttonholes as indicated
previously (page 23).
24
Page 27

X. Applications of the Blind Hem Stitch
Hemming
The blind hem stitch provides a durable hem
finish that is almost invisible on garments
drapes, and curtains. It is done easily with
straight or slightly curved hems, ^ith a littk
practice it will be a very quick and easy hem
application and the hem will never need
repairing.
Procedure; .
(1) Prepare raw edge of hem “ desired
manner, such as overcast, 1/4 men
stitched under, pinked, hem tape, or just
plain. (Fig.92-Stepl)
Fold hem up desired length.
Baste or pin 1/2 inch from upper edge.
Press in place. (Fig.92—Step2) ,, , .
(3) Fold hem back toward right side of fabric
leaving about 1/4 inch extended.
(Fig.92-Step3)
(4) Adjust your stitch width and neeuie
position (Fig.93) so that the zigzag i e
of the stitch comes just slightly to the lett
of the center cut of the presser foot
Then the fold of the fabne may be guided
into the center cut of the presser foot tor
a perfect hem. The straight stitches
should be formed on the single thickness
of fabric, and the zigzag bite should catch
just barely into the fold of the fabric at
Pattern - <1
Length - 2
Width - 2-3
Needle Position - M
Feed Dog - High
Pressure - 5
Foot - All Purpose
92
(S') When stitching is completed, (Fig.94)
remove fabric from machine and turn to
right side. Press completed hem.
When hemming an A-line skirt, p ace a
machine basting stitch along the raw edge
the hem. At an ironing board, fold up the
hem, matching the seams. Ease in the excess
fabric by pulling on basting thread. Press with
steam, then apply hem tape. Baste or pin hem
1/2 inch from taped edge, then continue in о
step 3.
93
94
i
; >
(C
r
Page 28

Pattern -
Length - ‘/2-I
Width ^ 5
Needle Position — M
Feed Dog High
Pressure — 5
Foot — All Purpose
96
Shell Tuck
The blind hem stitch gives a very effective and
easy way to make a shell tuck for lingerie,
pillowcases, and decorative finishes. (Fig.95)
This works well on knits or on the bias of
soft, woven fabrics. A single folded bias tape
may be tucked in this manner, and then
applied under a fold for a decorative hem on
pillowcases or applied with the facings at the
neckline or armhole for a decorative finish.
Fold under the edge where the shell tuck is
to be created. Place the bulk of the fabric to
the right of the needle with the folded edge
to the left. Place the fabric so that the folded
edge will be guiding into the center cut of
the foot. The straight stitches will form on
the fabric, and the zigzag bite will swing to
the left off of the folded edge. (Fig.95) The
shell edge is created as the needle swings
back onto the fabric. The size of the “shell”
can be varied by changing the stitch length.
1 j
; ;
><
' ;
:
i <<
> i
!
> !
I
—
-4>
: <
t- _
H
> i
i
> i
r'
1 ;
: <
> i
; <
S ;
/T “ * F
V _ - i.
\ ■
r "
'=1
Needle Positicn - .M
Feed Dog ^ High
Pressure ^ 5
Foot ^ All Purpose
Decorati"? Effe-''
By sewing two adjacent rows of blind hem
stitching on lace or ribbon attractive decora
tions are created. (Fig.96) The stitch may be
pivoted when the zigzag bite swings to the left
and the points matched in the second row.
Another variation alternates the zigzag bites
in the center of the straight stitched segment.
The stitch may also be pivoted after three
straight stitches to form a snowflake-like
pattern.
A flower design can be created by starting at
the center of the zigzag bite, then pivoting at
the end of each petal as shown. Four more
petals can be added if desired.
26
Page 29

. f-f-. .o \j t Htc iviuitLIpiC OtiLUIl ¿LiyZdy
Overcasting
The multiple stitch zigzag is an excellent
choice for overcasting. (Fig.97) It keeps the
fabric flat and prevents raveling. For most
fabrics, this stitch is better than the zigzag
stitch for overcasting.
The stitch should fall right at the raw edge of
the fabric. Feed the fabric under the presser
foot by guiding the raw edge along the right
hand side of the hole in the presser foot.
97
Pattern - 7:
Length - '/;-l
Width - 5
Needle Position ^ M
Feed Dog - High
Pressure - 5
Foot - All Purpose
Patching
The multiple stitch zigzag is an excellent
stitch for patching. It is stronger than the
zigzag and the tiny stitches bury into the
fabric to make an almost invisible stitch when
using matching thread.
Place the patch over the right side of the worn
or damaged area. Sew around the patch with
the multiple stitch zigzag letting the last stitch
to the right overcast the edge of the patch.
(Fig.98) When turning comers leave the needle
in the fabric at the comer. (Fig.99) Usually
this will be the furthest stitch to the right or
left. In this way, the eomers are doubly
stitched and very strong. When the patch is
stitched in place, trim away the excess worn
fabric on the wrong side of the patch. (Fig.
100)
Mending a Tear or Instant Darning
The multiple stitch zigzag provides a strong
and easy repair for tom garments. It gives an
almost invisible mend, especially when a fine
darning thread is used.
To mend a tear, hold the tom edges close
together and stitch down the middle. (Fig.
101) If the tear is guided under the slot in the
middle of the presser foot, stitching will be
equal on both sides. If necessary, sew again on
either side of the first row of stitching making
sure the needle catches the stitch in the
center. With very worn or frayed fabric,
place a piece of lightweight interfacing or
cotton batiste under the tear for reinforce
ment.
Pattern - ‘A
Length Width - 5
Needle Position - M
Feed Dog - High
Pressure - 5
Foot ^ All Purpose
99
Pattern - Lp
Length
Width - 5
Needle Position M
Feed Dog - High
Pressure - 5
Foot - All Purpose
101
27
Page 30

■^1 '
102
f ■ - ■ r-is. Vi^.
104
'j.' -t,'
/.V-'i '■ 'r^";
rail cm ' . .
Length - m - 1
Width — 5
Needle Position ^ M
Feed Dog ^ High
Pressure — 5
Foot - All Purpose
103
■:
Applying elastic to lingerie or soft knit fabrics
is easy when using the multiple stitch zigzag.
Cut the elastic 2 inches smaller than your
waist measurement. Overlap the raw ends to
form a circle and stitch with a tiny zigzag to
form a box as shown. Fold the elastic into
quarters or eighths and mark with pins. Do
the same with the waistline of the garment.
(Fig. 102) Place the elastic about Id inch from
the top edge of the fabric, matching the pins.
Place under the presser foot and begin stitch
ing. As you stitch, place the forefinger of each
hand on the fabric at either side of the presser
foot. (Fig. 103) Stretch the fabric exactly at
the point where the needle is sewing over the
elastic and the fabric. This will ease your
fabric and elastic together as you sew. The
amount of ease is dependent on how much
you stretch the fabric. In this way you never
need to stretch the elastic, which can be
damaged and stretched out of shape. Trim
off excess fabric above elastic near the stiches.
n
» s
■t«
105^
/ \
< >
\ /
X
< >
\ r
X
/ N
< >
\ /
X
r \
< >
\ /
X
/ \
< >
\ /
NT
/ / / / /
/ / / / /
<<<<<
\ S \ \ N
>>>>>
/ / / / /
<<<<<
\ N \ \\
>>>>>
/ / / / /
<<<<< <
S N N \N
> >>>>
/ / / / /
<<<<<
\ N S S \
>>>>>
/ / / / /
<<<<<
s \ N s \
\ \ \ \ s
A
i \
< >
< >
\ /
V
Pattern — m
Length 1
Width ^ 5
Needle Position -- M
Feed Dog High
Pressure ^ 5
Foot - All Purpose
Pattern W:
Length — 1^2
Width ^3-5
Needle Position ^ M
Feed Dog High
Pressure — 5
Foot - All Purpose
Understitching Facings
The multiple stitch zigzag is an excellent
choice for understitching and eliminating bulk
in facing seam allowances. (Fig. 104) After
attaching the facing to the garment, trim and
clip the seam allowance as usual. Press the
seam allowances toward the facing and use
the multiple stitch zigzag close to the seam,
stitching through the facing and the seam
allowances. Using a matching thread, the
stitch will blend into the fabric and prevent
excess bulk. This is much more successful
than a straight stitch for understitching. It
really helps to keep the facinp from rolling.
Decorative Effects
As with the blind hem stitch, the multiple
stitch zigzag can be used for many decorative
combinations. (Fig. 105) If the stitch is
pivoted when the needle reaches the far left
or right of its swing, and the points are
carefully matched, a tracery diamond shape
results.
On the other hand, if rows of the multiple
stitch zigzag are sewn with the points falling
directly under each other, a wavy pattern is
produced.
Flowers may also be produced. Start in
center; pivot at points shown. Add four more
petals if desired.
28
Page 31

Seams
This stitch gives a finished % inch seam in one
step. For knits, it gives strength and elasticity
to the seams and prevents the curling of the
fabric that often occurs with 5/8 inch opened
seams. It is most applicable to soft, thin knits
such as nylon or acetate knits, but may be
used on other fabrics as well. Always make
test seams with this stitch and with the Ultra
Stretch Stitch and choose between the two
according to performance on the particular
fabric.
For woven fabric, the overlock stitch gives
strength and prevents raveling. It can be used
on woven goods to replace flat felled or
French seams.
For patterns with ’A inch seams: (Fig. 106)
Place the raw edge of the fabric under the
presser foot so that as the needle swings to
the right, it comes down at the raw edge. This
will result in an enclosed seam allowance.
For patterns with 5/8 inch seams: (Fig. 107)
The seam allowances may be trimmed to 14
inch either before or after sewing. If trimming
before sewing, proceed as above. Otherwise,
sew the seam with the raw edge of the fabric
on the etched guide line “14”. (Any time you
use the full width of a particular stitch, you
should readjust the raw edge of the fabric
1/8 inch to the left.) Afterward, trim the
excess fabric near the stitching. This method
is actually easier than the overedge method
for fabrics that curl.
Note: On soft, loose knits, the fabric may
seem to wave or ripple. If this occurs, reduce
the pressure (Page 12).
Pattern —
Length - 4
Width - 5
Needle Position -- M
Feed Dog - High
Pressure — 4 or 5
Foot - .4.11 Purpose
107
Nylon Tricot Seams
The overlock stitch is excellent for use on
fine fabrics such as nylon tricot. Lingerie or
tricot seams should only be about 1/8 inch
finished width. Use size *11 needle for better
seams.
If your pattern has wide seams, trim them
down to /4 inch while cutting out the pattern.
Guide the raw edges of the fabric into the
center slot of the presser foot. On the right,
the needle will stitch over the edge resulting
in a finished rolled seam of 1/8 inch. If a
pucker results when stitching, a looser tension
is needed.
Stitching in this manner can also be used to
form a rolled hem on the raw edge of a scarf.
.Applying Elastic
The overlook stitch gives a very finished
appearance to elastic application. (Fig. 108)
See instructions for elastic application on
Page 28, but use this stitch instead of the
multiple stitch zigzag.
29
Pattern -
Length Width - ;
Needle Po
Feed Dog
4
i
.Nitiuil -
- High
Pressure -
Foot - A
nose
Pattern -
Length — 4
Width ^ 4 or 5
Needle Position - M
Feed Dog — High
Pressure — 5
Foot -- All Purpose
.M
108
Page 32

109
Pattern - XiiX
Length - 4
Width - 5
Needle Position — M
Feed Dog - High
Pressure — 5
Foot — All Purpose
110
.à
Ladder Stitcli
This stitch gives a very effective means of
sewing fake furs and soft leathers to produce
a seam with no bulk. It is also very effective
in a contrasting color as a decorative accent
for special seams, such as raglan sleeves or
for applying an edge trim. (Fig. 109)
Place the bulk of your fabric to the right of
the needle and the raw edge so that the
needle will swing off the fabric at the left.
(Fig. 110) The left side of the stitch will be
formed off of the fabric to provide a very
strong seam with only a tiny seam allowance.
Pull the seam open from the right side until
the “rungs” of the ladder appear. The “rungs”
become a decorative accent if a contrasting
thread is used. On fake fur, the nap can be
pulled up with a needle to hide the stitches
and create an invisible seam.
Pattern Length - 4
Width — 3-5
Needle Position - M
Feed Dog - High
Pressure - 5
Foot
Purpose
Pattern - iCil
Length — 4
Width - 3-5
Needle Position — M
Feed Dog — High
Pressure - 4 or 5
Foot — All Purpose
Hemstitching
By using a very large needle and a fine thread
an openwork effect can be attained which is
beautiful for sewing the hems into table
cloths, napkins, placemats, handkerchiefs, etc.
Use a large needle, size 18 or 20, and a fine
cotton thread. Tighten the upper tension
slightly, until the stitch looks better on the
underside than on top. (You will be sewing
with your fabric face side down.)
Turn up 1 inch then turn up 1 inch again to
form a hem of a double thickness of fabric.
The bulk in comers can be eliminated by
trimming away the excess, as shown, (Fig.
111) after having folded the fabric on all sides.
Stitch from the wrong side, so that the straight
stitch forms on the single layer and the
zigzag bites on the double layer. (Fig. 112)
Stitch all the way to the edge of the fabric
along all sides. (Fig. 113)
Topstitching
The overlock stitch can be used to topstitch
non-raveling fabrics such as felt or leather into
place for appliques or pockets.
Stitch so that the straight part of the stitch is
formed over the edge of the leather, and only
the zigzag part holds it on. (Fig. 114)
I i
30
Page 33

Xlll. Applications of the Straight Stretch Stitch
Seams
Tlus stitch may be used on knits and wovens
(Fig. 115), in areas of stress as a reinforcement
stitch. It is excellent for curved seams such as
armholes and crotch seams. For active wear
such as ski pants and girdle fabrics which
endure a lot of stress in bending and stretch
ing, this stitch may be used for seaming
throughout the garment.
CAUTION - It is difficult to remove this
stitch from fabric. Pre-fit garment before using
this stitch.
Topstitching
Because this stitch is heavier than an ordinary
straight stitch, it is ideal for topstitching,
particularly on knits. Needle position may be
varied from left to right in order to line up
stitching closer to or farther from an edge.
(Fig. 116)
XIV. Applications of the Ultfa-Stretch Stitch
Seams
On most knits, a (4 inch finished seam, such as
the Ultra-Stretch or the Overlock Stitch, is
more desirable than a 5/8 inch opened seam
allowance. These stitches can create a neater,
more professional finish, eliminate bulky
seams, prevent curling, permit the garment to
“give” under stress, and at the same time they
cut down on the amount of work involved in
making a garment. If ever in doubt as to
which of the two stitches to use, test both on
the particular fabric in question and choose
according to their performance.
The Ultra-Stretch Stitch is excellent for
stretch fabrics such as sweater knits, bathing
suit knits, and cotton knits. It has the greatest
strength and elasticity of all.
For patterns with % inch seam allowances:
Feed the fabric such that the needle goes over
the raw edge of the fabric when it swings to
the right. (Fig. 117)
For patterns with 5/8 inch seam allowances:
Feed the raw edge of the fabric along the
etched guide line “'/2”, then trim away the
excess fabric close to the stitching. (Fig. 118)
Pattern - XXX
Length — 4
Width 0
Needle Position - M
Feed Dog - High
Pressure — 5
Foot - All Purpose
Pattern - xXX
Length - 4 '
Width - 0
Needle Position - L—M^R
Feed Dog - High
Pressure — 5
Foot — .All Purpose
Pattern - U.l
Length - 4
Width ^ 5
Needle Pusiiion - ,\i
Feed Dog ^ High
Pressure - 4 or 5
Foot - .All Purpose
117
115
116
118
I
g
119
Elastic Application
Fold fabric over the elastic and stitch elastic
and fabric at one time, using the ultra stretch
stitch. The straight part of the stitch should
form on the double layer of fabric next to the
elastic and the angled part of the stitch should
catch through the elastic. (Fig.l 19)
31
Pattern - iliLength - 4
Width — 5
Needle Position - .M
Feed Dog - High
Pressure — 5
Foot — All Purpose
Page 34

120
121
Twin Needle Sewing Effects
To use a twin needle in the machine,
remove the single needle, and insert the
twin needle into clamp with the flat side
to the back. (Fig. 120)
Threading of the machine when using a twin
needle is the same as normal with these
exceptions: (Page 9)
1. Place thread, matching or contrasting m
color, on each spool pin. and put spool
caps in place.
2. Hold both threads together as you follow
through thread guides as normal, but
separate the threads at the tension. Pass
one thread through the upper disc and one
thread through the lower disc. (Fig. 121)
3. Then separate threads through arm thread
guide (Fig. 122)
When using a twin needle only use the middle
needle position (M). Set the zigzag width lever
at 2V2 to prevent needle breakage with a wide
stitch.
Pattern — M
Length - 2-3
Width - 0-2>/i
Feed Dog — High
Pressure — 5
Foot - Embroidery or
124
II
))»
\\
\\
,fg
// 0
% \\
// #
))
w \\
w
,//
// i(
\\ "X
//
// h
Pattern — Any
Length - Уг-2
Width - 0-2'/2
Needle Position - M
Feed Dog - High
Pressure - 5
Foot - All Purpose or
M Purpose
Embroidery
Pin Tucks ^
Narrow tucks, sewn with thread that matches
the fabric, produce subtle decoration on plain
fabrics. Using the twin needle, sew straight
lines on the fabric guiding the edge of the
presser foot along each successive tuck to
make parallel rows. Soft fabrics will be pulled
to form a soft crease. To achieve a tuck on a
fabric, increase the top tension slightly.
Heavier fabrics will produce two lines of
straight stitching. Attractive pin tucks are
made with the multiple stitch zigzag as well
as with a straight stitch. (Fig. 124)
HINT: Transparent tape makes straight lines
easy to sew. Just sew with the presser foot
guiding along the edge of the tape. When
sewing is completed peel off tape. (Fig.123)
Decorative Tucks or Desiims
Any stitch can be used with the twin needle
for decorative effects. (Fig. 125) Most attrac
tive are the multiple stitch zigzag and blind
hem stitch for fancy tucks. The satin stitch or
tapered zigzag designs in two colors are
effective for creative trims.
Remember to use no more than a 214 zigzag
width for twin needle sewing.
32
Page 35

Yarn and Cord Sewing
Pearl cotton and lightweight baby or mending
yams can be used on the bobbin. Simply wind
cord or yam on the bobbin in the usual manner
(see page 5). By pass the tension, by threading
the cord or yarn through the hole on the
hook as illustrated. (Fig. 126) Bring up bobbin
cord or yam as usual. Select the desired stitch
and sew with the right side of the fabric down
against the needle plate. Top tension may
have to be adjusted slightly.
A straight stitch can be used for a very dyna
mic topstitch effect. Zigzag, multiple stitch
zigzag, or blind hem stitch can make an
interesting decorative stitch. The overlook
with yam can be used to make a stretch
buttonhole on sweaters (see page 24). When
using cord or yam with the ultra stretch
stitch, a reinforced binding on blankets or
garment edges can be achieved. Experiment
with cord or yam to test decorative or practi
cal uses.
Zipper Foot
The zipper foot is used to sew in zippers
and insert cording.
126
127
128
Zipper
1. To sew the right side of zipper, set needle
position dial at “L”, and stitch close to
zipper teeth. (Fig. 127)
2. To sew the left side of zipper, set needle
position dial at “R” and stitch. Close to
zipper teeth. (Fig. 128)
To insert cording
1. Set needle position dial at “L” and make
the welting by sandwiching the cord into
a bias strip of fabric. Stitch close to cord.
(Fig. 129) .
2. Set needle position dial at “R”. Sandwich
the welting between two layers of fabric
with right sides together. Stitch a second
time. The needle stitches close to the
cord through all thicknesses. (Fig. 130)
Quilting Guide
Parallel straight lines are easy to sew with the
quilting guide. (Fig.131) Slide quilting guide
through black clip on back of presser foot
shank. Adjust the curved bar to the desired
distance from the needle. Sew the first
line of stitching as desired, and then for the
succeeding rows let the guide follow along the
previous line of stitching. A straight stitch,
zigzag, or any other stitch may be used.
129
130
131
Page 36

XVI. Additional Sp»:ial Accessories
132
134
136
133
135
Roller Foot
Ideal for use on vinyls, imitation leathers,
jerseys, synthetics and velvets. This foot helps
keep both layers of fabric feeding the same.
On very slippery fabrics, the roller foot helps
prevent skipped stitches. (Fig. 132)
Overcast Foot
Zigzag overcasting may tend to roll the edge
of some fabrics causing a bulky edge. The
overcast foot helps to produce a flat edge.
The bar behind the needle hole holds the
threads firmly in a full width zigzag or overlock
stitch to keep the stitches from drawing
tightly together. (Fig. 133)
Blind Hem Foot
For all those who find machine blind hemming
difficult, this foot gives a clear guide for the
fold of fabric to follow. The blind hem foot is
a fine accessory for those who like the
strength and durability of machine hemming.
(Fig. 134)
Rolled Hem Foot
Recommended for narrow rolled hems on
scarves, shirts, linens, and linings. This foot
makes a very tedious hand sewing job very
easy to do on a sewing machine. (Fig. 135)
Fringe-Foot
Thick chenille type loops can add interest to
appliqued flowers and animals. Used with a
satin stitch this foot gives a plush texture to a
design. Also used for hemstitching and tailor
tacking. (Fig. 136)
34
Page 37

XVII. Care and Maintenance of Your Sewing
Machine
1. Changing Needles
3.
Always use the correct type of needle
a.
for your machine.
Always use the appropriate size
b.
needle for the thread and fabric you
are using.
Always change the needle after every
c.
other garment.
Needles dull easily and when dull will
damage both your fabric and your
machine.
Always put needle in machine cor
rectly. It will cause stitches to be
skipped if it is inserted incorrectly.
Pulling on fabric while sewing will
e.
bend the needle, which will sub
sequently break the needle and
damage the needle plate.
Cleaning
After each garment is completed, a
a.
light cleaning is recommended. Use a
lint brush to clean bobbin case area,
tension discs and needle bar.
Keep machine covered when not in
b.
use to prevent accumulation of dust
and dirt particles.
Oiling
Use a pure oil, one that has no
a.
detergents. It is best to buy oil
manufactured specifically for sewing
machine use. Other oils will eventual
ly cause the mechanisms to lock up.
Your machine should be oiled every
b.
8-10 hours of use, using only one
drop in each red oiling spot. Your
machine cannot be over-oiled but
excess oil may drip and stain your
garment.
Before oiling the machine remove the
following:
139
35
The needle
(1)
The presser foot
(2)
The needle plate. Loosen the two
(3)
screws with the large screw driver,
then lift off the plate. (Fig. 137)
Do not lose the screws.
The bobbin case. With your right
(4)
thumb, puO the black bracket up
and to the ri^t. (Fig. 138) Lift
out the bobbin case with your
thumb by pulling it to the right.
Use the lint brash to remove all lint
from the open area in the bed of the
machine. In addition, open the face
plate and clean above the needle bar.
(Fig. 139)
Page 38

Using a sewing machine oil, place a
single drop on each oiling point as
illustrated, specifically those points
marked in red on your machine.
(Fig. 140) Run the machine to allow
the oil to penetrate.
After you have finished oiling the
machine replace the bobbin case by
placing case into the machine and
pushing toward the left until the
grooves fit. (Fig. 141) Place the screw
driver to the right of the black bracket
and force it toward the left and down.
To test bobbin case for correct place
ment, place thumb in center of the
case and pull toward the right. The
black bracket and bobbin case should
remain in place.
The needle plate should then be
placed into its normal position and
the screws tightened, then the presser
foot and needle are replaced.
(pages 9 &14)
4. Changing the Light Bulb
Open the'^face plate by pulling towards the
left. Turn the light bulb counterclockwise to
remove. Replace the bulb by turning clock
wise. (Fig. 142)
141
142
A majority of service calls could be avoided
by foUowing the above procedures and by
first checking to see that the machine is;
1. Threaded properly.
2. That the bobbin is wound evenly.
3. That the needle is in the machine
correctly.
36
Page 39

\ N X V
■ ,'\ V
y(//
W
^ X '
X\ ' /■
V N
\ ^
\
\\\.^:-/W
/
W/
\\ /X'
w;// X
■'// \
" \x
. \ X X /
)06:
W'^
x\ .
VX/
X/
1. Skipped stitches
Skipped stitches have become a problem in
recent years, especially with the appearance
of knit fabrics and polyester threads on
the market. Skipped stitches normally can be
traced to four basic causes:
A. The Needle
The needle is dull or bent. Change it.
(1)
The needle is placed incorrectly in
(2)
the needle clamp. It is either
backwards or the height is wrong.
The wrong type of needle is being
(3)
used for the fabric. Use ball point
needle on knits and wedge point
needles for leathers and vinyls.
The thread is too thick for the size of
(4)
needle being used. Use a larger
needle.
The Thread
B.
(1) The machine is threaded incorrectly.
(2) Many brands of polyester thread are
too stiff and coarse thus making loop
formation difficult or impossible.
Change brands or use a cotton
thread.
C. The Presser Foot
(1) The foot being used is not holding
the fabric taut enough over the
needle plate hole, thus the fabric is
being pulled up and down while
stitching. Use the foot which gives
the most control possible for the
particular job being done.
(2) There is not enough pressure on the
presser bar to hold the fabric firmly.
Increase pressure on the pressure
control.
D. The Fabric
w
\
If your machine skips stitches only on certain
fabrics, try all of the above procedures before
calling a repairman.
The fabric has a heavy finish on it
which deters stitch formation. Wash
the fabric thoroughly before sewing.
37
Page 40

Tliread Breaking
A. Machine improperly threaded.
B.
Thread is caught in a slit of the spool
or under the spool.
c.
Thread is dry or of poor quality.
Tension is too tight.
D.
E.
Starting the machine with take-up
lever in the wrong position. Always
start and end sewing with take-up
lever in highest position.
F.
Needle is bent, blunt, or has a bunon it.
G.
Needle is not inserted correctly.
H.
Thread is too coarse for needle being
used.
I.
Needle plate has been nicked by the
needle, thus is sharp and cuts the
threads.
Needle Comes Unthreaded
A. Take-up lever is not in correct posi
tion as you start sewing. Always
start and end with your take-up lever
in its highest position.
Needle Breaks
A. Pulling on fabric while sewing bends
the needle, this may cause breakage
if needle hits the plate. .
B.
Needle is inserted incorrectly.
C.
Needle is too fine for the type of
fabric.
Needle is hitting pins.
D.
E.
Presser foot is improperly fastened.
F.
3.
6. Threads Jam at Start of Sewing
Machine is improperly threaded.
Material Puckers
A. Tensions are too tight.
B. Improper threading.
C.
Thread is too heavy for fabric.
D.
Stitch is too long for fabric.
E.
Needle is dull so it is difficult to
pierce fabric.
The presser foot being used is not
holding the fabric taut enough.
G.
A. Hold the threads tightly for the first
B. Place thread ends under side of
C. Be sure the presser foot is down on
If all else fails, try sewing over paper.
few stitches.
presser foot instead of to the back.
thick fabrics.
7. Machine is .Noisy
A. Clean and oO it.
B. If it is a punching sound, change the
8. Bobbin Does Not Wind Properly
needle.
A. Machine is improperly threaded.
B. Rubber wheel on bobbin winder is
worn or not making contact.
C. Bobbin winder tension disc is not in
position.
rotary
v^e^N
en\oV
38
Page 41

Accessones ................................................................................................................. p
.
..............
3,34
Adjusting for the Fabric .................................................................................................................. “
Adjusting the Stitch...........................................................................................................................P
All Purpose Foot..............................................................................................................................
Applique...........................................................................................................................................P
Basting..............................................................................................................................................2 4
INDEX Page
Blind Hem Foot ..............................................................................................................................
....
Blind Hem Stitch.............................................................................................................................P "
Buttonhole Foot.....................................................................................................................................
...
Buttonholes......................................................................................................................................35-36
Care and Maintenance...................................................................................................................
Changing the Light Bulb.................................................................................................................... ^ ^5
Changing the Needle .........................................................................................................................p’
Cloth Guide........................................................................................................................................23
Cord Sewing ......................................................................................................................................p
Corners
....
..........................................................................................................................................17 27
Darning .p...............................................................................................................................
Decorative Sewing ......................................................................................................... 2i
......
9’, 20 , 26, 28, 32, 33
Elastic, Applying.............................................................................................................................“ ’
Elastic Thread Shirring ....................................................................................................................P 2 q 2 6 28 32,33
Embroidery................................................................................................................................................... ’ ’ “ ’ ’
Embroidery Foot................................................................................................................................P
Etched Seam Guide.........................................................................................................................
Facings, Understitching .................................................................................................................
Feed Dog Control ............................................................................................................................24
Fringe Foot..........................................................................................................................................^ j
Gathering Over a Cord..................................................................................................................
....
Hems, Blind Hem Stitch .................................................................................................................... 1 ”
Hems, Flutter ...................................................................................................................................2Q
Hemstitching ...................................................................................................................................... .
Installation Into Cabinet or Case.....................................................................................................^ ^
Lace...................................................................................................................................................
....
Ladder Stitch ...................................................................................................................................27
Mending ...........................................................................................................................................^ 2
Minor Problems and Their Solutions ..........................................................................................
Monogramming-Freehand .............................................................................................................. 27 28
Multiple Stitch Zigzag....................................................................................................................... ^ ’25
Needle, Changing...............................................................................................................................p’
Needle Position .................................................................................................................................. ^
Needle Selection.................................................................................................................................. „
Needle, Thread, Fabric Chart ......................................................................................................
Oiling ................................................................................................................................................24 ’
Overcast Foot
........................................................................................................................................
Overcasting - Multiple Stitch Zigzag............................................................................................
Overcasting * Zigzag........................................................... 1
Overlock Stitch ...............................................................................................................................
39
Page 42

Parts Identification.......................................................................................................................... j_2
Patching ...........................................................................................................................................27
Pattern Selector Dial ......................................................................................................................11
Pinning .............................................................................................................................................
...
Pin Tucks..........................................................................................................................................32
Pivoting ............................................................................................................................................16
Presser Foot, Changing ..................................................................................................................14
Presser Foot, Selection ....................................................................................................................¡4
Pressure Control .............................................................................................................................12
Principle Parts.................................................................................................................................. 1_2
Quilting Guide.................................................................................................................................33
Relating Stitch Length to Stitch Width
......................................................................................
10
Removing the Needle Plate........................................................................................................................ 9 35
Reverse Button ..................................................................................................................................lo’
RoUed Hem Foot............................................................................................................................ 34
RoUer Foot........................................................................................................................................34
Satin Stitching....................................................................................................................... 19
Seam Guide........................................................................................................................... 15
Seams
............................................................................
15—17 29
Seams, Curved........................................................................16 ’ ’
Seams, Ending..................................................................................................................................
...
Seams, Knits .............................................................................................................................. Ig
Seams, Nylon Tricot .......................................................................................................................29
Sewing on Buttons ...............................................................................................................! J8
SheB Tucking .................................................................................................................................. 26
Shirring ............................................................................................................................................ 17
Stitch Length Dial ..........................................................................................................................
...
Straight Stretch Stitch.................................................................................................!' ^ ! 31
Straight Stitch Foot....................................................................................................................... 14
Tapering Zigzag ...................................................................................................................'!! ! 19
Tension Adjustments .....................................................................................................................
...
Threading the Machine .................................................................................................................. 5_ 6
Topstitching ...................................................................................................................................... 17 30 31
.
Turmng Comers .............................................................................................................................
Twin Needle Sewing
Ultra Stretch Stitch
............................................................................................................................................3 2’ ’
...
............................................................................................................ . 32
.........
.............................................................................................................
.....
Winding the Bobbin......................................................................................................................... 5
Yam, Sewing with ......................................................................................................................... 3 3
Zigzag Stitch Applications ............................................................................................................
...
g_21
Zipper Foot..................................................................................................................................... 33
Zippers ........................................................................................................................................... 3 3
31
40
Page 43

41
Page 44

42
 Loading...