

Page 1

tit
<19
INSTRUCTION
,0« SE..0
Page 2

CONTENTS
Name of parts
1.
Turning of light
2.
Winding the bobbin............................................................. 3
3.
Inserting of the needle
4.
How to thread the needle
5.
How to remove the bobbin case................................................. 6
6.
How to insert the bobbin case................................................ 6
7.
How to thread the bobbin case................................................. 7
8.
How to sew straight stitches.................................................. 8
9.
Adjustment of stitches and reverse Sewing
10.
Use drop feed device
11.
Adjustment of pressure to cloth............................................... 12
12.
Regulating width of zigzag stitch
13.
Manual zigzag sewing
14.
How to keep the machine in good repair...
15.
How to make button holes
16.
Darning and embroidery
17.
Sewing on buttons
18.
Narrow hemming
19.
Sewing in a zipper
20.
Installing sewing heads in cabinet or portable base
21.
Blind hems................................................................................................................................................................................. 24
22.
.................................................................
..............................................................
.......................................................
.....................................................
.....................................
..........................................................
............................................
.........................................................
....................................
.....................................................
.......................................................
............................................................
...............................................................
...........................................................
.........................
1
2
^
5
11
H
13
14
15
16
18
19
20
21
22
.1'"
Page 3

1. NAME OF PARTS
^ ? 29 1 2 28 27
ni A*
1. Spool pin
2. Zigzag width control knob
3. Bobbin winder thread guide
4. Top cover thread guide
5. Thread take-up lever
6. Patchomatic darner
7. Face plate
8. Thread guides
9. Needle bar
10. Needle bar thread guide
11. Presser foot thumb screw
12. Presser foot
13. Shuttle cover slide plate
14. Feed teeth
15. Needle plate
16. Needle
17. Pres ser bar
18. Needle clamp
19. Thread tension regulator
20. Arm
21. Bed plate
22. Drop feed knob
23. Reverse button
24. Stitch length regulator knob
25. Stitch indicator window
26. Balance wheel
27. Bobbin winder latch
28. Bobbin winder spindle
29. Top cover
Page 4
2. TUENING ON LIGHT
The lamp housing is enclosed in the face plate (Fig 2).
The switch for operating the light is beneath the face plate (Fig 3).
Changing bulb:
Be sure to first unplug your sewing machine. With your left hand, open the face
plate and the bulb is easily replaced.
I ^
l!
Fig. 2
Fig. -3
Page 5
3. WINDING THE BOBBIN
The bobbin is easily wound by the fol
lowing method.
(a) Turn the stop motion knob (1) toward
you while holding the balance wheel
(2) with the left hand, loosening it
so the wheel will run free without
operating the sewing mechanism.
(b) Place the Spool on the Spool.pin (3).
Pass the end of the thread through the
Arm Thread Guide (4). Also pass it
between the discs of the tension brack
et (5). Wind the thread around the
Bobbin (6) seven or eight times, and
place the bobbin on the Bobbin winder
spindle (7). The bobbin winder auto
matically disengages when the bobbin
is about 907o full.
5 4
3 8 7 6 2
Fig. 4
Page 6
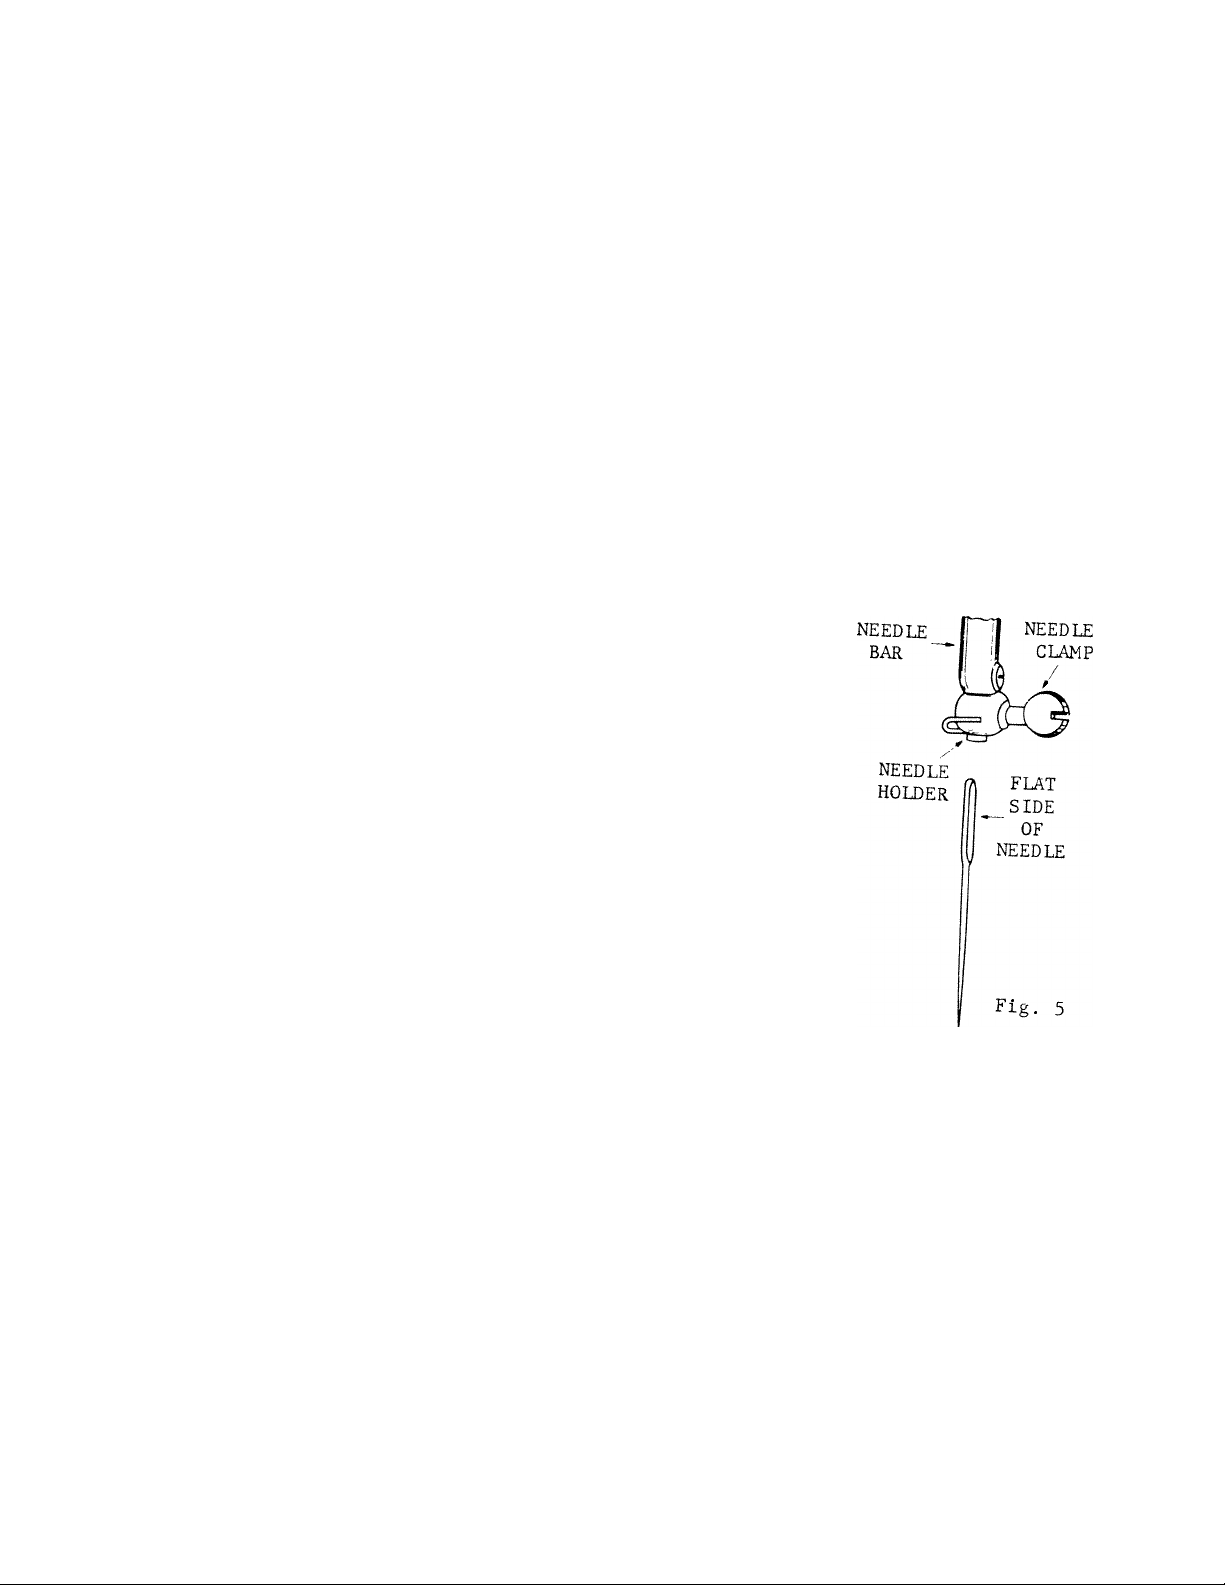
4. INSERTING OF THE NEEDLE
(a) Loosen the needle clamp with your right hand
and hold needle so that the flat side is to
your right. Then insert the upper part of the
needle until it hits the closed end of the
clamp,
(b) Tighten the needle clamp with your right hand.
(c) As the picture indicates, turn the needle
clamp to the left to loosen it, and turn it to
the right to tighten it.
(d) Always make sure that the long groove in the
needle is toward the left.
Page 7
5. HOW TO THREAD THE NEEDLE
(a) Raise the needle bar to its highest point.
(b) Thread the needle by following the numbers indicated in the picture.
(1) Arm Thread Guide
(2) Tension Bracket
(3) Tension Disc
(4) Tension Thread Guide
(5) The Take-up Spring
(6) Thread Take -up Lever
(7) Arm Thread Guide
(8) Arm Thread Guide
(9) Needle Clamp Thread Guide
(10) Needle
Fig. 6
Page 8
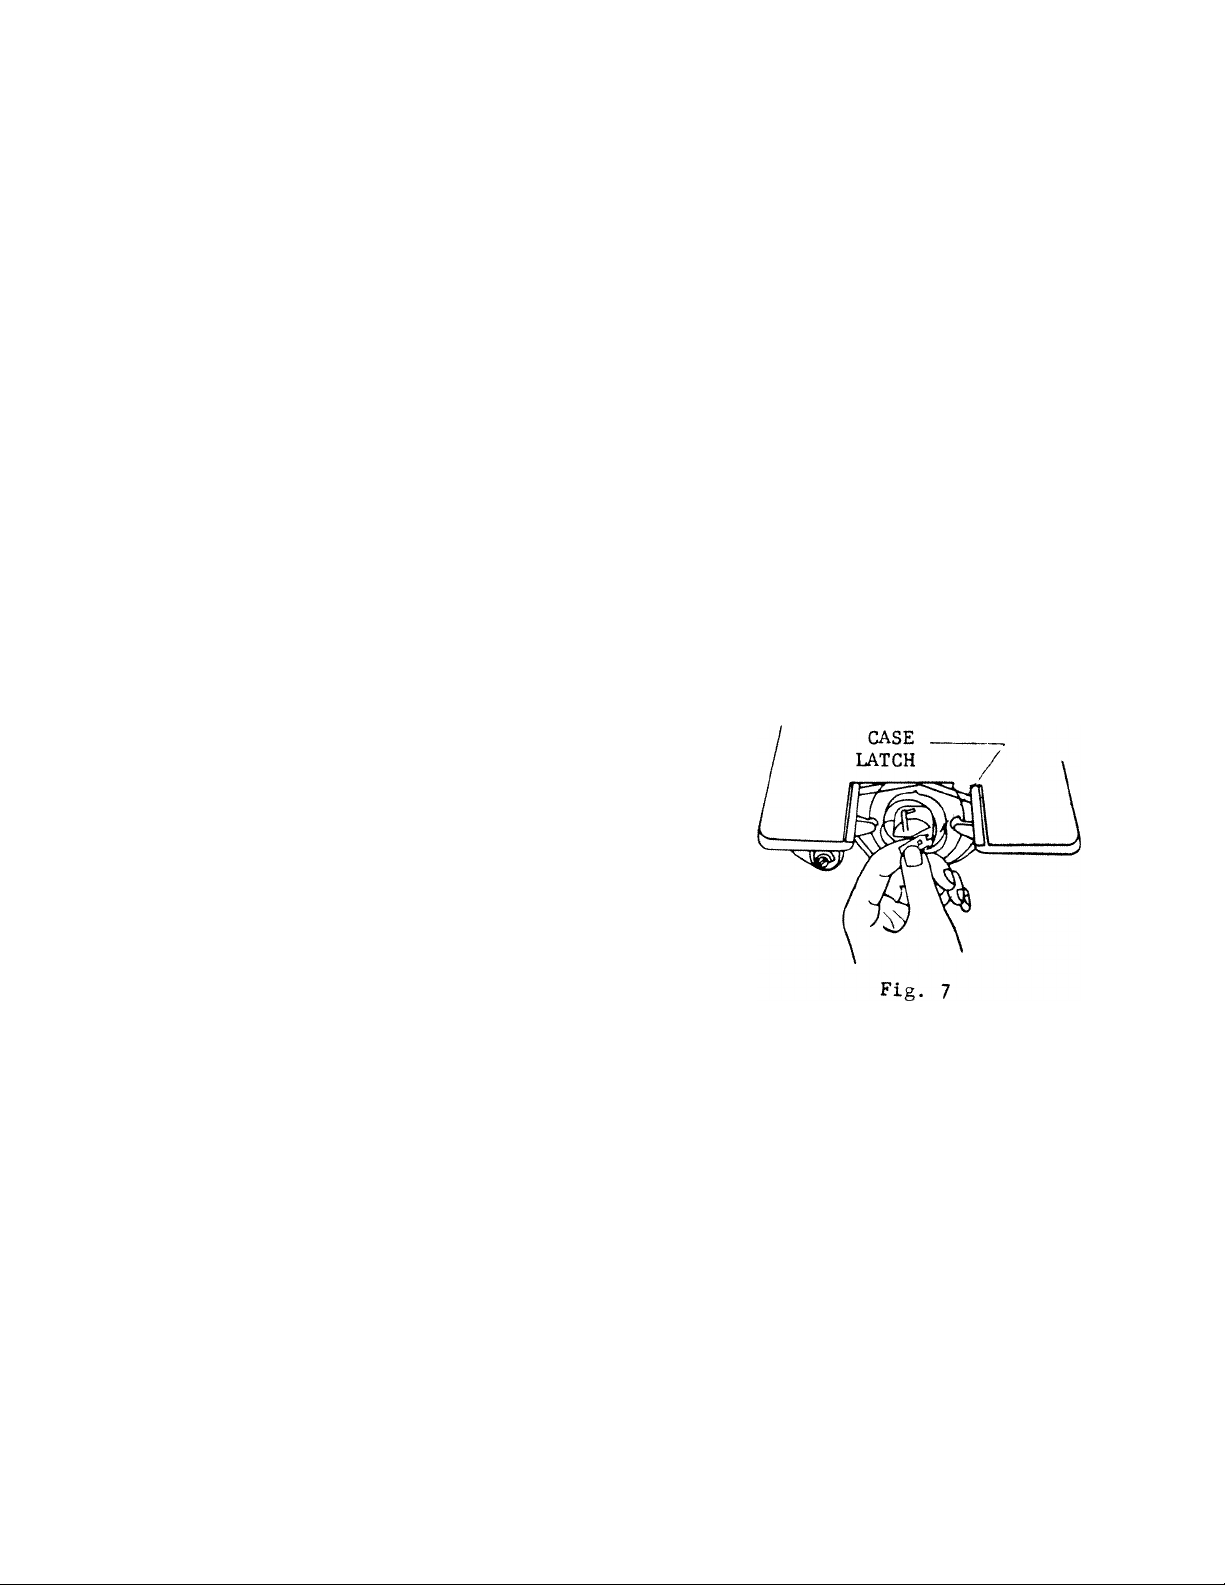
6. HOW TO REMOVE THE BOBBIN CASE
(a) Raise the needle bar to its highest point by
turning the balance wheel.
(b) Open the bobbin case cover.
(c) Open the latch of the bobbin case and take it
out.
(d) Close the latch of the bobbin case thus taken
out, and turn it with the open side downward.
The bobbin will drop out.
7. HOW TO INSERT THE
BOBBIN CASE
(a) Open the latch and insert the bobbin case on the
shuttle race pin. Be sure that the horn goes
into the slot in the shuttle race.
(b) Close the latch when the bobbin case has been
inserted.
(c) Be careful not to remove or insert the bobbin
case when the needle bar is lowered. The shuttle
body and the shuttle race will be damaged if
BOBBIN
this warning is ignored. — 6 —
Page 9

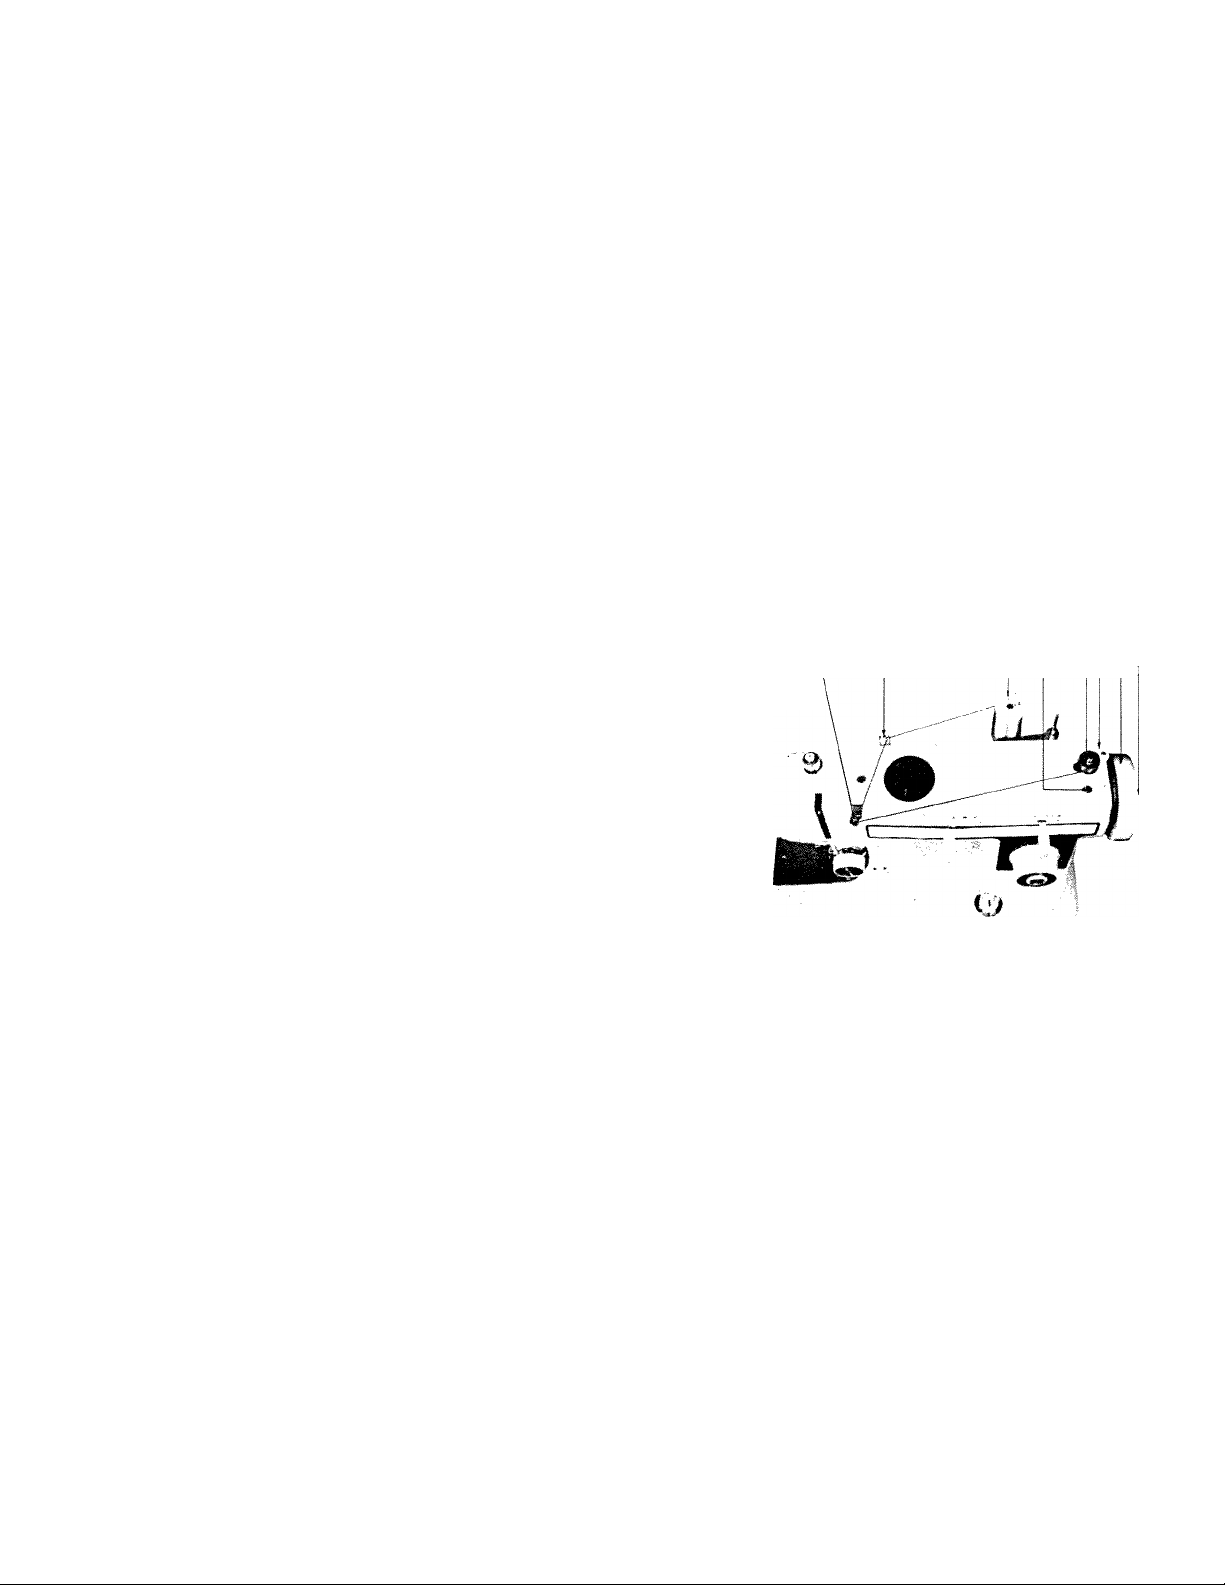
8. HOW TO THREAD THE BOBBIN CASE
(a) Hold the bobbin in your right hand, pull out the thread about 5 inches, and
insertin the bobbin case. (Fig. A)
(b) Pull the thread through the slot in the bobbin case as indicated in Figure B,
and pull the thread under the tension spring.
(c) Pull out the thread, and it will come out to the position indicated in Figure C.
Page 10

9. HOW TO SEW STRAIGHT STITCHES
(1) Prepare for Sewing as Follows:
(a) Set the zigzag width regulating knob to "0" (zero po
sition). Now you can sew straight sewing.
(b) Hold the upper thread lightly in your left hand.
(c) Turn the balance wheel toward you gently with your
right hand, until needle enters needle plate & re
turns to highest point.
(d) When the needle bar with the thread inserted into the
needle has been raised, pull the upper thread, and
the lower thread will come out of the needle hole
picked up by the upper thread.
(e) Put both the upper and the lower thread beneath the
presser foot and pul] the ends to the back.
(2) Actual Sewing:
(a) Place the cloth to be sewn beneath the presser foot,
making one stitch by turning the balance wheel, and
lower the presser foot.
(b) Start sewing.
(c) Do not pull on the material. This often causes the
needle to break.
(3) How to Change the Direction of Sewing:
- 8 -
Page 11

(a) Stop sewing with the needle in the cloth
(c! L»:: 2 izz
(4) How to Remove the Cloth:
(a) When the needle bar has reached its highest noint cr. •
(b) Raise the presser foot and ^ sewing.
(5) Adjustment of the Upper and Lower Thread Tension,
( } Satisfactory seams can be produced by
being sure the upper thread and the lower
thread are knotted right in the middle of
the two pieces of material being sewn. See
Figure C.
(b) When too much tension is applied to the
upper thread, the result shown in Figure A
is produced.
(c) When too much tension is applied to the
lower thread, the result shown in Figure B
presser root and resume sewing,
presser toot and pull the material out to the left.
Fig. 13
Page 12

is produced, (looping on the bottom)
(6) How to Adjust the Tension of the Upper Thread
(b) Turn the tension disc to the right to increase the tension.
(c) j-urn it to the left to loosen the tension
(7)
111 Z- ‘Z°ZZ
(7) How to Adjust the Tension of the Lower Thread
(a) Ordinarily it is unnecessary to change the
tension of the lower thread, but there are
some fabrics that require a change.
(b) Turn the screw to the right in order
tighten the tension.
(c) Turn the screw to the left in order
loosen the tension.
(d) As it depends entirely upon the tension
whether or not you sew well, it is highly
important that you learn how to adjust the
tension as soon as possible.
(e) Use the small screw driver in your acces
sory kit to make these adjustments.
““ -“p »p pt»ippp<i.
to
to
-10-
Page 13

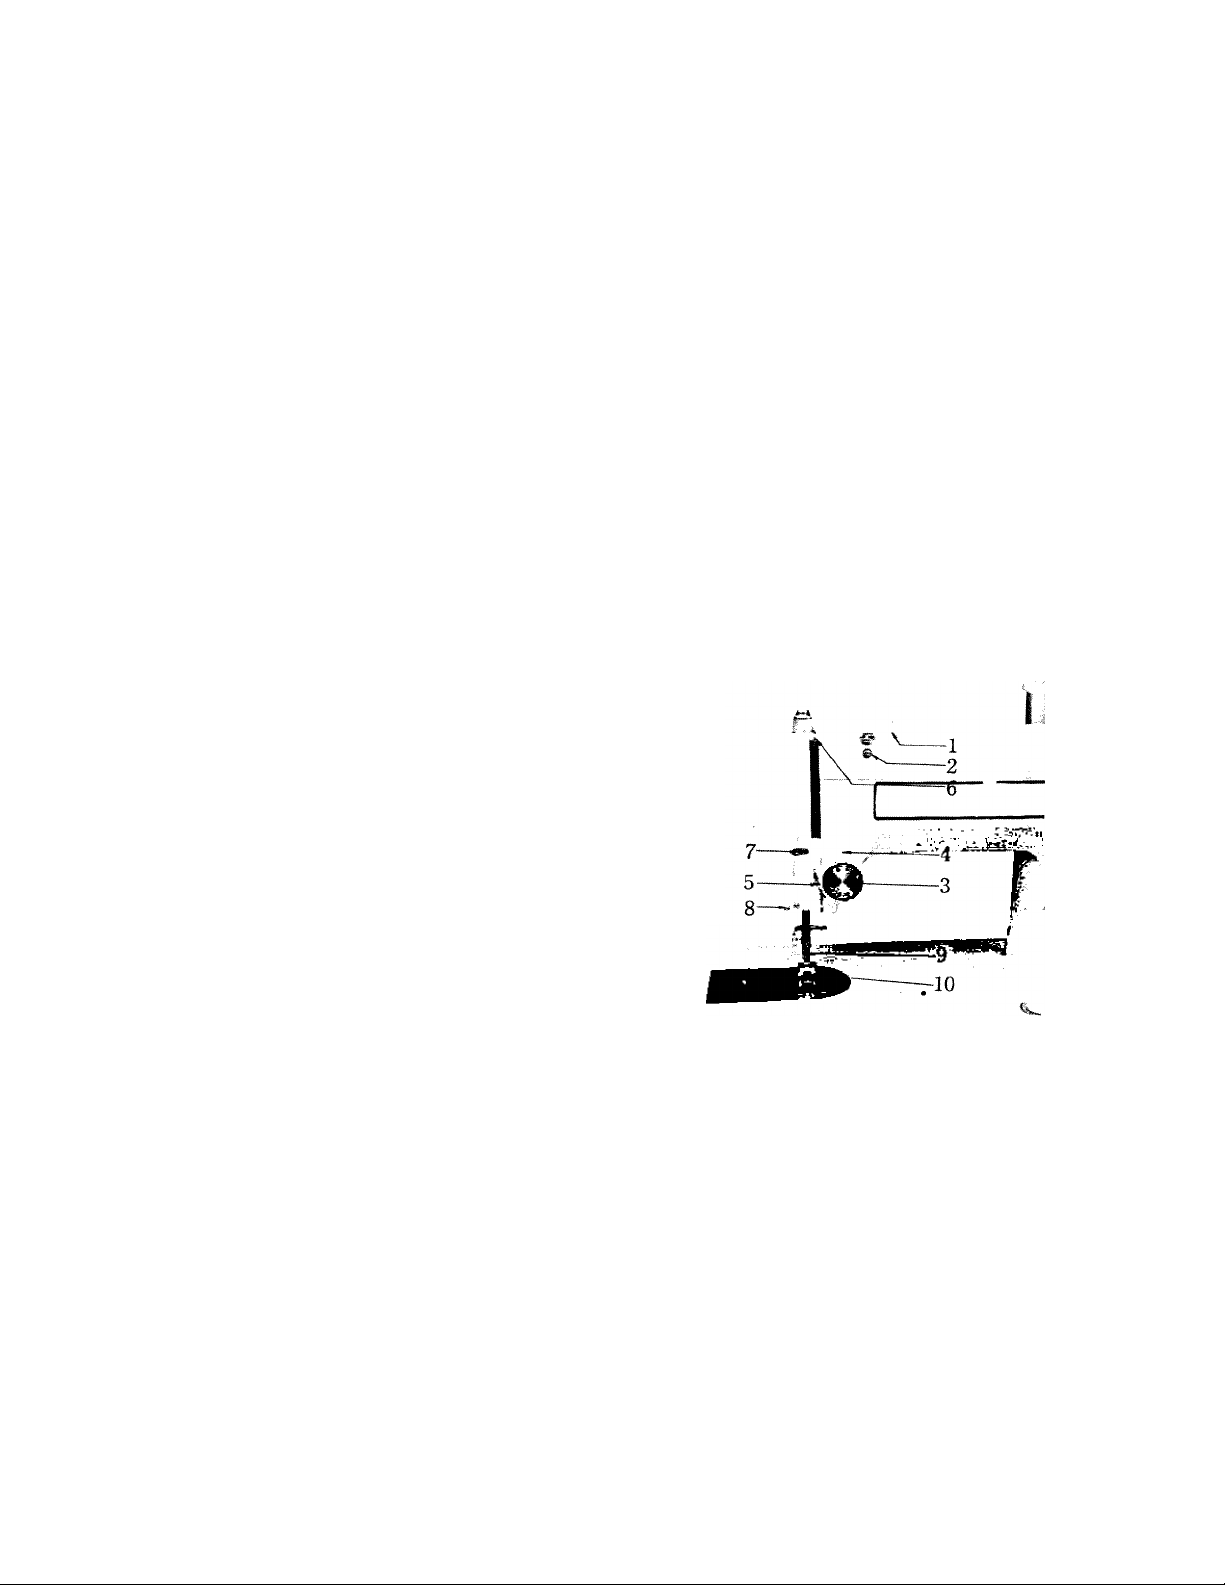
10. ADJUSTMENT OF STITCHES
AND REVERSE SEWING
(a) The figures on the indicating plate (3)
show the stitch length.
(b) Turn the knob (1) setting the desired
length of the stitch to the black-mark
on the knob (2).
(c) For reverse sewing, push the push button
reverse (4) until it stops.
11. TO USE DROP FEED DEVICE
Darning and embroidering is facilitated by means of the drop feed knob on the right
hand corner of the bed.
When this knob is set at "0", the feed teeth drop below the surface of the needle
plate so that it will not interfere with
the free movement of the cloth.
The feed teeth will return and resume their
normal operation when the knob is set at "2".
For sewing light materials like silk, it may
be set at "1" position in order to avoid
puckering the material.
-11-
Page 14

12. ADJUSTMENT OF PRESSURE TO CLOTH
(a) In the case of ordinary cloth, it is seldom
necessary to adjust the pressure, but when
sewing thin or delicate materials the pressure
must be so adjusted that the cloth gets the
proper pressure. For instance, too much pres
sure will cause the material to pucker.
(b) Press down the patch-o-matic darner (A) and
the presser bar will jump up and the pressure
will release. Press down the presser bar (B)
and the pressure will become strong.
(c) You can easily adjust the pressure. In the
case of embroidering, the presser bar should
be raised to its highest point.
12-
Page 15

13. REGULATING WIDTH OF ZIGZAG STITCH
The width of tlgtag stitch Is regulated by the zigsae width ,
rigtag width lever to desire zlzzae stlth "Idth lever. By moving the
straight stitch, and to "5" mar zigzag stitch. Instance, to "O" as
Zigzag stitch accordinelv s
Fig. 9
13-
Page 16

14. MANUAL ZIGZAG SEWING
By manually adjusting Che stitch length, zigzag width while running the machine, a variety of omamental stitches are
sewn.
following are some examples of manually sewn omamental stitches:
Patterns
—
I-«"’«""!-»
Stitch Length
any length
short
any length
"
long and short
(repeat)
any length
"
14-
Width
0
5
1-5
••
any width
5-2-5
"
Page 17

IS. HOW TO KEEP THE MACH/NP
Oiling CHINE IN GOOD repair
IS SQ important that if
ot only shorten the ^ should be neaT
nT , roachine'Q '^^gligent in •
; ° al3„ "
Oo not use fnn cause it p
°° »11. I, PP P'PC.O„
(2) Where to Oil
<p)
to be oiled. PPPPP
Just one drop at a ti
<P^ «^PU you dare „ned “
'"pppppuj. run the „aed;:;
WhxX0 Q l r^т T i-OE 3.
slowly so that the oil
penetrate and ^
The Quali,, Of tb T'"'
Oil of nn Used
the ^ quality will not n 1
the machine to run u ^ause
will cause wear and
°nly good quality'"'' °f
- -Wing machines "
^ “""Pcessary ,
"Py sta,„ „
BOTTOM
-15-
Big. 22
Page 18

HOW TO MAKE BUTTON HOLES
Place a marking needle
across the cutting
space to protect the
stitching.
1. Kemove the regular presser foot and attach t-ho k
2. Set the zig-zae wiHrh i v attach the buttonhole foot.
3. Mark witr^pLcIfor IhS^^tL^poLi° "Pitches (stain stitch),
the fabric. -“-^ngth of the buttonhole on
zigzag width lever between "1" and "2"
Stop the machine with needle on fabric at point A.
16-
Page 19

end to brine thp к ^s^ng the needlp я
-7 ■ feed tep^ь u
'• the eigeag width J drop f„d t
taok. (2) ** ® at '4., P faed k„
8- Raise teedle e " ^°"t stitches t
at „g,, -«P fabric, siao taise deed te th K
»P» to sew the other row g '*’'* “-P feed кос
"ееа 1" g^d "2" (to 1оГ dettonhole ret
stltchiog reaches he p„sit°"""‘' ’a» со ‘ 1*-^ be
“• To „ske the iidal bar-t.l «*“- (3, ““ datli Д
bar-tack. (4) ^gain setting the d. '
11- Return zigzag -a u ^ at "П" a
thread. 5 ® to "0" a^d r.u the
Re„o;:^r,fP"P stitches to is t
« -- -ebioe sod open the hott h
C) P bottoohoie cott
Pr*esser foot апи •
■17-
Page 20

17. DARNING AND EMBROIDERY
Raise the presser bar lifter and remove the presBei. foot. Then lower the presser
bar lifter to ensure the thread tension device is set correctly.
Set the drop feed knob at "O",
Now your machine is ready for embroidery and darning.
Embroidery will be done most successfully when the fabric is stretched and fixed in
an embroidery hoop. Hold the hoop closely on the machine bed with both hands, press
the material with your left forefinger in the vicinity of the needle.
This will help in holding down the material and will prevent the machine from
making skipped stitches. Manipulate work carefully and be sure to keep fingers out
of the path of the needle.
Adjust thread tensions for the best appearance of embroidery work and slightly in
crease the bobbin thread tension to avoid the lower thread from being pulled up.
18-
Page 21

18. SEWING ON BUTTONS
(b)
)-op.,..,
(c) Place the button under th^ k
fcot. Get both holes c r
foot evenly. centered under the
(<i) Turn the balance wheel tn
ybur bpttop eyes, and fl* eh
''"»b at the propen „„ ■ "“‘b
\^) Run the marsK,-
proper position.
machine at medium speed •
wneei to set the .c
‘■bout 5 or 6 stitches.
<0 Set the Zigzag width knob maklne e
straight stitches In the sas,e h„^ “
zigzag stitch. lock
■19-
fig. 25
Page 22

19. NARROW HEMMING
Turn balance wheel towards you until needle
reaches its highest point. Raise presser bar
and remove the regular presser foot. At
tach hemmer foot (Fig. 27).
1. Fold over edge of material approximately
wide, then fold it over again in the
same way for a length of about 2". Insert
this folded end from beneath into spiral
formed opening (scroll) or hemmer foot.
Move material back and forth until the
hem forms itself in the scroll.
2. Pull material towards you until the beof the hem is just below the
needle.
3. Lower presser foot and begin to sew.
Guide material into hemmer foot while
sewing (Fig. 27).
NOTE: Do not crowd material into scroll and do not leave scroll
by material.
Feed just enough material into the hemmer foot to fill out the scroll.
Instead of a straight stitch, you can also use a zigzag stitch for this hemming
operation. Be sure however, to adjust the width of the zigzag stitch to be as
wide as the hem itself. Using a very long stitch and tight tensions will pro
duce a shell stitch.
-20-
Fig. 27
only partly filled
Page 23

20. SEWING IN A ZIPPER
The Zipper foot included in the arrpce^ •
rlc. accessories enables you to attach a tipper „„ feb-
Remove the regular presser foot and attach thp •
the machine. zipper foot to the presser bar of
First open out the tipper and place fab
ric in the position under the needle.
Set the machine for straight stitching.
Loosen the thumb screw (A) to set the
foot on the left side of the needle and
saw the left-side zipper as sho™.
To sew the right-side zipper, bring the
foot to the right side of the needle.
21-
Page 24

21. INSTALLING SEWING HEAD IN CABINET
OR PORTABLE BASE
1. Back off both head hinge set screws
until head hinge hole is clear.
2. Tilt head hinge tongues up and back
as far as they will go.
3. Carefully slip head onto head
(1) CABINET
Hi HEAD HINGE
HOLES
hinges-making sure tongues are in
serted as far as they can go into
head hinge holes.
4. Allow the head to rest in its
tiltedback position.
5. Tighten boht set screws securely
with screw driver.
6. Plug electrical leads into sockets
located inside cabinet. Cord iden
tified with "motor" tag must be
into socket marked "motor".
Untagged cord gees to "light"
- socket.
^22
Page 25

(2) PORTABLE BASE
■ 23-
Page 26

22. BLIND HEMS
1. Usfe blind stitch cam. NO. 8
2. Use standard zigzag presser foot
3. Set needle position lever in right notch marked
4. Set zigzag stitch width control knob at ”o”
5. Set stitch length control dial between “2” and “3”.
Prepare the garment in the same manner as for hand hemming.
Step 1. If hem with folded edge is used make first fold 3/8” deep.
Step 2. Turn hem the depth desired and baste 1/4 from upper edge.
Press into place. __
◄ R
Step 3. Fold hem back toward right side of garment leaving 1/4 extended.
Step 4. Place material under presser foot and sew blind hem automatically.
 Loading...