

Page 1
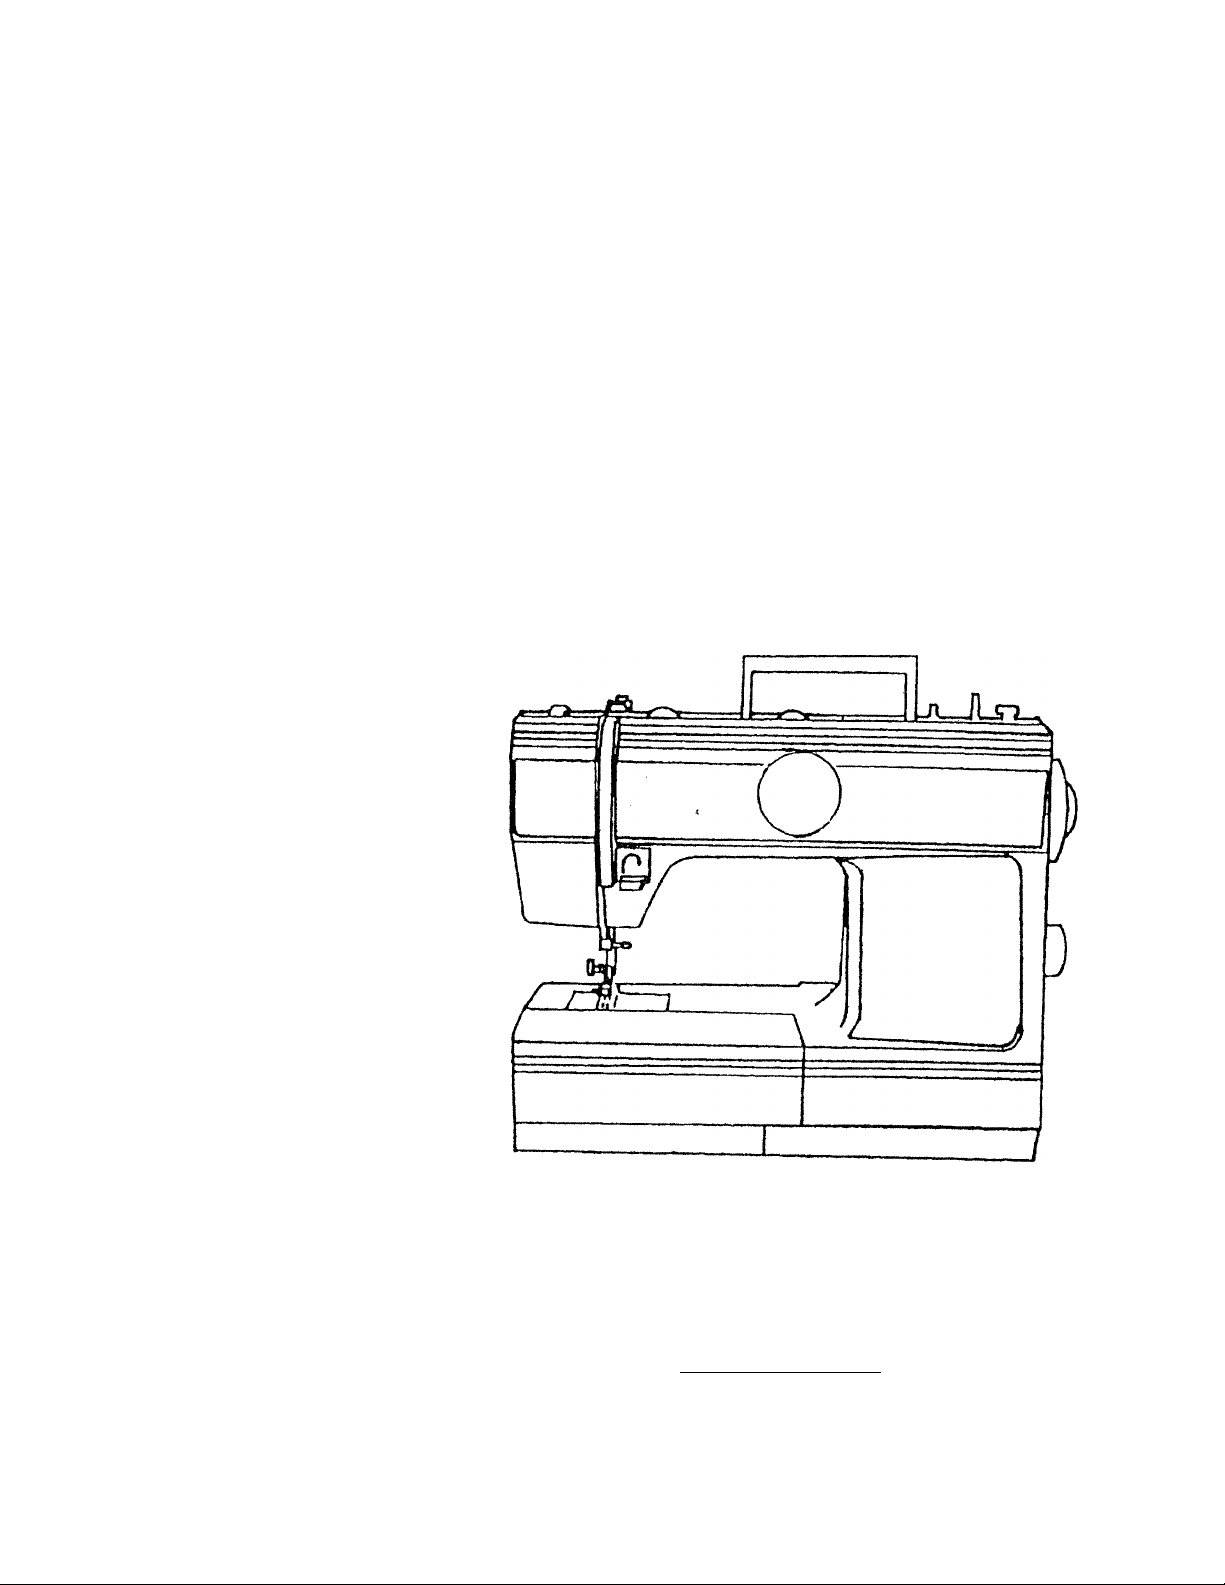
INSTRUCTION MANUAL
FOR
SEWING MACHINE
EL MANUAL DE INSTRUCCIO’N
PARA
COSER MAQUINA
\\2b
UIHITE
Call Toll Free
800-331-3164
www.whitesewinq.com
Page 2

POLARIZED PLUGS CAUTION
This product is equipped with a polarized alternating
current line plug (a plug having one blade wider than
the other). This plug will fit into the power outlet only
one way. This is a safety feature. If you are unable to
Insert the plug fully into the outlet, try reversing the plug.
If the plug should still fail to fit, contact an electrician
to replace the obsolete outlet. Do not defeat the safety
purpose of the polarized plug.
WHITE SEWING MACHINE COMPANY
Record in spece provided below the Serial No. and
Model No. of this appliance.
The Serial No. is located on Bed Plate.
The Model No. is located on Rating Plate.
Serial No.
Model No.
Retain these numbers for future reference.
emmmmmmmmmm
Page 3

IMPORTANT SAFETY INSTRUCTIONS
When using an electrical appliance, basic safety precautions should always be
fotowed, including the following; ^
Read all instructions before using
(this sewing machine)
DANGER To reduce the risk of .
An appliance should never be left unattended when plugged in. Always unplug this
appliance from the electric outlet immediately after using and before cleaning.
Always unplug before relamping. Replace bulb with same type rated 15 watts.
WARNING
To reduce the risk of burns* fire,
electric shock, or injury to persons:
Operate sewing machine only when mounted in sewing machine table, case, and the
like. See the instaliaiion instructions.
1. Do not allow to be used as a toy. Close attention is necessary when this appliance
is used by or near children.
2. Use this appliance only for its intended use as described in this manual. Use only
attachments recommended by the manufacturer as contained in this manuffl.
a Never operate this appliance if it has a damaged cord or plug, if it is nA working
properly, If it has been dropped or damaged, or dropped into water. Return the.
appliance to the nearest authorized dealer or service cerner for examination, repair,
electrical or mechanical adjustment.
4. Never operate the appliance with any air openings blocked. Keep ventilation open
ings of the sewing machine and toot controller free from the accumulation of tint,
dust, and loose cloth,
5. Never drop or insert any object into any opening.
6. Do not use outdoors.
7. Do not operaté where aerosol (spray) products are being used or where oxygen is
being administered. , ,
a To disconnect, turn all controls to the off (“0”) position, then remove plug from
outlet. .
9. Do not unplug by pulling on cord. To unplug, grasp the plug, not the cord.
ia Keep fingers away from all moving parts. Special care is required around the sewing
machine needle.
11. Always use the proper needle plate. The wrong plate can cause the needle to breax.
12. Do not use bent needles. .
13. Do not pull or push fabric while stitching. It may deflect the needle causing it t
break. .
14. Unplug the sewing machine when making any adjustments in the needle area,
such as threading needle, changing needle, threading bobbin, or changing
presser toot, etc.
15. Always unplug sewing machine from the electrical outlet when remowng
lubricating, or when making any other user servicing adjustments mentioned in the
instruction manual.
SAVE THESE INSTRUCTIONS
Page 4

CONTENTS
Name of Parts................................................................................................................................................. 1&2
Accessories........................................................................................................................................................3
Before sewing(Power supply and Sewing lamp)................................................................................................4
Take out extension table,free arm sewing..........................................................................................................5
Winding the bobbin.............................................................................................................................................6
Removing bobbin case and bobbin....................................................................................................................7
Inserting bobbin into bobbin case..
Inserting bobbin case into shuttle race..............................................................................................................S
Threading upper thread & Twin needle threading..............................................................................................9
Drawing up bobbin thread................................................................................................................................ 10
Levelling machine..............................................................................................................................................11
Changing sewing directions...............................................................................................................................12
Adjusting thread tension....................................................................................................................................13
Regulating the presserfoot pressure................................................................................................................ 14
Drop feed...........................................................................................................................................................15
Changing needle................................................................................................................................................15
Fabric- Thread- Needle table.............................................................................................................................16
Sewingipattern selector)and operation table.....................................................................................................17
To start sewing................................................................................................................................................. 18
To finish seam.................................................................................... I....................................................... 19
Straight stitch.....................................................................................................................................................20
Zigzag sewing....................................................................................................................................................20
Overcasting........................................................................................................................................................21
Stretch stitch......................................................................................................................................................21
Blind stitch........................................................................................................................................................22-23
Button sewing....................................................................................................................................................24
Binding...............................................................................................................................................................24
Zipper sewing.....................................................................................................................................................25
Button hole sewing.............................................................................................................................................26
Hemming.......................................................................................................................................................... 27
Twin Needle.......................................................................................................................................................28
Embroidery.........................................................................................................................................................28
Quitter............................................................................................................................................................... 29
Seam guide........................................................................................................................................................29
Maintenance (Cleaning and oiling)................................................................................................................... 30
Checking Performance Problems WHAT TO DO..............................................................................................31
....
..............................................................................................................7
Page 5

LOS CONTENIDOS
El nombre de partes......................................................................................................................................... 3
Los accesorios.................................................................................................................................................. ^
Antes de Coser(fuente de alimentación y Cosiendo Lampara)................................................................. ^
Quitar extention mesa,el brazo libre cosiendo....................................................................6
Torcer el carrete
Quitar carrete y caso de carrete
Meter carrete en el caso de carrete..................................... ^
Meter caso de carrete en la reza de transbordador.......................................................................................
Enhebrando hilo superior & la aguja Melliza enhebrando......................................................... • • • • •
De dibujo arriba el carete enhebra.......................................
Nivelación de la máquina............................................................................................................................... ... 12
El cambio que cose direcciones
Ajustando tensión de hilo
Regular la presser caminar presión
Baje alimentación..................................................................... ............................................................................,5
La aguja cambiante
La Tela Enhbra mesa de Aguja............................................................................ , .,. ita
Cosiendo(selector de modelo) y mesa de operación
.......................................................
.................................................
.............................................. ........................................................................
........................................
.................................
....................................................
..........................................................................................j
.....................................................................^
,
...............
.................................................................
.........................................................................................jg
.................................................. ■ ■ •'''''''' ’'' ’'
..........
.........
...........
' ^
■ Para comenzar cosiendo.
Para terminar costura
Derecho hilvanar
El zigzag cosiendo................................................................... ..........................................................................21
Overcasting............................................................................ .............................................................................21
Derecho estirar costura.................................................................................................................................... 22-23
ti
Ciego toser puntada.............................................................. ............................................................................24
El boton cosiendo............................................................................
La atadura........................................................................ ....................................................................................25
La cremallera cosiendo.......................................................... ............................................................................26
El hoyo de boton cosiendo
Tosiendo......................................................................... .....................................................................................28
Mellizo aguja............................................................................................. ..........................................................28
El bordado............................................................................... ...........................................................................29
Acolchando............................................................................. ...........................................................................29
Cosa guia............................................................................. ................................................................................30
El mantenimiento(Limpiando y aceitando)................................................................ ......................................
La comprobación problema de de desempeño..............................................................
...........
............................. ... 19
................................................
..................................................................
..........................................................
.... zo
...............................................................................20
.................................................................
37
B
Page 6
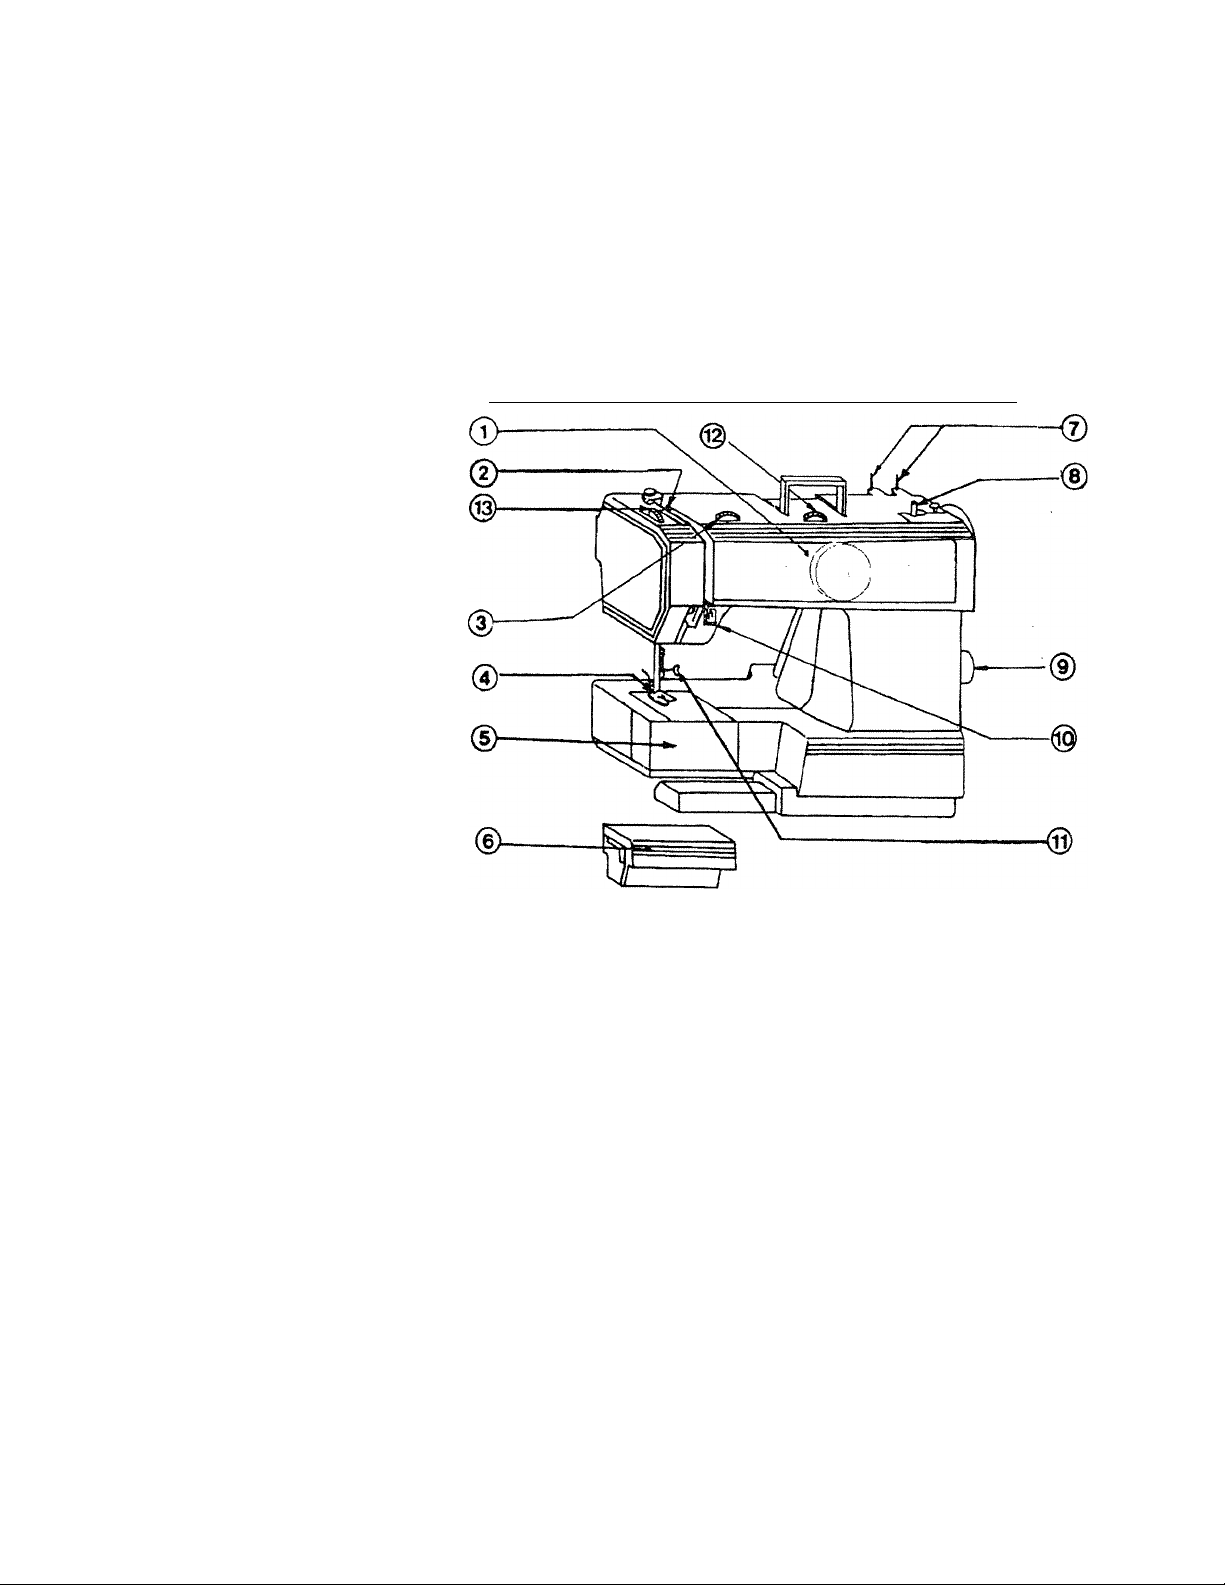
NAME OF PARTSfFRONT VIEW)/ NOMBRE PE PARTESfLADO ANTERIOR!
Stitch selector 1.
1.
TTiread take-up lever
2.
3. Thread tension dial
4.
Presser foot
Shuttle cover
5.
a Accessory tray
7.
Spool pins
8.
Bobbin winder spindle
9. Stitch length dial
10. Reverse button
11.
Needle clamp screw
12.
Stitch width dial
Presser foot pressure diai
13.
1. Use a soft cloth to clean the
machine.
Do not expose the machine to
direct sunlight.
Selector de puntadas.
2.
3.
4.
5.
6.
7.
Alfileres de hilvanado.
8.
Carretel para llenado del hilo.
Dial para longitud de las puntó
9.
Botón de reserva.
10.
11.
12.
13.
Use un paño suave para limpiar la
máquina.
*
No exponga la máquina a los rayos
solares.
Page 7
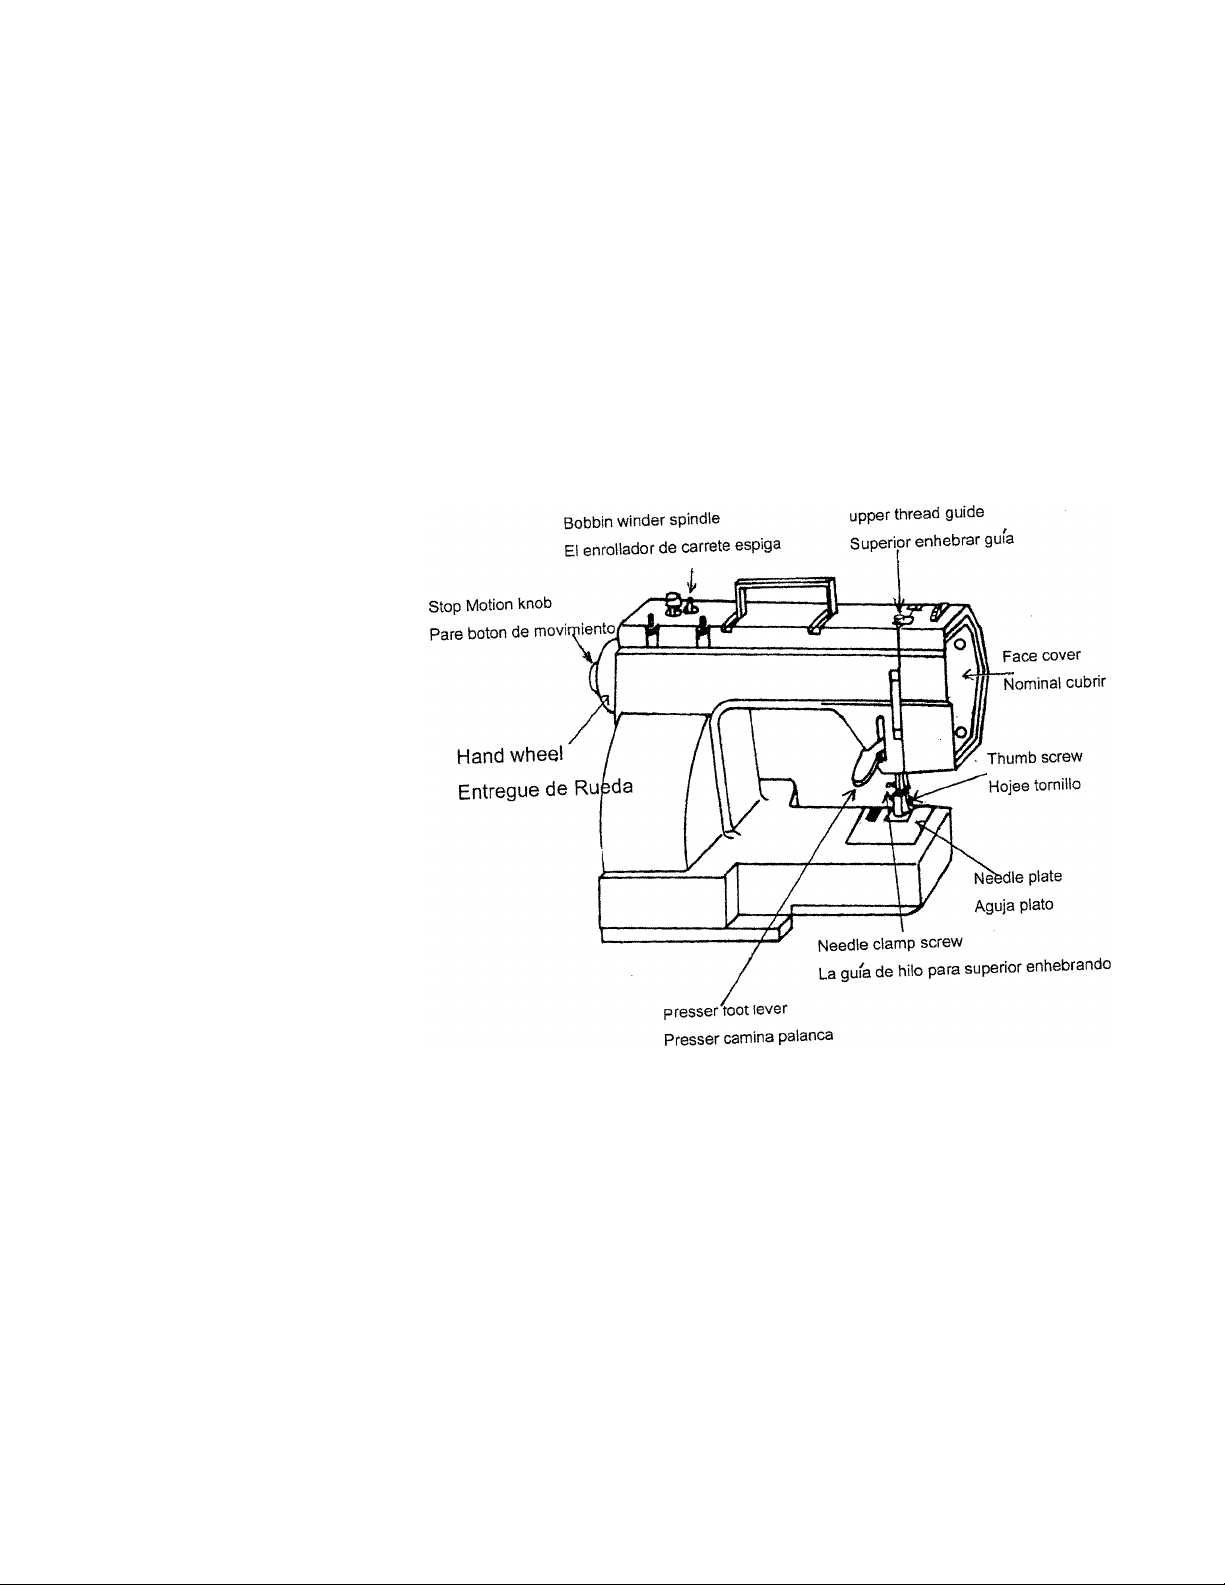
(REAR VIEW)
Page 8
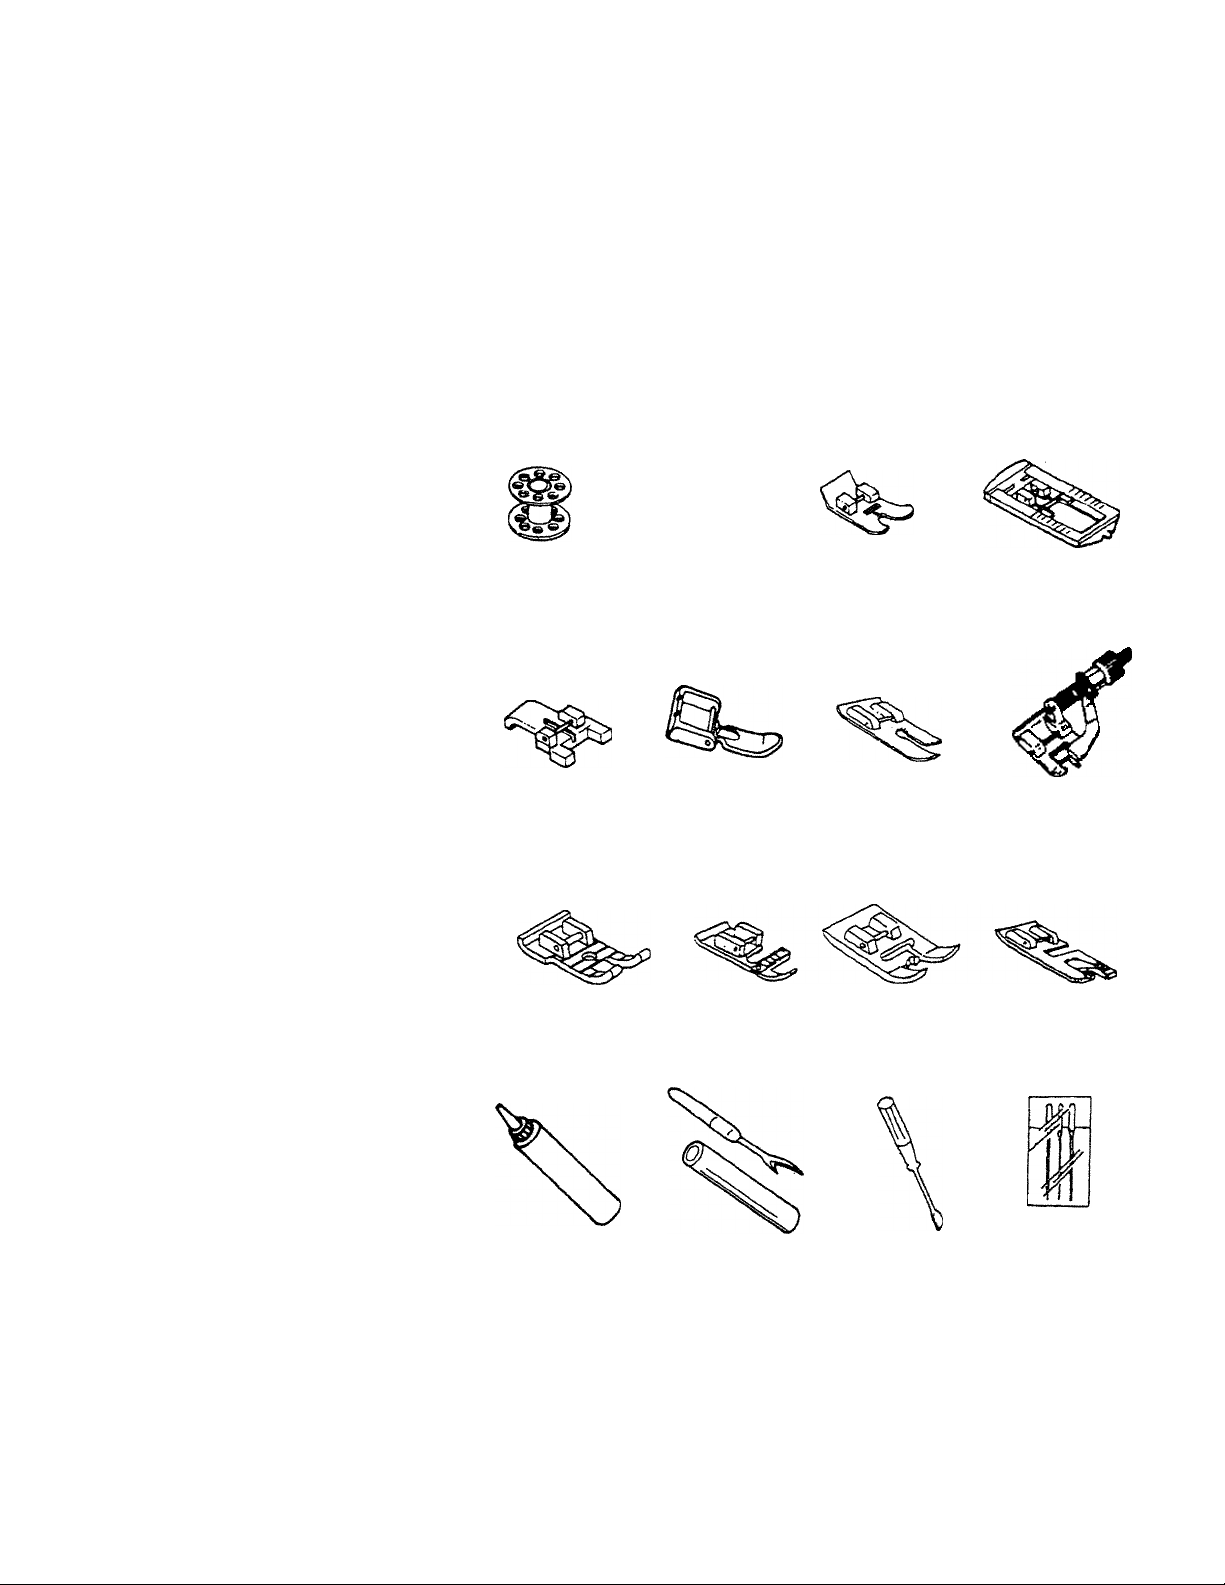
ACCESSORIES/ LOS ACCESORIES
Bobbin
Bobina
Button sew on foot
Pie de coser botones
1/4 inch piedngfoót
Prénsatelas de 'A de
pulgada
Spool pin felt
Reltro del porfacarrefe
Zipper foot
Pie de cremallera
Cording foot
Pie de cordoncillo
Zigzag foot
(On machine)
Pie de zigzag
(en la máquina)
Straight stitch foot
Pie de puntada recta
Gathering foot
Pie de recogido
Buttonhole foot
Pie de ojales
Blind stitch foot
Pie de puntada
invisible
Nanraw hem foot
Pie de dobladillo angosto
Machine oi!
Aceite para la máquina
Buttonhole cutter
Cortador de ojales
Screw driver
Destornillador
Needles
#11 #14
Agujas
No. 11 y No. 14
Page 9
BEFORE SEWIME/ ANTES DE COSER
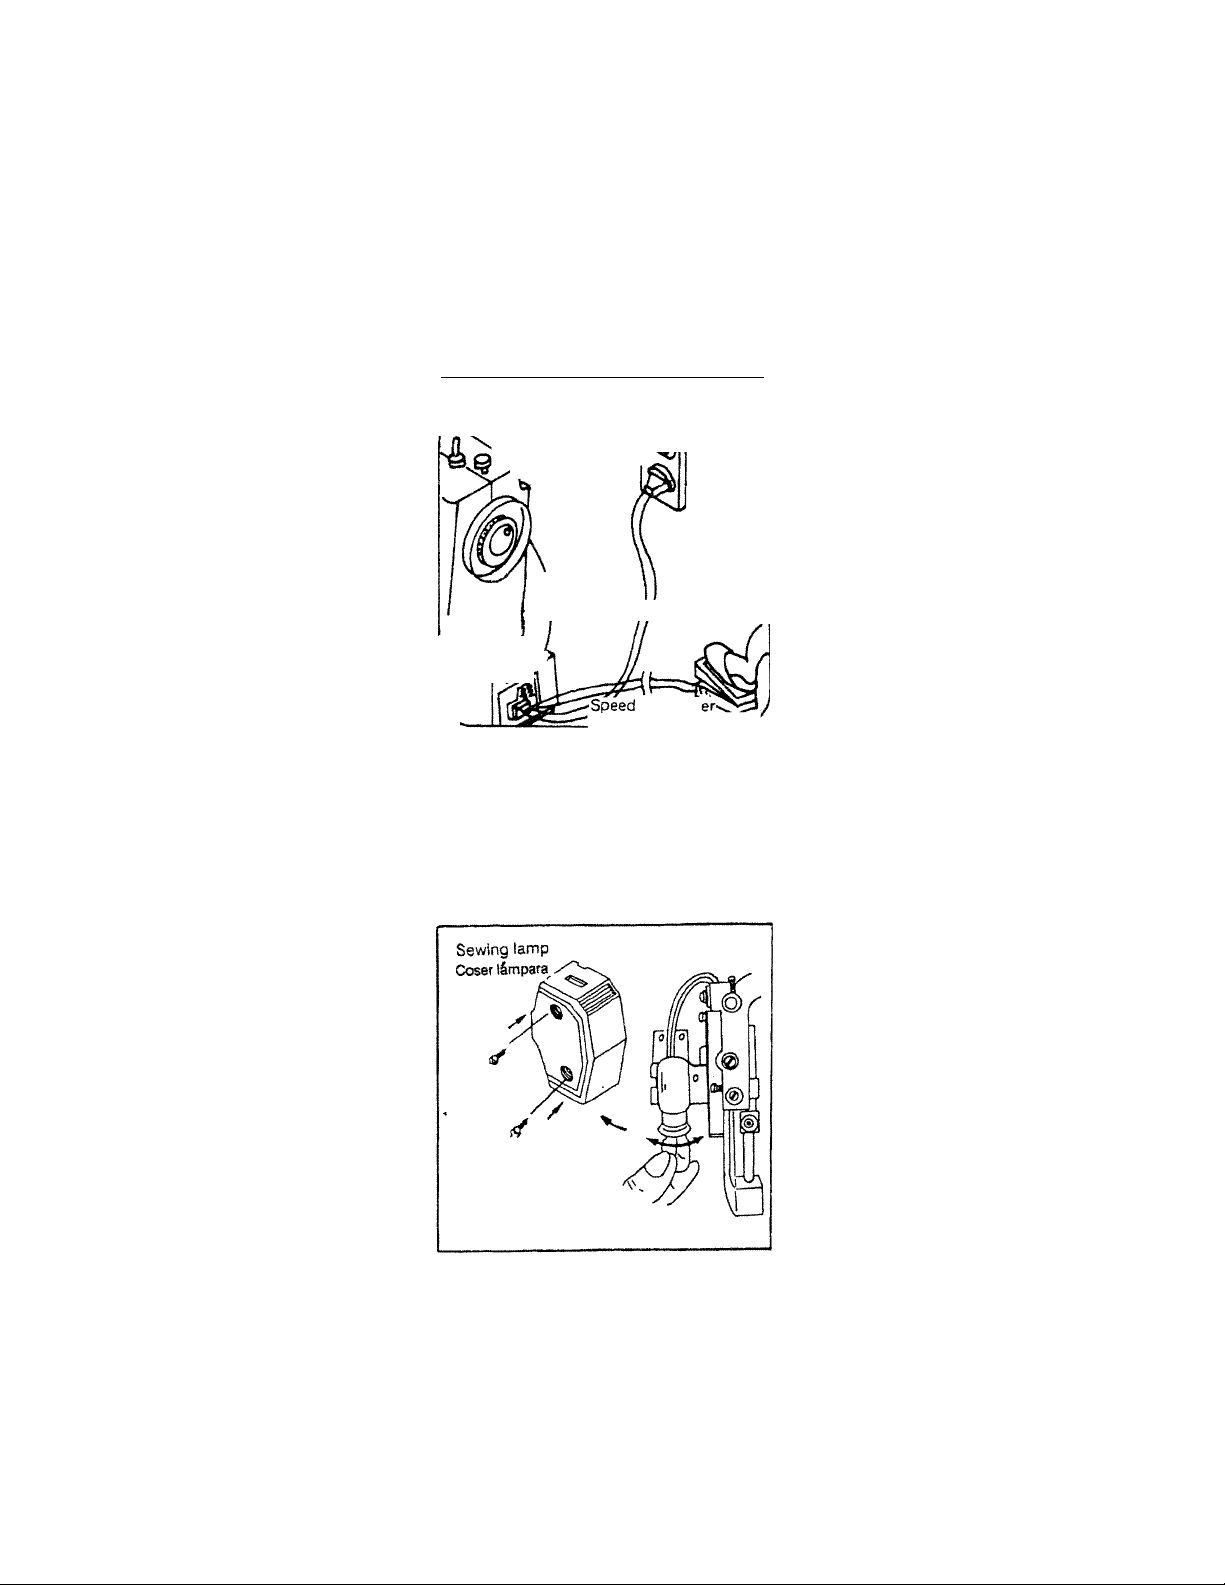
1. Fit plug into the machine.
Power supply plug 1^
Enchufe de suminis
tro de energía
Plug receptacle^.
Receptáculo depnchufe
Machine plug
Enchufe de la
maquinan
"Control de velocidad''
IMPORTANT : When leaving the sewing machine unattended, the
plug must be removed from the socket outlet.
Power suddIv model YC-482 foot controller with
Suministrador ^'^hine,
de energía j Adapte la máquina obturar en la máquina.
_ control! __
2. Plug the machine to the power supply.
3. Sewing speed can be varied by the foot control.
2.Obture la . máquina a la fuente de alimentación.
3. Coser la velocidad puede ser variada por el
oonWador de velocidad.
Solamente usa regulador de pie del Modelo YDK
YC-482 para maquina de coser.
ADVERTENCIA: Cuando la máquina no es utilizada, antes de cambiar la lámpara
o antes de proceder a limpiarla, retire el enchufe de la toma de
corriente.
REMOVE OR INSTALL BULB
1, Open face cover in direction of arrow.
2. Remove bulb by unscrewing
it counter-clockwise.
. 3. Install a new bulb by screwing it in clockwise.
4, Use a screw type bulb withi20v/15W(Max).
1. Quite o instale bombilla desde adentto de portada
nominal. ,
2. Abierto nominal cubrir en la direcetón de flecha.
3. Quite bombHIa por desatomlar lo mostrador
dockvñse.
4. Instale una bombia nueva poi atornillar
lo dockwise.
5. Use una bomMla de «pd de tomMo con
120V/15W. (Max)
When servicing the sewing machine, or when removing covers or
changing lamps, the machine must be disconnected from the supply
by removing the plug from the socket outlet.
Page 10
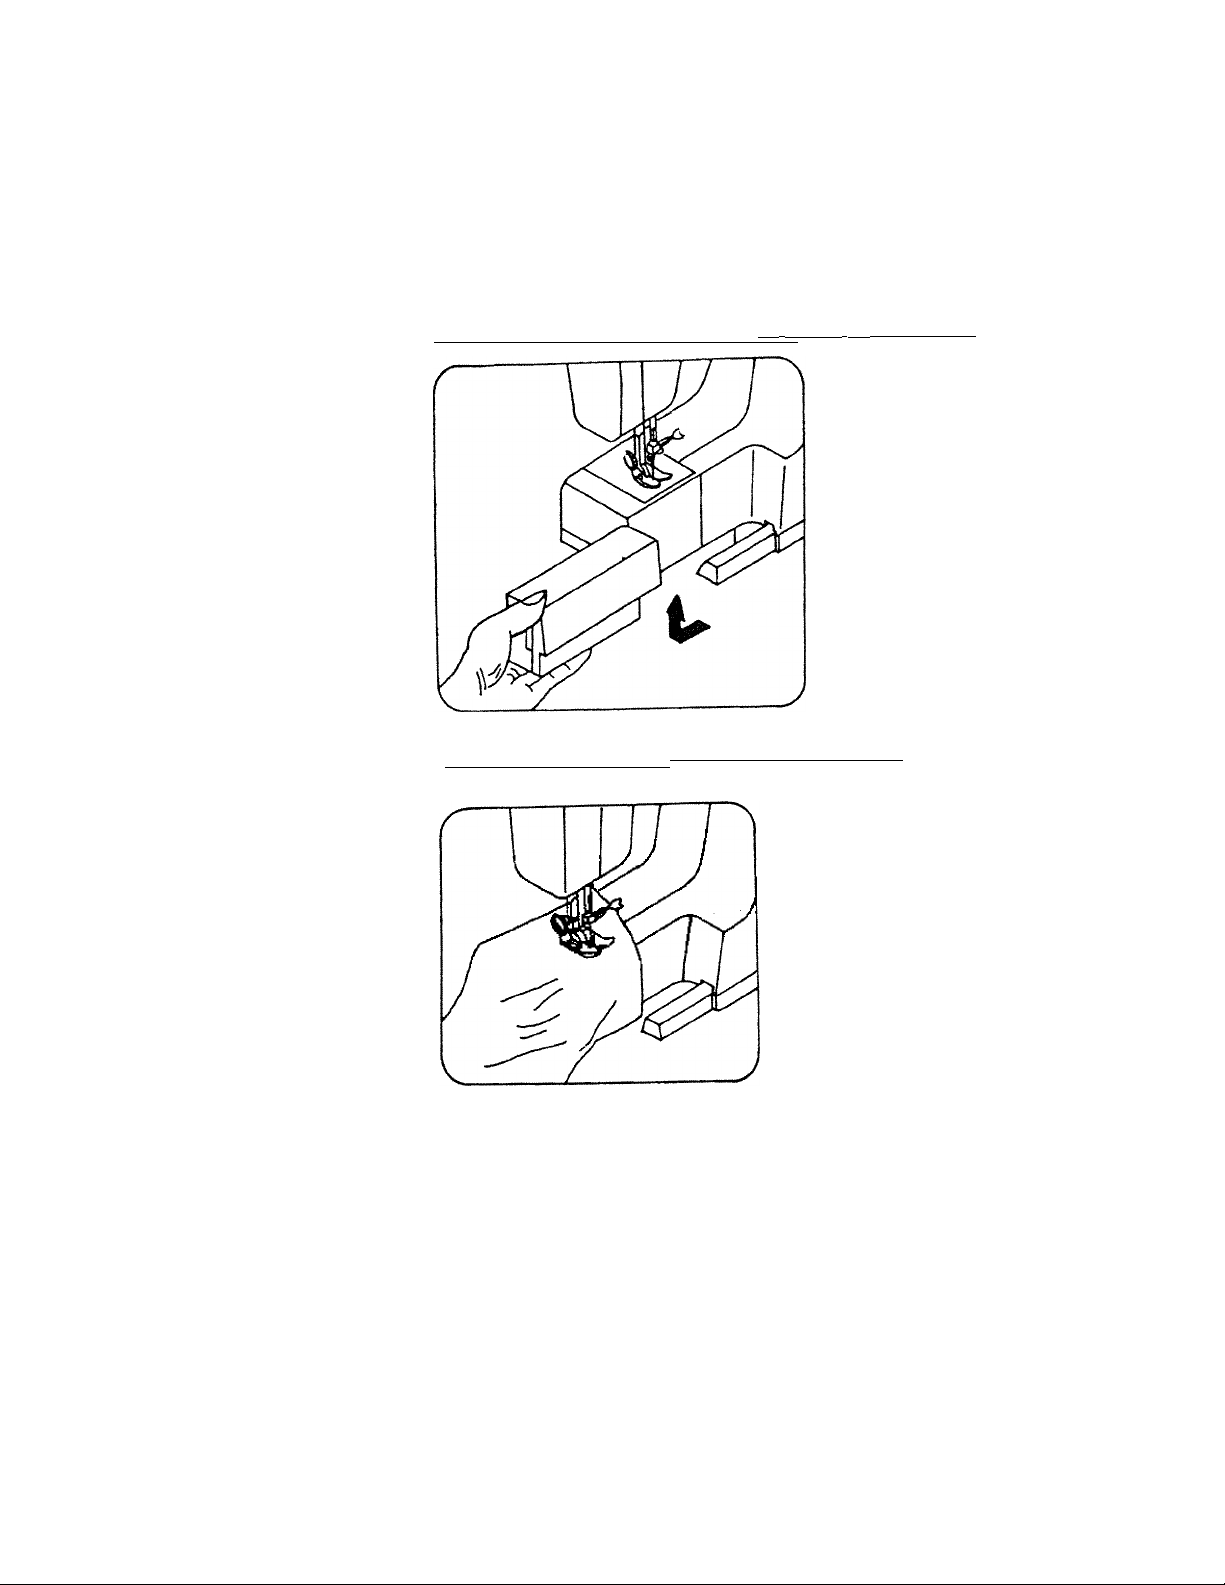
removing extension table/ que quita mesas de EXTENEIQÜi
1 To convert the machine from fiat-bed use
to free-arm use simply remove the ex
tension table as shown.
1. Reienoa el ¡ado Izquierdo de mesa y
retire en la dirección de Hecha.
EREE-APM SEWING/ EL BRAZO UBRE COCIENDO.
1. Especially useful when sewing sleeves, pants
leg, tubular fabrics etc more easily.
2. To sew tubular just slip the sleeve or pants
leg on the free arm as shown above.
3. This sewing machine can be used as a flat
bed machine, but easily converts to free
arm machine by removing the extension table.
1. Especialmente útil cuando las mangas
coser, jadean pierna, tutfular etc. de
talas-
2. Para coser tubular simplemente
resbalón la pierna de pantalón o manga
sobre el brazo libre como mostrada
arriba.
3. Esto cosiendo la máquina puede usarse
como una máquina piaña da lacho,
pero fácilmente convierte pata
armar máquina por quitar la mesa
da extensión. .
Page 11
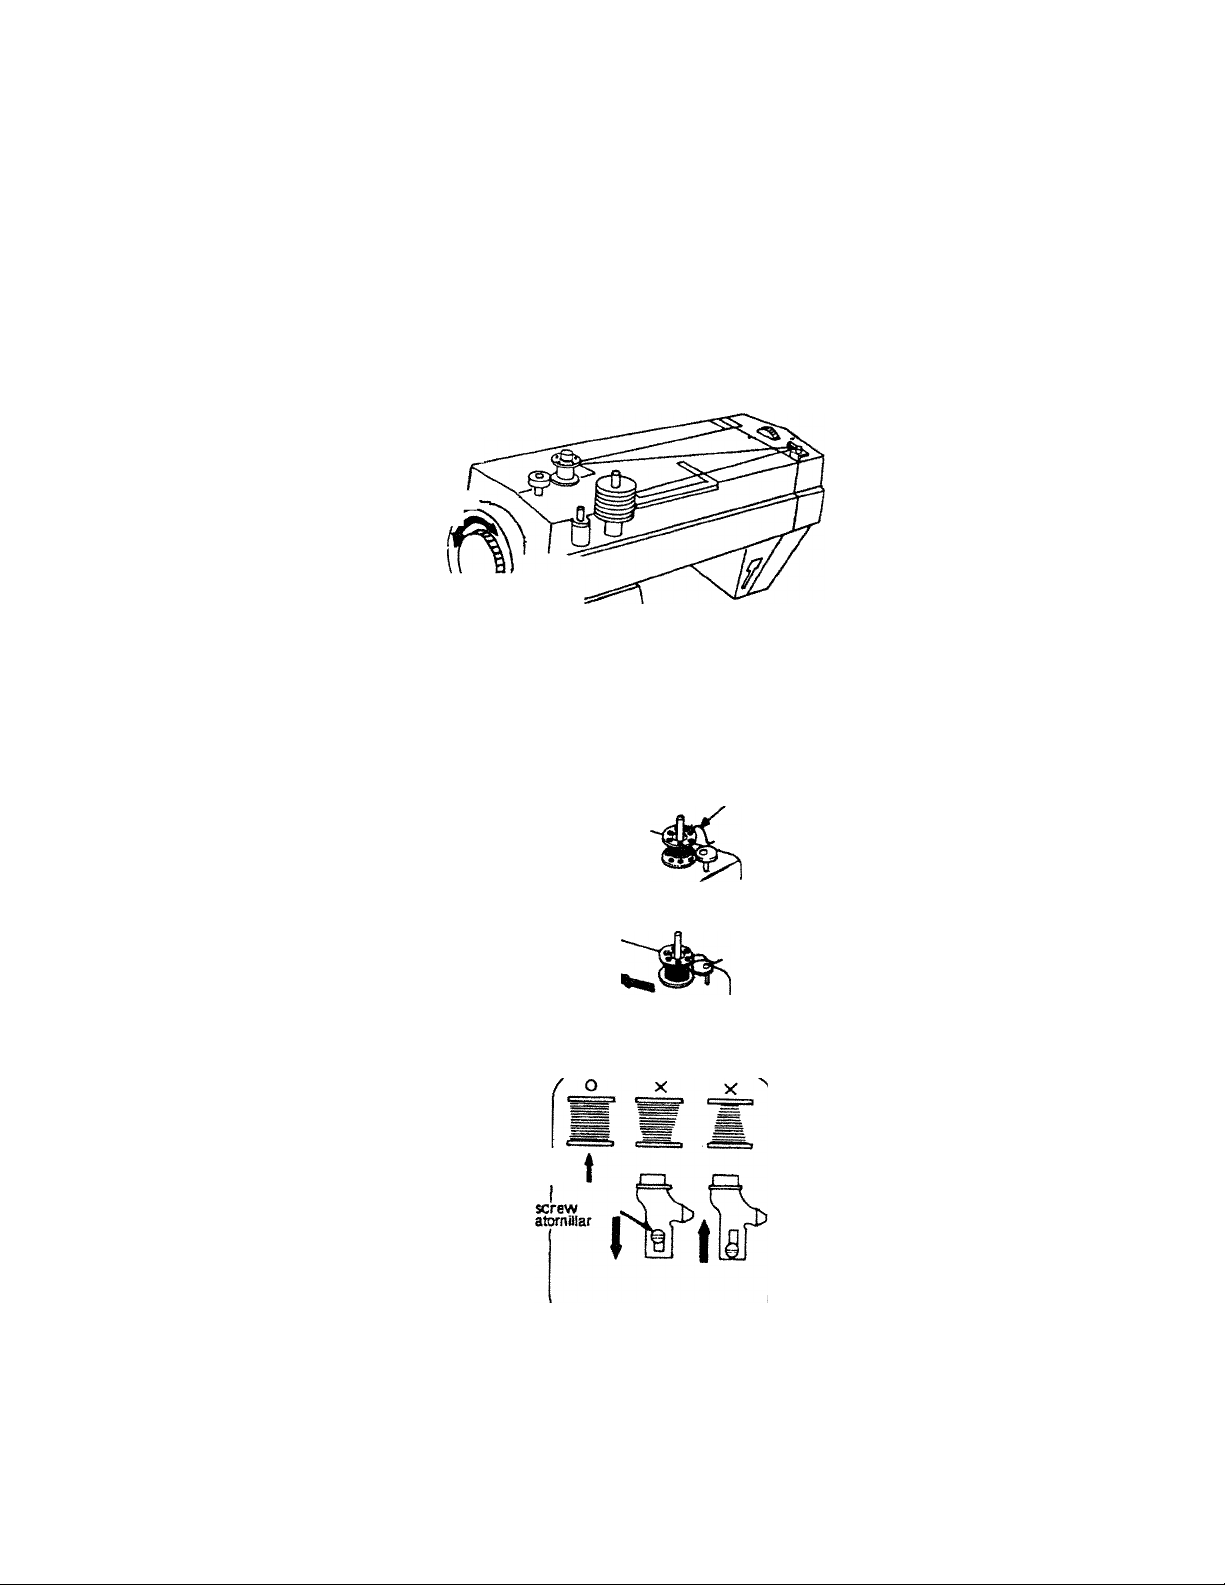
winding the bobbin/ torcer el carrete
Inside
Adentro
Release
Liberei
Tighten
Stop motion knob
parar botón de movimiento
Bo.bbin
---------
El enrollador de
winder spindle
carrete aspiga^^
1. Release stop motion knob.
2. Thread as shown.
3. Place bobbin onto spindle
and hand-wind thread onto
bobbin in an anti-clockwise
direction for 5 or 6 turns.
(When bobbin is filled re-tighten
stop motion knob!
1. Libere botón de parada.
2. EI hilo como mostrado.
3. Cuando et carrete llena, aprieta botón de
movimiento de parada. Empuje el
enrollador de carrete espiga en la
dirección de Jacha.
Push bobbin winder spindle against stopper,
in direction of arrow, and depress foot pedal.
When bobbin winding is completed return
spindle to its original position.
correct
correcto
Cuando bI torcer de carrete se completa el
regreso espiga a orgininal posición.
Note;
If the bobbin winding should be
uneven (it is factory set) the
thread guide can be raised or
lowered to achieve the correct
winding.
Remove the top cover and adjust
with a suitable tool.
Cuando el torcer de carrete es Incorrecto,
liberado el tornio de hilo superior evienía
y ajusta arriba o abajo hasta et torcer de
que carrete sa equilibre.
6
Page 12
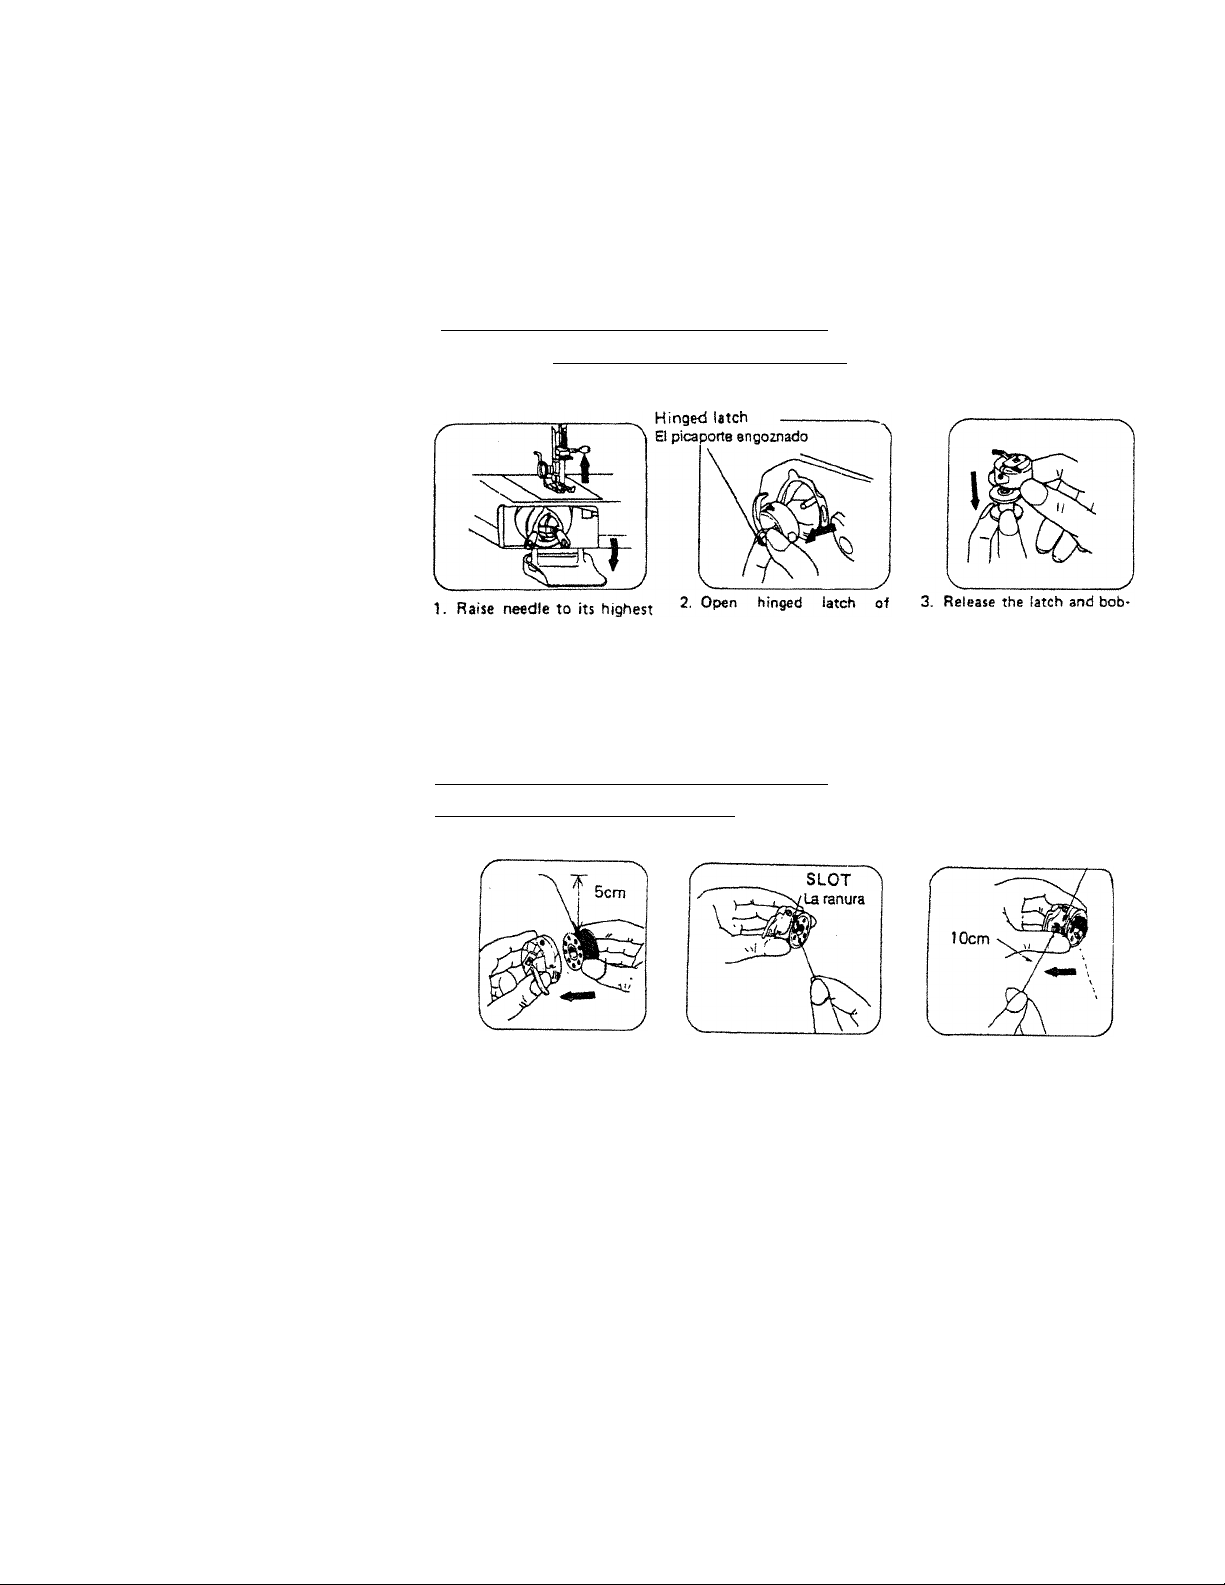
REMOVING BOBBIN CASE AND BOBBIN REMOVIN CARRETEY CASO DE CARRETE
position and open the shuttle
race cover.
1, La aguja de alza a su altísimo
ubica y abra la portada de raza
de fransbordadot.
bobbin case and pull bob
bin case out of machine.
2. El picaporte engoznado abierto
de el caso de carrete y tira
caso de carrete ftjera de máquina.
INSERTING BOBBIN INTO BOBBIN CASE
METER CARRETE EN EL CASO DE CARRETE
1. Pull off 5cm of thread
from bobbin and insert it
into bobbin case as shown.
2. Guide the end of thread
into slot.
2.0rienteel flnde hilo.
1. Pul fuera 5cm de hilo desde el
carrete y mete lo en el caso de
carrete como mostrado.
bin will fall out easily.
3. Libere el picaporte y el carrete
caerá ftjera Mcilmente.
Tension spring
3. Pull into slot and under
tension spring and draw
out about 10 cm of
thread.
3. El tirón en la ranura y debajo
el resorte da tensión y saca
fuera sobra lOcm de hilo.
Page 13

INSERTING BOBBIN CASE INTO SHUTTLE RACE
METER CASO DE CARRETE EN LA RAZA DE TRANSBORDADOR.
1. Ensure needle is at its highest position.
Pulling thread to the front, open the
latch of bobbin case and hold it.
1. Levante aguja a su posición más alta,
tirando hilo a la frente,. abriendo el
picaporte de el caso de carrete y
retiene lo.
2. Holding latch open, place bobbin case
onto centre pin in shuttle and release
latch.
2. La tenencia de de picaporte abre,
pone el caso de carrete en el centro
sujeta en el picaporte de alivio y
transbordador.
8
Page 14

-TM-P.nlMB UPP-P THREAD/ ENHFRBONnO HILO SUPERIOR
Ihread the machine from A to las per illustration.
Enhebre el hilo desde A hasta I segCin la liustracio
Twin needle threading
Enhebrado para la aguja gemela
Page 15

n./>WING UP BOBBIjlTHBEAB ^
,. Hold oppor mr.«i with I.)t "■"‘I;.
needle goes down and comes up. Then rt p „ brought up in a ,s=« loop.
,«H,Pestposition. Li.Ht. dra. up Ha.a
1. Retenga hilo superior con '^^"'Jene arriba. Entonces parar la mano rodar
usted hasta que la agusa vay posición más ate.
suando la takeup la ^ filóse criará en una presilla.
Ughtiiy tira el hilo superior de carrete e m.o s
of machine.
10
Page 16

LEVELING MACHINE/ NIVELACION PE LA MAQUINA
Down
’ Abajo
Up
Alto
11
Page 17

1. Lower needle down into fabric and raise pressar foot, pivot the fabric arourtd the
needle to change direction as desired.
1. Mas inferior aguja abajo en la tela y alza presser pie, pivote la tela alrededor la
aguja para cambiar dirección corno desear.
Page 18

anJUSTING UPPER THREAP TENSION
a iiiRTANPn tfmsiQ'N DE HILQ
It is only normally necessary to adiustthe upper
thread Jnsion to achieve the correct balance
between the upper and lower threads^
The higher the number on the dial the greater
the tension.
U tensión superiora de hilo puede ser ajustada por
volver la tensión de hilo daii.
Incorrect
Incorrecto
Increase
Aumente
Inside of fabric
Adentro detela
Upper thread
Superior enhebrar ^ ^ ^,
tension for normal sewing, by carefully suspending the
wound bobbin in its case by the thread. It the bobbin
and case immediately fall to the ground, the tension is too
loose and should be increased. The correct tension ,s
obtained when a slight jerk of the thread causes the bobbin
to drop a short distance only. H this action does not move
the bobbin the tension is too tight and should be loosened
until the desired effect is achieved.
Como un owaral orientar único, el usuario puede lograr
correcta para normal cosiendo por cuidadosamente suspendiendo el
carrete de herida en su -i terreno la tensión
Si el carrete V. 5®®°,Stnentada. U tensión correcta
S6 desatademasiado Y uebana po» ^„ota nara
se obtiene cuando un tirón delgado del hilo ocasiona el carrete pa
bajar una distancia corta Cínica.
ADJUSTING LOWER THREAD TENSION
Lower thread tension can be adjusted by turning the «rew
on the bobbin case slightly to the right {clock-wise)
Decrease
Disminuya
to increase tension, (Anti-clockwise) to the left to decrease
tension.
U tensión más inferior de hilo puede ser
Sbre el caso de carrete ligeramente a la derecha pata aumenta
tensión o al Izquierda pata disminuir tensión.
Fabric
Uteia
Correct
Correcto
Upper thread
Superior Enhebrar
1 Bobbin thread
B carrete enhebra
13
Page 19

REGULATING THE PRESSER FOOT PRESSURE REGULAR EL PRESSER CAMINA PRESIO'M
1- Move the lever to the pressure you want. For light, elastic fabrics choose setting 1, medium
fabrics 2 and heavy fabrics 3.
2. Too low pressure can result in poor feeding, skipped stitches or difficulties in guiding the
fabric.
a When darning or sewing free-hand embroidery the pressure must be released. Set at 0.
1. Mueva el nivel de presión que Ud. desee. Para prendas de tela elàstica
ponga 1, telas medianas 2 y telas pesadas 3. ’
2. También bajar la presión puede resul tar una mala alimentación, omisión de
puntadas o dificultades para dirigir latela.
3. Cuando ^urce, cose o borda con las manos libres, la presión se debe pon
er en 0.
DROP ^ED/ BAJE ALIMENTACION
í¡-
Lower feed dog by pushing lever, down in direction of arrow. |No feeding of fabric)
Used when sewing on buttons, free hand embroidery, etc.
For general sewing, raise height of feed dog by lifting lever in direction of arrow.
Más inferior alimentar perro por la palanca empujar, abajo en la dirección de Secha.
Ningún alimentando de tela.
Usado cuando cosiendo sobre botones, mano libre bordado, etc. Para el general
cosiendo, levantando altura de alimentación acosar por lifiting palanca en la
dirección de flecha.
14
Page 20

CHANGING NEEDLE/ LA AGUJA CAMBIANTE
1. Raise needle to its highest position.
2. Loosen neeale clamp screw and remove old needle.
3. With the fiat side of the needle facing away from yoo, insert needle as far up as it
will go.
4. Tinten the needle damp screw securely.
1. Levante agu|a a su posición altísima.
2. Desate la grapa de aguja atornilla y quila aguja vieja.
3. gm el lado plano de la aguja que encara lejos de usted, mete aguja tan lejos arriba como
4. Apriete la grapa de aguja atornilla firmemente.
15
Page 21

Chart - fabric, neaile and thread
Fabrics
Light
Medium
Heavy
DIAGRAMA-GENERO, AGUJA E HILO
Este diagrama le aporta algunas suoerpnr-iao ji+íiq,>
ferentes generös sugerencias-utiles para coser en di-
Genero
Delgado
Mediano
Tricot, silk, tulle, chiffong
Organdie, taffeta, lawn
Cotton, poplin, satin, velvet,
wool, light a>rduroy,
qabardome
Denim, tweed, corduroy, cashmere
coat material '
Seda organdí, Tull, Chiton
Batista
AIgodón,Popolin, Satin
Cotele delgado, Gabardina
Needle
size
60-70Í8-10)
80 (12)
90-100(14-16)
Aguja
60-70(8-10)
80(12)
Thread type
Light cotton or synthetic
thread
Cotton or synthetic thread
Heavy cotton or synthetic
thread
Tipo hilo
Algodón suave o
sintetico
Algodón suave o
sintetico
Grueso
Atencion! Siempre utilice el mismo grosor en el hilo superior y el hilo
^scilfa, Tweed, Cotele
Cachemira
90-100(14-16)
Algodón grueso o
sintetico
16
inferior.
Page 22

SEWING (PATTERN SELECTOR! AND OPERATION TABLE
sewing
straight stittii
1
Zig-zag
2
Full auto zig-zag
3
Super Zig-zag
4
Button hole
5
Twin needle
6
Embroidery
7
Pattern
1 1
II
■< ^
Ml
in
lit
ODI]
except button hole
II
Zigzag width
0
0-5
0-5
0-5
0-5
0
5
0-5
0-5
Stitch length
33
IP
•
•B
:
D
0
•0
•g
1
•
0
•E
Presser foot
No need
biopfeeti
(¿TSS
Page 23

>1
>
Hïtiîïi
Page 24

TO START SEWING/ PARA COMENZAR COSIENDO
Important Hints
1. Raise the take-up lever to its highest position when starting and stopping
sewing.
2. Hold both threads about 10 cms to the rear of machine for the first two to
three stitches.
3. Sufficient fabric should be placed under needle before lowering presser foot
4. Depress foot/Spced control and start to sew.
5. Test the machine stitches on a scrap of fabric you plan to use, adjusting the
machine for the length of stitch and tension suitable to your fabric.
Attention
1. When turrting the hand wheel manually, always turn it toward you.
2. Guide the cloth gently with your hand.
3. To prevent breaking needle always stop with the needle out of the fabric.
Los Indicios importantes
4. Deprima pie o apure controfar y comenzar para coser.
5. Pruebe la máquina hilvana sobre un trozo de tela usted planifica para usar y ajustar la
máquina para la longitud de puntada y tensión conveniente a su tela.
La atención
í.Cuando volviendo la mano rodar manualmente, siempre volverlo hacia usted.
2.Oriente el paño suavemente con su mano.
3-Para prevenir quebrar una aguja siempre parar con la aguja ftjera de la tela.
P'«-
18
Page 25

TO FINISH SEAM/ PARA TERMINAR COSTURA
1 .Sew to the edge of seam.
2. Push the reverse button and sew in reverse for about 3-4 cms.
3. Raise needle to its highest position.
4. Lift presser fool and puli’out the fabric to rear of machine.
1 .Cosa al borde de costura.
Z.Empuje el revés abotonar y coser en el revés para sobre. 3-4cms.
3. Levante aguja a su posición más alta.
4. La elevación presser camina y retira la tela para criar de máquina.
5-Cut threads as shown on the thread cutter.
5.Los hilos de cortadura, como mostrados, sobre el cortador de hilo.
19
Page 26

STRAIGHT STITCH/ DERECHO HILVANAR
1. Thij type of stitching is one used most frequently.
2. The zig-zag presser foot can be used for both strai^t and zig-zag sewing. ‘
3. For sewing light fabric, use smaller stitch size and left needle position.
(Refer to page 16 for dial setting).
1. Este tipo de hilvanar es el uno usado debe frecuentemente.
2. The zig zagpresser el pie puede usarse para ambos derecho y zig zag cosiendo.
3. Para coser tela liviana, usar un tamaHo menor de puntada. Refiera para paginar 15 para
«locaciones de dial.
ZIGZAG SEWING/ ZIG ZAG COSIENDO
Pattern selector position^ Pattern selector position
% Decore posición de selector
Zig-zag stitching is a general purpose stitch.
Satin stitching is a "closed up", very short stitch length,
sewing initials, patterns, applique, etc. ,
Zig zag hilvanando es una puntada general de proposito.
El satén hilvanando es una cercano arriba y la longitud de punida muy corta,
y puede usarse para coser siglas, decora y apitigües.
and can be used for
20
Page 27

I
OVERCASTING
§ I ^
x \
K\ ÜBSm
Use these stitches fof oversewing rough edges.
•*
<■
I
P
Use estas puntadas para sobre coser bordes
ásperos. .
Use multi-zig zag puntada pata reparaciones.
ajustando longitud de puntada para favorecer
aplicación. .
Use this stitch with knitted.tricot or other
stretchy fabrics.
The stitch enables your seam to stretch
with out breaking the thread.
It is also a very strong straight stitch for
areas under stress.
Use esta puntada con tejida, tricot u otro stretchy
telas. La punfada permite su costura de estirar
con fuera quebrando el hilo. Es también una
puntada + derecho muy fuerte para áreas debajo
la tensión.
21
Page 28

BLIND STITCH/ CIEGO TOSER PUMTüriA
1. I-a tela de doWaz como mostrada
2. To finish seam as shown.
2. U costura de conclusion como mostrada asegura que la zlo rao i«
puntada simplemente taladra la doblez de la tela ^
22
Page 29

Adjust width and needle position to obtain
correct seam.
Ajuste dobiez de tela para obtener costura correcta.
Needle is not piercing edge of
fold at all.
La aguja no taladra el borde de
doblez en todos.
(A)
Correct seam
Correcto coser.
Needle is pierces edge of fold too
much.
La aguja taladra el borde de doblez
demasiada.
(B)
23
Page 30

BUTTON SEWING/ EL BOTO'N COSIENDO
(U$e drop feed see page 14)
1 .Lower drop feed.
2.^ce button pressar foot in position and attach firmly.
Into both holes of button without obstruction.
(Increase or decrease width setting)
S.Sew about 7 stitches. ’
6.Pull both threads to the underside and tie together.
B uso que zurce plato vs página #14
1 .Cover alimentar con zurdr plato.
3 foni ^ firmemente.
3.Ponga boton entre pressar pie y la tela y + rebajar presser pie.
eiSrdruriXrhioTem™ ^ cuidadosamente que la aguja va mediante
S.Cosa 6 o 7 puntadas. ®' ajustar zig zag anchura.
5.Tire hilo a la underside y corbata.
enters
BINDING/ LA atadura
To sew fabrics edge to edge select
the mutti zig-zag stitch.
Para coser el borde de telas para afflar
selecciona la multi zig zag puntada.
24
Page 31

ZIPPER SEWING/ LA CREMALLERA COSIENDO
Select straight stitch.
1. Fold the fabric about 2cm and place fabric under
foot.
2. Zipper foot is designed to sew close to a raised edge
preventing sewing on zipper.
Selecto derecho hilvanar.
1. PlieouB la tela sobre 2 cm y tela de lugar debajo el pie.
2. E1 píe de cremallera se disefk para coser cerca de un borde
levantado preveniendo cosiendo sobre la cremallera.
1. T0 sew the left side of the zipper.set the zipper
foot on the left side, of the needle.
2. To sew the right side of the zipper bring
the foot to the right side of the rieedle.
1. Pata coser el lado izquierdo de la aemallera colocar
la cremallera camina sobre el lado izquierdo de la aguja.
2. Para coser el lado derecho de !a aemallera traer el pie a la
<i6tec^a lado de la aguja.
sew as illustrated,
Cosa como ¡lustre.
25
Page 32

BUTTON HOLE SEWING/ EL HOYO DE BOTO'N COSIENDO
Select stitch length dial in area indicated,
a selecto dial de longitud de-puntada en la área indicó
Pattern
selector dial
Decore dial de
selector
a
Steps
Camina
Settings
Coloca
1. Set dial to "1" position.
2. Saw left side.
3. Raise the needle
4. Set dial to "2" position, -Coloque dial a # 2 posidón.
5. Sew 5-6 stitches. ®'C°sa S a 8 puntadas.
6. Raise the needle S.Levante la aguja
7. Set dial to "3" positron. 7.Coloque dial a # 3 posición.
8. Sew right side. B.Cosa lado derecho.
9. Raise the needle 9.Levante la aguja
10. Set dial to “4" position. lO.Coloque dial a # 4 posidón.
11. Sew 5-6 stitches. 11 .Cosa 5 a 6 puntadas.
12. Raise the needle 12.Levante la aguja.
1 .Coloque dial a # 1 posidón.
2. Cosa lado izquierdo.
3. Levante la aguja.
Before sewing fit button-hole foot
as shown.
Antes de coser ajuste el pie de hoyo de
botón como mostrado.
Cut buttonhole along centre with
cutter as shown.
Corte ei hoyo de botón a lo largo de el
centro con el cortador como mostrado.
26
Page 33

HEMMING/ TOSIENDO
1. Rais« the foot and the needle to its highest position. Replace the foot with the hemmer foot
2. Fold over the fabric edge by about 3mm and place it under the foot. Secure the folded edge
with a few stitches. Take out the workpiece and draw the hem into the hemmer foot by
pulling the threads.
1. Levante el pie y la aguja a su posición más alta. Reemplace el pie con el hemmer pie.
2. Pliegue sobre el borde de tela por sobre 3mm y lugar lo debajo el pie. Asegure el borde plegado
con unas pocas puntadas. Tome fuera el trabajo el pedazo y saca el dobladilla en el hemmer
pie por tirar ios hilos
- -r» - -
-------
----
^ ssMw«* w iwti imw MIC Mwnmvr Tooi
5. Make sure that the fabric does nor move under the right half of the foot. The fabric must
be fed into the scroll of the hemmer sufficiently so that the workpiece edge runs freely
through the groove under the foot.
Only suitable materials can be used and some practice may be necessary to aeheive
best result*.
3. + rebajar el pie y + coser el dobladillo.
4. Dufanle coser, plegar la tela a! izquierda un poco y permitir io correr en el hemmer pie.
5. Asegure que la tela no mueve debajo la mitad +dereoho del pie. La tela debe alimentarse en la
lista de! hemmer suficientemente para que el trabajo repare de borde corre libremente mediante
la ranura debajo el píe.
Los materiales convenientes únicos pueden usarse y alguna práctica puede ser necesaria a
acheive mejores resultados.
27
Page 34

MMJiEiDi^/ MELLIZO Afill.iA
optional ^ ~ ^
ANOTEiLa aguja melliza pueda comprarse separadamenta.
procedure:
embroidery/ el BQRDAPn .
Lew»,
Suso que zurce plato va página 14
28
Page 35

QUiLTER/ ACOLCHANDO
optional
1, insert supporter of quilter.
2. Move quilter and adjust stitch distance.
1. U diapositiva que acolcha gufa en la ranura arriba presser palancada alivio de pie _
2. EI movimiento que acolcha derecho o izquierda de guá de ajustar distanaa P
SEAM GUIPE/ COSA GUi'A
optional
1. Use seam guide when sewing a long seam of regular distance from edge
2. Set"^Wefn hole on bed, at right of needle plate, and adjust distance.
3. Run machine with edge of material touching guide. Position cloth
guide at an angle to rew a curved seam.
1. Use la guia de costura cuando cosiendo una costura larga de distancia regular
desde el borde de material.
2. U gu& de conjunto en el hoyo sobre el lecho en e! derecho de aguja platea y
ajuste distanda. ^ ,
3. U máquina de corrida con el borde de material que toca guía-EI paRo de posición
oriente en un ángulo para coser una costura curva.
29
Page 36

MAíNTENANCFíCLíANING and ni,
5. Raise needle to its highest position.
2. Take out bobbin case.
3. Turn latch knob A as illustrated.
4. Take off shuttle race cover.
5. Take out shuttle hook.
6. Clean and oil shuttle race and hook
then replace in the reverse order. '
Cleaning shuttle race
(A) Latch knob
(Bj Shuttle race cover
(C) Shuttle hook
La limpieza de de transbordador corre.
# A boton de Picaporte.
# B + transbordador portada de raza.
# C+tracsbordador gancho.
Open face cover and oil points
indicated.
B abierto puntos nominales de
petróleo y portada indicaron.
1. Levante agula a su posición más alta.
2. Toma teera caso de carrete.
3. Turn ai botón de picaporta # Un conio
»ustrado.
4. Tome fuera transbordador correr portada
5. Tome fuera gancho de transbordador.
6. Limpro y acertar transbordador correr y
gancho. '
Cleaning feed dog
Limpio alimentar perros.
30
Page 37

CHECKING PERFORMANCE PROBLEMS WHAT TO DO
mitt» Jtffi ¡_r I
Cl)
PROBLEM
Fabric noi
moving
Breaking Needle
Breaking Upper
Thread
Breadkin Bobbin
Thread
Machine Jamming
Knocking Noise
Puckering
PROBABLE CAUSE CORRECTION
— Feed dog down.
— Machine not moving.
- Stitch length dial in 0 position.
- Light pressure on presser foot.
- Incorrect setting of needle.
- Needle bent.
- Pulling fabric.
- Incorrect using needle, thread and fabric.
- Incorrect position of zigzag width dial.
- Improper threading.
- Tight upper thread tension.
- Needle bent.
- Nicks or burrs on shuttle.
- Tight bobbin thread tension.
- Incorrect setting of needle.
- Improper threading.
- Dust and thread in shuttle.
— No oil.
— Oust and thread in shuttle.
- Tension too tight.
- Sewing foot pressure tod strong.
- Incorrect Milng fabric, needle, and thread.
- Raise feed dog.
- Moving stop motion.
- Moving dial to 1>4.
- Increase pressure on presser foot.
- Reset needle.
- Replace new needle.
- Do not pull fabric.
- Correct using needle, thread, and fabric.
- Moving to correct position.
- Rethread machine,
- Loosen upper thread tension.
- Replace new needle,
- Replace shuttle, or polish off burrs
completely.
- Loosen bobbin thread tension.
- Reset needle.
- Rethread machine.
- Clean shuttle.
- Need oil.
- Clean shuttle.
- Reset.
- Regulating sewing foot pressure.
- Correct using fabric, needle and thread.
Page 38

COMPROBACIO N PROBLEMAS DE DI DESEMPEÑO Qué papíí HACER
■A
>
EL PROBLEMA
U TEU NO MOVIENDO
EL QUEBRANTAMIENTO
dedeaquja
EL QUEBRANTAMIENTO
SUPERIOR ENHEBRA
EL QUEBRANTAMIENTO DE
DE CARRETE ENHEBRA
LA MAQUINA ATASCANDO
0 TOCANDO RUIDO
PUCKERING.
PROBABLE OCASIONAR
- La aitmenSá’ón acosa abajo.
- La máquina no moviendo.
~ Stiich la lonoltud marca en # 0 posición;
- Livianp presionar sobre presser pie
— La colocación incorrecta da aguja.
— La aguja doblo.
— Tirar tela.
-Incorrecto aguja, hilo y tela.
- La posición Incorrecta de zig zag anchura marca.
- Inadecuado enhebrando.
- Ajustado superior enhebrar tensión.
- La aguja dobló.
- + muesca o burrs sobre el transbordador.
El carrete ajustado enhebra tensión.
— La colocación Incorrecta de aguja.
— Inadecuado enhebrando.
— Desempolve y enhebre en el transbordador
- Ninguno petróleo.
- Desempolve y enhebre en el transbordador.
- La tensión demasiado ajustada.
- Coser el pie presiona demasiado fuerte.
- La tela Incorrecta, aguja y enhebra.
— Lt:vanté perfo 08 atímenlación.
“ Mueva movimiento de parada.
" La mudanza de de dial a # Ithur # 4.
*“ Aumente presión sobre presser pie
- Reset + aguja.
- Reemplace aguja nueva.
- No tiran tela.
- Correcto aguja, hilo, y tela
— ci movimiento para corregir posición.
— Rethread elabora.
— Desale tensión superiora de hilo.
— Reemplace aguja.
— Reemplace transbordador o pula fuera burrs
completamenle.
- Desate tensión de hilo de carrete.
- Reset aguja.
- Rethread elabora.
- Limpio transbordador.
- Las necesidades aceitan.
— Limpio transbordador-.
— Resel
— Reset que cose presión de pie.
—
----------
— La tela correcta, aguja y enhebra.
—----------------------------------------—
LA CORRECCIO'N
------------------------------
---
------
i
 Loading...