

Page 1
Page 2

You are now the owner of a new straight stitch machine, the most versa
tile machine of its type you cam possess.
■'Hk
c. ^
‘'li
To aid you in obtaining the greatest achievement from your machine
this book on its care and use has been written for you. Read the instruc
tions carefully as a thorough understanding will reward you with many
hours of trouble-free sewing.
Time-saving attachments such as rufflers, binders, buttonholes, edge-
stitchers cording feet, decorators and so forth to complement the acce
ssories, are available from your dealer.
J!
I
y
c
c
a
c
K
Page 3

INDEX
i arts warranty
Service policy ... „
„ ........................................... 3
reatures and parla
Needle and thread chart
Winding the bobbin
Threading bobbin case .......................................... g
Placing bobbin case in shuttle
...........................
...............................................
2
...........................................
.....................................
...........................
g g
Upper threading ..................................................... Ц
Setting the stitch length
Stitch length chart
Sew in reverse
...................................
Adjusting the tensions
Adjusting pressure and feed
General sewing
Light weight fabrics
Darning and mending
Preparing to sew
...............
..............................
.................................
...............................
......................
..............................
............................
....................
"
22
2g
22 13
24
23
23
24
Page
456
^
ю
Removing the work .............................. .
/—»__ , _
>^are and mainteriance
Accessories
^7“' ....................................... 18-19.20
At achmenb ,. 22.23-24.2S.26.27-2S-29-30
Attachment foot .................................................... 23
Edgestitcher
Binder
Huffier
Cording and zipper foot
Hemmers ....
Darning spring
Buttonholes
Button sew-on .
............
...........................
.............
.........................
..................................
..................................................... 17
...............
....................................
........................................................
.....................................................
..............................
.....................................................
............................................
..............................................
.
............
15-16 17
-i-T’-xO
28
Decorator .............................................
Blind stitch hemmer
.........................................
Installing Head in cabinet ..................... g >
Head in Portable case
..................................
3q.3{
25
27
Page 4
18 17
с
e
fe;
С !ч
с N
L)
С
с N
- к
^ I '
- :■ <
1^'
! ¥
^ i¡
с •<
сЧ
Л
сН
с1
^ Fig. 1
"г
с 'í
ci.
с Í
.t
ft
?.
Page 5

Hand wheal
],
Bobbin winder
2.
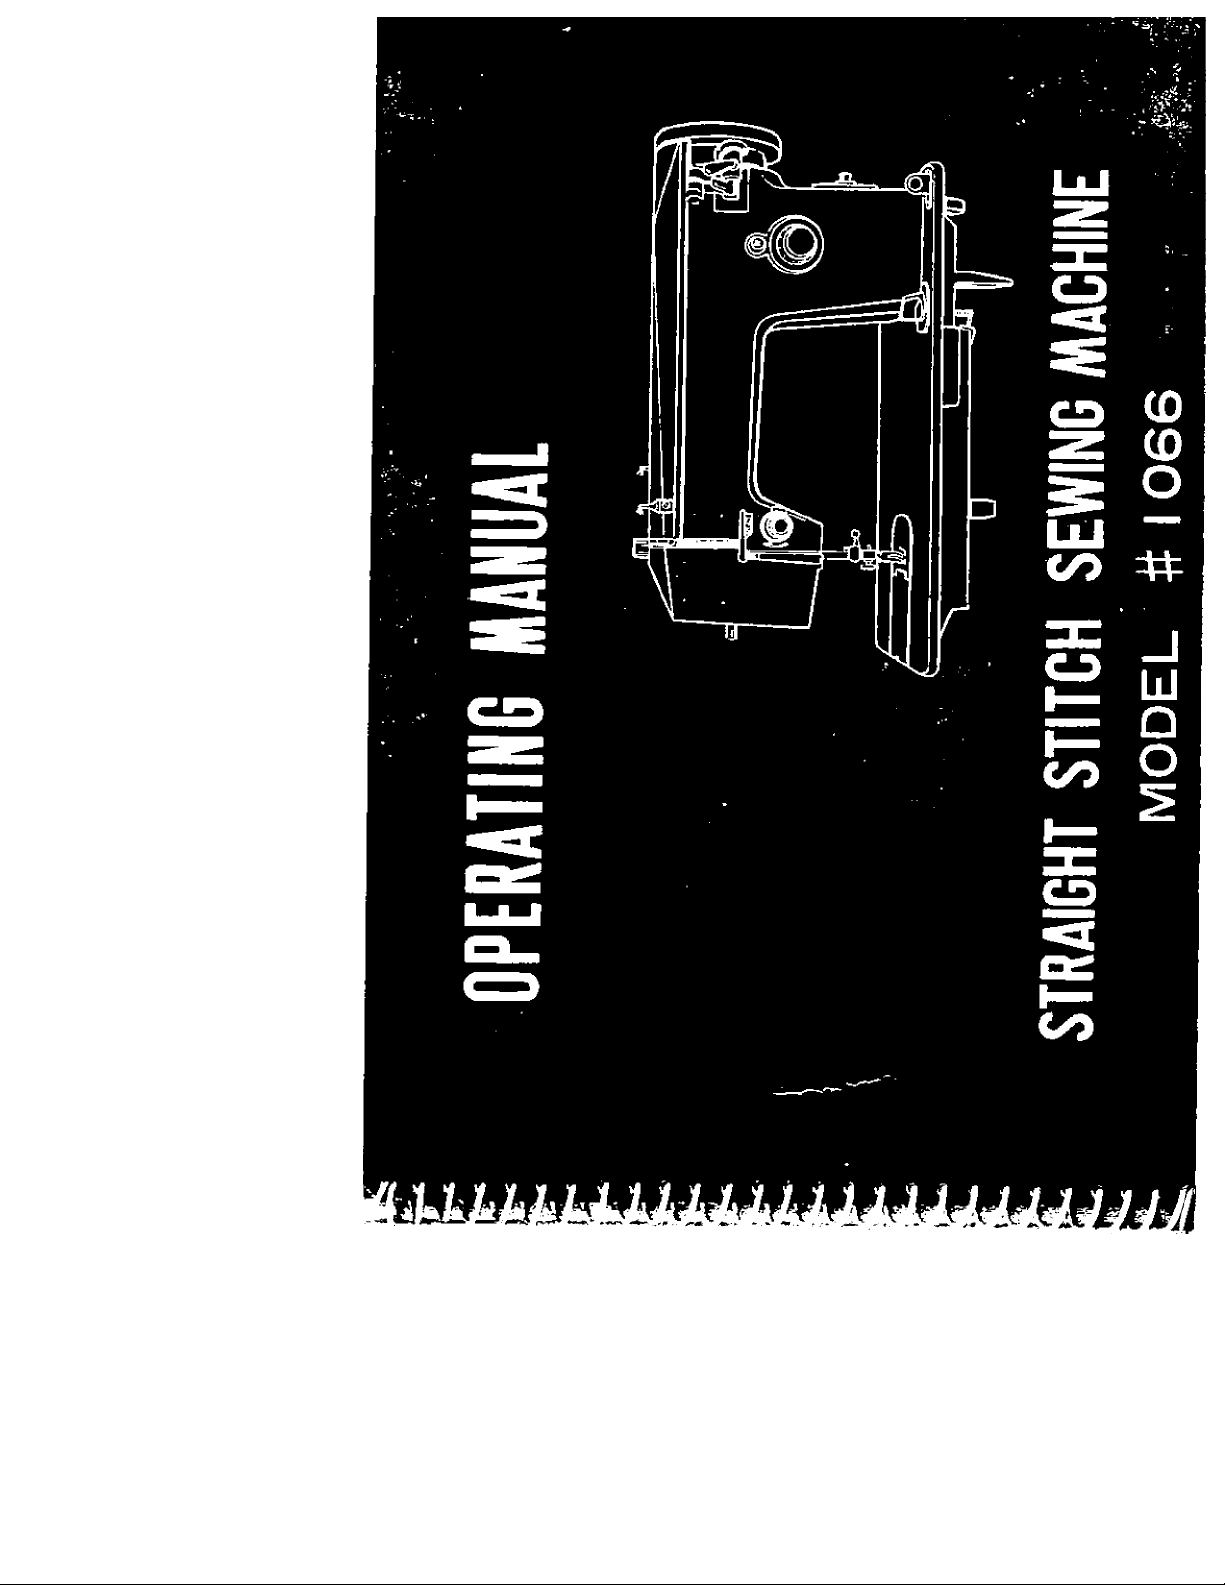
FEATURES AND PARTS
11.
12.
Attachment and foot thumb screw
Needle clamp and screw
*jr
-
►
W
Stitch length dial
3,
Push button reverse
4.
Bobbin winding tension
5,
Drop feed knob
6.
Bed
7.
Needle plate-seam guide 18.
8.
Cover plate
9.
Presser foot
10.
Needle bar thread guide
13.
14. Thread guide bar
Tension regulator
15.
Take-up lever
16.
17. Thread guides
Presser release-darner
Light switch
19.
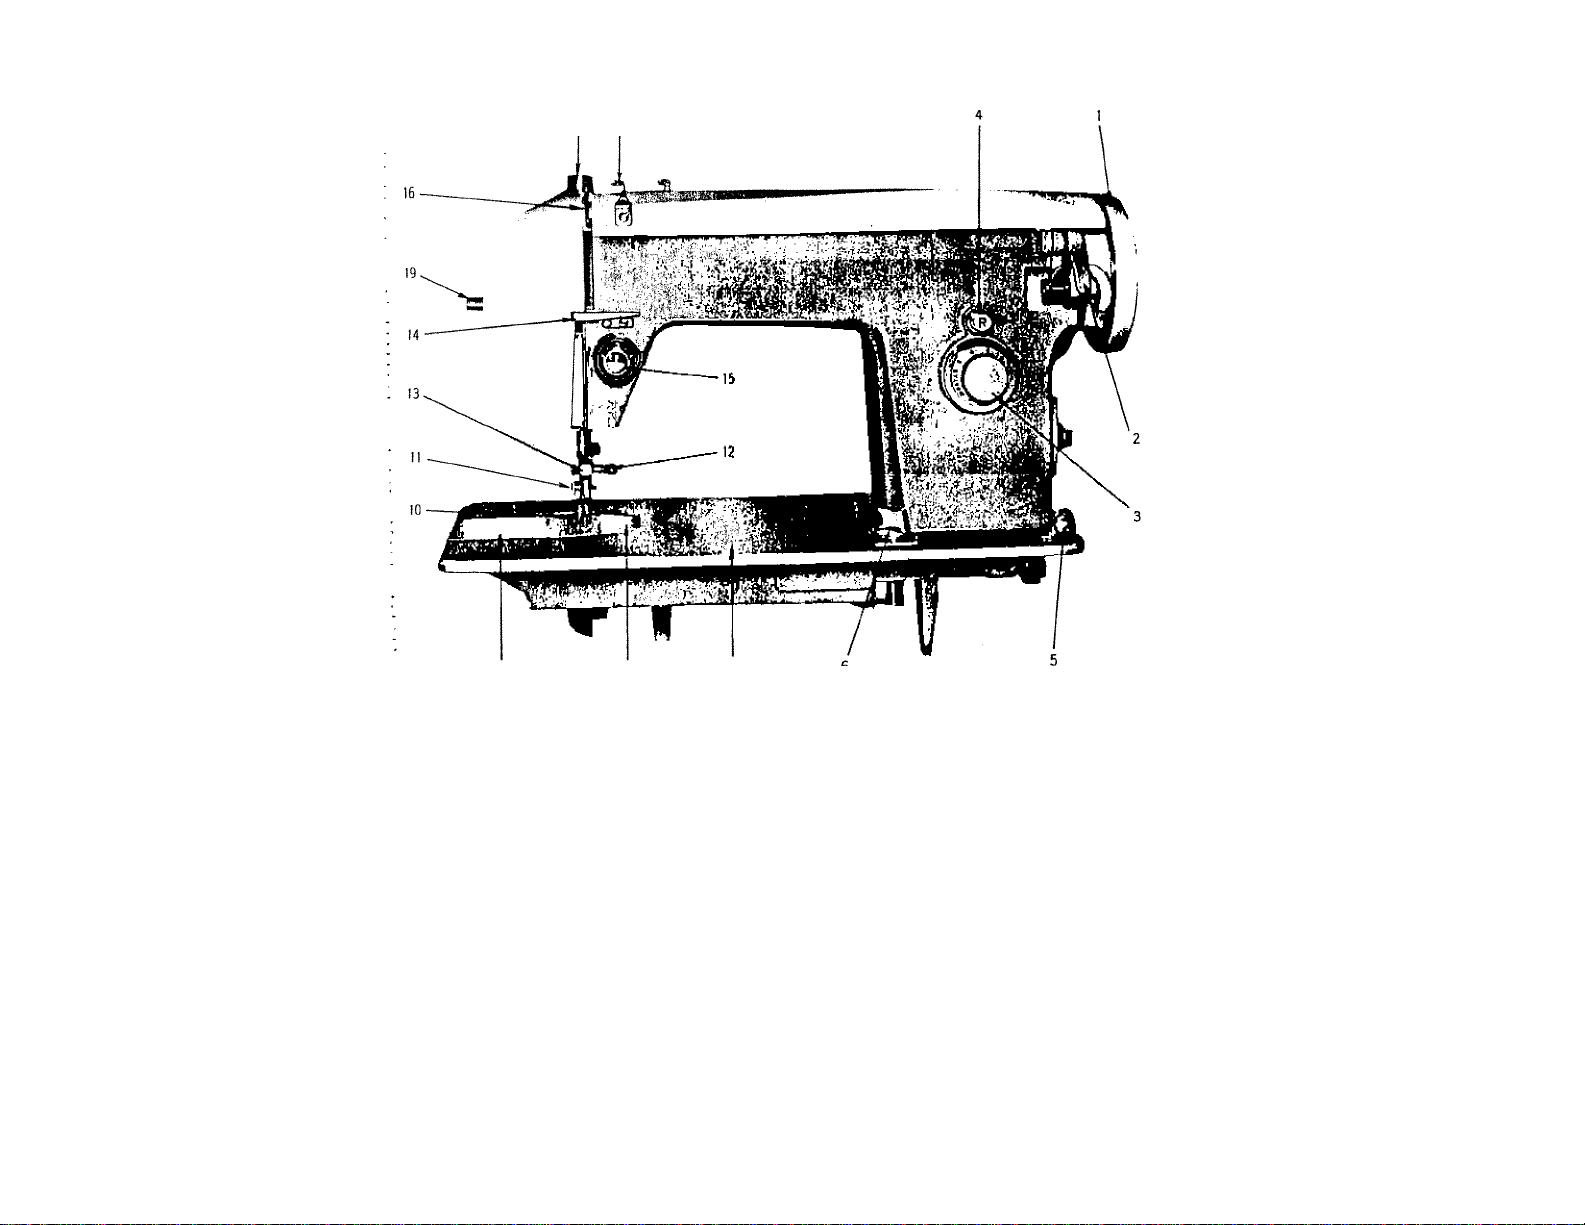
Page 6
features and parts
(Back view)
■ ais:
20. Thread Cutter
21. Presser Bar Lifter
reed
23. Motor
24. Belt
25. Spool pin
Fig 2
26. 1 inge Screv/s
Page 7

NEEDLE - THREAD - FABRIC - STITCHING GUIDE
ii
y
u
u
u
J
J
A
y
y
Fabric
Extremely heavy
tarpaulin, sacking,
canvas, duck, etc.
Heavy upholstery
fabric, ticking,
denim, leatherette
Medium heavy drapery
fabric, velveteen,
suiting, felt, terry, etc.
Medium broadcloth,
percale, gingham, linen,
chintz, taffeta, sheer
wool, shantung, etc.
Sheer voile, lawn,
dimity, crepe,
handkerchief linen,
plastic film, etc.
Very sheer chiffon,
batiste, lace, organdy,
ninon, net, marquisett, etc.
Needle
No.
4
3
1
0
00
Machine
Stitches
Per Inch
6
to
8
8
to
10
10
to
12
12
to
14
14
to
16
(Plastic film^
8 to 10
16
to
20
Cotton
Thread
10
to
30
30
to
40
40
to
60
60
to
80
80
to
100
1
100
to
150
Mercerized
Thread
Heavy Duty
Heavy Duty
Heavy Duty
50
50
50 A
Silk
or
Nylon
A
A
Page 8
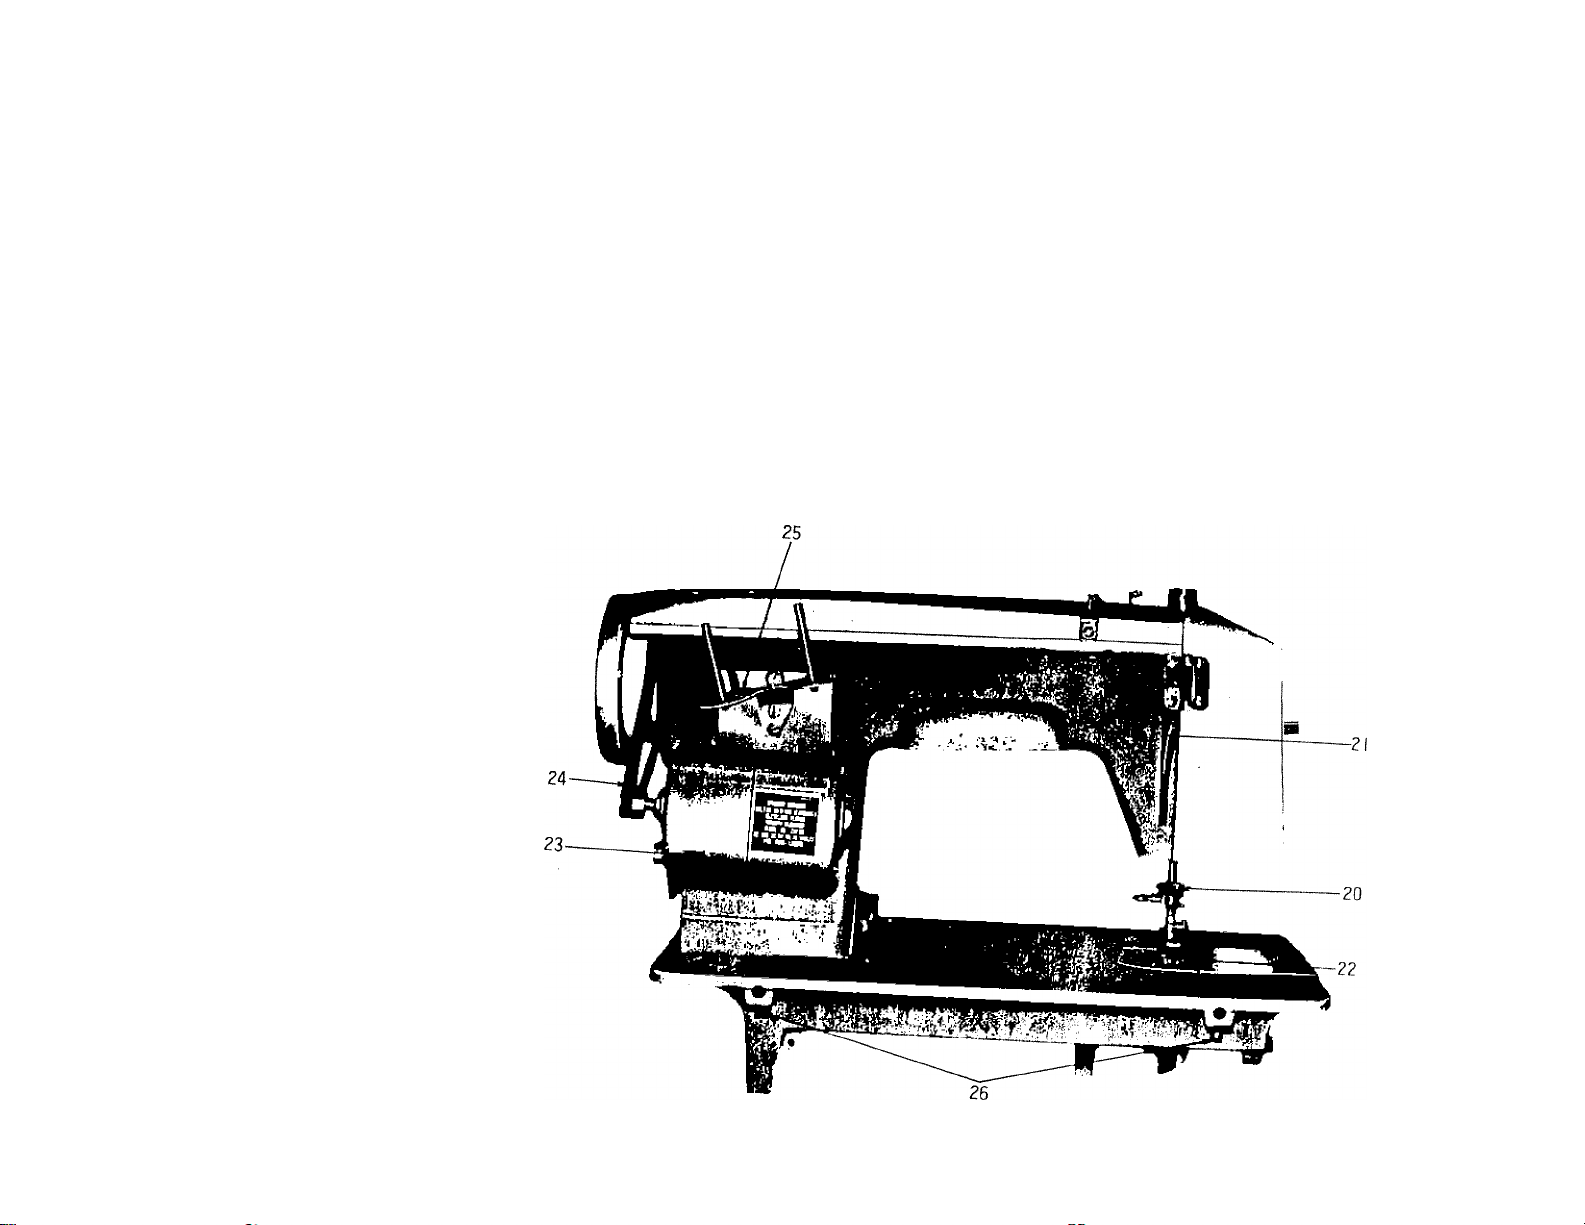
SETTING THE NEEDLE
Fig. 3
Fig 4
See Fig. 3. Raise the needle bar A to its highest
point, turning wheel toward you by hand.
Then loosen the needle clamp screw B and the
needle can be inserted into clamp C. Place needle
(flat side to right) in the needle clamp and push it
upward as far as it
hole, tightening the
with a screw driver.
After changing the needle make one com
plete revolution of the balance wheel by
hand to be sure the needle is in the correct
position.
will go into the needle clamp
needle clamp screw securely
Flat surface
of needle
shank
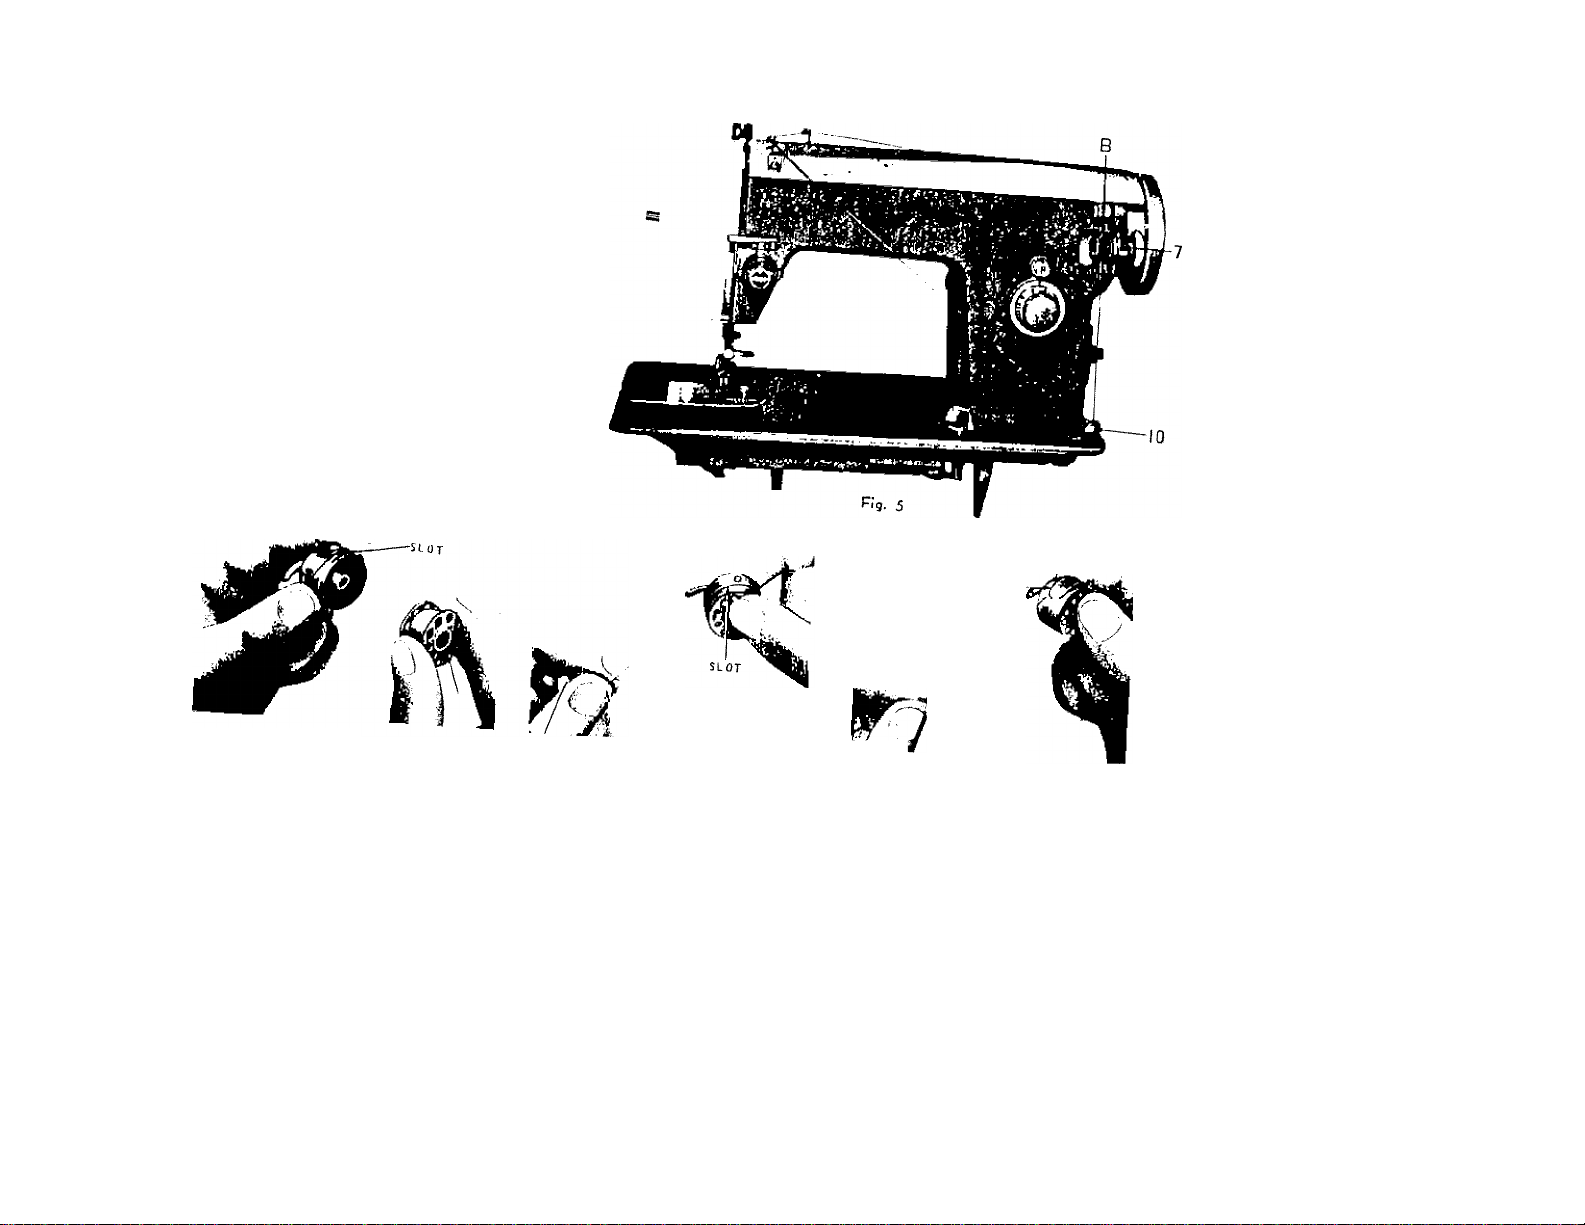
WINDING THE BOBBIN
Disengage the hand wheel (5, (Fig. 4) from the stitching
mechanism by turning the clutch 6 toward you or counterclock
wise.
Place a spool of thread on one of the spool pins, lead thread
through the upper thread guides on the arm, and down through
the tension disc (10, (Fig. 5) at the base of the machine. Run
end of thread through a hole in the bobbin edge and place
bobbin B on spindle of bobbin winder 7, fitting the notch on
bobbin over small pin on spindle. Push bobbin winder pulley
against hand wheel. Hold thread end loosely and start machine
slowly.
Bobbin will stop winding when it is filled. Turn clutch away
from you until sewing mechanism is again engaged so that
needle moves when you turn the hand wheel.
Break off loose thread end used to start the winding.
It*
:
A;
h;
c ii
c ^
r I
it 6
Page 9
, M
M
u
J
J
J
J ■
i"
I -
THREADING THE BOBBIN CASE
k ^ «"illustrated in Fia R)
bobbm case between thunlb ?
Rnger of left hand, so that the f
edge of the bobbin case is o^f °
the bobbin between thumb and
of right hand so that the fh^ ^“^efinger
leads from left to right Step^ T
bobbin into bobbin case Jli J'
into the slot of the bobh',,f ^^
■» Kg. 7, a„d d,:„
spring and into the fork-sh. tension
of the spring as shown in Fig.^8
Fig. 6
Fig. 7
rtMilOM SPR|^4(; .
' a
Fig. 8
Page 10

10
PLACING BOBBIN CASE IN SHUTTLE
Raise needle bar to high
est position, and lift hinged
cover plate. (See 10, Fig
1.) Hold the bobbin case
latch, ( D), Fig. 9, between
the thumb and forefinger
of the left hand, with at
least three inches of thread
running from the top of the bobbin case to the right.
Insert and center the bobbin case on the stud of the
shuttle body, (C). Be sure the bobbin case finger,
(E), is opposite the shuttle race notch, CA).
the bobbin case (B) into the shuttle as far as possible
until latch catches on the center post of the shuttle.
THEN release the bobbin case latch, (D). Press
bobbin case again after latch has been released to
make sure the bobbin case is locked securely in place.
Close the cover plate.
UPPER THREADING (Fig. 10)
THRE
QUID
1. Turn the balance wheel toward you to raise
the take-up lever to its highest position.
2. Place a spool of thread on the spool pin.
3. Lead the thread through the upper arm thread
guides.
Page 11

■1 Hun ll.e Uiread tlirough the thread guide bar to the
tenuion discs, then around and between them from
rigtil lo left.
!i. Draw llie thread up through the check spring and
with a slight lug into the hook. (See insert, Fig. 10}
6. I ass ttie thread under the bar and up through the eye
of the take-up lever from right to left.
7. I.ead tfiread down under bar, tlirough the face plate
guides and then through the needle bar guide.
8. Thread needle FROM LEFT TO RIGHT, drawing it
through about 3 or 4 inches. Hold the end of upper
thiead loosely and turn hand wheel toward you until
the needle goes all the way down and comes back up.
A loop ( Fig. 11) will be formed over the upper thread
which then can be pulled out straight. Place both
thread ends under the slot of the presser foot and
draw toward the back of the machine, leaving both
threads three of four inches long.
SETTING THE STITCH LENGTH
The length of the stitch is regulated by the dial, shown
in Fig. 12. Near 0 is the shortest stitch and 5 is the long
est, but the dial may be set at any spot between the mark
ings or a variety of lengths. Turn the dial to the right to
length and to the left to shorten the stitch. The number
stitch length you choose is indicated by the triangular pointer.
11
Fig. 11
Fig. 12
-'i
Page 12

Figures on indicator
Number of stiches per inch
SEWlNCdi ilN
adjusting THE TENSIONS
Always adjust the upper tension with P ^ ^3^ to
released when il is raised. To increase e ensio number on the dial the lighter
,„e right, or dochw.se. To decrease ° is threaded properly,
the tension. Before adiusting lower tension be sure that tn
When necessary to change the bobbin tens,or., turn sma
screw (Fig, 14) on side of the bobbin case clockw.se
lighten, counterclockwise to loosen. Uy^lanred
When the upper and under tensions
a perlecl st.loh will be formed with both threads interlockmg
in fabric (Fig. 15). ic.
When the upper tension is too light, the lower
pulled up over the upper thread which is lying flat on
i • nh the nresser foot down, as the tension is na u
' I?
c h
c ^
y
ij
'"'’"when Ihl^ upper tension is too loose the “PP“
terms loops over the lower thread lying ilal under the
(Fig. 17).
Page 13

Fig.
15
Rg. 16
Rg. !7
Fig. 18
ADJUSTING PRESSURE AND FEEDING OF FABRIC
GENERAL SEWING. Usually for straight sewing, the pressure bar cap or darner release Fig
18, IS at Its lowest position and the feed at its highest level-with the drop feed dial knob turned
to the positon marked "NORM" Fig. 19 P e aiai icnob turned
SEWING THIN OR LIGHT WEIGHT FABRICS
When lighter pressure is required to sew satisfactorily on thin
silk or filmy material, the pressure cap should be about halfway
own. Release all the way by pressing the snap lock. A, Fig.
8, and then press cap B down again to half-way spot. Lower
13
"" 19) to the point
marked SILK"
Fig. 19
Page 14

14
l^e'crp rcompletelY by pressing down on
sure cap to left marReo
Fia 20. turn dial knob t,ng-
!S,er *CH a.ps .He .eea »eu He.ew he neea.e
To return feed to normal, turn the drop teeo
position marked "NORM"
Fig. 20
preparing to sew ^ ^
He,e .he-op .e,e. e. H.pHes. po.n. He,o,e ^ ,J,
h, pulling the malerlel ns this mny aellecl the needle n
NEVER run machine without passer loot and lower the presses tool. You
Place nra.erinl and threads m y^Hp^t poinl, it is not necessary o
are now ready to begin sewing. By a»i 3peed ol Ihe
n —dX iXa“— the aJoun. o. pressure eserted on the coniroi,
machine is regulated oy
removing the work
1 d 1 lovfor and needle bar are al the higher
Be sure to stop the machine when the thread iahe-up lever
^^rrmV
Now raise the presser foot and draw
foot and draw the labric back and to the lell. Fid- 21-A and It, nud
Page 15

’
is"
.’I
Vi:
i'i
15
-1 ^
•i ^
V
51"
‘1'
.'5i
Fig. 2!A £-. _,„
1
r
pass the threads over the thread cutter.
We ae"
Leave the ends of thread under the presser foot.
Fig. 21B Pig 22
CARE AND MAINTENANCE OF YOUR MACHINE
HOW TO OIL YOUR MACHINE
Your machine should be oiled occasionally to keep
it operating smoothly-how often depends on the amount
of sewing you do.
Fig. 23
Page 16

■ f;
lOv* •
16
Before oiling the tipper part of the sewing unit at points indicated by arrows in Fig. 22 turn
hand wheel toward you until the take-up lever is at its lowest point.
Avoid over-oiling-only a drop is needed at each point.
To oil parts under the bed of the machine, tip the unit back on its hinges and apply a drop
of oil at each point indicated in Fig. 23.
CLEANING AND OILING THE SHUTTLE
(See Fig. 24 and 25)
The stitch forming mechanism occasionally becomes
clogged with loose threads and lint. This will interfere
with the efficient operation of the machine. Cleaning
and removal of the lint will safeguard the performance.
To remove the shuttle assembly, proceed as follows;
1. Turn the balance wheel until the needle reaches its
highest position. Tilt head back on its hinges
2. Remove bobbin case (A)' Fig. 24.
3. Turn the two shuttle race cover clamps (B) downward
and remove the shuttle race cover (D) and shuttle
Fig. 24
body (D).
Page 17

r
fii 3
*11
ii}^
?11"
if ’
'i ^
i;
*%i ^
>i 3
4. Clean the shuttle race, the shuttle, and
cover by removing all threads, lint etc.
5. Apply a drop of oil with finger tip to
of shuttle.
When the cleaning has been completed, proceed
follows to replace the shuttle assembly;
Turn the balance wheel until the needle reaches its
highesj: position.
Place shuttle body, (D), in race against shuttle driver.
Replace shuttle race cover, iC), over hinge pin at lower edge and lock into position with
s u e race cover clamps, (B) making certain the clamps have been snapped securely into
position.
4.
Put bobbin into bobbin case.
5.
Put the bobbin case into the shuttle race, fitting tongue into notch E of race cover.
shuttle race
outer edge
as
ACCESSORIES
1.
Plastic Oiler
(Sealed and filled)
2.
Package of Needles (5:
3.
Large Screw Driver
4.
Small screw Driver
5.
Felt washers (2)
(For spool pins)
Bobbins (3)
o
5
o
17
K
Page 18

If Machines
Binds
BOBBIN
CASE
LATCH
BOBBIN
CLAMPS
2— Turn clamps outward and remove race cover.
3— Remove hook. . • i j
4— Clean thread and lint from all parts, includ
ing race.
5— Run a drop of oil along rim of hook.
6— Replace hook, then race cover. Snap clamps
into place. 1,1 j
7_Grasp threaded bobbin case by latch and re
place, fitting tongue into notch of race cover.
RAC:
Page 19

19
Skipping
Stitches
Irregular
Stitches
Uneven
Stitches
Trouble
! Probable Cause
Bent needle
i
Needle place iri-
1 correctly in clamp
I Too fine a needle
j for thread being used
Upper thread tension
too loose
1 Improper threading
Bobbin not wound
even
Pulling or holding
material
Not enough tension
on upper thread
Poor quality thread
Needle too fine for
thread being used
Correction
Discard and replace.
See instruction page No. 8.
See needle and thread chart, page No. 7.
Tighten upper tension.
See threading instruction, page No. 10.
Rewind bobbin.
Avoid puling or holding material, just guide it.
Increase tension.
Try different thread.
See needle and thread chart, page No. 7.
Page 20

20
ly
Trouble
Upper Thread
Breaking
Material
Puckering
Probable Cause
Improperly threaded
Too much tension
Starting with take-up
in incorrect position
Improper setting of
needle
Bent or eye of needle
too sharp
Bent or blunt needle
Tensions too tight
"
...............
Dull needle
Stitch length too long
Correction
Refer to threading instructions see page No. 10
and rethread machine
Loosen tension on upper thread by turning
thread tension knob to lower number
Always start sewing with take-up lever in
highest position
Refer to needle setting instruction see page No. 8
Try a new needle
Discard all blunt or bent needles and replace
with new
See tension adjustment page No. 13 and 12
Change needle
Reduce stitch length
. r
.J
Page 21

Il
ì’-:. O
• <!
i ■ D
.•fi
ì ■ D
■ 1
■l ^
;i ^
Tour sewing machine comes equipped with the basic set of accessories
described earlier in this book.
The following pages illustrate additional time saving attachments that have
been designed specifically for your machine. They are available at modest
cost from your dealer. If your dealer cannot supply you with these items,
ask him to order them for you by part number. Then you will be assured
of receiving the genuine part designed for best performance with your
machine.
If a sewing machine dealer is not available mail your inquiry directly to :
'i ’
'-I ^
'.4
-3
h ^
j o
WHITE SEWING MACHINE COMPANY
11750 Berea Road
CLEVELAND, OHIO 44111
' ^
In Canada :
WHITE SEWING MACHINES
1470 BIRCHMOUNT ROAD
o
SCARBOROUGH, ONTARIO, CANADA
Page 22

22
SOME OF THE ATTACHMENTS AVAILABLE FOR YOUR MACHINE
il
O fO
RUFFLER
PART# 1403
ATTACHMENT
FOOT
PART#74I74
PART#76553
DARNING
SPRING
PART #2146'
BINDER
PART#74I59
HEMMERS
PART #76552
J
PART #76551
S '
CORDING &.
ZIPPER FOOT
PART#I873
edgestitcher
PART#76554
PART #76550
-I
-I
-I
Ì
A
_ n
ci'
. ^
a
r k
^ k
-1
.1
" I:
on
■jf
Page 23

F,9- 26
23
ATTACHMENT FOOT
In order to attach the binder, edgestitcher and the
hemmers, it is necessary to remove the presser foot and
replace it with the attachment foot. Fig. 26.
Mount binder, edgestitcher or hemmers sliding the
attachment to the left as far as possible and tighten screw.
The mounting slot enables you to sew as close to or
as far away from the edge as desired. Just move the
attachment to the correct position before tightening the
mounting screw.
I =
i’.
THE EDGESTITCHES
The edgestitcher is used in making
lace insertions, edgings and pipings.
The slots serve as guides. To sew lace
edging to fabric, place the material you
want on top in slot. 1 (Fig. 27) and the
other piece in slot 4. (Fig. 28)
To trim with a wide piping, place Fig. 27 28
the fabric in slot 4, and the fold of the .. -i ¡. o rho folded edge of
p.pmg to the left in slot 3, ior a narrow piping, place the fabric rn slot 2 and the folded edge
the piping to the right in slot 3.
Slot 5 may be used as a guide in stitching a french seam.
Page 24

24
BINDER
This attachment sSts‘‘o„"''smoÎ ol the
edge oi material m widths oi commençai fo ec
binder are for corresponding
bias binding. used for unfolde
The open mouth of bmae
15 16 inch wide.
folded BINDING ,pp„psiate
Cut a point ‘f “^„^^■„tàm'binde. «i* strong pin^
,lpt. Draw through edge, Adinst by
Test strtching to be sure . s
sliding binder to right or l^tt.
TWO.TONE BINDING - Fjg^ 29^^
Two bindings can be se™ ^hip one siue be-
c- When two are used, aiway
operation^ When ^^^e slot,
tween Widths, inserting (Fig. 30)
hand-cut ® in half for a couple
Cut 15.16 inch ‘>‘«1"“^' ® ie„e,d end, almost to
oi inches. Cut bindm, dragona y Draw back until
fold. Slip fold mto end ol scroll. Test
out opens and brndm« none „ „.oessary.
Stitching to be sure it
P-'
r'
r, f
Fig. 25*
Fig- 30
Page 25

A
25
R U F F L E R
0
\
ii
■1
<1
;i
f .
V1
’1
:i
♦i
<1
%
^il
Fig. 31 Fig. 32 Fig. 33
The ruffler will produce yards of delicate ruffling or precision pleating.
Ruffling can also be done and sewn to another piece of fabric at the same time.
This highly versatile attachment despite its wide range of use, is simple to use.
Use the ruffler for making aprons, curtains, pleating a skirt, adding fullness to the bodice ot
a dress and etc.
o
3
3
3
n
Page 26

28
THE ADJUSTABLE CORDING
AND ZIPPER FOOT
- V
This attachment is used to make
and insert covered cording, and to
sew in zippers. Loosen thumb screw
to slide foot to either right or left
of needle.
CORDING. Fold bias strip of
fabric over cord. Loosen thumb
screw and set foot so needle is cen
tered in needle hole. Machine taste
cord in place (Fig. 34 )
TO sir covered ooid to material, reset adjustable loot so ueedle stitches closer to cord, and
on edge of base fabric.
SEWING IN ZIPPER
Loosen thumb screw and slide foot so needle
enters center of needle hole. Guide metal of zipper
along edge of foot (Fig. 35). Stitching should be
close to zipper to allow easy opening and closing.
Adjust to sew from either right or left side, which
ever is more convenient.
-I
-li
Fig. 34
rP.
^ %
•
Fig. 35
Page 27

Is 3
%
U 3
! J'
’ •i ~
o
o
Before attaching any of the hemmers. Be sure
bobbin thread is pulled up. Then, with hemmer in
place, hold top thread loosely and turn hand wheel one
full turn toward you, making a loop under hemmer.
thread will catch loop and carry upper thread to back
of hemmer.
THE SET OF HEMMERS
Grasp bobbin thread with both hands and slip
horizontally under hemmer toward back. Bobbin
■J.,
■■■ -’k I.':--;;»
27
'ii
u I
3
Ni’
;1-
'^1*’
Fold material to suit for two inches along edge,
hold at each end of fold. Slip fold into guide and
up over spoon (Fig. 36). Fold hem in material back of hemmer. Draw forward to
and fasten with point of needle. Pnll on threads gently as you start st.tohing.
Fig. ;i6
DARNING SPRING
HOW TO ATTACH
Remove presser foot, unthread needle, place darner
spring, on needle and slip hook up over needle clamp.
Fig. 37
end of hem
Page 28

28
Fig. 38
BUTTON SEW - ON
(Fig. 39)
This is a time saving attachment which will
convert your machine to a unit that will sew
buttons of various size on any item you care
BUTTONHOLE ATTACHMENT
(Fig. 38)
Perfect buttonholes every time--all uniform m
size when you let the Butionholer take over for
you. Once it's on the machine you do not even
guide the fabric--the buttonholer thinks for it
self It comes with live different size keys for
buttonholes rangings in length from 5/16 to
1-1/16" in both the straight and keyhole type.
Once you have used this Buttonholer you
will realize there's no greater timesaving acces
sory for your sewing machine.
Keys for other size button holes are also
available.
-H
-li
' H
'A
ri
p
c
^
^"^"^'just place the button under the foot of the
attachment let the machine take over and sew
it to the material quickly, easily and m a neat
appearing manner.
T %
* ^
Fig- 39
•I
VOV-
Page 29

■ai’
o
U
3
•*1
ft"
'
¡ì;
1’
'i-.
H
H '
>i
With the wonderful new decorator your machine
converts to a master-controlled performer of
embroidery magic. It's so simple, too. Just remove
the presser foot, attach the "A.D." and you're ready
to make eight different decorative patterns.
Each pattern of course, has many variations in
PART 4176022
Fig. 40
BLIND STITCH HEMMER
(Fig. 41)
With the use of this attachment you are able to
quickly produce invisible stitched hems on dresses,
skirts, draperies and etc. Also save many tedious
hours of hand work and give your sewing that pro
fessional look.
Just fold your material and let the attachment
take over.
width and length. All designs are built right into the
decorator, reducing your effort to a minimum and
you use ordinary thread, standard needles.
29
DECORATOR ATTACHMENT
(Fig. 40)
Fig. 41
-i
K
 Loading...