

SINGER W106 User Manual

02/14/2008

02/14/2008
’ PAGE
Parts Identification
Principle Parts..........................................................................................................4
Accessories .............................................................................................................6
Installing Machine Head into portable case
or cabinet and Connecting Machine
Selection of Needles and Threads ....................................................................................8
Needle-Thread-Fabric-Stitching Guide...................................................................9
Changing Needle.............................................................................................................10
Changing Needle Plate ..................................................................................................10
Selection of Presser Foot...............................................................................................11
Winding Bobbin ................................................................................................................12
Upper Threading.............................................................................................................13
Threading Bobbin Case...................................................................................................14
Placing Bobbin Case in Shuttle .......................................................................................14
Selection of Stitch
Stitch Length Control.............................................................................................15
Reverse Button .....................................................................................................15
Stitch Width Control...............................................................................................16
Relating Stitch Length to Stitch Width ..............................................................16
Controls
Adjusting Thread Tensions...................................................................................17
Adjusting Pressure on Fabric and Feed Dog Height..............................................18
Sewing Light..........................................................................................................19
Creative Embroidery Control.................................................................................19
........................................................................
7
Preparing to Sew .............................................................................................................20
Guiding Fabric.................................................................................................................. 20
Turning Corners................................................................................................................20
Curved Seams..................................................................................................................21
Sewing Across Heavy Seams
Removing the Work..........................................................................................................21
..........................................................................................
SECT,10N^V^aAPta:rdAttONr5F;.St3ICHfS V W
Straight Stitch
Seams....................................................................................................................22
Basting/Topstitching...............................................................................................22
Darning...................................................................................................................22
Cording/Sewing in Zipper....................................................................................23
Quilting...................................................................................................................23
Zigzag Stitch '
Overcasting ............................................................................................................24
21

02/14/2008
PAGE
Sewing Knits ..........................................................................................................24
Sewing on Buttons..................................................................................................24
With a Thread Shank ...................................................................................25
Satin Stitching.........................................................................................................25
Tapering/Creative Embroidery..............................................•
Manual Embroidery Designs
...
.............................................................................
..............
.................
26
26
Freehand Monogramming.....................................................................................27
Applique.................................................................................................................27
Gathering Over a Cord..........................................................................................28
Lace Application....................................................................................................28
Flutter Hem............................................................................................................28
Sewing Tips ...........................................................................................................29
Shaping Darts in Interfacings................................................................................29
Buttonholes
Preparation............................................................................................................30
Turn Around Buttonhole
......
..................................................................................31
Corded Buttonhole ................................................................................................ 31
Oiling Machine.................................................................................................................. 32
Cleaning and Oiling Shuttle Area .....................................................................................33
Adjusting Bobbin Winder..................................................................................................34
Adjusting and Changing Motor Belt..................................................................................34
Problem and Remedies....................................................................................................35
Attachment Foot .............................................................................................................37
Edgestitcher ....................................................................................................................37
Binder.............................................................................................................................. 38
Folded Binding .................................................................................................... 38
Two-Tone Binding.................................................................................................38
Hand-Cut Bias Binding..........................................................................................38
The Set of Hemmers.......................................................................................................39
Rüffler ..............................................................................................................................40
Narrow Hemmer..............................................................................................................41
Lace Trimmed Hems.............................................................................................42
Lace Edge with Invisible Stitching
........................................................................
42
French Seam......................................................................................................... 42
02/14/2008
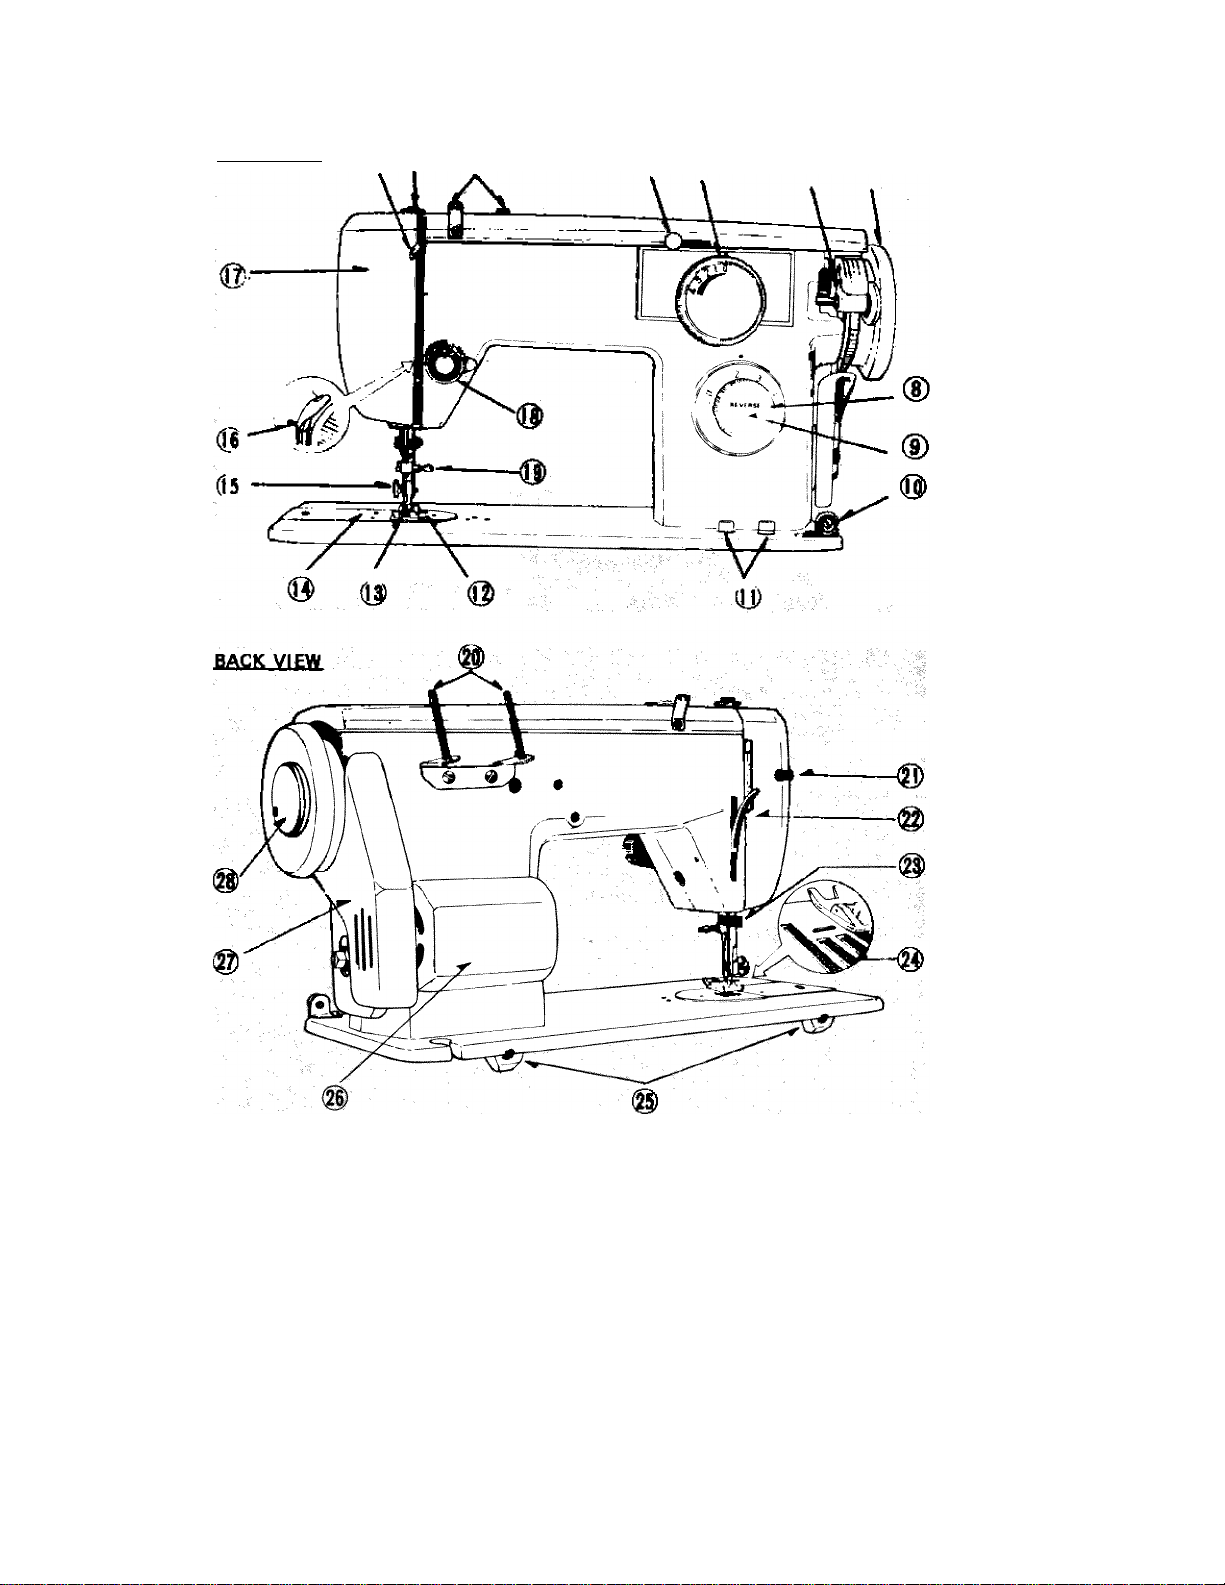
PARTS IDENTIFICATION
PRINCIPLE PARTS
F_BONT VIEW 0 (D (D
0 ® ® ©

02/14/2008
1. Take-up
2. Pressure Control
3. Top Thread Guides
4. Creative Embroidery
Control
5. Stitch Width Control
6. Bobbin Winder
7. Hand Wheel
8. Stitch Length Control
9. Reverse Button
10. Bobbin Winder Tension
Discs
11. Feed Dog Height
Control
12. Needle Plate
13. Presser Foot
14. Slide Plate
15. Thumb Screw
16. Check Spring
17. Face Cover
18. Tension Control
19. Needle Clamp
20. Spool Pins
21. Light Switch
22. Presser Foot Lever
23. Thread Cutter
24. Feed Dog
25. Head Hinge Holes
26. Motor
27. Belt Cover
28. Clutch Nut
Always at its highest position when beginning or ending
sewing.
For regulating the pressure on fabric.
For le^ing thread to tension control for sewing
For precise adjustment of zigzag stitch width as well as
tapering.
For setting stitch width
For winding thread on bobbin.
For the control of the up and down movement of the
needle.
For selecting stitch length between no feeding and
about 6 stitches per inch.
For easy back tacking to lock thread ends.
For providing proper tension on thread when bobbin
winding.
For regulating feed dog height for various materials and
types of sewing.
With guide lines for sewing accuracy.
For holding fabric when sewing.
For opening an dccess for bobbin and bobbin case.
For tightening pre^r foot in place on presser bar.
For automatic precise adjustment of flow of upper thread.
Htnp-open type for replacement of light bulb and oiling.
For regulating the amount of tension on upper thread.
For holding needle in place In the slot of needle bar.
For holding ^ools, preventing over-spin of spools.
For turning on or off the light inside face cover.
For lifting or lowering presser bar and presser foot.
For convenience to cut both upper and lower threads
after sewing. .
Diamond point to move fabric accurately.
For instaliation of machine head into portable ca» or
cabinet
110—Its Vote, for running machine.
For covering motor belt.
For releasing movement of the needle bar In order to wind
bobbin.
02/14/2008
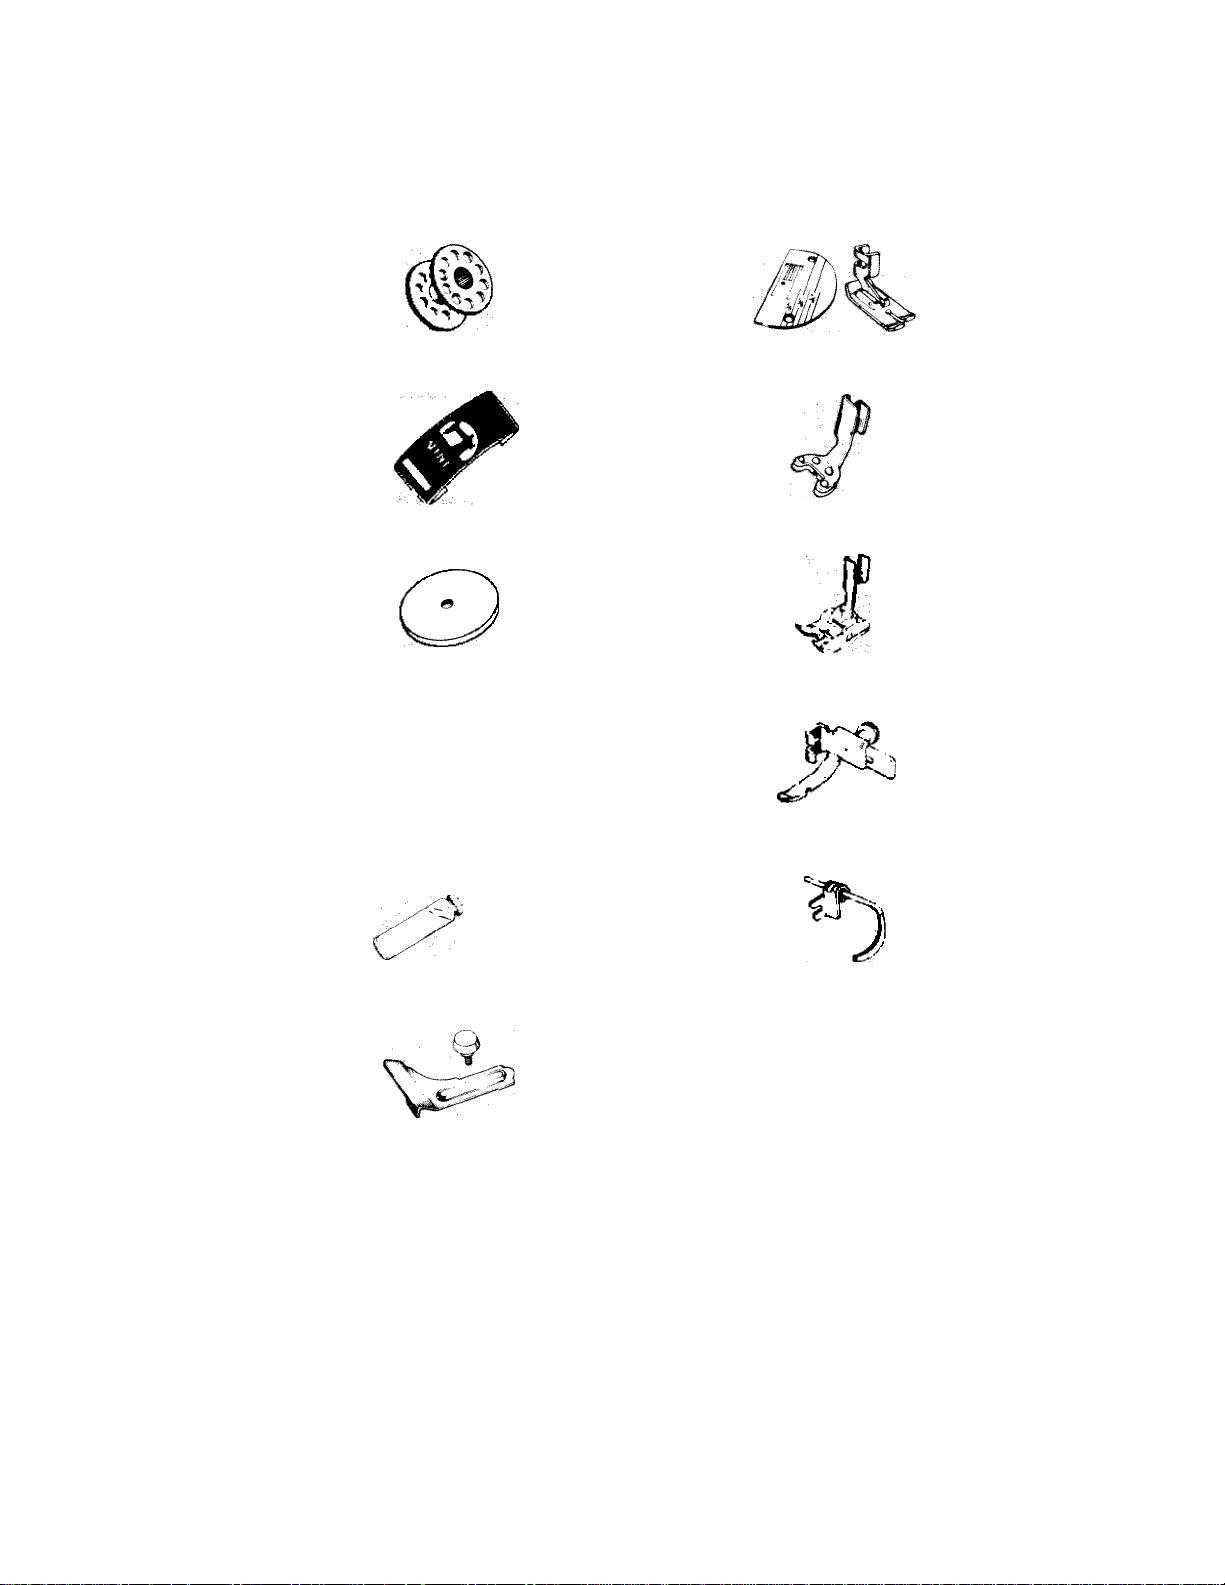
ACCESSORIES
Your new sewing machine comes equipped with the following set of accessories
to make your sewing easier.
METAL BOBBINS
Three metal bobbins
are included.
A PACK OF NEEDLES
One each at sues
#11. #14 and #16
light ball point
needles.
SPOOL CUSHIONS
Place felt spool
cushions on spool
pins to reduce sound
of spool spinning
SCREW DRIVERS
Small one for bobbin
thread tension adjuftment. Large orte
for thumb screw,
needle clamp, etc.
STRAIGHT STITCH FOOT81 NEEDLE PLATE
For straight stitch*
infl m very sheer
soft or very li^tweight stretchy w*ateriait y^re extra
control if needed.
BUTTON FOOT
For holding buttons
in place when «itch^
ing.
BUTTONHOLE FOOT
Use for buttonhol
ing. Do not use
when normal wwing.
CORDING AND ZIPPER FOOT
For Stitching very
close to the edge
of a cord or zipper.
OILER
Containing rhachine
oil, use as oiler.
CLOTH GUIDE WITH SCREW
Aid in creating
straight seams.
QUILTING GUIDE
Helps make parallel
rows of sti№hing.
SEAM RIPPER
For cutting open
the buttonholes and
for remowirtg *titches.

02/14/2008
INSTALLING MACHINE HEAD INTO PORTABLE-CASE
OR CABINET-AND CONNECTING MACHINE
Loosen both head hinge set screws
on the back of machine bed plate
until head hinge- holes are clear.
Tilt head hinge pins up and back
as far as they will go.
Carefully slip machine head onto
hinges — making sure the head
hinge pins are inserted as far as
they can go into head hinge holes.
Allow machine head to rest in its
tilted back position.
Tighten both set screws securely
with screwdriver.
Plug electrical leads from machine
head into sockets located inside
cabinet or portable case. Cord
identified with "motor" tag must
be plugged into socket marked
"motor". Untagged cord goes to
"light" socket.
Insert plug into a wall outlet of
110-115 Volts.
02/14/2008
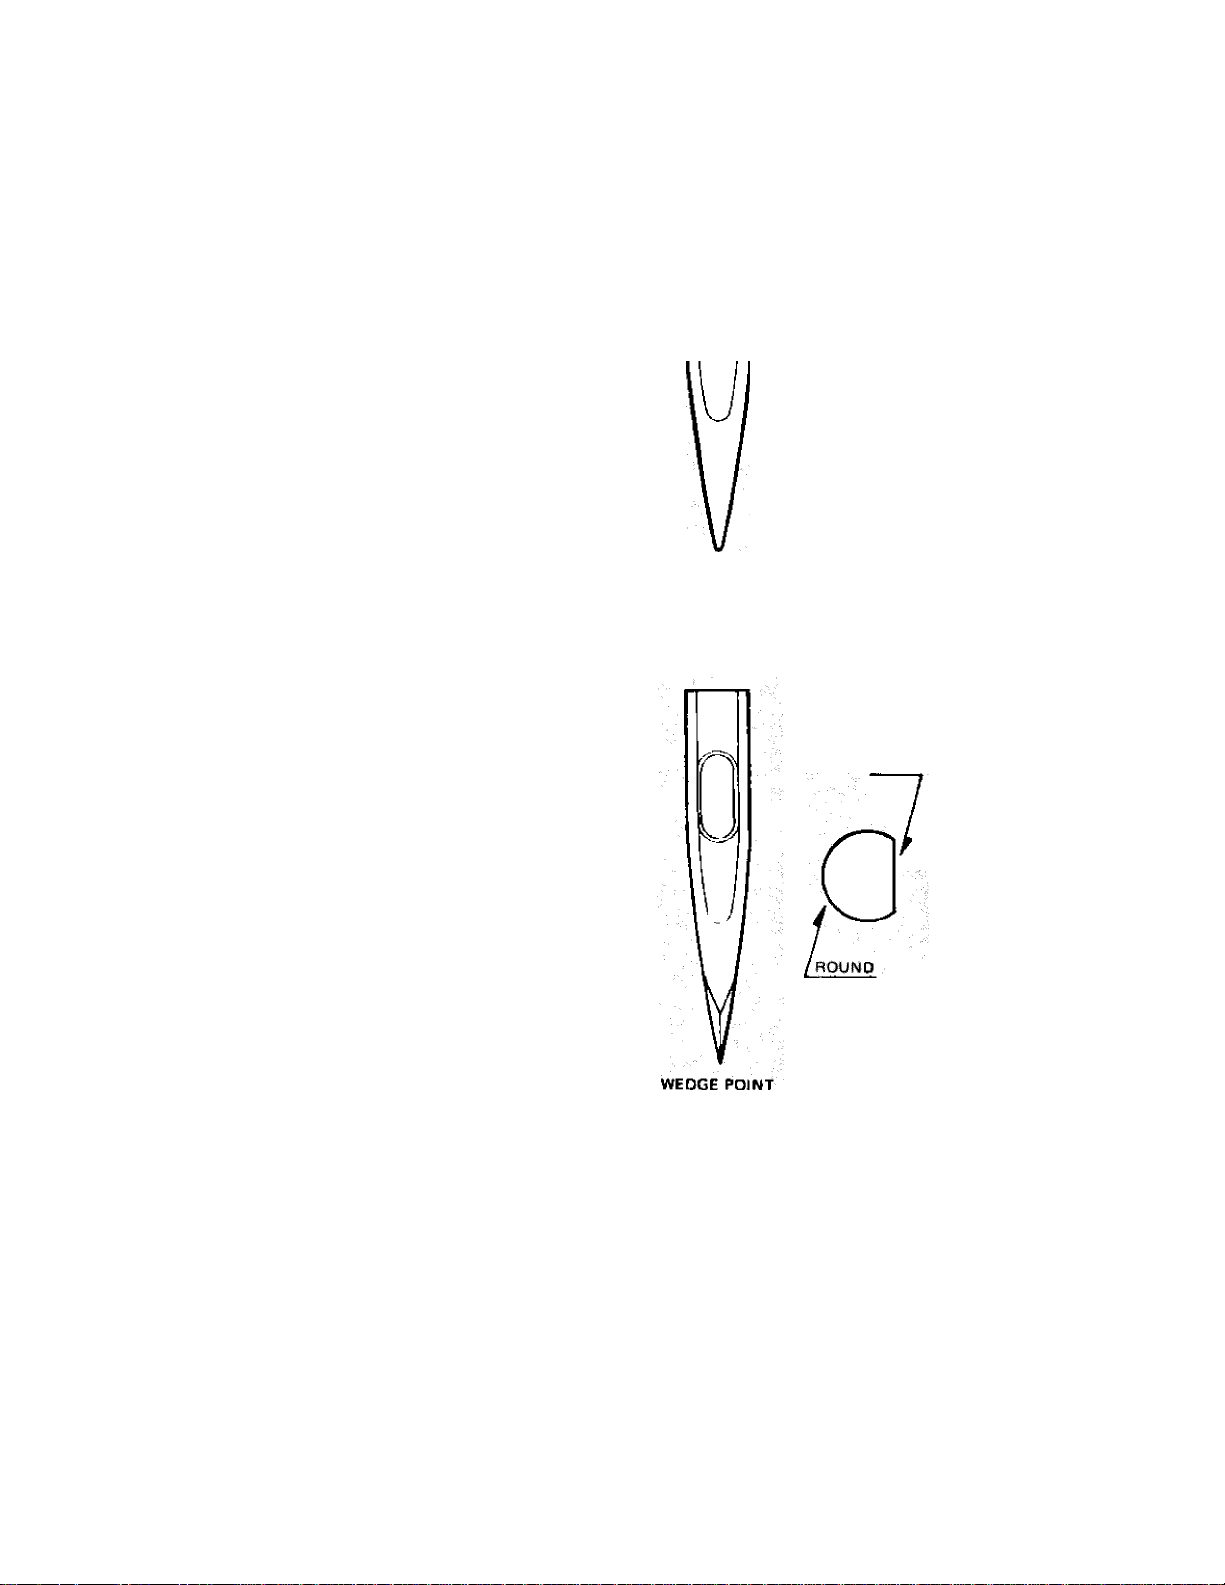
SELECTION OF NEEDLES AND THREADS
The needle and thread you choose depends
upon the fabric you are stitching. The correct
selection of needle and thread is very important
to avoid damaging light weight or tightly woven
fabrics, to prevent skipped stitches when sewing
on very sheer, stretchy fabrics or needle breakage
when stitching heavy or stiff fabrics. For best
results, sewing machine needles should be replaced
when they become even slightly dull or bent
or at the completion of every other garment.
A regular needle is suggested for use with
woven fabrics. Needles, style 15 x 1, of the
range in size from 8 to 20 are used on this
machine. The lower number indicates the finer
needle. The most commonly used sizes are 11
and 14.
A ball point needle is recommended for use
with tricots, jerseys, lingeries and power nets.
Unlike sharp pointed needles, which pierce
fibers of knit fabrics destroying elasticity,the
ball point needle slips between fibers without
damage to fabric and skipped stitches.
A wedge point needle is recommended for use
with leather and leather-look vinyls. A wedge
cutting point pierces leather more easily than
ordinary sewing machine needles, resulting in
more satisfactory stitching.
REGULAR BALLPOINT
SHARP NEEDLE NEEDLE
FLAT
Although a ball point needle is recommended
for knit fabrics and sewing on very stretchy
fabrics of knits, the placement of a thin paper
under the fabric and the use of a finer needle
are suggested to prevent skip stitches.
Always use the same type and size of thread
in both needle and bobbin. Use a good quality
thread without knots for best stitches.
8
NEEDLE

02/14/2008
NEEDLE - THREAD - FABRIC - STITCHING GUIDE
Extremely heavy
tarpaulin, sacking,^
canvas, duck, etc.
Heavy upholstery
fabric, ticking,
denim, leadierette.
18
to
10
Heavy Duty
Hewy Duty
Medium heavy drapery
f^ric, velveteen,
suiting, felt, terry, etc.
Medium broadcloth,
percale, gins^am, linwi,
chintz, taffeta, sheer
wool, shantung, etc.
Sheer voile, lawn,
dimity, crepe,
handk^chief lir»n.
Plastic film, etc.
Very sheer rdtiffon,
batiste, lace, <»gandy,
nylon net, marquisette, etc.
16
14
11
10
to
12
12
to
14
14
to
16
(plastic film)
Staio
16
to
20
Heavy Duty
50
50
60

02/14/2008
CHANGING NEEDLE
Always change the needle after every
other garment especially when sewing on
polyester and nylon fabrics which dull
needles much faster. When needles are
dull or bent, they damage both your
fabric and the machine. A general rule
when placing sewing machine needles is
that the flat side of the needle is placed
to the right of the machine, when the
bobbin is put in from the left. If the
needle is inserted incorrectly, the stitches
will not form.
To change the needle
1. Raise the needle bar to its highest
position by turning the hand wheel
toward you.
2. Loosen needle clamp to remove the
needle.
3. Place needle (flat side to the right and
long groove to the left) in the needle
clamp and push it upward as far as it
will go, tighten needle clamp.
4. After changing the needle, make one
complete turn of the hand wheel by
hand to be sure the needle is clearing
the needle plate.
CHANGING NEEDLE PLATE
Although an all-purpose, utility needle
plate is fixed on your machine, for
straight sewing on fine fabric or soft very
stretchy fabric, you may want to use the
straight stitch needle plate with the
straight stitch foot, which are included in
your accessory box.
To change the needle plate, simply slide
the slide plate as far left as possible.
Remove the two screws holding the
plate in place. Lift the needle plate and
replace.
The needle plate is removed for cleaning
the lint which may pile up between
needle plate and feed dogs.
STRAIGHT STITCH UTIUTY
NEEDLE PLATE NEEDLE PLATE
02/14/2008
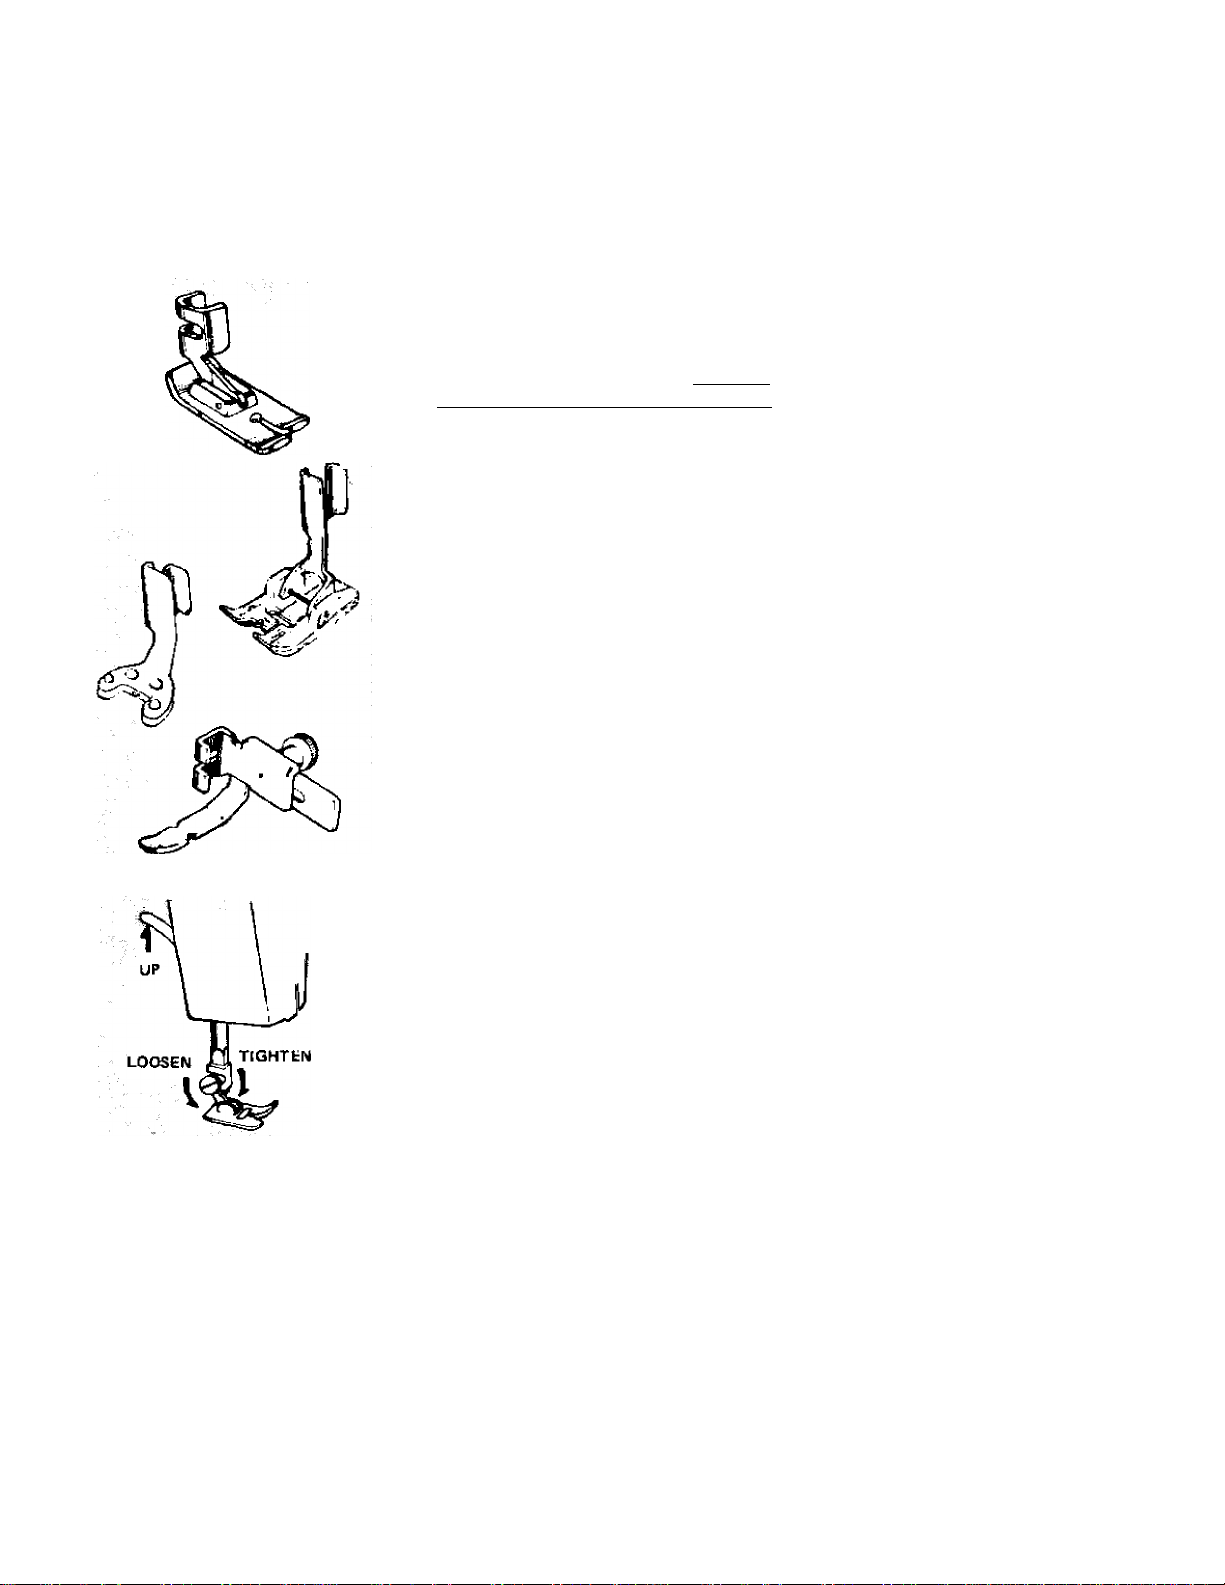
SELECTION OF PRESSER FOOT
For most ordinary sewing the original all-purpo^ foot can be used. However, the
following feet in your accessory box are recommended for special purposes.
Straight Stitch Foot
This has only a narrow hole to accommo
date only straight stitching. It may be
used on sheer or soft fabrics for more
control. When using this foot, the Stitch
Width Control should be at 0 to avoid
hitting the foot and breaking the needle.
Buttonhole Foot
This foot has a groove underneath, to
allow the narrow satin stitch or button
hole to form evenly. However, if skip-
stitch occurs on sheer fabrics with this
foot, it may be necessary tb use thin
paper underneath.
Cording or Zipper Foot, and Button Foot
Use for sewing very close to the edge of a
cord or zipper, and sewing on buttons
respectively.
CHANGING FOOT
Use the large screwdriver to loosen thumb
screw. Turn the screw backward until the
foot becomes loose. Then, lift up on
presser foot lever until it is in its highest
position in order to remove the foot.
Replace with desired foot and tighten
thumb screw securely.
02/14/2008
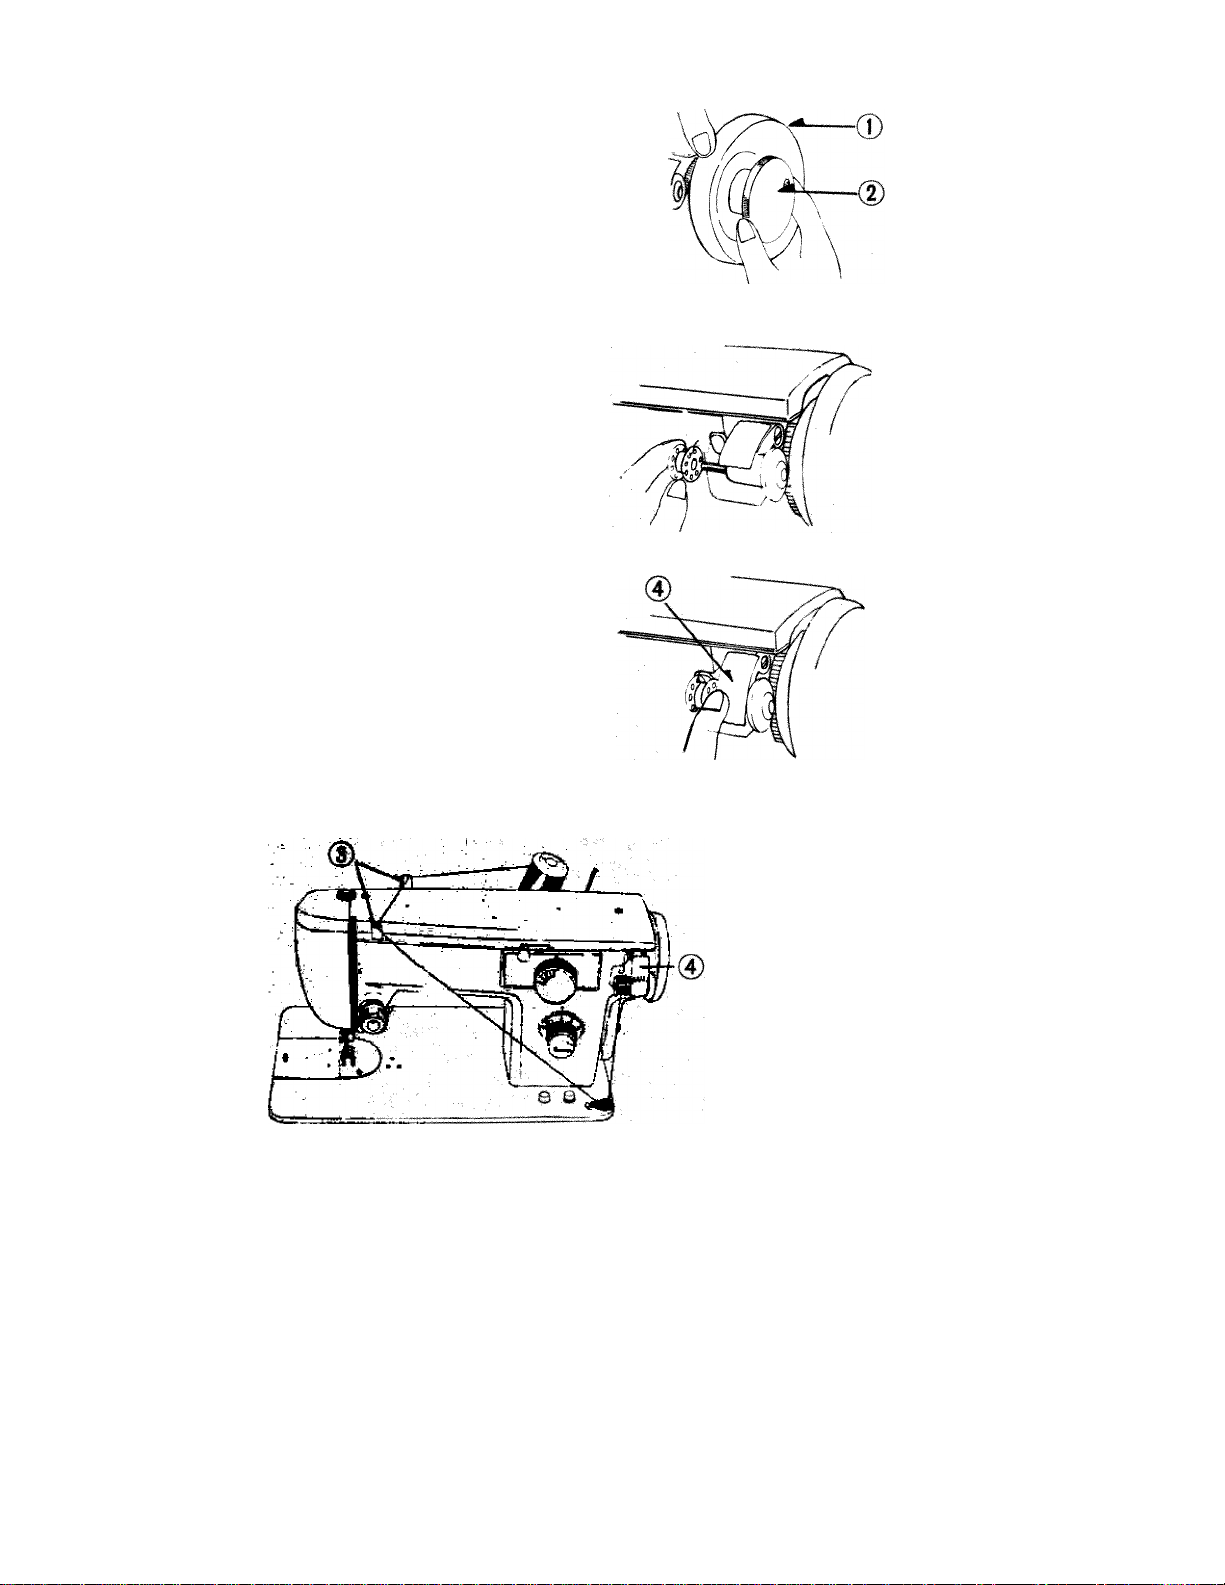
WINDING BOBBIN
Disengage the hand wheel(l) from
the stitching mechanism by turning
the clutch nut (2) toward you or
ccwnter-clockwiM.
Place a spool of thread on one of
the spool pins and lead thre«f
through the Top Thread Guide
(3) and Bobbin Winder tension
Disc at the right front of bedplate.
Run the end of thread through a
hole in the bobbin edge and place
tobbin on spindle of bobbin winder
fitting the notch on bobbin over
small pin on spindle.
Prea bobbin winder latcfi (4)
down, and hold the thre^ end
loosely then start machine slowly,
and bobbin winder latch will be
relea^ to stop winding when
bobbin is full.
Turn clutch nut away from you
until sewing mechanism is again
engaged so that needle moves when
you turn the hand wheel.
Break off loose thread end used to
start the winding and cut other
thread end. Then remove bobbin
from bobbin winder.
02/14/2008
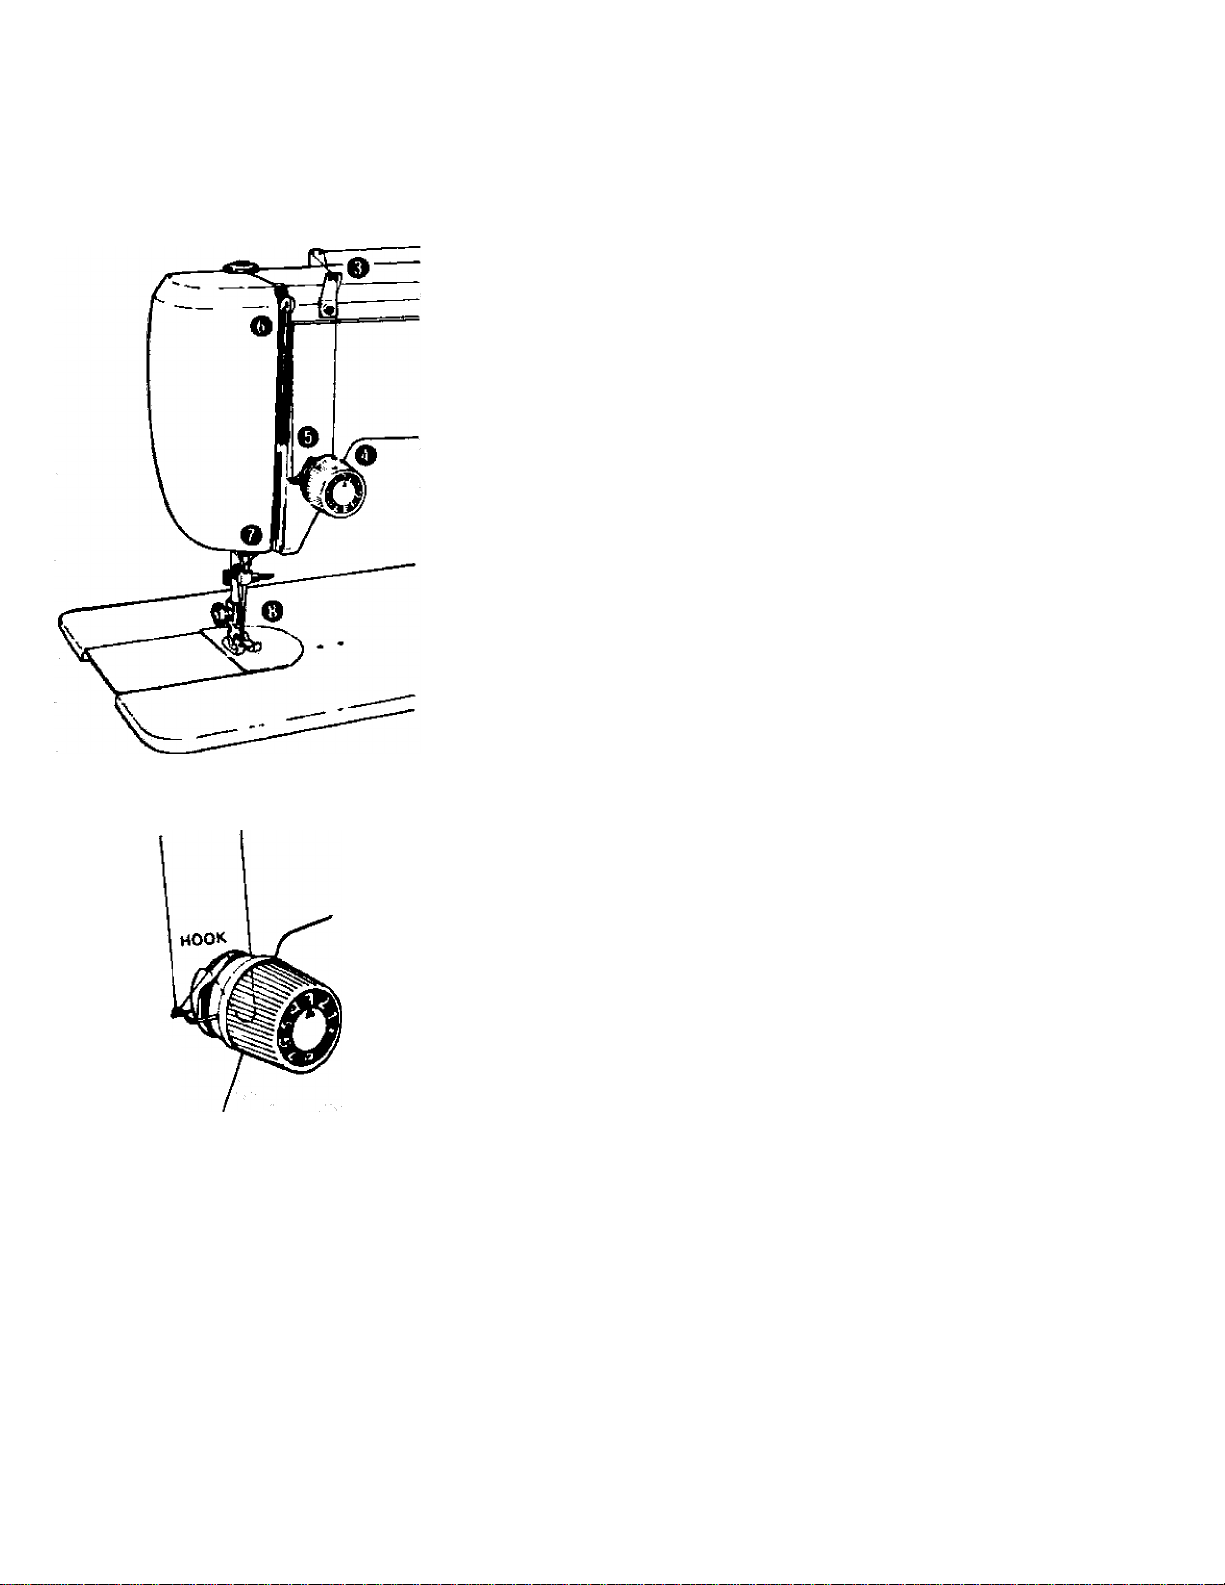
UPPER THREADING
1. Turn the hand wheel toward you
to raise the take-up lever to its
highest position.
2. Place a spool of thread on the
spool pin.
3. Lead the thread through the top
thread guides.
4. Down and between the tension
discs, from right to left.
5. Draw the thread up through the
check spring and with a slight
tug into the hook.
6. Up and through the eye of takeup lever from right to left.
7. Lead thread down through the
thread guide at the bottom of
the threading slot, then, through
the needle bar thread guide from
the back.
CHECK
SPRING
8. Thread the needle FROM LEFT
TO RIGHT, drawing it through
about 3 or 4 inches. Hold the
end of the upper thread loosely
and turn the hand wheel toward
you until the needle goes all the
way down and comes back up.
A thread loop will form over
the upper thread which then can
be pulled out straight. Place
both thread ends under presser
foot and draw toward the side
of the machine, leaving both
threads three or four inches
long.
02/14/2008
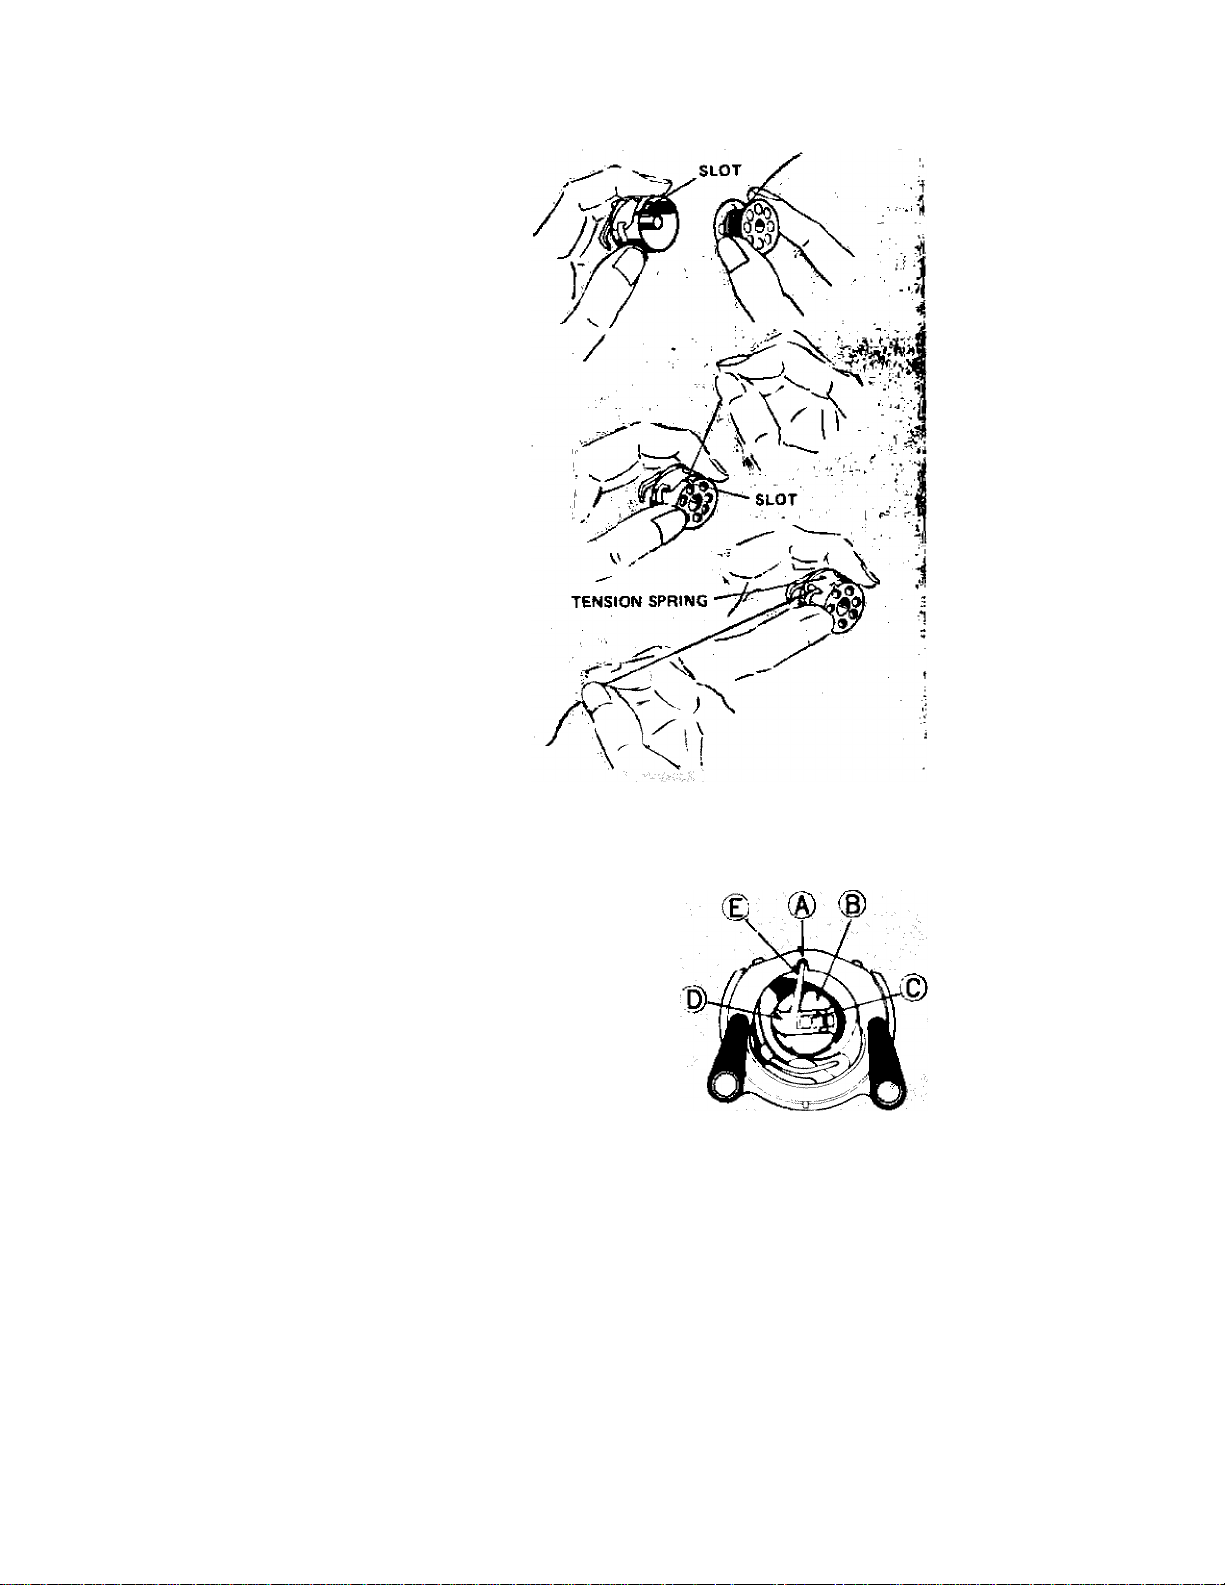
THREADING BOBBIN CASE
1. Hold bobbin case be
tween thumb and fore
finger of left hand, so
that the slot in the edge
of the bobbin case is on
top. Take the bobbin
between thumb and fore
finger of right hand so
that the thread on top
leads from left to right
2. Insert bobbin into bob
bin case, pull the thread
into the slot of the
bobbin case and draw it
under tension spring and
into the fork-shaped
opening of the spring.
PLACING BOBBIN CASE IN SHUTTLE
Raise needle bar to its highest position, and slide plate to
the left. Hold the bobbin case latch (D) between the
thumb and forefinger of the left hand, with at least three
inches of thread running from the top of the bobbin case
to the right. Insert and center the bobbin case on the
stud of the shuttle body (C). Be sure the bobbin case
finger (E) is opposite the shuttle race notch (A). Press
the bobbin case (B) into the shuttle as far as possible
until the latch catches on the center post of the shuttle.
Then release the bobbin case latch (D). Press the bobbin
case again after the latch has been released to make sure
the bobbin case is locked securely in place. Close the
slide plate.
 Loading...