

Page 1

Page 2

1. CONTENTS
tents................................................................................................................................................................................................... ^
:ription of machine............................................................................................ ..........................................................................
ding the bobbin........................................................................................................... ................................................................. ^
Jading the bobbin case.................................................................... ................................................................................................g
rting and removing the bobbin case...........................................................................'
Jading the machine......................................................................................................................................................................... y
ing the needle.................................................................................................................................................................................. -j
laring to sew................................................................................................................^
ting to sew........................................................................................................................................................................................ g
ulating the thread tension............................................................................................................................................................... g
ulating the stitch length................................................................................................................................................................. i‘o
ulating the drop feed...............................................................................................^ ^
ulating width of zigzag stitch...........................................................................................'
ulating length of zigzag stitch........................................................................................................................................................11
of zigzag patterns......................................................................................................................................................................... ^2
■^9......................................................................^ 1111 ;
ining the shuttle race............................................................................................... .......................................................................
li to make buttonholes......................................................................................................................................................... 15^16
ling embroidering and monogramming................................................................................
ton sewing.......................................................................................... .............................................................................................
'ow hemming............................................................................................... ....................................................................................
....
...............................................................g
......................................................................
...................................................................
....
........................................................
.....................................
..............................................
itii
g
^0
^ ^
13
ing........................................................^ ^ ^;.........................................................................................on
:h guide..................................................................................................... .......................................................................................t.
Iting..........................................■......................................................! ^ ^ ^ ^ ^ ...................................................
le useful sewing hints.......................................................................................’
se of common difficulties.................................................................................................' ................
die and thread sizes.................................................................................................................................................................... 24
....
........................................................................„„
.....................................
21
23
Page 3
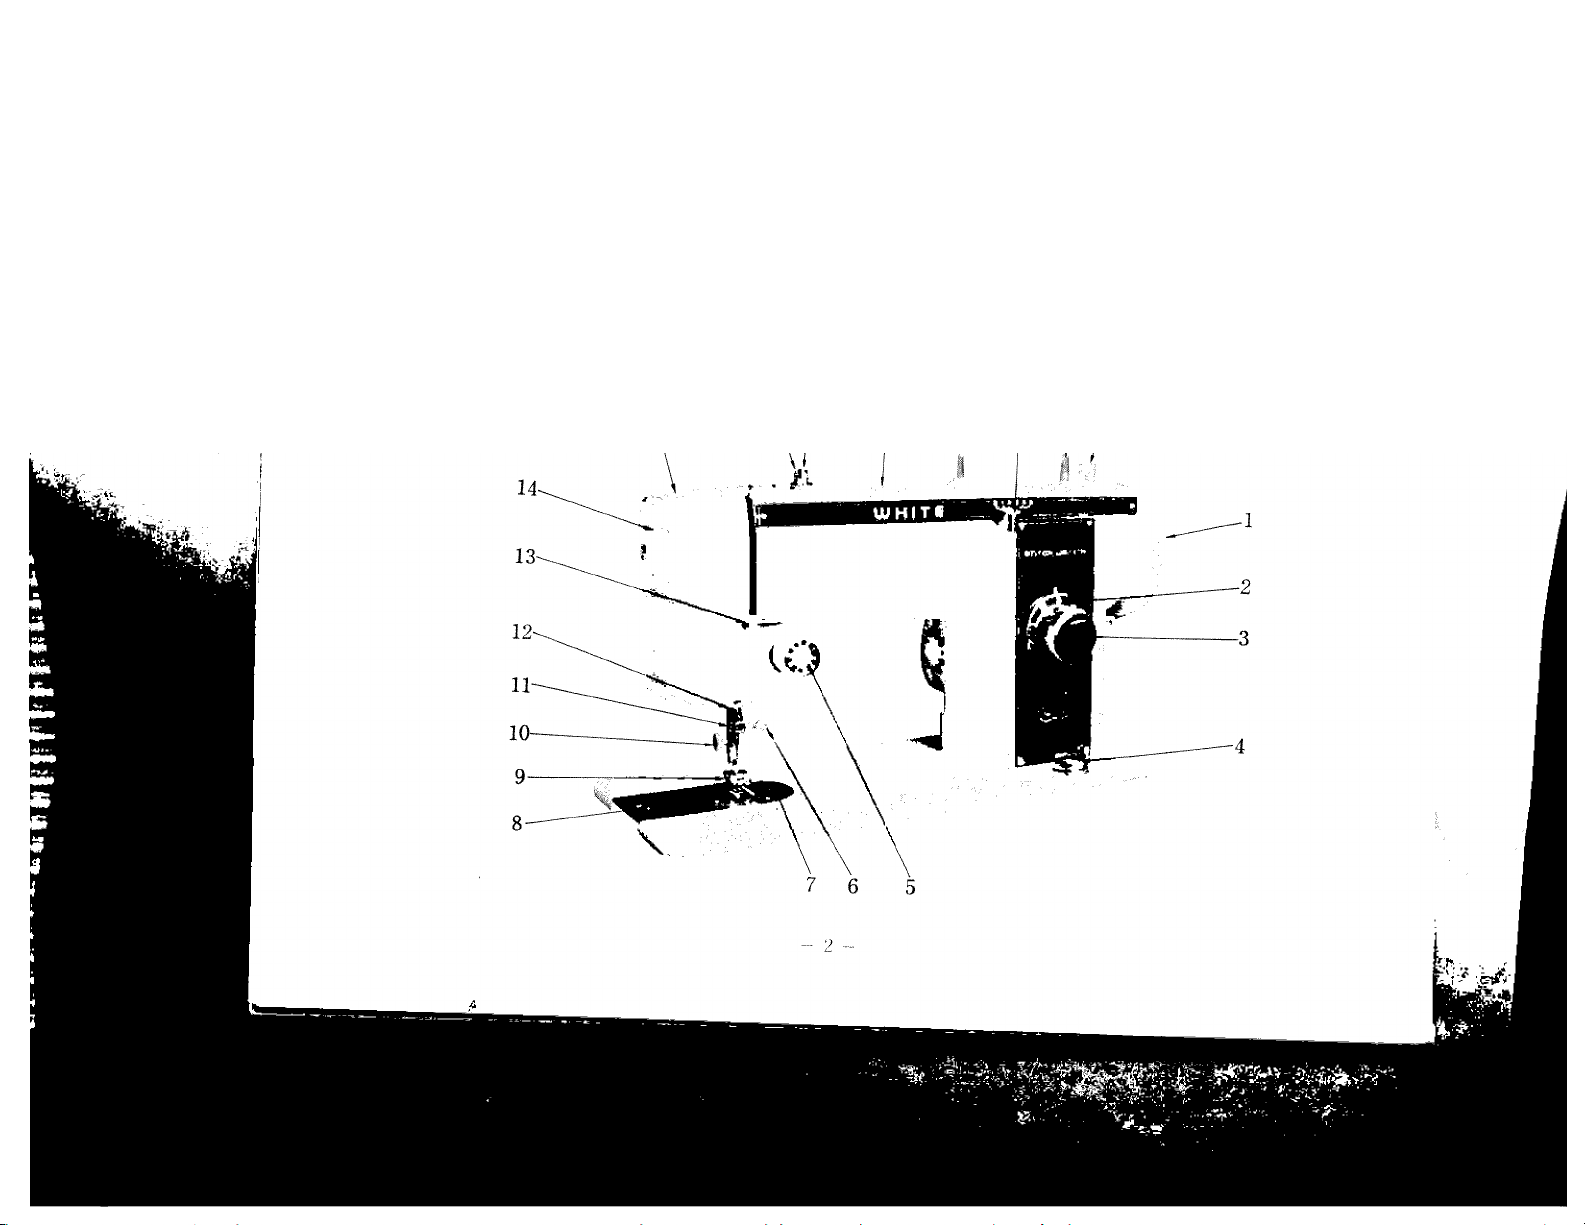
2. DESCRIPTION OF MACHINE
If 17 18 19 20 21
18
1
19
1
1
1
22
Page 4

1.Balance Wheel
2,Stitch Length Control Knob
3. Reverse Push Button
4. Drop Feed Knob
5. Dial Tension
6. Needle Clamp
7. Needle Plate
8.Slide Plate
9,Presser Foot
lO.Presser Foot Clamp Screw
11 .Needle Bar Thread Guide
12. Lower Thread Guide
13. Florizontal Thread Guide
14. Face Plate
15. Light Switch (Rear side)
le.Thread Guide
17.Tension Backet
iS.Top Plate
19.Spool Pin
20.Zig-Zag Width Lever
21 .Bobbin Winder
22.Bobbin Winder Stopper
-'.il
v: ; ■
r-
Page 5
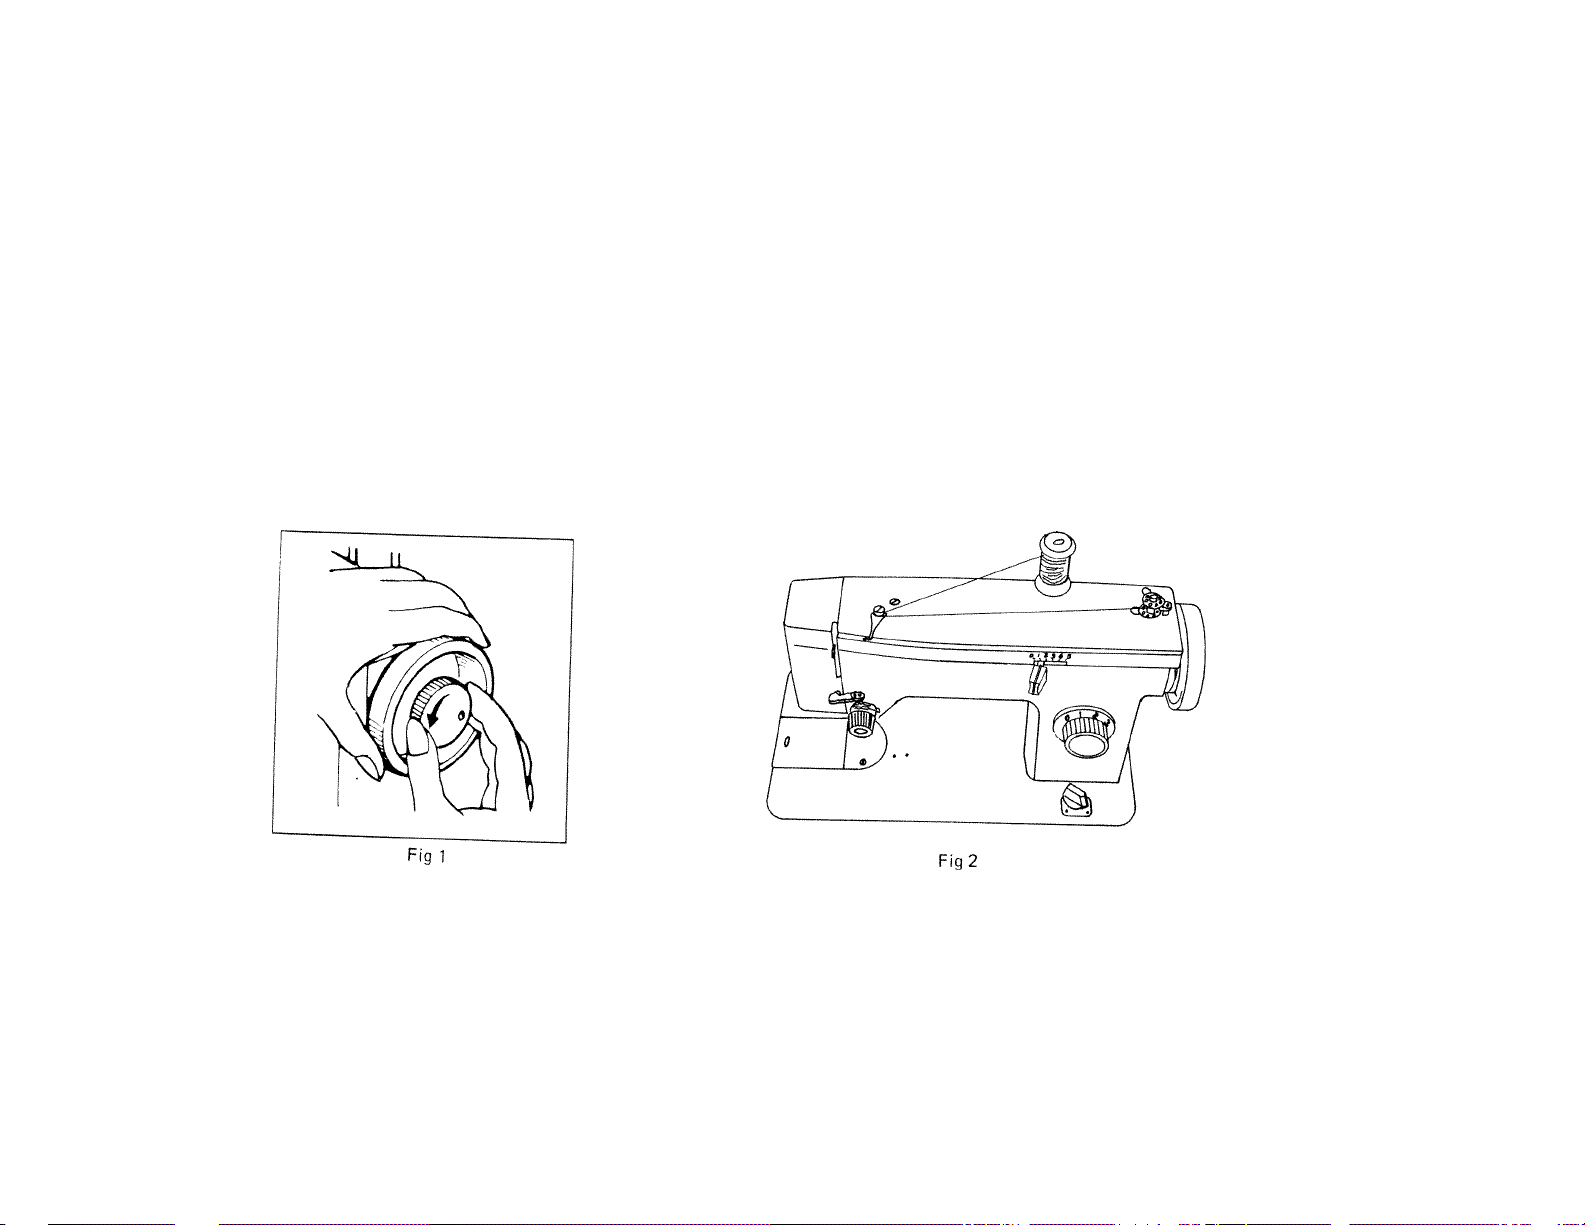
3. WINDING THE BOBBIN
harxl. This w,ll ps„;;i, ,h. Ltance whes7,„ . 7 k"* C='i >1 .-wards you „i,h yo„r righ,
^ balance wheel is now disconnected for the bobbin windinVoper'aLn"
' front (Fr2).”^ bracket from back to
" o:Their„r rh:::: 1“:;,“"" h„hh„,
4. And push the bobbin winder from left to right
":;:T;:r.7::r-“;r ;;:::rg7:::: »-"-v
with left hand and with the right hand turn t spmdle. Hold balance wheel firmly
-V ,hr,her and .he „eedle -a. re:"!!: Zl^^rhiahrilT
Page 6
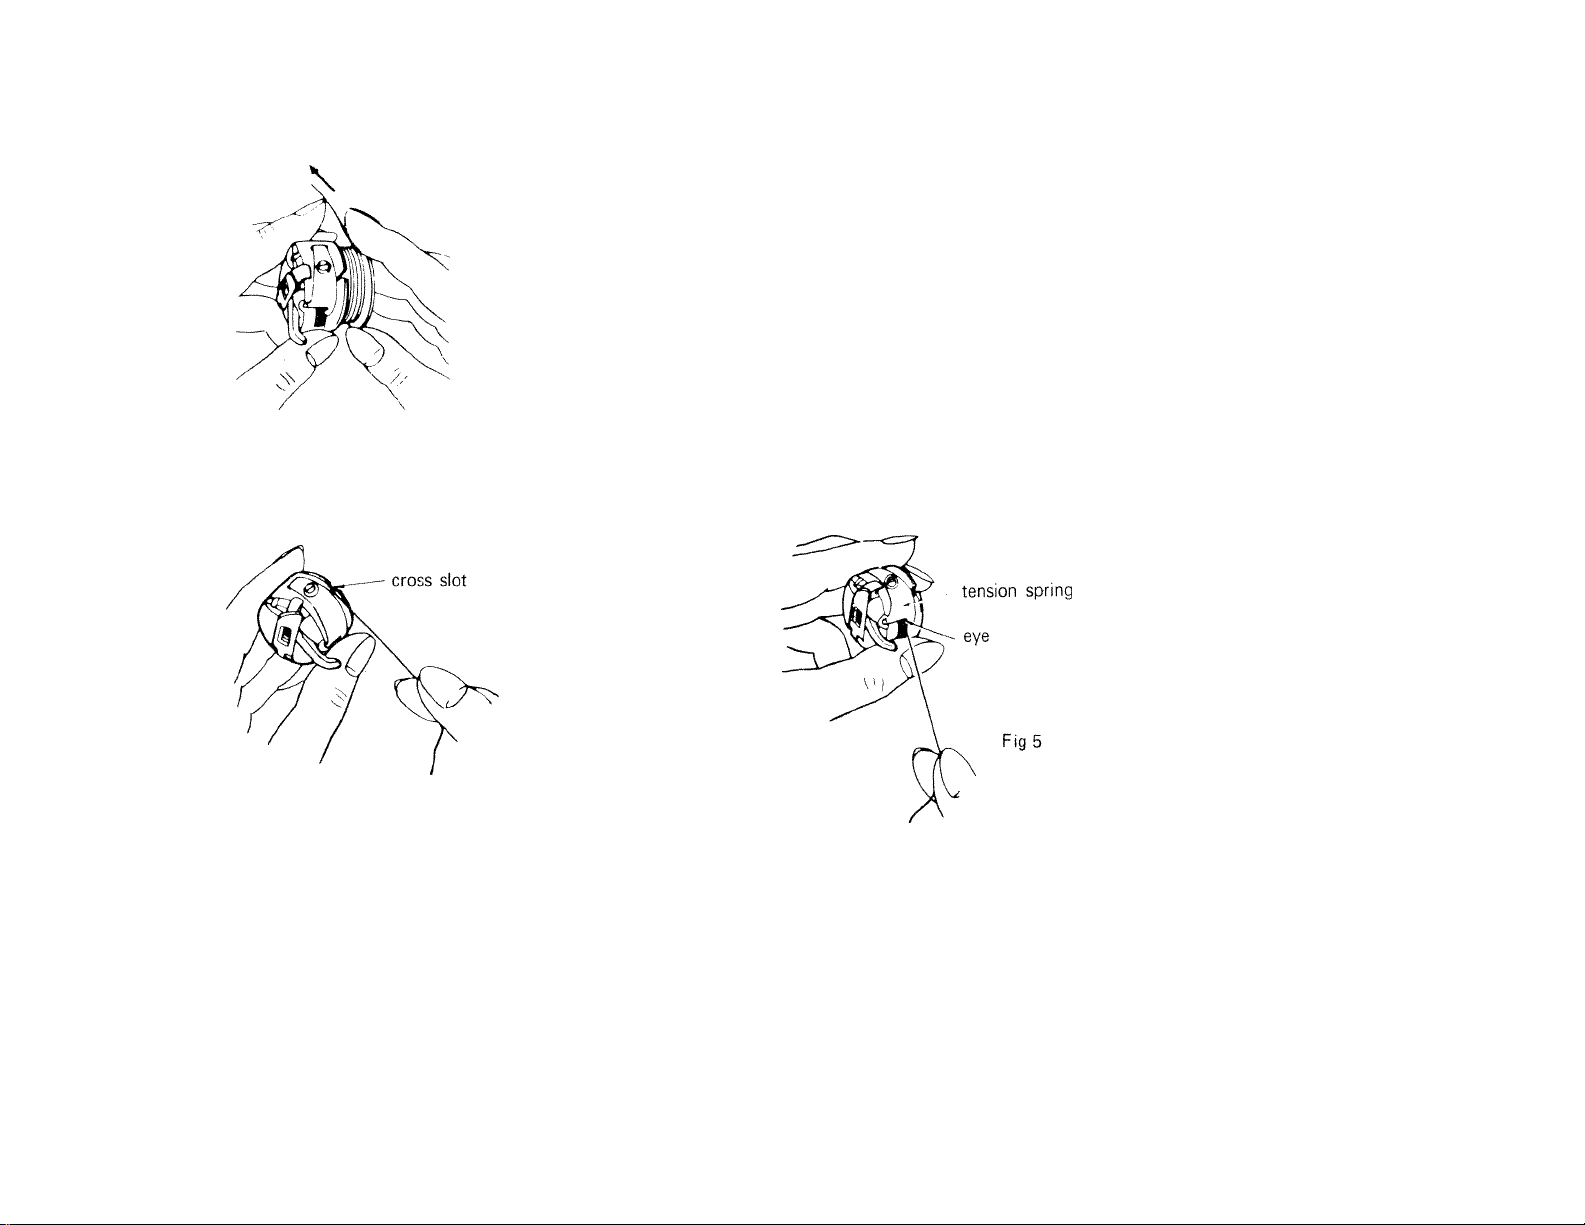
4. THREADING THE BOBBIN CASE
Fig3
Before threading the bobbin case, study Fig. 3, 4 and 5 to get a general idea
as to how it is done.
1. Hold the bobbin case with your left hand and put the bobbin into the
bobbin case with your right hand, leaving about two inches of the thread
end unwound (Fig. 3). As the bobbin is being inserted in the bobbin case,
the thread flow, you will note, is clockwise.
2. While holding the bobbin case as before, grasp the thread end with your
right hand and guide it into the cross slot (Fig.4).
3. Then pull it through under the tension spring of the bobbin case until it
enters the delivery eye (Fig. 5).
Fig 4
Page 7
5. INSERTING AND REMOVING THE BOBBIN CASE
1. Raise the presser bar by lifting the presser bar lifter
" vo.
4. After threading the bobbin case hold its latnh /P- 7, u
position finger opposite the notch at the top of the sh forefinger of the left hand, with its
iFig 7). shuttle race and replace it on the centre stud of the shuttle
5. Then release the latch and press the hnhhin ^ u i
6. Allow the end at the thread to hang free S'"''' ™«' »•e end of the atud
S. Puth hath Slide Plate, To re™.e the hohhln ease do al, the aho.e In reverse order.
Fig 6
Fig 7
Page 8
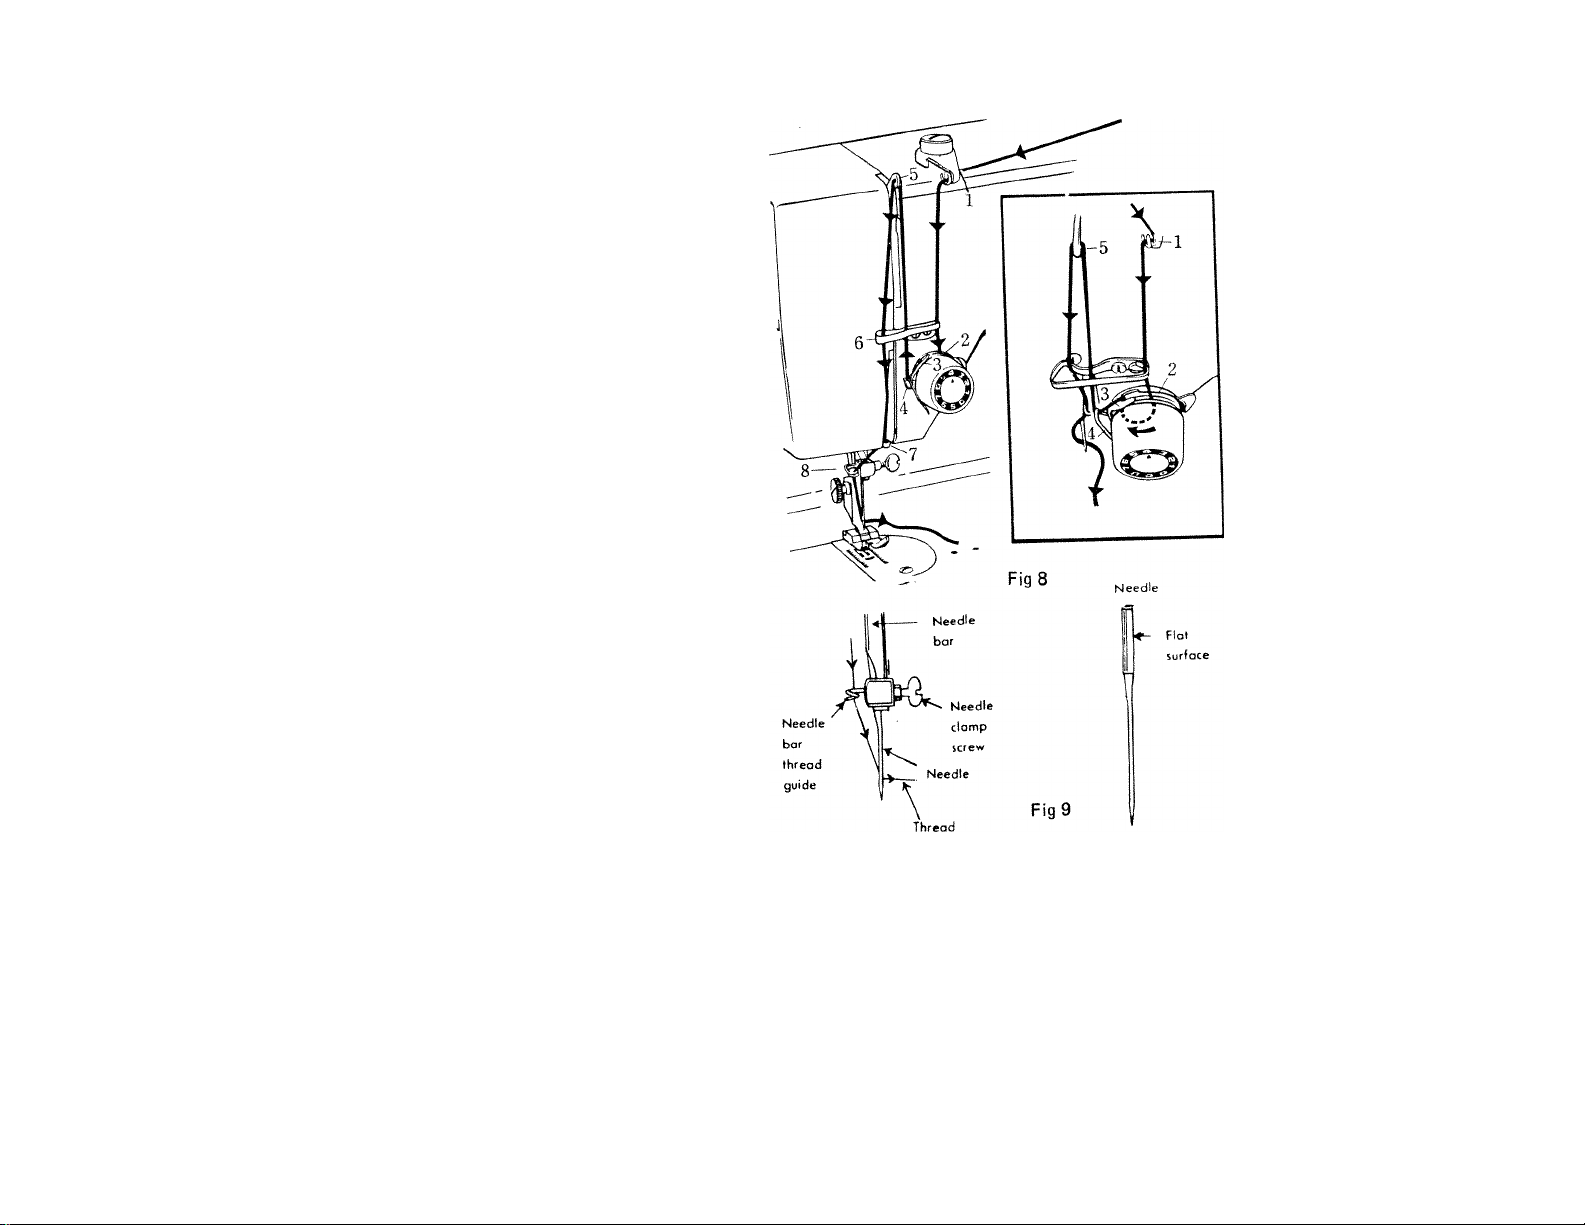
6. THREADING THE MACHINE
Place a spool of thread on spool pin and raise the take-up
lever to its highest point Refer toiFig. 8).
Pull thread through slot of upper thread guide (1) down
through tension discus(2)up into thread check spring (3) and
(4) and on up into the eye of the take-up lever (5) from right
to left.
Return thread through middle thread (6) down through lower
guide (7) and into needle bar thread guide (8).
Thread needle from left to right, pulling about four inches
of thread through needle.
7. SETTING THE NEEDLE
1. Turn the balance wheel towards you, raising needle bar
to its highest position, and loosen the needle clamp screw.
2. Hold the needle in the left hand with the point down
and insert the needle up into the needle clamp as for
as it will go with its flat surface to the right then retight
en the clamp screw {Fig. 9).
Page 9

8. PREPARING TO SEW
1. Hold the end of the upper-thread with the left hand, leaving it
slack from the hand to the needle.
2. Turn the balance wheel towards you to raise the needle bar to its
highest position,
3. Pull the thread you are holding, and the lower thread will be brought
up with it through the hole in the needle plate, as shown (Fig. 10).
4. Place both ends of the upper and lower thread under and to the back
of the presser foot (Fig. 11).
9. STARTING TO SEW
1. Place the fabric to be sewn beneath the presser foot.
2. Lower the presser foot by lowering the presser bar lifter.
3. Start sewing by slowly turning the balance wheel towards you while
gradually working the foot control.
ALWAYS TURN BALANCE WHEEL TOWARDS YOUl
Fig 10
Page 10

10. REGULATING THE THREAD TENSION
For ordinary stitching the tension of the upper
and lower threads should be equal so as to lock
both threads in the centre of the material (Fig.
13). If one tension is stronger than the other,
imperfect stitching will result. Fine materials
require a light tension, while heavy matericis
require more tension to obtain a perfect stitch.
TO INCREASE the tension, turn the thread
tension dial (Fig. 12) clockwise.
TO LESSEN the tension, turn the thread tension
dial in the opposite direction. (When regulat
ing the tension always have the presser foot
down),
As all machines are correctly adjusted before leaving the factory and
readjusted before the dealer delivers them to you, the lower tension
seldom requires to be altered, but, if this becomes necessary, tighten
the screw holding the tension spring on the outside of the bobbin case
for more tension, or loosen the screw slightly for lesser tension (Fig. 14).
Fig 12
Needle Thread Tension too strong
m m i 2 iw??? ? S
Needle Thread Tension too weak
Fig 13
Page 11

11. REGULATING THE STITCH LENGTH
The length of the stitch can be changed with the stitch length dial (Fig. 15). In
order to set machine at a certain length of stitch, turn the stitch length dial until
the indicator is facing the selected number on the scale. The length of the stitch is
variable from 0-5. The normal stitch lenght is 2.
a. Regulate the length of the stitch as for forward sewing.
b. Push reverse stitch button located in the centre of the stitch length dial (Fig,
15) as far as it will go. The machine will remain sewing in reverse while the
reverse stitch button is depressed. When released the machine resumes forward
sewing with the same stitch length.
12. REGULATING THE DROP FEED
The DROP FEED is located on the bed of the machine (Fig 16). It regulates the
height of the feed dog for sewing normal material, for darning and embroidering,
1, For darning, embroidering and monogramming, turn the knob at left
"DOWN" place and the feed mechanism will be lowered under the level of
the needle plate, so that the material can be moved freely.
2. For normal sewing turn the knob to the right "UP" place.
Fig 15
■ 10-
Page 12

13. REGULATING WIDTH OF ZIGZAG STITCH
Fig 17
The width of zigzag stitch is regulated by the zigzag lever. By pushing the zigzag lever to right, the width of the
zigzag stitch will increase accordingly. And by pushing the zigzag lever to left, the width of the zigzag stitch will
decrease accordingly. If at "0" position, there will be a straight stitch.
14. REGULATING LENGTH OF ZIGZAG STITCH
The stitch length dial regulates the length of the zigzag stitch for zigzag sewing in the same manner as for straight
sewing. In order to produce the "Satin Stitch" which is the closest zigzag stitch, set the stitch length dial close
to 0.
11-
Page 13

Page 14

16. OILING
To see that your machine is always in smooth running condition, you must keep it oiled at all times.
No grease is required, just a drop of oil is sufficient at each time of oiling. Points to be oiled are il
lustrated in Fig. 18 & 19 by arrow marks. To oil your machine thoroughly, open topi plate and turn
the machine over to get to parts underneath the bed.
After oiling, run the machine at high speed for a few minutes to let the oil penetrate to all parts.
^ I , 1«.
Fig 18
Fig 19
■ 1 3 --
Page 15

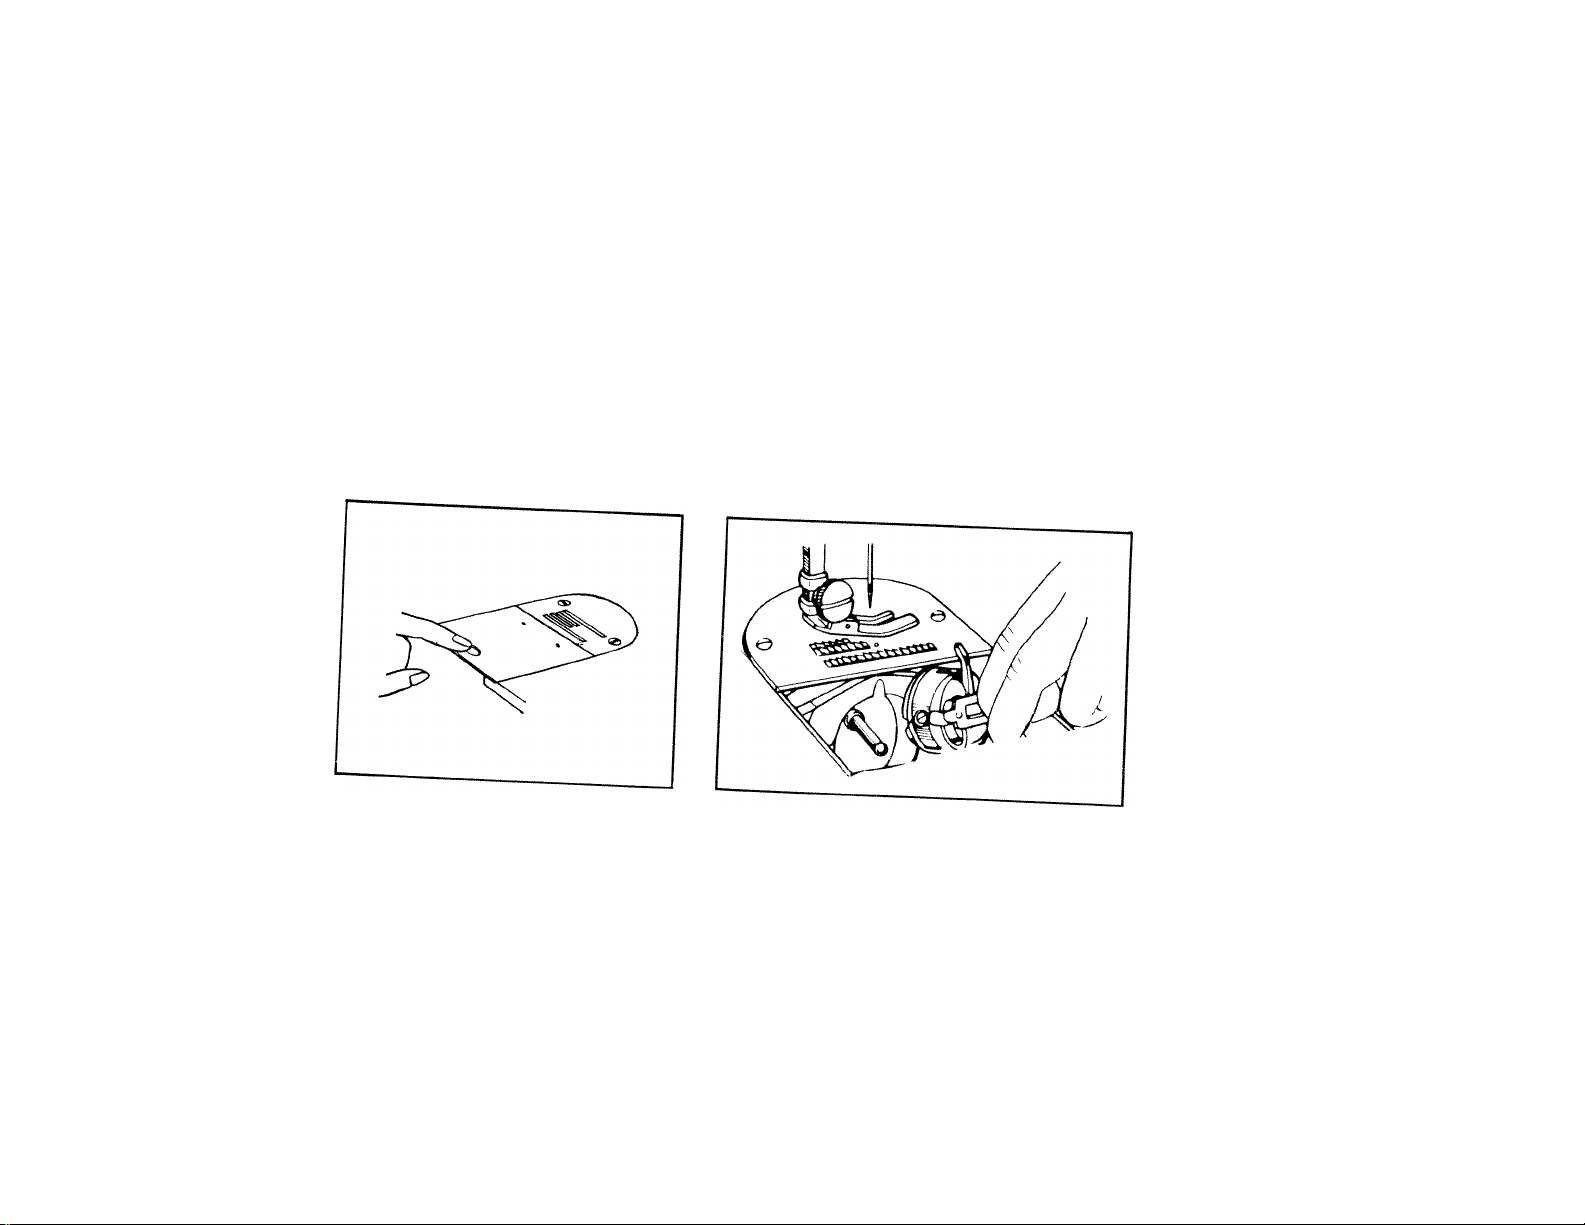
17. CLEANING THE SHUTTLE RACE
When the thread is tangled in the race or lint gets into the
space, between the shuttle and shuttle-race, this will cause
abrupt heavy running or complete stoppage of the machine.
When this occurs
1. Raise the needle bar to its highest position and take the
bobbin case out.
2. Pull the KNOBS (A) on both side of shuttle race (Fig. 20
& 21) aside, then take out the outside ring and the shuttle
body with your fingers.
3. After shuttle race and bobbin case have been cleaned, put
all of them back in reverse order.
Fig21
Fig 20
14-
Page 16

18. HOW TO MAKE BUTTONHOLES
1. Set zig-zag width between markings 1 and 2.
2. Raise the presser foot and turn the balance wheel towards you to bring needle to its highest position. Replace
regular presser foot with special buttonhole foot shown on Fig. 22. Tighten thumb screw.
3. Set stitch length to obtain closely spaced forward stitches. Best length of stitch for buttonholes is when
indicator is placed between markings 0 and 1 on dial. Adjust length of stitch, if necessary, to get best possible
appearance of buttonhole.
4. Slightly tighten needle thread tension, turning thread tension to the right. If appearance of buttonhole should
not prove satisfactory, slightly vary tension until the desired results are obtained.
NOTE: It is suggested that you make one or two sample buttonholes
on a clipping of fabric, same as your garment, to test adjustments
of machine and to make corrections, if needed. Also mark with
pencil or chalk the position and exact length of buttonhole on
garment. Adjust gauge on bottonhole presser foot ¡Fig 22) to
correspond to the desired length of the buttonhole. To determine
this adjustment, measure size of button and add approximately
3/16" to 1/4". The distance from the needle or the machine to
the front of the gauge should equal this measurement. The actual
sewing of the buttonhole should be done in this sequence.
Page 17

^ u p its face you. Let down presser foot and
5. Place start of ^les tiaches the gauge.
' *o.e 1o "u n“ ™; pc,ion. » .- ■'"“ r:ne eC o<
with 219,89 width ev8 lelt'down: Insert Button ° * ft.oid cuttln9
and turn the dtop feed hno smchra^ ^„„„„nol.e
buttonhole end oate u ^ buttonholes, to ™ ' '^^„(„„bn-shapeded
of stitching to assu mfion buttonholes
introduce gimp of df°def „.gaser foot. Sew oyer gimp as mac i buttonholes
y.irch hole of the buttonhole pres Purl ^ ^,..3
,g..e thread tension ™*; “: b,g.b. For better appearance, u-e needle
leouire a tight tension of the
the next heavier size.
Fig. 22-A
needle
needle is
Fig. 22
idle
Fig. 22-C
needle-^
‘here '
/
Fig.
22-D
16-
Page 18

19. DARNING EMBROIDERING AND MONOGRAMMING
Lower the feed by turning drop feed knob to "DOWN" thus permitting the work to be moved by hand
in any direction desired. Also remove presser foot and raise foot lifting lever and your machine is ready for
embroidering and darning. Both will be done most successfully when material is stretched on an embroidery
hoop.
Hold the hoop closely on the machine base with both hands and press the material with index finger on
the vicinity of the needle. This will help in holding down the material and will prevent the machine from
skipping stitches. Manipulate work carefully and be sure to keep finger out of path of needle to avoid injury.
Adjust thread tensions for best appearance of embroidery work and slightly decrease the upper thread
tension to avoid the lower thread from being pulled up.
17^
Page 19

20. BUTTON SEWING
Turn balance wheel towards you to get needle to its highest position.
Raise presser bar and replace regular presser foot, with button sewing
foot as shown in Fig. 23- Drop the feed dog as required for darning
and embroidering. Upper and lower thread tensions rerttain the same
as for ordinary sewing.
Place material or parment together with bo.ton uhder ,h, preaaer
teot ,o that holes In hot.on line op with oblong bole in preaser too,.
Adiuat wrdth O. Z,gz„ ...tcb ,0 permit needle to pas. throogb centre
or holes in button. make sure that needle will stitch in
Before sewing with power, lur
i,h oower torn the balance wheel bv hand toward, yoo to make
tbe centre o. the holes in hottoh.lt the needle bit the bo,ton I, will break.
Then sew ,1.. to .1« «itches to attach hotton.
When attaching foor-hole buttons first sew one
lock thread with two or three plain stitches in last hole.
18-
Page 20

2". 'nsert this folded end ^
°P-ing (scroll) or hammer forto"'“
2. Pull material towards you until th. k
is just below the needle, beginning of the hem
3- Lower presser foot and begin to sew r 'h
-to hammer foot While sewing (Fi,J '
-hem forms itself in tt:r""
..........
to adjust the width of th ■ ^ ^^^ch for this hemmi
tpnc- Zigzag stitch to be a«, suiming operation. Be sure hn
^--ns Will produce a shell stitch. " 'tself. Using a very long stiTc 7""
I 9
y 'uiig stitch and tight
Page 21

22. ZIPPER SEWING
Release the thumb screw on rear side of foot. Lower needle into the
side notch of the foot and check position of the foot to avoide needle
strike the foot. Fasten thumb screw to the lock make sure that the foot
into position. , . , , I
Fold edge of the material by %" and place zipper under the folded portion
of the material where you wish to attach the zipper.
Stretch close to the edge of the zipper foot along zipper teeth.
To sew on the opposite site of the zipper, loosen thumb screw and slide
the foot over and sew the same way.
23. FELLING
Use the hemmer foot for doing felling and proceed in the following manner:
1. Lay twa pieces of cloth one on top of the other with their RIGHT sides facing
each other. The right edge of the bottom piece must extend about /.¿inch beyond
' the right edge of the top piece. See Fig. 26-
2. Sew both pieces of cloth together using the hemmer foot like a regular presser
foot. Use the right edge of long toe of hemmer foot to guide the bottom piece
of material while the left edge of the same toe serves as a gu i de for the top piece
of material. Fig. 26 shows this detail.
3. Open and spread out material and put back on machine right sides downward.
Make sewn edges of material stand up.
Fold over the edges to the left and insert them into the scroll of the hemmer foot.
Sew as you would do ordinary hemming. Use left edge of long toe of hemmer
foot as guide, having original seam run alongside of it (Fig. 27'
^20-^
Page 22

24. CLOTH GUIDE
when making wileleml deeTtucks oT 1'
greater than presser foot allows.
It IS attached to machine as illustrated.
25. QUILTING
padded fabric»,,toL”he*„™“Liy“„f““”
aa.nde ,d. JZ I“ tr ™ k"*“
p;-,„o,„de„.c.ed„i:::::™:-”-«'-
2. Adjust the width guide of the quilte, ,„ q - ,
ahd drop guide on material * ”'“1 "'"'b
" "r'^n'Vgr^ -ide tolldwing the pre.io„s
-21-
Page 23

26. SOME USEFUL SEWING HINTS
TO TURN CORNERS:
1. Stop the machine while the needle is still in the material.
2. Raise the presser foot and turn the fabric using the needle as a pivot.
3. Lower the presser foot and resume sewing.
TO SEW ELASTIC FABRICS:
In sewing such elastic materials as jerseys, bias cut cloths etc., it is advisable to sew them with reduced upper
thread tension otherwise the thread will break when the sewn materials are stretched.
TO SEW VERY THEN CLOTH:
When sewing very thin cloth w'-ich tends to gather as you sew, place a sheet of newspaper or any other thin
paper underneath the material ana sew with the shortest stitch possible. This will keep your work from gathering
BASTING:
1. Reduce the tension of the upper thread and employ the longest stitch possible.
2. The stitches may then be easily removed by pulling the lower thread.
TO KEEP YOUR MACHINE IN PERFECT CONDITION;
1. Keep all moving parts of the machine constantly oiled and clean. Do not over-oil machine.
2. Always turn handwheel toward you.
3. Do not run machine without cloth.
4. When sewing, do not pull the material otherwise you will bend the needle. The machine is designed to feed
the material automatically.
5. Do not operate machine when the presser bar lifter is raised.
-22-
Page 24

27. CAUSE OF COMIVION DIFFICULTIES
BREAKING OF THE UPPER THREAD;
1. Incorrect threading
3. Faulty needle or needle set incorrectly
4. Needle brushing against presser foot or other attachments
5. Needle eye too small for thread used 6. Starting the machine suddenly or with a jerk
7. Starting the machine with the take up lever at its highest position
BREAKING OF THE LOWER THREAD;
1. Incorrect threading of the bobbin case 2. Lower thread tension too tight
3. Bobbin being wound too fully
4. Rough edge of hole in needle plate caused by improper needle action
BREAKING OF THE NEEDLE;
1. Pulling the fabric while machine is running, thus causing, the needle to strike the needle plate
2. Using bent needle
SKIPPING STITCHES;
1. Using bent or blunt needles 2. Needle inserted incorrectly
3. Needle threaded incorrectly 4. Using wrong size needle
5. Pressure on presser foot insufficient, especially when sewing heavy material
UNEVEN STITCHES;
1. Presser foot not resting evenly on material 2. Feed dog not being high enough
'ng too short a stitch 4. Pulling the cloth while the machine is running
b. Using too fine a needle with to coarse a thread
2. Upper thread tension too tight
-23 -
Page 25

Sizes & Grades of
Needles
28. NEEDLE AND THREAD SIZES
Type of Fabric
and
Work to be Done
11
(Medium-Fine)
14
(Medium)
16
(Light-Heavy)
18
(Medium-Heavy)
19
(Heavy)
21
(Extra-Heavy)
Fo?rul=d,»»s children's dresses, washable co.ron
dresses, aprorw,_c^tains^
------
__-------“T—T7TTTT.C
^sTTnkTand cottons, light weight woolens, draperies,
)r;Vrrral iSehold sewrn,, line „sen's sblr.s, smocks,
window draperies^andjabricd^
or cotton fabrics, awnings^slip^ver^and^
coating, duck, drdhng
canvas and sacking. For heavy wash uniforms, bedding
supplies for hospitals, hotels and camps.
__________
For bags, canvas coarse cloths and heavy goods.
-24-
------
^
40
10
to
30
---------------Very
Coarse
E
Twist
^
60
to
80
40
to
60
 Loading...