

Page 1
Page 2

Page 3
FORM 71OT.
£iu)>ei«6d«B Form 7C0C«
July 7, 18BL
DIRECTIONS
FOR USING THE
InPl^OVRD PaAIET
SHEER SEWING MACHINE.
I .
The Sihger Manufacturing Co.,
NEW YORK.
1891.
Page 4

Fio. 1,
to
Tbrcmd T»ka Vp Com
i’VoMiier Bar Tliuuib Sctuk
iteedio Bar Connoctlon Link..
K{>ed1« Bar--
Thread TaJio Vp
ftoemr Bar Siiriiui,’.
ргоФаот Шг^.
Feed HegulmLor Thuisb Screw.
Feed Cam Forked ConnecUoa ) \
Feed Bar
SbnCtV
Shuttle Driver
PHANTOM HF-ЛП OF IMPROVED FAMILY WACHiNE.
Feed lie njUtor I
Feed Cats
Fwd Bock Shaft
OeciLiaUbfi Shaft
Belt Cover
Bitasce Wlieel
wAiiicmiatlc Dobhhi ^l&der Spindle
..ATitomatie ВоЪЫс Winder Spring
AQ Coma lie Bobbin Winder Spool Bracket
Antomatic Bobbin Winder Spool Bracket Diece
Crank Oortiuicting Hod
■OecClatlttii IlJ>ck Shaft
ЧМсШаВпе Shaft Ornbk
PS
rt
n
H
о
cn
о
a
5
a
I'
* -f. it
r- Vr
► r* r
Page 5
THE IMiHOVED FAMILY SINGER.
Bto. a
lipool Hn
TeDfttbid Thumb Sara^_k-. q
i^WiiiHer-PoatiLiftflrZ-^.
Pr6»t86i>$^oht . ..
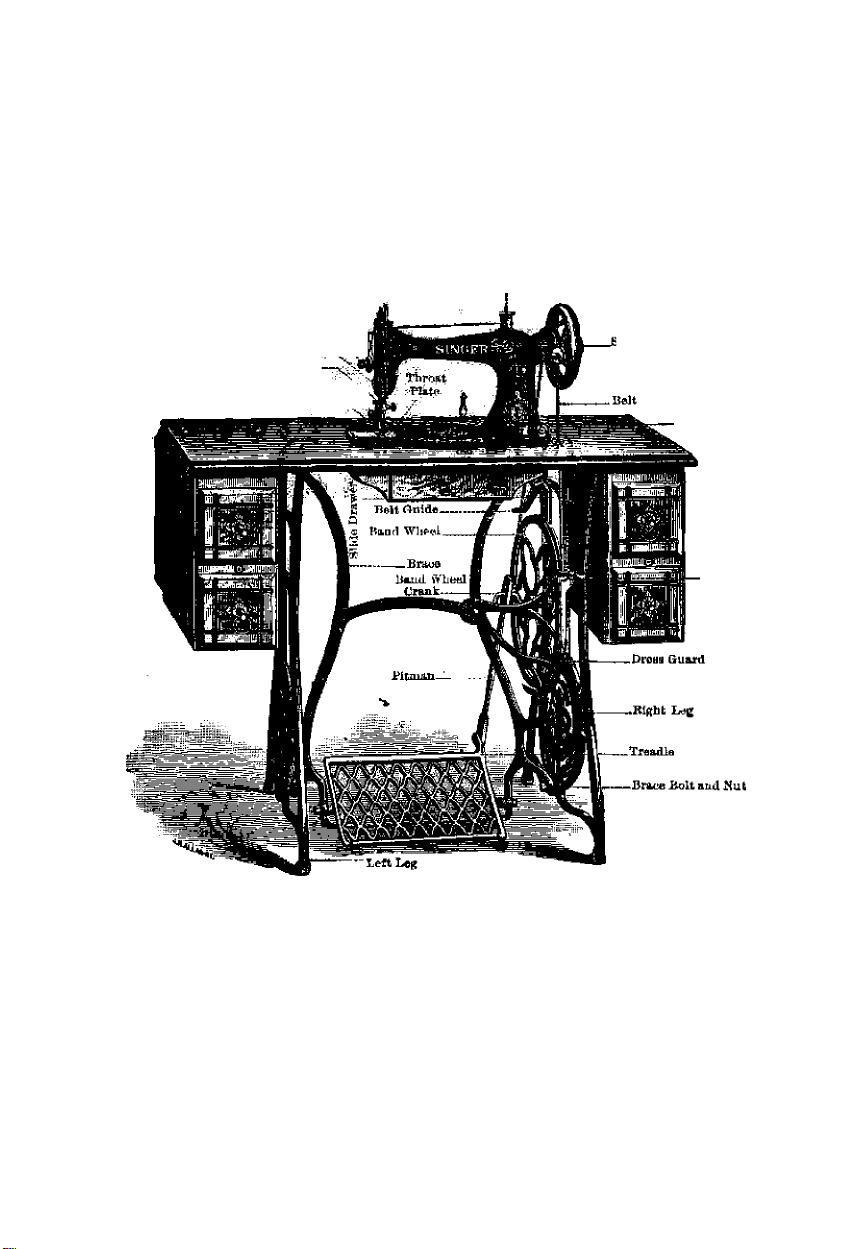
IMFSOVED FAMILY UACHlS^y WITH STANU
Ltop Uotlnn
Top
BaltiSbiftW'
Page 6
DIRECTIONS FOR USING
Fig. 3.
Fig, 4.
't-
Page 7

1^1 RECT IONS
FOR USING THE
Trppí-oV^cí РагртТу Aiach^nS-
~—->Ф<—'
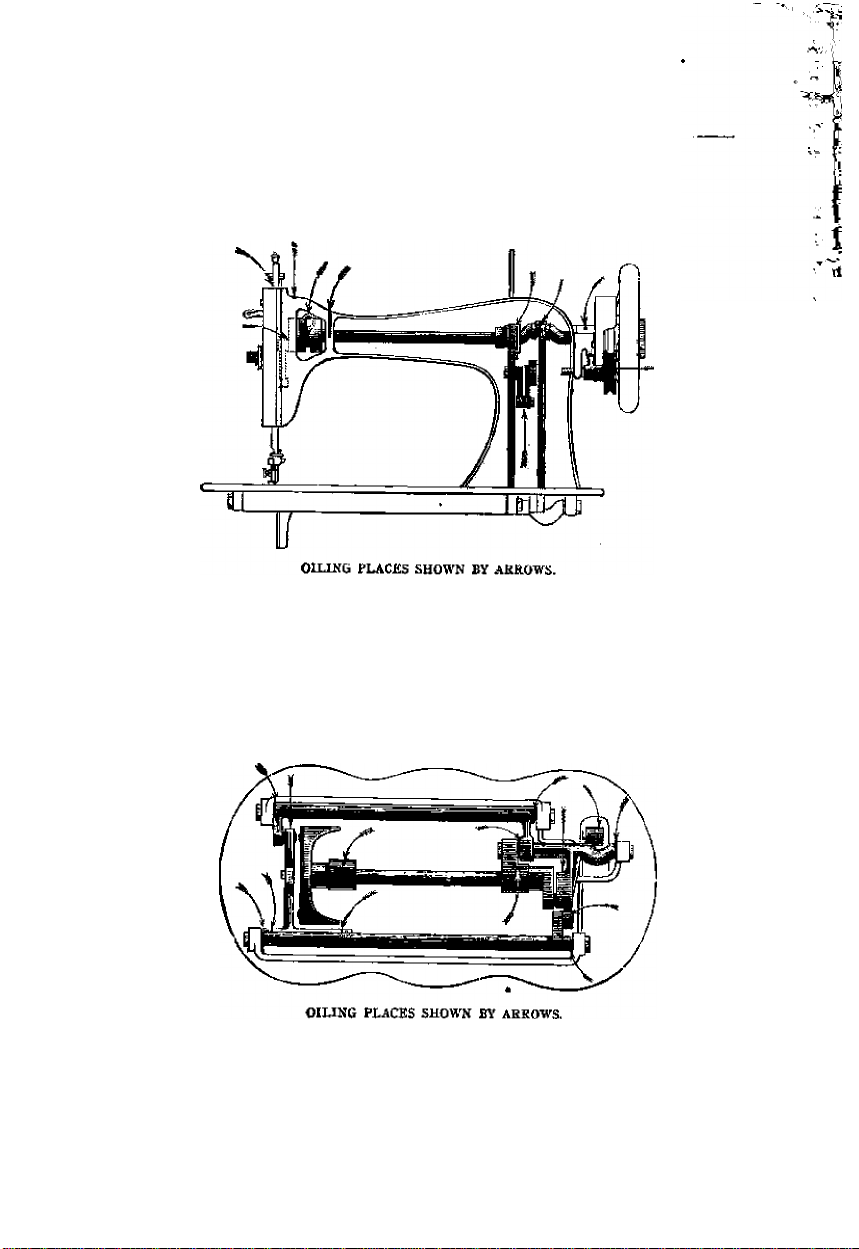
To Oil the Machine.
Be sure that every part is dean before you cominence to sew. ¡/ ¡hi
machine runs hard at any time, it is с екта in that some piare has not been oiled.
Oil holes will be found ftir all bearings whidi cannot be reached without
them. Each place reipiiring oil is indicated by an arrow head in the
cuts on the opposite page. The shuttle should be oiled sparingly, but
often, if the machine is in constant use; always be careful to use no
more oil than is needed, a single drop bdng sufficient at any point, If
the machine runs hard after standing idle for some time, use a little kero
sene oil or henainc on the wearing points, run rapidly, ivipe dean, and
then oil with the best .\perm oil, which should always be used. To make
sure of gettiHg good oil, buy it at at any of the Company’s offices or from
its auihori/ed representatives. The genuine oil is f>ut up in bottles which
have 'I'he Singer Manufacturing Company’s "trade-mark" blown in their
panel, and bear the Company's label
The Stop Motion.
The object of the slop motion is to enable the operator to wind a
bobbin by running the balance-wheel without running the macliine, which
not only saves labor but permits the re-winding of a bobbin w hen a seam
is partially sewed, without removing the goods from tlic machine or
interfering with tlic upper or needle thread.
■ ’'Го operate the stop-motion turn the friction-screw outside of the
balance-wffieel over towards you to release the balancc-wh^l, and in the
opposite direction to clamp it.
To Operate the Treadle and Machine.
Release the balance-wheel as explained, (see ‘ ‘ slop motion ”) place
your feet upon the treadle with the instep directly over its center, turn the
balance-wheel over towards you with the right hand and continue with
the feet (giving an alternate pressure with the heel and toe) the motion
thus commenced until a regular motion is obtained. Next clamp the
balance-wheel to the machine, (see “stop motion’’) see that the presser
foot does not rest on the feeding surface, and operate the treadle as before.
Page 8

DIRECTIONS FOR USING
Finally place some goods in the machine, loosen the presser-foot
upon them and again operate the traadle.
Do not attempt to sew until you are sufficiently familiar
Caution 1. -
Caution
Caution
Caution
Caution
with the treadle motion to be able to start the machine
without turning it backwards, to run it with a regular
and steady motion, and to guide the goods,
i Never run the machine with the presser-foot resting on the
2.
I feed and no cloth between.
i Practice upon strips of cloth, and do not attempt pratical
I sewing until you can guide the material and produc a
3-
' regular motion of the machine,
’ Do not try to help the machine by pulling the fabric, lest
you bend the needle; the machine feeds without any
4.
' assistance,
(Never mn the machine with both shuttle and needle
5-
I threaded, except while you are sewing.
To Set the Needle.
Hold the needle in the left hand with the flat side of the shank
towards the arm of the machine ; raise the needle-bar to its highest point,
put the needle up in the clamp as far as it will go, and tighten the
thumb-screw.
Relative Sizes of Needles and Thread.
Bound Porsi' Nkkduss fob Cloth.
O...
B.. .
...............
...........
f lOO, 150 Cotton.
1 000 Silk.
f 80, 100 Cotton.
100, 0 Silk.
j 60, 80 Cotton.
...............
1 A Silk.
j 40, 60 Cotton.
г...
...............
...............
|b, C Silk.
f 24, 40 Cotton.
1 D, E Silk.
{20, 24 Cotton.
.........
[ 60, 00 Linen.
4...
' " ' 1 very coarse Cotton.
J 40, 60 Linen, or
5-..
Wbihje and Twist Points fob
Lkattbb Wobk.
.....................
0.
.....................
B.
.....................
I ,
...................
2 .
.....................
3-
’ 1 EE Silk.
000, 0 Silk.
A, В Silk,
C, D Silk.
j40 to 60 Cotton.
1D, E Silk,
j 40, 60 Linen,
35> 40 Linen.
4.
Page 9

THE IMmOVED FAMILY SINGER.
Fig. 5.
Place ihe spool of thread on the spool pin, and draw the thread from
the BjK)o] through the eyelet i, on the side of the arm, downward between
the tension discs a from the back toward you, up behind and over the
staple 3, through the hook of the lake up spring 4, up and through the
eyelet in th; end of the take-up lever S from the back toward you, down
through the eyelet 6 in the face plate, under the hook 7 on the needle
bar, and from left to right through the eye 8 of the needle. Enough
thread should he drawn through the needle to leave an end two inches
long when the take up is at its highest point, w hich should be caught
up behind tlie thread cutter 9.
Page 10

DIRECTIONS FOR USING
Pia.
e.
Fia. 7.
THE SHUTTLE CONTAINING BOBBIN.
Fio. 8.
THE BOBBIN WINDER (with latch down).
Palmil’d.
THE BOBBIN,
The Bobbin Winder.
To prepare for winding^, release the balance-wheel (see "Stop
Motion ”) press the bobbin on the spindle of the bobbin-winder until it
reaches the shoulder, then press the arm of the latch down between the
./
Page 11

THE IMPROVED FAMILY SINGER.
flanges of the bobbin until it catches, to bring the pulley in contact with
the driving-belt
To wind the bobbin, place the spool of thread on the spool-pin at
the base of the arm. draw to the right between the retainer discs, pass the
end about an inch through the slot in the outer end of the bobbin from the
inside (this must be done before the bobbin is placed on the spindle) and
“Operate the Treadle " the same as in sewing until the bobbin is filled,
when it will stop automatically.
The free end of the thread must be held with the hand until a few
coils are wound, and should then be broken off.
To Remove the Bobbin.
Tto. 9.
Open the slide on the
beil of the machine, and
bring the shuttle into
position by turning the
balance-wheel toward
you until the needle-bar
reaches its lowest ¡joint;
then with your left hand
under the table, remove
the bobbin, by ¡>lacing
your thumb against the
cap, on outside of the
shuttle (as shown in Fig.
9) and press it outward
as far as it will go; the
cap will then remain
o|Jen and allow the bob
bin to drop out into
your hand.
Page 12

10
DIRECTIONS FOR USING
To Replace the Bobbin and Thread the Shuttle.
Fig. 10.
Talte the bobbin between the thumb
and forefinger of the left hand with
threat! drawn tightly across the finger
(as shown in Fig. lo).
Pw, n.
Pass the hand un
der the table and
place the bobbin in
the cap of the shut
tle and with the same
movement press the
thread which passes
over the finger into
the slot of the deliv
ery eye (as shown in
Fig. ii).
Page 13

THE IMPROVED FAMII.V SINGER.
Ehj, J3.
Withdraw the thumb
gently, allowing the
shuttle to close; then
draw the thread behind
the delivery-eye-guard
or hook, (as shown in
*3)f leaving an end
two inches long, with
which to commence
ewing.
Page 14

12
DIRECTIONS FOR USING
To Commence Sewing.
With the left hand, taVe hold of the needle thread (leaving it slack
between the hand and the needle), turn the balance-wheel over toward
you until the needle moves down and up again to its highest point, thus
catching the shuttle thread ; draw up the needle thread, and the shuttle
thread will appear ; then draw the shuttle thread up through the hole in
the throat-plate, lay both threads back across the feed points, and catch
them behind the thread-cutter, place the material beneath the needle,
lower the presser-foot upon it, and commence to sew, turning, the wheel
over toward you.
TO TURN A CORNER,
stop the machine without raising the needle more than half way out of
the goods. Raise the presser-foot and turn the work in the manner
desired, the needle as a pivot.
FOR SEWING FLANNEL OR BIAS SEAMS,
use a fine stitch and as light a tension as possible so as to leave the
thread loose enough to stand the strain of stretching the goods,
A STII'CH 'rO RAVEL EASILY
can he had, if desired, by leaving the upper tension so light that the
under ihreail w ill not draw into the goods, hut lie straigliL
To Remove the Work.
Let the take up rest at its highest point; take hold of the upper thread
between the take up lever and the eyelet on the face-plate and draw down
about two inches of slack ; then raise the presser-foot, and draw the
fabric to the left, about two inches, and cut the threads by drawing them
behind and then down across the knife-edge of the thread-cnttcr, leaving
the ends caught behind the same.
I^This ingenious but simple device saves " hunting-up the
scissors” every few minutes, and is a highly-valued addition to the special
aitadiments of the Singer machine. ”
To Regulate the Tensions.
The tension on the shuttle-thread is regulated by the small screw
near the delivery eye—turn toward you to increase, and from you to
diminish; when once properly adjusted, it will seldom require to be
changed for any kind of thread commonly used, as a perfect stitch can
usually be obtained by regulating the tensions on tlie upper or needle
Page 15

THE IMPROVED FAMILY SINGER.
thread. To regulate tlie upper tension, turn the ^mall thumb-screw in
front of the tension discs, over toward you to increase the tension, and
from you to diminish it. A loose tension is best for sewing cotton or
linen fabrics, to prevent fullness after the goods have been washed.
If there are loops or a straight Uiread on the under side of the fabric,
as in Fig, 14,
Fig. 14.
it shows that the upper or needle tension is too loose.
If loops or a straight thread appear on the upper side of the goods, as
in Fig. 15,
Fig. 10.
it ^ows that the upper tension is too tight, and it should be diminished
sufficiently to bnng the lock m the centre of the fabric, as in Fig. 16,
Fig. 10.
To Alter the Length of Stitch.
^ On the right side of the operator, and at the front of the arm, there
is a thumb-screw working in a slot. Loosen this, and move it downwards
to lengthen, or upwards to shorten the stitch. When you get the length
of stitch you require, tighten the thumb-screw.
To Change the Pressure on Material.
Turn the large thumb-screw on the top of the head of the machine,
to the rig^ht to increase, and to the left to diminish the foot-bar pressure;
When properly set, this need never be changed for any ordinary work.
Page 16

14
DIRECTIUNS FOR USINO
The Belt.
The leather belt, which gives motion to the machine, should always
be tight enough not to slip, and no tighter—not so tight as to prevent the
easy motion of the machine. If the belt is too long, uncouple and cut
to the desired length.
Twist, Linen and Cotton Thread and Needles.
Do not use poor thread or needles. Any good thread will worjt well,
but you must not expect to make a smooth even stitch with poor rough
thread, r.or can you expect a machine to work well with a cheap grade of
needles made in imitation of ours. As our interest is to maintain the
reputation of the Tinuhine, it is evident that we will always supply the besL
Persons living at a distance from an agency, can send by mail, enclosing
us the money, and we will fill orders promptly by mail or express.
■t
Page 17

THE IMPROVED FAMILY SINGER.
Fid. 17.
DROP CABINET (closed).
To open the cabinet turn over the leaf which covers the machine,
release the platform upon which the machine is fastened by pressing- the
button at the right of the operator near the bottom of the centre doors,
first taking hold of the arm of the machine with the left hand to steady it
as it rises, and when entirely up push back the centre doors which then
become a firm support for the platform, liee page i6.
Page 18

16
DIRECTIONS FOR USING
Fig. 18.
.a
....
DROP cabinet (open).
To close the cabinet, bring the small doors to the front, as shown
on page 15, A slight pressure upon the machine will then force it down
beneath the top of the cabinet, and after the platform is latched the leaf
is folded over the apierture, completely enclosing the machine.
The cabinet, when closed, forms a handsome piece of furniture.
A
Page 19

THE IME'KOVF.D FAMIFV SI MGER.
Fro. 10-
SINGER DROP CABINET (read-v for oiling).
Fig. 19 represents the Drop Cabinet with the machine turned back
and the driving mechanism exposed^ ready for oiling. In order to turn
the machine back, pull open the door at the right of the operator, and
Iwith the machine in motion) turn the belt-shifter handle to tlie left, to
throw the belt off the band-wheel. To reach the oiling points in the
driving mechanism, open the door at the end of the cabinet. After
oiling, turn the machine up again, and operate the treadle as in sewing,
which will automatically replace the belt on the band-wheel.
Page 20

18
DIRECTIONS EOR USING
Fib. 20.
Fig. zo shows our Stand
Brace, carrying the entire
driving mechanism.
Both the baiui-wheel and
treadle work upon adjust
able centres, which admit
of accurate adjustment
with a minimum amount
of friction.
This distinctive feature
renders ours the lightest
running of any sewing
machine stand yet con
structed, and is a matter
of great importance to the
health and comfort of the
operator.
THE NEW SINGER STAND RKACE (WITH BELT
THROWN ofe).—PatiTticd,
Tills invention simplifies and makes
easy the often-irritatingp task of throwing
off and replacing the belt. To throw
off the belt, press the small lever St the
top of the dress guard to the left wiih
the forefinger, keeping up the motion
of the treadle meanwhile. To put on
the belt, allow the lever to spring back
in its place, and operate the treadle as
in sewing (%vith the w'heel turning toward
you), w^hen a single revolution of the
wheel will bring the belt back in place.
Pio. 31,
THE NEW singer bf.i.t shifter.
Paienkd.
Page 21

I
I
I ^
r*
I ■
Fig. Ua.
THE IMPROVED FAMILY SINGER.
Fig.
22
block which forms one-half of the journal is adjust
ed to the crank or pin by means of the screw,
shown at the top of the cut.
Wheti^ taking up lost motion, be careful not to
make the journal so close as to prevent the free
motion of the band wheel.
shows ogt hew adjustable pitman. The
I 2
I
■i
THE NEW SINGER
pitman.
We send with each machine a full set of Attachments in a neat
case, and an Attachment Instruction Book.
The Singer Manufacturing Co. use and recommend exclusively the
“Willimantic 6 Cord Spool Cotton.”
if
Page 22

 Loading...