

Page 1

ENGLISH
“IMPORTANT SAFETY INSTRUCTIONS”
“When using an electrical appliance, basic safety precautions should always be followed, including the following.”
“Read all instructions before using this sewing machine.”
“DANGER
1. “This sewing machine should never be left unattended when plugged in. Always unplug this sewing machine from the electric
outlet immediately after using and before cleaning.”
2. “Always unplug before replacing light bulb. Replace bulb with same type rated 15 watts.”
“WARNING
1. “Do not allow to be used as a toy. Close attention is necessary when this sewing machine is used by or near children.”
2. “Use this sewing machine only for its intended use as described in this manual. Use only attachments recommended by the
manufacturer as contained in this manual.”
3. “Never operate this sewing machine if it has a damaged cord or plug, if it is not working properly, if it has been dropped or
damaged, or dropped into water. Return the sewing machine to the nearest authorized dealer or service center for examination,
repair, electrical or mechanical adjustment.”
4. “Never operate the sewing machine with any air openings blocked. Keep ventilation openings of the sewing machine and foot
control free from the accumulation of lint, dust, and loose cloth.”
5. “Never drop or insert any object into any opening.”
6. “Do not use outdoors.”
7. “Do not operate where aerosol (spray) products are being used or where oxygen is being administered.”
8. “To disconnect, turn switch to the off (“0”) position, then remove plug from outlet.”
9. “Do not unplug by pulling on cord. To unplug, grasp the plug, not the cord.”
10. “Keep fingers away from all moving parts. Special care is required around the sewing machine needle.”
11. “Never sew with a damaged needle plate as this can cause needle to break.”
12. “Do not use bent needles.”
13. “Do not pull or push fabric while stitching. It may deflect the needle causing it to break.”
14. “Switch the sewing machine off (“0”) when making any adjustments in the needle area, such as threading needle, changing
needle, threading bobbin, or changing presser foot, etc.”
15. “Always unplug sewing machine from the electrical outlet when removing covers, lubricating, or when making any other user
servicing adjustments mentioned in the instruction manual.”
To reduce the risk of electric shock:”
-
-
To reduce the risk of burns, fire, electric shock, or injury to persons: ”
-
FOOT CONTROL (USA only)
Use Matsushita Electric, Model 4C-316B with this
sewing machine.
POLARIZED PLUGS CAUTION
This appliance has a polarized plug (one blade
wider than the other). To reduce the risk of electric
shock, this plug is intended to fit in a polarized
outlet only one way. If the plug does not fit fully in
the outlet, reverse the plug. If it still does not fit,
contact a qualified electrician to install the proper
outlet. Do not modify the plug in any way.
“CAUTION
Moving parts-To reduce risk of injury, switch off before servicing. Close cover before operating machine.”
-
-
“SAVE THESE INSTRUCTIONS”
“This product is for household use, or equivalent.”
This appliance complies with EEC Directive 89/336/EEC covering the electromagnetic compatibility.
®
SINGER
is a Registered Trademark of The Singer Company Limited.
1
Page 2

ITALIANO
AVVERTENZE
1. Fare sempre attenzione al movimento dell'ago e non distrarre
mai la vostra attenzione dalla macchina quando è in funzione.
2. Spegnere sempre il motore della macchina agendo sull'interruttore o togliendo la spina dalla presa d'alimentazione
quando:
-
Si sostituiscono gli organi di cucitura quali ago, piedino,
spolina, ecc.
-
Si infila l'ago, il crochet, ecc.
-
Si lascia il posto di lavoro incustodito.
-
Si esegue qualsiasi lavoro di manutenzione.
3. Attenzione:
In caso di sostituzione della lampadina, disinserire la presa
di corrente della macchina.
4. Non mettere niente sul pedale di controllo della velocità
poichè ciò potrebbe fare partire accidentalmente la macchina
o sovrariscaldare il motore o lo stesso pedale di controllo.
5. La potenza massima ammissibile per la lampada è di 15 W.
6. Quando usate la vostra macchina per la prima volta, mettete
un pezzo di stoffa di scarto sotto il piedino pressore e fate
girare la macchina senza filo per alcuni minuti. Asciugare
macchie d'olio che potrebbero apparire.
7. SALVADITA
Questo accessorio impedisce che possiate distrattamente
mettere le dita sotto l'ago.
Se la macchina viene usata da lavoratori subordinati o ad essi
equiparati (ad esempio allievi di scuole, apprendisti, ecc.) il
salvadita (art. 155 D.P.R. 27/4/55 n. 547) deve essere mantenuto
in perfetta efficienza.
La nostra Società declina ogni respensabilità in caso di mancata
ottemperanza.
Questo apparecchio è conforme alla direttiva CEE 89/336/EEC relativa alla
soppressione dei radiodisturbi.
2
Page 3
DEUTSCH
Wichtig
Bevor Sie Ihre Nähmaschine benutzen, bitten wir Sie Folgendes sorgfältig
zu beachten:
1. Lassen Sie beim Nähen wegen der auf- und abgehenden Nadel
besondere Vorsicht walten, und beachten Sie bei der Arbeit ständig die
Nähstelle.
2. Achtung: Beim Verlassen der Maschine oder bei Wartungsarbeiten
sowie beim Entfernen von Abdeckungen, Auswechseln von Nadel,
Spule oder Lampe muss die Nähmaschine durch Herausziehen des
Netzsteckers aus der Steckdose vom Netz getrennt werden.
3. Die maximal zulässige Leistung der Lampe ist 15 Watt.
Die CE-Kennzeichnung bestätigt, dass dieses Gerät die wesentlichen
Schutzanforderungen der relevanten europäischen Richtlinien einhält.
3
Page 4
ENGLISH ITALIANO
TABLE OF CONTENTS
1. KNOWING YOUR SEWING MACHINE
Machine identification ..................................................................................................... 6 - 7
Accessories ........................................................................................................................... 8
Setting up your machine ............................................................................................... 9 - 10
Foot control, Power/light switch, Spool pins, Presser foot lifter
Winding bobbin................................................................................................................... 11
Threading the bobbin thread.............................................................................................. 12
Needle, thread and fabric chart ..................................................................................13 - 14
Threading the top thread ....................................................................................................15
Using automatic needle threader ................................................................................16 - 17
Picking up bobbin thread ................................................................................................... 18
Adjusting top thread tension .............................................................................................. 19
Changing presser foot ........................................................................................................ 20
Feed dog control ................................................................................................................. 21
Stitch selector and indicator, Stitch length/super(stretch) stitch control ......................... 22
Super (stretch) pattern group selector, Reverse stitch lever, Pressure regulator............23
Stitch width control, Converting to free-arm sewing ......................................................... 24
2. STARTING TO SEW
Machine setting chart .................................................................................................. 25 - 27
Straight stitches ........................................................................................................... 28 - 31
Starting to sew, Removing fabric, Turning a square corner, Darning, Inserting zippers
and piping, Traditional pintucks, Twin needle pintucks, French seam
Zigzag stitch.................................................................................................................31 - 32
Overcasting, Satin stitch, Free Motion Stippling, Embroidery and Monograms
Blind stitch ........................................................................................................................... 33
Multi-stitch zigzag, Rampart stitch ..................................................................................... 34
Shell stitch ........................................................................................................................... 35
Faggoting ..................................................................................................................... 36 - 37
Stretch stitch ................................................................................................................36 - 41
Straight stretch stitch, Ric-rac stitch, Overedge stitch, Honeycomb stitch,
Double overedge stitch, Chevron stitch, Slant overedge stitch,
Wizard stitch, Slant pin stitch, Feather stitch, Random slant pin stitch,
Crossed stitch, Reinforced overedge stitch, Thorn stitch
Decorative embroidery designs ......................................................................................... 42
Tips on design stitching
Buttonhole making.......................................................................................................43 - 44
Adjusting stitch balance, Corded buttonholes, Sewing a Button
3. CARING FOR YOUR MACHINE
Caring for your machine ..............................................................................................45 - 46
Cleaning hook area and the feed dogs, Changing light bulb
Cleaning hook area and the feed dog, Chan ............................................................. 47 - 48
4. PERFORMANCE CHECKLIST
Cleaning hook area and the feed doan ............................................................................. 49
5. SPECIAL ACCESSORIES
Overcasting foot, Satin stitch foot, Rolled hemmer
NDICE
1. LA VOSTRA MACCHINA DA CUCIRE
Identificazione delle parti ................................................................................................ 6 - 7
Accessori ...............................................................................................................................8
Preparazione della macchina ........................................................................................9 - 10
Reostato, Interruttore, Portarocchetti, Leva alzapiedino
Avvolgimento della spolina ................................................................................................ 11
Avvolgimento della bobina ................................................................................................. 12
Tabella ago, filo e tessuto ............................................................................................13 - 14
Infilare del filo superiore .....................................................................................................15
Infilatura automatica .................................................................................................... 16 - 17
Estrazione del filo inferiore ................................................................................................. 18
Regolazione della tensione del filo ....................................................................................19
Sostituire il piedino ............................................................................................................. 20
Controllo della griffa ........................................................................................................... 21
Selettore ed indicatore punto, Manopola lunghezza punto/punto elastico ..................... 22
Regolatore larghezza punto, Cucire a braccio libero ....................................................... 24
2. AVVIO DELLA CUCITURA
Tabella impostazione macchina ..................................................................................25 - 27
Punto diritto..................................................................................................................28 - 31
Avvio della cucitura, rimozione del tessuto, esecuzione di un angolo retto,
, inserimento di cerniere e cordoncini
Punto zig-zag ...............................................................................................................31 - 32
Sopraggitto, Punto passato,
Free Motion Stippling, Embroidery and Monograms........................................................ 32
Punto invisibile .................................................................................................................... 33
Zig-zag a tre punti, Punti doppia azione ............................................................................ 34
Punto conchiglia ................................................................................................................. 35
Faggoting ..................................................................................................................... 36 - 37
Punto elastici................................................................................................................36 - 41
Diritto elastico, Zig-zag elastico, Punto overlock, Punto smock,
Overlock elastico, Punto smock, Overlock elastico, Spina di pesce,
Overlock elastico, Punto elastico per patchwork, Sopraggitto obliquo,
Punto piuma, , Punto forcella, Doppio overlock, Punto spinato
Cuciture ornamentali .......................................................................................................... 42
Consigli per l’esecuzione dei ricami
Esecuzione asole .........................................................................................................43 - 44
, Asole cordonate,
3. CURA DELLA MACCHINA
Cura della macchina ....................................................................................................45 - 46
Pulitura della griffa e della zona della navetta, Sostituzione della lampadina
Cleaning hook area and the feed dog, Chan .................... 47 - 48
4. COME RIMEDIARE A PICCOLI INCONVENIENTI
Cleaning hook area and the feed doan ....................................................................... 49
5. ACCESORIOS ESPECIALES
Pata para overlocado, Pie prensatelas para coser en satén, Dobladillo rodillo
Leva retromarcia, Regolatore di pressione piedino ................................ 23
4
Page 5

DEUTSCH
INHALTSVERZEICHNIS
1. LERNEN SIE IHRE MASCHINE KENNEN
Die Hauptteile der Maschine ........................................................................................... 6 - 7
Das Zubehör ......................................................................................................................... 8
Das Aufstellen der Maschine .........................................................................................9 - 10
Fußanlasser, Hauptschalter,
Aufspulen des Unterfadens ................................................................................................ 11
Einlegen der Spule und des Unterfadens ......................................................................... 12
Stoff-, Nadel-und Garntabelle ......................................................................................13 - 14
Einfädeln des Oberfadens ..................................................................................................15
Gebrauch des Nadeleinfädlers ................................................................................... 16 - 17
Heraufholen des Unterfadens ............................................................................................ 18
Einstellen der Fadenspannung .......................................................................................... 19
Auswechseln der Nähfüße .................................................................................................. 20
Die Transporteur-versenkung ............................................................................................. 21
Stichwahlknopf und Stichanzeige, Stichlängen/Super-NutzStichregler .......................... 22
, Die Rückwärtstaste, Regulierung des Füßchendruckes ............................ 23
Stichbreitenregler, Freiarm-oder Flachbett-Nähen ............................................................ 24
2. DER NÄHBEGINN
Nähen mit Ihrer Maschine ........................................................................................... 25 - 27
Geradstich .................................................................................................................... 28 - 31
Der Nähbeginn, Herausnehmen des Materials, Änderung der Nährichtung, Stopfen
Einnähen von Reißverschlüssen und von Kordel,
Zickzackstich................................................................................................................ 31 - 32
Kantenbefestigung, Satin-Stich
Blindstich ............................................................................................................................. 33
Elastikstich, Schrittnaht ...................................................................................................... 34
Dessous-Stich ..................................................................................................................... 35
Fagott-Stich .................................................................................................................. 36 - 37
Super-Nutzstiche (Stretch-Stiche)............................................................................... 36 - 41
Stretch-Geradstich, Stretch-Zickzackstich, Overlock-Stich, Kräuseln mit dem Rautenstich,
Elastischer Overlock-Stich, Pfeil-stich, Stretch-overlock-stich, Stretch-patchwork-stich,
Geneigter kantenstich, Federstich, , Hexenstich,
Doppelter overlock-stich, Grätenstich
Dekorative Zierstiche .......................................................................................................... 42
Nähen von Knopflöchern .............................................................................................43 - 44
Knopfloch mit Beilauffaden, ,
3. PFLEGE UND REINIGUNG IHER MASCHINE
Entretien de votre machine ......................................................................................... 45 - 46
Reinigung des Transporteurs und Spulenkapsel,
Auswechseln der Glühlampe
Cleaning hook area and the fee d d og, ............................................47 - 48
4. NÜTZLICHE TIPPS BEI STÖRUNGEN
Cleaning hook area and the feed doan ....................................................................... 49
5. ACCESSOIRES SPÉCIALES
, Satin-Stich Fuß, Säumerfuß
5
Page 6
ENGLISH ITALIANO DEUTSCH
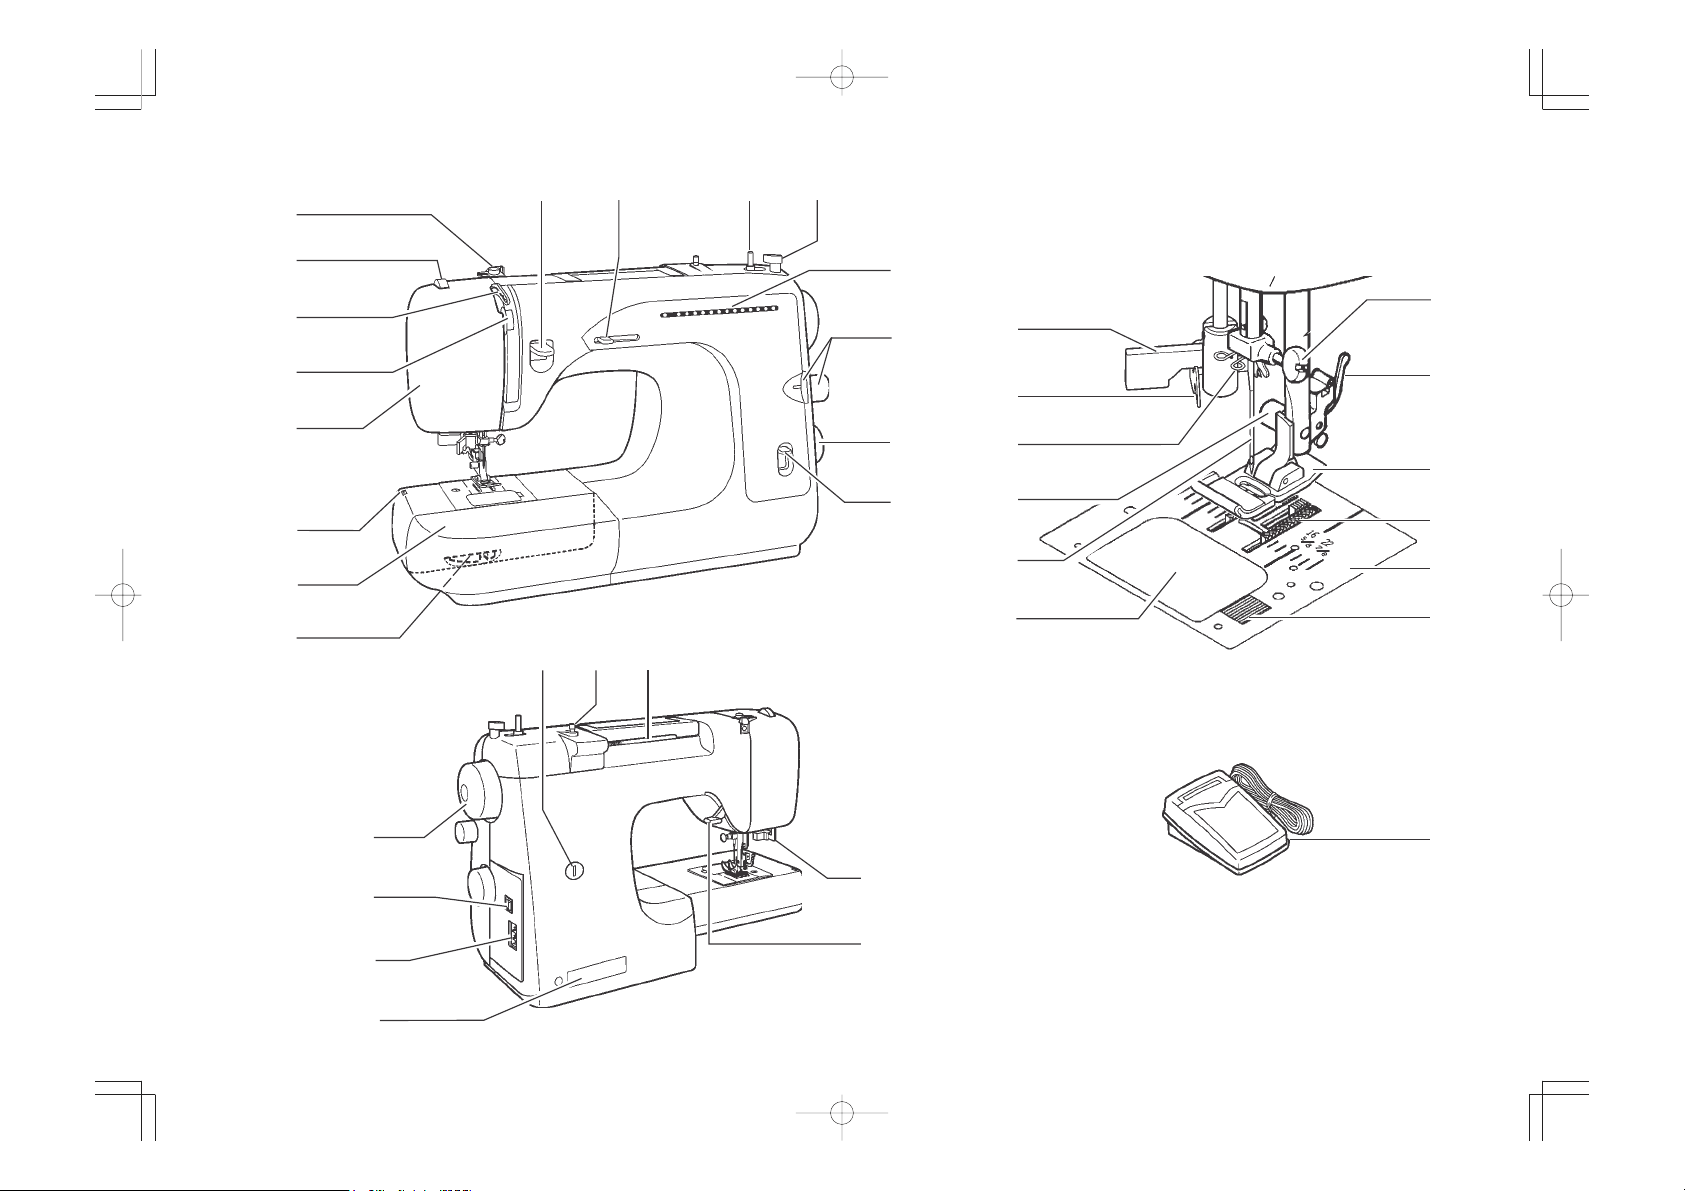
1. KNOWING YOUR SEWING
MACHINE
MACHINE IDENTIFICATION
1. Bobbin winder tension disc
2. Pressure regulator
3. Thread take-up
4. Thread tension control
5. Face cover
6. Thread cutter
7. Extension table
8. Feed dog control
9. Reverse stitch lever
10. Stitch width control
11. Bobbin winder shaft
12. Bobbin winder stop
13. Stitch indicator
14. Stitch length control
15. Stitch selector
16. Super pattern group selector
17. Hand wheel
18. Power/light switch
19. Plug socket
20. Identification plate
21. Buttonhole stitch adjuster
22. Retractable spool pin
23. Horizontal spool pin
24. Buttonhole lever
25. Presser foot lifter
26. Automatic needle threader
27. Thread guide
28. Thread guide
29. Presser foot screw
30. Needle
31. Bobbin cover plate
32. Needle clamp screw
33. Foot release lever
34. Presser foot
35. Feed dogs
36. Needle plate
37. Bobbin cover release button
38. Foot control
1. LA VOSTRA MACCHINA DA
CUCIRE
IDENTIFICAZIONE DELLE PARTI
1. Disco di tensione del filarello
2. Regolatore pressione premistoffa
3. Tendifilo
4. Bottone regola tensione filo superiore
5. Coperchio frontale
6. Leva alza piedino pressore
7. Braccio estraibile
8. Controllo della griffa
9. Leva della retromarcia
10. Selector ancho puntada
11. Annaspatoio
12. Fermo dell’annaspatoio a spolina piena
13. Indicatore punto
14. Manopola lunghezza punto
15. Selettore punti
16. Selector grupo de puntadas elesticas
17. Volantino
18. Interruttore
19. Enchufe del control por pedal
20. Targhetta
21. Dispositivo de ajuste puntada ojal
22. Pasador carrete
23. Portarocchetto orizzontale
24. Leva per asole
25. Palanca pie prensatelas
26. Infila-ago automatico
27. Guidafilo
28. Guidafilo
29. Vite fissa piedino
30. Ago
31. Coperchio bobina
32. Vite morsetto ago
33. Leva di sgancio del piedino
34. Piedino
35. Griffa
36. Placca ago
37. Tasto di sgancio del coperchio bobina
38. Reostato
1. LERNEN SIE IHRE MASCHINE
KENNEN
DIE HAUPTTEILE DER MASCHINE
1. Spulvorspannung
2. Regulierung des füsschendruckes
3. Fadenhebel
4. Oberfadenspannung
5. Kopfdeckel
6. Nähfushebel
7. Boîte à accessoires/Table de rallonge
8. Die transporteur-versenkung
9. Rückwärtstaste
10. Largeur de point
11. Spulwelle
12. Spulstop
13. Stichanzeige
14. Stichlängenknopf
15. Stichwahlknopf
16. Sélecteur des points «super»
17. Handrad
18. Hauptschalter
19. Boîtier de contact machine
20. Typenschild
21. Équilibrage de la boutonnière
22. Porte-bobine rétractable
23. Horinzontaler Garnrollenstift
24. Knopflochhebel
25. Der nähfusshebel
26. Nadeleinfädler
27. Fadenführung
28. Fadenführung
29. Nähfußschraube
30. Nadel
31. Ausiöser for Spulenabdeckung
32. Nadelhalteschraube
33. Nähfuß-Auslöser
34. Nähfuß
35. Transporteur
36. Stichplatte
37. Auslöser für Spulenabdeckung
38. Fußanlasser
6
Page 7
911
10
12
1
2
13
32
3
14
4
26
33
27
5
15
28
34
16
6
7
29
30
31
35
36
37
8
22
21
17
23
38
18
19
20
24
25
7
Page 8
ENGLISH ITALIANO DEUTSCH
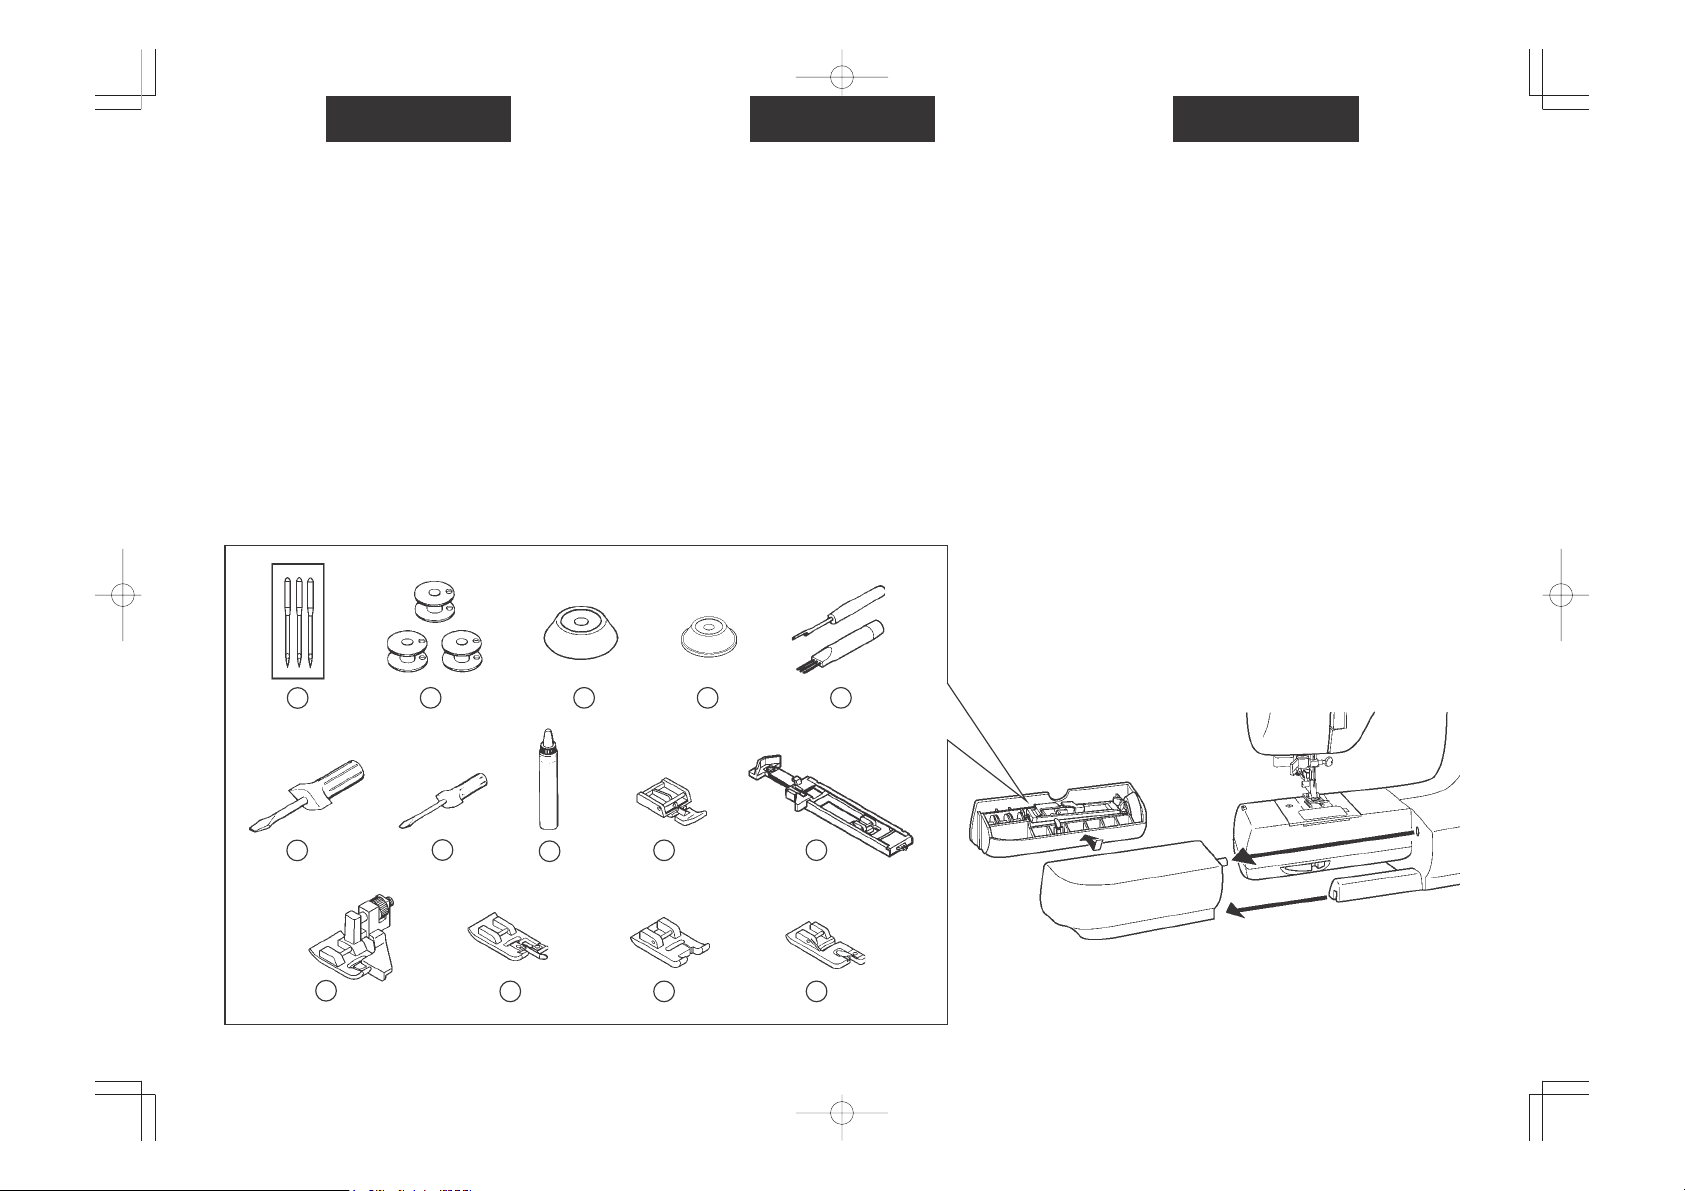
ACCESSORIES
1. Needles
2. Bobbins
3. Spool pin cap (large)
4. Spool pin cap (small)
5. Buttonhole opener/Brush
6. Screwdriver (large)
7. Screwdriver (small)
8. Oiler
9. Zipper foot
10. Buttonhole foot
11. Blind stitch foot
12. Overcasting foot
13. Satin stitch foot
14. Rolled hemmer
ACCESSORI
1. Aghi
2. Spoline
3. Fermarocchetto (grande)
4. Fermarocchetto (piccolo)
5. Taglia-asole / Spazzolino
6. Cacciavite (grande)
7. Cacciavite (piccolo)
8. Oliatore
9. Piedino per cerniere
10. Piedino per asole
11. Piedino punto invisibile
12. Piedino sopraggitto
13. Pie prensatelas para coser en satén
14. Dobladillo rodillo
3
4 521
DASZUBEHÖR
1. Nadeln
2. Spulen
3. Garnrollenkappe (groß)
4. Garnrollenkappe (klein)
5. Trennmesser/Pinsel
6. Schraubenzieher(groß)
7. Schraubenzieher(klein)
8. Ölfläschchen
9. Reisverschlussfus
10. Knopflochfuß
11. Blindstichfuß
12. Überwendlingfuß
13. Pied pour point bourdon
14. Pied pour ourlet rouletté
6
7
8 9 10
11 12 13 14
8
Page 9
ENGLISH ITALIANO DEUTSCH
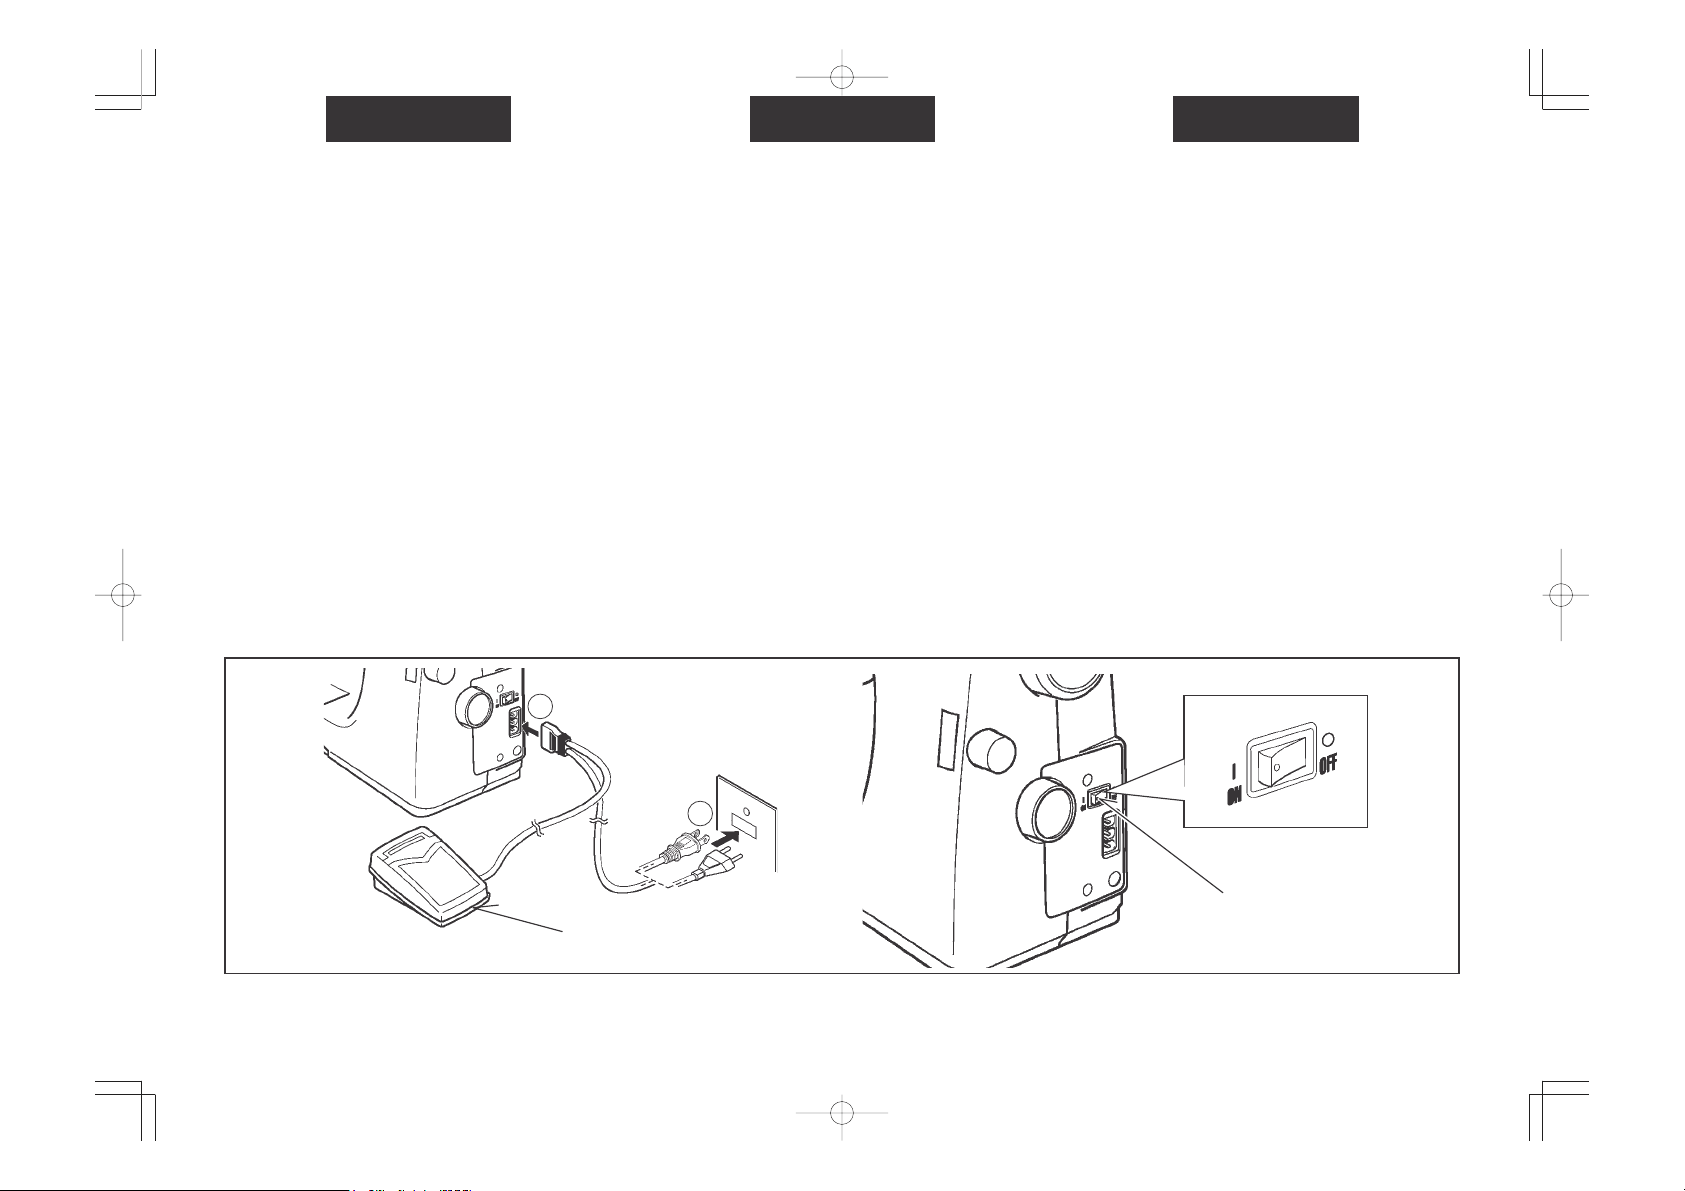
SETTING UP YOUR MACHINE
Be sure to wipe off any surplus oil from needle plate area
before using your machine the first time.
FOOT CONTROL
Connect the plug of the foot control into the machine socket
(1) and your wall outlet (2) as illustrated.
POWER/LIGHT SWITCH
Your machine will not operate until the power/light switch is
turned on. The same switch controls both the power and
the light.
When servicing the machine, or changing needles or Iamps,
etc., machine must be disconnected from the power supply.
1
PREPARAZIONE DELLA MACCHINA
Assicurarsi di rimuovere ogni eccesso di olio dalla placca
ago prima di utilizzare la macchina per la prima volta.
REOSTATO
Inserite a fondo iI connettore del reostato nella presa della
macchina (1) e la spina nella presa a muro (2) , come
indicato in figura.
INTERRUTTORE
La macchina non funzionerà finchè l'interruttore non sarà
azionato. Lo stesso interruttore regola sia la corrente che
la luce.
Quando si revisiona la macchina o si sostituiscono aghi o
lampadine, la macchina deve essere scollegata.
DAS AUFSTELLEN DER MASCHINE
Stellen Sie die Maschine auf eine gerade, feste Unterlage.
Bevor Sie die Maschine zum ersten Mal benutzen, wischen
Sie bitte überschüssiges Öl ab, das sich während des
Transports im Stichplattenbereich ansammeln kann.
Verbinden Sie das Hauptkabel mit der Maschine (1) und
der Steckdose (2) wie abgebildet.
Der Hauptschalter
Ihre Maschine näht nur, wenn der Schalter für Licht und
Maschine eingeschaltet ist.
Bei Wartungsarbeiten oder beim Auswechseln von Nadel
oder Glühlampe muss die Maschine durch Ziehen des
Netzsteckers aus der Steckdose abgeschaltet werden.
Foot control
Reostato
Fußanlasser
2
Power/light switch
IInterruttore
Hauptschalter
9
Page 10
ENGLISH ITALIANO DEUTSCH
SPOOL PINS
Place a spool of thread on the spool
pin.
Secure it with a suitable size spool cap
(A) to ensure smooth flow of thread.
Pull up the spool pin (B). This is used
for bobbin winding when the machine
is already threaded.
PRESSER FOOT LIFTER
There are three positions for your
presser foot.
1. Lower the presser foot to sew.
2. Raise the lifter to the middle
position to insert or remove fabric.
3. Lift it to its highest position to
change the presser foot or to
remove thick fabric.
PORTAROCCHETTI
Coloque un carrete de hilo en el porta-
carretes. Fijelo con la tapa (A)
asegurándose una salida fluida del
hilo.
Tire de la barrita (B). Esta se utiliza
para el llenado de canilla cuando la
máquina ya está enhebrada.
LEVA ALZAPIEDINO
Esistono tre posizioni per il piedino
pressore.
1. Piedino abbassato per la cucitura.
2. Piedino alzato a metà per inserire
o rimuo-vere il tessuto
3. Piedino alzato in posizione
massima superiore per la sua
sostituzione o per rimuovere
tessuti pesanti.
GARNROLLENSTIFTE
Placez une bobine de fil sur le porte-
bobine. Bloquez-la avec le chapeau
(A) afin d’assurer le bon déroulement
du fil.
Pour le bobinage du fil de canette alors
que la machine est déjà enfilée ou
pour coudre à deux fils, tirez le porte-
bobine rétractable (B).
DER NÄHFUSSHEBEL
Es gibt drei Positionen für den Nähfuß.
1. Zum Nähen den Nähfuß
herunterlassen.
2. Zum Einlegen und Herausnehmen
Ihrer Näharbeit: mittlere Stellung.
3. In die höchste Stellung bringen,
wenn Sie den Nähfuß auswechseln
oder besonders dicken Stoff
herausnehmen.
A
B
10
Page 11
ENGLISH ITALIANO DEUTSCH
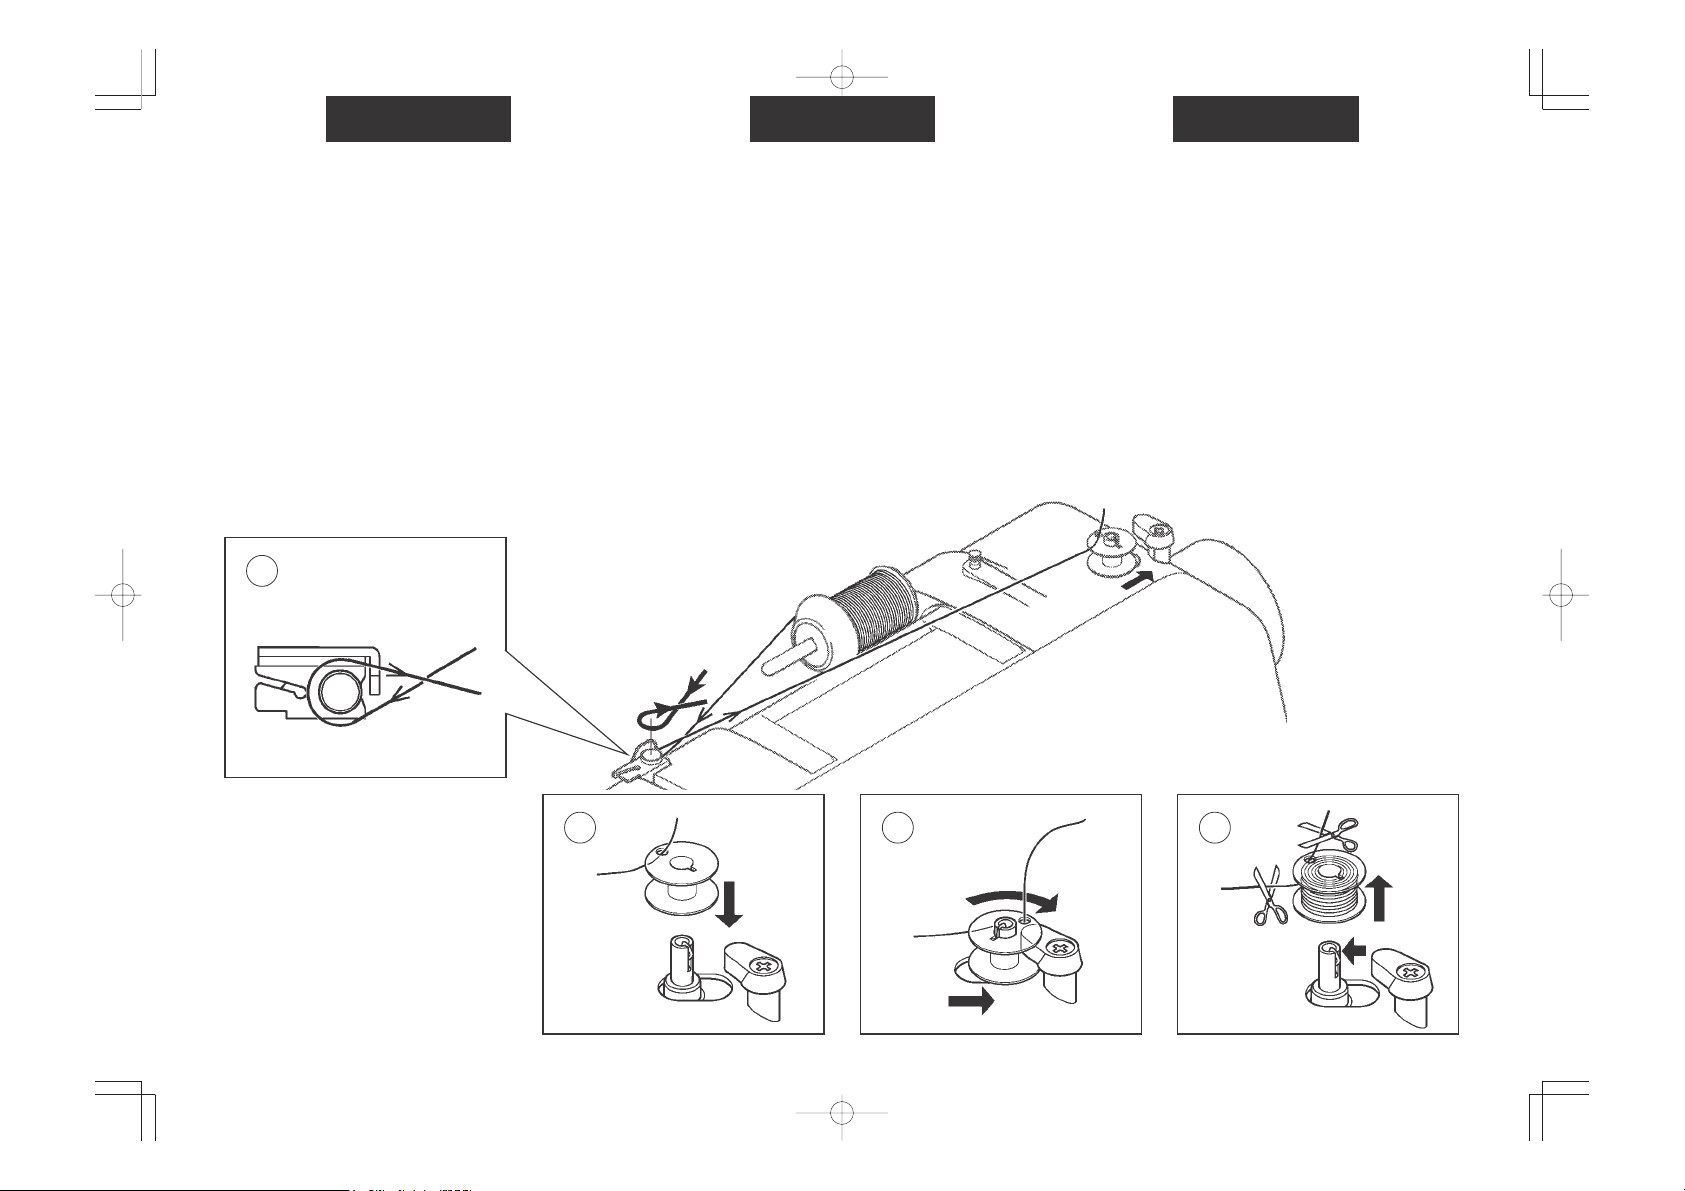
WINDING BOBBIN
1. Pass thread from spool through thread guides as shown.
2. Pull end of thread through hole in bobbin as shown.
3. Push bobbin winder shaft to far left position, if it is not
already there. Place bobbin onto shaft with end of thread
coming from top of bobbin. Push bobbin winder shaft to
the right until it clicks. Hold onto end of thread.
4. Start machine. Bobbin will cease turning when
completely filled. Push shaft to left to remove bobbin and
cut thread.
1
AVVOLGIMENTO DELLA SPOLINA
1. Fate compiere al filo del rocchetto il percorso indicato
nella figura.
2. Introducete il capo del filo nel foro della spolina come si
vede in figura.
3. Spingete l'asse del dell' annaspatoio verso sinistra se
non è già in questa posizione. Inserite la spolina sull'asse
con l'estremita del filo che fuoriesce dalla parte superiore.
Spingete l'asse del dell' annaspatoio verso destra finchè
non avvertite lo scatto.
4. Avviate la macchina trattenendo l'estremità del filo per i
primi giri di avvolgimento. La spolina si arresterà
automaticamente quando è piena. Per sfilarla dall'asse,
spingete questo a sinistra.
AUFSPULEN DES UNTERFADENS
1. Ziehen Sie den Faden von der Garnrolle durch die
Fadenführungen, wie die Skizze zeigt.
2. Ziehen Sie das Fadendende durch ein Loch in der Spule
(siehe Skizze).
3. Drücken Sie die Spulwelle so weit wie möglich nach links,
und stecken Sie die Spule so auf die Welle, dass das
Fadenende nach oben verläuft. Drücken Sie nun die
Spulwelle nach rechts bis es klickt, und halten Sie das
Fadenende fest.
4. Starten Sie die Maschine. Nach ein paar Umdrehungen
können Sie das Fadenende loslassen. Wenn die Spule
voll ist, schaltet sich der Spuler von selbst ab. Drücken
Sie die Spulwelle wieder nach links, nehmen Sie die
Spule ab, und schneiden Sie die Fadenenden ab.
32
4
11
Page 12
ENGLISH ITALIANO DEUTSCH
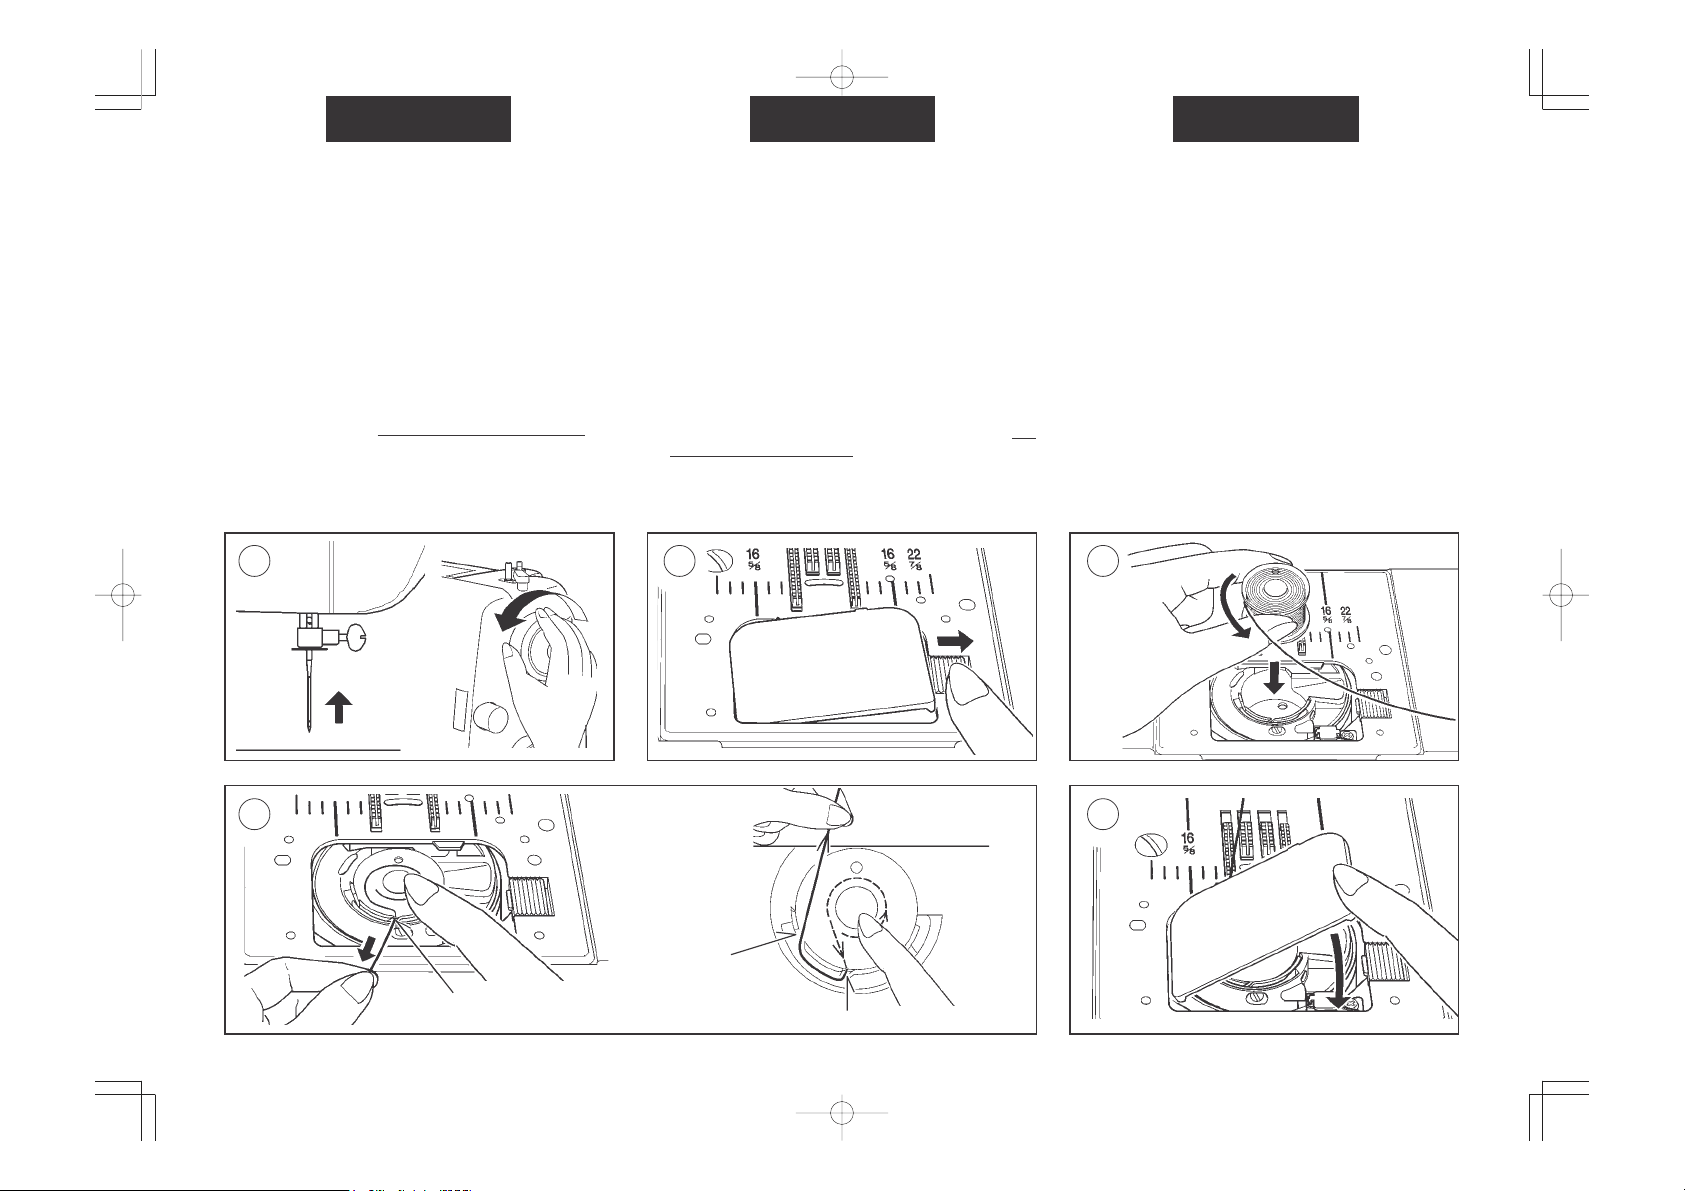
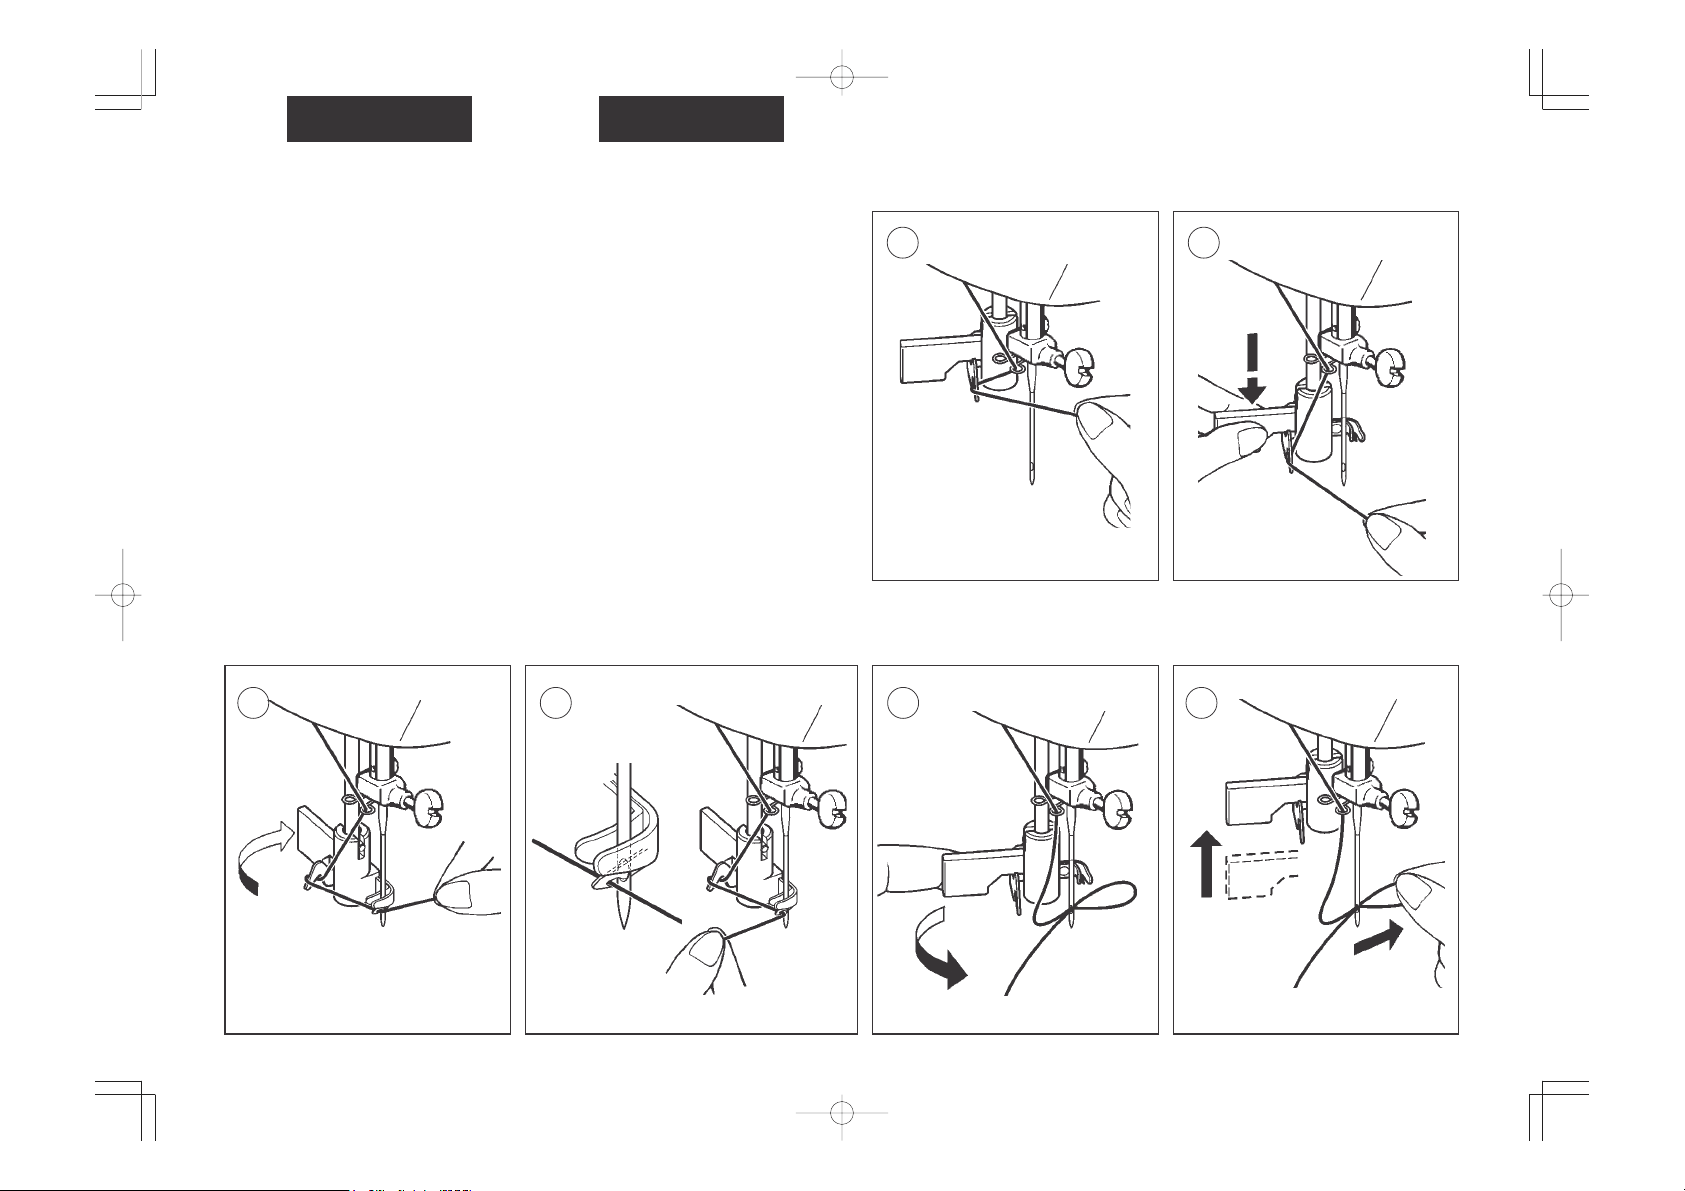
THREADING THE BOBBIN THREAD
1. Raise the needle to its highest position by rotating the
hand wheel towards you.
2. Remove the bobbin cover plate by pushing the release
button to the right while pushing the left corner of plate.
3. Insert the bobbin making sure the bobbin rotates counterclockwise.
4. Pull thread through the slot (A) and then to the left.
5. With a finger held gently on top of the bobbin, pull thread
through the slot (B) until you hear a clicking sound, and
then leave about 6" (15 cm) of thread.
6. Replace the bobbin cover plate onto the needle plate.
1 32
AVVOLGIMENTO DELLA BOBINA
1. Ruotate il volantino verso di voi per sollevare l’ago nella
sua posizione più alta.
2. Rimuovere il coperchio della bobina come illustrato nel
disegno 2.
3. Inserite la bobina controllando che ruoti in senso
antiorario.
4. Fate passare il filo attraverso la scanalatura (A) e tiratelo
verso sinistra.
Premete delicatamente con un dito sul lato superiore
della bobina e tirate il filo fuori dalla scanalatura (B)
a che non udite uno scatto. Lasciate circa 15 cm di filo.
5. Rimettete il coperchio della bobina.
fino
EINLEGEN DER SPULE UND DES
UNTERFADENS
1. Bringen Sie die Nadel in ihre höchste Stellung, indem
Sie das Handrad nach vorn drehen.
2. Entfernen Sie die Spulenabdeckung.
3. Legen Sie die Spule so ein, dass sie sich entgegen dem
Uhrzeigersinn dreht.
4. Ziehen Sie den Faden durch den Schlitz (A) und dann
nach links.
Halten Sie die Spule leicht mit einem Finger fest, und
ziehen Sie den Faden zum Schlitz (B) ,
Klicken hören. Ziehen Sie dann etwa 15cm Faden aus
der Spule heraus.
5. Setzen Sie die Spulenabdeckung wieder ein.
bis Sie ein leises
4 5
B
A
12
A
Page 13
ENGLISH ITALIANO
NEEDLE, THREAD AND FABRIC CHART
Your fabric will determine the choice of a needle and thread. The following table
is a practical guide to needle and thread selection. Always refer to it before a
new sewing project. And be sure to use the same size and type of thread in the
bobbin as in the top thread supply.
FABRICS THREAD NEEDLES
The fabrics below can be of any
fiber: cotton, linen, silk, wool,
synthetic, rayon, blends. They
are listed as examples of weight.
LightWeight
MediumWeight
MediumHeavy
Knits Bonded Knits
Batiste
Chiffon
Crepe
Corduroy
Flannel
Gabardine
Gingham
Linen
Muslin
Wool Crepe
Bonded Wovens
Canvas
Coating
Denim
Duck
Sailcloth
Double Knit
Jersey
Tri cot
Cotton-wrapped
Polyester
100% Polyester
* Mercerized Size 60
Cotton-wrapped
Polyester
100% Polyester
* Mercerized Size 50
Nylon
Cotton-wrapped
Polyester
100% Polyester
* Mercerized Size 40
* "Heavy Duty"
Cottonwrapped
Polyester
Polyester
Nylon
* Do not use on stretch fabrics.
* For best sewing results, always use a Singer Branded Needle.
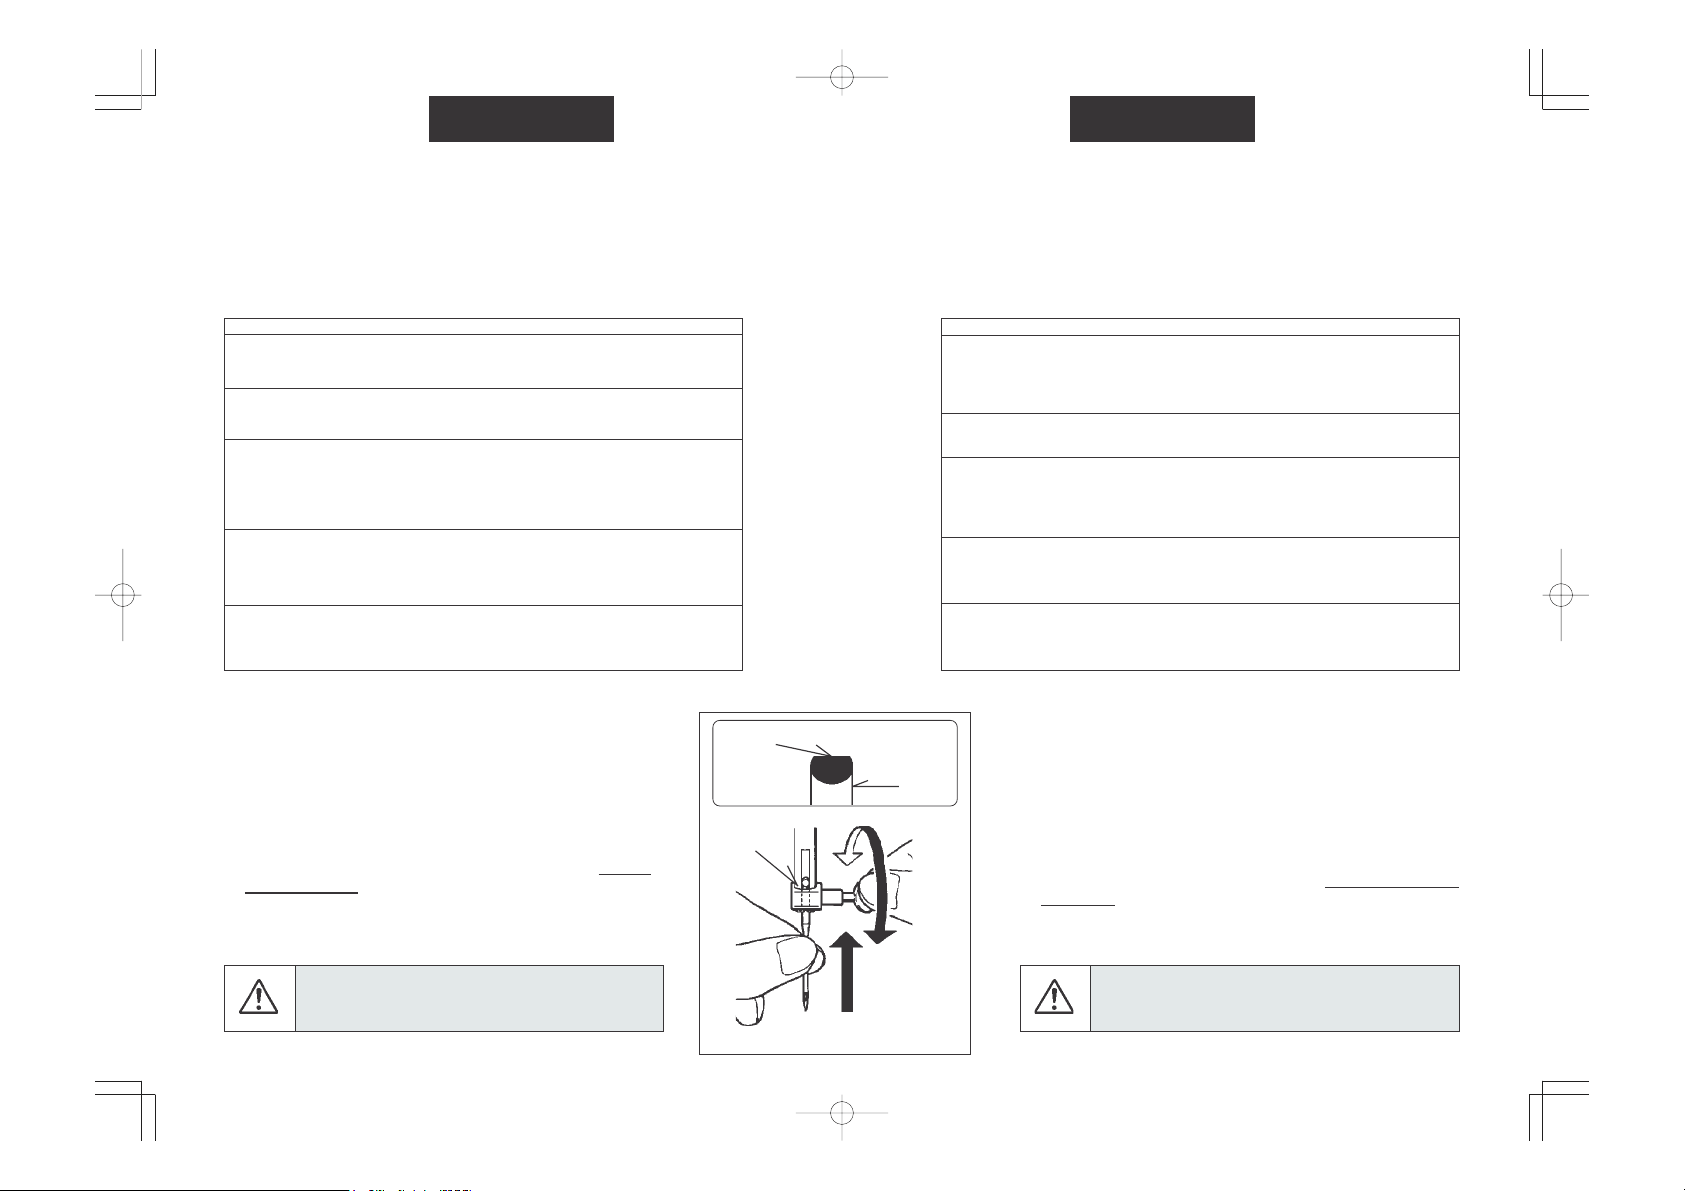
Changing the needle
1. Raise the needle bar to its highest position by turning the hand
wheel toward you.
2. Loosen the needle clamp screw by turning it toward you.
3. Remove the needle by pulling it downward.
4. Insert the new needle into the needle clamp with the flat side
toward the back.
5. Push the needle up as far as it can go.
6. Tighten the needle clamp screw firmly with the screw driver.
Always disconnect the machine from power supply
by removing the plug from the wall-outlet.
TYPE SIZE
2020
red
shank
2020
red
shank
2020
red
shank
2020
Ball-Point 2045
(With yellow
band) Size
11/80,14/90,
16/100
11/80
orange
band
14/90
blue
band
16/100
purple
band
18/110
Flat side
Lato piatto
Pin
Perno
Flat
side
toward
the
back
TABELLA AGO, FILO E TESSUTO
La scelta dell’ago e del filato da usare sarà determinata dal tipo di tessuto. La
seguente tabella Vi sarà di guida nella scelta dell’ago e del filo adatto e ad essa
dovete fare riferimento per tutti i Vostri lavori di cucito. Assicuratevi anche di
usare lo stesso tipo di filato nella bobina e nella macchina.
TESSUTI FILATO AGHI
I tessuti sotto indicati possona
essere di qualsia si fibra:
cotone-lino-seta-lana-sinteticorayon ecc. I nomi indicati
servono a dare un’idea della
pesantezza del tessuto.
LEGGERO
MEDIO/
LEGGERO
MEDIO/
PESANTE
MAGLIA ago con punta a
Batista
Chiffon
Crèpe
Corduroy
Flanelia
Gabardine
Lino
Mussola
Crèpe di lana
Tessuto bonded
Canavaccio
Denim
Tela olona
Tela da vela
Maglia grossa
Maglia doppia
Jersey
Tri cot
Cotone/Poliestere
100% Poliestere
*Mercerizzato, mis. 60
Cotone/Poliestere
100% Poliestere
*Mercerizzato, mis. 50
Nylon
Cotone/Poliestere
100% Poliestere
*Mercerizzato, mis. 40
Cotone/Poliestere
Poliestere
Nylon
* No usar sobre el material estirado.
* Per ottenere i risultati migliori, utilizzate sempre aghi di marca Singer.
Sostituzione dell’ago
Needle
Ago
Il lato
piatto
rivolto
all’indietro
1. Sollevate la barra d’ago nella posizione più alta, ruotando il
volantino verso di voi.
2. Allentate la vite del morsetto che fissa l’ago ruotandola verso di
voi.
3. Togliete l’ago tirando verso il basso.
4. Inserite il nuovo ago nel morsetto con
all’indietro.
5. Premete a fondo l’ago.
6. Serrate bene la vite del morsetto utilizzando il cacciavite.
Prima di procedere alla pulizia scollegate sempre la
macchina estraendo la spina dalla presa di corrente.
TIPO MISURA
2020 11/80
gambo banda
rosso arancio
2020 14/90
gambo banda
rosso blu
2020 16/100
gambo banda
rosso viola
2020 18/110
stera 2045
(banda gialla)
mis. 11/80, 14/90,
16/100,
il lato piatto rivolto
13
Page 14
DEUTSCH
STOFF-, NADEL-UND GARNTABELLE
Die Wahl von Nadel und Faden wird meist durch die Stoff- bzw. Materialart
bestimmt. Diese Tabelle gibt dazu praktische Hinweise und sollte deshalb vor
jedem Nähprojekt zu Rate gezogen werden. Grundsätzlich gilt: Für Ober- und
Unterfaden (Nadel- und Spulenfaden) das gleiche Garn verwenden.
STOFFARTEN GARNE
Leicht Batist
Chiffon
Crèpe
Mittel-
Cord
schwer
Flanell
Gabardine
Gingham
Leinen
Musselin
Woll-Crèpe
Schwer Verbund-
gewebe
Canvas (oder
Drillich)
Mantelstoff
Denim (oder
Jeans)
Segeltuch
Strick Verbundene
Strickwaren
Elast. Wirkw.
Jersey
Trikot
Polyester, mit Baumwolle
umwickelt, 100 % Polyester
Merzerisierte Baumwolle
Gr. 60'
Polyester, mit Baumwolle
umwickelt, 100 % Polyester
Merzerisierte Baumwolle
Gr. 50*
Nylon
Polyester, mit
Baumwolle umwickelt,
100 % Polyester
Merzerisierte Baumwolle
Gr. 40'
Widerstandsfähig*
Polyester, mit
Baumwolle umwickelt
Polyester
Nylon
* Nicht bei elastischen Stoffen verwenden.
* Für beste Nähresultate SINGER-Nadeln verwenden.
Auswechseln der Nadel
1. Bringen Sie die Nadel in ihre höchste Stellung, indem Sie das
Handrad nach vorn drehen.
2. Lösen Sie die Nadelhalteschraube, indem Sie sie nach vorn
drehen.
3. Ziehen Sie die Nadel nach unten heraus.
4. Setzen Sie die neue Nadel in den Nadelhalter ein,
Seite nach hinten.
5. Schieben Sie die Nadel bis zum Anschlag ein.
6. Ziehen Sie die Halteschraube wieder fest an.
Maschine immer durch Herausziehen des
Netzsteckers aus der Steckdose vom Netz trennen.
mit der flachen
NADELN
Typ Grösse
2020
2020
2020
2020
11/80
14/90
16/100
18/110
Kugelspitze
2045
Größen 11/80
14/90, 16/100
Flache Seite
Nadel
Stift
Flache
Seite
nach
hinten
14
Page 15
ENGLISH ITALIANO DEUTSCH
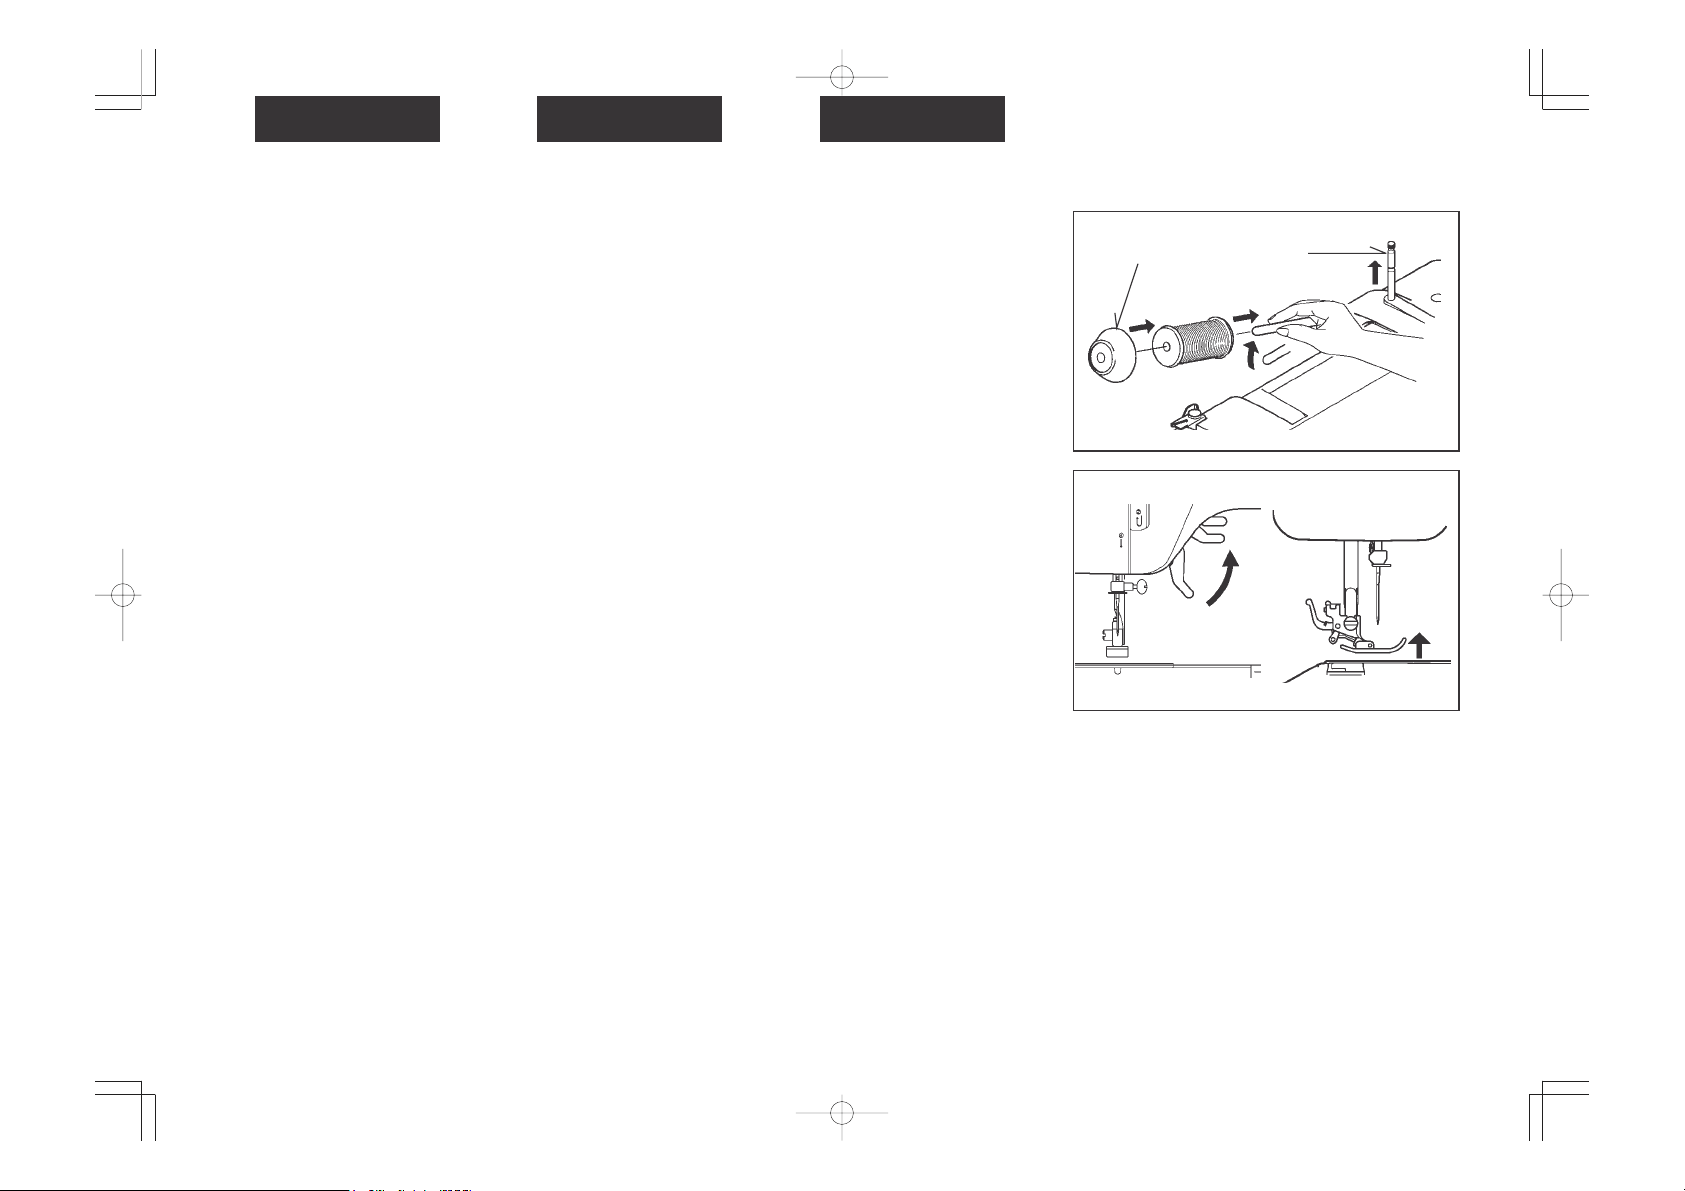
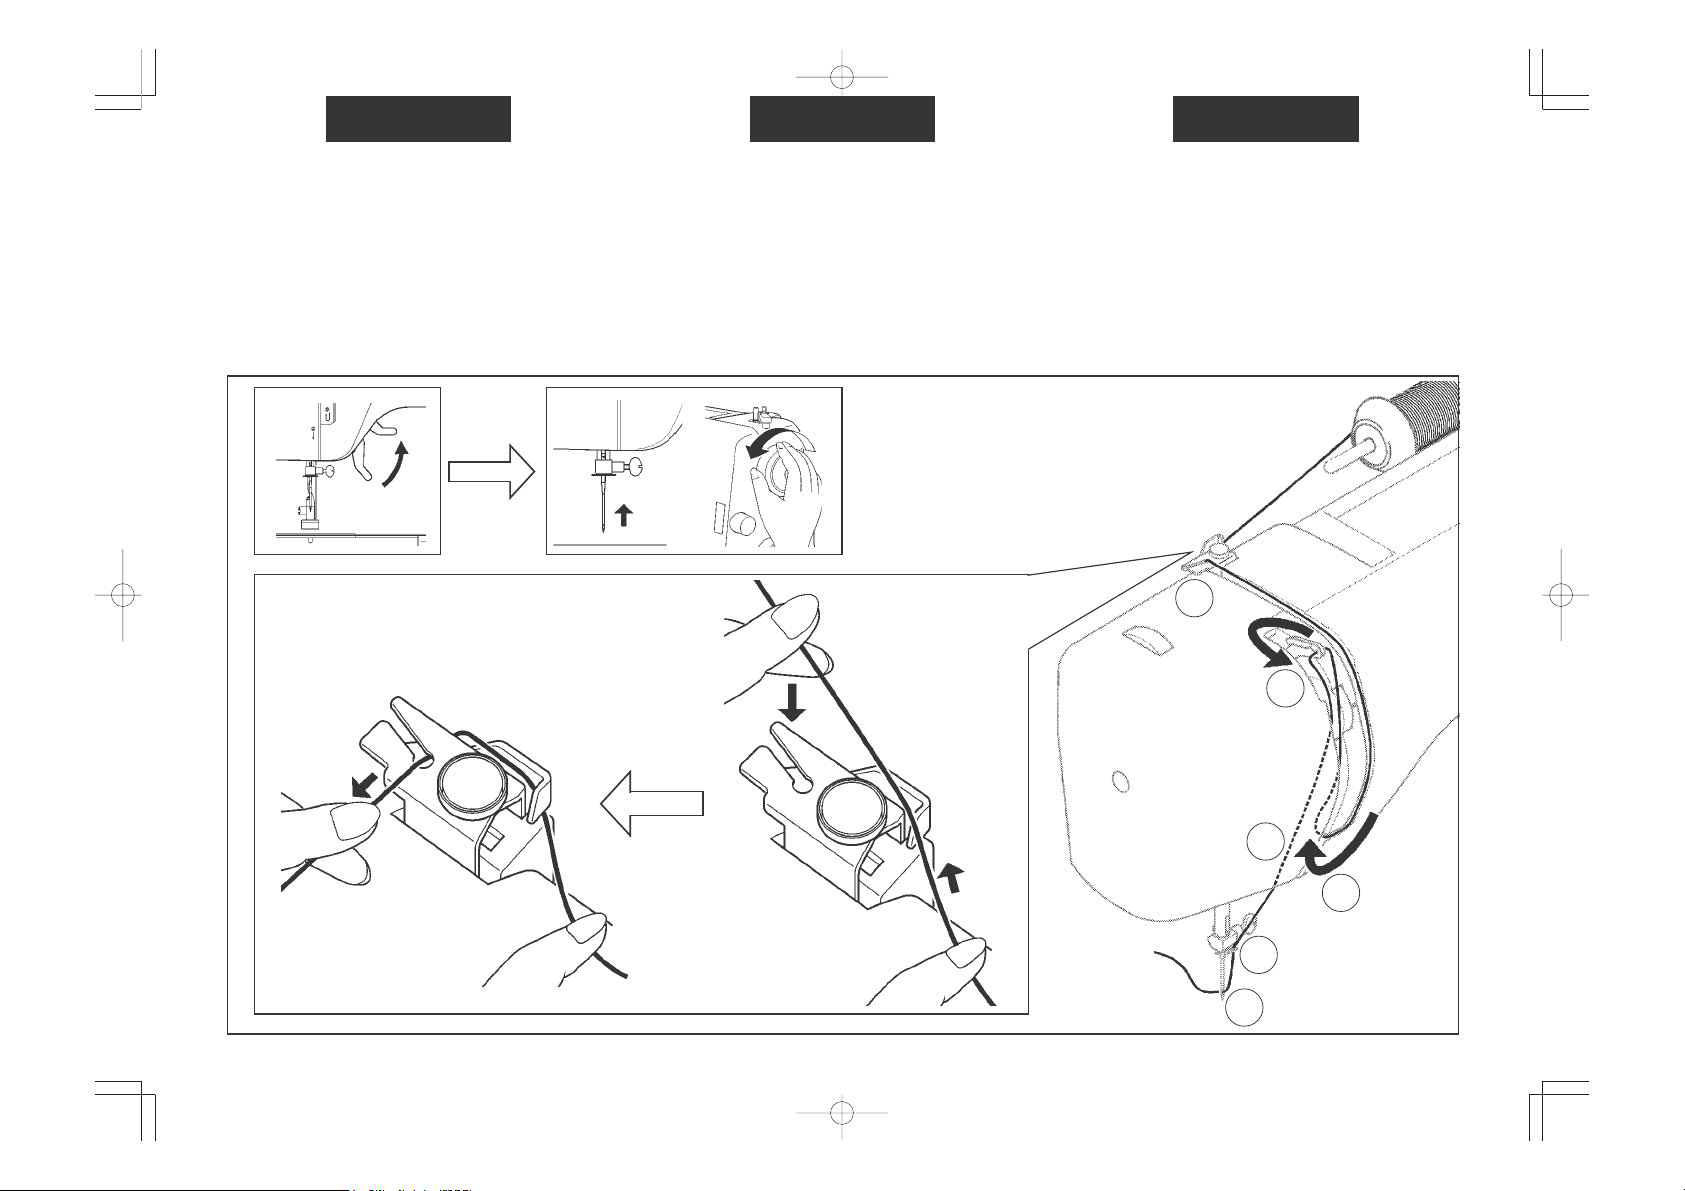
THREADING THE TOP THREAD
1. Raise the presser foot lifter.
2. Raise the needle to its highest position by rotating the
hand wheel towards you.
3. Thread the machine in the order as illustrated.
INFILATURA DEL FILO SUPERIORE
1. Alzare la leva del piedino.
2. Alzare l'ago nel punto morto superiore ruotando il
volantino verso voi.
3. Infilare la macchina nell'ordine seguente come illustrato.
EINFÄDELN DES OBERFADENS
1. Stellen die den Nähfußhebel hoch.
2. Bringen Sie den Fadenhebel (3) in die höchste Stellung,
indem Sie das Handrad nach vorn drehen.
3. Fädeln Sie die Maschine entsprechend der Reihenfolge
in der Skizze ein.
1
3
6
4
2
5
15
Page 16
ENGLISH
ITALIANO
USING AUTOMATIC
NEEDLE THREADER
Raise the needle to its highest position by
rotating the hand wheel towards you.
1. Hook thread to thread guide as
illustrated.
2. Pull down lever holding the end of thread.
3. Turn the lever as far as it will go.
4. Guide thread into hooked end and pull it
upward.
5. Return the lever and needle will be
threaded automatically.
6. Release the lever and pull thread away
from you.
NOTE:
For smooth threading it is recommended to
set the machine at straight stitching (center
position) when using needle threader.
INFILATURA AUTOMATICA
Sollevate l’ago nella sua posizione più alta
ruotando verso di voi il volantino.
1. Agganciare il filo al guidafilo come
illustrato.
2. Tirare in basso la leva tenendo l'estremità
del filo.
3. Girare la leva fin quando è possibile.
4. Guidare il filo nel gancio ed alzarlo.
5. Ruotare la leva e l' ago sarà infilato
automaticamente.
6. Rilasciare la leva e tirare il filo dell'ago
attraverso la cruna.
NOTA:
Per una infilatura corretta con l’infila ago è
bene impostare la macchina sulla cucitura
diritta (posizione centrale).
4 653
1 2
16
Page 17

DEUTSCH
GEBRAUCH DES NADELEINFÄDLERS
Vergewissern Sie sich, daß die Nadel in der höchsten Stellung steht.
1. Ziehen Sie den Faden durch die Fadenführung am Nadelhalter und um den Haken am
Einfädler.
2. Ziehen Sie den Einfädler nach unten, und halten Sie das Fadenende fest.
3. Drücken Sie den Griff des Einfädlers so weit wie möglich nach hinten.
4. Ziehen Sie den Faden von unten nach oben in die Fadengabel.
5. Drücken Sie den Einfädler wieder in die Ausgangsstellung, und die Nadel wird automatisch
eingefädelt.
6. Lassen Sie den Einfädler los, und ziehen Sie den Faden nach hinten.
NOTE:
Pour un enfllage plus aisé, il est recommandé de placer la sélecteur de point en position point
droit (aiguille au centre) avant d’utiliser l’enfileur.
17
Page 18

ENGLISH ITALIANO DEUTSCH
PICKING UP BOBBIN THREAD
1. Raise the presser foot lifter.
2. Holding needle thread loosely with your left hand, turn
hand wheel towards you with your right hand first
lowering the needle and continuing until the needle
comes to its highest position.
3. Lightly pull up the top thread, and pick up bobbin thread,
which will appear through the needle plate slot.
4. Pull both top and bobbin threads together towards back
of machine under the presser foot, leaving about 6” (15
cm) clear.
ESTRAZIONE DEL FILO INFERIORE
1. Sollevate la leva alza piedino.
2. Tenendo delicatamente il filo con la mano sinistra, con
la mano destra continuate a ruotare verso di voi il
volantino fino a che l’ago si abbassa e torna nuovamente
nella posizione più alta.
3. Sollevate delicatamente il filo superiore e raccogliete il
filo della bobina, che appare attraverso la fessura della
placca ago.
4. Tenendoli insieme, tirate entrambi i fili verso il lato
posteriore della macchina, sotto al piedino, lasciando
15 cm circa di filo libero.
HERAUFHOLEN DES UNTERFADENS
1. Stellen Sie den Nähfußhebel nach oben.
2. Halten Sie den Oberfaden leicht in der linken Hand,
und drehen Sie das Handrad eine volle Umdrehung
nach vorn, sodass sich die Nadel erst senkt und dann
in der höchsten Stellung befindet.
3. Ziehen Sie leicht am Oberfaden, und der Unterfaden
kommt durch die Öffnung in der Stichplatte herauf.
4. Ziehen Sie Ober-und Unterfaden etwa 15cm heraus,
und legen Sie beide Fäden nach hinten unter den
Nähfuß.
1 32 4
18
Page 19

ENGLISH ITALIANO DEUTSCH
ADJUSTING TOP THREAD TENSION
Straight stitching: the good looking appearance of your
stitching is largely determined by the balanced tension of
both top and bobbin threads. The tension is well balanced
when these two threads ‘lock’ in the middle of layers of fabric
you are sewing.
Set the tension control at “AUTO” position for ordinary
sewing.
If, when you start to sew, you find that the stitching is irregular,
you will need to adjust the tension control.
Make any adjustments with presser foot ‘down’.
Well balanced
Equilibrata
Ausgewogen
Under side
Rovescio
Unterseite
REGOLAZIONE DELLA TENSIONE
DEL FILO
Con il punto diritto, la buona riuscita della cucitura dipende
ampiamente dalla tensione del filo superiore e dalla tensione
del filo della bobina, che devono essere equilibrate. Questo
si verifica quando i due fili si “bloccano” a metà degli strati
di tessuto che state cucendo.
Top stitch too tight
I punti sul diritto sono
troppo stretti
Oberfadenspannung
zu hoch
Decrease tension
Diminuire la tensione
Spannung verringern
EINSTELLEN DER FADENSPANNUNG
Eine gut aussehende Naht hängt weitgehend von der
richtigen Fadenspannung ab. Die Spannung ist
ausgewogen, wenn sich Ober- und Unterfaden in der
Stoffmitte miteinander verbinden.
Top side
Diritto
Oberseite
Top stitch too loose
I punti sul rovescio
sono troppo lenti
Oberfadenspannung
zu niedrig
Increase tension
Aumentare la tensione
Spannung erhöhen
19
Page 20

ENGLISH ITALIANO DEUTSCH
CHANGING PRESSER FOOT
Be sure needle is in the up position. Raise presser foot
lifter.
1. Raise foot release lever to remove the foot. (Fig. 1)
2. Place the desired foot on the needle plate aligning the
presser foot pin with the foot holder. (Fig. 1)
3. Lower the presser foot lifter so that the foot holder snaps
on the foot. (Fig. 2)
Foot release lever
Leva alza piedino
Auslöser
SOSTITUIRE IL PIEDINO
Assicurarsi che l'ago sia in posizione superiore. Alzare la
leva alza piedino.
1. Premete il tasto di sgancio del piedino per togliere il
piedino.
2. Mettete il nuovo piedino sulla placca ago, allineandolo
il perno del piedino con il supporto.
3. Abbassate la leva alza piedino di modo che il supporto
si agganci al piedino.
AUSWECHSELN DES NÄHFUSSES
Vergewissern Sie sich, dass die Nadel „oben“ steht. Stellen
Sie den Nähfußhebel hoch.
1. Drücken Sie auf den Auslöser am Nähfußhalter um den
Nähfuß zu entfernen.
2. Legen Sie den gewünschten Nähfuß auf die Stichplatte,
und bringen Sie den Nähfußhalter und die kleine
Haltestange des Nähfußes zur Deckung.
3. Lassen Sie den Nähfußhebel herunter, sodass der
Nähfußhalter im Nähfuß einrastet.
Foot holder
Supporto del piedino
Nähfußhalter
20
Fig. 1 Fig. 2
Page 21

ENGLISH ITALIANO DEUTSCH
FEED DOG CONTROL
The feed dogs control the movement of the fabric that is
being sewn. They should be raised for all general sewing
purposes and lowered for darning, freehand embroidery and
monogramming so that you, not the feed dogs, are moving
the fabric.
CONTROLLO DELLA GRIFFA
Le griffe controllano il movimento del tessuto che viene
cucito. Possono essere sollevate per le cuciture più comuni,
mentre possono essere abbassate per rammendi, cuciture
a braccio libero e ricamo di lettere in modo da essere voi, e
non le griffe, a spostare il tessuto.
DIE TRANSPORTEUR-VERSENKUNG
Der Transporteur bewirkt die Bewegung des Stoffes beim
Nähen. Für normale Nähzwecke sollte er daher auf „oben“
stehen und für Sonderarbeiten wie z.B. Stopfen und
Freihand-Sticken und Nähen von Monogrammen abgesenkt
werden. Sie können dann die Bewegung des Stoffes selbst
bestimmen.
21
Page 22

ENGLISH ITALIANO DEUTSCH
STITCH SELECTOR
AND INDICATOR
1. To select a stitch, be sure needle
is out of fabric at its highest
position.
2. Then turn the selector until the
required stitch is indicated by the
red symbol on the indicator panel.
STITCH LENGTH/
SUPER (STRETCH)
STITCH CONTROL
Stitch length can be selected easily
according to thickness and type of
fabric.
Super (stretch) stitch patterns can be
selected by turning the same dial to
mar mark where fine adjustment can
be made.
SELETTORE ED
INDICATORE PUNTO
1. Per selezionare un punto,
assicurarsi che l'ago sia lontano
dal tessuto nella sua posizione
superiore massima.
2. Quindi ruotare il selettore finchè il
punto richiesto è indicato dal
simbolo rosso sul pannello
indicatore.
MANOPOLA
LUNGHEZZA PUNTO/
PUNTO SUPER
(ELASTICO)
La manopola consente di selezionare
agevolmente la lunghezza del punto,
in base al tipo di tessuto e al suo
spessore.
Ruotando la stessa manopola sul
segno “èèSè possibile selezionare i
punti elastici, effettuando regolazioni
di precisione.
STICHWAHLKNOPF
UND STICHANZEIGE
1. Bevor Sie einen Stich einstellen:
vergewissern Sie sich, dass sich
der Fadenhebel in der höchsten
Stellung befindet.
2. Drehen Sie den Stichwahlknopf,
bis der gewünschte Stich in der
Stichanzeige erscheint.
Stitch indicator
Indicatore punto
Stichanzeige
Stitch selector
Selettore punto
Stichwahlknopf
STICHLÄNGEN/SUPERNUTZSTICHREGLER
Die Stichlänge kann leicht dem
Nähgut entsprechend reguliert
werden, die Zahlen geben die
Stichlänge etwa in mm an.
Durch Einstellen des Reglers auf das
SSS Symbol können die Super-Nutz-
Stiche eingestellt werden.
22
Page 23

ENGLISH ITALIANO DEUTSCH
SUPER (STRETCH)
PATTERN GROUP
SELECTOR
To select red patterns, push down the
selector. Push it up for blue patterns.
REVERSE STITCH
LEVER
It is recommended to begin, or end
seams with several stitches in reverse
for reinforcement. As long as you are
pressing down this lever, the machine
will continue to feed the fabric
backwards.
PRESSURE
REGULATOR
This control regulates the pressure of
the presser foot on to the feed-dogs.
Insufficient pressure may cause poor
feeding of the fabric, skipped stitches,
or difficulty in guiding the fabric. Too
much pressure may result in feeddogs or presser foot marks appearing
on the fabric.
For most fabrics set the control at 3.
For thicker ones increase it to 4 and
for finer ones decrease to a lower
number.
SELECTOR GRUPO DE
PUNTADAS ELESTICAS
Para seleccionar grupo de puntadas
rojos baje la palanca. Súbala para
grupos de puntadas azules.
LEVA DELLA
RETROMARCIA
Si raccomanda di iniziare o terminare
le cuciture con qualche punto
all'indietro di rinforzo.
Per invertire il senso di cucitura
premere l'apposita leva come
indicato.
L'inversione permane finchè la leva
resta premuta.
REGOLATORE DI
PRESSIONE
PIEDINO
Questa manopola regola la pressione
del piedino pressore sulla griffa. Una
pressione insufficiente può causare
uno scarso trasporto del tessuto, il
salto di punti o difficoltà nel guidare
il tessuto stesso. Una eccessiva
pressione può comportare
l'apparizione di segni della griffa o del
piedino sulla stoffa. Per la maggior
parte dei tessuti posizionare la
manopola su 3. Per quelli più pesanti
aumentare a 4 e per i più leggeri
decrescere ad un numero inferiore.
SÉLECTEUR DES
POINTS «SUPER»
Pour sélectionner les motifs rouges,
abaissez le sélecteur. Relevez-le pour
les motifs bleus.
DIE RÜCKWÄRTSTASTE
Es empfiehlt sich, eine Naht mit ein
paar Rückwärtsstichen anzufangen
und zu beenden. Sie befestigen
dadurch die Fadenenden und
verhindern ein Aufgehen der Naht.
Wenn Sie rückwärts nähen wollen,
drücken Sie die Rückwärtstaste
solange wie die Maschine rückwärts
nähen soll.
REGULIERUNG DES
FÜSSCHENDRUCKES
Dieser Regler kontrolliert den Andruck
der Nähfüßchen auf den Transporteur.
Ungenügender Druck kann
schlechten Transport, Fehlstiche oder
Schwierigkeiten beim Führen des
Materials verursachen. Zu starker
Druck kann Abdrücke von Nähfuß
oder Transporteur auf dem Nähgut
verursachen.
Für normales Nähgut stellen Sie den
Füßchendruck auf 3. Erhöhen Sie den
Druck wenn Sie schwere Stoffe nähen
und verringern Sie ihn bei leichten
Materialien.
23
Page 24

ENGLISH ITALIANO DEUTSCH
STITCH WIDTH
CONTROL
The width of all the stitches produced
on this machine can be made
narrower or wider by adjusting the
stitch width control.
NOTE:
When using twin-needles (option), the
stitch width should never be set
above twin needle mark, regardless
of the stitch you have selected. Doing
so will result in broken needles and
possible damage to your machine.
CONVERTING TO
FREE- ARM SEWING
Your machine can be used either as a
flat- bed, or as a free- arm model.
With the extension table in position, it
provides a large working surface as a
standard flat- bed model.
By removing the extension table (just
pull it off to the left as shown), the
machine converts into a free- arm
model.
REGOLATORE
LARGHEZZA PUNTO
En esta máquina puede regularse el
ancho de puntada ajustando el
“selector ancho puntada”.
Nota:
Cuando utilice “agujas dobles”
(opcional), el ancho de la costura no
deberá nunca ajustarse por encima
de la separación de la “aguja
doble”, sin importar la puntada
seleccionada. De no hacerlo así se
romperán las agujas y podría resultar
dañada la máquina.
CUCITURA A BRACCIO
LIBERO
La macchina può essere utilizzata sia
a base piana sia a braccio libero.
La base, grando è completamente
estesa, fornisce un ampio superflcie
di lavoro, equivalente a quella di un
modello standard a base piana.
Togliendo la base estendibile
(estraendola da sinistra, come mostra
la figura) la macchina si converte in
modello a braccio libero.
STICHBREITENREGLER
La largeur de tous les points de cette
machine peut être diminuée ou
augmentée en réglant ce levier
comme indiqué. Si le point droit est
sélectionné, l’aiguille sera déportée á
gauche lorsque le levier est au
maximum sur la droite.
NOTE:
Quand on utilise l'aiguille double (en
option), la largeur du point ne doit
jamais excéder le repère
>>
, en rapport avec le point que
double
vous avez sélectionné. Sinon, vous
casserez des aiguilles et risquez
d'abîmer votre machine.
<<
aiguille
FREIARM-ODER
FLACHBETT-NÄHEN
Sie können Ihre Maschine sowohl als
Freiarm- als auch als FlachbettMaschine benutzen.
Wenn der Anschiebetisch an der
Maschine ist haben Sie eine große
Arbeitsfläche wie bei einem FlachbettModell.
Ziehen Sie den Anschiebetisch mit
beiden Händen nach links weg (siehe
Skizze). Zum Wiedereinsetzen
schieben Sie den Anschiebetisch in
seine Position bis es klickt.
Ohne den Anschiebetisch verwandelt
sich die Maschine in ein schlankes
Freiarm-Modell; günstig zum Nähen
von Kinderkleidung, Manschetten,
Hosenbeinen und anderen schwer
zugänglichen Stellen.
24
Page 25

ENGLISH
2. STARTING TO SEW
MACHINE SETTING CHART
ō
ŏ
Ő
ŋ INDICATOR
Ō STITCH LENGTH CONTROL
ō STITCH WIDTH CONTROL
Ŏ SUPER PATTERN GROUP
SELECTOR
ŏ PRESSER FOOT
A. Zig-zag foot B. Blind stitch foot
Ő FEED DOGS CONTROL
ŋ
Ō
Ŏ
D. Zipper footC. Buttonhole foot
STITCH
BUTTONHOLE
STRAIGHT
ZIGZAG
BLIND
MULTI-STITCH
ZIGZAG
FOUR- POINT
LINGERIE
STRETCH BLIND
DECORATIVE
RAMPART
LINGERIE
FAGGOTING
STRAIGHT
STRETCH
RIC- RAC
OVEREDGE
HONEYCOMB
REVERSE
OVEREDGE
Left
needle position
Center
needle position
SCALLOP
DOMINO
DIAMOND
ARROWHEAD
Left
needle position
Center
needle position
1-4 A
MIN.- MAX.
MID.- MAX.
1-4 B
MID.- MAX.
1-4 A
1-4 B
MID.- MAX.
0.5
MID.- MAX.
1-4
MIN.- MAX.
MID.- MAX.
ŏŌŋŎō
Ő
DOUBLE
C
OVEREDGE
SUPER
DECORATIVE
CHEVRON
SLANT
OVEREDGE
WIZARD
SLANT PIN
FEATHER
REVERSE
SLANT PIN
RANDOM
SLANT PIN
SUPER
DECORATIVE
A
CROSSED
REINFORCED
OVEREDGE
THORN
INSERTING
ZIPPERS
DARNING
STITCH
ŏŌŋŎōŐ
MID.- MAX. DOWN
A
MID.- MAX. UP
1-4 D
25
Page 26

ITALIANO
2.AVVIO DELLA CUCITURA
TABELLA IMPOSTAZIONE
MACCHINA
ō
ŏ
Ő
ŋ Indicatore
Ō Regolatore lunghezza punto
ō Regolatore larghezza punto
Ŏ SELECTOR "GRUPO DE
PUNTADAS"
ŏ Piedino
ŋ
Ō
Ŏ
PUNTO
ASOLA
DlRlTTO
ZIG-ZAG
INVISIBILE
ZIG-ZAG MULTIPO
PUNTO CORSETTERIA
A 4 PUNTI
INVISIBLE SUPER
ELASTICO
DECORATIVI
PUNTI DOPPIA
AZIONE
CONCHIGLIA
FAGGOTING
ago centrale
ago a sinistra
FESTON
DOMINO
DIAMANTE
PUNTA DE PLEOHA
1-4 A
MIN.- MAX.
MED.- MAX.
1-4 B
MED.- MAX.
1-4 A
1-4 B
MED.- MAX.
0.5
MED.- MAX.
1-4
ŏŌŋŎō
Ő
OVERLOCK
C
ELASTICO
DECORATIVI
SPINA DI PESCE
OVERLOCK
ELASTICO
PUNTO ELASTICO PER
PATC HWORK
SOPRAGGITTO
OBLIQUO
PUNTO PIUMA
SOBREHILADO
INCLINADO
ALFILER
INCLINADO CASUAL
DECORATIVI
A
PUNTO
MED.- MAX. ABAJO
MED.- MAX.
ARRIBA
ŏŌŋŎōŐ
A
A.Piedino
zig-zag
C. Piedino per asole
B.Piedino punto
Ő Controllo della griffa
26
invisibile
D.Piedino per
cerniere
DIRITTO
ELASTICO
ZIG-ZAG ELASTICO
PUNTO OVERLOCK
SMOCK
SOBRE-BORDE
CONTRARIO
ago centrale
ago a sinistra
MIN.- MAX.
MED.- MAX.
PUNTO
FORCELLA
DOPPIO
OVERLOCK
PUNTO SPINATO
INSERIMENTO
CERNIERA
STOPFEN
1-4 D
Page 27

DEUTSCH
2. DER NÄHBEGINN
NÄHEN MIT IHRER MASCHINE
ō
ŏ
Ő
ŋ Stichanzeige
Ō Stichlängenregler
ō Stichbreitenregler
Ŏ SÉLECTEUR SUPER POINTS
ŏ Nähfuß
ŋ
Ō
Ŏ
STICH
KNOPFLOCH
GERADSTICH
ZICKZACKSTICH
BLINDSTICH
ELASTICKSTICH
4-PUNKT
DESSOUS-STICH
OURLET
EXTENSIBLE
ZIERSTICHE
SCHRITTNAHT
DESSOUS-STICH
FAGOTT-STICH
A GAUCHE
AU CENTRE
FESTON
DOMINO
DIAMANT
FLÈCHE
1-4 A
MIN.- MAX.
MOY.- MAX.
1-4 B
MOY.- MAX.
1-4 A
1-4 B
MOY.- MAX.
0.5
MOY.- MAX.
1-4
ŏŌŋŎō
Ő
ELASTISCHER
C
OVERLOCK-STICH
ZIERSTICHE
PFEIL-STICH
STRETCHOVERLOCK-STICH
STRETCHPATCHWORK-STICH
GENEIGTER
KANTENSTICH
FEDERSTICH
ÉPINGLE OBLIQUE
HASARO
ZIERSTICHE
A
STICH
ŏŌŋŎōŐ
MOY.- MAX. HAUT
A
MOY.- MAX. BAS
A. Zickzackfuß B. Blindstichfuß
C. Knopflochfuß
D. Reisverschlussfus
Ő Die transporteur-versenkung
STRETCHGERADSTICH
STRETCHZICKZACKSTICH
OVERLOCK-STICH
RAUTENSTICH
A GAUCHE
AU CENTRE
MIN.- MAX.
MOY.- MAX.
HEXENSTICH
DOPPELTER
OVERLOCK-STICH
GRÄTENSTICH
EINNÄHEN VON
REISSVERSCHLÜSSEN
STOPFEN
1-4 D
27
Page 28

ENGLISH ITALIANO
DEUTSCH
STRAIGHT STITCHES
1 Straight stitch at center needle
position with following settings;
Stitch selector
Stitch width control
2 Straight stitch at left needle
position with following settings;
Stitch selector
Stitch width control
STARTING TO SEW
Before placing the material on the
machine, see that the ends of the
threads have been drawn about 6” (15
cm) to the rear of the machine. Hold
onto the threads during the sewing of
the first 3 or 4 stitches of the seam.
-
-
-
-
PUNTO DIRITTO
1 Puntada recta posición aguja en
el centro realizar los siguientes
ajustes:
Selector puntada
Selector ancho puntada
2 Puntada recta en posición aguja
en la izquierda realizar los ajustes
siguientes:
Selector puntada
Selector ancho puntada
AVVIO DELLA CUCITURA
Prima di posizionare il tessuto sulla
macchina osservare se le estremità
dei fili si estendono di circa 15 cm sul
retro della macchina. Tenere i fili
durante la cucitura dei primi 3 o 4
punti.
-
-
-
-
GERADSTICH
1 Point droit avec l’aiguille au centre,
suivre les réglages suivants :
Sélecteur de point :
Largeur de point :
2 Point droit avec aiguilles à gauche,
suivre les réglages suivants :
Sélecteur de point :
Largeur de point :
DER NÄHBEGINN
Bevor Sie Ihr Nähgut in die Maschine
einlegen, prüfen Sie, ob beide
Fadenenden ca. 15cm nach hinten
gezogen sind.
Halten Sie die Fadendenden während
der ersten 3 bis 4 Stiche leicht fest.
-
-
-
-
21
Fasten each seam by back tacking at
the beginning and end of the seam.
28
Fissare ogni cucitura rinforzandola
con punti aggiuntivi all'inizio e alla fine
della cucitura stessa.
Befestigen Sie jede Naht mit ein paar
Rückwärtsstichen am Anfang und am
Ende.
Page 29

ENGLISH ITALIANO DEUTSCH
REMOVING FABRIC
First turn the handwheel towards you
until the needle is at its highest
position, then raise the presser foot,
draw materials to the rear and cut off
excess thread with the thread cutter
located on the left end of working
surface or on the presser bar.
TURNING A SQUARE CORNER
To turn a square corner 5/8" (16 mm)
from the fabric edge, stop stitching
with the needle tip piercing the fabric,
when reaching the cornering guide as
shown. Raise the presser foot, turn
fabric.
New stitching line will align with 5/8"
(16 mm) seam guide on side of needle
plate. Lower the presser foot and
begin stitching in new direction.
DARNING
Lower feed dogs and remove presser
foot.
Stretch fabric with an embroidery
hoop with the hole at center. Holding
the needle thread, take one stitch and
pick up bobbin thread through the
fabric. Lower presser bar and start
sewing at a slow to medium speed,
moving the fabric back and forth with
a steady rhythm. Turn fabric and sew
another layer of stitching across over
the first layer of stitching.
RIMOZIONE DEL TESSUTO
Per prima cosa girare il volantino
verso di voi finchè l'ago raggiunge il
punto morto superiore, poi alzare il
piedino pressore, quindi tirare il
tessuto verso il retro e tagliare il filo in
eccesso con il tagliafilo situato sul
fondo del coperchio frontale o sulla
barra premistoffa.
ESECUZIONE DI UN ANGOLO
RETTO
Per eseguire un angolo retto di 16 mm
sul bordo del tessuto,
arrestare la cucitura con la punta
dell'ago inserita nel tessuto quando
si raggiunge la guida dell'angolo
come mostrato.
Alzare il piedino pressore, girare il
tessuto.
La nuova linea di cucitura sarà
allineata di 16 mm rispetto alla guida
dalla parte della placca ago.
Abbassare il piedino pressore ed
iniziare a cucire nella nuova direzione.
ZURCIDO
Baje los dientes y saque la pata
prensatelas. Con el bastidor de bordar
tense el material con el agujero en el
centro. Sujete el hilo aguja y coja el
hilo de la bobina a través del género.
Baje la barra prensatelas y comience
a coser a velocidad de lenta a media,
moviendo el género de adelante hacia
atrás con un ritmo constante. Gire el
material y de otra capa de puntadas
cruzada encima de la primera.
HERAUSNEHMEN DES
MATERIALS
Drehen Sie das Handrad auf sich zu,
bis sich die Nadel in der höchsten
Stellung befindet. Stellen Sie den
Lüfterhebel hoch, ziehen Sie das
Nähgut nach hinten, und schneiden Sie
die Fäden am Fadenabschneider (am
Kopfdeckel oder am Füßchenhalter)
durch.
ÄNDERUNG DER NÄHRICHTUNG
Auf beiden Seiten der Stichplatte
befinden sich Abstandsmarkierungen,
die Ihnen die genaue Führung des
Nähguts erleichtern.
Zum Nähen eines rechten Winkels
(16mm von der Stoffkante) stoppen
Sie, wenn die Stoffkante die vordere
Markierung auf der Stichplatte
erreicht, und die Nadelspitze erade
in den Stoff einsticht. Den Nähfuß
anheben, und den Stoff drehen.
Richten Sie die neue Nährichtung an
der 16mm-Linie auf der Stichplatte
aus. Lassen Sie den Nähfuß wieder
herunter und nähen Sie weiter.
STOPFEN
Entfernen Sie das Nähfüßchen, und
legen Sie die Stopfplatte ein.
Spannen Sie die schadhafte Stelle in
einen Stickrahmen. Halten Sie den
Oberfaden fest, nähen Sie einen
Stich, und ziehen Sie den Unterfaden
durch den Stoff nach oben. Lassen
Sie den Lüfterhebel herunter, und
nähen Sie mit langsamem bis
mittlerem Tempo, während
Sie den Stickrahmen gleichmäßig
nach vorn und hinten bewegen.
Drehen Sie das Nähgut, und nähen
Sie eine weitere Stichlage über die
erste.
Cornering guide
Guida angolo
Abstandsmarkierungen
29
Page 30

ENGLISH ITALIANO DEUTSCH
INSERTING ZIPPERS AND
PIPING
Use zipper foot which allows you to
sew to the right or left of the zipper or
close to the cord.
INSERTING ZIPPERS
To sew down the right side, attach left
side of zipper foot to presser foot
holder so that the needle passes
through the opening on the left side
of the foot.
To sew down the left side, attach right
side of foot to foot holder.
PIPING (WELTING)
Pattern: Straight Stitching
Stitch Width: For straight stitching
Stitch Length: 2 – 3
Foot: Zipper
Use store bought piping or cover cord
with a bias strip of fabric to make your
own. Hand or machine baste piped
edge between 2 layers of fabric so
that all raw edges are aligned. Attach
zipper foot to shank so that needle
passes through the opening on left
side of foot. Sew guiding the zipper
foot along the edge of the piping.
TRADITIONAL PINTUCKS
Pattern: Straight
Stitch Width: Straight
Stitch Length: 2 – 3
Foot: Zipper
To mark pintucks in your fabric, either
pull a thread to mark the fold or mark
with chalk or marking pencil. Fold
and press wrong sides together on
pulled thread line or marked lines.
Stitch 1/8 of an inch from fold line.
Repeat, sewing in the same direction
for each tuck. Press flat.
30
INSERIMENTO DI CERNIERE E
CORDONCINI IMPOSTAZIONE
Utilizzare il piedino cerniera che consente
di cucire a destra o a sinistra della cerniera
o vicino al cordoncino.
INSERIMENTO DI CERNIERE
Per cucire la parte destra, attaccare la parte
sinistra del piedino cerniera al porta
piedino in modo che l'ago passi attraverso
l'apertura nella parte sinistra del piedino.
Per cucire la parte sinistra, attaccare la
parte destra del piedino al portapiedino.
VIVEADO
Punto: Recto
Posicion de la aguja: Central
Ancho de la puntada: Recto
Largo de la puntada: 2 – 3
Prensatela: Para Cremalleras
Cubrir el cordon con una cinta de tejido al
bies y sujetarla con un alfilero atacarla a
la pieza principal de tejido. Aplicar el lado
derecho del prensatelas de cremalleras al
sujetador prensatelas, de manera que la
aguja pase a traves de la abertura en el
lado derecho del prensatelas.
PLIEGUE COSIDO TRADICIONAL
Puntada: Recta
Ancho de puntada: Recta
Largo de puntada: 2 – 3
Pie: Cremallera
Para marcar el pliegue cosido en su tela,
tire un hilo de la trama o marque el pliegue
con una tiza o lápiz. Pliegue y presione
revés con revés en la marca. Cosa un 1/8
de pulgada desde la línea del pliegue.
Repita, cosiendo en la misma dirección
para cada pliegue. Presione para aplanar.
EINNÄHEN VON
REISSVERSCHLÜSSEN UND VON
KORDEL
Montieren Sie den Reißverschlußfuß. Sie
können dann ganz dicht rechts oder links
neben dem Reißverschluß oder der Kordel
nähen.
EINNÄHEN VON
REISSVERSCHLÜSSEN
Um an der rechten Seite zu nähen, klinken
Sie die linke Hälfte des
Reißverschlußfußes in den Füßchenhalter
ein, sodaß die Nadel in die Aussparung
links am Fuß einstechen kann.
Um an der linken Seite des
Reißverschlusses zu nähen, klinken Sie
die rechte Hälfte des Nähfüßchens in den
Halter ein.
GALONNER- BIAISER (PASSEPOIL)
Point: Droit
Largeur de point: Pour point droit
Longueur de point: 2 – 3
Pied: Fermeture Glissière
Utilisez un galonner tout fait ou
confectionnez-le vous-même. Placez le
galonner entre les deux épaisseurs de
tissus et faufilez les bords vifs à égalité.
Fixer le pied fermeture à glissière vers la
droite, de façon à ce que l’aiguille entre
dans l’encoche située au coté gauche du
pied. Cousez le long du galonner.
NERVURE TRADITIONNEL
Point : Droit
Largeur de Point : Droit
Longueur de Point : 2 – 3
Pied : Fermeture à Glissière
Pour le placement des nervures, tirez un
fil de trame ou marquez la ligne avec de
la craie ou un crayon. Pliez le tissu envers
contre envers en suivant cette ligne.
Piquez à 3mm de la ligne de pliure.
Répéter, en cousant dans la même
direction pour chaque nervure. Presser à
plat.
Needle to left of foot
Aguja a la izquierda del prensatelas
Aiguille à gauche du pied presseur
Needle to right of foot
Aguja a la derecha del prensatelas
Aiguille à droite du pied presseur
Page 31

ENGLISH ITALIANO DEUTSCH
TWIN NEEDLE PINTUCKS
Pattern: Straight at center position
Needle: Insert twin needle.
Threading: Two spools. (Use
retractable spool pin for second spool
and thread machine as you normally
would). Left thread in left needle, right
thread in right needle.
Stitch Width: Set at twin needle marking.
Stitch Length: 2 – 3
Tension: Increase slightly
Foot: Standard Zigzag
To mark pintucks in your fabric, either
pull a thread to mark the fold or mark
with chalk or marking pencil. Stitch
guiding one of the needles along the
marked or pulled line. Repeat, sewing
in the same direction for each tuck.
Press flat.
FRENCH SEAM
Pattern: Straight Stitch
Stitch Width: Straight
Stitch Length: 2 – 3
Foot: Standard Zigzag or Zipper
Align top and bottom fabric,
undersides together. Stitch at ¼ of
an inch from the edge. Press seam
open and then fold in topsides
together, with stitching line exactly on
fold. Press flat. Stitch 3/8 of an inch
from fold.
PLIEGUE COSIDO DE AGUJA DOBLE
Puntada:
Aguja: Inserte una aguja doble
Enhebrado:
retráctil para la segunda bobina y enhebre la
máquina como lo hace habitualmente). El hilo
izquierdo en la aguja izquierda, el hilo derecho en
la aguja derecha.
Ancho de puntada: En la marca de aguja
doble
Largo de puntada: 2 – 3
Tensión: Aumentar ligeramente
Pie: Zigzag estándar
Para marcar el pliegue cosido en su tela,
tire un hilo de la trama o marque el pliegue
con una tiza o lápiz. Cosa guiándose con
una de las agujas a lo largo de la marca o
hilo quitado. Repita, cosiendo en la misma
dirección para cada pliegue. Presione
para aplanar.
Recta posición aguja en el centro
Dos bobinas. (Use el portabobina
COSTURA INGLESA
Puntada: Recta
Ancho de puntada: Recta
Largo de puntada: 2 - 3
Pie: Zigzag estándar o Cremallera
Alinee las dos telas, revés con revés. Cosa
a un ¼ de pulgada del borde. Abra la
costura y pliegue sobre el derecho de las
telas, con la línea de costura exactamente
en el pliegue. Presione para aplanar. Cosa
a 3/8 de pulgada desde el pliegue.
NERVURE AIGUILLES JUMELÉES
Point : Droit avec l’aiguille au centre
Aiguille : Insérer une aiguille jumelée.
Enfilage :
bobine rétractable pour la deuxième bobine
et enfiler la machine comme d’habitude.
Bobine gauche enfiler dans l’aiguille gauche
et bobine droite dans l’aiguille droite.
Largeur de Point : Droit
Longueur de Point : 2 – 3
Tension : Légèrement augmentée.
Pied : Zigzag
Pour le placement des nervures, tirez un
fil de trame ou marquez la ligne avec de
la craie ou un crayon. Cousez en alignant
une des aiguilles avec la ligne que vous
avez tiré ou marqué. Répéter, en cousant
dans la même direction pour chaque
nervure. Presser à plat.
Deux bobines de fil. Utilisez le porte-
COUTURE ANGLAISE
Point: Droit
Largeur de Point: Droit
Longueur de Point: 2 – 3
Pied: Zigzag ou Fermeture à Glissière
Aligner les 2 tissus envers contre envers.
Cousez à ¼ de pouce (6mm) du bord du
tissu. Ouvrez la valeur de couture au fer
et ensuite pliez vers l’endroit du tissu, avec
la couture exactement au centre de la
pliure. Pressez à plat. Cousez à 3/8 de
pouce (10mm) du bord de la pliure.
ZIGZAG STITCH
OVERCASTING
This is one of the more frequent uses
for the zigzag stitch in garment
construction.
Place material under the presser foot
so that the needle pierces just short
of the outside edge.
PUNTO ZIG-ZAG
SOPRAGGITTO
Questo è uno dei punti zig-zag più
frequentemente utilizzati nella confezione
di abiti. Porre la stoffa sotto il piedino in
modo che l'ago agisca a filo del bordo
esterno.
ZICKZACKSTICH
KANTENBEFESTIGUNG
Die Abbildung zeigt den häufigsten
Einsatz des Zickzackstiches. Nähen Sie
so an der Stoffkante entlang, daß die
Nadel ganz knapp an der Kante einsticht..
31
Page 32

ENGLISH ITALIANO DEUTSCH
SATIN STITCH
This is a closely spaced attractive
stitch used for appliqué, bar-tacking,
etc. Slightly loosen top thread tension
for satin stitching.
Use a backing of stabilizer or
interfacing for sheer materials to
avoid puckering.
For applique set machine to desired
width and length. Position applique
on garment and stitch along design
lines using satin stitch to cover raw
edges of applique.
FREE MOTION STIPPLING,
EMBROIDERY AND
MONOGRAMS
Drop feed dogs and remove presser foot.
Using a marking pencil trace your
design onto your fabric.
Hoop your fabric before sewing.
Sew using a straight stitch (stippling)
or zigzag (Embroidery & Monograms)
following your design line. Using a
hoop will give you better control as
you work.
LACE APPLICATION
Pattern: Zigzag
Stitch Width: 1.5 to 2mm
Stitch Length: 1 - 2
Foot: Satin or Standard Zigzag
Align the edge of the fabric with the
edge of the lace, topsides together.
Zigzag along the edge of the 2 layers
of fabric, so that the needle swings
off the right edge of the fabric when
sewing. This is referred to a roll and
whip stitch. Once your seam is
completed, press the seam open.
32
PUNTO PASSATO
Questo è un interessante utilizzo del
punto che risulta più stretto ed è
usato per applicazioni, bordi, ecc. Per
il punto passato è necessario
allentare leggermente la tensione del
filo superiore. Quando si usano stoffe
leggere è bene utilizzare un rinforzo
di carta velina, in modo da evitare le
grinze.
Per le applicazioni regolare l'ampiezza
e la lunghezza desiderate.
posizionare l'applicazione sul tessuto
a cucire lungo la linea di ricamo
utilizzando il punto passato per
coprire i bordi dell'applicazione.
ZURCIDO LIBRE, BORDADOS
Y MONOGRAMAS
Baje los dientes y saque la pata
presentelas
Haga un bosquejo o trace su diseno
sobre la tela utilizando un marcador
de trazar. Cosa en puntada recta o
satin controlando el movimiento de
la tela. Utilizando el presatelas de
zurcir, le servira como quia en su
costura.
APLICACION DE CORDON
FINO
Puntada: Zigzag
Ancho de puntada: 1,5 a 2mm
Largo de puntada: 1 - 2
Pie: Satinada o Zigzag estándar
Alinee el borde de la tela con el borde
del cordón fino, revés con revés.
Usando puntada zigzag cosa a lo largo
del borde de las dos telas, de manera
que la aguja salga hacia el borde
derecho de la tela cuando cose. Una
vez terminada la costura, tire del cordón
fino hacia el borde sobre la costura.
SATIN-STICH
Diesen dichten Zickzackstich können
Sie gut für Applikationen oder zum
Nähen von Riegeln, usw. benutzen.
Bitte Oberfadenspannung etwas
reduzieren.
Bei sehr weichem Material benutzen
Sie bitte eine Einlage um ein
Zusammenziehen zu verhindern.
Pour appliqué placer l’appliqué sur le
tissu. Régler la largeur et la longueur
comme désiré couser en suivant le
bord du motif. Le point bour don doit
recouvrir le bord de l’appliqué.
BRODELIE, PIQURE LIBRE ET
MONOGRAMME
Abaissez les griffes et retirez le pied
presseur.
En utilisant un marqueur, tracer ou
dessiner votre motif sur le tissu.
Placer le tissu dans un cerceau.
Coudre en utilisant le point droit
(piqûre libre) ou le point zigzag
(broderie et monogramme) en suivant
le motif que vous avez dessine.
L'utilisation d'un cerceau vous donnera
un meilleur contrôle en cousant.
APPLICATION DE DENTELLE
Point: Zigzag
Largeur de point: 1.5 a 2mm
Longueur de point: 1 – 2
Pied: Bourdon ou Zigzag
Alignez le bord de la dentelle avec le
bord du tissu endroit contre endroit.
Avec le point zigzag cousez au bord
du tissu pour que l’aiguille pique hors
du tissu au côté droit. En terminant
la couture, presser la dentelle vers le
bord sur l’endroit.
Page 33

ENGLISH ITALIANO DEUTSCH
BLIND STITCH
1. First finish the raw edge. Do this by turning it under on
fine fabrics or overcasting it on medium to heavyweight
fabrics.
Then turn the hem up the required depth, press and pin
in place.
2. Now fold the fabric as illustrated.
3. Place the fabric under the foot with the fold of the fabric
positioned so that the needle just pierces the fold when
the needle swings to the left. Use stitch width control to
fine tune exact position of needle.
4. When completed, the stitching is almost invisible on the
right side of the fabric.
-
Regular blind stitch for normal fabrics
-
Elastic blind stitch for soft, stretchable
fabrics
Medium to heavyweight fabric
Tessuto medio-pesante
Mittlere bis schwere Stoffe
Under side
Rovescio
Unterseite
Under side
Rovescio
Unterseite
PUNTO INVISIBILE
1. Per prima cosa finite il bordo grezzo. Se il tessuto è
leggero, ripiegatelo su se stesso, se il tessuto è mediopesante, sopraggittatelo.
Quindi create un orlo delle dimensioni desiderate, stirate
e mettete degli spilli.
2. Ora piegate il tessuto come indicato nella figura.
3. Mettete il tessuto sotto al piedino con la piega del
tessuto posizionata di modo che l’ago penetri nel
tessuto solo quando oscilla a sinistra. Utilizzate il
controllo di larghezza del punto per regolare con
precisione la posizione dell’ago.
4. Al termine, sul diritto del tessuto, la cucitura sarà
praticamente invisibile.
-
Punto invisibile regolare per tessuti normali
-
Punto invisibile elastico per tessuti elastici e
delicati
21 4
3
BLINDSTICH
1. Versäubern Sie die Stoffkante: bei feinen Stoffen
umschlagen, bei mittleren bis schweren Stoffen
umnähen.
Legen Sie dann den Saum auf die gewünschte Breite,
bügeln Sie ihn an und heften Sie ihn mit Stecknadeln.
2. Falten Sie nun den Stoff wie in der Skizze gezeigt.
3. Legen Sie das Nähgut so unter den Nähfuß, dass die
Nadel mit ihrem linken Anschlag ganz knapp an der
Kante einsticht. Zur genauen Einstellung der Nadel die
Stichbreite nachstellen.
4. An der Oberseite ist der Blindstich nun kaum zu sehen.
-
Normaler Blindstich für normale Stoffe
-
Elastischer Blindstich für weiche, dehnbare
Stoffe
Under side
Rovescio
Unterseite
Fine fabric
Feine Stoffe
Feine Stoffe
21
Under side
Rovescio
Unterseite
Top side
Diritto
Oberseite
33
Page 34

ENGLISH ITALIANO DEUTSCH
BLINDSTITCH APPLIQUE
Pattern: Blind Stitch
Stitch Width: 1.5 (1/16 of an inch)
Stitch Length: 2 – 3
Foot: Blind Stitch
Position appliqué piece on background fabric.
Align needle so that it pierces background
fabric along the outside edge of the appliqué.
Lower presser foot and align the lip of the
blind hem foot guide so that it sits directly
under the edge of the appliqué. You may need
to adjust the position of the guide to bring it
closer or further from the edge of the appliqué,
by using the thumbscrew located at the right
of the foot. Begin sewing keeping the guide
along the edge. To pivot for curves or corners,
leave needle down in fabric on outside edge
of appliqué, lift foot and pivot.
MULTI-STITCH ZIGZAG
OVERCASTING
This is a strong stitch because as its
name implies, it makes multiple short
stitches where the normal zigzag
makes only one.
For this reason it is highly
recommended for overcasting all
types of fabrics.
It is also ideal for mending tears,
patching, sewing towelling, patchwork and attaching flat elastic.
MENDING
Pattern: Multi-Stitch Zigzag
Stitch Width: Maximum
Stitch Length: 1 – 2
Foot: Standard Zigzag
Use this method for repairing tears in
fabric. Place a piece of fabric directly
under the tear. Beginning at top of
tear, stitch over torn seam. Backstitch
at the beginning and end of seam.
RAMPART STITCH
This stitch is ideal for producing flat
overlapped seams on almost any type
of fabric and a bolder effect will result
from sewing with contrasting thread.
This technique is also known as
fagoting.
APLIQUE INVISIBLE
Puntada: Invisible
Ancho de puntada: 1,5 (1/16 de pulgada)
Largo de puntada: 2 – 3
Pie: Puntada invisible
Ubique el aplique sobre la tela de fondo. Alinee la
aguja de manera que atraviese la tela de fondo a lo
largo del borde del aplique. Baje el prensatelas y
ajuste la guía de pie de dobladillo invisible de
manera que quede directamente debajo del borde
del aplique. Podría ser necesario ajustar la posición
de la guía acercándola o alejándola del borde del
aplique, usando el tornillo de mariposa a la derecha
del pie. Comience a coser manteniendo la guía a
lo largo del borde. Para pivotear en curvas o
esquinas, deje la aguja abajo atravesando la tela
en el borde del aplique, levante el pie y pivotee.
ZIG-ZAG A TRE PUNTI
SOPRAGGITTO
Questo è un punto rinforzato perchè, come
indica il nome, è composto da tre piccoli
punti mentre il normale zig-zag ne presenta
uno solo. Per questa ragione e altamente
raccomandato per il sopraggitto di tutti i
tipi di tessuto.
E'ideale anche per rammendare strappi,
applicare toppe, cucire asciugamani e per
attaccare elastici bassi.
ZURCIDO
Puntadas: Multi-Zigzag
Ancho de puntada: Máximo
Largo de puntada: 1 – 2
Pie: Zigzag estándar
Use este método para reparar
desgarrones en la tela. Coloque un
pedazo de tela directamente debajo del
desgarro. Comenzando en la parte de
arriba del desgarro, cosa atravesando el
desgarro. Haga una costura de refuerzo
al final y comienzo de la costura.
PUNTI DOPPIA AZIONE
Il punto a doppia azione e ideale per
realizzare giunture piatte su quasi tutti i
tipi di tessuto e un effetto marcato della
cucitura utilizzando un filo di colore
diverso.
34
APPLIQUÉ INVISIBLE
Point: Invisible
Largeur de Point: 1.5mm
Longueur de Point: 2 – 3
Pied: Invisible
Placer l’appliqué sur le tissu de fond. Aligner
l’aiguille et abaisser-la dans le tissu au bord
de l’appliqué. Abaisser le pied presseur et
placer le guide pour qu’il soit positionné sous
le bord de l’appliqué. Il sera peut-être
nécessaire d’ajuster (rapprocher ou éloigner)
le guide du bord en utilisant la vis à la droite
du pied. Piquer en suivant le bord de
l’appliqué. Pour pivoter autour des courbes
et aux coins, abaisser l’aiguille dans le tissu
au bord et à l’extérieur de l’applique, lever le
pied presseur et pivoter.
ELASTIKSTICH
KANTENBEFESTIGUNG
Der Elastikstich ist besonders
strapazierfähig, weil er, anders als der
normale Zickzackstich, auf gleichem
Raum drei kleine, kurze Stiche näht.
Er empfiehlt sich daher für
Überwendlingarbeiten auf allen Stoffen.
Weiterhin ist er gut einzusetzen zum
Flicken, zum Nähen von Frottee, zu
Patchwork-Arbeiten und zum Aufnähen
von Gummibändern.
Bei Stichlänge 0 können Sie sehr gut
Riegel nähen.
RACCOMMODAGE
Point: Multi-Zigzag
Largeur de point: Maximum
Longueur de Point: 1 – 2
Pied: Zigzag
Utiliser cette technique pour réparer les
déchirures. Placez un morceau de tissu sous
l’accroc. Placez le début de l’accroc sous la
partie centrale du pied et cousez le long de
l’accroc. Renforcer avec un point arrière au
début et la fin de la couture.
SCHRITTNAHT
Die Schrittnaht ist ideal für flach
überlappende Nähte auf fast allen Stoffen.
Einen schönen Effekt erzielen Sie, wenn
Sie zum Stoff kontrastierendes Nähgarn
verwenden.
Å
5 mm
Thumbscrew
Tornillo de mariposa
Vis
Å
5 mm
Page 35

ENGLISH ITALIANO DEUTSCH
SHELL STITCH
Shell stitch is for seaming and
overcasting sheer, soft fabrics in one
operation. It also produces a delicate
shell hem on lingerie and other fine
garments.
SEAM AND OVERCAST IN
ONE OPERATION
Place the right sides of the fabric
together and position under the
presser foot so that the zig-zag part
of the stitch sews just over the raw
edge.
SHELL TUCKS
Turn under the raw edge and press.
Place the fabric right side up so that
the zigzag part of the stitch sews just
over the folded edge, pulling the fabric
in to form a shell hem. Trim away
excess fabric close to the stitching
line.
Regular shell stitch
Regular shell stitch produces a tiny
shell hem on lingerie and other fine
garments.
Four-point shell stitch
If bigger size of shell pattern is
desired, use four-point shell stitch.
PUNTO CONCHIGLIA
Il punto conchiglia è utilizzato per la
cucitura ed il sopraggitto di tessuti
leggeri e morbidi in una sola
operazione. Esso produce un
delicato orlo conchiglia sulla lingerie
e su altri indumenti delicati.
CUCITURA E SOPRAGGITTO
Unire le parti anteriori del tessuto e
posizionare sotto il piedino in modo
che la parte zig-zag del punto ricopra
perfettamente il bordo non rifinito.
ORLO CONCHIGLIA
Rivoltare l'orlo non rifinito e premere.
Porre il davanti del tessuto in modo
che la parte zig-zag del punto vada a
coprire il bordo ripiegato, facendo
rientrare il tessuto per formare un orlo
conchiglia. Tagliare il tessuto in
eccesso vicino alla linea di cucitura.
Punto corsetteria (o conchiglie)
normale
E’ adatto per orli piccoli su biancheria
intima e altri indumenti fini.
Punto corsetteria (o conchiglia)
a 4 punti
Usatelo se volete ottenere un disegno
più grande.
DESSOUS-STICH
Mit diesem Stich können Sie in einem
Arbeitsgang leichte, weiche Stoffe
nähen und versäubern.
Sie können auch einen
Muschelkanteneffekt erzielen.
Legen Sie den Stoff rechts auf rechts,
und schieben Sie ihn so unter den
Nähfuß, dass die Spitze des Stiches
gerade über die Stoffkante
hinausgeht.
MUSCHELKANTE
Schlagen Sie die Stoffkante etwa 12
mm um und bügeln Sie sie an.
Überstehenden Stoff knapp entlang
der Naht abschneiden. Schieben Sie
den Stoff mit der rechten Seite nach
oben so unter den Nähfuß, dass die
Spitze des Stiches knapp über der
umgelegten Kante einsticht und so
den Stoff in Muschelform zieht.
Normaler Dessous-Stich
Mit diesem Stich nähen Sie eine
kleine Muschelkante auf feiner
Wäsche oder anderen leichten
Stoffen.
4-Punkt Dessous-Stich
Wünschen Sie einen gößeren Stich,
benutzen Sie den 4-Punkt DessousStich.
Regular lingerie stitch
Punto corsetteria (o conchiglie)
normale
Normaler Dessous-Stich
Four-point lingerie
stitch
Punto corsetteria (o conchiglia)
a 4 punti
4-Punkt Dessous-Stich
35
Page 36

ENGLISH ITALIANO
FAGGOTING
This is a popular decorative stitch (used in sleeves or fronts
of blouses and dresses). To attach two separate pieces of
fabric together, leave a little space in between. To prepare
the fabric:
Fold under the seam allowances on the cut edges, and
press. Baste folded edges to tissue paper with about 1/8"
(0.3 cm) space between. Stitch over the 1/8" (0.3 cm)
allowance, just catching the fabric fold on both sides with
needle. Remove bastings and paper; press.
STRETCH STITCHES
Stretch stitches are mainly for use on knit, or stretchable
fabrics, but can also be used on ordinary materials.
Use the stretch stitch needle with yellow shank when sewing
on stretchable fabric. Use normal needles for nonstretchable fabrics.
ADJUSTING STRETCH STITCH BALANCE
Stitch length/super (stretch) stitch control should be at WAT
mark for most materials. Depending upon the type of fabric
used, you may need to adjust this Control to match forward
stitches of stretch sewing with reverse motion stitches. If
the stitches are too open, turn the Control to S position; if
the stitches overlap, turn the Control to L position.
STRAIGHT STRETCH STITCH
Straight stretch stitch is far stronger than an ordinary straight
stitch because it locks three times
and forwards.
It is particularly suitable for reinforcing the seams of
sportswear in stretch and non-stretch fabrics, and for curved
seams which take a lot of strain.
Use this stitch also to top-stitch around lapels, collars and
cuffs to give a professional finish to your garments.
-
forwards, backwards
FAGGOTING
This is a popular decorative stitch (used in sleeves or fronts
of blouses and dresses). To attach two separate pieces of
fabric together, leave a little space in between. To prepare
the fabric:
Fold under the seam allowances on the cut edges, and
press. Baste folded edges to tissue paper with about 1/8"
(0.3 cm) space between. Stitch over the 1/8" (0.3 cm)
allowance, just catching the fabric fold on both sides with
needle. Remove bastings and paper; press.
PUNTI ELASTICI
I punti elastici vengono utilizzati principalmente per la
maglieria o per i tessuti elasticizzati, anche se possono
essere utilizzati su tessuti normali.
REGOLAZIONE DEL BILANCIAMENTO DEL
PUNTO ELASTICO
La manopola di lunghezza punto deve essere posizionata
sul segnoSSSper la maggior parte dei tessuti. Secondo il
tipo di tessuto utilizzato, può rendersi necessario regolare
questa manopola per equilibrare i punti in avanti con i punti
all'indietro. Se i punti sono troppo aperti, ruotare la
manopola sulla posizione L ; se i punti si sovrappongono
ruotare la manopola sulla posizione S.
DIRITTO ELASTICO
Il punto elastico diritto è molto più resistente del normale
punto diritto perché penetra tre volte: in avanti, indietro e
ancora in avanti.
E’ particolarmente indicato per rinforzare le cuciture di abiti
sportivi in tessuto elastico e non elastico, e per cuciture
curve che subiscono molta tensione.
Potete utilizzare questo punto anche per risvolti, colletti e
polsini, per dare una rifinitura professionale ai vostri
indumenti.
Ric-rac Stitch
Zig-zag elastico
Honeycomb Stitch
Punto smock
S L S L
RIC-RAC STITCH
Ric-rac is a quick method of finishing a raw edge and
providing a decorative top-stitch in one operation. It is ideal
for edging neck-bands, armholes, sleeves and hems.
36
ZIG-ZAG ELASTICO
Lo zig zag elastico costituisce un metodo rapido per rifinire
un bordo grezzo e fornire un punto decorativo, in un’unica
operazione. Ideale per bordare collarini, giromanica,
maniche e orli.
Page 37

DEUTSCH
FAGOTT-STICH
Dieser beliebte dekorative Stich wird gern bei Ärmeln oder
Vorderseiten von Blusen, usw. benutzt. Um zwei Teile
zusammenzufügen, lassen Sie zwischen ihnen etwas Abstand.
Vorbereitung:
Falten Sie die Nahtzugaben an den gerade geschnittenen
Stoffkanten um, und bügeln Sie sie an. Heften Sie die Teile
mit ca. 0.3mm Abstand auf Einlagepapier. Nähen Sie so
über die Lücke, daß die Nadel auf beiden Seiten gerade
den Stoff erfaßt.
Heftstiche und Papier entfernen, dann bügeln.
SUPER-NUTZSTICHE (STRETCH-STICHE)
Die Super-Nutzstiche sind besonders vorteilhaft für
elastische Materialien und Strickstoffe. Sie können sie aber
auch gut auf normalen, nicht-elastischen Stoffen
verwenden.
REGULIERUNG DER STICHLÄNGE
Der Stichlängen/Super-Nutzstichknopf sollte normalerweise
auf SS stehen.
Je nach Stoff und gewünschtem Stichbild können Sie die
Vorwärtsbewegung der Super-Nutzstiche der
Rückwärtsbewegung anpassen. Sind die Stiche zu offen,
drehen Sie den Knopf auf 'L' zu, überschneiden sich die
Stichelemente, drehen Sie in Richtung 'S'.
STRETCH-GERADSTICH
Der Stretch-Geradstich ist viel stärker als der normale
Geradstich, weil er den Stoff mit jeweils drei Stichen
verbindet
Er eignet sich deshalb vor allem für elastische Stoffe, zur
Verstärkung von Nähten bei Sportbekleidung und für alle
besonders strapazierten Nähte.
Sie können ihn auch zu dekorativen Zwecken z.B. auf Kragen
oder Manschetten benutzen, um Ihrer Kleidung ein
professionelles Finish zu geben.
-
vorwärts, rückwärts und wieder vorwärts.
STRETCH-ZICKZACKSTICH
Mit dem Stretch-Zickzackstich können Sie in einem
Arbeitsgang versäubern und eine dekorative Naht erhalten.
Ideal zur Kantenbearbeitung am Halsausschnitt, an Ärmeln
oder Säumen.
RautenstichStretch-Zickzackstitch
S L S L
37
Page 38

ENGLISH ITALIANO DEUTSCH
OVEREDGE STITCH
This is the same type stitch used by
the garment industry in making
sportswear
seam in one operation.
It’s very effective for use in repairing
raw or worn edges of older garments.
-
it forms and finishes the
HONEYCOMB STITCH
1. Make a straight line of gathers
across the fabric that you wish to
smock.
2. With a narrow strip of fabric directly
under the line of gathering, stitch
over the gathers. The design will
be a series of small diamonds.
DOUBLE OVEREDGE
STITCH
Use this stitch in preference to regular
overlock stitch for overcasting stretch
or knit fabrics where strength and
flexibility are required.
PUNTO OVERLOCK
E’ lo stesso tipo di punto utilizzato a
livello industriale per gli indumenti
sportivi, in grado di dare forma e
rifinitura alla cucitura nello stesso
tempo.
E’ molto efficace per riparare bordi
grezzi o i bordi consumati di
indumenti usati.
PUNTO SMOCK
1. Formare una linea diritta di
piegoline sul tessuto che si
desidera cucire a punto smock.
2. Con una stretta striscia di tessuto,
direttamente sotto la linea delle
pieghe, cucire sopra la
pieghettatura, Il disegno risulterà
una serie di piccoli diamanti.
OVELOCK ELASTICO
Vi consigliamo di preferire questo
punto per il normale overlock di
sopraggitti elastici e di tessuti in
maglina, quando è richiesta
robustezza ed elasticità.
OVERLOCK-STICH
Diese Art des Stichs wird von der
Textilindustrie bei Sportkleidung
benutzt – nähen und versäubern in
einem Arbeitsgang.
Er eignet sich sehr gut zum
Reparieren von abgestoßenen Kanten
an länger getragenen Kleidungsstücken.
KRÄUSELN MIT DEM
RAUTENSTICH
1. Nähen Sie mehrere Geradstiche in
gleichem Abstand auf dem
Kleidungsstück, das Sie smoken
möchten.
2. Zwischen die Geradnähte nähen
Sie einElastikband mit dem
Wabenstich auf.
Die Geradnähte können danach
entfernt werden.
ELASTISCHER
OVERLOCK-STICH
Benutzen Sie diesen Stich anstelle des
normalen Overlock-Stichs, wenn Sie
elastische Stoffe oder Strickstoffe
versäubern und es auf Belastbarkeit
und Flexibilität ankommt.
38
Page 39

ENGLISH ITALIANO DEUTSCH
CHEVRON STITCH
Use to create decorative borders and
for embroidery.
SLANT OVEREDGE
STITCH
Stretch overlock seams and overcasts
in one to produce a narrow, supple
seam, particularly suited to swimwear,
sportswear, T-shirts, babywear in
stretch nylon, stretch towelling, jersey
and cotton jersey.
SPINA DI PESCE
Utilizzato per bordature decorative e
per il ricamo.
OVERLOCK ELASTICO
Un punto che cuce e sopraggitta al
tempo stesso, per ottenere una
cucitura stretta e flessibile,
particolarmente indicata per costumi
da bagno, tute, T shirt, tutine elastiche
in nylon, asciugamani elastici, jersey
e jersey di cotone.
PFEIL-STICH
Benutzen Sie ihn für dekorative
Kanten und zum Sticken.
STRETCH-OVERLOCKSTICH
Mit dem Stretch-Overlock-Stich nähen
und versäubern Sie in einem
Arbeitsgang und erhalten eine
schmale, geschmeidige Naht.
Besonders gut für Schwimm-und
Sportbekleidung, T-Shirts, Frottee und
Jersey.
WIZARD STITCH
Stretch patching stitch, as well as
being a decorative stitch, is ideal for
patching stretch fabrics such as jersey
and knitwear.
PUNTO ELASTICO PER
PATCHWORK
E’ un punto ornamentale che è anche
ideale per unire dei riquadri di tessuto
elastico o a maglia.
STRETCHPATCHWORK-STICH
Neben seiner dekorativen Wirkung
eignet sich dieser Stich gut für
Patchwork-Arbeiten mit elastischen
Materialien wie Jersey und
Strickstoffen.
39
Page 40

ENGLISH ITALIANO DEUTSCH
SLANT PIN STITCH
Excellent for hemstitching table and
bed linens with an elegant touch.
Picot-like stitch can also be made on
sheer materials. Sew along the raw
edge of fabric and trim close to the
outside of the stitching.
FEATHER STITCH
The pleasing appearance of this stitch
enables it to be used for top stitching,
or attaching lace or inset panels when
making lingerie.
RANDOM SLANT
PIN STITCH
It is an attractive stitch for border
designs.
SOPRAGGITTO
OBLIQUO
Eccellente per orlare in modo
raffinato tovaglie e lenzuola. Il punto,
in stile “picot”, può essere fatto anche
su tessuti delicati. Cucite lungo il
bordo grezzo e rifilate a filo
dell’esterno della cucitura.
PUNTO PIUMA
L’aspetto elegante di questo punto ne
permette l’uso per rifinire o inserire
merletti, oppure per inserire strisce di
stoffa nel cucire biancheria intima o
bustini
Ideale anche per trapuntare e
faggoting
PUNTADA ALFILER
INCLINADO CASUAL
Se trata de una puntada atractiva para
diseños en dobladillos.
GENEIGTER
KANTENSTICH
Hervorragend zum Verzieren von
Tisch-und Bettwäsche. Auf glatten
Stoffen können Sie einen
spitzenähnlichen Effekt erzielen.
Nähen Sie entlang der
unversäuberten Stoffkante, und
schneiden Sie den Stoff dicht an der
Außenseite des Stiches ab.
FEDERSTICH
Dieser hübsche Stich kann als
Dekoration benutzt werden, zum
Aufnähen von Spitze oder zum
Einsetzen von Dekorationen in
Wäsche oder Gürtel.
Auch gut für Applikationen oder zum
Zusammenfügen von Stoffteilen.
POINT ÉPINGLE
OBLIQUE HASARO
C’est un point de bordure décoratif.
40
Page 41

ENGLISH ITALIANO DEUTSCH
CROSSED STITCH
Use to sew and finish elastic fabrics
or for decoration of borders.
REINFORCED
OVEREDGE STITCH
It is perfect for overcasting and
seaming and overcasting in one on
slightly stretch fabrics and non-stretch
ones such as linen, tweed, and
medium to heavy-weight cotton.
THORN STITCH
It is a versatile stitch used for joining
fabric pieces and embroidery.
PUNTO FORCELLA
Per cucire e rifinire tessuti elastici,
oppure per la decorazione di
bordature.
DOPPIO OVERLOCK
Il doppio overclock ha alcuni utilizzi
principali. Perfetto per attaccare
elastici piatti quando si crea o si ripara
biancheria, è indicato per cucire e
sopraggittare allo stesso tempo su
tessuti leggermente elastici e non
elastici, come lino, tweed e cotone
medio e pesante.
PUNTO SPINATO
Un punto versatile, utilizzato per unire
scampoli di stoffa e per ricamare.
HEXENSTICH
Zum Nähen von elastischen Stoffen
oder zum Dekorieren von Kanten.
DOPPELTER
OVERLOCK-STICH
Dieser Stich hat drei
Hauptanwendungen. Sehr gut zum
Aufnähen von flachen
Gummibändern beim Nähen oder
Reparieren von Unterwäsche, und
zum gleichzeitigen Nähen und
Versäubern von leicht elastischen und
nicht-elastischen Stoffen wie Leinen,
Tweed und mittlerer bis schwerer
Baumwolle.
GRÄTENSTICH
Vielseitiger Stich zum
Zusammenfügen von Stoffteilen oder
zum Sticken.
41
Page 42

ENGLISH ITALIANO DEUTSCH
DECORATIVE EMBROIDERY
DESIGNS
Your Machine will produce a wide range of beautiful
decorative embroidery patterns as illustrated on the Stitch
indicator panel.
Simply select the design of your choice and follow the
settings on page 25. The final effect of each design will
depend on the setting.
TIPS ON DESIGN STITCHING
1. Always make a practice design on a scrap of the fabric
you plan to use.
2. Start with a full bobbin and plenty of thread on the spool
to avoid running out of thread in the middle of your
design.
3. Reduce the top thread tension slightly.
4. On a very soft fabric you may want to use a tissue paper
backing or stabilizer that can be cut away afterwards.
CUCITURE ORNAMENTALI
Questa macchina per cucire oltre alle molteplici possibilità
già elencate oonsente di realizzare i bellissimi ricami che
si vedono sul pannello indicatore.
L’unica cosa che dovete fare è scegliere il punto ed iniziare
a cucire; la macchina eseguirà il disegno in modo
completamente automatico.
L’effetto finale di ciascun disegno dipenderà dalla
regolazione della lunghezza del punto.
Consigli per l’esecuzione dei ricami
1. Prima di eseguire la cucitura sul capo, provate sempre
la regolazione e l'effetto su un campione di tessuto
uguale a quello che userete.
2. lniziate il ricamo con la spolina piena con filo sufficiente
sulla spola, in modo da non interrompere ii ricamo a
metà per mancanza di filo.
3. Riducete leggermerte (rispetto al valore standard) la
tensione del filo superiore.
4. Se il tessuto è molto sottile, rinforzatelo con un foglio
di carta nella parte inferiore, carta che verrà poi tolta a
cucitura avvenuta.
Scallop pattern on collar
Bordatura a festoni su colletto
Festonbogen
DEKORATIVE ZIERSTICHE
Sie können mit Ihrer Maschine eine Reihe von Zierstichen
nähen, die Sie auf der Stichanzeige sehen.
Einfach den gewünschten Stich einstellen und nähen - der
Effekt der Stiche hängt von der jeweils eingestellten
Stichlänge ab.
HINWEISE ZUM NÄHEN VON ZIERSTICHEN
1. Es empfiehlt sich, immer erst eine Probe auf dem Material
zu nähen, das Sie verzieren wollen.
2. Nähen Sie mit voller Spule und genügend Nähgarn auf
der Garnrolle, damit Ihnen nicht mitten in einem Muster
der Faden ausgeht.
3. Reduzieren Sie die Oberfadenspannung etwas.
4. Bei sehr weichen Stoffen können Sie Einlagepapier oder
Organdy zur Verstärkung benutzen.
Diamond on narrow hem
Rombi su orio stretto
Rautenkette
42
Domino on bias tape
Quadri su sbieco
Domino-Muster
Arrowhead on lapel
Pinarelli au risvoho
Pfeilspitzen-Girlande
Page 43

ENGLISH ITALIANO DEUTSCH
BUTTONHOLE MAKING
1. Carefully mark the position of
buttonhole on your garment.
2. Slide the button carrier and insert
the button.
3. Attach the buttonhole foot.
4. Place the garment under the foot
so that the needle pierces the
fabric at the beginning of
buttonhole.
5. Lower the buttonhole lever and the
presser foot lever.
6. Push the buttonhole lever toward
the back.
7. Start machine to complete entire
buttonhole.
NOTE:
* While making buttonholes,
maintain an even sewing speed for
uniform buttonholes.
* When buttonholes are completed,
be sure to push up the buttonhole
lever as far as it can go.
ADJUSTING STITCH BALANCE
Stitch length differences in forward
and reverse stitches of the buttonhole
are equalized with the buttonhole
stitch adjuster.
If the reverse stitches are too close
together, turn the adjuster slightly
clockwise using a coin as illustrated;
if they are too far apart, turn anticlockwise.
ESECUZIONE ASOLE
1. Marque cuidadosamente la
posición del ojal en la prenda
2. Deslice el porta botones e inserte
el botón.
3. Ponga la pata para ojales.
4. Coloque la prenda debajo de la
pata de forma que la aguja
traspase el género al inicio del ojal.
5. Baje la palanca para ojales y la de
la pata prensatelas.
6. Suba la palanca para ojales.
7. Arranque la máquina para
completar el ojal.
Nota: Una vez completados los
ojales asegúrese de subir la
palanca hasta su posición más
alta.
AJUSTE DE LA
COMPENSACION
PUNTADAS OJAL
Las diferencias de longitud puntada
en las puntadas hacia adelante y
hacia atrás del ojal, se igualan con el
dispositivo de ajuste puntada ojal.
Si las puntadas hacia atrás son
demasiado compactas, girar
ligeramente el dispositivo de ajuste,
usando una moneda como está
ilustrado. Si están demasiado
separadas, girar en el sentido
contrario.
NÄHEN VON
KNOPFLÖCHERN
1. Marquez attentivement
l’emplacement de la boutonnière
sur le vêtement.
2. Coulissez le support du bouton et
placez le bouton.
3. Fixez le pied pour boutonnière.
4. Placez le vêtement sous le pied afin
que l’aiguille perce le tissu au début
de la boutonnière.
5. Abaissez le levier pour boutonnière
et le levier du pied presseur.
6. Poussez le levier pour boutonnière
vers l’arrière.
7. Démarrez la machine qui effectuera
le cycle complet.
NOTE:
Lorsque la boutonnière est terminée,
veillez à repousser au maximum le
levier pour boutonnière.
BOUTON DE BALANCE DU
POINT
Ce bouton permet d’équilibrer les
points arrières et avants de la
boutonnière.
Si les points arrières sont trop
espacés, tourner le bouton à l’aide
d’une pièce de monnaie très
légèrement dans le sens des aiguilles
d’une montre.
Si les points arrières sont trop serrés,
tourner le bouton très légèrement
dans le sens inverse des aiguilles
d’une montre.
1
2
3
4
43
Page 44

ENGLISH ITALIANO DEUTSCH
CORDED BUTTONHOLES
Hook filler cord (crochet thread or
buttonhole twist) to the spur and pull
both ends of the cord forward under
the guide.
Sew buttonhole so that zig-zag
stitches cover the cord.
When completed, release the cord
from foot, pull ends of cord forward
and snip off extra length.
Sewing a Button
Drop feed dogs and select zigzag
stitch.
Position your fabric and button under
the presser foot. Lower presser foot,
adjust your stitch width to 0 and sew
a few securing stitches. Set stitch
width between 3 and 5. Turn the
handwheel to make sure needle
clears both left and right openings of
button. Adjust width if required. Sew
10 stitches across. Set stitch width
back to 0 and sew a few securing
stitches.
If a shank is required, place a darning
needle on top of the button and sew
over top of it.
ASOLE CORDONATE
Agganciare il cappio del cordoncino
sul gancio posteriore e tirare verso
di voi le due estremità sotto al
piedino.
Cucire l'asola in modo che lo zig-zag
copra il cordoncino. Quando
terminato, sganciare il cordoncino
dal piedino e tirare le due estremità
come indicato, quindi, tagliare la
parte in eccesso.
Cosido de Botónes
Baje los dientes
Combie el prensatelas al especial
para coser botones. Seleccione el
dibujo en zig-zag.
Coloque la labor bajo el prensatelas.
Coloque el botón en la posición
deseada, baje el prensatelas, ajuste
el ancho de la puntada a 0 y cosa
unas pocas puntadas de fijación.
Ajuste el ancho de la puntada a 3 - 5.
Gire el volante para comprobar que
la aguja entra limpiamente en los
agujeros derecho e izquierdo de
botón (ajuste el ancho de la puntada)
y cosa lentamente el botón con unas
10 puntadas. Ajuste el ancho de la
puntada a 0 y cosa unas pocas
puntadas de fijación.
KNOPFLOCH MIT
BEILAUFFADEN
Hängen Sie den Beilauffaden an der
Nocke des Knopflochschuhs ein, und
ziehen Sie beide Fadenenden unter
die Schablone. Nähen Sie die
Knopflochraupen so, dass die
Zickzackstiche den Beilauffaden
überdecken. Wenn das Knopfloch fertig
genäht ist, ziehen Sie den Beilauffaden
in das Knopfloch ein, und schneiden
Sie die beiden Enden knapp ab.
Pose de Boutons
Abaissez les griffes et choisir le point
zigzag.
Positionner le tissu et le bouton sous
le pied presseur. Abaisser le pied,
régler la largeur du point a 0 et faire
quelques points de sécurité. Régler la
largeur de point entre 3 et 5. Tourner
le volant afin de s'assurer que I'aiguille
passe nettement dans les trous
gauche et droit du bouton (régler la
largeur du point en fonction du
bouton) et coudre le bouton lentement
en utilisant approximativement 10
points. Régler la largeur du point sur
0 et faire quelques points de sécurité.
Si une tige de maintien est requise,
placer une aiguille de reprisage sur la
partie supérieur du bouton et coudre.
Spur
Gancio
Nocke
44
Page 45

ENGLISH ITALIANO DEUTSCH
3. CARING FOR YOUR MACHINE 3. CURA DELLA MACCHINA
CARING FOR YOUR MACHINE
To ensure the best possible operation of your machine, it is
necessary to keep the essential parts clean at all times.
Cleaning hook area and the feed dogs
1. Raise the needle to its highest position.
2. Remove the needle plate (A).
3. Remove the bobbin case (B).
4. Clean the feed dogs and hook area with the lint brush.
Put one drop of sewing machine oil (C) on the hook
race as indicated by the arrows.
5. Replace the bobbin case with the projection (D)
positioned against the spring (E). Replace the needle
plate.
1 3
CURA DELLA MACCHINA
Perché la macchina sia sempre efficiente e duri a lungo
occorre pulire regolarmente le parti essenzieli.
PULITURA DELLA GRIFFA E DELLA ZONA
DELLA NAVETTA
1. Alzare l'ago al punto morto superiore.
2. Rimuovere la placca d’ago (A).
3. Rimuovere la scatola bobina (B).
4. Pulire la griffa e la zona della navetta con lo spazzolino
per le filaccia.
Mettere una goccia di olio sul perno centrale della navetta
e sulla pista come indicato dalle frecce. (C).
5. Rimettere la scatola bobina con la sporgenza posizionata
contro la molla. Rimettere la placca d’ago.
2
(A)
3. PFLEGE UND REINIGUNG
IHRER MASCHINE
PFLEGE UND REINIGUNG IHRER
MASCHINE
Um eine einwandfreie Funktion Ihrer Maschine
sicherzustellen ist es nötig, alle wichtigen Teile immer
sauberzuhalten.
Reinigung des Transporteurs und
Spulenkapsel
1. Bringen Sie die Nadel in ihre höchste Stellung.
2. Entfernen Sie die Stichplatte (A).
3. Entfernen Sie Spulenkapsel (B).
4. Reinigen Sie den Transporteur und den Greiferbereich
mit dem Pinsel aus dem Zubehör.
Geben Sie einen Tropfen Nähmaschinenöl auf den
Greifertreiber, siehe Pfeile (C).
5. Setzen Sie die Spulenkapsel wieder ein, sodass der
Vorsprung (D) an der Feder (E) anliegt. Stichplatte
wieder einsetzen.
(B)
4
5
(C)
(D)
Always disconnect the machine from power
supply by removing the plug from the wall-outlet.
Prima di procedere alla pulizia scollegate sempre
la macchina estraendo la spina dalla presa di
corrente.
Maschine immer durch Herausziehen des
Netzsteckers aus der Steckdose vom Netz
trennen.
(E)
45
Page 46

ENGLISH ITALIANO DEUTSCH
Changing light bulb
In USA
1. Remove the face cover. Push up the bulb slightly and
turn clockwise.
2. Insert new bulb, push up and turn counterclockwise.
Replace the face cover.
In Europe
Remove the face cover. Unscrew the bulb
and firmly screw in a new bulb.
Replace the face cover.
Disconnect the machine from power supply before changing
a bulb. Do not use a bulb of more than 15 watts.
Always disconnect the machine from power
supply by removing the plug from the walloutlet.
Face cover
Coperchio frontale
Kopfdeckel
Screw
Vite
Schraube
SOSTITUZIONE DELLA LAMPADINA
Rimuovere il coperchio frontale. Svitare la lampadina ed
avvitarne una nuova. Riposizionare il coperchio frontale.
Scollegare la macchina prima di sostituire la lampadina.
Non utilizzare una lampadina superiore a 15 watts.
Prima di procedere alla pulizia scollegate
sempre la macchina estraendo la spina dalla
presa di corrente.
Auswechseln der Glühlampe
Entfernen Sie den Kopfdeckel. Drehen Sie die Glühlampe
heraus, und schrauben Sie eine neue fest ein.
Kopfdeckel wieder anschrauben.
Verwenden Sie nur Glühlampen 230V, max. 15W, Fassung
E14.
Maschine immer durch Herausziehen des
Netzsteckers aus der Steckdose vom Netz
trennen.
In USA In Europe
46
21
Light bulb
Lampadina
Glühlampe
Light bulb
Lampadina
Glühlampe
Page 47

ENGLISH ITALIANO
4. PERFORMANCE CHECKLIST
GENERAL PROBLEMS
Machine does not sew.
*Foot control is not connected.
*Power switch is turned off.
Machine jams/knocks.
*Thread is caught in hook.
*Needle is damaged.
Fabric does not move.
*Presser foot is not lowered
*Stitch length is set at 0.
*Feed dog control is lowered (see page 21).
STITCHING PROBLEMS
Machine skips stitches.
*Needle is not all the way up into needle clamp.
*Needle is bent or blunt.
*Machine is not threaded correctly.
*Thread is caught in hook.
Stitches are irregular.
*Needle size is not correct for thread and fabric.
*Machine is not threaded correctly.
*Top thread tension is too loose.
*Fabric is being pulled or pushed against machine feeding action.
-
Guide it gently.
*Bobbin has not been wound evenly.
Needle breaks.
*Fabric is being pulled or pushed against machine feeding action.
-
Guide it gently.
*Needle size is not correct for thread and fabric.
*Needle is not all the way up into the needle clamp (See page 13-14).
THREAD PROBLEMS
Thread bunches.
*Top and bobbin threads are not drawn back under presser foot before starting seam.
-
Draw both threads back under presser foot about 4 inches (10 cm) and hold until a
few stitches are formed.
Needle thread breaks.
*Machine is not threaded correctly.
*Top thread tension is too tight.
*Needle is bent.
*Needle size is not correct for thread and fabric
Bobbin thread breaks.
*Bobbin case is not threaded correctly. See page 12.
*Lint accumulates in bobbin case or hook.
Fabric puckers.
*Top and bobbin thread tensions are too tight.
*Stitch length is too long for sheer or soft fabric.
-
-
Replace needle (see page 13).
-
See page 9.
-
Turn on the switch.
-
Clean hook (see page 45).
Replace needle (see page 13-14).
-
lower presser foot.
-
Set it at 1 to 4.
-
-
Replace needle (see page 13-14).
-
-
See page 15.
Clean hook (see page 45).
-
See page 15.
-
See page 19.
-
Rewind bobbin.
-
See page 15.
-
See page 19.
See page 13-14.
-
See page 13-14.
-
See page 13-14.
-
See page 13-14.
-
Remove lint (see page 45).
-
Adjust thread tensions (see page 19).
-
Shorten stitch length.
4. COME RIMEDIARE A PICCOLI INCONVENIENTI
GUASTI COMUNI
La macchina non cuce
*Il cavo di collegamento non è inserito nelia spina.
*Il selettore delia velocità è disinserito.
Macchina bloccata
*I fili sono impigliati nel crochet.
*L'ago è danneggiato.
La macchina non trasporta
*Il piedino è posizionato in alto.
*La lunghezza del punto è regolata su 0.
*Il copri griffa è inserito.
PROBLEMI DI PUNTI
Punti saltati
*L'ago non è inserito correttamente
*L'ago è piegato oppure è spuntato.
*La macchina non è infilata bene.
*Fill impigliati nel crochet.
Punto irregolare
*L'ago non è adatto alla stoff a e al filo. (vedi pag. 13 - 14).
*La macchina non è infilata correttamente.
*La tensione del filo superiore è allentata. Vedi pag. 19,
*Avete tirato sulla stoffa oppure I'avete spinta contro la direzione di trasporto
-
Guidare la stoffa delicatamente.
*Il filo inferiore non è avvolto regolarmente.
L'ago si rompe
*Avete tirato la stoffa oppure I'avete spinta contro la direzione del trasporto.
la stoffa delicatamente.
*La misura dell'ago non è adatta alla stoffa e al filo.
*L'ago non è spinto a fondo nel porta-ago.
PROBLEMI CON I FILI
I fili si aggrovigliano
*Il filo superiore e quello inferiore prima dell'inizio della cucitura non sono tirati indietro
sotto il piedino. Tirate tutti e due i fili circa 10 cm. sotto il piedino e fissateli
leggermente con qualche punto.
Il filo superiors si rompe
*La macchina non è infilata correttamente.
*La tensione del filo superiore è eccessiva.
*L'ago è piegato.
*La misura dell'ago non è adatta alla stoffa e al filo.
Il filo inferiore si rompe
*La bobina non è inserita correttamente.
*Filaccia intasa la bobina o ii crochet. Togliere la filaccia.
La stoffa si raggrinza
*La tensione del filo superiore ed inferiore è eccessiva. Allentare la tensione del filo.
-
(vedi pag. 19).
*La lunghezza del punto per stoffa leggera e morbida è eccessiva. Accorciare la
lunghezza del punto.
-
Togliere I'ago. (vedi pag. 13 - 14).
-
Estrarre il copri-griffa.
-
Pulire il crochet. (vedi pag. 45).
-
Cambiare I'ago. Vedi pag. 13 - 14.
-
Metterio su 1 o 2.
-
Pulire o ii crochet (vedi pag. 45).
-
Abbassare il piedino.
-
-
(vedi pag. 13 - 14).
-
Cambiare I'ago (vedi pag. 13 - 14).
-
Vedi pag. 15.
-
-
Vedi pag. 9.
Regolaria da 1 a 4.
-
Vedi pag. 15.
-
Avvolgerlo di nuovo.
-
-
-
-
Vedi pag. 12.
Vedi pag. 13 - 14.
Vedi pag. 13 - 14.
Vedi pag. 15.
Vedi pag. 19.
-
(vedi pag. 13 - 14).
-
(vedi pag. 45).
-
Guidare
47
Page 48

DEUTSCH
4. NÜTZLICHE TIPPS BEI STÖRUNGEN
ALLGEMEINE STÖRUNGEN
Maschine näht nicht.
*Der Fußanlasser ist nicht angeschlossen.
*Der Hauptschalter ist nicht eingeschaltet.
Maschine blockiert/klopft.
*Faden im Greifer verfangen.
*Die Nadel ist beschädigt.
Maschine transportiert nicht.
*Der Nähfuß ist hochgestellt. - Nähfuß herunterlassen.
*Die Stichlänge ist auf 0 gestellt. - Auf 1 bis 4 einstellen.
STICHPROBLEME
Fehlstiche
*Die Nadel ist nicht ganz in den Nadelhalter eingeschoben.
*Die Nadel ist stumpf oder verbogen.
- Nadel auswechseln (siehe S. 13 - 14).
*Die Maschine ist nicht richtig eingefädelt.
*Faden im Greifer verfangen.
Ungleichmäßige Stiche
*Nadelstärke passt nicht zu Stoff und Faden.
*Die Maschine ist nicht richtig eingefädelt.
*Oberfadenspannung zu gering.
*Sie haben am Stoff gezogen oder ihn entgegen der Transportrichtung geschoben. -
Stoff nur leicht führen.
*Unterfaden nicht gleichmäßig aufgespult.
Nadel bricht
*Sie haben am Stoff gezogen oder ihn entgegen der Transportrichtung geschoben. -
Stoff nur leicht führen.
*Nadelstärke passt nicht zu Stoff und Faden.
*Die Nadel ist nicht ganz in den Nadelhalter eingeschoben.
(Siehe S. 13 - 14.)
FADENPROBLEME
Fäden verwirren sich
*Ober-und Unterfaden vor Nähbeginn nicht nach hinten unter den Nähfuß gezogen.
-
Beide Fäden ca. 10cm nach hinten unter den Nähfuß ziehen und bei den ersten
Stichen leicht festhalten.
Oberfaden reißt
*Die Maschine ist nicht richtig eingefädelt.
*Oberfadenspannung zu fest.
*Die Nadel ist verbogen.
*Die Nadelstärke passt nicht zu Stoff und Faden.
Unterfaden reißt
*Die Spule ist nicht richtig eingefädelt. Siehe S. 12.
*Flusen an der Spule oder im Greifer.
Stoff zieht sich zusammen
*Die Oberspannung ist zu fest.
*Stichlänge bei dünnem oder weichem Stoff zu lang.
-
Greiferbereich reinigen (siehe S. 45).
-
Nadel auswechseln (siehe S. 13 - 14).
-
Greiferbereich reinigen (siehe S. 45).
-
-
Siehe S. 19.
-
Nadel auswechseln (siehe S. 13 - 14).
-
Fadenspannung nachstellen (siehe S. 19).
-
Siehe S. 9.
-
Schalter einschalten.
-
Siehe S. 15.
-
Siehe S. 13 - 14.
-
Siehe S. 19.
Siehe S. 15.
-
Neu spulen.
-
Siehe S. 13 - 14.
-
Siehe S. 15.
-
Siehe S. 13 - 14.
-
Flusen entfernen (siehe S. 45).
-
Stichlänge verkürzen.
-
siehe S. 13 - 14.
48
Page 49

ENGLISH ITALIANO DEUTSCH
5. SPECIAL
ACCESSORIES
OVERCASTING FOOT
This foot is used to guide fabric when
overcasting. Place your fabric under
the foot with its edge against the edge
guide and start to sew.
SATIN STITCH FOOT
Satin stitch foot is grooved to permit
dense stitching to pass under it easily.
Closely spaced zig-zag stitches are
called satin stitches. This is an
attractive stitch used for appliqueing,
bar tacking.
Slightly loosen top thread tension for
satin stitching.
Use a backing of tissue paper or
interfacing for the sheer materials to
avoid puckering.
ROLLED HEMMER
Fit the rolled hemmer and sew guiding
the fabric into the scroll of the foot.
Rolled hemming is performed with a
zig- zag stitch, narrow hemming with
a straight stitch.
5. ACCESORIOS
ESPECIALES
PATA PARA
OVERLOCADO
Este pata se utiliza para guiar el
material durante el overlocado. Situe
el género bajo la pata con su borde
contra el canto de la guia y comience
a coser.
PIE PRENSATELAS
PARA COSER EN SATEN
El pie prensatelas para tejido satén
está rebajado para permitir que las
puntadas densas pasen fácilmente
bajo la pata.
La puntada de zig-zag corta, se llama
puntada satén. Esta es una puntada
atractiva usada para apliques,
atacados y presillas.
Aflojar suavemente la tensión del hilo
superior para esta puntada.
Usar papel de seda ó entretela no
tejida, para evitar las arrugas en
materiales finos.
DOBRADILLO RODILLO
Colocar el prensatelas de dobladillo
rodillo y coser guiando el tejido en el
rollo de pie.
Dobladillo rodillo es cumplido con
puntada zig-zag, dobladillo estrecho
con puntada recta.
5. ACCESSOIRES
SPÉCIALES
PlED POUR SURFILAGE
Ce pied est conçu pour guider le tissu
pendant le surfilage. Placez votre tissu
sous le pied avec le bord aligné contre
le côté du pied et commencez à
coudre en le suivant.
DER SATIN-STICH FUSS
Dieser Fuß ist gewölbt, um dichten
Stichen leichten Durchlaß zu bieten.
DER SÄUMERFUSS
Vergewissern Sie sich, daß lhr Nähgut
gerade abgeschnitten ist.
Rollen Sie einen ganz kleinen
doppelten Saum (3 mm), ca. 5 cm
lang, und legen Sie das Ende dieses
Stücks unter den Säumerfuß.
Für einen schmalen Rollsaum
benutzen Sie den Geradstich, für
einen breiteren den Zickzackstich.
Edge guide
Canto de guia
Guide latéral
du tissu
Scroll
Rollo
Einrollen
49
Page 50

50
Part No. 77131 3/03
©
Page 51

Model/Modello/Modell 2662
INSTRUCTION MANUAL
MANUALE DI ISTRUZIONI
GEBRAUCHSANLEITUNG
51
 Loading...