

Singer EM200 Instruction Manual
INSTRUCTION MANUAL
EM200
IMPORTANT SAFETY INSTRUCTIONS
This household embroidery machine is designed to comply with IEC/EN 60335-2-28 and UL
1594.
IMPORTANT SAFETY INSTRUCTIONS
When using an electrical appliance, basic safety precautions should always be followed,
including the following:
Read all instructions before using this household embroidery machine. Keep these instructions
conveniently near the machine. Make sure to hand them over if the machine is given to a third
party.
DANGER
To reduce the risk of electric shock:
An embroidery machine should never be left unattended when plugged in. Always unplug
this embroidery machine from the electric outlet immediately after using and before cleaning,
removing covers or when making any other user servicing adjustments mentioned in the
instruction manual.
WARNING
To reduce the risk of burns, fi re, electric shock, or injury to persons:
• Do not allow to be used as a toy. Close attention is necessary when this embroidery machine
is used by or near children.
• Use this embroidery machine only for its intended use as described in this manual. Use only
attachments recommended by the manufacturer as contained in this manual.
• Never operate this embroidery machine if it has a damaged cord or plug, if it is not working
properly, if it has been dropped or damaged, or dropped into water. Return the embroidery
machine to the nearest authorized service center for examination, repair, electrical or
mechanical adjustment.
• Never operate the embroidery machine with any air openings blocked. Keep ventilation
openings of the embroidery machine free from the accumulation of lint, dust, and loose fabric.
• Keep fi ngers away from all moving parts. Special care is required around the embroidery
machine needle.
• Always use the proper needle plate. The wrong plate can cause the needle to break.
• Do not use bent needles.
• Do not pull or push fabric while stitching. It may defl ect the needle causing it to break.
• Wear safety glasses.
• Switch the embroidery machine off (“0”) when making any adjustment in the needle area,
such as threading needle, changing needle, threading bobbin, changing presser foot, etc.
• Never drop or insert any object into any opening.
• Do not use outdoors.
• Do not operate where aerosol (spray) products are being used or where oxygen is being
administered.
• To disconnect, turn all controls to the off (“0”) position, then remove plug from outlet.
• Do not unplug by pulling on cord. To unplug, grasp the plug, not the cord.
• Do not use the machine if it is wet.
• If the LED lamp is damaged or broken, it must be replaced by the manufacturer or its service
agent or a similarly qualifi ed person, in order to avoid a hazard.
2
• This embroidery machine is provided with double insulation. Use only identical replacement
parts. See instructions for Servicing of Double-Insulated Appliances.
SAVE THESE INSTRUCTIONS
Servicing should be performed by an authorized service representative.
FOR EUROPE ONLY:
This appliance can be used by children aged from 8 years and above and persons with reduced
physical, sensory or mental capabilities or lack of experience and knowledge if they have been
given supervision or instruction concerning use of the appliance in a safe way and understand
the hazards involved. Children shall not play with the appliance. Cleaning and user maintenance
shall not be made by children without supervision.
The noise level under normal operating conditions is less than 70db.
FOR OUTSIDE EUROPE:
This embroidery machine is not intended for use by persons (including children) with reduced
physical, sensory or mental capabilities, or lack of experience and knowledge, unless they have
been given supervision or instruction concerning use of the embroidery machine by a person
responsible for their safety. Children should be supervised to ensure that they do not play with
the embroidery machine.
The noise level under normal operating conditions is less than 70db.
SERVICING OF DOUBLE INSULATED PRODUCTS
In a double-insulated product, two systems of insulation are provided instead of grounding. No
ground means is provided on a double-insulated product, nor should a means for grounding
be added to the product. Servicing of a double-insulated product requires extreme care and
knowledge of the system and should be done only by qualifi ed service personnel. Replacement
parts for a double-insulated product must be identical to those parts in the product. A doubleinsulated product is marked with the words ‘DOUBLE INSULATION’ or ‘DOUBLE INSULATED’.
SETTING UP THE MACHINETHREADING THE MACHINE
EMBROIDERY PREPARATION
PREFACE
Thank you for your purchase of this embroidery machine.
This machine intended for household use will provide you with excellent performance in sewing
embroidery designs and lettering.
Please refer to this booklet for proper use and optimum performance. To get the most out of
your embroidery machine, read the entire instruction manual before attempting to operate the
machine. Then familiarize yourself with the machine by following the instruction manual page by
page.
To ensure that you are always provided with the most modern embroidery capabilities, the
manufacturer reserves the right to change the appearance, design or accessories of this
embroidery machine when considered necessary without notifi cation or obligation.
SINGER® is the exclusive trademark of The SINGER® Company Limited S.à.r.l. or its Affi liates.
©2015 The SINGER® Company Limited S.à.r.l. or its Affi liates. All rights reserved.
3
EMBROIDERYMAINTENANCE

TABLE OF CONTENTS
MAIN PARTS
ACCESSORIES
NEEDLES
REMOVING & INSERTING THE NEEDLE ...........................7
SELECTING NEEDLE & THREAD ........................................ 7
SETTING UP THE MACHINE
CONNECTING THE EMBROIDERY UNIT ............................ 8
REMOVING THE EMBROIDERY UNIT ................................ 8
ELECTRICAL CONNECTION ............................................... 8
MESSAGES AT START UP ...................................................9
MACHINE CONTROL FUNCTIONS .....................................9
START/STOP BUTTON ..................................................9
SPEED CONTROL BUTTONS .......................................9
THREAD CUTTER BUTTON .........................................10
TOP COVER ..................................................................10
HAND WHEEL ............................................................... 10
PRESSER FOOT LIFTER .............................................10
THREAD CUTTER ........................................................ 10
MOUNTING MACHINE IN SEWING CABINET .............10
SOFTWARE INFORMATION
USB EMBROIDERY STICK ................................................11
CONNECTING USB STICK ........................................... 11
DESIGN BOOK .............................................................. 11
INDIVIDUAL DESIGN INFORMATION .......................... 11
EMBROIDERY SOFTWARE .......................................... 11
UPDATING YOUR MACHINE ........................................ 11
THREADING THE MACHINE
BOBBIN SETTING ..............................................................12
REMOVING THE BOBBIN............................................. 12
SETTING SPOOL OF THREAD ON SPOOL PIN ..........12
WINDING THE BOBBIN ................................................12
WINDING BOBBIN INDEPENDENTLY .........................13
INSERTING THE BOBBIN .............................................13
THREADING THE NEEDLE ................................................ 14
PREPARING T O THREAD MACHINE ...........................14
SETTING SPOOL OF THREAD ON SPOOL PIN ..........14
THREADING THE UPPER THREAD ............................14
THREADING THE NEEDLE EYE .................................. 15
DRAWING UP THE BOBBIN THREAD .........................15
EMBROIDERY PREPARATION
HOME SCREEN/HOME BUTTON ...................................... 16
EMBROIDERY MACHINE SETTINGS ................................16
SETTING BUTTON ........................................................ 16
THREAD TENSION .......................................................16
STOP FOR CUT ............................................................17
AUDIBLE BEEP ............................................................. 17
CONTRAST OF SCREEN .............................................17
CALIBRATION SCREEN ...............................................17
SOFTWARE VERSION .................................................17
........................................................................5
....................................................................6
..............................................................................7
...............................................8
.............................................. 11
.............................................12
..........................................16
USING FABRIC AND STABILIZER .....................................18
SECURING FABRIC IN THE EMBROIDERY HOOP ..........19
A TTACHING THE EMBROIDERY HOOP TO THE MACHINE .
REMOVING THE HOOP FROM THE MACHINE ..........19
SELECTING DESIGNS
HOME SCREEN ..................................................................20
EMBROIDERY COLLECTION .......................................20
SELECTING A DESIGN ......................................................20
TO SELECT A BUILT-IN DESIGN ..................................20
TO SELECT A USB DESIGN ......................................... 20
EDITING THE DESIGN
EMBROIDERY PLACEMENT SCREEN..............................21
EMBROIDERY ROTATION AND MIRRORING SCREEN ...21
EMBROIDERY SCALING SCREEN .................................... 21
EMBROIDERY OPTION SCREEN ...................................... 22
HOOP OPTION AND SELECTION ................................22
HOOP OPTION - MOVING HOOP POSITION .............. 22
HOOP SELECTION ....................................................... 22
TRACING .......................................................................23
BASTING .......................................................................23
MONOCHROME ............................................................23
SEWING DESIGN
SEWING SCREEN .............................................................. 24
ST AR T T O SEW ..................................................................24
EMBROIDERY LETTERS
SELECTING EMBROIDERY LETTERS ..............................25
EDITING EMBROIDERY LETTERS .................................... 25
SEWING EMBROIDERY LETTERS .................................... 25
POP-UP MESSAGES
UPPER THREAD BREAKAGE ..................................... 26
CONNECT USB ............................................................26
THREAD JAM ................................................................ 26
WRONG HOOP TYPE ...................................................26
DATA ON THE USB STICK CANNOT BE READ...........26
REMOVE THE HOOP ....................................................26
EMBROIDERY TOO LARGE .........................................26
STOP COMMAND IN DESIGN ......................................26
MAIN MOTOR OVERLOAD ...........................................26
CORRUPTED DATA ......................................................26
MAINTENANCE
REMOVING THE EMBROIDERY FOOT ............................. 27
ATTACHING THE EMBROIDERY FOOT ......................27
CLEANING ..........................................................................27
BOBBIN HOLDER .........................................................27
HOOK RACE & FEED DOG ..........................................27
HELPFUL HINTS
EMBROIDERY QUICK REFERENCE CHART
TECHNICAL SPECIFICATION
DESIGN BOOK
.......................................................20
.......................................................21
...............................................................24
...................................................25
.........................................................26
..................................................................27
................................................................28
...................29
...........................................30
19
4
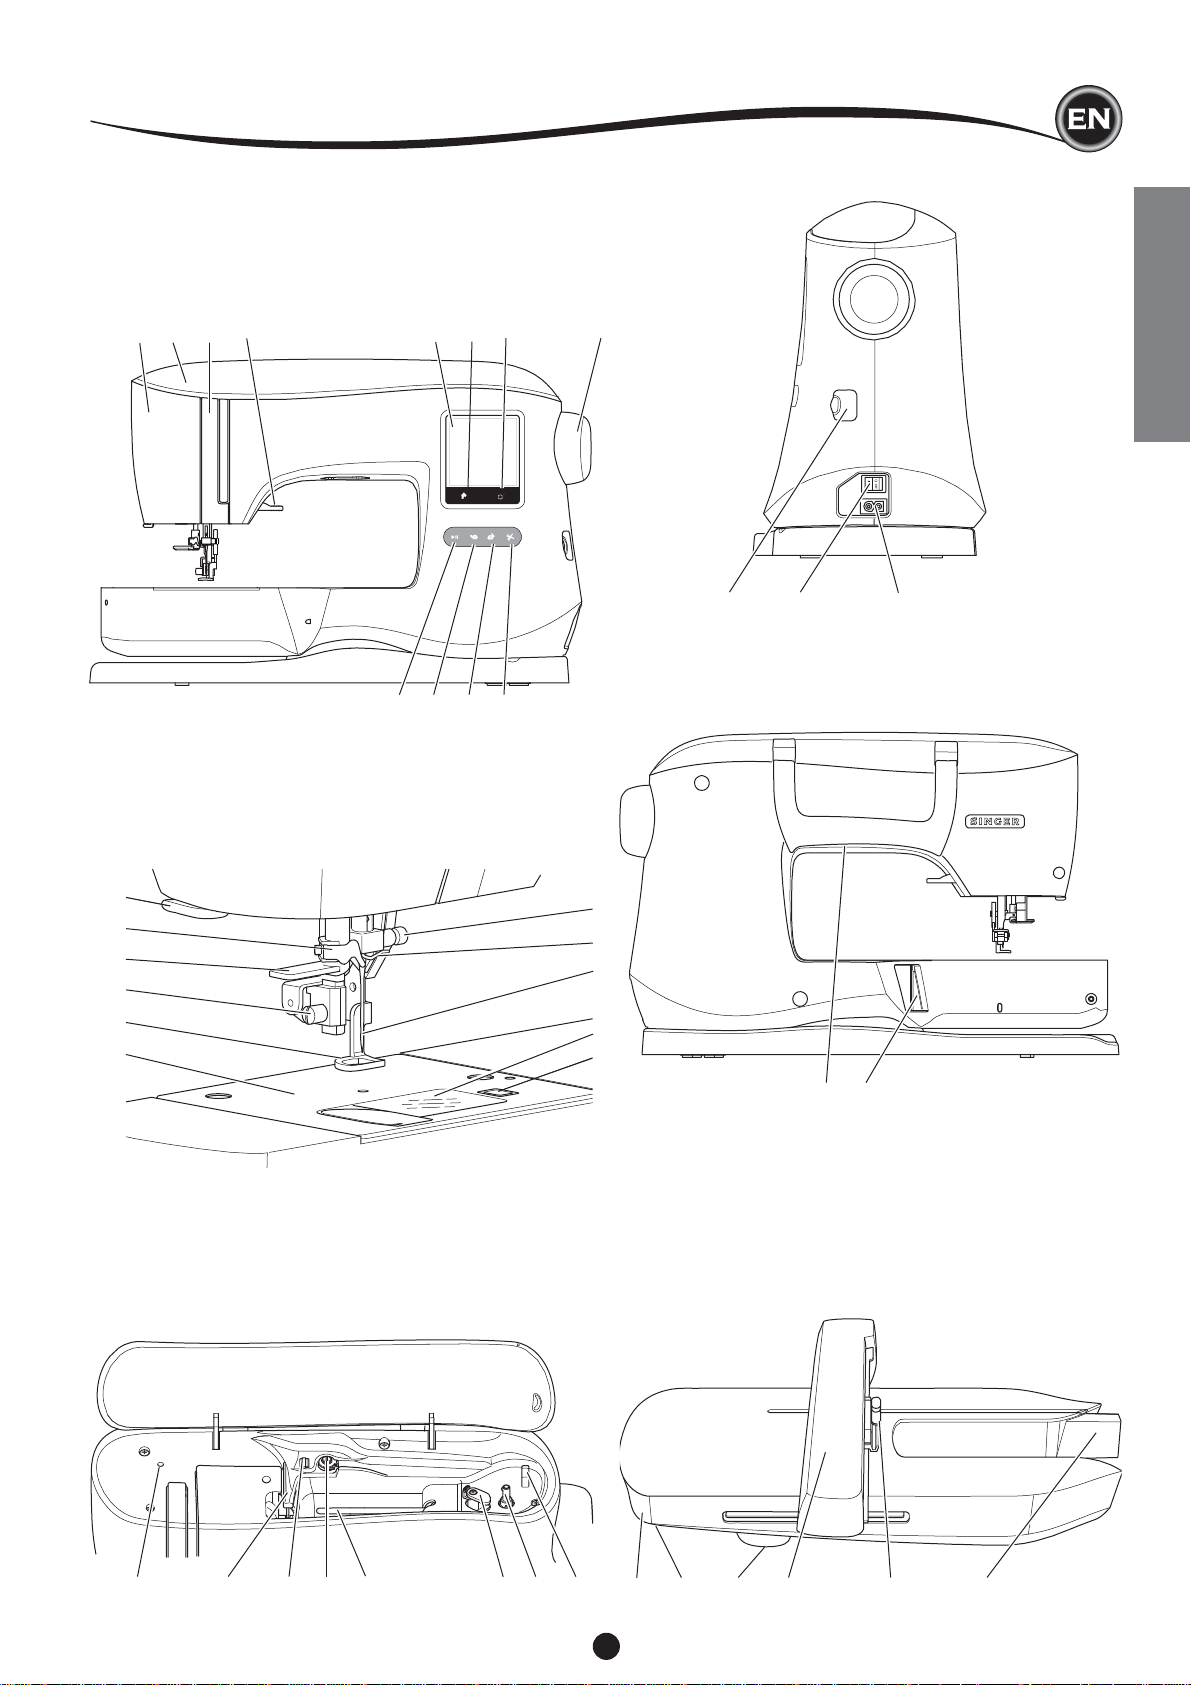
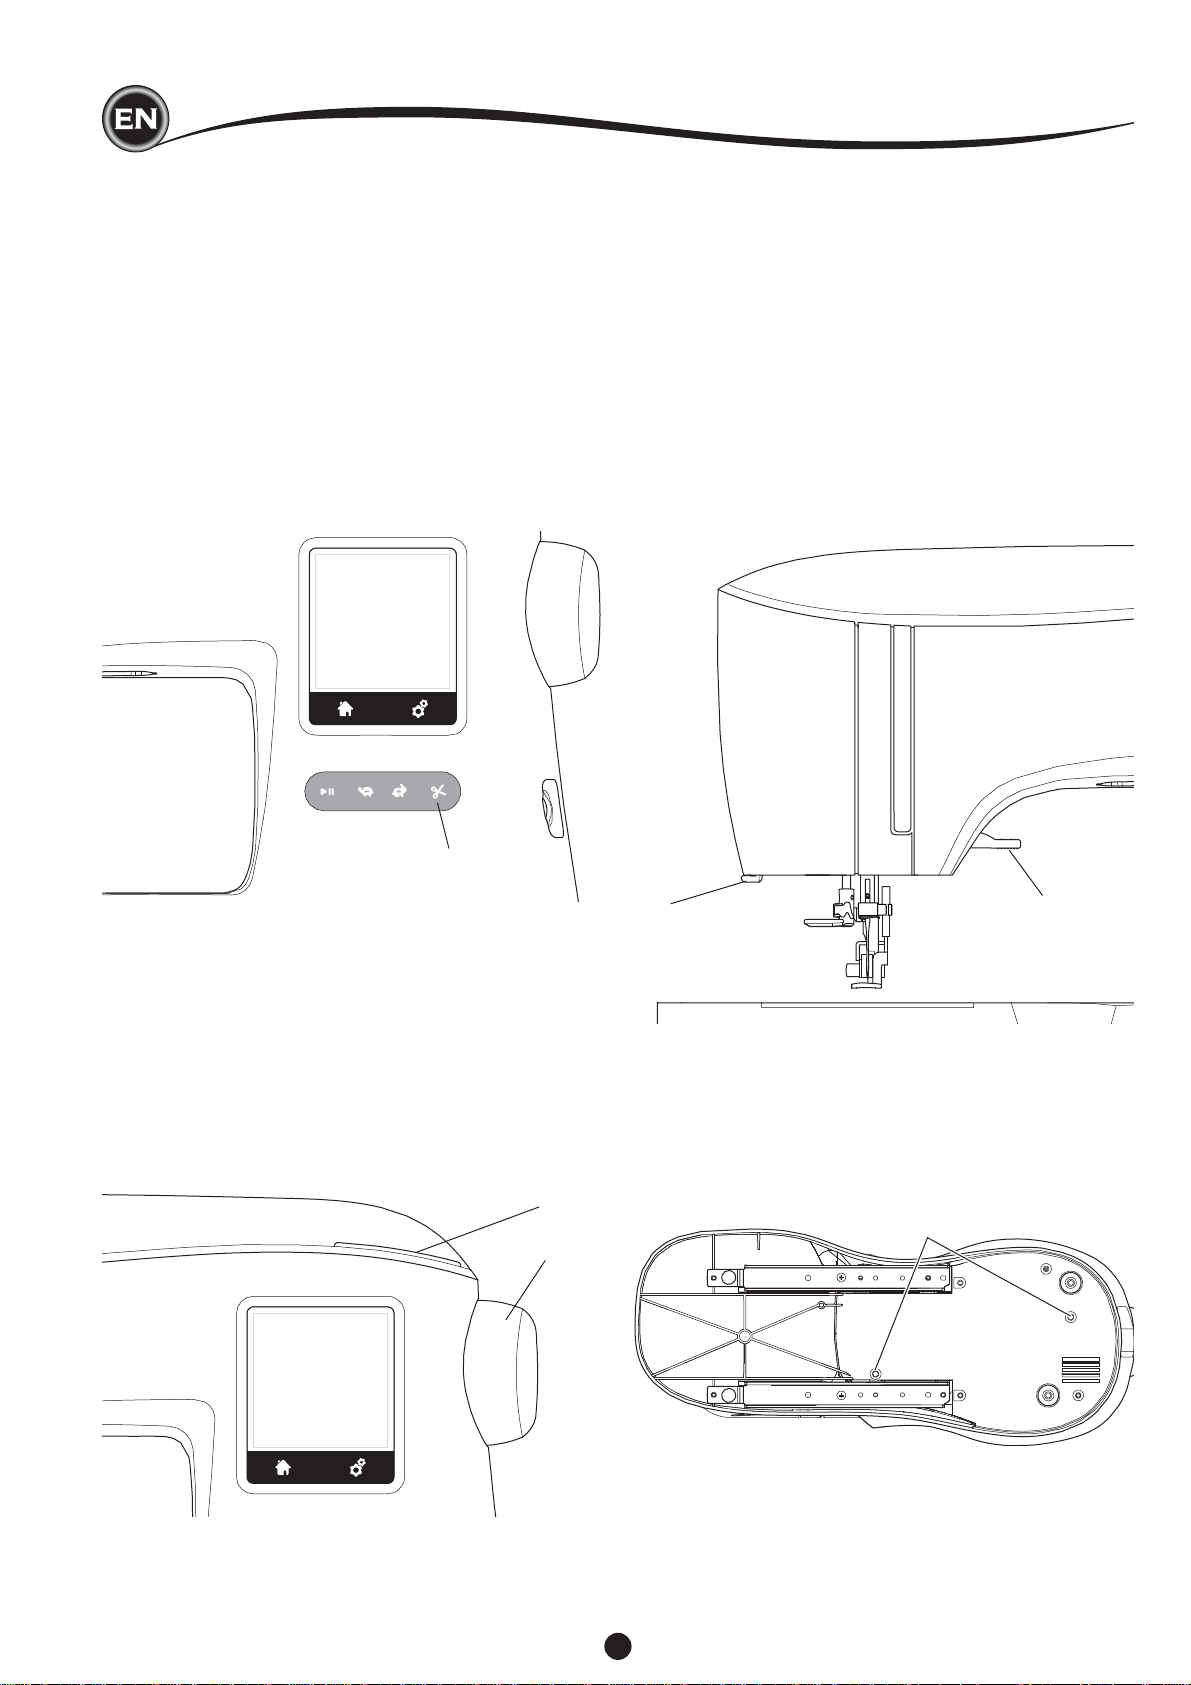
MAIN PARTS
1. Face Plate
2. Top Cover
3. Thread Take-Up Lever
(Inside)
4. Presser Foot Lifter
5. Touch Panel LCD
6. Home Button
1 2 3 4 5 6 9 7 8
13. Thread Cutter
14. Needle Threader
15. Needle Threader Lever
16. Presser Foot Screw
17. Embroidery Presser Foot
18. Needle Plate
7. Setting Button
8. Hand Wheel
9. Start/Stop Button
10. Slow Button
11. Fast Button
12. Thread Cutter Button
10 11 12
19. Needle Clamp Screw
20. Needle Thread Guide
21. Needle
22. Bobbin Cover
23. Bobbin Cover Latch
32. USB Embroidery
Stick Socket
33. Power Switch
34. Connector for
Power Cord
32 33 34
35. Handle
36. Embroidery Unit Connection Socket
SETTING UP THE MACHINE
13
14
15
16
17
18
24. Auxiliary Spool Pin
Holder
25. Thread Guide
26. Extra Thread Guide
27. Bobbin Winding Tension
Disc
28. Spool Pin
29. Bobbin Winder Stop
30. Bobbin Winder Shaft
31. Bobbin Winder Thread
Cutter
19
20
21
22
23
37. Accessory Tray
38. Embroidery Unit
Release Lever (Under
Accessory Tray)
39. Level Adjusting Feet
(Bottom of Unit)
35 36
40. Embroidery Hoop
Carriage
41. Embroidery Hoop
Connection Assembly
42. Embroidery Unit
Socket
24 25 26 27 28 29 30 31
37 39 40 41 42
38
5
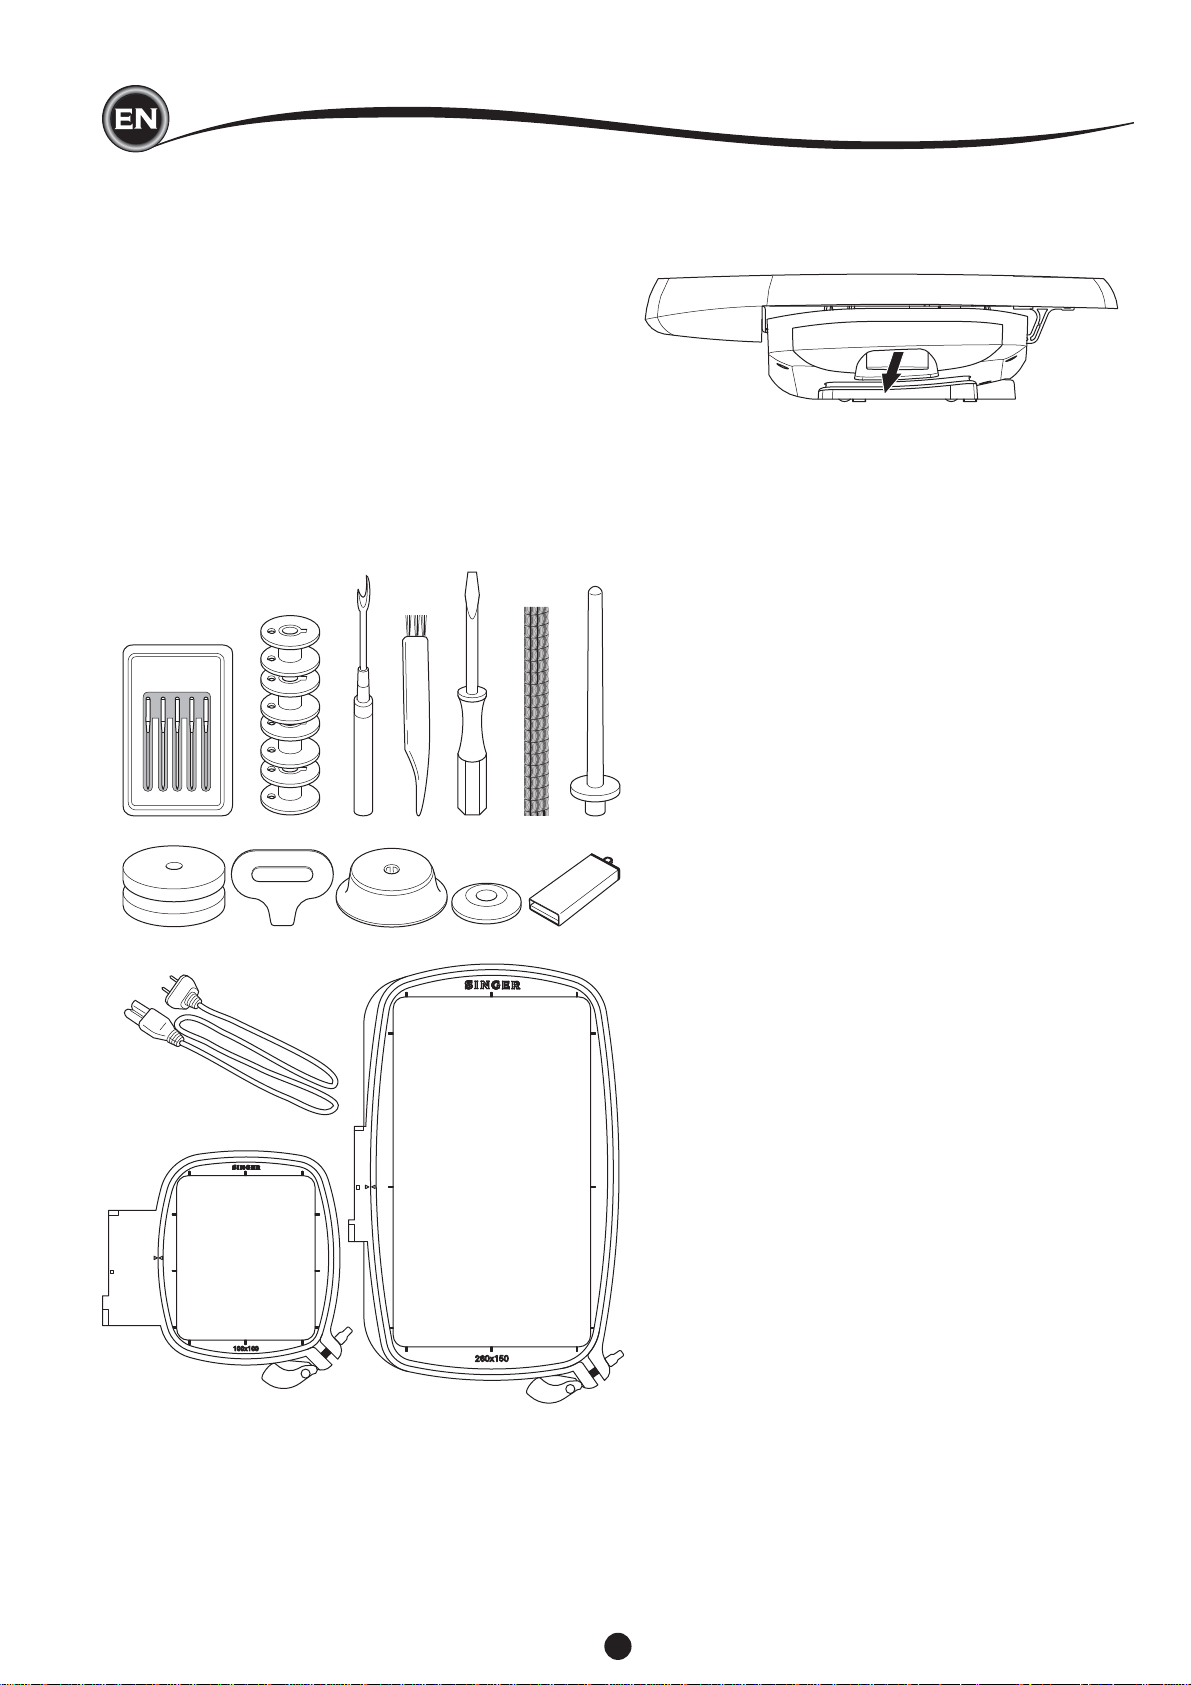
ACCESSORIES
ACCESSORIES
Some accessories are stored in the accessory tray.
1. Needle Pack
2. 5 SINGER® Class 15 transparent bobbins
( 1 is in the machine)
3. Seam Ripper
4. Brush
5. Screw Driver
6. Thread Net
7. Auxiliary Spool Pin
8. 2 Felt Washers
9. Screwdriver for Needle Plate
10. Spool Cap
11. Small Thread Cap
12. USB Embroidery Stick
13. Power Line Cord
14. Embroidery Hoop 100mm x 100mm (4” x 4”)
15. Embroidery Hoop 260mm x 150mm (10 1/4” x 6”)
ACCESSORY TRAY
The accessory tray is located on the left side of the embroidery
unit. Pull to open.
1 2 3 4 5 6 7
8 9 10 11 12
13
14
15
6
NEEDLES
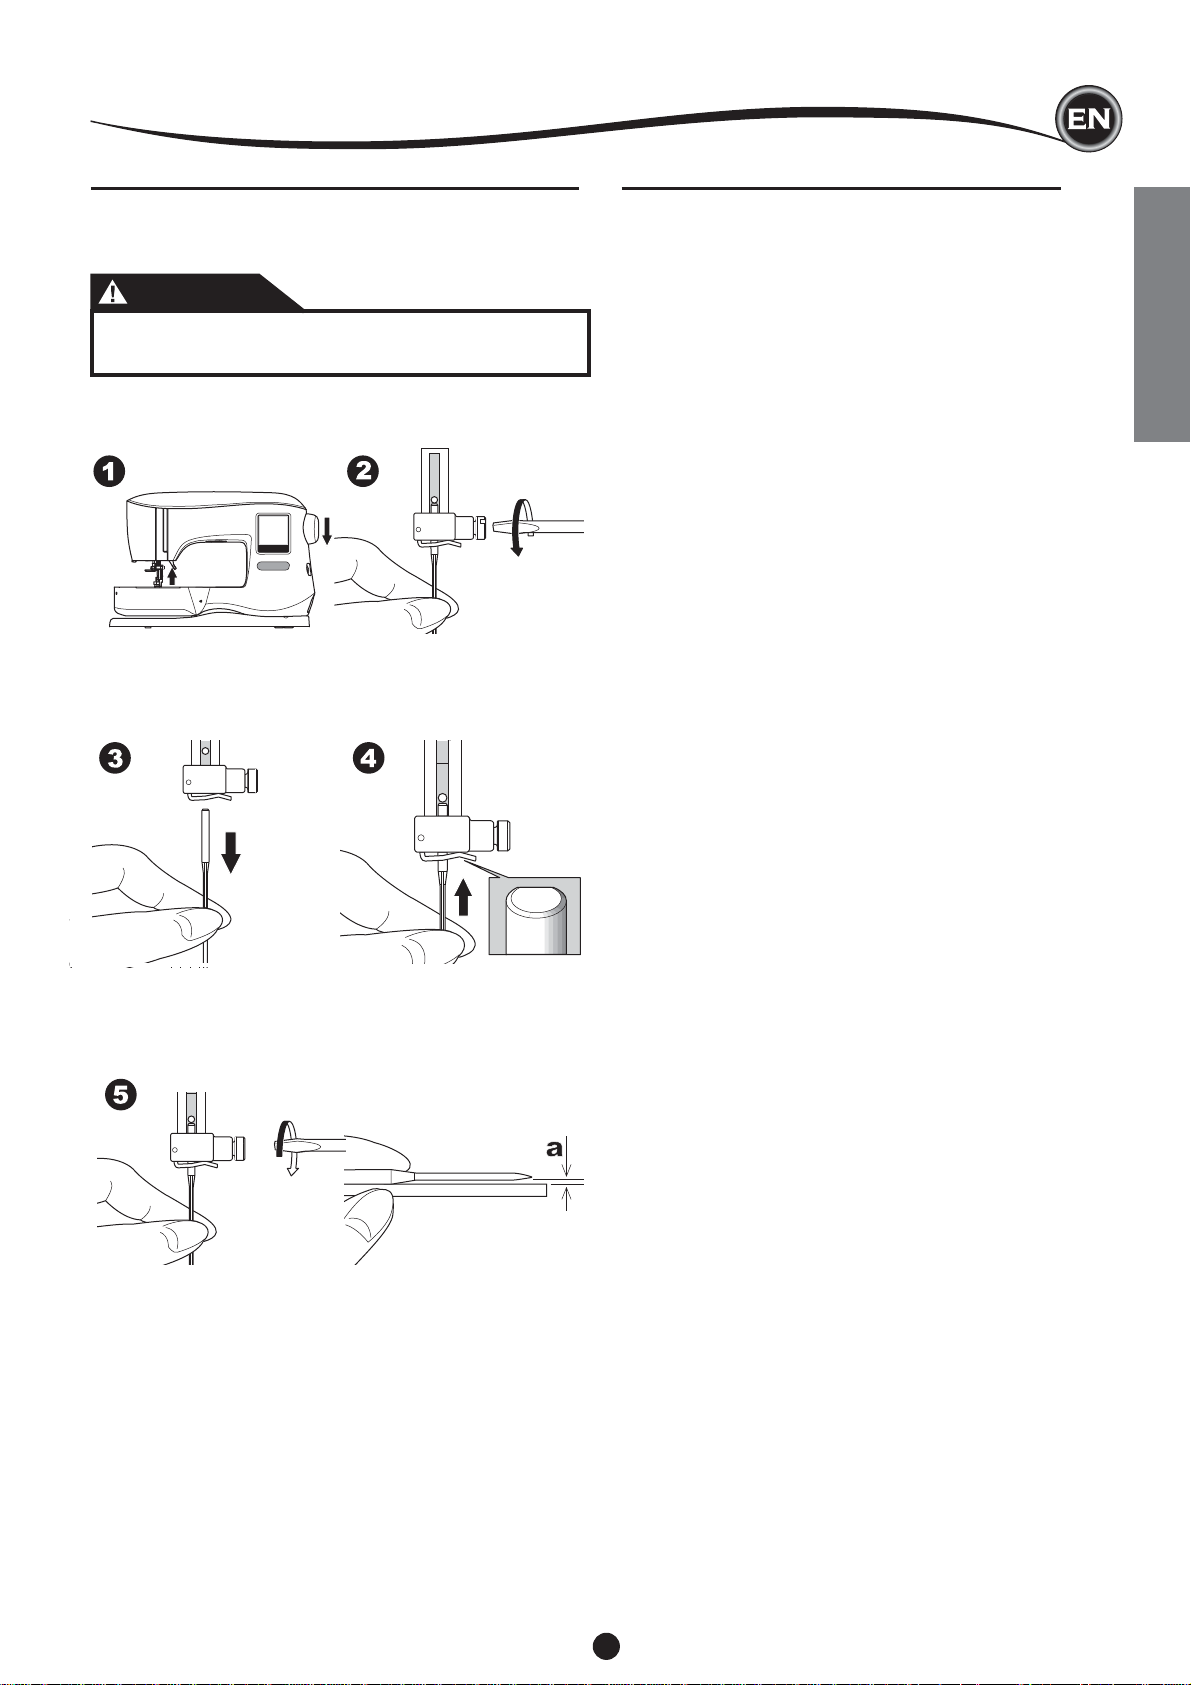
REMOVING & INSERTING THE NEEDLE
Select a needle of the appropriate style and size for the fabric
to be embroidered.
CAUTION
To prevent accidents:
Turn off the power before removing the needle.
1. Turn the hand wheel toward you until the needle is at its
highest position.
2. Loosen the needle clamp screw.
3. Remove the needle.
4. Insert new needle into needle clamp with the fl at side to the
back and push it up as far as it will go.
SELECTING NEEDLE AND THREAD
For good quality results, it is important to use the appropriate
style and size of needle for the fabric that will be embroidered.
For help with determining which needle to use, refer to the
Embroidery Quick Reference Chart on page 29.
NEEDLE
1. For light weight woven fabrics, use SINGER® Style 2000,
Size 11/80 needle.
2. For medium to heavier weight woven fabrics, use SINGER®
Style 2000, Size 14/90 needle.
3. For light weight stretch fabrics, use SINGER® Style 2001,
Size 11/80 needle.
4. For medium to heavier weight stretch fabrics, use
SINGER® Style 2001, Size 14/90 needle.
It is possible to substitute SINGER® Style 2020 needles for
the 2000 Style, in either the 11/80 or 14/90 sizes.
It is possible to substitute SINGER® Style 2045 needles for
the 2001 Style, in either the 11/80 or 14/90 sizes.
It is recommended to use SINGER® needles in your SINGER®
embroidery machine.
THREAD
Machine embroidery is most often done using rayon or
polyester thread in the needle.
A lighter weight thread, referred to as bobbinfi ll, is
recommended for the bobbin. This helps create less density on
the back side of the embroidery design.
NOTE: In addition to the correct needle and thread, it is also
important to use the appropriate stabilizer for the fabric to be
embroidered. (See pages 18 and 29 for more information.)
SETTING UP THE MACHINE
5. Tighten the needle clamp screw securely.
Do not use a bent or blunt needle (a). Place needle on a
fl at surface to check its straightness.
7
SETTING UP THE MACHINE
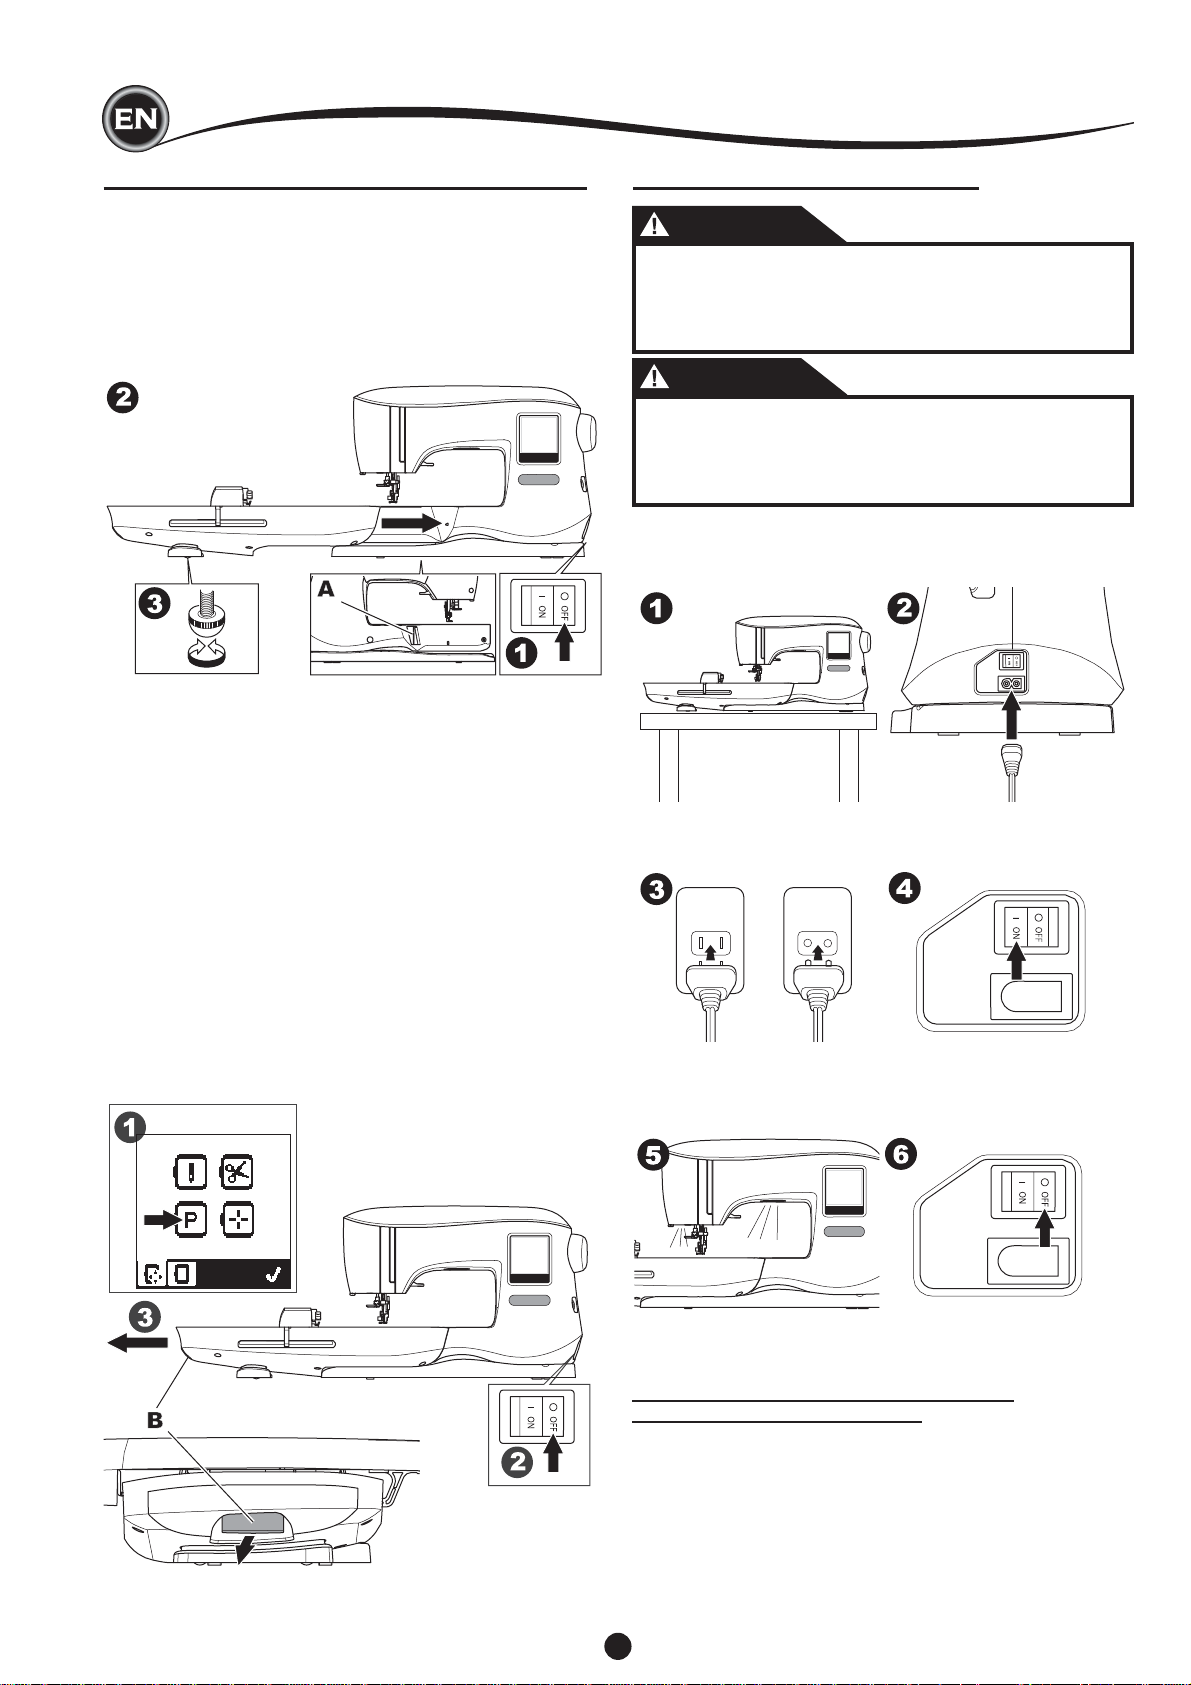
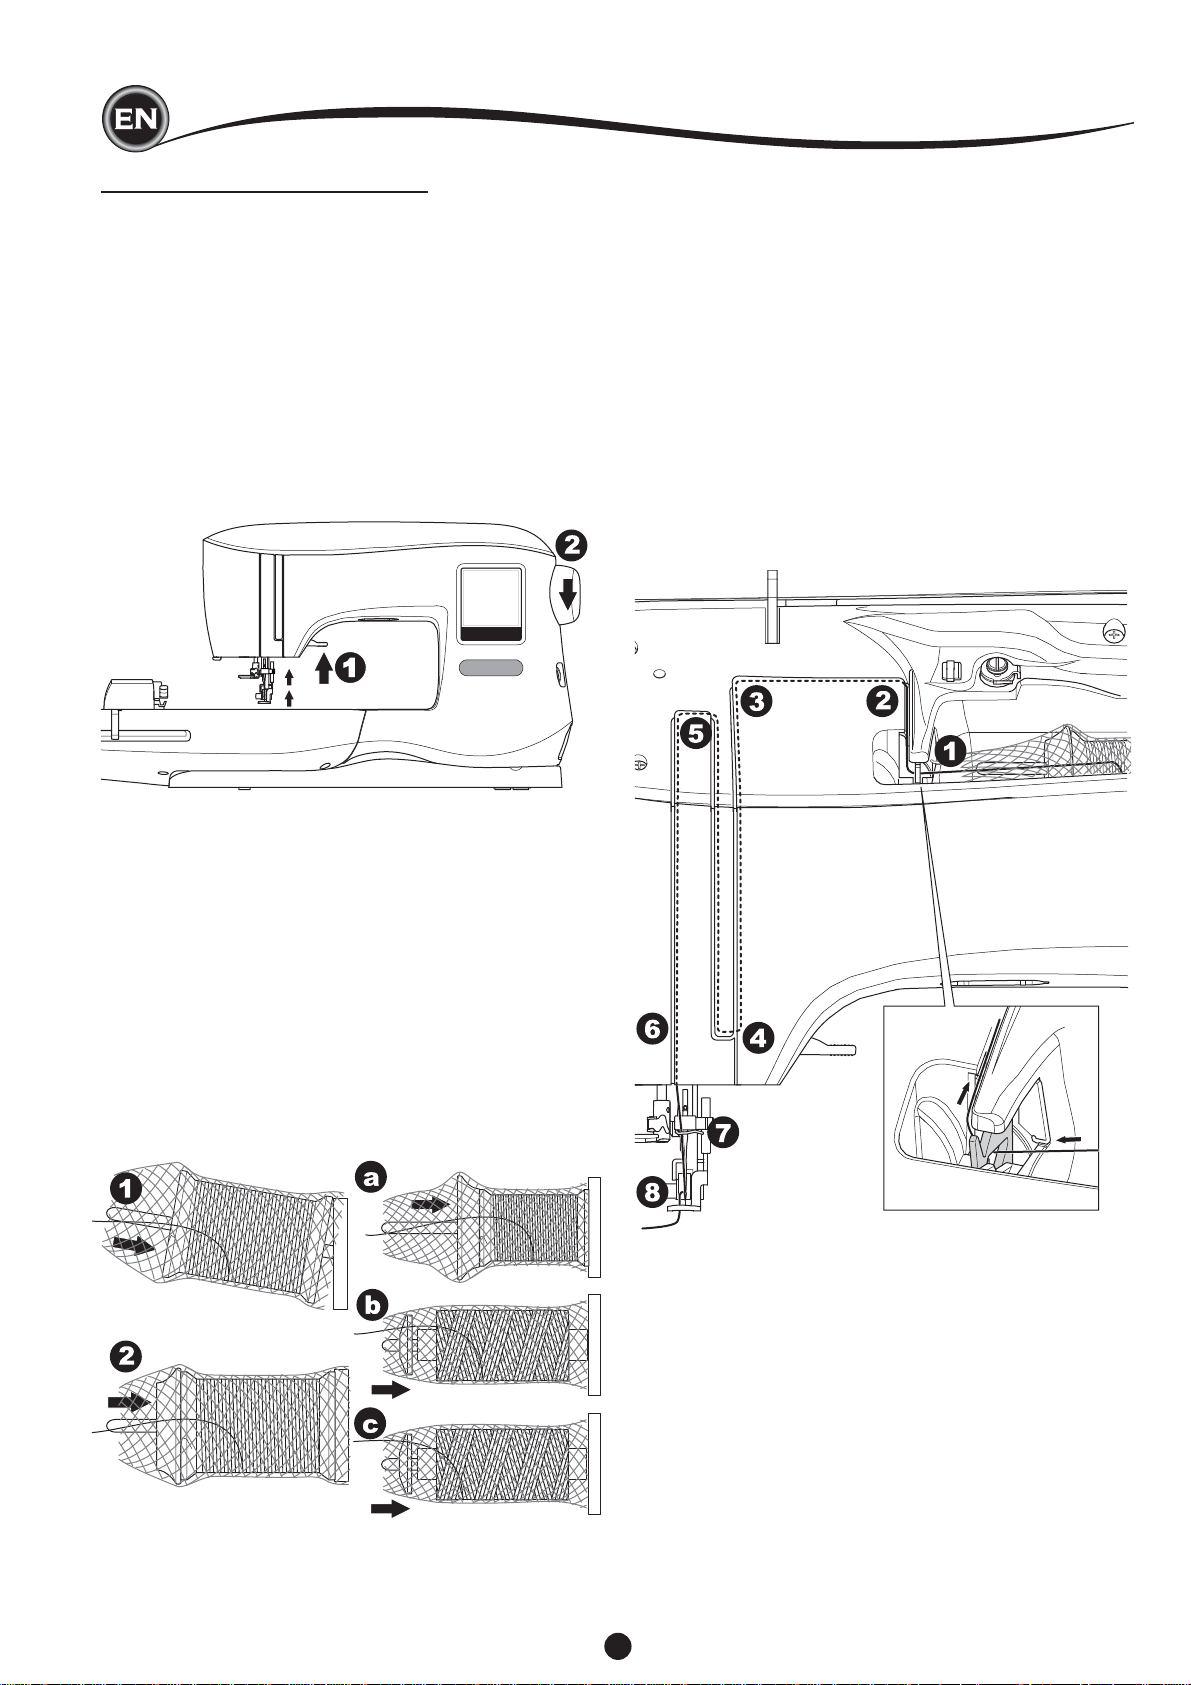
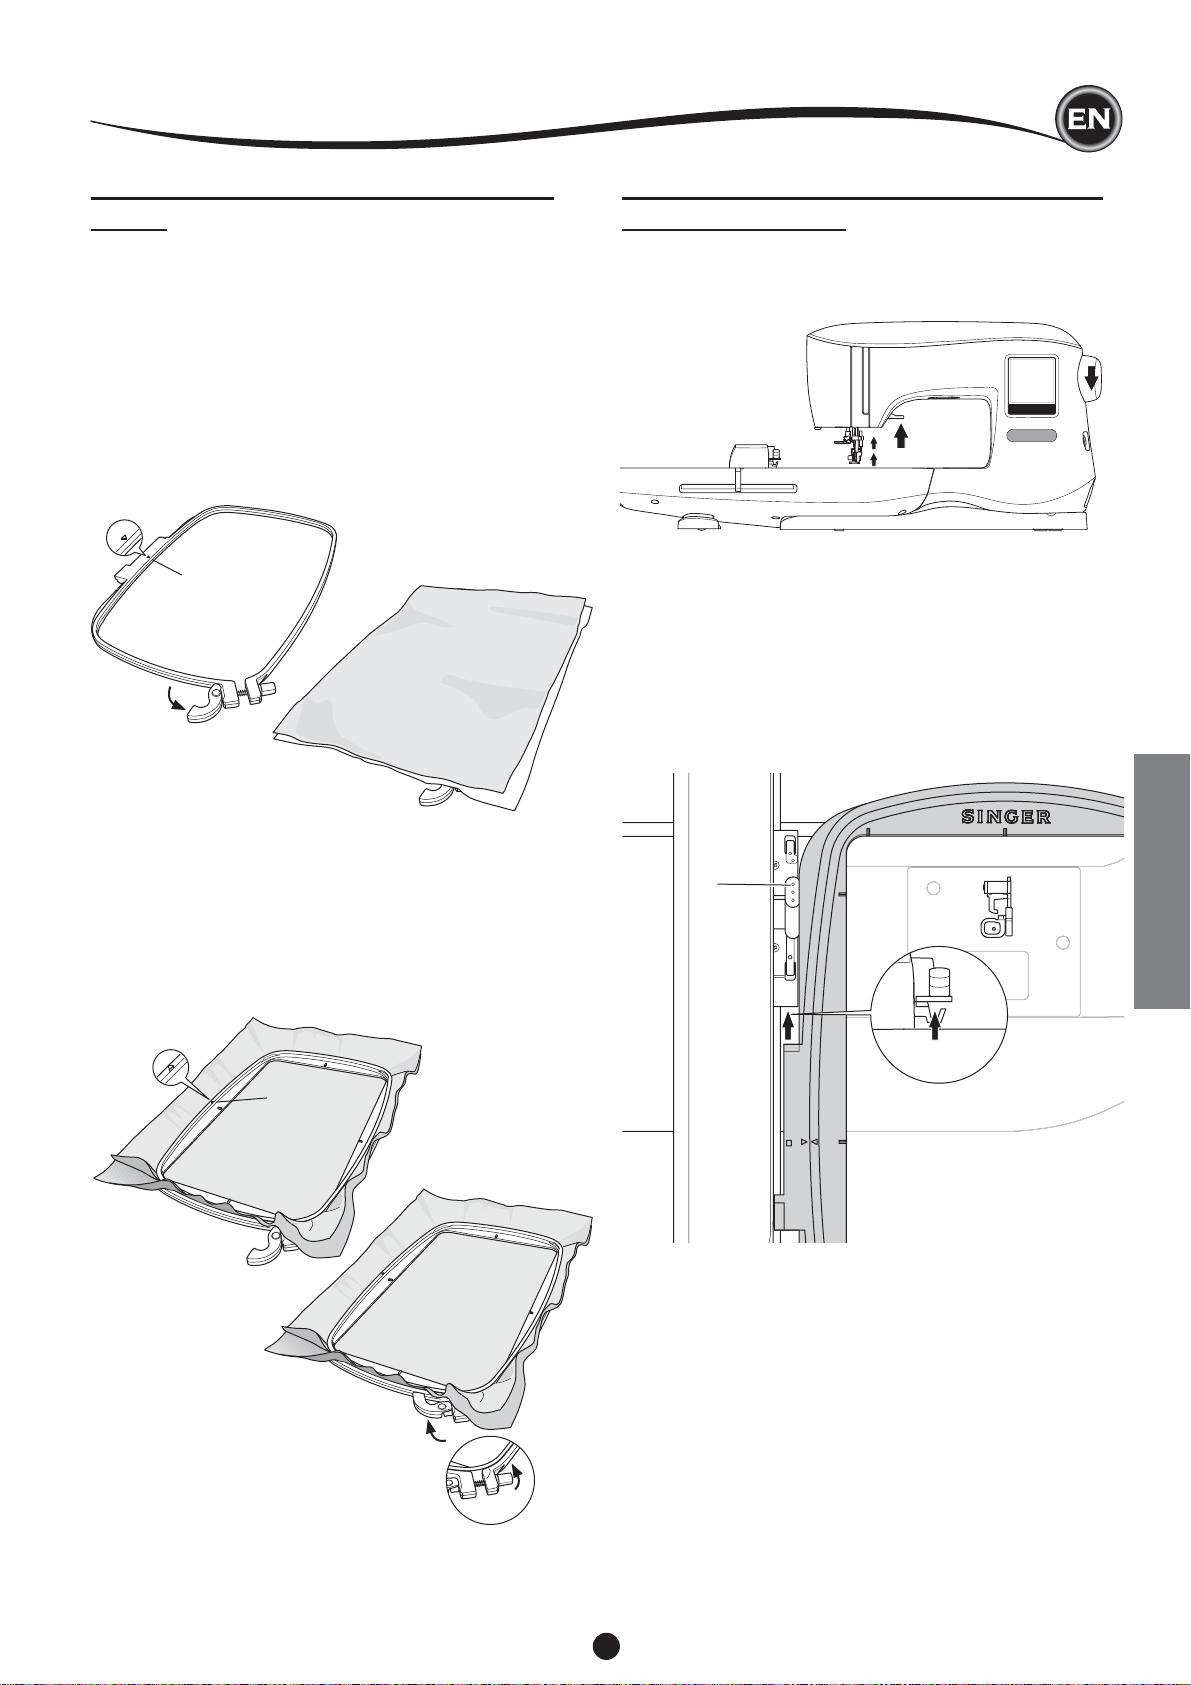
CONNECTING THE EMBROIDERY UNIT
There is a covered socket (A) behind the machine. The cover
will open automatically when connecting the embroidery unit.
1. Turn the machine off before connecting the embroidery unit.
2. Slide the embroidery unit onto the arm of the machine until
it plugs fi rmly into the socket.
3. If needed, use the level adjusting feet so that the machine
and embroidery unit are even with one another.
ELECTRICAL CONNECTION
DANGER
To reduce the risk of electric shock:
Never leave unattended when plugged in. Always
unplug this machine from the electric outlet
immediately after using and before maintenance.
WARNING
To reduce the risk of burns, fi re, electric shock, or
injury to persons:
Do not unplug by pulling on cord. To unplug, grasp
the plug, not the cord.
1. Place machine on stable surface.
2. Connect the power line cord to the machine by inserting
the 2-hole plug into the power cord connector.
TO REMOVE THE EMBROIDERY UNIT
Remove the hoop from the machine. (See Page 19)
1. To store the embroidery unit into the box, move the carriage
to park position by selecting Park Position in the Hoop
Option.(See page 22)
2. Turn off the machine.
3. Pull the lever (B) at the left, underneath the embroidery unit
and slide the unit to the left to remove it.
The cover of the socket closes automatically.
4. Store the embroidery unit in the original packing material.
3. Connect the power line plug to the electric outlet.
4. Turn on the power switch.
5. The lamps will light up when switch is turned on (symbol I).
6. To disconnect, turn the power switch to the off position (symbol
O), then remove plug from outlet.
FOR UNITED STATES AND CANADA USERS:
POLARIZED PLUG INFORMATION
This appliance has a polarized plug (one blade wider than the
other). To reduce the risk of electric shock, this plug is intended
to fi t in a polarized outlet only one way. If the plug does not fi t
fully in the outlet, reverse the plug. If it still does not fi t, contact
a qualifi ed electrician to install the proper outlet. Do not modify
the plug in any way.
8
SETTING UP THE MACHINE
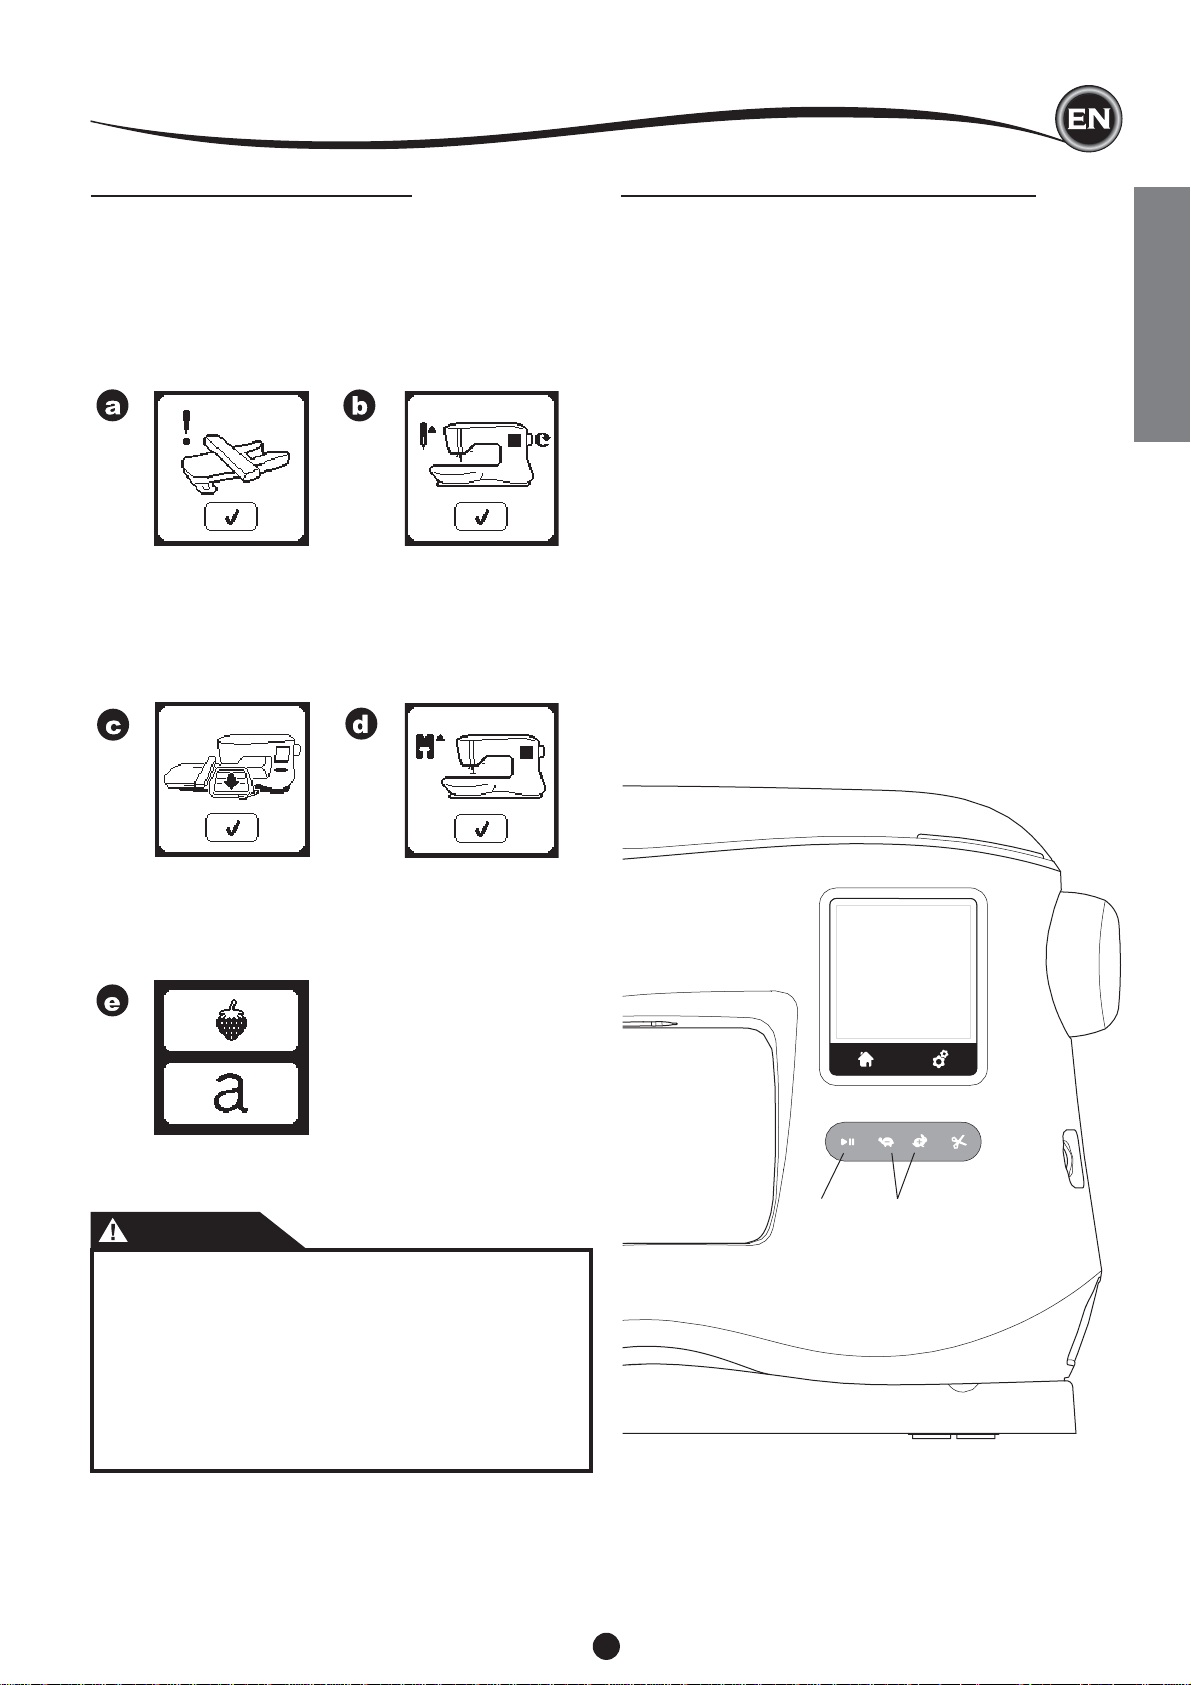
MESSAGES AT START UP
When you turn the machine on, a series of messages will
appear on the screen.
a. If the embroidery unit is not attached, this message will
appear. Attach the unit correctly. (See previous page.)
b. If the needle is not in its highest position, this message
will appear. Turn the hand wheel toward you to raise the
needle to its highest position and then press the “✓” button.
c. If this message appears, remove the hoop (if attached),
clear the embroidery area and press the “✓” button.
d. If presser foot is lowered, this message will appear. Raise
the presser foot lifter and press the “✓” button.
(See next page)
MACHINE CONTROL FUNCTIONS
TART/STOP BUTTON (A)
S
The machine will start running when Start/Stop button is
pressed and will stop when pressed the second time. The
machine will ramp up slowly at start of sewing.
NOTE:
1. Machine will not start if you don’t select an embroidery
design or letter.
2. Bobbin winding function is independent from this button. (See
page 12)
SPEED CONTROL BUTTONS (B)
The sewing speed is controlled by the machine.
You can change the maximum speed by pressing these
buttons.
Press the left button to decrease the speed.
Press the right button to increase the speed.
NOTE:
If you use a specialty thread, such as metallic thread, you
should reduce the the maximum speed to help prevent thread
breakage.
SETTING UP THE MACHINE
When the messages a-d have cleared the screen, the carriage
will move to start point.
e. The Home Screen will appear.
(For more information on the Home Screen, see page 16.)
CAUTION
To prevent accidents:
1. Do not carry the machine when embroidery unit is
attached. It may fall off.
2. Do not push nor pull the carriage forcefully. It may
break.
3. Do not hold the carriage to move the machine.
4. Do not press the screen too hard and do not use
sharp objects to touch it. Doing so can damage the
screen. Touch the screen with your fi nger only.
A B
9
SETTING UP THE MACHINE
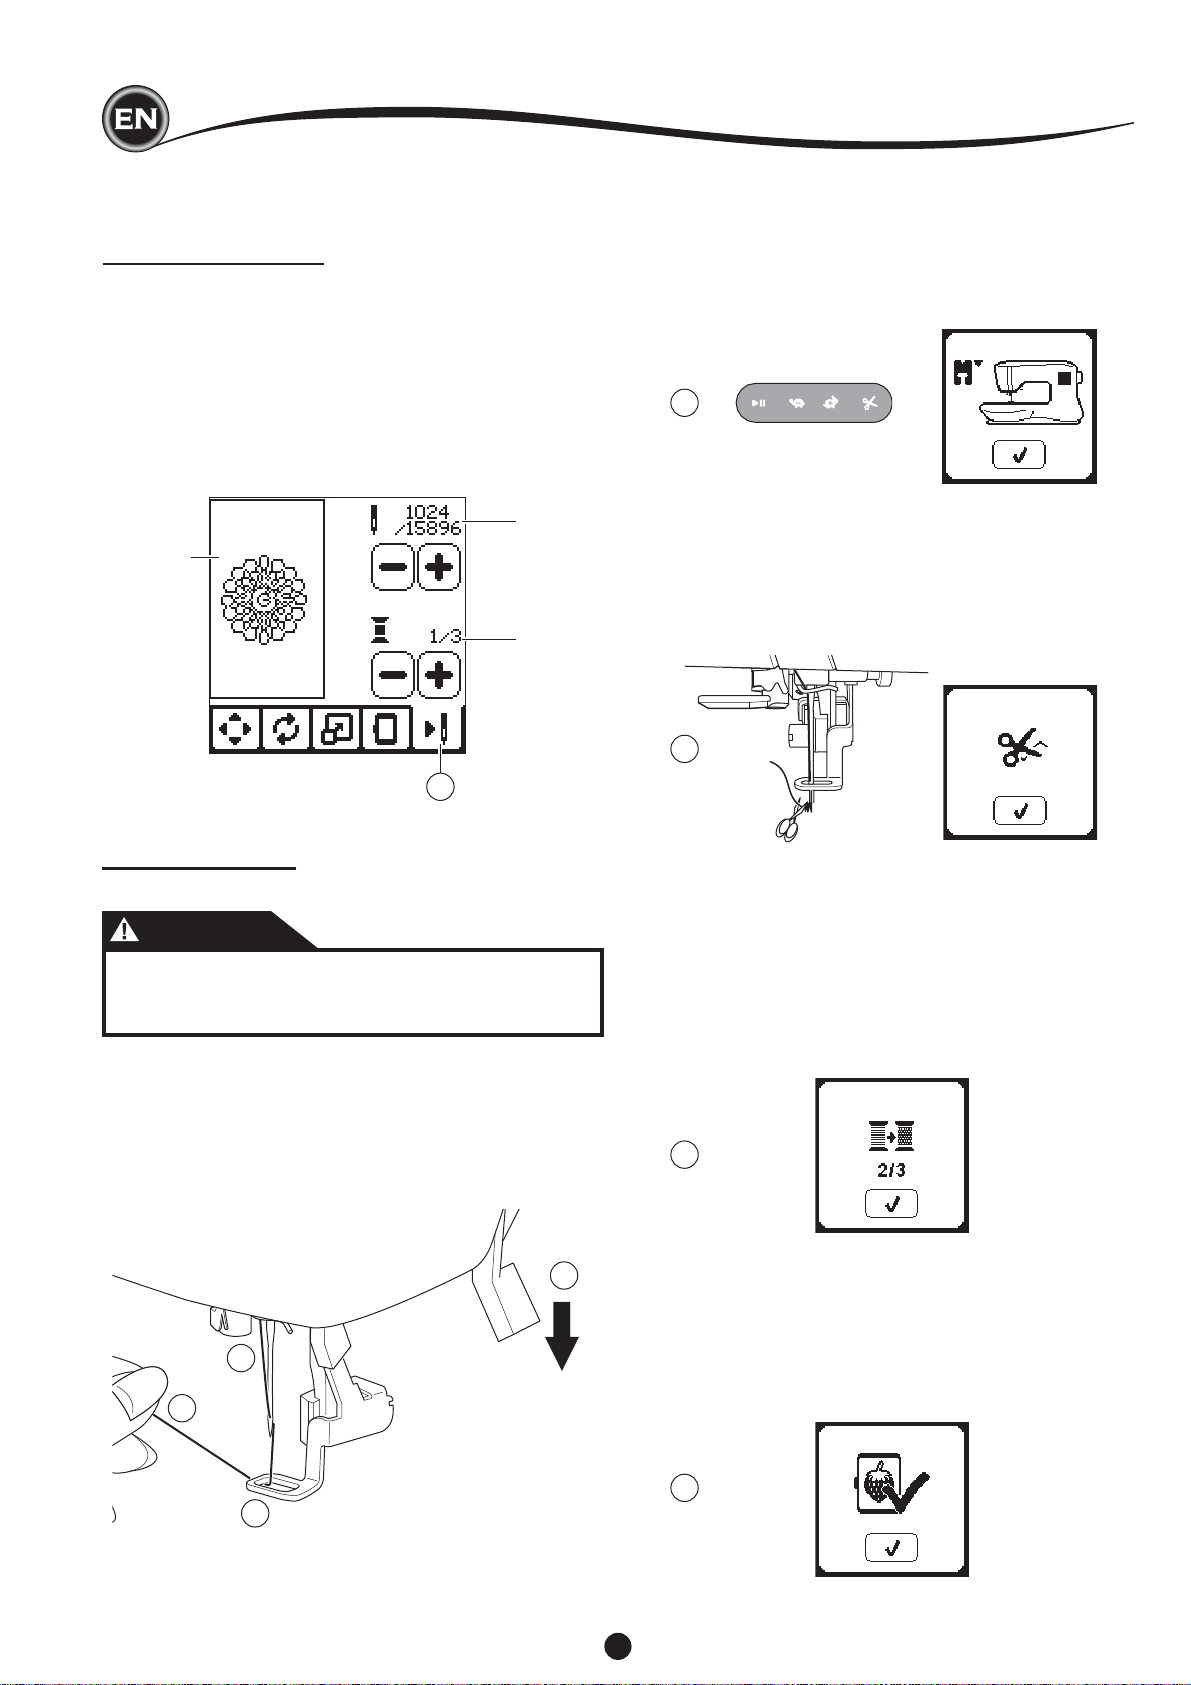
THREAD CUTTER BUTTON (C)
By pressing this button, machine will cut both threads
automatically.
NOTE:
The machine will cut threads automatically between color
changes and when an embroidery design has been completed.
CAUTION:
1. Do not press this button when there is no fabric under the
presser foot or no need to cut the threads. The thread may
tangle, resulting in damage.
2. Do not use this button when cutting thread thicker than
#30, nylon thread or other speciality threads.
In this case, use the thread cutter (G).
PRESSER FOOT LIFTER (F)
The presser foot is raised or lowered by this lever.
You can raise and hold the presser foot lifter to an extra-high
position, which can help make it easier to install the embroidery
hoop.
NOTE:
Machine will not start when the presser foot is raised (except
for bobbin winding).
THREAD CUTTER (G)
Use this cutter if the Thread Cutter button is not used.
1. Raise the presser foot and bring threads toward the back.
2. Hook the threads to the thread cutter from back to front.
3. Pull threads to cut them.
C
TOP COVER (D)
To open the top cover, lift up the front right side of the cover.
HAND WHEEL (E)
By turning the hand wheel, the needle will raise or lower. You
should always turn hand wheel toward you.
D
E
FG
MOUNTING MACHINE IN SEWING CABINET (H)
There are two holes on the underside of the machine designed
for mounting the machine into a sewing cabinet. Align the
holes (indicated in the picture) with the corresponding holes in
the cabinet base. Attach the machine with screws. (Screws not
included)
H
10
SOFTWARE INFORMATION
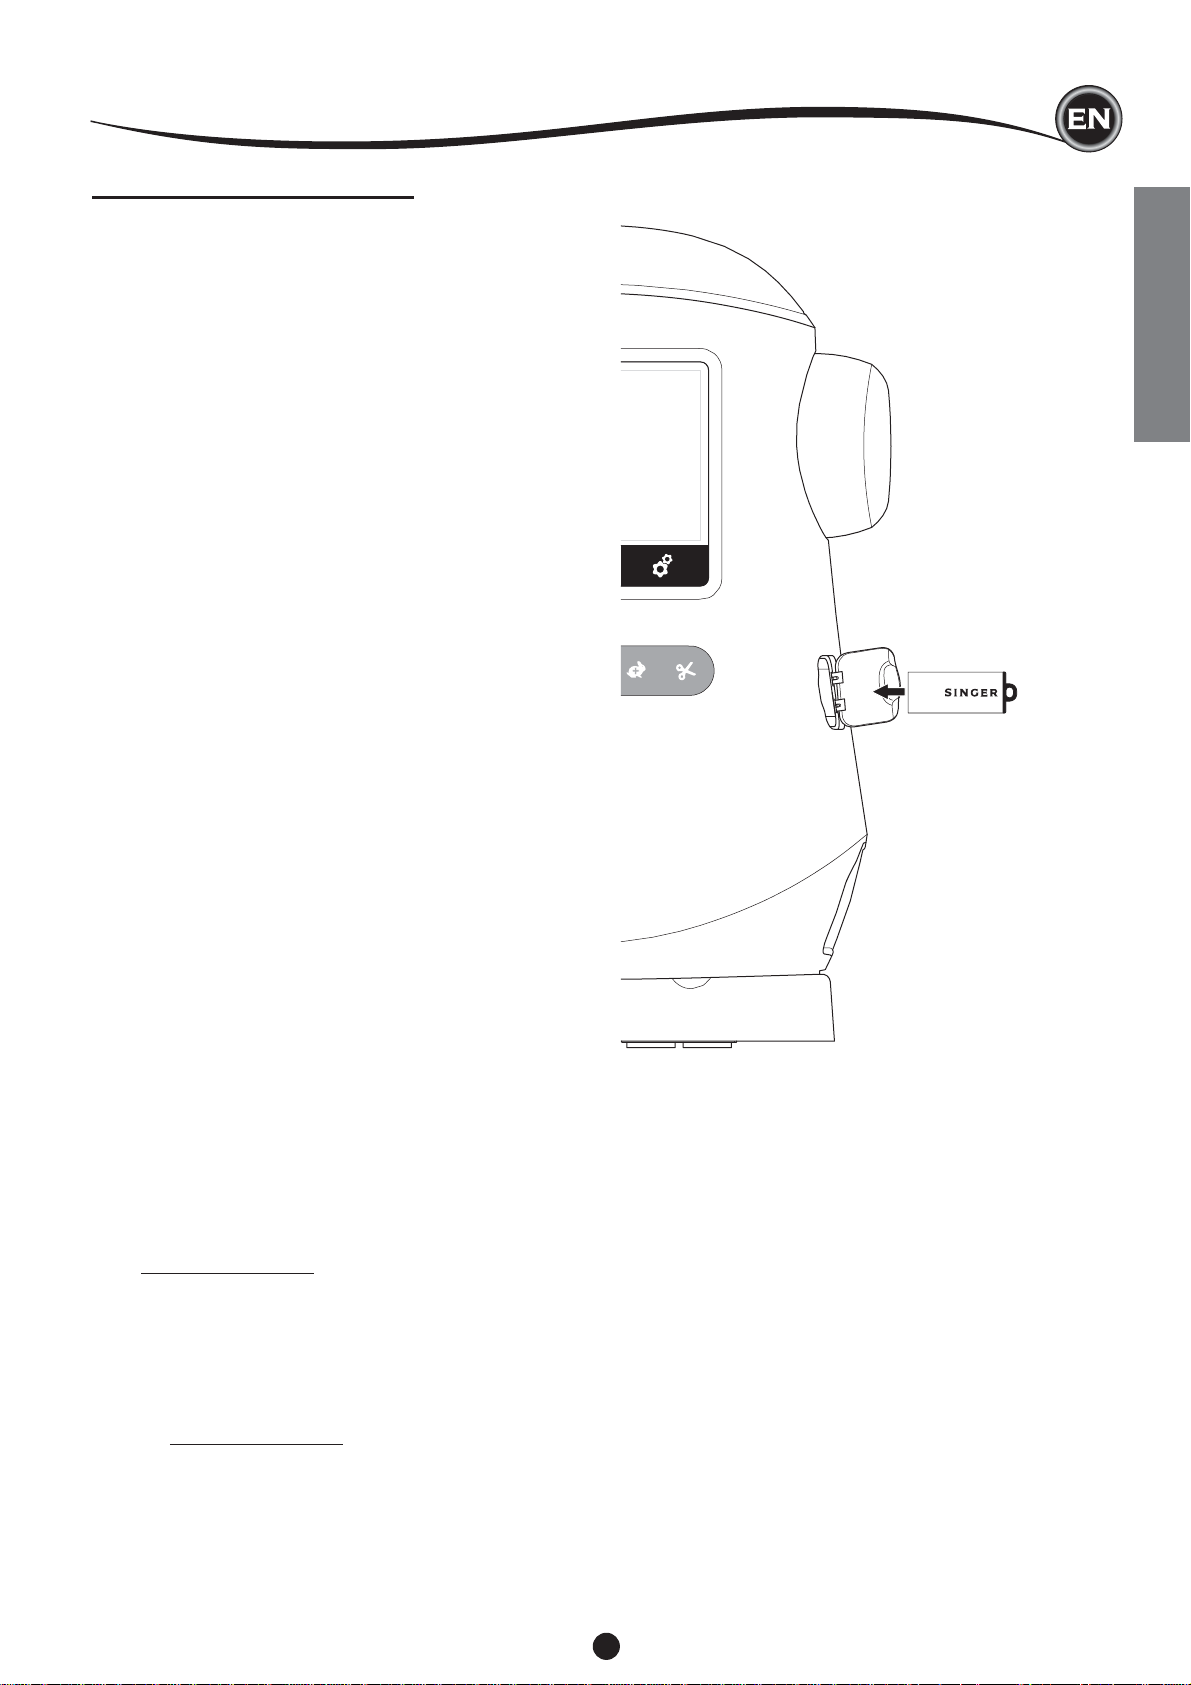
USB EMBROIDERY STICK
Your machine comes with a USB stick. This stick contains the
following:
a. Design Data (embroidery designs)
b. Design Book (PDF fi le displaying images of included
embroidery designs and fonts, viewed on PC)
c. Individual Design Information (PDF fi le displaying details
on individual designs, viewed on PC)
CONNECTING USB STICK
Your machine has a USB socket to read embroidery data from
the USB embroidery stick.
Open the cover and insert the USB embroidery stick in the
socket. The USB plug can only be inserted one way - do not
force it into the socket.
To remove, carefully pull the USB embroidery stick out straight.
NOTE:
Do not remove the USB embroidery stick while operating the
machine or stitching the embroidery, as this can damage the
fi les on your USB embroidery stick.
DESIGN BOOK
A Design Book is provided, which displays an overview of the
included embroidery designs and fonts that come with your
machine. You can see an images of the designs, as well as
the dimensions and stitch count of the designs.
This book is a PDF fi le, which can be accessed from the USB
stick when placed in your PC. Your PC will need to have
Adobe Acrobat Reader installed in order to view the Design
Book. If your PC doesn’t have Acrobat Reader, access the
Adobe website to install it.
SETTING UP THE MACHINE
INDIVIDUAL DESIGN INFORMATION
This is a PDF fi le that contains more specifi c information
about each individual embroidery design that comes with your
machine, such as the order of thread colors, suggested thread
colors and more.
This book is a PDF fi le, which can be accessed from the USB
stick when placed in your PC. Your PC will need to have
Adobe Acrobat Reader installed in order to view the Design
Book. If your PC doesn’t have Acrobat Reader, access the
Adobe website to install it.
EMBROIDERY SOFTWARE
Embroidery software is available for your machine, which will
allow you to use designs from other sources, such as design
CD’s and designs from the internet.
Go to singer.mysewnet.com for information on how to
download this software to your PC.
UPDATING YOUR MACHINE
Periodically, updates may be made available for your machine.
Your machine is updated via your USB stick.
1. Go to singer.mysewnet.com for information about available
updates for your machine.
2. Follow the instructions for how to update your machine.
11
THREADING THE MACHINE
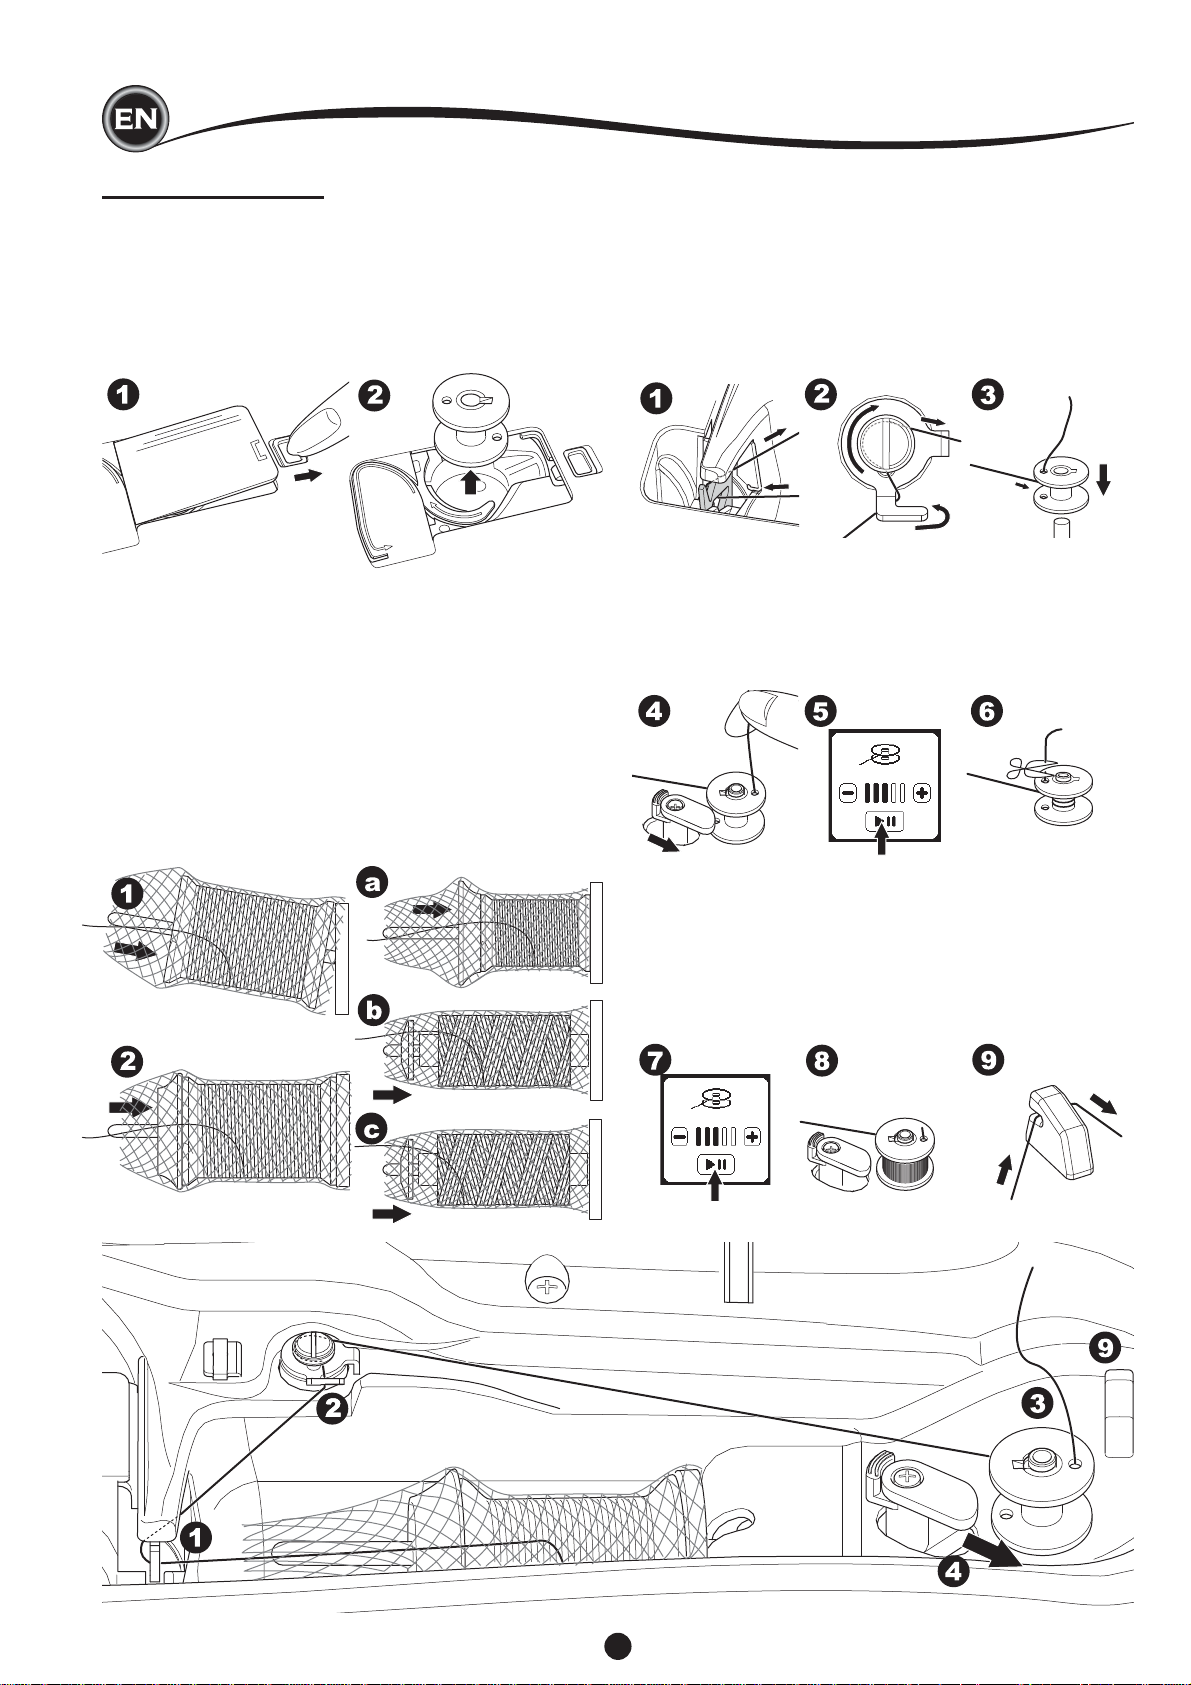
BOBBIN SETTING
Be sure to use only SINGER® Class 15 transparent bobbins in
this machine.
REMOVING THE BOBBIN
1. Pull the bobbin cover latch to the right and remove the
bobbin cover.
2. Lift up the bobbin from the machine.
SETTING SPOOL OF THREAD ON SPOOL PIN
1. Pull up the left end of spool pin and set the felt washer and
the spool of thread on spool pin so that the thread unrolls
from the front of the spool.
2. Set the spool cap on spool pin as far as it will go.
a. The spool cap can be reversed in order to better
accommodate the size of smaller thread spools.
b. Use the small spool cap when you use cross wound
thread. Leave small opening between cap and spool as
illustrated.
c. Set the thread net over the spool if thread unrolls too
easily.
WINDING THE BOBBIN
1. Hold thread in both hands and hook thread to the guide
from front opening.
2. Bring thread to the right and pass it through the thread
guide from the back side. Pass thread under the tension
disc in a clockwise direction.
3. Insert thread through hole in bobbin and place the bobbin
on bobbin winder spindle.
4. Hold the end of the thread and push bobbin stopper to the
right. When the bobbin winding screen appears, press the
Start/Stop button on the screen to start winding.
5. After the bobbin winds a few turns, stop the machine by
pressing the Start/Stop button on the screen.
6. Cut the thread near the hole, as illustrated.
7. Start the machine again.
You can adjust winding speed by pressing “+” (faster) or “-”
(slower) button on the screen.
8. When the bobbin is wound fully, the bobbin stopper will
return to the left and stop winding.
9. Remove the bobbin from the spindle and cut thread with
the thread cutter.
12
THREADING THE MACHINE
WINDING BOBBIN INDEPENDENTLY
You can wind the bobbin independently while embroidery
stitching.
1. Insert the auxiliary spool pin into the hole at the left side on
the top of the machine.
2. Place the felt washer and spool of thread onto the auxiliary
spool pin.
3. Bring thread to the right and hook the thread to the thread
guide from rear opening.
4. Follow the normal winding procedure from Steps 2 to 9 (on
page 12).
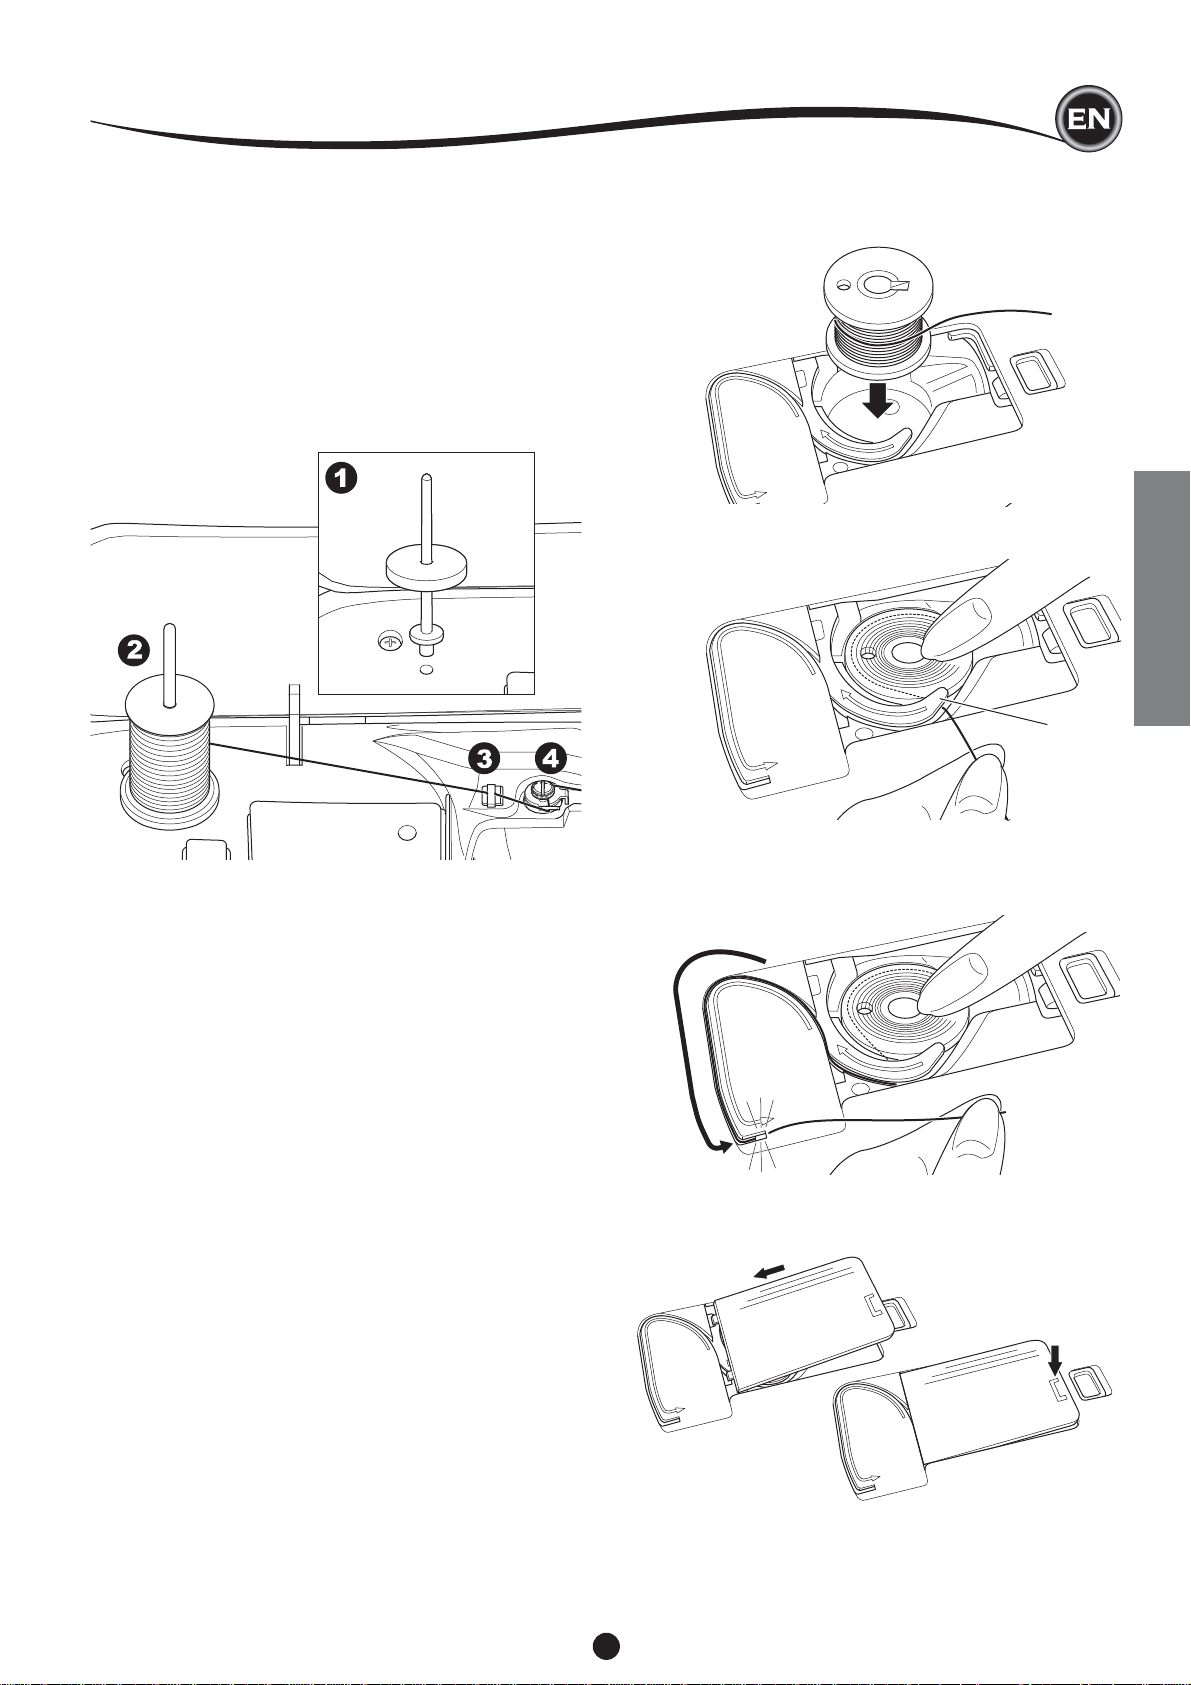
INSERTING THE BOBBIN
1. Place bobbin into bobbin holder, making sure the bobbin
turns in a counter clockwise direction.
2. Draw thread into notch (a) while holding the bobbin.
a
THREADING THE MACHINE
3. Pull thread along the groove, up and around the top, to the
left, then down.
While lightly holding the bobbin in place with your fi nger,
pull the thread to the right to cut the thread.
4. Replace the bobbin cover. Set the left tabs into the holes in
needle plate and push the right side of bobbin cover down
until it clicks into place.
NOTE:
This machine can start to sew without manually drawing up the
bobbin thread.
If you want to draw up the bobbin thread manually, see page
15.
Be sure to use only SINGER® Class 15 transparent bobbins in
this machine.
13
THREADING THE NEEDLE
THREADING THE MACHINE
REPARING TO THREAD MACHINE
P
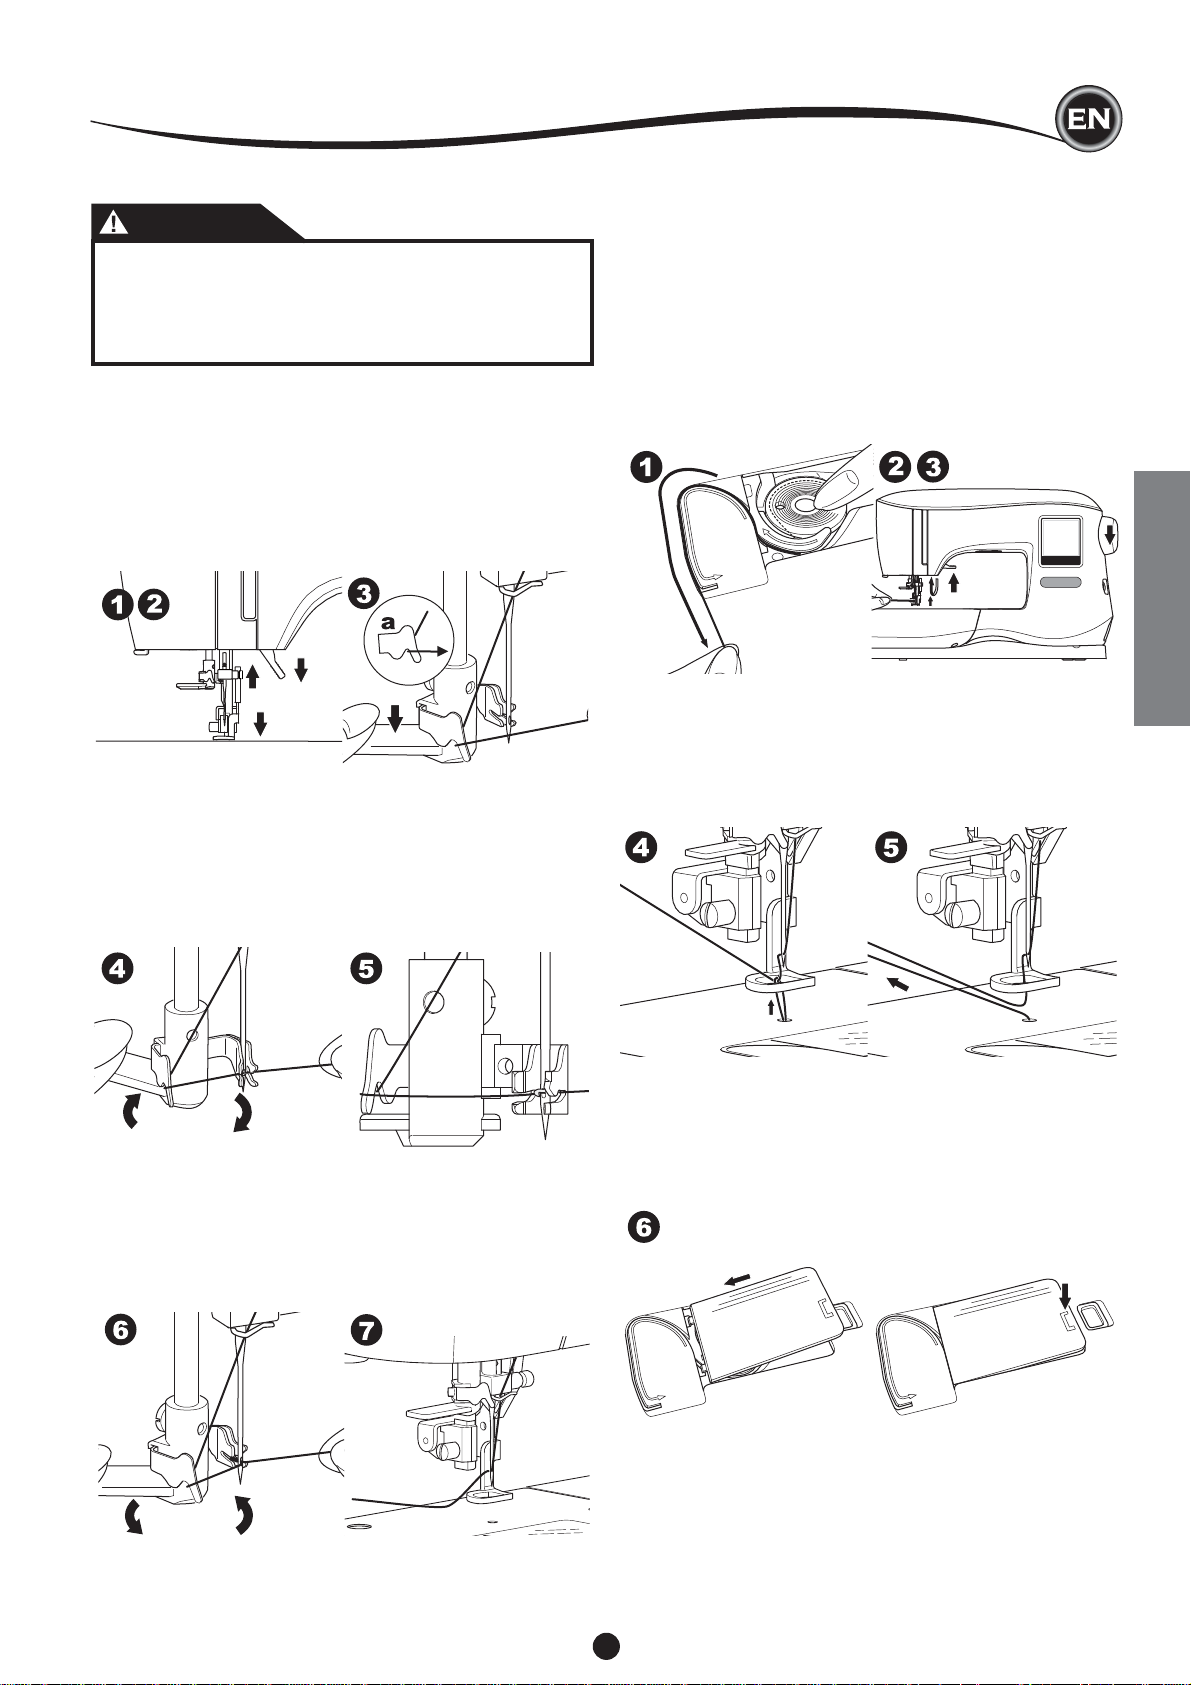
1. RAISE THE PRESSER FOOT LIFTER. It is very important
to raise the presser foot lifter before you proceed to thread
the machine to ensure proper thread tension.
2. Raise the needle to its highest position by turning the
handwheel toward you.
(Keep this position for threading the eye of the needle.)
NOTE:
It is very important to raise the presser foot lifter before you
thread the machine. Not doing so will likely result in poor
stitch quality, or excessive thread loops on the underside of
the fabric. Always raise the presser foot lifter before you begin
threading the machine.
THREADING THE UPPER THREAD
1. Hold thread in both hands and pass thread into the guide
from front opening.
2. Bring thread backward and pass through the slit from right
to left.
3. Bring thread to the left and pull thread down toward you
along the slit.
4. Pull the thread around the U-turn, then bring it back up.
5. To thread the take-up lever, draw thread up and bring
thread back down again from right to left along the slit.
6. Pull thread downward along the slit.
7. Draw thread through thread guide from right side opening.
8. Pass through needle eye from front to back.
Refer to next page for instructions on how to use the built-
in needle threader.
SETTING SPOOL OF THREAD ON SPOOL PIN
1. Pull up the left end of spool pin and set the felt washer and
the spool of thread on spool pin so that the thread unrolls
from the front of the spool.
Set the spool cap on spool pin as far as it will go.
2.
a. The spool cap can be reversed in order to better
accommodate the size of smaller thread spools.
b. Use the small spool cap when you use cross wound
thread. Leave small opening between cap and spool as
illustrated.
c. Set the thread net over the spool if thread unrolls too
easily.
14
THREADING THE MACHINE
THREADING THE NEEDLE EYE
CAUTION
To prevent accidents:
1. Keep fi ngers away from all moving parts. Special care
is required around the needle.
2. Do not lower the threader lever while machine is
operating.
NOTE:
The needle threader is used for needle sizes 11/80 and 14/90.
1. Lower the presser foot.
2. Check that the needle is raised to its highest position. If it is
not, raise needle by turning the handwheel toward you.
3. Lower the threader slowly and draw thread through thread
guide (a) and pull toward the right.
DRAWING UP THE BOBBIN THREAD
This machine can start to sew without drawing up the bobbin
thread. If you want to start sewing with longer bobbin thread,
draw up the bobbin thread as follows.
1. Insert the bobbin into the bobbin holder as shown on page
13, but do not cut thread.
2. Raise the presser foot.
3. Hold upper thread loosely and turn hand wheel toward you
one complete revolution.
4. Lower the lever as far as it will go. The threader will turn
and the hook pin will go through the needle eye.
5. Draw the thread into the guide, ensuring that the thread is
under the hook pin.
6. Hold thread loosely and release the lever.
As the threader rotates back, the hook pin will pass through
the needle eye, forming a loop of thread.
7. Pull thread out about 10 cm (4 inches) through the needle
eye.
THREADING THE MACHINE
4. Pull upper thread lightly. Bobbin thread will come up in a
loop.
5. Pull both upper and bobbin threads about 10 cm (4 inches)
toward the back of presser foot.
6. Replace the bobbin cover. (See page 13)
15

EMBROIDERY PREPARATION
HOME SCREEN / HOME BUTTON
OME SCREEN (A)
H
When you have attached the embroidery unit correctly, the
Home Screen will appear.
You can start selecting and editing embroidery from this
screen.
HOME BUTTON (B)
You can go back to the Home Screen from anywhere by
pressing the Home Button.
At this time, all selected designs or letters and editing for
embroidery will be cleared.
A
B
THREAD TENSION (D)
This embroidery machine adjusts thread tension automatically.
However, depending on the thread or fabric being used, it
may be necessary to modify the tension setting to achieve the
desired results.
To obtain the desired thread tension, adjust as follows.
i. CORRECT THREAD TENSION
Upper thread appears slightly on the bottom side of fabric.
ii. UPPER THREAD TOO TIGHT
Bobbin thread appears on the top side of fabric.
Decrease the upper thread tension by pressing the “-”
button.
iii. UPPER THREAD TOO LOOSE
Upper thread is loose or makes loops.
Increase the upper thread tension by pressing the “+”
button.
TOP SIDE BOTTOM SIDE
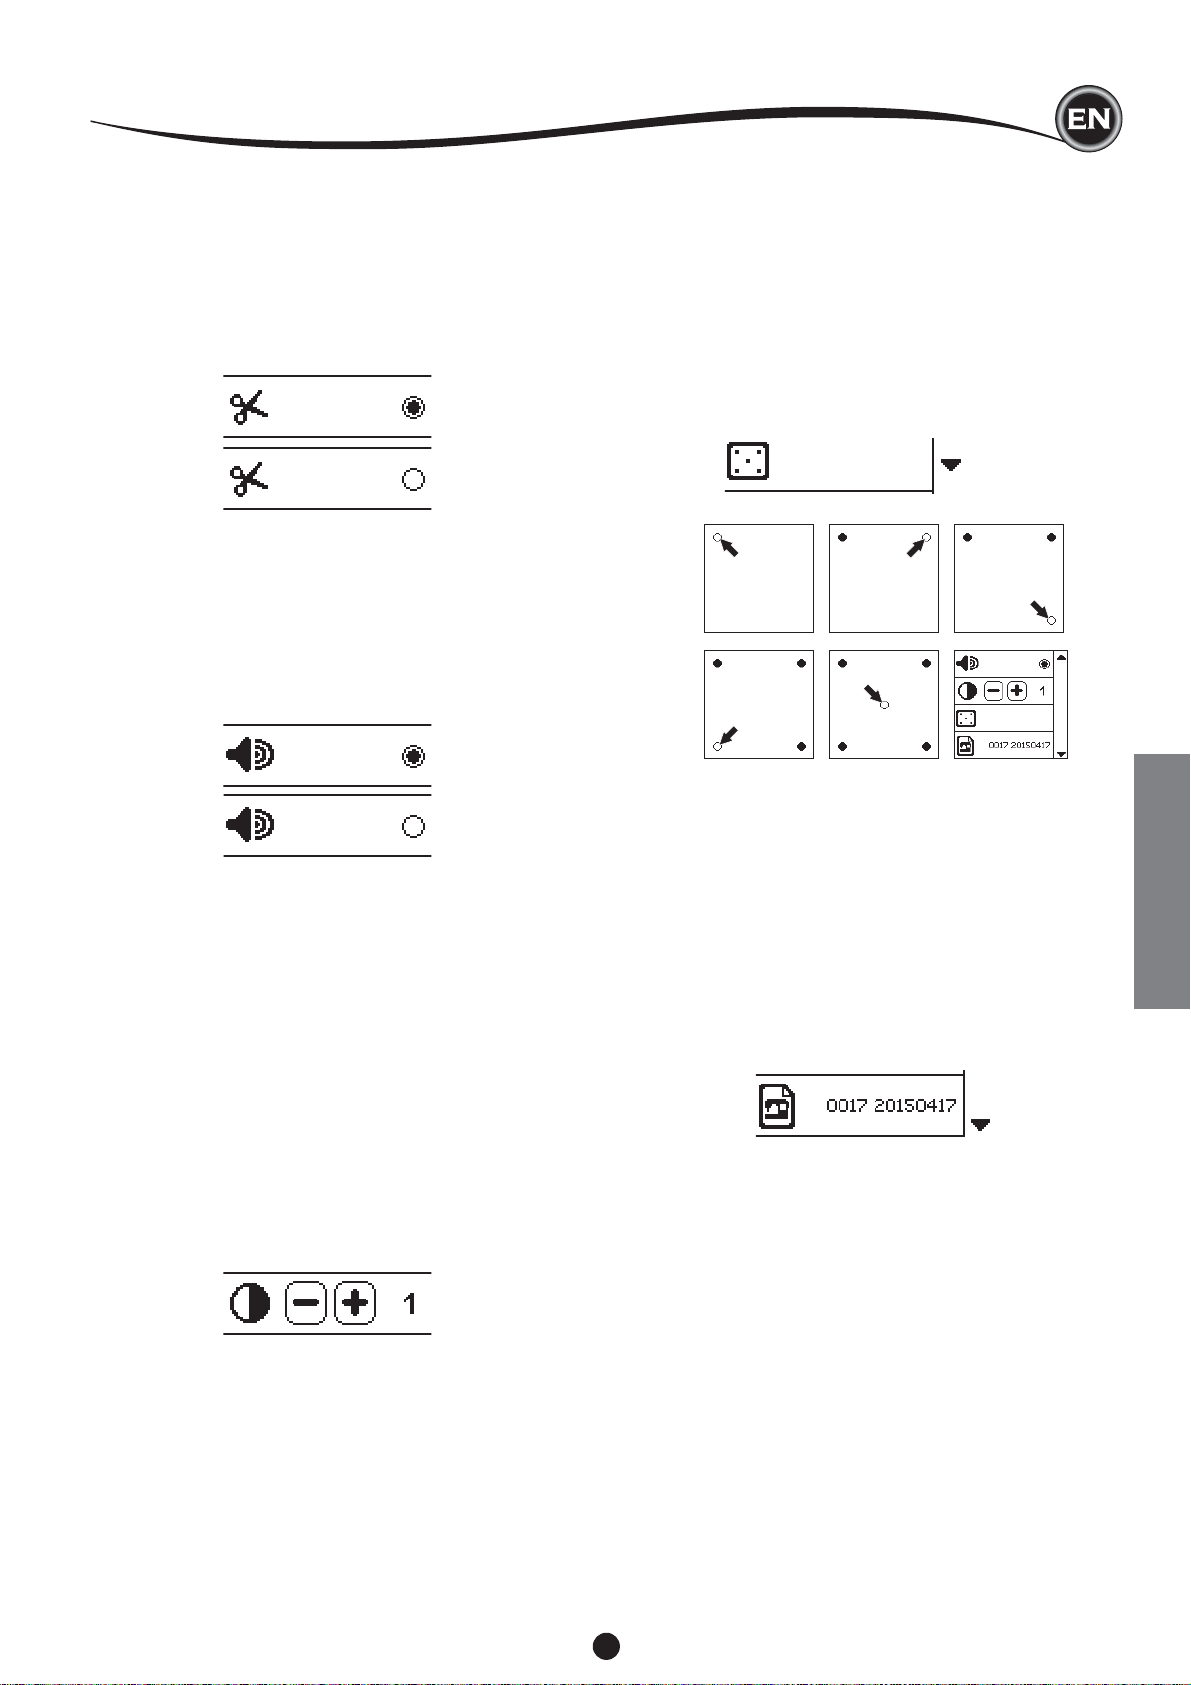
EMBROIDERY MACHINE SETTINGS
ETTING BUTTON (C)
S
Before or during the embroidery process, you can adjust the
machine settings by pressing the Setting Button.
The Setting Screen will appear. (a)
This screen is scrolled by pressing the right side arrow buttons.
Pressing the Setting Button again, machine will return to
previous screen.
NOTE:
All settings except for thread tension will remain until you
change them. Thread tension will return to pre-set when you
change the design.
(a)
D
i
ii
iii
When thread tension is changed from the default (pre-set)
setting, the number will be highlighted.
NOTE:
If the bobbin has been threaded or inserted incorrectly, or if
the upper thread has not been threaded correctly, good thread
tension cannot be achieved. Check to make sure that the
bobbin and upper thread are correctly threaded before making
any adjustments.
C
16
EMBROIDERY PREPARATION
STOP FOR CUT
When starting to embroider, the machine can be set so that it
will stop after a few stitches, allowing you the opportunity to cut
the thread tail.
You can select or deselect this function, as follows:
i. Stop for Cut is activated.
ii. Stop for Cut is deactivated.
i
ii
AUDIBLE BEEP
You can turn the audible beep on or off by pressing this button.
i. Audible Beep is on.
ii. Audible Beep is off.
i
CALIBRATION SCREEN
If the icons on the screen (in relationship to where you touch
the screen) seem misaligned, the screen may need calibrating,
as follows:
1. Scroll down and press calibration screen button.
2. Press the each “O” mark indicated on the screen 5
positions. (4 corners and center)
When calibration is completed, setting screen will appear
again.
1
2
5
3
4
6
ii
CONTRAST OF SCREEN
You can adjust the contrast of the LCD screen.
By pressing “+” or “–” button, contrast will increase or
decrease.
SOFTWARE VERSION
Software version of this embroidery machine will be indicated
at the bottom of this screen.
You can update the software by using the USB embroidery
stick.
(See page 11)
(example)
EMBROIDERY PREPARATION
17
F ABRIC AND ST ABILIZER
Embroidery can be applied to many different types of
fabrics. Regardless of the fabric, it will be necessary to use
an appropriate type of stabilizer. (See page 29 for more
information)
Stabilizer serves as a foundation, holding fabric securely while
the embroidery machine stitches out the design, eliminating
distortion in the fabric and the design.
Different fabrics will require different types of stabilizer,
depending on the nature of the fabric and the density of the
design being embroidered. But most embroidery designs will
stitch out looking their best if the fabric is properly stabilized.
Stabilizer is mainly used as a backing, but at times, a stabilizer
is used on the top of the project as well.
A “Backing” goes on the back side of the area to be
embroidered. It may be hooped along with the fabric or hooped
alone, depending on the fabric and project.
A “Topper” means that an additional stabilizer is placed on the
top of the fabric, either hooped with the fabric or secured in
another manner. Its function is to ensure that the texture or loft
of the fabric is held down, providing a smooth surface for the
embroidery.
Though there are many types of stabilizers available, the most
common types are tear-away, wash away, and cut away.
Stabilizers come in different weights as well. After selecting the
best type of stabilizer for the project, choose the appropriate
weight. A good general rule is that the weight of the stabilizer
be compatible with the fabric.
Tear-away stabilizers are temporary, so once the excess is
removed after embroidering, the fabric itself must be able to
support the design on its own.
Tear-away stabilizers are usually recommended for woven
fabrics.
EMBROIDERY PREPARATION
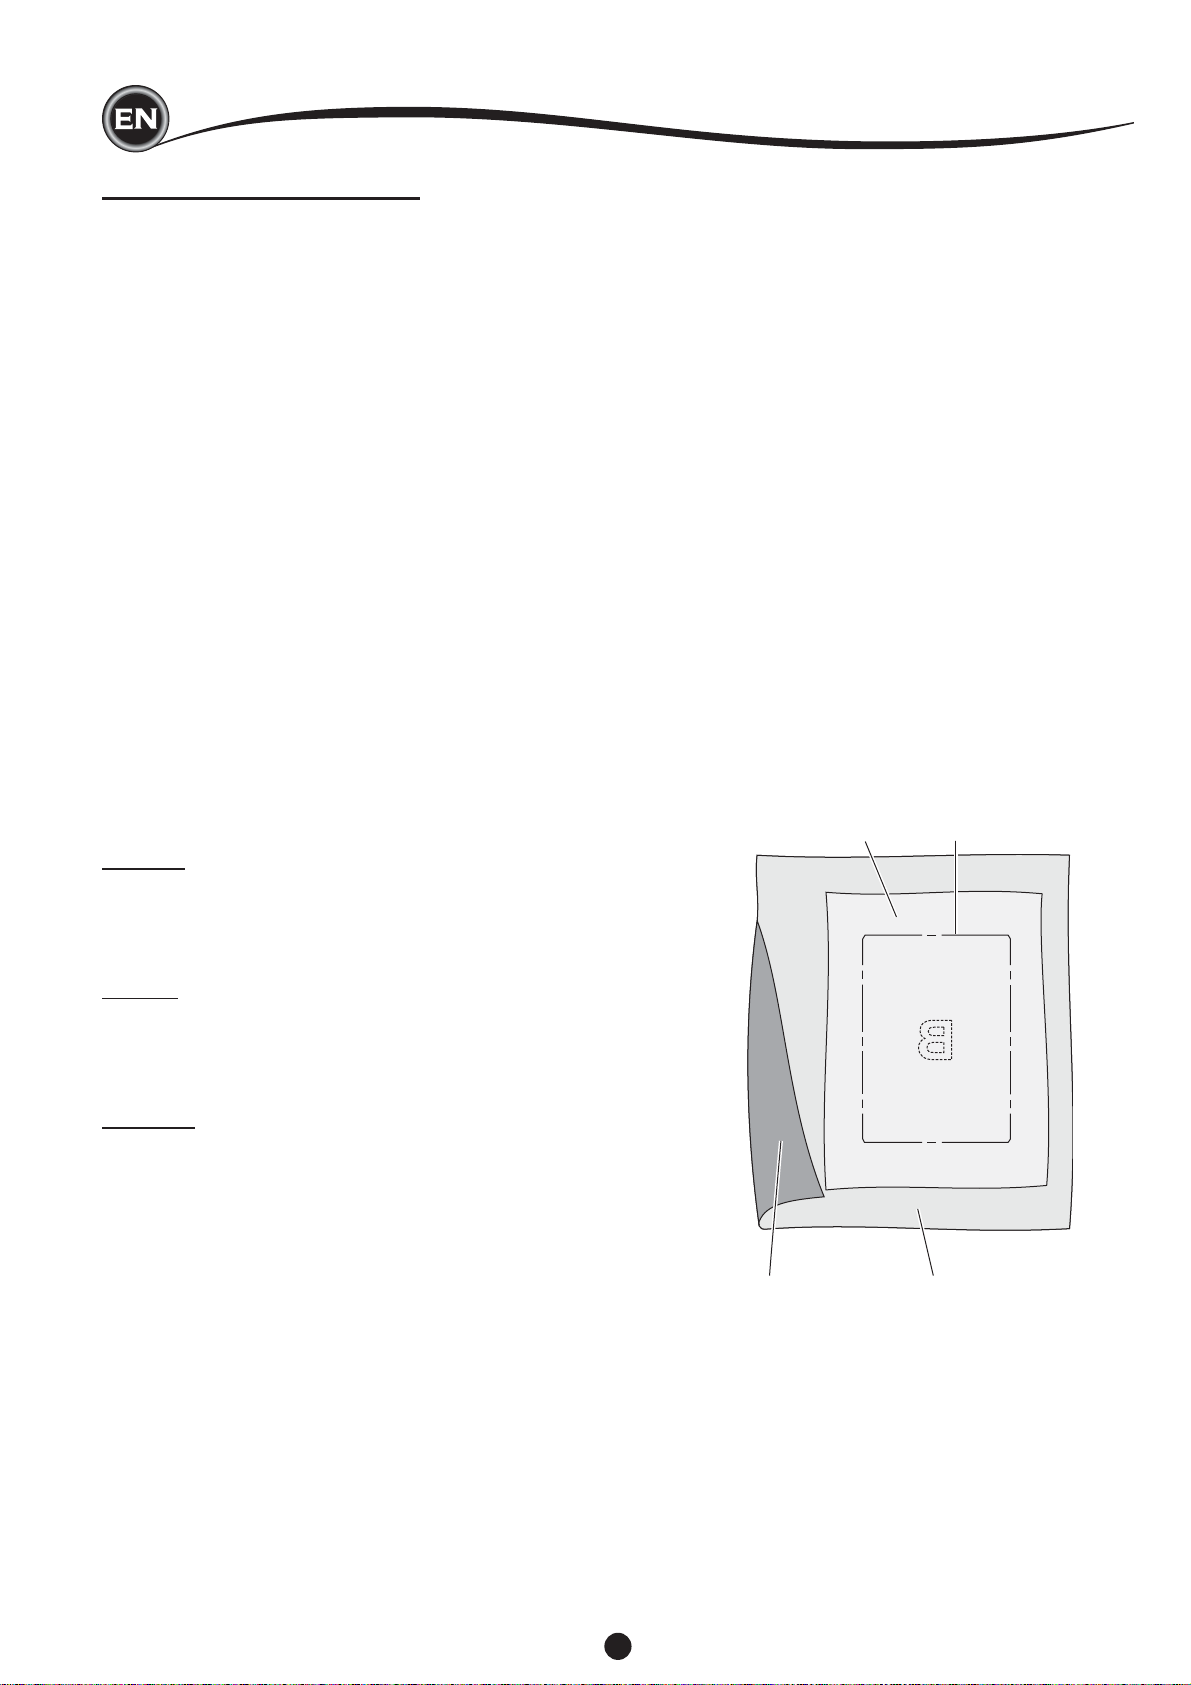
Generally, the stabilizer should be larger in size than the hoop
with which it is being used. When embroidery is completed,
use a fi ne point scissor to carefully remove any excess
stabilizer from the embroidery area.
a. Stabilizer
b. Hoop position
c. Fabric (Under side)
d. Embroidery surface (Top side)
a
b
Cut-away stabilizers are permanent, and therefore a better
choice for supporting embroidery on unstable fabrics, to
prevent distortion. Simply trim away the excess from around
the design. Even after frequent laundering, the embroidery
design will stay intact.
Wash-away stabilizers rinse away from the embroidered area.
Though they are a good choice when sewing very light weight
fabrics, they can also be used as a topping. After removing the
main excess stabilizer, the rest is simply rinsed away.
There are also fusible and non-fusible version of stabilizer
available. Fusible stabilizers can be ironed onto the back of
the area to be embroidered, preventing distortion of the fabric
while hooping.
However, for fabrics that may be more sensitive to ironing,
the non-fusible stabilizers are used. In these cases, another
helpful tool is a temporary fabric spray adhesive. Use this to
temporarily ‘hold’ the fabrics and stabilizer while hooping and
embroidering, to prevent the fabrics from shifting during the
embroidery process.
Knowing how to properly stabilize involves a little trial and error
at fi rst. Follow the stabilizer manufacturer’s recommendations,
for best results.
cd
18
EMBROIDERY PREPARATION
SECURING FABRIC IN EMBROIDERY
HOOP
For the best embroidery results, place a layer of stabilizer
beneath the fabric. When hooping stabilizer and fabric make
sure that they are smooth and securely hooped.
1. Open the quick release lever on the outer hoop and remove
the inner hoop.
2. Place the outer hoop on a fi rm fl at surface with the screw
on the lower right. There is a small arrow in the center of
the left edge of the outer hoop which will line up with a
small arrow on the inner hoop.
3. Place stabilizer and the fabric, with the right sides facing
up, on top of the outer hoop.
2
3
1
ATTACHING THE EMBROIDERY HOOP
TO THE MACHINE
1. Raise the presser foot. Raise the needle to its highest
position by turning the hand wheel toward you.
2. Slide the hoop onto the embroidery unit from front to back
until it clicks into place.
NOTE:
Presser foot lever can be raised and held in a higher position
to help passing the hoop under the foot.
4. Place the inner hoop on top of the fabric with the small
arrow at the left edge and push fi rmly into the outer hoop.
5. Close the quick release lever. Don’t force the quick release
lever. If it seems as though it doesn’t want close, loosen the
retaining screw fi rst and then try closing the quick release
lever again.
6. Adjust the pressure of the outer hoop by turning the
retaining screw. The fabric should be taut in the hoop for
the best results.
4
a
EMBROIDERY PREPARATION
REMOVING THE HOOP FROM THE MACHINE
Press and hold the release lever (a) on the hoop connection
assembly, then slide the hoop toward you.
5
NOTE:
When embroidering additional designs on the same fabric,
open the quick release lever, move the hoop to the new
position on the fabric and close the quick release lever. When
changing type of fabric, you might need to adjust the pressure
using the retaining screw. Do not force the quick release lever.
6
19
SELECTING DESIGNS
HOME SCREEN
Selecting designs to embroider begins with the Home Screen.
The Home Screen has two main selections.
a. Selecting a design, editing and stitching.
b. Programming letters, editing and stitching.
a
b
EMBROIDERY COLLECTION
Your machine comes with 200 embroidery designs, as well as
embroidery fonts. You will fi nd 69 of these designs, plus the
fonts, built-in to the machine. The remainder of the designs
are on the USB stick.
The USB stick also has 2 PDF fi les with information about the
designs. For more information about this, see page 11.
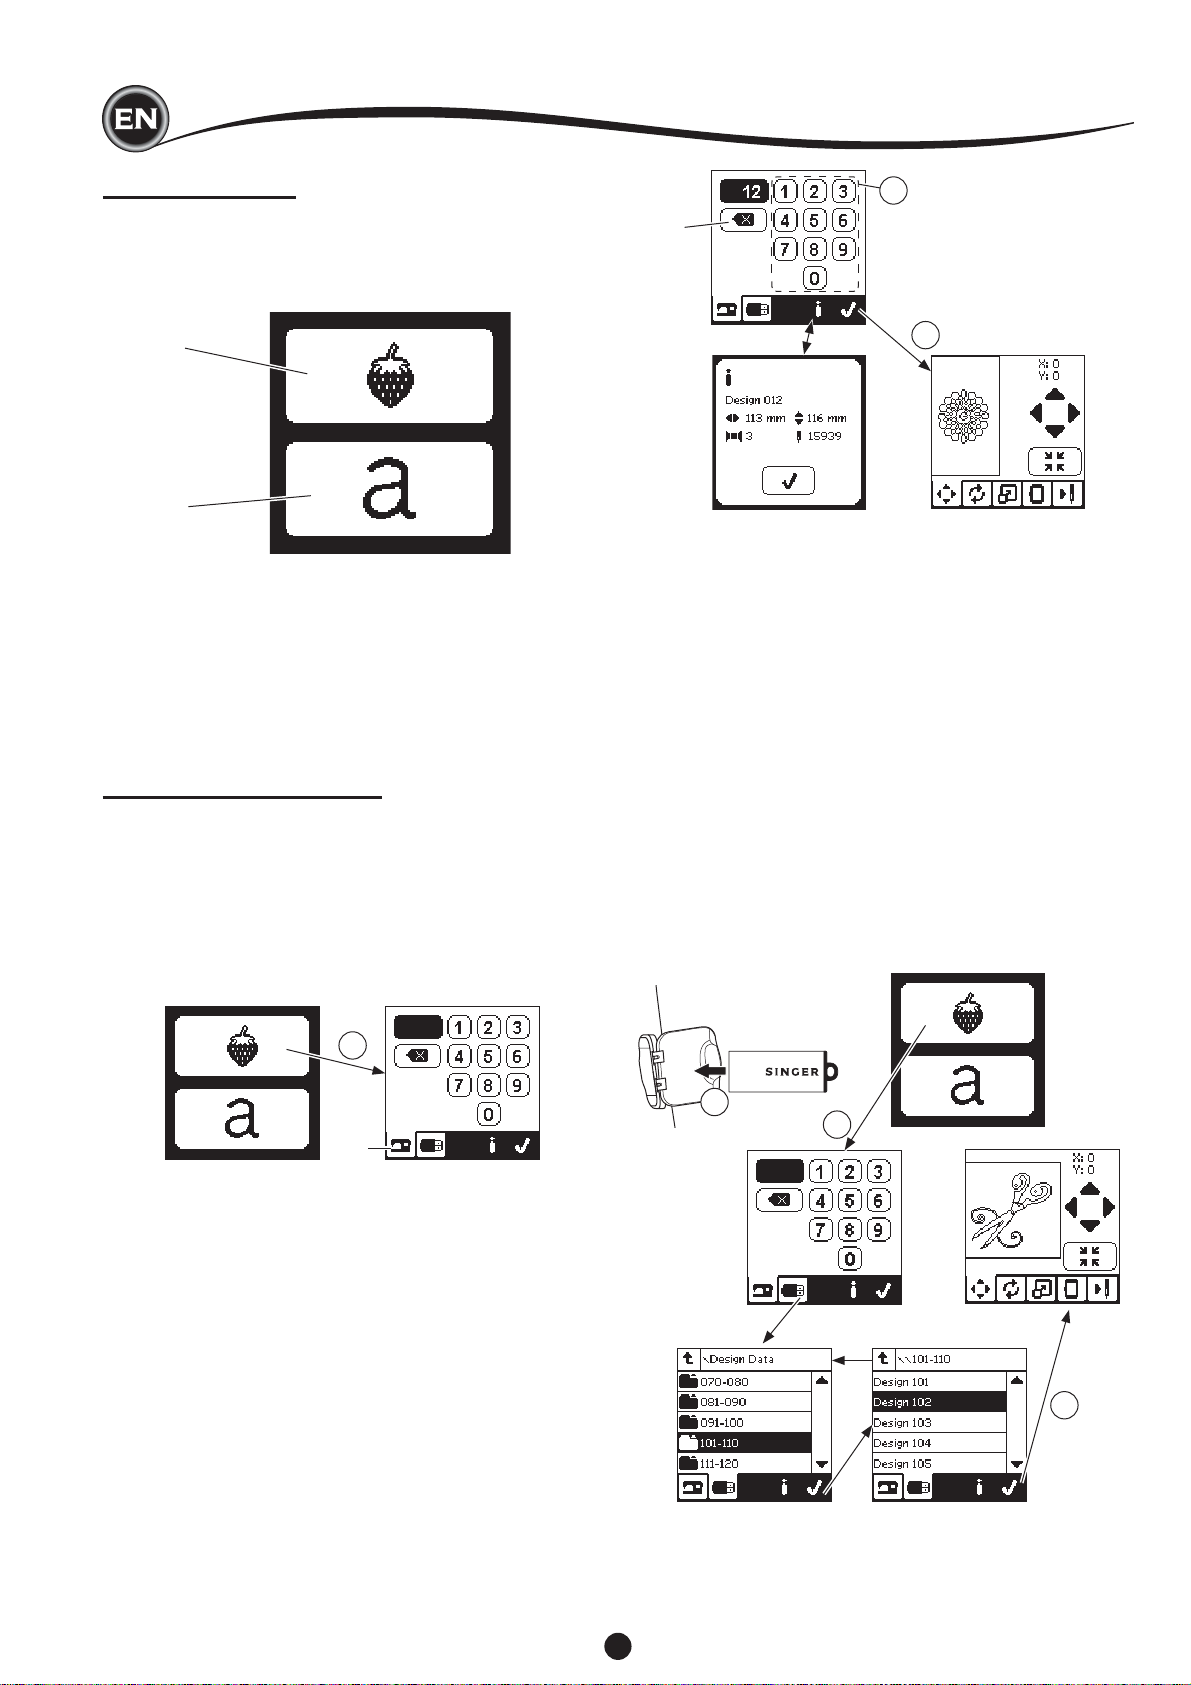
SELECTING A DESIGN
O SELECT A BUILT-IN DESIGN
T
Your machine has 69 built-in embroidery designs.
1. Press the Design button on the Home Screen.
A ten-key screen will appear.
NOTE:
Press the Machine tab (c) if USB tab is activated.
2
d
e
3
TO SELECT A USB DESIGN
Your machine can read “.xxx” and “.dst” embroidery data
stored in the USB embroidery stick.
1. Insert the USB embroidery stick into the USB socket.
2. Press the design button on the Home Screen and then
press the USB tab (f).
Data list will appear in the screen.
Press the fi le or folder to select or open and press the “✓”
button.
When folder is opened, the list of designs included in that
folder will appear (g).
To go back, press the arrow button on the top line (h).
Press the info button for more information about the
selected design.
NOTE:
If the USB stick or a folder is empty or if readable fi le is not
included, empty mark will appear.
3. When fi le is selected, embroidery placement screen will
appear.
1
c
2. Select the design from the Embroidery Collection and press
the design number on the ten-key screen.
Selected number will appear in the top left of LCD.
To delete a number, press the Delete button (d).
If you want to know about selected design, press the info
button (e). The following information is indicated on the
screen.
i. Design name
ii. Design width & height
iii. Total number of colors
iv. Total number of stitches
By pressing “✓” button, the information will disappear and
ten-key screen will appear again.
3. Press the “✓” button at ten-key screen.
The design is selected and Embroidery Placement screen
will appear.
1
2
f
h
3
g
20
EDITING THE DESIGN
Before you begin embroidering, you can edit designs, as
shown below, using the Edit tabs.
NOTE:
The pop up message may appear if you did not attach the
correct hoop.
Press “✓” button and attach the hoop indicated in this message
or change hoop size setting at the Embroidery Option screen
(Next page).
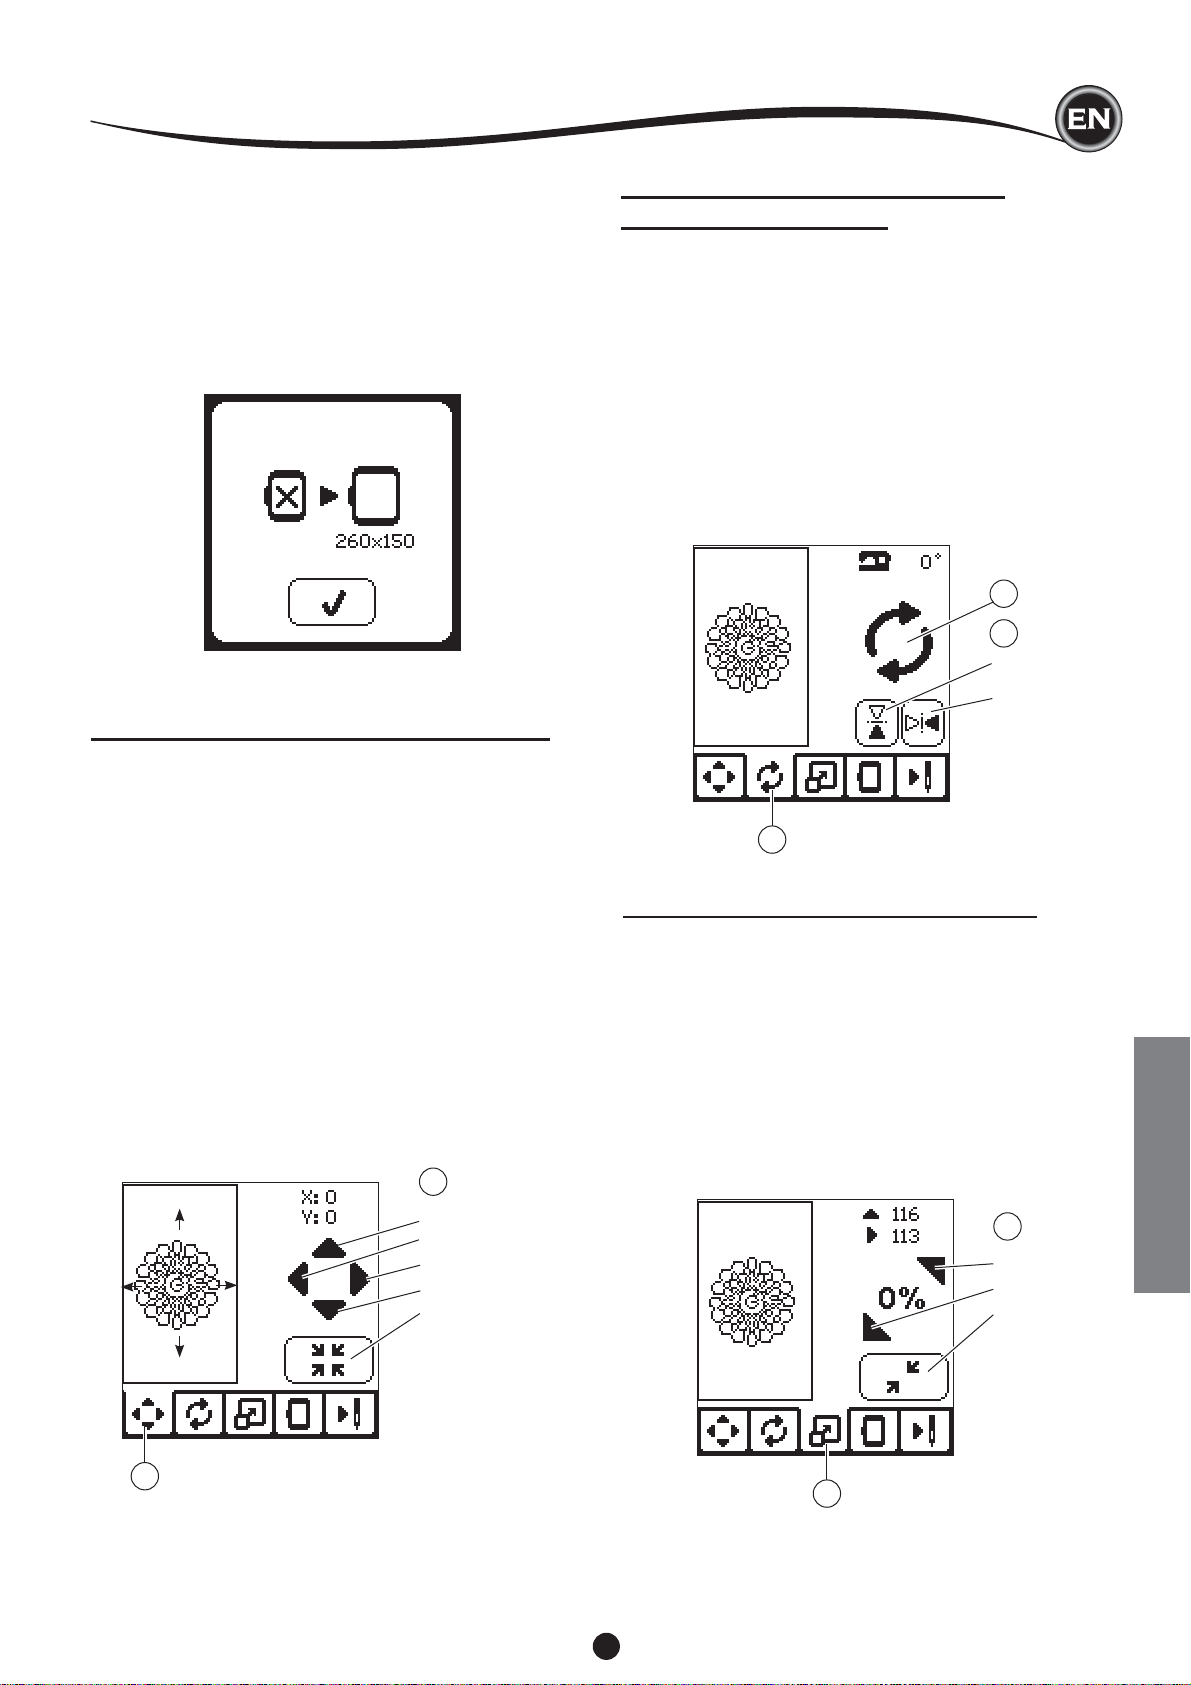
EMBROIDERY PLACEMENT SCREEN
You can move the placement or position of the selected
embroidery design, as follows:
1. Press the Embroidery Placement tab.
(When you have selected the design, this screen will
appear fi rst.)
2. Press the four arrow buttons to move the position.
a: up, b: left, c: right, d: down
The hoop will move according to the direction selected.
Each time the button is touched, the hoop will move. If the
button is touched and held, the movement will occur in
larger increments.
The values (X:Y:) near the top of the screen indicate
distance from center position.
NOTE:
The left side of screen is indicating embroidery fi eld and
relative design position and size.
When you edit the design, this fi eld will redraw according to
your editing.
EMBROIDERY ROTATION AND
MIRRORING SCREEN
1. Press the Embroidery Rotate and Mirroring tab.
2. Press the Rotate button. By pressing this button, the design
will rotate 90 degrees clockwise. If the design is too wide or
too high to rotate 90 degrees, it will rotate 180 degrees.
The total rotation value will be indicated at the top right of
the LCD screen. Located to the left of the rotation value is
a ‘machine icon’, which will rotate as the rotation value is
changed.
3. Press the Mirror buttons.
a. Mirror from top to bottom
b. Mirror from side to side
The ‘machine icon’ (located near the top of the LCD screen)
will invert according to the selections made, indicating the
new orientation of the embroidery design.
2
3
a
b
1
EMBROIDERY SCALING SCREEN
1. Press the Embroidery Scaling tab.
2. To increase the scale, press the upper arrow button (a).
To decrease the scale, press the lower arrow button (b).
The design will be scaled 5 percent each pressing on a
button.
The maximum scaling is +/- 20 percent.
If scaling is over the hoop size, it cannot be selected.
To return to original size, press the button (c).
The value of scale is indicated between the buttons, and
size of scaled design is indicated on the top line of screen.
2
a
b
c
d
e
1
1
21
2
a
b
c
EMBROIDERY
EDITING THE DESIGN
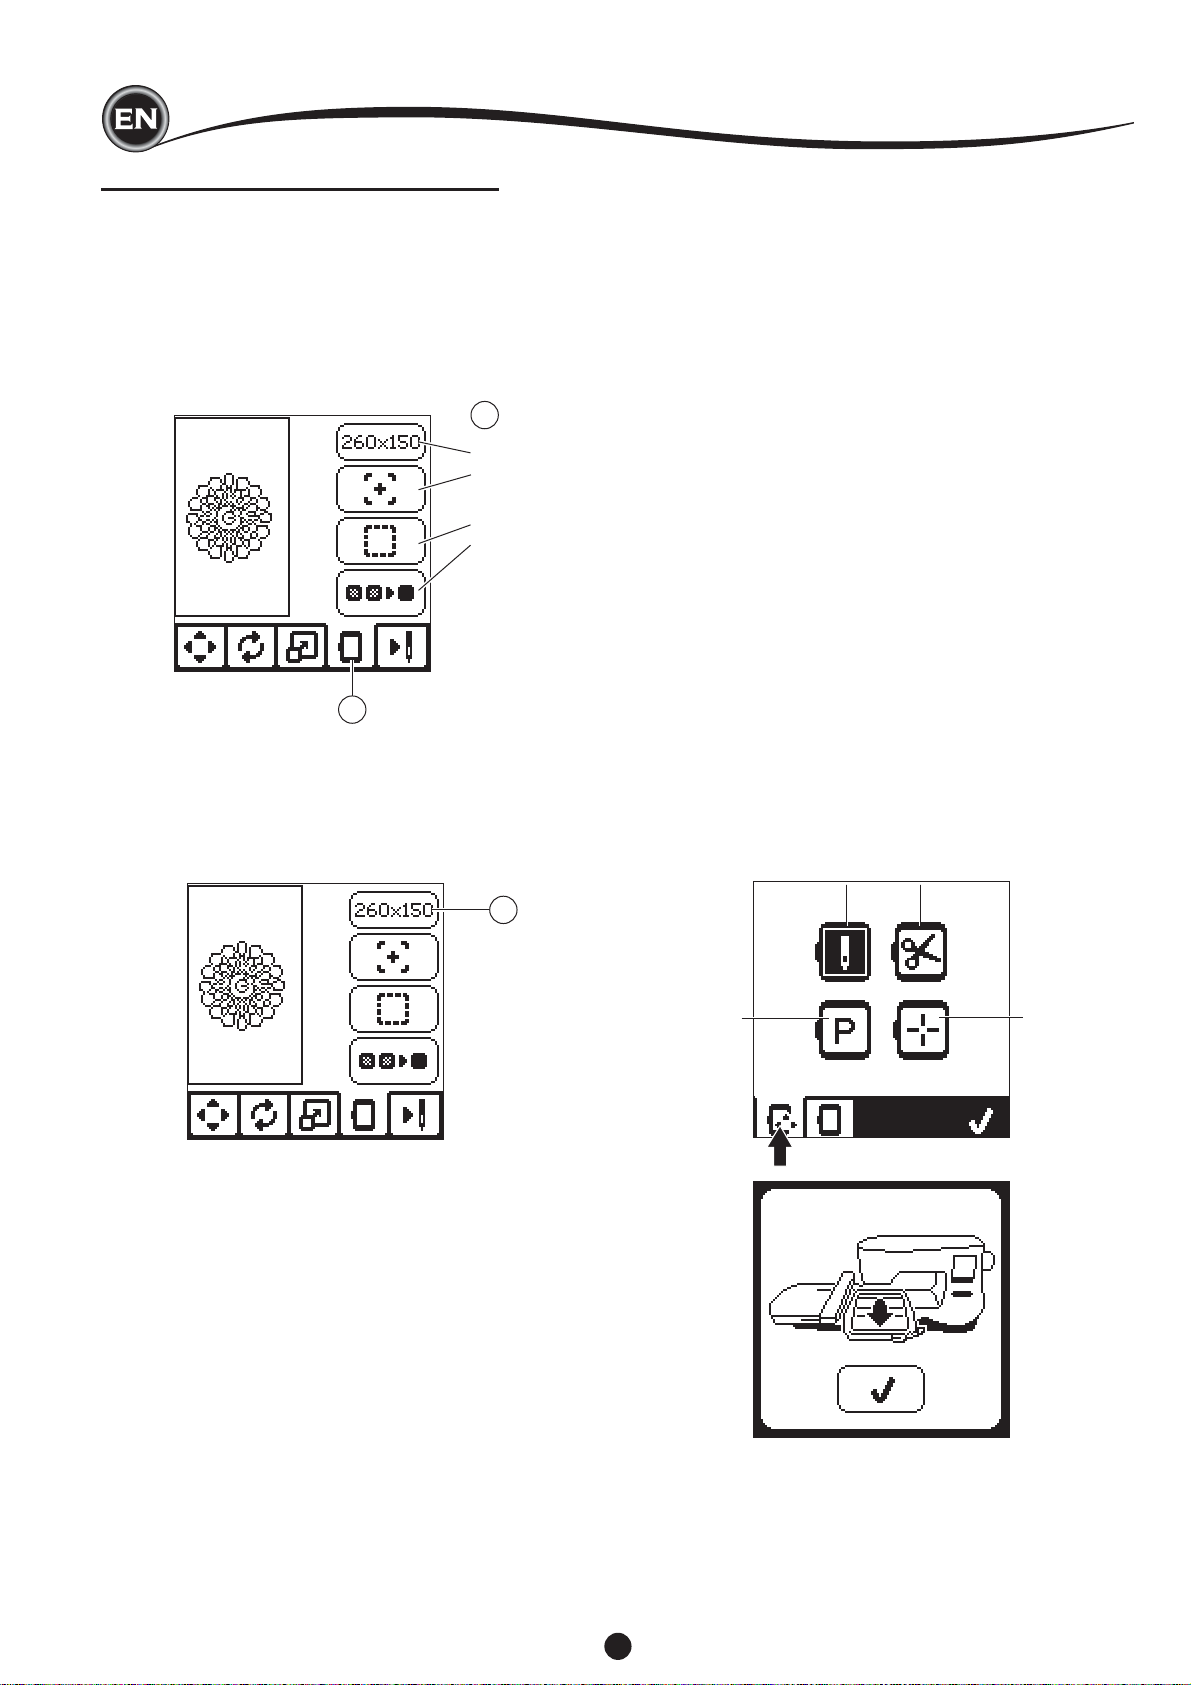
EMBROIDERY OPTION SCREEN
1. Press the Embroidery Option tab.
2. You can access embroidery options by pressing the
buttons, as shown below:
A. Hoop Option and Selection
B. Tracing
C. Basting
D. Monochrome
2
A
B
C
D
1
HOOP OPTION AND SELECTION (A)
The top right button indicates the hoop size selected. Press
this button to move the hoop position or to change the hoop
size.
HOOP OPTION - MOVING HOOP POSITION
When you press the Hoop Option and Selection button, the
Hoop Option screen will appear fi rst.
You can move the hoop position as follows:
i. Current Position:
When you want to return to the current stitch and start
embroidering again where the embroidery was interrupted,
press this button.
Hoop will move to current positon and return to embroidery
option screen.
NOTE:
You can also press the “✓” button to return to current
positon and embroidery option screen.
ii. Cut Position:
By pressing this button, move the hoop towards you,
making it easier to trim fabric when embroidering an
appliqué.
iii. Park Position:
When your embroidery is fi nished and you want to store
your machine, it will be necessary to move the hoop
carriage to Park position. Press the Park position button.
When the pop-up message (v) appears, remove the hoop
and press the “✓” button. The carriage will then move to
the correct position for storage.
Then, turn off the power switch and remove the unit.
NOTE:
It is very important that the hoop is removed, otherwise it
may be damaged.
iv. Center Position:
If you want to check where the center position of the hoop
will be placed on the fabric, press this button.
i
ii
A
iii
v
NOTE:
When hoop is not attached, buttons “ ii, iv “ will not activate.
iv
22
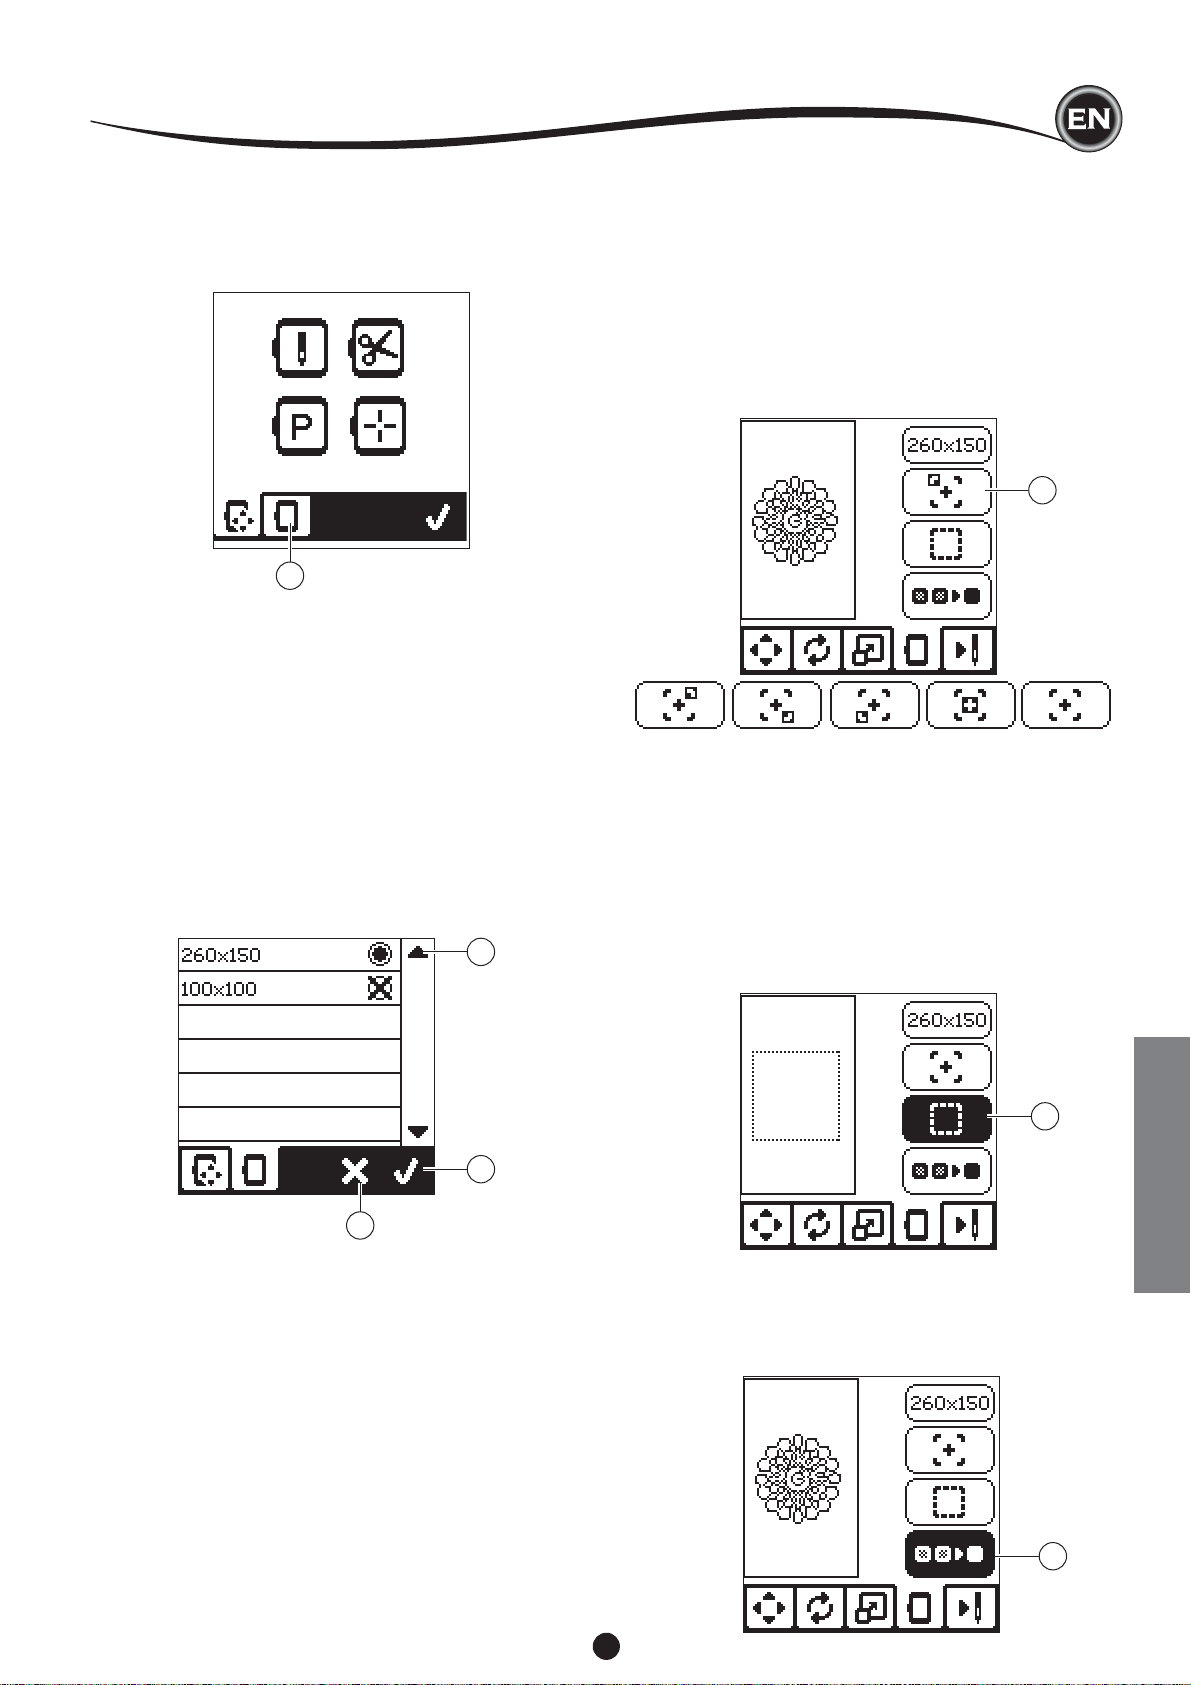
EDITING THE DESIGN
HOOP SELECTION
When you select the design, machine will select most suitable
hoop automatically.
1. To change the hoop, press the second tab to open the hoop
list.
1
2. Select the hoop you want to use.
The hoop list can be scrolled by pressing the right side
arrow buttons.
Only hoops that are big enough for the selected design will
be possible to select.
Hoops that are too small are marked with an X and cannot
be selected.
Selected hoop is marked with a black dot.
✓
3. Press the ”
embroidery option screen will appear.
At this time, all edits (rotation, mirroring and scaling) will be
reset. If you don’t want this, press the “X” button (e). Hoop
size and edits will not change and return to the Embroidery
Option Screen.
” button. Hoop size will change and the
2
TRACING (B)
The Tracing function can be used to trace around the design
area. Press the second button to move the hoop so the needle
is placed in the upper left corner of where the design will be
embroidered. Each press of the button will move the hoop to
view all corners of the design.
On the fi fth press, the hoop will move to the center position
of the design and on the sixth press it will move back to its
original position.
The Tracing button will indicate the position by highlighting
mark.
B
BASTING (C)
By pressing the third button and pressing the Start/Stop button,
machine will sew a basting stitch around the design area as a
box.
Basting enables you to secure your fabric to a stabilizer placed
beneath it, especially when the fabric to be embroidered
cannot be hooped. Basting can also provide added support,
especially for unstable fabrics.
NOTE:
During basting, the design box will be indicated with a dashed
line and basting button will be highlighted.
3
e
NOTE:
If the hoop you have selected is not the same as the hoop
attached to the embroidery unit, a pop-up will appear to inform
you of this. Attach the correct hoop or select another hoop
from the list.
Hoops 260x150 and 100x100 are provided with this machine.
C
EMBROIDERY
MONOCHROME (D)
Press the fourth button to activate monochrome embroidery.
The machine will not stop for color block changes. Press the
button again to deactivate monochrome embroidery.
When monochrome is activated, this button will be highlighted.
D
23
SEWING DESIGN
When you complete editing the design, press the Stitch Out
tab to start sewing.
SEWING SCREEN
When you press the Stitch Out tab (A), the Sewing Screen will
appear.
a. Embroidery fi eld and position
b. Stitches left in color block / Total number of stitches left in
design.
By pressing -/+ buttons, stitch will go backward/forward.
c. Current color / Total number of colors
By pressing -/+ buttons, color block will go backward/
forward.
b
a
c
6. Press the Start/Stop button.
The machine will start embroidering the fi rst color of the
design.
NOTE:
If presser foot lifter is raised at this time, the pop up
message will appear. Lower the foot and press the “✓”
button.
6
7. When Stop for Cut setting is on, machine stops
automatically after few stitches for cut thread end. A pop up
appears asking you to cut thread end. Cut thread end and
press the “✓” button. Continue embroidering by pressing
Start/Stop button.
7
A
START TO SEW
1. Thread the upper thread with the fi rst color.
CAUTION
To avoid injury:
Special care is needed for the needle when changing
the upper thread.
2. Pass the upper thread through the hole of the Embroidery
Foot from the top side.
3. Lower the presser foot lifter.
4. Hold the upper thread.
5. Clear suffi cient space to accommodate movement of the
carriage and the hoop.
3
1
4
8. When embroidering is completed, machine will stop
automatically and cut upper thread.
A pop up will appears asking you to change color. Re-
thread with the next color and press “✓” button. Continue
embroidering by pressing Start/Stop button.
Each color segment is tied of at the end and the upper and
bobbin threads are cut.
8
9. When the embroidery is completed, your machine cuts both
threads and stops.
A pop-up informs you that your embroidery is fi nished.
Then press “✓ button.
Raise the presser foot and remove the hoop.
9
2
24
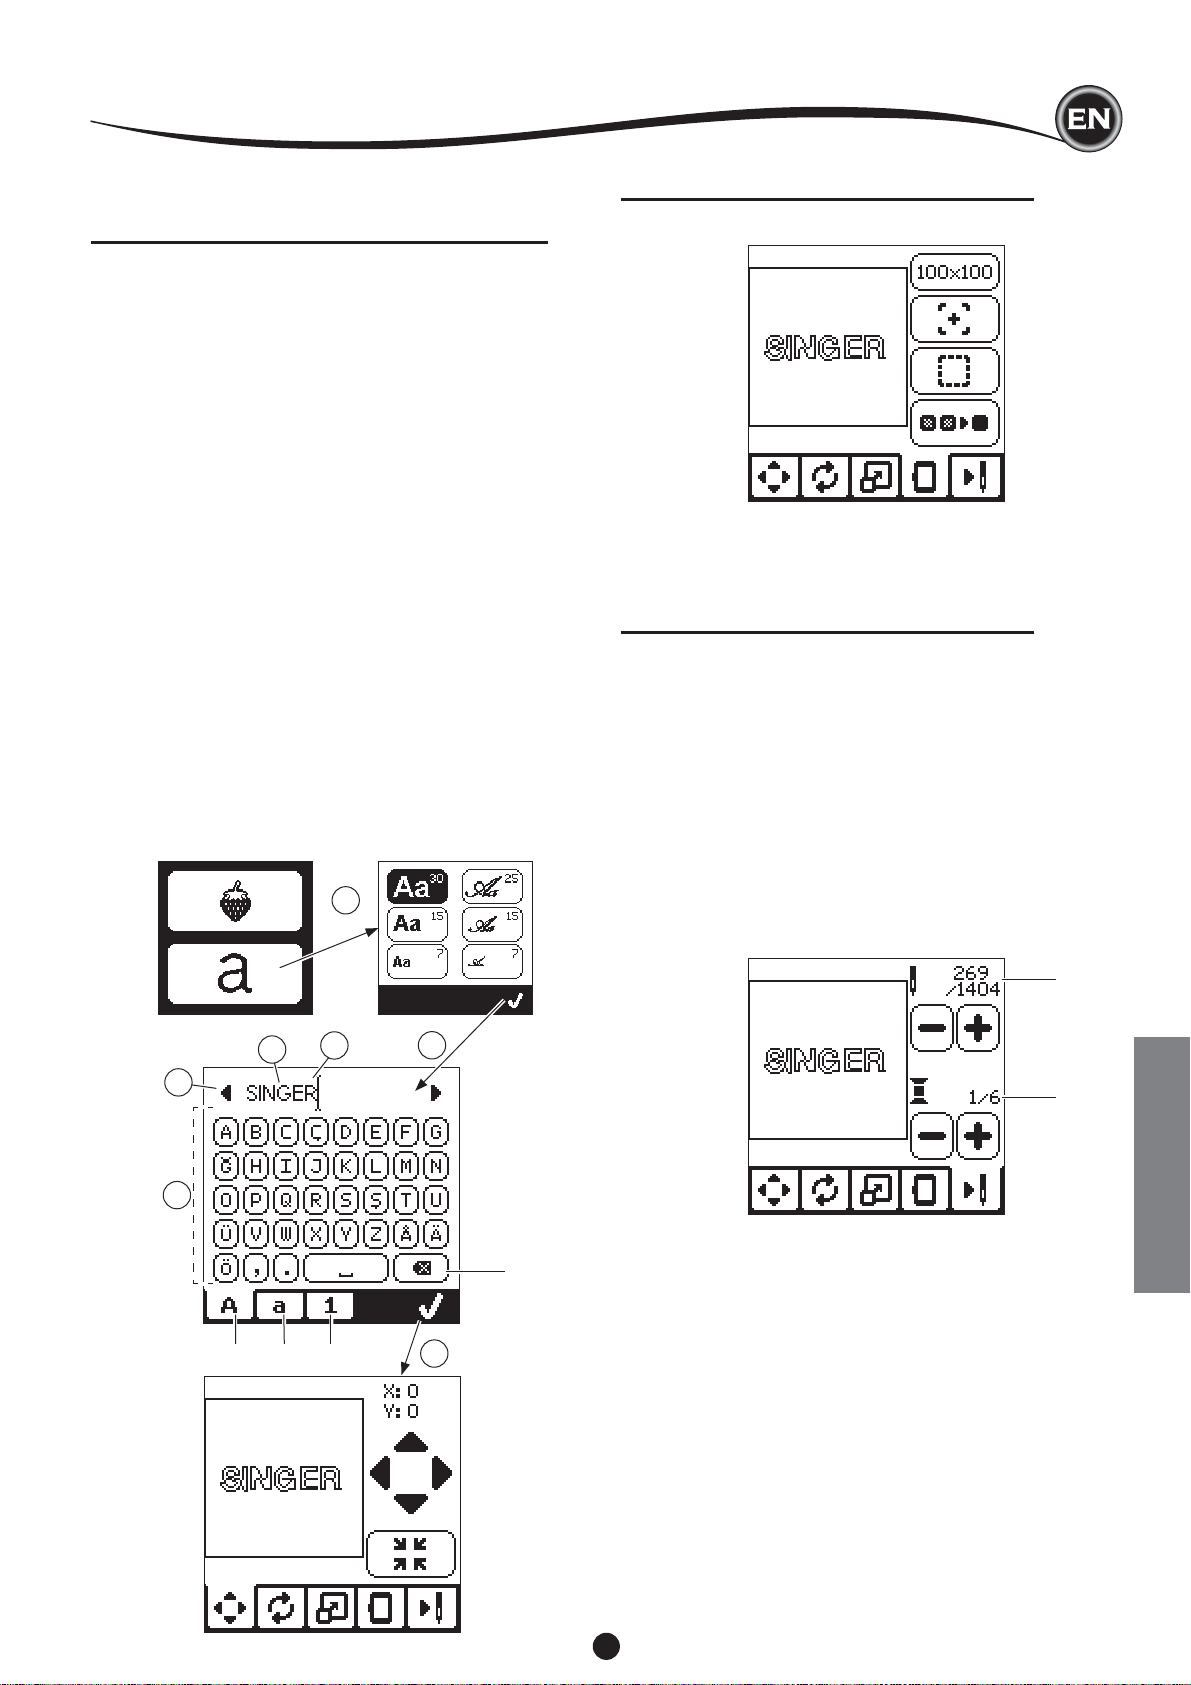
EMBROIDERY LETTERS
You can select from 2 different font styles.
SELECTING EMBROIDERY LETTERS
1. Press the Font button on the Home Screen.
The Font Selection screen will appear.
2. This machine has 2 fonts and each font has 3 sizes.
Press the button for the font you want to sew, and then
press the “✓” button.
The uppercase letter screen will appear.
3. Select the letters you want to embroider.
To change to different types of characters, press the
tab that contains the desired characters, as follows:
a. Uppercase letters
b. Lowercase letters
c. Numeric letters and special letters
4. Selected letter will be added to the top line.
5. The arrow buttons on top line will move the cursor.
6. To insert the letter, move the cursor to the inserting point
and select letter.
To delete the letter, move the cursor to the right side of the
letter to be deleted, then press the delete button (d).
7. When sequence of letters is completed, press the "✓" mark.
The Sewing Screen will appear.
NOTE:
If no letters are selected, the Home Screen will appear.
✓
You can return to letter selecting mode after pressing "
by pressing home button.
You can add letters until largest hoop height (If width of
letters exceeds maximum width of hoop, 90 degree rotate
automatically).
1
" mark
EDITING EMBROIDERY LETTERS
Lettering can be edited, similar to the way designs can be
edited.
SEWING EMBROIDERY LETTERS
Sewing embroidery letters works in the same way as sewing a
design.
When stitching lettering, the values appear on screen.
a. Stitches left in current letter / Total number of stitches left
all letters
b. Current letter / Total number of all letters
The machine will stitch each letter, cutting the threads between
each letter.
NOTE: If desired, you can select the Monochrome function (see
page 23) so that all letters will sew without cutting between
each letter, cutting only at the end.
5
3
abc
a
4
6
2
b
EMBROIDERY
d
7
25
POP-UP MESSAGES
UPPER THREAD BREAKAGE
When the upper thread breaks or
runs out, this pop-up will appear
and sewing will stop.
Re-thread the upper thread and
press “✓” button.
Go back 3-4 stitches backward
from broken point by pressing “-”
at sewing screen.
Press the Start/Stop button to
restart sewing.
CONNECT USB
This pop-up will appear if the USB
button is pressed without any
USB stick connected or if the USB
stick is removed during browsing
of the stick or removed when
embroidering.
Connect USB stick and press the
“✓” button.
THREAD JAM
If upper or bobbin thread is
jammed under the needle plate,
machine will stop and pop-up this
message.
Remove the hoop and needle
plate (see next page) Remove the
thread jam and reset needle plate.
Press the “✓” button.
WRONG HOOP TYPE
This pop-up will appear when
the selected hoop in the hoop
selection list is not the same
as the hoop attached to the
embroidery unit. Attach the correct
hoop type and press the “✓”
button.
REMOVE THE HOOP
This pop-up will appear when a
function has been chosen that the
forces the embroidery unit to move
outside the limits for the attached
hoop. In order for the carriage to
move freely, remove the hoop and
then press the “✓” button.
EMBROIDERY TOO LARGE
This pop-up will appear if a design
is too large for this machine to
read from USB stick.
STOP COMMAND IN DESIGN
This pop-up will appear when
there is a programmed stop in
the design. The machine will
stop. Press “✓” button to continue
embroidering.
MAIN MOTOR OVERLOAD
If you are sewing on very heavy
fabric or if the machine is blocked
when sewing, the main motor can
get overloaded and the machine
will stop sewing. The pop-up
message will close when the
main motor and power supply are
secure.
CORRUPTED DATA
This pop-up will appear when
the content of the USB memory
is corrupted and cannot be read
correctly.
THE DATA ON THE USB
STICK CANNOT BE READ
This pop-up will appear when
your embroidery machine cannot
access the information on the
USB stick. This can be caused
by wrong fi le formats on the USB
stick, the USB stick could be
damaged or you might be using a
USB stick that is non-compatible
with this machine.
26
MAINTENANCE
CAUTION
To reduce the risk of electric shock, disconnect the
power line plug from the electric outlet before carrying
out any maintenance.
REMOVING THE EMBROIDERY FOOT
When cleaning the machine, you should remove the
embroidery foot.
1. Turn the hand wheel toward you until the needle is at its
highest position.
2. Raise the presser foot lifter.
3. Remove the presser foot screw and remove the embroidery
presser foot.
ATTACHING THE EMBROIDERY FOOT
1. Turn the hand wheel toward you until the needle is at its
highest position.
2. Raise the presser foot lifter.
3. Attach the embroidery foot to the presser bar (a) so that the
arm (b) of foot rest securely on the shaft (c) of the needle
clamp.
Attach the presser foot screw and tighten it.
(It may be helpful to lower the needle slightly when
attaching the presser foot and presser foot screw.)
BOBBIN HOLDER
Remove the bobbin cover and bobbin.
Clean the bobbin holder with a brush.
HOOK RACE AND FEED DOG
1. Remove the needle, presser foot and holder. Remove the
bobbin cover and bobbin. Remove the screws holding the
needle plate.
2. Remove the needle plate by lifting up the right side of the
plate.
1 2
b
c
a
CLEANING
If lint and bits of thread accumulate in the hook, this will
interfere with the smooth operation of the machine. Check
regularly and clean the stitching mechanism as needed.
3. Lift up the bobbin holder and remove it.
CAUTION
To prevent accidents, do not touch the thread cutter
unit (a).
4. Clean the hook race, feed dogs and bobbin holder with a
brush. Also clean them, using a soft, dry cloth.
3
5. Replace the bobbin holder into the hook race so that the tip
(b) fi ts to the stopper (c) as shown.
6. Replace the needle plate inserting the hook into the
machine.
Replace the screws and tighten.
5 6
a
4
NOTE:
* An LED lamp is used to illuminate the stitching area. It does
not require replacement. In the unlikely event it does not
light up, call your authorized SINGER® retailer for service.
* There is no need to lubricate this machine.
MAINTENANCE
b
c
27
HELPFUL HINTS
PROBLEM
Upper thread
breaks
Lower thread
breaks
Machine skips
stitches
Fabric puckers
Machine makes
loose stitches or
loops
CAUSE
Machine not properly threaded.
Thread entwined around bobbin.
Needle inserted incorrectly.
Thread tension too tight.
Thread of incorrect size or poor quality.
Bobbin threaded incorrectly.
Bobbin wound unevenly or too full.
Dirt or lint in the bobbin holder.
Needle inserted incorrectly.
Bent or blunt needle.
Incorrect size of needle.
Machine not properly threaded.
Bobbin threaded incorrectly.
Blunt needle.
Thread tension too tight.
Design too dense for fabric being
embroidered.
Insuffi cient stabilizer.
Bobbin threaded incorrectly.
Machine not properly threaded.
Tension not adjusted properly.
CORRECTION
Re-thread machine.
Remove entwined thread.
Re-insert needle.
Readjust thread tension.
Choose correct thread.
Re-thread the bobbin.
Rewind the bobbin.
Clean the holder.
Re-insert needle.
Insert new needle.
Choose correct size needle for fabric.
Re-thread machine.
Re-thread the bobbin.
Insert new needle.
Readjust thread tension.
Select less dense design for fabric, or change
fabric type.
Use proper stabilizer for fabric being
embroidered.
Re-thread the bobbin.
Re-thread machine.
Readjust thread tension.
Page
14
13
7
16
7
13
12
27
7
7
7
14
13
7
16
20
18
13
14
16
Stitch pattern is
distorted
Threader does not
thread to needle
eye
Needle breaks
Machine runs with
diffi culty
Machine will not
run
Hoop or carriage is interferred.
Thread tension is not balanced.
Insuffi cient stabilizer.
Needle is not raised to highest position.
Needle inserted incorrectly.
Bent needle.
Needle inserted incorrectly.
Incorrect size needle or thread for fabric.
Dirt or lint accumulated in the hook race.
Cord not plugged into electrical outlet.
Power switch is not turned on.
Presser foot is not lowered.
Remove obstruction.
Adjust the thread tension.
Use proper stabilizer for fabric being
embroidered.
Raise the needle.
Re-insert needle.
Insert new needle.
Re-insert needle.
Choose correct size needle and thread.
Remove the needle plate and bobbin holder
and clean the hook race.
Insert plug fully into outlet.
Turn on the switch.
Lower the foot.
24
16
18
15
7
7
7
7
27
8
8
10
28

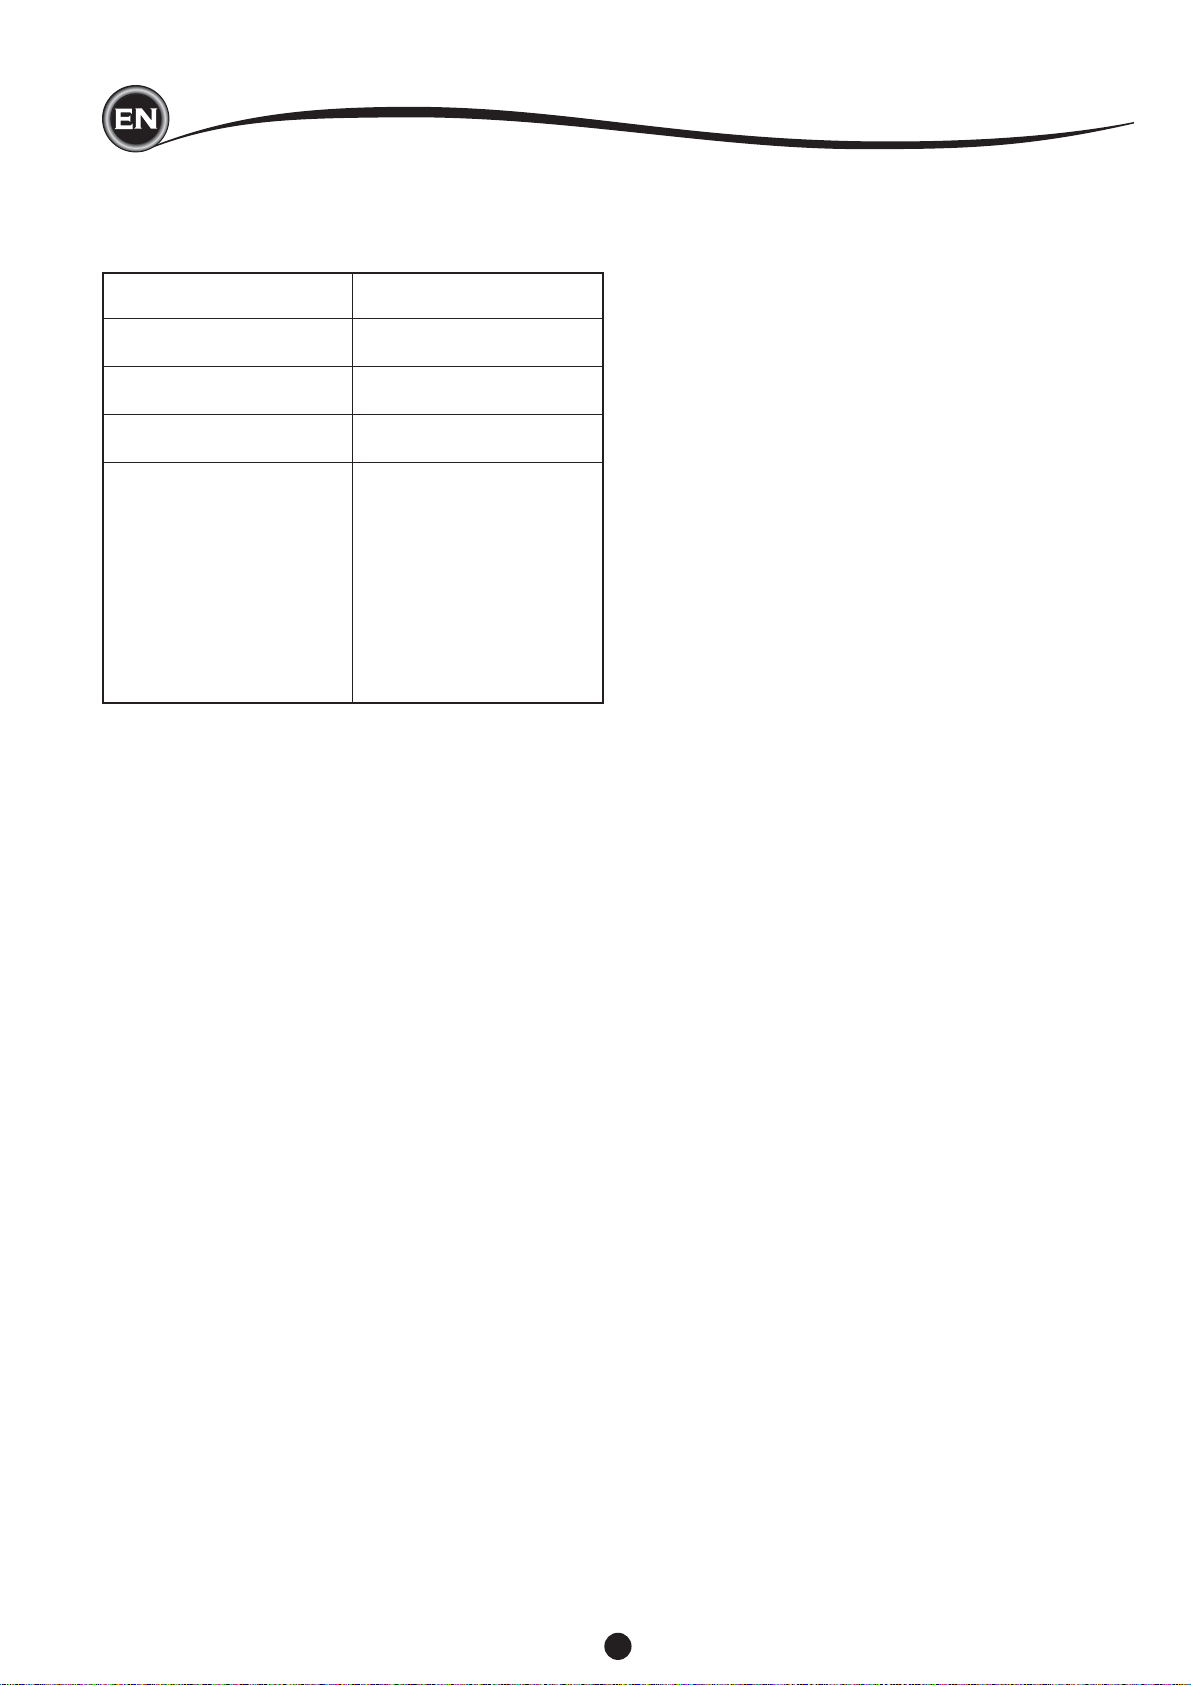
HELPFUL HINTS
PROJECT STABILIZER HOOPING NEEDLE
SINGER
T-Sh irts
Soft Mesh
Cut-Away
Hoop fabric and stabilizer together.
Chromium
Size 11/80
SINGER
Chromium
Size 14/90
Fleece
Cut-Away and
Topper
Hoop cut-away stabilizer. Pin topper
and fleece to the hooped cut-away
stabilizer.
SINGER
Towe ls
Topper and
Tear-Away
Hoop tear-away stabilizer. Pin topper
and towel to the hooped tear-away.
Chromium
S
SINGER
Chromium
Size 14/90
Sweater Knits
Cut-Away
Stabilizer
Hoop cut-away stabilizer. Pin topper
and sweater to the hooped cut-away
stabilizer.
SINGER
Light Weight
Fabrics
Water-Soluble,
Light Tear-Away
Hoop fabric & stabilizer together.
Chromium
Size 11/80
Medium to
Heavy Woven
Fabrics
Medium to Heavy
Weight Tear-Away
Hoop fabric and stabilizer together.
SINGER
Chromium
Size 14/90
SINGER
Denim
Medium to Heavy
Weight Cut-Away
Hoop fabric and stabilizer together.
Chromium
Size 14/90
Medium to Heavy
Napped Fabrics
Weight Cut-Away
and Topper
Vinyl & Leather Cut-Away
Hoop cut-away stabilizer. Pin topper
and fabric to the hooped cut-away
stabilizer.
Hoop cut-away stabilizer. Secure
fabric to the hooped cut-away
stabilizer.
SINGER
Chromium
Size 1
SINGER
Chromium
Size 14/90
#2001
#2001
#2000
ize 14/90
#2001
#2000
#2000
#2000
#2000
4/90
#2000
BOBBIN
THREAD
®
NEEDLE THREAD
Bobbinfill Polyester or Rayon
®
Bobbinfill Polyester or Rayon
®
Same color as
needle thread
®
or towel
recommended
Bobbinfill Polyester or Rayon
®
Bobbinfill
®
Rayon is most often
Bobbinfill Polyester or Rayon
®
Bobbinfill Polyester or Rayon
®
Bobbinfill Polyester or Rayon
®
Bobbinfill Polyester or Rayon
Polyester is
used
NOTE:
Though the SINGER® Chromium needles are recommended for machine embroidery, it is possible to substitute, as follows:
In place of SINGER® Chromium 2000 needles, use SINGER® Regular Point needles for woven fabrics.
In place of SINGER® Chromium 2001 needles, use SINGER® Ball Point needles for stretch knit fabrics.
Follow the guidelines in the chart above regarding the size of needle, depending on the fabric to be embroidered.
29
MAINTENANCE
Rated voltage 100–240V ~ 50–60Hz
Nominal consumption 55W
Light LED
Sewing speed 700 rpm maximum
Machine dimensions:
Length (mm) 470
Width (mm) 750
Height (mm) 315
Net weight (kg) 10.2
TECHNICAL SPECIFICATION
• The technical specifi cations and this Instruction manual can be changed without prior notice.
30
 Loading...