

Page 1

9224 9217
Page 2

Page 3

IMPORTANT SAFETY INSTRUCTIONS
When using this machine, basic safety precautions should always be followed including
the following:
Read all instructions before using this machine.
DANGER.
To reduce the risk of electric shock:
■ The machine should never be left unattended when plugged in. Always unplug the
machine from the electric outlet immediately after using and before cleaning.
■ Always unplug before changing light bulb. Replace bulb with the same type rated 12
volts, 5 watts. Be sure to replace the face plate which covers the light bulb before
operating the machine.
WARNING.
To reduce the risk of burns, fire, electric shock or injury to persons:
■ Be sure that the electrical voltage of the socket outlet (wall receptacle) is the same
as the rated voltage of the motor.
■ Use this machine only for its intended use as described in this Operator’s Guide. Use
only attachments recommended by the manufacturer as contained in the Operator’s
Guide.
■To disconneqt, turn all controls to the off ("O") position, then remove plug from outlet.
■ Disconnect the power-line plug from the socket outlet or switch the machine off when
making any adjustments in the needle area, such as threading needle, changing
needle, changing needle plate or changing presser foot, etc.
■ Always unplug the machine from the electrical outlet when removing covers,
lubricating, or when making any other user servicing adjustments mentioned in the
Operator’s Guide.
■ Do not attempt to adjust the motor belt. Contact your nearest Service Center should
any adjustment be required.
■ Do not unplug by pulling on cord. To unplug, grasp the plug, not the cord.
■ Handle the foot controller with care and avoid dropping it on the floor. Be sure not to
place anything on top of it.
■ Always use the proper needle plate. The wrong plate can cause the needle to break.
■ Do not use bent needles.
■ When sewing, keep fingers away from all moving parts. Special care is required
around the sewing machine needle.
■ Do not pull or push fabric while stitching. This may deflect the needle causing it to
break.
■ Before removing the bobbin case, remove plug from the socket outlet.
■ For double insulated machines, when servicing, use only identical Singer replacement
parts. See instructions for Servicing of Double-insulated Appliances.
■ Never operate the machine if it has a damaged cord or plug, if it is not working
properly, if it has been dropped or damaged, or dropped into water. Return the
machine to the nearest authorized dealer or Service Center for examination, repair,
electrical, or mechanical adjustment.
■ Never operate the machine with any air openings blocked. Keep ventilation openings
of the machine and foot controller free from the accumulation of lint, dust, and loose
cloth.
■ Never drop or insert any object into any opening.
■ Do not use outdoors.
■ Do not operate where aerosol (spray) products are being used or where oxygen is
being administered.
■ Do not allow to be used as a toy. Close attention is necessary when the machine Is
used by or near children.
■ SERVICING OF DOUBLE-INSULATED PRODUCTS. In a double-insulated product, two
systems of insulation are provided instead of grounding. No grounding means is
provided on a double-insulated product, nor should a means for grounding be added
to the product. Servicing of a double-insulated product requires extreme care and
knowledge of the system, and should be done only by qualified service personnel.
Replacement parts for a double-insulated product must be identical to those parts in
the product. A double-insulated product is marked with the words "DOUBLE
INSULATION" or "DOUBLE INSULATED".
SAVE THESE INSTRUCTIONS
Servicing should be performed by an authorized service representative.
This product is intended for househoid use.
FOR EUROPEAN AND SIMILAR TERRITORIES:
This puoduct is suppressed for radio and television interference with the international
Electrotechnical Comnriission requirements of the CISPR.
Machine for Great Britain and some other countries having similar wiring standards
are shipped from the factory with a plug for connection to the mains. The wires in
this mains lead are coloured in accordance with the following code:
Blue:neutral (N) Brown:live (L)
As the colours of the wires in the mains lead of this appliance may not correspond
with the coloured markings identifying the terminals in your plug, proceed as follows:
The wire which is coloured blue must be connected to the terminal which is marked
with the letter N or coloured black. The wire which is coloured brown must be
connected to the terminal which is marked with the letter L or coloured red. If a 13
Amp. (BS 1363) plug is used, a 3 Amp. fuse must be fittecf, or if any other type of
plug is used, a 5 Amp. fuse must be fitted either in the plug or adaptor or at the
distribution board. Neither cord is to be connected to the‘earth terminal of a three-pin
plug.
-I —
Page 4

.............................................................................
........
IMPORTANT SAFETY INSTRUCTIONS....................................................... i
PRINCIPAL PARTS....................................................................................... 2
ACCESSORIES INCLUDED WITH MACHINE
CONNECTING AND RUNNING MACHINE
INSTRUCTION SYMBOLS
............................................................................
..............................................
...................................................
3
4
4
THREADING MACHINE................................................................................. 5
WINDING BOBBIN......................................................................................... 6
INSERTING PREVIOUSLY WOUND BOBBIN
..............................................
7
RAISING BOBBIN THREAD.......................................................................... 7
SELECTING A PATTERN.............................................................................. 8
STRAIGHT STITCH....................................................................................... 8
STITCHING IN REVERSE............................................................................. 8
KEEPING SEAMS STRAIGHT....................................................................... 8
ADJUSTING NEEDLE POSITION
.................................................................
9
TURNING SQUARE CORNERS.................................................................... 9
USING SEAM GUIDE.................................................................................... 9
RECOMMENDED SETTINGS AND APPLICATIONS
...................................
10
ADJUSTING THREAD TENSION..................................................................15
ADJUSTING STITCH WIDTH........................................................................15
ADJUSTING STITCH LENGTH.................................................................... 15
BALANCING A PATTERN............................................................................ 15
FREE ARM SEWING..................................................................................
CHANGING PRESSER FEET.......................................................................16
BLINDSTITCHING.........................................................................................17
OVEREDGING AND SEAMING
....................................................................
17
ONE-STEP BUTTONHOLING.......................................................................18
ADJUSTING BUTTONHOLE BALANCE.......................................................19
SEWING ON A BUTTON.............................................................................. 19
DARNING.................................................................................................... 20
FREE MOTION EMBROIDERY
...................................................................
20
CHANGING NEEDLE..................................................................................21
FABRIC, THREAD AND NEEDLE TABLE.................................................. 21
INSERTING A ZIPPER
OPTIONAL ACCESSORIES NOT INCLUDED
REMOVING AND REPLACING BOBBIN CASE
REMOVING AND REPLACING LIGHT BULB
CLEANING MACHINE
................................................................................
............................................
.........................................
.............................................
.................................................................................
22
22
23
23
24
PERFORMANCE CHECKLIST....................................................................24
Dear Customer:
We recommend that for future reference you record the Serial Number of your
Sewing Machine in the space provided.
Refer to illustration
at right for location
of Serial Number on
your machine.
Model No
___________
To ensure that you are always provided with the most modern sewing capabilities,
the manufacturer reserves the right to change the appearance, design or
accessories of this sewing machine when considered necessary.
SINGER CUSTOMER ASSISTANCE IN THE U.S.A.
TOLL-FREE NUMBER: 1-800-877-7762
Serial No.-^
. Serial No..
Page 5
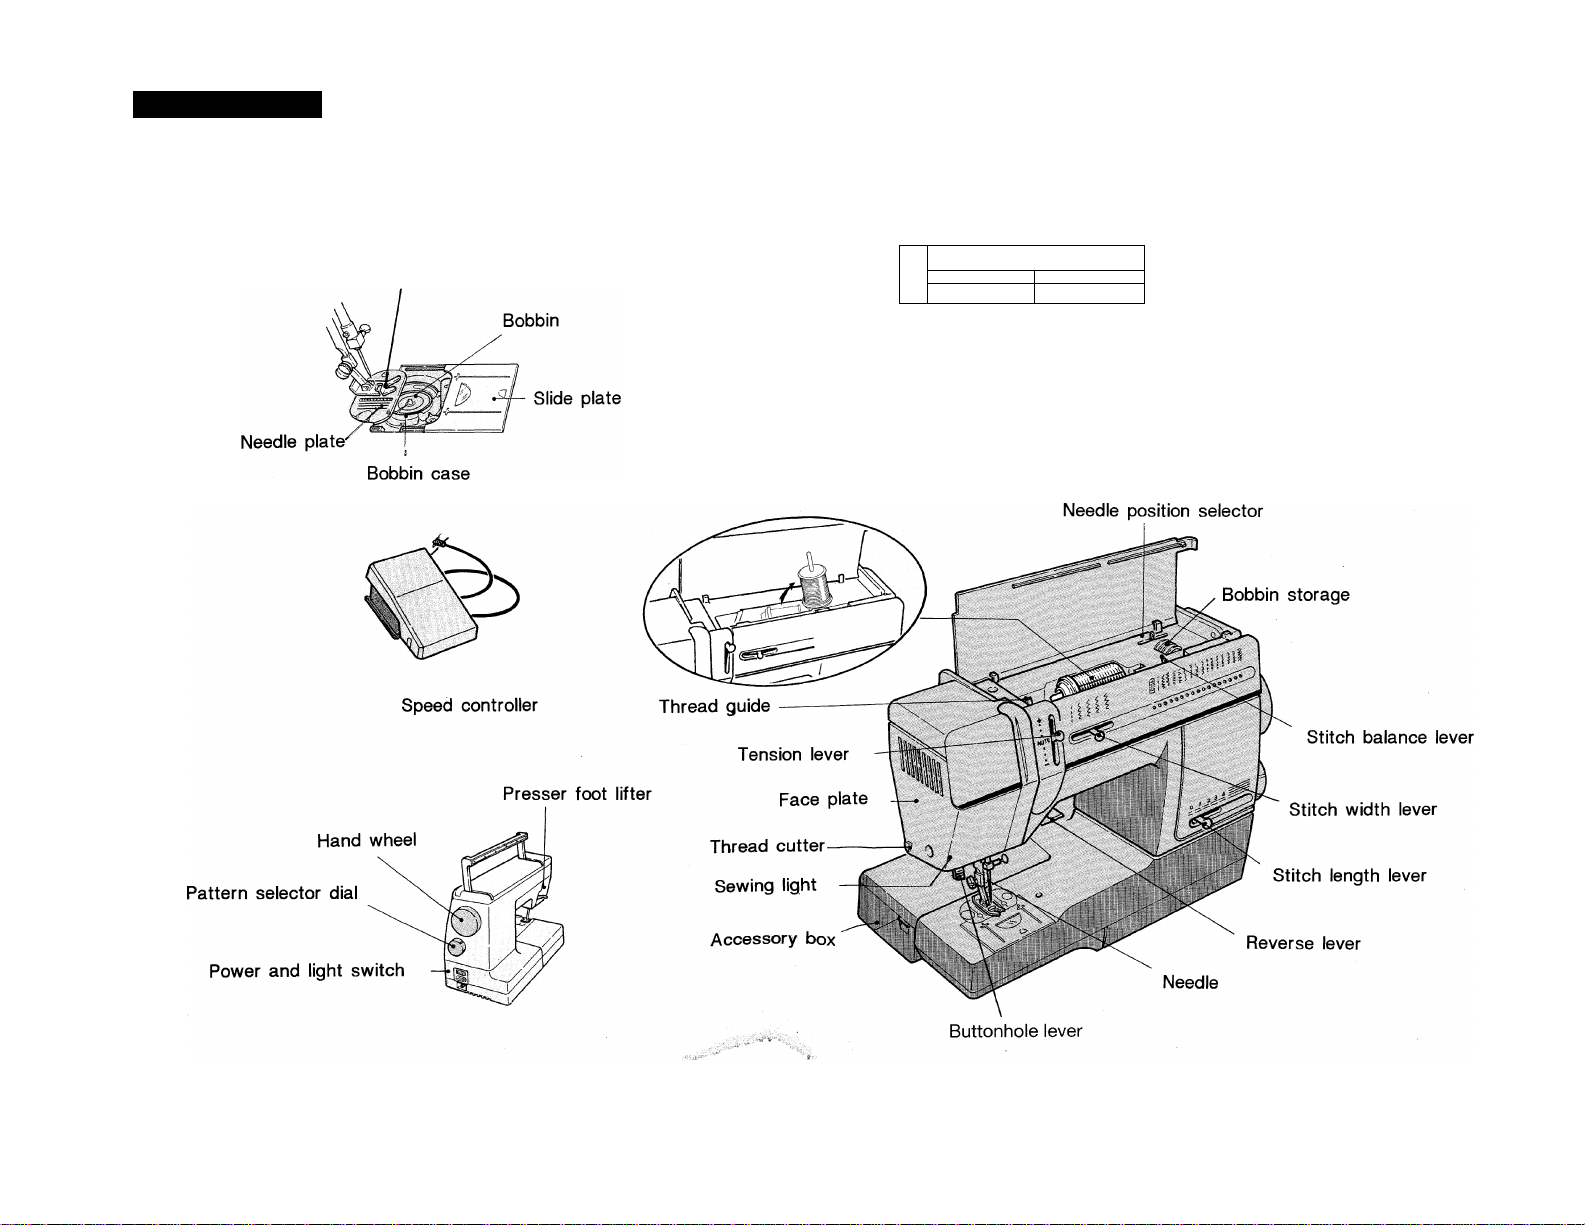
PRINCIPAL partì
Jg—gH.
WBÊÊmm
17 Patterns
Presser foot
Spool pin and cap
ii!
^ Il
24 Patterns
iMÎUinn!
tni^llUlii
mmmum
ïli
Page 6
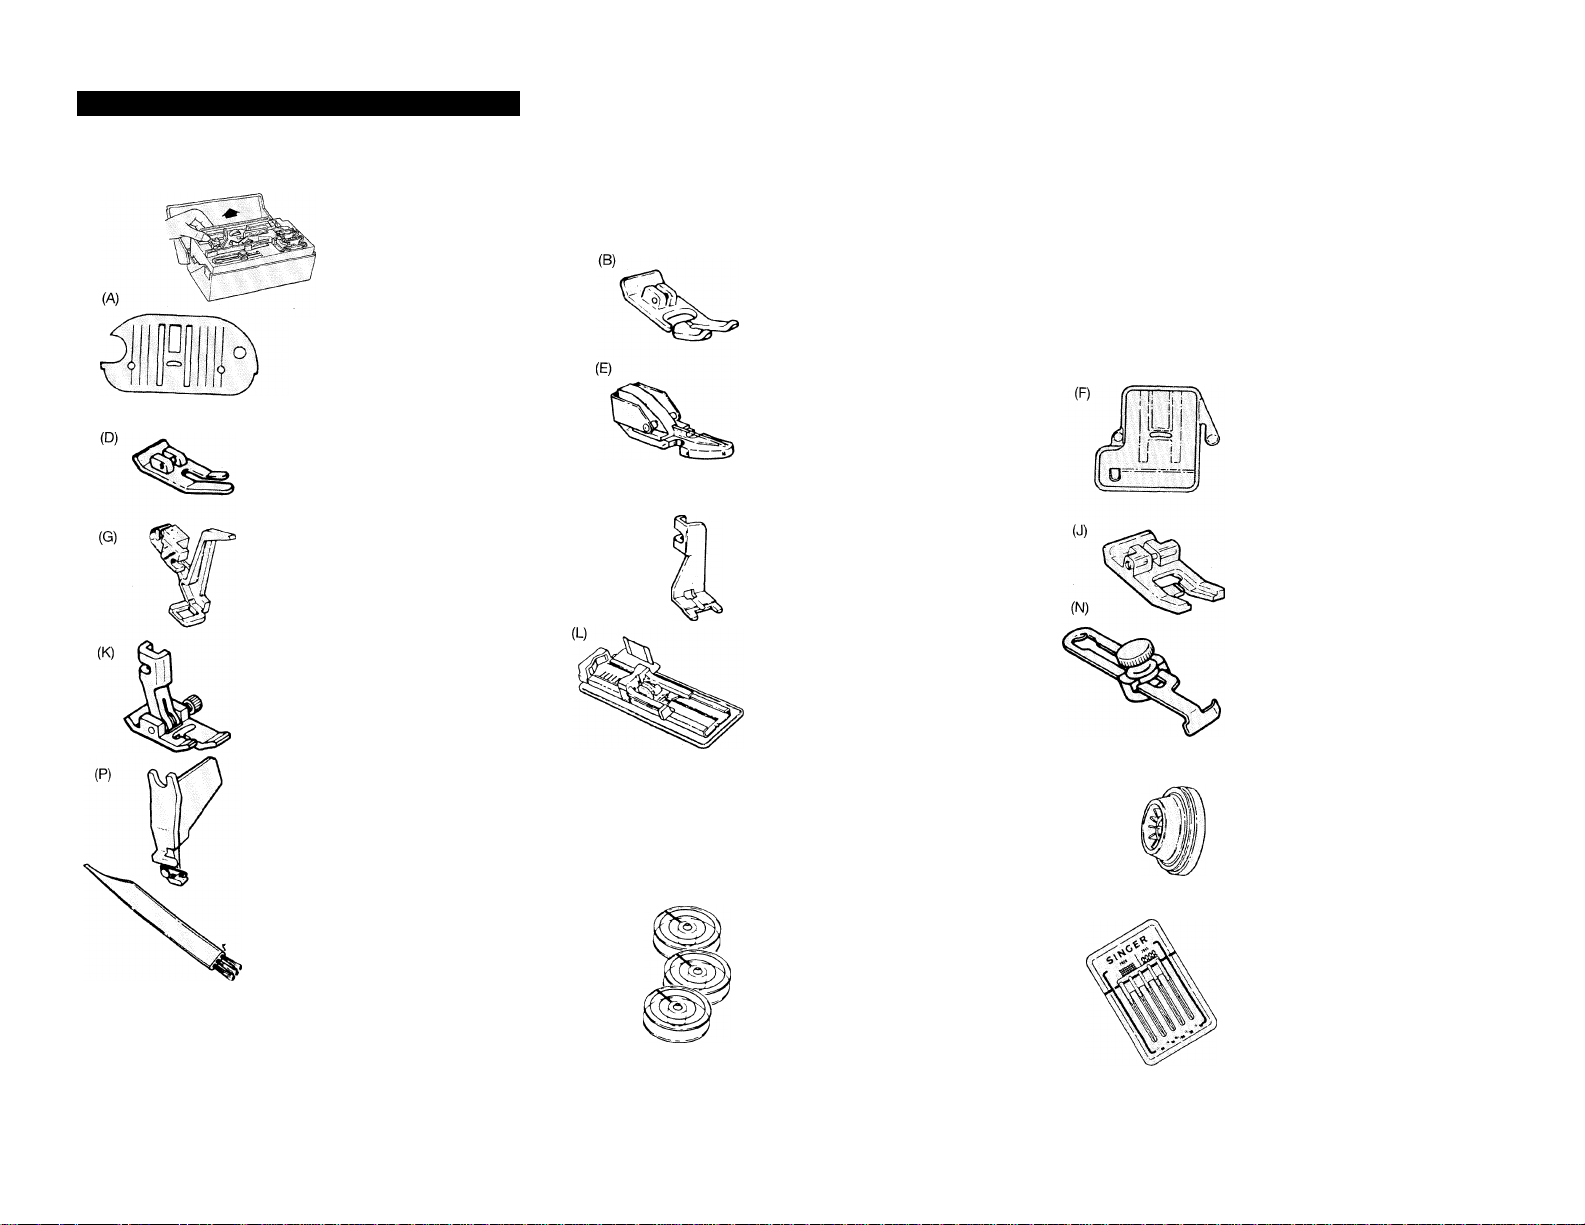
ACCESSORIES INCLUDED WITH MACHIN
General purpose
needle plate
(on machine)
#312777
Straight stitch presser foot
#353628
Darning and embroidery foot
#384037
Blindstitch presser foot
#381491
Needle threader
#503277
General purpose
presser foot
(on machine)
#313150 .
Zipper foot
#171480
(H)
Button sewing foot
#381066
(C)
D
Straight stitch needle plate
#313066
Feed cover
#313117
Special purpose
presser foot
#171463
One-step buttonhole foot
#313093
(Q)
Small spool cap
#507664
Seam guide
#161172
Spool cap
(on machine)
#179967
Lint brush
#546358
Bobbins
(1 in machine)
#312956
-3-
Needle pack
Page 7
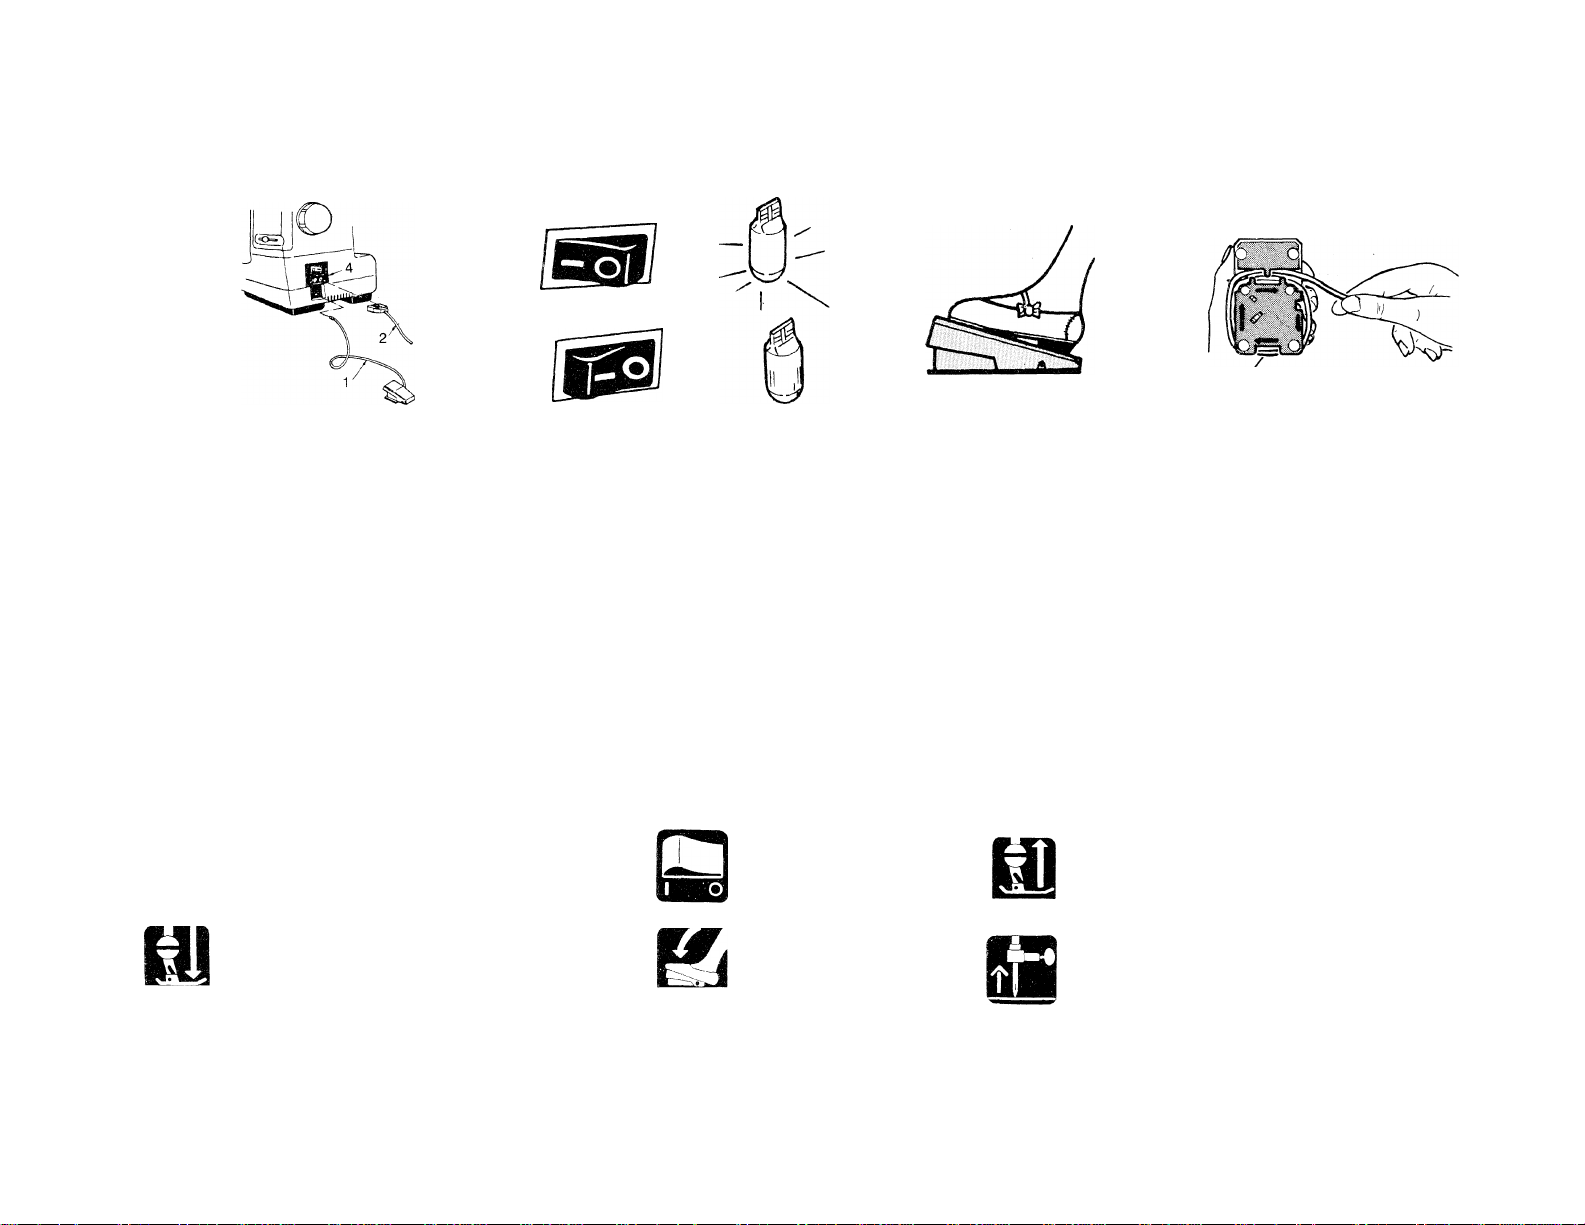
CONNECTÎNG-
RUNNING-
3 Kl
r
Push speed controller tube (1)
Power on - press "I" side of switch.
and electrical power cord (2) into
receptacle (4).
Power off - press "O" side.
Plug power cord (3) into electric
outlet.
To simplify understanding, the following
symbols are used throughout the operator’s
manual.
Lower presser foot.
Press speed controller to
run machine.
Turn power off.
Press speed controller.
When not using machine, rewind air
hose around speed controller for
storage, as shown.
Note:
Raise presser foot.
Use hand wheel to raise
needle.
-4-
Page 8
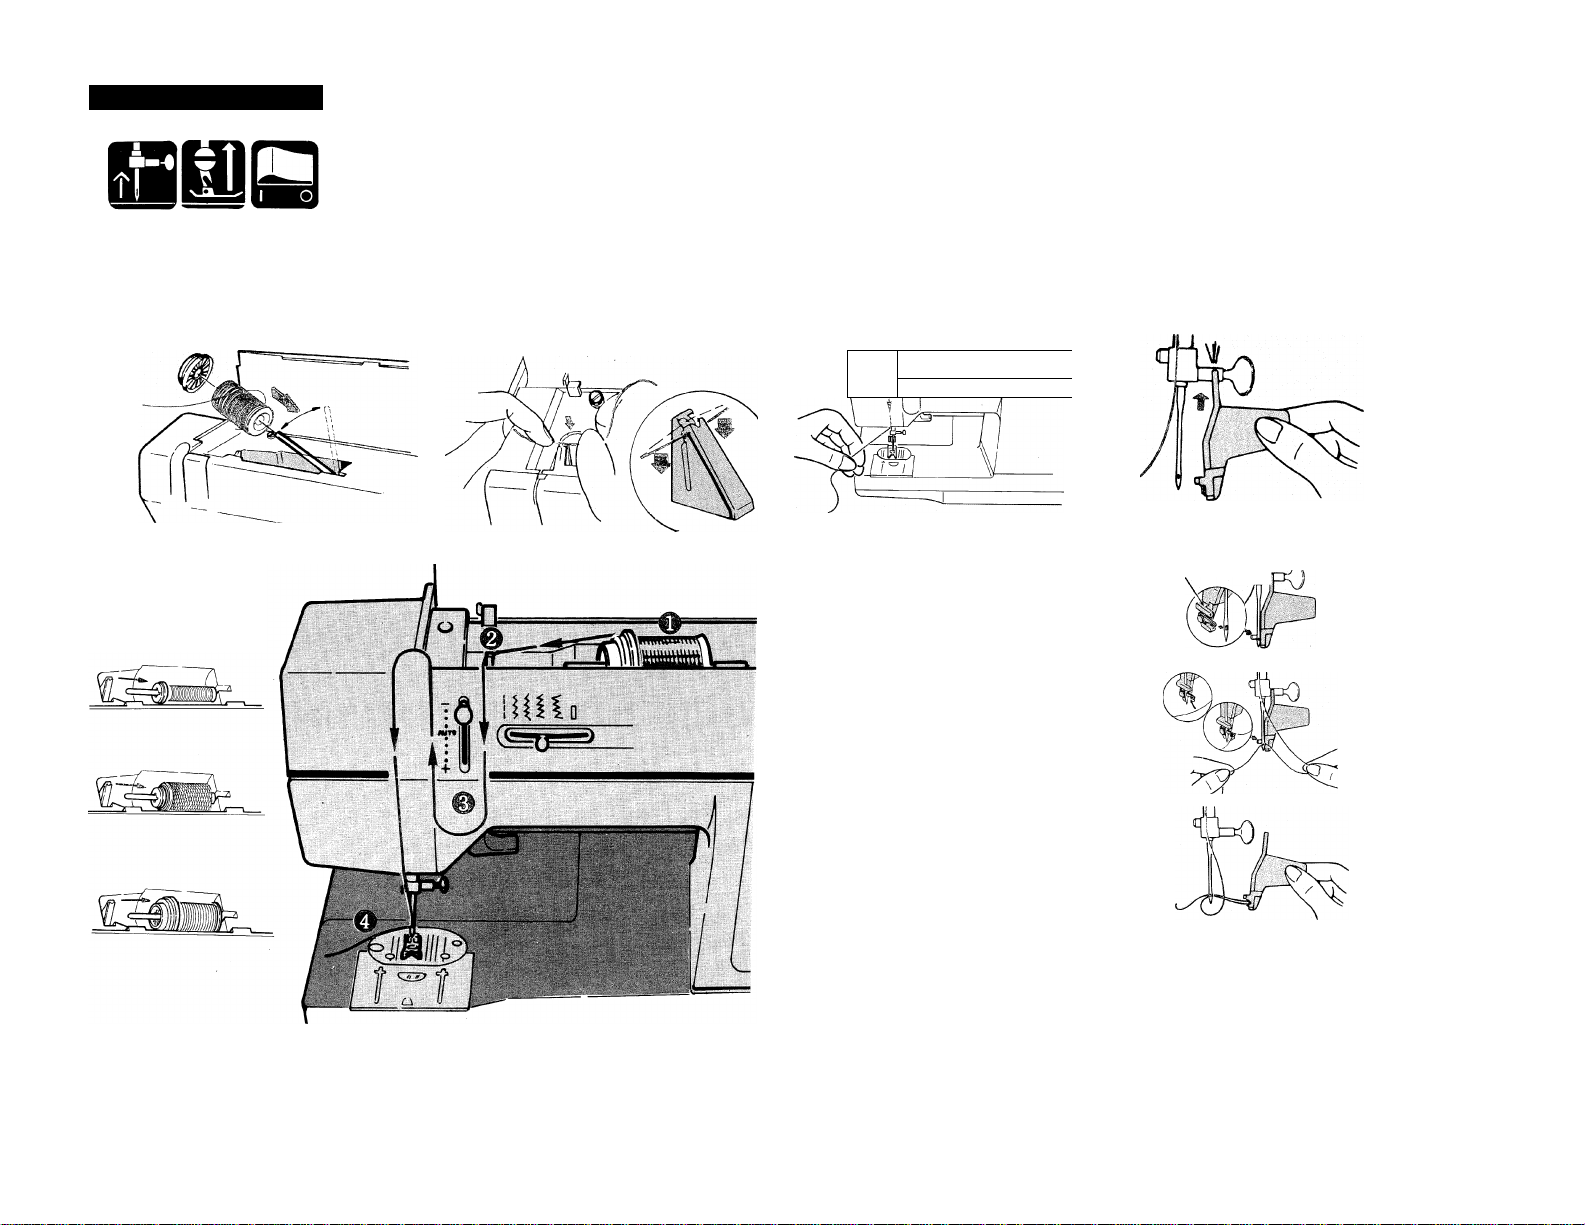
THREADING MACHIN
4
USING NEEDLE THREADER
Place thread and cap onto spool Snap thread into Thread guide,
pin.
Slide spool cap firmly over the rim of the spool to prevent thread tangling.
For best sewing
performance use
proper spool cap.
Following arrows, guide thread Snap threader up onto bar.
down to needle.
r
Slide threader as far to the
left as it will go.
Be sure guide (1) is against
the left side of needle.
Bring metal hook of threader
forward, through eye of needle.
Guide thread into metal hook.
Draw metal hook and thread
backwards.
Slide threader to the right to
remove.
-5-
Page 9
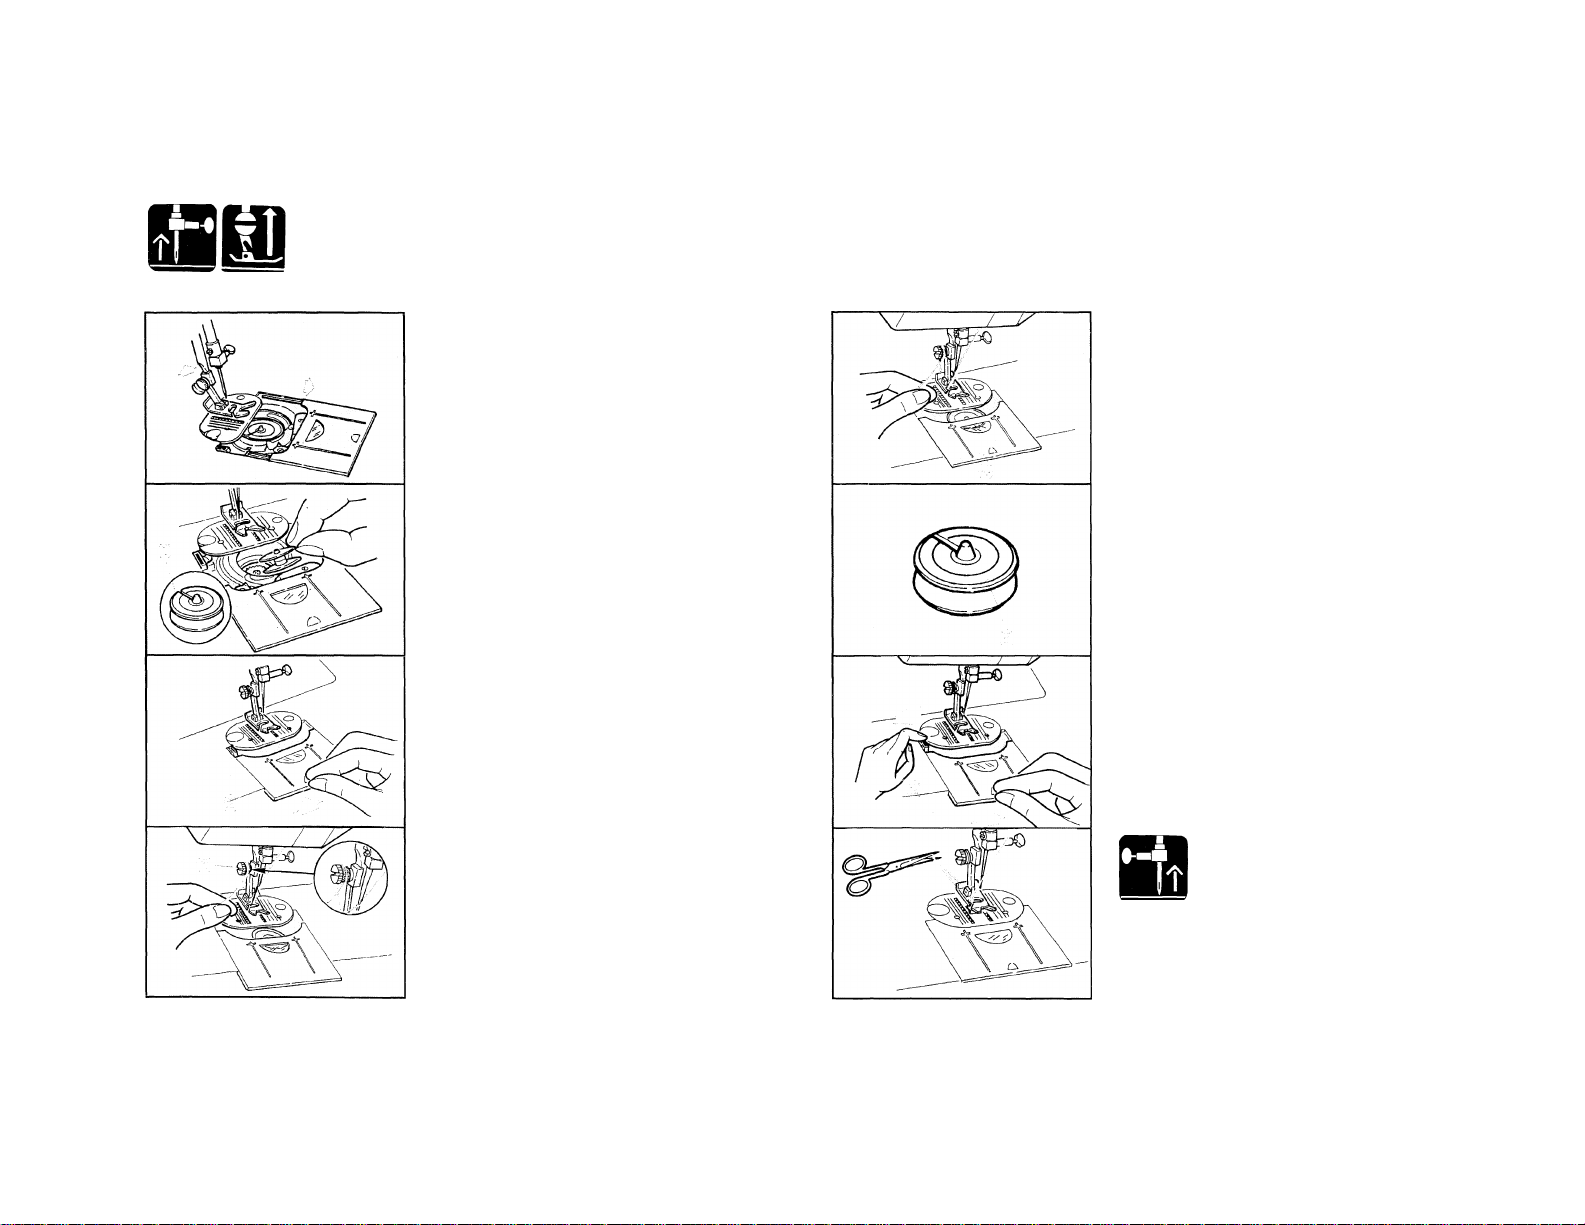
Move stitch width lever to
straight stitch position (|)
Open slide plate.
Put an empty bobbin, with rings
(1) facing up, into bobbin case.
Close slide plate until it stops
against button (2).
Bring needle thread under
presser foot and wind it around
presser foot screw (3) one time.
Hold thread and run machine,
at a moderate speed.
Watch bobbin winding from the
window (4) in slide plate.
Remove thread from presser foot
screw.
Push button (2) down to close slide plate.
Cut thread.
Page 10
INSERTING PREVIOUSLY WOUND BOBBI
RAISING BOBBIN THREA
SÌ9Q
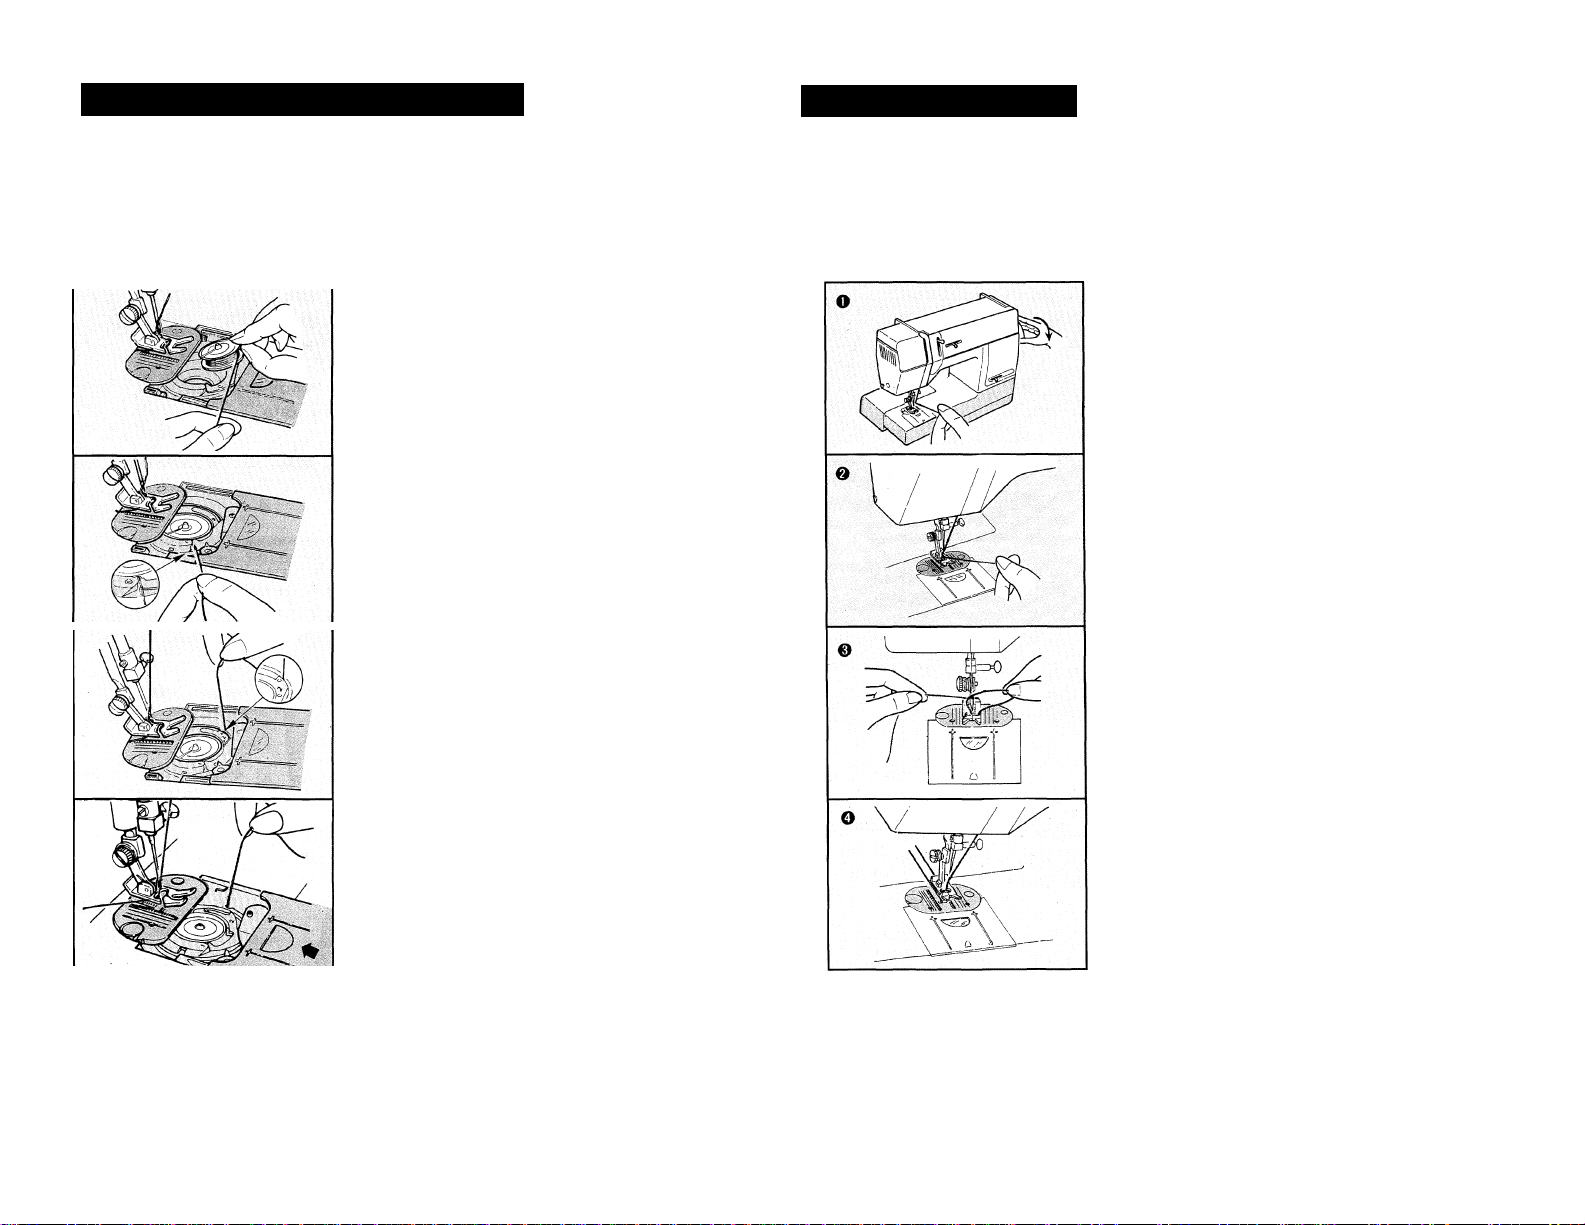
Open slide plate.
Insert bobbin into bobbin case.
Guide thread into notch (1).
Bring thread around and past
point (2).
iaay
Hold needle thread.
Turn hand wheel towards you
lowering, then raising needle.
Gently pull needle thread to
raise bobbin thread.
Open loop.
Hold thread and close slide
plate.
Pull both threads back.
-7-
Page 11

Preparation: Refer to "Recommended settings and applications" on page 10.
Place fabric under presser foot
and lower foot.
At end of seam.
Cut thread.
Remove fabric.
STITCHING IN REVERS
Secure beginning and end of seam as shown.
Begin sewing.
Guide fabric.
Line up fabric with guideline (1).
-8-
Page 12

TING NEEDLE POSITION
Note; needle position only works with straight stitch pattern. (
Center needle position.
n
Caution: Sew only in center needle positio
When bottom of fabric reaches
crosslines (2), stop stitching.
Lower needle into fabric.
(\
--------------
).
Left needle position.
Use stitch width lever
to position needle from
center to full left
position.
—
«L X J»
Right needle position.
Use stitch width lever
to position needle from
center to full right
position.
■
To attach seam guide, place
screw of guide into hole (1).
Position guide for desired seam
allowance.
Turn fabric, bringing bottom
edge in line with guideline (1).
Continue stitching seam.
Hand tighten screw.
To sew curved seams, attach
seam guide at an angle.
-9-
Page 13

RECOMMENDED SETTINGS AND APPLICATIONS
Page 14

RECOMMENDED SETTINGS AND APPLICATIONS
PATTERN
Multistitch
"M" - stitch
Crescent
17
pattern
•
iÜ
•
,24
pattern
•
•
•
APPLICATIONS
Hem finishing, bartacking and
attaching elastic.
Stretch seams, couching and
shell tucks.
STITCH
LENGTH
1
or
lower
2
or
lower
STITCH
WIDTH
PRESSER
FOOT
(j)
REQUIRES
BALANCING
No
WAaV
Chinese dynasty
Kite tail
Borders, edges, smocking and
•
embroidering.
•
1
or
. lower
-11-
Page 15

RECOMMENDED SETTINGS AND APPLICATIONS
PATTERN
Arrowhead
Bunting
Domino
17
pattern24pattern
•
•
•
•
•
APPLICATIONS
Decorative stitching, decorative
bartacks and border design.
Decorative stitching.
STITCH
LENGTH
1 or lower No
STITCH
WIDTH
PRESSER
FOOT
REQUIRES
BALANCING
Flag
Satin Bead
Boomerang
•
• •
Decorative stitches for
borders and smocking.
•
12-
Page 16

RECOMMENDED SETTINGS AND APPLICATIONS
Page 17

RECOMMENDED SETTINGS AND APPLICATIONS
PATTERN
17
pattern24pattern
APPLICATIONS
STITCH
LENGTH
STITCH
WIDTH
PRESSER
FOOT
REQUIRES
BALANCING
Ric-Rac
Crown
Feather
Honeycomb
• •
• •
•
Heavy-duty, general purpose
sewing and bold topstitching.
•
Borders, embroidery and
smocking.
Fagoting, embroidery, patchwork
quilting and lattice seams.
Smocking, mending, overedging
attaching lingerie elastic,
•
stretch lace and blanket
binding.
(j)
Yes
АЛЛА
straight
feather
llill
•
Appliqueing, fagoting and borders.
14-
Page 18

ADJUSTING THREAD TENSION
Move lever (1) up or down to
adjust thread tension.
Auto position suits most
sewing applications.
ADJUSTING STITCH LENGTH
—
ADJUSTING STITCH WIDT
Too much tension Move lever up.
Too little tension Move lever down.
Move lever (2) to widen or
narrow stitch.
When using twin-needle do not
set width wider than twinneedle graphic.
_____
jj 4
7/ H
FREE ARM SEWING
When stitches are too close (4)
move lever (1) to the left.
When stitches are too far apart
(5) - move lever (1) to the right.
j
Swing accessory box to back of
machine or remove by lifting.
Topstitch edges, on sleeves or
finish waistband and pants legs.
15-
Page 19

CHANGING PRESSER FEET
mma
Lift toe of presser foot (1) up,
until it snaps off shank (2).
Take foot off machine.
REPLACING PRESSER FOOT WITH SHANK
Center new presser foot (1)
under shank (2).
Lower presser foot lifter.
Press screw (3) down.
Open slide plate.
Press tab (1) and (2) into
holes on needle plate.
Close slide plate.
16-
Page 20

Fold hem to wrong side.
Pin or baste in place.
Fold hem back as shown.
Place folded edge against
presser foot guide.
There are four stitch patterns
that can be used for
overcasting.
For overcasting edge of fabric
to prevent fraying.
For hemfinishing on fabrics to
prevent rolling.
Use with stretchy material
which tends to fray or roll.
For stitching and finishing
seams in light weight fabrics.
Sew, allowing wide stitches to
enter edge of fold.
Adjust foot if necessary.
Turn fabric to right side and
press.
For overcasting edge of fabric
to prevent fraying.
For stitching and finishing
seams in heavyweight fabrics.
-17-
Page 21

SETTINGS
PATTERN
I
LENGTH
4
ACCESSORY
WIDTH
^ 1 ^ ^
Place button on the carrier.
Slide clamp (1) back to hold
button.
Place fabric between the
plates.
Center 3 red guidelines (4)
around beginning line of
buttonhole.
Pull buttonhole lever (5) down
and press it toward you.
Draw both threads between
upper (2) and lower (3) plates
to the back.
The entire buttonhole will be
stitched in one operation.
-18-
Page 22

SEWING ON A BUTTO
SETTINGS
Cut buttonhole opening.
ADJUSTING BUTTONHOLE BALANCE
If the two sides of buttonhole
are unequal, adjust with
stitch balance lever (1).
If the right side is too openmove the lever to the right.
PATTERN
LENGTH
0
ACCESSORY
WIDTH
Jill
Center holes in button
between toes of foot.
Lower needle Into either
hole of button.
a
,(H)
(F)
If the left side is too openmove the lever to the left.
While slowly turning hand
wheel, adjust width so
needle enters both holes of
button.
Sew 8-10 stitches.
Pull thread to back side
and tie.
-19-
Page 23

DARNING
FREE MOTION EMBROIDERY
J
PATTERN
SETTINGS
LENGTH
ACCESSORY
WIDTH
(G)
Place area to be darned, right
side up, under presser foot.
PATTERN
1 or I
1 <
LENGTH
0
SETTINGS
ACCESSORY
WIDTH
III
Remove foot with shank.
Control fabric with embroidery
hoop, (hoop not included)
Stitch, guiding fabric back and
forth, until entire area is filled In.
Lower presser foot lifter.
Lengthen or shorten stitches
by moving hoop faster or
slower.
-20-
Page 24

E23 HS i
1
ma
Important: For best sewing results, use
only Genuine Singer needles.
Insert needle with flat away
from you.
FABRIC, THREAD AND NEEDLE TABLE
Fabric
The fabrics below can be of any fiber, cotton, linen, silk, wool,
synthetic, rayon, blends. They are listed as examples of weight.
Very Lightweight-Batiste, Chiffon, Organza, Voile.
Llghtwelght“Challis, Chambray, Carmeuse, Crepe de Chine, Gauze,
Handkerchief Linen, Silk, Taffeta, Tissue faille.
Medlum-weight’Broadcloth, Brocade, Chino, Chintz, Corduroy,
Flannel, Linen, Poplin, Satin, Synthetic, Suedes, Taffeta, Terry, Velvet.
Medium to Heavy-welght'Coating, Damask, Denim, Drapery Fabric,
Fake Fur, Gabardine, Ticking, woolens.
Heavy-weight-Canvas, Duck, Sailcloth, Upholstery Fabric.
2
Loosen screw and remove needle. Tighten screw.
Cotton-Wrapped polyester core (extra fine)
Long fiber polyester (extra fine)
Cotton-Wrapped polyester core (all purpose)
Long fiber polyester (two spun)
Cotton-Wrapped polyester core (all purpose)
Long fiber polyester (two spun)
Cotton-Wrapped polyester core (all purpose)
Long fiber polyester (two spun)
Cotton-Wrapped polyester core (all purpose)
Long fiber polyester core (two spun)
3 .........................
Needles
Failure to use a Singer brand needle may result in
skipped stitches, poor sewing performance or damage
to your machine.
TYPE
2020 9/70 or 11/80
2020
2020
2020
2020
SIZE
11/80
14/90
16/100
18/110
Leather
Knits-Jersey, Tricot single Knit.
Sweatshirt-Double Knit, Swimwear, Sweater Knit.
Twin-needle
Cotton-Wrapped polyester core (all purpose)
Long fiber polyester (two spun)
Cotton-Wrapped polyester core (all purpose)
Long fiber polyester (two spun)
-21-
.2032
leather
11/80
14/90
14/90
Page 25

INSERTING A ZIPPE
OPTIONAL ACCESSORIES NOT INCLUDED
SETTINGS
PATTERN
1
1
1
1
LENGTH WIDTH
IV2
to
4
Baste zipper opening.
Attach left side of
foot to shank.
Stitch zipper to seam
allowance.
ACCESSORY
Il
(R)
Even feed foot
#421333
Twin needle
#2025
Spool pin
#313026
Pin tuck foot
#317263
Open toe foot
#317446
(S)
Overedge foot
#541582
Shirring foot
#543106
Ruffler
#161561
Attach right side of
foot to shank.
Stitch zipper to seam
allowance.
22-
Flat hemmer
presser foot
#137597
Round hemmer
presser foot
#317450
Seam ripper
#546357
Page 26

REMOVING AND REPLACING BOBBIN CASE
mma
Open slide plate and remove
bobbin.
REMOVING AND REPLACING LIGHT BULB
y
Lift needle plate (1) by right
corner.
Push lever (2) towards you until
it stops, and hold in this
position.
Lift bobbin case up and guide it
out toward you, as shown.
Push lever (2) towards you.
Guide bobbin case into place,
making sure block (3) is under
metal bracket (4).
Return lever (2) to locking
position over top of bobbin case.
To replace needle plate, slide it
under pin (5) and push it to the
left.
Loosen screw and face plate.
(Screwdriver not included)
TO REMOVE
Pull down light reflector (1).
Pull bulb down.
TO REPLACE
Push new bulb into light
socket (2).
(Use only a 5 watts 12 volts
light bulb part #979603)
Push light reflector (1) into
place.
Make sure the small end of
light reflector is aligned with
the small end of light socket
(2).
-23-
Page 27

CLEANING MACHIN
Using lint brush, remove lint or
dust from:
-presser bar
-needle bar
-machine surface (if necessary,
dampen a soft cloth and use a
mild soap to clean the surface)
PROBLEM
Needle does not move
Needle moves but stitch
is not formed
Needle breaks
Bobbin winding
difficulties
Upper thread breaks
Lower thread breaks
CAUSE
Is machine connected to electrical supply?
Is power and light switch on?
Is controller connected?
Is air supply from controller clear?
Is needle defective?
Is needle fully inserted-into needle clamp?
Are bobbin and needle correctly threaded?
Is bobbin correctly inserted into bobbin case?
Is needle straight and sharp?
Is needle correct size?
Is needle fully inserted Into needle clamp?
Are controls properly set?
Are accessories correct for application?
Is thread unwinding freely from spool?
Is slide plate In proper position?
Is thread end securely held at start of wind?
Is machine properly threaded?
Is thread freely unwinding from spool?
Is proper size spool cap being used?
Is needle correct size for thread?
Is upper thread tension too tight?
Is bobbin case properly inserted?
Is bobbin rim free of nicks?
Is bobbin correctly wound?
Is bobbin correctly inserted in bobbin case?
Is bobbin case correctly threaded?
Remove needle plate as
instructed and clean exposed
area with lint brush.
-bobbin case (if there is a lot of
lint in this area, remove bobbin
case for cleaning)
-24-
Skipped stitches
Is fabric firmly held down?
Is needle correct style and size?
Is needle straight and sharp?
Is machine properly threaded?
Fabric does not move
properly under presser
foot
Is presser foot correctly attached to machine?
Is presser foot lowered?
Is stitch length correctly set?
FOR BEST PERFORMANCE, PURCHASE ONLY GENUINE SINGER
ACCESSORIES AND REPLACEMENT PARTS.
Page 28

PERSONAL NOTES
Page 29

PERSONAL NOTES
Page 30

PERSONAL NOTES
Page 31

Page 32

Part No. 286746-001 Eng.
Printed in Taiwan (G17/24)
 Loading...