

Page 1
Page 2

TABLE OF CONTENTS
1. NAMES AND FUNCTIONS
OF PARTS ............................................... 1
2. ACCESSORIES AND SPARES
3. BEFORE SEWING
Unpacking the Machine............................. 5
Converting the Machine
Connecting Foot Controller and
Power Cord............................................... y
Fabric, Thread and Needle Table ... 7
Changing the Foot..................................... 3
Changing the Needle
Bobbin Winding
Inserting the Bobbin Case
Upper Threading
Drawing up the lower Thread
Twin Neelde Threading
Setting Patterns
(1) Straight Stitch, Zigzag Stitch and
Zigzag Pattern Stitches
....................................
............................
................................
.......................................
.....................................
...........................
......................................
................
......................
.................
...................
10
12
14
15
16
17
17
Zipper Sewing.......................................... 28
Overcasting
3
5
6
9
Overlocking
Buttonhole Sewing.................................. 31
Sewing on Buttons................................... 34
Blindhem Stitching
Mending................................................... 37
Attaching Elastic
Shell Stitching
Roll Hemming
Lapped Seam Sewing............................. 45
Edge to Edge Stitching
Quilting.................................................... 49
Pin Tucking.............................................. 50
Smocking
Cording.................................................... 52
Embroidering and Monogramming . 53
Applique Work
.............................................
.............................................
..................................
.....................................
.........................................
.........................................
...........................
................................................
.........................................
29
30
35
41
42
43
47
51
55
(2) Super Stretch Stitches
(3) Buttonholes
(4) Twin Needle Sewing......................... 20
4. SEWING CHART.................................... 21
Operation Guide
Straight Sewing
Zigzag Sewing
Elastic Sewing
......................................
.....................................
.......................................
.........................................
.........................................
.....................
18
19
21
22
25
27
5. HOWTO USE THE FREE ARM.... 56
6. MAINTENANCE
Cleaning Feed Dog and
Rotary Hook............................................. 57
Oiling
.......................................................
7. TROUBLESHOOTING CHART .... 59
INDEX
..........................................................
......................................
57
58
66
Page 3
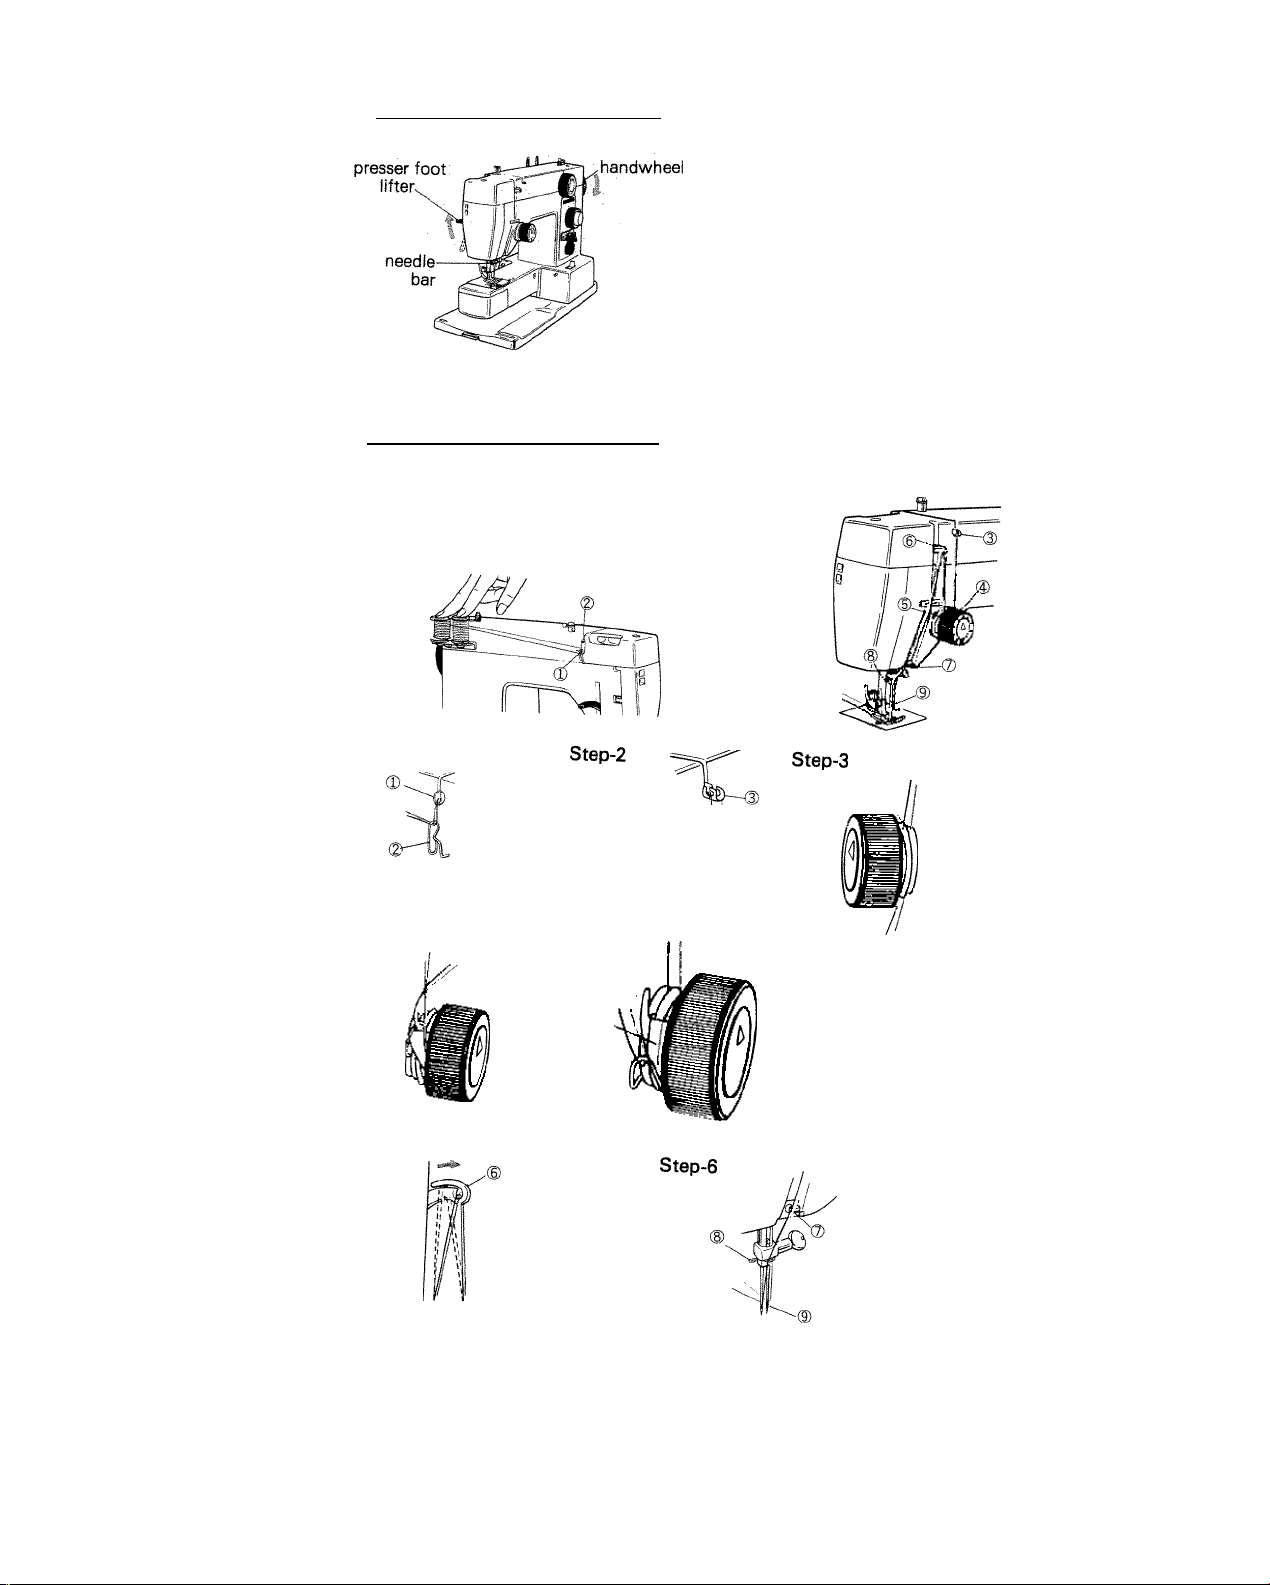
1. NAMES AND FUNCTIONS OF PARTS
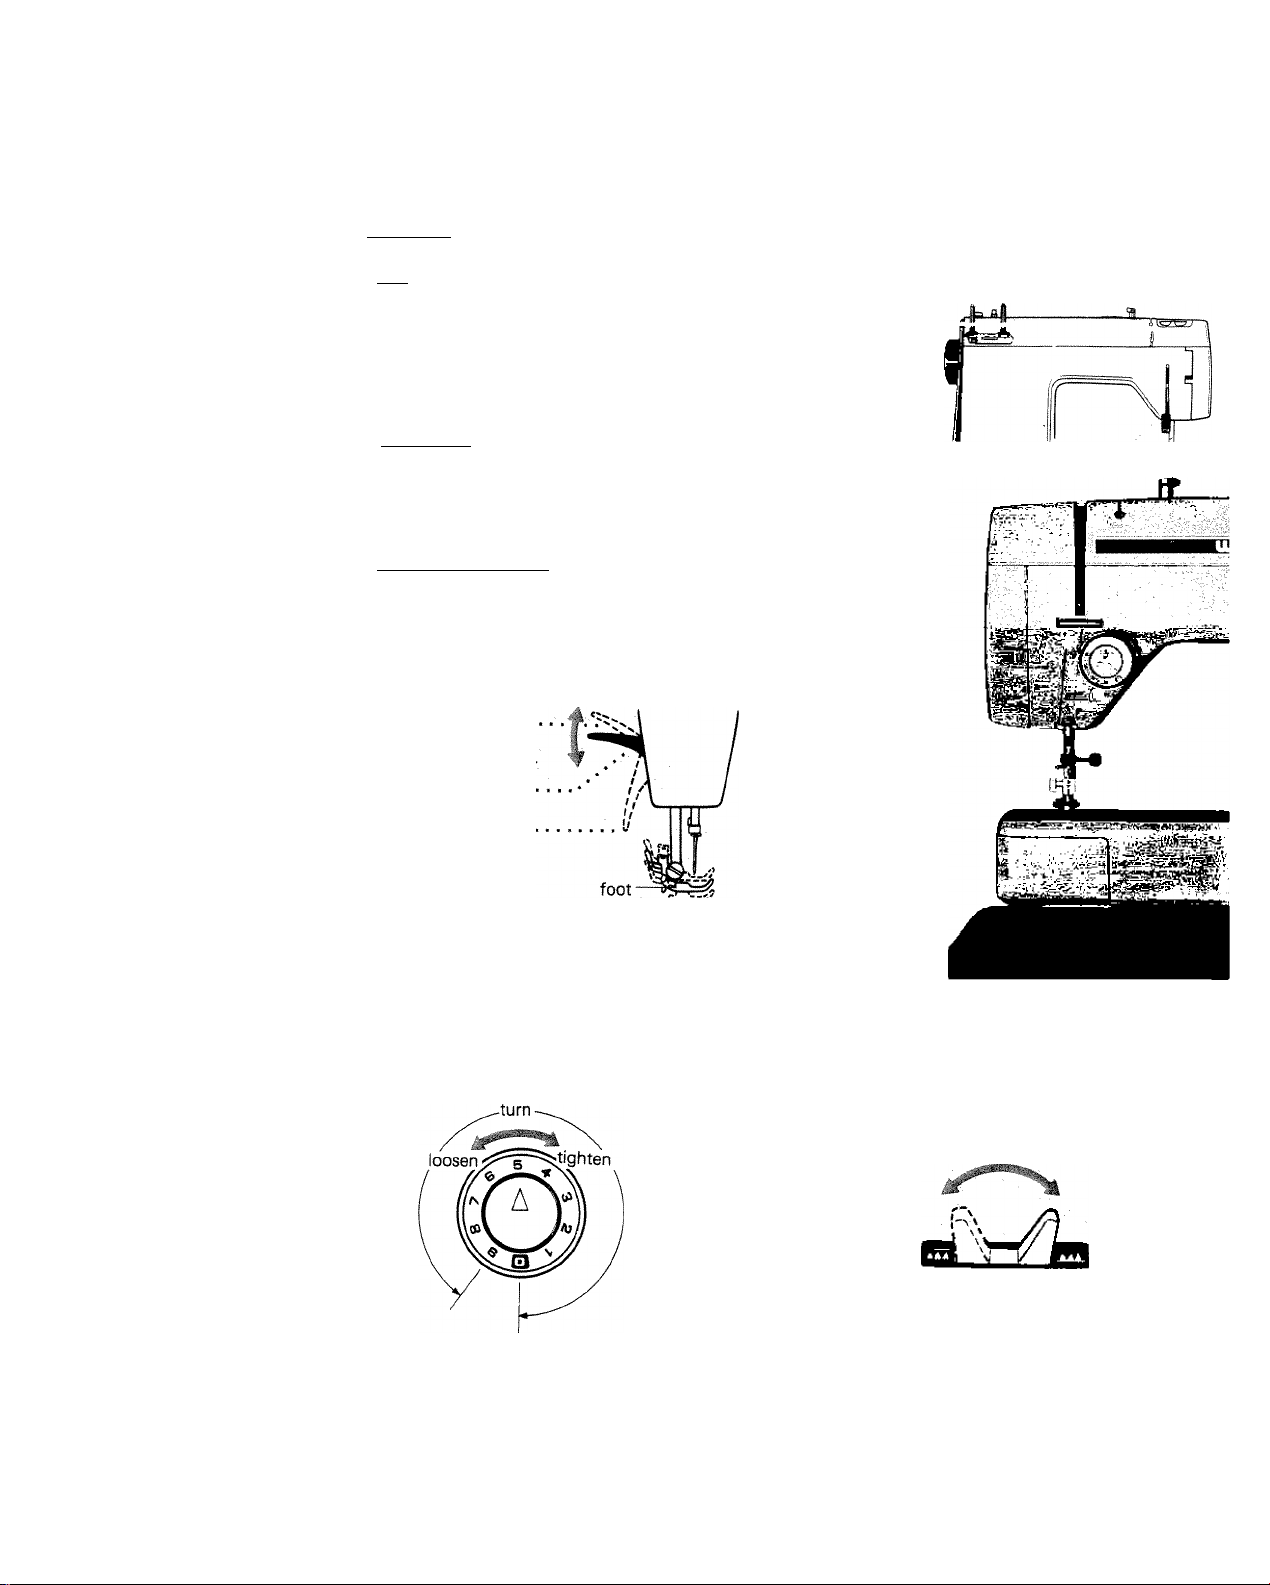
( Protaer foot praaaure control
To change pressure of the presser foot.
turn
laker^^"*^ stronger
I Raise foot when ad-
vr \ ^ justing the dial.
• .
To sew normal fabrics.
I To sew thin or elastic
V
/V\yv\ J fabrics.
* Feed may be difficult at settings under "2"
Presser footllfte^
To raise or lower the foot.
To position and re
move thick fabrics,
buttons, etc
To position and re
move normal fabrics
For sewing.
Upper thread tension dial
To adjust upper thread tension.
Drop feed lbt^
To raise or lower the feed dog.
Not feeding.
Feeding.
Page 4
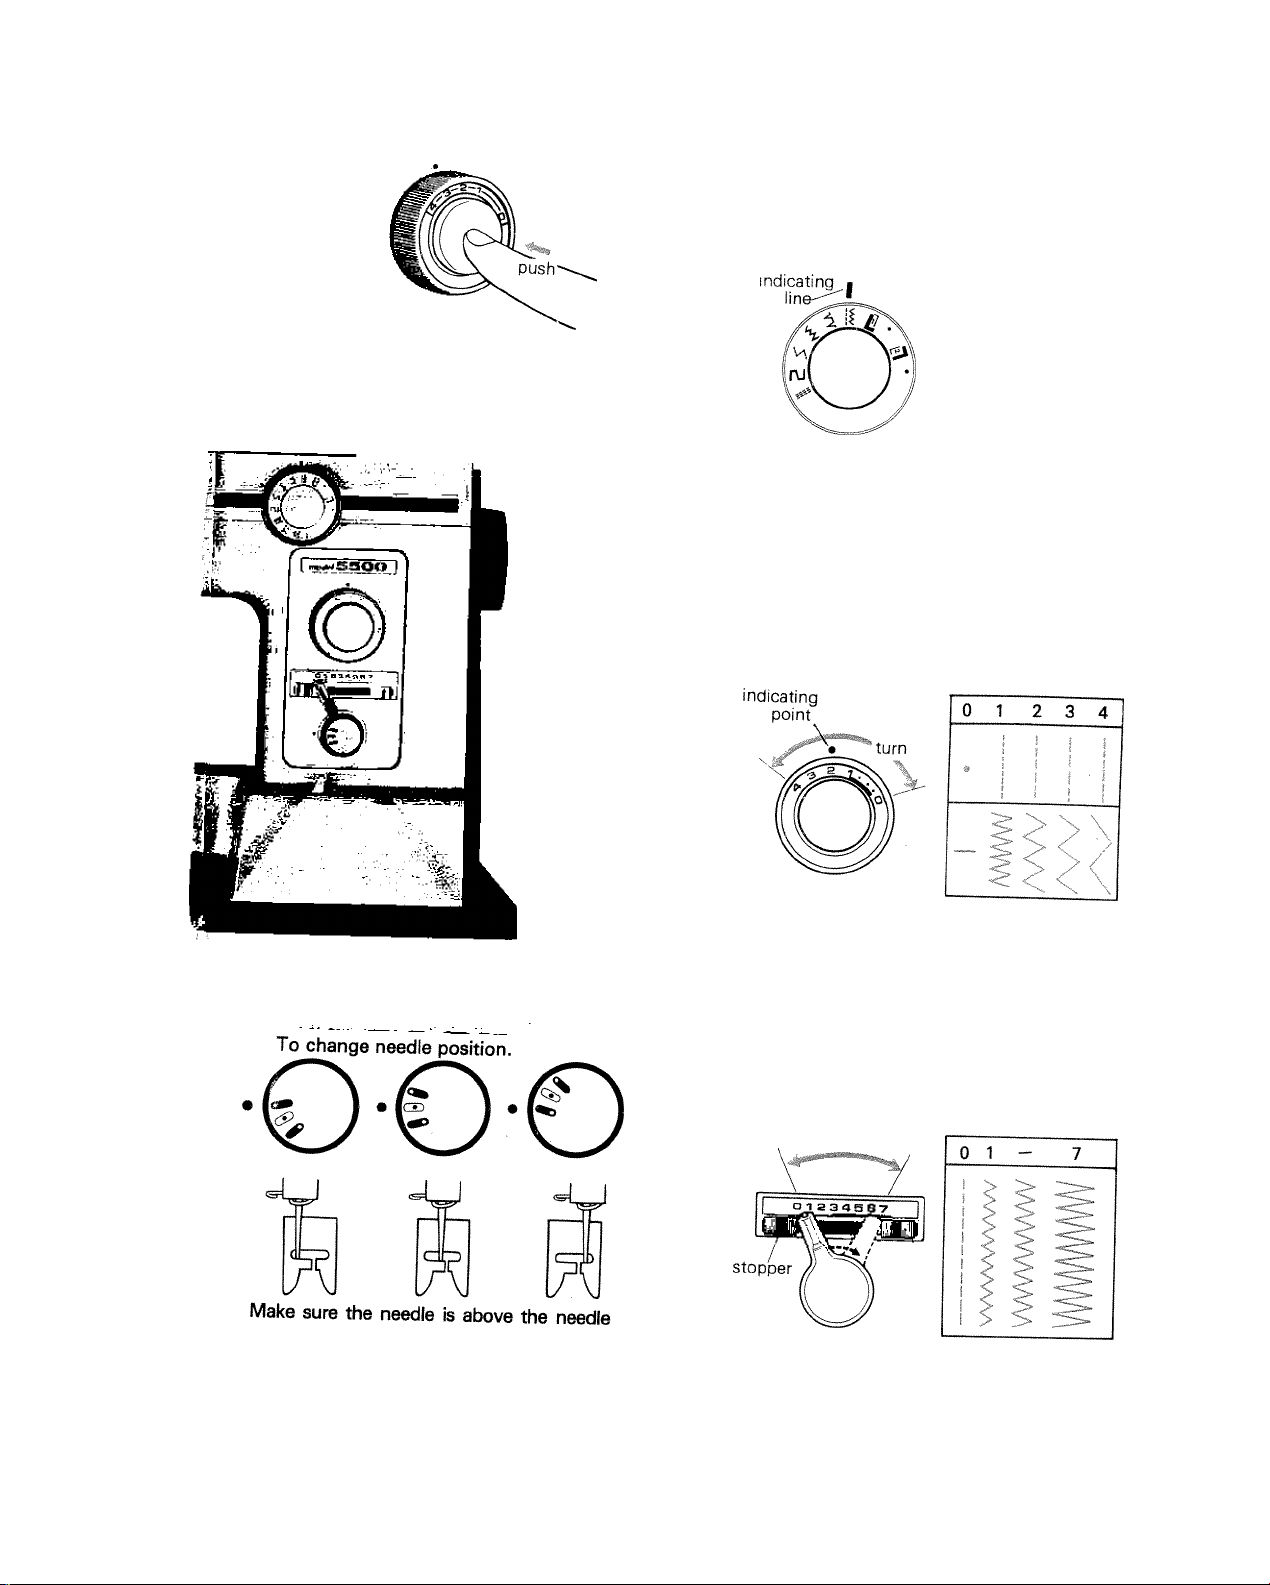
Reverse sewing button
Pattern selectordiai
To sew reverse stitches.
Continue pressing on the button
while sewing in reverse.
i Bn
To select the stitch pattern.
turn
Set the selected pattern at
the indicating line.
Adjust stitch length and
stitch width within the
colour band.
Stitch length diai
To adjust stitch length.
Set within the colour band according to
the pattern selected.
Needte position controi
plate when operating the dial.
Zigzag width control lever
To adjust zigzag width.
Set within the colour band according to
the pattern selected.
turn
Page 5
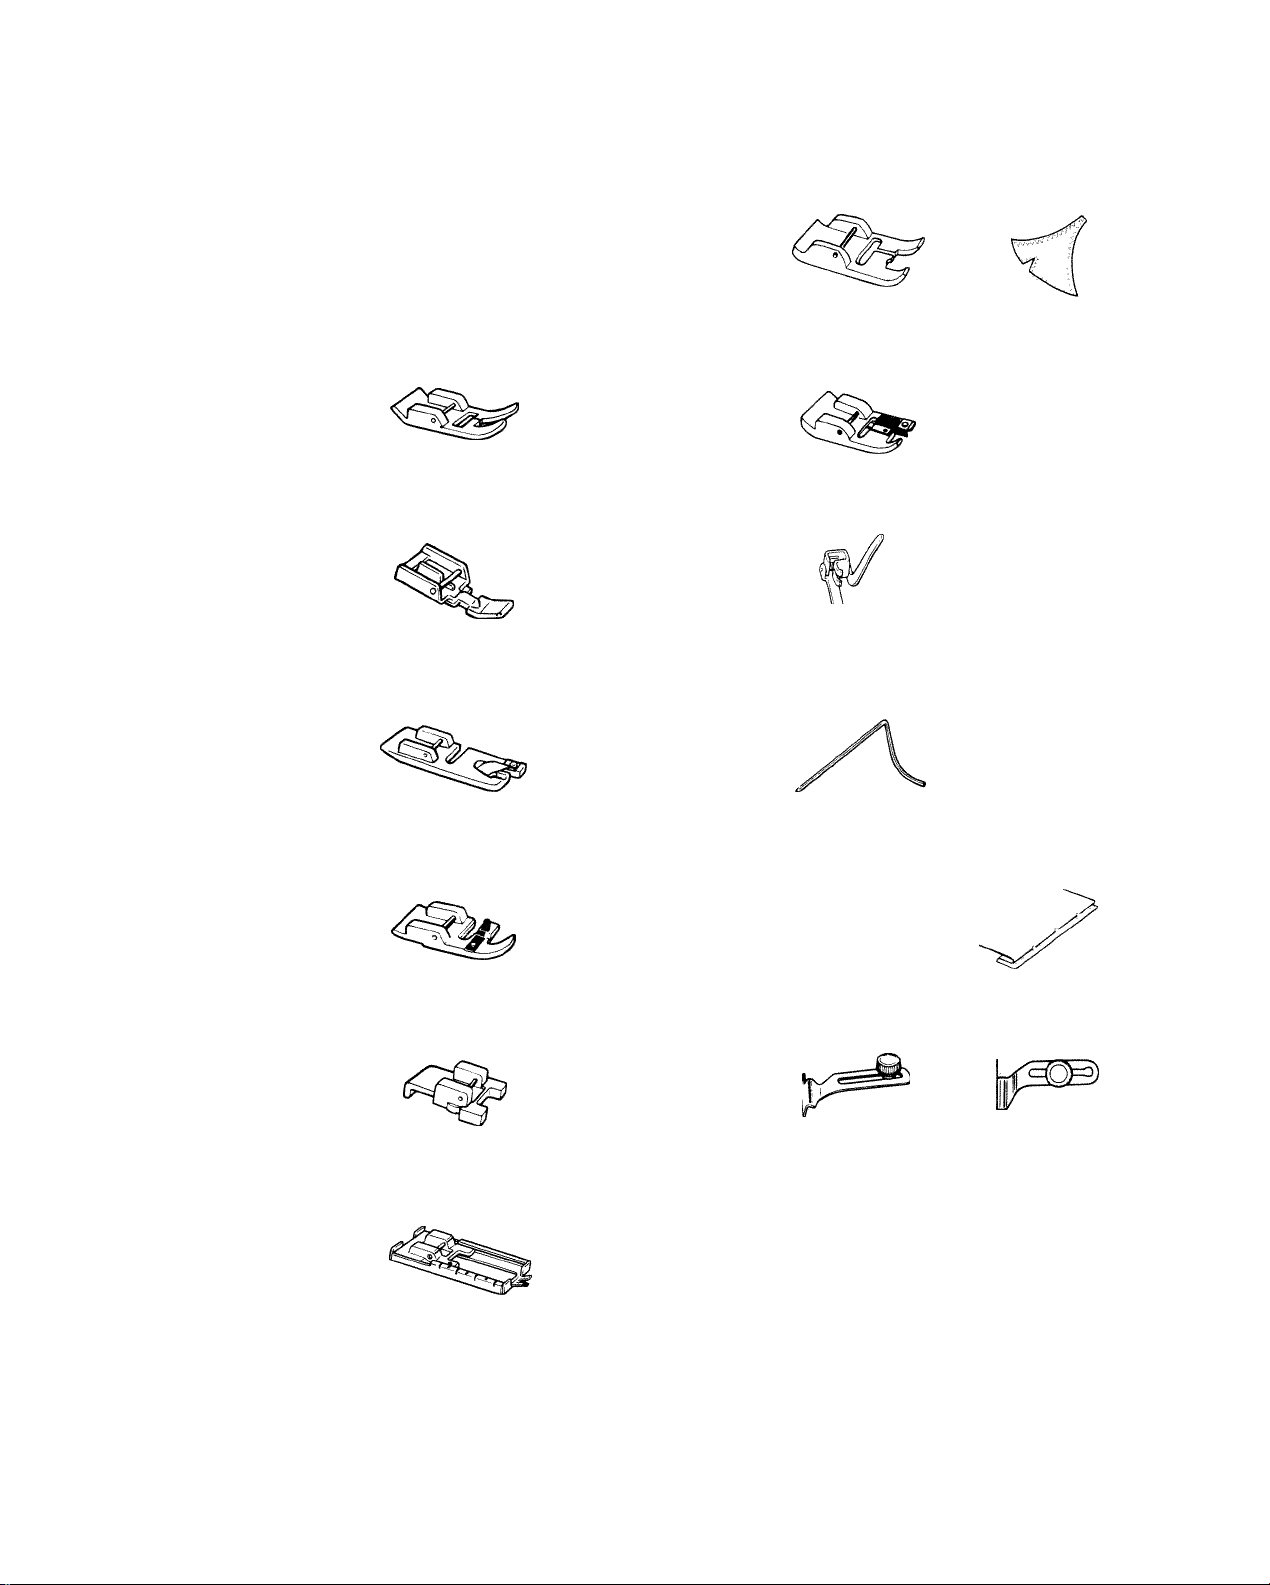
Straight stitch foot
Special foot
Zigzag foot
Zipper foot
Roll hemming foot
Cording foot
Overcasting foot
O
Darning foot
(V
1
Quilting guide
Blind hem stitch guide
Button sewing foot
Buttonhole foot
({ QiaD 11
Cloth guide
:i) ;
Buttonhole cutter
...
J
Page 6
Ordinery needles
Twin needles
size 9/65 {1 pc.)
size 11/75 (2 pcs.)
size 14/90 (2 pcs.)
size 16/100(1 pc.)
—>
(2 pcs,)
Ball point needles
Screwdriver
size 14/90 (2pcs.)
small (Ipc.)
large (1 pc.)
)
(3pcs.
NOTE
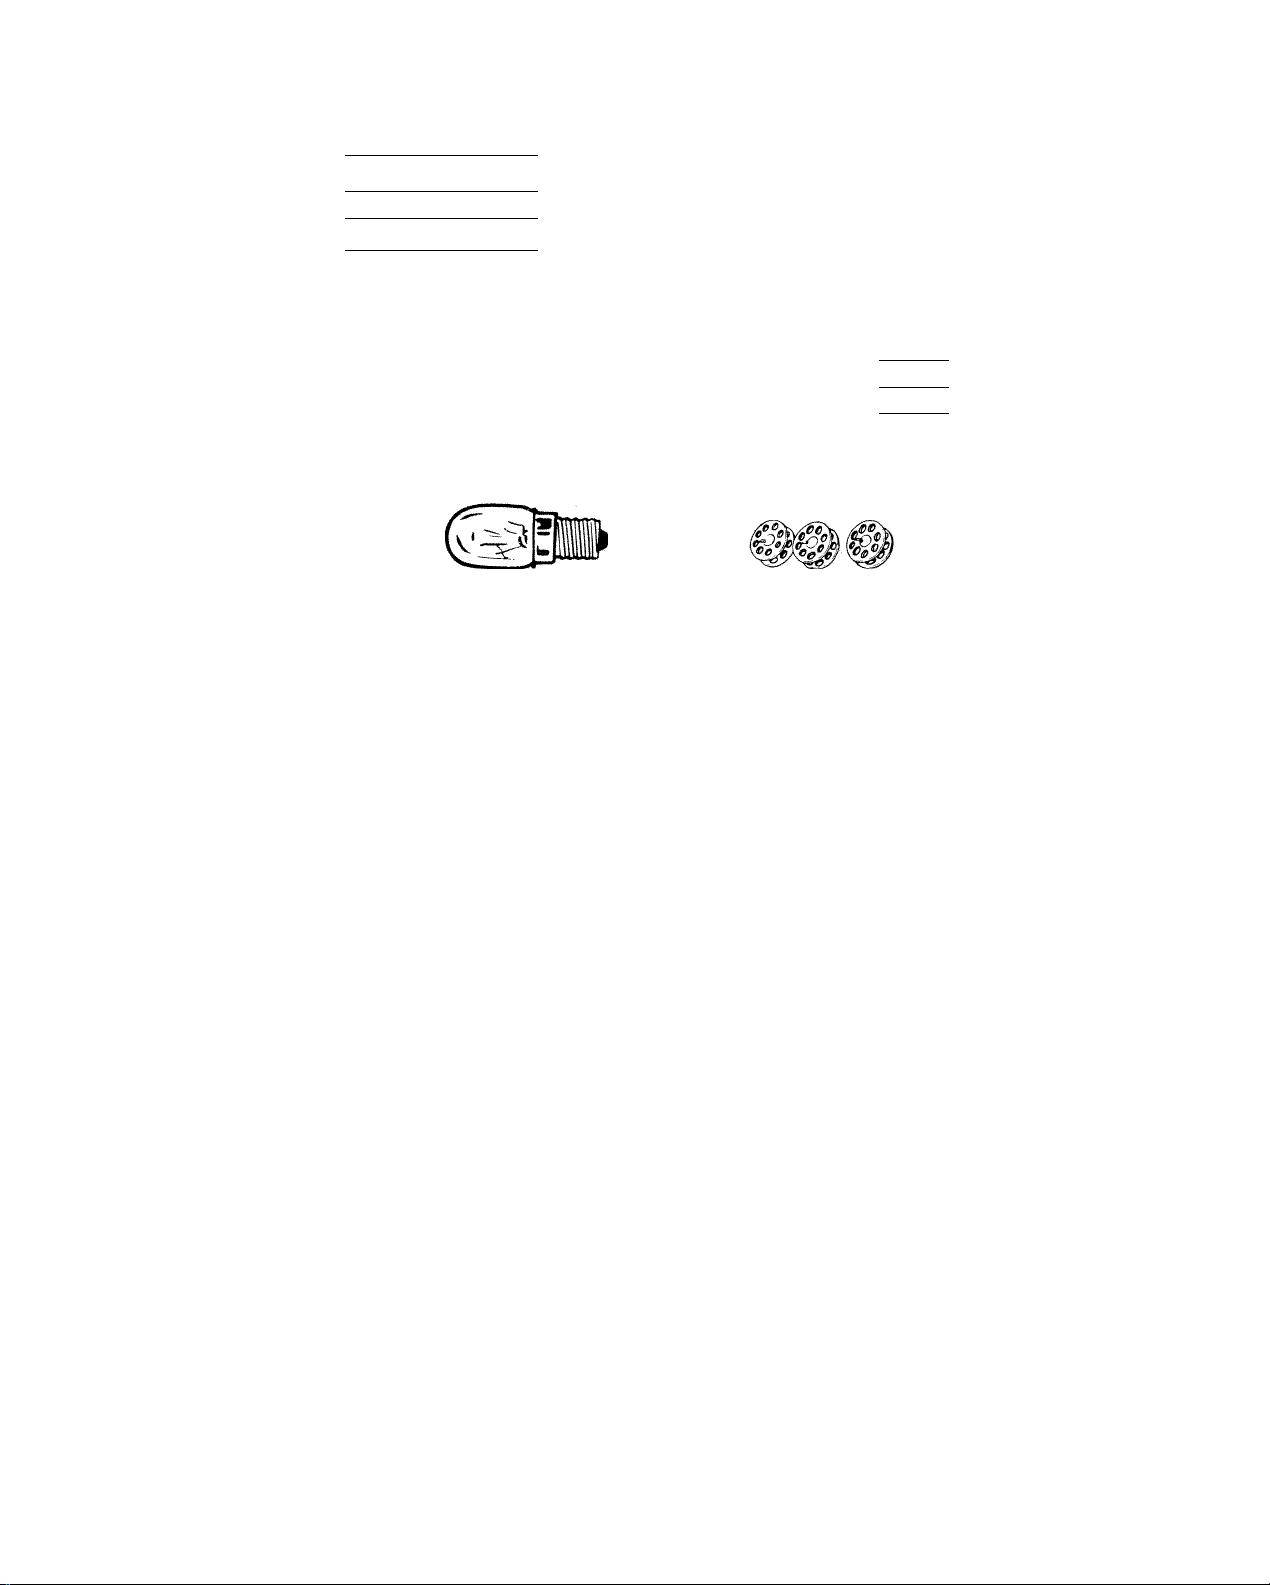
Bulb
Cleaning brush
Bobbins
Oil
Page 7
i. ^5 is; Ca
jfittacicsriij “i'ii iVia«i*:K;s
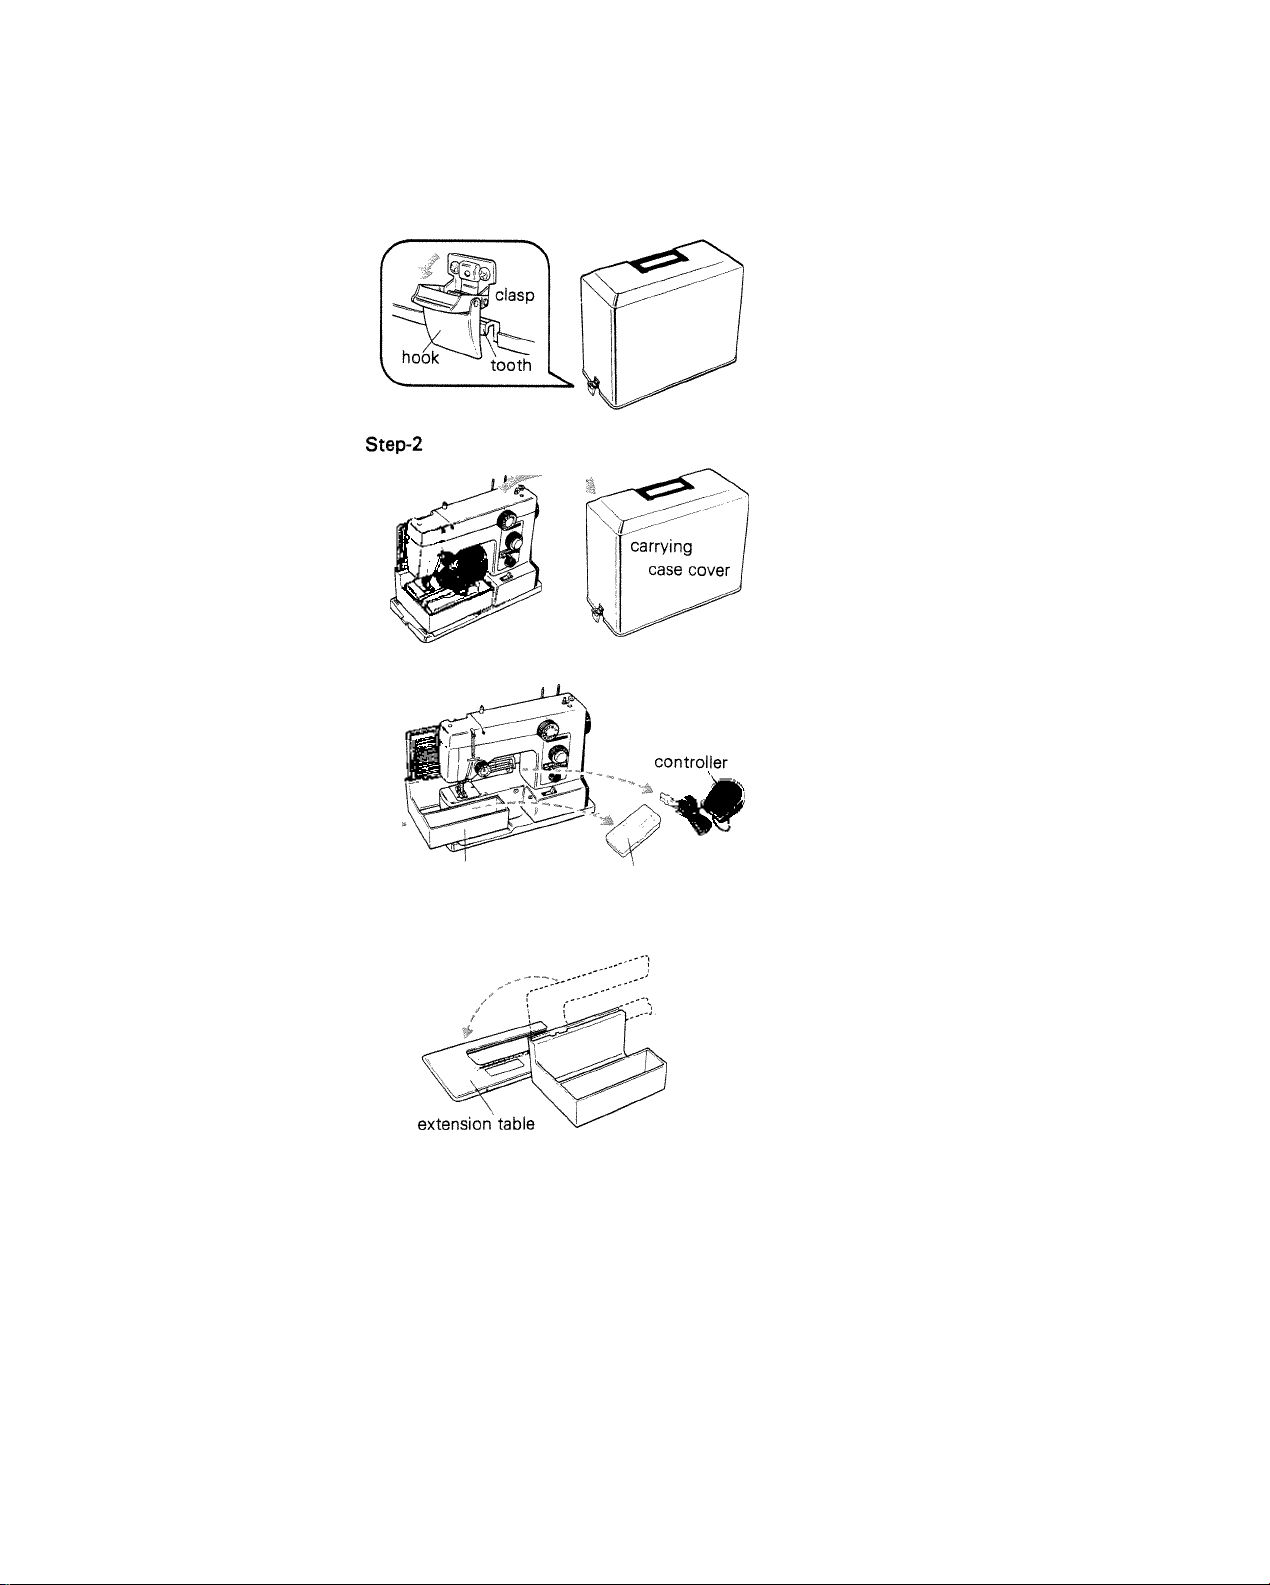
Step-1
Place the machine on the table and unlatch
clasps on both sides by pressing them slightly
in the arrow direction.
Remove the carrying case cover.
Step-3
Take out the foot controller and accessory
box.
Slide the compartment In the arrow direction.
compartment
accessory
box
Step-4
Take out the extension table.
Packing the machine —
Packing is the reverse of the above procedure.
Note the following.
Lower the presser foot lifter when sliding in the compartment.
Make sure that the hooks of the upper clasps are firmly attached to the teeth when
installing the carrying case cover.
Page 8
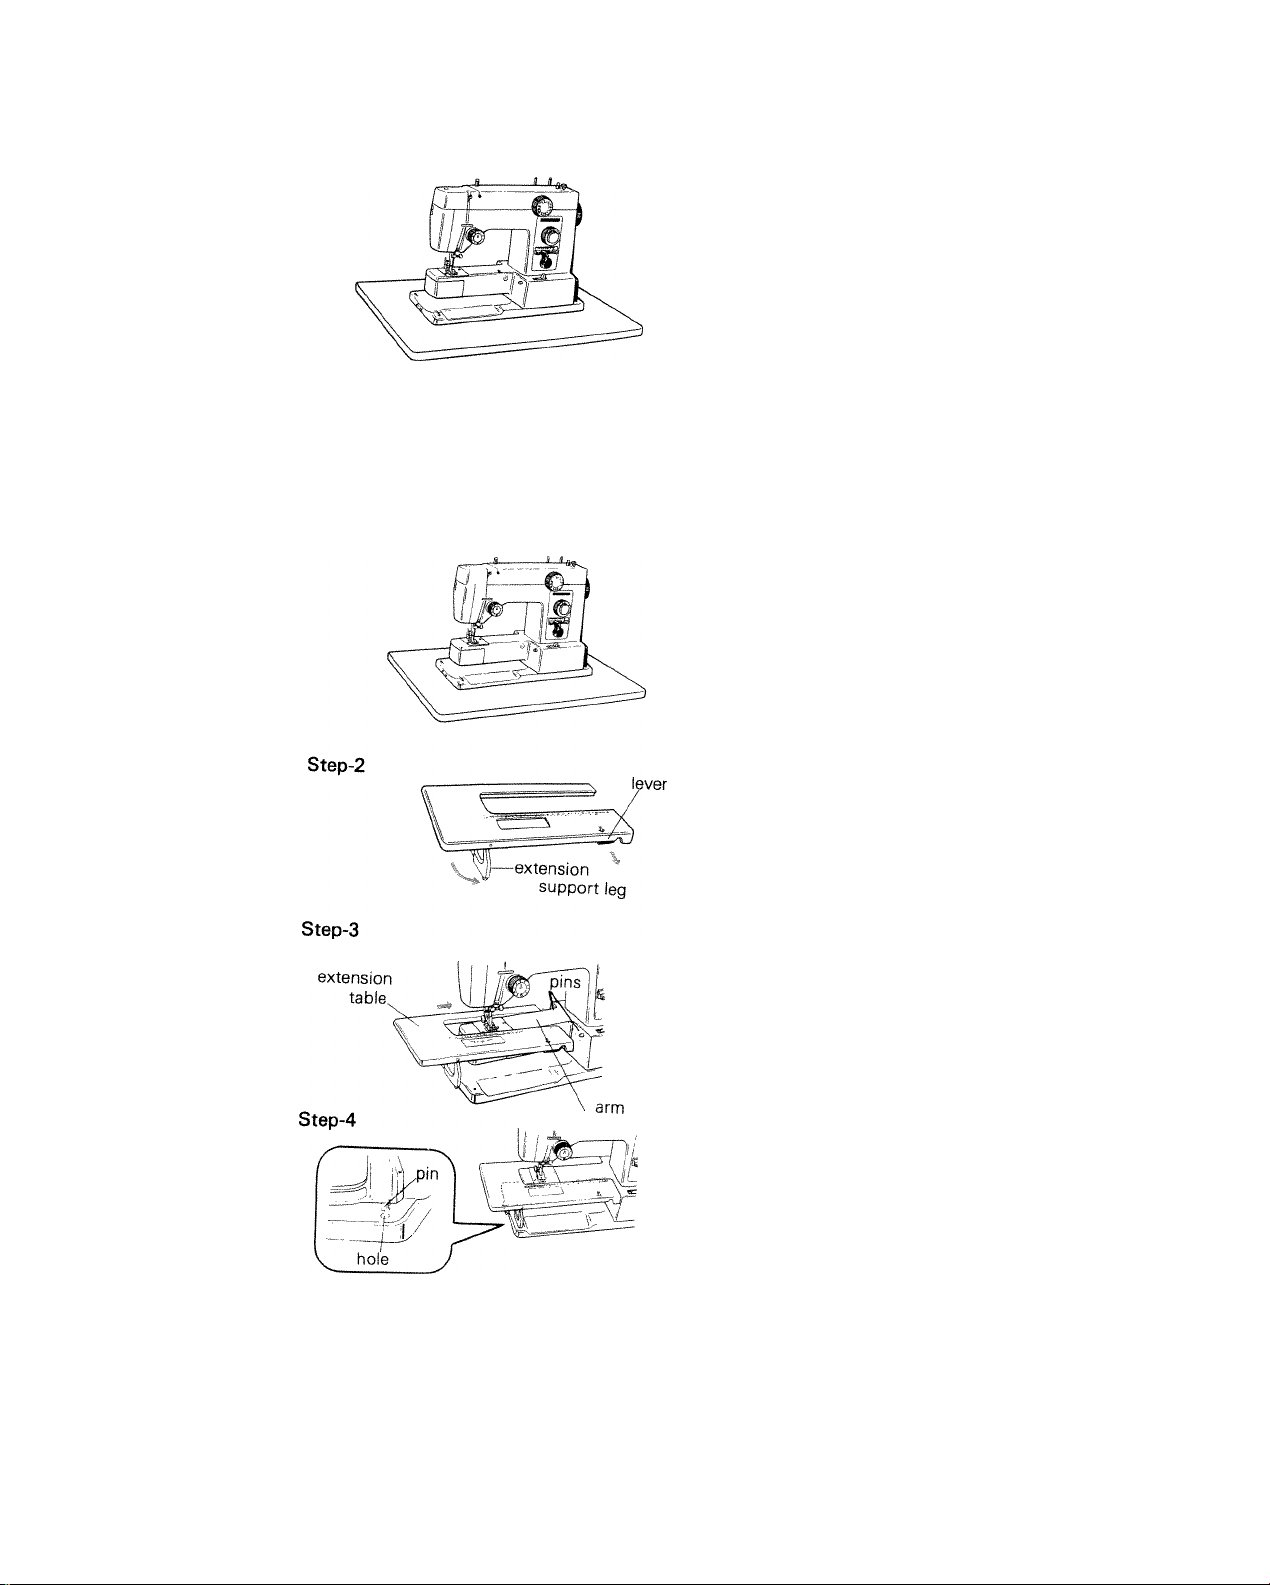
For free-arm use
Without an extension table, the machine is
used as a free-arm model for convenient
sewing of trousers, sleeves, cuffs and the
like.
* Set the machine on a steady surface.
For flat-bed use
Attach the extension table by the following steps.
Step-1
Place the machine in the free-arm condition
on the table.
* Be sure the machine is mounted steadily.
Detaching the extension table —
Pull out the lever and slide the table to the left.
Push down the extension support leg and
stand it.
Pull out the lever and slide in the extension
teble in the arrow direction until it is supported
by the two pins in front and back side of
the arm.
Fit two pins of the leg to the holes on the
lower left of the machine.
Page 9
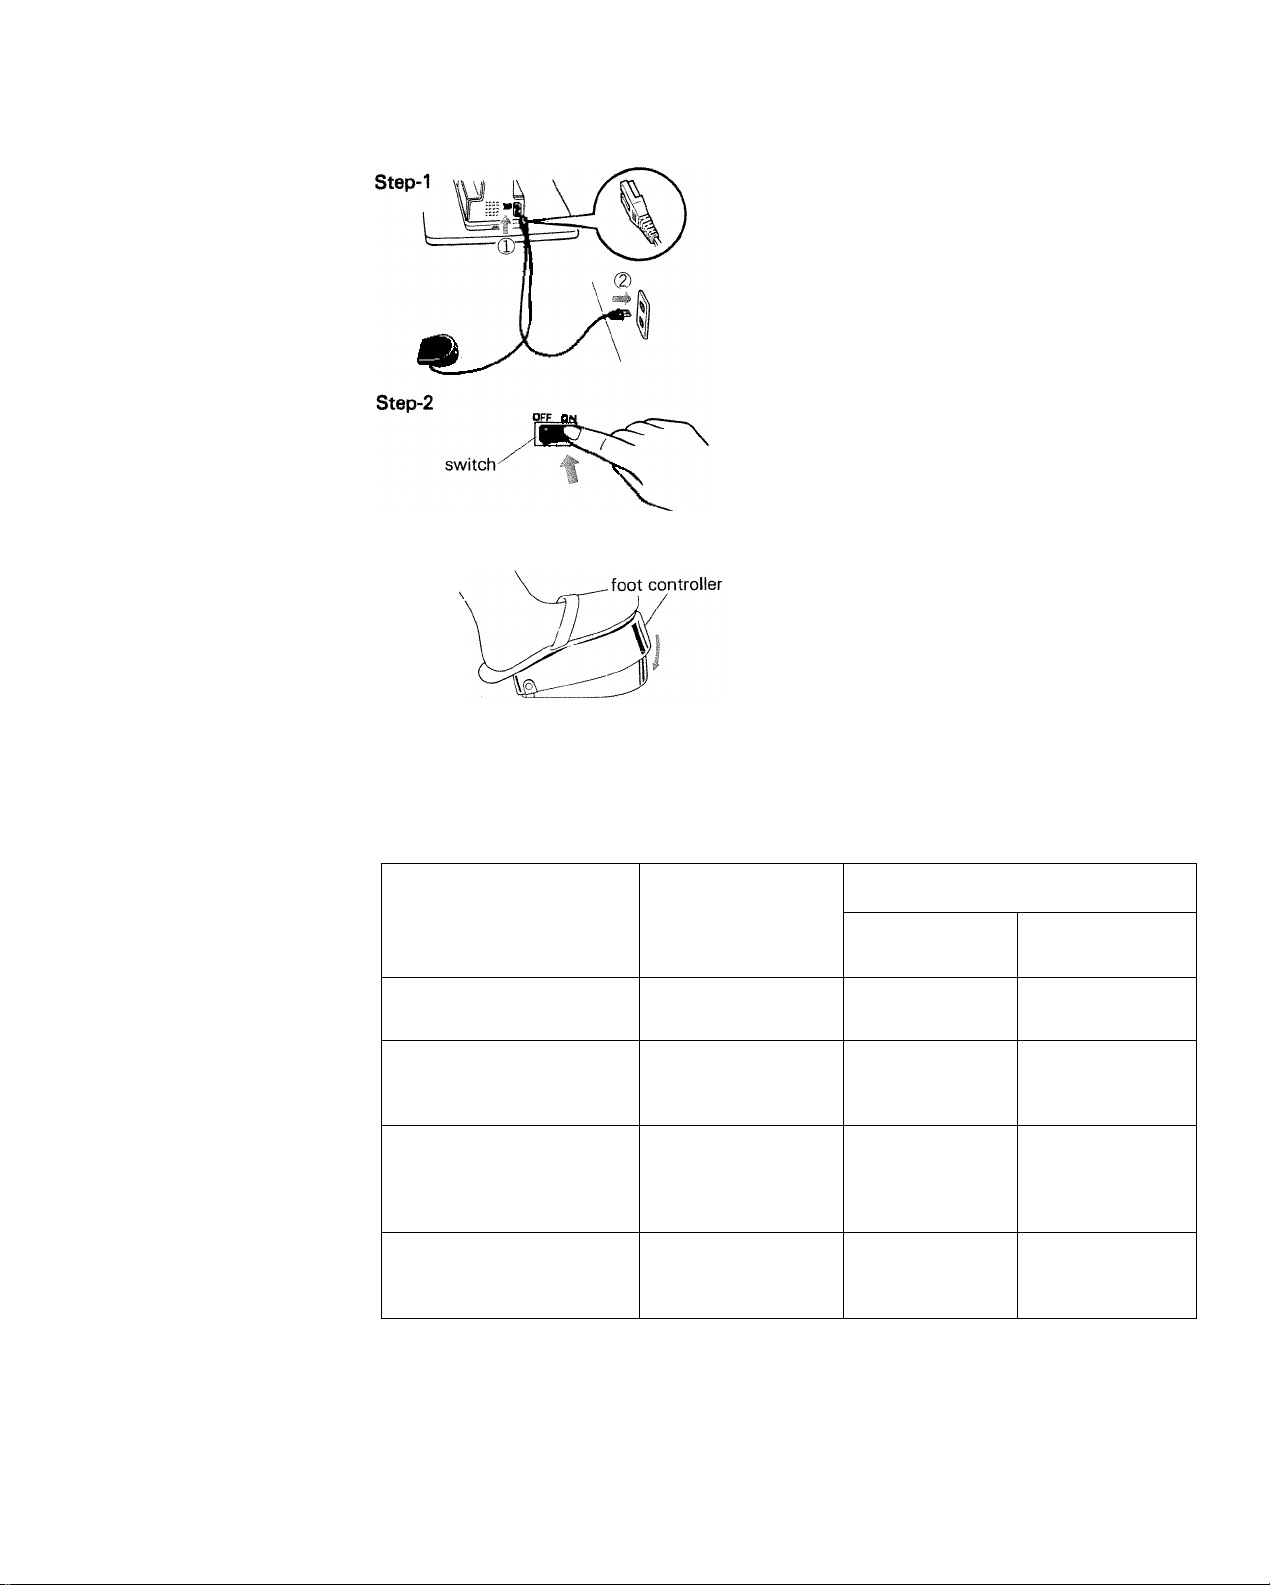
Connestiiii Foot Controller ini Power Cord
Step-3
Make sure the voltage is the same as stated
on the nameplate on the back side of the
machine.
Plug in following numbers (I) — (2) as shown.
* Always unplug the machine when not in use.
Switch on the power to put on the machine
and turn on the sewing light.
The more you depress the foot controller,
the faster the machine runs.
• Be careful not to drop the foot controller
from a high place.
Fabric, Thread and Neadle Table
Always use Type 705 (Needle)
FABRIC
DELICATE- tulle, chiffon, fine
lace, silk, organdy
LIGHTWEIGHT-basiste, or
gandy, jersey, voile, taffeta,
silk, crepe, chiffon, velvet,
plastic film
MEDIUM WEIGHT-gingham,
percale, pique, linen, chintz,
faille, satin, fine corduroy,
velvet, suitings, stretch fabrics,
knits
MEDIUM HEAVY-gabardine,
tweed, sailcloth, denim, coat
ings, drapery fabrics
* For stretch fabric such as knits and jersey materials, use Ball-point Needle to get better
stitch performance.
*
THREAD SIZE
Fine mercerized cot
ton, fine synthetic
thread
50 mercerized cotton,
"A" silk, synthetic
thread
50 mercerized cotton,
60 cotton, "A" silk,
synthetic thread
Heavy-duty mercerized
cotton, 40 to 60 cotr
ton, synthetic thread
NEEDLE SIZE
ENGLISH AND
AMERICAN
9
11
14
16
EUROPEAN
65,70
75,æ
90
100
Page 10
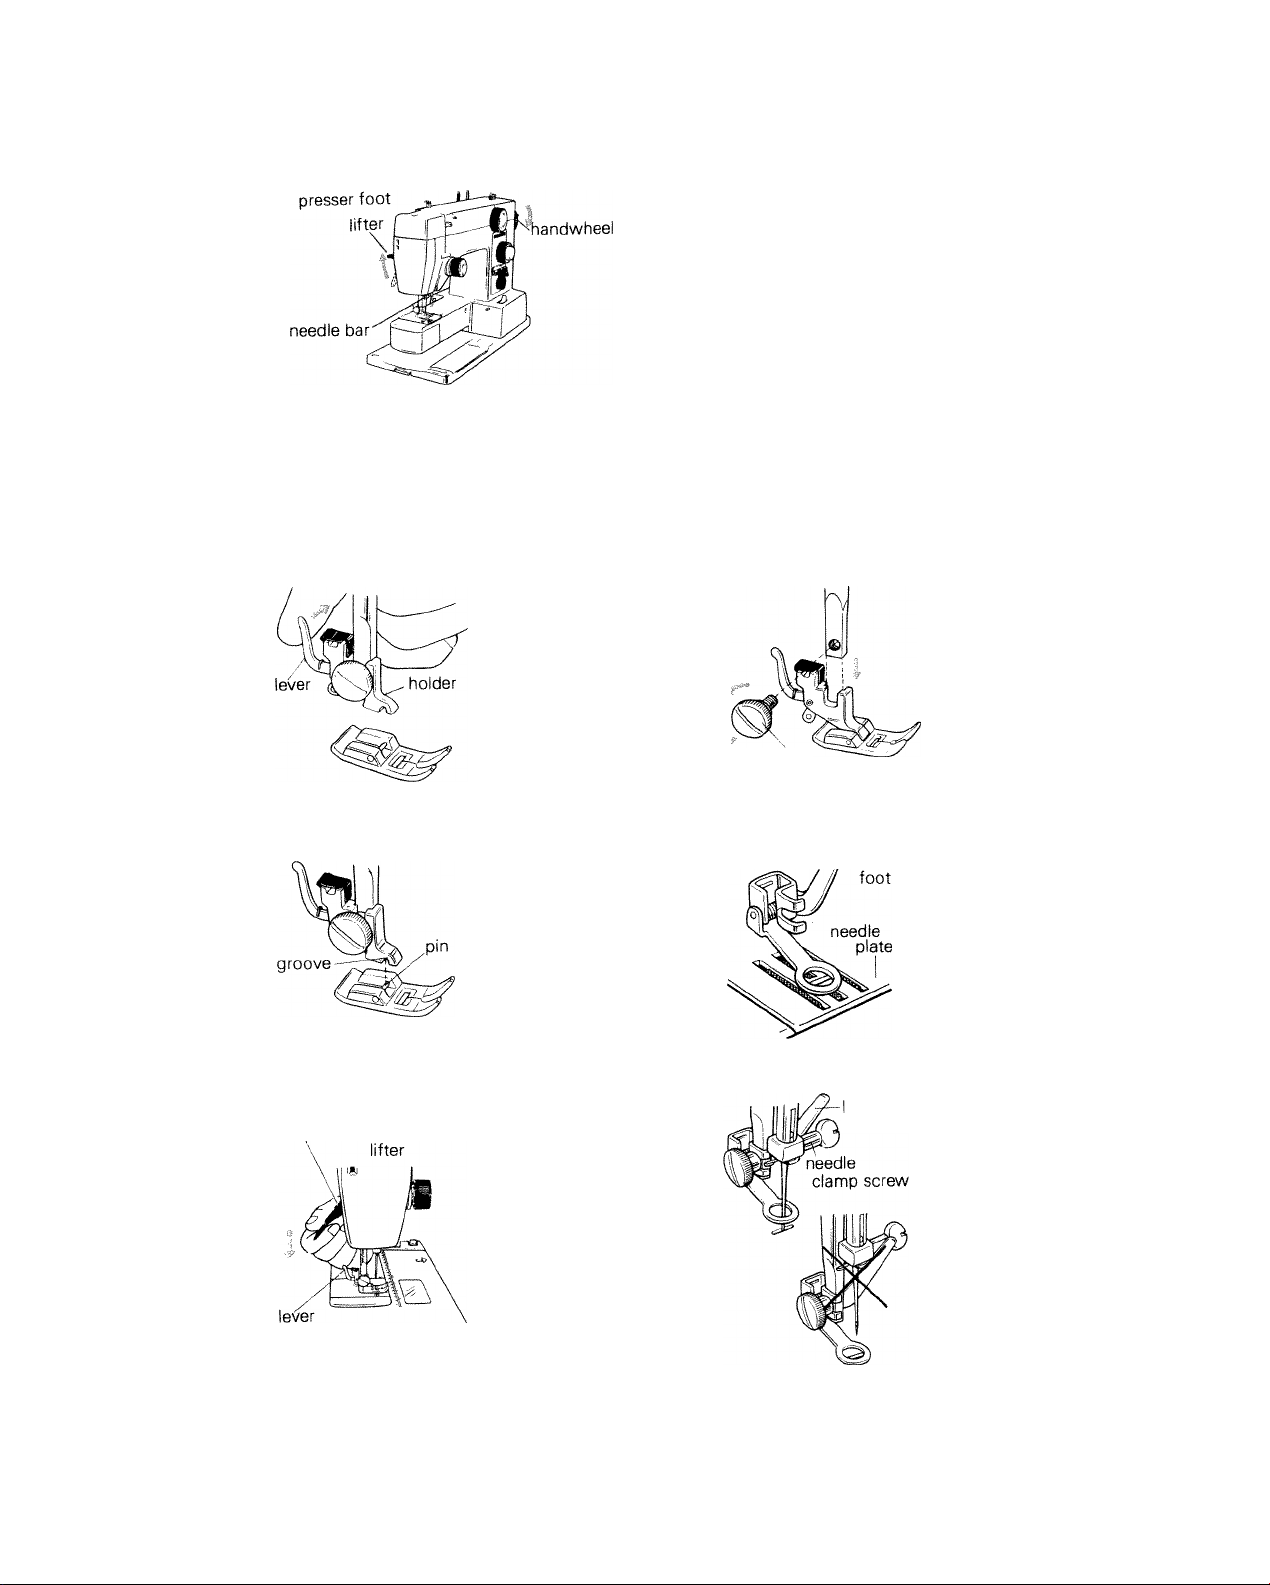
Raise presser foot lifter and needle bar
Changing a foot
(1) Raise the presser foot lifter.
(2) Set the needle bar in the highest position
by turning the handwheel toward you.
Snap-on presser foot
Step-1
Step-2
Step-3
presser foot
Push the lever of the
holder in the arrow
direction.
Position a new foot
with the pin right
under the groove of
the holder.
By lowering the pres
ser foot lifter, the foot
will be automatically
snapped on.
»When you fail to catch
the foot, press the
lever slightly.
Screw-snap presser foot {darning foot)
Step-1
Remove the foot and
the holder by loosen
ing the screw with a
screwdriver.
screw
Step-2
,7
darning
Align the hole of the
darning foot with the
hole of the needle
plate.
Step-3
ever of
the foot
Lower the needle by
turning the handwheel
toward you.
The lever of the foot
should be behind the
needle clamp screw.
Tighten the screw on
the holder.
Page 11
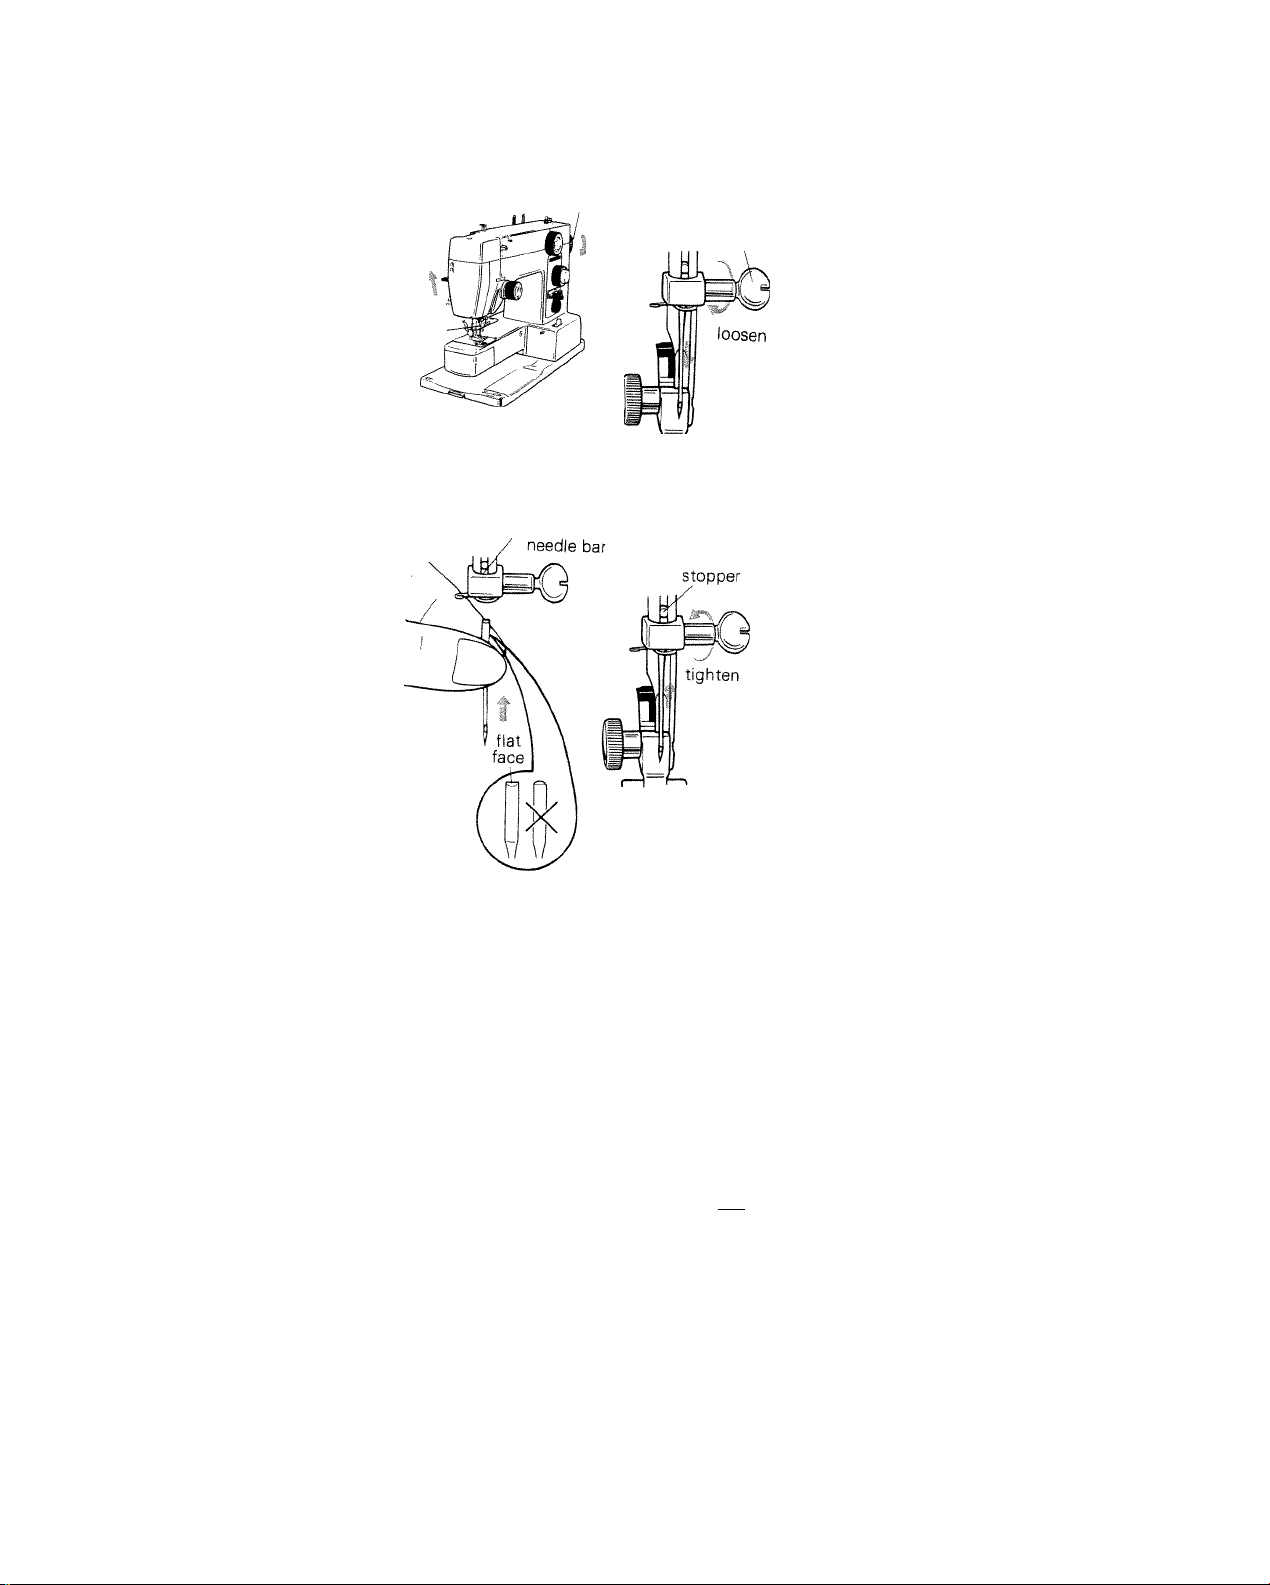
nging the N@@h
Step-1
needle “
bar
handwheel
needle
clamp screw
(1) Set the needle bar in the highest position
by turning the handwheel toward you.
(2) Loosen the needle clamp screw and take
out the needle.
Step-2
groove of the
-How to check your needles-
Proper needle
It is straight.
The gap is even.
Improper needle
Bent needle.
(1) With the flat face away from you, insert a
new needle into the groove of the needle bar.
¡2) Push the needle until it reaches the stop
per and tighten the needle clamp screw
firmly.
The point is sharp.
Using defective or worn needles not
only causes stitch skipping, break
age of needles or snapping of thread;
it also can damage the rotary hook
and the needle plate.
Blunt point.
~5—
Bent point.
3^
Page 12
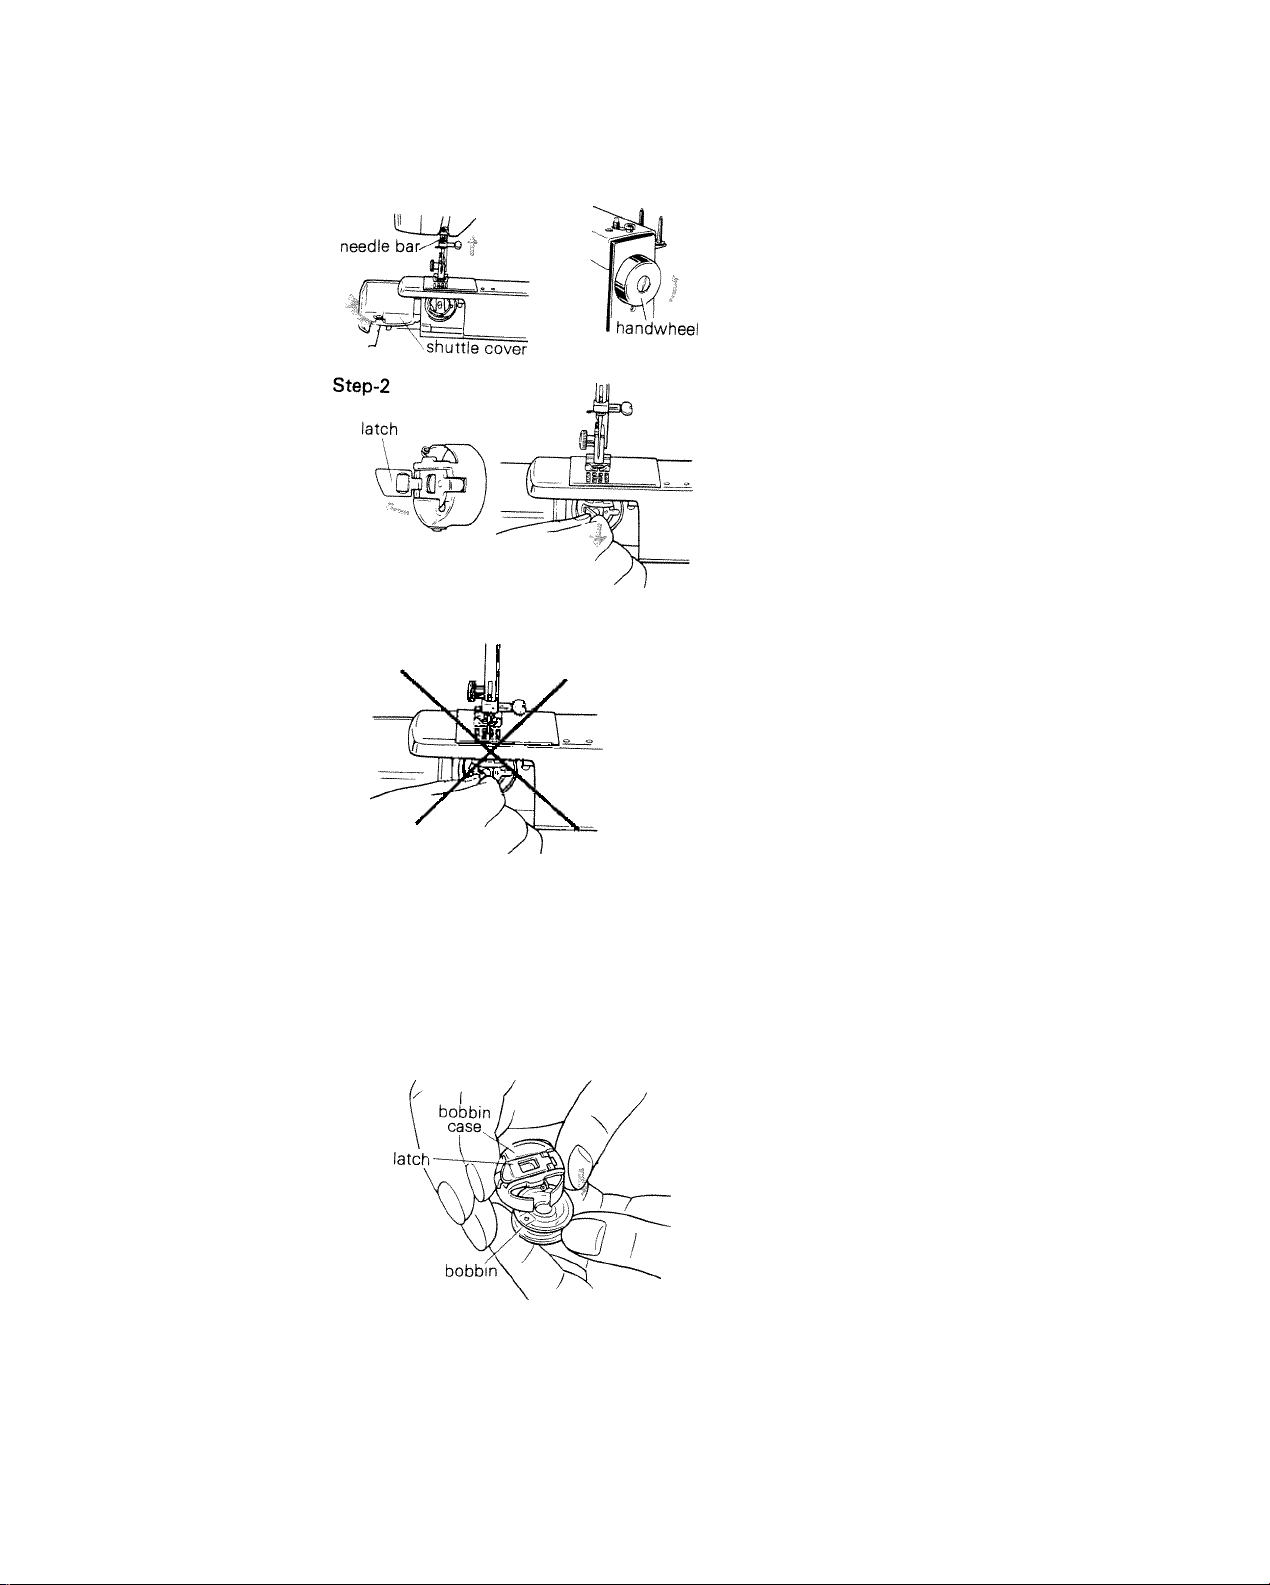
Step-1
Removing the bobbin caae
i1) Set the needle bar in the highest position
by turning the handwheel toward you.
(2) Open the shuttle cover.
Open the latch of the bobbin case and take it
out.
* Be sure that the needle is in the highest position.
Remotnhg the bobbin from the bobbin
case
(1) Close the latch.
(2) Hold the bobbin case with the
latch upward as shown.
(3) Bobbin comes out easily.
10
Page 13
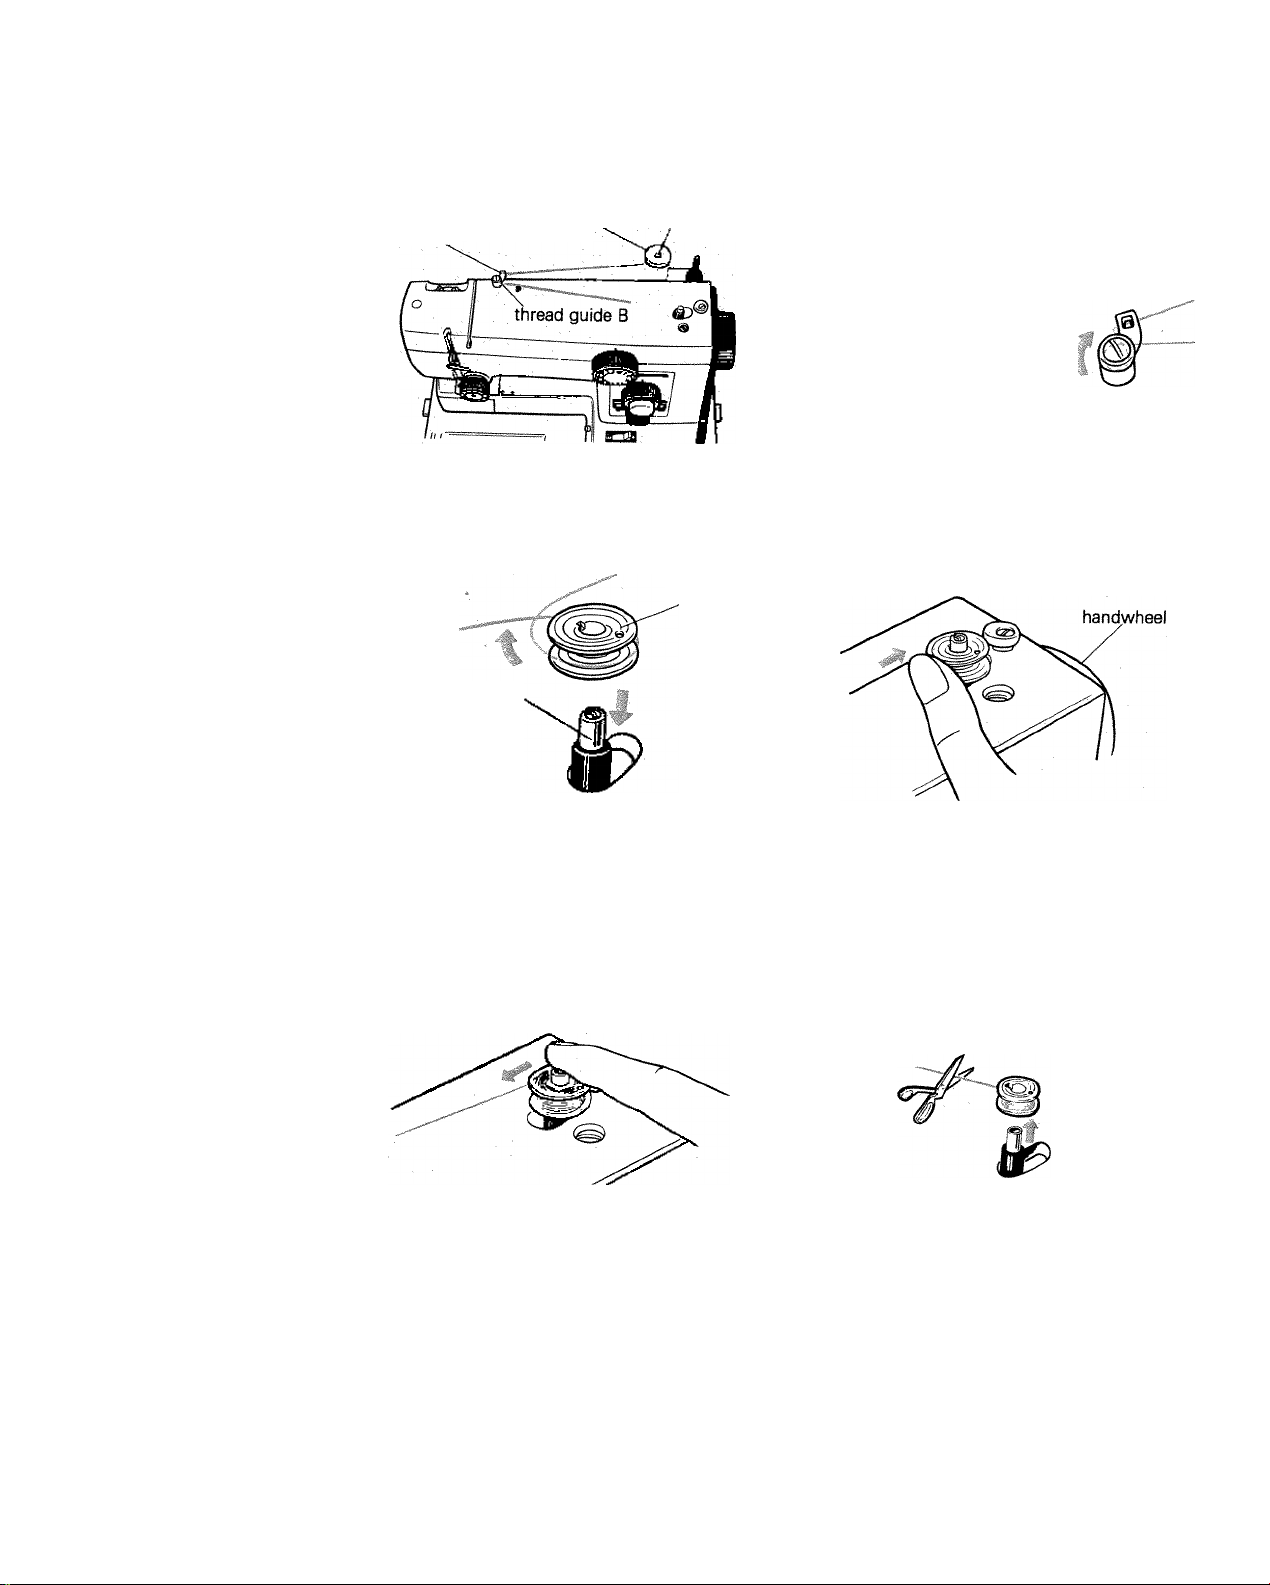
Winding the bobbin
Step*l
thread
guide A
spool spool pin
-tfiread \
guide A
thread guide B
Put the spool on the spool pin. Draw the thread from the spool pin through the thread
guides A and B as shown in (D @ and @.
Step-2
bobbin
spindle
Step-3
Wind the thread clockwise around the bob- Push the bobbin toward the handwheel and
bin several times.
Push in the bobbin as far as it will go.
press down the foot controller.
• Not to place your fingers near the needle
bar. Needle bar may move a little when
starting to wind the bobbin.
* Never press the spindle while sewing.
Step-4
The machine stops automatically when
winding is finished.
Step-5
Take out the bobbin from the spindle and
cut the thread.
Return the spindle by pushing it in the
arrow direction.
* Be sure that the machine is not running.
n
Page 14
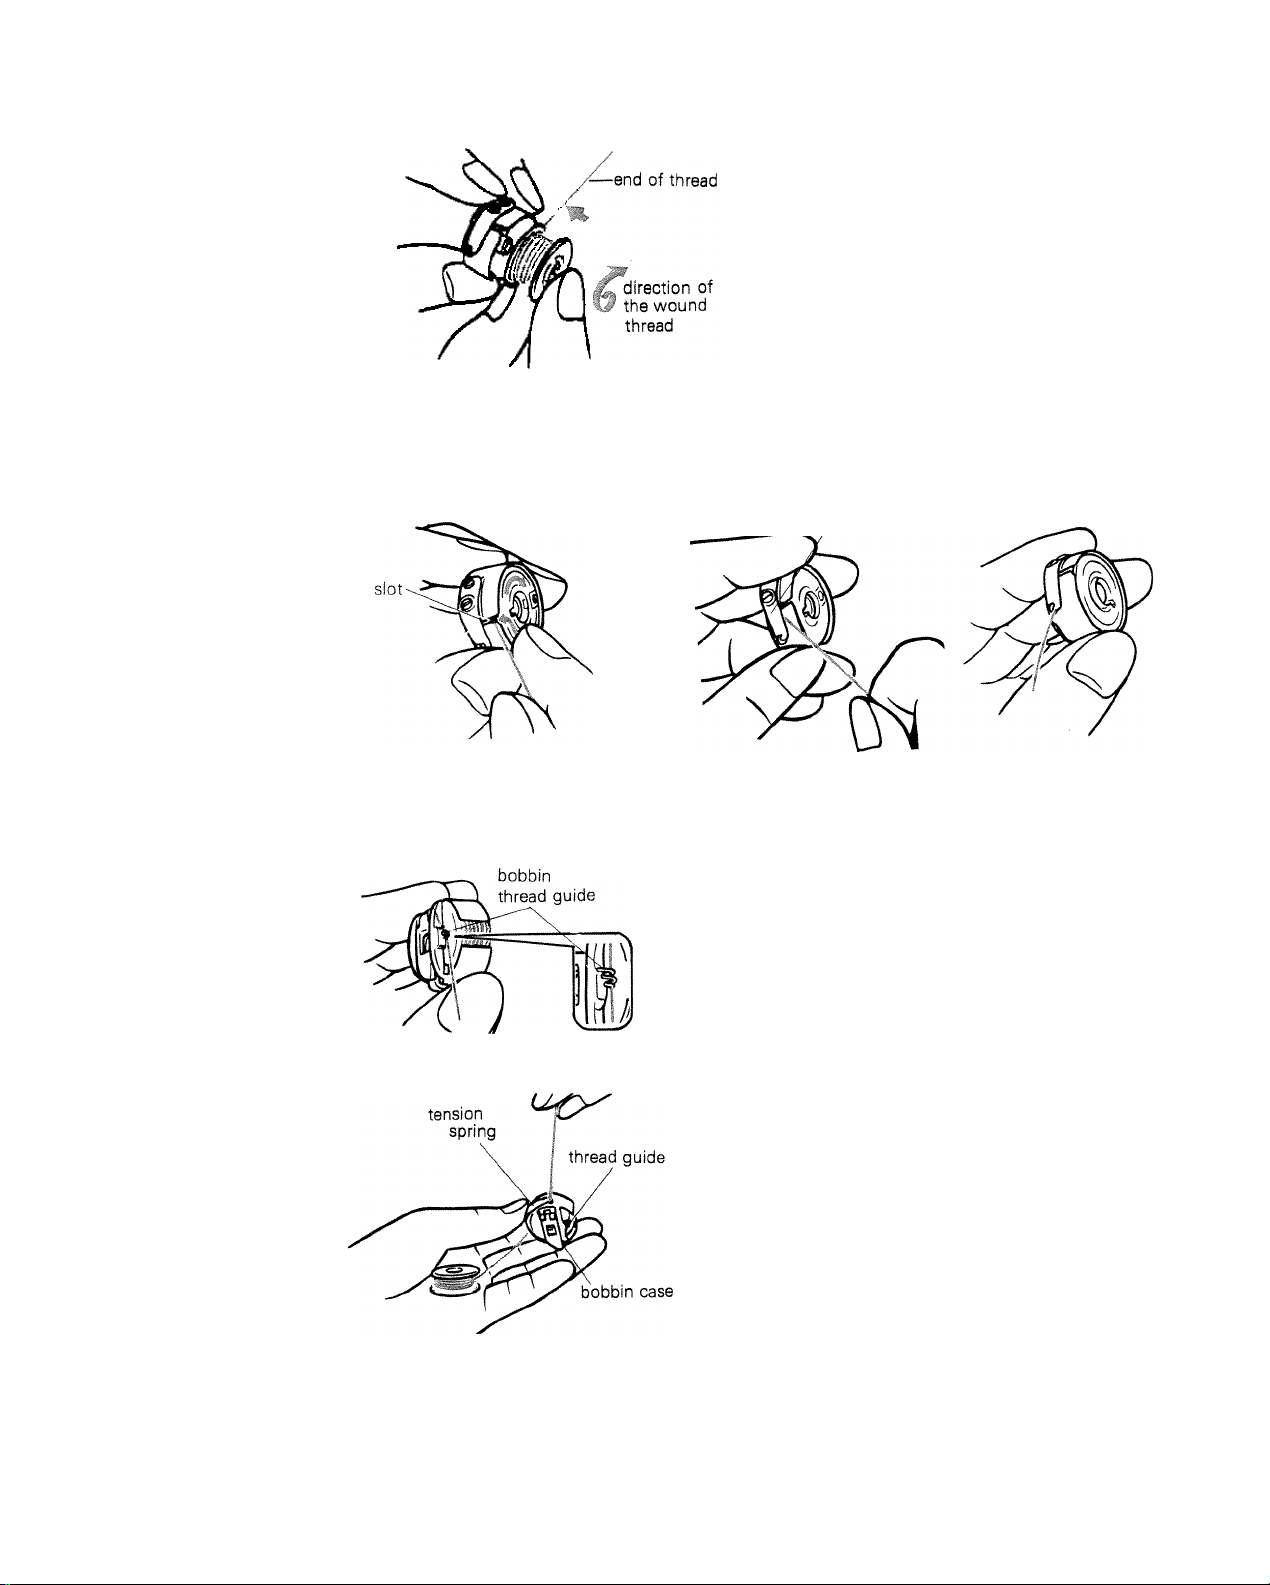
inserting the Bobbin Case
Inaartlng the bobbin
Thraadlng the lower thread
!1) The end of the thread is away from you as
shown.
(2) Leave the end of the thread of about 10cm
(4") from the bobbin.
(3) Insert the bobbin into the bobbin case.
Step-1
Slide the thread into the slot of
the bobbin case.
Step-3
Step-2
tension spring
Pulling the thread to the left, pass the thread
under the tension spring.
Pass the thread through the bobbin thread
guide.
— How to adjust lower thread tension
(1) Checking the tension
Complete the threading of the lower thread.
Take out the end of the thread from the bobbin
thread guide.
Place the bobbin and the bobbin case on your palm.
Pick up the end of the thread and shake it gently.
At the proper tension, the bobbin case will gra
dually drop a small amount.
12
Page 15
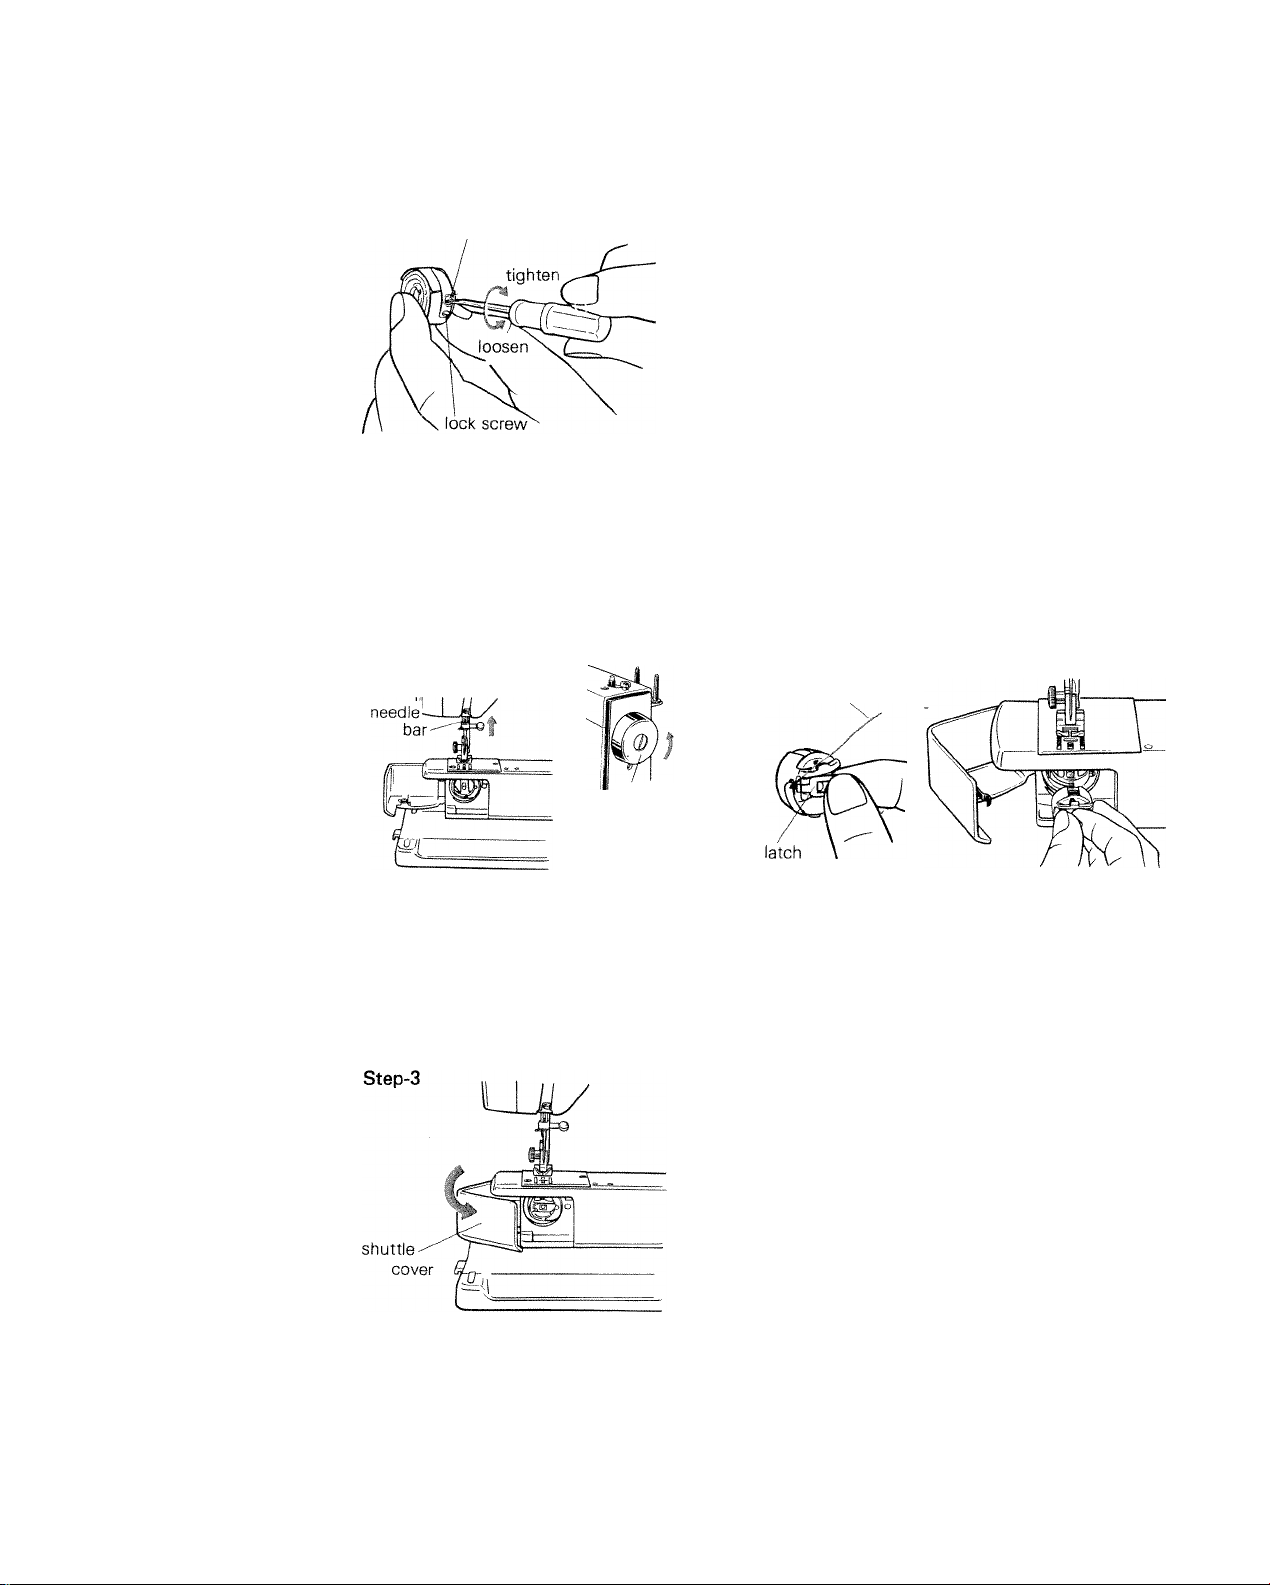
adjusting screw
Inserting the bobbin case
(2) Adjusting the tension
Turn the adjusting screw with the small screw
driver for adjustment.
* Be careful not to touch the lock screw when
adjusting the bobbin tension.
Step-1
handwheel
Set the needle bar in the highest po
sition by turning the handwheel to
ward you.
Step-2
end of thread
¡1) Leave the end of the thread of about 10cm
(4") from the bobbin.
¡2) Holding the latch of the bobbin case with
your thumb and index finger, push the
bobbin case into the rotary hook.
(1) When the bobbin case is inserted, close the
latch.
(2) Close the shuttle cover.
13
Page 16
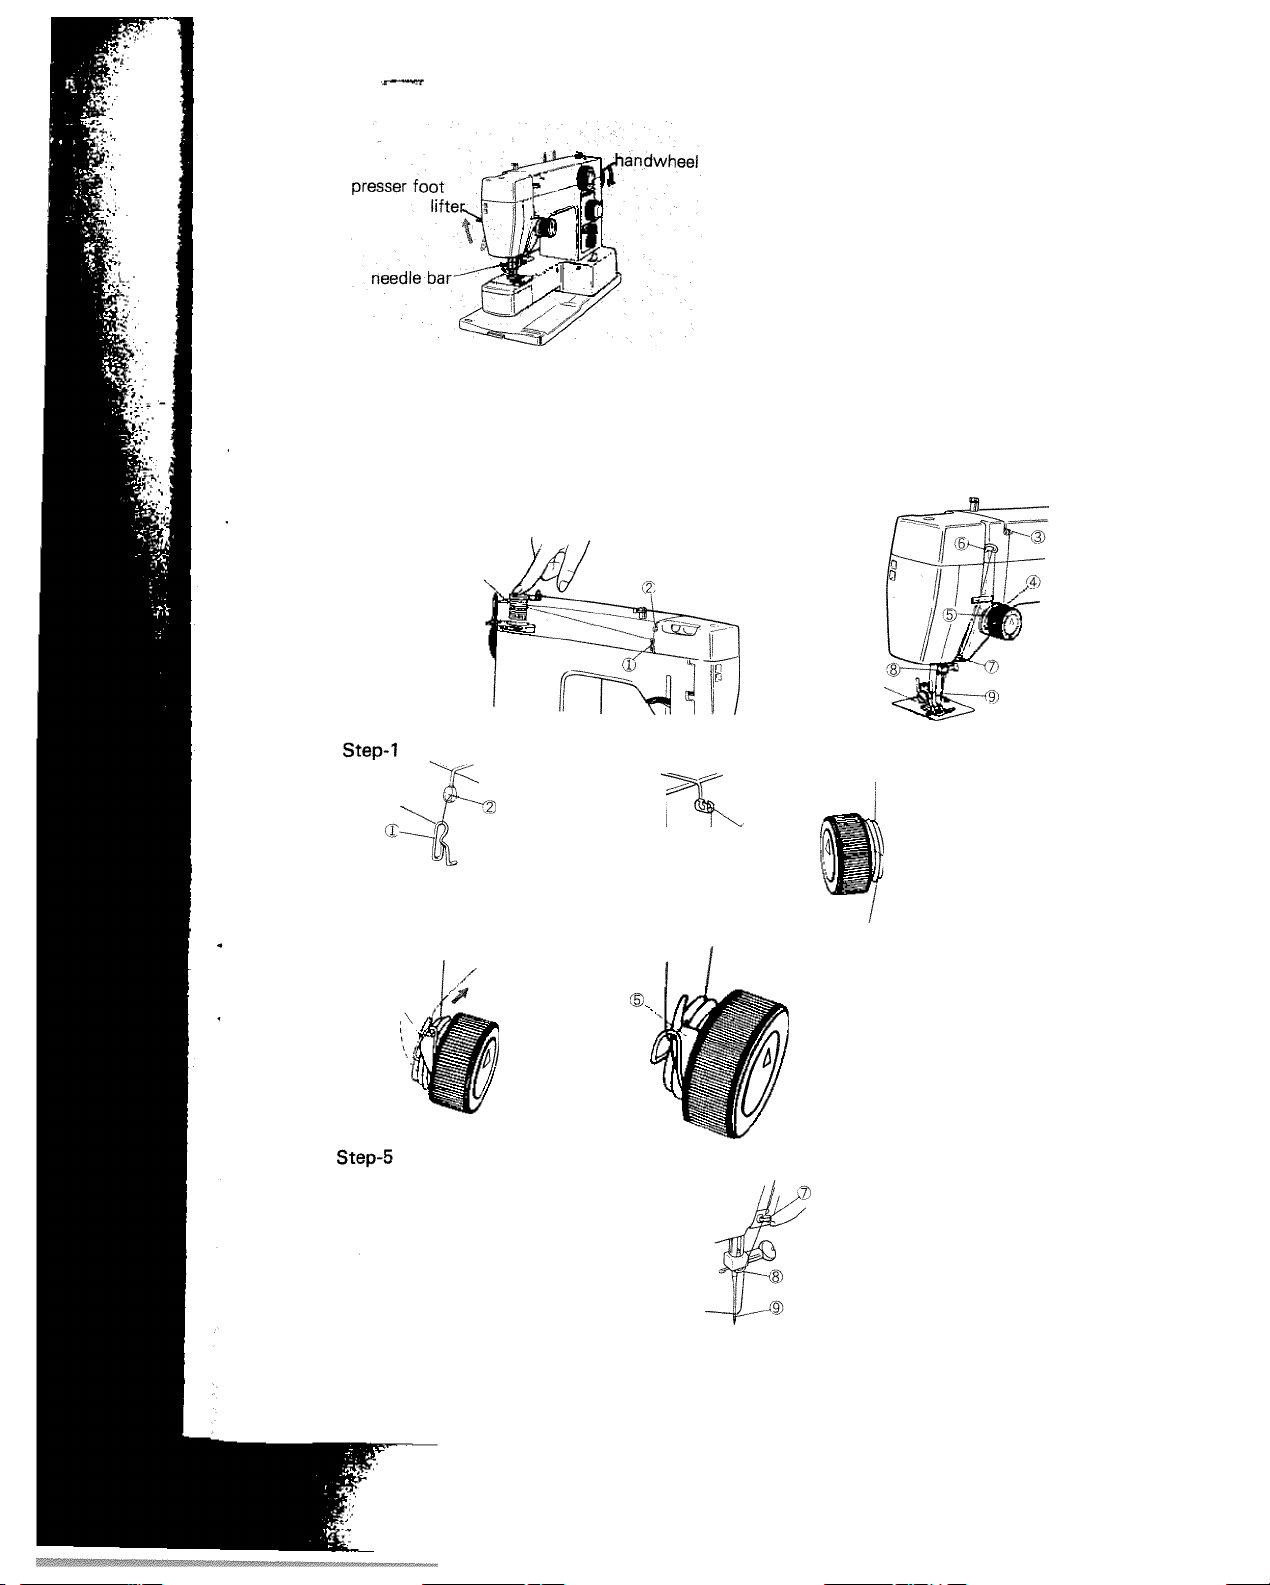
Upper Thraading
RàiiB6(fxÿ6t atict^iraandral^
■ yiinii* I 1 —, ^„••■ ■ ■ ■ u.i - -TITT
Tht^diH^ iippër^
Thread by following numbers ® — ® while
pressing the spool lightly with your index
finger.
spool of thread
i i) Raise the presser foot lifter. ^ ^ ^ ^
(2) Set the needle bar in the highest position
by turning the handwheel toward you.
Step-2
Pass the thread to Then to the guide
the guides (I) and @
Step-4
tension
spring
guiding
plate
Step-6
Thread the take-up lever (
Step-3
Lead the thread be
tween the two ten-
^nsion sion discs
discs ®
Lead the thread into the
hook of the guiding plate ©
by pulling the tension spring
to the right with the thread.
Thread the guides © and @
then the needle eye @ .
Leave an end of the thread of
about 15cm (6").
14
Page 17
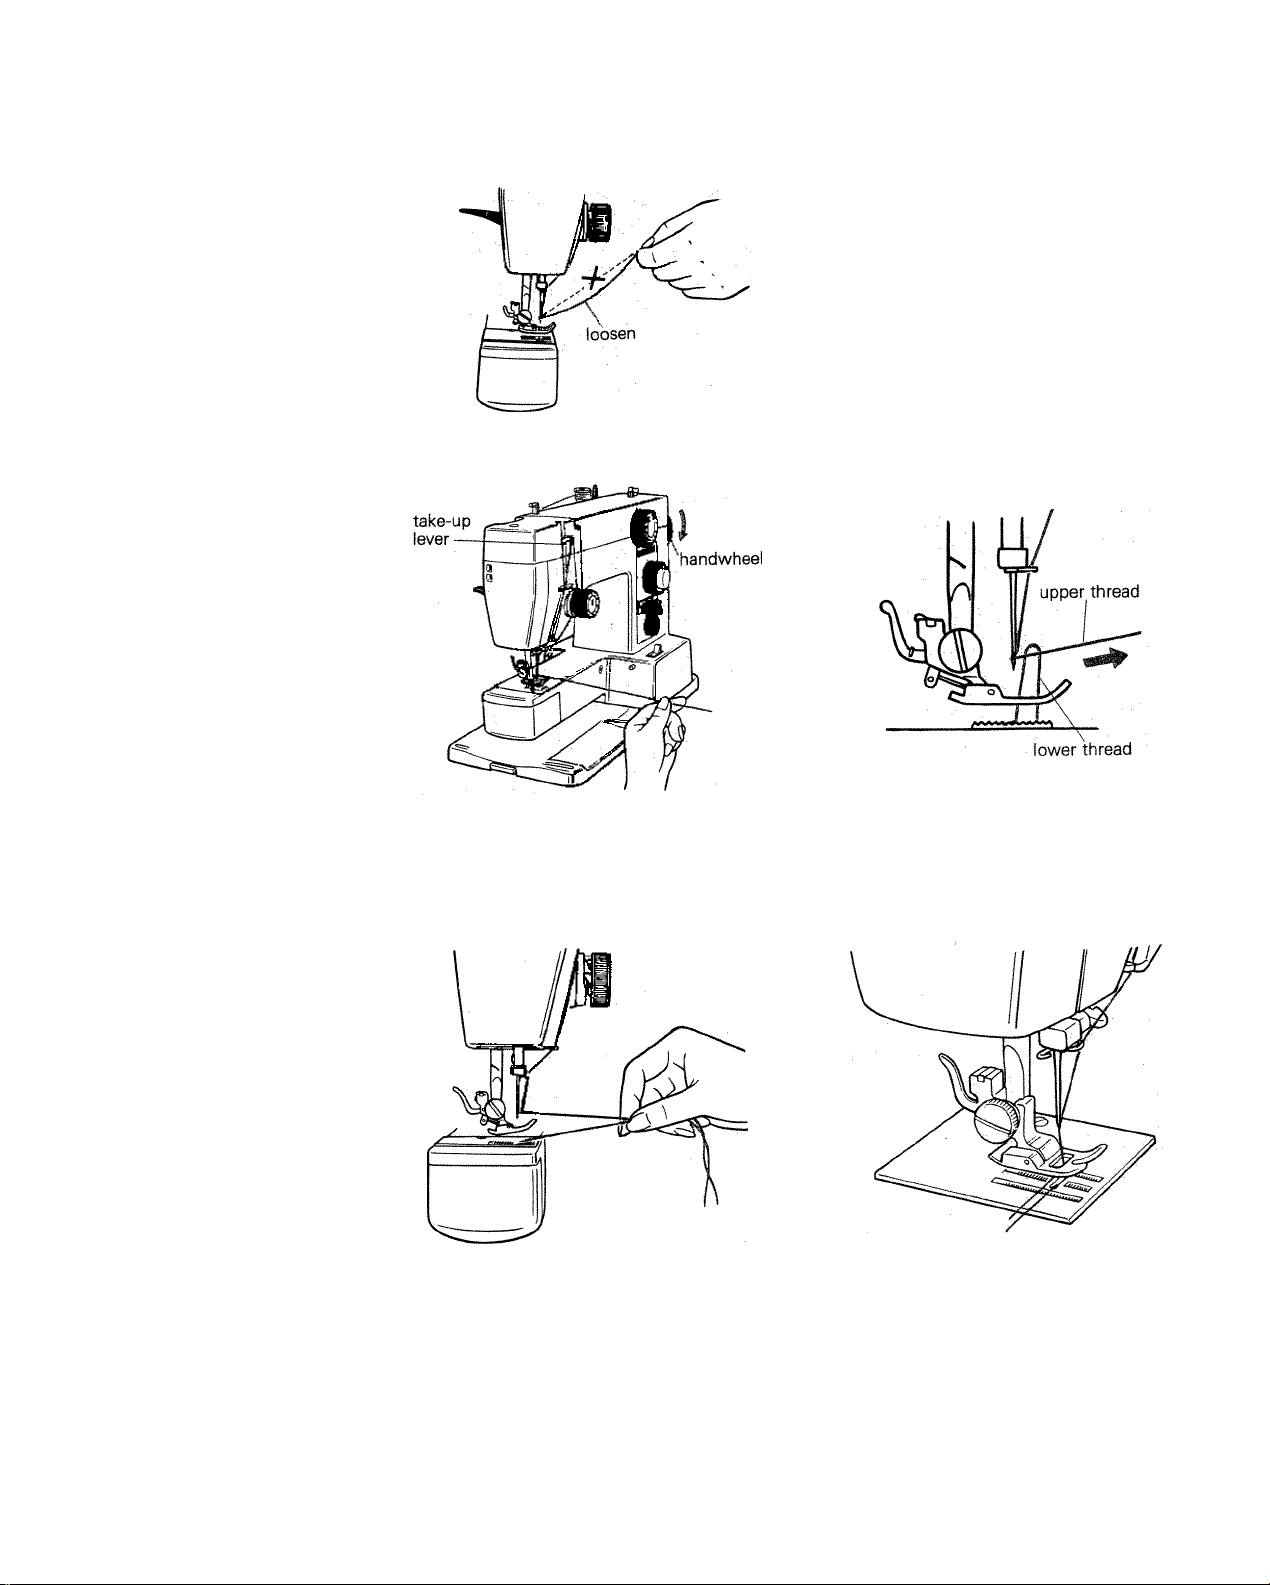
Drawing Up the Lower Thread
Step-1
Hold the end of the upper thread gently in
your left hand.
Step-2
Turn the handwheel once slowly toward
you. Stop turning it when the take-up
lever reaches the highest position.
Step-4
Step-3
Pull the upper thread gently and the lower
thread will come out.
Step-5
Pull out both upper and lower threads to Place both threads together under the foot
about 15cm (6"). on the left side.
15
Page 18
Twin Ns« ding
Rajae foot and needla Ьвг^
(1) Raise the presser foot lifter.
(2) Set the needle bar in the highest position
by turning the handwheel toward you.
Threading the upper threat^
Thread by following numbers ® @ while pressing the two spools lightly with your fingers.
»Be careful at the points ® ® and ®, since the way
of threading is different from the normal
threading with one spool of thread.
Step-1
Рам the threads to
gether to the guides
Ф and Ф.
Step-4
tension
spring
Step-5
Thread the take-up lever
Pass them separately to
the right and left at the
guide @.
guiding
plate ®-
tension
discs®.
Lead one of tl» threads
between the discs front
and middle and the
other one between
middle and back.
Lead the two threads to
gether into the hook of the
guiding plate ® by pulling the
tension spring to the right
with the threads.
Thread the guides ©and®
then the two needle eyes ®.
Leave the ends of the threads
of about 15cm (6").
16
Page 19
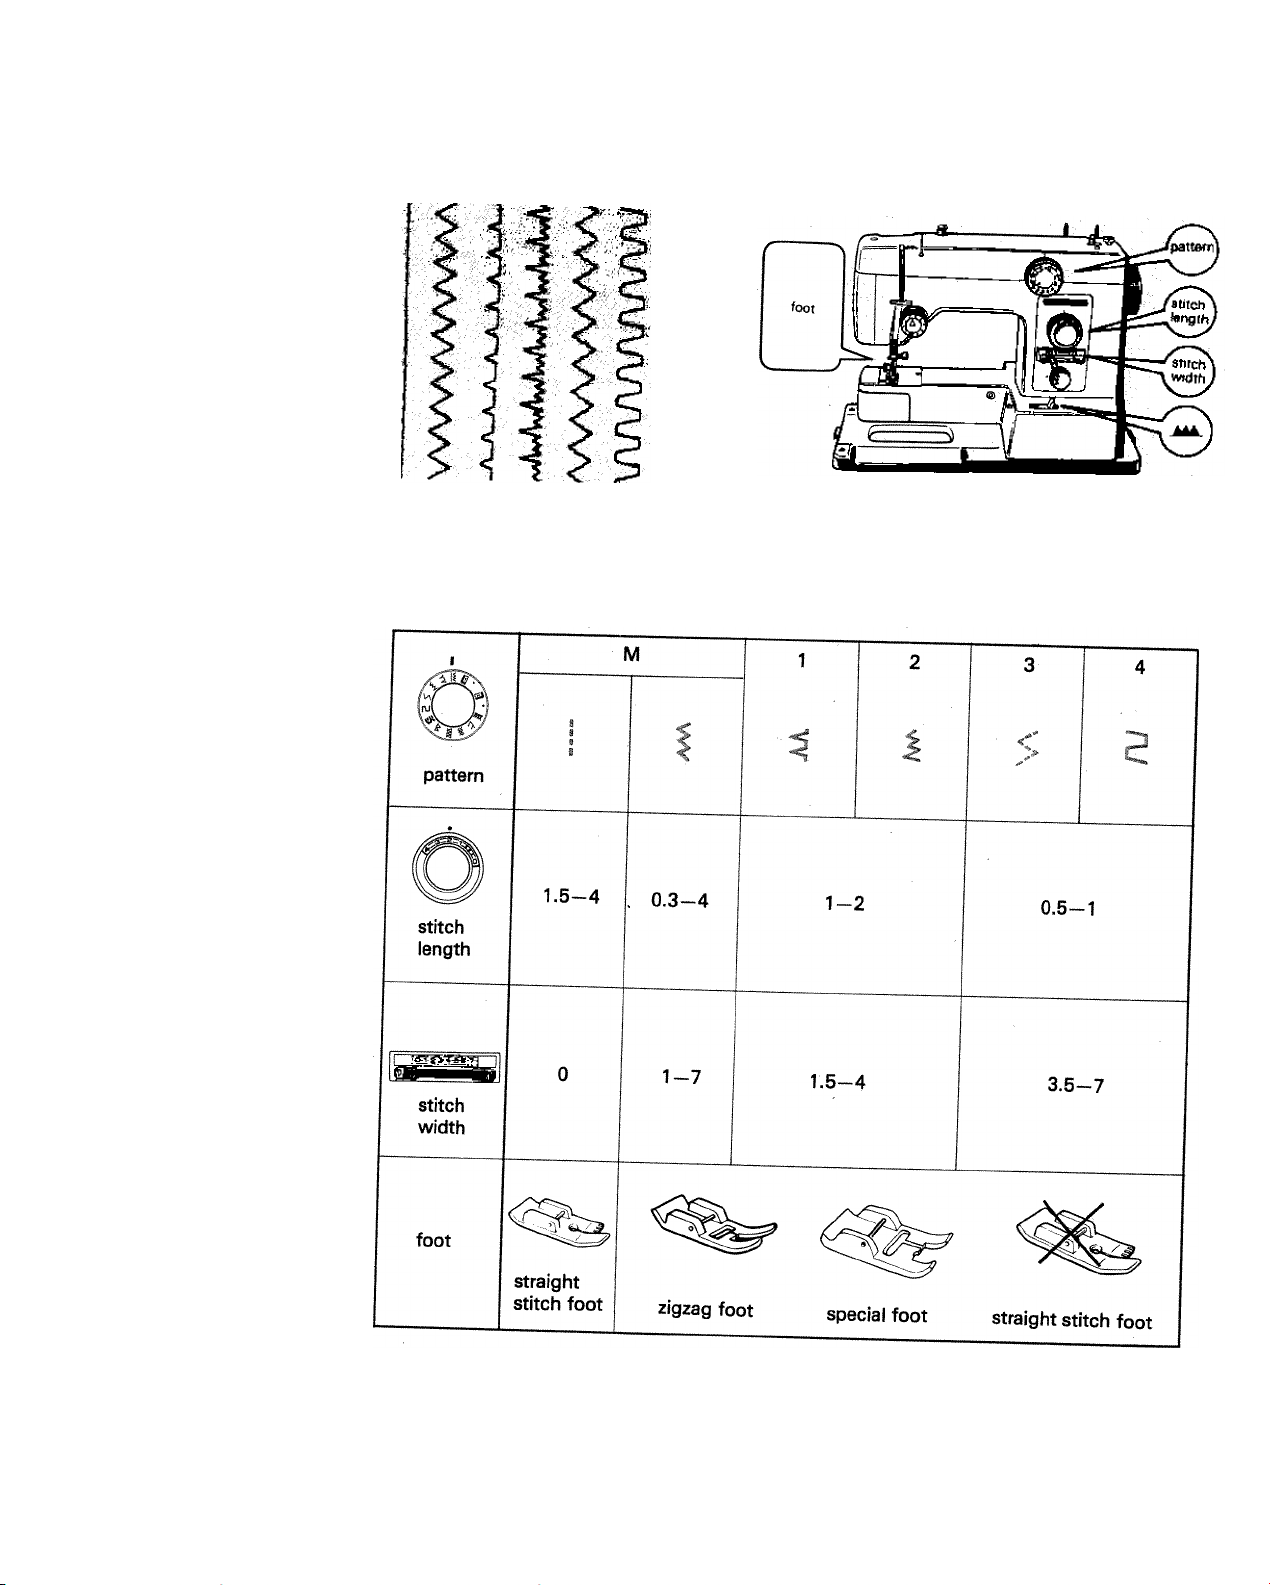
Pattwn setting
gzag Pattern Stitches
Machlheli"^
ur zigzag pattern stii
these are very useful for both practical and decorative sewing.
___________
_
a straight stitch and a zigzag stitch. All of
17
Page 20

i21 Super Stratch Stitehes
Machine setting
(*•
Pattern setting
Seven super stretch stitehes are built in. All of these are very useful for both practical and
decorative sewing.
1
pattern
stitch
length
stitch
width
foot
Hi
Sii
III
zigzag foot
5
6
3 s
3.5-7
7
special foot
8
9 10
»
straight stitch
foot
18
Page 21

13} Buttonholes
For actual sewing, see p.3l.
Step
1
2
<^^^d|u8^ent of stitch width ^
Decide tl
of fabric.
i Ad}us^^mahfof«itch^^
Jhe stitth »Idth according to the sit. and tha thickness of the button and the type i
Pattern
B automatic
----------
•
^ automatic
Actual Stitch
i
nn ^
Set within the orange colour. ^
The bigger the number, the wider |
the stitch.
,, I
Decide the stitch length according to the typo of fabric.
indicating
19
Set within the orange colour.
The lower the number the closer
the stitch.
n
Page 22

{41 Twin Maedle Sewing
Enjoy attractive stitching with two different colour threads.
Pattern setting
Machine setting
20
Page 23

4. SEWING CHART
Operation Goide
M 1
2
4
3
5
7
6
10 1-2
9
8
Straight
Sewing
Zigzag
Sewing
Elastic
Sewing
Zipper
Sewing o
Overcasting
Overlocking
Buttonhole
Sewing
Button
Sewing
Blind hem
Stitching
Mending
Attaching
Elastic
Shell
Stitching
Roll
Hemming
Lapped Seam
Sewing
Edge to Edge
Stitching
Quilting
<
i
1
\
1
<€
i
O
o
o
-
o
"s
\ /
o o
-
TO
o o
t \
O
o
o
o
o
o
o
/
o
o
o
o o
o
o
o
o
o
o
C)
o
'
CO
o
o
Page
u
22
25
27
28
29
30
31
34
35
37
41
42
43
45
47
49
Pin Tucking
Smocking
Cording
Embfoiderying
and Mono-
gramming
Applique
o
o
o
o
... Explained in detail from the next page.
Not explained but can also be used.
21
o
50
51
52
53
55
Page 24

Straight Sewing
Adjustment of stitch length dial
Machine setting
For a long stitch, turn the dial clockwise. For
a short stitch, turn it counter clockwise.
How to sew^
Step-1
(0.4") inside the edge.
Lower the presser foot.
Lower the needle by turning the handwheel
toward you.
* Leave the ends of the threads of about
15cm (6").
Step-3
For normal sewing, it is set between 2 and 3.
Step-2
To reinforce the seam, sew reverse stitches
to the edge of the fabric.
Step-4
Never pull too hard on it.
Sew reverse stitches for reinforcement at
the finish.
22
Page 25

Turning corners
Step-1
raise
the foot
Stop sewing with the
needle in the fabric at the
pivot point. Raise the foot.
Removing fabric
Step-1
fabric
Turn the fabric.
At the end of sewing, raise the needle to its
highest position.
Raise the foot to release and remove the
fabric by pulling it to the left. '
Step-3
Lower the foot and stari
sewing.
Step-2
Cut the both threads together with the
thread cutter behind the presser bar as
shown.
23
Page 26

Cloth guide
Adjusting thread tension
Upper thread tension dial
(1) Use the cloth guide to sew a seam with
a certain interval from the edge. Set
the guide in the hole of the arm, right
to the needle plate, and adjust the dis^
tance.
(2) Run the machine with the edge of the
fabric touching the guide.
In most cases, a suitable tension can be obtained easily only
with the adjustment of the upper thread tension dial.
Correct tension
upper
Upper thread tension too loose Upper thread tension too tight
upper surface
The upper thread lies straight
along the upper surface of the
fabric.
The lower thread lies straight
along the lower surface of the
fabric. '
•When sewing a very thin fabric, loosen the lower thread tension a little. (See p.13)
With reverse straight stltciD
i^Machlne setting^
lower
surface
Page 27

Zigzag Sawing
indicating point
For a long stitch, turn the dial clod
wise. For a short stitch, ftim it count
clockwise.
AdJusimant.o^ztj3^gi.yy,|^th
For a wide stitch, turn the lever to
ward 7.
For a narrow stitch, turn it toward 0.
Move zigzag width control lever to a
desired position, then lock it with the
stopper.
*
* The stopper can be set by pressing in
slightly and sliding to a desired posi
tion.
25
Page 28

How to 86w3
Step-1
Place the fabric under the foot about
tcm 10.4") inside the edge.
Lower the presser foot.
Step-2
Guide the fabric by hand as it is fed.
Never pull too hard on it.
Lower the needle by turning the hand
wheel toward you.
♦ Leave the ends of the threads of about
15cm (6"),
To reinforce the seam, set the machine for the straight stitch and sew in reverse at the
beginning and the ending of the seam.
Thread tension for zigzag stitch
For better appearance, the upper thread should be slightly visible in the wrong side of
the fabric.
Loosen the upper thread tension a little more than when sewing with the straight stitch.
Correct tension
wrong side
right side ^ right side v right side
Upper thread tension too tight Upper thread tension too loose
wrong side ^ • wrong side ^ , ,
The lower thread appears in The upper thread appears too
the right side of the fabric. much in the wrong side of the
fabric.
26
Page 29

Excellent for seaming elastic materials.
With reverse íítraight stitch
Good for searnpng jersew^m
etc. I “
With small zigzag stitch
Machine setting
Machine setting
materials.
With multiple zigzag ?
• Weaken the pressure of the presser foot for
<^achïneaêtting~^
very elastic materials
Page 30

With the specially designed zipper foot, zipper sewing can be done easily.
Setting zipper foot
Set the holder in the left pin. The needle
comes to the left groove.
How to sev^
needle should be
left of the foot
When sewing the right side, place the
zipper under the left side of the foot.
Sew carefully beside the right side teeth
of the zipper, guiding the fabric.
Set the holder in the right pin. The
needle comes to the right groove.
needle should be
right of the foot
When sewing the left side, place the zip
per under the right side of the foot.
Sew carefully beside the left side teeth
of the zipper, guiding the fabric.
28
Page 31

Overcasting
It is used for the settlement of margins to seam or to cut.
With zigzag atltchQ
Rne^^for thick' matenals
whim do noi fray easily.
: j:
How to sew ^
Màchlnaàètting ^
Position the ends of the threads behind the
foot. Place the edge of the fabric against the
cloth guide of the overcasting foot and lower
the foot.
Sew carefully, guiding the right edge of the
fabric along tne cloth guide so that the needle
goes slightly off the edge of the fabric.
* When overcasting with the stitch width below 5, use special foot and blind hem stitch guide.
With multiple zigzag (Machine aetting )
Pi:;;-
iPi-®;
.
.1 ■.
Goo(f for'»elastic
terials;
^ -
* Weaken the pressure of the presser foot for very elastic materials.
■ a- ; '
*
29
Page 32

Owarleeking
Overlooking stitches can sew seams and finish them in one operation.
With crdss-over-edge stitch
Suitable for tlj^jersey materials,
etc. -
How to sew
Sew in the same way as overcasting.
Machine setting
With blind-over-edge stitch
Good for
Machine setting
30
Page 33

Byttsnfioie Sewing
Buttonholes are easy for children's clothes, shirts, blouses, etc.
{ Machine setting
Pattern setting
Step
1
2
• When setting pattern i , the stitch is sewn from the front to the back.
Pattern
automatic
——.
i automatic
Actual Stitch
Adjustment of stitch width. Adjustment of stitch length .... see p. 19.
How to sew
It is recommended to sew a testing sample first with the same fabric as the garment.
Step-1
guide lines
f.
i
Mark guidelines on the fabric where the
buttonhole to be sewn.
The diameter of the button plus its thickness
tells you the right length for a buttonhole.
(1) Place the upper thread under the foot .
passing through the cut square of the i
foot. i
Pull both thread ends about 15cm (6"). ;
(2) Push back the sliding base as far as it i
will go. Match the starting line on the |
fabric with the arrow mark on the foot. ;
31
]
...'i’iiNi.;;
Page 34

Step-3
(1) Set pattern selector dial E and start
sewing.
You will hear the click sound for the bar
mii auto
matically starts sewing the left side
column from the front to the back.
(2) When the arrow mark of the foot meets
the end line, stop sewing.
* When making same-size buttonholes
memorize the point where the arrow
s ows so that it is not necessary to mark
the end lines for all the buttonholes.
Step-5
Step-4
right side
column
starting
I line
arrow marine
(1) Set pattern selector dial i and start
sewing.
After sewing the bar tuck with the click
sound, the machine automatically starts
sewing the right side column from the
back to the front.
(2) When the arrow mark of the foot
comes back to the starting line, stop
sewing.
Step-6
knot
i1) Turn the lever to the "0" position.
(2) Sew 5 or 6 stitches to make a knot.
When sewing buttonholes on stretch fahri^o •
the fabrics to obtain a better stitch. to insert interlining between
Cut the buttonhole in the middle by
pushing the cutter forward.
* Use a needle to avoid over cut as shown.
32
Page 35

Corded buttonholes
To reinforce the buttonhole, especially
pressing with finger
crochet cotton
for knits, a corded buttonhole is useful.
(1) Hook a kind of crochet cotton to the pro-
(3) After finishing sewing, pull the ends of the
cord so that the loop of the cord on the
Sint
note
(4) Cut both ends of the crochet
33
cotton.
Page 36

Sawiili on Buttons
With the specially designed two-step foot lifter, even thick buttons can be sewn easily.
Machine setting
(1) Set the zigzag width
at "0".
(2) Place the button so
that the needle lo
wers into the left
hole.
(3) Lower the presser
foot.
(1) Sew the button on.
(2) Draw out the work
and cut off the thread
ends with 10cm (4")
left.
(1) Turn the handwheel
until the needle
comes up above the
button.
(2) Set the zigzag width
so that the needle
is positioned right
above the right hole.
Step-4
Draw the thread
ends through to the
wrong side and tie
a knot.
If a shank is required, insert a needle in the Centre of
the presser foot and sew over It. Re-set the needle
position at the mark.
34
Page 37

Blind H«m Stitching
Superb for horrrpmg skins, trousers, suits, etc., without the stitches showing on the right
side of the fabric.
Machin« Mttina )
With blind ham stitch
V.
<2^
zigzag foot
and
blind hem
stitch guide^-^
____
Setting blind hem stitch guide
Insert the blind hem stitch guide under the
spring plate on the foot holder.
Folding the fabric)
Fold the fabric as shown.
35
Page 38

How to S8W
1 handwheel by hand and when
aLv i P°«hion the
the edge of the fold.
®''9htfy catches
right side
s&r
wrong side
fabric perfectly.
together with the guide. ^
Correct seam.
too'mTr "
fotó="T " •'<8-
^°‘"‘=h the fold of the
of the
For a neater finish, it is preferable to do basting
With stastfc blind hem stitch
right side
wrong side
materiate.
or ironing beforehand.
Machine setting
Page 39

Mending
111 Mending a rip
How to sew
Machine setting
A
■i: ?
(1) Sew the edges of the fabric together as
shown. i
(2) Sew 2 more stitches at the side parallel i
with the first stitch. ;
•If necessary, reinforce the rip with a piece of |
fabric on the back side. :
{21 Pateliing
How to sew
Machine setting
--------------
zigzag
foot
—
1 .
(1) Cover the worn part completely with a
piece of the same material as the fabric.
(2) Sew along the edge of the patching
material from the right side.
(3) Trim away the worn part from the bacjt
side up to about 0.5—1 cm (1.3" — 2.5 r
from the stitching.
i
37
Page 40

m Mending a big hole
,he -o..
How to sew
yii
flip'
n
MMfifti« setting
^ SsittoT®'” control dial to the "0"
ill
''' "nTfoTbXnT dac.
hole in the-^amelaT
38
Page 41

^How to sew^
Step-1
^Machina setttngi)
To attach darning foot, see p.8.
Stretch the fabric on the hoop with the worn
-out part in the center.
Hold the hoop correctly as shown.
Place the upper thread under
through the hole of the foot.
Step-2
Step-3
Sew over the worn-out part, guiding the hoop
back and forth by hand. ]
Making stitches closely spaced gives a bener
finish. t
* Be sure the presser foot is lowered. |
r
C
)
(
w
)
Turn the fabric 90° and sew in the same way.
* By making the turning points blunt, the
darned part becomes softer and more flexible. |
I
39
Page 42

Darning tubular articles.
^ How to sow
Machine setting
^ (1) Remove the extension table for
^ sewing.
(2) Place the upper thread under the foot
passing through the hole of the foot
(3) Loop the article onto the free-i
Tho'w f’^Ssrs as close as possible to
the darned part.
TaDric with your fingera.
* Be sure the presser foot is lowered.
fhplh ® horizontally, guiding
the fabric with your fingers.
arm.
free-arm
’Sse™nT''
the worn-out part with your fingers
40
Page 43

il
11
Attaching Elastic
Elastic can be easily attached to sleevebands, skirt waists, etc.
V Machine aetting ~)
How to aew
41
Page 44

- -'.JX-
Shell Stitching
The stitch gives an attractive trim to children's clothes, blouses, negligees, etc.
:H6v»^to abw
foot
fabric
needle
(1) With the folded edge to left, place the fabric under the presser foot in the position where
the needle sews just off the outer edge of the fabric.
(2) Start sewing, pulling the both thread ends away from you by hand.
•
• For better appearance;
Tighten the upper thread tension a little.
Use thin, elastic fabrics.
Use cloth on the bias.
42
Page 45

houses, aproni №u „fep
J“*J!^t.titch
such as sh/r
Step-3
Make a double 3mm fo I5"i #
(1) Place ,he ,„,^3^
foot. Under the presse
and lower thfpressfiV^r*®'
®ndsawayfroryoibyS. thread
(T) Raise the foot with the needle h •
fabric. needle down in the
(21 Insert the folded edoe intp,
the foot. mouth of
43
Page 46

Step-4
Mt up the edge of fabric
With zigzag stitch
Lower the preeser foot and continue to sew.
♦ By lifting up the edge of thp ■ .■
foot easily feeds tho # ^ little, the
out. “»iout sliding it
Machine setting
How to sew
whhst'iaigtsltoh.''''' ''
«."inrs, or with very elastic
44
Page 47

i-opped Saam Sewing
Lapped seams can be sewn easily in one operation.
With doubi» action stitch
Convenient toSoin edges of
non-elastic fabrics.
' ■■■''' ■'''
How to sew
Step-1
Machine setting
Place one piece over another as shown.
Step-2
fabric which
does not fray
lower fabric
fabric which
frays easily
upper fabric
Sew over the folded area from the .
side of the fabric.
On the left, the needle comes slig
inside the upper fabric.
SLI'’!"?'"- s»9i
inside the lower fabric.
45
Page 48

With over-edge stitch
For the seatjs^Jvhtch undergo
great stress.5
Machine setting
With rick rack stitch
Convenient toj^join edges
elastic fabrics.!^
NOTE
Machine setting
of
46
Page 49

To join the edges of the fabric.
Machtne^atting^
(—~^
f
How
j-V .
^^avy fabrics that
'y-
zigag
foot
r-
Sew carefully, keeping the line where the
foor^ together in the center of the
With multiple zigzag sti^
i:.-'
GM^,fpr thiri^rips' interlining,
Machine aettlnìÈr^
Page 50

With honay^comb stitch
' ! ^ ’. *.
^%-
■■:pít^<^'¡
' '■
Machine setting
Fine for towel:
ais--; ;■ ■ ’I
• .C--::|
With edge stltciT^
Suitable with elastic
woven materialll
note
.' ■ ■ i
•J elastic mate'ri-
or
rough
Mach’inVsettiin^
48
Page 51

Setting quilting guide
Machine setting
lines. ^ ® wrking
How to sew
(V Baste to avoid misaligning.
(2} Draw the first line on the fabn> ■
mark. and sew along
'«intSnr ='»"» «-e previ,
49
Page 52

Pill Tucking
Pin tuck stitching is used to obtain delicate tucks on the front or sleeves of blouses, one-piece
dresses, etc.
ii
Sdittirig quUtihg s^a)
rS-
zigzag foot
twin needle
quilting
guide
To thread twin needle, see P.17.
Insert the quilting guide under the spring plate
on the holder.
It is very easy to sew parallel lines with
the guide without marking the lines.
How to saw^
Mark the first line with a pensil or tailor s
chalk and sew.
From the second line, sew with the guide
just following the seam of the first line.
The width between the seams can be adjusted
by moving the guide in the arrow direction.
* Tighten the lower thread a little.
* Attractive pin tuck stitching cannot be ob
tained with very thick fabrics.
50
Page 53

Smocking
O'- >'» P-aa«ered
Machine setting
—How to do pre-gathering with the machine—
Step-2
knots
(1) Sew two straight lines on the part for
smocking with the stitch length 4 and the
upper thread tension extremely loose.
(2) Make knots in one end.
(3) Gather the fabric toward the knots while
holding the ends of the lower threads
in the other end.
♦ See page 24 for sewing straight stitches.
(1) Sew smocking stitches on the gathered
part between two straight stitches.
(2) Take out the threads used to do pre
-gathering after you have finished.
51
Page 54

Cording
An attractive design with lines can be drawn easily with yarn or cords as a decoration for child
ren's clothes, dresses, etc.
With zigzag stitch
How to sev^
Step-1
Draw the design on the fabric with a pencil
or tailor's chalk.
Pass the cord under the spring of the
cording foot then to the groove on the back
side of the foot.
Decide the width and the length of the
zigzag stitch according to the thickness of the
cord.
Sew on the cord along the design while
guiding the cord with your fingers.
To change the direction at the corner or to
sew very small circles, lift the presser bar with
the needle down in the fabric outside the cor
ner of the curve and turn the fabric.
52
Page 55

-».«.«.««ring ana Monogramming
Exquisite designs are easy with the machine.
* How to choose needles and threads
Ne
edle
Upper
Thread
Lower
Use small needle numbers
thin, silky-type of threads
As thin as upper thread or thinner
Maehjne aettinfl^
V.
How to spread the clo^ on theJioqp ^
(1) Draw your desired design on the fabric
(2) Spread the fabric on an embroidery hoop
(3) Stretch the fabric as firmly and as evenly
* Nice results cannot be obtained if the fabric is
notstretched correctly and sufficiently.
with a pencil or tailor's chalk.
with the drawn design in the center of the
hoop.
Push the inside hoop about 2mm (0.1")
out of the outside hoop.
as possible.
*
53
Page 56

How to saw
Step-1
•hrsadlightli, '’‘’“'■"9 •’’» dpper
S'"“ •'’« -¡9zag „id,h „ 0
•a» aara ,ha p,^33^,
Step-2
and aaw
.f" as closaaa®p„aa,b,a,
sewing. ^ thumb while
Step-3
hoop sUghtly.'^^ fTioving the
obtain i nte fpSTrance'^®
Step-4
.r:„T>:r.Tr':
Both embroidering and
Sanite Zcitontnha «ten "7“ "™-
"'a pa^ ngp, na„ „ ™'ng
monogramming can be done i
54
'"tha same way mem,oned above.
Page 57

Appllqye Work
Ideal for the decoration of children's clothes, aprons, etc.
I*
---------—,
special
foot
^
------
---
----
How to aewT)
Step-1
Draw the design on the fabric to be used as
an applique and cut it out.
M&ciiihe sa
f
/
knot
Step-2
Place the cut work on the part of the base
Ind'LsteTt'“''
Step-3
Stitch with zigzag stitches on the outline.
The stitch length and width should be adjusted
according to the figure and the size of the cut
work and the type of the base fabric.
To change the direction at the corner or to
sew very small circles, lift the presser bar with
the needle down in the base fabric slightly
outside bf the cut work and turn the fabric.
Step-4
Sew 5-6 stitches in the end with the zigzag
width at 0 to keep the thread ends from
coming out.
55
Page 58

HOW
.V " := s iv«
Places which were once hard or impossible to sew can now be sewn easily with a free-arm.
You can do sleeves, cuffs, collars, the edge of trousers, tubular articles, etc.
Preparation of the machine
Pull out the lever and slide off the ex
tension table in the arrow direction.
» Unless you pull out the lever the extension
table will not come out.
Various usefui metfiods
Put the armhole and the sleeve together
facing inside and sew.
It is easy to sew or embroider on sleeve cuffs
of T-shirts, blouses, etc.
Enjoy monogramming sleeves.
56
Page 59

l7aZe™;trsrj7oVaTw;„'“""^H^"‘‘
Do not tamper with parts while cleaning or oiling.
* Be sure to unplug the machine while cleaning or oiling.
wnicn IS used for a few hours a day needs to be cleaned and oiled once a month.
Feed dog
or other many troublet'^'^fheValways ^eL^irbe clean.'"’'’'“'"^' movement of the feed dog
(1) Set the needle in the highest position by
turning the handwheel toward you.
(2) Remove the needle, and the foot.
(3) Remove the needle plate, loosening the
screws with the large screwdriver.
(4) Brush off all the lint with the attached
cleaning brush.
Clean especially the upper part of the feed
dog and between the teeth.
Rotary hook
Dust or lint in the rotary hook cause the slow
so it always needs to be clean.
»When the thread is rooted in the hook groove,
turn the handwheel away from you and take
out the thread.
running of the machine or irregular stitches
(1) Open the shuttle cover and remove the
bobbin case.
(2) Brush off all the lint with the attached
cleaning brush.
57
Page 60

Rotary hookT^
Apply one drop of oil to the rubbed part in
the hook.
^ Too much oil may stain your fabric and cause
some sewing difficulty.
Arm top
!,
(1) Remove the arm top cover by taking out
the screws.
(2) Apply one drop of oil to the parte indicated
by arrows.
(natde the face plate
Apply one drop of oil to the
parts indicated by arrows.
* After oiling, run the machine 5 or 6 times or
run it fast for 1 or 2 minutes.
* Use oil manufactured specifically for sewing
machine use.
Other oils will evetually cause the mechanism
to jam.
* In the case that the machine is not used
for more than one month, always apply oil
before using it.
58
*
Page 61

7. TfiOUBLiSHOOTlNG CHART
Trouble Operation
Not plugged in properly.
Machine
does not sew
Making noise
Running slowly
Breaking
upper thread
Improper needle setting.
Probable Cause
Power supply switch is not on.
Thread is stuck in the hook groove.
Lack of oil.
Dust of thread jamming the rotary hook.
Dust of thread jamming the feed dog.
Thread is stuck in the hook groove.
Improper threading.
Upper thread tension too tight.
Needle bent or blunt.
Removing fabric when take-up lever is not in
the highest position.
Upper thread too thick or too thin for needle
used.
Correct
Page 7
57
58
57
57
57
14
7
24.26
9
9
23
7
Improper threading.
Breaking Lower thread tension too tight.
lower thread
Skipping
stitches
Stitches
not locked
Wrinkled
fabrics
Dust of thread jamming the bobbin case or
around the spring of the bobbin case.
Improper needle setting.
Needle bent.
Improper needle and thread for the fabric.
Improper upper threading.
Too much oil.
Upper thread tension too loose.
Improper tension of the lower thread.
Improper needle for the thread.
Upper or lower thread tension too tight.
Improper threading of upper or lower thread.
Needle too thick for the fabric.
Stitch length too long for the fabric.
* When sewing very fine fabric, place thin paper
underneith the fabric for better results.
12
12
-
9
9
7
14
58
24.26
12
7
24.26
12.14
7
—
59
Page 62

Trouble
Fabric not
moving
Probable Cause
Dust of thread jamming on the feed dog.
Feed dog is lowered.
Correct
Operation
Page 57
1
Improper needle setting.
Needle bent.
Needle clamp screw too loose.
Breaking
needle
Light going supply switch is not on
out burnt out.
Upper thread tension too tight.
Needle too thin for the fabric
Changing pattern or width of the stitch with the
needle down in the fabric.
Setting stitch width more than 3.5 when sewing
with twin needle.
Not plugged in properly.
9
9
9
24.26
7
20
7
7
60
N.B. If .rouble ie ebll apparent in .he nrachine, please consul, your nearest dealer. Do no,
try to correct the fault by yourself
Changing the light bulb—
Step-1
Step-2
Unplug the machine.
Open the face plate in the arrow direction.
Step-3
Install a new bulb by
screwing it clockwise.
Plug in the machine.
60
 Loading...