

Page 1
Page 2

Copyright © 1985 T. S. Co
All rights reserved throughout the world
Page 3

CONTENTS
.....
Page
, 24
Chapter 1. Getting to Know Your Machine........................................................................................................................... 2
Principal Parts........................................................................................................................................................2
Accessories............................................................................................................................................................3
Chapter 2. Getting Ready to Sew...........................................................................................................................................4
Choosing and Changing Accessories................................................................................................................ 4
Fabric Weight Table........................................................................................................................................ 6
Fabric Thread and Needle Table....................................................................................................................8
Needle-Fabric Combinations..............................................................................................................................10
Operating the Machine........................................................................................................................................10
The Bobbin Thread..............................................................................................................................................11
Winding the Bobbin • Threading the Bobbin Case
Threading the Machine........................................................................................................................................13
Raising the Bobbin Thread
Chapter 3. Straight Stitching
Adjusting Machine Stitch to Suit Your Fabric...................................................................................................15
Setting Selectors • Regulating Presser Foot Pressure •
Adjusting Stitch Length • Needle-Thread Tension
Sewing a Seam.....................................................................................................................................................17
Keeping-the Seam Straight
Applications ....................................................................................................................................................... 18
Zipper Insertion • Darning ■
Chapter 4. Basic Zig-Zag Stitching..................................................................................................................................... 19
Adjusting Machine to Suit Your Fabric........................................................................................................19
How to Set Selectors • Pattern Group Selector •
Needle Position Selector • Stitch Width Selector • Adjusting Needle Tension •
Adjusting Stitch Length • Adjusting Presser Foot Pressure
Satin Stitching.....................................................................................................................................................21
Applications .........................................................................................................................................................22
Appliqué • Lingerie Seams • Zig-Zag Seam Finishes
Chapter 5. Machine Stitch Patterns..................................................................................................................................... .24
Setting Selectors . . . •..............................................................................................................................
Selecting a Pattern Group • Adjusting Width of the Design • Adjusting Stitch
Placement • Adjusting Stitch Length • Adjusting Stitch Balance
Adjusting Stitches to Suit Stretch Fabrics .
Guiding and Supporting Fabric • Adjusting Pressure
Stitch Pattern Chart............................................................................................................................................ 28
Applications ........................................................................................................................................................ 29
Blindstitch............................................................................................................................................................ 29
Hems
Multi Stitch Zig-Zag
Bar Tacks • Mending a Tear
Honeycomb Stitch...............................................................................................................................................31
Attaching Elastic
Chapter 6. Buttonholes and Buttons.....................................................................................................................................32
Four-Step Buttonholing...................................................................................................................................... 32
Changing Stitch Density
Buttons................................................................................................................................................................. 34
Chapter 7. Twin-Needle Stitching...........................................................................................................................................35
Chapter 8. Free-Arm Sewing................................................................................................................................................. 36
Chapter 9. Performance Checklist........................................................................................................................................ 37
Chapter 10. Caring for Your Machine......................................................................................................................... 38
Index ............................................................................................................................................................................................40
....
...........................................................................................................................................15
.................
......
......................................................................................................................................30
...................................................................................27
Page 4
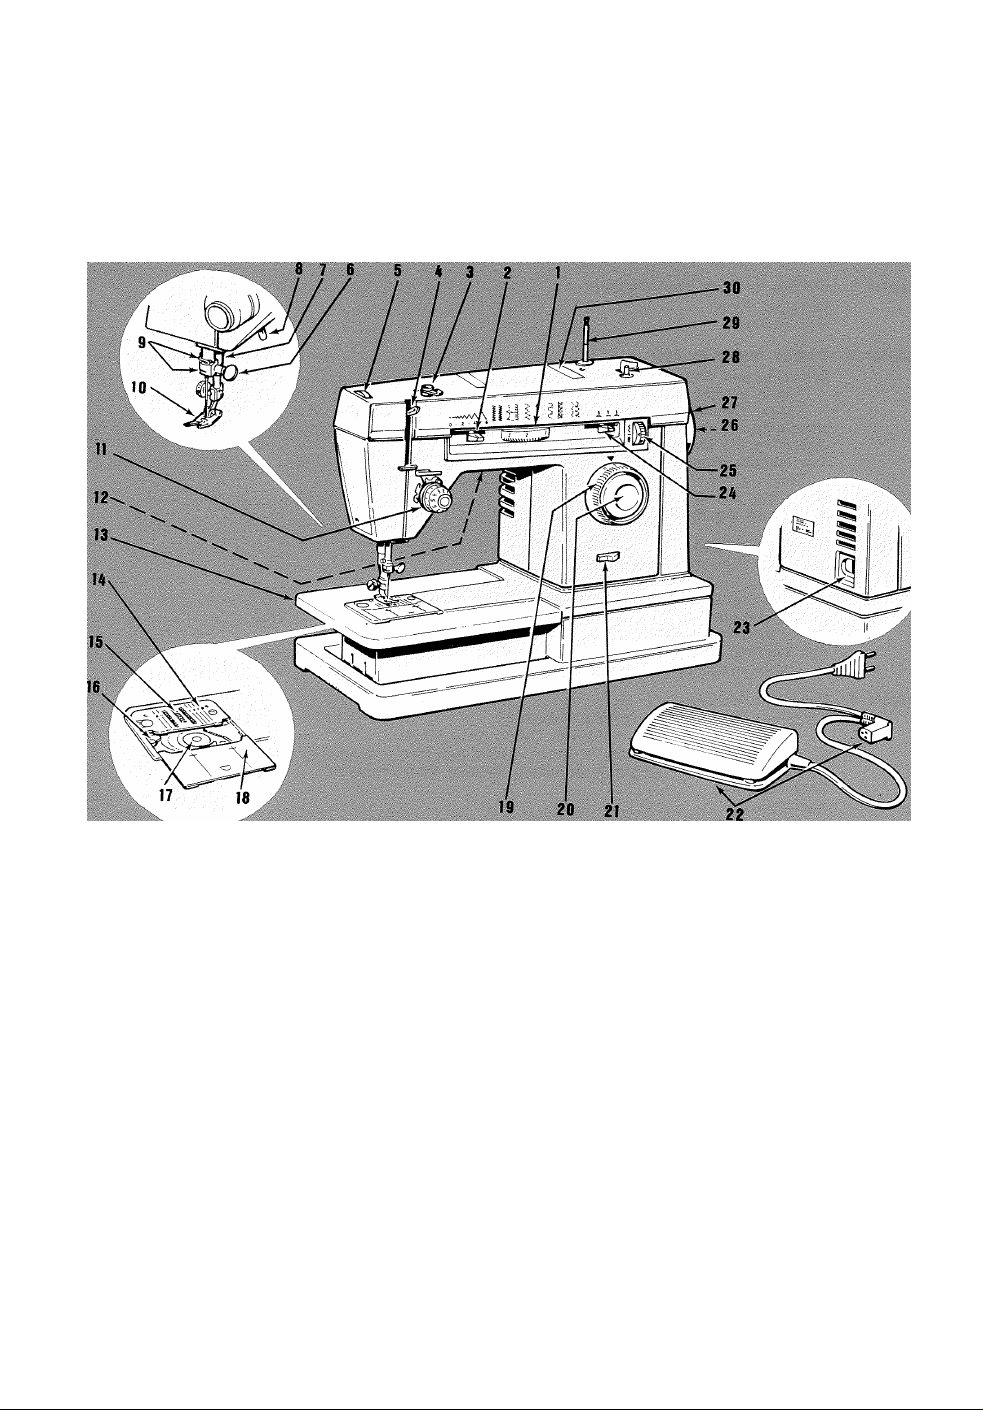
principal parts
1. Pattern Group Selector
2. Stitch Width Selector
3. Bobbin Winder Tension
4. Take-up Lever
5. Pressure Dial
6. Needle Clamp
7. Thread Cutter
8. Presser Foot Lifter
9. Thread Guides
10. General Purpose Presser
11. Tension Dial
12. Sewing Light
13. Extension Bed
14. General Purpose Needle
16. Bobbin Case Holder
17. Transparent Bobbin
18. Slide Plate
19. Stitch Length Selector
and Buttonhole Dial
20. Reverse Stitch Push
Button
21. Power and Light Switch
22. Electrical Connections
and Speed Controller
23. Machine Plug Receptacle
24. Needle Position Selector
25. Stitch Balance Control
26. Hand Wheel Knob
27. Hand Wheel
28. Bobbin Winder Spindle
29. Telescopic Spool Pin and
30. Carrying Handle
Page 5
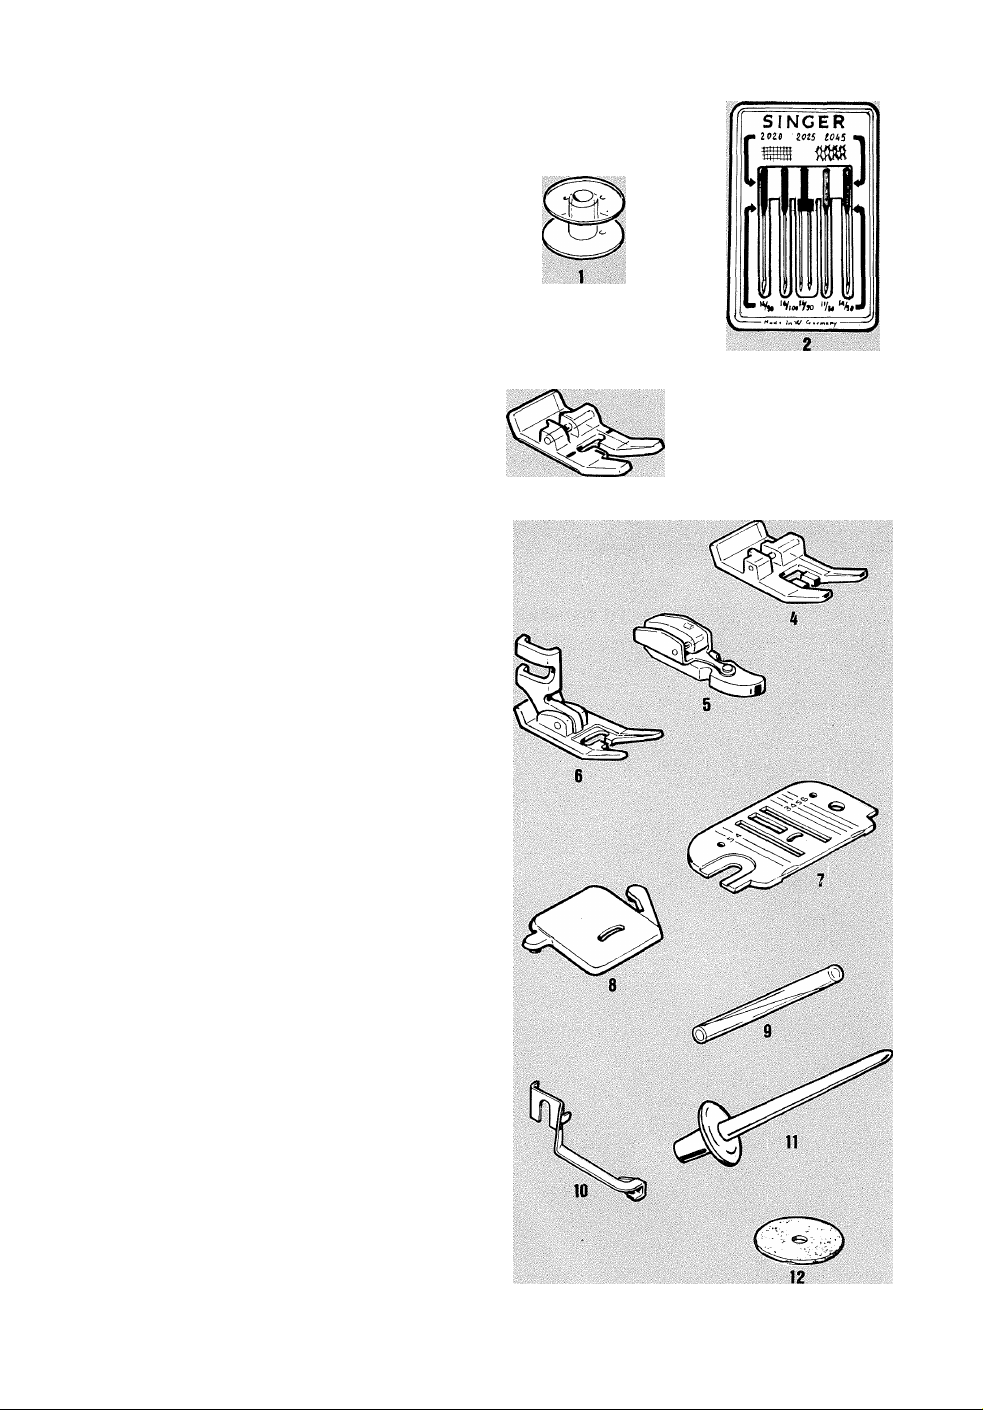
accessories
The accessories that come with your sewing
machine are designed to help you do many
kinds of sewing easily.
1. Transparent Bobbins (No. 172336).
2. Needles
• Style 2020 in your machine when deliver
ed is for general sewing.
• Style 2045 is used for sewing knits,
stretch fabrics and elastic.
• Style 2025 for twin-needle decorative
stitching on woven and knit fabrics.
3. Buttonhole Foot is used to make bar tack
buttonholes qf any length in four steps.
4. Special Purpose Foot. Used for all kinds
of decorative zig-zag stitching.
5. Zipper Foot for inserting zippers and stitch
ing corded seams.
6. General Purpose Foot on your machine
when delivered, is used for all utility sew
ing, with either straight or zig-zag stitching.
7. General Purpose Needle Plate on your
machine when delivered is used with all
presser feet.
8. Snap-In Feed Cover for button sewing and
free-motion work.
9. Spool Pin Extension used for tubes of
thread.
10. Blindstitch Hem Guide. Use this with the
general purpose foot to position and guide
the hem.
11. Detachable Spool Pin for decorative twin-
needle stitching and two-thread topstitching.
12. Felt to help thread unwind smoothly.
Page 6
Chapter 2. Getting Ready to Sew
choosing and changing accessories
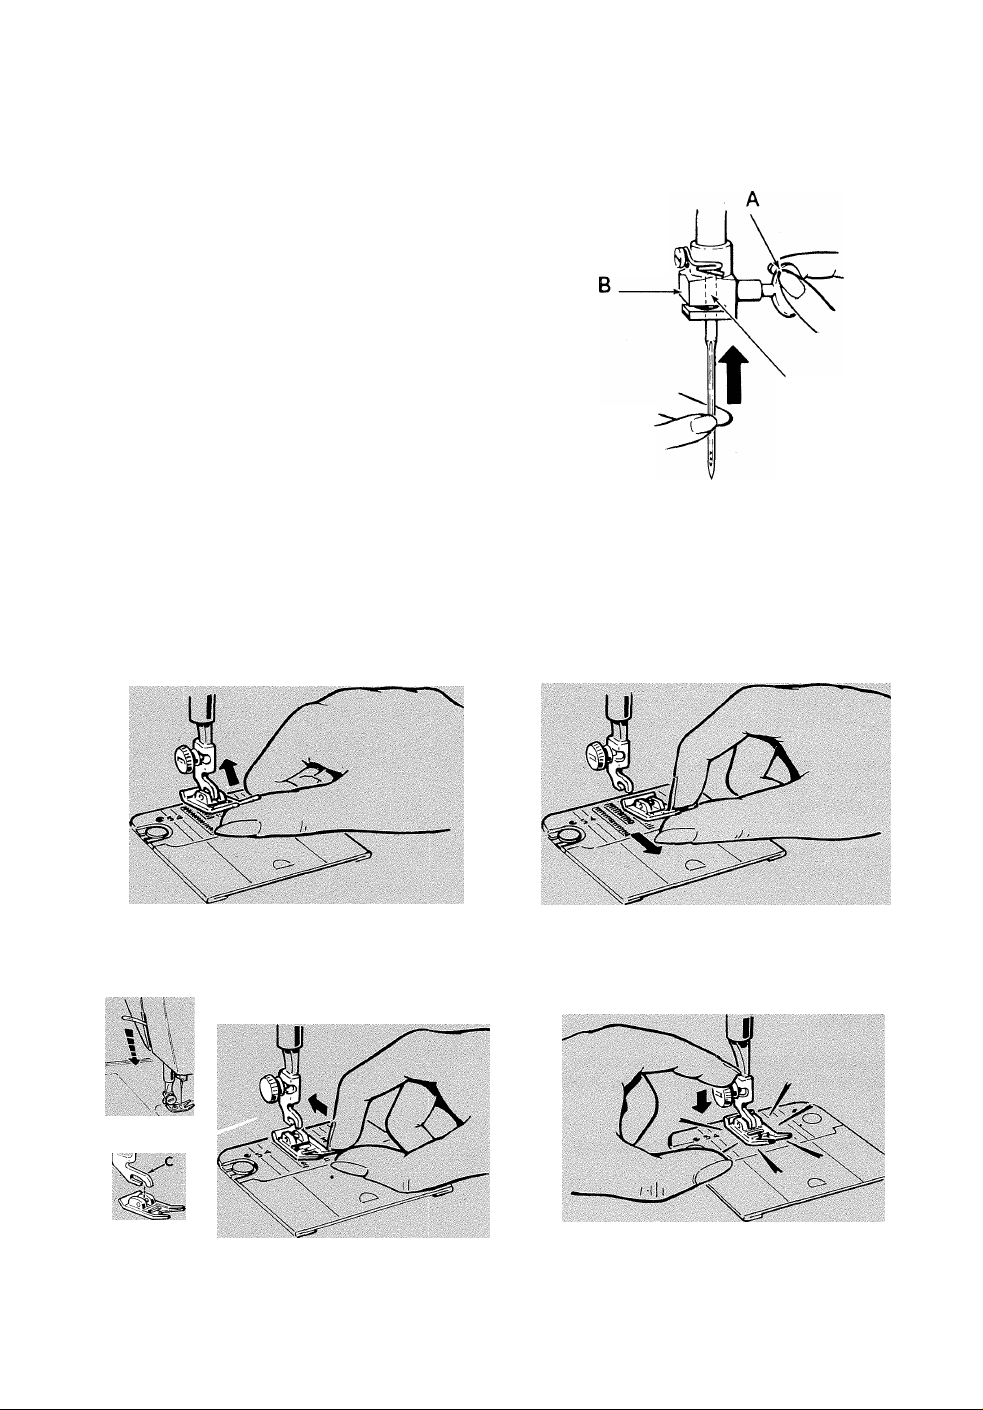
CHANGING THE NEEDLE
• Raise needle to its highest point by turning
the hand wheel toward you. Loosen needle
clamp screw A and remove the needle.
• Insert new needle up into clamp B as far
as it will go, with the flat side of the needle
to the back.
• Tighten needle clamp screw.
CHANGING PRESSER FEET
Snap-on Presser Feet
The presser feet furnished with your machine Raise needle to highest position by turning the
snap on and off a common shank. hand wheel toward you. Raise presser foot.
To Remove and Replace Foot
Flat Side to Back
la. Press toe of presser foot upward as far as 1b. Then snap down to remove,
it will go.
2. Centre the new presser foot under the shank 3. Press presser foot screw down firmly until
C and lower the presser foot lifter so that foot snaps into place,
the shank fits over the presser foot pin.
Page 7
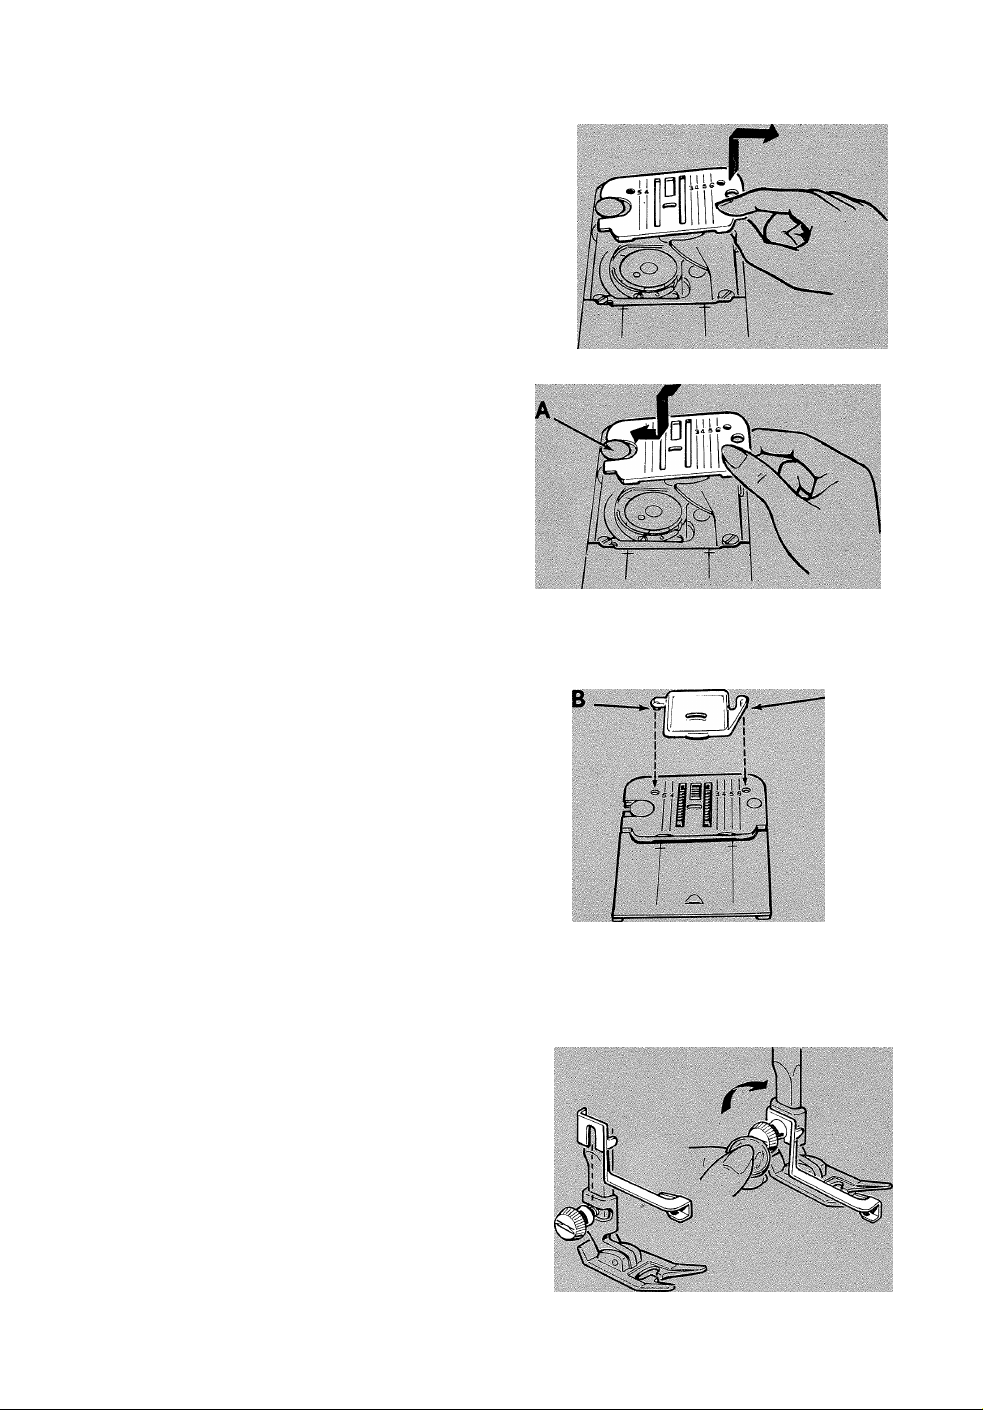
REMOVING AND REPLACING NEEDLE
PLATE
• Raise presser foot.
• Raise needle to highest position.
• Open slide plate. Place thumb under right
side of needle plate, lift it up and withdraw
it to right.
• Replace needle plate under clamping pin A,
push it gently to the left and press down
until it snaps into place.
ATTACHING SNAP-IN FEED COVER
• Raise presser foot.
• Raise needle to highest position by turning
hand wheel toward you. Open slide plate.
® Slide snap-in feed cover away, from you
over needle plate until points B and C are
positioned directly over holes in needle plate
as illustrated. Snap in point B. Then push
point C in toward point B until it snaps into
place. Close slide plate. To remove, open
slide plate then simply lift up front edge of
feed cover.
ATTACHING BLINDSTITCH HEM GUIDE
• Raise presser foot, loosen presser foot
screw with a coin and slip blindstitch hem
guide between screw and shank of the
general purpose foot.
• Be sure underside of the guide clears the
slide plate and front of foot.
® Tighten scpew with a coin.
Page 8

FABRIC WEIGHT TABLE
There are many types of fabrics around the world, each manufactured with a specific fibre and
weight. The fabric below have been classified according to weight to give a small sample of
what is available for purchase.
FIBRE
AND
FILMY
CONSTRUCTION
SILK
(Woven)
Chiffon,
Organza,
Tulle
Net, Lace, Ninon
Velvet, Crepe de Chine. Shantung, Faille
(Knit)
RAYON
(Woven)
(Knit)
COTTON
(Woven)
(Knit)
WOOL
(Woven)
(Knit)
SYNTHETiC
(Woven)
(Knit)
Tulle
Voile,
Tulle
Chiffon,
Organza,
Tulle
Net, Lace
Net, Lace
Net, Lace, Ninon,
Crepe de Chine
Jersey
Velvet, Taffeta, Satin
Ciré
Challis, Organdy, Muslin, Batiste, Dimity,
Lawn, Percale, Eyelet, Gingham, Piqué,
Poplin
Jersey
Cashmere, Flannel, Mohair, Felt, Crepe
Jersey
Crepe, Velvet, Taffeta, Satin
Raschel, Single Knit, Sweater Knit,
Bonded Knit, Tricot, Ciré
SYNTHETIC
BLENDS
(Woven)
(Knit)
LEATHER
PLASTiC
VINYLS
Voile
Plastic Film Plastic Film
Broadcloth, Batiste, Eyelet, Gingham,
Poplin
Single Knit
Kidskin, Patent, Chamois, ImitationLeathers & Suedes, Leather, Suede
Page 9

Refer to this table to determine the weight and type of fabric you will be using in order to
select the correct needle and thread combination.
For correct needle and thread combination for your fabric, refer to the Fabric, Thread and
Needle Table on the following page.
MEDIUM
Velvet. Crepe de Chine, Shantung,
Suiting. Brocade
Velvet. Taffeta, Satin, Crepe
Velveteen, Corduroy, Velvet, Fleece.
Velour, Terry. Chintz
Stretch Velours' , Stretch Terry ■
¿i Usually contain some synthetic fibres also.
Suiting, Flannel, Gabardine, Felt,
Serge. Mohair
Jersey
Velvet, Crepe, Taffeta. Satin,
Gabardine
HEAVY
Brocade. Taffeta. Satin, Crepe
Corduroy. Denim. Ticking, Canvas,
Linen, Drapery Fabric, Burlap
Suiting, Tweed, Duffle
VERY HEAVY
Denim, Duck,
Canvas, Sailcloth,
Upholstery Fabric
Coating, Blanketing
Jacquard. Double Knit. Sweater Knit.
Bonded Knit, Tricot. Spandex. Stretch
Terry, Stretch Velour, Deep Pile. Fake
Furs
Linen Type. Poplin, Corduroy,
Gabardine
Terry Knit
Patent. Imitation-Leathers & Suedes,
Leather. Suede, Reptile
Bonded Vinyl (Knit Back), Patent,
Embossed, Printed
Double Knit, Helenca, Fake Furs
Denim, Gabardine, Drapery Fabric
Double Knit
Buckskin, Calfskin, Suede, Reptile Upholstery Leather
Upholstery Vinyl
Upholstery Vinyl
Page 10
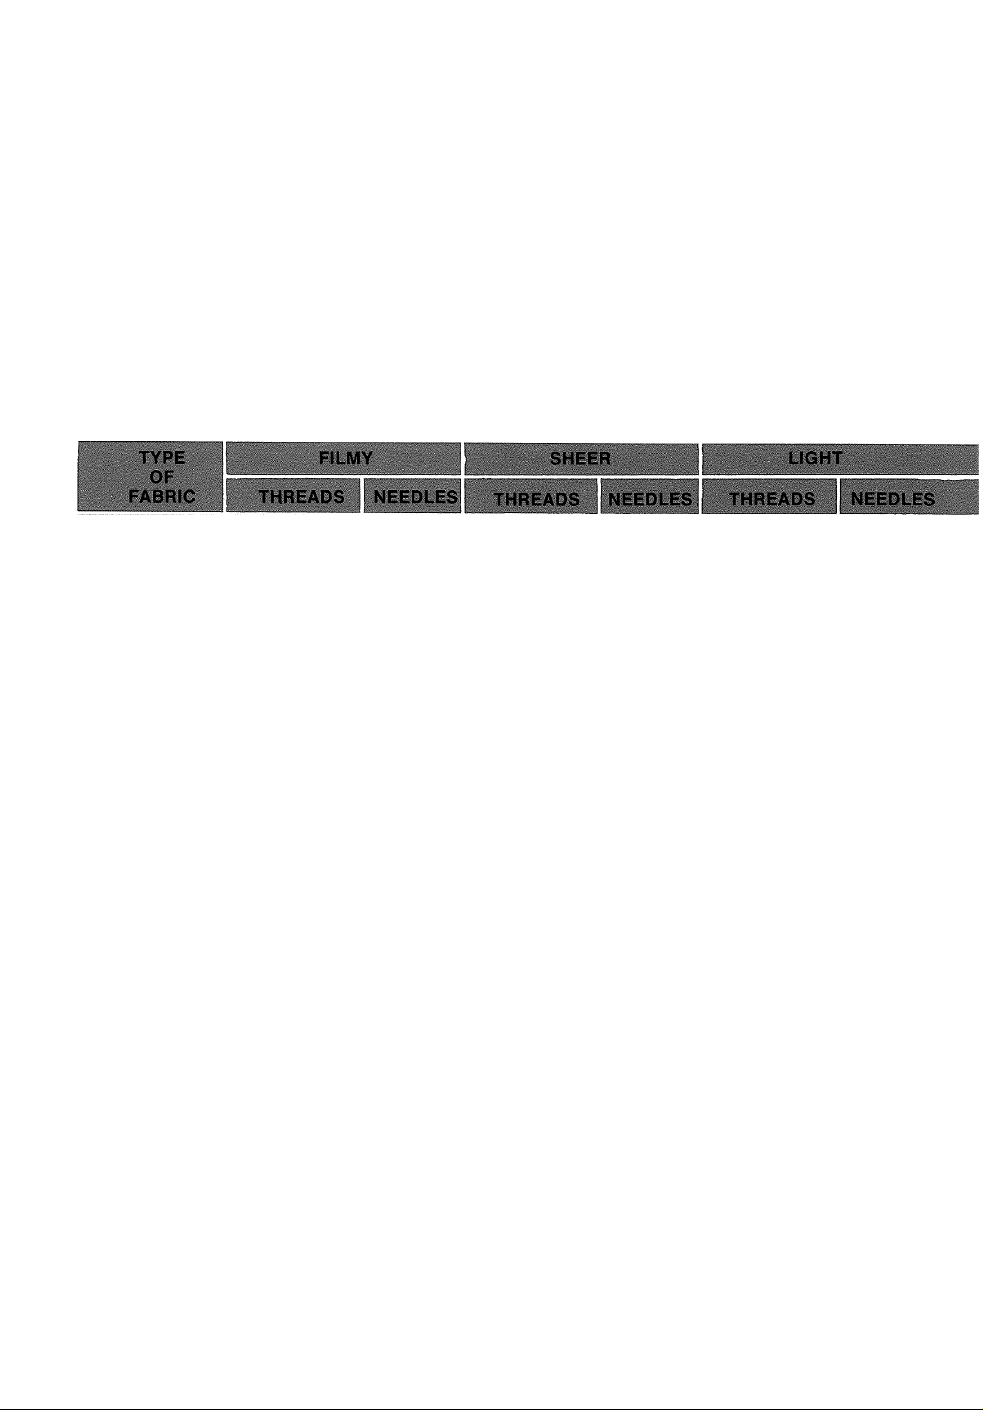
FABRIC, THREAD AND NEEDLE TABLE
Choosing the correct needle and thread for your fabric is of utmost importance. Correct choice
will make the difference in the wear and appearance of your new garment. The Fabric Weight
Table on the previous page, and the Fabric, Thread and Needle Table below are practical guides
to needle and thread selection. Refer to them before starting a sewing project. Be sure
to use the same size and type of thread in both needle and bobbin.
To select the correct needle and thread for your fabric, first refer to the Fabric Weight Table
to determine the weight and type of the material you are using.
Next, refer to the Fabric Thread and Needle Table.
SILK
RAYON
COTTON
WOOL
SYNTHETIC
SYNTHETIC
BLENDS
LEATHER
PLASTIC
VINYLS
Silk
Fine
Fine
Mercerized
Silk
Fine
Fine
Mercerized
Cotton
Fine
Fine
Mercerized
Fine Synthetic
Fine
Synthetic
2020-9/70
2020-9/70
2020-9/70
2020-9/70
2020-9/70
Fine
Silk
Fine
Mercerized
Fine
Silk
Fine
Mercerized
Fine
Cotton
Fine
Mercerized
Fine
Silk
Mercerized
Fine
Fine Synthetic
Fine Synthetic
2020-9/70
2020-9/70
2020-9/70
2020-11 /80
2020-9/70
2020-9/70 Fine Synthetic
Fine Silk
Fine Mercerized
Fine Silk
Fine Mercerized
Medium Cotton
Med. Mercerized
Fine Silk
Fine Mercerized
Fine Synthetic 2045-11/80
Med. Mercerized
Med. Synthetic 2032-11/80
Fine Mercerized
Fine Synthetic 2020-11/80
Fine Mercerized
Fine Synthetic 2020-11/80
2020-11/80
2020-11/80
2020-11/80
2020-11/80
2045-11/80
Page 11

Find the fabric you are using in Type of Fabric column at left (silk, rayon, etc.). Then locate
the fabric weight column (filmy, sheer, etc.) for your fabric at top of table. Read across from
Type of Fabric column to correct weight of fabric column. There, the correct thread and needle
choice for your fabric will be found.
Example: If you are sewing a medium weight wool, find wool in Type of Fabric column. Read
across to Medium (weight) column and you will see that a medium silk or mercerized thread
and a size 2020-14 needle are to be used.
You should follow the recommendations in this instruction book and on the needle package
for correct style and size of needle for different types and weights of fabric.
MEDIUM
THREADS
Medium
Medium
Medium
Medium
Medium
Medium
Medium
Medium
Medium Synthetic 2045-14/90
Medium Synthetic
Medium
Medium
Medium
Medium
Silk
Mercerized 2020-11 /80
Synthetic
Mercerized 2020-11/80
Cotton
Mercerized
Silk
Mercerized
Mercerized
Synthetic
Mercerized
Synthetic
NEEDLES
2020-14/90
2020-14/90 Heavy Mercerized 2020-16/100
2045-14/90 Heavy Synthetic
2032-14/90
2020-11./80
HEAVY
THREADS NEEDLES
Heavy Silk
Heavy Mercerized
Heavy Synthetic
Heavy Mercerized
Heavy Cotton
Heavy Mercerized
Heavy Synthetic
Heavy Mercerized
Heavy Synthetic
Medium Mercerized
Medium Synthetic
VERY HEAVY
THREADS
2020-14/90 Heavy Silk
2020-14/90
2020-16/100
2045-16/100 Heavy Synthetic
2045-16/100 Heavy Synthetic
2032-16/100
2020-14/90
Heavy Synthetic
Heavy Mercerized
Heavy Cotton
Heavy Mercerized
Heavy Mercerized
Heavy Mercerized
Heavy Synthetic
Heavy Mercerized
Heavy Synthetic
NEEDLES ;
2020-14/90
2020-14/90
2020-18/110
2020-16/100
2020-16/100
or 18/110
2020-16/100
or 18/110
2032-18 /110
2020-16/100
Medium
Medium
Mercerized
Synthetic
2020-11/80
Medium Mercerized
Medium Synthetic
2020-14/90
Heavy Mercerized
Heavy Synthetic
2020-16/100
Page 12
needle-fabric combinations
Correct needle selection is closely related to
stitch quality and appearance. Damaged fabric
is almost always caused by a needle that is
bent, burred
for the fabric and thread you are using.
The three types of needles most commonly used
are the regular, ball point, and wedge. To
obtain good results, the correct size and type
of needle for the fabric and thread you are
using must be chosen. Refer to the Fabric,
Thread and Needle Table, page 8.
or that is an inappropriate style
operating the machine
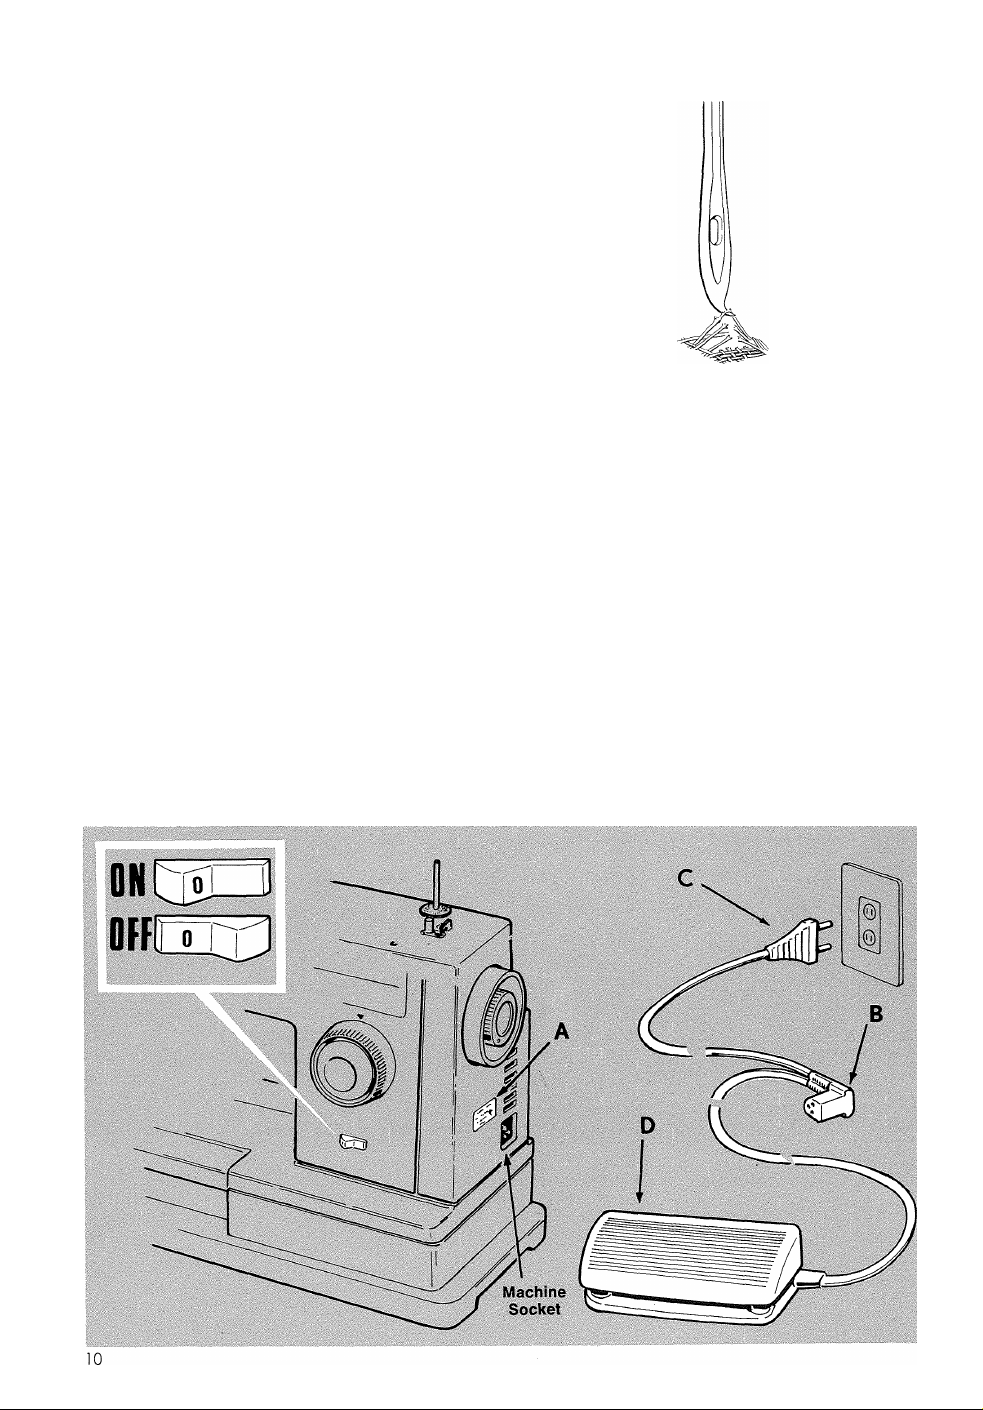
CONNECTING MACHINE
• Before plugging in your machine, be sure
the electrical information on the side of the
machine A, below the hand wheel agrees
with the range marked on your electrical
meter.
• Connect plug B to machine and plug C to
your socket outlet.
• To turn the machine and light on or off,
press switch as shown.
Result of Using a Bent Needle
• To run the machine and control speed,
press the speed controller D with your foot.
The harder you press, the faster the ma
chine will sew.
CAUTION: Disconnect the power line plug from
the socket outlet when changing needles, feet
or needle plates or when leaving the machine
unattended. This eliminates the possibility of
starting the machine by accidentally pressing
the speed controller.
Page 13
the bobbin thread
Your sewing machine uses two threads to form a stitch. The upper thread comes from the
spool and is threaded through the eye of the needle. The lower thread comes from the bob
bin. Wind the bobbin before threading the machine.
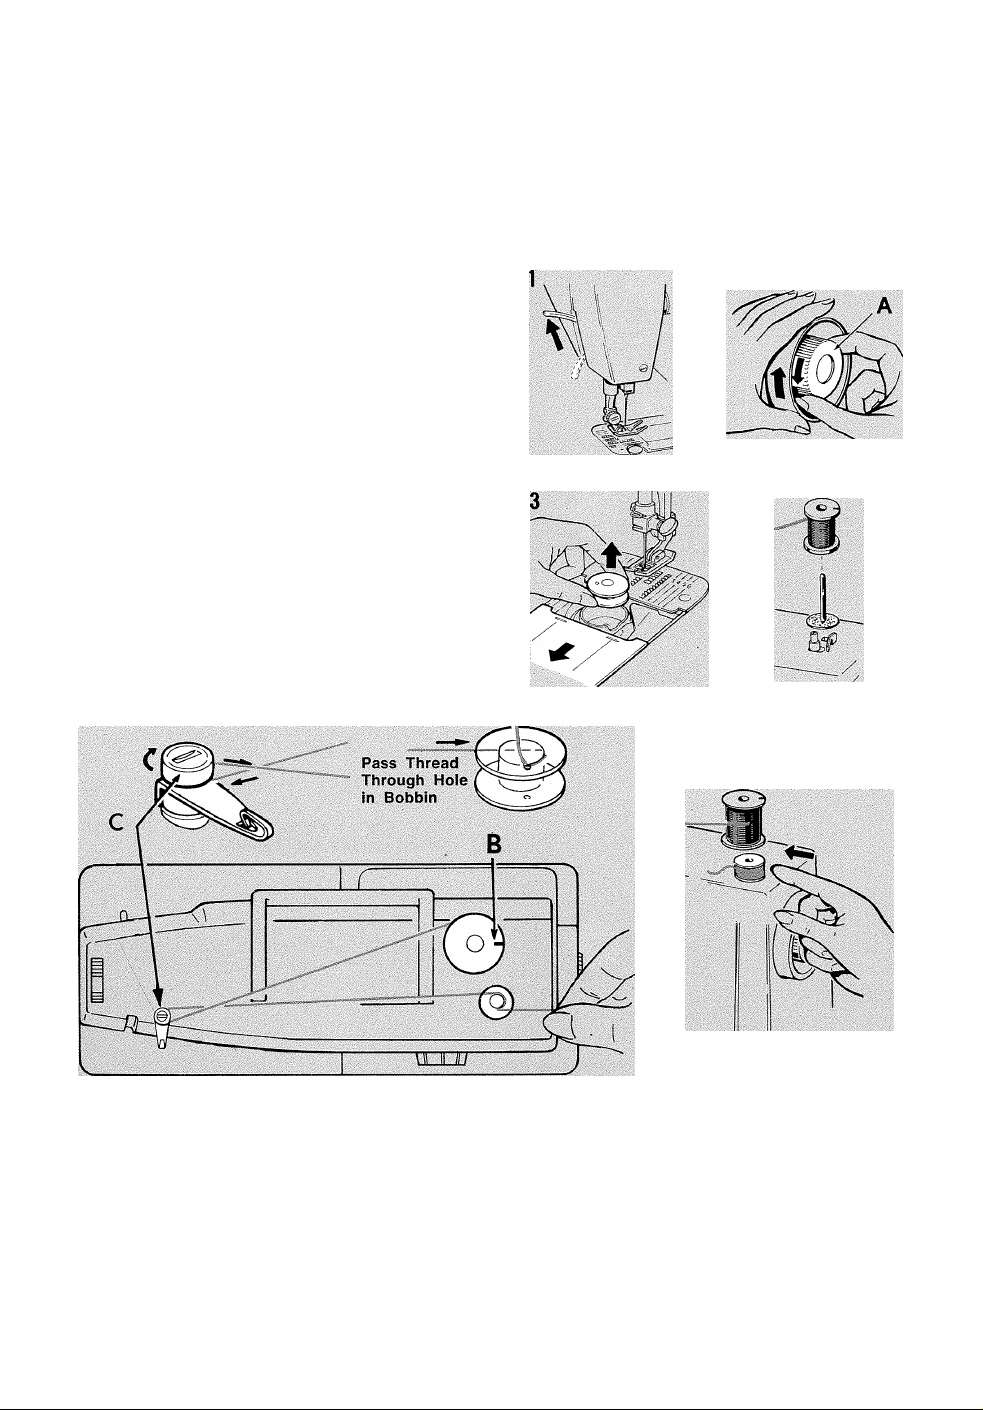
WINDING THE BOBBIN
Preparation Steps
1. Raise the presser foot and turn hand wheel
toward you until needle is in highest po
sition.
2. Loosen hand wheel knob A by turning it to
ward you with the right hand while holding
hand wheel with the left hand.
3. Open slide plate and lift out bobbin.
4. Place spool pin felt on pin.
Winding Steps
Place thread spool on spool pin with thread
retaining slit B on top. (Break paper at the
end of spool if necessary). If you are using
a tube of thread affix spool pin extension
to spool pin to ensure even flow of thread.
Lead thread around bobbin winder tension
disc C and through small hole in bobbin
from inside out.
Place bobbin on spindle and push bobbin
to right to engage bobbin winder.
• Hold thread end as shown and start the ma
chine. Cut off thread end aftei a few coils
have been wound.
• When required amount of thread has been
wound (winding will stop when bobbin is
full), stop the machine and cut connecting
thread.
• Push bobbin to left and remove bobbin from
spindle.
• Hold hand wheel and tighten hand wheel
knob.
Page 14
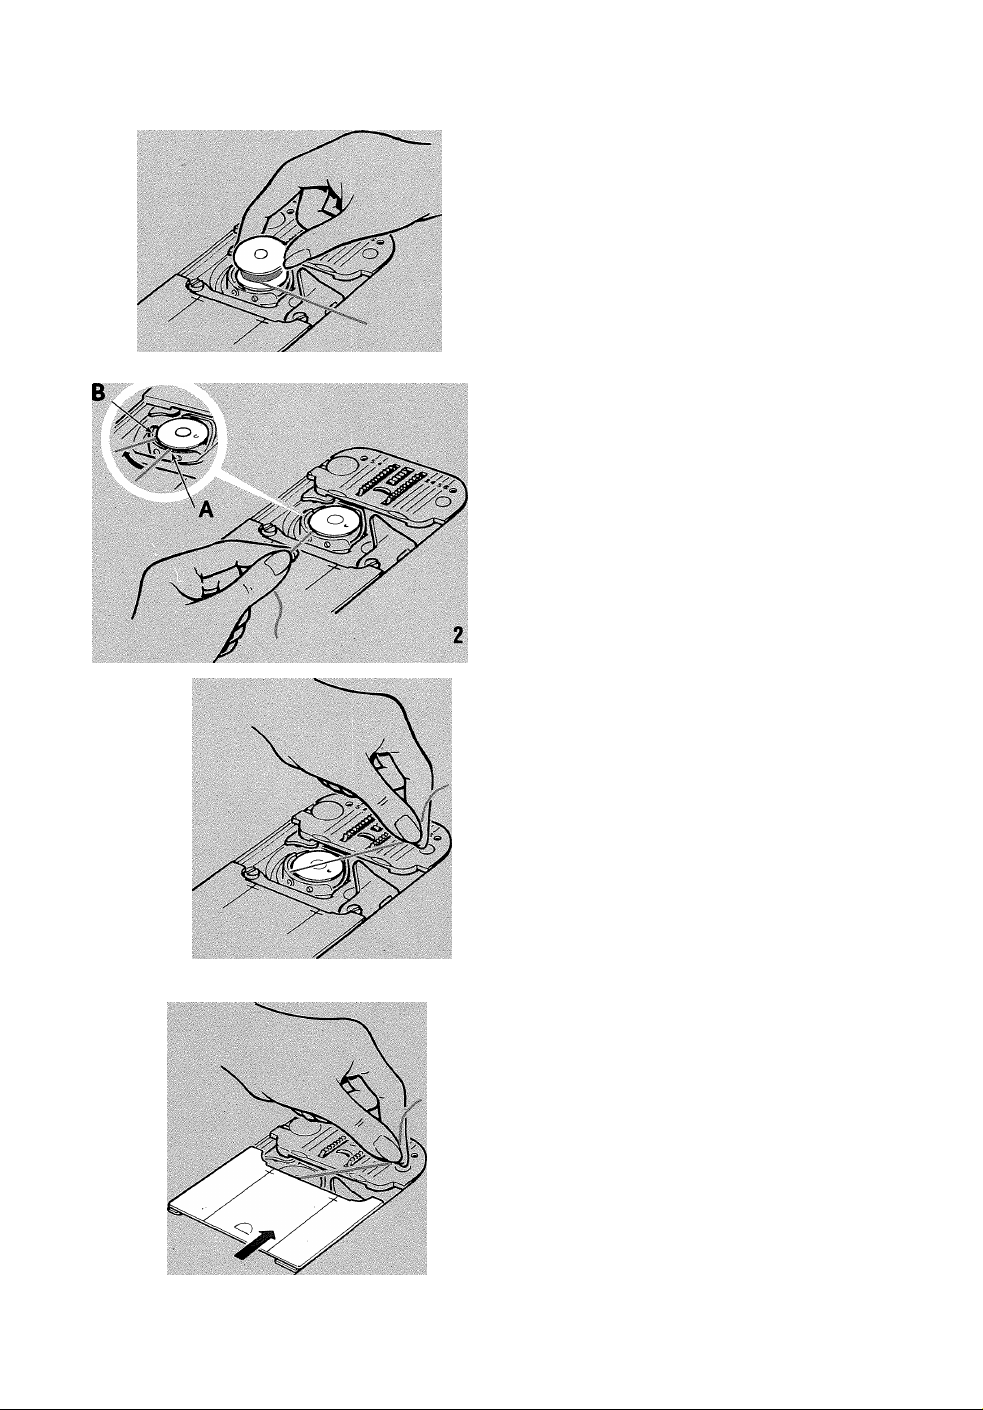
THREADING THE BOBBIN CASE
1. Hold bobbin so that thread unwinds in the
direction shown, and put bobbin into bobbin
case.
2. Pull thread into notch A, draw it back under
the tension spring and back into slot B.
12
3. Draw approximately 10 cm (4 inches) of
thread across the bobbin.
4. Close slide plate allowing thread to enter slot
between the needle plate and slide plate.
Page 15
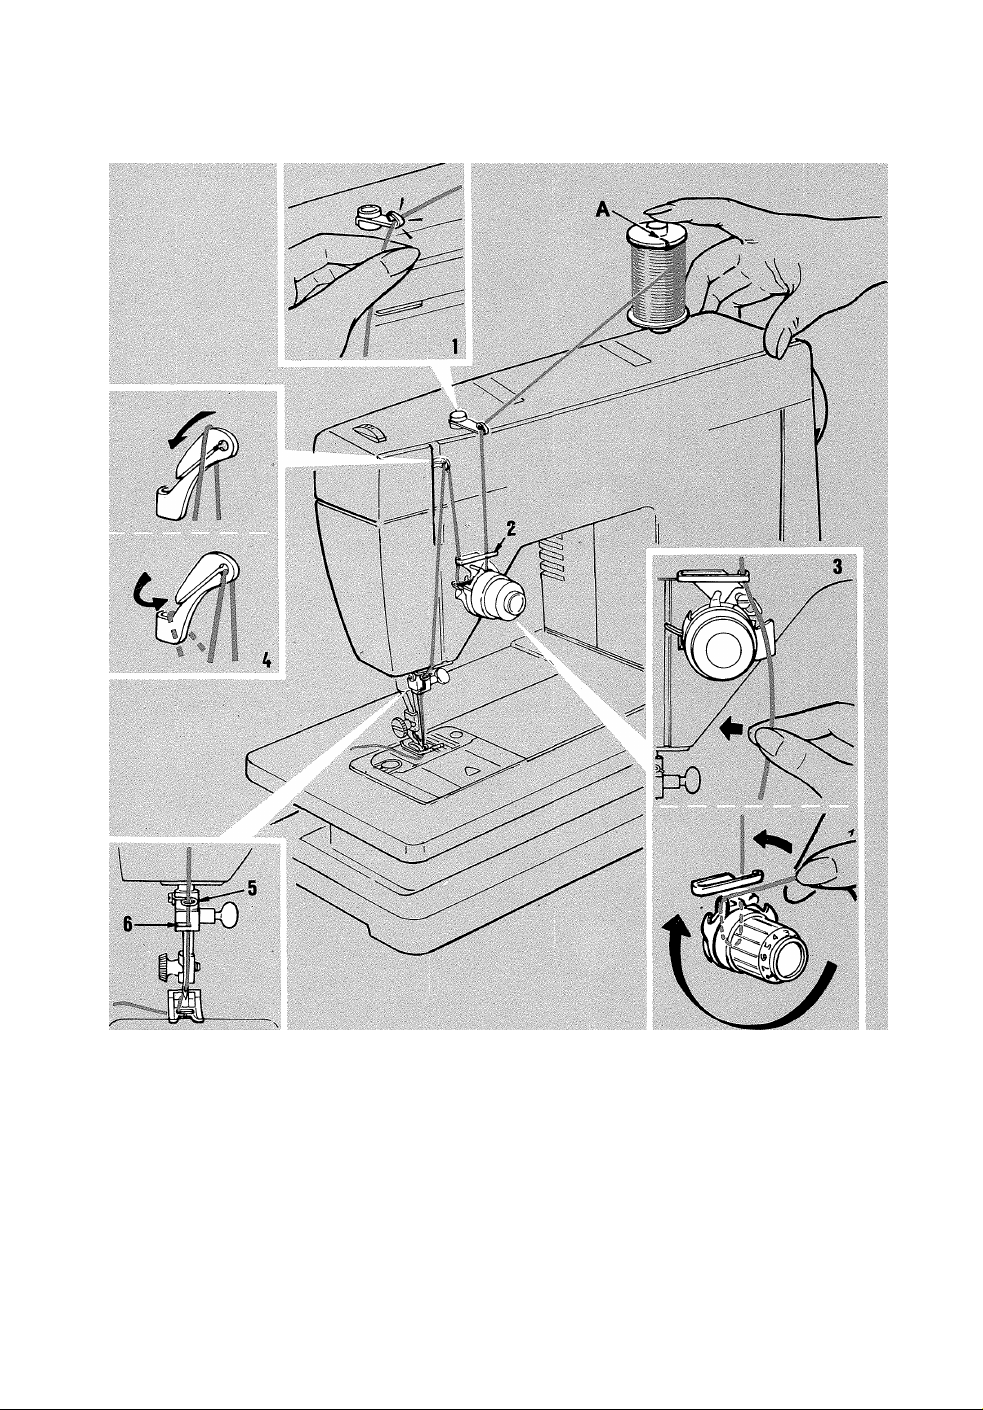
threading the machine
Raise the pressor foot to release tension
discs and make sure needle and take-up
lever are in highest position.
Place spool pin felt from accessories over
spool pin, and place spool of thread on
spool pin over felt, with spool thread re
taining slit A on top.
Keep right hand on spool of thread to hold
firmly in place while threading machine.
Snap thread into upper thread guide 1.
Pass thread through point 2.
Thread the needle thread tension 3. Slide
thread over metal plate into tension discs.
Lead thread under needle thread tension
and through tension w'ire by firmly pulling
thread straight up.
Pull thread to right behind point 2 guiding
thread up toward take-up lever.
Pass thread through points 4 to 6 as shown.
Thread needle from front to back and draw
about 10 cm (4 inches) of thread through
eye of needle.
13
Page 16
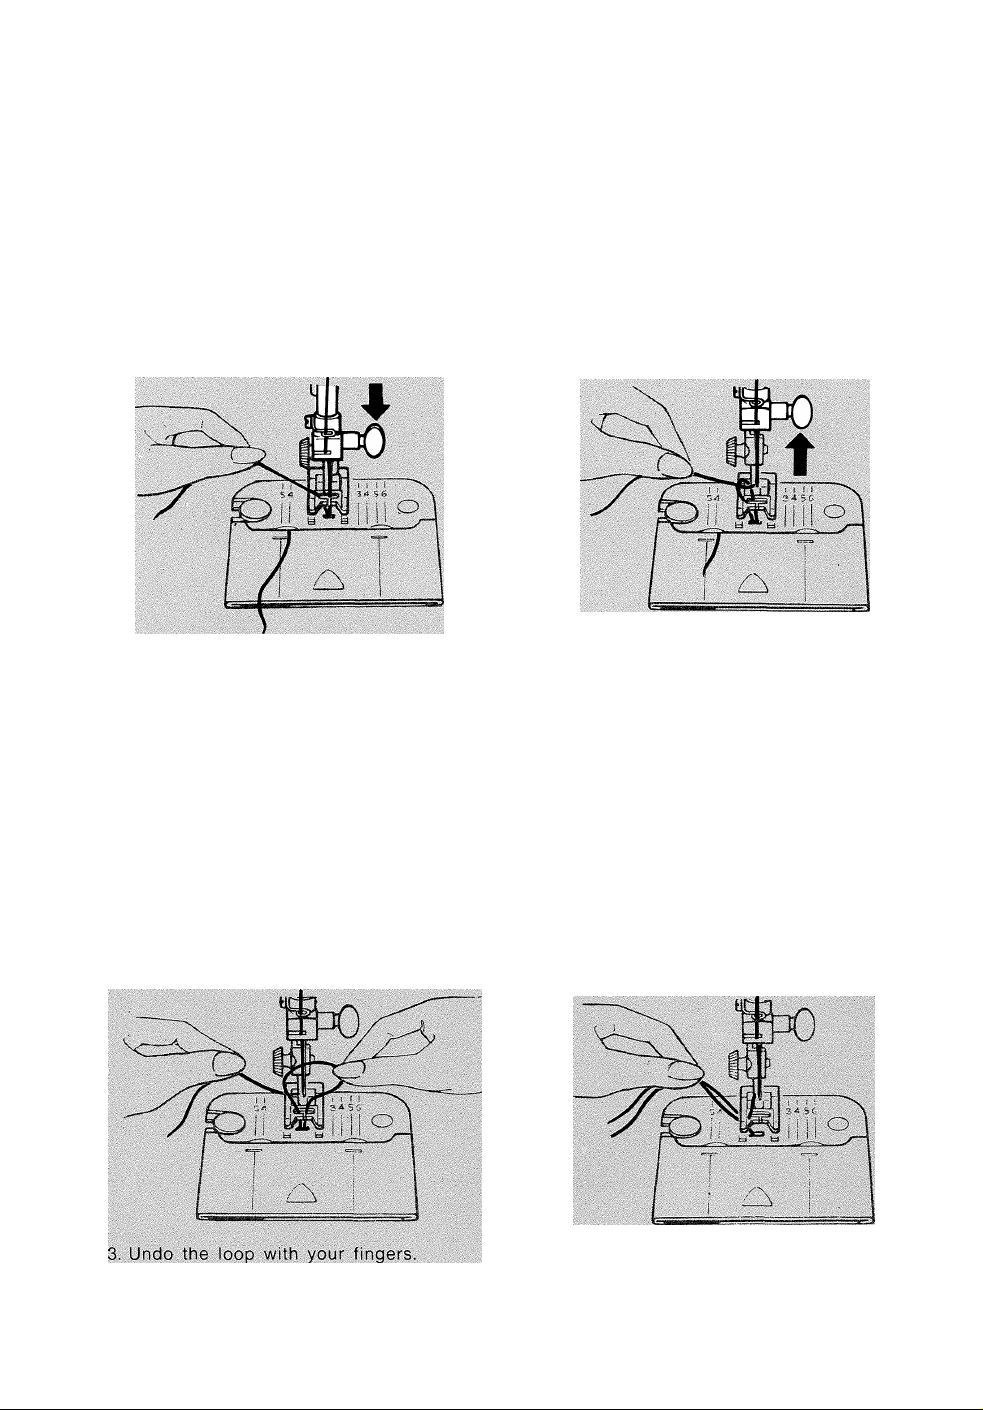
RAISING THE BOBBIN THREAD
Now that you have wound the bobbin and threaded the needle, raise the bobbin thread
through the hole in the needle plate.
1. Hold needle thread lightly with left hand
and turn hand wheel slowly toward you
so that needle enters needle plate.
2. Continue turning hand wheel and hold
ing needle thread until needle rises and
brings up bobbin thread in a loop.
4. Place both needle and bobbin threads
under the foot and draw them to back
of machine.
Page 17
Chapter 3. Straight CtitGhmg
adjusting machine stitch to suit your fabric
Before you move the selectors to set your
machine for straight stitching, turn the hand
wheel toward you until the needle is above
the needle plate.
SETTING SELECTORS
• Set needle position selector at LiljJ
• Set stitch width selector at
• Set stitch length; .5-4 to suit fabric
—w/vAAA^
0 •; I 2 3 4
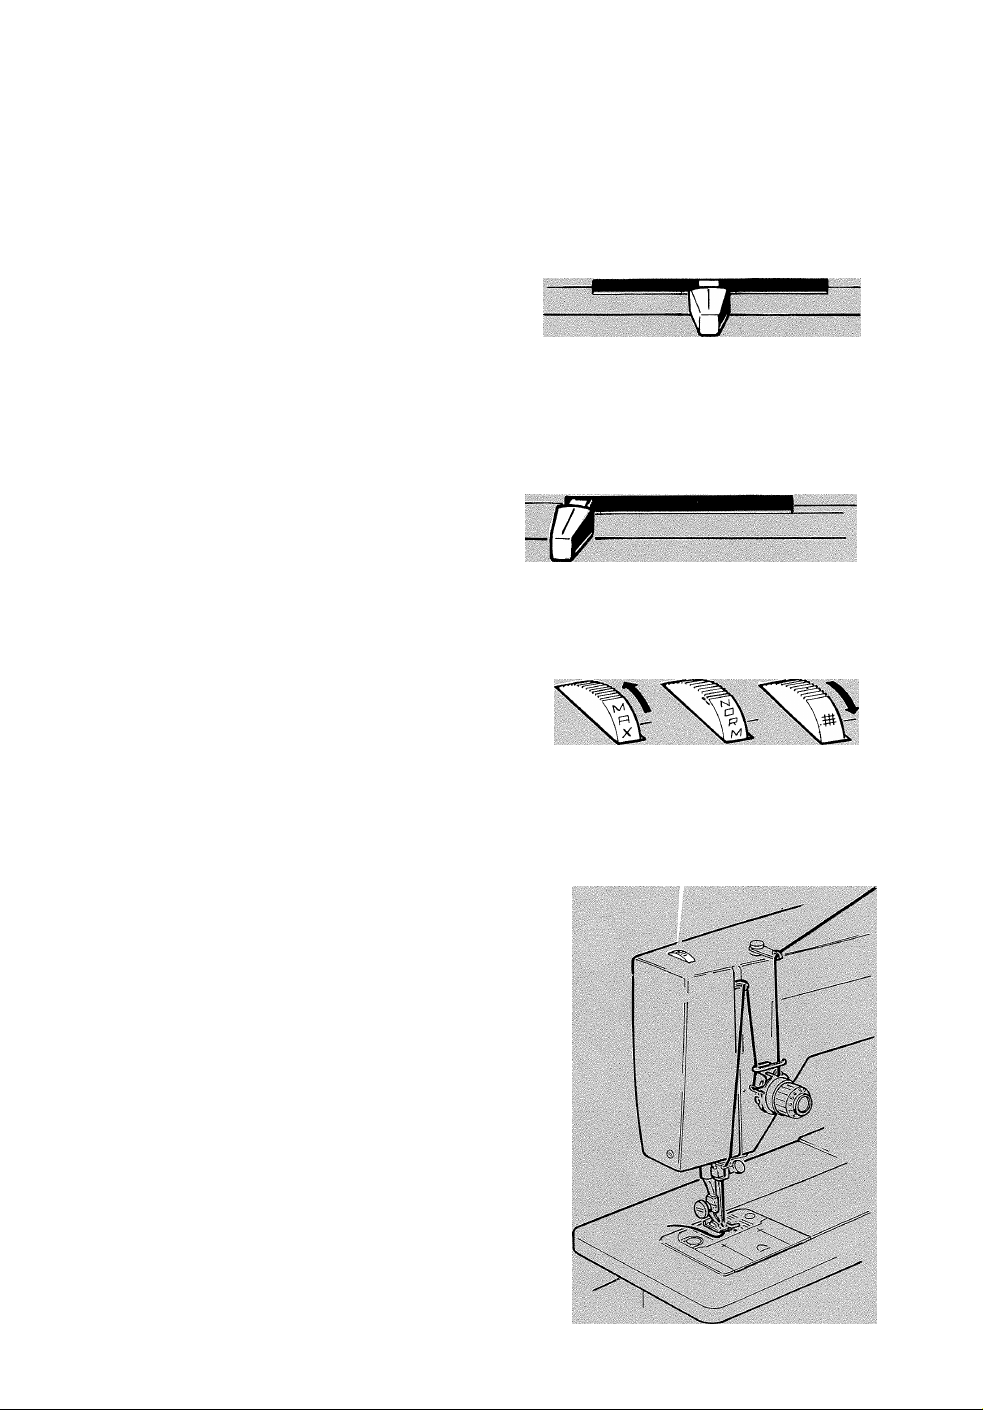
REGULATING PRESSER FOOT
PRESSURE
The pressure dial regulates the pressure that
the presser foot exerts on the fabric. Correct
pressure is important because it enables the
fabric to feed smoothly and evenly, without
being marked.
The NORM (normal) setting is an all purpose
setting that can be used for sewing a wide va
riety of fabrics of different weights and tex
tures. Intermediate notched settings above and
below NORM (normal) are also provided. When
you need extra control to sew, regulate the
setting to heavier or lighter pressure to suit
the fabric being used.
Lower the foot before setting pressure.
To increase pressure, turn dial from NORM
toward MAX.
® To decrease pressure, turn dial from NORM
toward ^ .
I
L _!
Needle Position Selector
0 12 3 4
stitch Width Selector
® For darning, set dial on ^ .
15
Page 18
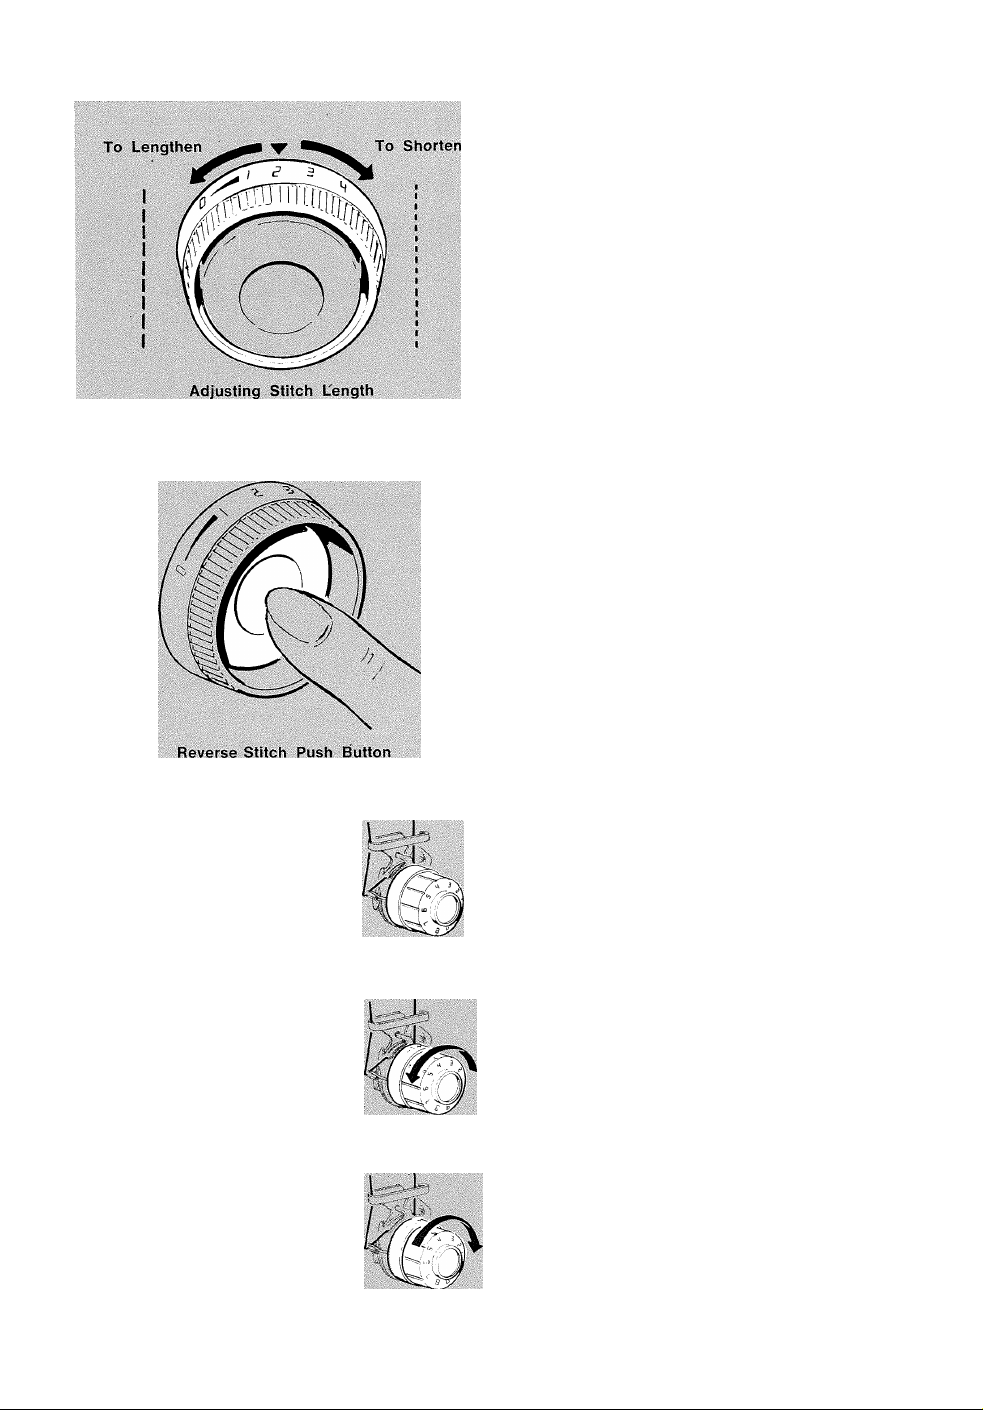
ADJUSTING STITCH LENGTH
The stitch length dial controls the length of
stitches. The numbers around the edge of the
dial express stitch length in mm; the lower
the number, the shorter the stitch. Generally,
shorter stitches are best for lightweight fabric;
longer stitches for heavy fabric. The area from
0 to 1 is used for the adjustment of zig-zag
satin stitching (see page 21).
Setting the Dial
• Turn dial so that stitch length desired is
positioned under ▼ symbol.
• To shorten stitch length, turn dial clockwise
to a lower number.
• To lengthen stitch length, turn dial counter
clockwise to a higher number.
REVERSE STITCHING
For reverse stitching, depress push button lo
cated in centre of dial, hold in until reverse
stitching is completed, then release push but
ton. Push button can be depressed while ma
chine is sewing.
Note: Reverse stitching cannot be done when
using a stretch stitch pattern.
NEEDLE THREAD TENSION
Correct tension is important because too much
or too little will weaken your seams or cause
your fabric to pucker. Make a test sample with
the fabric and the thread you plan to use and
examine it. A well balanced stitch, as shown in
illustration A, will have the needle and bobbin
threads locked between the two layers of fabric
with no loops on top or bottom and no puckers.
The tension dial regulates the degree of ten
sion on your needle thread. Set it according
to the type of thread and fabric you use. The
B
numbers on the dial eliminate guesswork.
If the fabric puckers B, decrease tension. If
the stitches in your test sample look loose C,
increase needle thread tension.
• To decrease tension, turn dial to lower
nuriiber.
® To increase tension, turn dial to higher
number.
Page 19
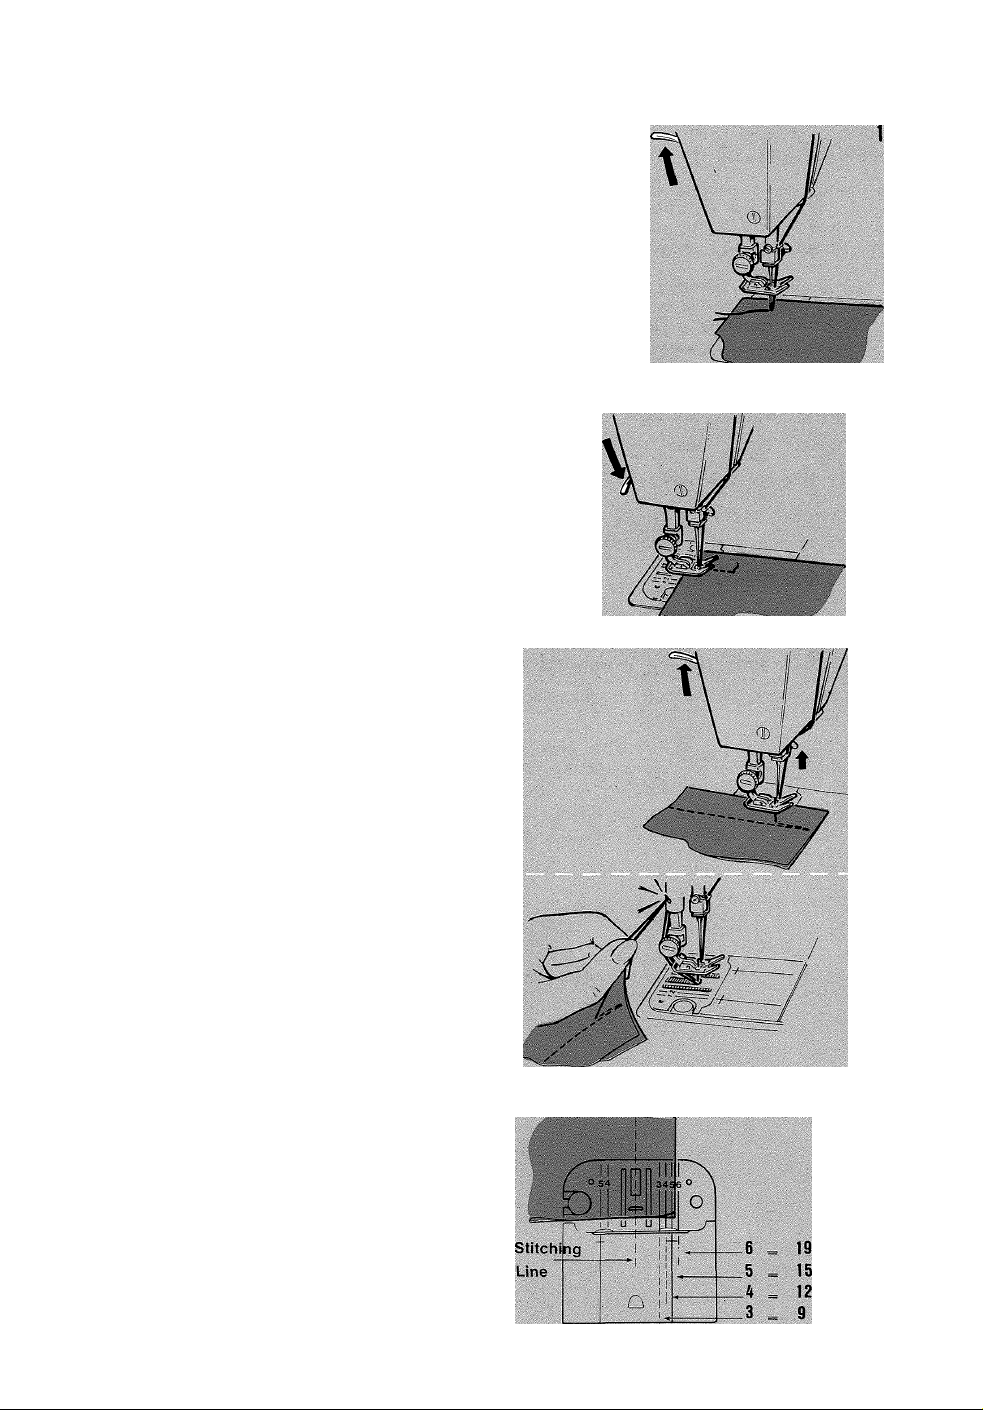
sewing a seam
• Needle Position:
• Stitch Width: ;-i-'''AAAA
• Stitch Length: To suit fabric
• General Purpose Needle Plate
• General Purpose Foot
1. Raise presser foot. Pull thread back under
presser foot leaving at least 10 cm (4 inches)
of thread.
2. Position needle approximately 1.2 cm (’ /2
inch) from fabric edge. Then lower pres
ser foot and backstitch almost to the edge
of the fabric for reinforcement by stitching
in reverse direction. For additional informa
tion on reverse stitching refer to page 16.
Stitch forward to end of seam and stop
machine before the end of stitching line.
(Do not sew beyond edge of fabric).
3. Raise needle by turning hand wheel toward
;0 : t 2 3 4
you. Press reverse stitch push button and
back stitch 1.2 cm (V2 ipch) to reinforce end
of stitching.
4. Raise needle by turning hand wheel toward
you. Raise foot and remove fabric by draw
ing it to the back and to the left. Cut threads
on thread cutter at rear of presser bar.
KEEPING THE SEAM STRAIGHT
To keep the seam straight, use one of the
numbered guidelines on the needle plate. The
dimensions they represent are shown in the
illustration.
CAUTION: Because of the up and down mo
vement of the needle, you must work care
fully and watch the sewing area when operat
ing the machine.
(3/4")
(5/8")
d/2")
(3/8")
17
Page 20
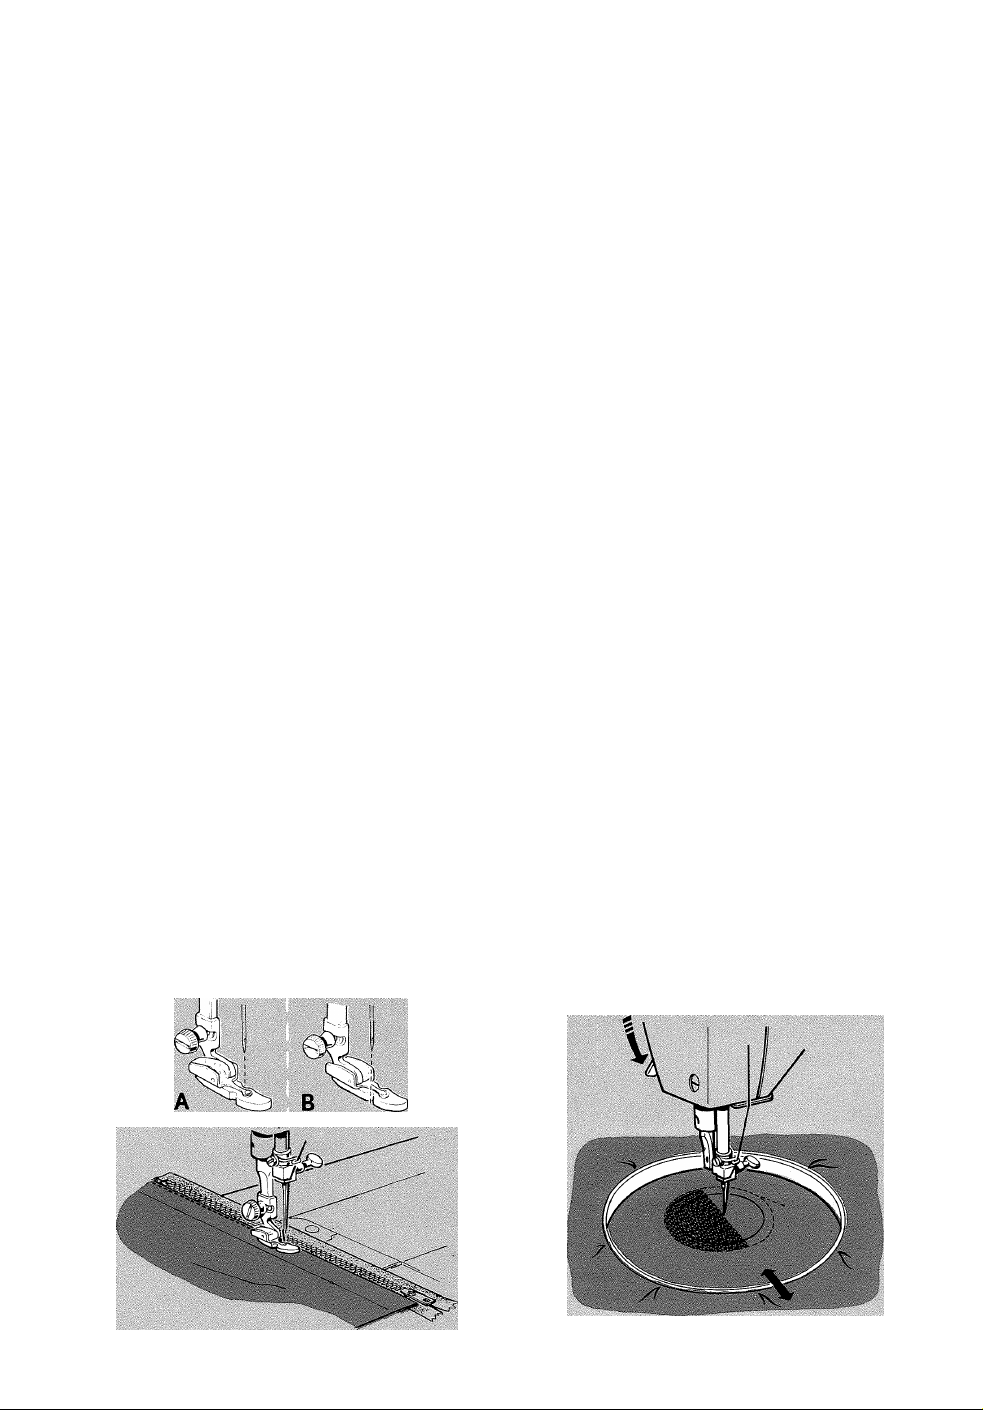
applications
DARNING
ZIPPER INSERTION
How the zipper is inserted will depend on the
type of the garment and the location of the
zipper. With the adjustable zipper foot, you
will find it easy to sew an even line of stitch
ing close to the zipper.
The zipper foot can be used either to the left
or right of the needle, depending on where
the bulk of the garment is placed.
Needle Position: LilU
• Stitch Width:
• stitch Length: To suit fabric
• General Purpose Needle Plate
• Zipper Foot
t«WW\
: I 2 3 4
Adjusting the Zipper Foot
When the zipper is to the right of the needle.
• Before attaching the zipper foot slide the
adjusting spacer to the left (illustration A).
• Snap on the zipper foot as instructed on
page 4.
• Check the position of the foot by lowering
the needle into the side notch of the foot,
making sure it clears the foot.
When zipper is to the left of the needle, ad
just the foot to the right of the needle in the
same way (illustration B).
^ Spacer . .i* *
With Embroidery Hoop
• Needle Position: ,
• Stitch Width:
• Stitch Length: 0
• Snap-in. Feed Cover
• No Presser Foot or Presser Foot Shank
• Presser Bar: Lowered
• Insert snap-in feed cover plate as instruc
ted on page 5.
• Trim ragged edges from area to be darned
and centre worn section in embroidery hoop
designed for machine use.
• Position hoop under the needle and lower
presser bar to engage tension. Hold needle
thread loosely with left hand, turn hand
wheel over and draw bobbin thread up
through fabric. Hold both thread ends and
lower needle into fabric. Take a few stitches
to secure.
Snip off thread ends close to fabric.
• Outline area to be darned with straight
stitches for reinforcement.
• Stitch across opening, moving hoop under
needle at a slight angle from lower left to
upper right. Keep lines of stitching closely
spaced and even in length. When opening
is filled, cover area with crosswise lines of
stitching.
This method of controlling fabric movement
with an embroidery hoop should be done with
the extension bed on the machine and may be
used to do embroidering or monogramming.
:0 : » 2 3 4
18
Page 21
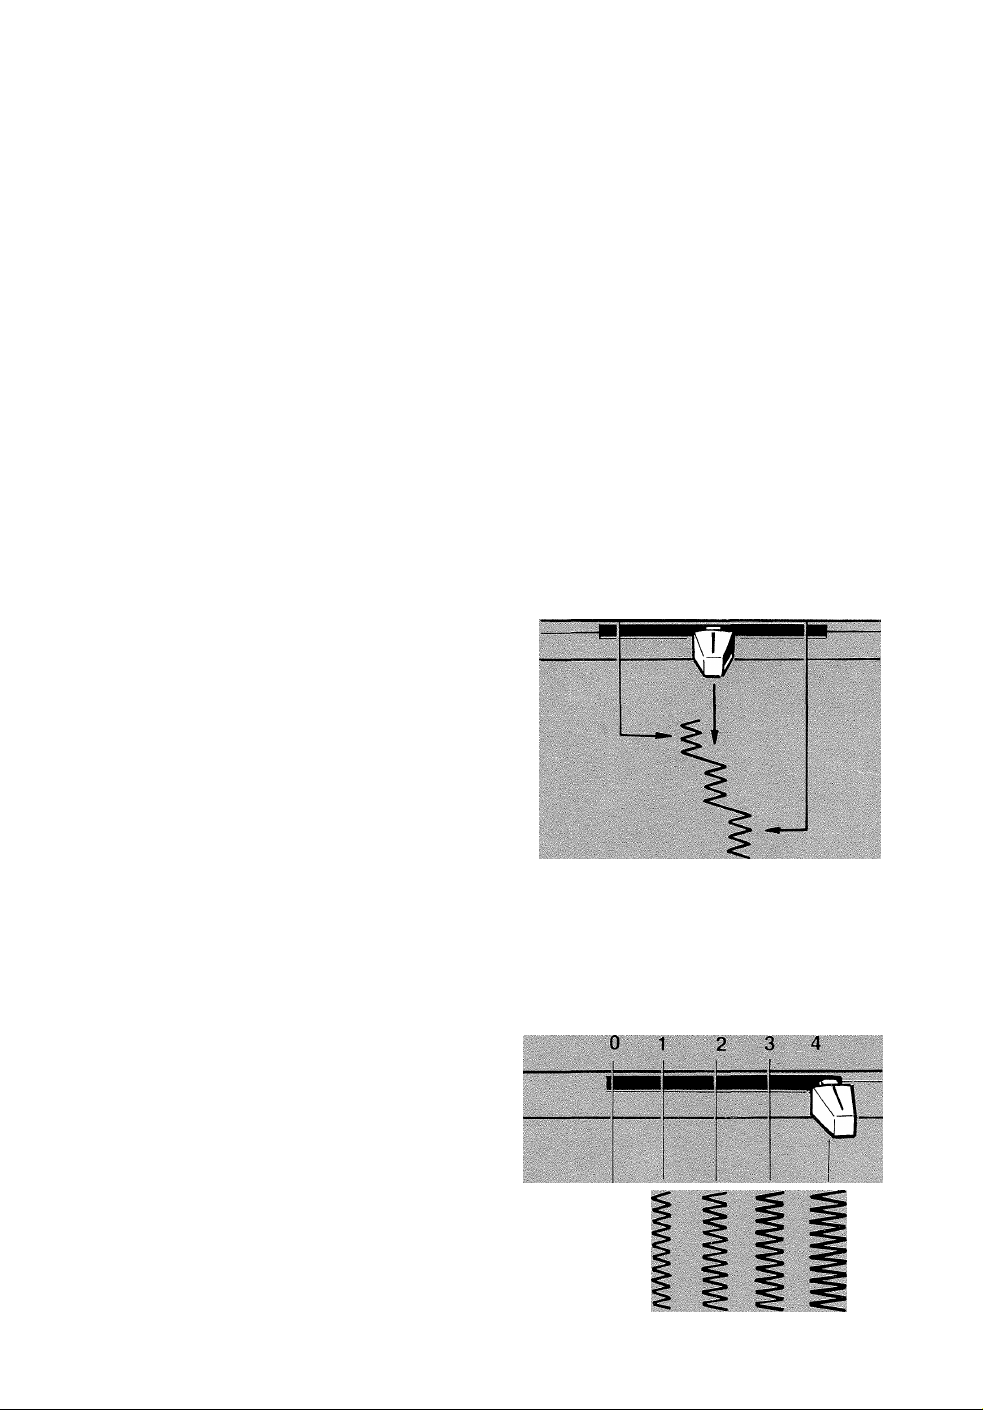
Chapter 4. Basic Zig-Zag Stitching
adjusting machine stitch to suit your fabric
You can do functional as well as decorative
zig-zag stitching with your sewing machine.
How to set selectors
PATTERN GROUP SELECTOR
Before moving selector, make sure needle is
out of the fabric.
For plain zig-zag stitching:
• Set stitch width selector on o (straight stitch)
• Turn pattern group selector to 1 aligning
number under I mark
• Pattern Group Selector: 1
• Needle Position:L-:,
2|
<
Pattern Group Selector
Left Centre Right
L J. J
• Stitch Width:-i'''^'AAAA:
• Stitch Length:.5 - 4 to suit fabric
• General Purpose Needle. Plate
® General Purpose Foot
NEEDLE POSITION SELECTOR
Before moving selector, make sure needle is
out of the fabric.
Most of your zig-zag stitching will be done in
centre J. needle position.
Left L. and right settings are used for
special stitch placement, as in button sewing.
STITCH WIDTH SELECTOR
Before moving selector, make sure needle is
out of the fabric.
To produce a plain zig-zag or a decorative
stitch, the stitch width selector is moved from
its straight stitch position o to any of its
other five positions. The further you move the
selector lever toward the right, the wider your
stitch will be.
0 ; I 2 3 4;
Needle Position Selector
4
—-v\aaA/\/\
stitch Width Selector
19
Page 22
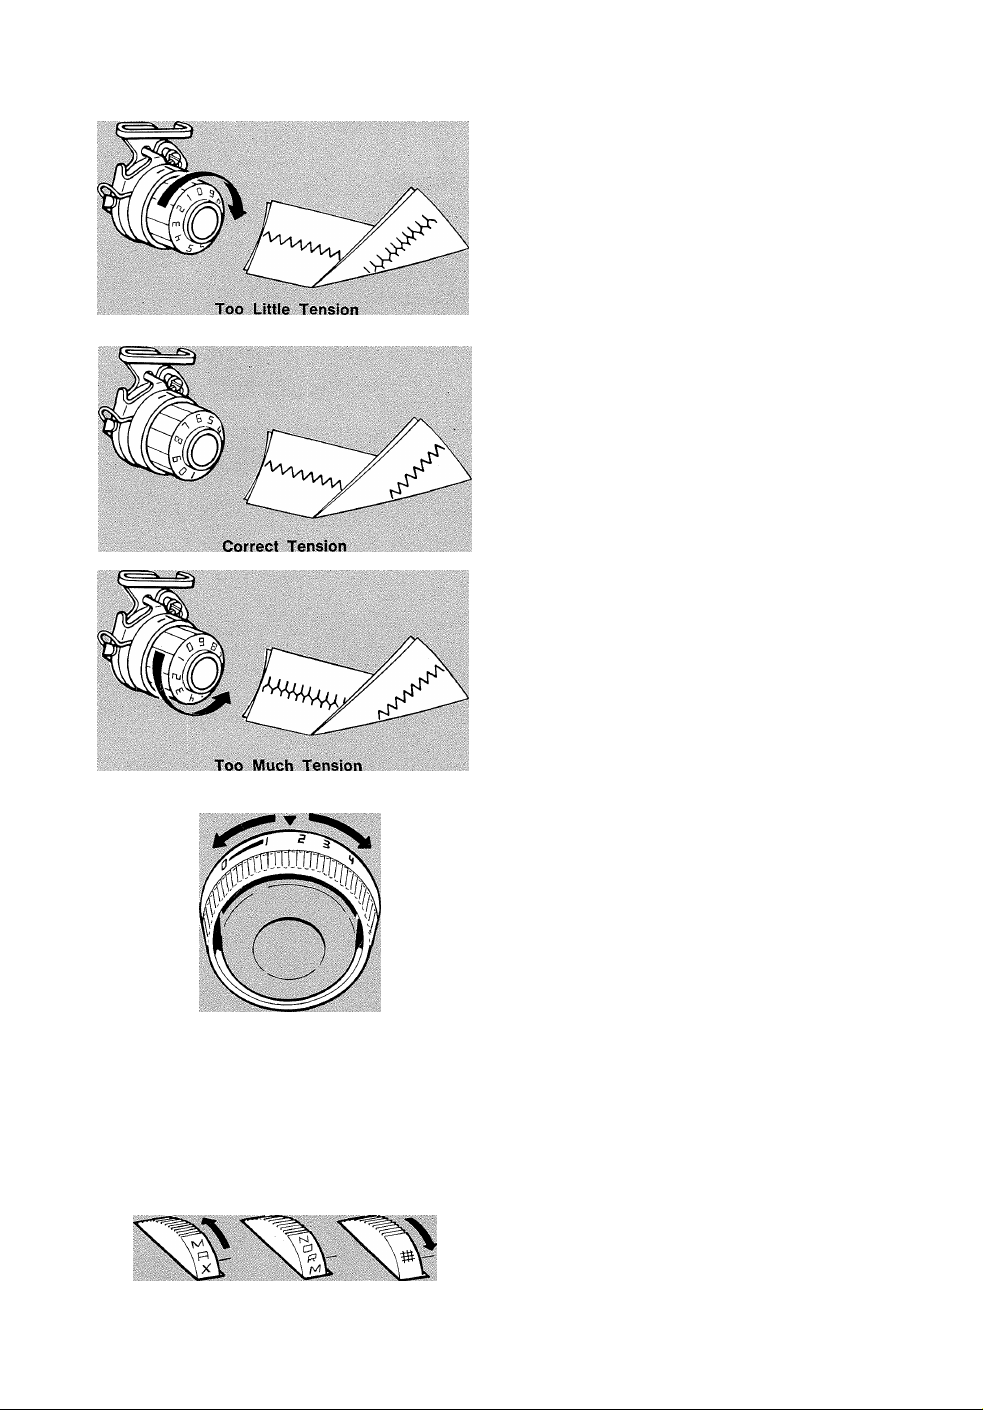
ADJUSTING NEEDLE THREAD TENSION
Zig-zag stitching requires less needle thread
tension than straight stitching.
Make a test sample with the fabric and thread
you plan to use so that you can adjust the
tension properly. The stitches should lie flat
against the fabric without causing the fabric
to pucker.
If the stitches are not fiat and the fabric is
puckered, lower the needle thread tension by
turning the dial to a lower number.
ADJUSTING STITCH LENGTH
Any stitch length setting from 1 to 4 will give
you an open zig-zag stitch.
The higher the number, the more open, or
farther apart your stitches will be.
The area between 0 and 1 on the dial, is used
for the adjustment of zig-zag satin-stitching, a
series of closely spaced plain zig-zag stitches
that form a smooth, satin-like surface. (Refer
to page 21 for information on satin stitching).
0-11234
Stitch Length Setting
20
ADJUSTING PRESSER FOOT PRESSURE
See page 15 under « Straight Stitching ».
Page 23
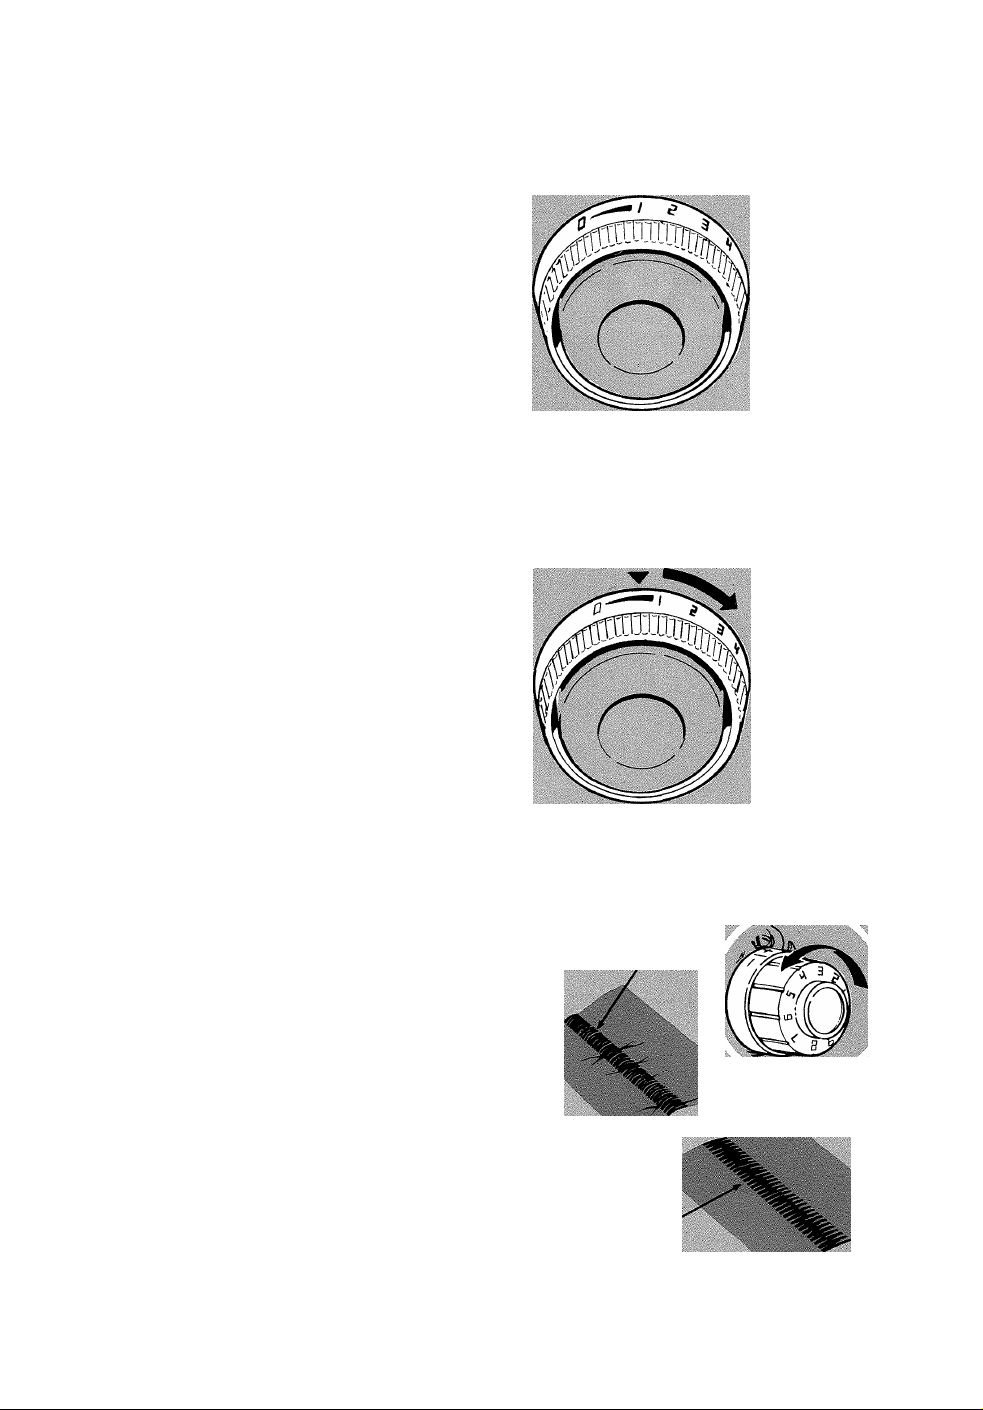
satin stitching
When you wish to produce a satin stitch make
a test sample first so you can adjust stitch
length and thread tension properly. Soft fabric
may require a backing to ensure a firm stitch.
Crisp organdy, lawn or a fusible interfacing
are suitable for this purpose.
Accessory and Selector Settings
• Pattern Group Selector: 1
• Needle Position: L.
• Stitch Width: -4'«aaAAAi
0 ;. ..2 .. ,3.¡1.
• Stitch Length: 0 to 1
General Purpose Needle Plate
Special Purpose Foot
* •
ADJUSTING STITCH LENGTH
• Turn stitch length selector dial to 1.
• Run the machine at a slow speed and grad
ually turn stitch length dial clockwise until
stitches are closely spaced and form a
smooth surface.
Incorrect
ADJUSTING NEEDLE THREAD TENSION
Satin stitching requires less tension than
straight stitching or open zig-zag stitching.
Furthermore, the wider the stitch, the lighter
the tension on the thread must be. Notice the
stitching on your sample. If the fabric is puck
ered, lower the needle thread tension by
turning the tension dial to a lower number.
Correct
2l
Page 24
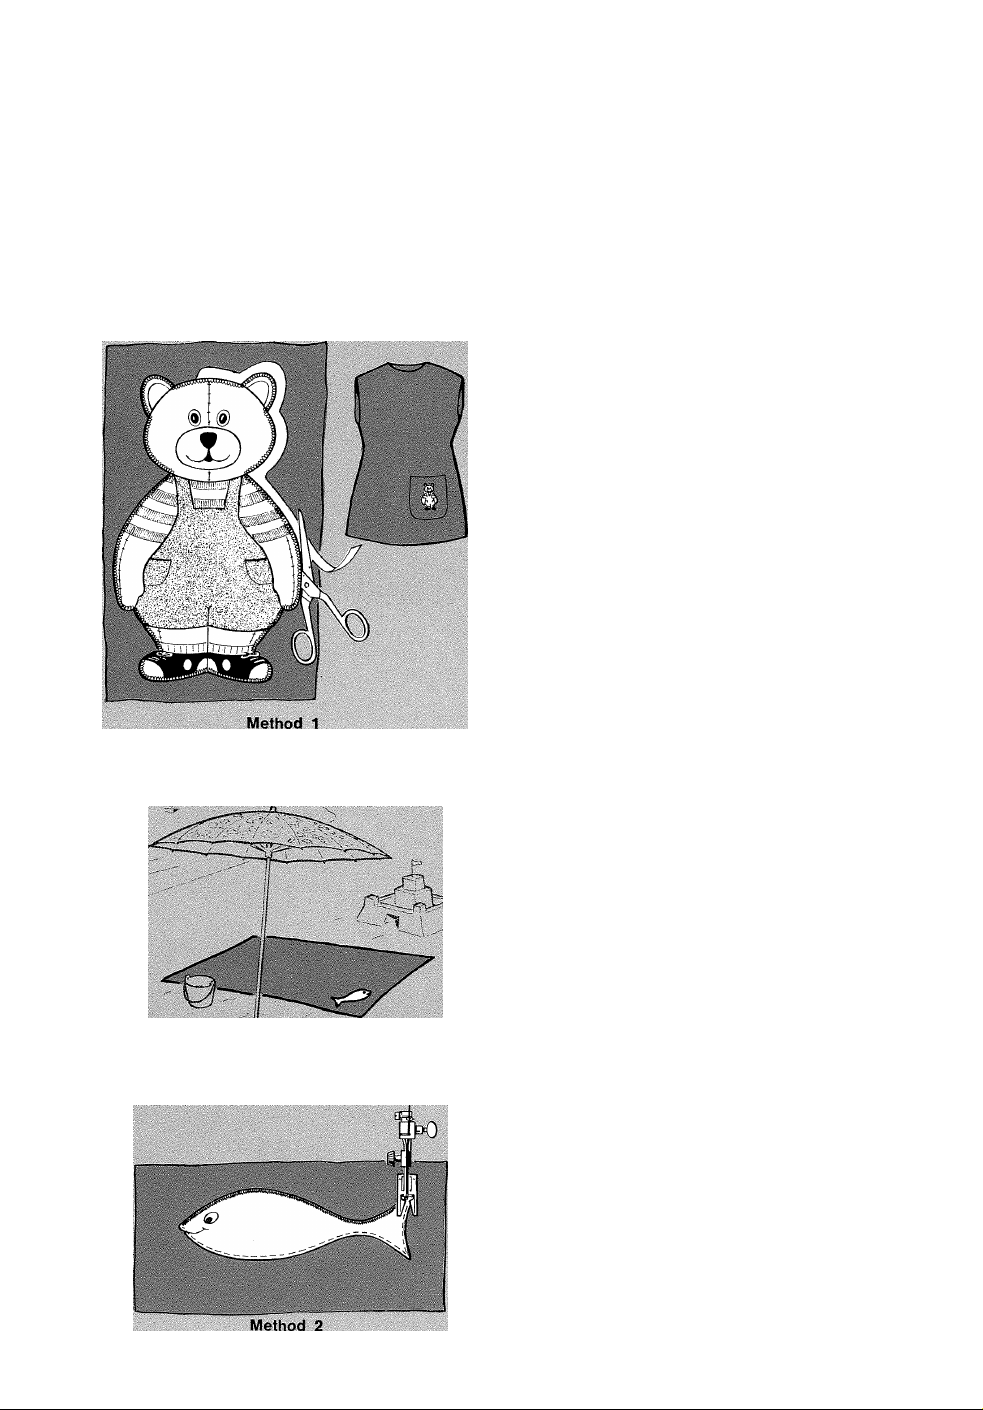
applications
APPLIQUÉ
Appliqué adds beauty and interest to clothing and household linens. You can create your own
design, trace a simple outline from a colouring book, or use a motif cut from a printed fabric.
Fabrics of similar or different textures combine equally well.
A closely spaced plain zig-zag stitch is used for appliqué work. Although,you may vary stitch
width to accommodate fabric weave and texture, never allow the stitch to be too wide.
Make a test sample to help you d.ecide which of the following methods is best for your fabric
and design.
• Pattern Group Selector: 1
• Needle Position:
• Stitch Width: To suit fabric
• Stitch Length: Between 0 and 1
• General Purpose Needle Plate
• Special Purpose Foot
Preparation
• Baste appliqué design to fabric and outline
the design with a short straight stitch.
• Remove basting and press.
Method 1 - Trimming after Stitching
« Set machine as code recommends.
• Outline the entire design with appliqué
stitching.
• Cut away the fabric or the outer edges of
the stitching with embroidery scissors.
Method 2 - Stitching after Trimming
• Trim outside fabric edges close to straight
stitch outline of design.
• Set machine as code recommends.
• Overedge the design with appliqué stitching.
This step will produce a smooth, lustrous
finish that requires no additional trimming.
22
Page 25
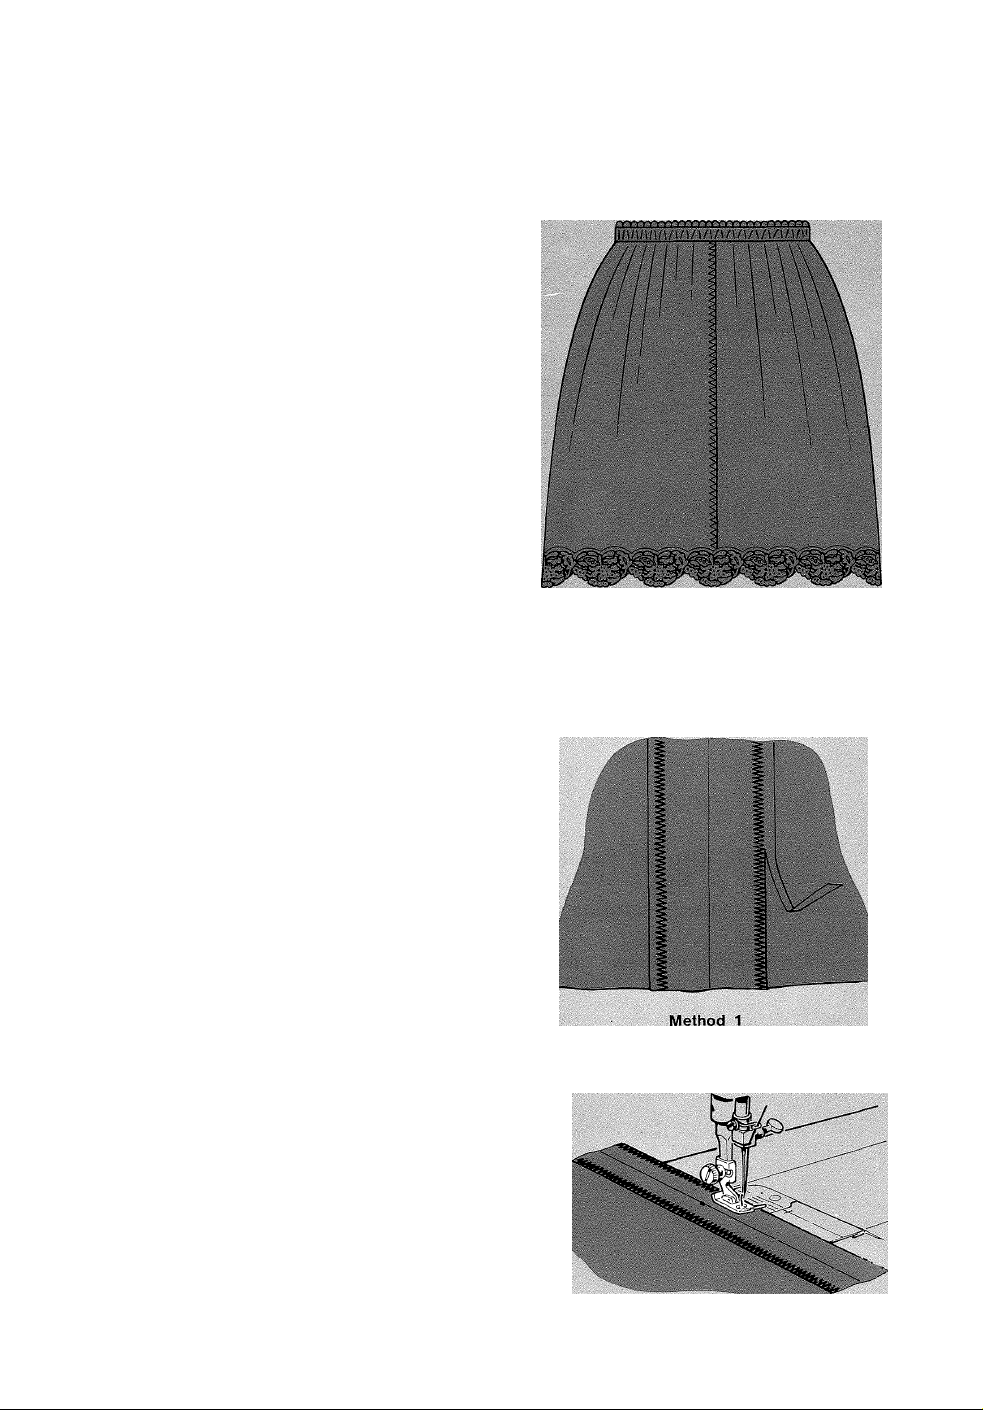
LINGERIE SEAMS
To make a lingerie seam durable and flexible use the plain zig-zag stitch at a narrow width
setting. This seam treatment is particularly suitable for bias seams. When seaming nylon tricot
insert a 2045 needle in the machine before you begin to sew.
• Straight stitch the seam line on wrong side
of fabric.
• Press both seam allowances in the same
direction.
• From the right side, topstitch with narrow
zig-zag stitching, letting the needle alter
nately enter the seam line and seam thick
ness.
(Stitch width narrow: stitch length 1 to 1.5).
ZIG-ZAG SEAM FINISHES
Seam edges support the garment and should be given a durable finish if the fabric is likely to
ravel. There are two methods of finishing seams in such fabrics; trimming seam edge or over
edging. Make a test sample to determine which method best suits your fabric.
Pattern Group Selector: 1
Needle Position;
Stitch Width;—
® Stitch Length; 1 to 3 to suit fabric
® General Purpose Needle Plate
® General Purpose Foot
0 t . 2 3 4.
Method 1 - Trimmed Seam Finish
® Adjust stitch width and length to give you
the most «open» stitch that will secure the
fabric edge; avoid harsh overstitching.
® Stitch near the edge of seam allowance, and
trim seam edges evenly after stitching.
Method 2 - Overedged Seam Finish
® Adjust needle thread tension, stitch width,
and stitch length to suit fabric.
® Trim seam edges evenly,
® Place trimmed seam under the foot and over
edge the seam allowance as illustrated.
Method 2
9'H
Page 26
Chapter 5. Machine Stitch Patterns
Setting selectors
5': ;6i
—■‘WNAA/X
0 12 3 4
uri
•
a
a
•
/ $
y y € i
/
L 1 J
Decorative Stitch Patterns
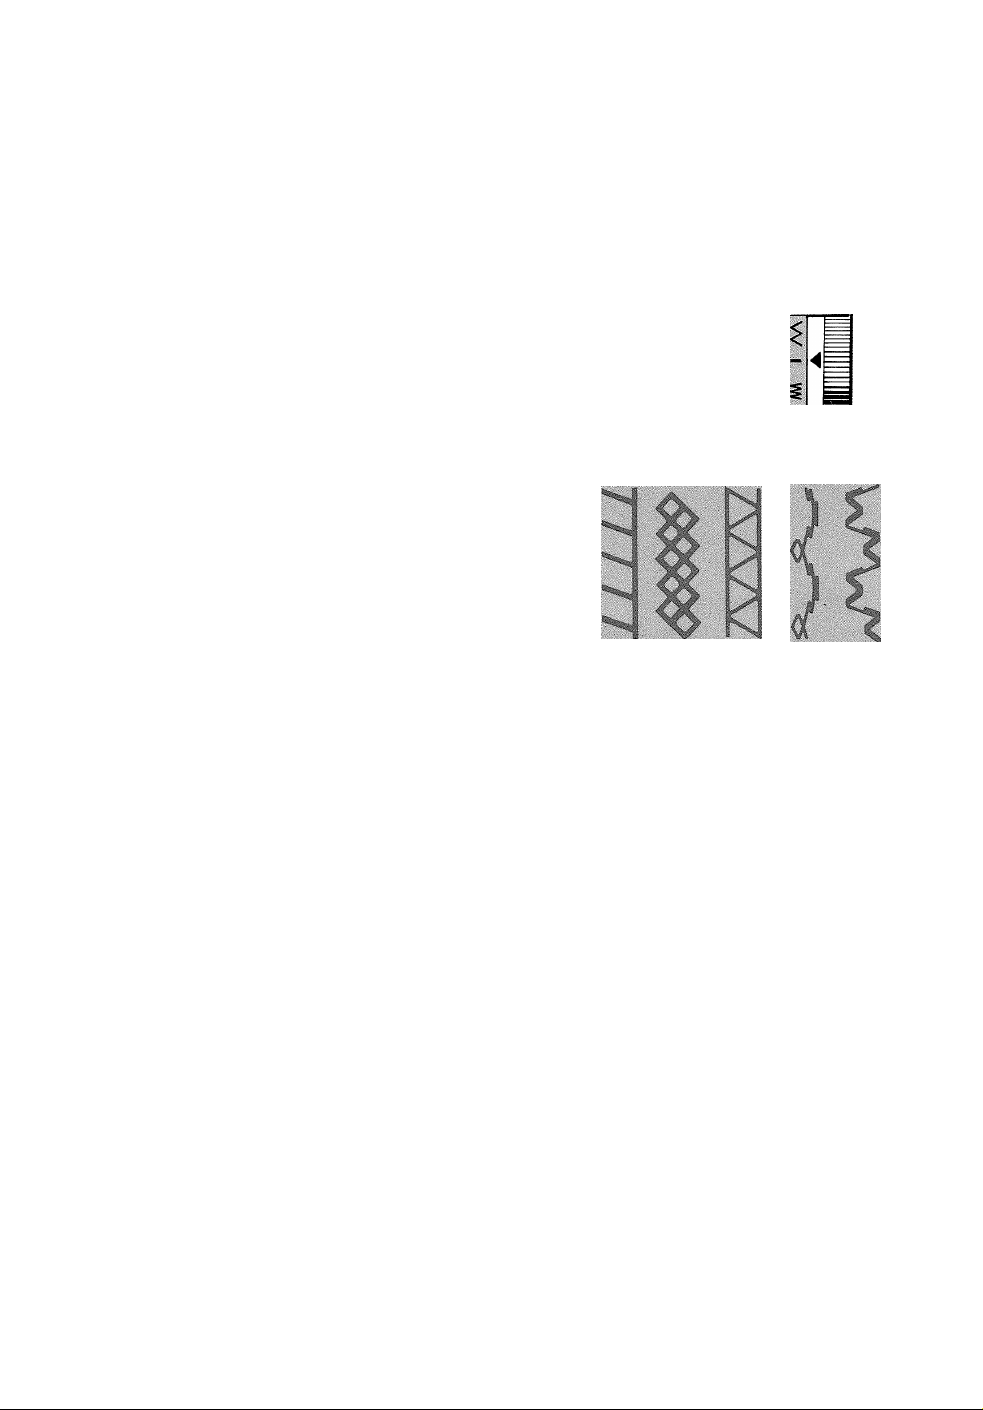
In addition to straight stitch and zig-zag stitch, your machine can produce a variety of stitch
patterns. There are two types of stitch patterns built into your machine:
• decorative stitch patterns, illustrated above, are produced by side-to-side movement of the
needle,
• stretch stitch patterns, illustrated above, are produced by both the side-to-side movement
of the needle and the back-and-forth movement of the feed.
Refer to chart on page 28 for further information on machine setting and applications for the
stitch patterns on your machine.
Stretch Stitch Patterns
24
Page 27
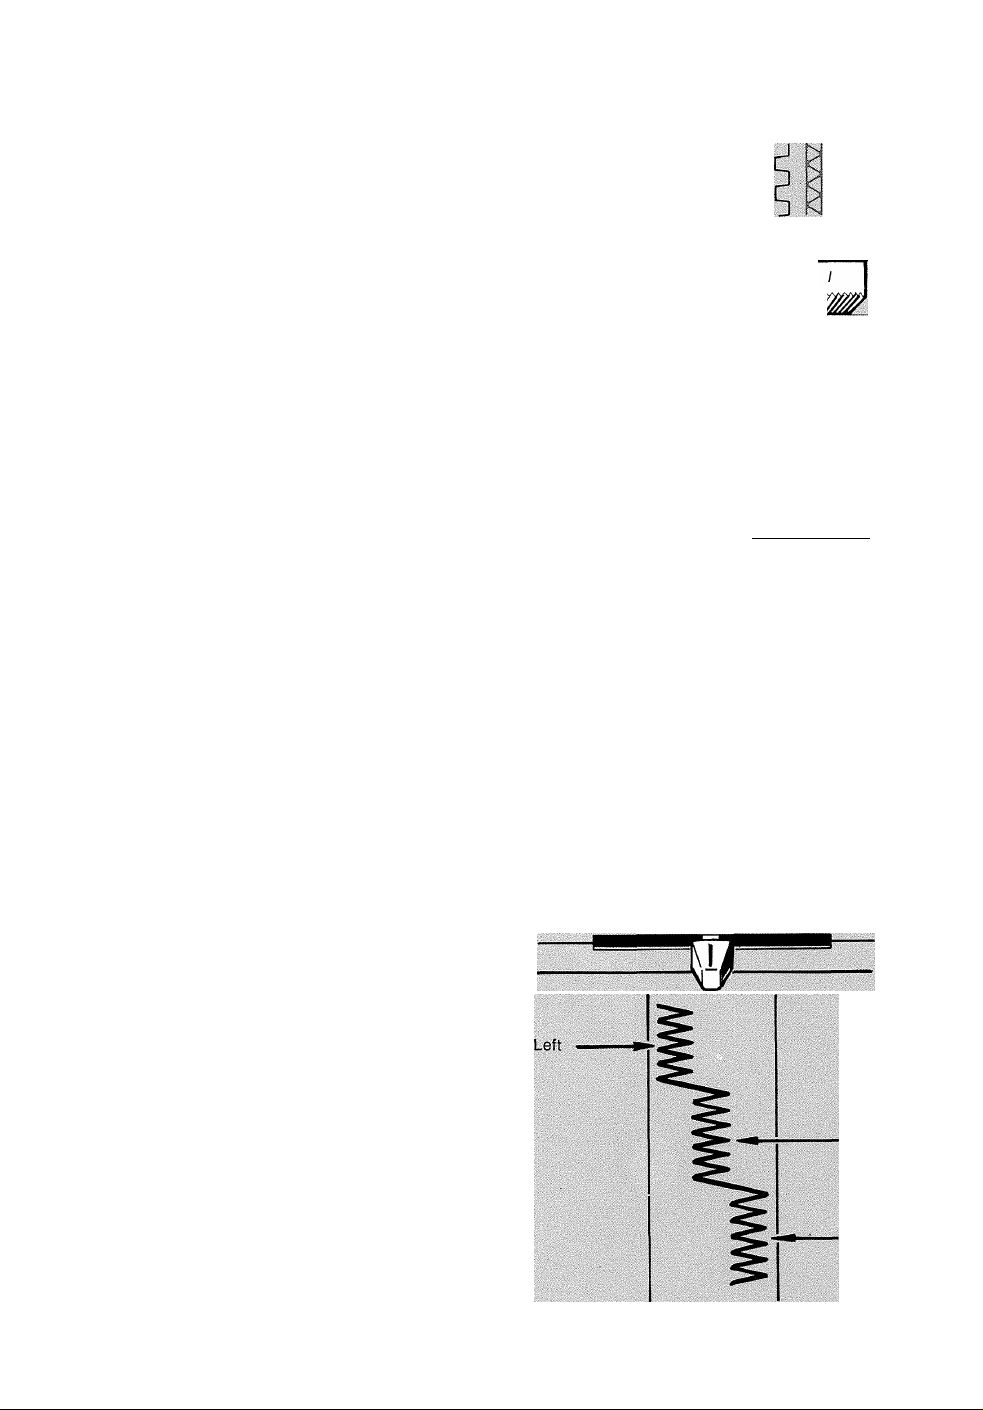
SELECTING A PATTERN GROUP
Before moving pattern group selector, make
sure needle is above fabric.
W'hen you rotate the pattern group selector,
one of six different groups of stitch pattern is
available to you.
Slide stitch width selector to 0 , then rotate
the pattern group selector as required, until
the number of the desired group of two stitches
is positioned under the ■ symbol above the
selector.
m
2
<
• ;
1
m
3
ADJUSTING WIDTH OF THE DESIGN
Before moving stitch width selector, always
raise needle above fabric.
To produce a stitch pattern, the stitch width
selector must be moved from o toward the
right. The further you move the selector lever
toward the right, the wider your stitch will be.
ADJUSTING STITCH PLACEMENT
Before moving needle position selector, make
sure needle is above fabric.
All stitch patterns can be sewn in either left
L. , centre J, , or right _J needle position
Selector setting centre J_ is used most often.
A L. left or J[ right setting is used to
place narrow stitch patterns to the left or right
of the centre in decorative work.
—w\AAA/\
0 1
l*i;
« % % m ^
I I I i ^
•t- '^St
Stitch Width Seiector
f J.
3 4
Centre
Right
25
Page 28
ADJUSTING STITCH LENGTH
When you are preparing to do pattern stitch
ing, make a test sample with the fabric and
thread you plan to use so that you can adjust
the stitch length correctly.
Any stitch length setting from 1 to 4 will give
you an open stitch pattern of whichever de
corative stitch pattern you select. The higher
the number, the more open, or farther apart,
your stitch will be. The area between 0 and 1
of ihe selector is used for the fine adjust
ment of satin stitching (see page 21).
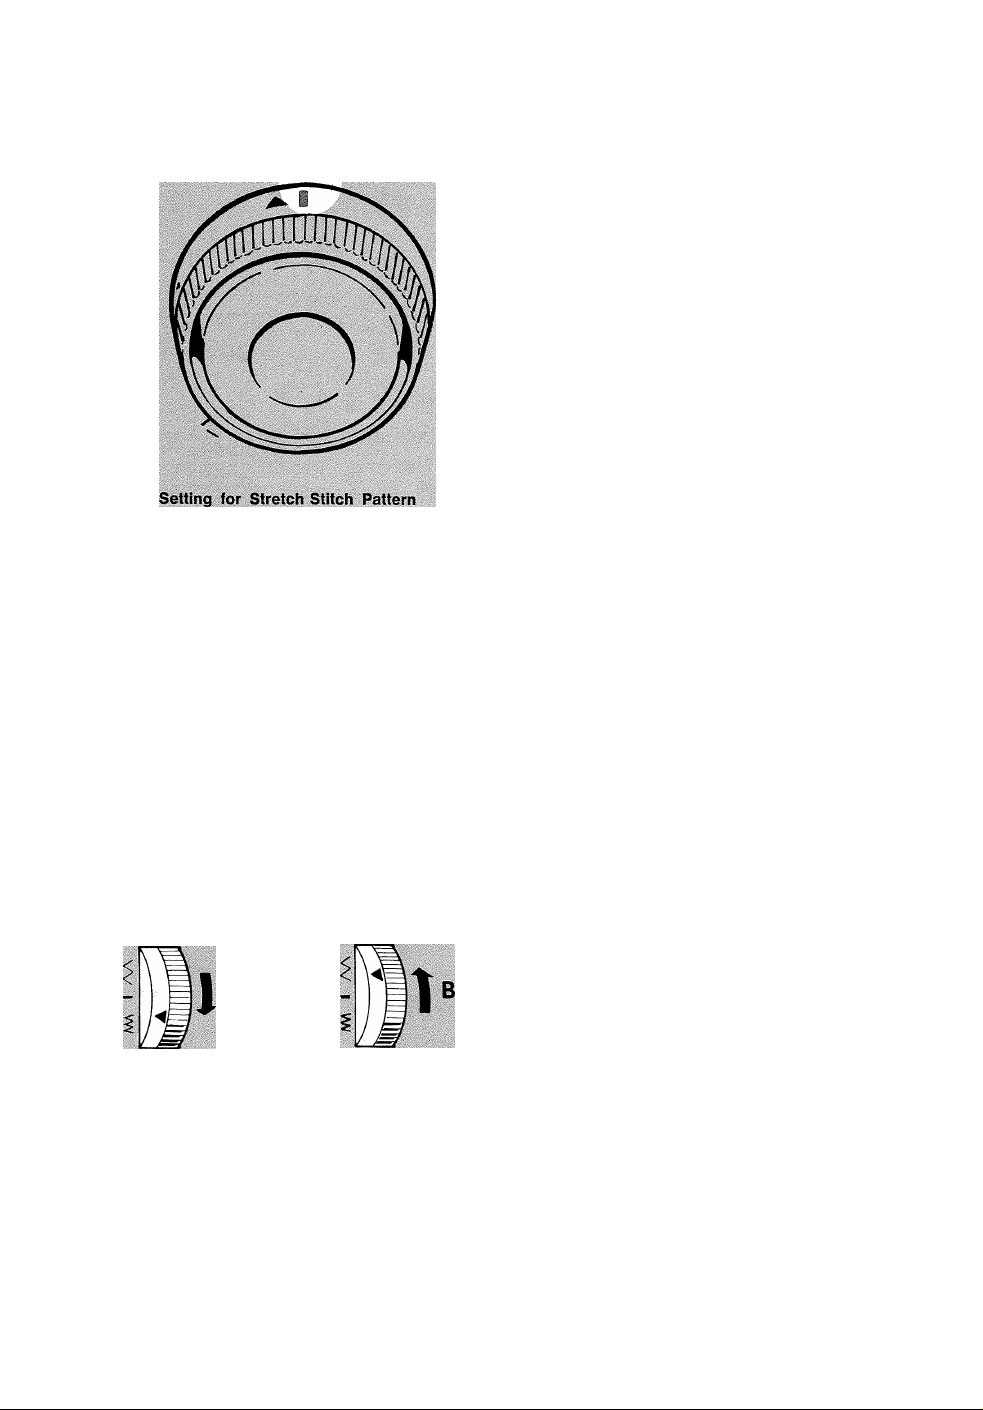
For stretch stitch patterns, stitch length is
controlled with a single setting of the stitch
length selector. Simply rotate it until the co
loured bar is under the
the dial.
T
symbol above
ADJUSTING STITCH BALANCE
incorrect
Correct
26
When you are using stretch stitch patterns,
you may need to adjust the stit’ch balance dial
in order to correct the appearance of the
stitch.
Before you move the dial from its neutral po
sition ( ◄ ! symbol on dial aligned with line
— on panel), make a test sample. If adjust
ment is required stitch slowly and move the
dial as illustrated.
® Turn dial down to bring stitches of the pat
terns together (ill. A).
• Turn dial up to separate stitches of the pat
terns (ill. B).
Always return the dial to its neutral position
after sewing stretch stitch patterns.
•
Page 29
adjusting stitches to suit stretch fabrics
GUIDING AND SUPPORTING FABRIC
Most fabrics of stretch or knit construction
need only to be guided in front of the presser
foot when you use one of the stretch stitches.
Some fabrics — nylon tricot and elasticized
fabrics, for example — do require support
while being stitched.
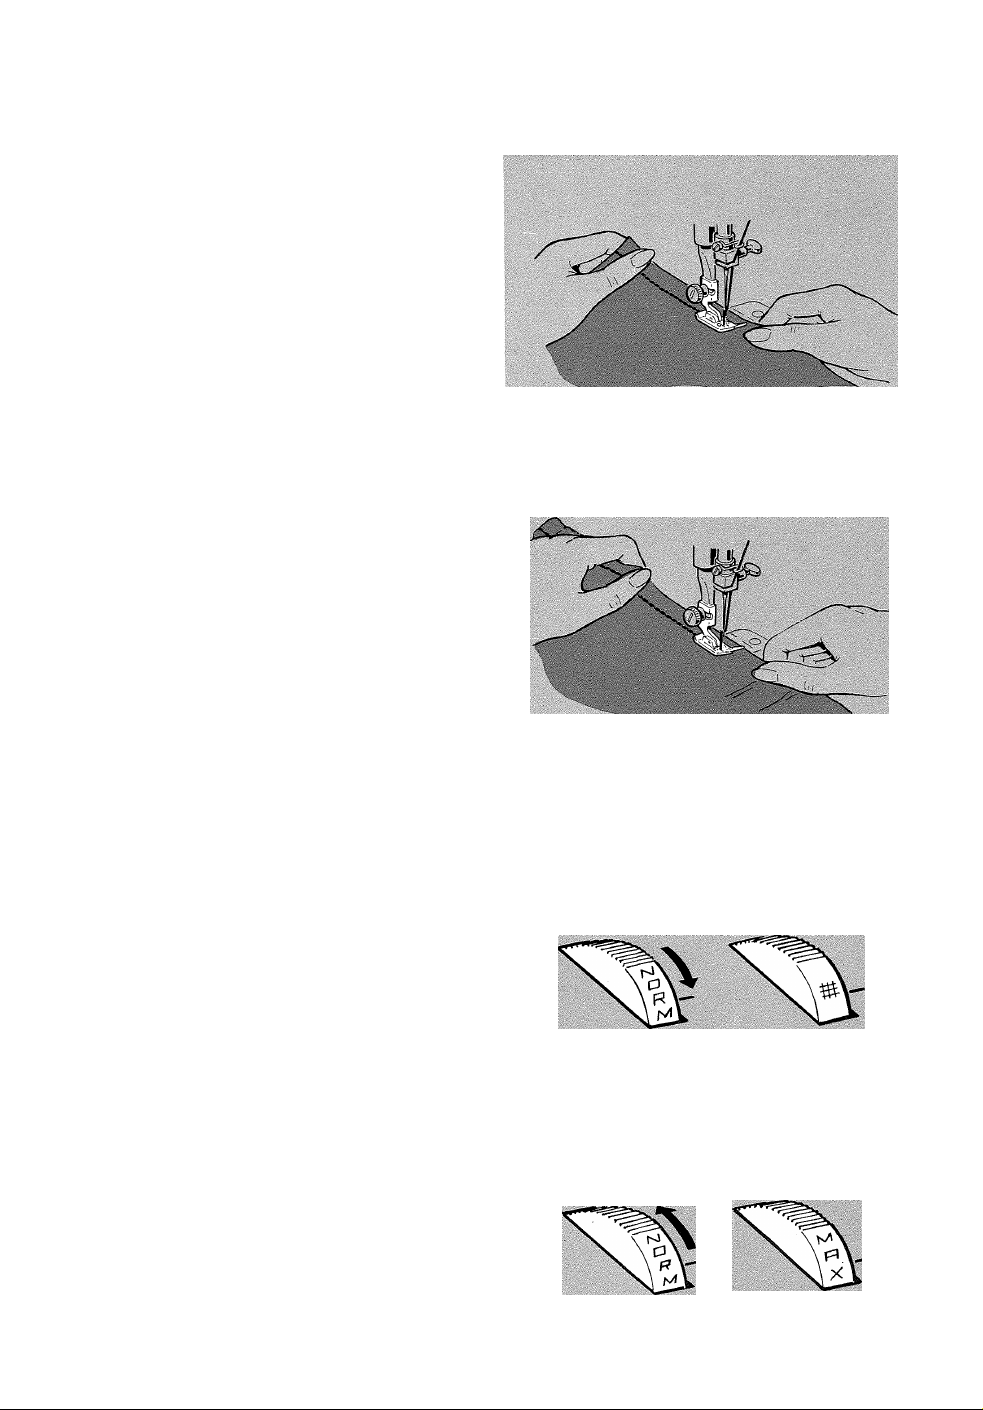
• For nylon tricot and similar synthetic knits,
apply gentle tension by holding the seam in
front and back of the presser foot as you
sew (illustration A).
• For elasticized fabric, stretch lace, and knits
with an unusual amount of elasticity, apply
firm tension in front and back of the presser
foot to stretch the seam as the stitches are
being placed (illustration B).
CAUTION: Do not pull the fabric while you are
stitching as this may deflect the needle, caus
ing it to break.
ADJUSTING PRESSURE WHEN
SEWING KNIT AND STRETCH FABRIC
Some knit and stretch fabrics, because of
their structure, require either more or less
than normal (NORM) presser bar pressure to
feed smoothly and evenly.
® For thick, soft or very stretchy knits, de
crease pressure by turning dial from NORM
toward ^
® For nylon tricot, ciré and similar hard sur
face synthetic knits, increase pressure by
turning dial from NORM toward MAX.
B
27
Page 30

STITCH PATTERN CHART
The table below will help you to select the correct pattern for your fabric and sewing job
Stitch Pattern
Pattern Stitch
Group i Length
wwww
Zig-Zag
“V
-------
Blindstitch
'VVVVVVVVVVVVVVVVV
Multi stitch
Zig-Zag
Rampart
Scallop
kktkkk kkkkkl iàÂài
kkkkr^^kkkkkr^^kkkkkl^
Twfn TtTfn ffTrff
Domino
Straight Stretch
setting (Coloured
Any
.5 - 4
1 - 2.5
.5-1
1 - 2.5
.5 - 1
.5 -1
Bar)
Stitch
Width
--ì''v\AAA/\
° A..Ì.
-.fvwvWA/\;
0 : 1 2 3 4:
--;-«s/vV\A/\;
0 : 1 2 3 4;
—'V'MAA^
0 I : 2 3 4;
---v'AAAA-
0 1 2 3 4:
—'A/vyV\/\:
0 I ^2 3 4 :
0
only
Where to use
Used for general purpose stretch sew
ing, bar tacks, finishing seams, em
broidery and appliqué.
For finishing hems and making ladder
seams.
Lets you mend, join and reinforce with
out bulk. Ideal for bar tacking.
Attractive for borders and smocking.
Makes perfectly formed, evenly spaced
scallops for edgings and tucks.
An interesting pattern for decorative
stitching.
Ideal for plain seams that stretch and
for repairing and reinforcing seams.
For heavy-duty general purpose sewing.
Ric-Rac Stitch-'
(Coloured
Bar)
0 1:2 3 4;
Sweater and swimsuit construction. -
Overcast seams in bulky knits and
stretch terry cloth.
Slant Overedge ^
(Coloured
Bar)
—“«wnÂAA/\:
0 1-2 3 4 :
Useful for mending, overcasting and
Honeycomb
(Coloured
Bar)
-—wvaAA^
0 1:2 3 4:
attaching elastic and stretch lace.
Traditionally used for hemstitching.
—w\ÁAA/\:
0 1^2 3 .4 ;
Turkish Stitch
(Coloured
Bar)
Perfect for ornamental borders.
Tatting'
Tyrol Stitch -
A SLOW speed setting is recommended for sewing Stretch Stitch patterns and a lighter-than-normal pressure dial setting
may be needed for some fabrics. This stitch is designed for strength and permanence and cannot readily be ripped out
without risk of fabric damage.
(Coloured
Bar)
(Coloured
Bar)
---waÂAA/\:
0 1 -2 3 4 :
—«n/'S\AA/\:
0 1:2 3 4;
A decorative stitch that may be used
creatively in joining patchwork.
28
Page 31
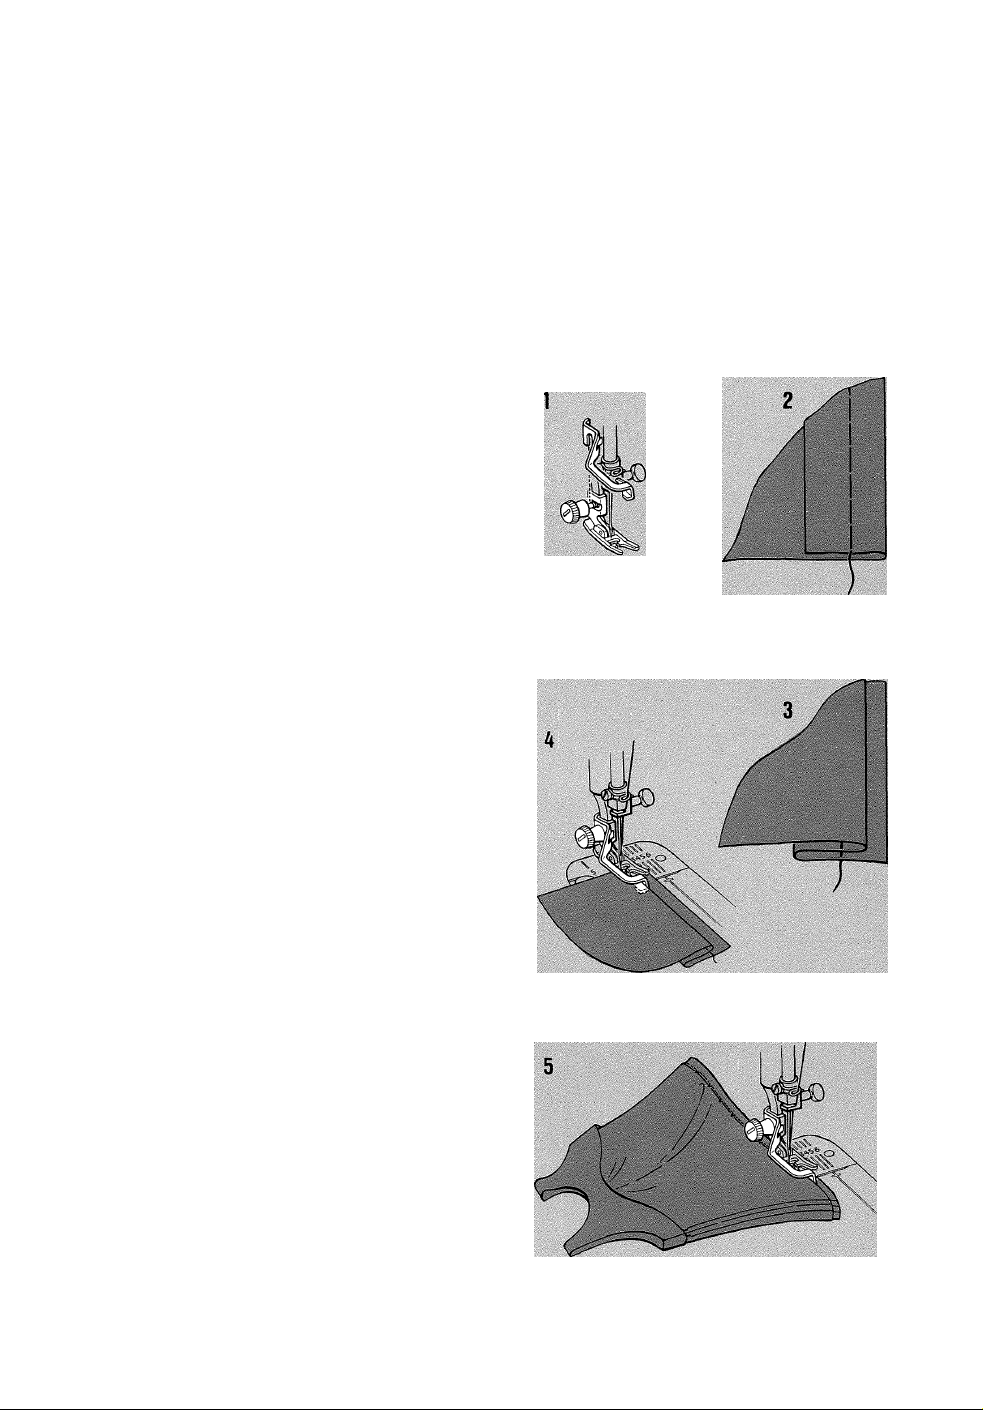
applications
i
^ BLINDSTITCH
I
L The blindstitch has many practical and functional uses. Its most common use
, provides a durable hem finish. However, the creative ways that one might apply
* this stitch are unending.
i
L. A-_A__ A.-.7V.--yV__yV__7V__A.__7V__7V--A.-_7V_-A--7V.-_7V.
Blindstitch Hems
• Pattern Group Selector: 2
• Needle Position:
<;
I
\
<
I
I
■<
Stitch Width: --h-wvVVX
• stitch Length: 1 to 2.5
• General Purpose Needle Plate
• General Purpose Foot
• Blindstitch Hem Guide
1. Raise foot, loosen screw, and slip blindstitch
hem guide from the front between the screw
and the shank of the foot. Make sure the
underside of the guide clears the slide plate
and the front of the foot. Tighten screw with
coin.
2. Prepare hem in the usual way. It is advisable
to baste the hem. Place the basting at least
1.3 cm (V2 inch) below the edge of the hem
allowance to avoid catching the flange of
the guide as you stitch.
3. With the wrong side of the work uppermost,
turn the hem under, creating a soft fold
from the top edge of the hem.
4. Position the hem under the foot with the soft
fold resting against the wall of the guide.
Make sure the flange of the guide is be
tween the soft fold and top of hem, as shown.
0 : 1 2 3 4
5. Lower the foot and stitch so that the straight
stitches fall on the hem allowance and the
zig-zag stitches pierce the soft fold of the
work. Adjust stitch width if necessary. While
stitching, guide the hem edge in a straight
line and feed the soft fold evenly against
the wall of the guide.
29
Page 32
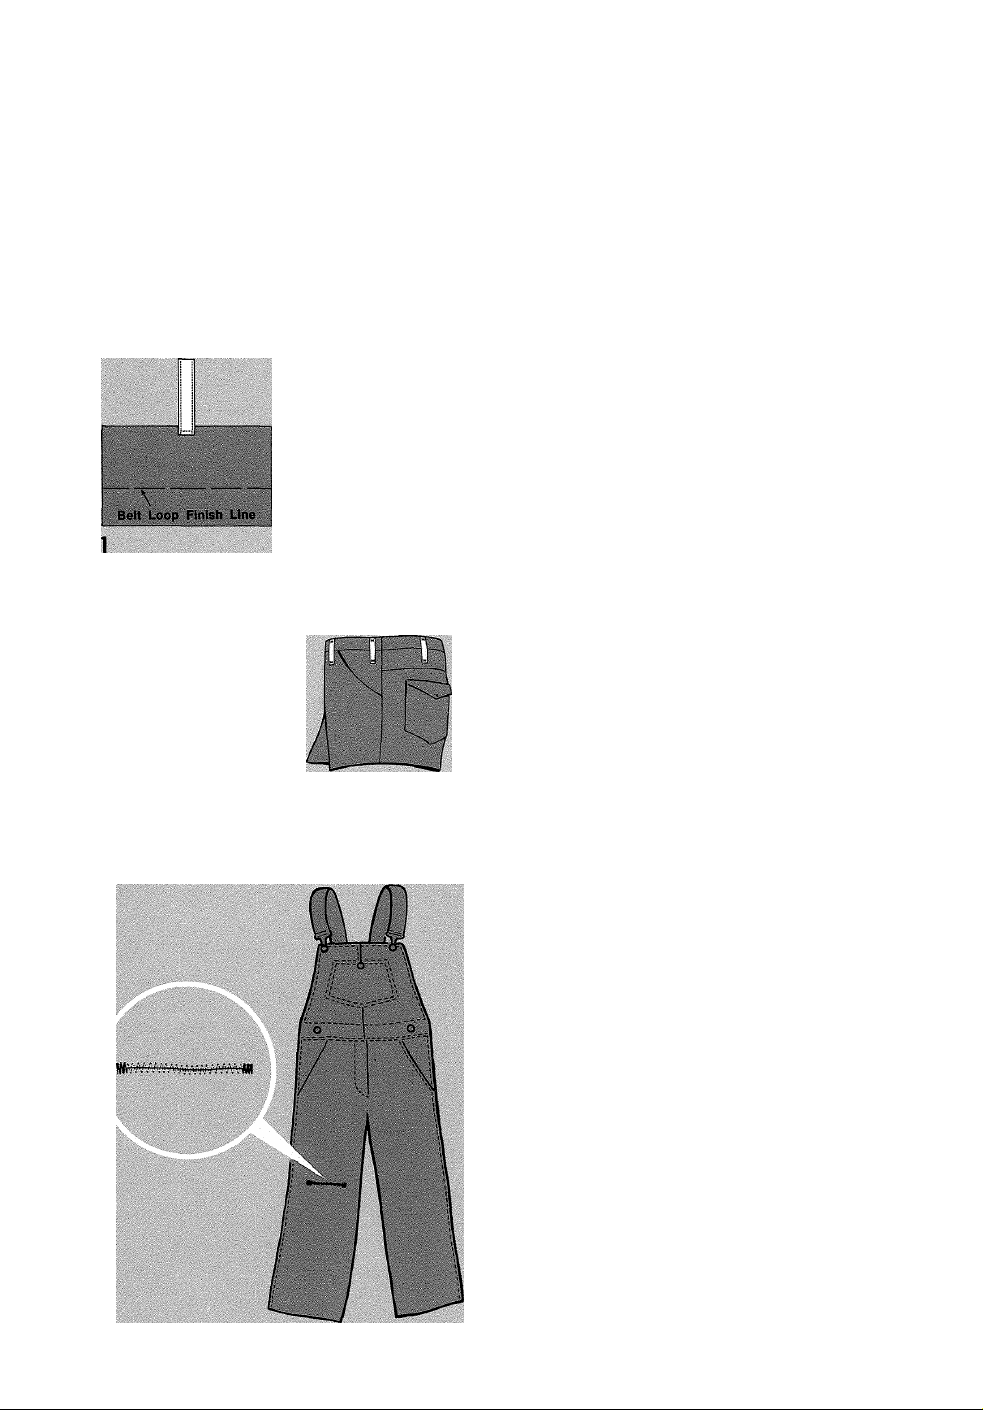
/ MULTI-STITCH ZIG-ZAG
s
s
The multi-stitch zig-zag is an extremely versatile stitch. Use it to mend, join or reinforce without bulk. With this stitch you may attach elastic and stretch lace, construct lingerie and swimsuits and finish seams. There are many other useful
\ applications for the multi-stitch zig-zag.
Bar Tacks
Pattern Group Selector; 3
Belt Loops on
Finished Garment
• Needle Position; L.
J
• Stitch Width; —<Wv\A/\
• Stitch Length; 0
• General Purpose Needle Plate
• General Purpose Foot
Make a test sample, using scraps of your ma
terial, and duplicating all garment thickness.
1. Mark position for the finished end of belt
loop on the fabric.
• Place belt loop, wrong side up, straight
stitch with cut end 3 mm (1/8 inch) from
edge of garment; do not stitch beyond
edges of the belt loop. Trim the end close
to the stitching and press.
2. Fold belt loop back on the stitching line and
press.
• Set your machine according to the code
above.
• Stitch 3 mm (1/8 inch) from the fold using
the multi-stitch zig-zag stitch.
3. Fold over second part and bar tack.
* •
30
Mending a Tear
® Trim ragged edges.
• Place- underlay on the wrong side of tear
for reinforcement. (Do not baste or pin the
underlay, since you will be bringing the
edges together in the next step).
® Stitch on the right side, bringing the edges
of the tear together. Shorten stitch length at
ends and corners to give extra strength.
• Trim underlay.
Page 33
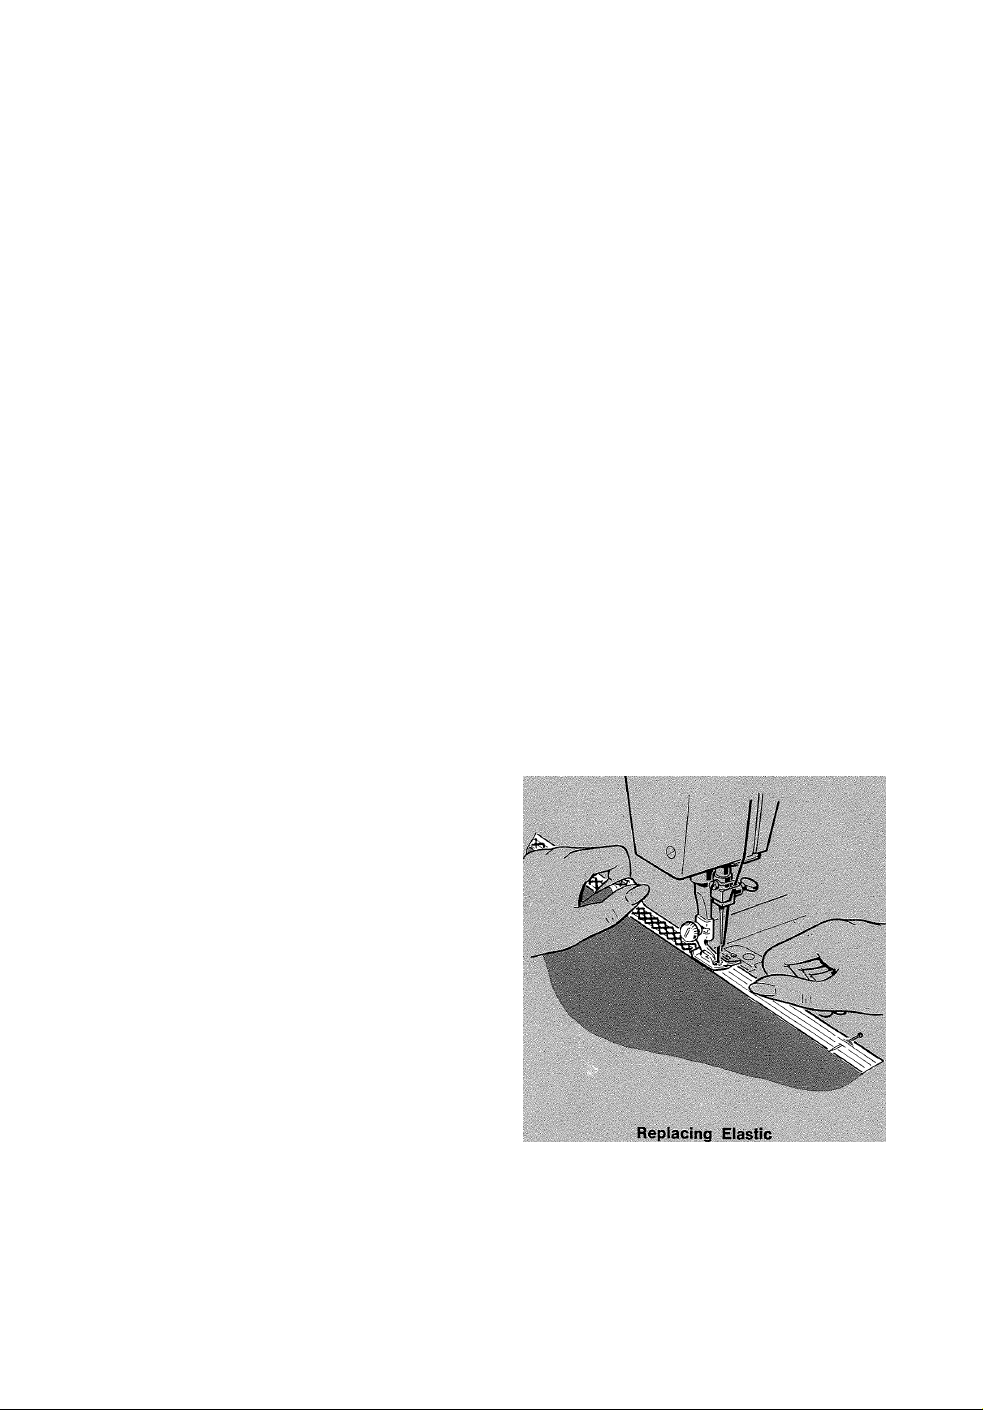
HONEYCOMB STITCH
The honeycomb stitch is ideal for smocking and it is useful for mending, overcast
ing and attaching lingerie elastic, stretch lace and blanket binding. Use this ver
satile stitch to create decorative designs on fabrics that stretch.
Replacing Lingerie Elastic
• Pattern Group Selector: 3
• Needle Position: I.:
• Stitch Width: —«'WAA/\
• Stitch Length:
0 1 '. 2 3 4!
(Coloured Bar)
• Stitch Balance: To suit application or fabric
• General Purpose Needle Plate
• General Purpose Foot
We recommend the needle style 2045 when
sewing on regular elastic.
• Fit elastic for desired snugness at waistline,
allowing 2.5 cm (1 inch) for joining. Lap
ends to form a band and straight stitch
together as shown using a ball point needle.
• Divide elastic band into four equal segments
and mark with pins. Do the same to the
garment. Then pin together at correspond
ing points, pinning elastic over right side of
fabric, top. edges even.
® Sew a few straight stitches to anchor elastic
to fabric.
• Select honeycomb. Plain zig-zag, and multi
stitch zig-zag are also effective for replacing
lingerie elastic.
® Then hold elastic and garment edge taut as
you stitch so that it will remain stretchable
after stitching is completed.
:
___
Joining Eiastic
CAUTION: Do not pull the fabric while you are
stitching as this may deflect the needle, caus
ing it to break.
31
Page 34
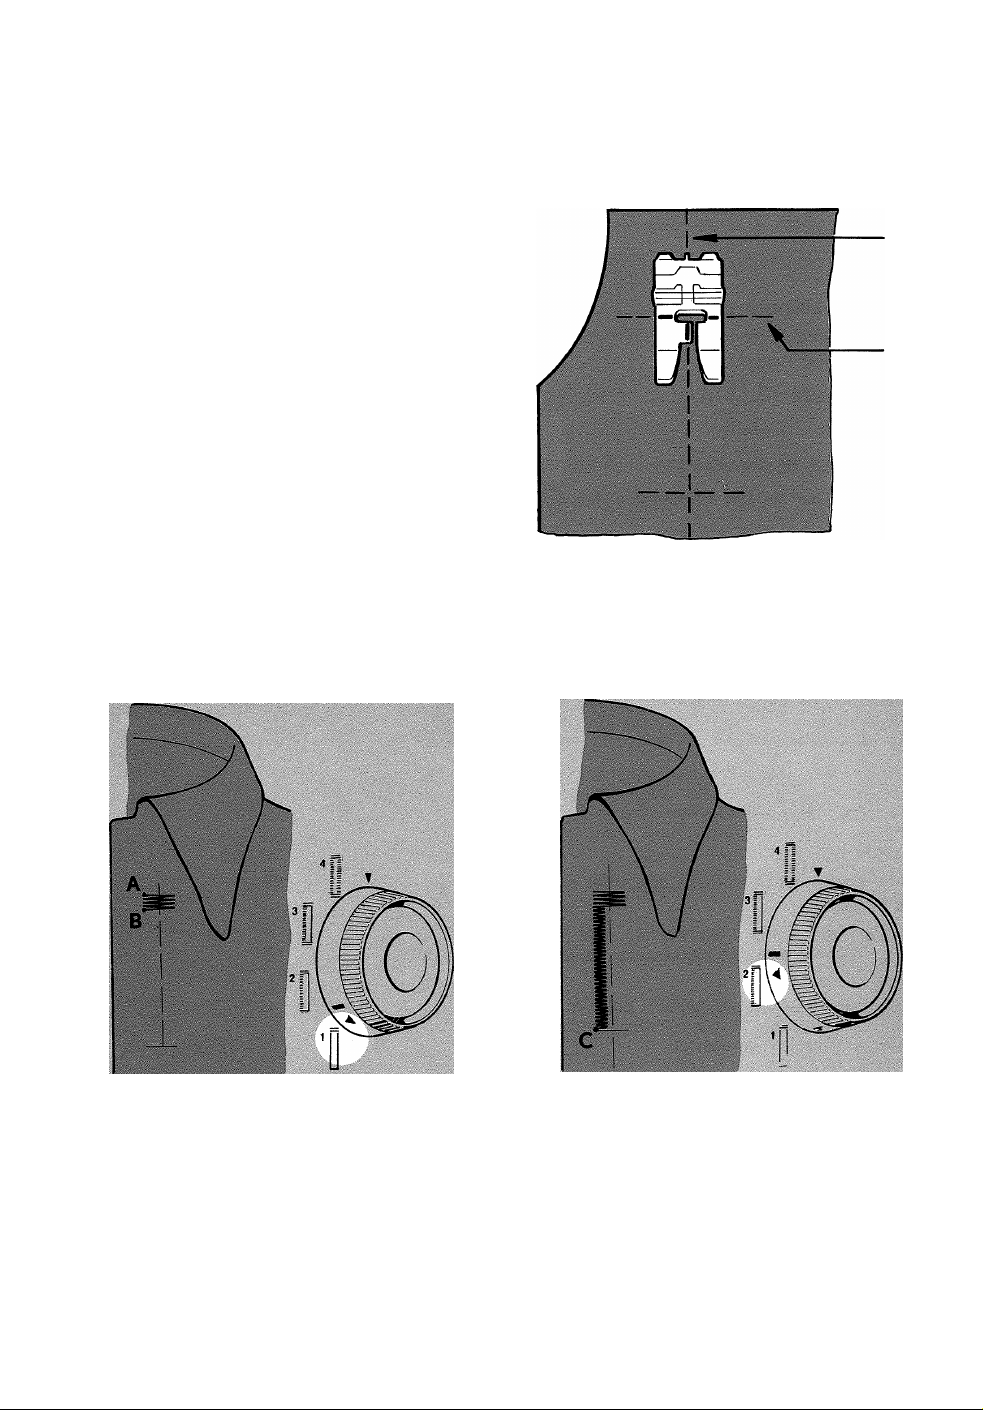
Chapter 6. Buttonhoies and Buttons
buttonholes
• Pattern Group Selector: 1
• Stitch Balance Dial: Neutral position
• Buttonhole Foot
Always make a test buttonhole on a sample in
your fabric. Be sure to duplicate thickness of
garment and include interfacing.
If the two lines of stitching in your sample are
of unequal density refer to the next page.
Place work under buttonhole foot, align centre
marking of buttonhole A with red line on foot,
and align end marking of buttonhole B with
horizontal line on foot. Do not lower the needle.
FOUR-STEP BUTTONHOLING
B
Step 1: Bar Tack
Turn buttonhole dial clockwise to step
1. Position needle in fabric at point A.
Lower the foot and stitch the first bar
tack taking at least four stitches end
ing at point B.
32
Step 2: Side Stitching
Raise needle above fabric by turning
hand wheel toward you.
Turn buttonhole dial clockwise to step
2. Stitch to the end of buttonhole at
point C.
Page 35
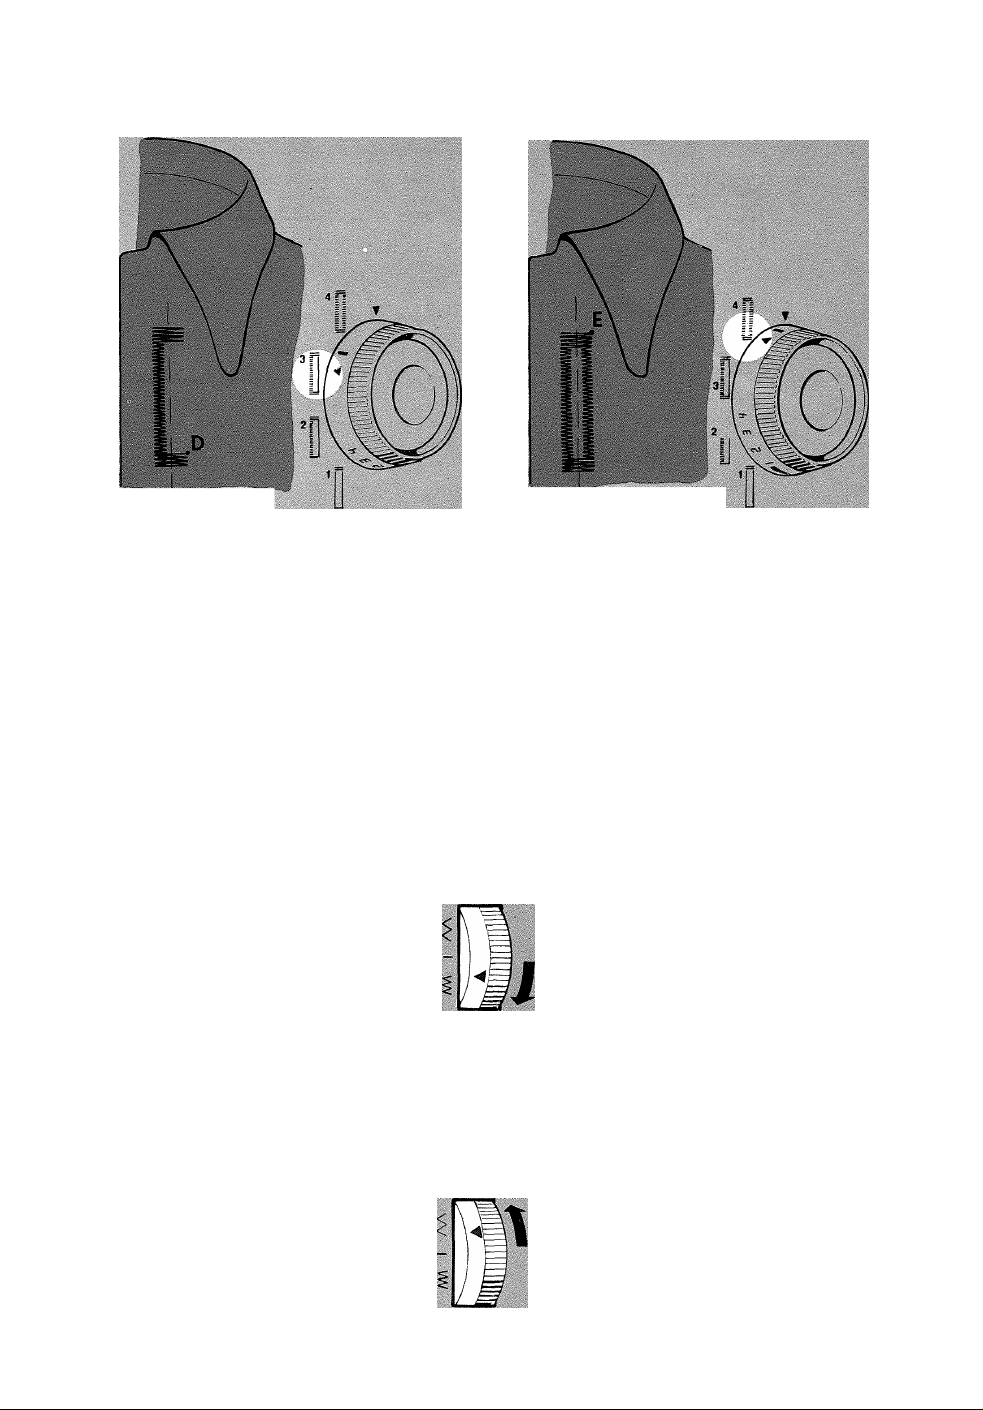
FOUR-STEP BUTTONHOLING (Cont’d.)
Step 3: Bar Tack
Raise the needle above the fabric.
Turn buttonhole dial clockwise to step
3. Take at least four stitches ending
at point D.
Step 4: Side Stitching
Raise the needle above the fabric.
Turn buttonhole dial clockwise to step
4. Stitch until the side stitching meets
the bar tack at point E.
CHANGING STITCH DENSITY
Stitch density on left and right sides of the buttonhole may be balanced by using the
stitch balance dial. Use the stitch balance dial to obtain similar stitch appearance on
either side of the buttonhole.
To change the density on either side of the buttonhole follow the procedure below.
Return the balance dial to its neutral position after buttonhole sewing is completed.
RESULT
Stitches on the
left side are
too far apart
THEN DO THIS
Similar stitch
appearance on
either side of
the buttonhole
Stitches on the
righ t side are
too far apart
THEN DO THIS
RESULT
Similar stitch
appearance on
either side of
the buttonhole
33
Page 36
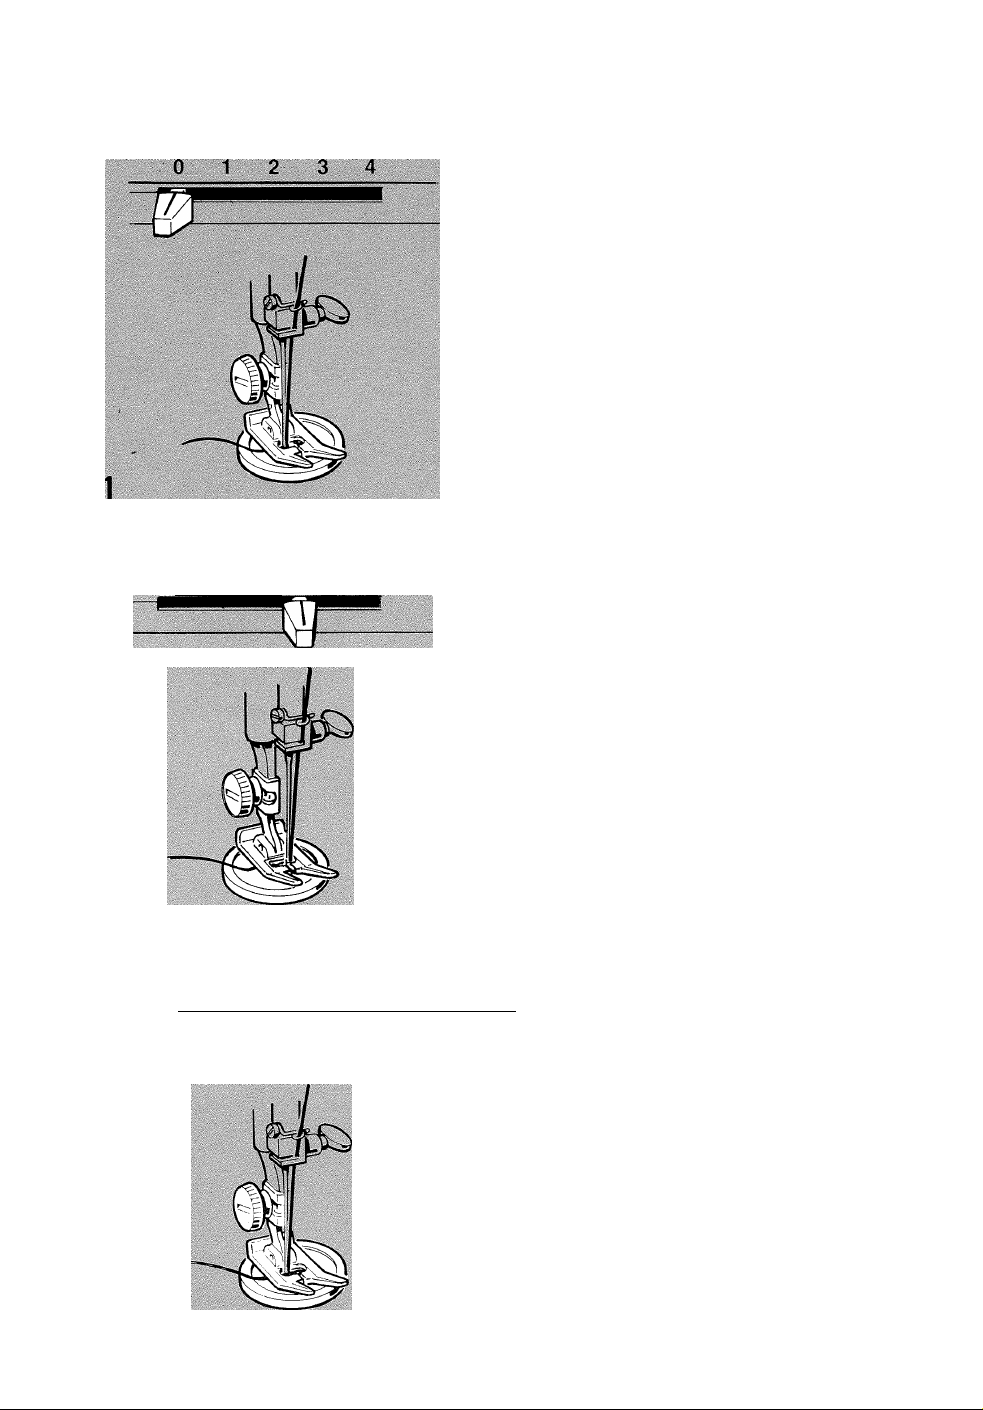
buttons
• Pattern Group Selector; 1
——xaaAA/\/\
0 1 2__3__i.
0 12 3 4
EX
• Needle Position:
• Stitch Width: To suit button
• Stitch Length: 0
• Snap-in Feed Cover
• General Purpose Foot
UIJ
ATTACHING A BUTTON
Flat buttons can be sewn on by nnachine using
the zig-zag stitch.
• Attach snap-in feed cover to general pur
pose needle plate.
1. Set stitch width selector at 0.
• Set needle position at leftL..
• Place button positioned on fabric under
foot and lower needle into centre of left
hole.
• Lower presser foot.
• Turn hand wheel toward you until the ne
edle rises out of button hole and is just
above the presser foot.
2. Set stitch width selector to a medium width
zig-zag setting.
• Continue turning hand wheel until the
needle is above right hole, adjust stitch
width, as necessary, until neecfle enters
the centre of the right hole.
• Take six or more zig-zag stitches and
finish with the needle on the left.
3. Move stitch width selector to o and take a
few stitches to fasten threads.
• Pull thread ends through to back of gar
ment knot close to fabric and snip off
loose ends of thread.
34
Page 37
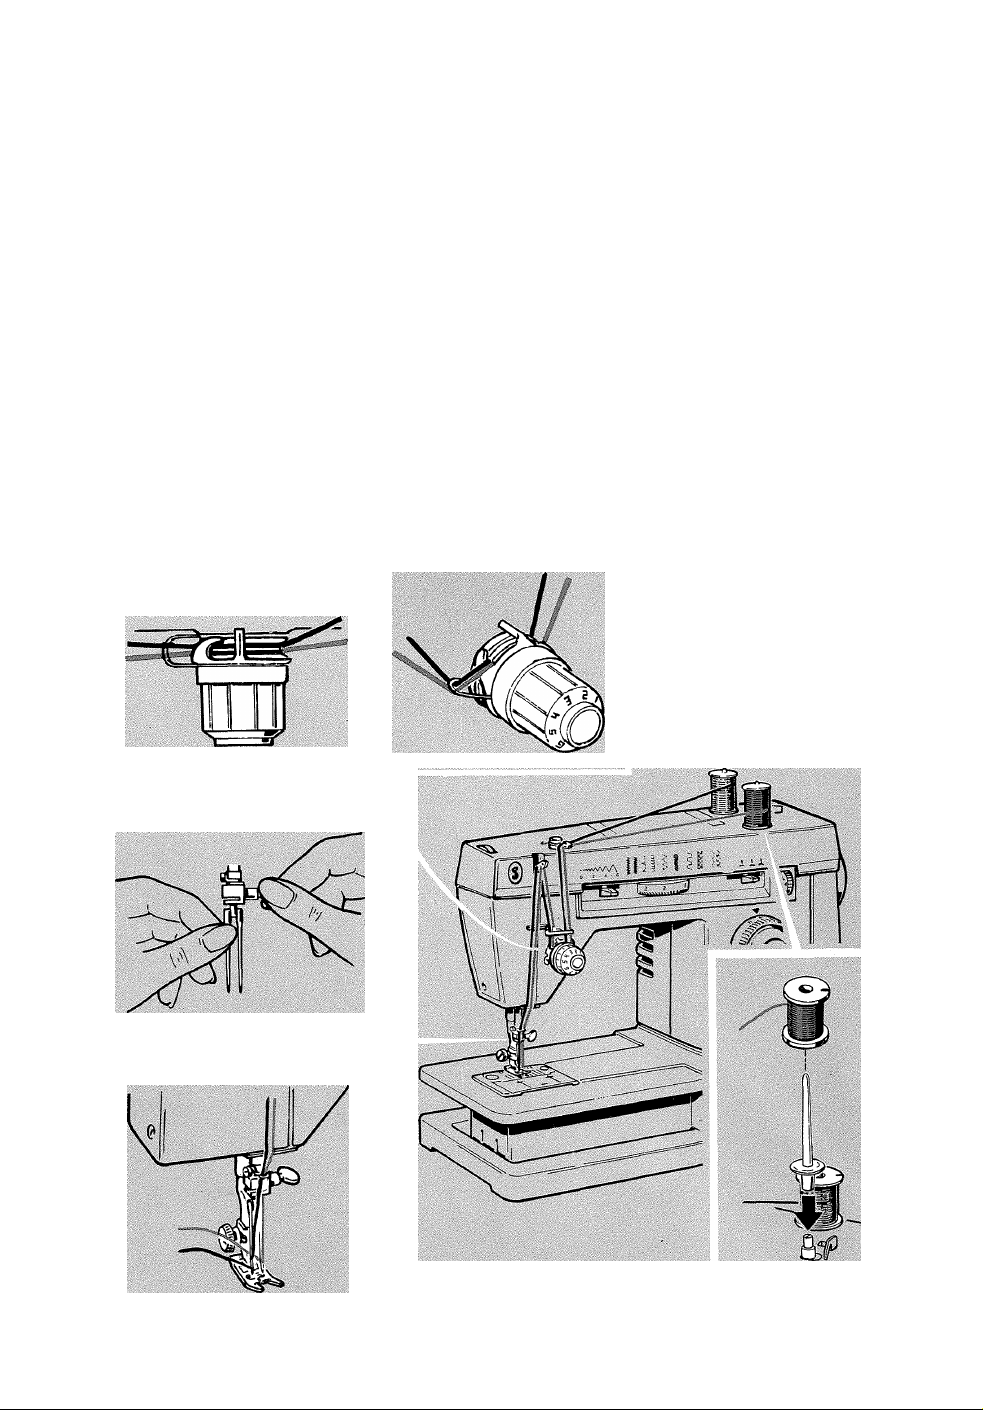
Chapter 7. Twin - Needle Stitching
The twin-needle simultaneously produces two
parallel, closely spaced lines of pattern stitch
ing. You can stitch with either one or two col
ours of thread.
Pattern Group Selector: Stitch desired
-I only• Needle Position: 1—
• Stitch Width: —'*Y'»/yV\ only-^^
• Stitch Length: .5-4 to suit fabric
0 1 ; 2 ; 3 A
• General Purpose Needle Plate
• General Purpose Foot or Special Purpose Foot
Procedure
• Insert twin-needle.
• Thread as for single-needle stitching, and
through right eye of needle.
• Attach detachable spool pin, with felt, in hole
on top cover.
• Place spool of thread on detachable spool
pin and thread machine in usual way.
• Thread through remaining points, making cer
tain to omit the thread guide above the needle
and pass thread through left eye of needle.
CAUTION: Do not use a stitch width greater than what is recommended. A wider stitch will result in needle breakage.
35
Page 38
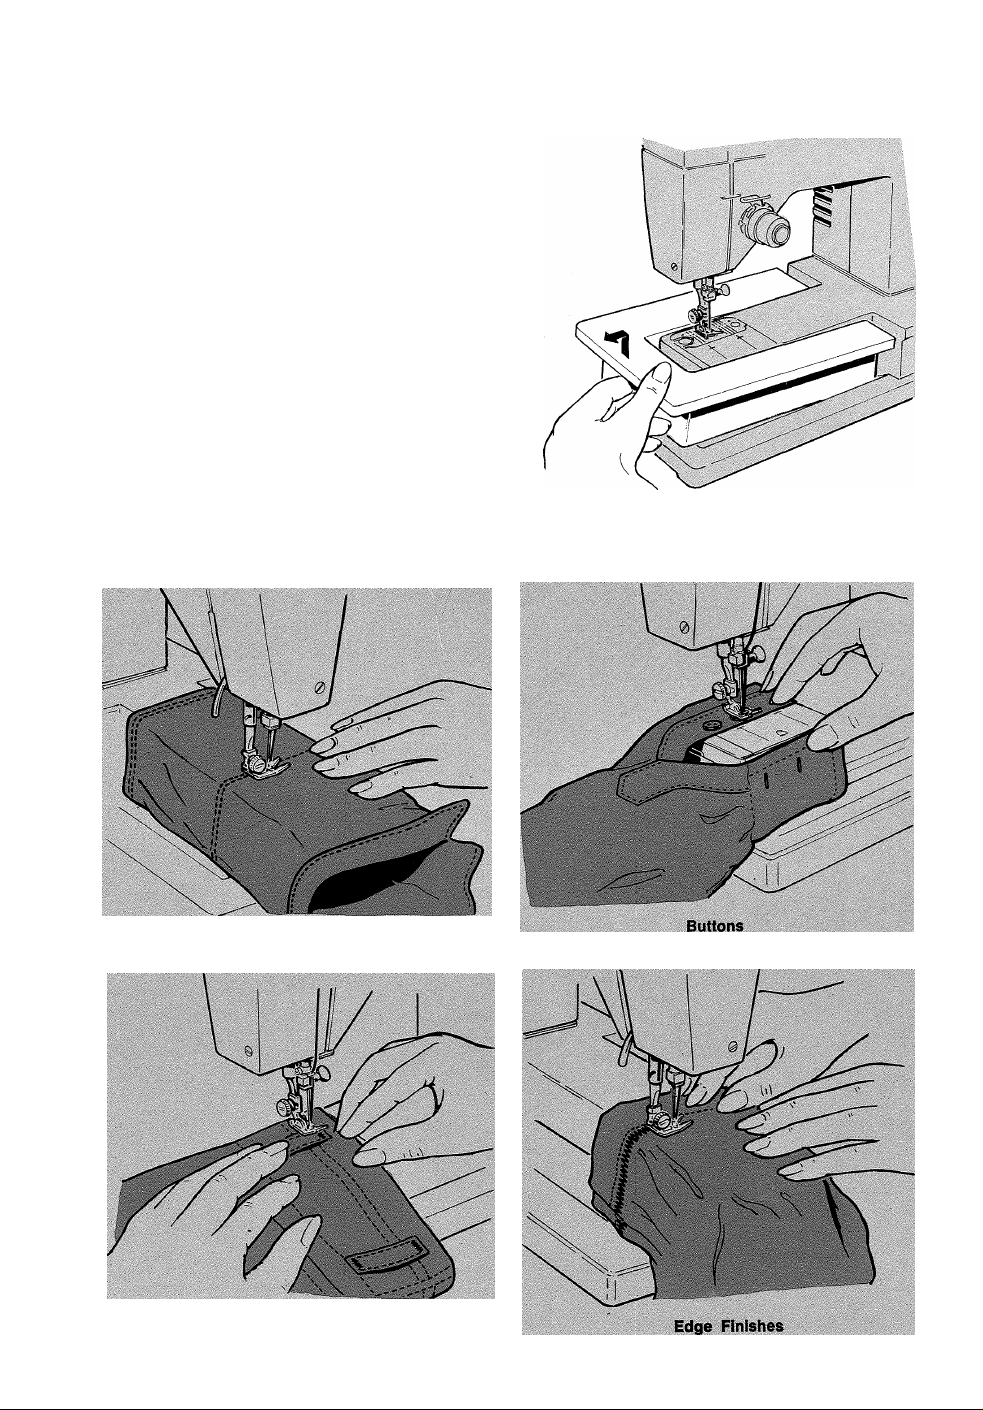
Chapter 0. Free-Arm Sewing
Fabric handling, when sewing tubular and
hard to reach garment areas, is simplified
when you convert your sewing machine to
free-arm sewing.
• To convert machine to free-arm sewing,
simply lift the extension bed up and off
the machine as illustrated.
• To convert machine back for flat bed sew
ing, simply slide extension bed onto the
base of the machine and snap into place.
applications
A few of the sewing jobs for which you will find the free-arm particularly useful are shown
below.
36
Sleeves
Bar Tacks
Page 39

Chapter 9. Performance Checklist
Whenever sewing difficulty is encountered, review the sections of the instruction book that
explain the operation you are performing to make sure you are using the machine correctly. If
the problem still exists, the following checklist may help you to correct it.
If you still have difficulties, call your nearest authorized Dealer.
What To Do If;
Needle Breaks Refer to Page:
Make sure...
• Needle is fully inserted into needle clamp...............................................................................................................4
• Needle is not being pulled to one side as fabric is removed from the machine.........................................17
• Presser foot or accessory is securely fastened to prasser bar................................................................................... 4
• Fabric is not being pulled while sewing causing needle to hit needle plate
Thread Breaks
Make sure...
• Machine is properly threaded................................................................................................................................13
• Needle is straight and sharp..................................................................................................................................10
• Needle thread tension is not too tight
• Thread is unwinding freely from spool...................................................................................................................11
• Bobbin case area is free of lint and loose thread ends..............................................................._
Machine is Noisy or Sluggish
........
.............................................................................................. 16,20,21
Make sure...
• Bobbin case and feed area are free of lint and loose thread ends
.......................
................................................
.........................
.................................................
27
38
38
Fabric Does Not Move Properly
Make sure...
• Presser foot or accessory is correctly attached to machine........................................................-
• Stitch length dial is correctly set
• Lint has not accumulated around feed.................................................................................................................38
Skipped Stitches
..........
.................................................'........................................
..............................
....
.16,20,26
Make sure...
• Needle is straight and sharp................................................................................................................................ 10
• Needle is correct style for machine and size for thread.........................................................................................8,9
• Machine is correctly threaded............................................................................................................................13
• Needle is securely fastened to needle bar................................................................................................................4
Fabric Puckers
Make sure...
• Needle thread tension is not too tight........................................................................................................16,20,21
Needle thread breaks .vhile winding bobbin
Make sure...
• Machine is correctly threaded............................................................................................................................ 13
• Thread is unwinding freely from spool
Thread does not wind onto bobbin
........
.......................................................................................................11
Make sure...
• Bobbin winder spindle is pushed to right..............................................................................................................11
4
37
Page 40
Chapter 10. Caring For Your Machine
CLEANING YOUR MACHINE
CAUTION: Before cleaning your machine, dis
connect power line plug from vour socket
outlet.
With a soft cloth or lint brush, clean all points
indicated by arrows, especially the bobbin
case area and feed. Also, cleaii exposed parts.
If necessary a mild solution of soap and water
may be used to remove stubborn stains. No
other cleaning liquid or powder should be
used.
Periodically apply a drop of oil only to the
areas indicated after cleaning.
CAUTION: Do not attempt to adjust the motor
belt Drive. Refer to your nearest Singer S ervice
Centre should any adjustments be required.
REMOVING BOBBIN CASE
В
Raise needle, open slide plate, remove
needle plate and lift out bobbin.
Turn bobbin case holder A to back as far
as it will go.
Lift out bobbin case B.
38
REPLACING BOBBIN CASE
Insert bobbin case with a back and forth
motion, so that front of the case is under
the position plate C. Turn holder all the
way forward to lock bobbin case.
Replace needle plate and close slide plate
Page 41
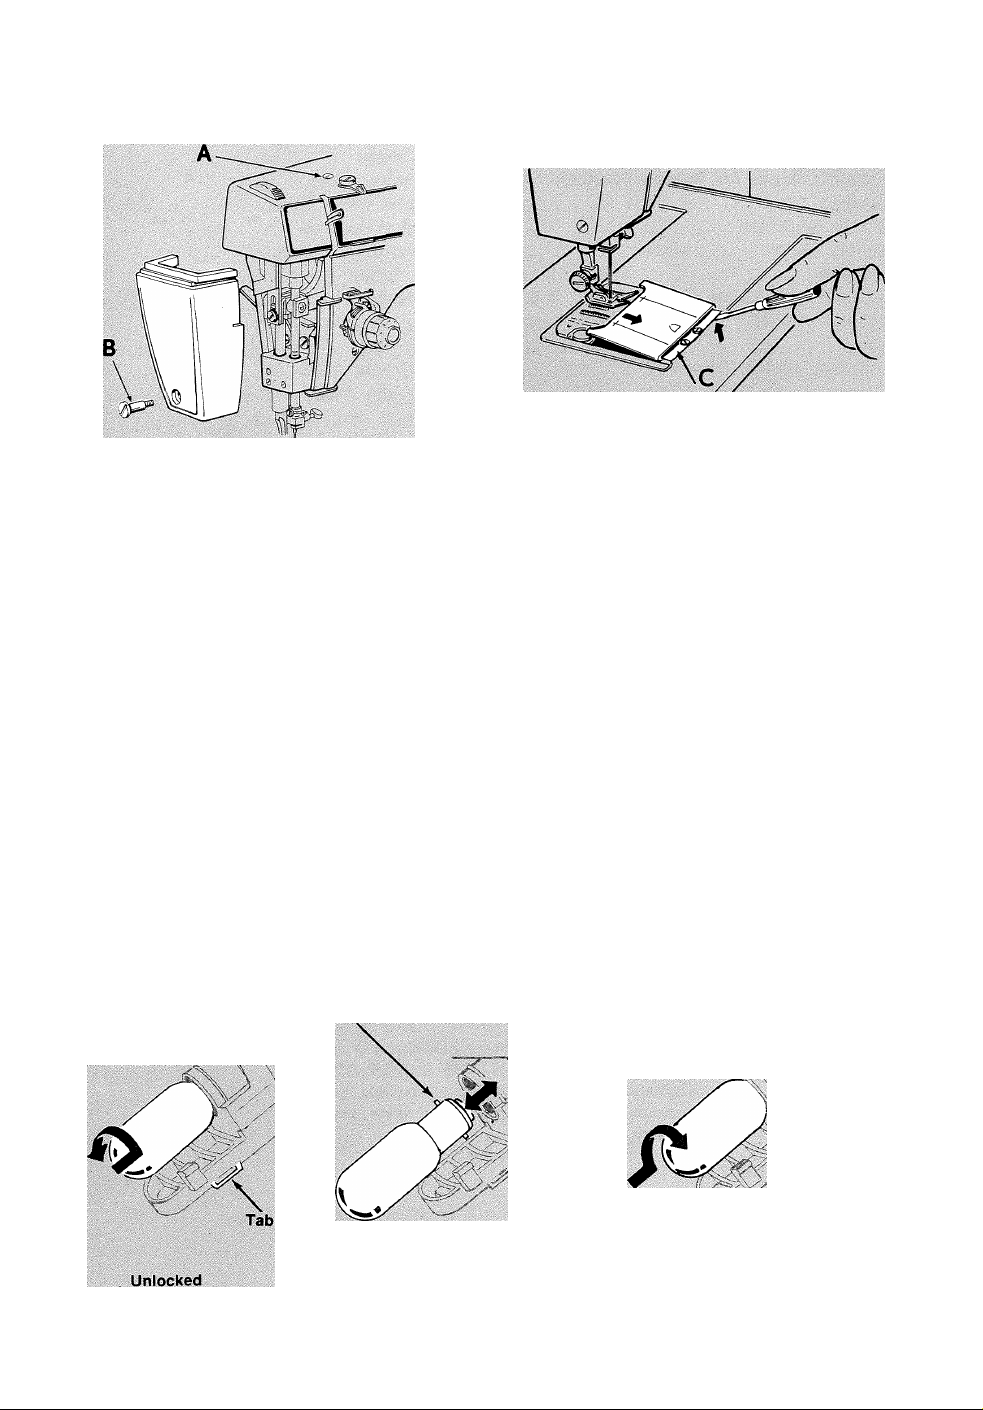
REMOVING FACE PLATE
REPLACING SLIDE PLATE
Loosen screw A (do not remove}.
Loosen face plate screw B then remove
face plate by drawing it toward you. Re
place face plate by sliding top edge of
plate under edge of arm top cover. Tighten
screws B and A.
CHANGING THE LIGHT BULB
CAUTION: Before changing light bulb make
sure you have disconnected power line plug
from socket outlet.
Removing Bulb
• With thumb of right hand push in and down
on tab of light lens and lower the light
bracket.
• Do not attempt to unscrew the bulb.
• Press it up into the socket and at the same
time turn bulb over in direction shown to
unlock the bulb pin and guide out of socket.
Bulb Pin
Place slide plate in slide way with the front
edge close to, but not covering, the retain
ing spring C. With a small screwdriver, lift
each end of the spring into each of the side
grooves on the under side of the slide plate.
Draw the slide plate gently toward you to
fully engage the spring. Close slide plate.
CAUTION: This machine is designed to use
a 15 watt maximum bayonet base bulb only.
Replacing Bulb
• Press new bulb into socket, with bulb pins
entering slots of socket.
• Turn it over in direction shown to lock bulb
in position.
• Push entire assembly up until it snaps in
position.
Locked
39
Page 42

Index
Accessories ...............................................3
Adjusting Stitches for Stretch Fabrics . . 27
Appliqué .................................................22
Attaching a Button.....................................34
Attaching Elastic
Bar Tacks
.......................................
................................................
31
20
Blindstitch Hem Guide...........................3,5,29
Blindstitch Hems
.......................................
29
Bobbin.........................................3,11,12,14
Raising Bobbin Thread
...........................
14
Threading the Bobbin Case......................12
Winding..............................................11
Bobbin Case
Buttonholes
Changing Stitch Density
......................
‘ .12,38
........................................
..........................
32, 33
33
Buttons...................................................34
Caring for Your Machine
.....................
38,39
Choosing and Changing Accessories . . 4, 5
Connecting Machine...................................10
Darning...................................................18
Fabric, Thread and Needle Table ... 8,9
Fabric Weight Table...............................6, 7
Face Plate
...............................................
39
Free Arm Sewing.......................................36
Guiding and Supporting Fabric
......................
27
Light Bulb................................................39
Machine Stitch Patterns
..............................
24
Mending a Tear.........................................30
Needle
...........................................
Changing
Threading
Thread Tension
.....
........................................4
...........................................
........................
Needle-Fabric Combinations
........................
4,10
13
16, 20, 21
10
Needle Position Selector .... 15,19,25
Needle Plate .
.......
.................................
3,5
Changing Plate.......................................5
Snap-in Feed Cover . . . .3,5,18,34
General Purpose
Operating the Machine
Pattern Group Selector
Performance Checklist.
Power and Light Switch
Presser Feet
Buttonhole Foot
Changing Presser Feet
....................................
...............................
...........................
..............................
..............................
........................................
...............................
.............................
10
19, 25
37
10
3,4
3,32
General Purpose Foot..............................3
Special Purpose Foot...............................3
Zipper Foot
Pressure Adjustments
Principal Parts
Reverse Stitching
.....................................
........................
3,18
15,20,27
...........................................
......................................
16
Satin Stitching..........................................21
Seams
................................................
Lingerie
Straight
............................................
.............................................
17, 23
23
17
Slide Plate...............................................39
Speed Controller
Stitch Balance
Stitch Length
.......................................
......................................
...............................
16,20,21,26
10
26, 33
Stitch Pattern Chart...................................28
Stitch Width Selector . . . . .15,19,25
Straight Stitching
Threading the Machine
Twin-Needle
......................................
...............................
............................................
15
13
35
Zig-Zag Seam Finishes . . . . . . .23
Zig-Zag Stitching
Zipper Insertion
.......................................
........................................
19
18
3
4
2
To ensure that you are always provided with the most
modern sewing capabilities, THE SINGER COMPANY
reserves the right to change the appearance, design or
accessories of this sewing machine when considered
necessary.
Page 43

Printed in ITALY
Page 44
 Loading...