

Page 1

431
Convertible
Page 2

Instructions for using
SINGER
Form 30-064 G / 1264 engl. Printed in Western Germany
* A Trademark of THE SINGER COMPANY
Page 3
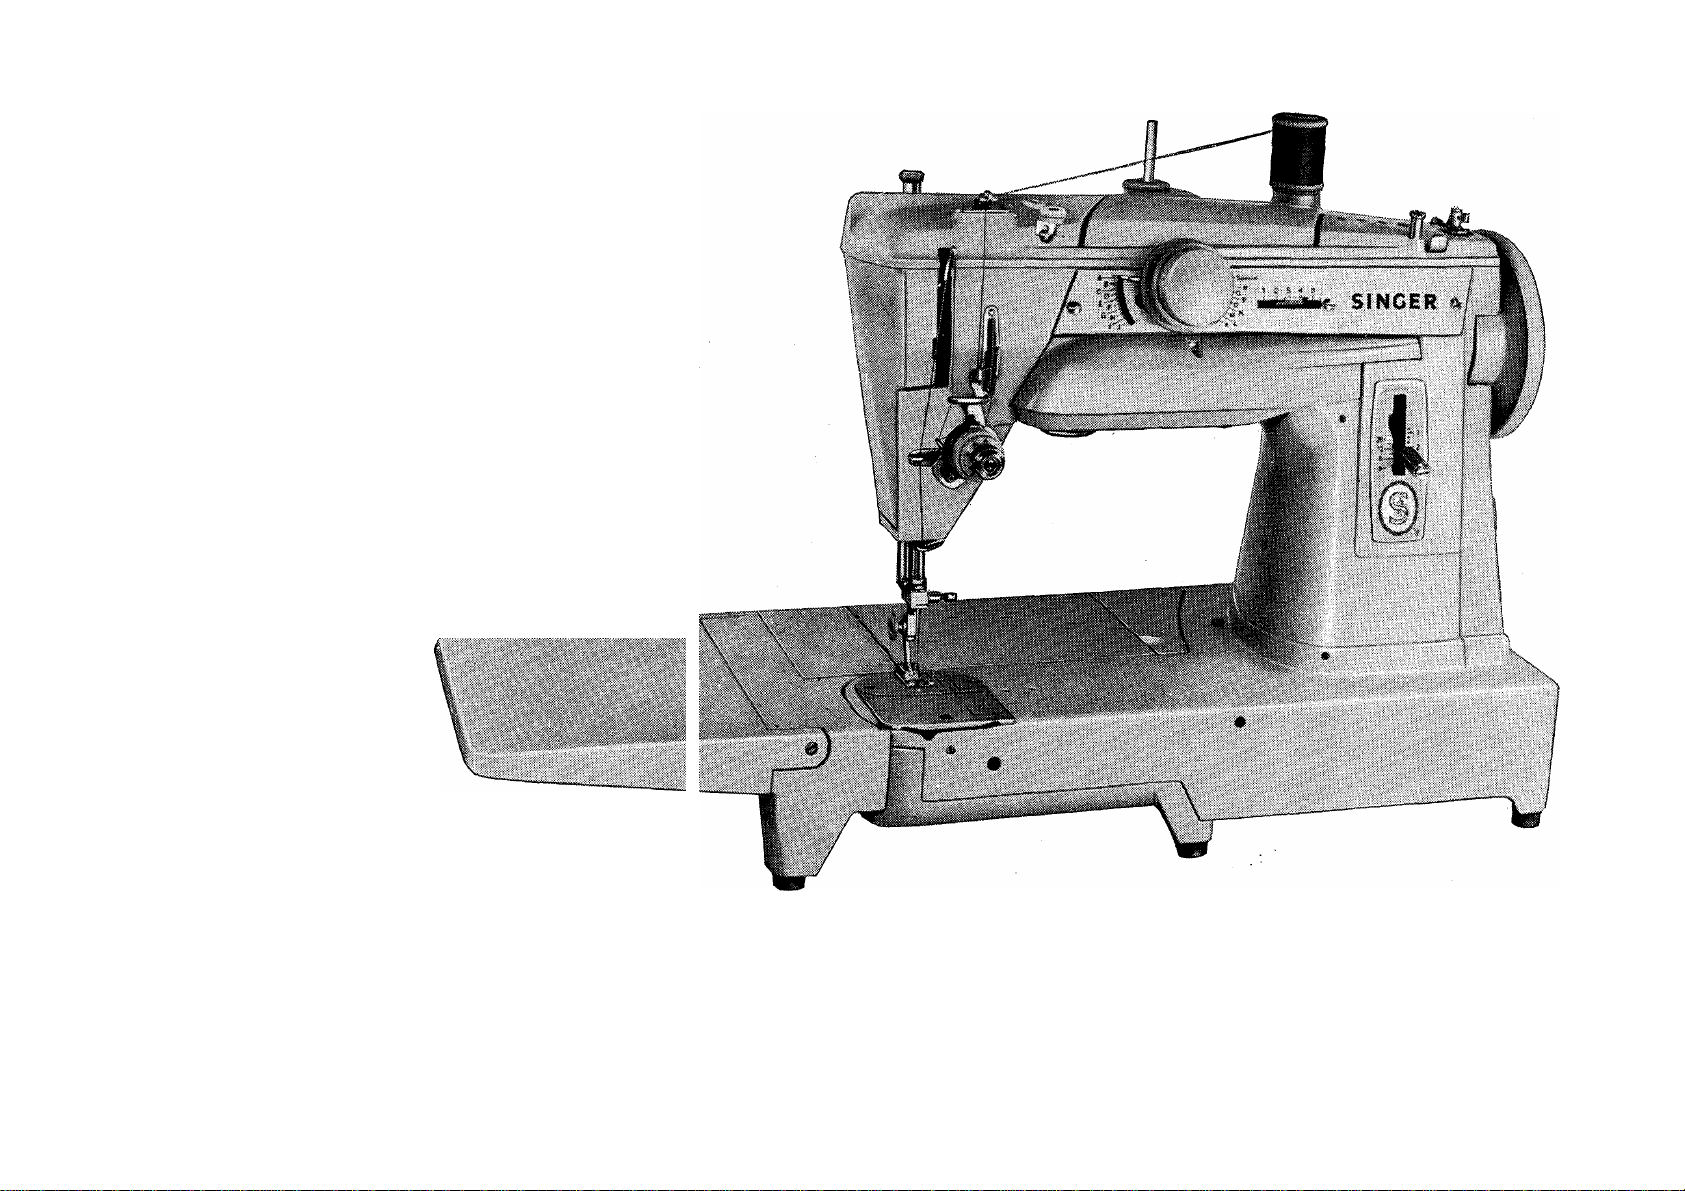
SLANT-O-MATIC
Convertible
.. the most versatile sewing machine ever built!
Page 4

THE CONVERTIBLE 431
. . . represents the ultimate in sewing machine performance. With the
purchase of the new SLANT-O-MATIC, you can take pride in owning
the finest sewing machine ever built. You'll marvel at its almost unbe
lievable ease of operation . . . the remarkable services it performs.
You'll delight in its perfect, beautiful stitching.
• World's first convertible with double-easy threading. Has built-in
threading chart, handy "drop-in" bobbin in front of needle!
• World's first convertible with slant needle and gear drive. Seeing
is easier, sewing smoothest ever. No slipping or stalling.
• World's first convertible with built-in eye-level stitch chart . . .
lets you "tune" the knob for whatever fancy stitch you want.
Add to these major developments in sewing machine design the
following ADVANCED features, and you have a machine far ahead
in design, unequalled in performance.
Copyright 1964 by The Singer Manufacturing Company
Page 5

OTHER OUTSTANDING FEATURES ARE:
• CYLINDER BED simplifies sewing of articles of
a curved or cylindrical nature — converts to
flat bed with the push of a button.
• PERFECT STITCHING . . . straight and zigzag.
• NEEDLE CLAMP holds one or two regular
needles — same or different sizes for exciting
two needle stitching.
• AUTOMATIC THREAD CONTROL ensures a
smooth flow of thread from spool to needle for
uniform stitch setting.
• HINGED FACE PLATE, houses threading chart
and swings open for easy access to oiling points.
• BUILT-IN MOTOR with worm wheel drive, no
belts required, excellent penetrating power
when sewing heaviest materials without manual
assistance. ,
• BUILT-IN LIGHT focused on sewing area.
• ALL MECHANISM completely enclosed.
• SPECIAL PURPOSE FOOT.
• FLEXIBLE SEAM GUIDE.
• CLIP-ON TYPE calibrated throat plate . . . easy
to remove and replace.
SUPERFINE CONTROL of stitch length ensures # COMPARTMENT for attachments and accessoperfect satin stitching. ries built into detachable cloth plate.
• HINGED BED EXTENSION for increased work
area.
Page 6
SINGER SERVICE
Wherever you go you will find expert, dependable SINGER* Service
close at hand. SINGER is interested in helping you keep your SINGER
Sewing Machine in top running condition. That is why you should
always call your SINGER SEWING CENTRE if your machine ever
requires adjustment or repair. Only from your SINGER SEWING
CENTRE can you obtain the services of a trained SINGER repair man
and warranted SINGER* parts.
EVERYTHING FOR THE WOMAN WHO SEWS
The answer to your sewipg needs is at your SINGER SEWING
CENTRE. There you will find a wide choice of sewing aids, notions,
sewing information and services. Look for the famous red "S" and
SINGER trademarks on your SINGER SEWING CENTRE and the ever
ready SINGER van. See phone book under SINGER SEWING
MACHINE CO. for address nearest you.
Page 7
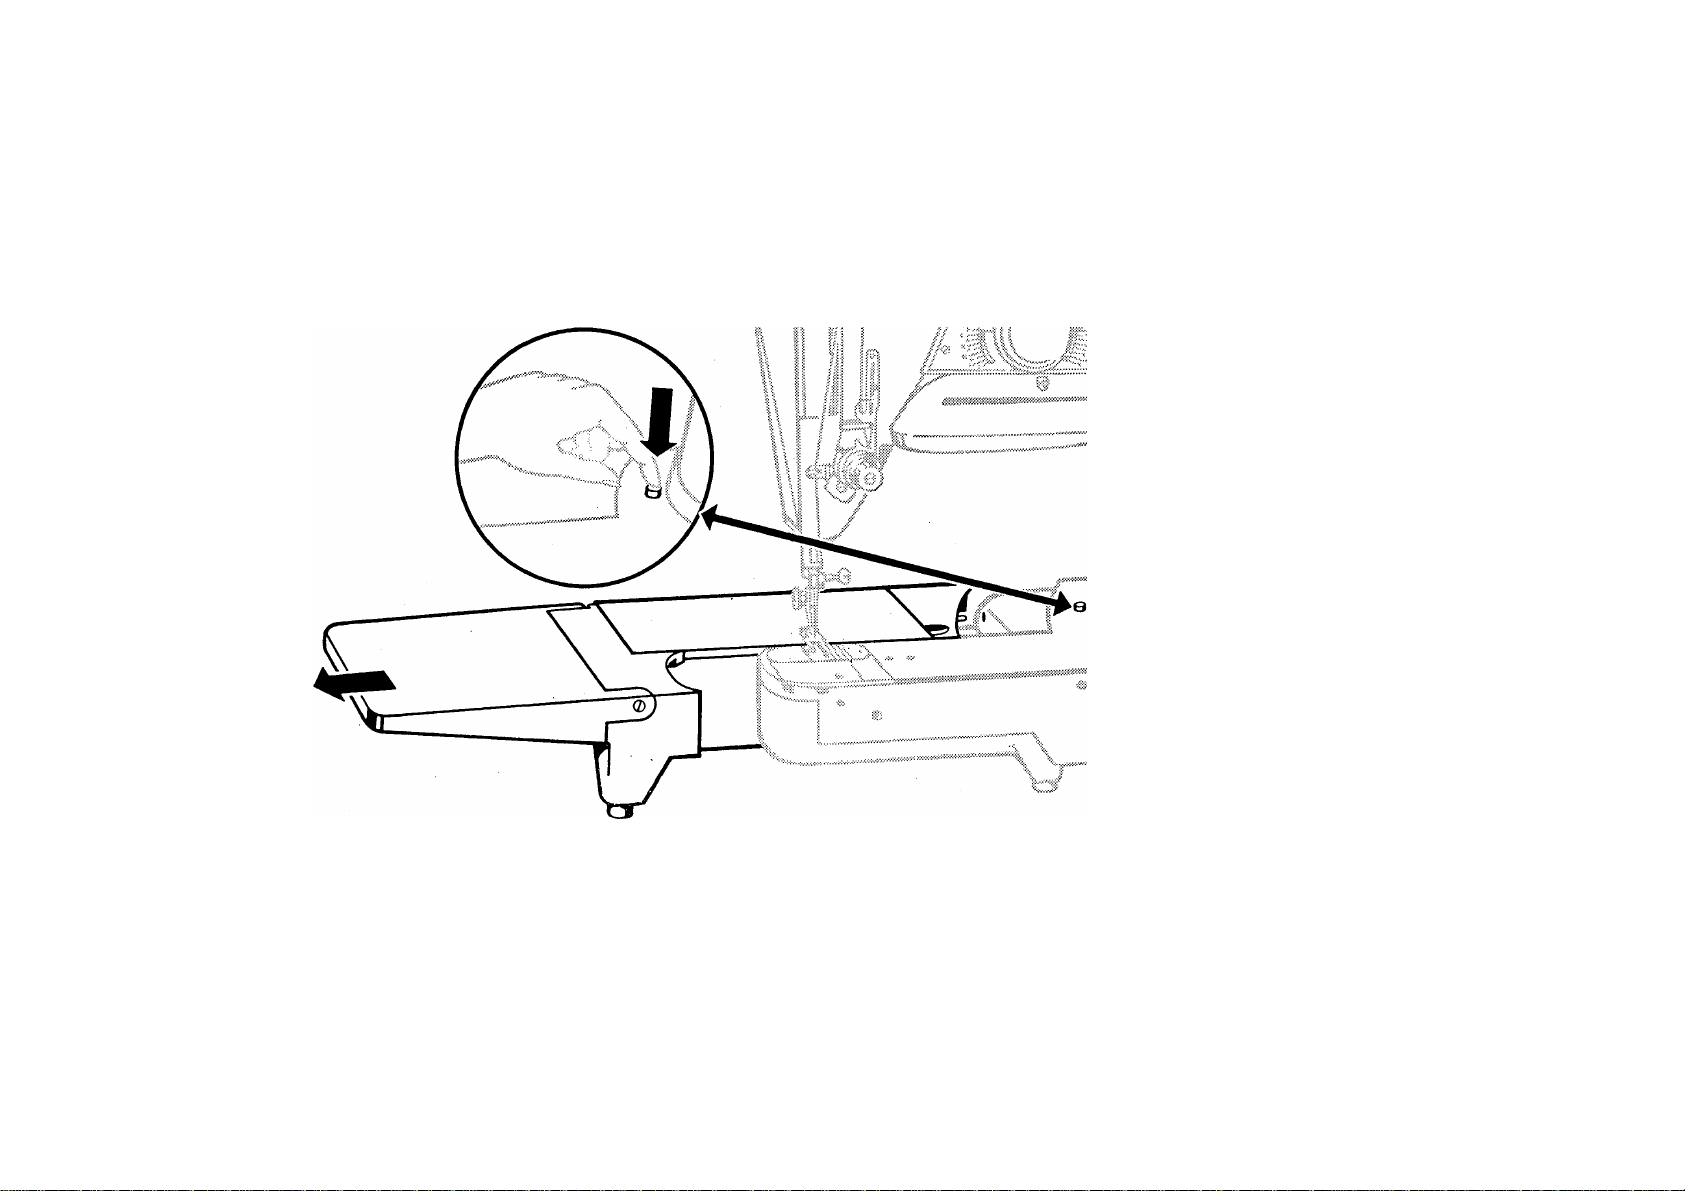
TO REMOVE AND REPLACE DETACHABLE CLOTH PLATE
. \
I I
To detach cloth plate from machine, press button on machine bed and withdraw plate.
Replace cloth plate in same manner, locating two pins in plate with corresponding holes in machine
bed. Push cloth plate to right until it snaps in locked position.
See pages 81 to 86 for applications of cylinder bed feature.
Page 8

NEEDLE AND THREAD SELECTION
The selection of thread should be based on the fabric to be stitched. The thread should blend with
the fabric in colour, fibre and size.
Silk and wool fabrics should be stitched with silk thread; cotton fabrics should be stitched with cotton
or cotton mercerised thread, etc. The thread must be of a size that will imbed itself into the texture of the
fabric. Thread that is too heavy for the fabric will remain on the surface and become weakened by
friction and abrasion.
The selection of the needle should be based on both the fabric and thread being used. The eye of the
needle must be large enough for the thread to pass freely through it. The blade of the needle must be fine
enough not to mar the fabric with too large a puncture, yet heavy enough to pierce the fabric without
binding or deflecting.
You will obtain best stitching results from your Sewing Machine if it is fitted with a SINGERS' Needle.
Page 9
This machine uses needles
Catalogue 2020 (15X1).
Sizes 9, 11, 14, 16 and 18.
NEEDLES AND THREAD
For perfect stitching, select correct needle
and thread to correspond with fabric (see
page 6).
Be sure to use similar threads for both
needle and bobbin.
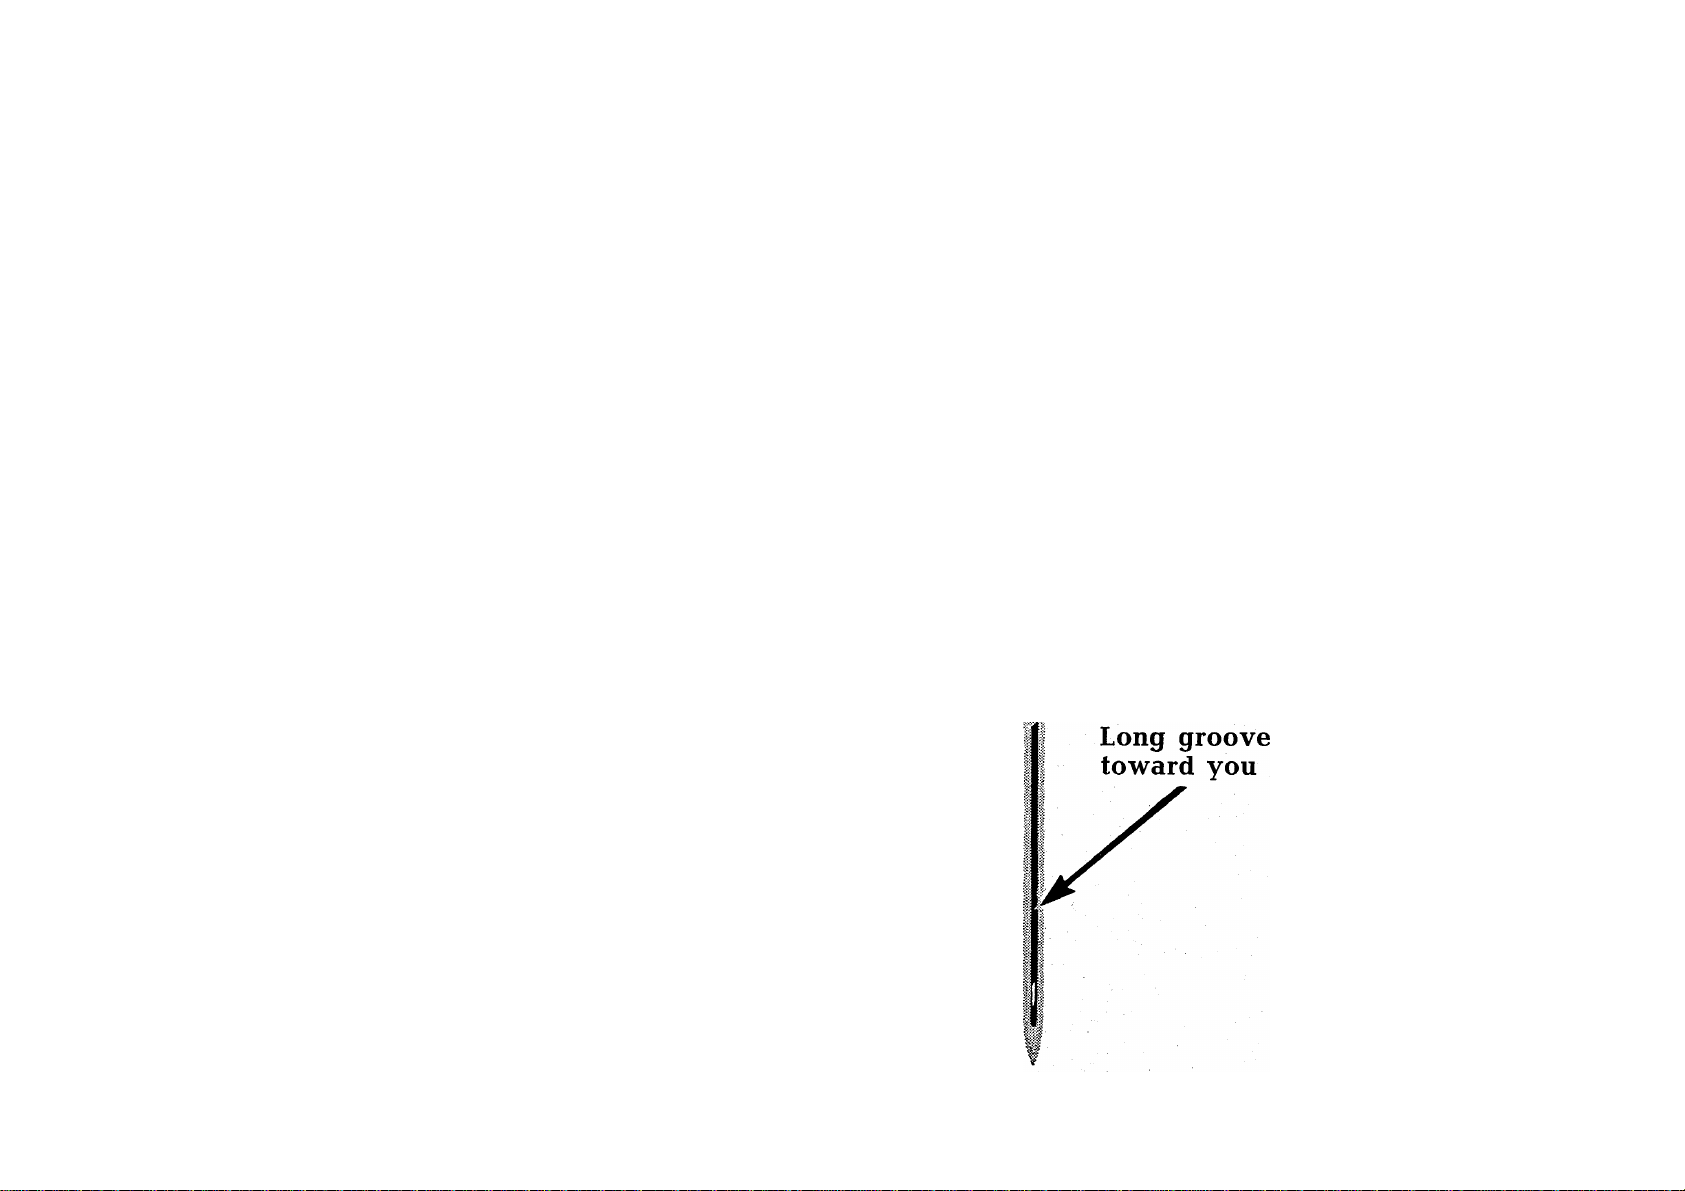
NEEDLE INSERTION
Raise the needle bar to highest point by
turning the hand wheel toward you. Loosen
the needle clamp screw. Insert needle
upward into clamp as far as it will go, with
mi
^1*
"1m
the flat side of the needle to the back and
the long groove toward you. Tighten needle
clamp screw.
Page 10
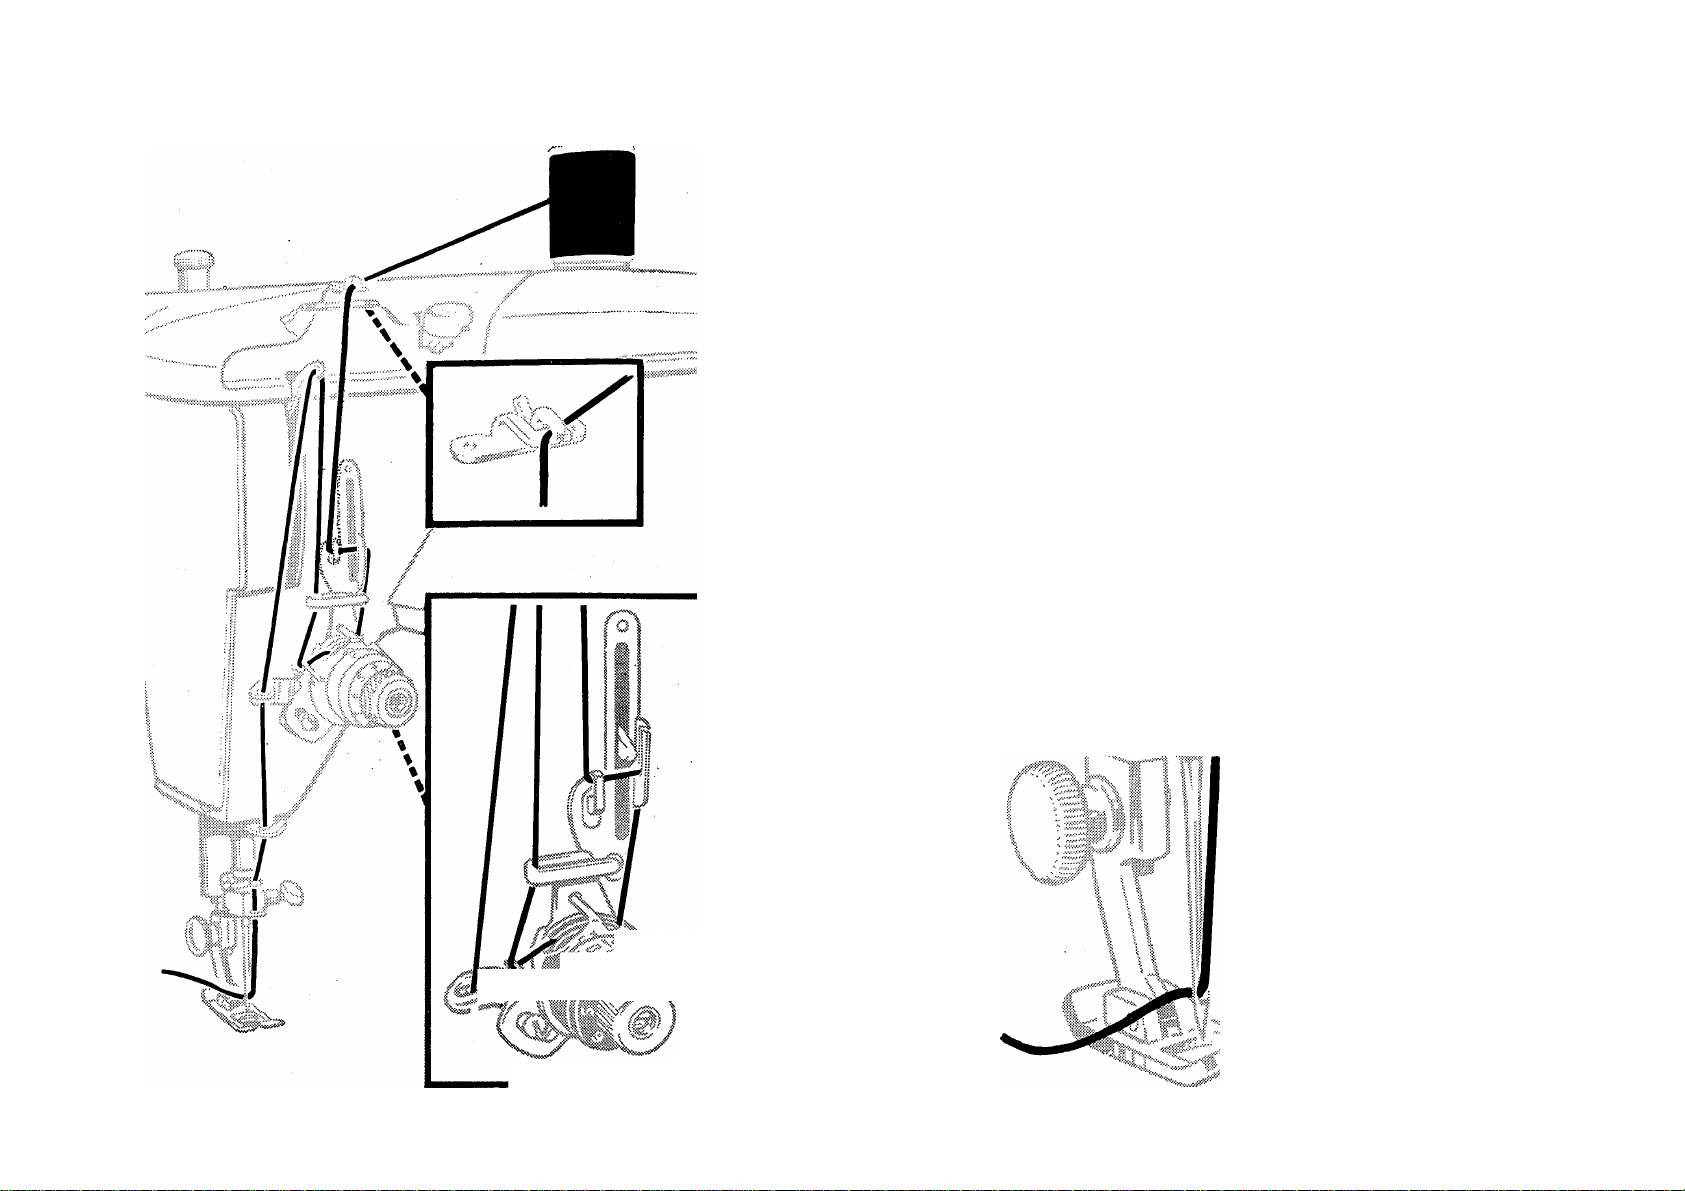
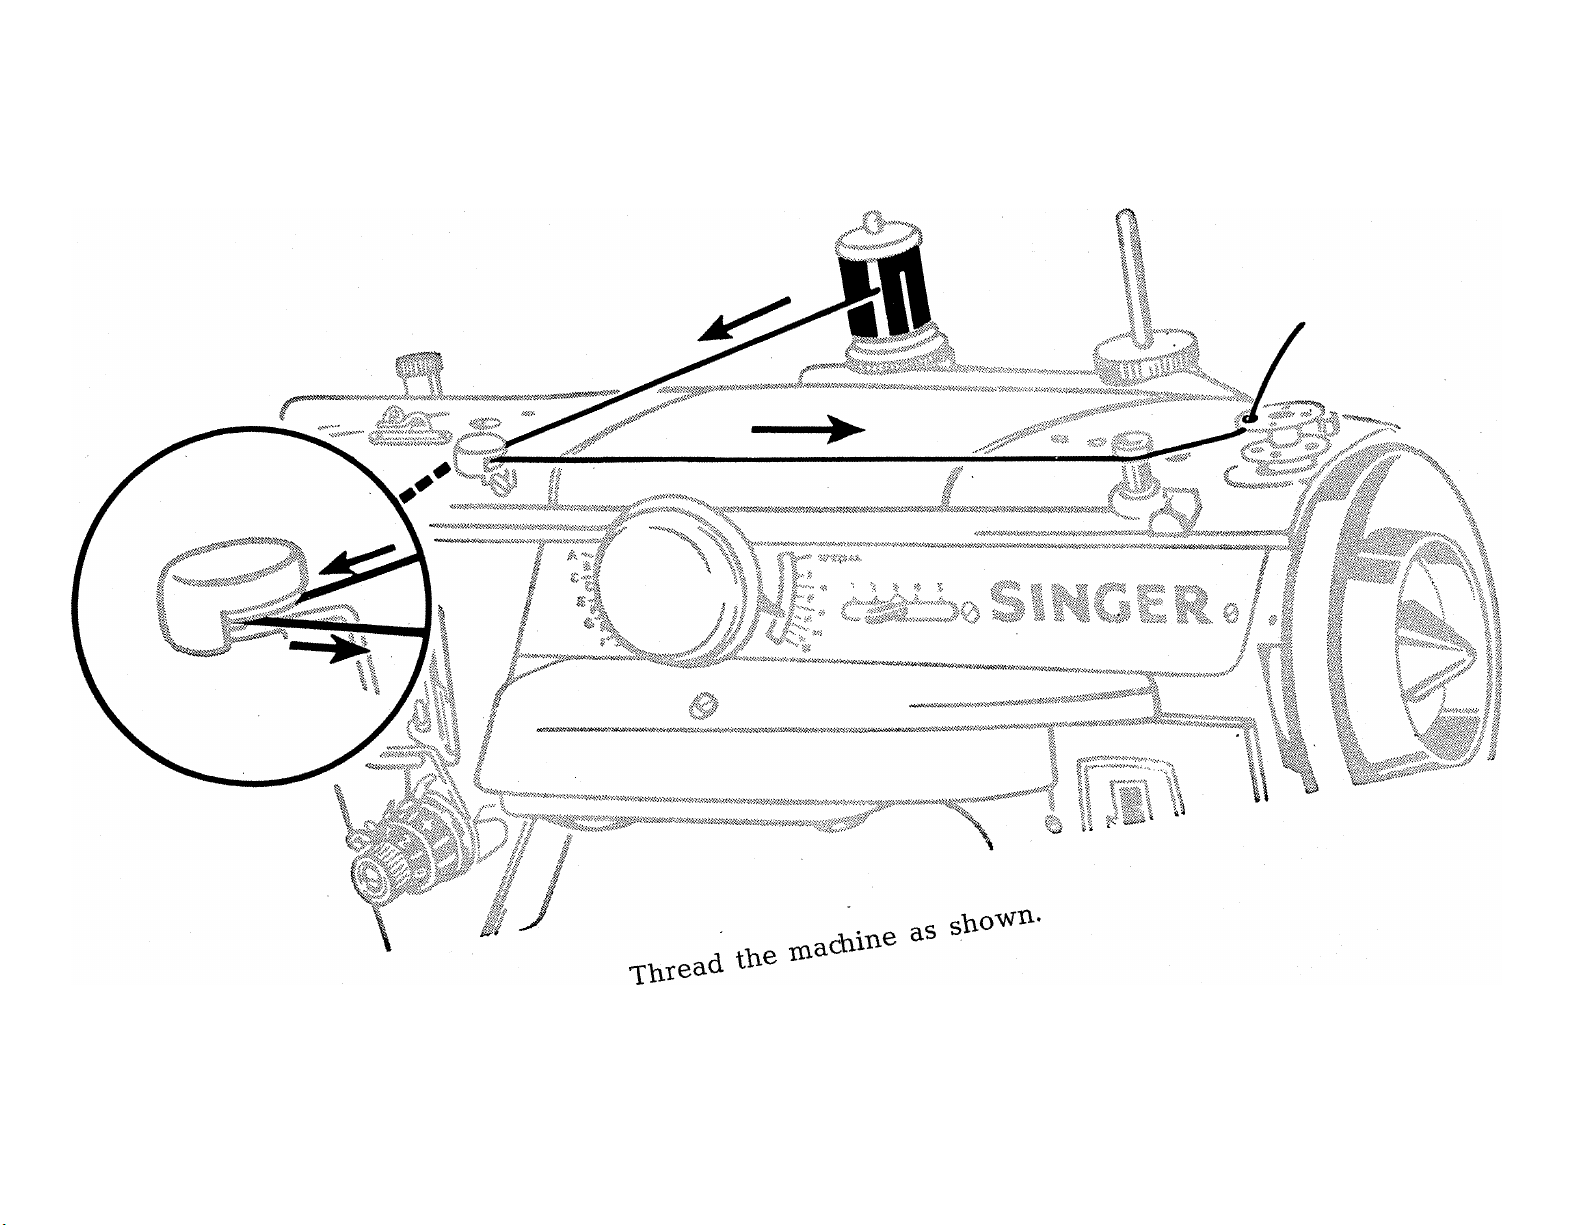
UPPER THREADING-SINGLE NEEDLE
Raise take-up lever to highest point. Place thread
on spool pin and lead through threading points
shown. Thread needle from front to back. Draw
sufficient thread through eye of needle with which
to start sewing.
8
Page 11
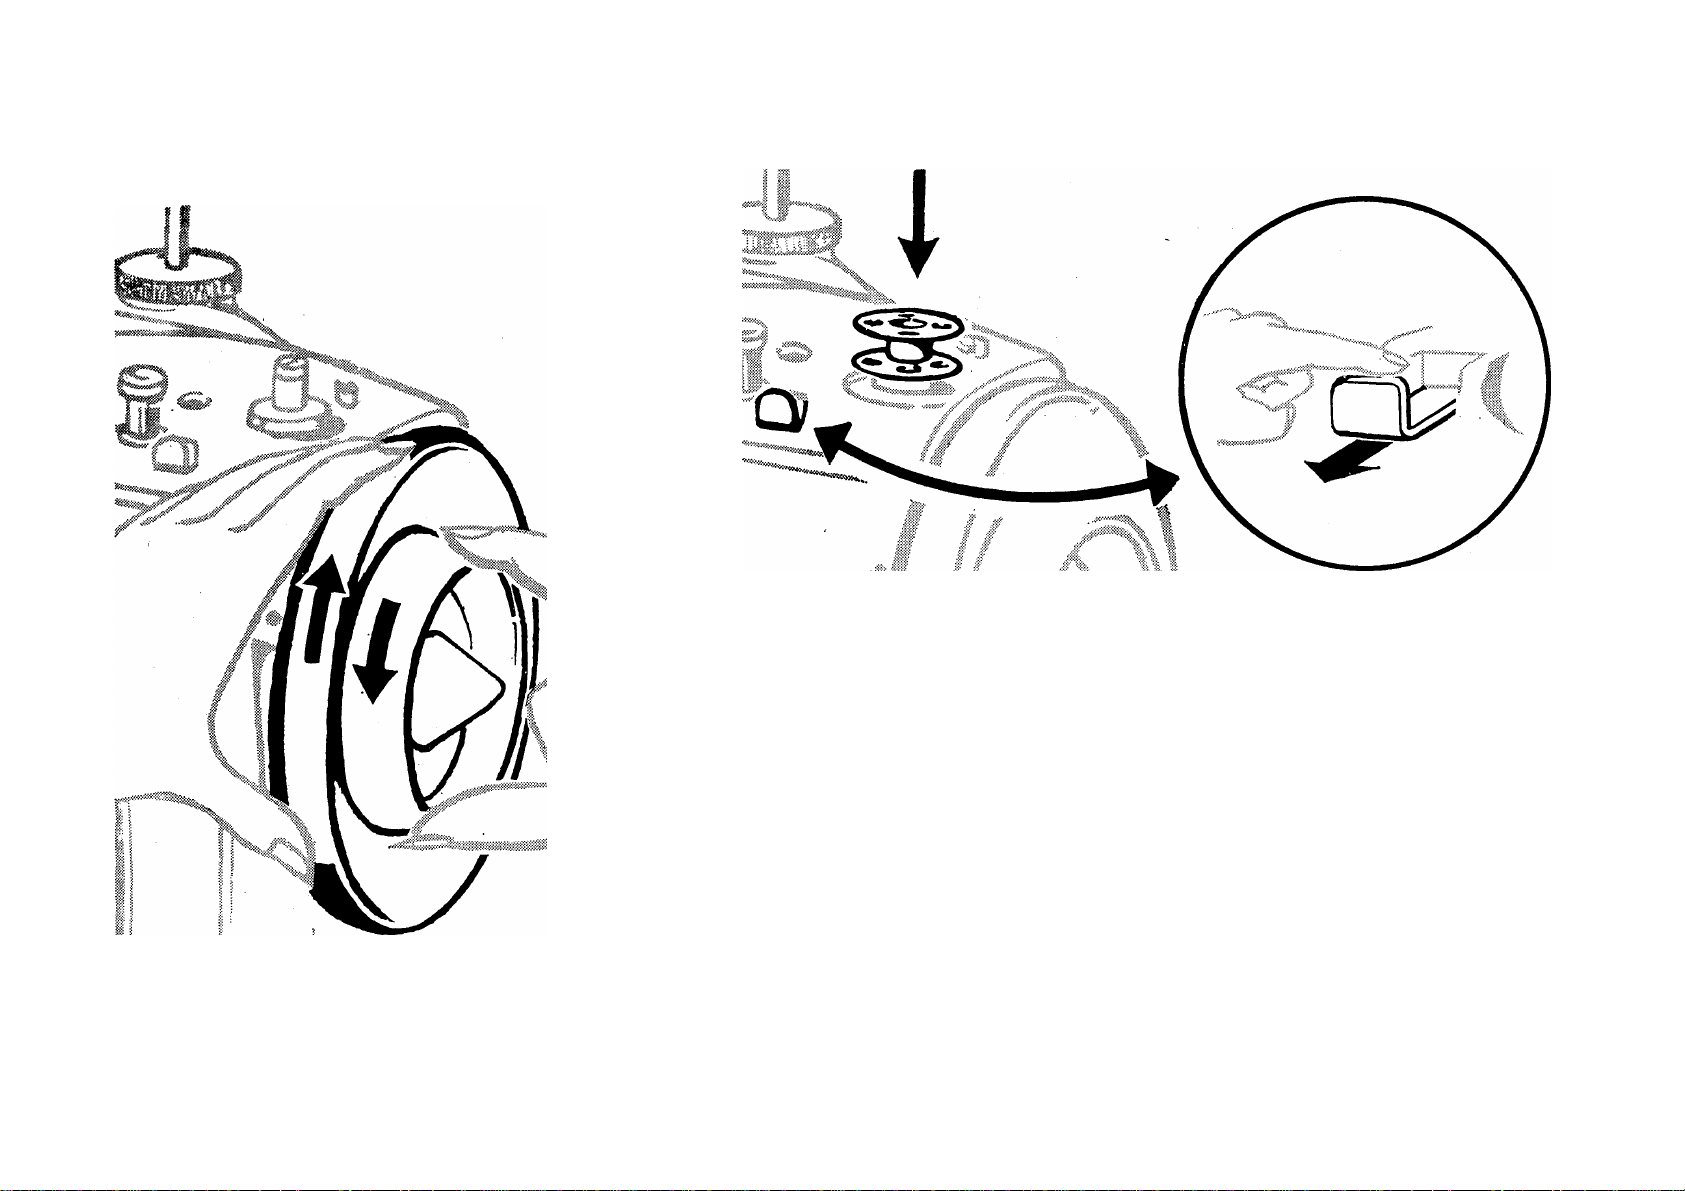
WIND THE BOBBIN
Loosen stop motion wheel with right hand. Place bobbin on spindle. Pull out bobbin winder engaging
slide.
9
Page 12
.OB..N
IO
Page 13
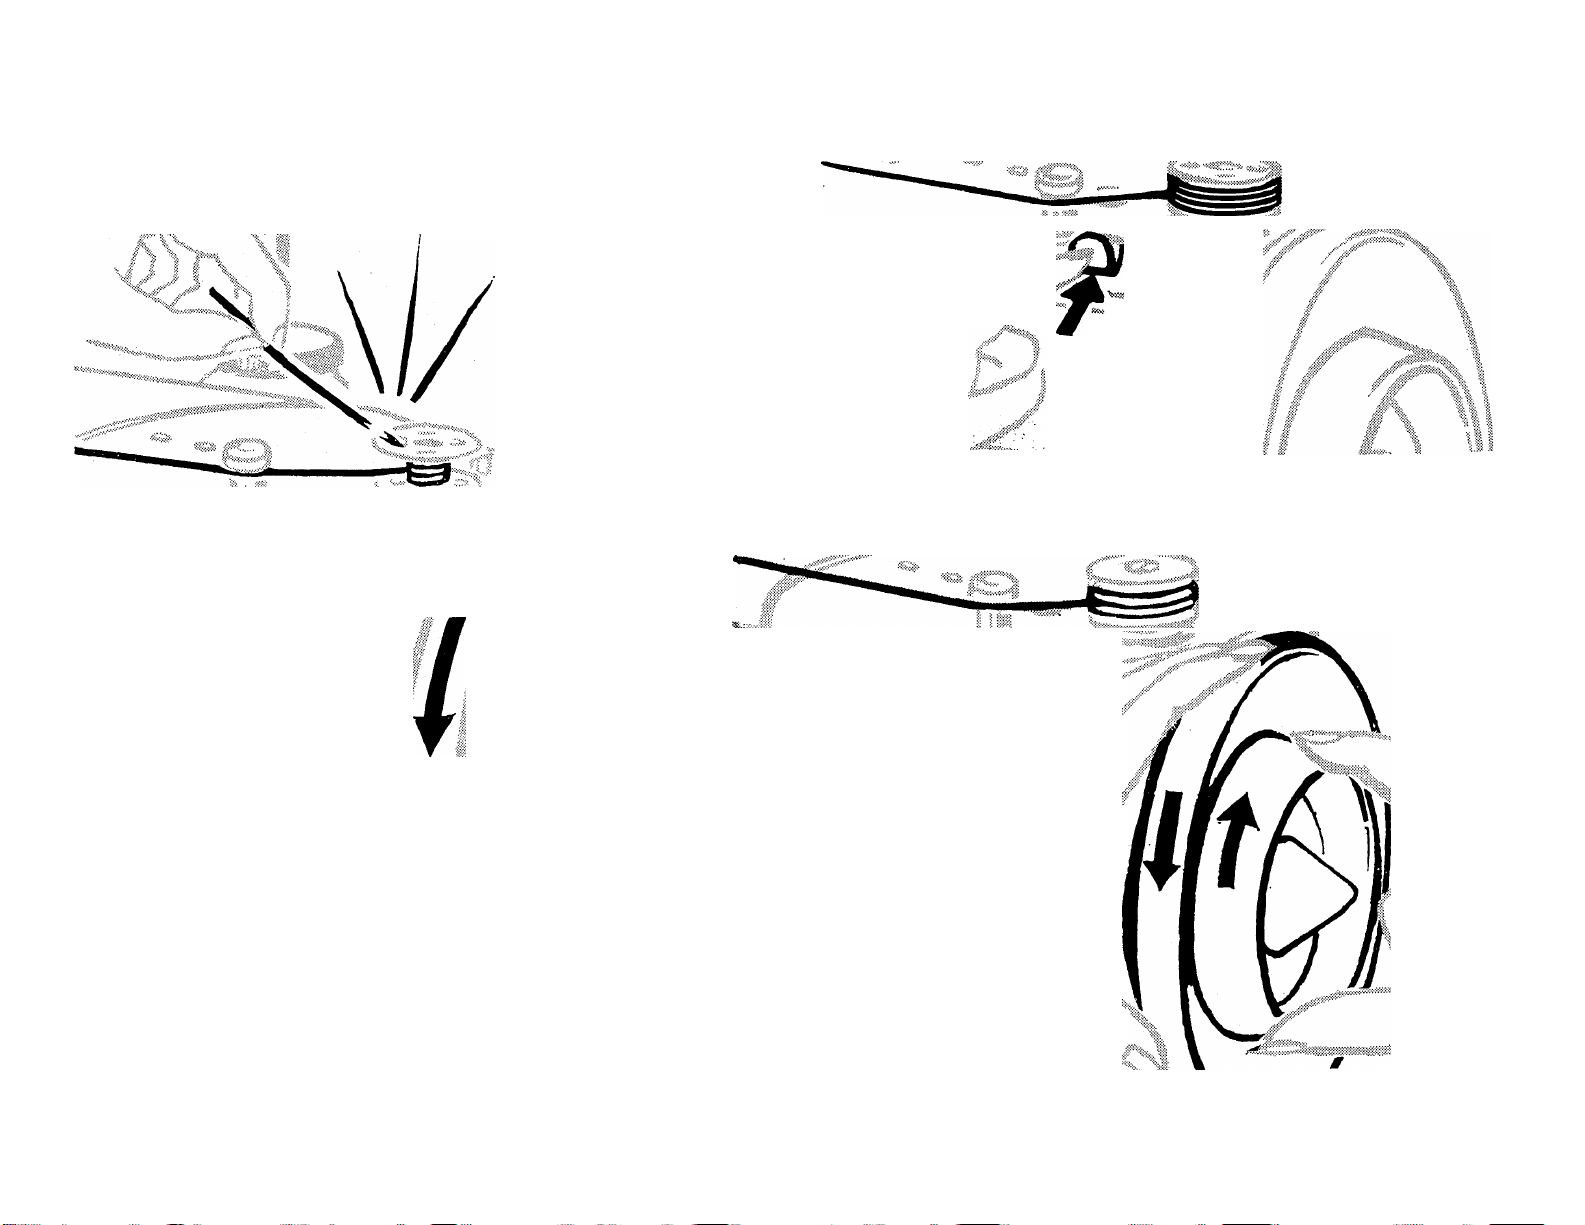
WIND THE BOBBIN (Cont'd.)
A full bobbin will automatically release. Stop
machine and push in disengaging slide.
Hold end of thread and start machine.
X
X
Tighten stop motion wheel.
11
Page 14
tu®
\г
Page 15

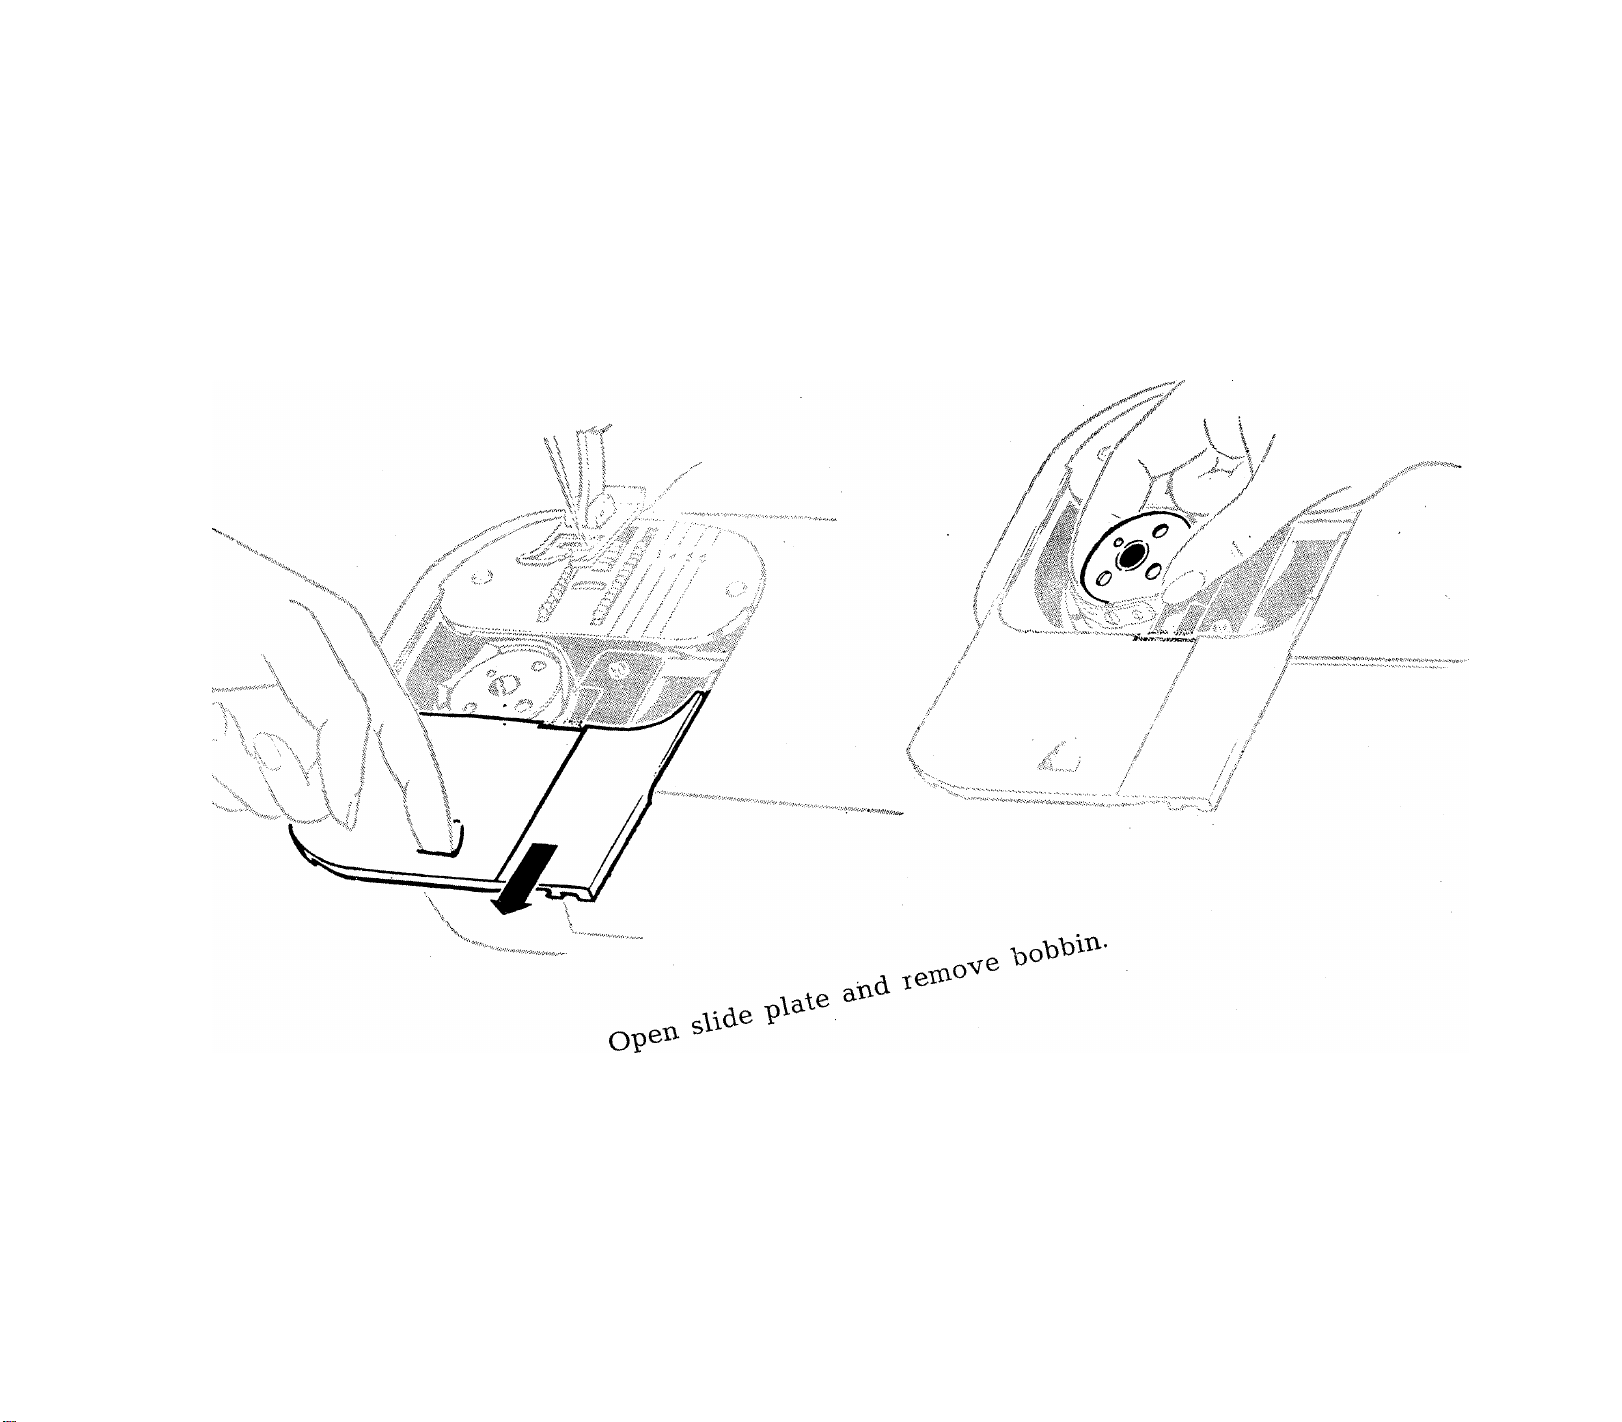
THREADING THE BOBBIN CASE
Hold bobbin so that thread leads off in direction shown. Place bobbin in case. Guide thread into slot
and under spring.
Draw thread into notch at end of spring, pulling off about 3 inches of thread across the bobbin.
Close slide plate allowing thread to enter notch.
13
Page 16
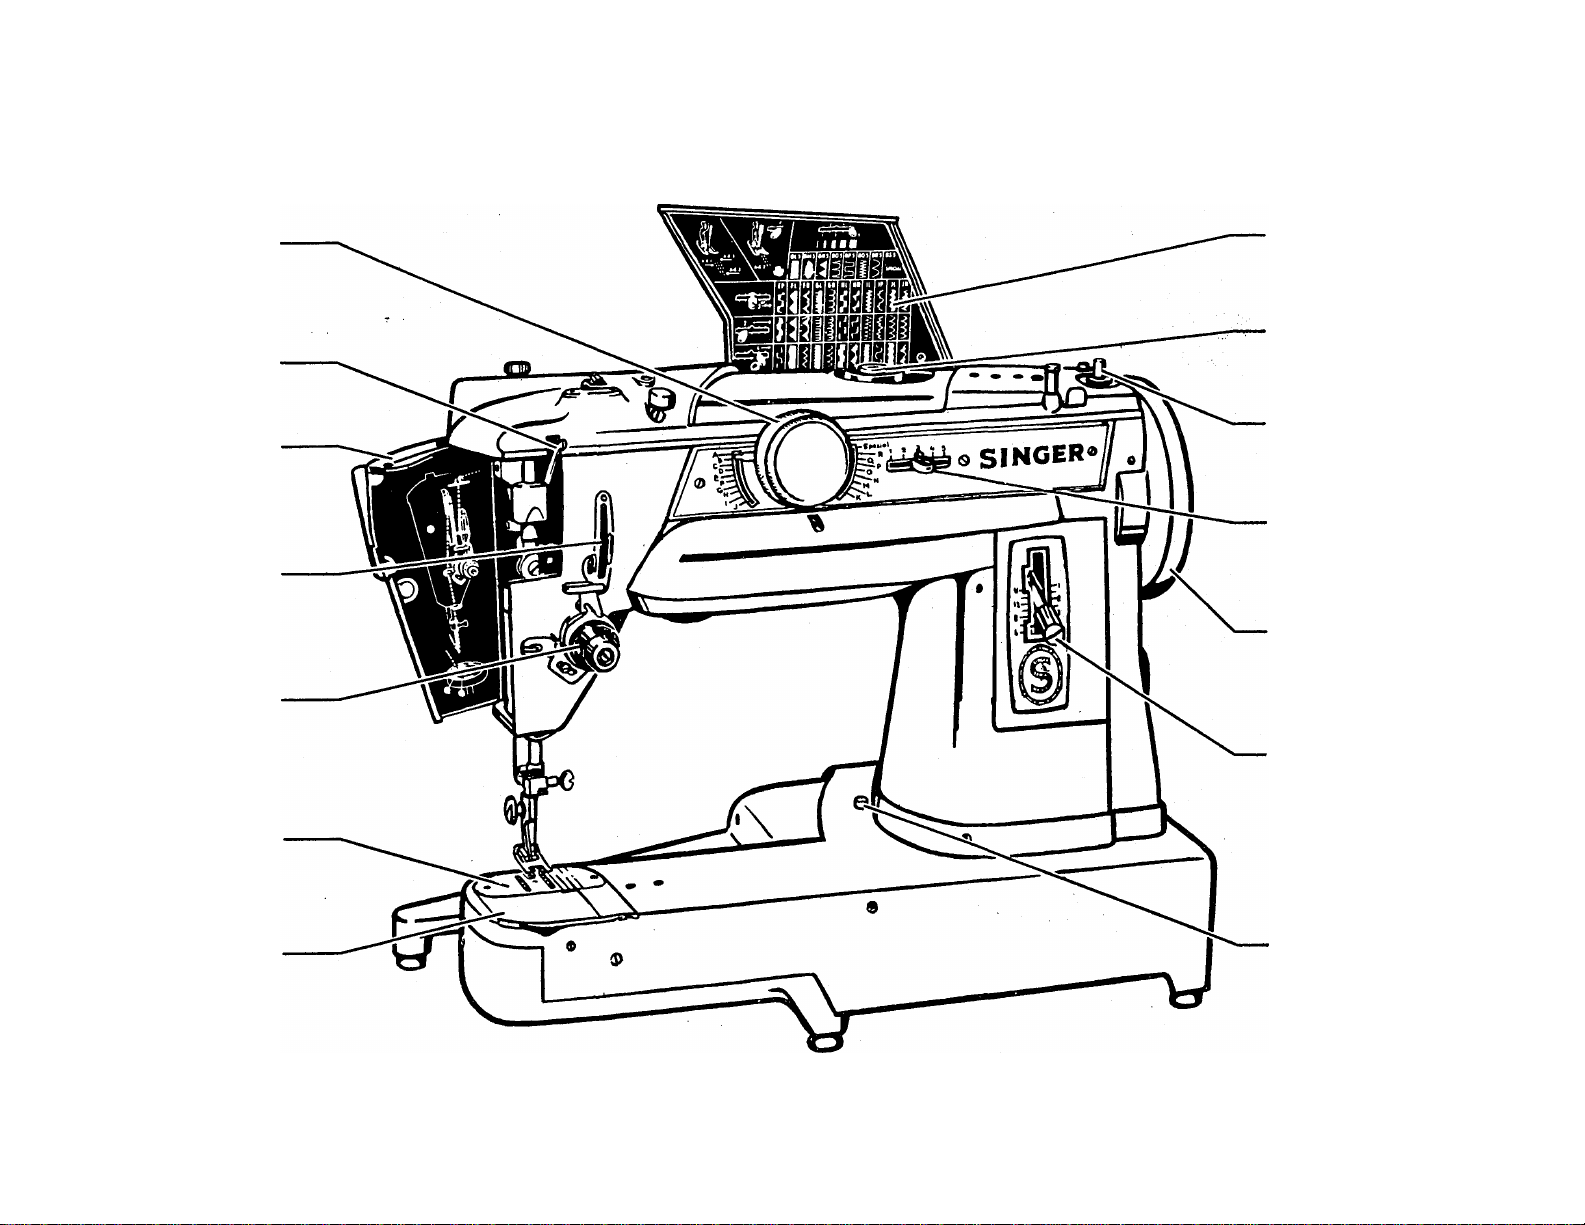
PRINCIPAL PARTS OF MACHINE 431
Stitch pattern
selector
Take-up lever
Face plate
Automatic
thread control
Needle thread
tension
Stitch chart
Special disc
Bobbin winder
stitch width
léver
Hand wheel
Stitch length
regulator
Throat plate
Slide plate
14
Cloth plate
disengaging
button
Page 17
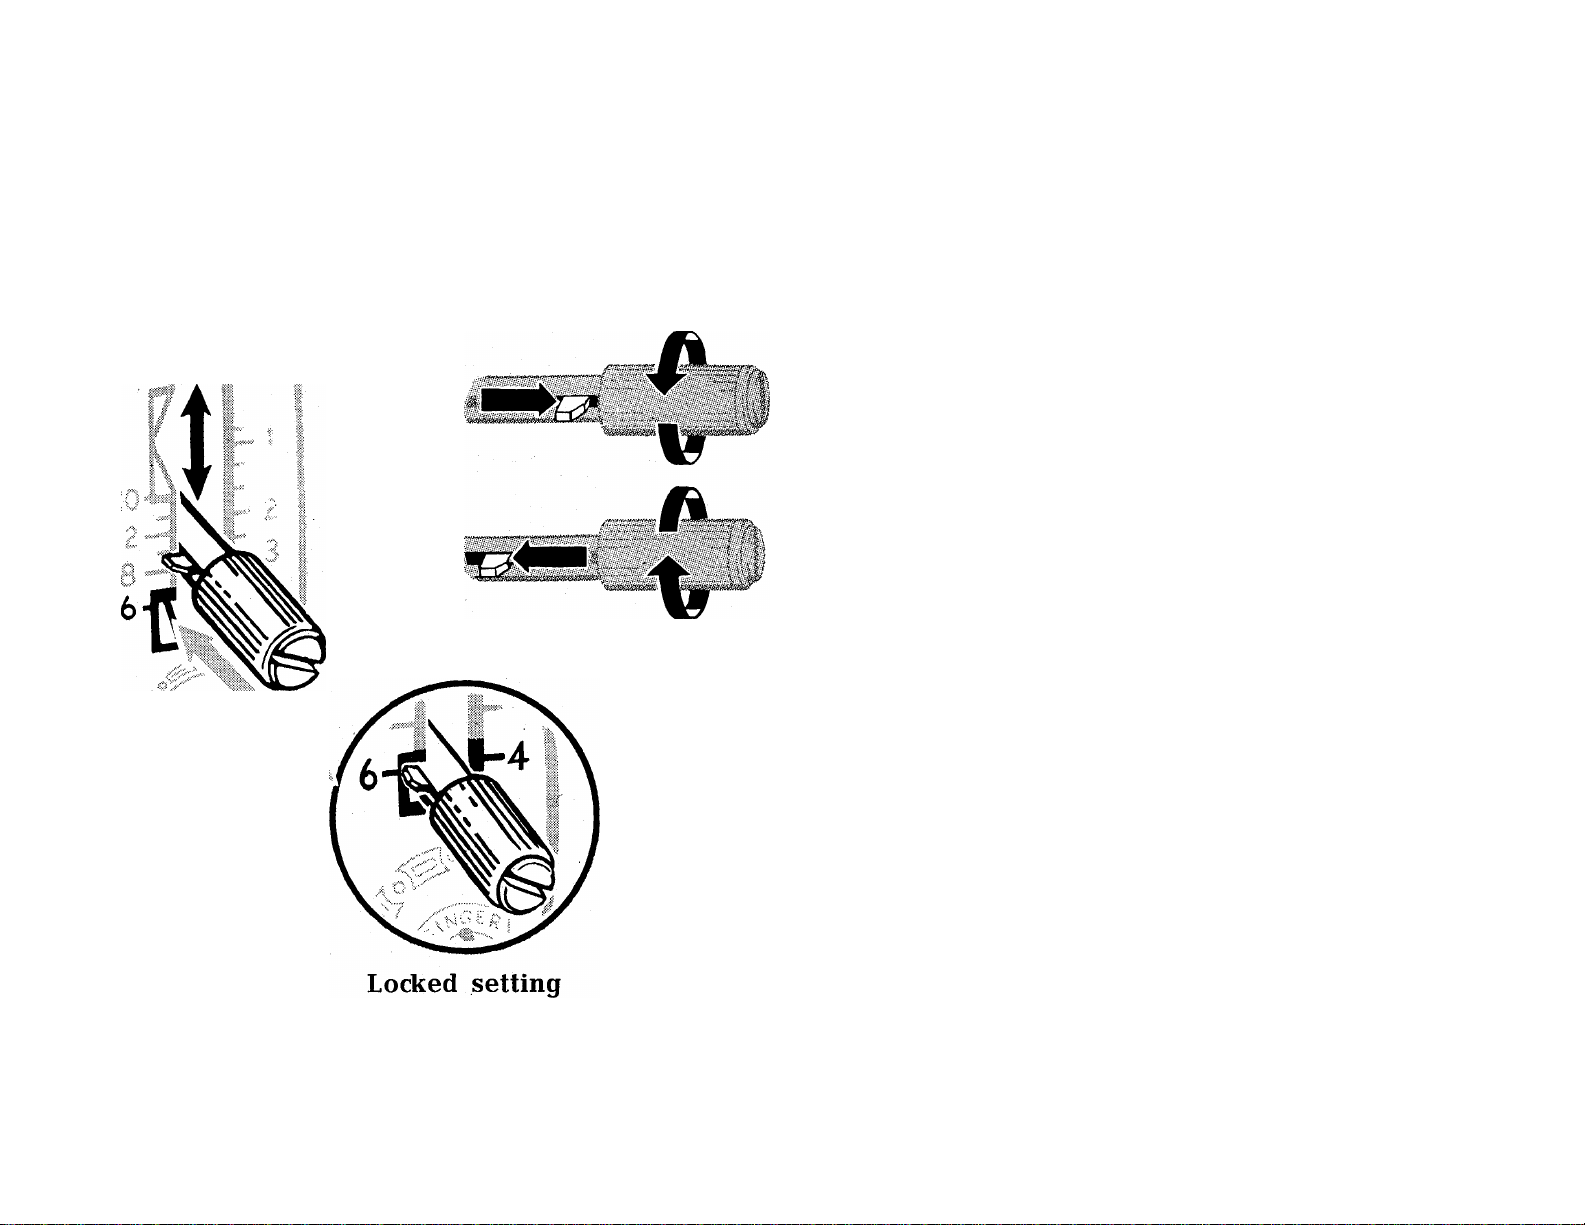
Reverse
STITCH LENGTH REGULATOR
Numerals on left side of indicator represent
number of stitches per inch.
Numerals on right side represent stitch length in
To release
millimeters.
The upper indented area of the indicator repre
sents stitch lengths above 20.
The lower indented area of the indicator allows
the No. 6 stitch length setting to be "locked" in
place when stitching folds, pleats or multiple layers
of heavy fabric.
Forward
To tighten
To set stitch length
• Release pointer by turning thumb nut to the
left.
• Position lever for desired stitch length.
/
• Tighten pointer against plate by turning thumb
nut to the right.
Once the pointer has been positioned, reverse
stitching is accomplished by raising the lever to its
highest position. The No. 6 "locked" position must
be unlocked for reverse stitching.
15
Page 18

STITCH WIDTH AND NEEDLE POSITION SELECTOR
A Stitch width or needle position setting is necessary for both straight and zigzag stitching.
When used with a straight stitch setting, the lever places stitching in left, centre or right needle position
(see pages 19 and 20).
When used with a decorative stitch setting, the lever controls width of primary patterns and produces
variations of combination patterns (see pages 34 and 36).
To position, depress lever and slide il left or right to desired setting. Numerals indicate five positions
but intermediate settings may also be used.
16
Page 19
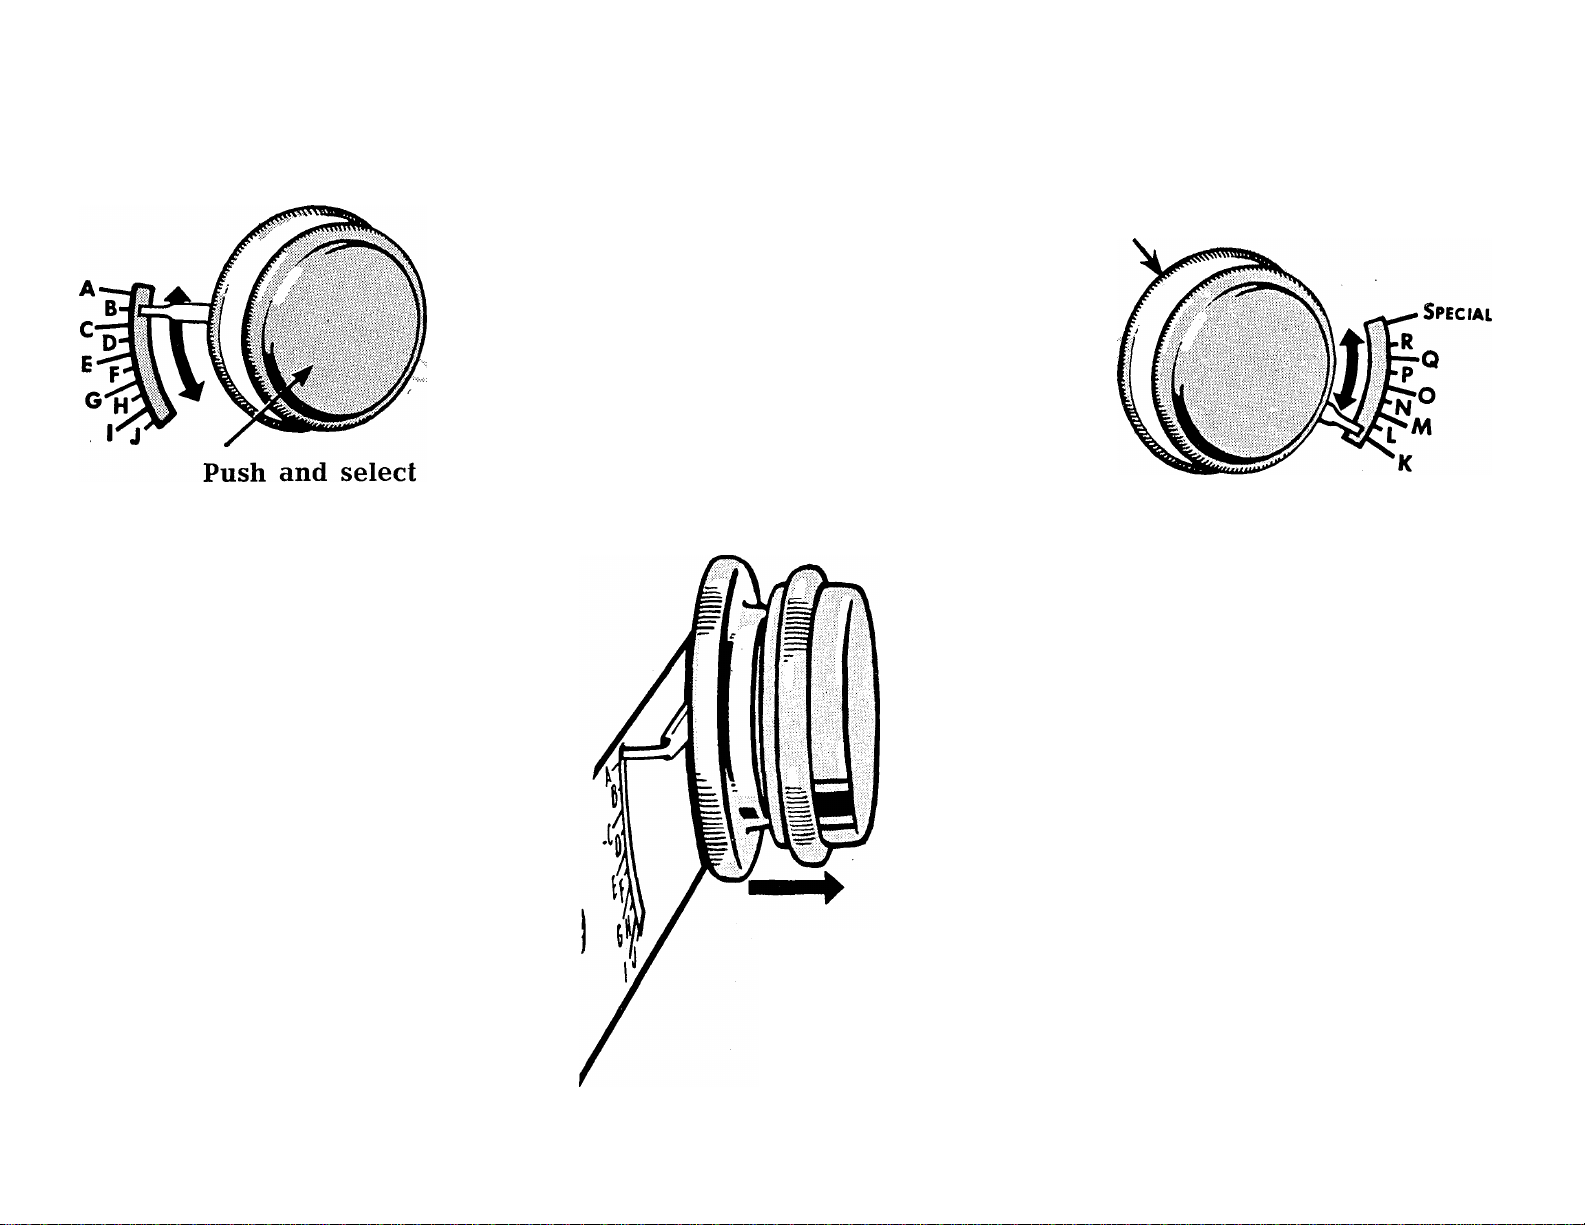
STITCH PATTERN SELECTOR
(Set Stitch Width Lever at 3.)
i
Pull and select
All settings on the left of the plate
are controlled by the outer knob.
Push (using right hand) —
select desired setting and release.
All settings on the right of the plate
are controlled by the inner knob.
Pull (using left hand) —
select desired setting and release.
1. Push
2. Select (A to J)
3. Release
1. Pull
2. Select (K to S)
3. Release
Do not make selector adjustments while the needle is in the fabric.
17
Page 20

THROAT PLATE
REMOVAL AND REPLACEMENT
To remove the throat plate
To replace the throat plate
Raise presser bar. Turn hand wheel until needle
bar is at its highest point. Open slide plate. Place
thumb under front end of throat plate and lift plate
from machine.
18
Place throat plate in position over two clamping
pins and press plate down until it snaps in locked
position. Then close slide plate.
Page 21

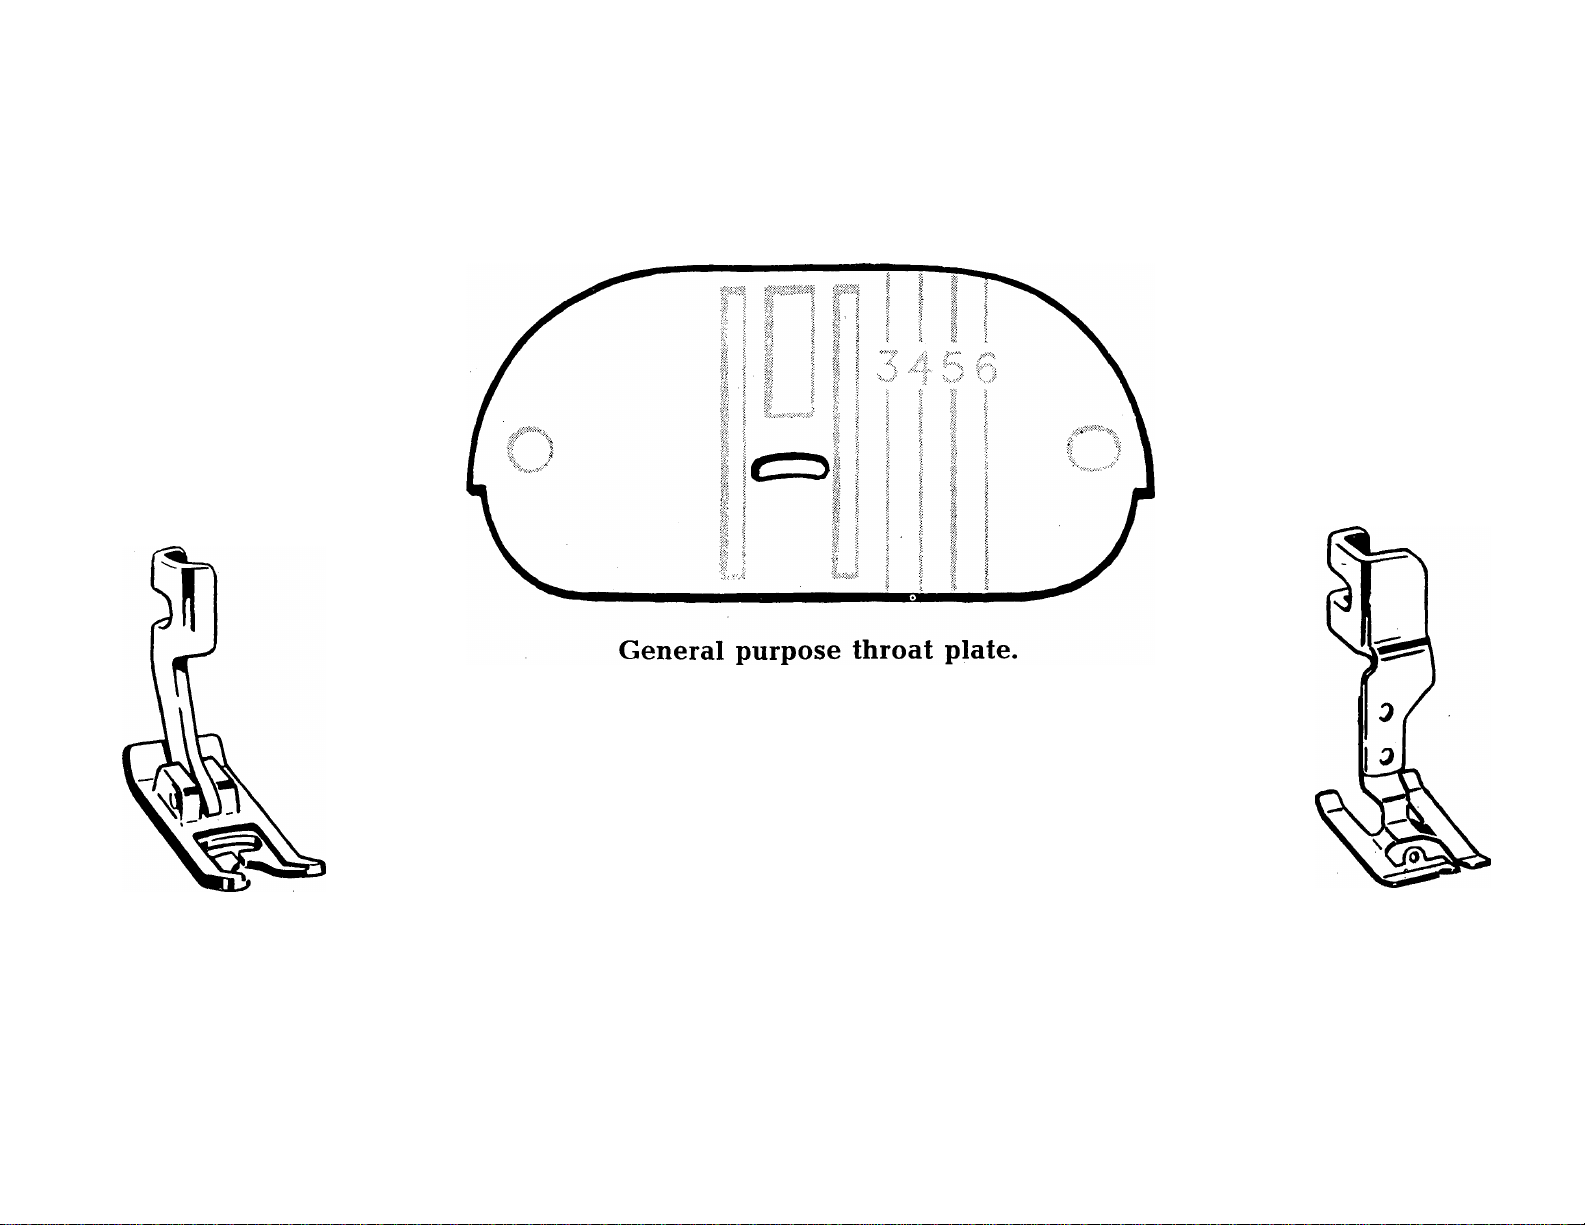
STRAIGHT STITCHING
CENTRE NEEDLE POSITION AK 3
Needle Position Lever at 3 (Centre Position).
General Purpose Throat Plate and Presser Foot.
Use general purpose throat plate and presser foot for all utility sewing, long straight seams, etc., and
where there is occasion to alternate between straight and zigzag stitching.
STRAIGHT STITCH THROAT PLATE AND
PRESSER FOOT
Use the straight stitch throat plate and presser
foot where fabric and sewing procedure require
close control . . . for precision stitching of curved
and scalloped edges, top stitching, edge stitching,
etc.
For best results, this equipment should be used
when stitching sheer and filmy fabrics, knits and
tricots (particularly synthetics) and all soft spongy
materials.
Page 22

STRAIGHT STITCHING
SECONDARY POSITIONS
f 111
Set Selector at AK.
Needle Position Lever at 1, 2, 4 or 5.
General Purpose Throat Plate and Presser Foot.
To meet special requirements a line of stitching may be placed to the left or to the right of centre.
Lever setting 1 locates stitching to the extreme left; lever setting 5 locates it to the extreme right. Inter
mediate left and right positions result when settings 2 and 4 are used.
The general purpose throat plate and presser foot must be used with left and right needle positions.
Do not make any lever adjustments while the needle is in the fabric.
20
Page 23

PREPARE TO SEW
Hold needle thread lightly with left hand. Turn hand wheel so that needle enters plate and brings
up bobbin thread.
i I » ■f"'! K- jJ«“”"'«»,..
'
Pull end of bobbin thread through plate and place both needle and bobbin threads diagonally under
presser foot.
21
Page 24
SEWING A SEAM
Set stitch regulator for stitch length desired. Position needle into fabric about V2 inch from edge and
lower presser foot. Raise stitch regulator to reverse.
Back stitch to edge of fabric for reinforcement. Lower regulator for forward stitching of seam. Raise
stitch regulator,
22
Page 25

SEWING A SEAM (Cont'd.)
Back stitch to reinforce end of seam, and lower regulator to forward stitching position.
With take-up lever at highest point, raise presser foot and remove fabric.
23
Page 26

GUIDING AND SUPPORTING FABRIC
Most fabrics need only to be guided in front of the presser foot.
Fabrics of unusual texture and weave, filmy sheers, crepes, tricots, etc., require support while being
stitched.
For such fabrics, use the straight stitch throat plate and presser foot, and apply gentle tension to the
seam by holding the fabric in front and at the back of the presser foot as illustrated.
24
\
Page 27

PRESSURE ADJUSTMENTS
To decrease pressure, turn thumb screw upward.
To increase pressure, turn screw downward.
Decrease
Pressure is the force the presser foot exerts on fabric while it is
being stitched.
. Smooth, even handling of several thicknesses of fabric results when
pressure is correctly regulated.
Too light a pressure will result in irregular feeding which affects
both quality of stitch and evenness of seams.
Too heavy a pressure not only affects stitch and seam quality but
will mar smooth surfaces and pile fabrics.
Surface finish, as well as the weight and texture of the fabric, must
be considered in determining the amount of pressure needed.
Increase
25
Page 28
NEEDLE THREAD TENSION
STRAIGHT STITCHING
Needle thread tension too tight —
correct by setting dial to lower
number.
A perfectly locked stitch results with the upper and lower tensions balanced so that needle and bobbin
threads are drawn equally into fabric.
26
Needle thread tension too loose —
correct by setting dial to higher
number.
Page 29
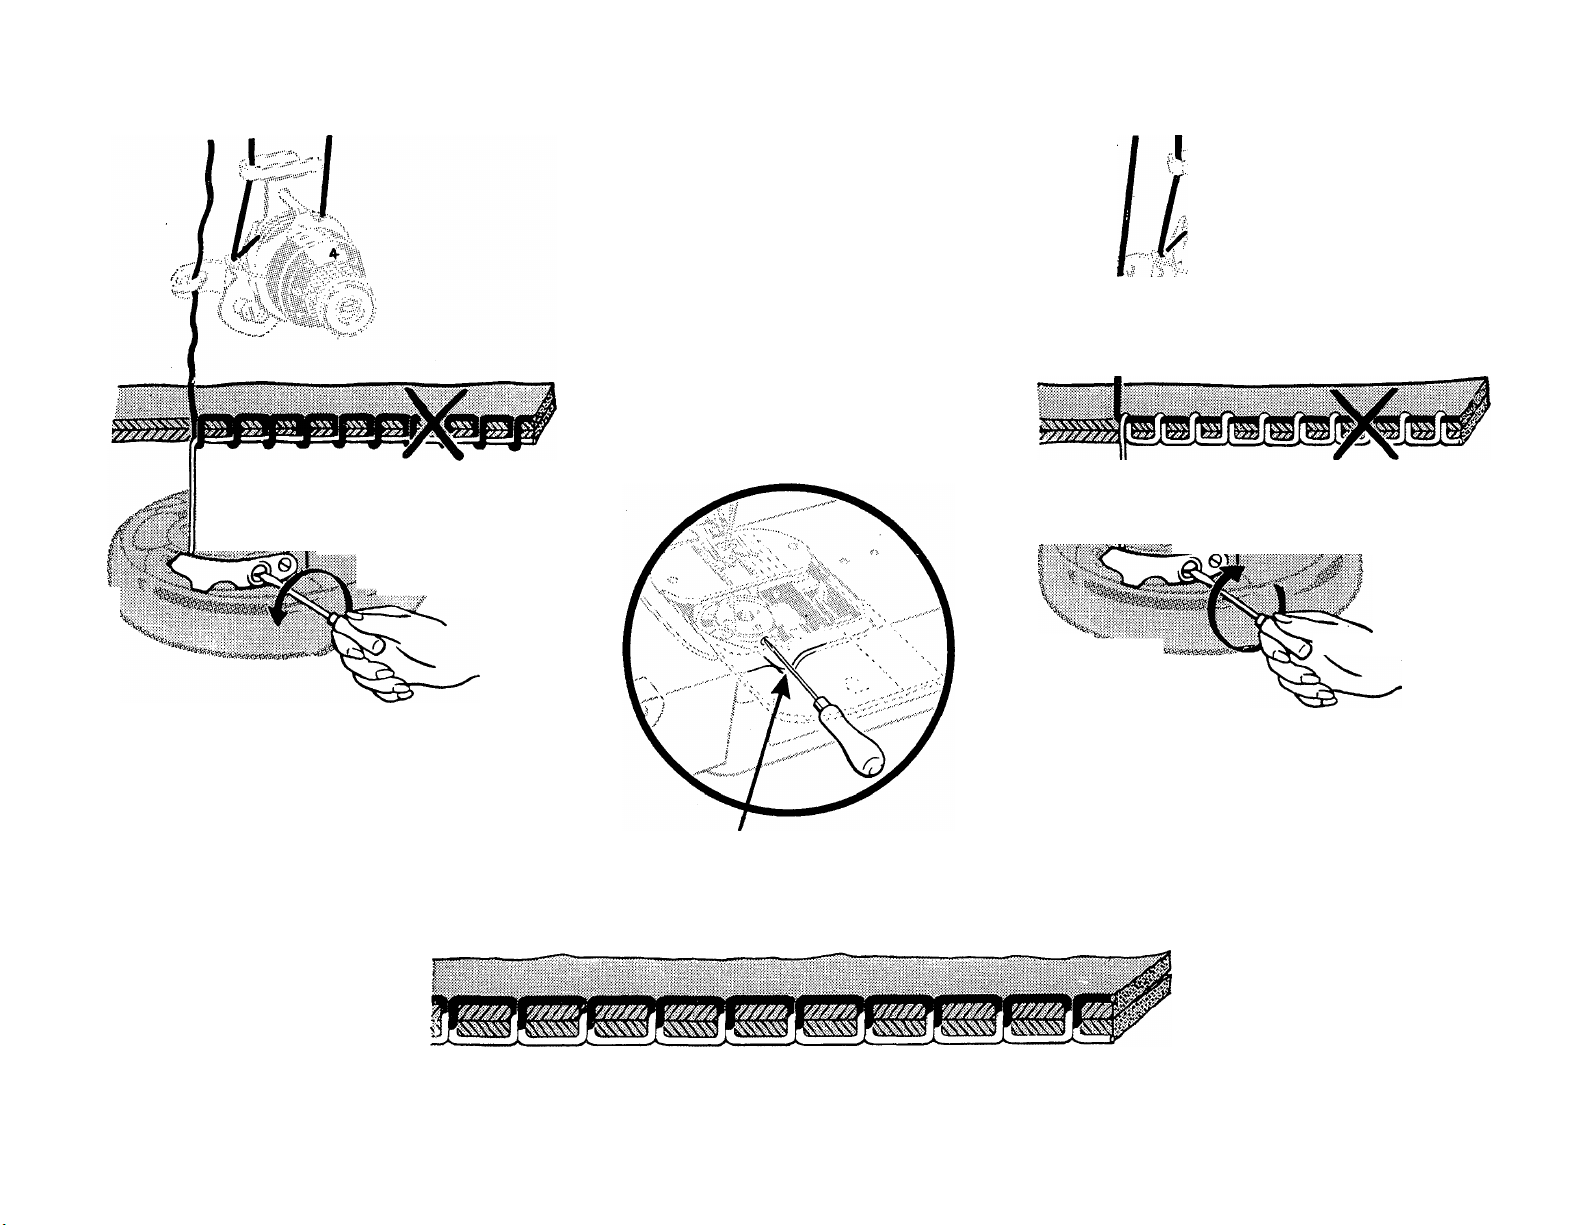
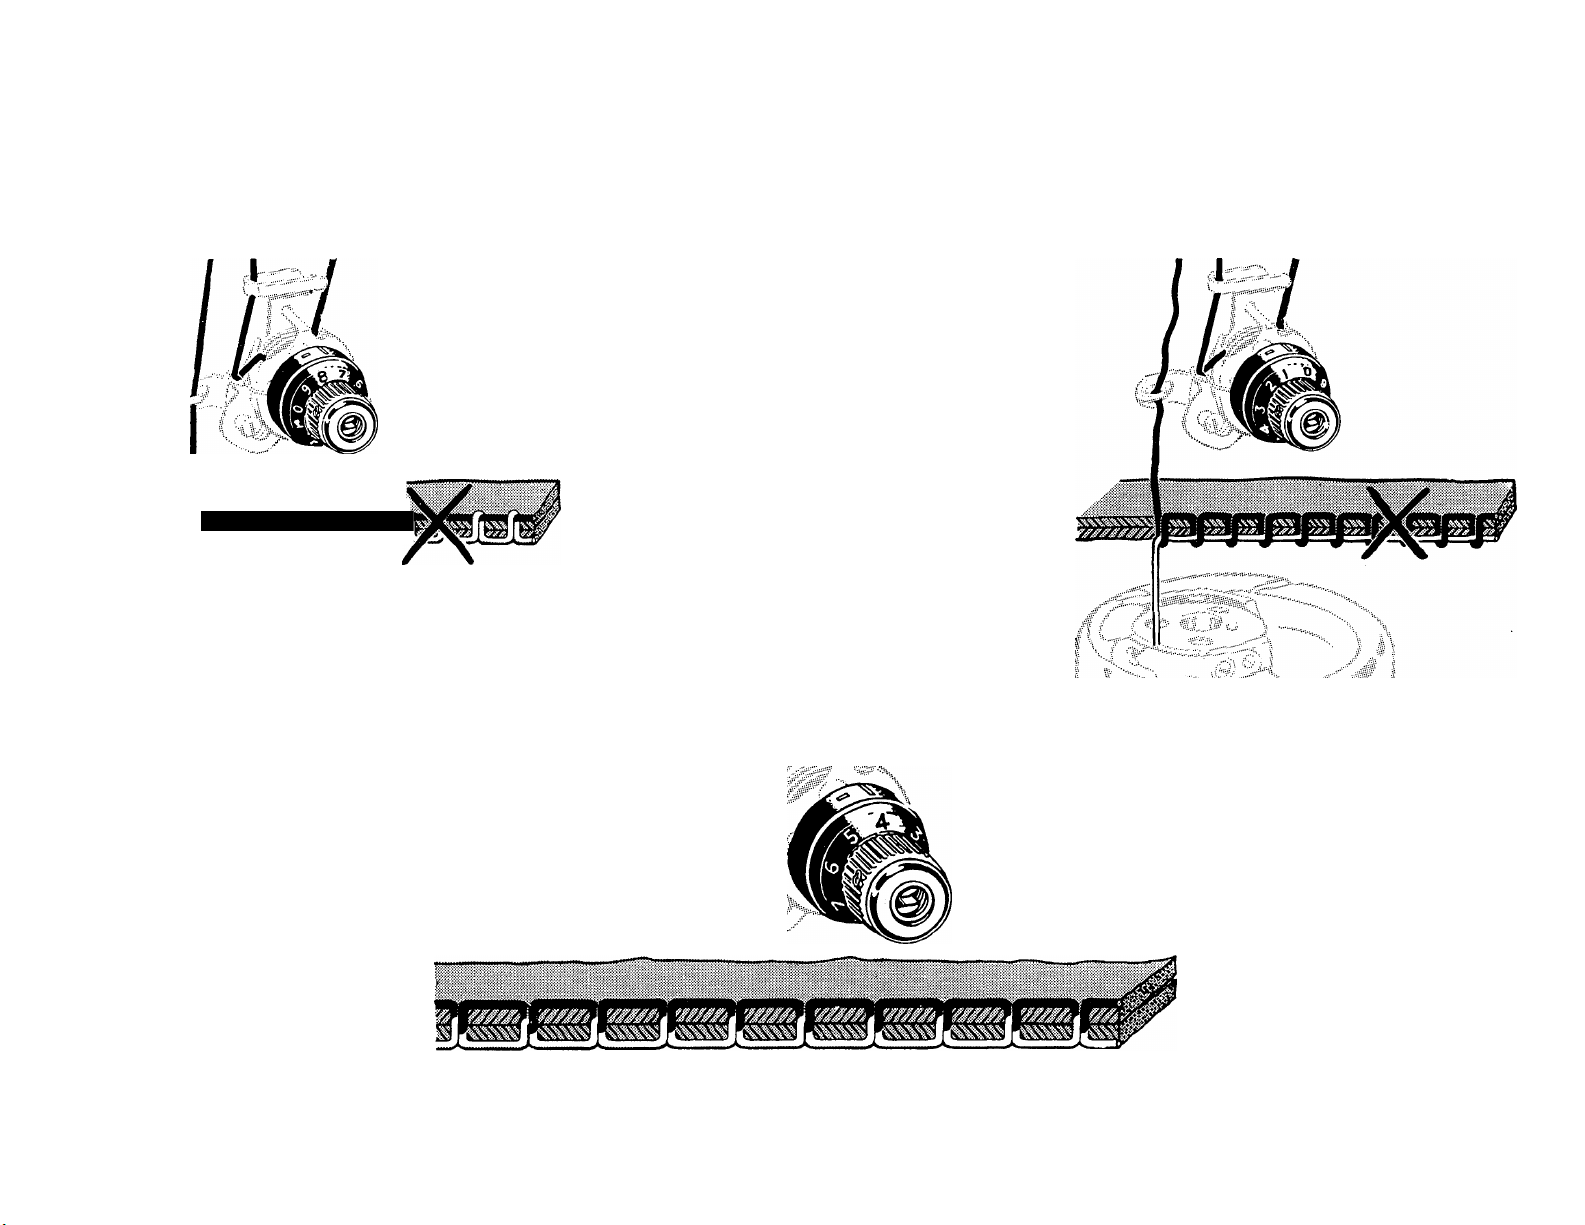
BOBBIN THREAD TENSION
STRAIGHT STITCHING
/
ex .„.-Jy/I
:r—-Hv, \ X
..m ...
\
.
Bobbin thread tension too tight
— correct by turning screw in
direction indicated.
y,iiS§i
'•'xA ''•> < •<
Bobbin thread tension too loose
— correct by turning screw in
direction indicated.
Insert for tension screwdriver
A perfectly locked stitch results with the upper and lower tensions balanced so that needle and bobbin
threads are drawn equally into fabric.
27
Page 30
ZIGZAG STITCHING EQUIPMENT
General purpose presser foot.
28
Special purpose presser foot.
Page 31

STITCH LENGTH ADJUSTMENT FOR SATIN STITCHING
..M
t
The upper indented area of the stitch indicator provides a means
of gradually shortening the stitch length.
As the regulator knob is turned, the pointer rides deeper into this
indentation until a closed satin stitch is obtained.
The exact stitch setting will vary with the texture of the fabric. It is
advisable to make a test on a scrap of self fabric, using the Special
Purpose Foot, before proceeding with the actual work.
29
Page 32

SATIN STITCH
TENSION ADJUSTMENT
Satin stitching requires a lighter needle thread
tension than straight stitching or open designs. The
wider the satin stitching the lighter the tension
required.
Wide satin stitching, Stitch Width at 5, requires
the least amount of tension. For narrower satin
stitching slightly more tension should be used.
To determine correct tension setting, a test
sample should be made on self fabric using the
Special Purpose Foot. A properly balanced satin
stitch should lie flat across the material. Any taut
ness or puckering indicates too high a needle thread
/
/
tension.
Some soft fabrics may require the addition of a
backing to ensure good stitching results. Crisp
organdie and lawn are suitable for this purpose. • xight needle thread
30
tension
Correct needle thread
tension
Page 33

PRIMARY PATTERNS
Selector settings "L" to "'SpeciaT' control primary patterns.
Selector setting "B" places stitching in central needle position.
Stitch width lever controls width of primary patterns.
See pages 16 and 17 for operation of Stitch Width and Stitch Pattern Selectors.
Do not make any adjustments while the needle is in the fabric.
M
N 0
P
u
J
U
j
Q
z>
c.
R
S
P
E
C
I
A
L
31
Page 34

PRIMARY PATTERNS
SPECIAL DISCS
These five interchangeable SPECIAL Discs, classified as Primary Patterns, are included with the
machine. Each produces an individual design.
Circled numbers (for example, @) in this book indicate SPECIAL Disc numbers.
32
Page 35

PRIMARY PATTERNS
REPLACEMENT OF SPECIAL DISCS
«
Special
To replace any of these discs, move right hand pointer of Selector off SPECIAL.
Raise the stitch chart at top of the machine. Remove disc and place another disc onto spindle, pushing
downward until disc snaps in place.
Set right hand pointer on SPECIAL to engage the disc.
33
Page 36

PRIMARY PATTERNS
CONTROL OF WIDTH
* »m
i
* * *
\ *■
I
Width of Primary Patterns is controlled by the Stitch Width Selector. As the selector lever is moved
to the right, the width of the stitch pattern is increased. Settings range from a minimum of 2 to a maxi
mum of 5. Intermediate settings may also be used.
To avoid damage to needle and fabric, do not make any selector adjustments while the needle is in
the fabric.
34
Page 37

PRIMARY PATTERNS
NEEDLE POSITIONS
Selector setting of B places stitching in central
needle position. Selector settings A and C place the
stitching in left and right needle positions at widths
less than 5.
Left
Centre Q
Special
Special
Right
Selector setting B is preferred. Settings A and C
are only used when special placement of stitching
is desired. For example: buttonholes, button'
sewing.
Page 38

COMBINATION PATTERNS AND VARIATIONS
▼
J L 2
J L3
A great variety of additional stitch patterns can be created by combining any left hand Selector setting
from D to J with any right hand Selector setting from L to SPECIAL.
A Lever setting of 3 results in a Combination Pattern. Settings of 2 and 4 produce Variations.
36
J L 4
Page 39

The needle clamp accommodates two Cata
logue 2020 (15X1) needles, generally of the
same size. However, where special effects
are desired, needles of different sizes may
be used together, with corresponding threads.
TWO NEEDLES
Loosen the thumb screw and insert the addi
tional needle from the right. (See page 7
for procedure.)
37
Page 40

TWO NEEDLES
UPPER THREADING
Use size 50 mercerised thredd.
Thread as for single needle (see page 8).
Make certain that both threads are separated by
the centre guide post of the thread control and by
the centre tension disc.
Carry only one thread through the last guide
before the needle, as shown below.
I ^
Page 41

Selector setting: AK
TWO NEEDLES
STRAIGHT STITCHING AK 2
2
I
Lever: 2 only
General purpose throat plate and presser foot.
39
Page 42

Selector setting: "A" — "L'' to “SPECIAL"
Stitch width: 2 or 3 maximum
General purpose throat plate
General purpose foot or special purpose foot
TWO NEEDLES
PRIMARY PATTERNS
11
* * 0
• 0
\ * ♦
40
Page 43

Instructions for using ATTACHMENTS...
NOTE: The attachments which are not regularly furnished with your machine are available
for separate purchase at your local SINGER SEWING CENTRE.
41
Page 44

SPECIAL PURPOSE FOOT
This light, flexible foot
is designed for satin
stitching. It provides
maximum visibility and
maneuverability while
allowing closely spaced
zigzag stitches to feed
freely.
It is ideal for accurate placement of satin stitch
ing in buttonholes, monograms, motifs and applique
work.
•:i%
%
# #
BUTTONHOLES
Selector: AL
Stitch Width: See Below
Throat plate: General purpose
Special purpose foot
Stitch length: Fine
To establish the correct stitch setting and length
of buttonhole, a sample must first be made.
Three Stitch Width settings are available. Fabric
weight and buttonhole size will determine the
selection.
The eyelet on the left side of the foot accommod
ates a filler cord.
APPLICATIONS
Buttonholes
Applique
Decorative Stitching
Couching
Monograms
42
Motifs
Page 45

BUTTONHOLES
Marking
lines
Length of
cutting space
I
Bar tacks and
side stitching
The length of cutting space, the opening through which the button passes, is measured by the width
and thickness of the button.
The length of the finished buttonhole will be the cutting space plus Vs inch for bar tacks.
Work a sample buttonhole in the same fabric as the garment. Use a double fold, duplicating a facing
and include interfacing if this has been used.
43
Page 46

BUTTONHOLES (Cont'd.)
Procedure. Set Selector (AL) and Width Lever (see page 42). Place work under needle, aligning centre
marking of buttonhole with centre score line of Special Purpose Foot.
..I..
C
® ''i .
,,..v
D
Side Stitching. Position needle in fabric at point A. Lower foot and stitch to end of marking. Leave
needle in fabric at point B. Raise foot and pivot work on needle. Lower foot. Take one stitch without
changing Width setting, bringing work to point C.
Bai Tack. Adjust Stitch Width for bar tacks and take no less than six stitches. Stop at point D.
Side Stitching. Readjust Stitch Width for side stitching. Complete work to point E. Leave needle in fabric.
Final Bar Tack. Adjust Stitch Width for bar tacks, and take no less than six stitches in reverse, ending
at point F.
44
Page 47

BUTTONHOLES (Cont'd.)
Raised or Corded Buttonholes. Either strands of
stitching thread or buttonhole twist make suitable
filler cords for raised buttonholes.
Place the spool of filler cord on the second spool
pin. Carry the cord through the first thread guide,
straight down between the centre and back tension
discs, into the large thread guide and then through
the eyelet on the Special Purpose Foot. Draw the
cord under and to the back of the foot and proceed
as for regular buttonholes.
©
F
Fastening Stitch. To secure stitching, move Stitch
Width Lever to 1 setting and take three stitches.
Remove work, draw threads to underside, fasten
and trim. Cut opening for button with sharp em
broidery scissors or buttonhole scissors.
45
Page 48

APPLIQUE
Appliqué adds beauty and interest to wearing
apparel,' linens and fabric furnishings.
Either contrasting or self fabric may be used
effectively. The most versatile stitch for appliqué
is a closely set zigzag stitch (Primary Pattern BL).
The width of this stitch may be varied to accom
modate weaves and textures of fabrics. Combina
tion Patterns and Variations present many interest
ing ways to appliqué with decorative stitching.
Preparation. There are two methods by which
Method No. 1. Set Selector and Lever for the
desired stitch pattern. Following the shape of the
design, outline it entirely with appliqué stitching.
Any excess fabric on the outer edges is trimmed
away after the stitching has been completed.
appliqué work may be done. The appropriate
9
method is determined by the fabric being used, and
a test sample is advisable.
Position the design properly and baste it to the
fabric. Attach the Special Purpose Foot to the
presser bar.
46
Page 49

APPLIQUE
Method No. 2. Set Selector and Lever to AK 3
for straight stitching. Outline the entire design with
a short stitch. Trim the raw edges down to the
stitching.
Set Selector and Lever to the stitch pattern
desired, and overedge the design with this stitch
ing. A smooth, lustrous finish results, which requires
no additional trimming.
Corded Appliqué. The Special Purpose Foot,
which provides for a filler cord, is perfect for
corded appliqué work. Gimp, crochet thread or but
tonhole twist are generally used.
See page 45 for threading.
Either method of appliqué may be used when
cording is desired. The only change in procedure
is the introduction of the cord, over which the
appliqué stitching is formed.
This stitching technique results in a raised, dimen
sional effect, and is an ideal finish for lace appliqué.
47
Page 50

MONOGRAMS AND MOTIFS
Any of the many stitch patterns are perfect for
monograms and motifs.
Select a design from the many transfer patterns
available or sketch one to suit your purpose.
Some fabrics may require a backing of lawn or
organdie.
Position the design on the right side of the
material. Trim backing away when stitching is
completed, if necessary.
To reproduce a specific portion of a stitch pattern,
first stitch on a scrap of material until the desired
point in the design is reached.
48
Remove the material from under the pr^sser foot.
Now position motif or monogram under the needle.
Lower presser foot and stitch.
This procedure is recommended for all precise
design placement. Leaves, and flower petals, for
example are created in this way.
Page 51

SEAMING SHEERS
Selector: BL
Stitch Width: 2
Throat plate: General Purpose
Special purpose foot
Stitch length: Fine (above 20)
A dainty hair-line finish is particularly desirable for the inside seams of sheer collars, facings and
yokes. Seam allowances that ordinarily show through are eliminated.
Both heavy duty thread and tatting thread make suitable filler cords (see page 45 for threading).
Follow the seam outline covering the cord. Cut away seam allowance close to line of stitching.
Turn and press.
Page 52

COUCHING
Novel effects are obtained by couching gimp,
yarn or braid with stitch patterns.
Spaced patterns are the most appropriate as they
allow the decorative cords to show as part of the
design.
The Special Purpose Foot is ideally suited to this
work (see page 45 for threading).
LACE EDGING AND INSERTION
Delicate, yet durable zigzag stitching is especially
appropriate for the application of lace edgings and
insertions.
Many decorative stitch patterns can be used
effectively serving as both finish and trim.
50
Page 53

BUTTON SEWING FOOT
This short, open foot
accommodates any
size sew-through
button, and holds it
securely for stitch
ing. The groove in
the foot allows for
insertion of a ma
chine needle, over
which a thread
shank may be form
ed.
The foQt is used in connection with the General
Purpose Feed Cover Plate.
Selector setting: AL
Stitch Width: 1 and 4
General Purpose Feed Cover Plate
Button sewing foot
Stitch length: above 20
Space between holes in button determines Stitch Width settings. Numbers 1 and 4 generally apply to
standard buttons. Number 1 setting is constant, but 4 can be increased or decreased to accommodate
buttons with unusual spacing.
Set Selector at AL and Stitch Width at 1. Attach general purpose feed cover plate to machine in place
of regular throat plate in same manner as instructed on page 18.
Position button under foot so that needle will enter into left hole. Lower foot. Turn hand wheel toward
you until needle rises out of fabric and is just above foot.
51
Page 54

BUTTON SEWING FOOT
Set Lever at 4. The needle should then enter into
the right hole of the button. Take approximately
six zigzag stitches in this position. End at the left
side.
To fasten stitching, adjust to number 1 Stitch
Width setting and take approximately three stitches.
THREAD SHANK
In order to form a shank, stitching is worked
over a regular machine needle. Position button and
lower button foot. Place needle in the groove of
the .foot so t];ie point enters the hole.
A larger shank results when the heavy end of
the needle is utilized.
52
Page 55

Used with the general purpose throat plate this
'ig:; ^
iiiil % <g:
SEAMS
LINGERIE SEAMS
Dainty lingerie seams are made durable and rip-
proof with zigzag stitching (BL 2V2). After straight
stitching the fitted seam on the wrong side, press
both seam allowances in the same direction. From
the right side, top stitch with a fine zigzag setting,
letting the needle enter the seam line and then the
seam thickness. Particularly good where flat bias
seams are desired.
foot provides a wide needle slot which accommo
dates all stitch settings and can be used for most
sewing operations.
APPLICATIONS
Seams and Darts Automatic Scalloping
Mending and Maintenance
Seam Finishes
53
Page 56

SEAMS
FLAT FELLED SEAMS
Zigzag stitching gives strength and durability to
flat felled seams.
Form the seam to the right side of the fabric,
taking full seam allowance, using a zigzag stitch
(BL 3).
Press the seam open, then fold and press the
two edges together, keeping the right side of the
zigzag stitch uppermost.
Trim away half the under seam edge.
Fold the upper seam edge evenly over the trim
med seam, and top stitch.
KNIT FABRIC SEAMS
A fine zigzag stitch (BL IV2) is ideal for seaming
knit fabrics. Particularly desirable for underarm
seams, or other seams where elasticity and give
are needed.
For neckline and waistline seams, where a stay
is needed to prevent undue stretching, this same
stitch can be used to apply seam tape. To ensure
a flat, smooth finish, position the seam tape with
the edge exactly on the sam line. If seam is cur
ved, pre-shape tape to fit by steaming, and baste
in place.
Stitch, allowing the needle alternately to enter
the seam tape and seam line.
>.saw®l
54
'< '. .J
Page 57

SEAM FINISHES
Seam edges support the garment and should be given a durable finish where fabrics have a tendency
to fray.
The zigzag stitch BL is ideaifor such finishing. Place the stitching near the edge of the seam allowance,
and then trim away excess fabric.
For an overedged seam, the blind stitch BO makes a durable bulkless finish. Good fgr straight grain,
lengthwise seams.
Seam edges should be trimmed evenly, and the stitch then formed over the raw edge.
Page 58

DARTS
Darts provide fit and contour in a garment and
should be accurately stitched.
A straight stitch dart (AK 3) is usually formed
by stitching from the seam edge, tapering grad
ually to the point, where the last 3 or 4 stitches
parallel the fold. Stitch beyond the fabric to form
a thread chain V2 to V4 inch in length. Tie the thread
ends into a single knot close to the stitching.
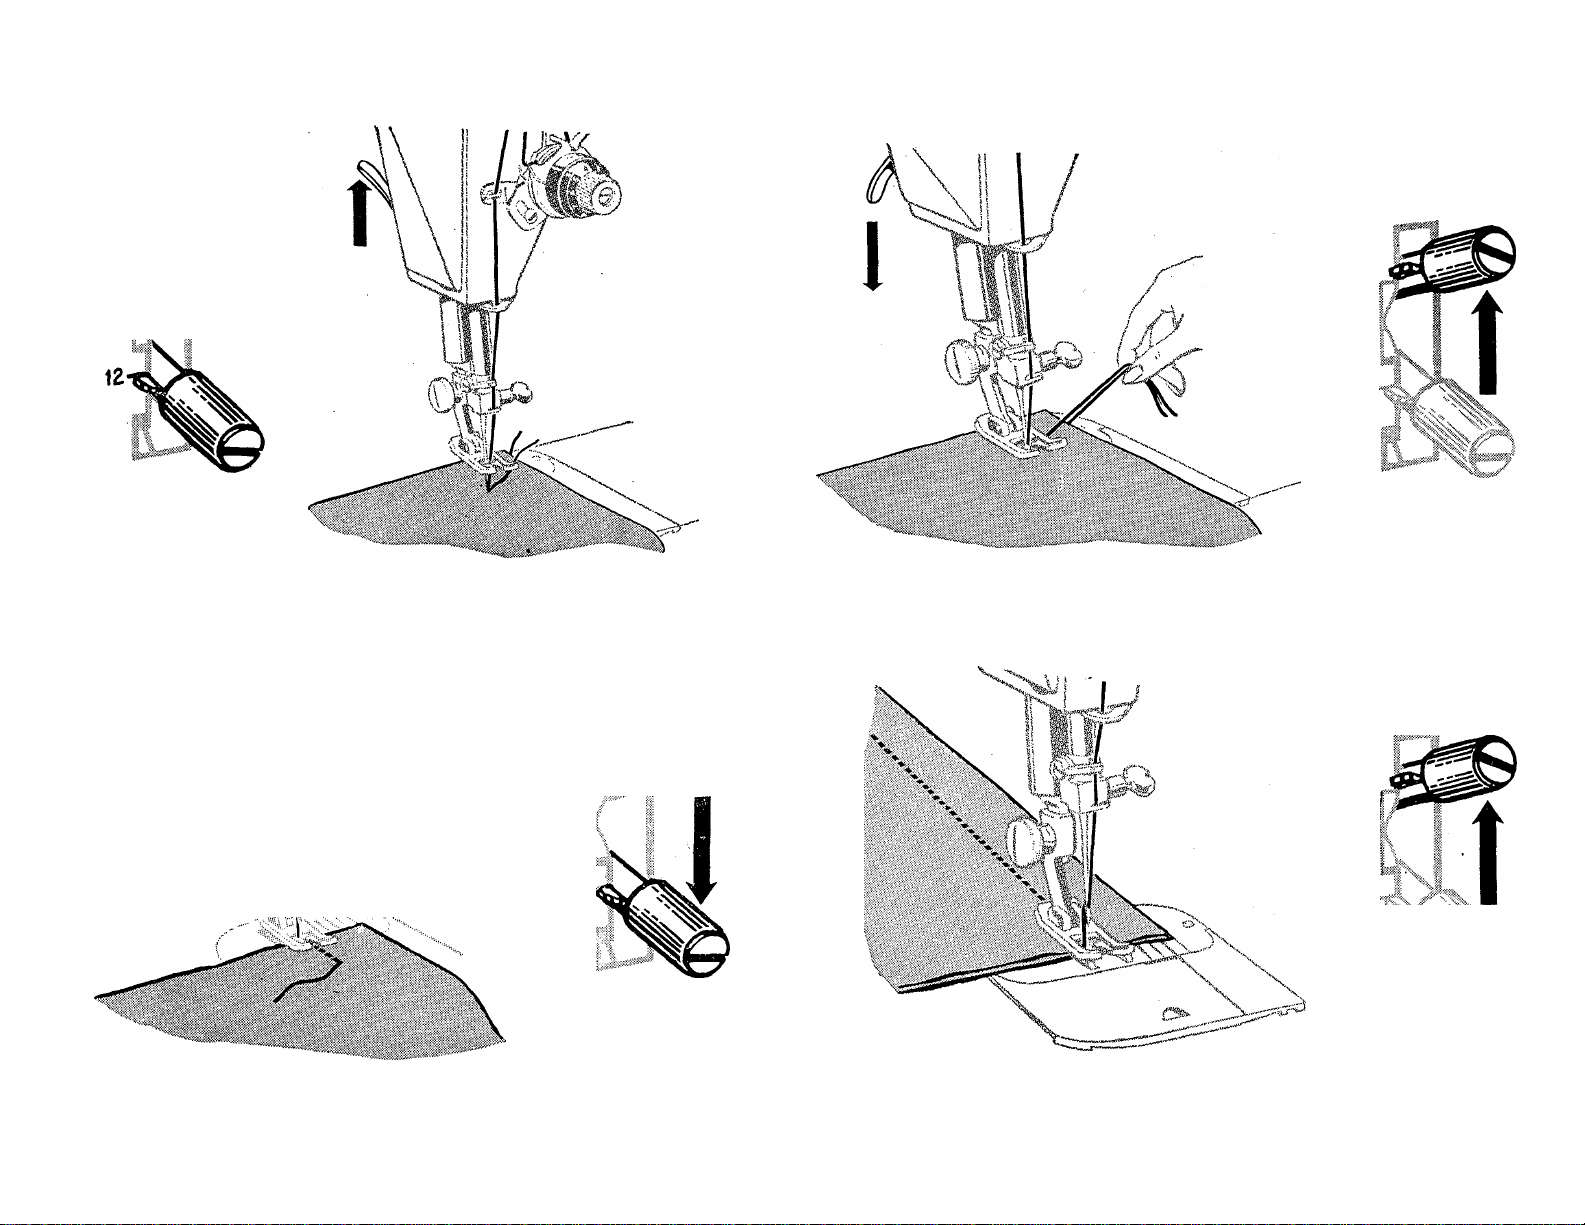
SINGLE THREAD DARTS
Darts add styling and interest when stitched with
the fold to the outside of garment. Thread ends at
the point of the dart are eliminated when the single
thread principle is employed.
Unthread the needle. Use the thread leading off
the bobbin and rethread the needle from back
to front. Tie bobbin and upper threads together.
Draw bobbin thread up
through threading points,
winding enough on the ..i.,
spool to complete a single
dart. Lower the needle
into the very edge of the
fold at the point of the
dart. Take any slack out
56
of the thread by turning
the spool. Lower the pres
ser foot and stitch care
fully toward the seam
edge.
This method is also
ideal for inside darts in
sheer fabrics as thread
ends are eliminated at the
point of the dart.
Page 59

DARTS IN INTERFACING
Non-woven interfacings can be shaped without
bulk with zigzag stitching. Selector setting BL or
BQ may be used.
Cut out the dart allowance on the stitching line
and bring the raw edges together. Pin, over a
muslin stay, and stitch. Back stitch at both ends.
BLANKET BINDING
The multiple stitch zigzag (BQ) is an excellent
stitch for applying blanket bindings and affords
both a decorative and durable finish. Remove worn
binding. Baste new binding securely in place and
stitch. Adjust pressure if necessary, to accommo
date the thickness of the blanket.
57
Page 60

MENDING
Zigzag stitching is well suited for all types of
household mending. Selector setting BQ provides
a firm, flexible bond for the repair of rents and
tears, and is ideal for the reinforcement and ap
plication of elastic. Stitch length and width are
regulated according to need.
Rent or Tear. Trim away ragged edges. Place
an underlay to the wrong side of the tear for rein
forcement. Using the multiple stitch zigzag (BQ)
follow the line of the tear bringing the edges to
gether. Shorten the stitch length at ends and cor
ners to give extra strength.
58
Application of Elastic.
Elastic, such as used in
waist bands, must be
stretched as it is applied,
to ensure fullness re
quired in the garment.
Page 61

SCALLOPING
Dainty scalloped edges are used extensively as self trimming on blouses, dresses, lingerie and chil
dren's wear.
Perfectly formed and evenly spaced scallops are produced automatically at Selector Settings BR and
BS
BR results in a 12-stitch scallop.
BS a 24-stitch scallop.
Stitch regulator and Lever settings vary the length and depth of the scallop.
After stitching, trim seam allowance to less than Vs" and clip into the points between scallops.
Some fabrics may also need notching, for a smooth, evenly turned edge. /
Turn, gently roll out scallops between the fingers and press.
When scalloping a shaped or bias edge it is best to use an interfacing.
When forming scalloped tucks, add an extra V4" to tuck allowance for seaming.
Page 62

The seam guide aids
in attaining uniformity
of seam width. It provi
des for stitching to be spaced at any distance bet
ween Va" to IV4" from the edge of the fabric.
SEAMS
To guide seam stitching straight and parallel to
the edge of the fabric, adjust the attachment for
proper seam width. Align the guide with the presser
foot. (Set Selector at AK, Lever at 3.)
Pin seam edges and baste if necessary. Hand
basting can be eliminated on easy-to-handle fab
rics. Place pins with the points toward the seam
edge so they nip into the fabric at the stitching
line. The hinged presser foot will ride freely over
the points. Guide the fabric edges lightly against
the guide while stitching.
APPLICATIONS
Seams Blind Stitching
Top Stitching Decorative Stitching
The attachment is used in connection with a
presser foot.
It is secured to the bed of the machine in either
of the threaded holes to the right of the needle.
60
Page 63

SEAMS (Cont'd.)
TOP STITCHING
Curved seams require additional treatment in
handling. A shorter stitch will provide greater
elasticity and strength. Set the attachment at an
angle so that the end closest to the needle acts
as a guide.
A simple and practical way to accent the lines
of a garment and at the same time give additional
firmness.
Either single or multiple rows of stitching can
be expertly placed along lapels and facing edges,
round collars and pockets and as a hem finish.
A subtle effect may be achieved by using straight
stitching, or a decorative touch may be added by
using any of the attractive stitch patterns accom
plished with this machine.
/
/
Page 64

BLIND STITCHED HEMS
Selector setting: BO
Stitch Width: 2 — 5
Stitch length: 10 — 20
Presser foot: General purpose
Throat plate: General purpose seam guide
Blind stitching provides a durable hem finish that
is almost invisible and comparable to hand sewing.
Mark, turn and press hem in the usual way. Baste
a guide line V4" from the top of the hem edge.
Place the hem edge over the feed of the machine,
turn back the bulk of the fabric to the line of bast
ing, thereby creating a soft fold.
Position the work so that straight stitches are
made on the hem edge and sideways stitches pierce
the fold.
Adjust the seam guide over the right toe of the
presser foot until it rests next to the soft fold. While
stitching, feed the fold against the flat of the guide.
When stitching is completed, swing the seam
guide out of position before raising presser foot.
A test sample should be made to determine stitch
width and stitch length for weight and texture of
fabric used.
62
Page 65

THE CORDING FOOT
pins, heavy layers of fabric or cross seams. It is attached to the machine
in place of the regular presser foot, and may be adjusted to either the
be used.
•f: -i: #
# # # # f: |! # # # 'Is i| # # # # # t
This foot is designed to facilitate the placing of stitching close to a
raised edge. The hinged feature of this foot ensures even feeding over
right or left side of the needle. Straight stitch or zigzag settings may
APPLICATIONS
Zip Fastener Insertions
Corded Seams
Preparation. Secure the cording foot to the pres
ser bar as you would the regular presser foot. Set
Selector and Lever. Adjustment to the right or left
of the needle is made by loosening the thumb screw
Tubular Cording
Slip Cover Piping
at the back. Check the position of the foot by
lowering the needle into the side notch, making sure
it clears the foot. Lock it into position bv tightening
the thumb screw.
63
Page 66

ZIP FASTENER INSERTION
Straight stitch setting: AK 3
Throat plate: General purpose
Cording foot
Many different types of zips are available for
everything you sew. There are several satisfactory
methods for insertion. Detailed sewing instructions
are included in zip packet. For any method used,
the Cording Foot enables you to form an even line
of stitching close to the zip.
When the zip is to the right of the needle —
• Adjust the Cording Foot to the left of the needle.
When the zip is to the left of the needle —•
• Adjust the Cording Foot to the right of the
needle.
64
Page 67

BLIND STITCHED ZIP FASTENER INSERTION
Selector setting: BO
Stitch Width: 2Vi or 3
Throat plate: General purpose
Stitch length: 12
Cording foot
Blind stitching the final step of a zip insertion
results in a fine finish that is almost invisible and
comparable to hand sewing. Particularly suitable
for chiffons, sheers, velvets and all delicate fabrics
where top stitching would be too harsh.
Allow a Vs" seam allowance. Start the insertion
in the regular way but omit final step.
Work from the right side of the garment and pin
the front of the zip tape into position.
Roll the work over finger to ease fabric and pin
through all thicknesses. Baste about Vs" from seam
line to provide guide for blind stitching. Remove
pins.
Set stitch and adjust cording foot to the right
side of the needle.
Turn garment inside out. Place zip tape over
feed of machine and turn back the front section of
garment to line of basting, creating a soft fold.
Position work so that the straight line of stitching
is made through front seam allowance and zip tape,
and the sideways stitch pierces a few threads of the
fold. Lower presser bar and stitch slowly. Remove
bastings. Press.
65
Page 68

CORDED PIPING
Straight stitch setting: AK 3
Throat plate: General purpose or straight stitch
Cording foot
Piping cord comes in a variety of sizes and, when covered with a firmly woven fabric, makes a piping
that is an excellent seam finish.
This piping is prepared in advance and then stitched into the seam. Cut a true bias strip IV4 inches
wide, plus three times the width of the cord, of either self or contrasting fabric. Sew strips together on
the lengthwise grain to obtain desired length.
Adjust cording foot to the left side of the needle. Encase the cord in the bias strip, raw edges even.
Lower presser bar. Stitch close to the cord, applying gentle tension to bias strip in front and back of the
cording foot. Use a stitch length slightly longer than for regular seaming. Do not crowd the stitching
against the cord.
66
Page 69

CORDED SEAMS
Straight stitch setting: AK 3
Throat plate: General purpose or straight stitch
Cording foot
The corded seam is a professional treatment for
slip covers, children's clothes, blouses and lingerie.
When cording a seam the cording foot is usually
adjusted to the right of the needle so that the bulk
of the work will fall to the left.
Attach the piping to the right side of a single
seam edge, with the same stitch length used to
make the piping
foot next to the cord, but do not crowd.
(page 66). Guide the edge of the
Place the attached piping over the second seam
edge, and pin or baste together.
Keep the first stitching uppermost as a guide and
position the seam under needle. Stitch, this time
crowding the foot against the cord.
This method produces evenly joined seam edges
and tightly set welting.
Curved seams are corded as easily as straight
seams, except that a shorter stitch length is used.
Since the seam allowance of the welting is bias, it
is not difficult to shape it to the seam.
67
Page 70

THE NARROW HEMMER
* #■ is i # #
iS; # % si: is
iil ;;ii' jii-
:*■ '-'i:-
Fine hems
Edging ruffles
Hemmed seams
Straight stitch setting: AK 3
Throat plate: Straight stitch
Narrow hemmer
The narrow hemmer forms
and stitches a perfectly turn
ed hem without basting or
pressing. It is attached to
the machine in place of the
regular presser foot.
APPLICATIONS
Hemming with lace
Lingerie finishes
the fabric under the foot and stitch the creased fold
for several stitches. Hold the thread ends in the left
hand and guide the raw edge in front of the hem
mer evenly into the scroll. Sew slowly, still holding
thread ends until the hem is well started.
Soft fabrics will enter the scroll best with the foot
down; firm, crisp materials with the foot raised.
Even feeding is essential to good hemming. The
same width of fabric must be kept in the scroll of
the hemmer at all times. A little practice will result
in perfectly formed hems.
HEMMING
Crease a double Vs" fold for about 2 inches along
the edge of the fabric to be hemmed. Draw the
bobbin and needle threads under the hemmer. Place
68
Page 71

HEMMED SEAMS
DECORATIVE HEMS
Straight stitch setting: AK 3
Throat plate: Straight stitch
Narrow hemmer
A hemmed seam is applied where a fine narrow
seam is appropriate. Allow a scant V4" seam allo
wance. With both sides of fabric together, place
upper layer Vs" to left of lower layer. Insert two
fabric edges into hemmer and proceed as for plain
hem.
Selector: All settings
Stitch Width: 2 to 4
Throat plate: General purpose
Narrow hemmer
Narrow hem edges can be turned and decorated
in one operation using the narrow hemmer and a
stitch pattern. This time-saving finish is especially
suited to ruffle edges and aprons.
Page 72

HEMMING WITH LACE
Selector setting: BL
Stitch Width: 3
Throat plate: General purpose
Narrow hemmer
Lace edgings can be applied with the Narrow
Hemmer to trim lingerie hems, children's clothes,
etc.
Lace Applied Over Hem. Fold and start the hem
in the usual way. Starting about 1" down from the
end of the lace, place the selvage under the needle
and lower needle to hold lace firmly. Raise the foot
slightly and slip the lace under the back portion
of the foot, without disturbing the position of the
fabric. Stitch slowly, guiding the fabric with the
right hand, the lace with the left. Take care not to
stretch the lace.
Lace Applied Under Hem. When using lace un
derneath the fold of a hem, the procedure is the
same as when making a hemmed seam. Slip the
lace in from the left as you would the second piece
of fabric. This method is used where a neat finish
is desired on both sides of the material.
70
Page 73

Commercial single fold bias tape is inserted from
Adjusting
lug
Scroll for
unfolded
binding
Slot for
folded bias
tape
Selector settings: All
Throat plate: General purpose
Guide
pins
the right into the slot at the wide end of the scroll.
Unfolded bias wide is inserted into the open
ing at the end of the scroll.
Cut binding diagonally and pull through the
scroll until evenly folded edges are under the
needle. Free length of binding is held between the
guide pins.
Insert the edge to be bound into the centre of
the scroll. Position stitching by moving the scroll
portion of the binder to the right or left by means
of the adjusting lug.
The multi-slotted binder is used to apply com
mercial binding as well as self-fabric bias to an un
finished edge. This colourful trimming is attractive
when applied to children's wear, aprons and house
hold linens. It is a practical finish for seam edges
that fray and for making bound seams.
71
Page 74

MULTI-SLOTTED BINDER (Cont'd.)
Curved edges require slightly different fabric handling from straight edges. Inside curves are straigh
tened as they are fed into the binder. If fabric is soft and has a tendency to stretch, reinforce the edge
with a single row of stitching before binding.
Outside curves tend to lead away from the centre slot of the scroll and should be guided so that a full
seam width is taken at the needle point. Do not attempt to pull or straighten fabric into the full length of
the scroll.
72
Page 75

fi' %
m % m m # -is- # # # #' ü ü ì* * # # -i? « » # ■# # # 'i? i
Fork
Arm
Adjusting
Finger
Adjusting
Lever
Straight stitch setting: AK 3
Throat plate: Straight stitch
Ruffler
Adjusting Points
The adjusting lever sets the ruffler for gathers or
pleats. The number 1 space setting is for gathers
and places fullness at every stitch. Numbers 6 and
12 are space settings for pleats, spacing them 6 or
12 stitches apart. The star is for straight stitching
and is used when grouping gathers or pleats.
The adjusting finger is used only for pleating
and affects the width of the pleat. It is thrown out
of action by bringing it out of contact with the
adjusting screw.
This attachment offers a simple and effective way
to make gathered and pleated ruffles. Ruffles may
be made separately or made and applied at the
same time. The ruffler is attached to the machine
in place ctf the regular presser foot and is used with
a straight stitch setting only.
The adjusting screw regulates the fullness of
gathers or pleats. When turned inward to its limit
with the adjusting finger in place, the attachment
is set for its deepest pleat. When turned outward
to its limit, with the adjusting finger out of action,
the ruffler gives only a hint of fullness.
73
Page 76

THE RÜFFLER (Cont'd.)
Activating Parts
The ruffling blade and the separator blade are
of blue steel and hold the material to be gathered
between them. The ruffling blade forms the gathers
or pleats by carrying the fabric to the needle
according to the spacing and fullness to which the
ruffler is adjusted. The separator guide is slotted to
guide seam edges evenly and to separate the ruffle
strip from the material to which the ruffle is
attached.
Gathering
• Set adjusting lever on Number 1 setting and
throw adjusting finger out of action.
• Turn adjusting screw for amount of fullness
desired and set stitch length to space fullness.
Turn screw in for more fullness; turn out for
less fullness.
Preparation
• Raise needle to its highest point.
• Locate ruffler on presser bar with fork arm over
needle clamp screw.. Securely tighten both
presser bar and needle clamp screws.
74
Page 77

THE RÜFFLER (Cont'd.)
Length of sewing machine stitch also affects ruffle
fullness. Since a given attachment setting puts an
equal amount of fullness into each stitch regardless
of its length, shortening the stitch (more stitches to
the inch) makes ruffle fuller; lengthening the stitch
(fewer stitches to the inch) makes it less full. For
fine, closely spaced gathering, use a short stitch
and an outward adjustment of adjusting screw. For
deeper, less closely spaced gathering, turn adjust
ing screw inward and use a medium stitch length.
Ruffling
Material
Attaching Fulls
• Place strip to be gathered between two blue
blades and through first separator guide.
• Place material to which full is to be attached
between separator blade and feed of machine.
• Proceed as for plain gathering.
Right sides of fabric are placed together when
the seam is to fall to the inside.
• Insert material to be gathered between blue
blades and through first separator guide.
• Draw material to back of needle.
• Lower presser bar and stitch.
Fabric texture influences performance of ruffler
as well as results. Soft fabrics, cut on crosswise
grain, are best adapted for gathered fulls. Always
test stitch length and ruffler setting on a scrap of
self-fabric before proceeding with the actual work.
75
Page 78

THE RÜFFLER (Cont'd.)
Pleating
• Move adjusting lever to desired space setting
for pleats either 6 or 12 stitches apart.
•' Set stitch length.
For deepest pleat, set adjusting finger and turn
adjusting screw inward to. its maximum setting. For
smaller pleats, turn adjusting screw outward.
A short stitch places pleats more closely together;
a long stitch separates the pleats for a greater
distance.
• Insert fabric to be pleated between blue blades
and into first separator guide.
• Lower presser bar and stitch.
Crisp fabrics cut on the crosswise grain form the
sharpest pleats. Glazed fabrics handle best if the
glazed side is downward and the soft backing is
next to the ruffler blade.
Group pleating
By using the star setting (straight stitching) alter
nately with 6 or 12 space setting, pleats are formed
in groups. Even spacing between groups is accomp
lished by counting the number of stitches.
76
Page 79

DARNING AND EMBROIDERY FOOT
This attachment is an aid to
all who desire perfection in free
motion darning and embroidery
work.
The foot firmly holds the fabric
as the needle enters and rises
from the work, while fully re
vealing the line of design to be
followed.
Free motion work darning
Straight stitch setting: AK 3
Feed cover plate
Darning and embroidery foot
Stitch length: Above 20
Trim ragged edges from area to be darned.
Centre worn section in embroidery hoops.
Attach feed cover plate to machine bed in place
of regular throat plate.
Locate darning and embroidery foot on presser
bar with lifting finger over needle clamp screw.
# i « iif # # i?? # # # ■ $;; ils 1 ■ ?; •i? ® ® s? w ii; ;?■ ai- iK * ij.
i
• Position work under needle and lower presser
bar. Hold needle thread loosely with left hand,
turn hand wheel over and draw bobbin thread
up through fabric. Hold both thread ends and
lower needle into fabric.
• Outline opening with running stitches V4" from
edge for reinforcement.
• Stitch across opening, moving hoops under need
le at a slight angle, from lower left to upper right.
Keep lines of stitching closely and evenly spaced.
• When opening is filled, turn work 90° and con
tinue stitching until darn is completed.
• Run machine at moderate speed and control
hoops with a steady continuous movement. Slow
movement of hoops will produce a short stitch;
more rapid movement lengthens the stitch.
Fairly long stitches are best for knit and tricot
fabrics; short stitches are best for cottons and
linens as they approximate weave of fabric.
77
Page 80

Selector setting: BL
Stitch Width: 2 —5
Feed cover plate
Darning and embroidery foot
Stitch length: Above 20
Script monograms and embroidery can be effec
tively accomplished with the zigzag stitch when the
free motion principle is employed.
FREE MOTION WORK
MONOGRAMS — EMBROIDERY
• Trace or mark design on right side of fabric.
• Place work in embroidery hoops large enough
to encompass entire design. Be sure fabric is
held taut.
• Attach feed cover plate to machine bed in place
of regular throat plate.
• Locate darning and embroidery foot on presser
bar with lifting finger over needle clamp screw.
• Position work under needle and lower presser
bar. Bring bobbin thread up through fabric at
start of design. Hold both thread ends to start
stitching.
78
• Move hoops slowly, following outline of design.
Maintain an even rate of speed so that stitches
are uniformly placed.
Slow movement of hoops produces a close satin
stitch; more rapid movement lengthens the stitch
and results in an open effect.
Shading stitches from wide to narrow is controll
ed by the angle at which work is placed and moved
under needle.
A test sample should always- be made before
proceeding with the actual work to determine stitch
setting and spacing. Some fabrics may require
addition of un underlay of crisp lawn or organdie.
Page 81

DECORATIVE STITCH PATTERNS
Examples of Stitch Patterns and their Selector Settings
gggn __ MiB HugM gng| mill mm imi ims ims mm mmi hééi mM mm mm mM ìmé imk mm mm mMi mmm imm mms mm
AnJTJTjnjriTLJTJrUVinjlAriJTjyTJTJTJVT^^
DP4
DS (D 2
DS (D 3
EP2
F02
FR2
FS © 3
79
Page 82

DECORATIVE STITCH PATTERNS
Examples of Stitch Patterns and their Selector Settings
UJiUiMAMAJlM^jlMiJljlJUjLMjUuUUjUAAJLÌMjlMUÌ%MJuMMU>Ml^
GM 4
GP 4
GS (D 2
«4> *4» -4^^
GS @ 4
HS (3) 4
■v/VAySj\Ayv^j\Ays,rNysyv\yvAy\/\y\Ayv\/\Aj\/\Au^v\AySj\A.AySj\/\A7\/^^
IL2
IS 0 4
80
Page 83

APPLICATIONS
OF THE
CYLINDER BED
FEATURE
81
Page 84

Page 85

83
Page 86

84
Page 87

85
Page 88

i
.
1
.1 '
. i-
i :X’
• ■ • '-ÿ'
? ■:. í
Il I
y
y
/
/
•Ï
l'íSíÉiíisiSsíííS:?
|í!:;Sf;S!í|;í||í^
ifcl
^lí
....
il
»%;'ÂiiiÉÉS4
'Í
àïii'ïïiiSibiSiïviis^iHi®
,y»''"' y V’Vi
,y
4:î:
..
' - •"'■ ■ " • ’• ^
Т1тгтгУфТ'
I Ч|!”;* ;
^"4 ' '■ '■-i”'
У/Д î|fe«'S '.5>¿
i V ■*'Í , ^
' ï> Й ' o
-» -1 s ä ; i l
%■ 511Щ ;l|
I - Aljli \|l
ШЩ W'W-
ШЩ ¡‘-f
{ il
'"‘'»»sa.
iÎ'SIgïàÂSi |v Í': r
"i, ' ü/'
•ууГ'"
■J û
'''“»«.о.Иёиздд^
' ' ‘ . 1
Ф?жУг-М J'*'"'r u I
y : У . -r
• vi _^.У'
/ y^".
w/-
ry ■
:,i
■:f / .
Á
Í Í '.ойГ
.' SS : ■ : ■ ■ ■ iaíy '
1^'
..
..................
'"‘'"»’S«»;
IÍ •
s ¡
rsw
.
'■•Чч Ш
'"'yj
;¿;,5:;¡:,::r%^
. ¥■
' 'ч-
1
|ì:|
l'I
i
'si-
i
i
86
1
t
I
ii
Page 89

TO CLEAN THE MACHINE
Your sewing machine was built to exacting
standards of precision and workmanship. Its per
formance depends on the care and treatment it
receives when in use and before storing it away.
When in regular use, the machine should be
cleaned periodically to remove the lint and fluff
which may have accumulated round the working
parts. To clean the bobbin case area, see instruc
tions for removing and replacing bobbin case on
pages 88 and 89. Oil the machine after each clean
ing as instructed on pages 90, 91 and 92.
If the machine is to be stored away for an inde
Clean
between
tension
discs
finite period of time, a thorough brush-cleaning to
remove all traces of lint and fluff, followed by
swabbing of all exposed parts with a lint-free brush
saturated with SINGER* Oil, is necessary to protect
the machine against rust damage. The areas that
should be cleaned and covered with a protective
coat of oil are shown in the illustration at the left.
87
Page 90

TO REMOVE THE BOBBIN CASE
V Sv-V..
Vsv<.x...
To clean hook raceway, remove bobbin case as
follows:
1. Remove throat plate (see page 18) and open
slide plate (see page 12).
2. Unlock bobbin case by lifting and pulling
holder to right as shown.
3. Remove bobbin case from machine.
4. Remove all lint, fluff, loose thread ends or any
other foreign matter which might clog the machine.
68
Page 91

Positioning stud
TO REPLACE THE BOBBIN CASE
I :l' .....
yi(Ci5i
...
\ / i
'"'"I
5. Replace bobbin case so that groove under tension spring fits on hook raceway and fork of case
straddles positioning stud.
6. Push bobbin case holder to left as shown until it snaps down into lock position.
7. Close bed slide and replace throat plate.
89
Page 92

TO LUBRICATE THE MACHINE
Use SINGER Oil and SINGER Lubricant!
Both are extra quality products especially pre
pared for sewing machines, and should always be
used in the care of your 431.
90
Clean the machine periodically as instructed on
page 87.
Apply a drop of oil to each place indicated.
Remove screws A and lift off arm top cover.
Apply a small amount of lubricant to the gears
as shown.
A tube of this lubricant can be purchased at your
Singer Sewing Centre.
Never apply Oil to these gears.
Page 93

TO LUBRICATE THE MACHINE (Cont'd.)
Swing face plate to left and oil the places indi
cated.
Open slide plate and apply a drop of oil to the
hook raceway as indicated.
Close slide plate, replace arm top cover and close
face plate.
91
Page 94

Clean
TO LUBRICATE THE MACHINE (Cont'd.)
llÉÉàSp
A '
iX,
Tilt machine back and remove thumb nut from screw B, being careful not to lose felt washer, and
remove cover from underside of machine.
Remove screw C and remove cylinder cover.
Clean hook and gear area, oil each of the places indicated, and occasionally apply a small quantity of
lubricant to teeth of gears as shown.
Replace bottom cover and cylinder cover.
The motor requires no lubrication.
92
Page 95

ELECTRICAL INFORMATION
The SINGER* Electric Motor in the electric ma
chine is furnished for operation on an alternating
or direct current. Orders must state the catalogue
number of the motor, or the voltage, and in the
case of alternating current, the number of cycles.
Before Inserting Electric Plug A, be sure that
voltage and cycles stamped on electrical nameplate
B are within range marked on your electric meter
installed by your power company.
Electrical Connections for Machine. Push 3-pin
terminal plug C on 3-pin terminal block at right of
machine and connect plug A at other end of cord
to electric outlet.
Speed Controller. The speed of machine is regu
lated by amount of pressure on the pedal of the
foot controller D or the knee lever.
93
Page 96

LIGHT
The light is turned "on" or "off" by the switch F.
To Remove Bulb. Remove screw H and lamp
cover E. Do not attempt to ynscrew bulb. Press it
into socket and at same time turn bulb over in
direction shown to unlock bulb pin G, then with
draw bulb.
To Replace Bulb. Press new bulb into socket with
bulb pin G entering slot of socket and turn it over
in direction shown to lock bulb pin G in position.
Replace lamp cover E and securely fasten it in
position with screw H.
94
Locks
5
Unlocks
Page 97

INDEX
Applications of Cylinder Bed Feature.....................................81—86
Appliqué
Attadiments
Button Sewing Foot .......... 51—52
Darning and Embroidery Foot.............................................77—78
Narrow Hemmer
General Purpose Foot
Multi-slotted Binder
Ruffler ....
Seam Guide
Special Purpose Foot.............................................................42—50
Cording Foot..........................................................................63—67
Binding
Blanket Binding, Replacing of......................................................... 57
Blind Stitdiing
Hems.............................................................................................. 62
Zip Insertion . . 65
Bobbin
Preparing for Stitdiing....................................................... . 21
Removing....................................................................................... 12
Thread Tension.............................................................................. 27
Winding.................................................................................. 9—11
Bobbin Case
Removal and Replacement....................................................88—89
Threading
Buttonholes
Corded............................................................................................ 45
Button Sewing
Cleaning the Madiine
Combination Patterns and Variations ..... 36
Illustrations............................................................................79—80
Corded Appliqué
Corded Buttonholes
Cording
Seams................................................................................... . 67
Welting.......................................................................................... 66
Cording Foot
Piping and Corded Seams ........ 66—67
Zip Insertion
Cdudiing........................................................................................... 50
Cylinder Bed, Applications
Darning and Embroidery Foot
Darning, Free Motion Work............................................................ 77
Darts...........................................................................................66—67
Interfacing ............ 67
Single Thread
.......................................
.........................................
......
...............................................................................
...............................................
............................................................................
...............................................................
.............................................................................
......
..................................................................
...................................................
.....................................................
.......
......
......................................................................... 66
......
• ... . . 46—47
......
.......................................71—72
................................
......
64—67
......
64—65
.............................................
...............................................
68—70
53—59
71—72
73—76
60—62
13
42—45
51—52
87—89
47
45
81—86
77—78
Decorative Hems
Decorative Stitch Patterns ....
Designs and Motifs ......
Detachable Cloth Plate . . . .
Elastic, Applications........................................
Electrical Information ......
Light .............................................................
Motor
Embroidery, Free Motion Work .
Features ...........................................................
Principal Parts of Machine ....
Feed Cover Plate
Button Sewing
Free Motion Work . . . . .
Filler Cord, Threading
Free Motion Work ......
Gathering.........................................................
General Purpose Foot, Applications .
Guiding and Supporting Fabric .
Hemmed Seams
Hemming with Lace
Hems
Blind Stitched...............................................
Decorative
Knit Fabric Seams
Lace
Appliqué
Edging and Insertion .....
Length of Stitch, Regulating ....
Light Bulb, Replacement ...
Lubricating
Mending
Monograms and Motifs
Free Motion Work
Motor................................................................
Multi-slotted Binder
Narrow Hemmer .......
Decorative Hems..........................................
Hemmed Seams............................................
Hemming with Lace
Needle and Thread Selection
Needle and Thread..........................................
Needle Insertion
Needle Position and Stitch Width Selector
Needle Positions . . . . . . •
......
...........................................................
.............................................
....................................................
..............................................
...............................................
.................................
.....
..............................................
..........................................
.......................................................
......................................................
..................................
................................
.................................
....................................
..............................................
......
......
......
69
79—80
48
5
58
91—94
94
93
78
2—3
14
51—52
77—78
45
77—78
74—75
53—59
24
69
70
62
69
54
47
50
15
94
90—92
58
48
78
93
71—72
68—70
69
69
70
6
7
and 37
16
36
95
Page 98

Needle Thread Tension
Satin Stitching
Straight Stitching
Needle Threading
Single................................................................................................ 8
Two................................................................................................. 38
Oiling...............................
Overcasting........................................................................................ 55
Piping................................................................................................. 66
Pleating.............................................................................................. 76
Prepare to Sew.................................................................................. 21
Pressure Adjustments...................................................................... 25
Primary Patterns.......................................................................31—35
Control of Width........................................................................... 34
Needle Positions............................................................................. 35
Special Discs...........................................................................32—33
Stitch Width and Stitch Pattern Selectors .... 31
Principal Parts of Machine
Reverse Stitching
Application................................................................
Regulation..................................................................................... 15
Ruffler.................................................
Attaching Ruffle
Gathering
Pleating
Satin Stitching
Stitch Length Adjustment
Tension Adjustment...................................................................... 30
Scalloping........................................................................................... 59
Seam Finishes.................................................................................... 55
Seam Guide................................................................................60—62
Blind Stitched Hems...................................................................... 62
Seams...............................................
Top Stitching.................................................................................. 61
Seams
Corded............................................................................................ 67
Flat Felled...................................................................................... 54
Guiding and Supporting............................................................... 24
Lingerie
Sheer Fabrics................................................................................. 49
Straight
SINGER Service.................................................................................. 4
Special Discs
Primary Patterns........................................................................... 32
Removal and Replacement . 33
Special Purpose Foot, Applications
Stitch Length
Regulator . 15
...
.........................................................................................
...............................................................
.....
......................................................................... 30
......
................................................................... 26
......
....................................................
..............................................................
......
......
................................
............................................................................
.................................
...................................................................................... 76
......
74—75
............................................................
.......................................
......
22—23
.........................................
90—92
14
. 22—23
73—76
75
29
60—61
53
42—50
96
Satin Stitch Adjustment................................................................ 29
Stitch Pattern Selector, Operation
Stitch Patterns
Combinations and Variations
Illustrations............................................................................79—80
Special Discs .
Stitch Width and Needle Position Selector
Combinations and Variations
Control of Width........................................................................... 34
Operation....................................................................................... 16
Straight Stitching
Equipment and Settings................................................................ 19
Seams......................................................................................22—24
Secondary Positions
Two Needles.................................................................................. 39
Tension Adjustments
Bobbin Thread............................................................................... 27
Needle Thread
Satin Stitching
Threading
Bobbin Case................................................................................... 13
Filler Cord..................................................................................... 45
Single Needle.................................................................................... 8
Two Needles................................................................................... 38
Throat Plate
Removal and Replacement........................................................... 18
Straight Stitch................................................................................ 19
Zigzag Stitch.................................................................................. 28
Top Stitching
Two Needles
Insertion......................................................................................... 37
Primary Patterns
Straight Stitching
Threading....................................................................................... 38
Variations and Combination Patterns
Illustrations............................................................................79—80
Winding a Bobbin..............................
Zigzag Stitching
Combinations and Variations . . . . . . . 36
Equipment.................................................................
Needle Positions . 35
Primary Patterns........................................................................... 31
Special Discs
Stitch Length Adjustment
Stitch Width Selector: Control of Width .... 34
Tension Adjustment...................................................................... 30
Two Needles.....................................:.... 40
...............................................................................
...............................................................................
....
...............................................................................
........
.
.......................................
......................................................................
......................................................
.........................................................................
.................................................................
..................................................
......................................................
......
32—33
......................................................
' . . 40
............................................
.......................................
......
............................................................
9—11
. 28
32—33
17
36
36
20
26
30
61
39
36
29
Page 99

To all whom it may concern:
The improper placing or renewal of the trademark SINGER or
any other of the trademarks of The Singer Company (all of which are
duly Registered Trademarks) on any machine that has been repaired,
rebuilt, reconditioned, or altered in any way whatsoever outside a
SINGER factory or an authorized SINGER agency is forbidden.
Page 100

For your protection
SINGER Sewing Machines are sold and serviced wherever you
see the famous SINGER and Red "S" Trademarks. When your
machine needs servicing call your SINGER SEWING CENTRE to
be sure of warranted SINGER parts and service. See address in
the telephone directory.
 Loading...