

Page 1

Owner's Manual
Manual de Instrucciones
Manuel d'instructions
SINGER
Sewing Machine
Máquina de Coser
Machine à Coudre
Model, Modelo, Modèle
384.18024000
758-800-008
Sears, Roebuck and Co., Hoffman Estates, IL 60179
Sears Canada Inc.,Toronto, Ont., M5B2B8
www.s0ars.com
Page 2

TABLE OF CONTENTS
IMPORTANT SAFETY INSTRUCTIONS
WARRANTY.................................................................8-9
........................
GETTING TO KNOW YOUR MACHINE
Cabinets and Tote bags.................................................10
Names of Parts..............................................................10
Available Accessories and Attachments
........................
12
GETTING READY TO SEW
Connecting Machine to Pow/er Supply
For Your Safety
When Finished Sewing
Operating Instructions....................................................14
Controlling Sewing Speed
Pressure Adjusting Lever...............................................16
Presser Foot Lifter
Thread Cutter.................................................................16
Extension Table.............................................................16
Accessory Box
Changing Needle...........................................................18
To Remove and Attach the Foot Holder
Changing Presser Feet..................................................18
Presser Foot Types
• A; Zigzag foot
• F; Satin stitch foot
• G: Blind hem stitch foot
• C: Overedge foot.........................................................20
• R: Automatic buttonhole foot.......................................20
Bobbin Winding
• Removing the hook cover plate...................................22
• Horizontal spool pin.....................................................22
• Additional spool pin
• Bobbin winding............................................................24
• inserting the bobbin.....................................................26
Threading the machine
• Threading the machine................................................28
• Drawing up bobbin thread
Adjust the Needle Thread Tension for Straight
Stitch..............................................................................30
• Tension is too tight
• Tension is too loose ....................................................30
Adjust the Needle Thread Tension for Zigzag
Stitch..............................................................................32
• Correct tension............................................................32
• Tension is too tight
• Tension is too loose.....................................................32
Stitch Selector................................................................34
Stitch Width Control.......................................................34
Stitch Length Control
Adjusting Stretch Stitch Balance
Reverse Stitch Control...................................................36
.............................................................
.................................................
.............................................
.........................................................
...............................................................
.......................................................
..............................................................
.......................................................
...............................................
........................................................
.....................................................
..................................................
...........................................
......................................................
......................................................
.....................................................
..........................
........................
22-26
....................................
14
14
14
14
16
16
18
20
20
20
20
22
28
28
30
32
36
36
STRAIGHT STITCHES
Straight Stitch
• Starting to sew
• Finishing sewing
• Seam allowance line
Turn a Square Corner....................................................40
Use the Quilter Guide
Topstitching
Quilting
To Drop or Raise the Feed Dogs
Darning ....................................................................42-44
................................................................
............................................................
.........................................................
...................................................
....................................................
...................................................................
.....................................................................
...................................
38
38
38
38
40
40
40-42
42
5
BUILT-IN STITCHES
Basic Zigzag..................................................................44
Overcasting Stitch
Overedge Stitch ............................................................46
Straight Stretch..............................................................48
Rick-rack Stretch...........................................................48
Overcast Stretch Stitching.............................................50
Serging..........................................................................50
Elastic Stretch Stitch
Stretch Patching............................................................52
Attaching Walking Foot (Optional).................................54
Attaching Hemmer Foot (Optional)
Blind Hem Stitch............................................................56
• To sew.........................................................................56
• Changing needle position
.........................................................
.....................................................
...............................
...........................................
46
52
54
56
DECORATIVE STITCHES
Lace Work.....................................................................58
Multiple Zigzag Stitch
Shell Stitch
Box Stitch
Fagoting Stitch
Two-point Shell Stitch....................................................62
Two-point Box Stitch......................................................62
Smocking.......................................................................64
Herring Bone Stretch ....................................................64
Decorative Stretch Patterns
Decorative Stitch of Geometric Patterns
....................................................................
......................................................................
....................................................
.............................................................
..........................................
.......................
58
60
60
62
64
66
BUTTONHOLE STITCHES
Auto Buttonhole........................................................68-72
• Preparation for sewing................................................68
• To sew.........................................................................68
How to Adjust Buttonhole Stitch Balance
• Corded buttonhole
Manual Buttonhole
• Manual buttonhole
......................................................
........................................................
......................................................
......................
72
74
76
76
ADDITIONAL STITCHES
Satin Stitch
Monogramming
Applique.........................................................................80
Embroidery....................................................................80
Button Sewing...............................................................82
....................................................................
.............................................................
78
78
CARING FOR YOUR MACHINE
Replacing the Light Bulb
Cleaning the Bobbin Holder
Cleaning the Hook Race and Feed Dogs
Oiling the Machine.........................................................86
Troubleshooting.............................................................88
Fabric, thread and Needle Table
...............................................
..........................................
......................
..................................
84
84
86
91
Page 3

IMPORTANT SAFETY INSTRUCTIONS
Your sewing machine is designed and constructed only for HOUSEHOLD use.
Read all instructions before using this sewing machine.
DANGER — To reduce the risk of electric shock:
1. This sewing machine should never be left unattended when plugged in. Always unplug this sewing machine from the
electric outlet immediately after using and before cleaning.
2. Always unplug before replacing a sewing machine bulb. Replace bulb with same type rated 15 Watts.
3. Do not reach for a sewing machine that has fallen into water. Unplug immediately.
4. Do not place or store this sewing machine where it can fall or be pulled into a tub or sink. Do not place or drop it into water
or other liquid.
WARNING — To reduce the risk of burns, fire, electric shock, or injury to persons:
1. Do not allow this sewing machine to be used as a toy. Close attention is necessary when this sewing machine is used by
or near children.
2. Use this sewing machine only for its intended use as described in this owner’s manual.
Use only attachments recommended by the manufacturer as contained in this owner’s manual.
3. Never operate this sewing machine if it has a damaged cord or plug, if it is not working properly, if it has been dropped
or damaged, or dropped into water.
Return this sewing machine to the nearest Sears store or service center for examination, repair, electrical or mechanical
adjustment.
4. Never operate this sewing machine with any air opening blocked. Keep ventilation openings of this sewing machine and
foot controller free from accumulation of lint, dust and loose cloth.
5. Never drop or insert any object into any opening.
6. Do not use outdoors.
7. Do not operate where aerosol (spray) products are being used or where oxygen is being administered.
8. To disconnect, turn all controls to the off (“ Q ”) position, then remove plug from outlet.
9. Do not unplug by pulling on cord.To unplug, grasp the plug, not the cord.
10. Keep fingers away from all moving parts. Special care is required around the sewing machine needle.
11. Always use the proper needle plate. The wrong plate can cause the needle to break.
12. Do not use bent needles.
13. Do not pull or push fabric while stitching. It may deflect the needle causing it to break.
14. Switch this sewing machine off (“O ”) when making any adjustment in the needle area, such as threading the needle,
changing the needle, threading the bobbin or changing the presser foot, and the like.
15. Always unplug this sewing machine from the electrical outlet when removing covers, lubricating, or when making any
other adjustments mentioned in this owner’s manual.
SAVE THESE INSTRUCTIONS
When using your sewing machine for the first few times, place a waste fabric under the presser foot and run
the machine without thread for a few minutes. Wipe away any oil which may appear.
Page 4

WARRANTY
FULL 25 YEAR WARRANTY ON DEFECT IN MATERIAL OR WORKMANSHIP
For 25 years from the date of purchase, Sears will, free of charge, repair defects in material or workmanship wh
appear in the internal mechanical part of the sewing machine.
FLILLTWO YEAR WARRANTY ON ELECTRICAL EQUIPMENT OF SEWING MACHINE
For two years from the date of purchase. Sears will, free of charge, repair defects in material or workmanship wh
appear in the electrical and electronic equipment of the sewing machine, including motor, wiring, electronic componer
switch and speed control.
FULL 90-DAY WARRANTY ON ALL PARTS AND MECHANICAL ADJUSTMENTS
For 90 days from the date of purchase. Sears will, free of charge, replace any parts and provide mechanical serv
necessary for proper operation of the sewing machine, except for normal maintenance. Warranty service is available
returning the sewing machine to the nearest Sears Service Center in the United States.
IFTHIS MACHINE IS USED FOR COMMERCIAL OR RENTAL PURPOSES,THE ABOVE WARRANTY COVERAGES APPLY FOR ONLY 90 DAYS FROM THE DATE OF PURCHASE
This warranty gives you specific legal rights, and you may also have other rights which vary from state to state.
Sears, Roebuck and Co., D/817 WA, Hoffman Estates, IL60179
GARANTIA
GARANTIA COMPLETA POR 25 AÑOS EN LA CABEZA DE LA MAQUINA DE COSER
Durante 25 años desde la fecha de la compra, Sears ofrece, libre de costo, reparar los defectos en material o de manufactura c
puedan presentarse en los componentes mecánicos de la cabeza de la máquina de coser.
GARANTIA COMPLETA POR 2 AÑOS EN EQUIPO ELECTRICO DE LA MAQUINA DE COSER
Durante 2 años desde la fecha de la compra, Sears ofrece, libre de costo, reparar los defectos en material o de manufactura c
puedan presentarse en el equipo eléctrico de la máquina de coser, incluyendo componentes eléctricos, motor, conexiones eléctric
interruptor y control de velocidad.
GARANTIA COMPLETA POR 90 DIAS SOBRETODAS LAS PARTES Y AJUSTES MECANICOS
Durante 90 días desde la fecha de la compra, Sears ofrece, libre de costo, reemplazar cualquiera parte y proveer el servicio mecan
necesario para la apropiada operación de la máquina de coser, excepto para mantenimiento normal. El servicio de garantia se pue
obtener enviando la máquina de coser al centro/departamento de Servicios Sears mas cercano en los Estados Unidos.
SI ESTA MÁQUINA DE COSER SE UTILIZA PARA PROPÓSITOS COMERCIALES O DE ALQUILER, LA COBERTURA
GARANTIA CITADA MÁS ARRIBA ES VÁLIDA UNICAMENTE DURANTE 90 DÍAS A PARTIR DE LA FECHA DE COMPRA
Esta garantiá le da a usted derechos legales específicos, pero usted puede tener también otros derechos los cuales varían de este
a estado.
Sears, Roebuck and Cp., D/817 WA, Hoffrnan Estates, IL 6017Q
................................................................................................GÁRÁÑflE...............................................................................................
GARANTIE TOTALE DE 25 ANS SUR LE MECANISME DE LA MACHINE
Pendant 25 ans, à partir de la date d’achat, Sears réparera gratuitement tout défaut de matériau ou de fabrication qui apparaîtra de
le mécanisme de votre machine.
GARANTIE TOTALE DE DEUX ANS SUR L’ÉQUIPEMENT ÉLECTRIQUE
Pendant deux ans, à partir de la date d’achat, Sears réparera gratuitement tout défaut de matériau ou de fabrication qui apparai
dans le moteur, le fil, l’interrupteur ou la commande de vitesse de marche, dans les circuits electriqu es ou électroniques.
GARANTIE TOTALE DE 90 JOURS SURTOUTES LES PIÈCES ET LA MISE AU POINT DU MÉCANISME
Pendant 90 jours, â partir de la date d’achat, Sears effectuera gratuitement tout remplacement de pièce et réglage nécessaires
au bon fonctionnement de la machine; l’entretien ordinaire étant à la charge de l’utilisateur. Pour bénéficier des avantages qu’offre
garantie ci-dessus, adressez-vous a votre magasin habituel ou au service apres-vente Sears, Partout aux États-Unis.
SI CETTE MACHINE À COUDRE SERT À DES FINS COMMERCIALES OU DE LOCATION, LA GARANTIE CI-DESSUS
LIMITE À 90 JOURS A COMPTER DE LA DATE D’ACHAT.
Cette garantie vous donne des droits légaux précis, et éventuellement d’autres droits, ceux-ci pouvant varier d’une état à une au1
Sears, Roebuck and Co., D/817 WA, Hoffman Estates, IL 60179
8
Page 5
GETTING TO KNOW YOUR MACHINE
Cabinets and Tote bags
A full line of sewing machine cabinets and Tote bags are
available through the RSOS catalog at your nearest Sears
retail store.
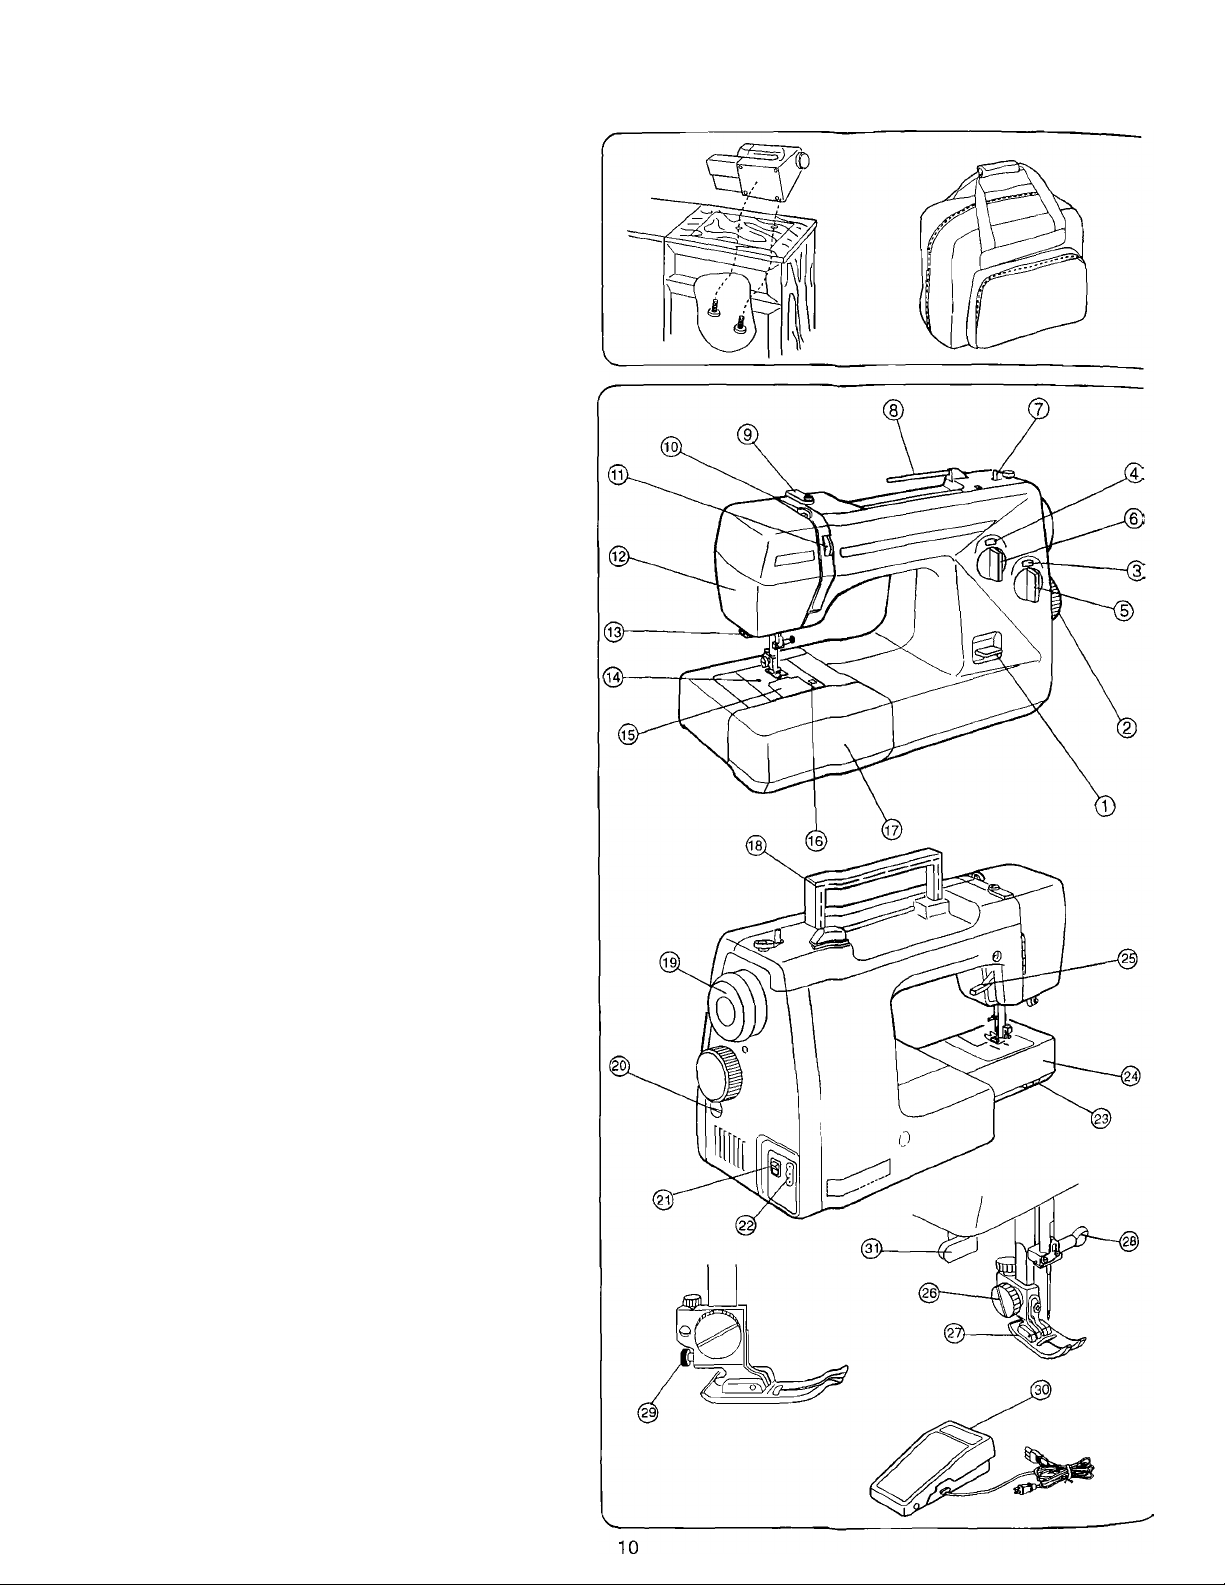
Names of Parts
© Reverse stitch control
@ Stitch selector
@ Stitch length setting display
@ Stitch width setting display
® Stitch length control
® Stitch width control
@ Bobbin winder spindle
® Spool pin
® Upper thread guide
® Thread take-up lever
(ij) Thread tension dial
® Face cover
©Thread cutter
® Needle plate
© Hook cover plate
® Hook cover plate release button
® Extension table (Accessory box)
® Carring handle
© Handwheel
© Feed balancing dial
@ Power switch
© Machine socket
© Drop feed dog lever
@ Free-arm
© Presser foot lifter
©Thumb screw
@ Presser foot
© Needle clamp screw
© Snap-on button
© Foot control
@ Buttonhole lever
Page 6
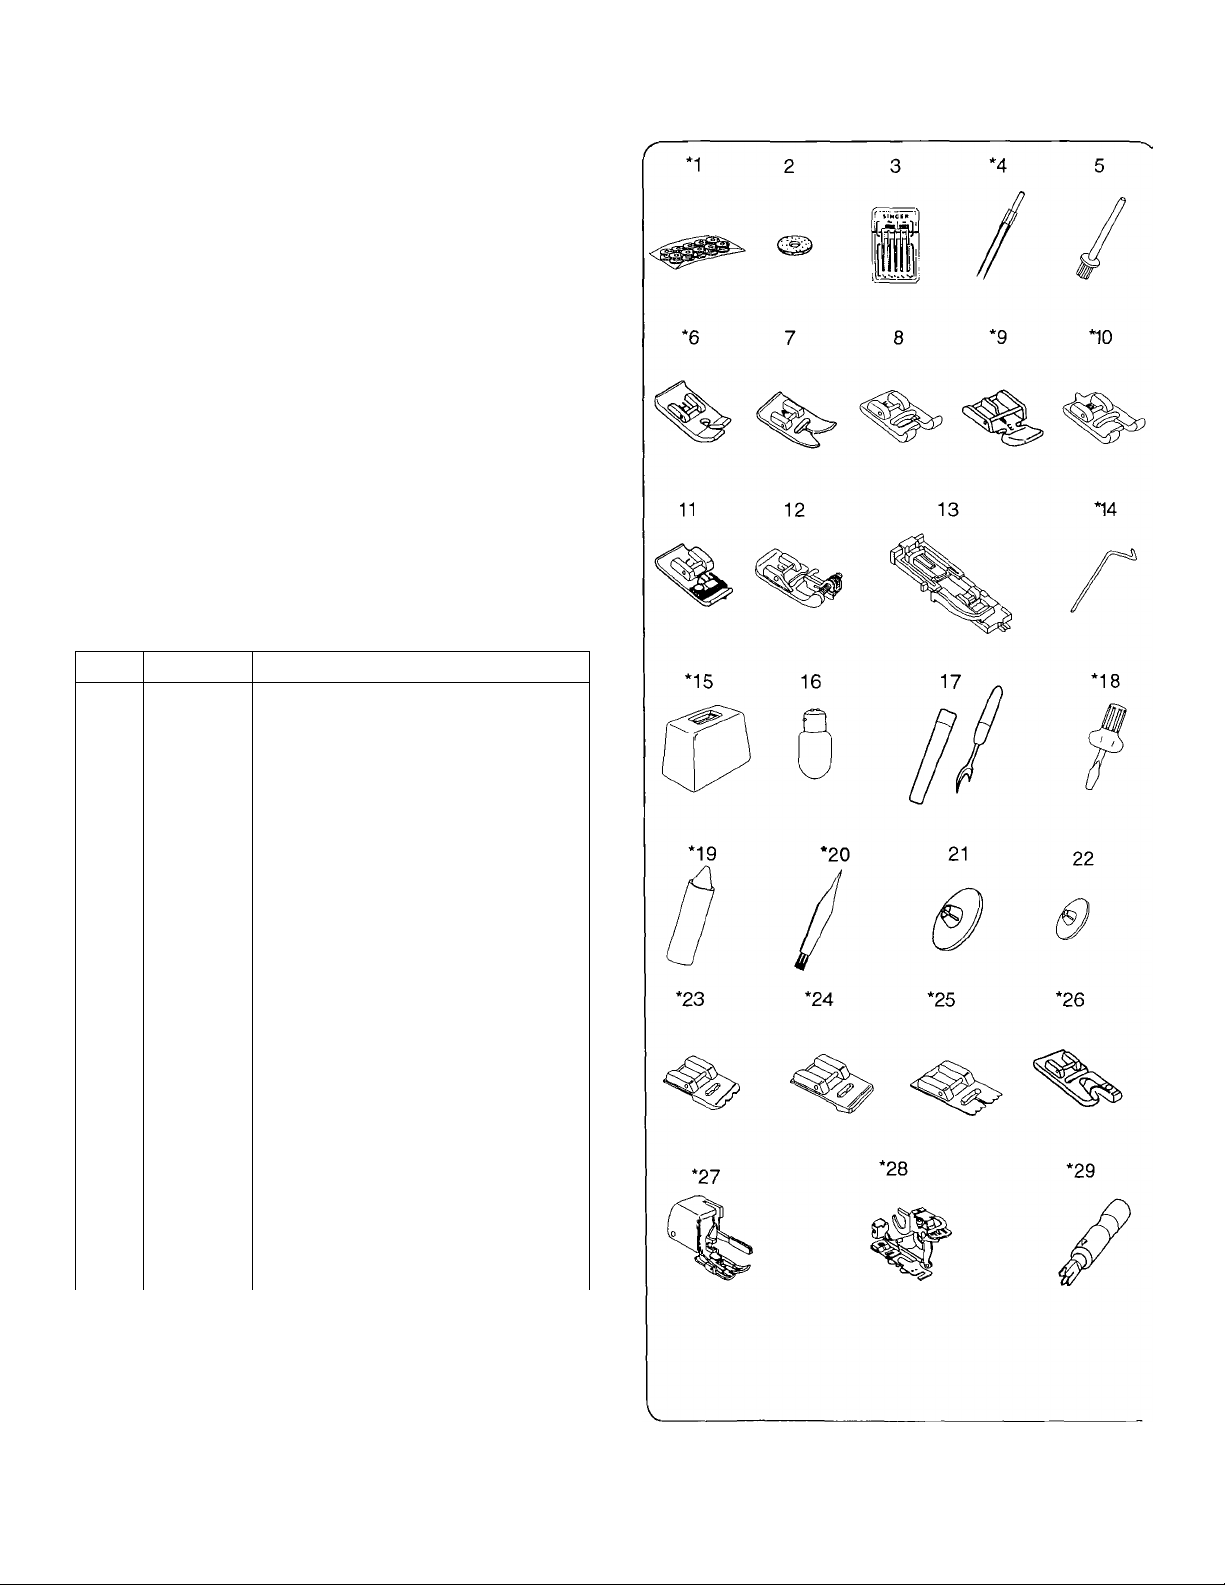
Available Accessories and Attachments
All parts listed may be ordered from any Sears store or
service center.
Only use Sears parts for this sewing machine.
WHEN ORDERING REPAIR PARTS, ALWAYS GIVE THE
FOLLOWING INFORMATION;
1. PART NUMBER
2. PART DESCRIPTION
3. MODEL NUMBER
4. NAME OF ITEM (SEWING MACHINE)
If the parts you need are not stocked locally, your order
will be electronically transmitted to a Sears Repair Parts
Distribution Center for expedited handling.
For the repair or replacement parts you need delivered
directly to your home.
Call 6 am -11 pm, 7 days a week.
1 -800-366-PART (1-800-366-7278)
Ref. No. Part No. Description
*102869107 10 X Bobbin
1
2
102403202
3
4
5 625031500
6
7 685502019
8 822804118
9
10 *820801016 B; Buttonhole foot
11
12
13 753801004 R: Automatic buttonhole foot
14 *802422002
15
16
17
18 *820832005
19
20 *802424004
21 822020503
22 822019509
23 *200002008 Piping foot
24
25
26
27
28
29
353364 Singer assorted needle set
*6562 Style 2020: 4 x No. 14 needle (RED)
*6563 Twin needle (260 202500090S01B)
*823801015
*829801002
822801001
820817015 G: Blind hem foot
*479701901
000009803 Light bulb
647808009
*741814003
*200003009 Gathering foot
*200005001
*200013105 Hemmer foot (2mm)
*214872011
*941620000 Ruffler
*200262101 Needle threader
Spool pin felt
Additional spool pin
H: Straight stitch foot
A: Zigzag foot
F; Satin stitch foot
E; Zipper foot
C: Overedge foot
Quilter
Carrying case
Seam ripper/Buttonhole opener
Large screwdriver
Oil
Lint brush
Large spool holder
Small spool holder
Pin-tuck foot
Walking foot
' These items are not furnished with the machine, but may be
ordered per instmctions above.
12
Page 7
GETTING READY TO SEW
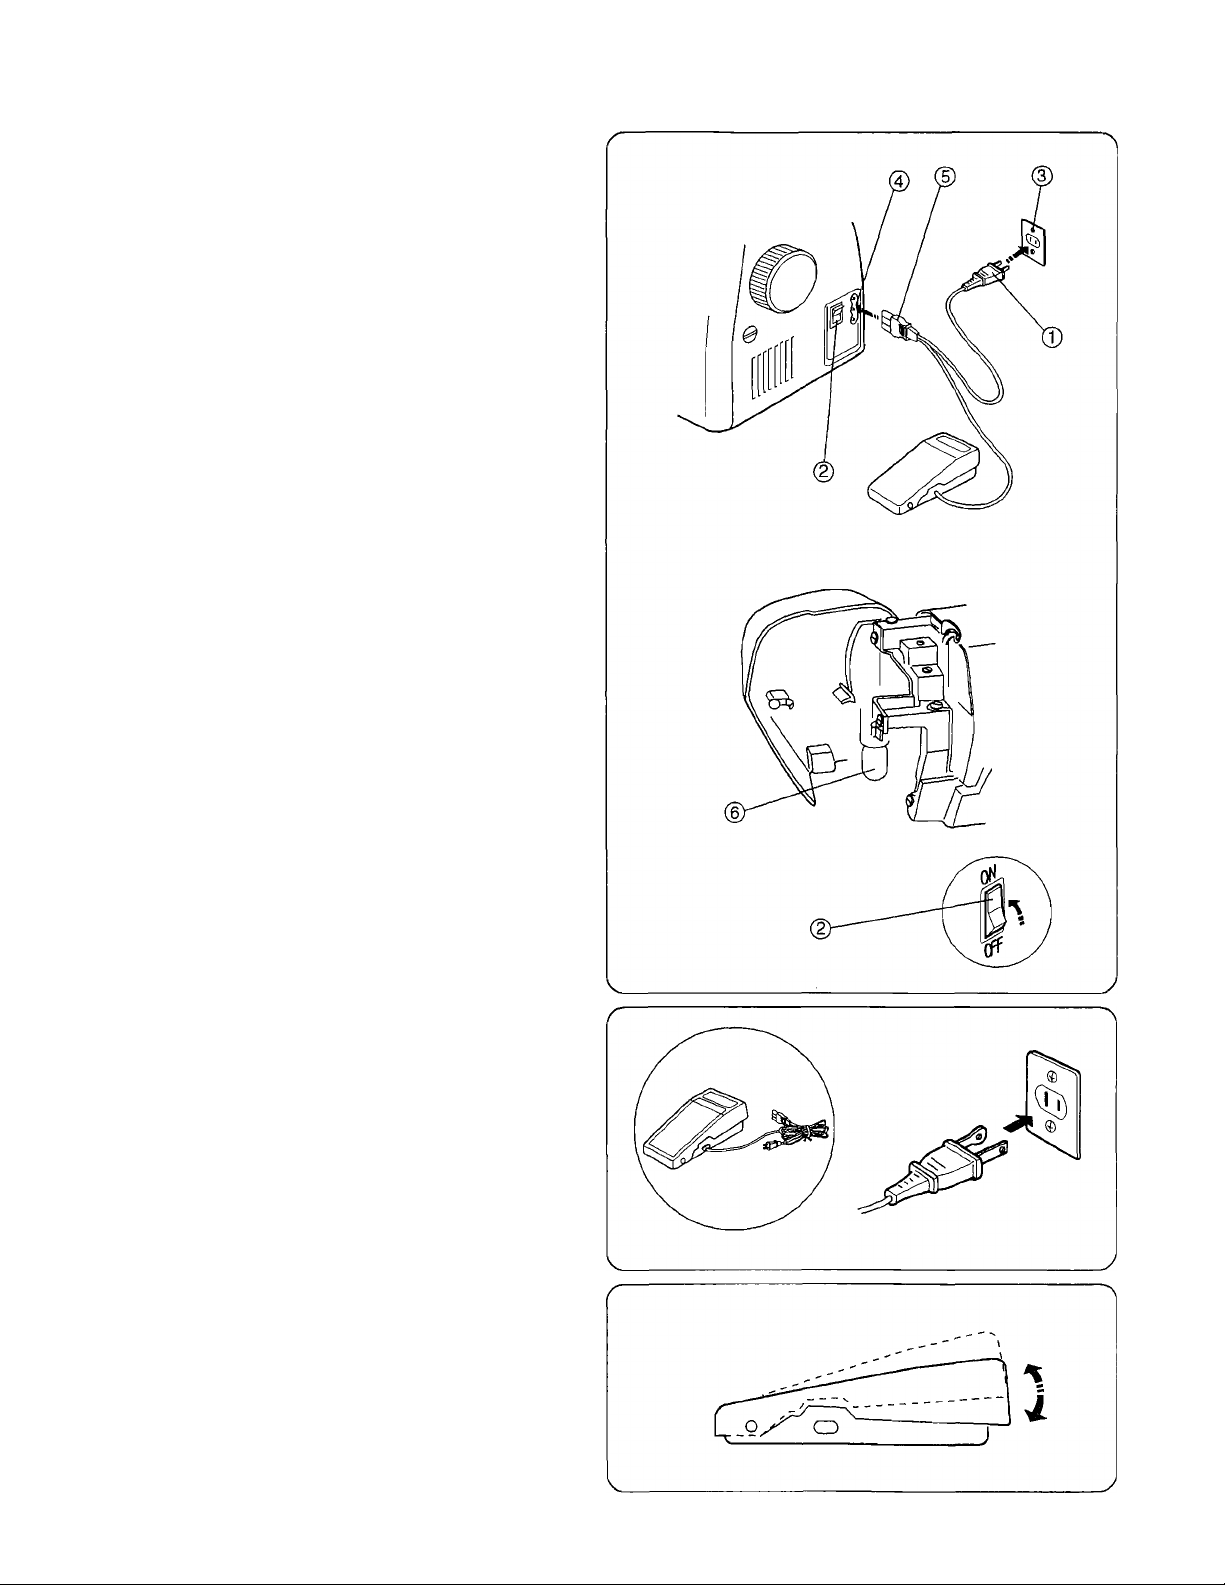
Connecting Machine to Power Supply
® Power supply plug @ Power switch
@ Outlet ® Machine socket
® Machine plug ® Light bulb
Before connecting the power cord, make sure the voltage
and frequency shown on the machine conform to your
electrical power.
1. Turn off the power switch @.
2. Insert the machine plug © into the machine socket
3. Insert the power supply plug ©into the outlet @ .
4. Turn the power switch©to turn on the power and
sewing light®.
For Your Safety
* While in operation, always keep your eyes on the sewing area.
Do not touch any moving parts such as the thread take-up
lever, handwheel or needle.
* Always turn off the power switch and unplug from the power
supply:
- When leaving the machine unattended.
- When attaching or removing any parts.
- When cleaning the machine.
* Do not place anything on the foot control, when not sewing.
When Finished Sewing
* When you are finished sewing, turn all controls to off (“ О ”)
position, then remove plug from outlet.
* Unplug foot control from machine.
* Lower presser foot lifter.
* Turn handwheel to lower needle bar to the lowest position.
* Place your machine out of reach of children in safe, dry
location.
Operating Instructions:
“For appliances with a polarized plug (one blade
wider than the other). To reduce the risk of electric shock,
this plug is intended to fit in a polarized outlet only one way.
If it does not fit fully in the outlet, reverse the plug. If it still
does not fit, contact a qualified electrician to install the
power outlet. Do not modify the plug in any way.”
“Foot Controller Model YC-482J-1 or TJC-150 is used with
Sewing Machine Model 384.18024 XXX.”
XXX - represents numbers 000 through 999.
Controlling Sewing Speed
Sewing speed can be varied by the foot control.
The harder you press on the foot control, the faster the
machine runs.
14
Page 8
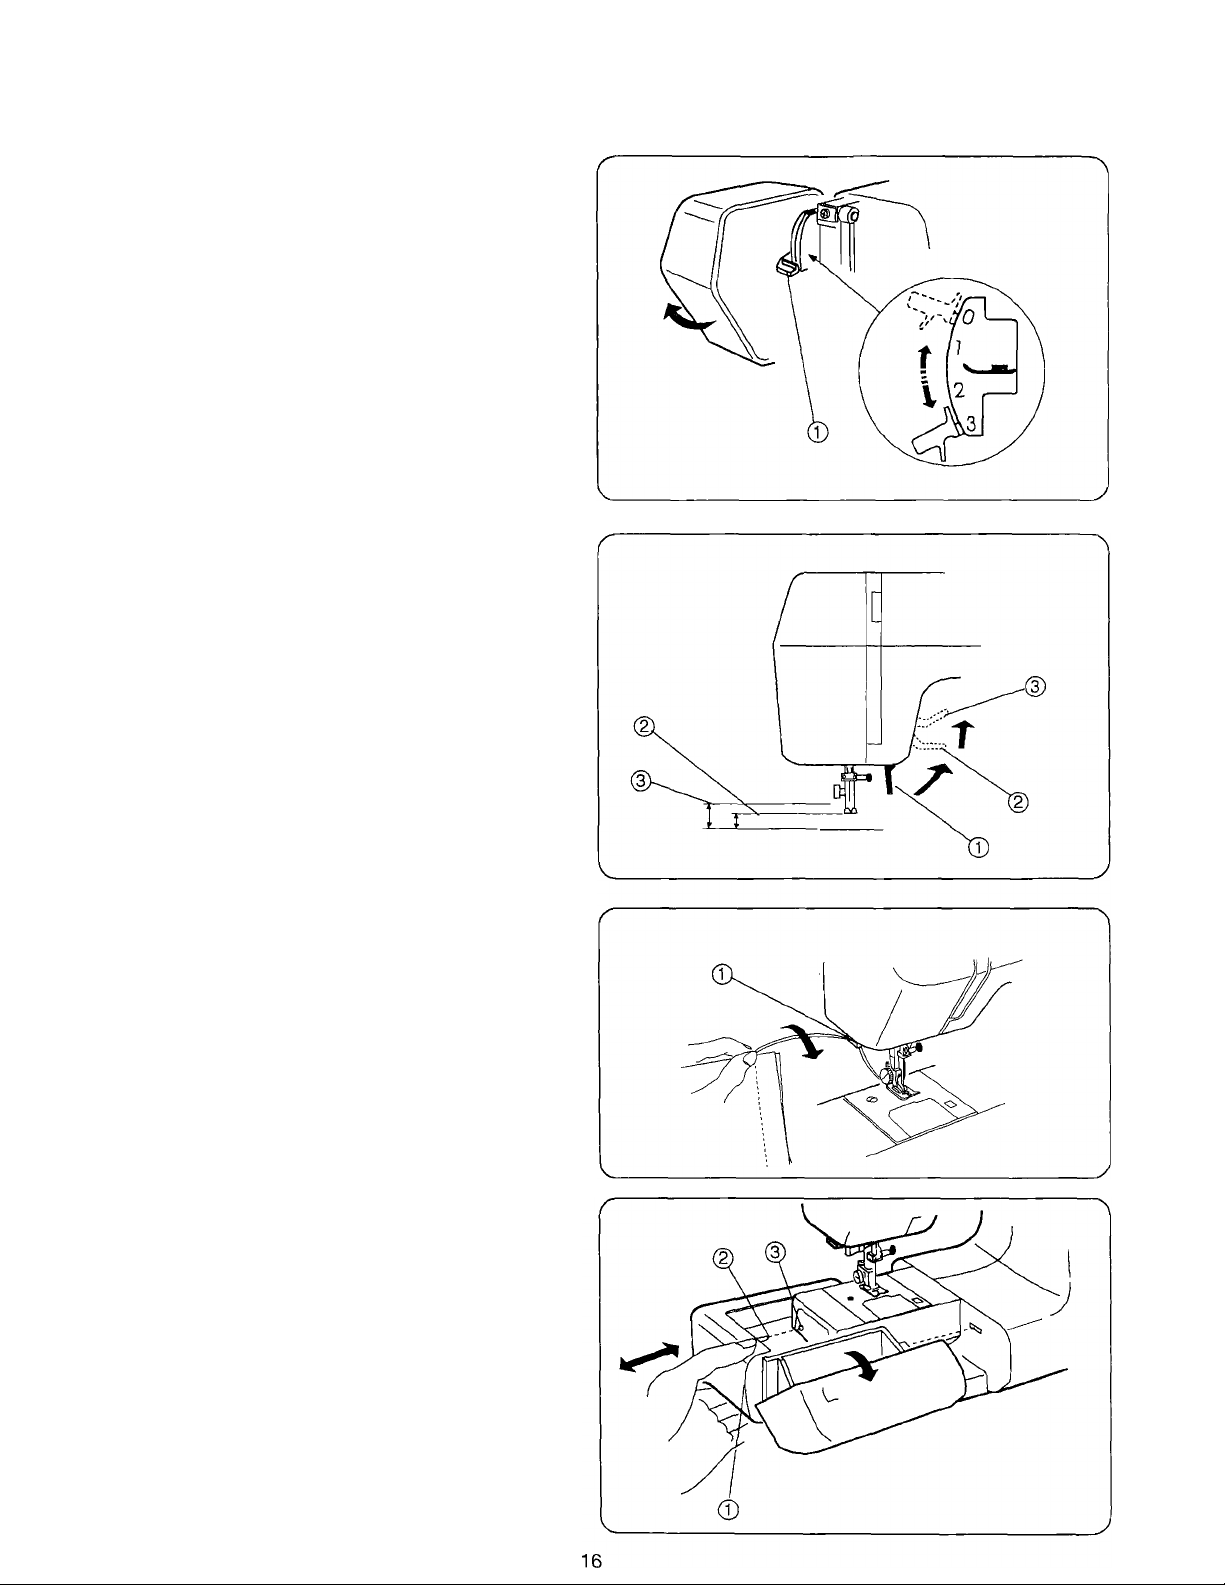
Pressure Adjusting Lever
(T) Pressure adjusting lever
The pressure adjusting lever should be set at “3” for regular
sewing.
Reduce pressure to “2” for applique, cut work, draw work and
basting.
Set pressure at “1” when sewing chiffon, lace, organdy and
other fine fabrics. Velour and knits with a lot of stretch may also
require pressure at “1”.
Presser Foot Lifter
(T) Presser foot lifter
® Normal up position
(D Highest position
The presser foot lifter raises and lowers the presser foot.
You can raise it about 1/4”(0.6 cm) higher than the normal up
position for easy removal of the presser foot or to help you
place heavy fabric under the foot.
Thread Cutter
® Thread cutter
You do not need a pair of scissors to cut threads after sewing.
Just use the built-in thread cutter.
Extension Table Detaching the table;
Pull the table away from the machine, as illustrated.
Attaching the table:
Push the extension table until it snaps into the machine.
® Extension table
@ Projection
©Hole
Accessory Box
Open the cover of the accessory box toward you. Sewing
accessories are conveniently located in the box.
Page 9
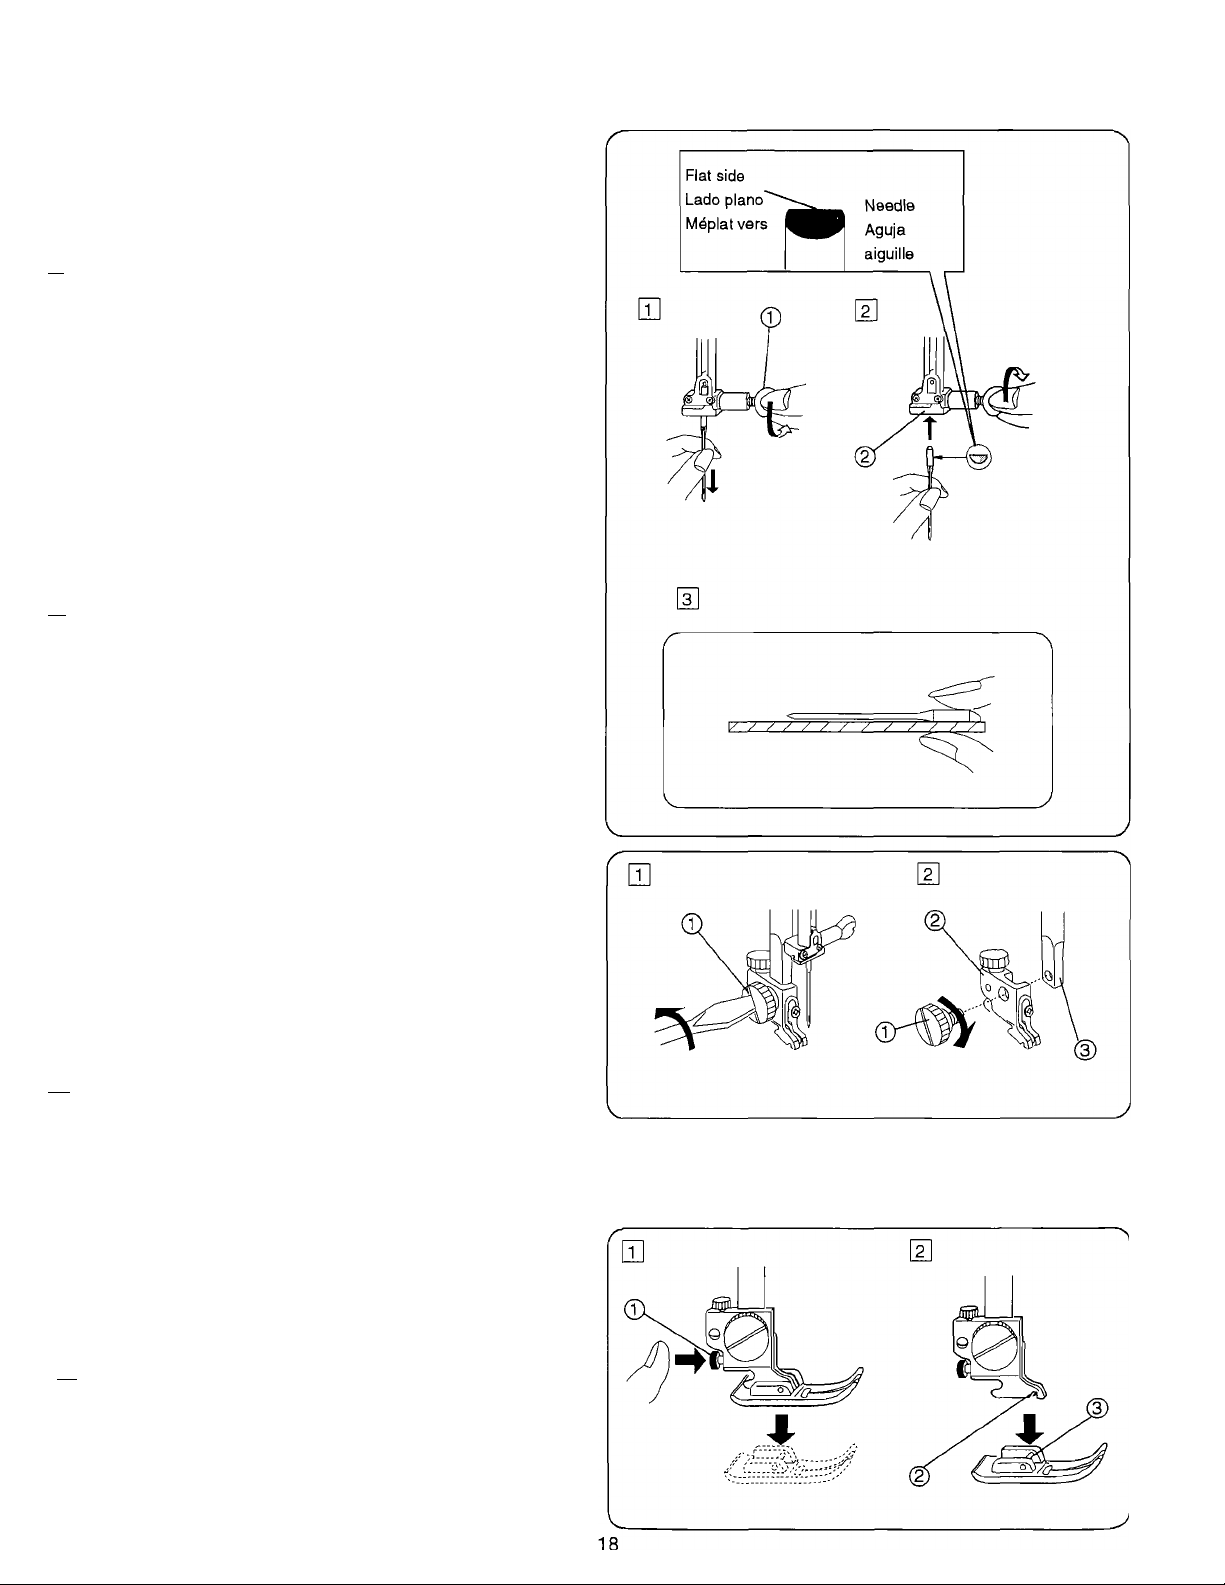
Changing Needle
© Needle clamp screw
© Needle clamp
rn Turn off the power switch.
Raise the needle to its highest position by turning
the handwheel counterclockwise, toward you, and
lowering the presser foot.
Loosen the needle clamp screw ©by turning it
counterclockwise.
Remove the needle from the needle clamp ©.
jj] Insert a new needle into the needle clamp© with
the flat side to the rear.
When inserting the needle into the needle clamp ©,
push it up as far as it goes. Tighten the needle clamp
screw © firmly by turning it clockwise.
[si To check for a good needle, place the flat side of
the needle onto something flat (needle plate, glass,
etc.).
The gap between the needle and the flat surface
should be consistent. Never use a bent or blunt
needle.
A damaged needle can cause permanent snags
or runs in knits, fine silks and silk-like fabrics.
To Remove and Attach the Foot Holder
© Thumb screw
© Foot holder
© Presser bar
[T] To remove:
Remove the thumb screw © by turning it
counterclockwise with a screwdriver.
[Y| To attach;
Match the hole in the foot holder© with the threaded
hole in the presser bar©. Fit the thumb screw© into
the hole. Tighten the screw © by turning it clockwise
with screwdriver.
Changing Presser Foot
© Snap-on button (red button)
@ Groove
@ Pin
pn To remove: Raise the needle to its highest position by
turning the handwheel counterclockwise. Raise the
presser foot, and press the red button ® on the back of
the foot holder.
[2] To attach: Place a selected presser foot so the pin ® on
the foot lies just under the groove @ on the foot holder.
Lower the presser bar to lock the foot in place.
Page 10
Presser Foot Types
• Zigzag foot (Foot A)
Use this foot for both straight and zigzag stitching.
For: Striaght stitch (Page 38)
Topstitching (Page 40)
Basic zigzag (page 44)
Overcasting stitch (page 46)
Overedge stitch (page 46)
Straight stretch (page 48)
Rick-rack stretch (page 48)
Overcast stretch stitching (page 50)
Serging (page 50)
Elastic stretch stitch (page 52)
Stretch patching (page 52)
Lace work (page 58)
Multiple zigzag stitch (page 58)
Box stitch (page 60)
Fagoting stitch (page 62)
Two-point shell stitch (page 62)
Two-point box stitch (page 62)
Smocking (page 64)
Herring bone stretch (page 64)
Decorative stretch patterns (page 64)
Button sewing (page 82)
• Satin stitch foot (Foot F)
Use this foot for satin stitch and outlining applique.
For: Darning (page 42)
Rick-rack stitch (page 48)
Shell stitch (page 60)
Smocking (page 64)
Satin stitch (page 78)
Monograming (page 78)
Applique (page 80)
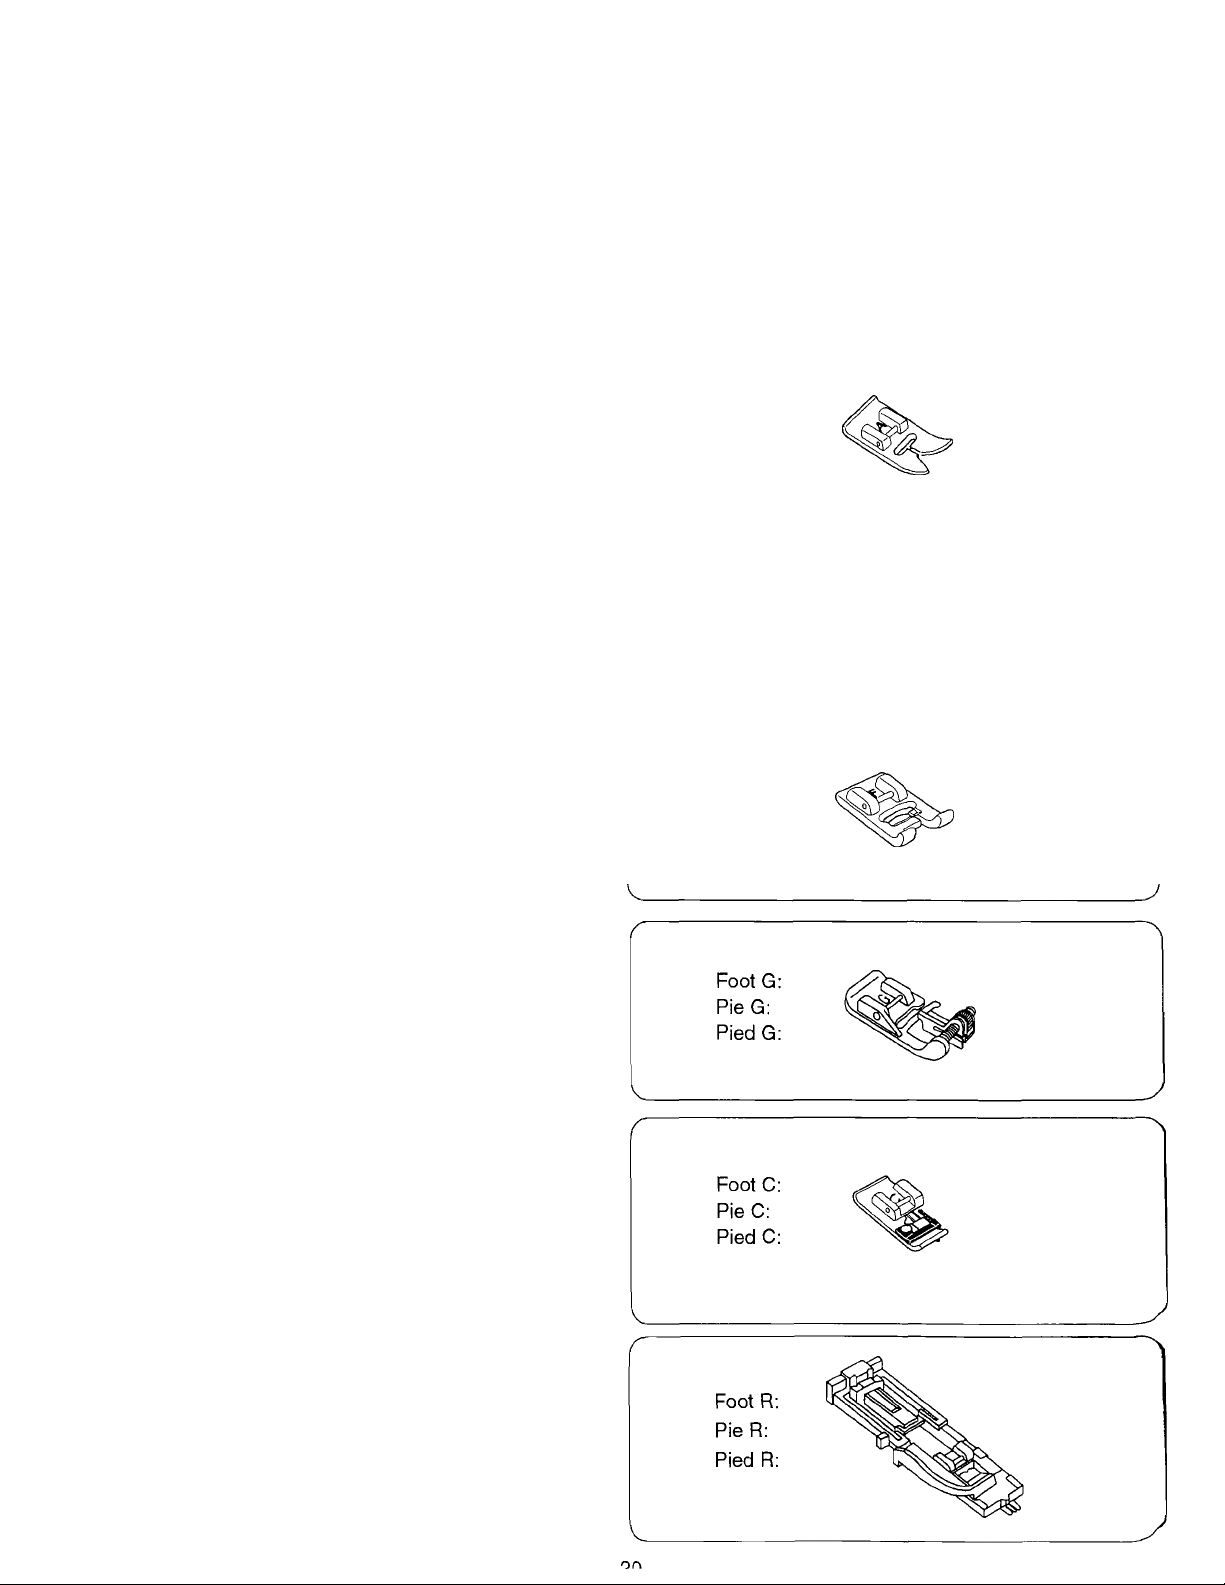
• Blind hem stitch foot (Foot G)
Use this foot for perfect blind hemming and topstitching. The
foot has ridges on the bottom to keep the fabric from slipping
and a screw on top to guide the folded edge of your hem.
For: Blind hem stitch (page 56)
Foot A:
Pie A:
Pied A:
Foot F:
Pie F:
Pied F:
• Overedge foot (Foot C)
This foot is specially constructed for stitching and/or
overcasting seams. The small brush and wire guides help
control the fabric, hold the raw edge in place and keep it from
puckering, especially when sewing on knit fabrics.
For: Overcasting stitch (Page 46)
Serging (page 50)
• Automatic buttonhole foot (Foot R)
Use this foot for one step automatic buttonholing.
Simply set a button on the guide of this foot and depress the
foot control.
You can sew exactly the same length of buttonhole as the
button.
For: Automatic buttonhole (page 68)
Page 11
Horizontal spool pin
0 Spool pin
@ Large spool holder
@ Small spool holder
Lift up the spool pin ©. Place a spool of thread on the spool
pin with the thread coming off the spool as shown.
Attach the large spool holder (2), and press it firmly against
the spool of thread.
The small spool holder (a) is used with narrow or small spools
of thread.
' Additional spool pin
0 Additional spool pin
© Spool pin hole
@ Spool pin felt
The additional spool pin © is for bobbin winding without
unthreading the machine and for twin needle sewing.
Insert the additional spool pin © in the hole @.
Place the felt @ and a spool on the pin.
Page 12
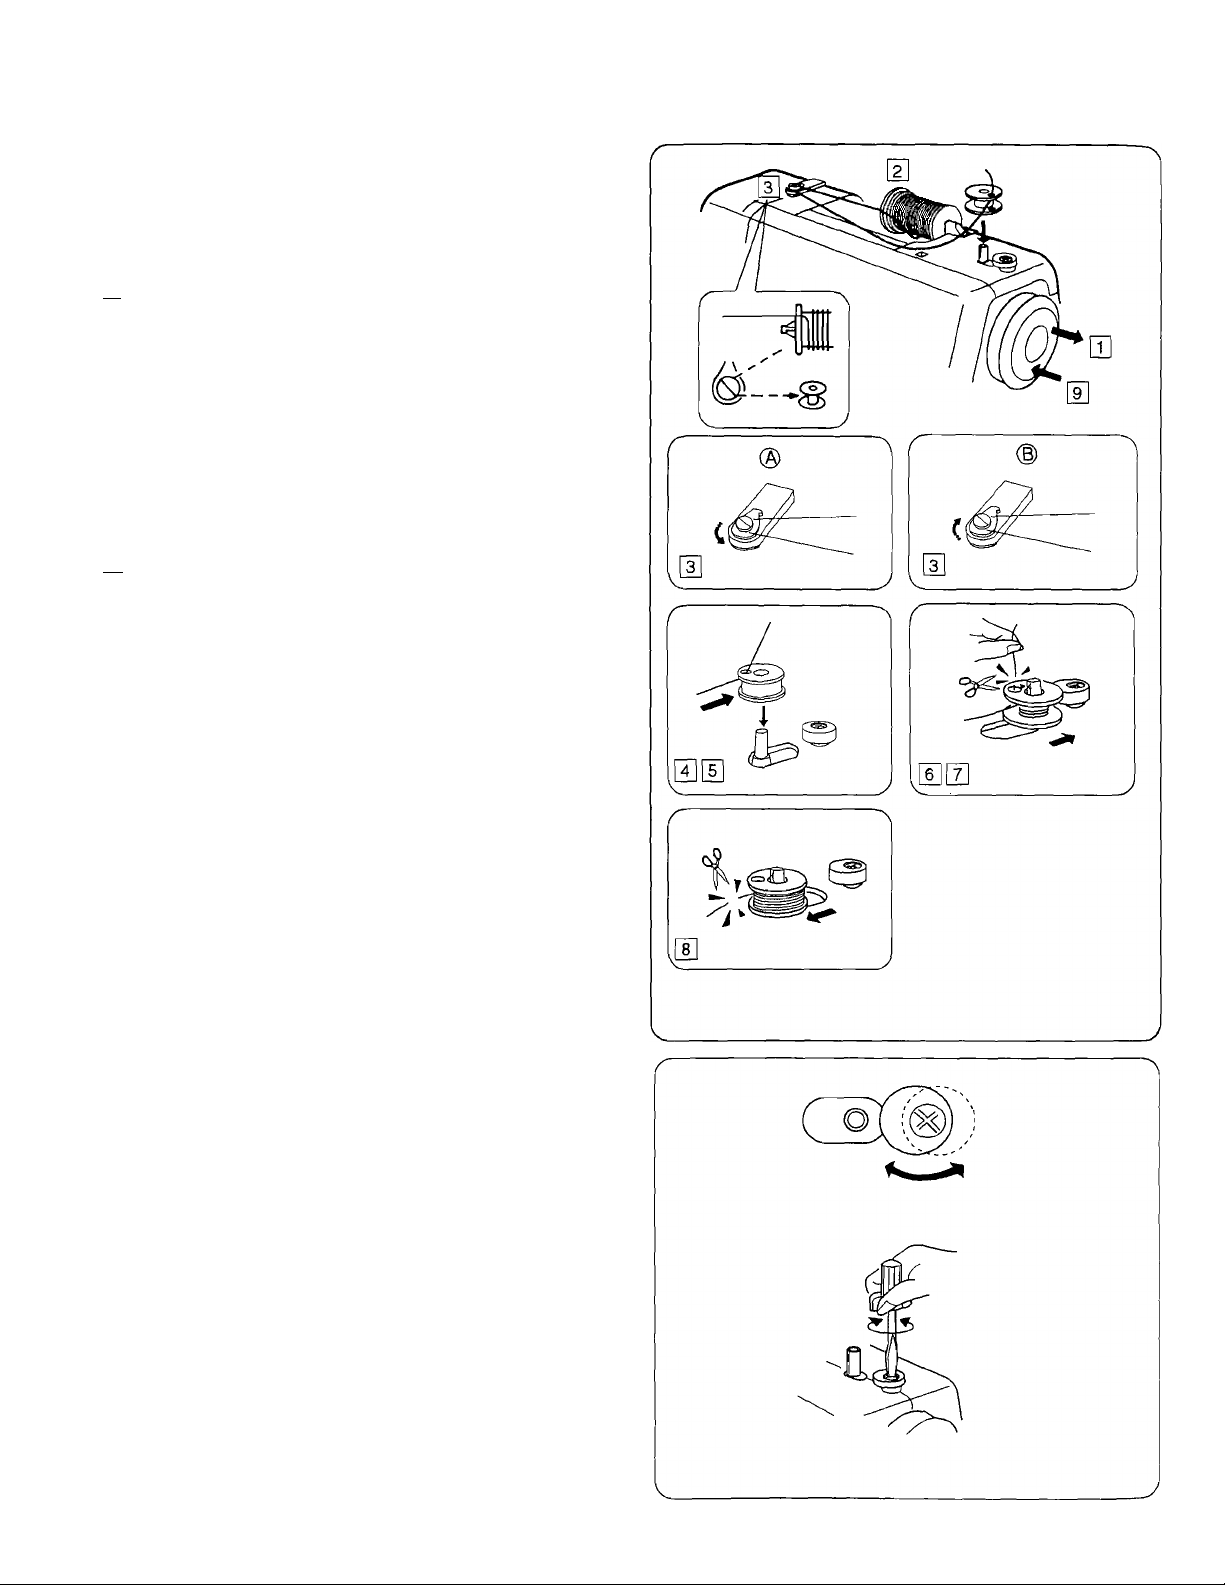
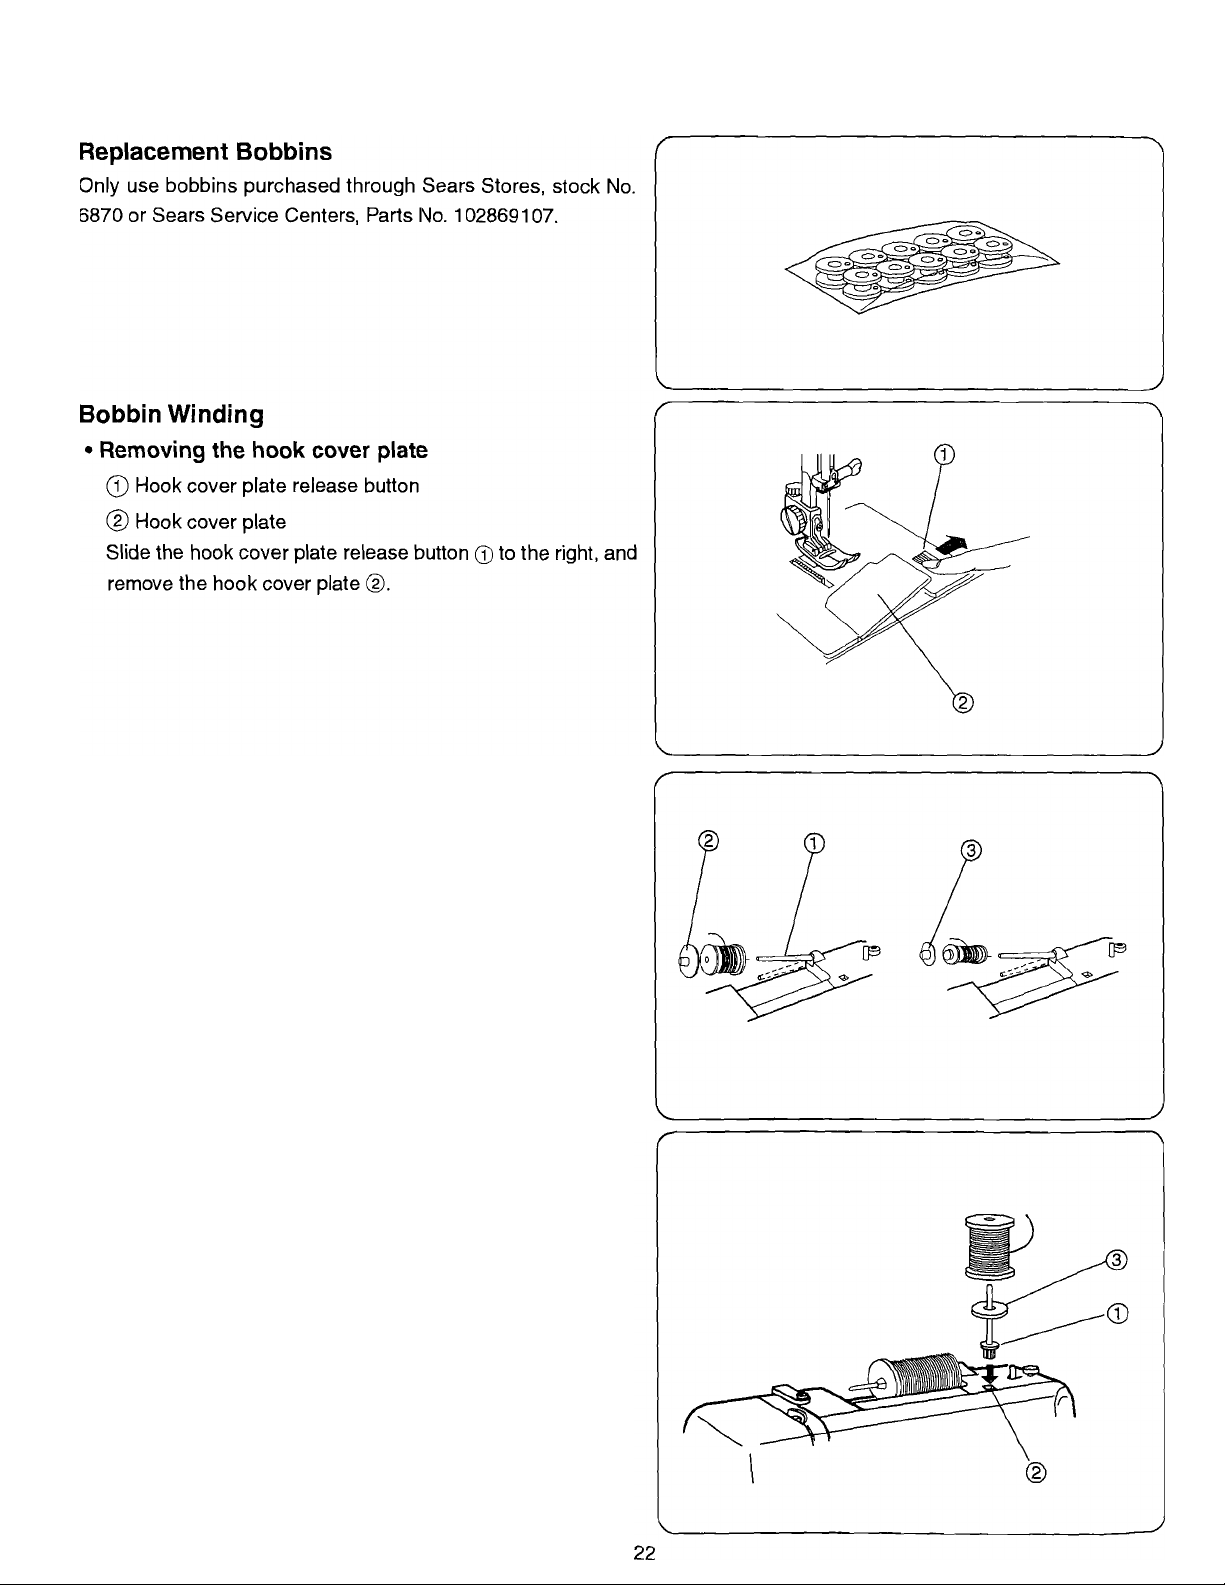
Bobbin winding
® For horizontal spool pin
(@) For additional spool pin
|T] Pull the handwheel out to the right.
[2I Draw thread from the spool.
[3] Guide the thread around the thread guide.
0 Thread through the hole in the bobbin from the inside to
the outside.
[5] Put the bobbin on the bobbin winder spindle.
0 Push the bobbin to the right.
[7] With free end of the thread held in your hand, depress the
foot control. Stop the machine when it has made a few
turns and cut the thread close to the hole in the bobbin.
[¥] Depress the foot control again. When the bobbin is fully
wound, it stops automatically. Return the bobbin winder
to its original position by moving the spindle to the left and
cut the thread as shown.
0 Push the handwheel in.
* The machine does not function until the clutch is engaged.
NOTE; Position of the bobbin winder stopper is adjustable
for the required amount of thread on the bobbin
(example 1/2 full or full etc.).
Use a screwdriver and loosen the screw one turn or
less so that you can adjust the position of the bobbin
winder stopper.
Do not take out the screw all the way.
24
Page 13
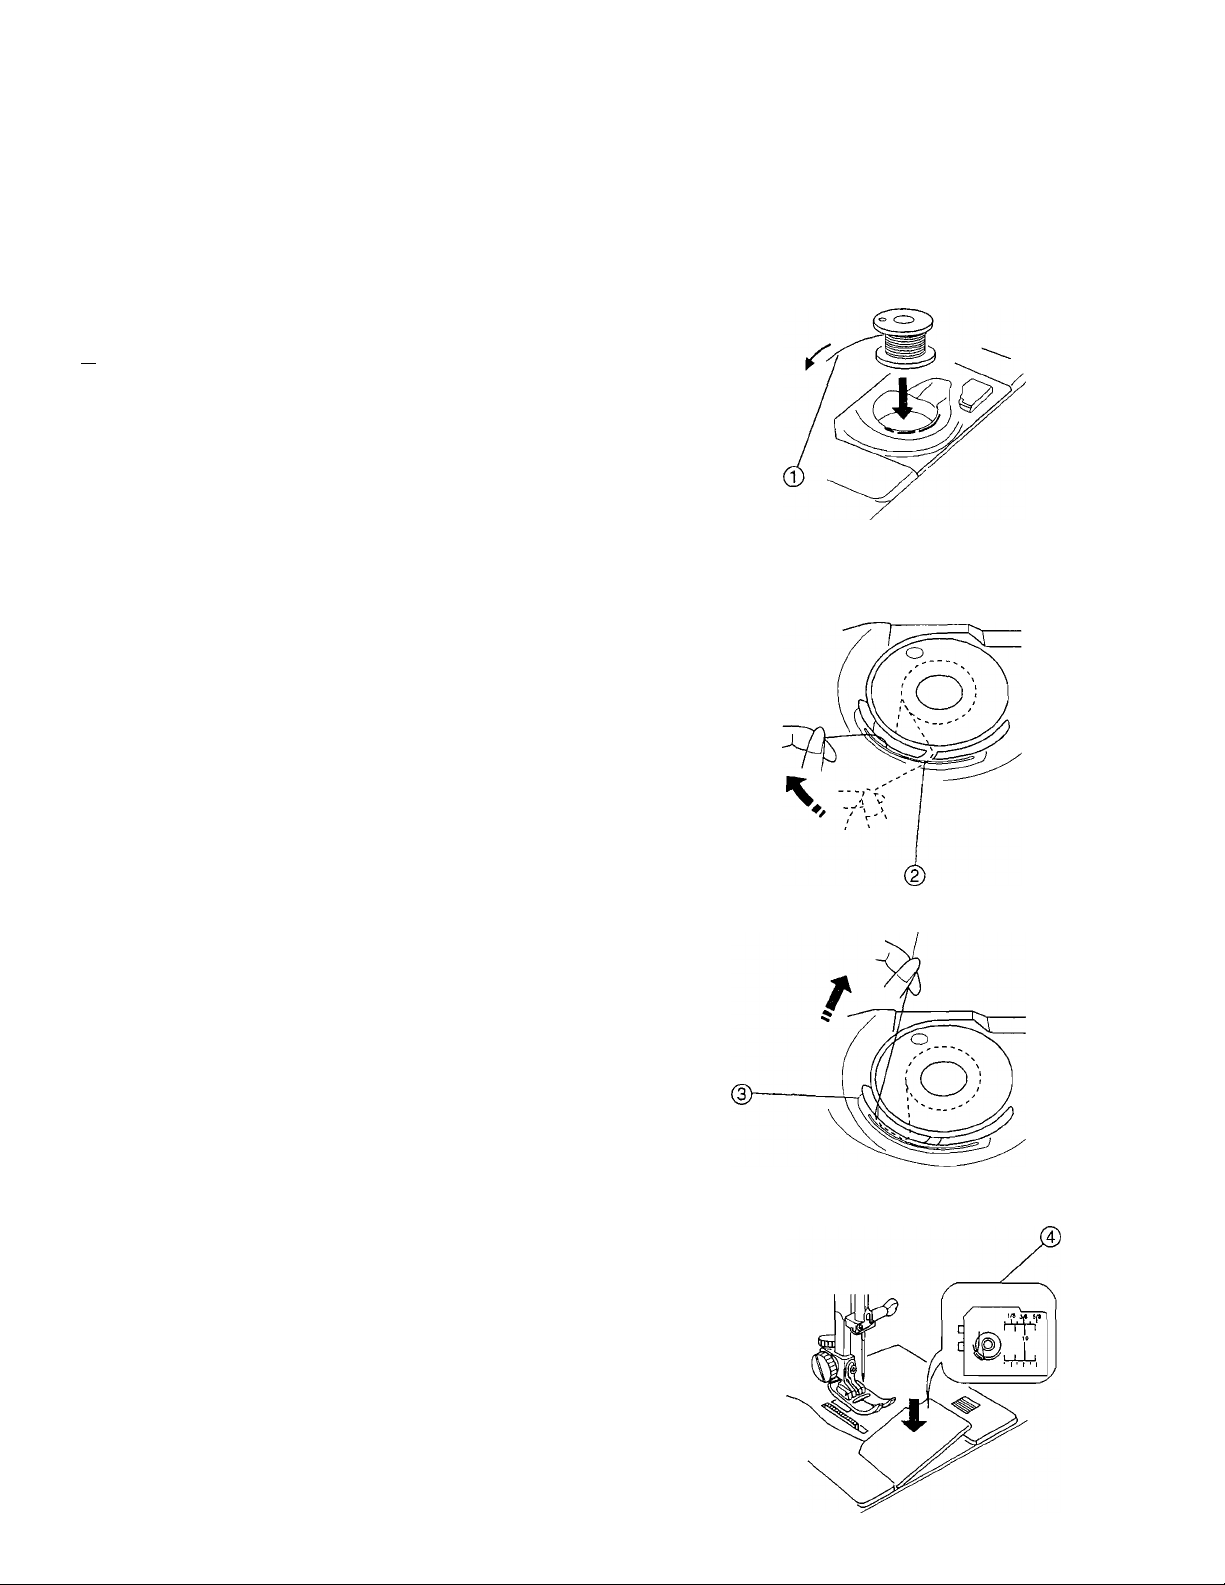
• Inserting the bobbin
0 End of thread
® Notch
@ Notch
©Threading chart
m Place a bobbin in the bobbin holder with the thread
running off counterclockwise.
I Guide the thread into the notch (2) on the front side of the
bobbin holder. Draw the thread to the left, sliding it between
the tension spring blades.
D]
0
[3] Continue to draw the thread lightly until the thread slips into
the notch (3). Pull out about 6.0” (15.0cm) of thread.
E Attach the hook cover plate.
0
26
Page 14
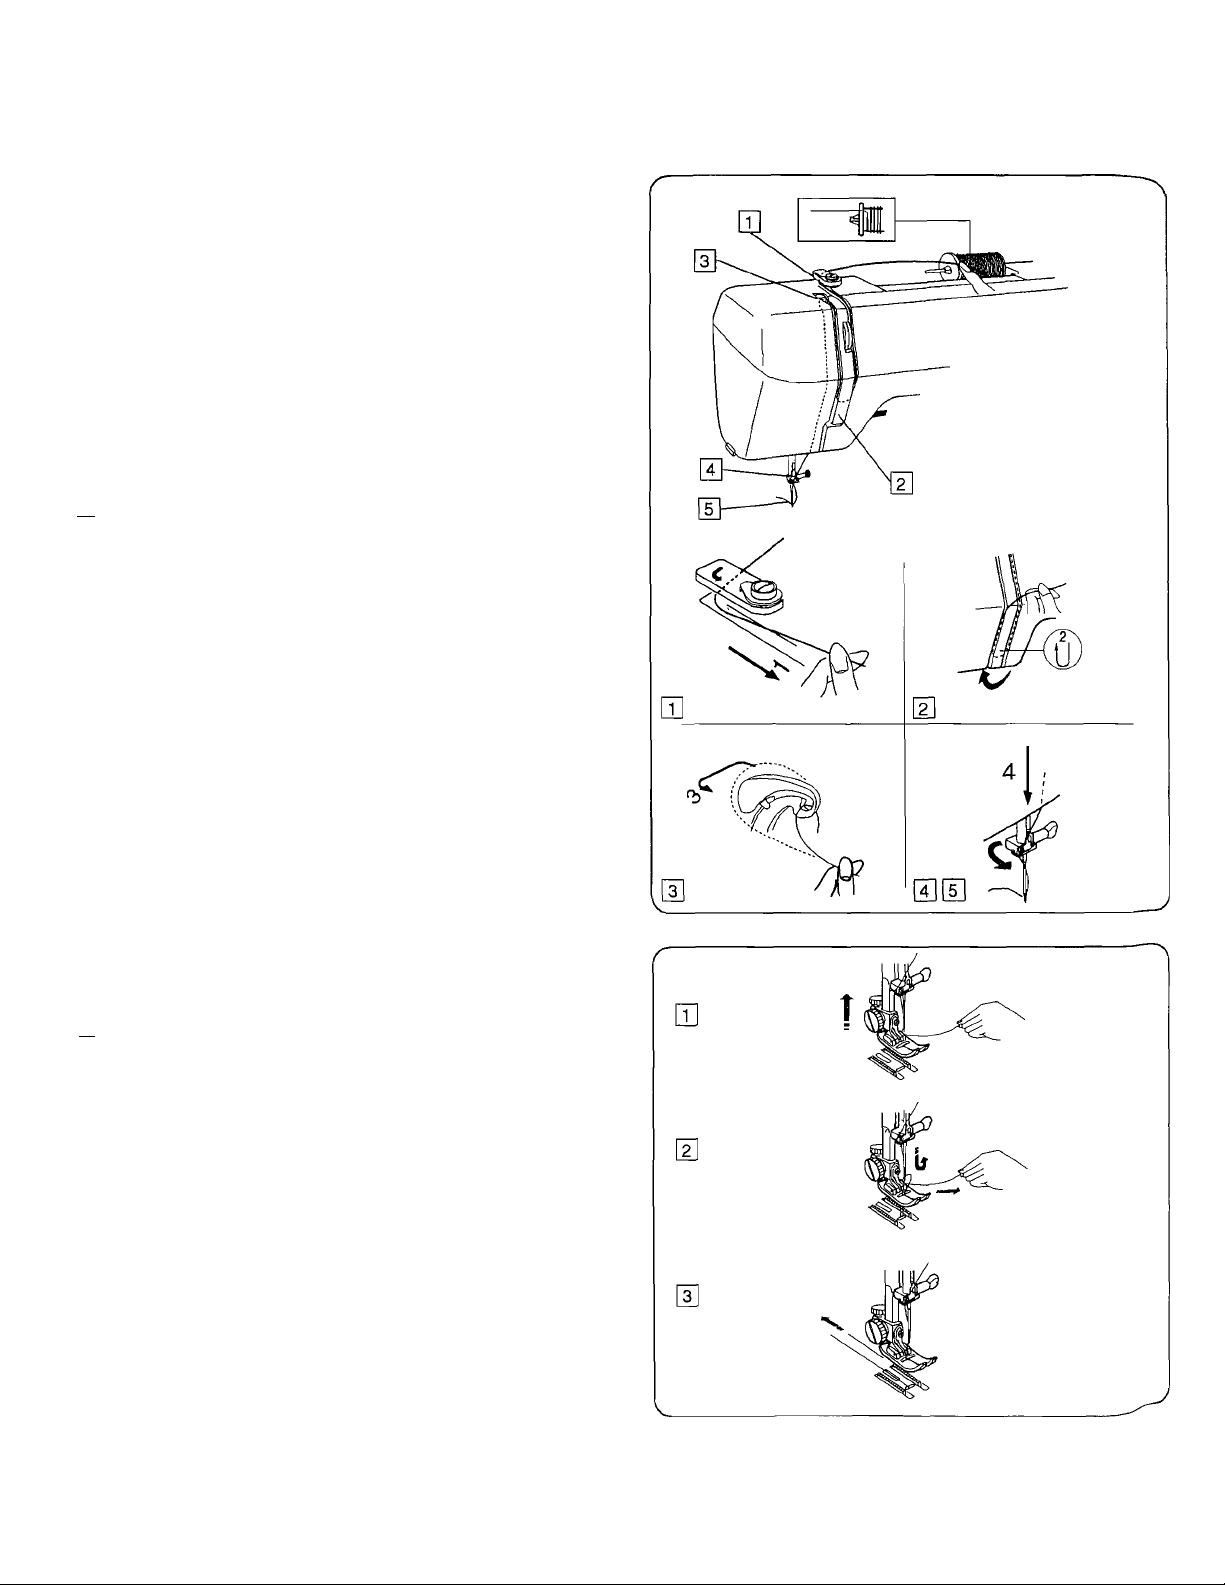
Threading the Machine
• Threading the machine
* Raise the thread take-up lever to its highest position by
turning the handwheel counterclockwise.
* Raise the presser foot lifter.
* Place a spool on the spool pin, with thread coming off as
shown.
U] Draw the end of thread around the upper thread guide.
[2] While holding the thread near the spool, draw the end of
the thread down around the check spring holder.
[3] Firmly draw the thread up from right to left over the take-up
lever and down into the take-up lever eye.
E Slide the thread behind the needle bar thread guide on the
left.
[5] Thread the needle from front to back or use a needle
threader.
• Drawing up bobbin thread
rn Raise the presser foot. Hold the needle thread lightly with
your left hand and turn the handwheel counterclockwise
for one complete turn.
|j] Bring the bobbin thread up by pulling the needle thread
up.
1
Pull both threads under and to the back of the presser
foot, leaving 4.0” to 6.0” (10.0 to 15.0 cm) of thread clear.
28
Page 15

Adjust the Needle Thread Tension for
Straight Stitch
• Correct tension
© Needle thread (Top thread)
© Bobbin thread (Bottom thread)
@ To loosen
© To tighten
The ideal straight stitch has threads locked between two layers
of fabric, as illustrated (magnified to show detail).
If you look at the top and bottom of a seam, notice that there
are no gaps. Each stitch is smooth and even.
When adjusting needle thread tension, the higher the number,
the tighter the top thread tension.
Results depend on:
--------
stiffness and thickness of the fabric
--------
number of fabric layers
--------
type of stitch
•Tension is too tight
© Needle thread (Top thread)
@ Bobbin thread (Bottom thread)
® To loosen
@ Right side (Top side)
©Wrong side (Bottom side)
The bobbin thread shows through on the right side of the fabric
and it feels bumpy. Turn the dial to a lower tension setting
number to loosen the needle thread tension.
•Tension is too loose
© Needle thread (Top thread)
@ Bobbin thread (Bottom thread)
@ To tighten
© Right side (Top side)
® Wrong side (Bottom side)
The needle thread shows through on the wrong side
of the fabric and it feels bumpy. Turn the dial to a higher
tension setting number to tighten the needle thread tension.
30
Page 16

Adjust the Needle Thread Tension for Zigzag
Stitch
For an ideal zigzag stitch, the bobbin thread does not show on
the right side (Top side) of the fabric and needle thread shows
slightly on the wrong (Bottom side) side of the fabric.
See the illustrations for correct appearance.
To match this appearance, adjust the needle tension.
• Correct tension
© Right side (Top side) of fabric
@ Wrong side (Bottom side) of fabric
Minimize the amount of needle thread visible on the wrong side
(Bottom side) of fabric without causing excessive puckering or
causing bobbin thread to show on the right
side (Top side) of fabric.
Results vary with fabric, thread and sewing condition.
•Tension is too tight
© Right side (Top side) of fabric
@ Wrong side (Bottom side) of fabric
Corner of each zigzag pulls together on the right side of fabric.
32
Page 17
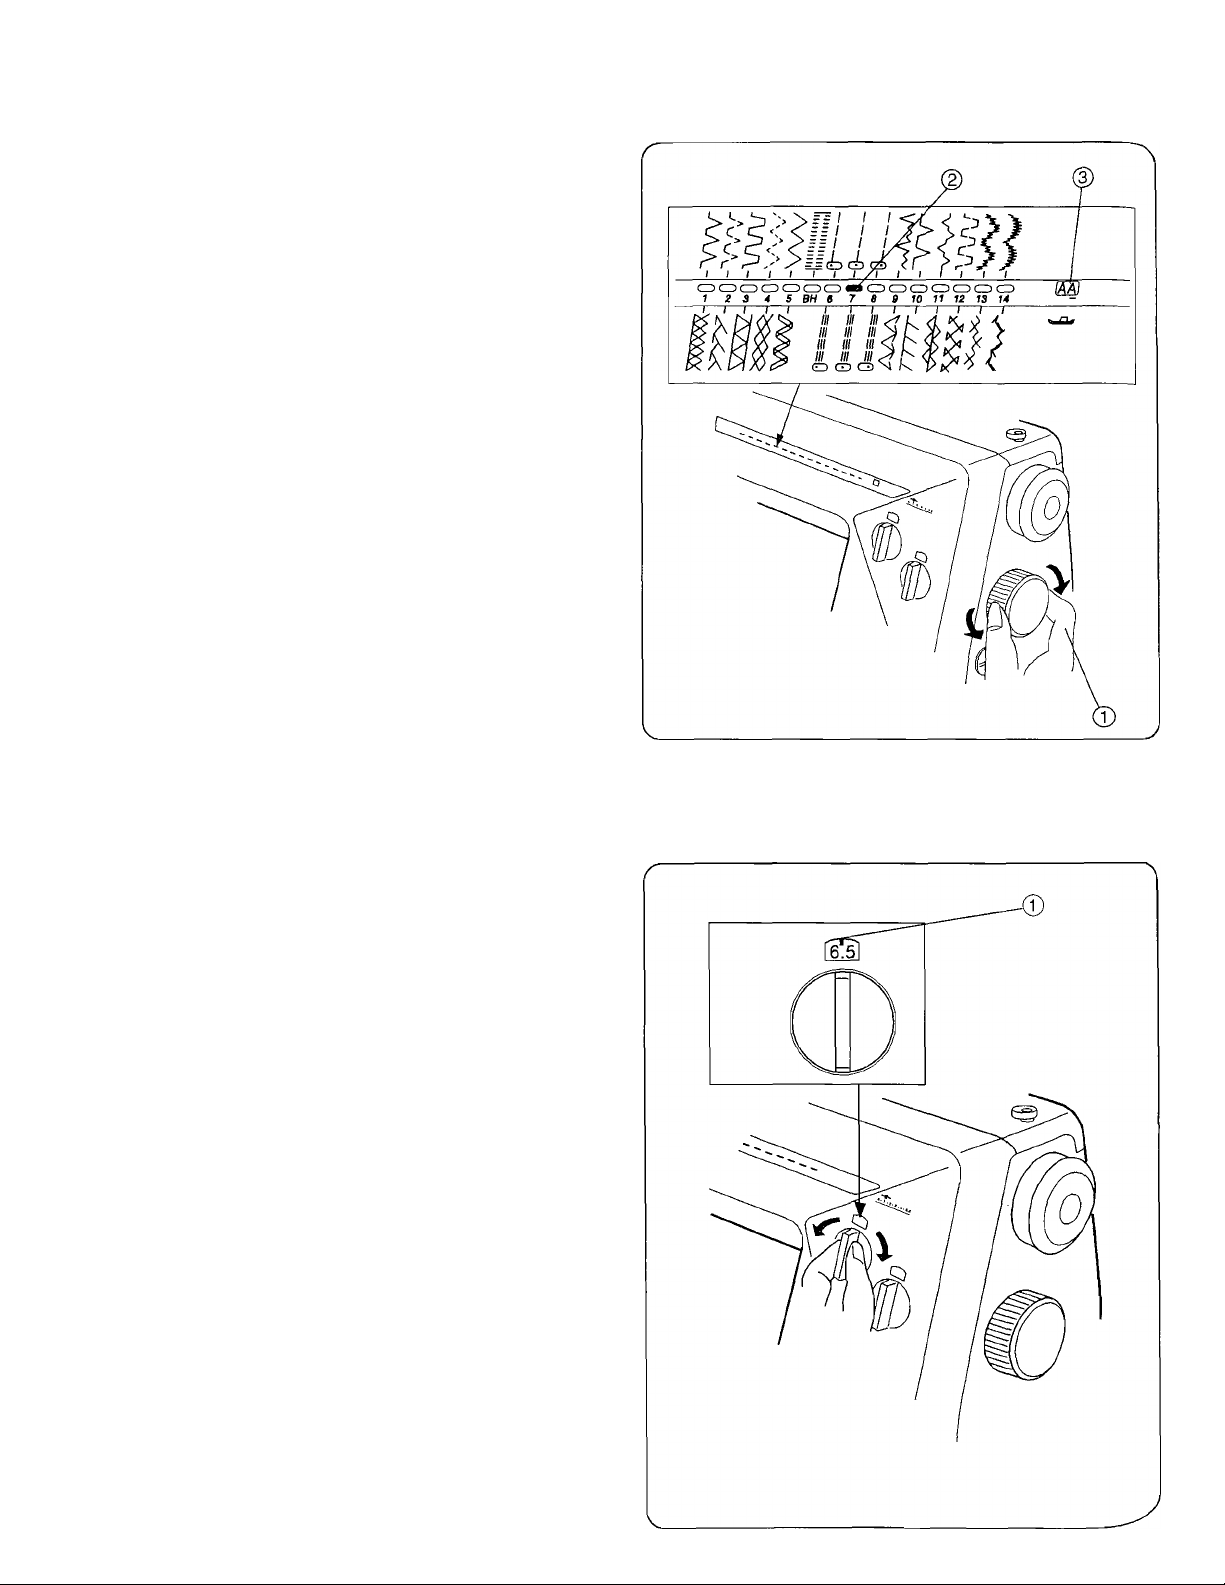
stitch Selector (how to select stitches)
Raise the needle and turn the stitch selector until the red
indication is below the desired stitch.
® Stitch selector
(2) Red indicator mark
@ Foot indicator window
* The foot indicator windows shows the recommended foot
for the selected pattern, a letter on the right shows the foot
for stretch patterns. Refer to page 20 for usage.
Stitch Width Control
(how to adjust the stitch width)
Turn the stitch width control until the desired number is shown at
the indicating mark.
The larger the number, the greater the stitch width.
55 mark shows the adjustment range when using the twin needle.
* Before turning the stitch width control, be sure to raise the
needle above the fabric.
© Indicating mark
34
Page 18

Stitch Length Control
(how to adjust the stitch length)
Turn the stitch length control until the desired number is shown
at the indicating mark.
(Set the stitch length control at S.S. when using the stretch stitch.)
The larger the number, the greater the stitch length,
s.«/ mark shows the adjustment range when sewing the
buttonhole.
* Raise the presser foot before turning the stitch length control.
(D Indicating mark
Adjusting Stretch Stitch Balance
If stretch stitch patterns are uneven when you sew on a
particular fabric, adjust them with the feed balancing dial.
To adjust distorted patterns
[a] If patterns are drawn out, correct by turning the dial in the
direction of
[b1 If patterns are compressed, correct by turning the dial in
the direction of “+”.
Reverse Stitch Control
Sewing will be made in reverse while the reverse stitch control is
pressed.
Page 19

STRAIGHT STITCHES
Straight Stitch
0 Stitch selector;
© Stitch width:
© Stitch length:
6 to 8
6.5
1.5 to 4
CD
I
I I
1 I
CD CD
WIDTH
LENGTH
© Needle thread tension:
® Presserfoot A:
® Presser foot H (option): Straight stitch foot( ,i, only)
NOTE; When using the straight stitch foot, make sure to
set the stitch width control at 0. Otherwise the needle
may strike the presser foot and possibily break.
2 to 6
Zigzag foot ( i i i )
'p ‘p =1' ',
• Starting to sew
Raise the presser foot and position the fabric next to a seam
guide line on the needle plate (5/8”{1.6cm) is most common).
Lower the needle to the point where you want to start. Lower the
presser foot and pull the threads toward the back. Depress the
foot control. Gently guide the fabric along a seam guide line letting
the fabric feed naturally.
• Finishing sewing
To fasten the ends of a seam, press the reverse stitch control
and sew several reverse stitches. Raise the presserfoot. Remove
the fabric, draw the threads to the back and cut them with the
thread cutter. The threads are cut in a proper length for the next
T5J
im
seam.
Seam allowance lines
The seam guides on the needle plate and hook cover
plate help you measure seam width.
The numbers on the needle plate indicate the distance
between the middle needle position and the seam
allowance line.
r
Marks on
needle
plate
0 Middle needle position
© Edge of fabric
@ Needle plate guide lines
Millimeters Inches
15mm
20mm 4/8”
5/8” 6/8”
_______)
38
Page 20

Turn a Square Corner
0 Cornering guide
To turn a square corner 5/8”(1.6cm) from the fabric edge.
1. Stop stitching and lower the needle by turning the
handwheel counterclockwise.
2. Raise the presser foot and turn the fabric to line the
edge with the 5/8”(1.6 cm) seam guide.
3. Lower the presser foot and begin stitching in the new
direction.
Line up the fabric edge facing you with the cornering guide
shown.
Use the Quilter Guide (Option)
0 Quilter guide lines
(D Quilter holding screw
® Quilter
The quilter guide lines will help to determine the distance for
quilting stitches.
Loosen the quilter holding screw.
Slide the quilter in the hole to the desired width, and tighten the
screw.
Refer to page 42 for the details of quilting.
40
Page 21

Quilting
© Stitch selector: 6 to 8
@ Stitch width: 6.5
@ Stitch length: 1.5 to 4
© Needle thread tension: 2 to 6
® Presser foot A: Zigzag foot (
® Presser foot H (option): Straight stitch foot ( only)
NOTE: When using the straight stitch foot, make sure to
set the stitch width control at 0. Otherwise the needle
may strike the presser foot and possibily break.
The quilter will help to keep the stitching lines straight.
rn Loosen the quilter holding screw.
Slide the quilter in the hole to the desired width and
tighten the screw.
[1] Sew, guiding the quilter over the previous row of stitching.
© Quilter holding screw
© Quilter
I I I
I I I
•|D C(3 C|i
)
I I I
I I I
GZ) CI3 C3
!®
WIDTH
LENGTH I 2
@ Hole
® Distance
To Drop or Raise the Feed Dogs
The drop feed dogs lever is located underneath the free
arm bed on the back side of the machine.
© To drop the feed dogs, push the lever in the direction of
the arrow as illustrated.
@ To raise the feed dogs, push the lever in the direction of
the arrow as illustrated and turn the handwheel toward
you.
Feed dogs must be up for normal sewing.
42
Page 22

Darning
© Stitch selector: 6 to 8
@ Stitch width; 6.5
@ Stitch length: Any
© Needle thread tension: 2 to 6
® Presser foot F; Satin stitch foot
® Pressure adjusting lever: 0
® Feed dogs; Dropped
Drop the feed dogs. Place fabric, with the hole in the center, on
an embroidery hoop, as shown.
Lower the presser foot F and sew at slow speed.
Move the fabric back and forth slowly until the darning area is
covered. Turn the fabric 1/4 turn (90°) and sew another layer
of stitching over the first layer. After darning is completed,
return the pressure adjusting lever to 3 for normal sewing.
NOTE: If fabric is thin or badly damaged, use a separate
piece of fabric under the hole to reinforce it.
BUILT-IN STITCH PATTERNS
Basic Zigzag
® Stitch selector: 5
@ Stitch width: 1 to 6.5
@ Stitch length: 0.5 to 4
® Needle thread tension; 3 to 5
® Presser foot: A Zigzag foot
The zigzag stitch is one of the most common and versatile
stitches. It can be a utility stitch for button sewing, buttonhole
making, hemming, overcasting, mending and darning.
It can also be used to decorate with trims, appliques and cut
work or as a decorative stitch.
Page 23

Overcasting Stitch
© Stitch selector: 5
@ Stitch width: 5 to 6.5
® Stitch length: 1 to 2
® Needle thread tension: 3 to 8
® Presser foot A: Zigzag foot
® Presser foot C: Overedge foot
NOTE:
Set the stitch width 5.0 to 6.5 when the overedge foot C
is used to prevent needle breakage or damaging the foot.
This is useful in garment construction and in finishing raw
edges of any sewing project.
Start overcasting about 1/8”(0.3cm) inside the raw corner of
a seam. If you start right at the edge, the fabric bunches up
and the stitches become tangled.
Overedge Stitch
© Stitch selector: 1
@ Stitch width: 3 to 6.5
@ Stitch length: 1 to 3
@ Top thread tension: 3 to 8
® Presser foot A: Zigzag foot
This stitch is often used as a seam finish to prevent fraying.
46
Page 24

straight Stretch
® Stitch selector:
@ Stitch width:
@ Stitch length:
@ Needle thread tension:
(D Presser foot A:
® Presser foot H(option):
6 to 8
6.5
S.S. (stretch stitch position)
2 to 6
Zigzag foot( S)
Straight stitch foot(
III II III
01
,5,
only)
NOTE:
When using the straight stitch foot, make sure to set the
stitch width control at 0. Otherwise the needle may strike
the Presser foot and possibly break.
This strong, durable stitch is recommended where both
elasticity and strength are necessary to insure comfort and
durability.
Use it to reinforce areas such as crotch and armhole seams
as well as to eliminate puckering on knits and stretch fabrics.
Also, use when constructing items requiring extra strength
such as backpacks.
Rick-rack Stretch
® Stitch selector:
d) Stitch width:
(D Stitch length:
@ Needle thread tension: 2 to 6
5
2 to 6.5
S.S. (stretch stitch position).
(D Presser foot A: Zigzag foot
® Presser foot F: Satin stitch foot
Sew on stretch fabrics in any area that you might use a
zigzag stitch. This stitch is used as a decorative topstitch as
well.
Page 25

Overcast Stretch Stitching
0 Stitch selector: 9
0 Stitch width: 3 to 6.5
0 Stitch length: S.S. (stretch stitch position)
0 Needle thread tension: 2 to 6
© Presser foot A: Zigzag foot
This stitch is for sewing a seam with an overcast finish. It is
used when making swim wear, ski pants and other garments
which require stretch.
•To sew
Place raw edge of fabric to the “left” of the needle as shown.
Sew in a manner so that the needle pierces the fabric very
close to the outside edge. Or place the fabric to allow a
5/8”(1.6 cm) seam, then trim seam allowance.
Raw or worn edges of older garments can be overcasted to
prevent further raveling.
Serging
0
stitch selector:
0
Stitch width:
@ Stitch length:
0
Needle thread tension: 3 to 6
0 Presser foot A: Zigzag foot
® Presser foot C: Overedge foot
NOTE:
Set the stitch width 5.0 to 6.5 when the overedge foot C
is used to prevent needle breakage or damaging the foot.
This stitch is ideal for 1/4”(0.6 cm) seams on knits or on
medium to heavy weight woven fabrics where you want a
narrow seam. It Is also great for sewing spandex swim wear.
Place the fabric under the Presser foot [C] so that the
stitches are made over the raw edge.
10
3 to 6.5
S.S. (stretch stitch position)
50
Page 26

Elastic Stretch Stitch
® Stitch selector:
(D Stitch width;
d) Stitch length:
3
3 to 6.5
S.S. (stretch stitch position)
® Needle thread tension; 3 to 6
(5) Presser foot A; Zigzag foot
Choose this stitch to attach elastic to garments. Mark elastic
into quarters and match these to the center front, center back
and side seams.
Place the middle of the elastic under the center of the Presser
foot [A] and stitch into place, making sure the elastic is evenly
distributed.
Stretch Patching
0 Stitch selector:
0 Stitch width:
11
5 to 6.5
® Stitch length;
0 Needle thread tension: 2 to 6
® Presser foot A: Zigzag foot
This stitch is for patching worn out elbows or knees and for
patchwork quilting.
S.S. (stretch stitch position)
52
Page 27
Attaching Walking Foot (Option)
The “walking foot” is a piece of equipment that helps
fabric feed more smoothly. With this foot, fabric can sewn
without shifting or puckering since the fabric is held and
fed by both upper and lower feed dogs.
It works well with material like lawn, knit, vinyl or leather.
Raise the needle, and the presserfoot.
Loosen the thumb screw on the foot holder to remove it.
Attach the walking foot to the presser bar with the lever
above needle clamb, and secure it with the thumb screw.
Operate the machine at low to medium speed.
Set the stitch length in the range of 0 - 4.
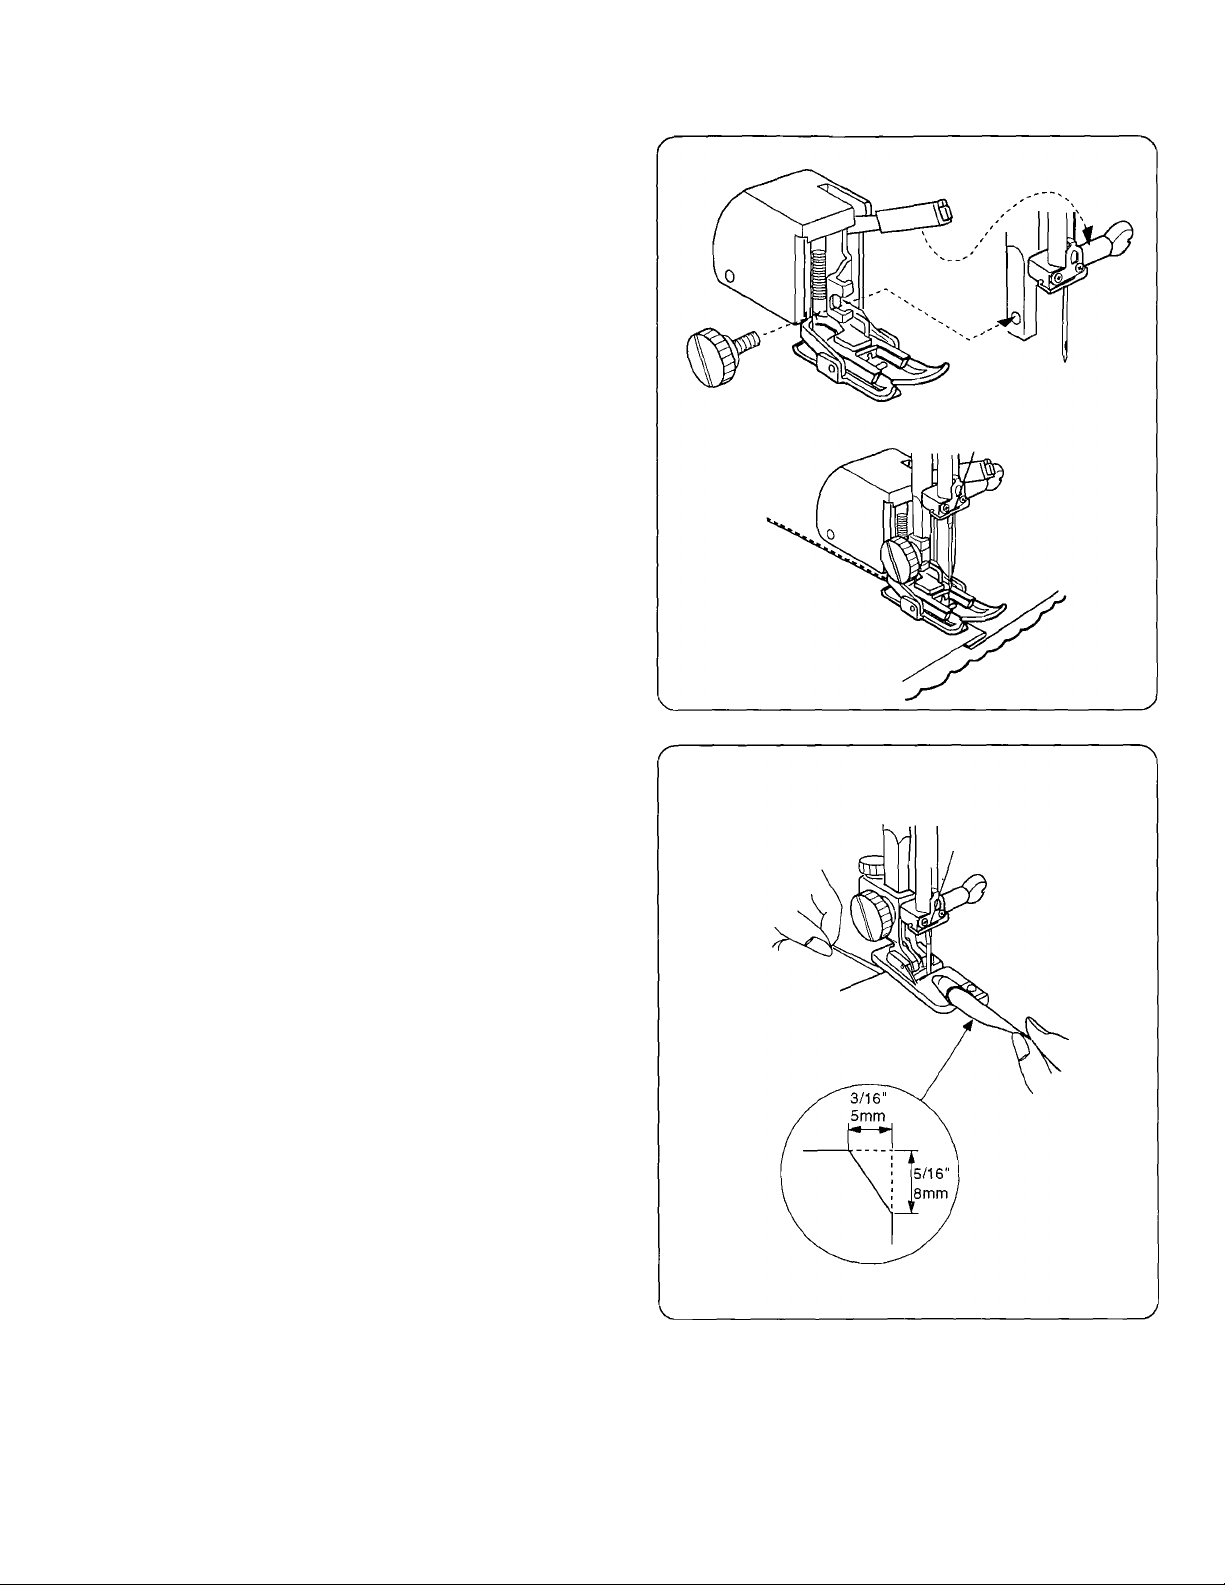
Attaching Hammer Foot (Option)
A rolled hem makes an attractive finish for scarfs, tables
liens and tricot lingerie fabric.
Make a double 1/8” (0.3cm) fold approximately 3” (8cm) in
length.
Lower the needle into the fabric at the point where sewing
is to begin, then lower the hemmer foot.
Sew 3 or 4 stitches while holding the needle and bobbin
threads. Lower the needle into the fabric and lift the
hemmer foot, insert the folded portion of the fabric into
the curl of the hemmer foot.
Lower the hemmer foot, then sew by lifting up the edge of
the fabric to keep it feeding smoothly and evenly.
Trim the corner as illutrated, to reduce bulk.
54
Page 28

Blind Hem Stitch
(T) stitch selector; 9
(g) Stitch width: 2 to 3
(3) Stitch length: 1 to 3
@ Needle thread tension: 2 to 6
(D Presser foot G: Blind hem foot
Q] On heavy weight fabrics that ravel, the raw edge should be
overcast first.
Fold the hem as illustrated.
© Wrong side (Bottom side) of fabric
@ 1/4” - 7/16” (0.4- 0.7cm)
@ Light weight fabric
© Heavy weight fabric
• To sew
[|] Position the fabric on the machine so that the needle just
pierces the folded part of the fabric when the needle comes
over to the extreme left side. Lower the Presser foot.
® When the needle comes to the left
® When the needle comes to the right
Sew, guiding the folded edge along the guide.
* For a professional looking hem, fold the fabric reducing
the width to about 1/8”(0.2cm).
As you sew, the right hand stitch will fall off the fabric edge
forming a chain stitch.
m
© Guide
® Folded edge
• Changing needle position
Turn the sliding guide screw so that the sliding guide is very
close, 1/16”(0.1cm), to the left side of the blind hem foot.
® Guide screw
© Needle
© 1/16”(0.1cm)
|y| If needle drops on the left side too far, the stitches appear
on the right side of fabric.
© Right side of fabric
56
Page 29

DECORATIVE STITCHES
Lace Work
0 Stitch selector;
@ Stitch width:
0 Stitch length:
0 Needle thread tension; 1 to 4
® Presser foot A: Zigzag foot
Lace adds a fanciful, feminine touch to blouses and linge
rie. Table linens and pillows become more elegant when
trimmed with lace.
Fold the raw edge of the fabric at least 5/8”(1.5 cm). Place
lace underneath and topstitch with blind hem stitch. Trim
excess fabric close to stitching.
9
2to3
1
Multiple Zigzag Stitch
0 stitch selector: 4
0 Stitch width; 5 to 6.5
0 Stitch length; 0.5 to 1
0 Needle thread tension: 2 to 6
0 Presser foot A: Zigzag foot
Seam finishing
This stitch is used to finish the seam allowance on
synthetics and other fabrics that tend to pucker. The stitch
is also excellent for darning and mending tears.
Place your fabric to allow a 5/8”(1.5cm) seam.
Mending
Position the tear under the needle so that the stitch
catches both sides.
58
Page 30

Shell Stitch
0 Stitch selector; 10
@ Stitch width; 3 to 6.5
(3) Stitch length; 2 to 3
@ Needle thread tension; 4 to 9
® Presser foot F; Satin stitch foot
Use a lightweight fabric such as tricot. Fold the fabric and
stitch on the bias. You may need to increase the needle thread
tension slightly. Allow the needle to just clear the folded edge
of the fabric at the zigzag stitches.
If you sew rows of shell stitches, space the rows at least
5/8”(1.5 cm) apart. You can also sew shell stitches on knits or
soft silky woven fabrics in any direction.
Box Stitch
0 Stitch selector; 3
0 Stitch width; 3 to 6.5
@ Stitch length; 0.5 to 2
0 Top thread tension; 3 to 8
0 Presser foot A; Zigzag foot
Overlap two raw edges of heavy weight interlining and use this
stitch to join them.
60
Page 31

Fagoting Stitch
(T) Stitch selector 11
0) Stitch width; 5 to 6.5
®
WIDTH ^
(D Stitch length: 0.5 to 2
0 Top thread tension: 3 to 8
© Presser foot A: Zigzag foot
Use this stitch to join two pieces of fabric to create an open
work appearance and add design interest. Fold under each
fabric edge 1/2" (1.3cm) and press. Pin the two edges to
paper or tear-away backing 1/8" (0.3cm) apart. Sew slowly,
guiding the fabric so the needle catches the folded edge on
each side.
® Paper or tear-away backing
@ 1/8”(0.3cm)
Two-point Shell Stitch
© stitch selector 2
(D Stitch width; 3 to 6.5
© Stitch length; 1 to 3
0 Top thread tension: 3 to 8
© Presser foot A; Zigzag foot
This stitch is often used as a single overlook stitch.
length CT] ®
33 0
WIDTH fT® ®
c:
r
6
0
LENGTH m ®
©
'i§\
V
m:
Two-point Box Stitch
0 Stitch selector 12
@ Stitch width: 3 to 6.5
® Stitch length; 1 to 2
0
Top thread tension; 3 to 8
© Presser foot A: Zigzag foot
This stitch is useful to join elastic fabrics.
62
f
> ffl
]
1
--
6
0
—
I]
V
am
WIDTH
LENGTH
1 e's ] (D
Page 32

Smocking
© Stitch selector:
@ Stitch width: 3 to 6.5
@ Stitch length:
@ Needle thread tension:
© Presser foot A: Zigzag foot
® Presser foot F: Satin stitch foot
Smocking is a delicate decorative treatment used on children’s
clothes or women’s blouses.
Choose a soft and lightweight fabric such as batiste, gingham
or challis. Cut the fabric three times wider than the projected
width. Set stitch length at “4” and sew rows of straight stitches
3/8”(1.0 cm) apart across the area to be smocked.
Knot the threads along the edge. Pull the bobbin threads to
distribute the gathers evenly and secure the threads.
Sew the decorative stitches of your choice between the
gathered rows. Remove the gathering stitches.
© Wrong side of fabric
NOTE:
Loosen the needle thread tension to make gathering
easier.
4
S.S. (stretch stitch position)
2 to 6
Herring Bone Stretch
© Stitch selector:
© Stitch width:
@ Stitch length:
© Top thread tension:
® Presser foot A:
Use as hemming stitch for blankets, table clothes and
draperies.
Place the fabric right side up, and sew 3/8"(1.0 cm) from the
edge. Then trim close to stitching.
Note:
Be careful not to cut the stitches.
2
3 to 6.5
S.S. (stretch stitch position)
2 to 6
Zigzag foot
Page 33
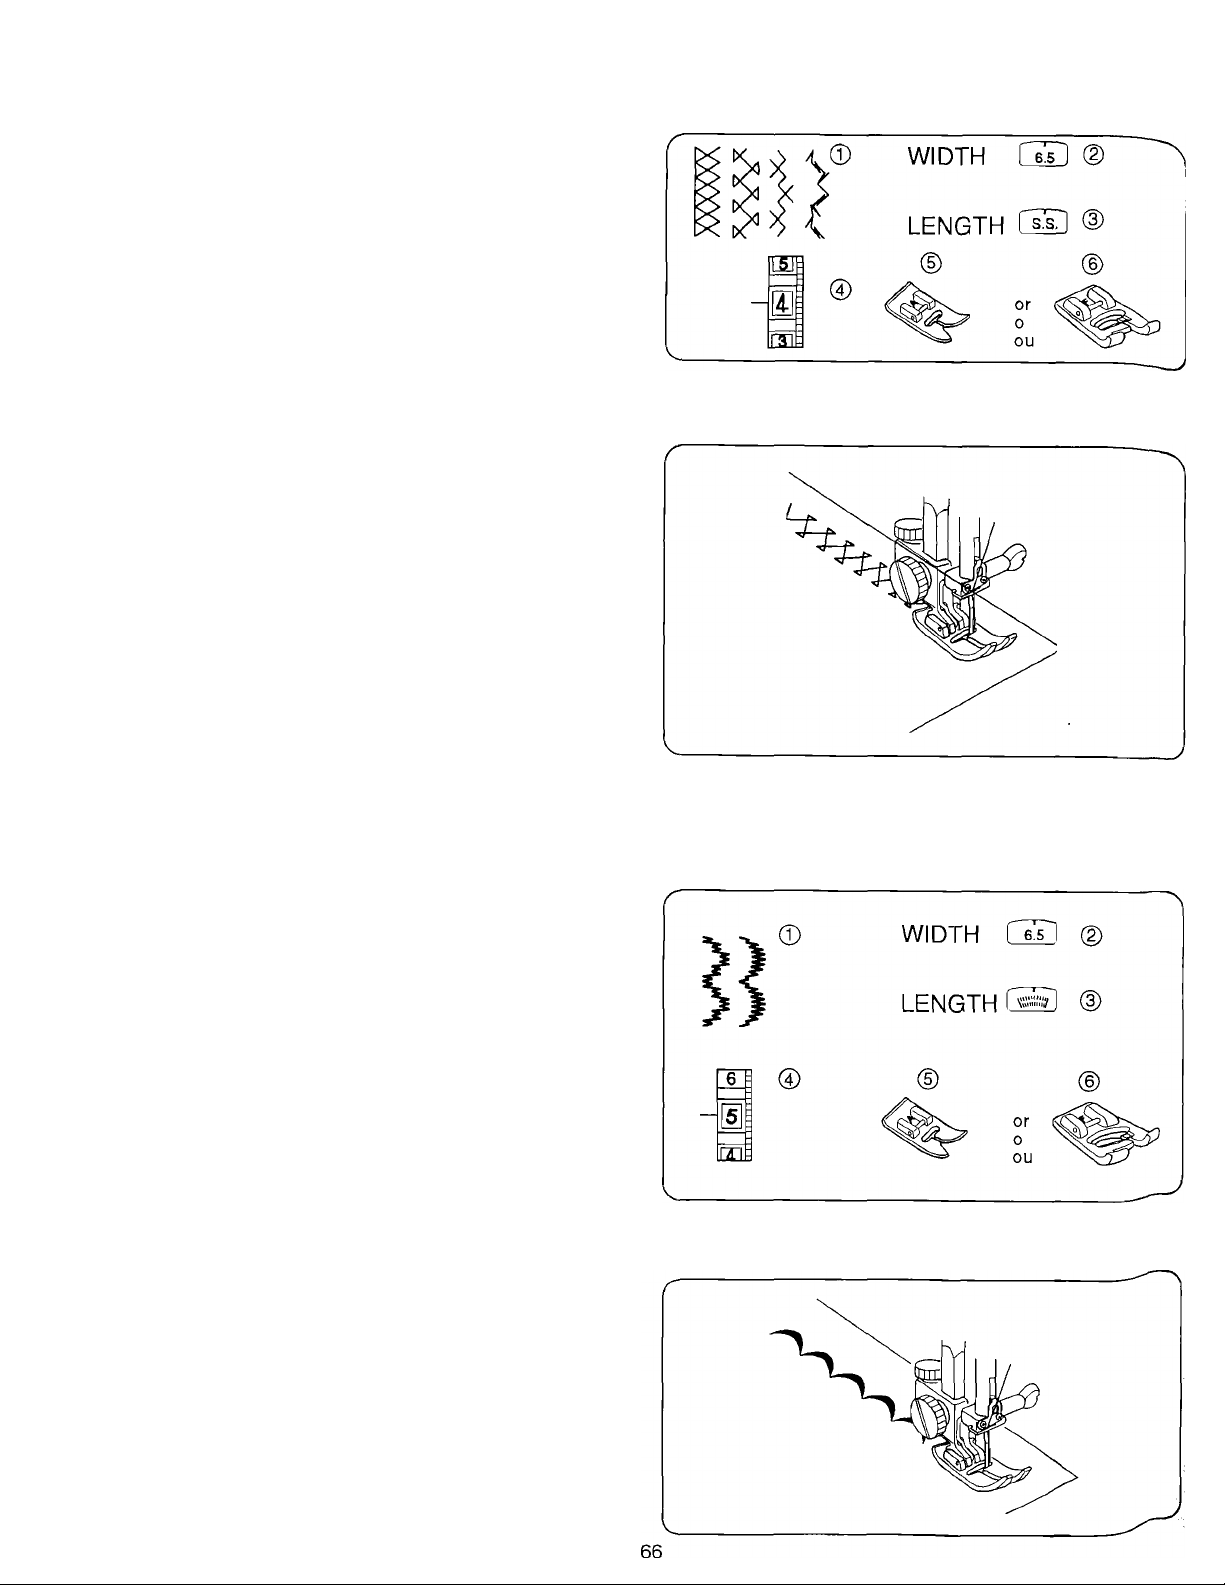
Decorative Stretch Patterns
@ stitch selector:
(2) Stitch width:
(3) Stitch length:
0 Needle thread tension:
0 Presser foot A:
0 Presser foot F:
Decorative stretch patterns are used for adding a creative
and personalized touch to items. You can decorate children's
clothes, women's blouses, curtains, etc.
1, 12to 14
3 to 6.5
S.S. (stretch stitch position)
2 to 6
Zigzag foot
Satin stitch foot
Decorative Stitch of Geometric Patterns
0 stitch selector:
0 Stitch width:
0
Stitch length:
0Top thread tension:
0
Presser foot A:
0
Presser foot F:
For a delicate appearance on fabric such as chiffon, use a
single layer with a tear-away backing, if necessary.
13to 14
3 to 6.5
2one
3to8
Zigzag foot
Satin stitch foot
Page 34

BUTTONHOLE STITCHES
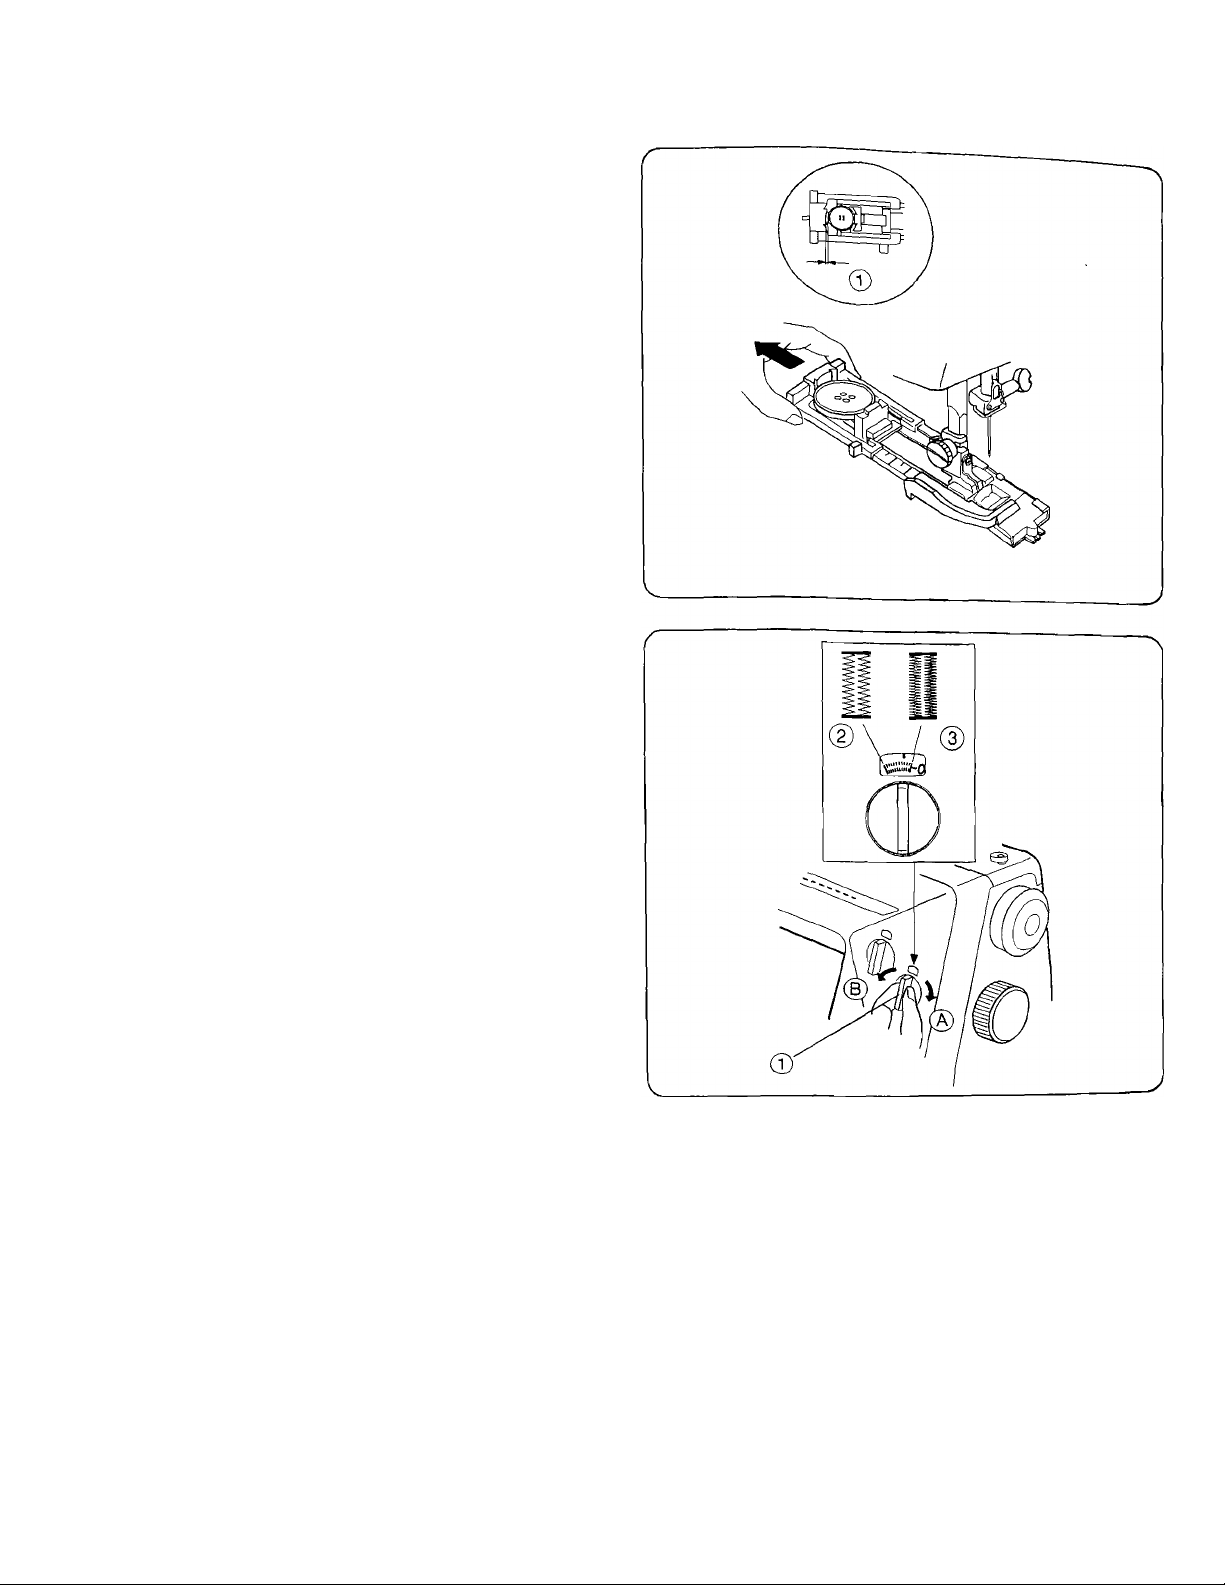
Automatic Buttonhole
(T) stitch selector: []
@ Stitch width: 3 to 6.5
(3) Stitch length: c'";'// zone
0 Needle thread tension: 2 to 6
® Presser foot R: Automatic buttonhole foot
• Preparation for Sewing
(T) Groove
@ Pin
Attach the automatic buttonhole foot R. Make sure the groove
on the holder catches the pin on the foot when lowering the
presser foot.
• To Sew
0 Button holder
® Buttonhole lever
The buttonhole size is automatically set by placing the button
in the rear of the automatic buttonhole foot.
The button holder on the foot takes a button up to 1.0’’(2.5 cm)
in diameter.
Make a test buttonhole on an extra piece of the fabric to check
your settings.
Use interfacing on stretch fabrics.
Pull the button holder ® to the back, and place the button in it.
Push it together tightly on the button.
Pull the buttonhole lever (2) down as far as it will go.
68
Page 35

® Mark for placement of buttonhole
(?) Starting point
(D Slider
® There shoud be no gap.
® Spring holder
® Difference
Draw both threads to the left under the foot.
Insert the garment under the foot, and lower the needle at the
starting point.
Then lower the automatic buttonhole foot.
* Make sure there is no gap (D between the slider © and the
spring holder ®.
If there is a gap ®, the length of the rows will be different, as
shown in ®.
Sew slowly and stop the machine at the starting point when a
buttonhole is completed.
Remove the fabric and place a pin just before the bartack at
each end to prevent cutting bartacks. Cut the opening with the
buttonhole opener.
After a buttonhole is sewn, move the stitch to the next stitch by
turning the stitch selector in direction of ® or ©, then return
the stitch back to “ |]’’ to reset for sewing the next buttonhhole.
When finished, push the buttonhole lever up as far as it will go.
Page 36
If the button is extremely thick, make a test buttonhole.
If it is difficult to fit the button through the test buttonhole,
lengthen the buttonhole by pulling the button holder on the
foot back to increase the length.
(T)Gap
How to Adjust Buttonhole Stitch Density
Use the stitch length control ® to adjust stitch density.
Turn the dial in direction ® for a coarser density (2).
Turn the dial in direction (!) for a tighter density (D.
72
Page 37

• Corded Buttonhole
Use the same procedure as automatic buttonhole.
* Set the stitch width to match the thickness of the cord
used.
With the buttonhole foot raised, hook the filler cord on the
spur at the back of the buttonhole foot.
Bring fhe ends toward you under the buttonhole foot,
clearing the front end.
Hook the filler cord into the forks on the front of the
automatic buttonhole foot R to hold them tight.
Lower the needle into the garment where the buttonhole will
start and lower the foot.
(T) Spur
Depress the foot control gently and sew the buttonhole. Each
side of the buttonhole and the bartacks will be sewn over the
cord.
Remove the fabric from the machine and cut the sewing
threads only.
(D Needle thread
@ Bobbin thread
Pull the left end of the filler cord to tighten it.
Thread the end through a darning needle, draw to the wrong
side of the fabric and cut.
* To cut the buttonhole opening, refer to the instructions on
page 70.
74
Page 38

Manual Buttonhole (Option)
0 stitch selector: D
@ Stitch width; 3 to 6.5
@ Stitch length: zone
® Needle thread tension: 2 to 6
(D Presserfoot B (option): Buttonhole foot
I5J
131
©
©
WIDTH Lai
LENGTH
• Manual Buttonhole
* If the diameter of the button is more than 1.0”(2.5 cm), a
buttonhole must be made manually as follows:
|T]Turn the handwheel toward you to raise the needle to its
highest position. Raise the presserfoot lifter.
[11 Set the stitch at “ |] ” by turning the stitch selector.
* If the stitch is already on at “ |] ” reset the machine in
accordance with the instructions on page 70.
[^ Attach the buttonhole foot (B).
[Tl Pull the buttonhole lever downward as far as it will go.
[si Lower the needle into the garment where the buttonhole
is to start, and lower the foot.
Sew the front bartack and left row, then stop the machine
after sewing the desired total length of buttonhole.
0 Pull the buttonhole lever toward you.
□
S
0 0
■0
] Sew the back bartack and right row, then stop the ma
chine at the starting point.
* To cut the opening and to reset for sewing the next
buttonhole, refer to the instructions on page 70.
E
Page 39

ADDITIONAL STITCHES
Satin Stitch
0 stitch selector: 5
@ Stitch Width; 2 to 6.5
® Stitch length: 0.5 to 1
WIDTH
length rn
0 Needle thread tension: 3 to 8
0 Presser foot F: Satin stitch foot
® Pressure adjusting lever: 1 to 2
The satin stitch is often used to decorate and to overcast the
raw edge on blankets, linens, tablecloths, napkins, etc. It is
also attractive in applique.
Once your machine is set up to stitch, test stitch on the fabric
being used for best results. A tight satin stitch may pucker
some lightweight fabrics.
Monogramming
0 Stitch selector:
5
1
I
WIDTH
0 Stitch width:
0 Stitch length:
0 Needle thread tension:
0 Presser foot F:
© Pressure adjusting lever: 1 or 2
Attach a piece of stabilizer on the wrong side (Bottom side)
of the fabric.
Draw letters on the fabric with tailor’s chalk. Form each pattern
with satin stitch, adjusting stitch width.
3 to 6.5
0.5 to 1
1 to 4
Satin stitch foot
LENGTH rrn ®
m
78
Page 40

Applique
© Stitch selector: 5
@ Stitch width: 2 to 6.5
@ Stitch length: 0.5 to 1
® Needle thread tension: 2 to 6
® Presser foot F: Satin stitch foot
® Pressure adjusting lever: 2
Baste applique pieces on the fabric, or fuse the applique
pieces with iron-on fabric joiner. Stitch around the applique
making sure the needle falls along the raw edge of the
applique.
Embroidery
© Stitch selector: 5
@ Stitch width: 1 to 6.5
@ Stitch length: Any
@ Needle thread tension: 2 to 6
® Feed dogs: Dropped
‘Presser foot: Remove
Drop the feed dogs and remove the foot holder. Adjust stitch
width as desired. Draw a design onto the fabric with tailor’s
chalk. Stretch the fabric between embroidery hoops and place
under the needle.
Lower the Presser foot lifter to engage the needle thread
tension. Holding the needle thread in your left hand, rotate the
handwheel counterclockwise for one complete turn.
Pull the needle thread to draw the bobbin thread to the right
side of the fabric. At medium speed, stitch along the marked
outline, guiding the fabric carefully by hand. After embroidery
is completed, raise the feed dogs for normal sewing.
80
Page 41

Button Sewing
0 Stitch selector: 5
© Stitch width: 2 to 6.5
© Stitch length: Any
0 Needle thread tension: 2 to 6
© Presser foot A: Zigzag foot
© Feed dogs: Dropped
Drop the feed dogs. Match the holes on a button with the
horizontal slot on the Presser foot [A], Adjust stitch width
matching the distance of the holes on the button. Lower the
foot to hold the button in place. Check to see if the needle
enters into the holes on the button by turning the handwheel
by hand. Sew about ten (10) stitches.
To strengthen the shank, cut the threads leaving about
4.0”(10.0 cm). Bring the needle thread down through one of
the holes on the button and wind it around the shank. Bring
the needle thread to the wrong side (bottom side) and knot.
After button sewing is completed, raise the feed dogs for
normal sewing.
82
Page 42

CARE OFYOUR MACHINE
NOTE:
* Unplug the machine.
* Do not dismantle the machine other than as explained in
this section.
* Do not store the machine in a high-humidity area, near a
heat radiator or in direct sunlight.
* Clean the outside of the machine with a soft cloth and mild
soap.
Replacing the Light Bulb
CAUTION: As the light bulb could be HOT, protect your
fingers when you handle it.
Unplug the machine and open the face cover. Push the bulb
up and turn it counterclockwise to remove. Put in a new bulb
by pushing it up and turning it clockwise.
Cleaning the Bobbin Holder
To insure that the machine operates at its best, you need to
keep the essential parts clean at all times. Collect dust and
lint from the bobbin area. The machine can become slug
gish or knock loudly when a thread is caught.
Turn off the power switch and unplug the machine. Remove
the hook cover plate by sliding the hook cover plate release
button to the right.
Take out the bobbin. Brush out dust and lint with a lint brush
or a vacuum cleaner.
Insert the bobbin and attach the hook cover plate.
Page 43

Cleaning the Shuttle Race and Feed Dogs
Unplug the machine and remove the presser foot and needle.
Remove the screw on the left side of the needle plate with a
screwdriver. Remove the needle plate © and take out the
bobbin.
(T) Needle plate
Lift up the bobbin holder @ and remove it.
® Bobbin holder
Brush out dust and lint inside the bobbin holder. Clean the
feed dogs @ and hook race © with a lint brush. Wipe out
gently with a soft, dry cloth.
@ Feed dogs
@ Hook race
Replacing the Bobbin Hoider
|T] Insert the bobbin holder so that the kind fits next to the
stopper in the hook race.
© Stopper
@ Knob
[U Insert the bobbin.
[U Replace the needle plate, inserting the two needle plate
guide pins into the holes in the needle plate.
Replace the screw.
@ Needle plate guide pins
@ Guide hole
Oiling the Machine
Open the face cover and oil the two points as shown at least
once a year. One or two drops of oil is sufficient. Remove
excess oil, otherwise it may stain fabrics. In case the ma
chine is not used for an extended period, oil it before sew
ing. Use quality sewing machine oil.
Page 44

Troubleshooting
r
Condition Cause
Reference
The needle thread
breaks.
The bobbin thread
breaks.
The needle breaks.
Skipped stitches
1. The needle thread is not threaded properly. Page 28
2. The needle thread tension is too tight.
3. The needle is bent or blunt. Page 18
4. The needle is incorrectly inserted.
5. The needle thread and the bobbin thread are not set properly
under the presserfoot when sewing is starting. Page 28
Page 30
Page 18
6. The fabric is not drawn to the rear when sewing is finished . Page 38
7. The thread is too heavy or too fine for the needle. Page 91
1. The bobbin thread is not threaded properly in the bobbin
case and shuttle. Page 24
2. Lint has collected in the shuttle area. Page 84, 86
3. The bobbin is damaged and doesn't turn smoothly.
1. The needle is incorrectly inserted.
2. The needle is bent or blunt. Page 18
3. The needle clamp screw is loose. Page 18
4. The needle thread tension is too tight. Page 30
5. The fabric is not drawn to the rear when sewing is finished. Page 38
Change the bobbin
Page 18
6. The needle is too fine for the fabric being sewn. Page 91
1. The needle is incorrectly inserted. Page 18
2. The needle is bent or blunt.
3. The needle and/or threads are not suitable for the work being
sewn. Page 91
4. The needle thread is not threaded properly.
5. The wrong needle is used. Change the needle
Page 18
Page 28
Seam puckering
The cloth is not
feeding smoothly.
The machine does
not work.
Patterns are
distorted.
Noisy operation
V
1. The needle thread tension is too tight. Pages 30, 32
2. The needle thread is not threaded properly. Page 28
3. The needle is too heavy for the fabric being sewn.
4. The stitch length is too long for the fabric. Make stitch denser
1. The machine is not plugged in. Page 14
2. The stitches are too fine. Make stitch coarser
3. The feed dog is not raised after “drop feed” sewing.
1. The feed dog is packed with lint.
2. A thread is caught in the shuttle race.
3. Push-clutch is disengaged.
1. The stitch is not balanced.
1. There is thread caught in the hook race.
2. Lint has built up in the shuttle or the shuttle race.
88
Page 91
Page 42
Page 86
Page 86
Page 24
Page 36
Page 86
Page 84
J
Page 45

Fabric, Thread and Needle Table
• The needle and thread used for a sewing project depends upon the fabric that is chosen.
• The table below is a practical guide to needle and thread selections for most situations.
• Refer to it before starting to sew. Be sure to use the same size and type of thread in both needle and bobbin. For
best results, use only genuine Singer needles.
Needles
Fabric
Thread
Type
A
Size
Delicate - tulle, chiffon, fine lace, organza
Lightweight - batiste, organdy, jersey, voile, taffeta,
crepe, chiffon velvet, plastic film
Medium Weight - gingham, percale, pique, linen,
chintz, faille, satin, fine corduroy, velvet, suitings,
knits, deep-pile fabrics, vinyl
Medium Heavy - gabardine, tweed, sailcloth,
denim, coatings, drapery, vinyl, deep-pile fabrics
Heavy - overcoatings, dungaree, upholstery fabrics,
canvas
All Weights - decorative topstitching
Fine mercerized cotton
Fine synthetic thread
50 mercerized cotton
Silk
Fine synthetic thread
50 mercerized cotton
60 cotton
Synthetic thread
Heavy-duty mercerized cotton
40 to 60 cotton
Synthetic thread
Heavy-duty mercerized cotton
24 to 40 cotton
Synthetic thread
Buttonhole twist**
Style 2020
Style 2020 11/80
Style 2020
Style 2020 16/100
Style 2020
Style 2020
9/70
14/90
18/100
16/100
18/100
Synthetic Knits and Stretch Fabric - polyester
doubleknit, nylon tricot, jersey, ciré, panne velvet,
bonded fabrics, raschel
Leather - suede, kidskin, lined leathers
V
_______________________________________________
Use with standard sewing thread in bobbin.
Synthetic thread
50 mercerized cotton
Silk
50 mercerized cotton
Synthetic thread
Silk
91
Style 2045
Ball Point
Style 2032
14/90
11/80
14/90
16/100
y
Page 46

For repair of major brand appliances in your own home-
no matter who made it, no matter who sold it!
1-800-4-MY-HOME"^
(1-800-469-4663)
Anytime, day or night
www.sears.com
To bring in products such as vacuums, lawn equipment and electronics
for repair, call for the location of your nearest Sears Parts & Repair Center.
1-800-488-1222 Anytime, day or night
www.sears.com
For the replacement parts, accessories and owner’s manuals
that you need to do-it-yourself, call Sears PartsDirecf^l
1-800-366-PART 6 a.m. - 11 p.m. CST,
(1-800-366-7278) 7 days a week
www.sears.com/partsdirect
To purchase or inquire about a Sears Service Agreement:
1-800-827-6655
7 a.m - 5 p.m. CST, Mon. - Sat.
Para pedir servicio de reparación a domicilio,
y para ordenar piezas con entrega a domicilio:
1-888-SU-HOGAR®^
(1-888-784-6427)
> Sears, Roebuck and Co.
® Registered Trademark / Trademark of Sears, Roebuck and Co,
5> Marca Registrada / Marca de Fábrica de Sears, Roebuck and Co,
Au Canada pour service en français:
1-877-LE-FOYER®^
(1-877-533-6937)
Printed in Taiwan
Impreso en Taiwan
Imprimó au Taiwan
 Loading...