

Page 1

Instru-Ctions for -asing
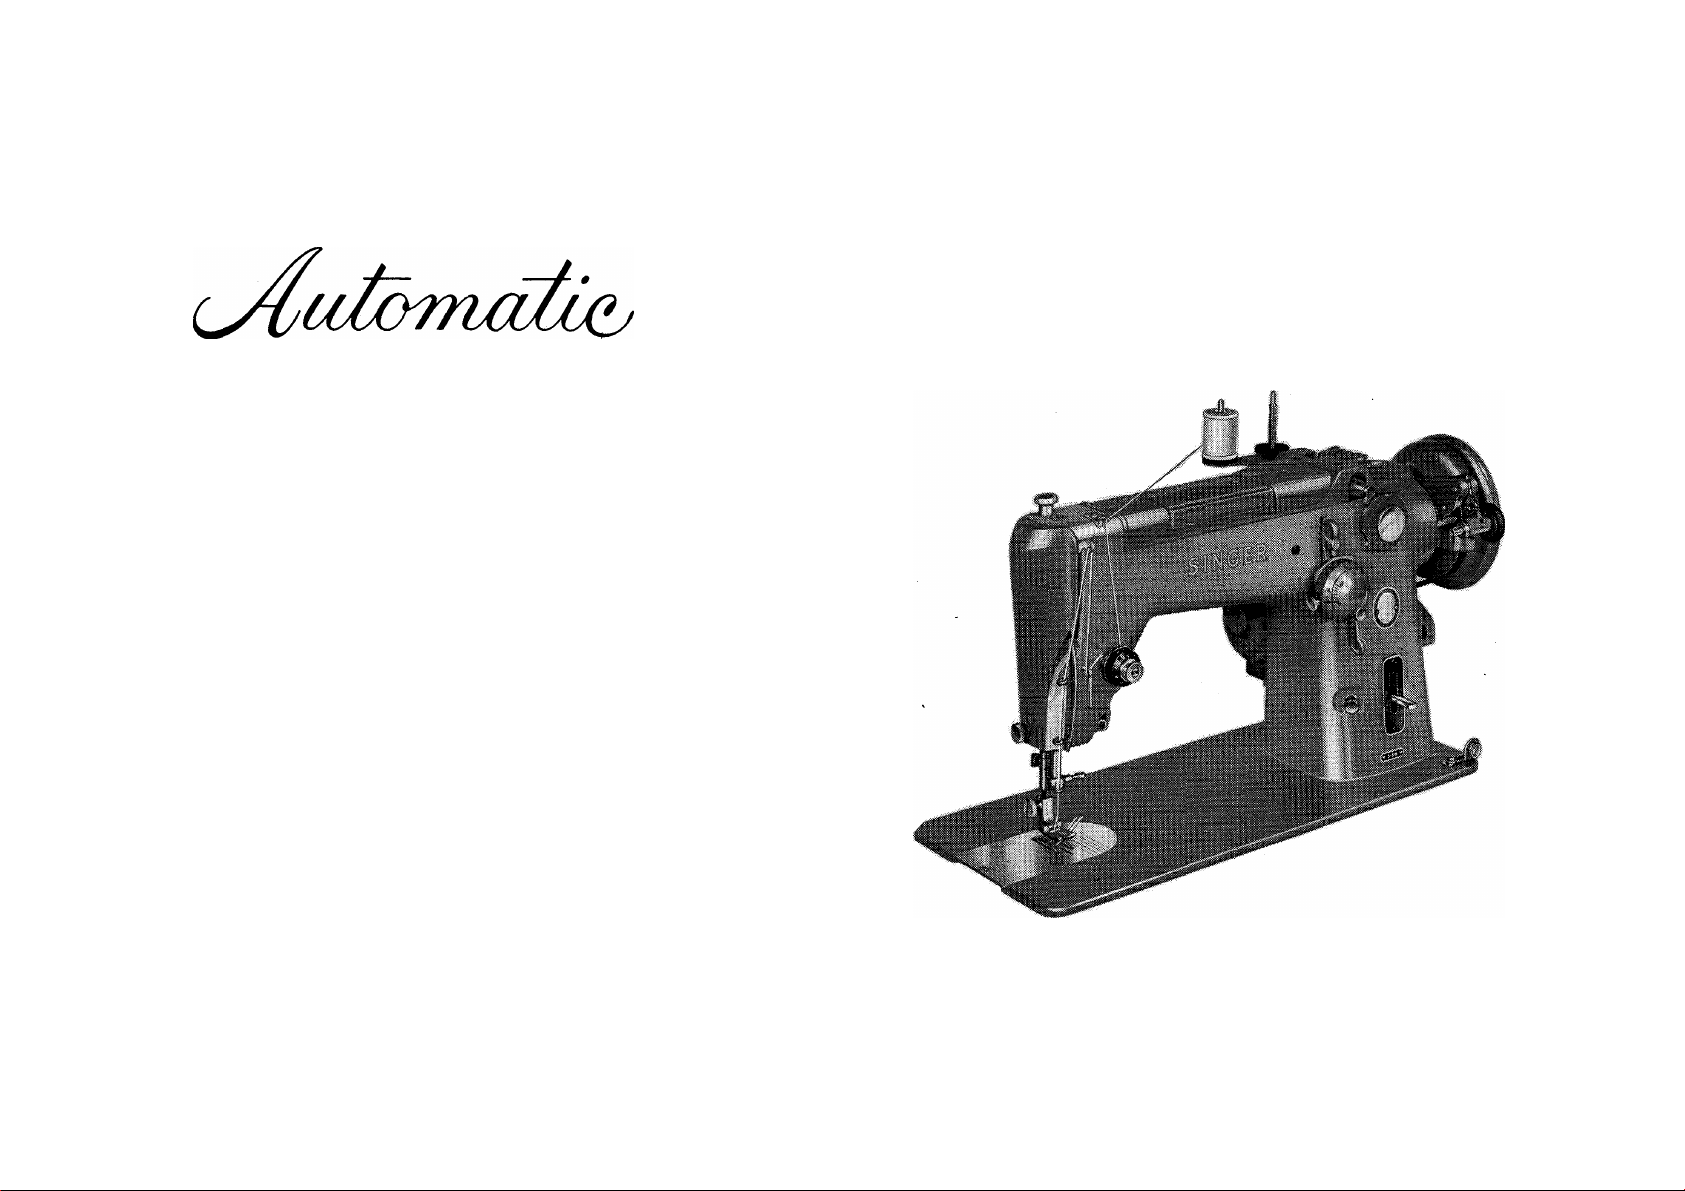
SINGER
Sewing faciline 31Q
THE SINGER COMPANY
Page 2

Page 3
SINGER 3i9
SWING-NEEDLE MACHINE
*A Trademark of THE SINGER COMPANY
Outstanding for its simplicity, the 319W2 is a
straight stitching machine of highest quality
plus an automatic zigzag machine with the
convenience of built-in stitch designs affording
unlimited versatility.
Page 4

AS THE OWNER OF THIS NEW SINGER «'AUTOMATIC”
You should take pride in having the finest zigzag sewing machine ever made for home use. You can
be confident that this extraordinarily versatile machine is built with the expert care and knowledge
that have made SINGER the best-known and respected name in sewing machines the world over
for more than a century. With it you can do beautiful and ornamental stitches automatically!
No more skill is required than it takes to sew an ordinary seam. This amazing machine will speed
through your straight sewing and then, by simply raising one or more levers you can do decorative
stitching in no more time or with no more effort than it takes to do straight stitching.
The 319W2 has all of the convenience of built-in stitches, yet all of the versatility of interchange
able FASHION* Discs. Change the FASHION Disc on the front of the machine and you have added
not one but many new stitches. Designs result from single lever operation or from the use of a
combination of levers. Truly the 319W2 is the simplest, most versatile automatic zigzag machine
on the market today.
TO GET THE MOST ENJOYMENT FROM YOUR SINGER
Take advantage of the free sewing lessons to which you are entitled! Skilled, SINGER-trained
teachers will give you personal guidance and assist you in learning the fundamentals of home
sewing.
Copyright © 1956 by The Singer Company
Page 5

SINGER SERVICE
Wherever you go you will find expert, dependable SINGER* Service close at hand. SINGER is
interested in helping you keep your SINGER Sewing Machine in top running condition. That is
why you should always call your SINGER CENTER if your machine ever requires adjustment or
repair. When you call your SINGER CENTER you can be sure of obtaining the services of a trained
SINGER repair man and can be assured of warranted SINGER* parts when needed! Look for
the famous red "S” Trade Mark on your SINGER CENTER and the ever ready SINGER Service Car.
EVERYTHING FOR THE WOMAN WHO SEWS
The answer to your sewing needs is at your SINGER CENTER. There you will find a wide choice
of sewing necessities and notions, sewing instructions and guidance and services for covering
buttons, hemstitching, making belts and buckles, to mention a few. Look in your telephone direc
tory under THE SINGER COMPANY.
Page 6

4
ADVANCED FEATURES OF THE SINGER 319
1. SIMPLICITY^—Truly the easiest to oper
ate zigzag machine made.
2. VERSATILITY—A straight stitching ma
chine of highest calibre capable of full
zigzag and automatic decorative stitching.
3. AUTOMATIC STITCHES—By means of
levers—scallops, blind stitched hems,
decorative designs, simple mending are
automatically accomplished. An amazing
number of lovely designs result from using
a combination of levers. For a greater
variety of stitch designs—more than
you’ve ever thought possible—merely
change the FASHION Disc.
4. TWIN-NEEDLE STITCHING can be done
by inserting the SINGER Twin-Needle,
especially sturdy and accurate because
the two blades are bonded in metal.
5. ROTARY MOVEMENT for smooth, quiet
performance . . . full rotary sewing hook.
6. FULL VISION BOBBIN CASE facilitates
removal and replacement. Time-saving,
extra capacity, round bobbin.
7. CALIBRATED TENSION within a single
turn, tensions are regulated for any type
of fabric and for any type of stitching.
8. REVERSIBLE FEED for sewing either
forward or backward—easy to back stitch
and fasten ends of seams.
9. CALIBRATED STITCH REGULATOR
with fingertip control.
10. SMOOTH, SEAMLESS THROAT PLATES
clip on to ensure snag-free performance.
11. POSITIVE FEED for handling all types of
fabrics.
12. FEED THROW-OUT permits darning and
embroidering.
13. PERFECT CONTROL whether sewing at
high or low speeds, the pick up and stop
are quick and effortless.
14. SINGER* Light illuminates working area—
prevents eye strain, lamp easily renewed.
15. ONE-WAY NEEDLE CLAMP makes it
almost impossible to place needle in
clamp incorrectly.
16. ALUMINUM CONSTRUCTION means
durability and light weight.
Page 7
ELECTRICAL INFORMATION
The SINGER* Electric Motor
is located at the back of the machine, and is
regularly furnished for operation on an
alternating current of 110-120 volts, 25-75
cycles, or on 110-120 volts direct current.
Special motors can be furnished for direct, or
alternating current for any voltage between 50
and 250, and for 32 volts direct current.
Before Inserting Electric Plug—
be sure that voltage and number of cycles
stamped on motor nameplate are within range
marked on electric meter installed by electric
power company.
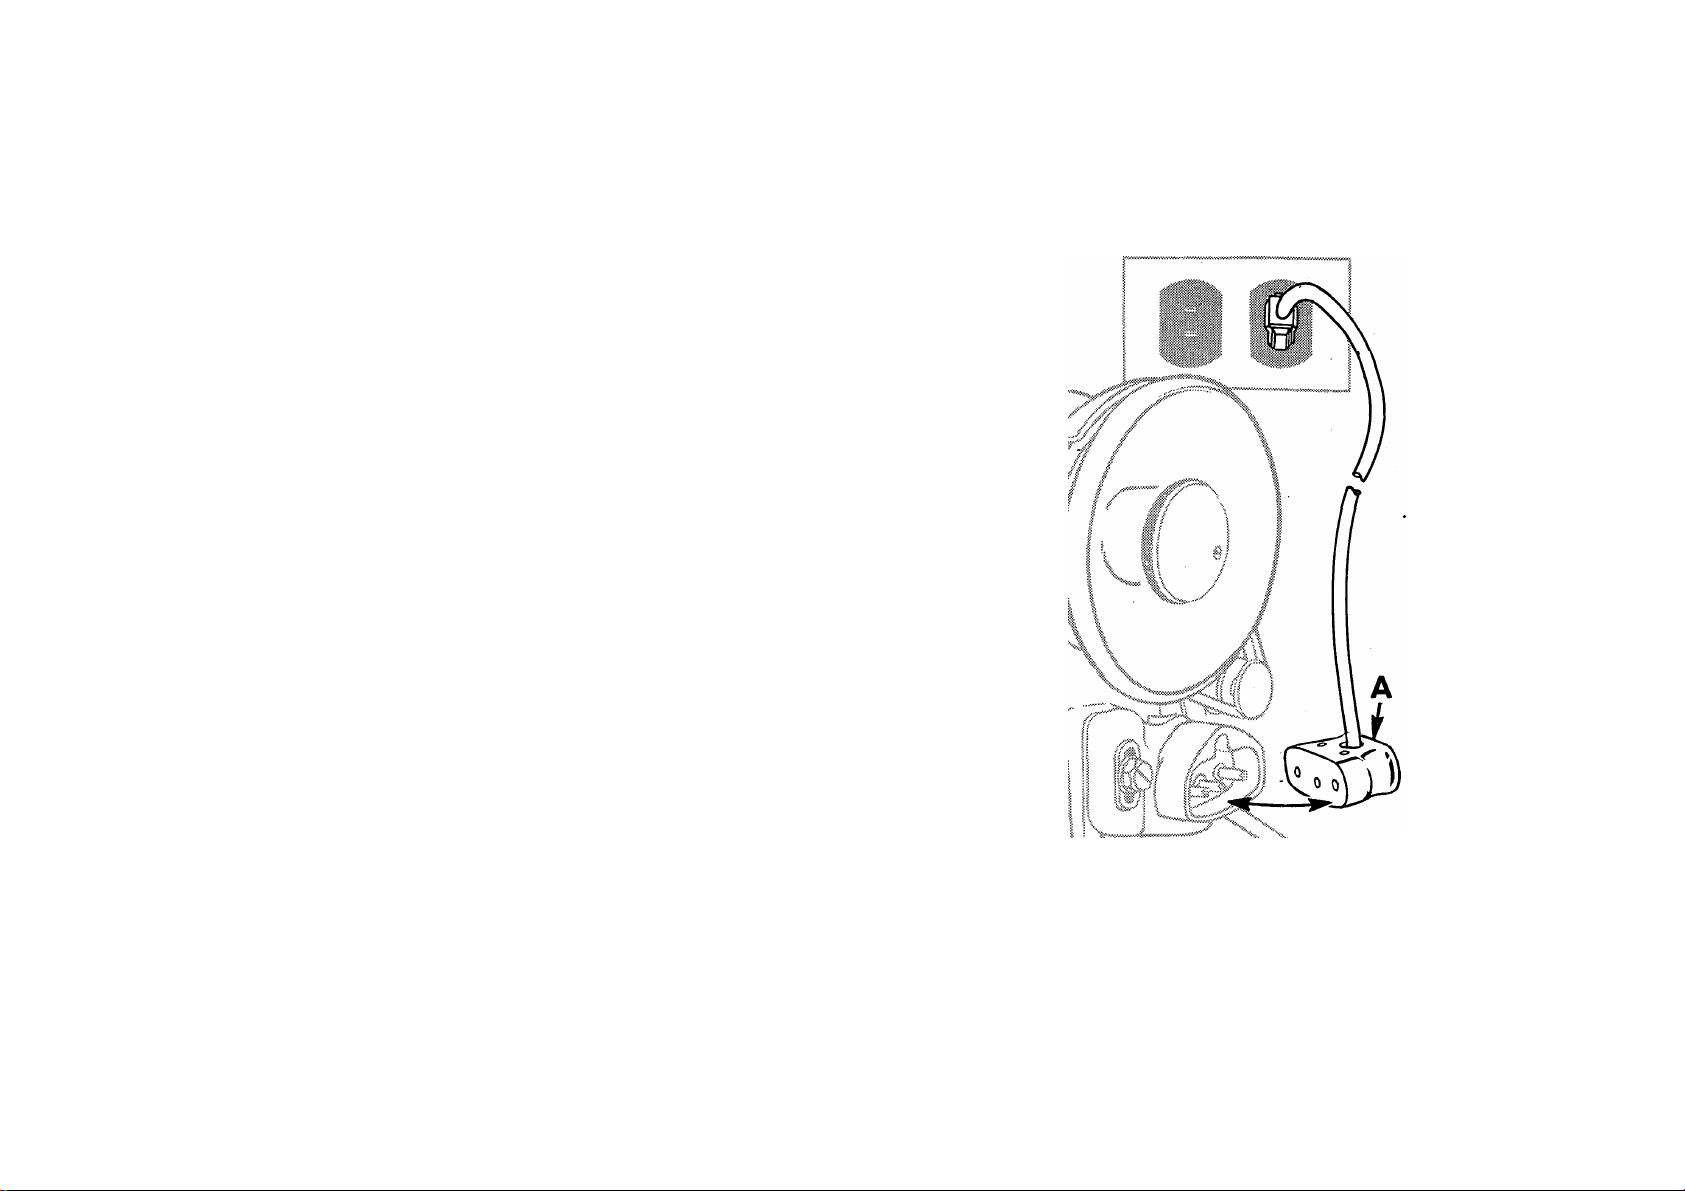
Electrical Connections for Machine
Push 3-pin safety plug A, Fig. 1, into 3-pin
terminal block at right of machine and connect
plug at other end of oord to electric outlet.
Speed Controller
The speed of machine is regulated by amount
of pressure on foot controller or knee con
troller.
Fig. 1. Electrical
Connection for Machine
Page 8
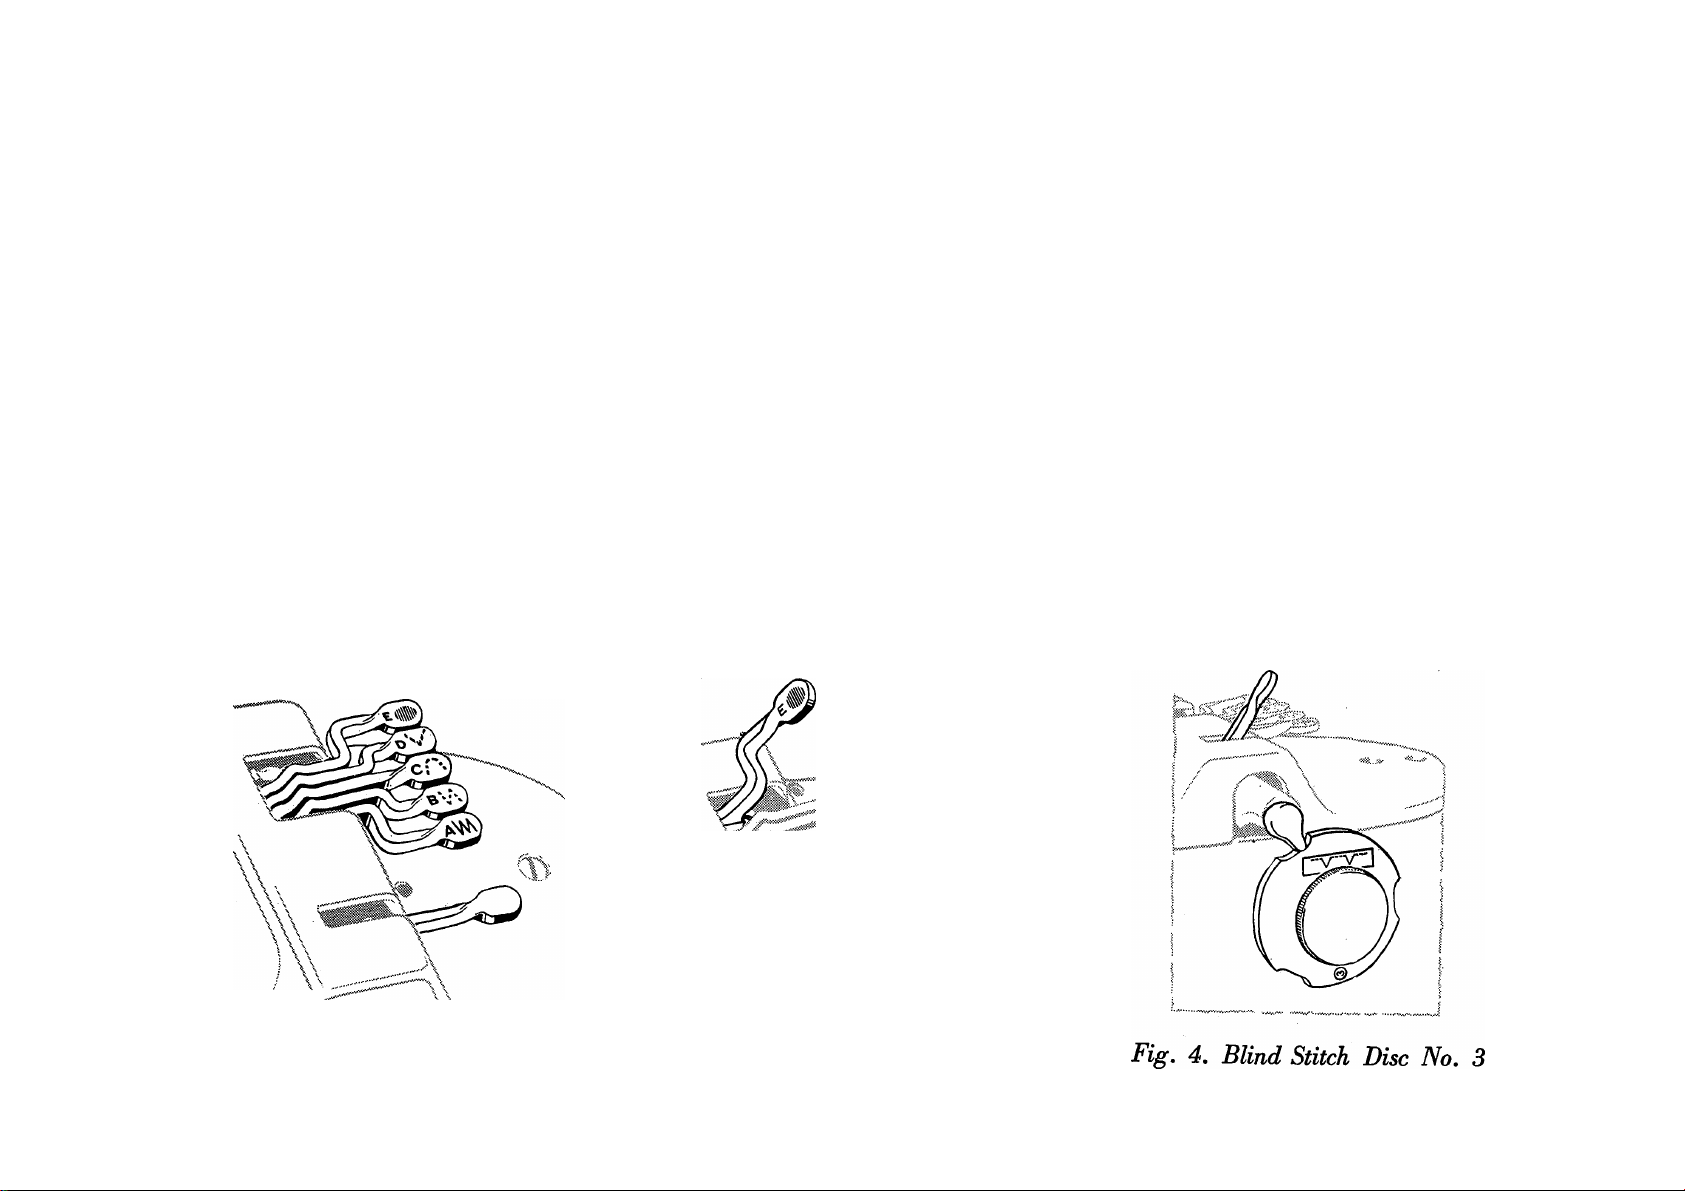
AUTOMATIC STITCHING
When all stitch levers, shown in Fig. 2, are
at their lowest position and the bight control
lever T, Fig. 26, in '"0” position, highest
quality straight stitching is done.
An amazing number of lovely useful stitches
aro produced automatically when you raise
one or more of the stitch levers.
For the most attractive of these combination
designs not more than three levers should be
Twenty-four additional FASHION Discs are
furnished with the machine. Each of these
FASHION Discs is interchangeable with the
one on the front of the machine. With each
disc, a new variety of combinations can be pro
duced, through the use of one or more levers.
Attached to the outside of the machine is the
Blind Stitch disc, which is engaged by the first
lever.
Fig. 2. Stitch Levers
\ \
\ \
Fig. 3. Stitch Lever E
in Position
Page 9

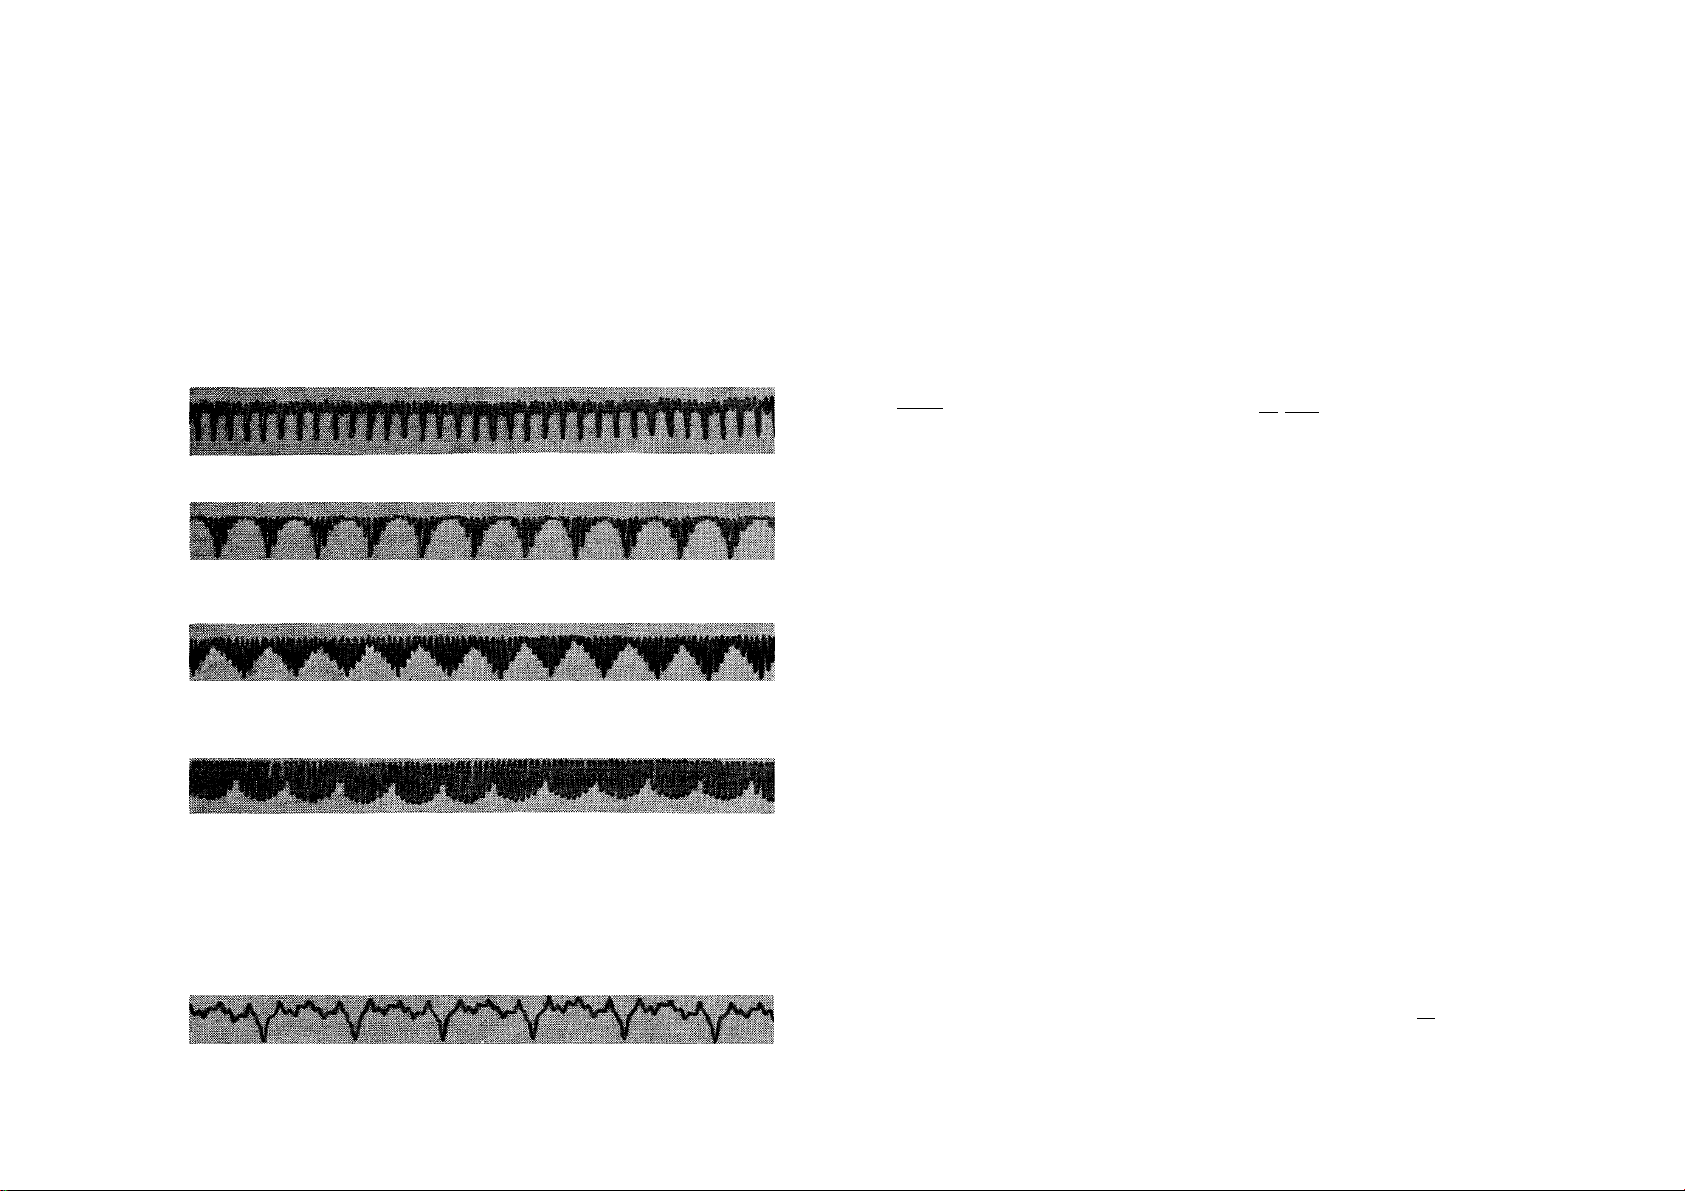
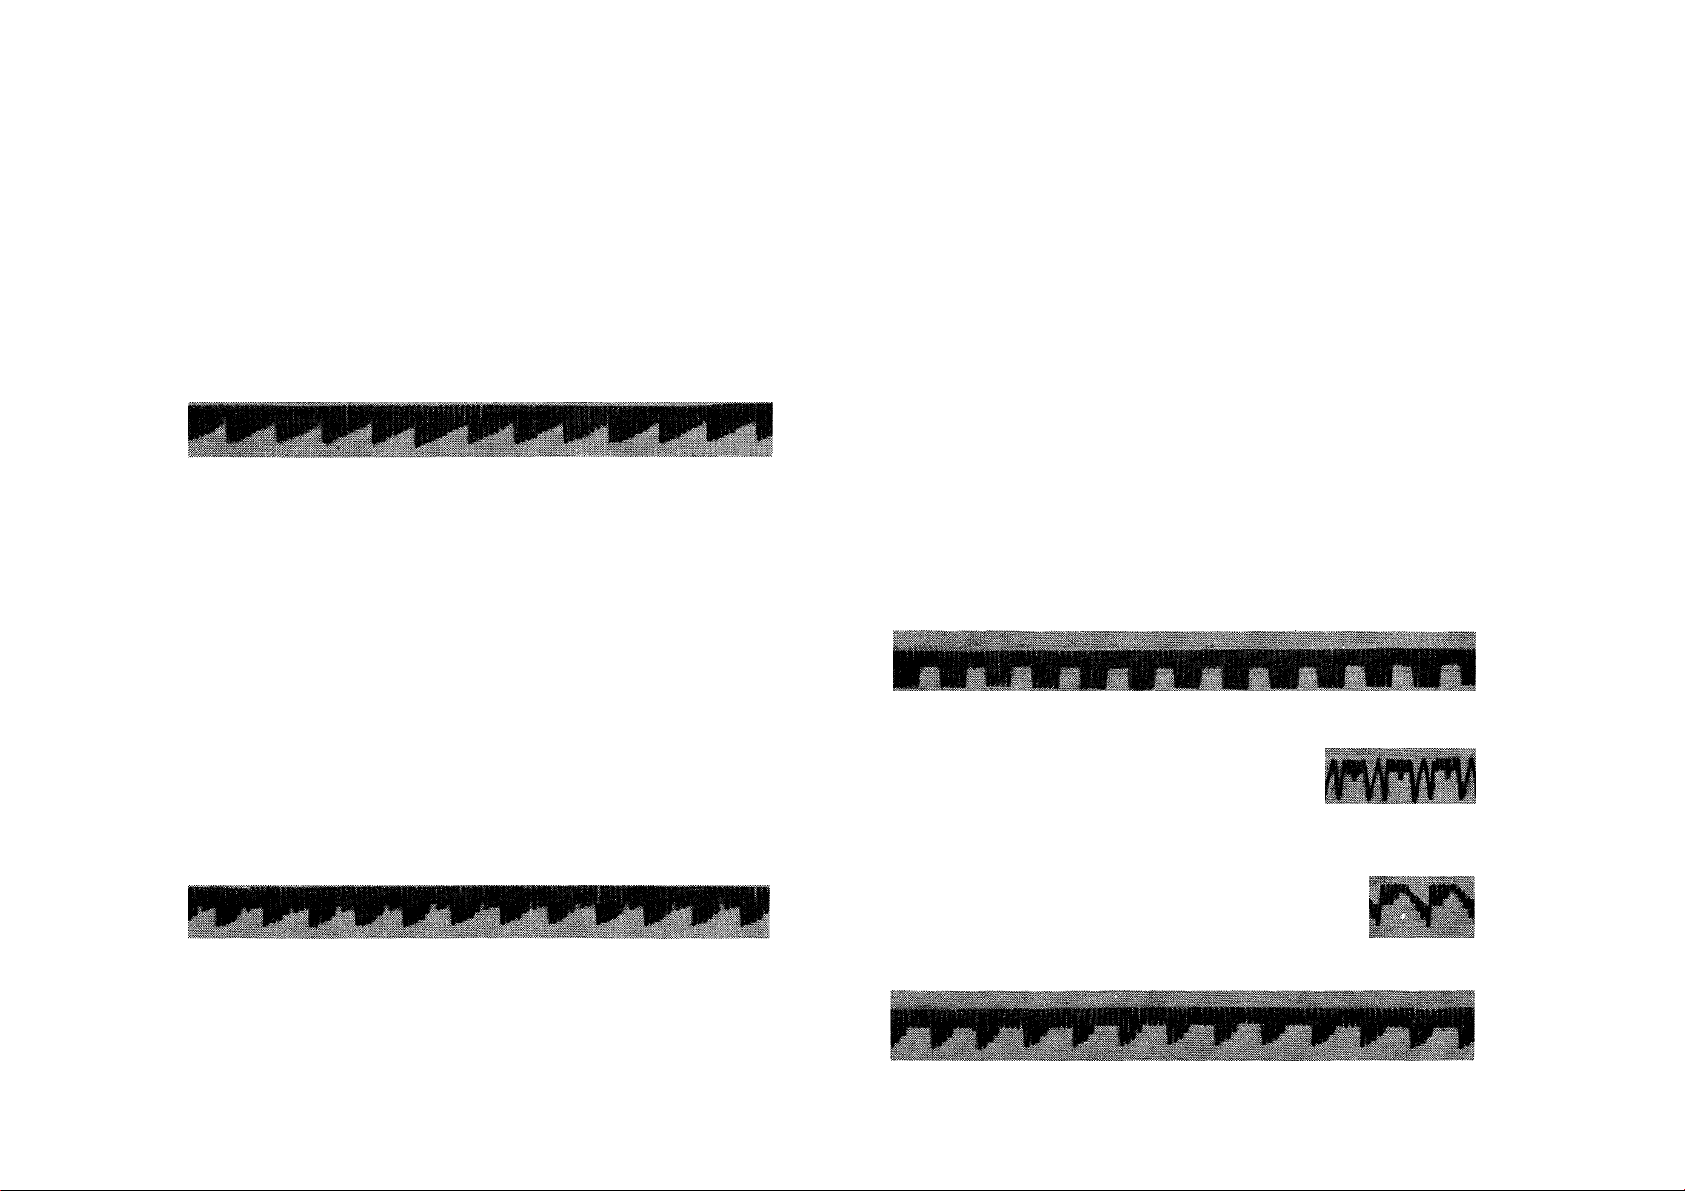
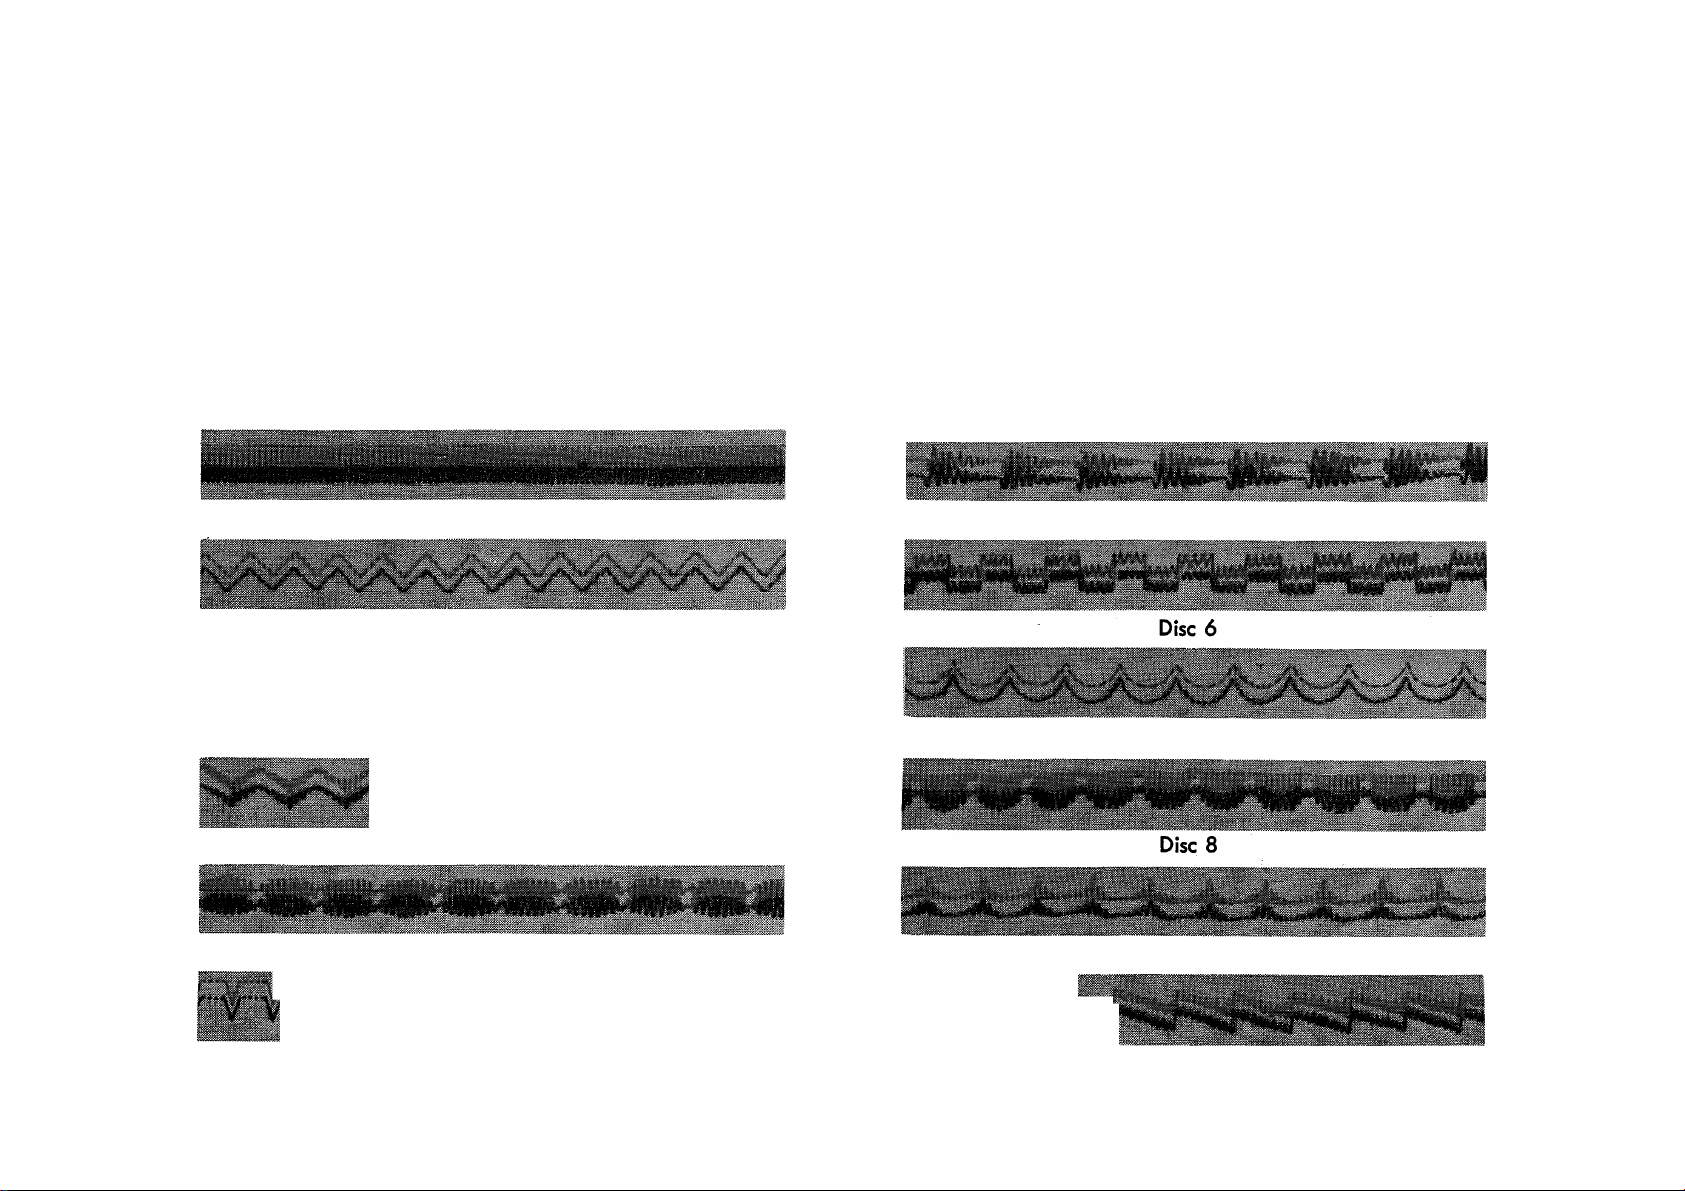
AUTOMATIC STITCHING
Five automatic stitch designs are built into the machine. Merely lift the designated lever to
produce the stitch indicated on the lever. The maximum width of the stitch is achieved when
bight is set at 5. Narrower designs result from setting the bight at less than 5. An almost zero
stitch length gives a solid design, while a longer stitch length gives an open pattern. Twin needle
stitching is done at 3 bight or less.
Zigzag—Lever A
For; Buttonholes
Sewing buttons
Reinforcing seams
Hairline seams
Cording seams
Invisible seams on lace
Multiple Stitch ZigzagFor: Reinforcing
Patching
Mending
Decorative stitching
Scallop—Lever C
For; Faced scallops
Decorative stitching
Abutted seams
Elastic seams
Binding blankets
illlllil|l||llll|l|ll Zigzag Point—Lever D vvvvvv^
Applique
Satin stitch
Script stitch
Shadow applique
Satin stitch scallop
"Lever B / ^ ^ ^ ^ \
Overlapped seams
A A
For; Decorative edging
Decorative border
Ball—Lever E
For; Motif designs
Border designs
Decorative applications
Monograms
Blind Stitch
For; Hems
Facings
Zippers
Overedging seams and facings
Decorative stitching
Applying bands and lace
Di„ i\rY~T'TT1
Applique of bands
or lace
Decorative applique
NOTE: To change the direction of pattern produced by FASHION Discs 5, 10, 15, 16, 17 and 18,
reverse the disc on the shaft.
Page 10

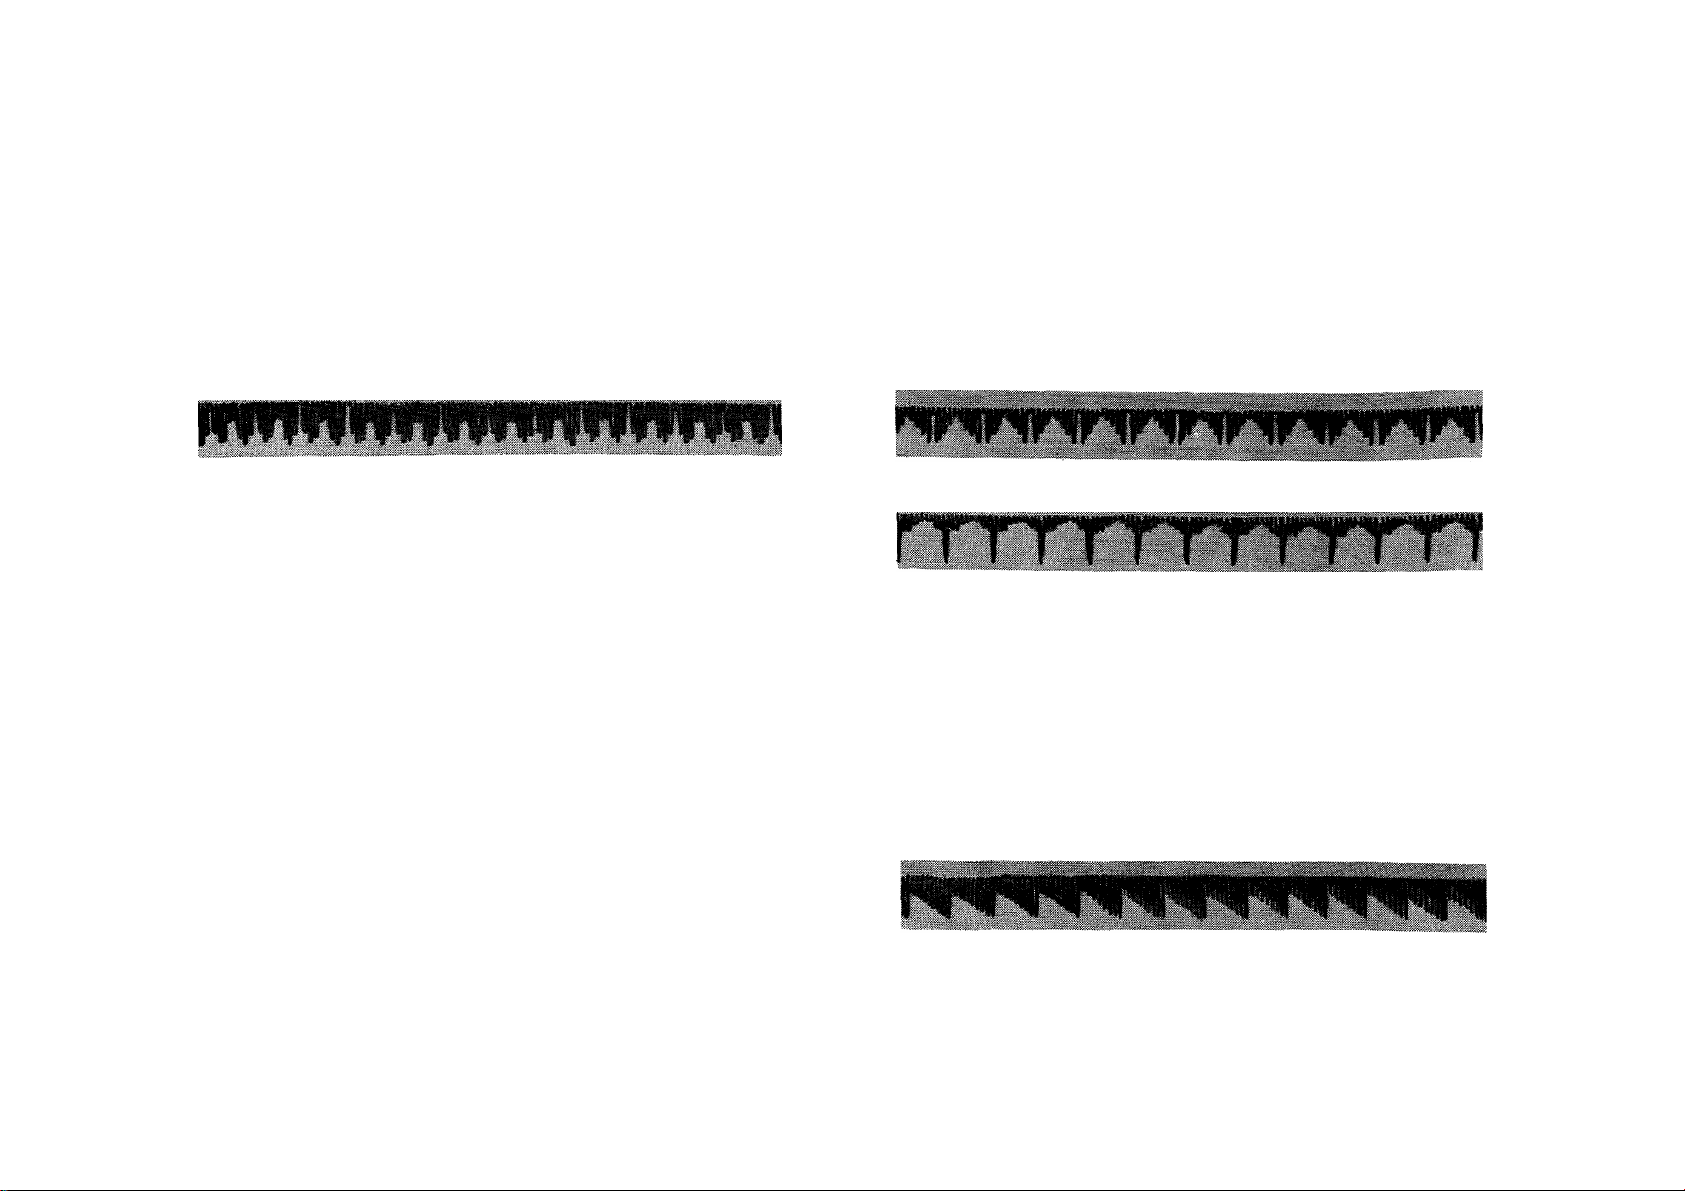
8
AUTOMATIC STITCHING
Twenty-four additional FASHION Discs are included with this machine. (Discs 14 and 19 are
built into the machine as Levers D and E, respectively, and produce designs as shown on page 7.)
The 24 additional discs produce the following designs:
Arrowhead (5)- Three Step (18) —iXVVVV'
Domino (6) —
Shell Edge (7)—
Solid Scallop (8)
Icicle (9)
-------
Banner (10)
Key (11) —
-----
iilwWl^ Curved Mending (20) \ / \ y
A A A A /
■/ V y ^ / N /
Thunderbird (21)
Semaphore {¡22) —
Solid Pyramid (23)
Open Pyramid (24)—/\/\/ \/\/\/\/
Spiny (25)—
Walls of Troy (12) Block (26) —
Solid Diamond (13)
Long Oblique (15) \ \
Shingle (16)-
---
Pennant (17) —
Fagoting (27)’
Comb (28)—
Pavilion (29) •
Platform (30)
---------
■liXA.i..Li. J..AJ. LX J..U.1.IJ.
nTrTrTnTlT
Ml Mi M Ml m M
in nl M In m Mi
^^Vl^^^VlVA^Vl^V
AAAA/VVWWW
MMAA MMi ^MAA MMM MM
./ \ /1 / \ I \ I \ I \ j
|A|M 1^^
^^^A
Page 11
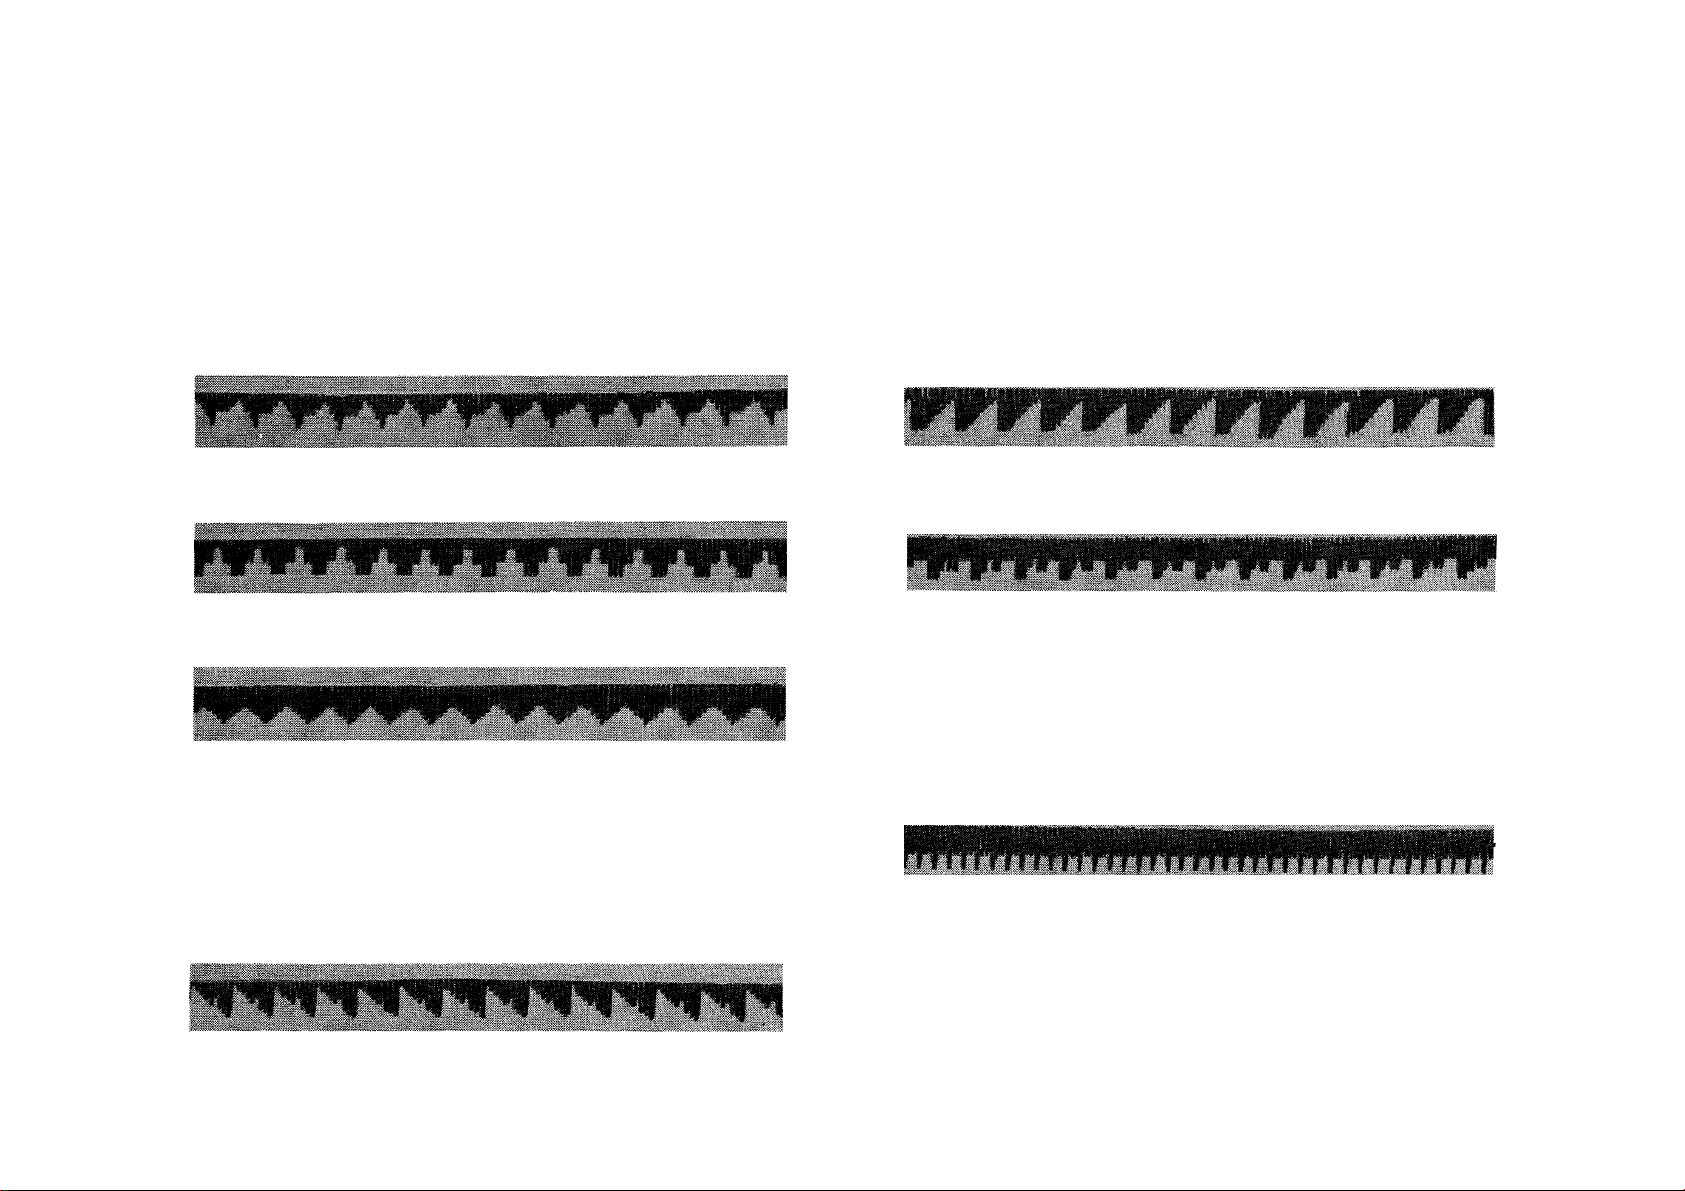
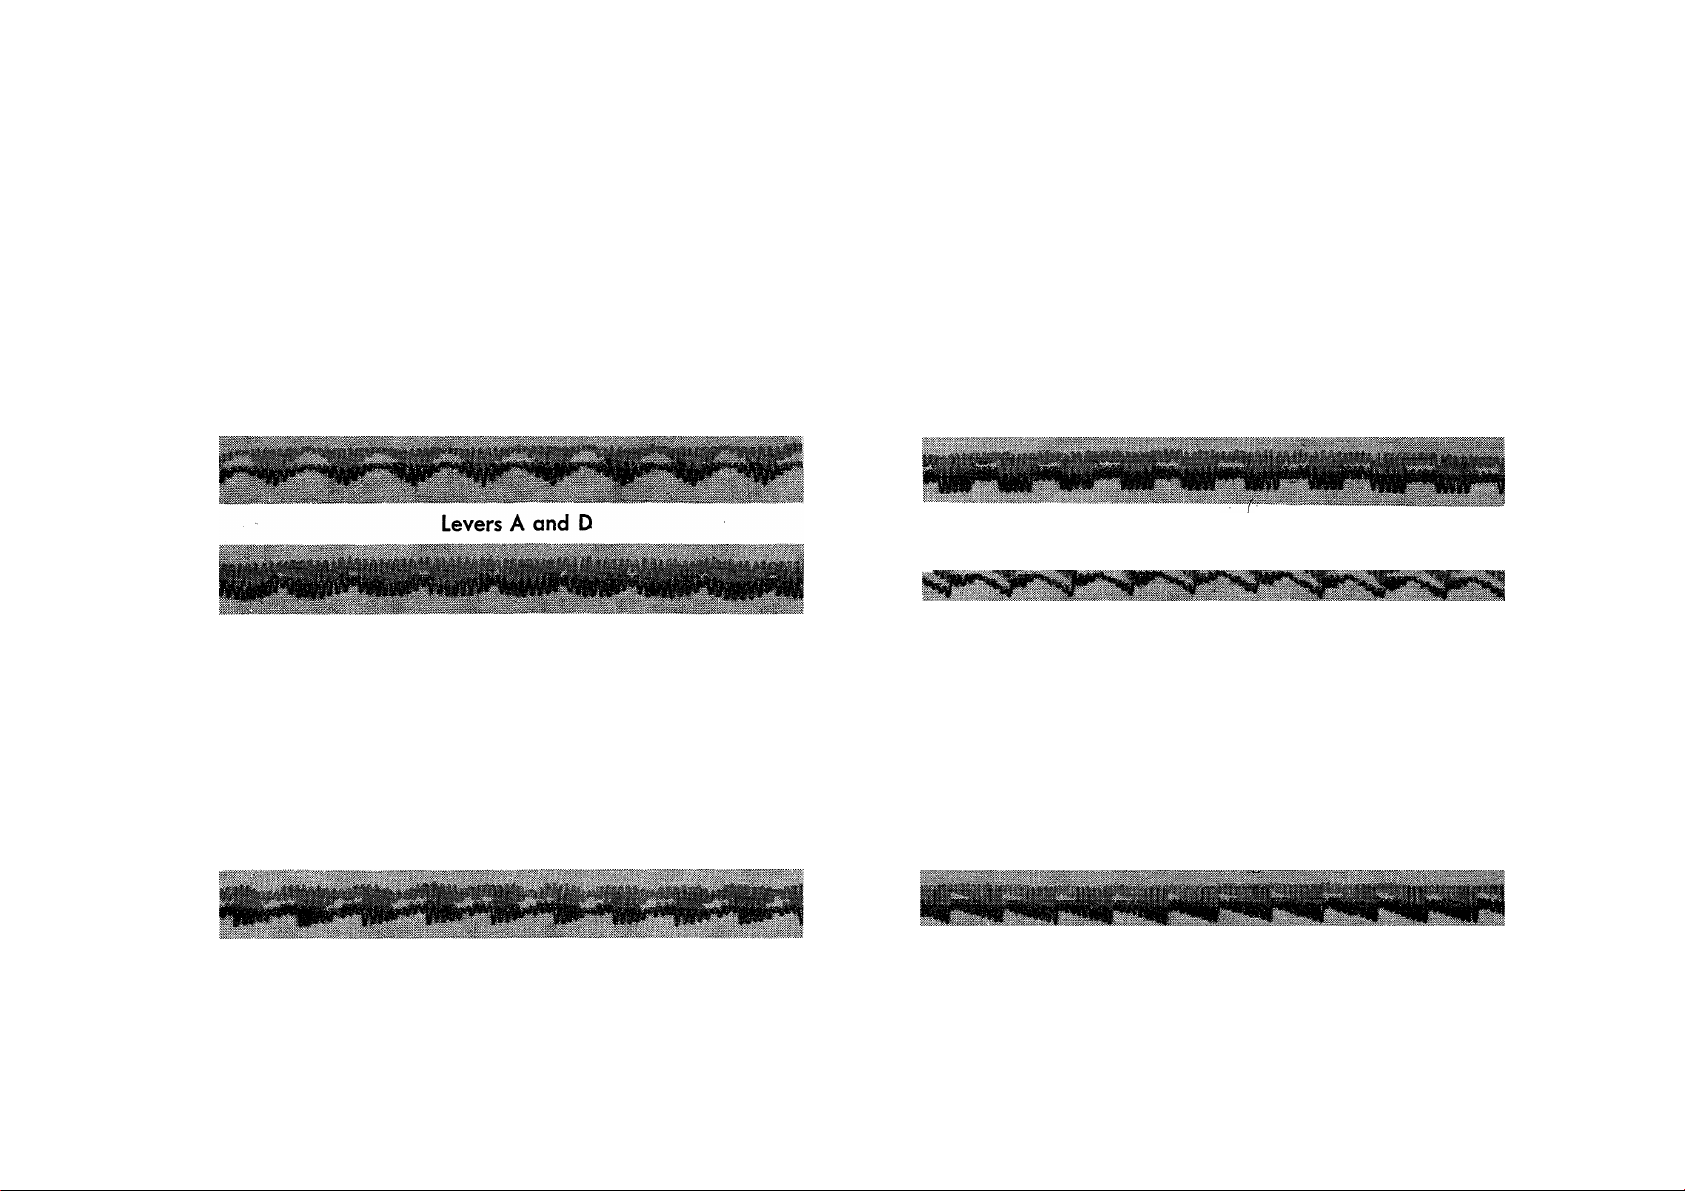
COMBINATION STITCHES
(With Levers)
The following stitches result from using at one time two or more of the levers which engage the
built-in FASHION Discs:
i^Himii jiÉiiA iriiitiM jütttiB BiiftiiE ifÉâfcËi mutiii ÊÊMaSk
Levers A and B
Levers A and C
Levers A and D
Levers A and E
Levers B and C
Levers B and E
Levers C and E
Levers D and E
Levers A, C and E
Levers B, C and D
iiWWlir ^**^**-*- iMÉM tMÊMt ÉMIto JÉfljiMi MéÊtM iâKto«* —>
Levers B and D
Levers B, D and E
Page 12
10
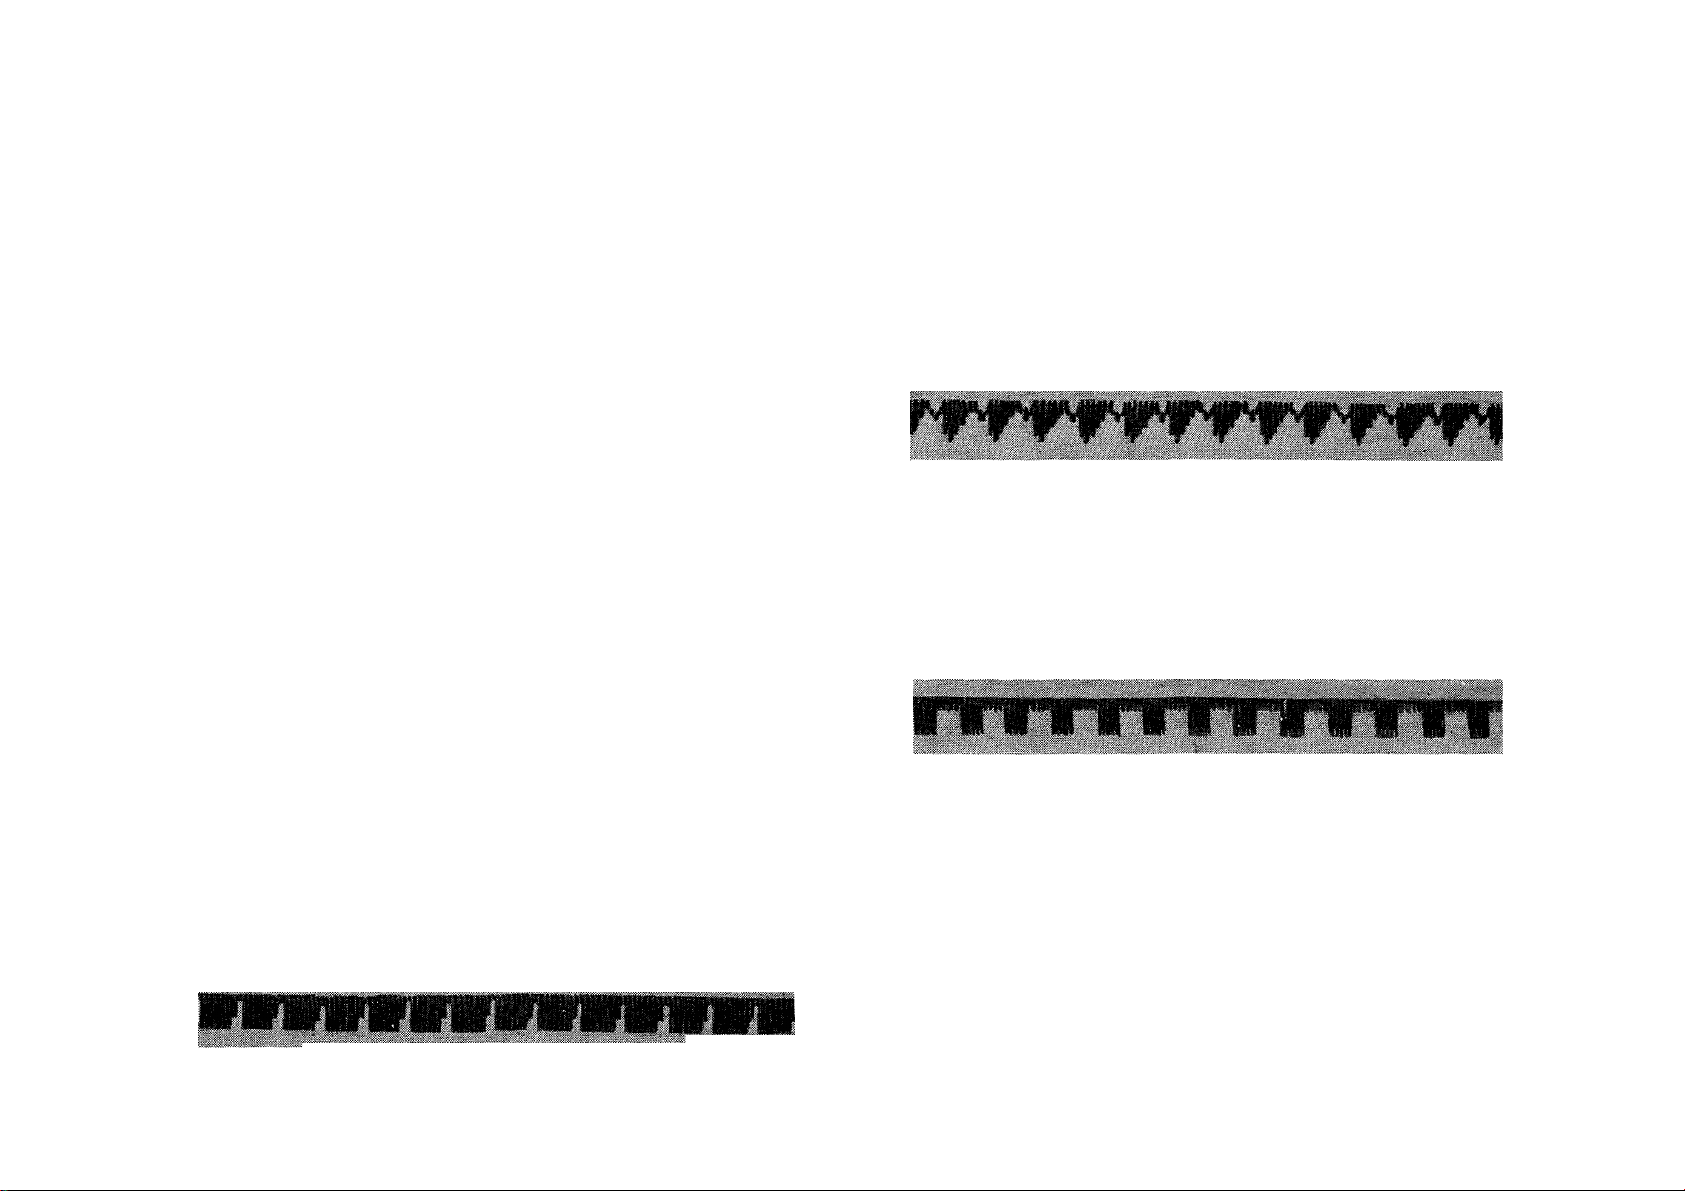
COMBINATION STITCHES
(With Levers and Disc)
The following Stitches are produced by using at the same time one or more of the levers which
engage the built-in FASHION Discs and Discs 5 or 6:
Lever A, Disc 5
Lever B, Disc 5
Lever E, Disc 5
Levers A and B, Disc 5
Levers A and E, Disc 5
Levers B and E, Disc 5
Levers A, B and E, Disc 5
Lever A, Disc 6
wvfvwwwvn
Lever B, Disc 6
Lever D, Disc 6
Levers B and D, Disc 5
Levers A and E, Disc 6
Page 13
11
COMBINATION STITCHES
(With Levers and Disc)
The following stitches are produced by using at the same time one or more of the levers which
engage the built-in FASHION Discs and Discs 7, 8, 9 or 10: -
Lever A, Disc 7
Lever B, Disc 7
Lever C, Disc 7
Lever D, Disc 7
Lever E, Disc 7
Levers A and D, Disc 7
Levers B and C, Disc 8
Levers B and D, Disc 8
Levers B and D, Disc 9
Lever A, Disc 10
MVVVWVVVVVVVV»
Levers A and B, Disc 7
Levers D and E, Disc 10
Page 14
12
COMBINATION STITCHES
(With Levers and Disc)
The following stitches are produced by using at the same time one or more of the levers which
engage the built-in FASHION Discs and one of the discs numbered from 11 to 21:
»'VWWWWWW
Lever D, Disc 11
Lever A, Disc 12
Lever A, Disc 13
Lever E, Disc 15
Lever A, Disc 17
Levers A and E, Disc 1 8
^TVrrrrfWnrVTI
Lever A, Disc 20
Lever A, Disc 21
Lever E, Disc 16
Lever B, Disc 21
Page 15
13
COMBINATION STITCHES
(With Levers and Disc)
The following stitches are produced by using at the same time one or more of the levers which
engage the built-in FASHION Discs and one of the discs numbered from 21 through 30:
Lever D, Disc 21
Lever E, Disc 21
Lever E, Disc 22
Lever B, Disc 25
«sгsw5»^x•>:1ws«;»№'*Kí»»«w^aг»■wí»x<<<•»^»!Wi»íWïW»íWíss<>^^т•;«•.•»:
Lever D, Disc 26
Lever A, Disc 29
Lever A, Disc 30
Lever B, Disc 30
yVVVVVVVV'VVV*^
Lever A, Disc 26
Lever D, Disc 30
Page 16
14
TWIN NEEDLE DECORATIVE STITCHING
The following stitches are produced by using one lever at a time or one of the FASHION Discs as
listed. The bight is limited to 3 and the stitch length is set between 25 and 0. The satin stitch foot
is used for closed designs. Scalloping and running-stitches are done with the all-purpose presser
foot:
Lever A
Lever B
Lever C
Lever D
Lever E
Disc 3
Disc 5
Disc 7
Disc 9
Disc 10
Page 17
15
TWIN NEEDLE DECORATIVE STITCHING
The following stitches are produced hy using one or more levers and one FASHION Disc at the
same time as listed. The bight is limited to 3 and the stitch length is set between 25 and 0. The
satin stitch foot is used for closed designs and the scalloping and running stitches are done with
the all-purpose presser foot.
Lever A, Disc 6
Wi1^«* - ito Î *
Levers A and E
Levers B and C
Levers A, C and E
Lever E, Disc 5
Levers A and B, Disc 5
Lever D, Disc 6
Lever B, Disc 7
Lever D, Disc 7
Lever A, Disc 10
Levers D and E, Disc 10
Page 18

FABRIC, THREAD, NEEDLE AND STITCH LENGTH CHART
TYPES OF FABRICS
Filmy materials comparable to Net, Marquisette, Chiffon,
Silk and Chiffon Velvets, Voiles, Ninon
16
THREAD
SIZES
50 Embroidery
100 Cotton
00 and 000 Silk
Nylon Thread
NEEDLE
SIZES
9
MACHINE STITCH SEHINGS
FOR STRAIGHT SEWING
INSIDE
SEAMS
15 to 20
TOP
STITCHING
15 to 20
Sheer materials comparable to Lawn, Dimity, Synthetic
Sheers, Paper Taffetas, Pure Silks, Gossamer Silks, Silk or
Synthetic Tricots, Synthetic Velvets, Satins
Lightweight materials comparable to Gingham, Cham-
bray. Pique, Poplin, Percale, Cretonne, Chintz, Faille, Bengaline. Wool Flannel, Wool Jersey, Wool Crepe, Cotton Velvets
and Velveteens, Lightweight Suitings
Medium heavy materials comparable to Corduroy, Crash,
Gabardine, Rep, Heavy Suitings and Coatings
Heavy materials comparable to Sailcloth, Denim, Ticking,
Overcoatings
Plastic materials
When ordering needles, always specify "Class and Variety 206 x 13” and state the size and quantity required.
See page 43 for ordering TWIN NEEDLES.
50 Embroidery
80 to 100 Cotton
A Silk
Nylon Thread
50 Mercerized
60 to 80 Cotton
A Silk
Heavy Duty Mer.
40 to 60 Cotton
Nylon Thread
30 to 40 Cotton
Thread
50 Embroidery
Nylon Thread
50 Mercerized
n
14
or
16
16
18
11 or 14
12 to 15
12
10 12
8 10
10 12
15 to 20
15 to 18
Page 19
17
NEEDLES AND THREAD
This machine uses a 206x13 Needle—
available in Sizes 9, 11, 14, 16 and 18.
For best stitching results, thread should he
selected according to fabric to be stitched. Needle
must be of correct size for thread to pass freely
through eye of needle. Select correct needle
according to table on page 16. Be sure that
needle is not blunt or bent.
NOTE: Thread breakage is sometimes caused by
variations in the diameter of thread. Such break
age is overcome by using the next size larger
needle.
Use like threads for needle and bobbin. Do not
use silk on bobbin and mercerized thread in
needle, or vice versa.
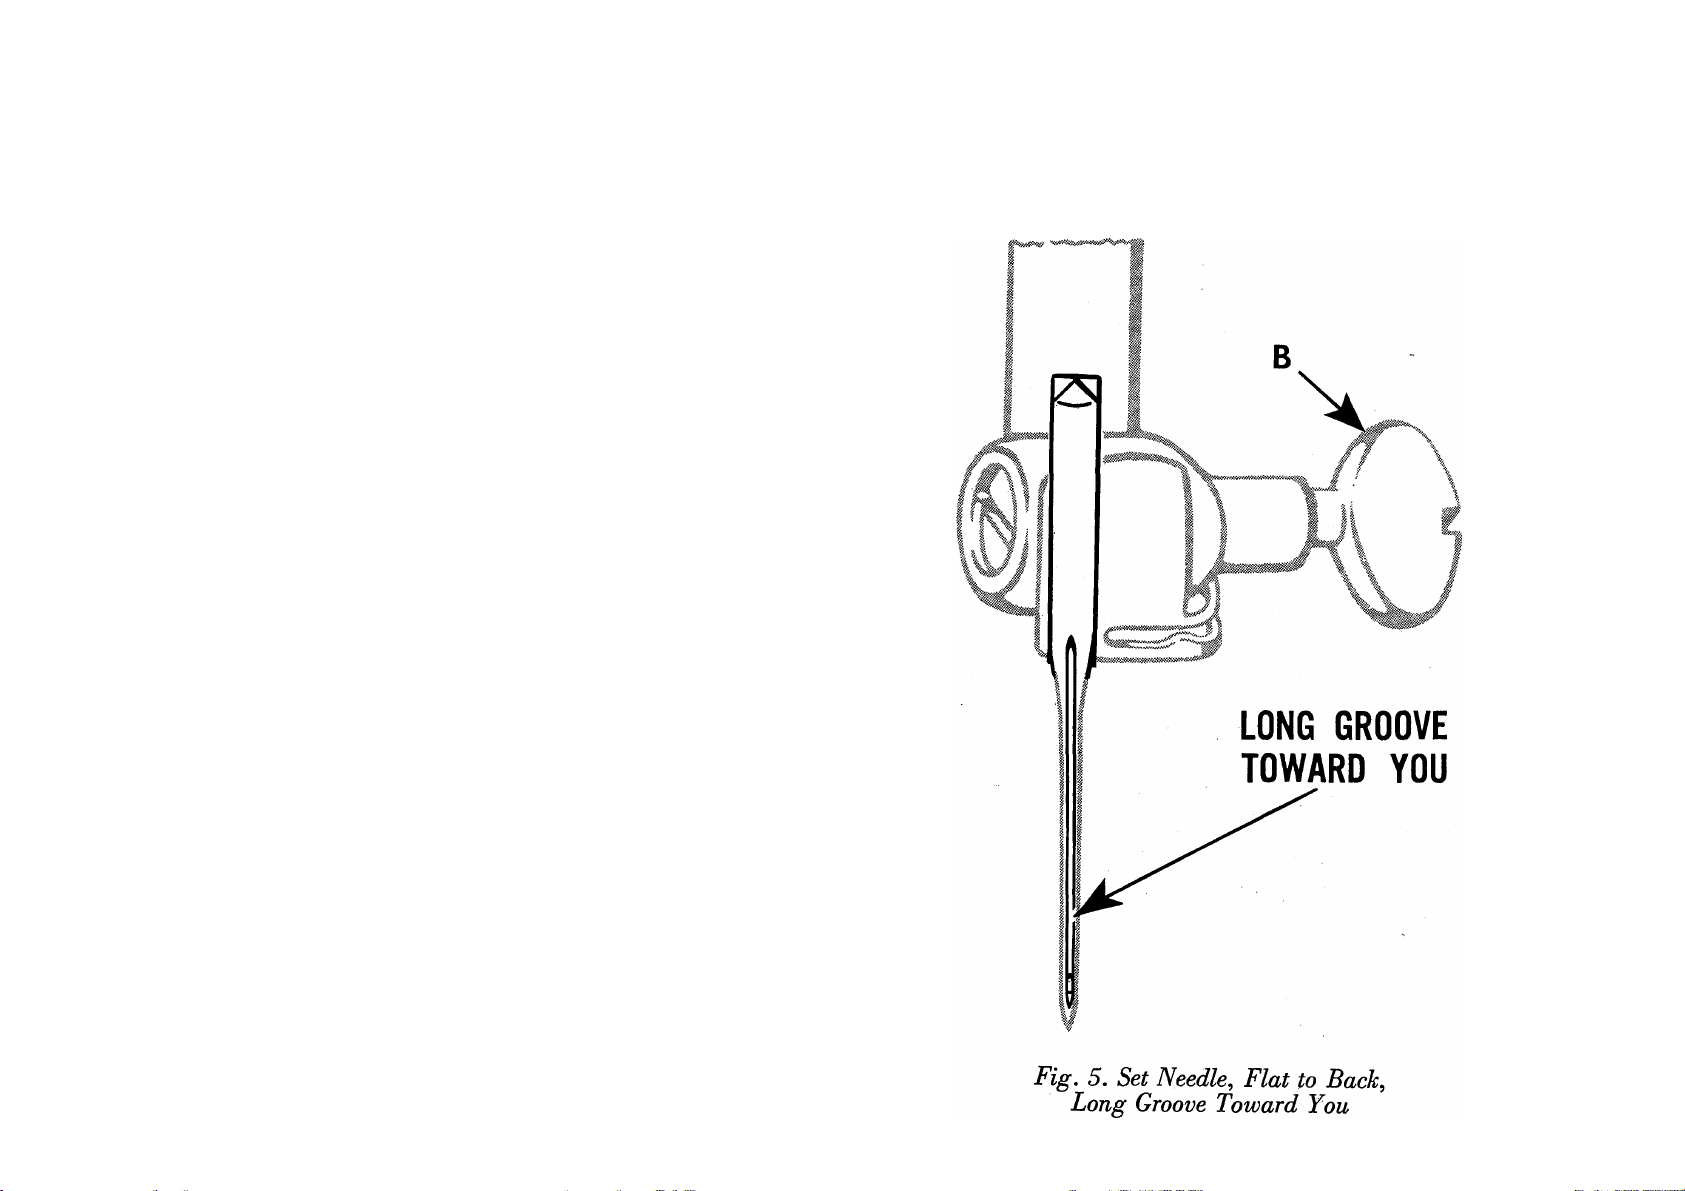
TO SET THE NEEDLE
Raise the needle bar to its highest position and
loosen needle clamp thumb screw B, Fig, 5.
Insert needle into clamp as far as it will go with
flat side to the back and long groove
toward you. Then tighten thumb screw B.
Page 20
18
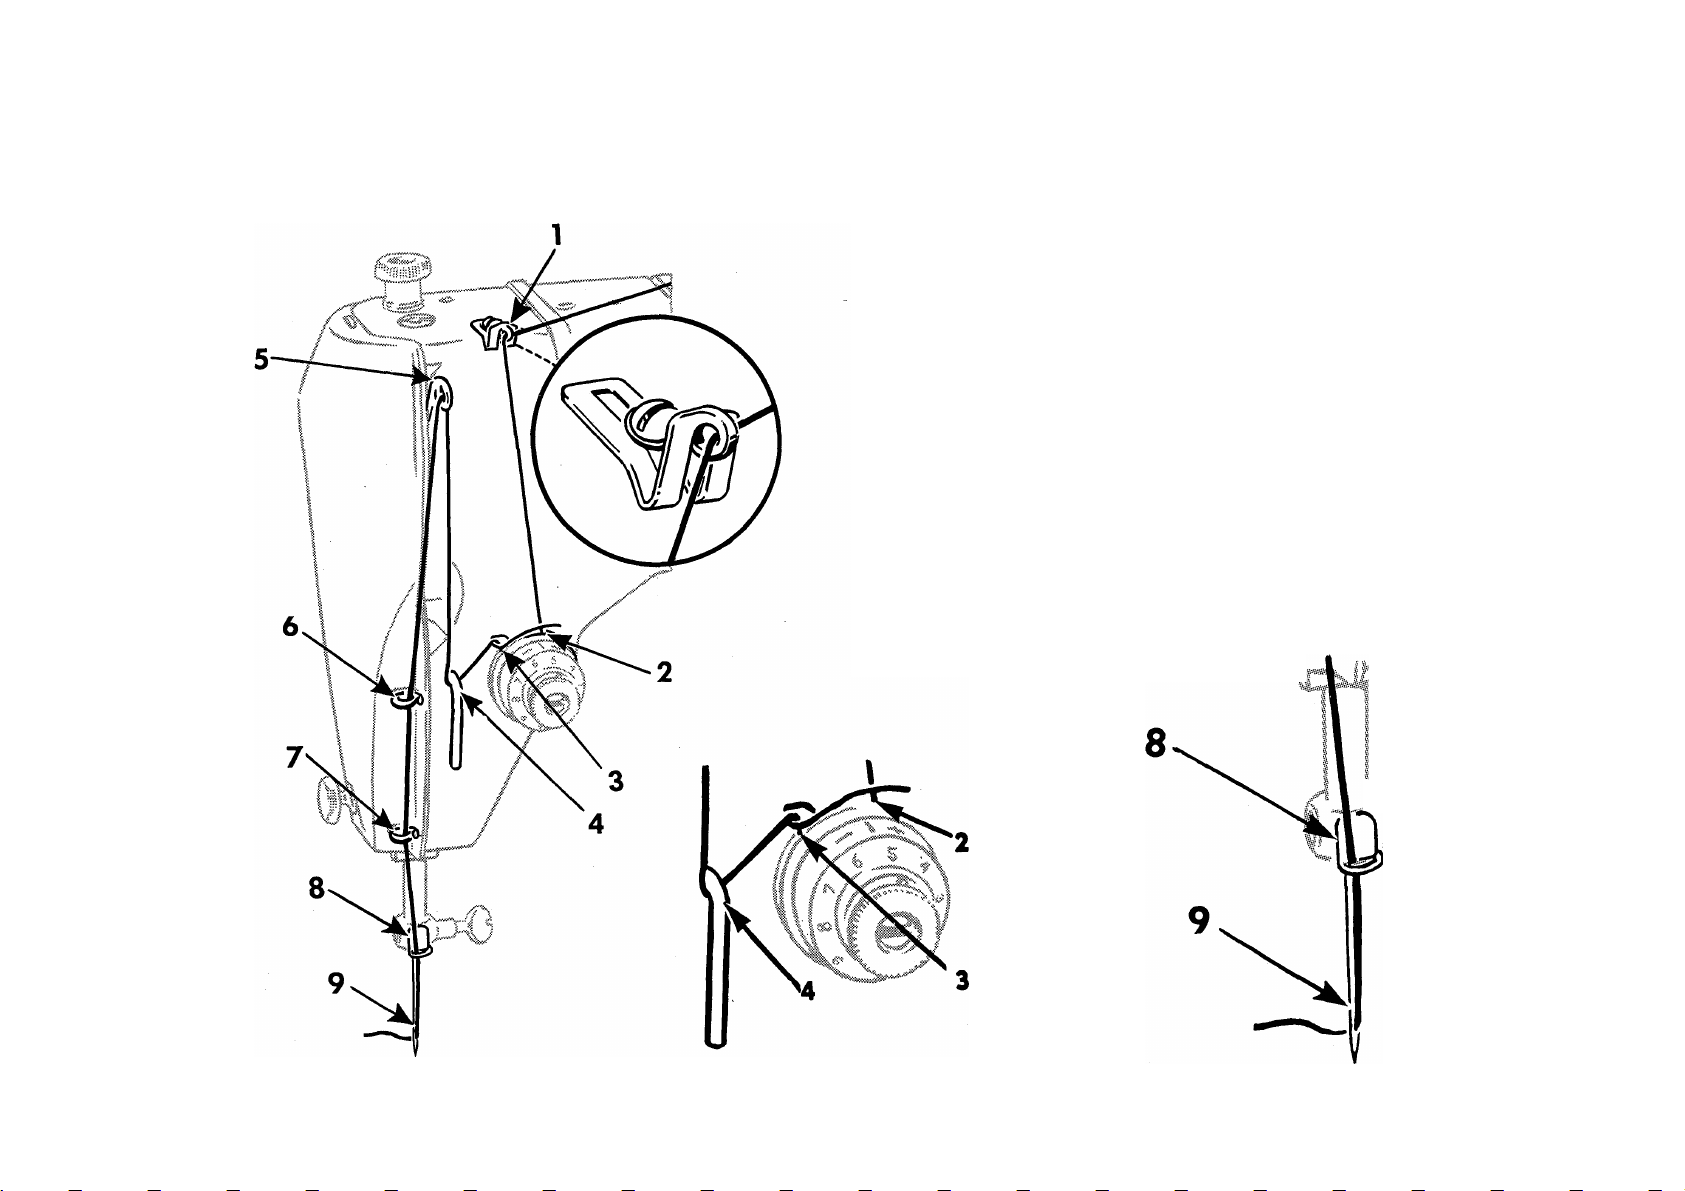
UPPER THREADING—SINGLE NEEDLE
Raise take-up lever 5 to its highest point.
Place thread on spool pin and hold with right hand.
Lead thread into self-threading guide 1 from under side,
Down and from right to left behind or in front of center
tension disc 2 (Center disc separates threads for twin
needle sewing.)
Into the loop of the take-up spring 3,
Under the slack thread regulator 4,
Up and from right to left through hole in take-up lever 5,
Down through guides 6 and 7 on face plate,
Into guide 8 on needle clamp,
From front to back through eye of needle 9.
Draw about two inches of thread through eye of needle
with which to start sewing.
Fig, 6. Upper Threading
Fig. 7. Threading Tension
Fig. 8. Threading Needle from
Front to Back
Page 21
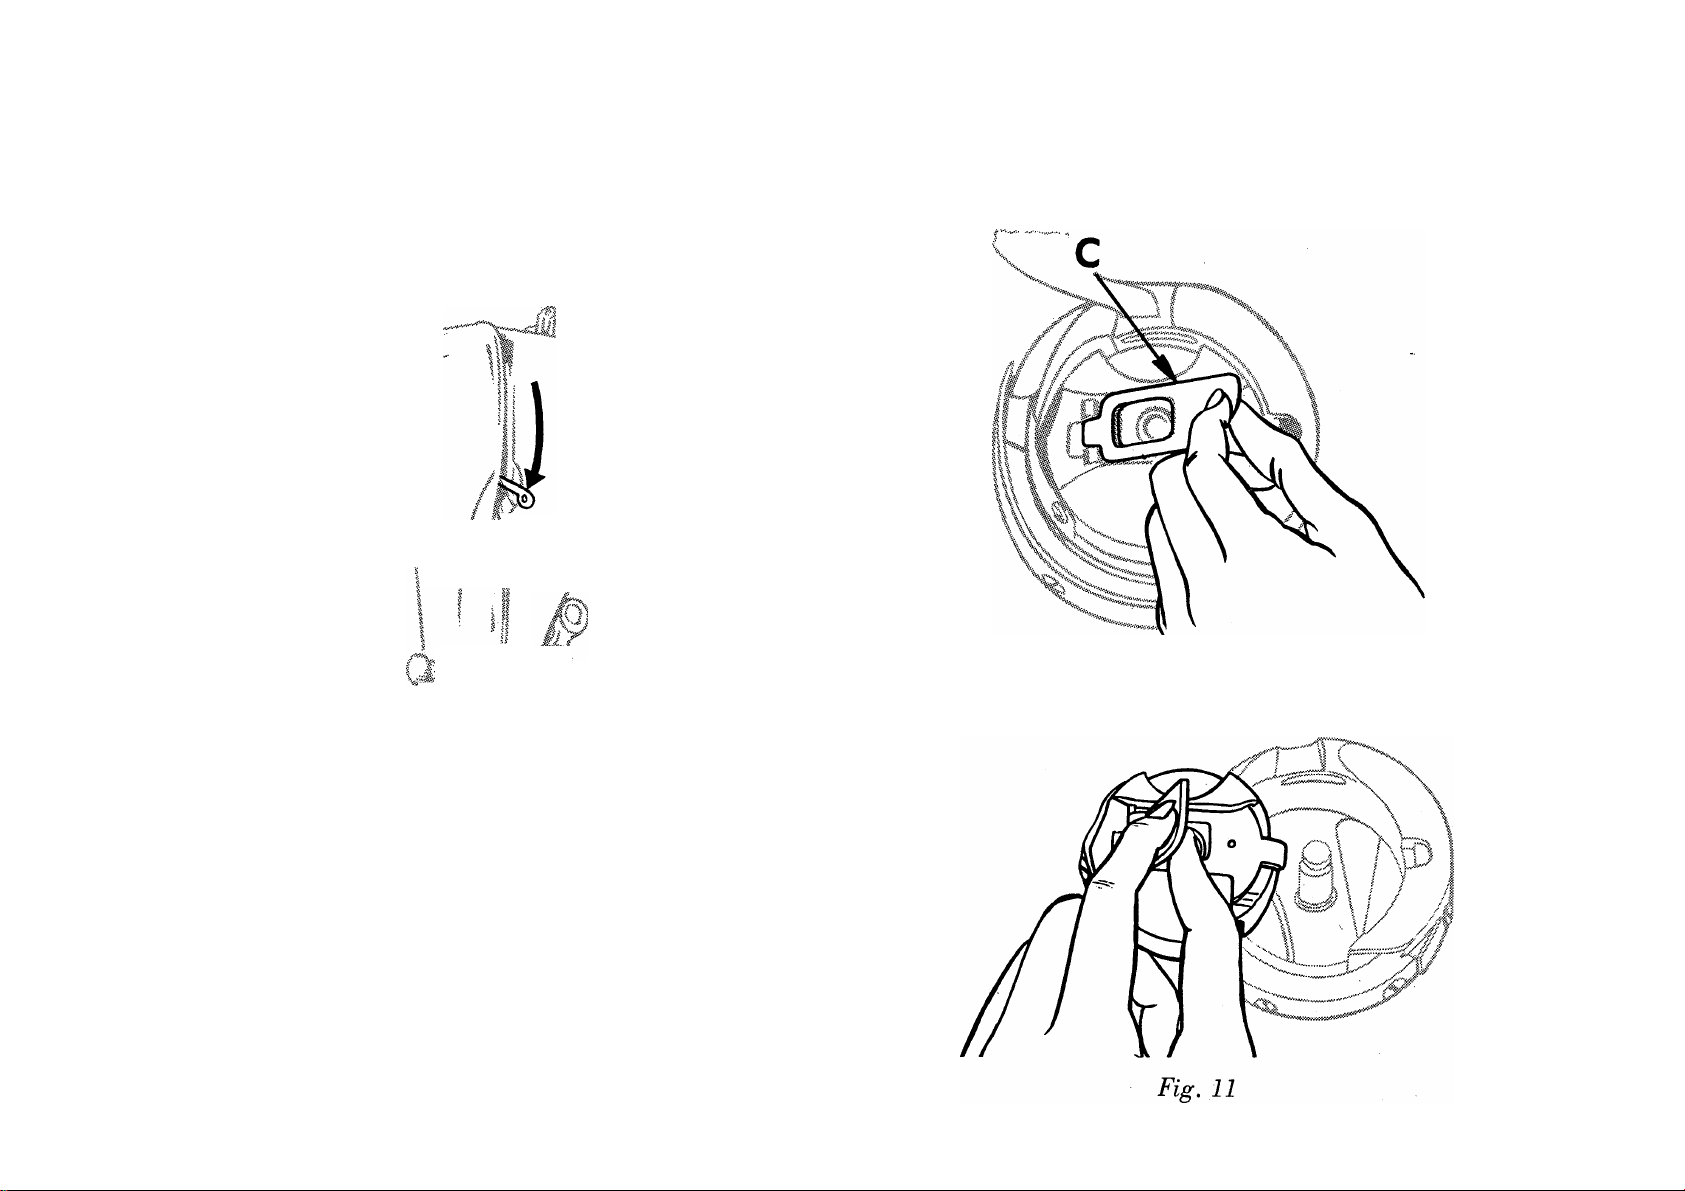
TO REMOVE THE BOBBIN
1. Bring take-up lever to its lowest point.
19
11
li,
. . ...
i i
I -"'n i
§ \ I
I
I ■ ¥ i ^
'a . &
^•> .V^Vi>«S
' "'. ■■ *’n
\ 1
.j
\$
Fig. 10
3. Open bobbin case latch C.
? W if
K.
:<i«.;....5
Fig. 9
2. Tilt machine back on its hinges.
4. Lift case and release latch to remove bobbin.
Page 22
// \
|: / ? ,v
i'i I SI
iia i ^||
|s ”-™-‘
y
: \ i %ii1i- )
Q '
♦
I
I ' 5
20
\ / \ /
\\ /
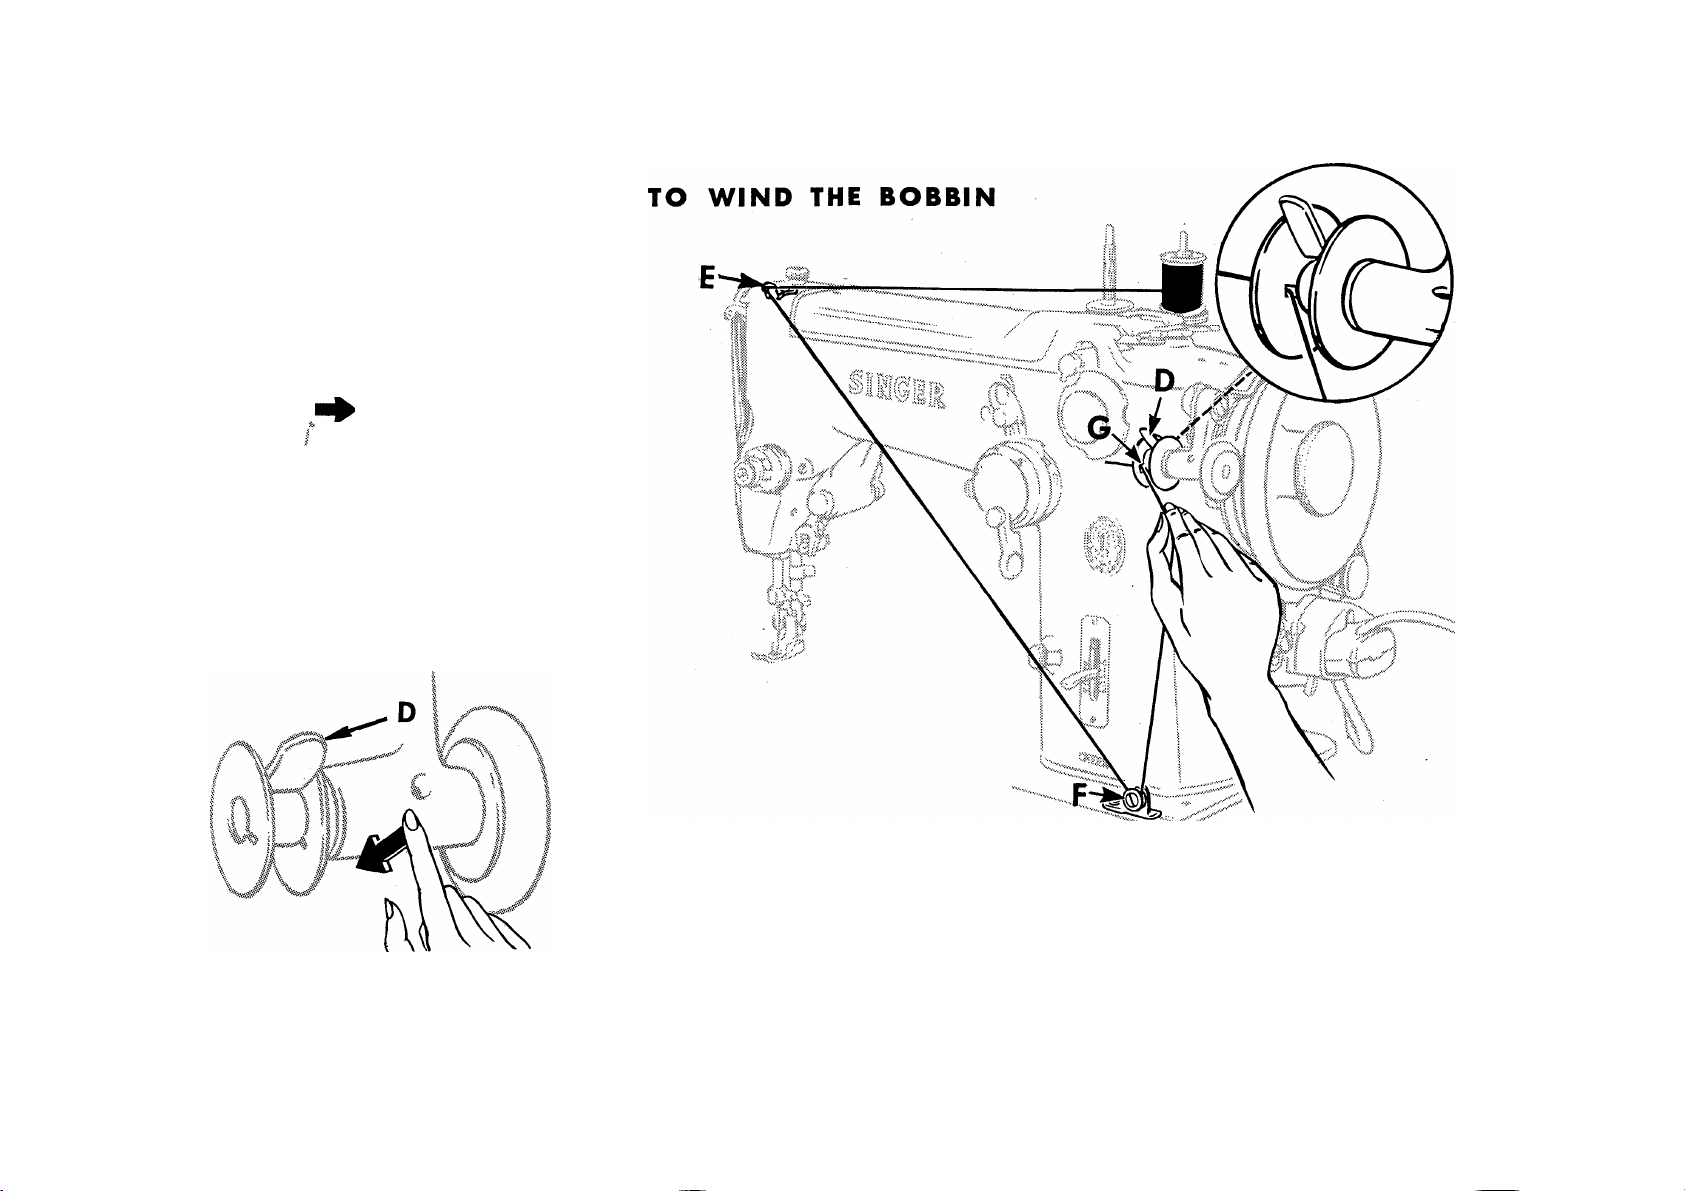
Fig. i2
1. Place bobbin on bobbin
winder spindle and turn until
pin enters slot in right side of
bol)bin.
Fig. 13
2. Lock bobbin in place by
pressing bobbin winder down
ward until latch D engages.
Fig. 14
3. Place spool of thread on either spool pin.
Draw thread through self-threading guide E on arm of
machine and pass thread down and from left to right
under tension F on bed. Lead thread up to bobbin and
thread from inside, through slot in left side of bobbin G.
Page 23
21
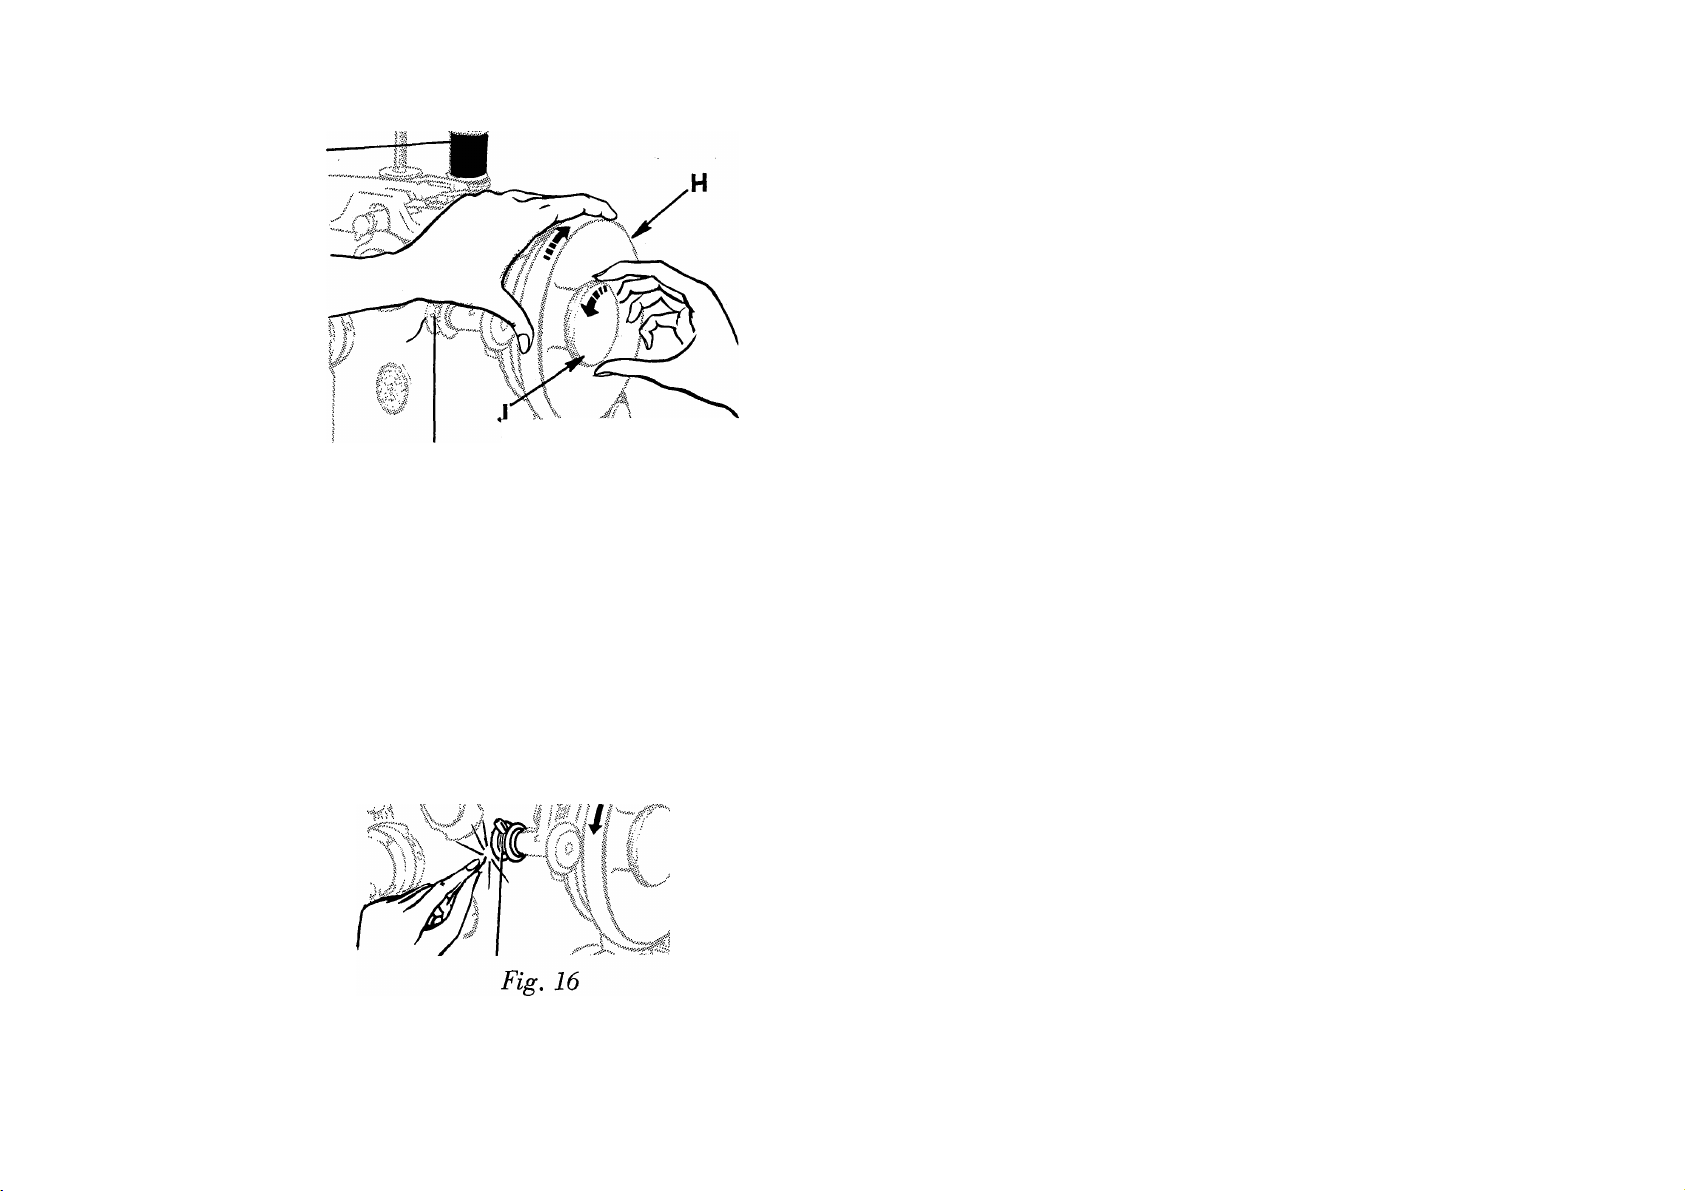
Allow tension discs F, Fig. 14, to control
flow of thread so that it winds on bobbin in
uniform, level rows. Do not guide or hold
thread when winding bobbin
Fig. 15
4. Hold hand wheel H with left hand, and
with right hand, loosen stop motion screw J
to release hand wheel from stitching mecha
nism as shown above.
5. Hold end of thread and press controller
pedal as for sewing. End of thread must be
held until it breaks off.
Thé bobbin winder will stop automatically
when the bobbin is filled. When less than a full
bobbin is desired, lift latch D. Remove bobbin
from spindle and retighten screw J, Fig. 15.
NOTE: If bobbin does not wind evenly, loosen
screw
which holds tension bracket F
in
position and move bracket to the left if bobbin
winds high on the right; move bracket to the
right if bobbin winds high on the left. When
bracket is properly centered, thread will wind
evenly across bobbin. Retighten tension
bracket screw.
Bobbin can be wound while machine is sewing.
Page 24
22
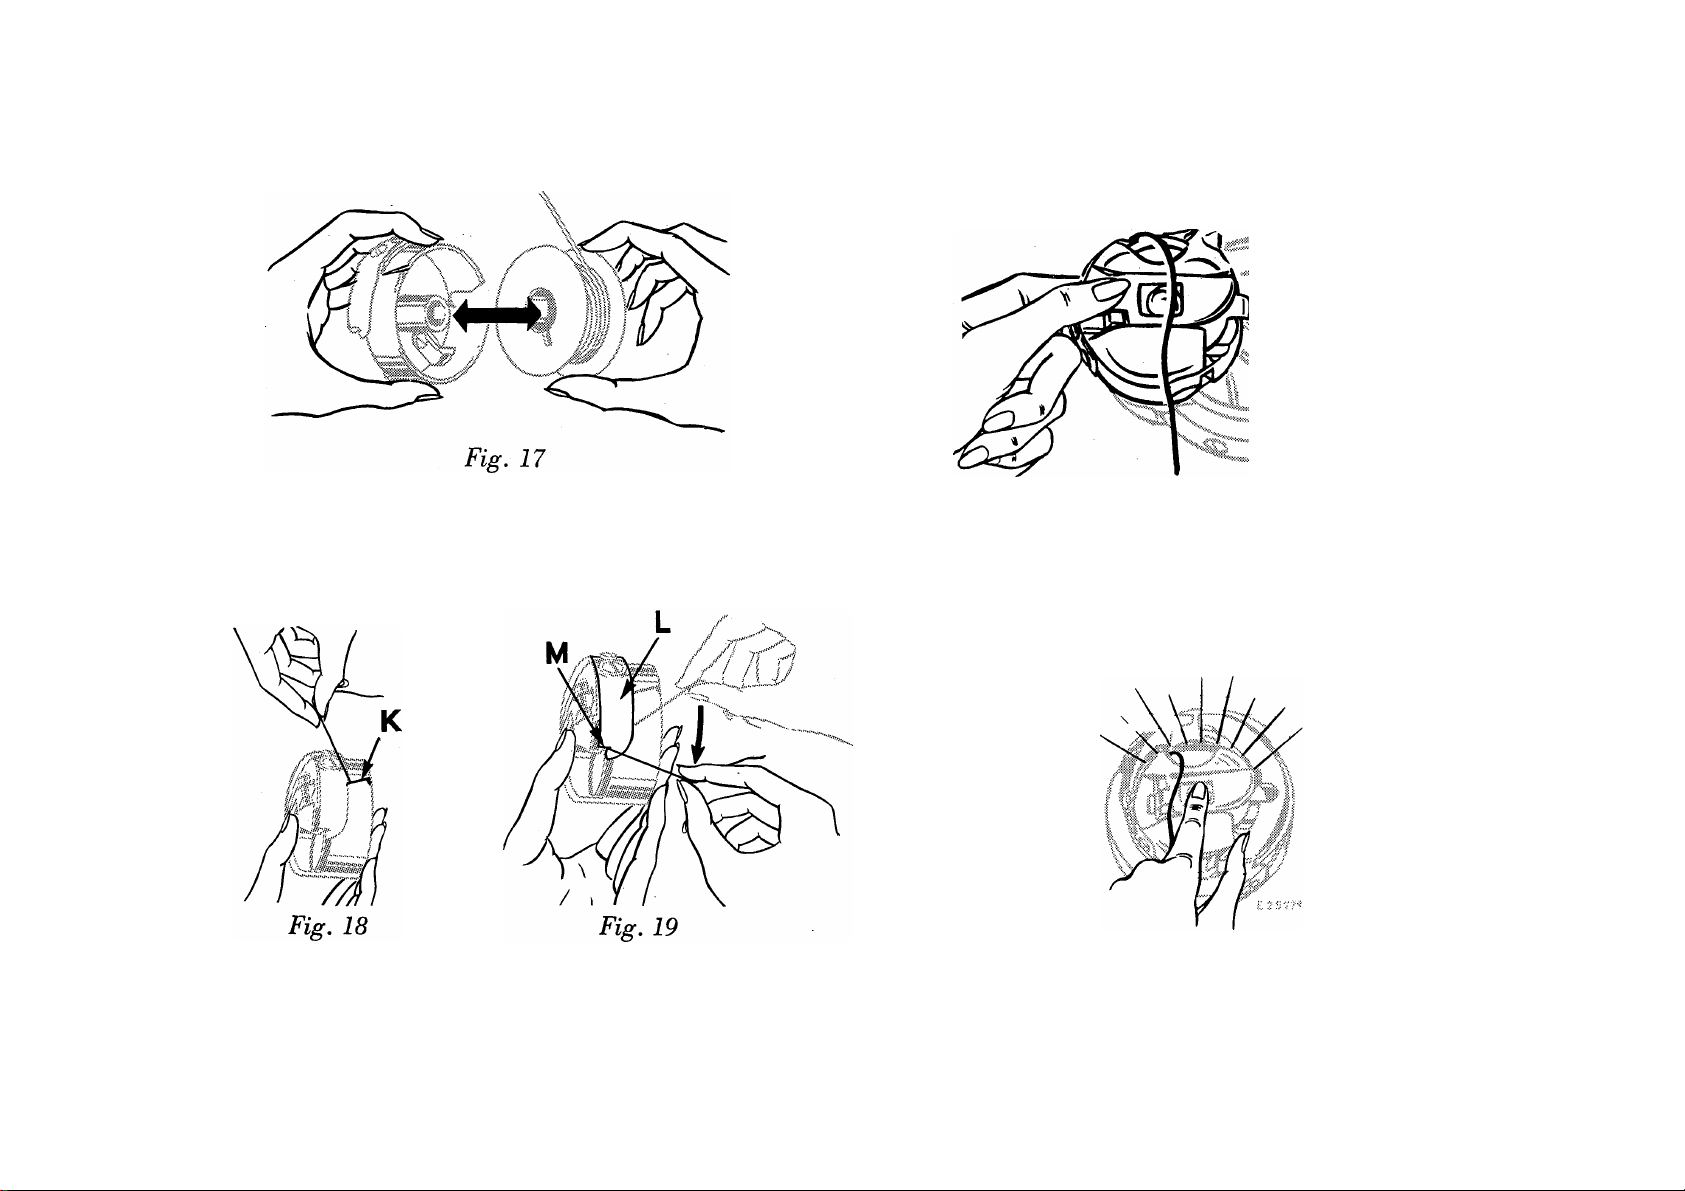
TO THREAD BOBBIN CASE TO REPLACE BOBBIN CASE
ci:::::®
1. Hold bobbin so that thread will unwind in
direction shown.
Hold bobbin case as shown above and place
bobbin into it.
2. Pull thread into slot K, under tension
spring L and into slot M at end of spring.
Allow about three inches of thread to hang
free from bobbin case.
Fig. 20
3. Grasp bobbin case between left thumb and
forefinger at latch hinge point as shown.
Tilt right edge of bobbin case slightly to en
gage post.
Fig. 21
4. Release bobbin case and press forefinger
against bobbin case until it snaps in place as
shown.
Page 25

23
FOR ALL-PURPOSE STITCHING
This SINGER Class 319 machine €omes
equipped with five built-in stitch designs, one
removable FASHION Disc, an All-purpose
Throat Plate 105266, and an All-purpose
Hinged Presser Foot. This throat plate and
presser foot have the same wide opening to
accommodate the swing of the needle. With
the equipment listed below, the machine can
perform straight, zigzag or ornamental
stitching.
Fig. 24. All-purpose
Hinged Presser Foot
Fig. 22. Bight Control Set
for Straight Stitching
Fig. 23.
All-purpose Throat Plate with guide lines
for seam width gauged from center of
needle hole and cross lines for gauging
square corners.
Fig. 25. Stitch Levers
A, B, C, A E
Page 26
24
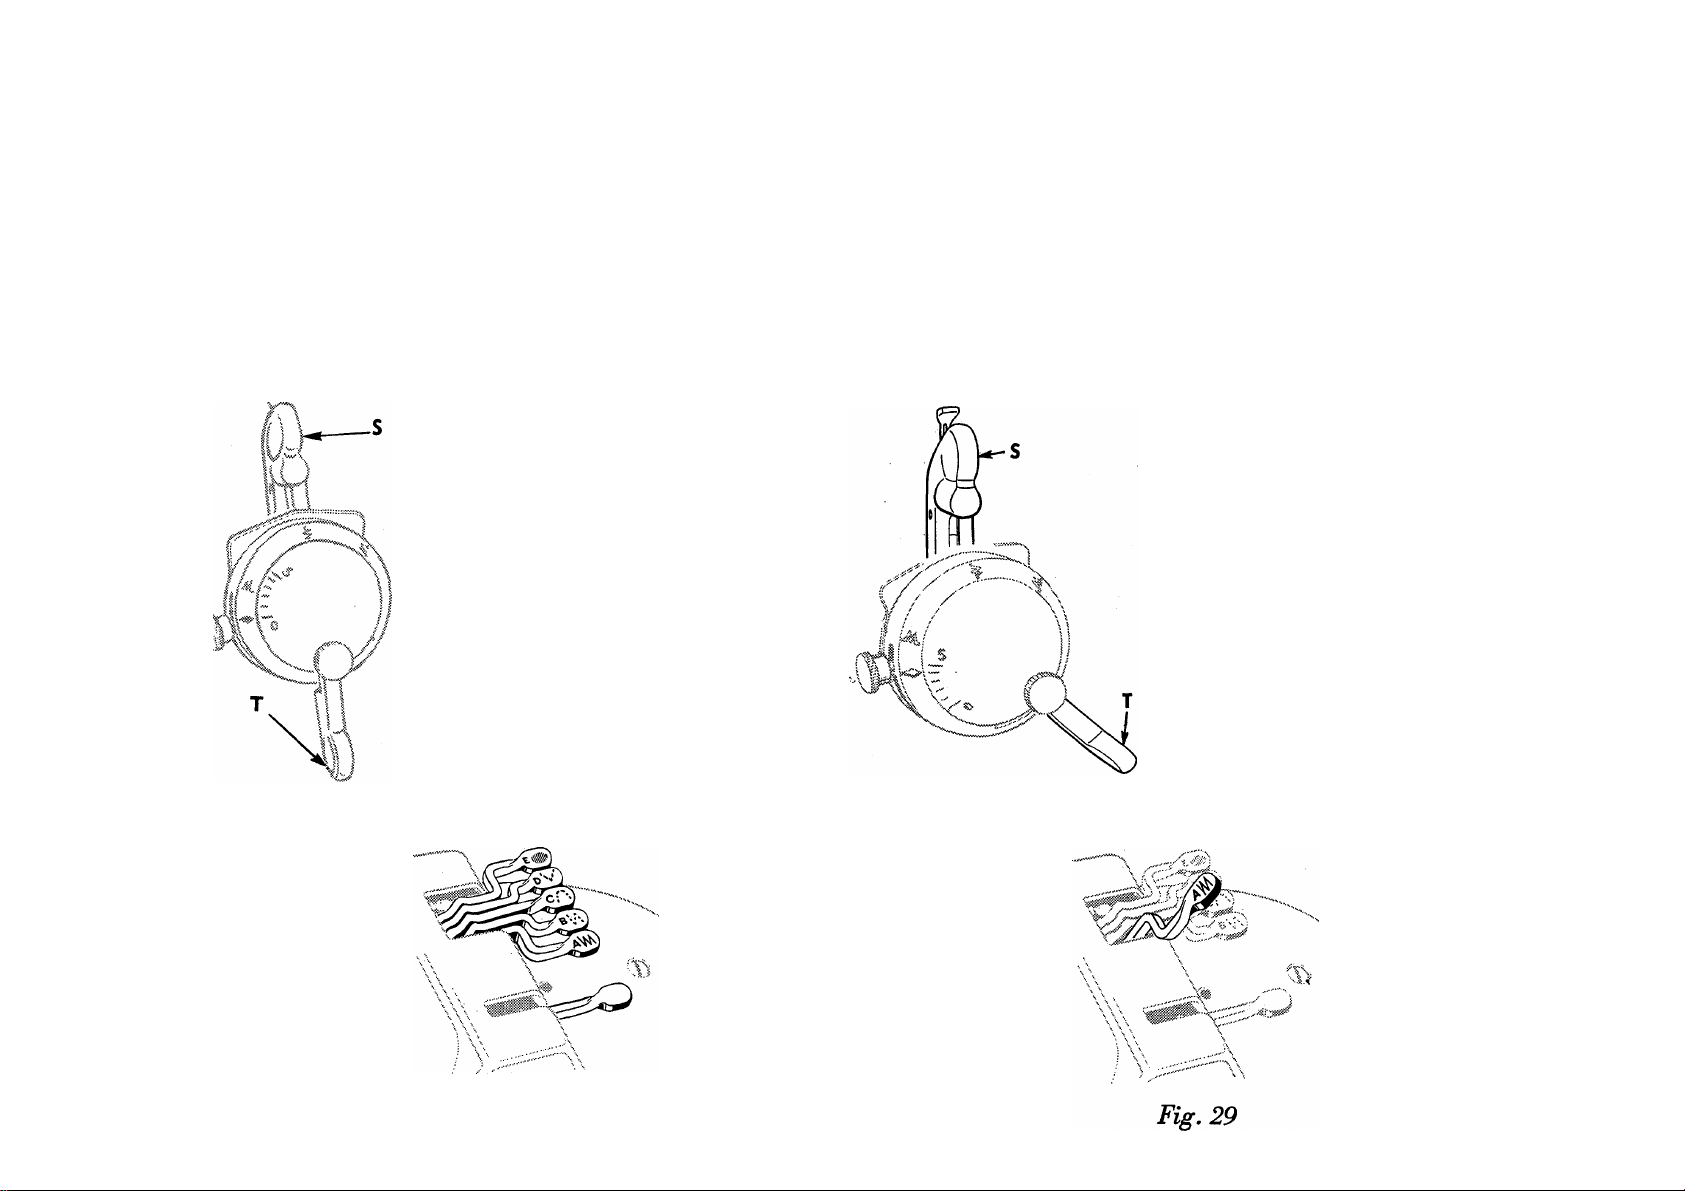
TO PREPARE FOR SEWING
STRAIGHT STITCHING—Set needle posi
tion lever S and bight lever T as shown in
Fig. 26. Set stitch levers in downward posi
tion, as shown in Fig. 27.
Fig. 26
ZIGZAG STITCHING—Set bight lever as
desired between I and 5 as shown in Fig. 28,
and lift Zigzag Lever A, as shown in Fig. 29.
Fig. 28
Fig. 27
Page 27
25
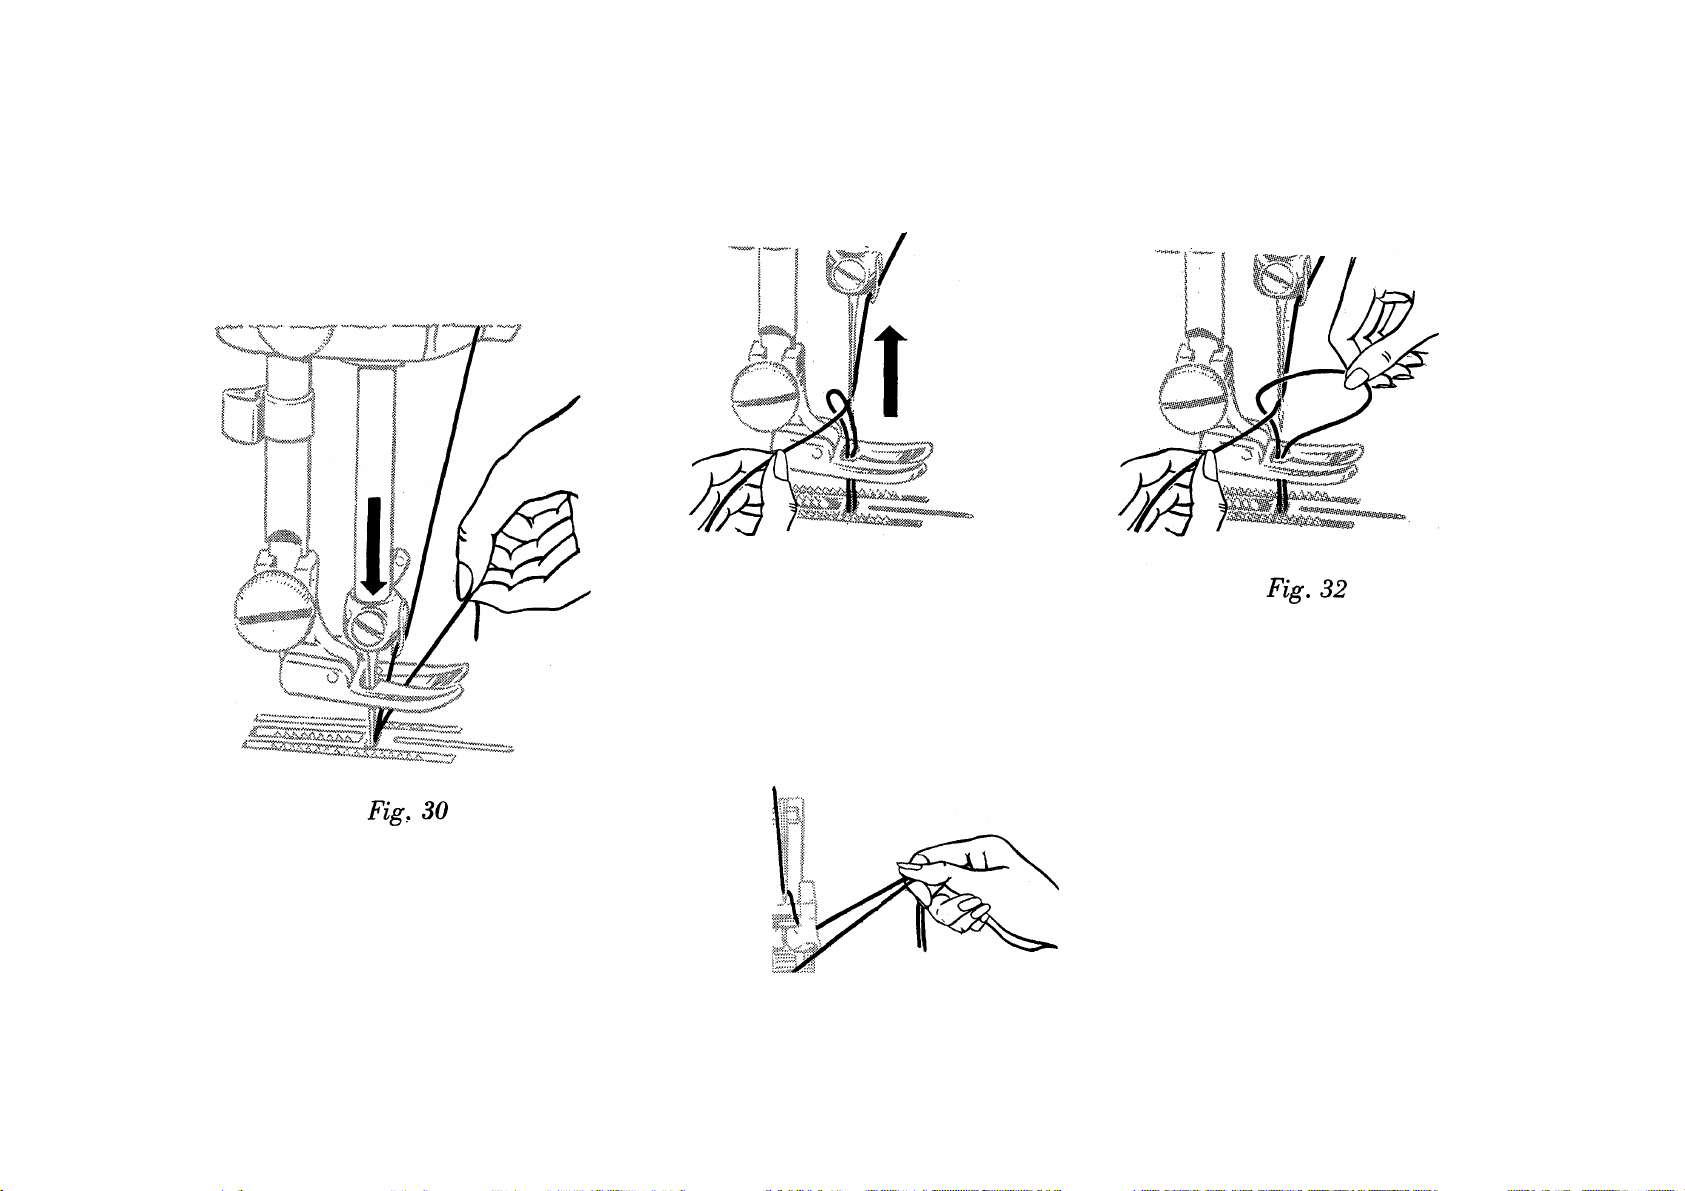
TO PREPARE FOR SEWING (continued)
Fig. 31
2. Pull up needle thread and bobbin thread
will come with it, as shown in Figs. 30, 31
and 32.
1. Hold end of needle thread
with left hand and turn hand
wheel toward you until needle
goes down and up again, and
take-up lever returns to its
highest point.
Fig. 33
3. Lay both threads back
under presser foot diagonally
across feed to the right or left
depending upon which side of
the needle the material is to be
located. See Fig. 33. When
the presser foot is lowered the
threads will be firmly held be
tween the feed and the presser
foot.
Page 28
26
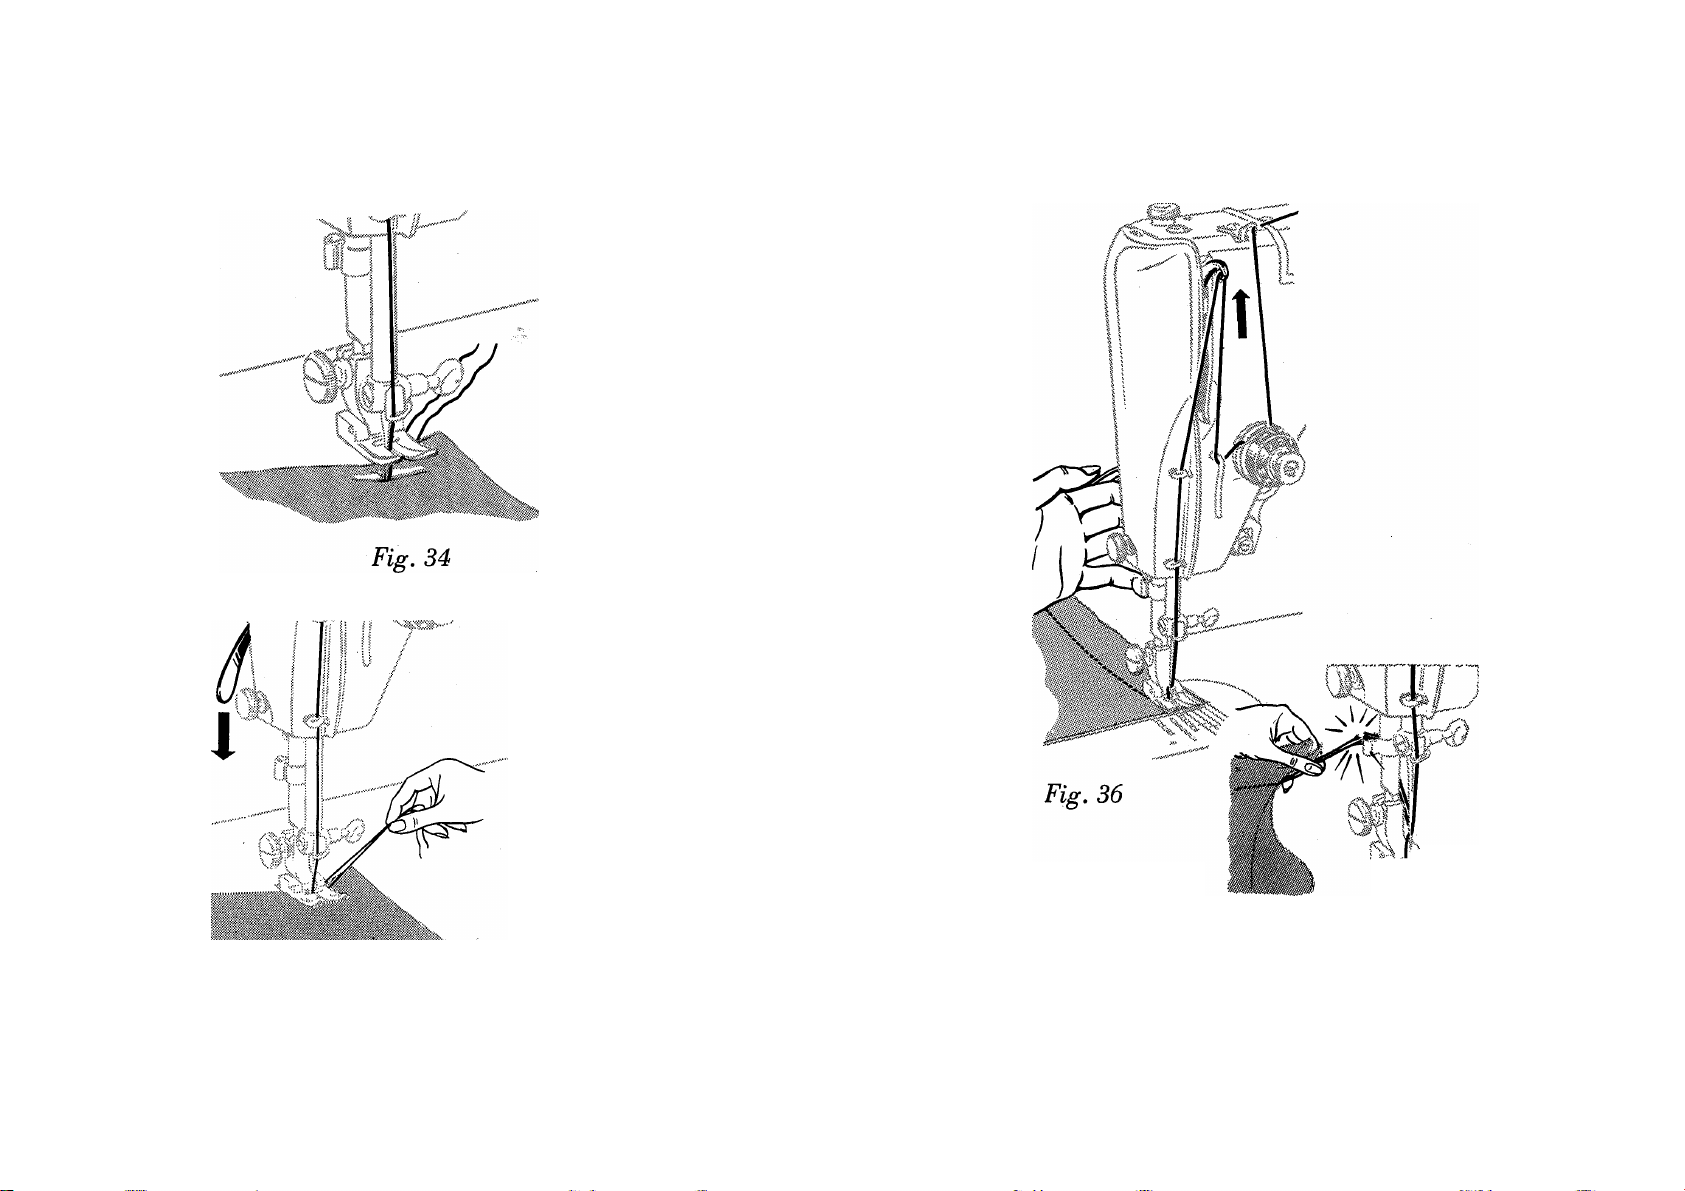
TO START SEWING
1. Bring take-up lever to
its highest point. Place ma
terial under presser foot.
2. Position needle in the
fabric.
3. Lower foot. Hold threads
which have been drawn to
the back toward the right
under the foot. Press con
troller pedal to start ma
chine. The speed depends
upon the amount of pressure
on the controller pedal.
TO REMOVE THE WORK
Fig. 37
4. Stop machine with take-up
lever at its highest point.
Fig. 35
5. Raise foot, draw fabric toward
the back and left and sever
threads on thread cutter.
Page 29
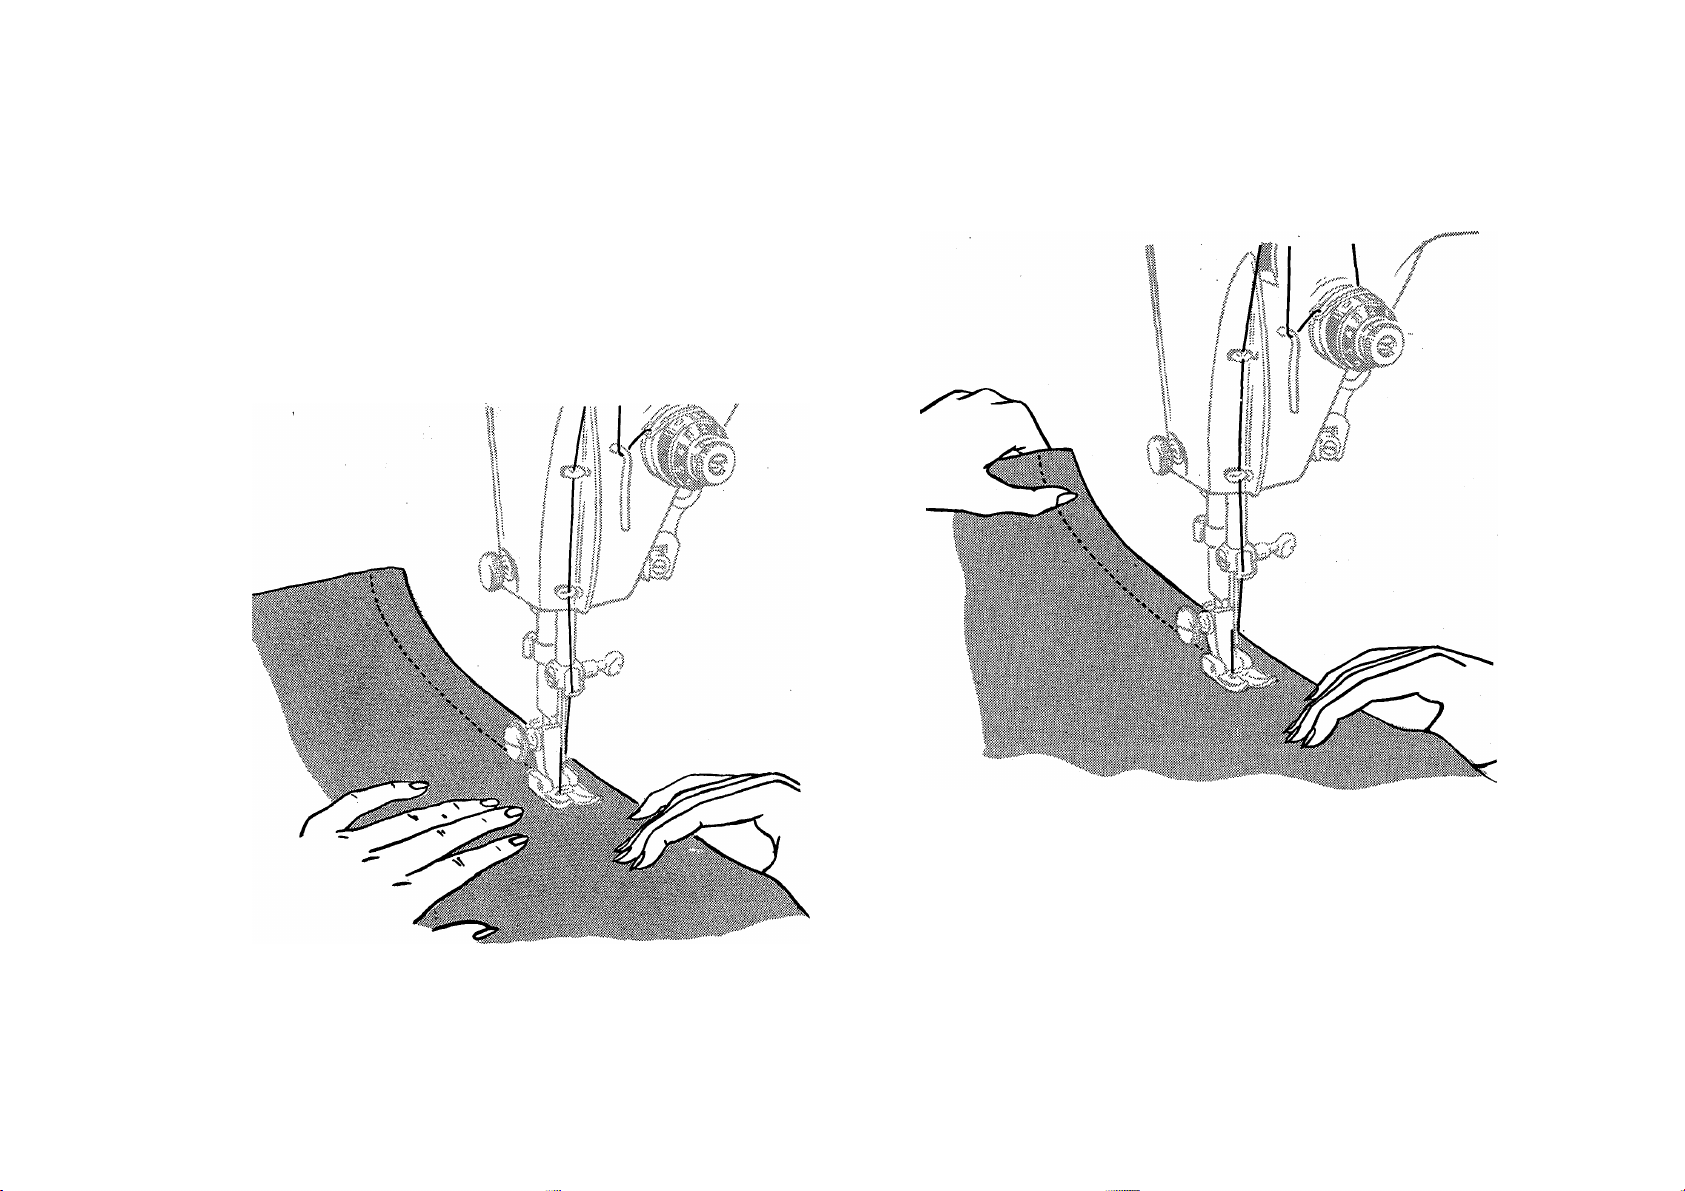
TO GUIDE AND SUPPORT MATERIAL
To avoid uneven tension, length of stitching
and distorted seams, never pull the ma
terial when sewing. Never operate the
machine without material under the presser
foot.
27
Fig, 38. Guiding Material While Sewing
Most materials require only guiding for best
sewing results, as shown above.
Fig. 39. Supporting Miracle Fabrics
Nylon, Dacron, Orion, and blends with rayon,
puffed weaves, sheers, jersey and tricot which
by their nature require light pressure, require
support while stitching. This support is given
by holding the material taut in back and in
front of the foot as the machine stitches and
assures a smooth even seam, as shown above.
Page 30
28
TO REGULATE LENGTH OF STITCH
Straight Stitching—The numerals on the
left of the stitch indicator scale denote the
approximate number of stitches per inch.
Zigzag Stitching—The lengthwise distance
between needle penetrations is controlled by
the stitch regulator.
To Reverse the Direction of Feed—To
feed the material toward you, raise the lever
Q, Fig. 40 as far as it will go. The machine
will then stitch in a reverse direction, thus
making it easy to ''back stitch” and to fasten
ends of seams.
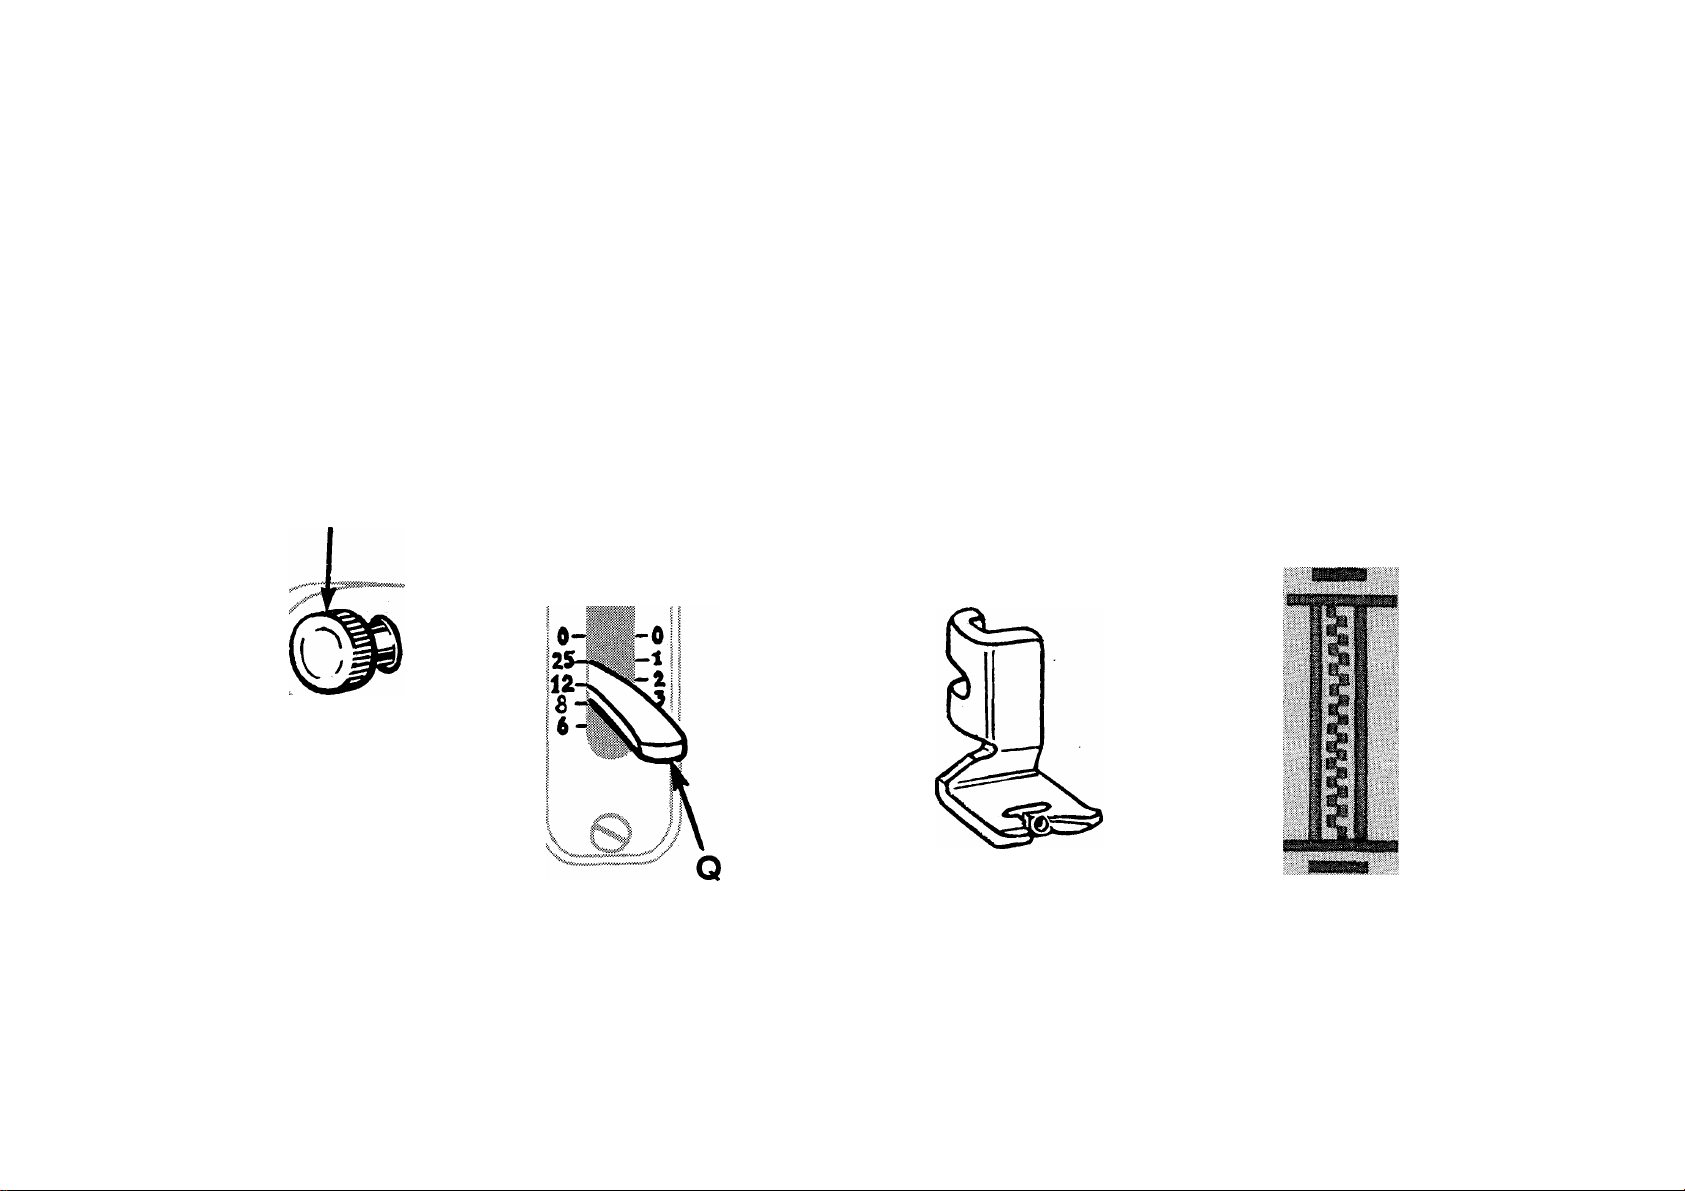
STITCH LENGTH FOR SATIN STITCHING
Fig. 40.
Stitch Length Regulator
To lengthen stitch, loosen limit screw R
enough to allow top of stitch regulator lever
Q to be lowered just below number desired.
Turn limit screw R until top of stitch lever Q
rises to setting desired.
Fig. 41. Satin
Stitch Foot
Satin stitching. Fig. 42, is done with stitch
regulator lever Q set between 25 and 0
position and with the Satin Stitch Foot
Fig. 42. Satin Stitching
Fig. 41.
Page 31

29
SATIN STITCHING—(Continued)
While stitching on a scrap of material, set
stitch regulator lever at 25, then carefully and
slowly turn limit screw R until stitches are
placed closely together, allowing material to
feed smoothly and evenly without irregularity.
The exact setting of the stitch length for
closed satin stitching will vary with the tex
ture of the fabric, the amount of needle and
bobbin thread tension, and with the operator
depending upon whether she holds the fabric
firmly or lightly. A light tension and light even
handling are recommended for satin stitching.
Foot 105251 provides a channel for satin
stitching and gives smooth uniform results.
TO START AT GIVEN PLACE IN A DESIGN
Stitch on a scrap of material until that point
in the design is reached which is to be repro
duced. Remove scrap from under the foot.
e2S7BS
Loosely woven or soft fabrics give best results
when backed with crisp lawn. This backing is
cut away close to the stitching when work is
completed.
Where satin or design stitching is to be done
on a single thickness of the garment, a backing
is essential on most fabrics.
Fig. 43
Fig. 44
Place work under needle. Position needle,
hold thread ends, drop presser foot and stitch.
This procedure is recommended for scalloping
and precise design stitching with all FASHION
Discs.
Page 32

30
BIGHT CONTROL
STRAIGHT STITCHING with straight stitch
ing presser foot, Fig. 46, and straight stitching
throat plate. Fig, 45. The small openings in these
fittings limit straight stitching to central needle posi
tion only. Set bight control at ''0” and stitch levers in
"down” position.
D
Fig, 45
Fig, 46
ZIGZAG STITCHING must be done with the all
purpose throat plate, Fig. 48, and the all-purpose
presser foot, Fig. 49, or any of the special feet which
nave a wide opening to accommodate the sideward
movement of the needle. Lever A is lifted for zigzag
stitching and the bight lever is set at 1, 2, 3, 4 or 5
depending upon the width of stitch desired. Needle
position of right, left or central may be used.
Straight stitching can also be done with this all
purpose equipment.
Fig, 47
To lock bight lever T for straight
stitching bring "0” mark W
opposite indicator V, loosen
MAXIMUM BIGHT STOP
SCREW X, then retighten. Loosen
and move intermediate bight
regulator screw U until it en
gages the notch, then retighten.
AUTOMATIC STITCHING requires the same
throat plate and presser feet as for zigzag stitching.
Levers B, C, D, E or any of the added FASHION Discs
may be used. In addition combinations of levers may
be used to produce an unlimited variety of com
bination stitches.
Page 33

BIGHT LEVER T, Fig. 50, regulates the width of
zigzag stitch or stitch pattern.
BIGHT SCALE is marked "0” to "5”. Each line
between '"0” and "5” denotes the width of stitch pat
tern obtainable up to a maximum of approximately
he inch.
BIGHT INDICATOR. Arrow V is the mark to
which the desired point on the bight scale is set.
31
INTERMEDIATE BIGHT REGULATOR
SCREW U, Fig. 51, acts as an intermediate springstop for a desired minimum bight. This spring-stop
can be passed over to zero bight if desired.
These stops allow you to operate the bight lever
manually between set positions without continual
reference to the dial while sewing. For example: To
limit zigzag stitching between 'T” and "4”, set bight
lever at ''4”, loosen MAXIMUM BIGHT LEVER
STOP SCREW X, then tighten. To set minimum
position 'T”, set bight lever so that arrow V is at *T”,
loosen INTERMEDIATE BIGHT REGULATOR
SCREW U and move it up or down until you feel the
notch engaged, then tighten screw U. The bight lever
is now set to limit the maximum bight at "4” and the
minimum at "1”. Other limits such as *T” and **3”
or and "3” can be obtained in the same manner,
see Fig. 51.
When free movement of the bight lever is desired
between zero and a given bight, screw U should be
moved down as far as it will go and then securely
tightened. Screw X is used to limit the maximum
bight.
ZERO BIGHT is synonymous with straight stitching.
MAXIMUM BIGHT. The machine will sew the
maximum width of stitch or stitch pattern when bight
lever is set at "5”, approximately he inch.
MAXIMUM BIGHT STOP SCREW X restricts
the movement of the bight lever to a maximum width
of stitch less than 5 when set at a given position.
CAUTION: When Straight Stitching Throat Plate
105268 is used, bight lever T must be set at 0,
needle must be set at central position, and all
stitch levers must be down.
Do not make any zigzag stitch, needle position
or stitch lever adjustments while needle is in
material.
Page 34

32
NEEDLE POSITION CONTROL
RIGHT
Fig. 52
When needle position lever S is
set to the left on the dial, as
shown in Fig. 52, the machine
sews at the extreme left for
straight stitching and, as the
bight is changed from ”0” to
*'5”, the needle swings from
the extreme left, as shown
in Fig. 52A for zigzagging.
Fig. 52A
Fig. 53
When needle position lever S
is set at the central position,
as shown in Fig. 53, the
needle swings equally to
the left and right of cen
ter, as shown in Fig. 53A.
Fig 53A
Fig. 54
When needle position lever S
is set to the right, as shown
in Fig. 54, the needle swings
from the extreme right,
as shown in Fig. 54A.
Fig. 54A
CAUTION: Left needle position, right needle position and stitch levers in '"up”
position are used only with the general-purpose throat plate, for straight stitching as well as zigzag
stitching.
Raise needle out of fabric before changing positions of bight control, needle position
and stitch levers.
Page 35

33
TO CHANGE FASHION DISCS
Raise needle out of material.
Set stitch levers in "down” position.
Remove knurled nut Y.
Grasp edges of FASHION Disc Z and draw it
off shaft.
Place new FASHION Disc on shaft so that
pin A2 engages at slot B2.
Replace nut Y and tighten securely. To avoid
variation in stitching, FASHION Disc must
be held in position firmly.
Set bight and needle position levers to de
sired settings and proceed as for regular
Fig. 55. Step 1. Removing Knurled Nut
Page 36

34
TO REGULATE PRESSURE ON PRESSER FOOT
The amount of pressure influences the ease
with which you achieve a straight seam and
uniform stitching. The pressure should be
heavy enough to prevent side creepage of
material and light enough to carry the material
without marking.
■A2
"V., }.-i \
The surface finish on fabrics, as well as their
weight, determine amount of pressure to be
applied. The glazed surface of chintz and pol
ished cotton, the loose nap surface of satin,
the deep piled surface of velvet, the delicate
and broken surface of lace and brocade, all
require a lighter pressui e.
To set a light pressure, turn thumb screw
A2, Fig. 57 upward until fabric moves easily
under presser foot without slipping and with
out showing feed marks.
To set a heavy pressure, turn thumb screw A2
downward until the fabric moves easily and
the seam edges are carried evenly by the foot
and the feed. Heavy, spongy fabrics like towel
ing, chenille, coating, etc., require heavier
pressure.
\ i I
1 k"
IM icSp m ^
i'^i i iji pi'
/A
U \
f !
■ H
ÍÍ
■ f
Fig. 57
Thumb Screw
Adjusted for
Light Pressure
L ^
N-? ^ \ i
k t f n
!«■ \ • / /:
, i
KJJ
Fig. 58
Thumb Screw
Adjusted for
Heavy Pressure
Page 37

35
TO REGULATE PRESSURE ON PRESSER FOOT
Light
»7/
'■SSW№Î«ÿÿÎT«»'№ÎîSÎ%ÎïWS5ÿÿSSÿWWRWK ^
Medium
x-K-»»»»»;«-
'<ww:«oc»x*xx«««««»««’ wsss5Kix«»x«»r
^ I >-
' r"N ■ " /""'"É. y'-'""\
Heavy
Page 38

NEEDLE THREAD TENSION
Thread Tensions for Straight Stitching
For perfect stitching, the tension on needle
and bobbin threads must be heavy enough to
pull threads to center of material and make a
firm stitch.
To Regulate Needle Thread Tension
The tension on needle thread can be tested
only when presser foot is down.
The numerals "0” to "9” on dial B2 indi
cate different degrees of tension that can be
obtained. The higher the number the greater
the tension. The numbers do not denote size
of thread or ounces of tension.
36
Fig. 59. Needle Thread
Tension Too Tight
When tension has been correctly set for aver
age sewing, note number at indicator line C2.
This setting may be quickly regained should
the tension be altered for special work or
change in size of thread.
Tensions Balanced
Page 39

needle thread tension (continued)
In the unbalanced tensions of Fig. 59, the
needle thread lies straight along top side of
material, caused by too heavy tension on
needle thread.
37
In the unbalanced tensions of Fig. 60, the
bobbin thread lies straight along under side of
material, caused by too light tension on needle
thread.
Fig. 60. Needle Thread
Tension Too Loose
Tensions Balanced
Page 40

38
TO REGULATE BOBBIN THREAD TENSION
The tension on bobbin thread is regulated by
the larger screw nearest the center of the ten
sion spring, as shown in Fig. 61.
When adjusting bobbin thread tension, a slight
turn of the screw is all that is needed to make
a fine adjustment, because the full range of
tension from zero to a maximum is made
within IM turns of tension regulating screw.
To increase tension, turn this screw gradually
over to the right.
To decrease tension, turn this screw gradually
over to the left.
Balanced Tensions
Page 41

39
BOBBIN THREAD TENSION (continued)
TO SET BOBBIN THREAD TENSION
Wind bobbin with a 50 yard spool of size "A”
silk thread.
Fig. 62 . Bobbin Thread
Tension Too Tight
x\
\
Thread bobbin case
and adjust tension so
that weight of bobbin
case with a bobbin of
50 yards of "A” silk
will cause the case to
slide slowly5 when held
suspended by the
thread. See Fig. 63.
Balanced Tensions
For correct tension,
its downward move
ment should be very
slow.
Fig. 63
Page 42

40
Satin Stitching
NEEDLE THREAD TENSION
Satin stitching and solid, closed design stitch
ing require a lighter needle thread tension
than for straight stitching or open design
stitching.
Wide satin stitching re
quires the lightest sew
ing tension. Set the ten
sion dial so the indica
Fig. 64
tor line is between 0 and
2, as shown in Fig. 64.
At ''0” there should be a very slight pull on
the thread to indicate there is a minimum
tension.
Soft fabrics should be
backed with crisp lawn
or organdy to prevent
cording and the dial
should be set at 2 or less,
as shown in Fig. 66.
Fig. 66
Fig. 65
For narrower satin
stitching, slightly more
tension may be used. Set
the dial between 2 and 4,
as shown in Fig. 65.
Fig. 67.
Corded Satin
Stitching resulting
from excessive
tension
Fig. 68.
Smooth Satin
Stitching Produced
with correct
tension
Page 43

41
SHOULD IT BECOME NECESSARY TO REMOVE
AND DISASSEMBLE NEEDLE THREAD TENSION
Turn thumb nut E2 to the left (counter-clockwise)
until "0” on dial G2 stops at center line on indicator
L2. To separate pin F2 in thumb nut E2 from dial
TO REASSEMBLE AND REPLACE NEEDLE THREAD TENSION
Make sure that tension releasing pin R2 is in place in
stud N2. Replace the tension parts on the stud N2 as
follows: Replace the three tension discs M2 with the
thick flat disc separating the convex surfaced discs.
Then replace the indicator L2, open side out, on stud
with plus and minus signs at top, then insert tension
spring K2 in indicator with the first (half) coil of this
spring straddling the lower half of the stud. Place stop
G2, press in dial, unscrew thumb nut and remove it.
Then remove tension parts from stud N2, as shown in
Fig. 69. Do not remove stud N2.
washer on stud with extension J2 above stud, so that
it clears the first (half) coil of tension spring. Next,
place dial G2 on stud with No. 2 opposite stop washer
extension J2, then push dial to compress tension
spring and at the same time screw thumb nut E2 on
stud, inserting pin F2 on nut in one of the holes in
dial G2. Then lower presser bar and turn thumb nut
E2 to left until "0” on dial G2 stops at center line on
indicator L2. Thread the tension and
02 P2 Q2
pull thread through tension discs to
test amount of tension on thread at
"0” position.
At this point there should be a slight
pull on the thread to indicate that
there is a minimum tension which
gradually increases with the turning
of thumb nut E2 to the right, pro
viding a full range of tensions with
one revolution of the thumb nut. If
the pull is too strong for a minimum
tension, press in dial G2 to disen
gage pin F2 on nut from dial, and
Fig. 69. Needle Thread Tension Assembly
Page 44

42
reset pin in one of holes at left of previous setting.
This resetting will produce less tension at "0”. Repeat
this process until minimum desired tension
obtained.
If there is no tension at press in dial G2 and
reset pin F2 on nut in one of holes at right of previous
setting, repeating this process until a slight minimum
tension is obtained. The tension on thread take-up
spring 02 and stroke of this spring should be just
sufficient to take im slack of needle thread until point
of needle reaches fabric in its descent.
To adjust tension on thread take-up spring 02, remove
tension disc assembly, disengage end of spring from
groove in tension stud, revolve spring and place its
end in the groove which produces correct tension.
To regulate stroke of thread take-up spring 02 loosen
screw Q2, Fig. 69, and turn the thread take-up
spring regulator P2, Fig. 69 until correct stroke
is obtained, then tighten screw Q2.
is
TO CHANGE THE THROAT PLATE
When changing from All-purpose Throat Plate to
Straight Stitching Throat Plate or Embroidery Plate,
FIRST raise needle to its highest point, set the needle
position lever at its central position and set bight lever
at "0”. Remove presser foot. Tilt the machine head
slightly with right hand.
With the left hand tilt the rounded end of throat plate
by pressing it up from the underside enough to clear
the pin and feed dog as shown in Fig. 70. Then draw
the plate to the left.
Fig. 70. Changing the Throat Plate
To insert the Throat Plate, slip both ends of its
^ring beneath the edges of the opening, as shown in
Fig. 70, and, while it is slightly tilted, slide it over the
feed dog, into position.
Lower the machine head into place.
Page 45

43
TO SET TWIN NEEDLES
This machin« uses a 306x1 Twin Needle in
size 3/14. The markings on the needle indicate
the spacing (3) and size of the needle (14).
Follow procedure described for setting single
needle (see page 17).
CAUTION—Before stitching with Twin Nee
dles be sure the needle position lever is set at
central as shown in Fig. 22, page 23 and
that the machine is operated at a bight not
exceeding 3. Set bight limit screw X, Fig. 50,
page 31 to lock the bight lever at the point
desired but not to exceed 3.
For Twin Needle work the wide slotted throat
plate 105266, and the wide slotted all-purpose
presser foot 105250 or the satin stitch foot
105251 must he used. Heavy, closely stitched,
solid patterns require the satin stitch foot
while straight stitching, scalloping or running
stitch designs are more effectively done with
the all-purpose presser foot. Failure to use the
proper throat plate or presser feet with the
wide openings will blunt or break needles.
Fig, 71. Inserting Twin Needles Into
Needle Clamp
Page 46

44
UPPER THREADING—TWIN NEEDLES
Place a spool on each of the two spool pins.
Thread each point with one thread at a time in the same
manner as for single needle threading with exception of the
tension. Pass one thread between the rear and center
tension discs and the second thread between the
center and front tension discs.
Thread the eye of each needle from
front to back. Threads must not cross
or bind each other. <
Start to sew with threads positioned in
the same way as when stitching with
single needle. , '
Fig. 72
I ^
i I
i I
I I I
Fig. 73
Fig, 74
Page 47

45
TWIN NEEDLE AIR TUCKING
Use: All-purpose throat plate
All-purpose presser foot
Twin Needles
Central needle position
0 bight
12 to 25 stitch
Simple air tucking is effective as an accent
when used to carry out a design or for straight
or diagonal lines of stitching. The two threads
carried by the twin needles interlock with a
single bobbin thread to form air tucking. When
the needle thread tension is increased, the
fabric between the lines of stitching is raised,
creating air tucking.
Select thread of a size appropriate for the
needle being used as well as a thread appro
priate for the fabric. The Fabric, Thread,
Needle and Stitch Length Chart on page 16
is a helpful guide.
Square corners are made by turning twice
while the needles are out of the fabric.
Stitch until the inside needle has reached the
corner. Raise presser foot when needles are
out of the fabric. Make a one-eighth turn of
the fabric, allowing the inside needle to enter
Fig. 75. Twin Needle Air Tucking
for the second time into the corner stitch
penetration. Turn hand wheel until the
needles go down and up again and rise out of
the fabric.
Make the second eighth turn of the fabric.
Allow the inside needle to enter for the third
time into the corner stitch penetration. Con
tinue to stitch in a straight line. When design
is completed draw threads to the underside
and tie.
When using parallel lines of air tucking,
spacing should be such that foot does not ride
over a previously stitched row.
Page 48

46
SEWING SUGGESTIONS
Breaking of needles might he caused by:
1. Wrong size of needle for thread and material—,
see page 16.
2. Wrong throat plate or presser foot for the type of
work being done—see pages 52 and 53.
3. Wrong setting of needle position lever and/or
bight lever—see pages 24, 30, 31 and 32.
4. Pulling of material when stitching—see page 27.
5. Loosely fastened presser foot or special fittings.
6. Wrong class of needle—see page 16.
Breaking of needle thread might he
caused hy:
1. A knot in thread.
2. Thread too coarse for needle—see page 16.
3. Wrong threading—see pages 18 and 44.
4. Upper tension too tight—see pages 36 to 42.
5. Needle blunt or bent.
6. Needle set incorrectly—see pages 17 and 43.
7. Roughened hole in throat plate.
8. Wrong arrangement of threads when starting to
sew—see page 25.
9. Needle thread tension too light.
10. Damaged sewing hook.
2. Bobbin thread tension too tight
42.
3. Bent Bobbin.
4. Damaged Bobbin Case.
see pages 36 to
Skipping of stitches might he caused by:
1. Wrong setting of needle—see pages 17 and 43.
2. Needle blunt or bent.
3. Needle too small for thread—see page 16.
4. Damaged presser foot.
5. Damaged throat plate.
Looped stitching might be caused hy:
1. Wrong threading—see pages 18 and 44.
2. Tensions set incorrectly—see pages 36 to 42.
3. Needle too fine for thread used.
4. Improper presser foot.
Gathering or Puckering of material
might he caused by:
1. Failure to use crisp lawn or organdy backing when
zigzag stitching with a very wide bight and/or on
sheer materials.
2. Excessive needle and bobbin thread tensions.
3. Improper presser foot.
Breaking of bobbin thread might be
caused hy:
1. Wrong threading of bobbin case—see page 22.
If the suggestions offered here do not correct your sewing problems, call your local SINGER CENTER.
If machine runs heavily after standing idle for a
long period, apply a few drops of kerosene at all oiling
points, run the machine for a few minutes, then wipe
clean and apply SINGER* Oil as described on pages
47, 48, 49 and 50.
Page 49

47
PROTECTION AGAINST RUST DAMAGE
Your sewing machine was built to exacting standards of precision and workmanship. Its perform
ance depends on the care and treatment it receives when in use and especially before storing away.
Lint and fluff, if not removed prior to storage will, during humid
periods, absorb and hold moisture, and thus accelerate rust damage
to highly polished thread handling and other exposed parts. The
extent of rust damage would depend upon the length of time the
X ..s-.-N
ii /’X V
CLEAN
AND^
machine remained in idle storage in an unventilated closet, attic or
basement room.
1 ■' tT
- Í
Fig. 75A
■ i< OfL
;> ^
i/CLEAN
CLEAN
Sudden drops in temperature will cause moisture to form on parts,
which if not protected by a film of oil, would rust and damage while
in storage.
Proper storage care suggests thorough brush-cleaning to remove all
traces of lint and fluff, followed by swabbing of all the exposed parts
with a lint-free brush, Fig. 75B, saturated with SINGER oil. See
Fig. 75A for the areas that should be cleaned and coated with a
protective coat of oil.
Fig. 75B. SINGER Lint Brush
Oil-fired ovens; fumes from open flame gas heaters will
cause corrosion, especially if the parts are covered with lint.
Lint brush may be purchased at your local SINGER CENTER.
Page 50

TO OIL THE MACHINE
Preparation
Remove face plate and throat plate and swing back
cover plate toward hand wheel.
Remove dust and lint with brush.
CAUTION: Do not brush sewing hook with fine
bristle brush. (Fine bristles break off and clog the
hook.) Use only brush with stiff bristles such as shown
in Fig. 75B, page 47.
48
Fig. 76. Front View, Showing Oiling Points
Oiling
Apply a drop of oil to all points indicated in Figs. 76,
77, 78, 79 and 80.
Page 51

49
Remove face plate S2, Fig. 76 by taking out thumb
screw T2 and slipping plate up and off screw at U2. Oil the
points indicated in Fig. 78 and then replace plate S2.
U2
Apply a drop of oil to race of bobbin case holder as shown
in Fig. 79.
4
4
4
Fig. 78. Face Plate Removed^
Showing Oiling Points
Fig. 79. Oiling Point in
Bobbin Case Holder
Page 52

50
Turn the machine back on its hinges and oil the places shown in Fig. 80.
The motor requires no lubrication.
Page 53

51
Grasp light socket so that thumb extends over switch X2. Then press
shade with thumb at Y2 to release shade from two catches and slide it
halfway out of shade holder A3. Then press bulb into socket and at
same time turn bulb over from machine as far as it will go to unlock
pin Z2 (see Fig. 83). Withdraw the bulb.
To Insert a New Bulb
Press bulb into socket and turn it over toward machine until pin Z2
enters notch in socket (see Fig. 83). Return shade to its normal
position as shown in Fig. 81.
UNLOCKS
Fig. 83. Locking or
Unlocking Bulb Pin
Fig. 84. Inserting
Bulb in Socket
Page 54

52
ALL-PURPOSE STITCHING EQUIPMENT
189632 Embroidery Plate
105266 All-purpose Throat Plate
105250 All-purpose Hinged Presser Foot
The wide openings in the equip
ment on this page will accommo
date the full range of settings at
tained by moving the needle posi
tion and bight position levers to
any point required.
\ iU
86616 Buttonholer Foot
160847 Multi-slotted Binder
105251 Satin Stitch Foot
189648 Button-Sewing Foot
189653 Shell Hemmer
Page 55

't—;
r
S'' »
105268 Straight Stitching
Throat Plate
53
STRAIGHT STITCHING EOUIPMENT
105248 Straight Stitching
Presser Foot
ir<
ÜI
160845 Cording
or Zipper Foot
{Left Toe)
160846 Cording
or Zipper Foot
{Right Toe)
120598 Ruffler
Fig, 85. Machine Set for
Straight Stitching
CAUTION: All of the parts shown on this page are designed for straight stitching only. They
must not be used for zigzag stitching. Use only AFTER needle position lever S is set at central
position, and bight lever T is set at "0”, as shown in Fig. 85.
Page 56

NEEDLE POSITION LEVER
PRESSURE REGULATING
THUMB SCREW
THREAD TAKE-UP LEVER
FACE PLATE
TAKE-UP SPRING
NEEDLE THREAD TENSION
TENSION REGULATING
THUMB NUT
FACE PLATE
THUMB SCREW
THREAD CUTTER
PRESSER BAR
NEEDLE
PRESSER FOOT
THUMB SCREW
54
SPOOL PINS
DISC FOLLOWER
FASHION DISC
KNURLED THUMB NUT
HANDLE
LATCH
BOBBIN WINDER
HAND WHEEL
BIGHT INDICATOR SCALE
3-PIN TERMINAL
MAXIMUM BIGHT STOP SCREW
BIGHT CONTROL LEVER
STITCH REGULATOR AND
FEED REVERSING LEVER
STITCH INDICATOR
BOBBIN WINDER
THREAD TENSION
STITCH REGULATOR LIMIT SCREW
PRESSER FOOT
FEED DOG
THROAT PLATE
'NEEDLE BAR
'NEEDLE CLAMP THUMB SCREW
'NEEDLE CLAMP
Fig, 86. Names of Principal Parts of 319 Machine
Page 57

55
APPLICATION OF SINGER AUTOMATIC
TO CONSTRUCTION OF GARMENTS AND FURNISHINGS
STRAIGHT STITCHING
finish causes the fabric to cling to the needle,
either on its upward or downward stroke.
r\
\\ry//‘
fFi"
\ / w
Fig. 87
I
W>x
Fig. 88
Straight stitching is accomplished with all
stitch levers in a downward position and with
the bight set at zero as shown in Figs. 87 and
88.
Central needle position is used for straight
stitching except in the unusual situation when
it is desirable to alter the location of the
needle in relationship to the center of the
presser foot.
The Straight Stitching Throat Plate
and Straight Stitching Presser Foot are
designed to accommodate all fabrics, but
especially delicate, soft fabrics, sheers, crepe
weaves and all fabrics where the weave or
convenient for stitching curved seams, follow
ing the edge of a lapped seam, the fold of a
pleat or when placing an edge-stitching on a
yoke or collar. The narrow right toe affords
an excellent view at the right of the needle
for such work.
To Lock Bight Control for Straight
Stitching. When straight stitching, set nee
dle position lever at central, bight lever T at
zero and set maximum bight stop screw X as
shown in Fig. 87. Then bring the inter
mediate bight regulator screw U upward or
downward until you feel the notch engaged.
Test Stitch. It is a good practice to test
stitch on a scrap of fabric before stitching a
garment to determine the correctness of ten
sions, length of stitch and pressure. The
Fabric, Thread, Needle and Stitch Length
Chart on page 16, is a useful guide to the
correct needle, thread and stitch length for a
wide variety of fabrics.
The Straight Stitching Presser Foot is
Page 58

£2(>0&B
56
PLAIN SEAMS—BACK STITCHING
Plain Seams comprise a large part of general sewing.
Seam ends are stayed with back stitching to prevent
their opening during fitting and assembling the gar
ment. Position needle a few stitches from the edge
of the garment. Hold threads which have been drawn
to the back and right under presser foot. Stitch in
reverse to the edge and then forward until end of
seam is reached. Back stitch again to stay end of
seam.
Fig. 89. Seaming Dress Sections
Fig. 90. All-purpose Scored Throat Plate
The All-purpose Presser Foot and All-purpose
Throat Plate are frequently used for both zigzag
stitching and straight stitching and must be used
when straight stitching in other than central needle
position.
The scoring on the throat plate of your SINGER
Swing-Needle makes it easy to guide your stitching
an exact distance from an edge. The cross line
markings indicate the point at which to pivot in
seaming a square corner for each seam width.
Page 59

57
FITTED DARTS
Darts are conveniently stayed at the points by stitch
ing beyond the fabric about one-half inch to foto a
thread chain. Tie these chained threads into a pllin
knot. The last three or four stitches of a dart must be
very close and parallel to the fold, resulting in a
smooth shaping of the garment.
TORSO OR SHAPED DARTS
Torso and shaped darts are stronger and more flexible
when stitched with a shallow zigzag. Stitch the points
for a distance of one inch with straight stitching.
Zigzag center portion.
Use: All-purpose Throat Plate and Presser Foot
Central Needle Position
H to 1 Bight
25 Stitch for Zigzag and 12 Stitch for Straight
Stitching
Lever A
Torso or Shaped Darts
ilSIilim
ml0lk
’ijlmMléf' "
Fig. 92
li
Fig. 93. Contour Dart
Along Raw Edges
CONTOUR DARTS IN INTERFACINGS
Contour darts in interfacings provide perma
nent shaping without bulk when cut, lapped
and zigzag stitched along raw edges as in
Fig. 93. The dart is often cut away, edges
abutted and stayed with straight grain strip
of muslin as in Fig. 94.
Use: All-purpose Throat Plate and Presser Foot
Central Needle Position
5 Bight
25 Stitch
Lever B
Fig
94. Contour Dart
with Abutted Edges
Page 60

m
m
i
|i ;
:E
■
1 1
58
ACCENTED DARTS
Darts add styling and interest when stitched with the fold
to outside of garment. Thread ends at the point of the
dart are eliminated when the single thread principle for
stitching is employed. With thread leading through the
throat plate from bobbin, thread needle from back to
front. Tie bobbin and upper threads together and draw
knot through threading points toward spool until a suffi
cient length of the thread leading from the bobbin has
passed the thread guide nearest the spool to complete
stitching the full length of the dart. Stitch from point of
dart toward edge of garment section. Back stitch to rein
force at outer edge.
Further accent is given to such a dart when an arrowhead
is placed at the point.
Fig. 95. Single Thread Darts
For Arrowhead, use:
All-purpose Throat Plate and Presser Foot
Central Needle Position
5 Bight
Almost 0 Stitch length
Arrowhead Disc No. 5
Page 61

59
CONTROL OF FULLNESS
Contour and shaping are accomplished in garments of soft
and sheer fabrics by contour shirring. Equip machine for
straight stitching, and with a stitch length of 12 or less,
according to the fabric, place five rows of parallel stitching
3^8 inch apart, with the first row Y2 inch from the outside
edge. Draw threads to inside of garment at one end only and
tie. Form a pin tuck across the ends of stitching. Form
shirring by pulling the threads on inside of garment at
second end until shirring has been drawn together suffi
ciently so that garment sections match. Knot thread ends
and finish with a pin tuck. Join sections of garment together.
Three rows of stitching are visible when finished.
Fig. 96. Contour Shirring in Process
When controlling eased fullness in a sleeve cap, at
the elbow of a long fitted sleeve, in the shaping of a
circular hem or in joining yoke or fitting seams,
two lines of control stitching are used and pin
tucks are omitted.
Fig. 97. Contour Shirring Completed
Page 62

£23?3-#
Fig. 98. Couched Elastic Shirring in Process
60
COUCHED ELASTIC SHIRRING
Elastic thread is often used to control fullness at the
waistline or cuff. Zigzag stitch over one or two strands
of elastic thread, drawing the elastic thread to give the
tautness desired. Knot ends securely. This treatment
provides a snug fit with elasticity. Either side may be
used as right side, depending upon the effect desired.
Use: All-purpose Throat Plate and Presser Foot
Central Needle Position
1 Bight
12 Stitch
Lever A
ELASTIC SHIRRING
Elastic thread is wound on the bobbin without stretch
ing, while regular sewing thread is used in the needle.
The machine is regulated for straight stitching. Stitch
parallel rows with a 10 stitch. The bobbin tension is
regulated so that it is heavy enough to stretch the
elastic thread when stitching, but light enough to
avoid breaking or fraying. Thread ends are fastened
securely by tying.
Fig. 99. Elastic Shirring Completed
Page 63

61
ZIGZAG SEAMING
After seams have been basted and fitted, mark
outline of seam on both sections of garment
with hand basting. Remove basting that joined
seams and lay one section over other with seam
lines matching and hand baste. Remove mark
ing stitches. Satin Stitch Foot 105251 (see
page 52) is used to follow outline of lace
motif that runs through seam lap.
Cut away excess seam up to stitching on both
right and wrong sides, using curved em
broidery scissors.
Fig. 100. Invisible Seam for All-Over Lace
Use: All-purpose Throat Plate and
Satin Stitch Foot 105251
Central Needle Position
IH Bight
Above 25 Stitch
Lever A
.•’if ^
■;.f ■ .s-- •■ „/
V: -?• r-
■ i“'' '..v'
i-' ' Ì*
-V" .’*k* '
- ■ >5i’ ■ ,
-» * *;»
' -* «™= '.',
^ ».ft ^ ^ *
» y %; 4k' -,
* ^.0 . , /^-4
. *V- <'
Fig. 101. Invisible Seam for All-Over Lace Embroidery
•xir '-'tif-™®,.:'.
> A, kt \
Page 64

62
CORDING
SEAM WITH SATIN STITCH FOOT 105251
Place a thread through the eye at the front of the foot and
lead it underneath the foot. Cover thread with closely
spaced zigzag stitches.
Use: All-purpose Throat Plate and
Satin Stitch Foot 105251
Central Needle Position
Fig. 102. Cording a Seam with
Satin Stitch Foot 105251
2 Bight
Above 25 Stitch
Lever A
HAIRLINE SEAM IN SHEERS
For a dainty hairline seam in sheers that is also frayproof, follow shaped seam line with a fine cording stitch,
then cut surplus seam away close to line of stitching. This
type of seam may be used either inside or outside.
RIP-PROOF SEAM FOR LINGERIE
For rip-proot seams in lingerie, first straight stitch fitted
seam on wrong side and press both edges to one side.
Fig. 103. Hairline Seam in Sheers
Fig. 104. Rip-proof Seam for Lingerie
Use: 0 Bight
15 Stitch for Straight Stitching
On right side of garment, top stitch with a fine zigzag
stitch allowing needle to enter alternately channel of
seam and seam thickness.
Use: All-purpose Throat Plate and All-purpose Presser Foot
Central Needle Position
2 Bight
25 Stitch
Lever A for Zigzag Stitching.
Page 65

63
INVISIBLE SEAM FOR HORSEHAIR OR
NET BANDINGS
Use: All-purpose Throat Plate and
All-purpose Presser Foot
Central Needle Position
13^ Bight
25 Stitch
Lever A
Guide braid or banding so that edges are abutted as they meet
when passing under slot of foot.
HEAVY DUTY REVERSIBLE SEAM
Fig. 105. Invisible Seam in Horsehair
Fig. 106. Heavy Duty Reversible Seam
Use: All-purpose Throat Plate and Presser Foot
Central Needle Position
2 Bight
Above 12 Stitch
Lever A
For heavy duty, strain-proof seams, use double interlocked
seam, zigzagged on both sides. Turn under raw edge of one
section, and turn up raw edge of joining section. Interlock two
raw edges and zigzag across one seam on right side and across
other seam on wrong side, producing a double fell, doubly
reinforced, with elasticity against strain when wearing.
Page 66

STAYED SEAM FOR JERSEY OR CREPE
Fig. 107. Stayed Seam in Jersey
OVERLAPPED SEAM FOR INTERLINING
64
Seams in fabrics that stretch or bias seams in firm fabrics
are often stayed with seam tape for durability. Position
seam tape with edge exactly on seam line. If seam is
curved, shape seam tape by steaming at the ironing board.
Hand baste if necessary. Stitch with fine zigzag stitching.
Press seam open, after clipping on curve.
Use: All-purpose Throat Plate and Presser Foot
Central Needle Position
K to 1 Bight
12 to 25 Stitch
Lever A
The seams of an interlining are always overlapped to
avoid excessive bulk in a garment. Care must be taken to
use the full seam allowance. Stitch in the center of the
overlap with multiple stitch zigzag. Trim excessive width
from seam edges. This seaming is durable, flexible and
free of bulk.
Use: All-purpose Throat Plate and Presser Foot
Central Needle Position
5 Bight
12 Stitch
Lever B
Fig. 108. Overlapped Seam
for Interlining
Page 67

65
SEAIW FINISHES
TO OVERCAST OPEN SEAMS
Turn raw edge toward wrong side and, while stitching, let it pass
over flanged toe of All-purpose Presser Foot and through slot.
Guide material so that needle, when swinging to the right,
pierces material exactly at edge.
Use: All-purpose Throat Plate and Presser Foot
Central Needle Position
2 Bight
15 Stitch
Lever A
TO FINISH SEAMS IN TRICOT OR SHEERS
Step 1. Stitch seam with short straight stitching
using Straight Stitching Throat Plate and Straight
Stitching Presser Foot. Support material when
stitching as described on page 27.
Step 2. Finish seam edges together with stitching
controlled with the Blind Stitch Disc No. 3. Trim
seam allowance close to stitching. This finish pre
vents fraying and provides a fine smooth edge.
Use: (for seam finish) All-purpose Throat Plate
and Presser Foot
Central Needle Position
1 or 2 Bight
25 Stitch
Blind Stitch Disc No. 3
Fig. 109. Overcasting
Open Seams
Fig. 110. Finishing Seam in Tricot
Page 68

66
TO OVERCDGE SEAMS
Seam edges support the garment and should always carry a durable finish if fit is to be maintained
after long wearing. The stitch made with the Blind Stitch Disc is especially durable and free of
bulk when used as a seam finish.
When seam edges are pressed in the same direction, they are overedged together, and when
pressed open, they are overedged separately.
Use: All-purpose Throat Plate and Presser Foot
Central Needle Position
4 or 5 Bight
25 Stitch
__________
,
Blind Stitch Disc No. 3
Fig. 11.1. Overedging Seam Edges Together
Fig. 112. Overedging Open
Seams in Process
V V;V ¥ 'V ViV V V ¥V'i v ¥ V ¥ V
Fig. 113. Overedged Open
Seams—Completed
Page 69

67
TO MAKE BUTTONHOLES
Step 1. Marking the Material
Mark position and length of buttonholes with basting stitches (see Fig. 114) or marking
chalk.
Step 2. Setting the Machine
Use: All-purpose Throat Plate and Buttonhole Foot 86616 (see page 52)
Left Needle Position (see page 32)
Above 25 Stitch (Stitch on a scrap to attain close setting of stitches.)
2 Bight for Side Stitches of Buttonhole (Use intermediate bight regulator screw.)
4 Bight for Barring Stitches (Use maximum bight stop screw X)
0 Bight for Fastening Stitches
Lever A
NOTE: Bight settings of 2/^ for Side Stitches and 5 for Barring Stitches make slightly
heavier buttonholes.
Step 3. Guiding
With bight lever at 2, position the needle just left of central marking and stitch using
point of buttonhole foot as a guide to keep stitches just left of central marking. (Note
slot in buttonhole foot for drawing needle and bobbin threads through.)
CENTER LINE
OF BUTTONHOLE
r.
t
Fig. 114. Step 1.
Marking Location of
Buttonholes with
Basting Stitches
When needle has reached end of marking, leave needle in fabric at the point nearest
center as shown by A in the illustrations.
Lift foot and using needle as a pivot, turn work around clockwise, as indicated by
arrow B.
Page 70

68
C A
Fig. 116
Step 4
Fig. 117
Step 5
Step 4. Pivoting
Lower foot and take one stitch, leaving needle in material at point C.
Step 5. Barring
With bight lever at 4 take six stitches, leaving needle in fabric at point D at left.
Step 6. Finishing Buttonhole Edge
Fig. 118
Step 6
Return bight lever to 2 and stitch second side of buttonhole,
keeping point of buttonhole foot just left of central marking to
provide sufficient cutting space.
Stop within six stitches of end, leaving needle in fabric at point E
at outside marking. This point may be easily determined, while
stitching, by observing last stitch in first row at lower edge of
opening in buttonhole foot.
''TSKtr"'' '
Fig. 119
Fig. 120
Step 7
Step 7. Finishing Final Bar and
Fastening Stitch
With bight lever at 4 take six stitches
to complete final bar. Set bight lever at
0 and take three fastening stitches at F.
Gut buttonhole along line of center
marking.
Fig. 121
Page 71

Raised or Gimp Buttonholes
Fig. 122. Making
Gimp Buttonholes
69
Insert No. 8 pearl cotton or buttonhole twist
thread through eyelet in front of buttonhole
foot, as shown in Fig. 122 and proceed as for
regular buttonholes as instructed on pages 67
and 68.
£¿1776
Fig. 123. Gimp Buttonholes
Page 72

Fig. 124. To Lower
the Feed
70
TO SEW ON BUTTONS
Lower the feed by turning machine back on its hinges and loosening screw L3,
Fig. 124, turning it over to left (using a screwdriver, if necessary) as far as it
will go. Bring machine forward into place and move stitch regulator lever Q,
Fig, 40, page 28, to 0 position.
When regular sewing is resumed,
tighten feed throw-out screw L3,
turning it to right as far as it will go.
Use: All-purpose Throat Plate
Button Sewing Foot 189648
Left Needle Position
Approximately 3 Bight
0 Stitch
Lever A
Fig. 125. Sewing on Buttons
With bight at 0, position button, drop needle through center of left hole.
Then lower button sewing foot. Turn hand wheel over toward you until
needle rises. Set bight at approximately 3 or so that needle, on its right
swing, enters center of right hole. Then stitch. Needle should enter each
hole six times. To fasten stitch, set bight at 0 and take 3 stitches in left
hole of button.
TO SEW ON BUTTONS WITH THREAD SHANK
Follow steps outlined above and in addition, hold pin or needle between
holes in button to deepen stitches and provide thread shank. A long thread
shank results when the heavy end of sewing machine needle is used in
dace of a pin. Tighten needle thread tension if stitches appear to be
f
oosely set.
Will
Fig. 126. Sewing Buttons with
Thread Shank
Page 73

71
TO SEW ON SNAPS AND HOOKS AND EYES
No Presser Foot is used for sewing on snaps. Instead,
hold snap in place with tweezers, stiletto, or the point of
embroidery scissors.
Lower the feed as instructed on page 70.
Use: All-purpose Throat Plate
Left Needle Position.
0 Stitch setting
2 Bight
Lever A
£ZU39
Turn hand wheel over by hand to bring needle in position
Sewing on Snaps and Hooks and Eyes
Fig. 127
ready for its left swing. Center needle in first hole and
take 6 overedging stitches, leaving needle in hole at left
position on last stitch. Change bight to 0 and take 3 fasten
ing stitches. Carrying thread across snap, center needle in
next hole and change bight to 2. Take 6 over edging stitches, then returning bight to 0, take 3
fastening stitches. Continue this process with each hole.
The same procedure and settings are followed
when sewing on hooks and eyes except that
after taking 6 overedging stitches in first hole
of hook, leave needle in center of hole and
turn work so that next 6 overedging stitches
changing bight to 0, finish with 3 fastening
stitches.
Follow same procedure for sewing on eye,
taking 6 overedging stitches in first hole,
6 overedging stitches across to second hole,
6 overedging stitches to side of hole, and,
will carry across bar of hook, then proceeding
to second hole, take 6 overedging stitches and
changing bight to 0, finish with 3 fastening
stitches.
Page 74

BLIND STITCHED AND DECORATIVE HEMS
Fig. 128.
Blind Stitched Hem in Process
72
BLIND STITCHED HEMS WITH FOLDED EDGE
Blind Stitched hems are appropriate for curtains, draperies,
table linens and fabric furnishings. Fold, press and baste
hem, keeping basting stitches at least M" from upper fold
of hem.
Place hem against feed, turning the bulk of the work back
in a soft fold. Position needle into folded edge of the hem
near this soft fold. The Blind Stitch Disc produces four
straight stitches separated by a single sideward stitch to the
left. The sideward stitch should pierce the soft fold, result
ing in a Blind Stitched hem. The bight is regulated at 2 or 3,
depending on the weight and texture of the fabric.
The length of stitch regulates the distance between the
Blind Stitches.
Use: All-purpose Throat Plate and
Cording Foot (right toe) 160846
Central to Left Needle Position
2 or 3 Bight
12 to 25 Stitch
Blind Stitch Disc No. 3
CAUTION: Left needle position must be used when bight
3 or 4 is used with Cording Foot (right toe).
Fig. 129. Blind Stitched Hem Completed
Page 75

73
SHADOW HEMS FOR TRICOT
Baste hem one-half inch from top edge. Posi
tion under All-purpose Presser Foot and stitch
with 13^ to 2 Bight, 25 Stitch and Blind Stitch
Disc No. 3.
Trim raw edge near solid line of stitching. A
small stitch will he visible at regularly spaced
intervals on the right side of garment. To make
this stitch less apparent, reduce width of bight.
Fig. 130. Shadow Hem for Tricot in Process
Fig. 131. Shadow Hem in Tricot Completed
Use: All-purpose Throat Plate and Presser Foot
Central Needle Position
13^ to 2 Bight
25 Stitch
Blind Stitch Disc No. 3
Page 76

74
BLIND STITCHED HEM FINISHED WITH SEAM TAPE
Hems in skirts, dresses or coats have extra width at the top
of the hem which must be considered. When the garment is
flared or circular, there is more fullness in the hem than in
straight cut styles. This fullness must be controlled before
the hem is finished, if a smooth hem is to result.
After the length of the garment is marked, pin and baste
with silk thread one-quarter inch from crease of hem. Press,
to shape hem allowance, then measure and cut hem to
desired width.
Fig. 132. Seam Tape Basted to Hem
Edge Before Blind Stitching
Control fullness by placing a line of straight stitching onequarter inch from top edge of hem and draw bobbin thread,
easing fullness and shaping top of hem to garment. Steam
to shrink excess fullness.
Baste and stitch seam tape along this quarter inch control
thread. Hand baste through center of seam tape in prepara
tion for Blind Stitching.
Position hem against feed with inside of garment rolled to
the left to form a soft fold at basting line. Blind Stitch hem
with the machine equipped as follows:
Use: All-purpose Throat Plate and Presser Foot
Central to Left Needle Position
1 to 3 Bight
12 to 25 Stitch
Blind Stitch Disc No. 3
Fi^ 133. Blind Stitching Hem
Finished with Seam Tape
Page 77

75
BLENDED CIRCULAR HEM
Circular hems in heavy coatings are smoothly
finished, when the fullness is removed, by cut
ting away narrow wedges at regular intervals to
allow the hem to conform exactly to the shape
of the garment. The cut should not extend
beyond one inch from the lower fold of the
hem. Garments where this treatment is used
are usually lined and the lining is carried to
one inch from the edge.
Bring cut edges together and stitch with
Multiple Stitch Zigzag Disc. Should the fabric
be loosely woven, an underlay of thin lawn
may be used as a stay on the underside.
Use: All-purpose Throat Plate and Presser Foot
Central Needle Position
5 Bight
25 Stitch
Lever B
The edge of the hem is finished by over edging
with Blind Stitch Disc No. 3, 5 bight, and
25 stitch, as described on page 66.
Hand baste hem to garment three-eighths inch
Fig. 134. Blended Circular Hem
from top edge of hem. Place hem against feed
and turn garment to form a soft roll at basting
line as in Fig. 133, page 74.
Use: All-purpose Throat Plate
Cording Foot (right toe) 160846
Needle Position, slightly left of Center
2 to 3 Bight
Blind Stitch Disc No. 3
Page 78

Fig, 135, Applique Shadow Hem in Process
76
APPLiaUE SHADOW HEMS
Shadow hems are lovely for table linens of crisp
organdy or fine linen, as well as for dresses or aprons of
sheer, crisp fabrics. Baste hem to full depth of design,
corners mitred where necessary. Mark design on right
side. Draw filler cord through opening in front of
Satin Stitch Foot and follow design with fine, closely
spaced zigzag stitching. When applique is complete, cut
away surplus edge from wrong side close to stitching.
See Fig. 136 for threading of cord. Note that cord is
carried from the first thread
guide down between center and
front tension discs, but not
into take-up spring. Carry
cord into needle clamp thread
Fig, 137, Applique Shadow Hem Completed
guide and then through the
opening in the front of the
Satin Stitch Foot.
Use: All-purpose Throat Plate
Satin Stitch Foot 105251
Central Needle Position
1 Bight
Almost 0 Stitch
Lever A
Page 79

EMBROIDERED LACE OR VIENNA WORK
Fig, 138, Outlining Lace Motif with
Satin Stitch Foot 105251
77
Embroidered Lace or Vienna Work is charac
teristic of high-priced lingerie. Yet it may be very
quickly and easily accomplished with Satin Stitch
Foot, using fine rayon or silk crochet thread as
the filler cord to he covered. See page 76 for
threading of cord.
Use: All-purpose Throat Plate
Satin Stitch Foot 105251
Central Needle Position
1 Bight
Almost 0 Stitch
Lever A
Use wide lace edging with a definite floral design,
and baste into position, where desired, on right
side of fabric. First follow upper lines of motif
nearest edge, covering filler cord with tiny
stitches along lines of motif, and continuing in
an unbroken, continuous line. Then choose a
section of the motif nearest edge and fully outline
this separate motif, repeating at evenly spaced
intervals for length of the lace. Finally, remove
bastings, cut away surplus lace close to stitches
of corded outlines and, from wrong side of gar
ment cut away surplus satin along edge, close to
lines of cording.
.
w
s ' \
Fig, 139, Lace Motif Embroidered Into Satin
Page 80

78
SHELL STITCHED HEMS
Shell stitched hems provide a soft, ornamental
finish for delicate fabrics, particularly when
material is cut on the bias.
Lower shell hemmer over raw edge of fabric on
wrong side of material. Take one stitch, raise shell
hemmer. Draw the work back and cut threads.
Holding both ends of attached needle thread, lead
raw edge of fabric lightly into scroll of hemmer,
drawing on threads to carry it through. On reach
ing slot of hemmer, lower the needle into hem, then
lower hemmer and stitch.
Use:
All-purpose Throat Plate
Shell Hemmer 189653
Central Needle Position
5 Bight
8 Stitch
Lever A or B, Blind Stitch
Disc No. 3 or Shell Edge
Disc No. 7
Many variations of the soft
Fig. 141
Shell Stitched Hem in Process
The automatic stitch designs lend further variation and interest to
shell hems.
The shell hems illustrated are stitched with Blind Stitch Disc at 3 bight
and 25 stitch (Fig. 142), and with Multiple Stitch Lever B at 5 bight
and 25 stitch (Fig. 143).
scallop may be obtained by
using different stitch settings
and threads.
Fig. 140. Leading Raw Edge Into Scroll of Shell Hemmer
¿'^3443
Fig. 142 Fig. 143
Completed Shell Hems
Page 81

79
SATIN STITCHED SCALLOPS
Satin stitched scallops provide a beautiful and
durable finish for household linens as well as
for wearing apparel.
Prepare the work for satin stitching by using
a double thickness of fabric stayed with crino
line or organdy, or a single thickness backed
with paper. Trace scallops in position, allowing
a sufficient margin of fabric (about 2 inches),
at right to grasp with right hand in guiding
scallops. If, when cutting, sufficient length
were not allowed, machine baste a piece of
same fabric, or stay fabric just outside marked
line of scallop.
Fig. 144. Satin Stitching Scallops
Use a size 11 needle, 50 embroidery or silk
thread, very light upper tension and medium
light bobbin tension and most important,
the Pressure on the Presser Foot must be
set as light as possible so that the fabric can be
moved from right to left while satin stitch is
being made. The fabric remains straight at all
times in line with the feed. Scallops are fol
lowed without turning by lightly moving the
work, to right or left, so that the needle on its
right swing follows the marking for the scallop.
This will maintain parallel stitches, evenly
spaced, automatically producing the effect of a
narrower stitch at the point between scallops
and widening to full depth at the arc.
Use: All-purpose Throat Plate
Satin Stitch Foot 105251
Central Needle Position
Almost 0 Stitch
5 Bight
Lever A
Light Pressure
Page 82

80
TO CORD SCALLOPS
A finely corded edge is added to complete satin stitched
scallops and to finish the edge. Lead heavy duty thread as
a filler into eye of Satin Stitch Foot and carry it through
and under foot. See page 76 for threading the filler
thread. Position needle close to edge of scallop, lower foot
and stitch close to scallop, covering filler cord with
closely spaced stitches, crowding against scallop all along
the way.
If scallops border a hem, cut away surplus of hem on
wrong side close to inside of scallop. If scallops form an
.t' ' JFSSk\ . s 'I jmf %
edge, cut away surplus border close to cording stitches on
outside of scallop, at the same time cutting away founda
tion crinoline or organdy.
Fig, 145. Cording the Scallops
R
Fig, 146, Trimming Scalloped Edge
Use: All-purpose Throat Plate
Satin Stitch Foot 105251
Central Needle Position
1 Bight
Almost 0 Stitch
Lever A
Medium Pressure Adjustment
Page 83

Fig. 147. Following Drawn Thread
with All-purpose Presser Foot
81
FRINGED EDGES
Use: All-purpose Throat Plate
and All-purpose
Presser Foot
Right or Left Needle
Position
2 Bight
12 to 25 Stitch
Lever A
Blind Stitch Disc No. 3
Draw a thread marking
depth of fringe. Stitch
along this line. Beginning
at raw edge, draw out
threads up to stitched line.
Fig. 148. Wide Hemstitching
Fig. 149. Blind Stitch Used for
Fringed Edge
Wide hemstitching is done in same manner as fringed edges,
except that threads are drawn to mark width of hemstitching.
When using Blind Stitch Disc, stitch to complete one side of
hemstitching. Turn fabric and stitch second side, matching
stitches. Then draw remaining center threads between rows of
stitching.
Lever A or Blind Stitch Disc No. 3 are equally effective to use for
fringed edges and wide hemstitching.
Page 84

ADJUSTING
LUG
OUTSIDE
SLOTS FOR
DIFFERENT
WIDTHS OF
FOLDED
BINDING
CENTER SLOT
OF SCROLL
EDGE GUIDE
FOR PIPING
ONLY
SCROLL FOR
UNFOLDED
BINDING
82
BIAS BOUND EDGES
The Multi-slotted Binder is provided with a wide throat to
accommodate zigzag as well as straight stitching. Zigzag stitched
binding affords an elastic and durable flat finish for curved, scal
loped or pattern edges. The Binder will apply prefolded bias
binding in sizes 1, 2, 3, 4 and 5, as well as self-fabric bias cut to
1^6 inch width. Bindings are fed through slots of corresponding
size'in the Binder scroll.
Use: All-purpose Throat Plate and Multi-slotted Binder
Central Needle Position
2 to 5 Bight
12 to 8 Stitch
Lever A
Fig.150. Multi-slotted Binder
Fig. 151. Applying Binding to Garment
To thread Binder, cut binding to a long point from
edges to center fold as shown in Fig. 152.
Insert pointed end of binding into appropriate slot
for its width and pull binding through until the
evenly folded edges are under needle.
Slip free length of binding between two upright pins
which act as a guide for lightly feeding binding into
Binder while it is being stitched. Place raw edge to
be bound as far to right as it will go into mouth of
scroll, guiding fabric lightly from back of Binder
and to the left, permitting unfinished edges to
swing naturally into scroll of Binder.
Fig. 152
Page 85

83
BINDING CURVED EDGES
Never pull bias binding while it is being fed through
Binder. The tape will narrow as it stretches thus
causing needle to miss the fold. Turn material slowly
when binding around curves to ensure stitching
through fold.
The scroll can be adjusted to right or left to make
needle catch edges of the fold.
PIPING AND BINDING IN ONE OPERATION
m F'
.............
Fig. 153. Binding Curved Edge
When piping and binding at the same
time, insert narrower width of binding
first, then insert wider width. Two con
secutive widths should not be used at
the same time. Widths 2 and 4, 3 and 5
or 2 and 5 are used in combination. Use
upright guide pins for wider binding.
Piped binding is very effective when
piping is in contrast to both the bound
edge and the garment and when it is
stitched in contrasting color.
Fig. 154. Piped Binding
Page 86

€2Z4f.t
Fig. 155. Applying Unfolded Bias
Binding with Straight Stitch
84
SELF FABRIC BIAS BINDING
Self fabric bias binding should be cut wide on the true bias.
Insert this unfolded binding directly into two folds of scroll as
shown in Fig. 155 and draw it back, folded by the scroll, under
the Binder. Adjust position of scroll so needle enters folded
edge of binding above and below garment, lower Binder, and
stitch. If preferred, a straight stitch may be employed for bind
ing instead of zigzag stitch. For straight stitching, set bight lever
at 0. All other operations are same as for binding done with
zigzag stitches.
NET BOUND SEAMS
Delicate fabrics that fray easily, like chiffon, velvets, sheer
metallics, etc., may have .seam edges bound with nylon net.
Cut net into Yi" wide strips and insert, unfolded, into slot
5 of Binder.
Fig. 156
Fig. 157
Bias gauge, shown above, may be
purchased at your SINGER
CENTER, for cutting bias strips
from Jie" to IVs' wide.
Use:
Central Needle Position
2 Bight
12 to 25 Stitch
Lever A
Feed seam edges into
Binder with napped or
right side up. This will
insure against fraying
without adding bulk.
Fig. 158. Net Bound Seams for
Velvets or Sheer Metallics
Page 87

85
DECORATIVE BOUND EDGES
Bindings are given added interest when stitched with
decorative automatic designs. Merely select the disc,
regulate stitch length, hight and needle position and
stitch as easily as if stitching straight.
Use: All-purpose Throat Plate
Multi-slotted Binder
Central Needle Position
3 Bight
Above 25 Stitch
Fig. 159—Lever B
Fig. 160—Blind Stitch Disc No. 3
Use: All-purpose Throat Plate
Multi-slotted Binder
Central Needle Position
5 Bight (Arrowhead)
3 Bight (Domino)
25 Stitch
Fig. 161—Arrowhead Disc No. 5
Fig. 162—Domino Disc No. 6
When piping and binding in one operation, unusual
effects are obtained by stitching with contrasting thread
while using one of the many suitable automatic stitch
patterns. The Blind Stitch (see Fig. 163) and Domino
stitch (see Fig. 164) patterns are especially suitable
when set for a 3 bight and 25 stitch.
Fig. 159 Fig. 160
Bindings with Designs made with
Lever B and Disc No. 3
Fig. 161 Fig. 162
Bindings with Designs made with
Discs No. 5 and No. 6
E23'M3
Fig. 163 Fig. 164
Piping and Binding with
Discs No. 3 and No. 6
Page 88

86
CORDED EDGES WITH FABRIC COVERED CORD
Use: All-purpose Throat Plate, or
Straight Stitching Throat Plate
Central Needle Position
0 Bight
Cording Foot (Left Toe) 160845
Cording Foot (Right Toe) 160846
To cover Cord cut bias strip twice the width of the seam
allowance plus cord. Fold bias over cord, raw edges even,
and position needle close to cord, but not into it, and lower
Cording Foot (Left Toe). Stitch, guiding the edge of the
Fig. 165. Covering Cord with Cording Foot
{Left Toe)
foot next to the cord, but do not crowd the foot against it.
Machine Baste Cord to right side of garment using
Cording Foot (Right Toe).
Apply facing and position under needle, with facing next
to feed and garment next to foot, so that basting stitch will
be in view. Stitch, this time crowding the foot against
the cording and making stitches between the basting and
the cording.
Before turning work, blend seams by cutting away seam
allowances, the bias to 3^" and the garment and facing
to M".
Corded seams and edges lend smartness to tailored gar
ments. Cushion covers and slip covers are usually finished
with corded seams. The cording feet are essential for making
E25803
corded seams and edges and have many applications in
addition to stitching zippers and hems.
Fig. 166. Machine Basting
Covered Cord to Garment
Page 89

87
SCALLOPING
SCALLOPED EDGES
£23824
Fig. 167. Scalloped Edge in Process
Use: All-purpose Throat Plate and
All-purpose Presser Foot
Central Needle Position
5 Bight
12 to 25 Stitch, as desired
Lever C
When the Scallop Disc is in use, the needle moves to
form a scallop while the fabric moves in a straight line
under the presser foot. The depth of the scallop is con
trolled by the bight setting. A 5 bight produces a scallop
approximately deep and each bight setting of less
than 5 produces a correspondingly narrower scallop.
The length of scallop varies with the stitch length. A
12 stitch and a 5 bight produce a scallop approximately
IM" in length, a 25 stitch and 5 bight give approxi
mately a scallop, while a stitch length above 25
produces a scallop of in length or less depending
upon the stitch.
A single straight stitch separates each scallop providing
space for cutting when the seam edges are trimmed and
turned to form the finished, faced scallop edge.
Scalloped edges are used extensively on blouses, dresses
and on children’s wear.
Stitch in the same way as when making a straight seam.
The garment section will pass straight under the
presser foot while the needle follows a scallop pattern.
Trim seam allowance to less than 3^" and clip into each
point between scallops.
Blend this narrow seam by clipping small wedges at
regular intervals. When the scallop is turned, the
seamed scallop edge will have a smooth even contour.
Fig. 168. Scalloped Edge Completed
Page 90

Fig, 169. Scalloped Tucks
88
SCALLOPED TUCKS
Scalloped Tucks are formed in the same manner as the
scalloped edge. In planning, added width of at least
must be allowed for seaming and trimming the scallop.
Form scallops first, then turn and stitch tuck with
straight line of stitching spaced as desired.
________
£23d2*
SHADOW SCALLOPING WITH TWIN NEEDLES
Sheer fabrics are well suited to shadow scalloping. Limit bight
to 3 and set machine at central needle position. Insert twin
needles as described on page 43 and replace presser foot with
satin stitch foot. Loosen needle thread tension slightly and set
desired stitch length between 12 and 25. If several rows are
used, start each row with the stitch pattern beginning at the
same point. Should fabric be soft, use an underlay of fine
organdy and trim away closely at line of stitching.
Shadow scalloping is attractive by itself or in combination with
scalloped tucks on blouses, dresses and children’s clothes.
EtS&ZJ
Fig. 170. Shadow Scalloping
Page 91

E2^5
89
MONOGRAMS
Attractive variation is given simple mono
grams when one or more automatic stitch
patterns are introduced. Select a monogram
from the many transfer designs available or
sketch one to suit your purpose.
Back fabric with tarlatan, crisp lawn or
organdy. Trace or stamp design on right side
of material. Cut away backing when stitching
has been completed.
The monograms on this page are suggestive of
the wide range and many variations which can
be achieved.
£23629
Fig. 171
Fig. 173
Fig. 174
Fig. 172
mm
Fig. 175
Page 92

90
SCRIPT STITCH
Do not lower the feed.
Use: Embroidery Plate No. 189632 (Page 52) 3 Bight
No Presser Foot 0 Stitch
Central Needle Position Lever A
Script stitch is most effective for marking baby blankets,
children’s wear, household linens, lingerie or accessories.
After tracing or marking lettering on right side of fabric,
Fig. 176. Script Stitching with Hoops
the needle and follow the outline traced. Should thread breakage occur, check setting of needle,
decrease tension and use crisp lawn or organdy as an underlay.
place in embroidery hoops large enough to encompass
word or initials to be worked, with right side inside hoops.
Place work under needle, lower the presser bar, position
SHADOW MONOGRAM
Shadow monograms have a dimensional appeal accomplished
with threads of different colors or shades and with twin needles.
Proceed as for script stitch. Limit bight to 3 or less and use
a needle thread tension slightly lighter than for script stitch.
Stitch more slowly when crossing one line of stitching over
another. Where lines cross, stitch the first line less dense and
allow the second line of stitching to be more prominent.
Move embroidery hoops in forming letters so that most of the
motion is away from you. Move hoops with the stroke of the
needle, taking care not to bend or deflect needles.
Shadow monograms are equally appropriate for linens and
wearing apparel. Fig. 177. Shadow Monogram
Page 93

Fig. 178
91
DESIGNS AND MOTIFS
A touch of stitching, smartly placed, is subtle and fashion wise.
The motifs illustrated on these pages are examples of stitching
accomplished with a combination of several discs from simple
original designs. When used on a collar point, tie, tab or pocket
they add smartness and individuality. For Fig. 178,
Use: All-purpose Throat Plate
Satin Stitch Foot 105251
Central Needle Position
3 Bight for lines and
5 Bight for Arrowheads
Almost 0 Stitch
Lever A
Arrowhead Disc No. 5
Stitch lines first, add arrowheads. Stitch on a scrap of fabric until the
arrowhead is completed and the needle is ready to take the last centrally
located stitch at the point. Position needle in the center of the bar of
stitching, lower foot and stitch slowly, completing the number of
arrowheads desired.
For Fig. 179, equip machine as indicated above and in addition to the
Arrowhead and Zigzag, use the Multiple Stitch Zigzag at a 5 bight and
almost 0 stitch length.
£23833
Fig. 179
Page 94

92
£23635
Fig, 180
Fig. 181
The Zigzag and Arrowhead stitches are used to
form the design in Fig. 180.
Classic designs, such as the one in Fig. 181,
are smart when used singly or in groups. The
Zigzag and Domino stitches are used, following
simple, straight lines.
The star of arrowheads in Fig. 182 is formed
with the Arrowhead stitch by stitching from
the center outwardly.
The leaf motif in Fig. 183 is attractive for
creating an embroidered fabric to complement
a plain fabric. The Banner Stitch (Disc 10) is
used at a 5 bight for the outer edges and the
Zigzag (Lever A) at a 1 and 2 bight for
center lines.
Fig. 182
Fig. 183
Page 95

93
BORDER DESIGNS
Unlimited variation and expression are possi
ble in border designs when several stitch pat
terns are used in combination. The width and
density of the border can be varied according
to the application. In addition to the suita
bility of such stitching for linens, draperies
and apparel as border designs, it is effective on
plain fabrics to simulate striped or plaid
effects. A popular application of these designs
is for pockets, yokes, cuffs and applied bands.
Three Discs are used in forming the border
design in Fig. 184. After stitching the rows of
scalloping with a 5 bight, and above 12
stitch length, satin stitched bars are made
with Zigzag Disc, 3 or 4 bight and almost 0
stitch across points between scallops. Arrow
heads accent each solid bar of stitching at
5 bight and almost 0 stitch.
The Scallop and Arrowhead stitches are used
to form the attractive design in Fig. 185. Two
lines of scallop stitching—bight 5, and stitch
above 25—are crossed by groups of arrow
head stitching—bight 5, stitch almost 0.
Lace insertion and edging are cleverly applied
with any of the many stitch designs. Fig. 186
illustrates the use of the Solid Scallop Disc 8
at 5 bight and almost 0 stitch length.
Fig, 184
£23636 185
Fig, 186
Page 96

Border designs such as the one
illustrated in Fig. 187 are made by
using a combination of stitches.
The center line is Zigzag Satin
Stitch with Zigzag Point on each
side. The outer lines are made of
the Ball Stitch, open Zigzag and
Solid Scallop. Innumerable com
binations are possible with the 319
Machine.
94
Fig. 188
Fig. 187
7^9
Velvet ribbon complements the
Domino Stitch for a bold accent on
dresses or leisure costumes. See
Fig. 188. The velvet ribbon is
carefully machine basted in place
before the Domino Stitch is added.
Page 97

95
BUTTONHOLE POCKETS
Buttonhole pockets accented with stitched designs are
effectively made on the SINGER Automatic Machine.
Appropriate for dresses of tailored and classic style as
well as for blouses, shirts and sportswear, these
pockets are simple to make and are sturdy and durable.
Mark position of pocket opening with a basting line
and the design for stitching with a fine chalk line. A
backing of lawn, organdy or muslin provides the body
and firmness desirable when satin stitching is used.
Fig. 189. Step 1 of Pocket in Process
The pocket design illustrated in Fig. 189 is stitched
using the Zigzag Stitch while the machine is set for a
3 bight and almost 0 stitch. The Arrowhead Stitch
is used with the machine regulated for a 5 bight and
an almost 0 stitch. Trim backing away along outside
of stitching when design is completed.
Locate pocket section on underside of garment and
from the right side, using Buttonhole Foot 86616,
a 2M bight, and an almost 0 stitch. Proceed as for
making buttonholes, eliminating the reinforcement
bars of stitching at each end. Cut between bars of
stitching to form pocket opening as was done in
Fig. 190.
Fig. 190. Step 2 of Pocket in Process
Page 98

Fig. 191. Underside of
Completed Pocket
96
Bring pocket sections together and seam with straight stitching.
Finish seam with Zigzag stitching to stay edges and prevent
fraying. Fig. 191 shows the underside of the completed pocket.
Place Arrowheads at each end of the bars of stitching from right
side of garment to reinforce ends of opening and to complete
pocket as shown in Fig. 192.
Simple, graceful designs are best for decorative pockets. The
styling of the garment will often suggest a line that can be
repeated to form the basis of the pocket design. The machine
itself will suggest variations in design that are original and
interesting, such as the design shown in Fig. 193.
Fig. 192. Right Side of Completed Pocket
£34159
Fig. 193. Decorative Pocket
Page 99

97
BRAIDING WITH GIMP
Use: All-purpose Throat Plate
Satin Stitch Foot 105251
Needle Position slightly right of center
1 Bight
12 to 25 Stitch
Blind Stitch Disc No. 3
Gimp yarns, available in various sizes in needlework
departments, afford an interesting treatment when
used as braid. The plain zigzag or the blind stitch can
be used, depending on the effect preferred.
Trace design on right side of fabric. Pass gimp through
eye of the Satin Stitch Foot. The needle position and
bight may be varied slightly from the above settings to
accommodate any one of several sizes of gimp yarn.
When design is completed draw ends of gimp to the
back of fabric through an opening in the weave punc
tured with a stiletto or coarse needle. Fasten gimp
with hand stitching against the underside of the
design for about an inch.
Braiding with rayon or metallic gimp is attractive on
synthetics, woolens, felt or heavy silk.
NOVELTY BRAIDING
Bold, interesting effects result from the use of auto
matic stitch patterns in combination with novelty
yarns. Straw yarn is cleverly applied with the domino
stitch. Two strands are held under the Satin Stitch
Foot. Long yarn ends are allowed at intervals in the
design to form tufts. Trim and brush yarn to give the
effect illustrated.
Use: All-purpose Throat Plate
Satin Stitch Foot 105251
5 Bight
Above 25 Stitch
Domino Disc No. 6
Novelty effects with yarns are attractive for fabric
furnishings and play clothes. Many clever trimmings
are possible by varying the yarn and design as well as
the stitch pattern.
Fig. 195. Novelty Braiding with Straw Yarn
amr
Page 100

98
APPLIQUE
to dull crepe to create beauty and interest by
contrast in texture. Print fabrics are some
times applied to plain fabrics in dresses,
children’s clothes, play clothes or linens, for
accent. In draperies, motif and border prints
may be applied to plain fabric of similar tex
ture. When large motif designs are used in
applique, the lines or sections of the design
are frequently accented by continuing the
stitching around these sections to bring out
the design. In fabric furnishings such design
sections are frequently padded to further
accent the design and to give it a dimensional
Fig. 196
Applique is eifective on many types of apparel
and fabric furnishings. Fabrics of like textures,
as well as fabrics of different textures and
weaves, are often used in appliqueing. For
example, in lingerie, lustrous satin is appliqued
quality. Shadow applique on sheer fabrics is an
important variation of plain applique and is
described on page 76.
After stitching, portions of the design are cut
away giving shadow contrast between portions
of the design having double and single
thickness.
Bold monograms of contrasting fabrics may be
applied to bedspreads, blanket covers or other
furnishings for the home.
 Loading...