

Page 1
SSW 812
TR
‹th. Firma : DE‹MA ELEKTROMEKAN‹K ÜRÜNLER‹ ‹Nfi. SPOR MAL.
‹MALAT SAN. VE T‹C. A.fi.
Adresi : fieyh Sinan Mah. Tekirda¤ Yolu Üzeri Karatepe Mevkii
Çorlu/TEK‹RDA⁄
Tel. : 0 282 654 25 09
0 282 652 49 61
Fax : 0 282 652 49 62
Yetkili Kifli
Kafle-‹mza :
Mal›n Cinsi : Dikifl Makinesi
Bakanl›kça Belirlenen Kullan›m Ömrü 10 Y›ld›r.
CE Belgesi Var.
CE Belgesi Veren Kurluflun;
Bel. Veren : TÜV Product Services
Adresi : Am Grauen Stein D-51105 Köln Germany
Belge No. : AE 50079382 0001
SATICI F‹RMA
‹MZA KAfiE TEL:
D‹K‹fi MAK‹NES‹ KULLANIM KILAVUZU
SEWING MACHINE • MACHINE À COUDRE • NÄHMASCHINE
NAAIMACHINE • FOLOSITI MASINA
INSTRUCTION MANUAL • MODE D’ EMPLOI
BEDIENUNGSANLEITUNG • GEBRUIKSAANWIJZING
INSTRUCTIUNI DE FOLOSIRE
GB
D
F
N
- 83 -
RO
Made in P.R.C.
for Turkey
Page 2

TÜRKÇE
D‹K‹fi MAK‹NES‹ KULLANIM KILAVUZU
De¤erli Müflterimiz,
Ürün seçiminizde Sinbo’yu tercih etti¤iniz için teflekkür ederiz.
Uzun ve verimli bir kullan›m için cihaz› kullanmadan önce bu k›lavuzu okuman›z› ve devaml›
suretle saklaman›z› tavsiye ederiz.
Sayg›lar›m›zla,
Sinbo Küçük Ev Aletleri
ÖNEML‹ GÜVENL‹K UYARILARI
1. Cihaz› kullanmadan önce kullan›m k›lavuzundaki tüm talimatlar› dikkatli bir flekilde okuyun, güvenlik uyar›lar›na
dikkat edin ve bu talimatlar› saklay›n.
2. Dikifl makinesi, fifli tak›l› haldeyken kesinlikle gözetimsiz b›rak›lmamal›d›r.
3. Cihaz› kullanaca¤›n›z yerin voltaj›n›n ürünün üzerinde belirtilen voltajla uyumlu olup olmad›¤›n› kontrol ediniz.
4. Dikifl makinesini kulland›ktan hemen sonra ve temizlemeden önce, cihaz›n fiflini prizden mutlaka ç›kar›n.
5. Elektrik aksam›n›n bulundu¤u bölümü söküp açmaya u¤raflmay›n.
6. Cihaz› sabit olan yüzeylerde çal›flt›r›n›z. Çal›fl›rken hareket ettirmeyin.
7. Cihaz ev kullan›ma uygun olup d›fl mekanlarda kullan›lmaz.
8. Makinenin ampülünü de¤ifltirmeden önce makinenin fiflini mutlaka ç›kar›n ve 15 W ile ayn› tip de¤erdeki bir ampül
ile de¤iflim yap›n.
9. Cihaz›, hasarl› kablo veya fifl ile, herhangi bir flekilde ar›zalanm›fl ise çal›flt›rmay›n.Cihaz›n tamiri için en yak›n
yetkili servise baflvurun.
10.Çocuklar›n, cihaz› kullanmas›na izin vermeyin ve gözetimsiz b›rakmay›n.
11.Bu k›lavuzda yeralan, sadece üretici firman›n önerdi¤i aksesuarlar› kullan›n.
12.Kontrol, onar›m, elektriksel veya mekanik ayarlama için dikifl makinesini en yak›n servis merkezine götürün.
13.Dikifl makinesini, herhangi bir hava aç›kl›¤› t›kal› flekilde kesinlikle çal›flt›rmay›n. Dikifl makinesinin vantilatör
aç›kl›klar›nda ve ayak kumandas›nda iplik, toz veya kumafl parças› birikmemesine dikkat edin.
14.Makinenin aç›kl›klar›ndan içeri yabanc› madde düflürmeyin veya sokmay›n.
15.Bu makineyi, aerosol (sprey)ürünlerinin kullan›ld›¤› yerlerde çal›flt›rmay›n.
16.Ba¤lant›y› kesmek için, önce dikifl ›fl›¤›n› « O » konumuna getirin, sonra cihaz›n fiflini prizden ç›kar›rken,fiflten
tutarak çekip ç›kar›n.
17.Parmaklar›n›z› hareketli parçalardan uzak tutun. Dikifl makinesinin i¤nesi etraf›nda özel dikkat gerekir.
18.Her zaman uygun i¤ne platformu kullan›n. Yanl›fl platform, i¤nenin k›r›lmas›na neden olabilir.
19.E¤ri i¤ne kullanmay›n.
20.Dikifl dikerken, kumafl› itmeyin veya çekmeyin. Bu durum, i¤neyi
- 1 -
‹THALATÇI / ‹MALATÇI
F‹RMA VE ADRES‹:
IMPORTER / EXPORTER
CONTACT
DE ‹MA
ELEKTROMEKAN‹K ÜRÜNLER ‹NfiAAT
SPOR MALZEMELER‹ ‹MALAT
SAN. VE T‹C. A.fi.
fieyh Sinan Mahallesi Tekirda¤ Yolu Üzeri
Karatepe Mevkii Çorlu/TEK‹RDA⁄
Marka:
Cinsi: D‹K‹fi MAK‹NES‹
Modeli: SSW-812
BELGE ‹Z‹N TAR‹H‹ : 01/02/2008
BELGE NO. : 47920
GARANT‹ SÜRES‹ : 2 YIL
AZAM‹ TAM‹R SÜRES ‹: 30 ‹fi GÜNÜ
Bu garanti belgesinin kullan›lmas›na 4077 say›l›
kanun ile bu kanuna dayan›larak düzenlenen
garanti belgesi uygulama esaslar›na dair
tebli¤ uyar›nca TC Sanayi ve Ticaret Bakanl›¤›
Tüketicinin ve Rekabetin Korunmas› Genel
Müdürlü¤ün’ce izin verilmifltir.
- 82 -
GUARANTEE
GARANT‹ fiARTLARI
1. Garanti süresi, mal›n teslim tarihinden itibaren
bafllar ve 2 y›ld›r.
2. Mal›n bütün parçalar› dahil olamak üzere tamam›
Firmam›z›n garantisi kapsam›ndad›r.
3. Mal›n garanti süresi içerisinde ar›zalanmas›
durumunda, tamirde geçen süre garanti süresine
eklenir. Mal›n tamir süresi en fazla 30 ifl günüdür. Bu
süre, mala iliflkin ar›zan›n servis istasyonuna, servis
istasyonunun olmamas› durumunda, mal›n sat›c›s›,
bayii, acentas›,temsilcili¤i, ithalatç›s› veya
imalatç›s›-üreticisinden birisine bildirim tarihinden
itibaren bafllar. Mal›n ar›zas›n›n 15 ifl günü içerisinde
giderilmemesi halinde, imalatç›-üretici veya ithalatç›;
mal›n tamiri tamamlan›ncaya kadar, benzer özelliklere
sahip baflka mal› tüketicinin kullan›m›na tahsis etmek
zorundad›r.
4.Mal›n garanti süresi içerisinde, gerek malzeme
ve iflçilik, gerekse montaj hatalar›ndan dolay›
ar›zalanmas› halinde, iflçilik masraf›, de¤ifltirilen
parça bedeli ya da baflka herhangi bir ad alt›nda
hiçbir ücret talep etmeksizin tamiri yap›lacakt›r.
5.Tüketicinin onar›m hakk›n› kullanmas›na ra¤men
mal›n;
-Tüketiciye teslim edildi¤i tarihten itibaren, belirlenen
garanti süresi içinde kalmak kayd›yla,bir y›l içerisinde;
ayn› ar›zan›n ikiden fazla tekrarlanmas› veya
farkl› ar›zalar›n dörtten fazla meydana gelmesi veya
belirlenen garanti süresi içerisinde farkl› ar›zalar›n
toplam›n›n alt›ndan fazla olmas› unsurlar›n›n yan›s›ra,
bu ar›zalar›n maldan yararlanamamay› sürekli k›lmas›,
-Tamiri için gereken azami sürenin afl›lmas›,
-Firman›n servis istasyonunun, servis istasyonunun
mevcut olmamas› halinde s›rayla sat›c›s›, bayii,
acentesi temsilcili¤i, ithalatç›s› veya
imalatç› - üreticisinden birisine düzenleyece¤i raporla
ar›zan›n tamirine mümkün bulunmad›¤›n›n
belirlenmesi,durumlar›nda, tüketici mal›n ücretsiz
de¤ifltirilmesini, bedel iadesi veya ay›p oran›nda bedel
indirimi talep edebilir.
6.Mal›n kullanma k›lavuzunda yer alan hususlara
ayk›r› kullan›lmas›ndan kaynaklanan ar›zalar garanti
kapsam› d›fl›ndad›r.
7.Garanti Belgesi ile ilgili olarak ç›kabilecek sorunlar
için Sanayi ve Ticaret Bakanl›¤› Tüketicinin ve
Rekabetin Korunmas› Genel Müdürlü¤ü’ne
baflvurulabilir.
Page 3
döndürerek k›r›lmas›na neden olabilir.
21.‹¤ne bölgesinde i¤neye iplik geçirmek, i¤neyi de¤ifltirmek, makaraya iplik takmak veya bask› aya¤›n›
de¤ifltirmek gibi ifllemler ve ayarlamalar yaparken makineyi kapat›n.
22.Kapaklar› ç›kar›rken, ya¤lama yaparken veya bu kullan›m k›lavuzunda bulunan herhangi bir di¤er ayarlama
ifllemi yaparken dikifl makinesinin fiflini mutlaka prizden ç›kar›n.
1.BÖLÜM
Teknik Özellikler
ZONGULDAK-EMEK ELEKTRON‹K-YAS‹N AYVAZ
PAP‹LA ‹fiHANI NO:10
(0372) 251 67 31
UfiAK-YALÇIN ELEKTRON‹K-‹SMA‹L YALÇIN
‹SL‹CE MH.YILDIRIM BEYAZIT CD.NO:22
(0276) 212 18 26
TRABZON-ÇIRAK TEKN‹K-YETER ÇIRAK
FAT‹H MH. AYASOFYA CD. NO:57 MERKEZ
0462 229 66 44
TRABZON-STAR ELEKTRON‹K-HAL‹L ER
‹NÖNÜ MAH. BORA SOK. NO:17
0462 230 62 02
TRABZON-YETSAN ELEKTRON‹K-AL‹ HAYDAR YILMAZ
FAT‹H MAH. FAT‹H CAD. NO:2/B
0462 223 15 04
fiIRNAK-ABAY ELEKTRON‹K-MESUT ABAY
2.CD.S‹EMENS BAY‹‹ KARfiISI S‹LOP‹
fiIRNAK-SERDAR ELEKTRON‹K-‹SMA‹L SAYRAÇ
fiAH MH.NURULLAH CD. NO:26 C‹ZRE
0486 616 16 06
fiIRNAK-ÜRÜN ELEKTRON‹K-HÜSEY‹N ÜRÜN
CUMHUR‹YET CD. PTT YANI ULUDERE
0486 351 28 22
SAMSUN-GÜNEY T‹CARET (ELEKTR‹KL‹)-YUSUF GÜNEY
EM‹R EFEND‹ MAH. EMN‹YET SOK. NO:16/C BAFRA
SAKARYA-ÇINAR ELEKTRON‹K-‹BRAH‹M ÇINAR
KÖMÜRPAZARI CAD.NO13 SAKARYA
0264 271 39 12
R‹ZE-CEVAH‹R ELEKTRON‹K-KAZIM CEVAH‹R
TOPHANE MAH. ATATÜRK CAD. ‹fi PSJ.
0464 213 16 17
UfiAK-ATAK ELEKTRON‹K-BAYRAM ATAK
DURAK MH.AKBUR SK.NO:55/A UfiAK
0486 518 50 99
TEK‹RDA⁄-FULL TEKN‹K-MUSTAFA UÇKUN
MUH‹TT‹N MH. F‹K‹R SK. NO:12/B ÇORLU
0282 652 28 68
TEK‹RDA⁄-ÇA⁄RI ELEKTRON‹K-MEHMET ÖZDEM‹R
U⁄URMUMCU CAD.NO:26/3 ÇERKEZKÖY
(0362) 532 26 03
SAMSUN-ÖZKAN ELEKTRON‹K-HÜSEY‹N ÖZKAN
ORTA MH. TUNCAY KOCABAfi SK. NO:85 ÇARfiAMBA
(0362) 832 28 90
SAMSUN-DEN‹Z ELEKTRON‹K-SABR‹ ARSLAN
KAD‹KÖY MH.OSMAN‹YE CD.NO:68
VAN-ÖZ USTA TAM‹RAT-BURHAN AYDIN
KÜLTÜR MERKEZ‹ C‹VARI DEM‹RC‹LER 1.SK NO:1/C
0432 216 3458
VAN-TUNCAY ELEKTRON‹K-FAT‹H TUNCAY
0276 227 34 60
UfiAK-KUPLAY ELEKTRON‹K-‹BRAH‹M KUPLAY
ÜNALAN MH. ZÜBEYDE HN. CD.NO:2/D MERKEZ
0276 223 13 13
0282 726 36 86
TEK‹RDA⁄-FULL TEKN‹K-MUSTAFA UÇKUN
MUH‹TT‹N MH. F‹K‹R SK. NO:12/B ÇORLU
0282 652 28 68
SAMSUN-ÖZÇEV‹K T‹CARET-HAYR‹ ÖZÇEV‹K
Ç‹FTL‹K MAH. HAKKI BEY CAD. NO:107
0362 231 00 97
0362 432 44 80
VERG‹ DA‹RES‹ ARKASI SARIMURAT SK.NO:28 MERKEZ
TEK‹RDA⁄-ARI ELEKTRON‹K-HAKAN ARI
AYDO⁄DU MH. fiEH‹TLER CD. NO:33/A MERKEZ
0536 493 43 77
TEK‹RDA⁄-KER‹MO⁄ULLLARI T‹C.-ERKAN KER‹MO⁄ULLARI
YEN‹MAHALLE GÜLDESTE SK. NO:4/B MALKARA
S‹‹RT-ERYILMAZ ELEKTRON‹K-M.ERYILMAZ
CUMHUR‹YET CD.NO:25 S‹‹RT
SAMSUN-GÜLTEK‹N SO⁄UTMA-ERKAN GÜLTEK‹N
M‹MAR S‹NAN MH. ATATÜRK BLV.NO:150 ATAKUM
0362 437 33 82
(0432) 216 18 04
VAN-ÖZKANAT TAM‹RAT-DAVUT KANAT
EMN‹YET KARAKOL ARKASI NO:3
(0432) 351 95 40
VAN-fiASER ELEKTRON‹K-‹.SERHAT BAfiAR
fiIHKE CAD. NURLAÇ‹N PSJ. NO:37
0432 216 37 59 0432 215 12 15
TEK‹RDA⁄-BATI TEKN‹K-YEL‹Z BARLAZ
YEN‹ MH. TAKS‹M CD. NO:9 SARAY
0282 768 69 34
TEK‹RDA⁄-POYRAZ TEKN‹K
0282 427 16 68
0484 224 03 92
H‹SAR MH. ADALET SK. NO:24 HAYRABOLU
S‹NOP-YILKAY SO⁄UTMA-MEHMET YILMAZ
YALI MH.DR.AZM‹ HAMZAO⁄LU CD. NO:46 AYANCIK
0368 613 52 12
S‹NOP-ÖZTÜRK BEYAZ EfiYA BAKIM ONARIM SERV‹S‹
BAYRAM ÖZTÜRK GÖKDERE MH. YUSUF KEMAL BEY
YALOVA-DO⁄AN TEKN‹K SO⁄UTMA-ORHAN DO⁄AN
CUMHUR‹YET MH. MERKEZ DURAK KARfiISI NO:29/A
YALOVA-PREST‹J ELEKTR‹K-ERDAL KARAKAfi
‹STANBUL CD. BORA SK.NO:3/B MERKEZ
(0226) 811 12 30
TOKAT-CEM TEKN‹K SO⁄UTMA-MET‹N AYDIN
0282 315 55 48
CD.NO:24 BOYABAT (0368) 315 61 21
SO⁄UK PINAR MH. G.O.P BULV.241/A HO:14
TEK‹RDA⁄-HAKAN ELEKTRON‹K-HAKAN ASLAN
MURAD‹YE MH. NAZIM SAV CD. NO:30/A MURATLI
(0282) 361 28 17
S‹NOP-ADA EV ALETLER‹-HAKAN CEZA‹R
CAM‹ KEB‹R MH. A. KEYKUBAT CD. NO:9 MERKEZ
(0368) 260 12 64
S‹VAS-EKOL ELEKTRON‹K-ERTU⁄RUL KOLDAfi
H‹KMET IfiIK CAD. NALBANTLARBAfiI NO:1/D
YOZGAT-KARDEfiLER ELEKTRON‹K-YAHYA ARSLAN
CUMHUR‹YET CAD.NO:29 1/C SORGUN
ALTINOVA 0226 461 26 21
MERKEZ 0356 212 37 57
0346 223 44 96
0354 415 45 79
YOZGAT-AYDIN SO⁄UTMA-MURAT AYDIN
AHISHAV‹ MH. 2. HANLAR SK. NO:10 AKDA⁄MADEN‹
0354 314 64 12
TOKAT-C‹HAN ELEKTRON‹K-‹LYAS DEDE
G.O.PAfiA BULV. S‹VAS CD. ESK‹ ARTOVA GARAJI ÜSTÜ
NO:290/A (0356) 214 00 74
TOKAT-UZAY ELEKTRON‹K-TU⁄RUL ULUHAN
G.O.P.BULVARI 13 SK. NO:31/C MEYDAN CAM‹‹ KARfiISI
0536 212 00 95
fi.URFA-GÜVEN ELEKTR‹K-MAHMUT
MEYDAN MAH. KÖPRÜBAfiI U⁄UR SOK. NO:12 B‹REC‹K
0414 652 94 02
fi.URFA-AKTAfi ELEKTRON‹K-AHMET AKTAfi
ASFALT CD. NO:22/F MERKEZ
0414 217 14 87
ZONGULDAK-EMN‹YETL‹ SERV‹S-RIZA ÇOLAK
YEN‹ MH. ATATÜRK CD. NO:24 DEVREK-ZONGULDAK
(0372) 556 82 54
ZONGULDAK-UZMAN ELEKTRON‹K-AL‹ OSMAN ERSÖZ
ERDEM‹R CAD. NO:130 KARADEN‹ZERE⁄L‹
0372 316 31 28 - 0372 316 59 60
YOZGAT-ÖNDER ELEKTRON‹K-DAVUT GÜLER
UN PAZARI NO:14 YOZGAT
0354 212 79 67
YOZGAT-AYDIN SO⁄UTMA-MURAT AYDIN
AHISHAV‹ MH. 2. HANLAR SK. NO:10 AKDA⁄MADEN‹
0354 314 64 12
YOZGAT-TUNCER SO⁄UTMA-S‹NAN TUNCER
MEDRESE MAH. S‹VAS CAD. NO:79 SEZEN APR. ALTI
0354 212 68 19
TRABZON-ATOM ELEKTRON‹K-VOLKAN YET‹M
ORTA MH. ERENLER SK. NO:5 AKÇAABAT
0462 228 12 58
TRABZON-fiENGÜL TEKN‹K-MUSTAFA fiENGÜL
BAGKUR KARfiISI NO:10/A ARAKLI
TOKAT-ÜSTÜN ELEKTR‹K-MUH‹TT‹N ÜSTÜNAKIN
Z‹RAAT BANKASI ARKASI 3. BLOK NO:3 TURHAL
0356 275 69 63
TOKAT-H‹DRO ELEKTR‹K-MUSTAFA BAYSAL
CUMHUR‹YET MH. GAZ‹ BULVARI NO:144 ERBAA
(0356) 715 56 01
fi.URFA-MÜJDE SO⁄UTMA-AHMET MÜJDE
KELEfi ABD‹O⁄LU MH. BAfiKURT SK. NO:7 V‹RANfiEH‹R
0414 511 68 71
fi.URFA-KÜÇÜK T‹CARET-ERGÜN KÜÇÜK
ATA. MAH. TOPÇU MEYDANI TOPÇULAR SOK. NO:14/B
0414 316 39 37 FAX 0414 316 39 37
0462 721 74 11
TOKAT-SELÇUK ELEKTRON‹K-CENG‹ZHAN SELÇUK
BENG‹LER MH. CAH‹T KÜLEB‹ CD. NO:19 N‹KSAR
(0356) 528 35 38
fi.URFA-EM‹N ELEKTRON‹K-EM‹N B‹LMEZ
‹NÖNÜ BLV.ESK‹ BU⁄DAY PAZ.NO:18 S‹VEREK
0414 552 27 38
fiIRNAK-CEM ÖZEL SERV‹S-NAZIM KISACIK
KALE MH. ESK‹ BELED‹YE CD. NO.20 C‹ZRE
fi.URFA-IfiIK SO⁄UTMA-ÖMER IfiIK
D‹K‹L‹ MH. Z‹YARET SK.NO:10 SURUÇ
0414 612 17 25
0486 616 77 82
• Ev tipi dikifl makinesi
• Model seçim butonu ile 20 farkl› flekilde dikifl yapabilme
• Dakikada 700 ilmik atabilme
• De¤iflebilir, kullan›m› kolay dikifl yata¤›
• Dü¤me deli¤i dikebilme
• Ters çevirme butonu ile ters dikifl yapabilme özelli¤i
• ‹lik açabilme özelli¤i
• Fermuar dikme özelli¤i
• Farkl› flekillerde (kabuk, çift i¤ne, a¤ flekilli,kutu flekilli,desen,kenar
k›v›rma) dikifl yapabilme özelli¤i
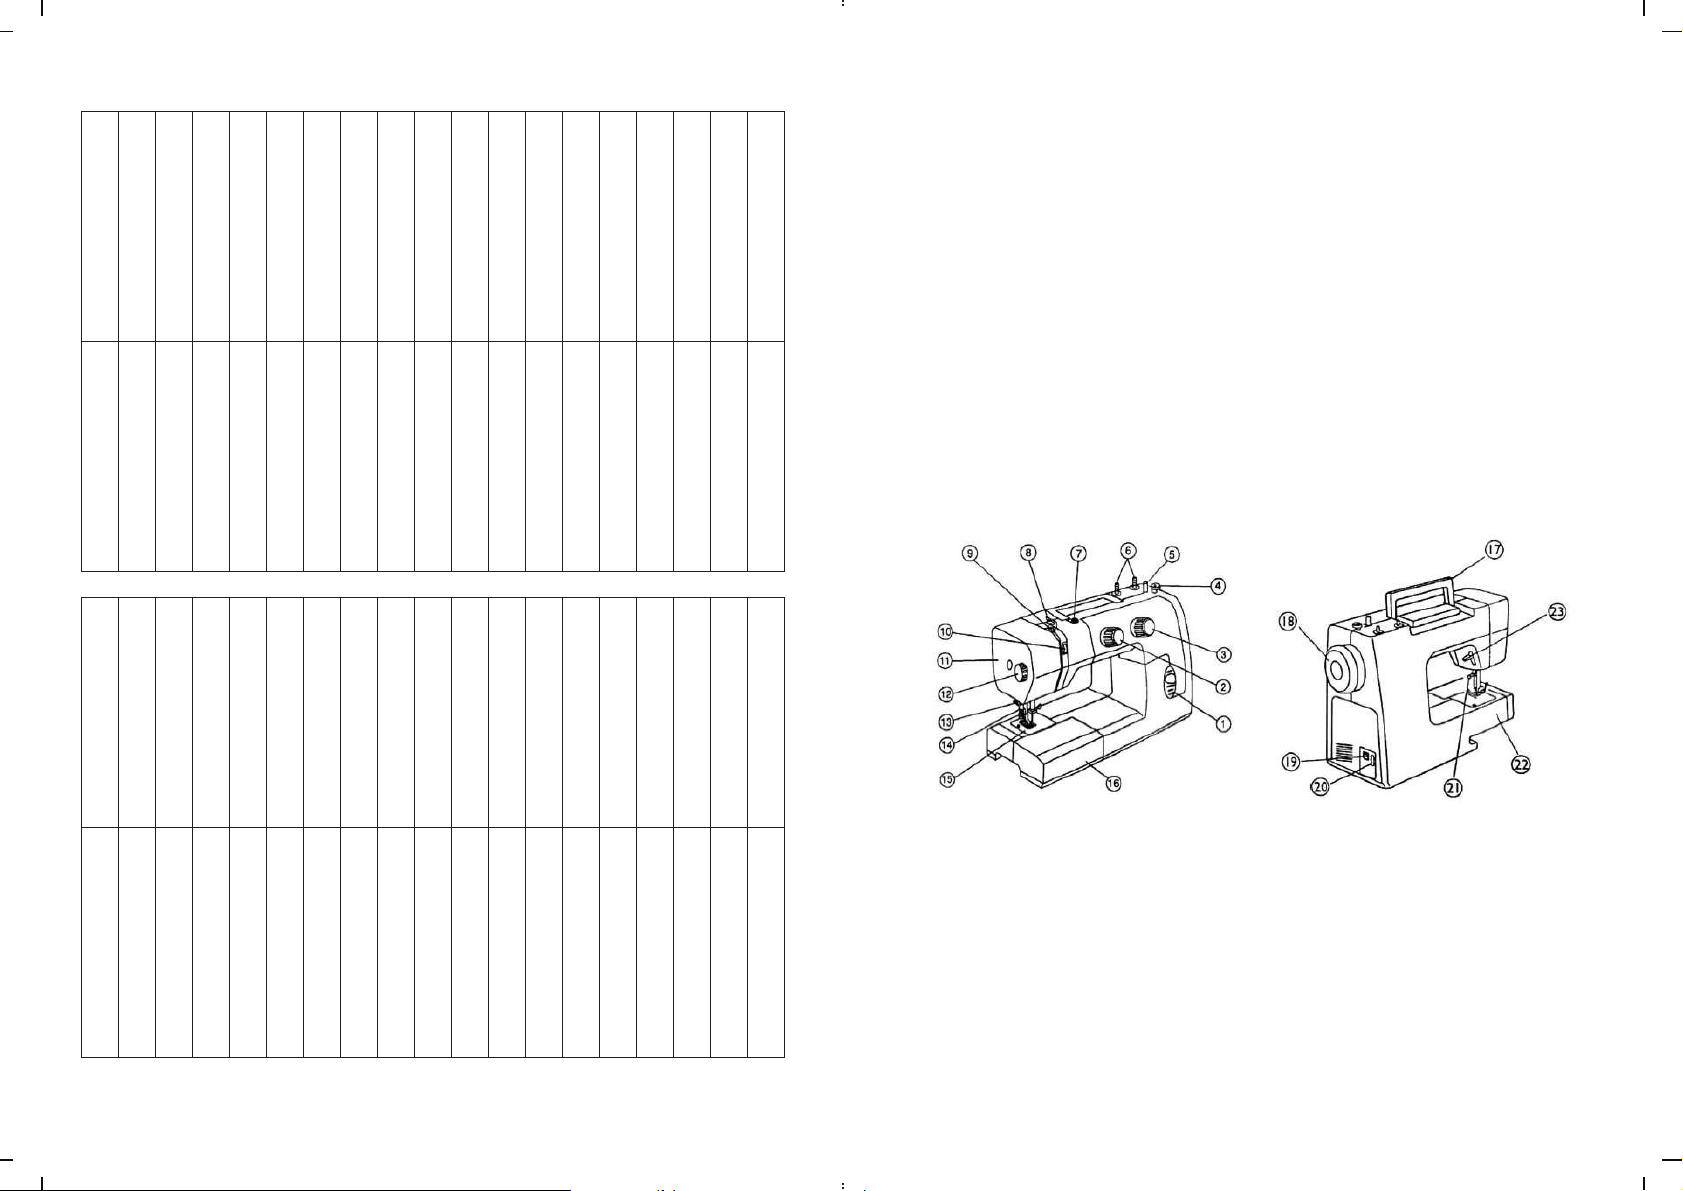
Dikifl Makinesinin Bölümleri
1. Geri çevirme butonu (Ters çevirme)
2. Model seçim butonu (Desen seçim dü¤mesi)
3. Dikifl uzunlu¤u seçim dü¤mesi
4. Bobin sar›m durdurucu
13. ‹p k›rma bölümü
14. Dikifl aya¤› de¤ifltirme kolu
15. ‹¤ne platformu
16. Geniflletilebilir kumafl platformu(aksesuar
5. Masura mandal›
6. Makara mandal›
7. Sar›m germe diski
8. ‹plik tutma bobini
9. ‹plik çekme kolu
10. ‹plik germe diski
11. Ampul kapa¤›
12. Bask› aya¤›
17. Tutma kulpu
18. Denge çark›
19. Dikifl ›fl›¤› açma/kapama dü¤mesi
20. Güç(Elektrik kablosu ba¤lant› bölümü)
21. ‹¤ne s›kma vidas›
22. Serbest kol kumafl platformu
23. Bask› aya¤› kolu
• Zigzag overlok yapabilme
• Kontrol edilebilir dikifl uzunlu¤u
• Ayarlanabilir iplik gerginli¤i
• Ayak pedal kontrolü
• Elektronik h›z yönetimi
• Geniflletilebilir kumafl platformu
• Aksesuar kutusu
• Dikifl ›fl›¤›
• Ürün tafl›ma tutaca¤›
• AC 220 V / 50 Hz / 85 W
kutusu)
- 81 -
- 2 -
Page 4
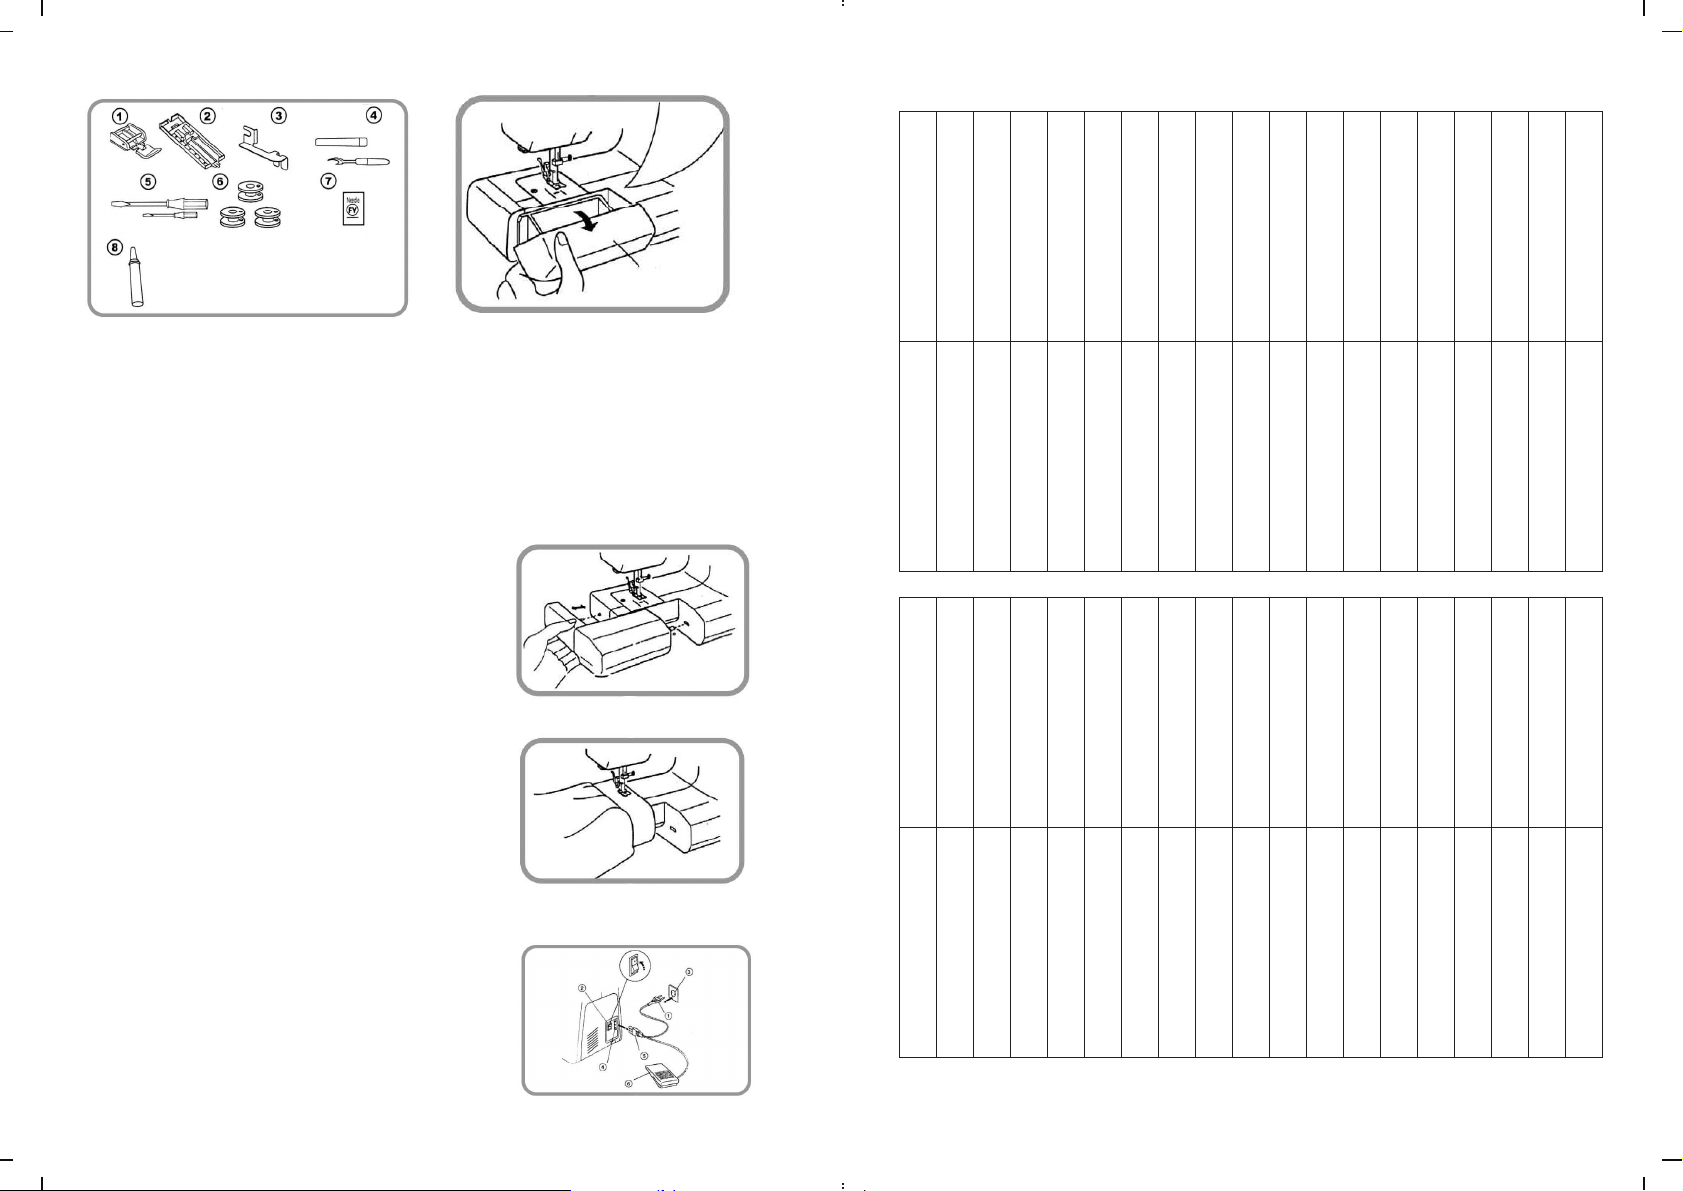
Aksesuarlar
1.Fermuar aya¤›, 2.Dü¤me ili¤i aya¤›, 3.Yön de¤ifltirme mandal› 4.Dü¤me ili¤i kesici, 5.Tornavida, 6.Mekik,
7.‹¤ne, 8.Bak›m ya¤›
NOT: Aksesuar kutusu geniflletilebilir kumafl platformunda olup, afla¤›da gösterildi¤i gibi kutuyu kendinize
do¤ru çekerek açabilirsiniz.Aksesuarlar kutu içerisindedir.
2.BÖLÜM
D‹K‹fi MAK‹NES‹ FONKS‹YONLARI
Geniflletilebilir Kumafl Platformu
Geniflletilebilir kumafl platformu ile, dikifl dikerken çal›flma alan›
artt›r›labilirve yerinden kolayl›kla da ç›kar›labilir. Ayr›ca,
serbest kol kumafl platformuda kullan›labilir.Kumafl platformunu
flekilde gösterildi¤i gibi ç›karabilir, sonra da tekrar birlefltirerek
yerine oturtabilirsiniz.Serbest kol kumafl platformunda dikifl
uygulamas›nda;cep,plise ve bluzkenar›dikerken ,kumafl›n i¤nenin
önünde birikmemesine dikkat edin.Giysi kolu,bluz kenarlar›,
pantolon paçalar› veya di¤er yuvarlak flekilli giysileri,diz ve dirsek yamalar› ve çocuk giysilerini bu platformda kolayl›kla
dikebilirsiniz.
MU⁄LA-ASTEKN‹K-AHMET MEM‹K
YEN‹ MH. 152. SK. NO:8 YATA⁄AN
0252 572 56 31
MU⁄LA-GÜN TEKN‹K-YILGÖR ÇELEN
MÜSTAKBEY MH.RAGIPBEY CD. A.YESEV‹ SK. NO:22
MERKEZ 0252 212 81 90
MU⁄LA-CAN-AY TEKN‹K-CENG‹Z RAM‹TGAN
TURGUT RE‹S CAD.15/A BODRUM
0292 313 67 47
MU⁄LA-SUN ELEKTRON‹K-SADETT‹N& ‹SMA‹L ZENC‹
TEPE MH. 36 SK. NO:19 MARMAR‹S
(0252) 413 82 80-(0252) 413 82 80
MAN‹SA-BURCU ELEKTRON‹K-ERTAN GÖRDESL‹
TUNCA MAH. KURTULUfi CAD. NO:54
0236 234 57 42
MAN‹SA-GÖKKUfiA⁄I ELEKTRON‹K-MEHMET ERG‹N
SO⁄UKSU MAH.‹SMETPAfiA CAD.NO:94 ALAfiEH‹R
0236 654 34 99
MAN‹SA-AYKAR SO⁄UTMA T‹CARET-YAS‹N ZEYBEK
MAN‹SA-GÜRMAK TEKN‹K-AHMET GÜREfi
‹DMAN SK. NO:47/A SOMA
(0236) 612 52 32
BEfiEYLÜL MH.BELED‹YE CD.NO:23 SAL‹HL‹
MU⁄LA-STAR ELEKTRON‹K-YAVUZ ERDO⁄DU
‹N‹fiD‹B‹ CD. NO:1/C AKYAKA BELDES‹ ULA
MU⁄LA-TEKN‹K SO⁄UTMA-AFfi‹N YILDIRIM
0236 714 88 68
0252 243 40 42
HACI ‹LYAS MH.PAZAR SK. NO:14 M‹LAS
0252 512 14 45
MAN‹SA-EM‹N ELEKTRON‹K-EM‹N IRA
ALTAY MH.SEV‹NÇ SK. NO:25 TURGUTLU
0236 313 28 35
MAN‹SA-SÖZB‹LEN ELEKTR‹K-MEHMET SÖZB‹LEN
RAGIPBEY MAH.16.SOK.NO:24 AKH‹SAR
0236 414 12 61
ORDU-TEKN‹K SO⁄UTMA-YUSUF TEMEL
ORDU-SERV‹S T‹CARET-MUAMMER SARI
BUCAK MAH. 15. SOK. NO:16
0452 214 64 62
ORDU-STAR TEKN‹K-AT‹LLA ÇAKMAK
KALEDERE MH. 20 TEMMUZ CD. NO:16 ÜNYE
N‹GDE-HUZUR ELEKTR‹K- AHMET KURTGÖZÜ
‹LHANLI MH. ÖZKILIÇ APT. ALTI NO:43 MERKEZ
0388 233 54 05
NEVfiEH‹R-ALSTAR SO⁄UTMA-C‹HAT KOYUTÜRK
AKSARAY CD. NO:47/A MERKEZ
0384 214 17 26
MUfi-HAfi‹MO⁄LU EK‹C‹ ELEKTRON‹K-ABDULLAH EK‹C‹
HAfi‹MO⁄. EK‹C‹ ‹fi HANI BELED‹YE CD. NO:20A/2
(0436) 212 38 80
MAN‹SA-fiEN SO⁄UTMA-HAKAN fiEN
ATATÜRK MH. 7 EYLÜL CD. NO:21/B SARUHANLI
0236 357 12 00
MARD‹N-ATOM BOB‹NAJ-KADR‹ YAVUZ
YILDIRIM MH. SELMAN‹ PAK SK. NO:9/A NUSAYB‹N
0482 415 19 69
MARD‹N-SA⁄LAM ELEKTRON‹K-MÜN‹R SA⁄LAM
ESNAF SANATKARLARI KARfiISI NO:20/2 M‹DYAT
0482 462 33 90
0452 324 82 51
N‹⁄DE-BAYKAN ELEKTR‹K-BAYRAM BALKAN
fiAH SÜLEYMAN MAH.TERM‹NAL CAD.BALIM SOK.NO:2
(0388) 232 42 27
MARD‹N-UZAY ELEK.-EKRAM KARAMANO⁄ULLARI
BELED‹YE MEYDANI NO:36 DER‹K
(0482) 251 34 35
MARD‹N-HAKAN ELEK.-ABDURRAHMAN ARTUKO⁄LU
AYDINLAR S‹T.C‹VACI YÜCESOY APT.ALTI YEN‹fiEH‹R
MARD‹N-‹BRAH‹MO⁄LU ISITMA SO⁄UTMA-RECEP BO⁄A
(0482) 213 18 76
fiANLIURFA CAD. ECE PSJ. NO:7-8 KIZILTEPE
(0482) 312 55 99
fi‹R‹NEVLER MH. ‹SMETPAfiA CD. NO:161/A MERKEZ
ORDU-KORKMAZ SO⁄UTMA-F‹KR‹ KORKMAZ
YEN‹ MAHALLE ALPASLAN TÜRKEfi CD.NO:78/1 MERKEZ
(0452) 214 09 28
MU⁄LA-ÖZKAN TEKN‹K SO⁄UTMA-ÖZKAN D‹LMEÇ
MERKEZ MH. ATATÜRK CD. NO:56 DALAMAN
MARD‹N-CEMALO⁄ULLARI SERV.-RESUL KÜÇÜKASLAN
BULVAR CD.PTT KARfiISI NO:115
0482 464 19 88
OSMAN‹YE-TERMO SO⁄UTMA-MUZAFFER TÜRKO⁄LU
UZUNBANI MH. UZUNBANI CAD. NO:31/A DÜZ‹Ç‹
0328 876 25 60
R‹ZE-ÖZER TEKN‹K-MAKSUT ÖZER
EMN‹YET MÜD. KARfiISI fiA‹RLER YOLU ÜZER‹ NO:3/2B
OSMAN‹YE-MODERN ELEKTRON‹K-NAKAN KÜÇÜKO⁄LU
ORTAOKUL CD.K‹fi‹O⁄LU ÇARfiISI NO:15
0328 818 82 84
ORDU-SAT-TEK ISITMA-SO⁄UTMA-RECEP SAYILAN
SAKARYA MH. YEN‹ KUMRU CD. NO:111 FATSA
0452 423 84 49
0452 234 03 50
MU⁄LA-ELBO ELEKTRON‹K-fiERAFETT‹N USLAN
ORHAN‹YE MH.HÜRR‹YET CD.NO:1/6 MU⁄LA
0252 692 25 25
OSMAN‹YE-YAYIN TEKN‹K-OSMAN AVARA
UZUN ÇARfiI CAD. AKBANK ARKASI NO:17 KAD‹RL‹
0328 718 45 62
0252 214 18 84
MU⁄LA-‹LKSEL ELEKTRON‹K-ÜNSAL GÖK
YEN‹ YOL CD.NO:51/9 MARMAR‹S
0252 412 62 60
MU⁄LA-ANADOLU TEKN‹K SERV‹S-O⁄UZHAN ÖZDE
BAHA fiIKMAN CD. NO:157 ÖLÜDEN‹Z YOLU ÜZER‹
FETH‹YE 0252 614 56 85
ÇAYEL‹ (0464) 532 63 81
MU⁄LA-MEL‹H ELEKTRON‹K-MEL‹H/BAHATT‹N AKBULUT
‹SKELE MH. AMBARCA CD. NO:17 DATÇA
0252 712 02 30
MU⁄LA-BA⁄CI SO⁄UTMA-SERKAN BA⁄CI
ATATÜRK BULVARI KÖYCE⁄‹Z CD. NO:53/B DALYAN
(0252) 284 39 93
Yandaki flekilde giysi kolunun,geniflletilebilir kumafl
platformuna yerlefltirilmesi gösterilmektedir.
Güç Kayna¤›
UYARI:Makine güç kayna¤›na ba¤lanmadan önce,makinenin üzerinde belirtilen voltaj ve frekans›n,güç kayna¤›yla
uygun olup olmad›¤› kontrol edilmelidir.
1. Ba¤lant› fifli, 2. Dikifl ›fl›¤› açma/kapama dü¤mesi , 3. Priz
4. Elektrik ba¤lant› noktas›, 5. Makine fifli, 6. Ayak kontrol pedal›
Öncelikle makinenin fiflini elektrik ba¤lant› noktas›na tak›n
Ba¤lant› fiflini prize tak›n
Anahtar butonla dikifl ›fl›¤›n› aç›n.
- 3 -
KOCAEL‹-B‹ROL ELEKTRON‹K-NEVZAT AKDAfi
HACI HAL‹L MAH. YAZI CAD.1228 SOK. NO:4 GEBZE
(0262) 643 45 43
KOCAEL‹-SAMET ELEKTRON‹K-MAHMUT GÖZÜAÇIK
BA⁄DAT CD. NO:42/2 D‹LOVASI
0262 754 79 86
KOCAEL‹-DORUK TEKN.MÜH.FETH‹ B‹ROL ÖZ‹fi
KARABAfi MH. C.TOPEL MH.MÜNECC‹M AR‹F SK.
KOCAEL‹-KARDEfiLER ELEKTRON‹K-RAMAZAN AKDAfi
KAZIM KARABEK‹R MH.MEVLANA CD.NO:1/A DARICA
0262 656 27 88
KARAMAN-GÜRSES ELEKTRON‹K-MEHMET SOYASLAN
YUNUS EMRE CAM‹‹ KARfiISI NO:17
0338 213 41 55
KARS-DELTA ELEKTRON‹K-EKBER NURLUGEY
BELED‹YE ‹fi HANI NO:9
0474 223 75 63
NO:6/A MERKEZ 0262 331 11 66
KONYA-DURMAZLAR ELEKTR‹K-S‹NAN DURMAZ
ANKARA-KONYA CD. NO:67 C‹HANBEYL‹
0332 673 28 48
KONYA-SAF‹R SO⁄UTMA-MEVLÜT ARABACI
FER‹TPAfiA MH.GÜNEY SK.NO:3/F SELÇUKLU
KASTAMONU-ÇA⁄DAfi BEYAZ EfiYA-DAVUT UYGUN
CEBRA‹L MH. S‹MSAR SK. NO:1/A MERKEZ
0366 212 44 11
KASTAMONU-EM‹N T‹CARET-EM‹N YUMUfiAK
‹NÖNÜ MH. KÖMÜR KARA SK.NO:19 MERKEZ
KARS-‹NC‹ ELEKTRON‹K-AT‹LLA KARAKAfi
KAZIM KARABEK‹R ‹fi HANI KAT:1 NO:114
0474 223 57 89
(0366) 212 45 77
KASTAMONU-DE⁄‹fi‹M ELEKTRON‹K-AHMET DEDELER
TABAKHANE MH. ATATÜRK CD. NO:55/A TAfiKÖPRÜ
KONYA-ÜNAL ELEKTR‹K-EROL ÜNAL
ESK‹ SEBZE PAZARI ARKASI NO:19 ERE⁄L‹
KONYA-SARI SO⁄UTMA-VEL‹ SARI
CAM‹ AT‹K MH. ATATÜRK CD. 52.SK. NO:4/A ILGIN
0332 882 51 31
0332 236 36 75
KAYSER‹-AR-TEK SERV‹S-‹BRAH‹M DURUSU
CUMH. MAH. U⁄UR SOK.NO:12/B ATATÜRK EV‹ YANI
KAYSER‹-U⁄UR SO⁄UTMA-U⁄UR HAYTA
HARMAN MH.BELED‹YE PASAJI ÜZER‹ NO:15 DEVEL‹
0352 621 56 31
(0366) 417 42 04
0332 713 23 26
KONYA-ERKAM SO⁄UTMA H‹ZM.-HUZEYFE TAfiDELEN
KARAKURT MH.TAfiKAPI MEDRESE CD. NO:223/C MERKEZ
0332 353 09 47
KONYA-EROL ELEKTRON‹K-GÜROL ZEREN
MEYDAN MAH.ÇOCUK PARKI SOK.NO:38 AKfiEH‹R
0332 812 61 12
KONYA-GÜRKAN TEKN‹K-fiAHSUVAR GÜR⁄AN
G.ALEMfiAH MH.SIRÇALI MED. CD.‹BN‹B‹B‹ SOK.NO:1/B
MERAM (0332) 351 02 03 - (0332) 353 90 73
KONYA-ZÜMRÜT SO⁄UTMA-HASAN Ç‹YLEZ
Ö⁄RETMENEVLER‹ MAH. LARENDE CAD. NO:56/B
0332 322 22 26 0332 320 73 73
KONYA-SELV‹ SO⁄UTMA-HASAN SELV‹
HACI ARMA⁄AN MAH.ANTALYA CAD.NO:108/F BEYfiEH‹R
0352 221 37 47
KAYSER‹-ÖZ FEDAKAR ELEKTRON‹K-HÜSEY‹N FEDAKAR
SERÇE ÖNÜ MH. SELAN‹K CD. B‹RKAN SK. TAÇ S‹TES‹
NO:9 KOCAS‹NAN (0352) 221 44 65
KAYSER‹-AKfi ELEKTRON‹K-AHMET KIfi
ÇORAKÇILAR MH.CENG‹Z TOPEL CD.NO:20/B MEL‹KGAZ‹
0352 320 14 00
KIRIKKALE-KARDEfiLER ELEKTRON‹K-AL‹ GAÇKA
GÜZELTEPE MAH. CELAL AT‹K CAD. NO:4/B
0318 224 47 42
KIRKLAREL‹-BUSE ELEKTRON‹K-TURGUT ÇAPRAZ
K.‹BRAH‹M MAH.KAPAN CAM‹‹ SOK.ACUN PASAJI NO:23
0288 214 69 94
KIRKLAREL‹-AKKAN T‹CARET-DURSUN KAN
YILMAZ MAH.ESK‹ KIRKLAREL‹ CAD.NO:22 LÜLEBURGAZ
KÜTAHYA-DORUK ELEKTRON‹K-HÜSEY‹N ORDU
0332 512 40 10
(0288) 412 10 51
CUM. CD. SEVG‹ YOLU NUR ‹fiHANI NO:35 MERKEZ
KONYA-TUNCER ELEKTRON‹K-MUSTAFA TUNCER
KIBRIS CAD.NO:26 SEYD‹fiEH‹R
0332 582 93 92
KIRfiEH‹R-GARANT‹ ELEKTRON‹K-RAMAZAN AÇIKBAfi
ANKARA CD. YA⁄MUR ‹fiHANI NO:9/B MERKEZ
0386 214 02 18
KIRfiEH‹R-ELEKTRO TEKN‹K-M.YAfiAR GÖKBULUT
ANKARA CD. NO:7 MERKEZ
- 80 -
MAN‹SA-AKIN ELEKTRON‹K-AKIN KARA
PAfiA MH.7.SK. NO:25 AKH‹SAR
0236 413 50 53
MAN‹SA-ALTINER ELEKTRON‹K-TEK‹N ALTINER
M.S‹NAN MH.AKKUfi SK.NO:10/A MAN‹SA
0274 216 26 66
MALATYA-YUVAM ELEKTRON‹K-F‹KRETT‹N GÜLDAfi
‹ST‹KLAL MAH. ‹MAMO⁄LU SOK.NO:1
0422 322 52 88
0386 213 15 53
K‹L‹S-KRAL ELEKTR‹K-HÜSEY‹N KÖMÜRCÜ
MURTAZA CAD. NO:42
0348 813 85 41
0236 237 32 69
MAN‹SA-MOTOCANSU-ERDAL KARAHAN
CAM‹‹ CED‹T MH.62.SKNO:67 KULA
0236 816 70 99
KOCAEL‹-KILINÇ ELEKTRON‹K-A.‹HSAN KILINÇ
‹NÖNÜ CD.YASEF SK.NO:10/M KARAMÜRSEL
0262 452 55 55
KOCAEL‹-EKOL MÜHEND‹SL‹K-LEVENT DÜLGER
SARAYALTI MH. EFE SK. NO:14/C MERKEZ
0276 224 31 23
KOCAEL‹-YILDIRIM ELEKTRON‹K-NECAT‹ YILMAZ
H.HAL‹L MH. 1209 SK. NO:13/C GEBZE
0262 641 35 88
Page 5
‹ZM‹R-ERDEM S. LEVENT ELEK.LAB.-ERDEM LEVENT
1710 SK. NO:70/B KARfiIYAKA
(0232) 381 14 42
‹ZM‹R-‹LTER ELEKTRON‹K-N‹YAZ‹ ‹LTER
‹ZM‹R(75.YIL) CD.NO:81/C-D URLA
0232 754 44 44
‹ZM‹R-AY ELEKTRON‹K-ATALAY AYT‹MUR
DR.SELAHATT‹N ÖZKURT CAD. NO:13/A MENEMEN
0232 832 02 31
‹ZM‹R-B‹RL‹K SO⁄UTMA-ELEKTR‹K-AKIN YILDIZ
8211/2 SK. NO:1/1C Ç‹⁄L‹
(0232) 329 57 47
‹ZM‹R-UMUT ELEKTRON‹K-ÖMER ZEYT‹NC‹K
YILDIZ CD.NO:152/A YEfi‹LYURT KONAK
0232 244 65 77
‹ZM‹R-S‹STEM ELEKTRON‹K-NECMETT‹N KAYAN
2414 SK. NO:10 GÜLTEPE KONAK
‹STANBUL-SADIK ELEKTRON‹K-SADIK ÇAMALAN
‹STANBUL-BUZ TEKN‹K-N‹HAT DEM‹R
A.GAZ‹ MH. FAT‹H BLV.BALCI SK.NO:3 SULTANBEYL‹
0216 496 07 95
‹STANBUL-M‹CROSYSTEM ELEKT.-AYHAN ULAfi
1.ORTA SK.NO:18/1 KADIKÖY
0216 411 91 50
‹STANBUL-ÇAM TEKN‹K-YÜCEL ÇAM
‹SLAMBEY MH. NEC‹P FAZIL CD.257 SK NO:25 G.O.PAfiA
0212 597 86 62
‹STANBUL-ENG‹N ELEKTRON‹K-ENG‹N DURGUN
TEVF‹KBEY MH. MERKEZ CD. ORK‹DE SK. NO:3/1
SEFAKÖY 0212 598 44 76
ERCÜMENT KÖYLÜBAY
ESK‹ TOPTAfiI CD. NO:48/1 ÜSKÜDAR
‹STANBUL-NUR ELKT.-ELEKTRNK-MUHAMMET KATIRCI
MERKEZ MH. ASALET CD. NO:22 GÜNGÖREN
0212 641 42 09
‹ZM‹R-GÜRGEN ELEKTRON‹K-MUSTAFA GÜRGEN
(0232) 469 72 69
‹ZM‹R-ÖZKA SO⁄UTMA-‹SMA‹L GEYGEL
FEVZ‹ÇAKMAK MH. DEM‹RC‹ EFE SK. NO:93 BALÇOVA
0232 278 80 71
0216 310 96 75
‹STANBUL-SEV-CAN T‹C.-NECMETT‹N SARIALTUN
‹STANBUL-Z‹RVE TEKN‹K-RECEP fiEV‹K
FAT‹H MH. EM‹N SK.NO: 4/1F S‹L‹VR‹
0212 728 53 23
‹ZM‹R-MELTEM ELEKTRON‹K-AL‹ SOYKAN
HÜRR‹YET CD. GÜNGELEN PSJ. NO:17 ÖDEM‹fi
0232 544 28 73
‹ZM‹R-CAN SO⁄UTMA-GÜNAY ‹ÇER
TEPEKÖY MH.ASLANLAR CD. NO:8/A TORBALI
321 SOK. NO:4/A BETONYOL
(0543) 524 03 27 - (0232) 255 35 82
‹ZM‹R-YILDIRIM ELEKTRON‹K-ABDULLAH YILDIRIM
11/2 SK.NO:6 ÜÇKUYULAR
0232 246 22 51
‹ZM‹R-KUDRET ELEKTRON‹K-KUDRET GÖRGÜN
BURAKRE‹S CAD.NO:239/B ÇAMD‹B‹
0232 435 81 36 FAX 0232 461 31 27
‹ZM‹R-ACEM ELEKTRON‹K-CEYDA BEfi‹RL‹
552/2 SK. NO:4/A BORNOVA
(0232) 339 73 31
‹ZM‹R-ÇA⁄LAR ELEKTRON‹K-GÜRKAN fiENGÜL
670/1 SK. NO:57/B BUCA
(0232) 276 16 97 - (0232) 487 24 04
‹STANBUL-AS-EL ELEKTRON‹K-‹LHAN PEKD‹R‹
HATBOYU CAD.NO:84PEND‹K
‹STANBUL-KASVA ELEKTRON‹K-SEDAT UÇAR
AB‹DE-‹ HÜRR‹YET CD.NO:210/26 fi‹fiL‹ CAM‹‹ YANI
0212 296 85 36
‹STANBUL-UZMAN ELEKTRON‹K-CEMAL BA⁄LAN
YEN‹DO⁄AN MAH.42.SOKNO:50 ZEYT‹NBURNU
Y. BEYAZIT CD. ZAFER MH. TÜRKBEY‹ SK. NO:6/2
YEN‹BOSNA 0212 552 45 87
0212 582 36 37
(0216) 354 93 06 - (0216) 354 17 22
‹STANBUL-YILKA T‹CARET-YILMAZ KAPUCUO⁄LU
SEYMEN SOK.NO:27/A KURTULUfi
0212 233 80 53
0232 856 11 36
‹STANBUL-IfiIK ELEKTRON‹K-HAKAN YAfiAR
AYAZA⁄A MASLAK ATATÜRK CD. fi‹fiL‹
0212 289 76 94
‹STANBUL-ÇA⁄DAfi SERV‹S LTD.fiT‹.-LEM‹ KAD‹R ‹PEK
CENNET MH.Y.KEMAL BEYATLI CAD.NO:14/D K.ÇEKMECE
0212 579 35 30 FAX 0212 540 12 42
KARABÜK-ACAR ELEKTRON‹K-ZAFER ACAR
VAKIF ‹fi HANI KAT:2 EMN‹YET MÜD. YANI
0370 424 32 00
KARABÜK-GÖKAY TEKN‹K-HÜSEY‹N GÖKAY
‹NÖNÜ MH. ESK‹ BA⁄LAR SK. NO:13 SAFRANBOLU
K.MARAfi-DEM‹RO⁄LU SO⁄UTMA-OSMAN DEM‹R
GÜNEfiL‹ MH. TERM‹NAL CD. NO:30 ELB‹STAN
K.MARAfi-AKSUNGUR ELEKTR‹K-HÜSEY‹N AKGUR
UZUNOLUK CAD. ILGAZ SOK. NO:22/A
0344 212 77 50 0344 212 77 51 FAX 0344 223 26 13
‹ZM‹R-ALBAYRAK ELEKTR‹K-TURGAY ALBAYRAK
G.O.PAfiA BLV. NO:82/Z-1 MEZARLIKBAfiI ÇANKAYA
0232 484 22 09
(0344) 413 60 67
K.MARAfi-KALE ELEKT.-SÜLEYMAN GEZER TAfiAR
YUSUFLAR MAH. SAY‹T ZAR‹FO⁄LU BULVARI NO:36/B
(0344) 225 07 94
‹ZM‹R-ÇANKAYA D‹J‹TAL ELEKTRON‹K-BÜLENT ÇIKIKCI
1372.SOK. NO:17/1A ÇANKAYA
0232 445 02 89 0232 425 02 86
‹ZM‹R-EGE SERV‹S-BARIfi TOKAY
6 SK. NO:3 ATIFBEY MH. KARAKOL KARfiISI GAZ‹EM‹R
0232 252 46 00
(0370) 712 24 97
‹ZM‹R-GEZG‹N SERV‹S-H‹DAYET GEZG‹N
K.KEMALBEY CAD.NO:82-84-86 BERGAMA
(0232) 633 35 15 - (0232) 633 18 91
‹ZM‹R-BAYRAK ELEKTRON‹K- CUMAL‹ BAYRAKÇI
3010 SK. NO:13 ÇEfiME
(0232) 712 93 77
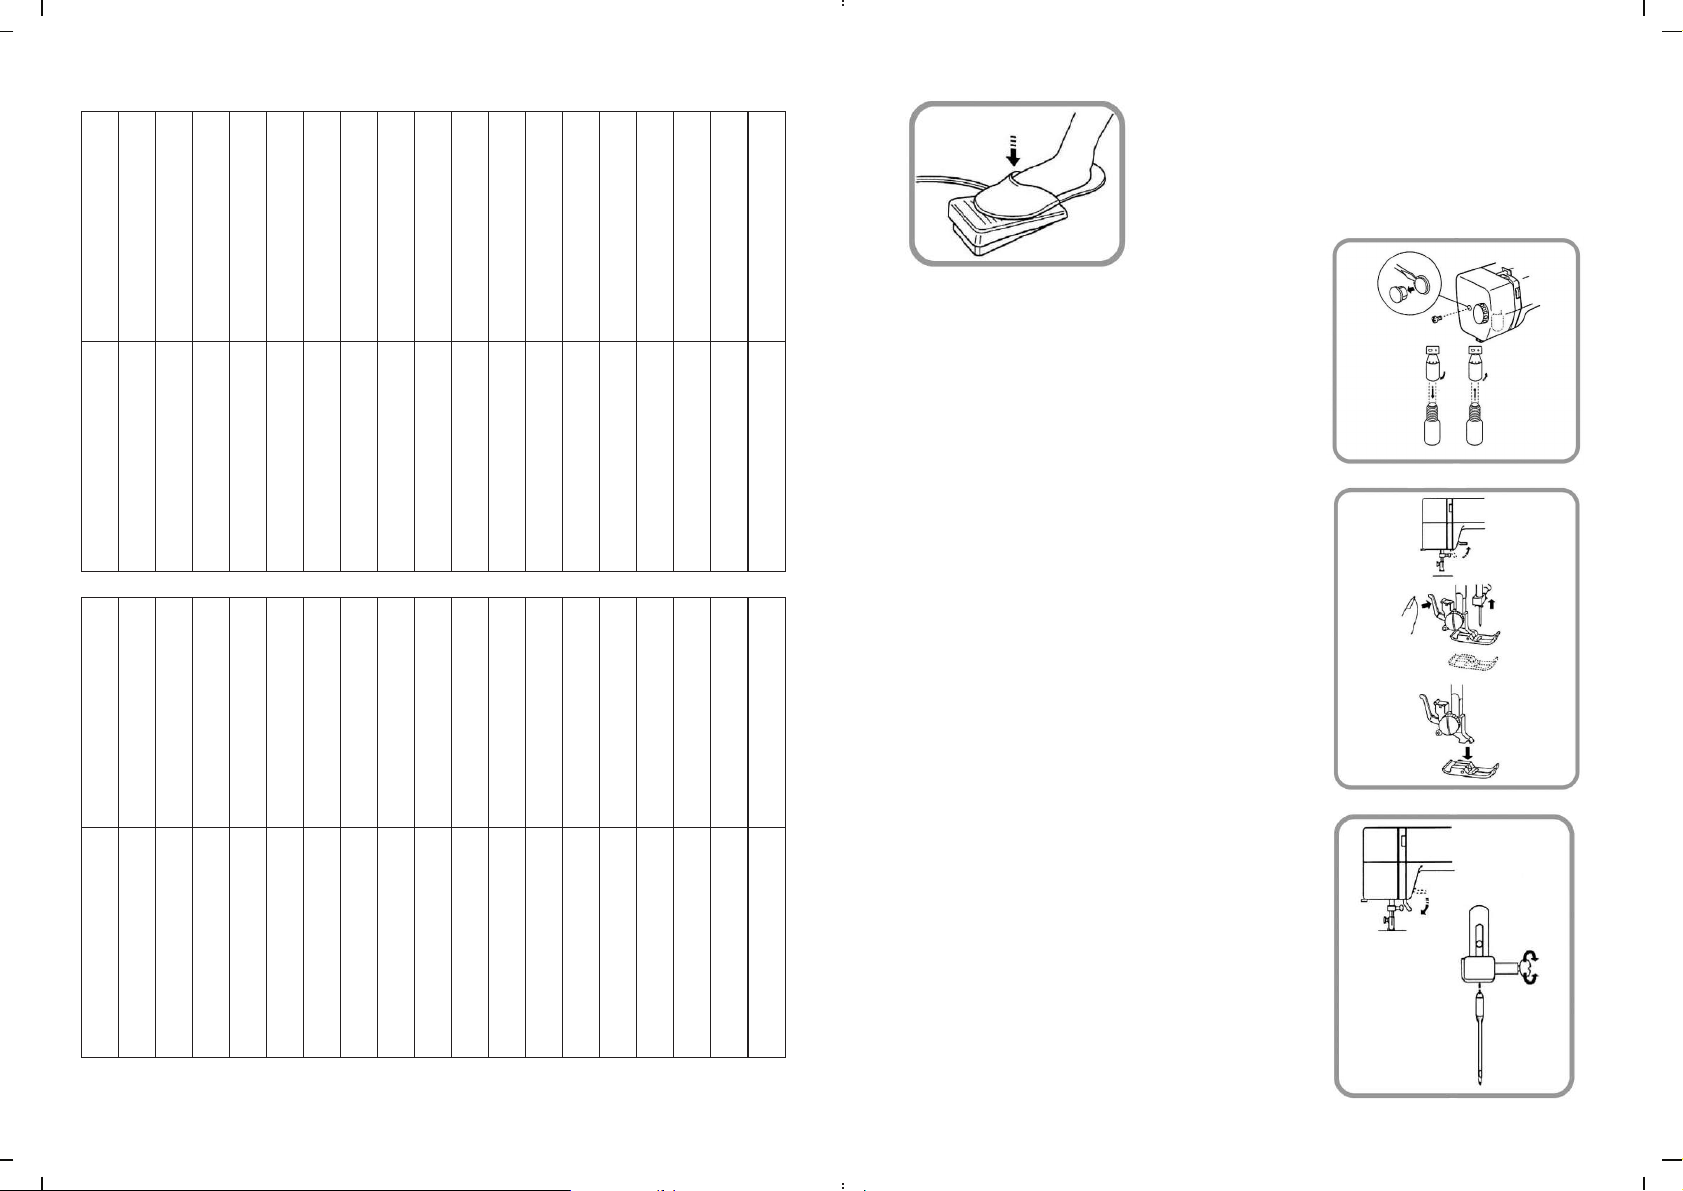
Ayak Kontrol Pedal›
Ayak kontrol pedal›,dikifl h›z›n› de¤ifltirir.Pedala nekadar s›k›
basarsan›z,dikifl o kadar h›zl› ilerler.
Dikifl Ifl›¤› ve Ampülün De¤ifltirilmesi
Dikifl ›fl›¤› ampulü,üst kapa¤›n arkas›nda bulunur.Ampulü
de¤ifltirirken,üst kapa¤› ç›kar›n(ön vida)
Uyar›:Ampulü de¤ifltirirken,makinenin gücünü kapat›n.
Ampulü ç›karma
Ampulü tutun ve sola do¤ru çevirin.
Ampulu takma
Ampulu tutun ve sa¤a do¤ru çevirin.
Bask› Aya¤›n› Ç›karma ve Takma
Bask› aya¤›n› ç›kar›rken;
Öncelikle denge çark›n› çevirerek i¤nenin yukar› ç›k›fl›n› sa¤lay›n,
flekilde gösterildi¤i gibi dikifl aya¤› de¤ifltirme kolunu belirtilen
yöne do¤ru itin ve bask› aya¤›n›n ç›k›fl›n› sa¤lay›n.
‹STANBUL-H‹ZMET D‹J‹TAL-BURHAN KAfiD‹B‹
‹STANBUL-ÖZKAN ELEKTRON‹K-SÜLEYMAN ÖZKAN
DEREBOYU SK. NO:113 MEC‹D‹YEKÖY
0212 217 24 97
‹STANBUL-CHIP ELEKTRON‹K-ARET-BERÇ DADYAN
BOZKURT CAD.NO:235 KURTULUfi
‹STANBUL-KÖYLÜBAY ELEKTRON‹K-
ALBAY HÜSAMETT‹N ERTÜRK SK. NO:7/A ÜSKÜDAR
(0216) 318 35 13
‹STANBUL-ELS‹T END. ELEKTRON‹K-N. BAHR‹ GÖKSEL
F.PAfiA MH.L‹SE CAD.NO:10/2 ÇATALCA
(0212) 789 47 97
‹STANBUL-ARSLAN ELEKTRON‹K-ARSLAN KÖSEO⁄LU
N‹SBET‹YE CD. PEKER SK. NO:28 LEVENT BEfi‹KTAfi
0212 269 59 60
‹STANBUL-AKSAN SO⁄UTMA-N‹HAT AKDA⁄
AKfiEMSETT‹N MH. SEYRAN SK. NO:33 EYÜP
0212 626 55 93
‹STANBUL-UMUT ELEKTRON‹K-KEMAL UYGUR
HAL‹TA⁄A CAD.CELAL MUHTAR SOK.NO:20/2 KADIKÖY
0216 346 39 78
‹STANBUL-ÜNKO ELEKTR‹K-MUSTAFA ÖZTAfi
CER.PAfiA CAD.G.SEBZEC‹LER SOK.NO:26 AKSARAY
0212 530 00 89
‹STANBUL-YÜKSEL ELEKTRON‹K-SAL‹H YÜKSEL
M.FEVZ‹ ÇAKMAK MAH.‹NÖNÜ CAD. NO:138 GÜNGÖREN
‹STANBUL-TOROS ELEKTRON‹K-AHMET Ç‹ÇEK
MERK. MAH.KÜÇÜKKÖY YOLU NO:65 GAZ‹OSMANPAfiA
0212 563 50 38
0212 504 61 42
0212 231 65 43 0212 231 27 89
‹STANBUL-AD‹L TV HASTANES‹-FAZLI KESEN
ZÜMRÜTEVLER TÜL‹N NO:69/2 MALTEPE
0216 376 78 96
‹STANBUL-GÜLSER TEKN‹K-RAMAZAN ECE
N.KEMAL MH. SÜTCÜ ‹MAM CAD. fi‹R‹N GÖRELE APT.
NO:128 KAT:1 ÜMRAN‹YE (0216) 335 60 19 - 521 71 56
KURTKÖY MH.CEV‹Z SK. NO:2 PEND‹K
‹STANBUL-ÇA⁄LAYAN ELEKTRON‹K-TEMC‹T ÇA⁄LAYAN
25.ADA 109 NUMARA ‹STOÇ
0212 659 92 49
‹STANBUL-AYDIN SERV‹S-RECEP KAYDIN
ÇINAR CAD.C‹HAN SOK.NO:12/E CEV‹ZL‹-KARTAL
0216 370 71 50
‹STANBUL-KARDEfiLER SO⁄UTMA-NEfiET TEMUR
S.N‹ZAM MH.fi.ERKAN ALYANAK SOK.NO:11 Z.BURNU
0216 378 38 83
‹STANBUL-ULUDO⁄AN ELEKT.-BAYRAM ULUDO⁄AN
KAYABAfiI ÇIKMAZI NO:5 BEYKOZ
0216 331 03 25
‹STANBUL-H‹SAR SERV‹S-OLCAY BAYARSLAN
NUR‹PAfiA CD.NO:48/A BA⁄LAR MEVK‹‹ SARIYER
‹STANBUL-KANTARCI ELEKTRON‹K-SAL‹H KANTARCI
M. AK‹F ERSOY MAH. fiANLIURFA CAD. NO:158 S.BEYL‹
(0216) 496 59 29-(0216) 496 59 29
(0212) 546 57 36
‹STANBUL-KORKMAZ ELEKTR‹K-Z‹YA KORKMAZ
Y.DUDULU fiENEL CAD.NO:76 ÜMRAN‹YE
(0216) 420 18 26
0212 223 27 96
‹STANBUL-TOLGA ELEKTRON‹K-HUR‹YE ERGÖKfiEN
DEREBOYU CAD.NO:28 KASIMPAfiA
0212 235 65 34
‹STANBUL-NUR ELEKTRON‹K-CÜNEYT SEMERC‹O⁄LU
DEN‹ZKÖfiKLER MAH. DERYA SOK. NO:36/1 AVCILAR
0212 694 12 82 0212 509 15 26
‹STANBUL-ÖZKAN ELEKTRON‹K-MÜM‹N KIRCI
KARTALTEPE MAH. B‹LGEHAN CAD.NO:32 BAYRAMPAfiA
0212 564 33 46 0212 564 38 58
‹STANBUL-SANCAKTAR BEYAZ EfiYA-TANER ULUDAfi
ORTAÇEfiME CAD. NO:91/C SARIYER
‹STANBUL-TEKN‹K ELEKTRON‹K-KASIM ALTNBA⁄
‹NÖNÜ CD.BAYO⁄LU AP.NO:37/1 MALTEPE
0216 457 63 34
‹STANBUL-ATILIM ELEKTRON‹K-MEHMET KÜÇÜKURAL
‹STANBUL-GÜR TEKN‹K SERV‹S-GÜRCAN SAATC‹O⁄LU
ATATÜRK CD.GÖZDE SK.UYGUR APT.NO:3/A MALTEPE
0216 352 25 20
‹STANBUL-YILDIRIM ELEKTR‹K-BÜLENT YILDIRIM
K.KARABEK‹R MAH.2.SOK.NO:10/B ESENLER
(0212) 611 10 76 - (0212) 647 98 00
‹STANBUL-PEKER SO⁄UTMA-AHMET PEKER
KALE‹Ç‹ MH. FERHATPAfiA CD. NO:8/8 ÇATALCA
0212 787 10 58 0212 789 11 24
CEBEC‹ MH. 1. CEBEC‹ YOLU 2472 SK. NO:10/A S.Ç‹FTL‹⁄‹
‹STANBUL-BTS BAfiARAN TEK SER-M.KEMAL BAfiARAN
DEREBOYU CD. NO:108/A MEC‹D‹YEKÖY-fi‹fiL‹
0212) 266 51 34
-79 -
‹STANBUL-ÜNVER ELEKTRON‹K-ZAK‹R NALBULAN
MARMARA CAD.ALTINTAfi SOK.NO:16 HAZNEDAR
0212 554 62 43 0212 557 04 73
‹STANBUL-‹LKE TEKN‹K-NUR‹ ÖZKAN
‹ST‹KLAL MH. fiEHZADE CD.ÜMRAN‹YE
‹STANBUL-KOCAYILDIZ SO⁄UTMA-A.KOCAYILDIZ
‹NÖNÜ CD. NO:56 PEND‹K
0216 397 34 35
‹STANBUL-TELV‹D ELEKTRON‹K-DO⁄AN YILDIZLAR
MAZHAR OSMAN SK. FERAH APT. NO:24/A KADIKÖY
0212 242 52 57
(0212) 475 85 62
0216 414 66 00
‹STANBUL-EMRE ELEKTR‹K-AL‹ AKPINAR
MAHMUTBEY CD.KÖPRÜYOLU SK.NO:8 BAHÇEL‹EVLER
0212 552 28 30
‹STANBUL-B‹L‹M ELEKTRON‹K-MUSTAFA ÖZKAN
HARMANTEPE A.‹PEKÇ‹ CAD. CAM‹ DÜK. NO:22 GÜLTEPE
0212 278 72 27 0212 280 75 33
0216 344 26 02
‹STANBUL-KUMRU ELEKTRON‹K-ADEM ELL‹C‹
KEMAL PAfiA MH. NAMIK KEMAL CD. NO:126 BA⁄CILAR
(0212) 429 34 19
‹STANBUL-‹K‹ZLER ELEKTRON‹K-MURAT Ç.ÖZTÜRK
SAKIZA⁄A MH. BERR‹NC‹N‹ SK. NO:16/A BAKIRKÖY
(0212) 543 85 83
Bask› aya¤›n› takarken;
Bask› aya¤›n› tutun ve bask› aya¤› manivelas›n› hareket ettirerek
yerine yerlefltirin.
‹¤neyi De¤ifltirme
Denge çark›n›, i¤neyi yüksek konuma ç›karacak flekilde çevirin ve
bask› aya¤›n› indirin. ‹¤ne k›skaç mandal›n› saat yönünün tersine
çevirerek gevfletin. Kullan›lm›fl i¤neyi ç›kar›n ve yeni i¤neyi, yass›
taraf› geriye bakacak flekilde tak›n. ‹¤neyi takarken i¤ne, i¤ne
k›skac›na tornavidayla mümkün oldu¤u kadar s›k› flekilde
yerlefltirilmelidir.
Not: ‹¤nenin bükülmüfl veya körelmifl olup olmad›¤›ndan emin
olmak için düzenli olarak kontrol edilmelidir. ‹pek veya ipeksi gibi
kumafllar dikilirken hasarl› i¤ne kullan›ld›¤›nda, s›kl›kla dü¤ümler ve
ilmik atlamas›yla karfl›lafl›l›r.Afla¤›da referans olmas› aç›s›ndan i¤ne
boyu ve iplik özellikleri tablosu verilmifltir.
- 4 -
Page 6

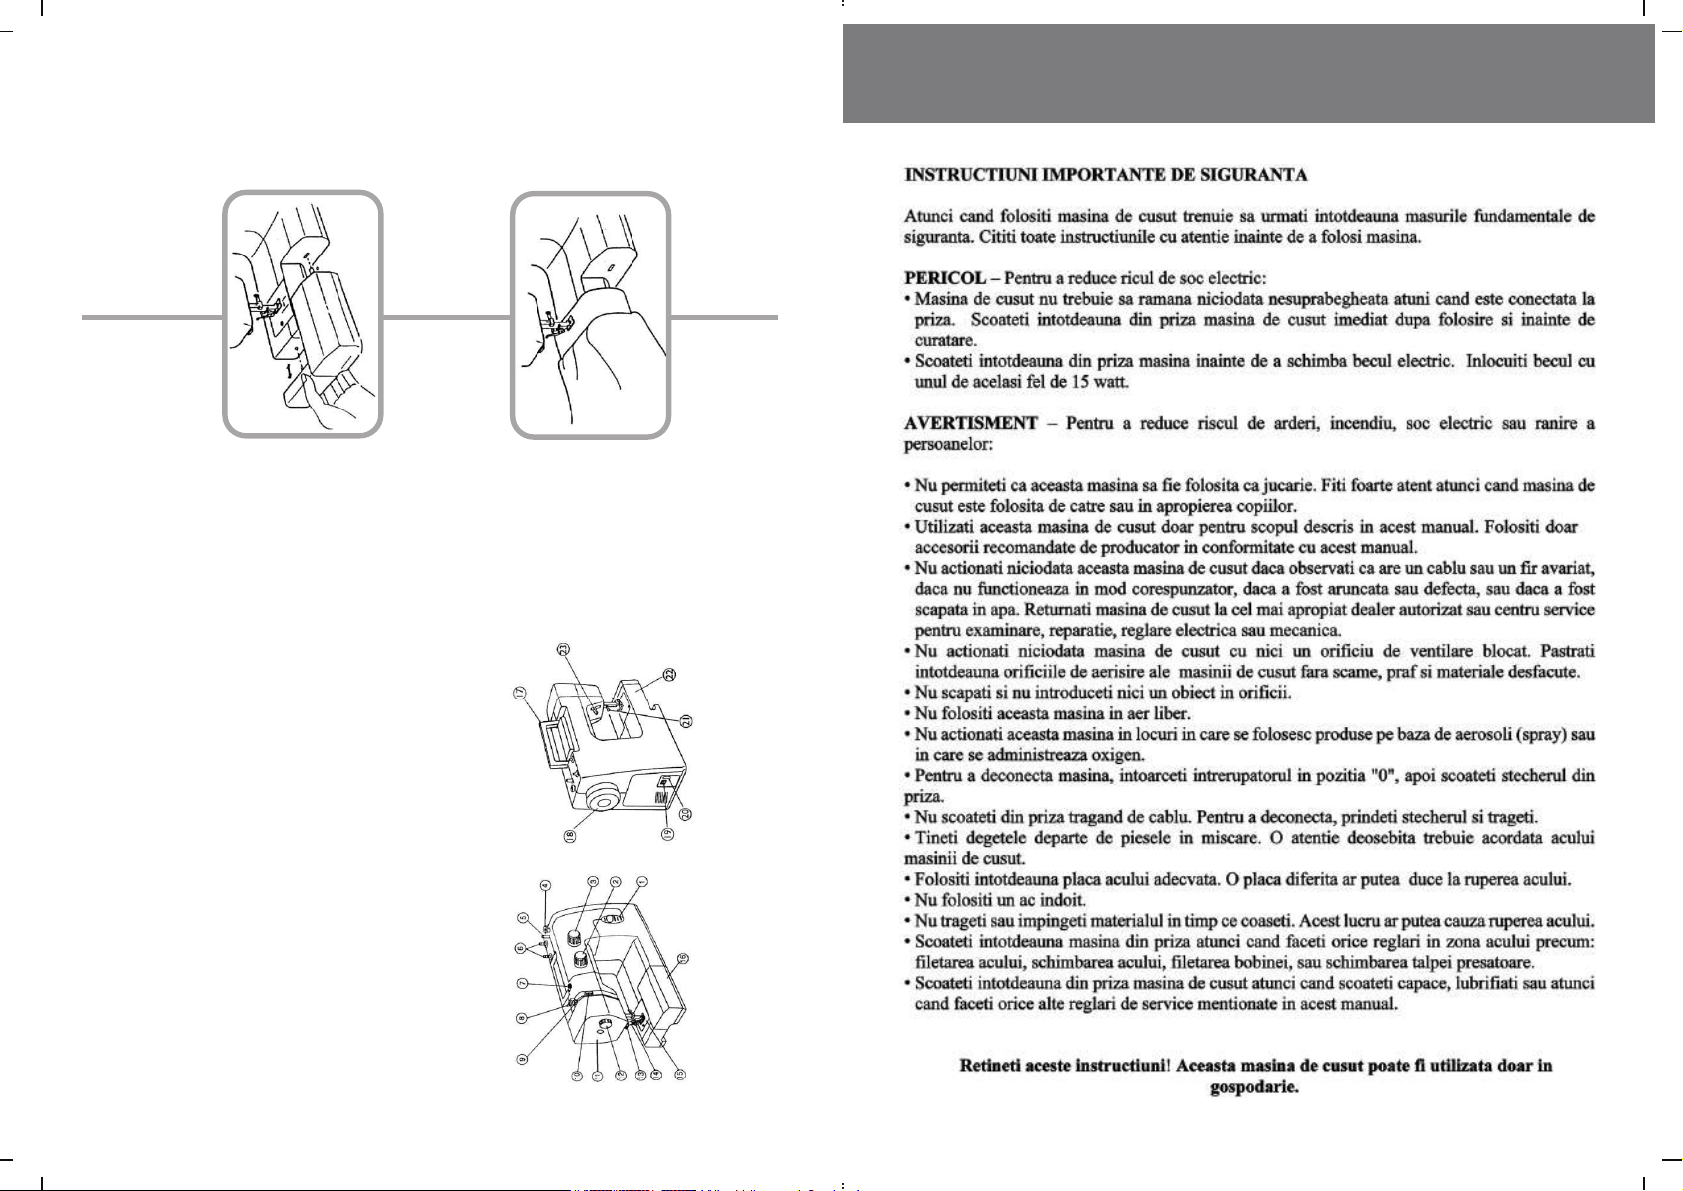
Makara Tutaca¤›n› Kullanma
fiekil 1: Makara tutaca¤›, makaralar› tutma ifllevi görür. Dikifl dikerken
makara tutucuyu yukar› do¤ru kald›r›n. Dikifl makinesini kald›r›rken,
makara tutaca¤›n› afla¤› indirin.
fiekil 2: Kullan›lan ipli¤in makara tutaca¤›na kolayl›kla dolanmas›
veya dü¤ümlenmesine karfl›, deli¤i makaraya bakacak flekilde
tutarak resimde gösterildi¤i gibi ipli¤i delikten geçirebilirsiniz.
Meki¤i Ç›karma / Takma
HATAY-BAfiTEKN‹K SO⁄UTMA-HAfi‹M BAfi
DÖ⁄ÜCÜLER ‹fi HANI NO:1 REYHANLI
0326 413 44 04
HATAY-SEREN MAK‹NA-NECAT‹ EZG‹
BARBAROS MAH.BOZTEPE CAD.NO:17/3 KIRIKHAN
0326 344 32 49
HATAY-GÜL‹STAN ELEKTRON‹K-‹SMA‹L KORKMAZ
KURTULUfi MH. fi.O⁄UZ YENER CD.NO:64/C ‹SKENDERUN
ELAZI⁄-ÖZDEV TEKN‹K-ERDAL DEVEC‹-AHMET ÖZBEK
‹ZZETPAfiA MH. KAZIM BAYAR CD. NO:24/A MERKEZ
(0424) 238 51 67
ERZ‹NCAN-B‹LG‹N ELEKTRON‹K-ERS‹N KAVLAK
ERZ‹NCAN CD.BELED‹YE ‹fi HANI REFAH‹YE
0446 611 26 10
ERZ‹NCAN-AYDINLAR ELEKTR‹K-ÜM‹T AYDIN
‹NÖNÜ MH. MERKEZ ÇARfiISI 15 SK. NO:5 MERKEZ
ÇORUM-U⁄UR ELEKTRON‹K-U⁄UR YALÇIN
ÜÇTUTLAR MAH.FAT‹H CAD.5.SOK.EYÜP SULTAN APT.1/C
0364 227 44 91
ÇORUM-YAS‹N ELEKTRON‹K-‹SMA‹L DA⁄
ÜÇTUTLAR MAH. FAT‹H SOK.NO:17/C ÇORUM
0364 227 38 55
DEN‹ZL‹-URAL TEKN‹K-AL‹ URAL
572.SK. NO:16 UÇANCIBAfiI MERKEZ
HATAY-ÖZEN ‹fi-NECAT‹ YILDIRIMÖZ
ÇAY MAH.RA‹F PAfiA CAD. 61/B ‹SKENDERUN
0326 641 17 06 0326 617 31 83
HATAY-FAT‹H ELEKTRON‹K-O.TURHAL CANLI
0326 613 50 64
HATAY-GÜNEfi ELEKTR‹K-DERV‹fi BÜLENT YILDIZ
ATA.MAH.‹SKELE CAD.HAYÜK PSJ.NO:38 SAMANDA⁄
0326 512 71 04 0326 513 06 16
0446 223 59 76
ERZURUM-GÜVEN ELEKTRON‹K-O⁄UZHAN YALDIZ
Z‹YABEY CD.BELED‹YE PSJ. NO:6 OLTU
0442816 42 23
0258 264 92 86
DEN‹ZL‹-ÖZPOLAT ELEKTRON‹K-‹BRAH‹M ÖZGÜL
L‹SE CD. NO:77 DEN‹ZL‹
SANAY‹ MH.EVREN CD.NO:15 DÖRTYOL
ERZURUM-IfiIN ELEKTRON‹K-M.AL‹ KEVGÜR‹
DERE MH.AfiA⁄I KÖfiK CD. NO:3 ERZURUM
0442 233 20 18
ERZURUM-AT‹LAY ELEKTRON‹K-ALPASLAN AT‹LAY
KONGRE CAD.HASIRHAN PASJ.NO:87
0258 242 31 31
D‹YARBAKIR-AZ‹Z ELEKTRON‹K-fiEYHMUZ NALÇA
GAZ‹ CAD.SÜLEYMAN NAZ‹F SK.NO:23/C D‹YARBAKIR
D‹YARBAKIR-VURANEL ELEKTR‹K-ABBAS VURANEL
FIRAT BLV.PEYAS MH.63.SK.ÇELEB‹4 APT.GAZ‹LER
0412 252 48 58
ISPARTA-ÜNALAN SO⁄UTMA-MUSTAFA ÜNALAN
0326 712 86 46
(0442) 213 30 60 - (0442) 213 30 61
0412 223 33 46
P‹R‹MEHMET MH. 1758 SK. NO:11/A MERKEZ
I⁄DIR-PARLAK TEKN‹K-‹BRAH‹M PARLAK
TOPÇULAR CAD. NO:34
0476 227 47 51
ESK‹fiEH‹R-SEV‹M TEKN‹K-HÜSEY‹N ATAR
GÖKMEYDAN MH. ULUS CD. NO:22/A MERKEZ
0222 240 16 41
ESK‹fiEH‹R-ARZU ELEKTRON‹K-SERVET KURUM
DEL‹KL‹TAfi MH. GÜRMAN SK. NO:37/B
D.BAKIR-DELTA ELEKTRON‹K-M.FADIL ORAL
‹STASYON CAD.NO:68 B‹SM‹L
(0412) 415 21 69
D‹YARBAKIR-D‹G‹TAL ELEKTRON‹K-MEHMET S.BAYKARA
KALE MH.SAM‹ SEÇK‹N CD.NO:5/B S‹LVAN
0246 223 35 20
ISPARTA-ARICAN SO⁄UTMA-FAT‹H ARICAN
BANK. CD. fiEKERBANK KAR. NO:118 YALVAÇ-ISPARTA
(0246) 441 37 47
‹ÇEL-MERT ELEKTRON‹K-MET‹N FINDIKLI
GAZ‹LER MH. ATATÜRK BULVARI NO:119 TARSUS
(0324) 626 83 98
‹ÇEL-PINAR ELEKTRON‹K-YAKUP TANRISEVS‹N
MAHMUD‹YE MAH.118.SOK.NO:46/B
G.ANTEP-‹K‹ZO⁄LU ELEKT.LTD.fiT‹-ÖMER ‹K‹ZO⁄LU
EYÜBO⁄LU MH. EBLEHAN ÇARfiISI NO:12/C
(0342) 230 71 00-(0342) 221 15 15-(0342) 230 58 58
0222 234 87 15
0412 711 44 14
D‹YARBAKIR-KARDEfiLER ELEKTRON‹K-FEYZ‹ KURTTEK‹N
M‹LL‹ EGEMENL‹K CD. NO:34 ERGAN‹
G.ANTEP-ÇAPAN TEKN‹K-MET‹N ÇAPAN
CUMHUR‹YET MAH.MERMER SOK.NO:10 N‹Z‹P
G.ANTEP-MUSTAFA ÇUBUKÇU-MUSTAFA ÇUBUKÇU
MÜTERC‹M ASIM CD. KÖRÜKÇÜ SK. NO:8/A
(0342) 231 00 73 - FAX (0342) 233 34 03
D.BAKIR-‹LK ADIM T‹CARET-ABDÜL FETTAH DURUP
BATIKENT S‹TES‹ A/5 BLOK ALTI NO:1 MERKEZ
(0412) 235 70 89-(0412) 236 44 04
0412 611 28 34
D‹YARBAKIR-fiIK ELEKTRON‹K-VURAN SEY‹THAN
KURTULUfi MH. NAMIK KEMAL CD. NO:20/A B‹SM‹L
‹ÇEL-HAKAN ELEKTRON‹K-AYDIN ILIKSU
B.EVLER MH. 1809 SK. D‹NL‹ APT ALTI NO:3/11 YEN‹fiEH‹R
0 324 328 03 25
‹ÇEL-TEKN‹K ‹fi-HASAN GEÇ‹M
ATATÜRK CD. U⁄UR ‹fi HANI NO:1 TARSUS
0324 336 82 98
‹ÇEL-AKN‹SAN SO⁄UTMA-HAKAN N‹SAN
GMK.BLV.FAT‹H MH.18 SK.ÖZÜDO⁄RU S‹T. 3/A MEZ‹TL‹
0 324 359 64 34
0342 517 51 66
G‹RESUN-YÜKSEL SO⁄UTMA-‹RFAN YÜKSEL
GAZ‹ANTEP-YILMAZ SO⁄UTMA-MAHMUT YILMAZ
AYDINLIK MH.GÖZ CD. ÜNLÜ S‹T.NO:2 ISLAH‹YE
0342 862 12 20
0412 415 05 94
D.BAKIR-STAR ELEKTRON‹K-RAMAZAN BALIKÇI
BA⁄LAR GÜRSEL CAD. NO:127 DÖRTYOL
0412 235 48 34 0412 228 84 15
(0324) 624 27 97 - (0324) 614 05 60
‹ÇEL-SADIK ELEKTR‹K-BÜLENT fi‹MfiEK
GÖKSU MH. O⁄UZKAAN CD. NO:22/B S‹L‹FKE
0324 714 05 54
‹HSAN‹YE MH. CEMAL GÜRSEL CD. NO:257 BULANCAK
0454 318 17 28
G‹RESUN-MUTLUSES ELEKTRON‹K-ABDULLAH MUTLU
GAZ‹ CAD.HASAN AKBULUT SOK.NO:9/B
0454 216 28 33
G‹RESUN-GÜNEfi TEK.-HAL‹L BÜLENT KARAAHMETO⁄LU
HACI S‹YAM MAH.FAT‹H CAD.NO:113
0454 216 60 96 0454 214 18 46
ED‹RNE-MUTLU TEKN‹K-MUTLU ORTA
YUKARI ZAFER‹YE MH. ‹LYAS BEY CD.NO:32/B KEfiAN
0284 715 22 71
ED‹RNE-TEKN‹K ELEKTR‹K-ZEK‹ YUMURTACI
100.YIL PASAJI NO:8 KEfiAN
0284 714 40 15
DÜZCE-ENSAR SERV‹S H‹ZM.-HÜSEY‹N TAfiTAN
CED‹D‹YE MH. fiEH‹T MUHTAR SK. NO:8/A MERK.
0380 523 34 74
‹STANBUL-AYGÜL TEKN‹K-YAKUP BIÇAK
19 MAYIS MH. OSMAN GAZ‹ CD. NO:7 B.ÇEKMECE
0212 881 33 18
‹STANBUL-DESER fiUBE-TAHTAKALE SERV‹S
TAHTAKALE CD. P‹RHAN KAT:4 EM‹NÖNÜ
(0212) 528 38 52
‹ÇEL-ESEN ELEKTR‹K-MEHMET fiAfiMAZ
MERKEZ MAH.ATATÜRK CD.NO:11 ERDEML‹
0324 515 68 87
‹ÇEL-ÇEL‹K ELEKTRON‹K-MURAT GÖRMEZ
BAHÇE MH. ORMAN ‹fiLETMES‹ ALTI NO:61/B ANAMUR
0324 814 85 90
HATAY-YEL‹Z BOB‹NAJ-M.FAT‹H ÖZBADEMC‹
MUSTAFAL‹ MH. ‹STASYON CD. NO:143 ERZ‹N
HAKKAR‹-HAKAN TEKN‹K SO⁄UTMA-KEREM ER‹K
ÇEVRE YOLU S‹VAS APT. NO:84/B MERKEZ
0438 211 73 03
GÜMÜfiHANE-VESTEL YETK‹L‹ SERV‹S‹-YAfiAR YALÇIN
HASANBEY MH. HASANBEY CD. NO:17/A MERKEZ
0456 213 51 54
ED‹RNE-YILDIZ SO⁄UTMA-ERKAN SABUZKA
1.MURAT MH. GÜNGÖR MAZLUM CD.SERHAT S‹T.
B/BLOK 35/A MERKEZ 0284 235 37 63
ED‹RNE-GÜVEN TEKN‹K-ABDÜLGAN‹ GÜLER
GAZ‹ CAD.YUSUF SOK. YURDACAN PSJ.NO:7 UZUNKÖPRÜ
0284 513 89 66
0326 681 81 98
HATAY-SER‹ SO⁄UTMA-MEHMET HAVL‹O⁄LU
KURTULUfi CD.NO:15/C ANTAKYA
0326 213 28 32
ELAZI⁄-YILMAZ BOB‹NAJ-FETH‹ YIMAZ
YEN‹ MAH.KEMAL SEDELE CAD. 12/E
0424 212 08 96
ELAZI⁄-GÜNEfi ELEKTRON‹K-FARUK GÜNEfi
KÜLTÜR MH.VAL‹ FAHR‹BEY CD.NO:113/D ELAZI⁄
0424 233 10 18
fiekil 1: Geniflletilebilir kumafl platformunu ç›kard›ktan sonra i¤neyi yükseltmek için denge çark›n› ileri do¤ru çevirin
ve i¤neyi yukar› kald›rarakön kapa¤› aç›n.
fiekil 2: Mekik ç›k›fl›n› tutarak meki¤i yerinden ç›kar›n.
fiekil 3: Meki¤i yuvas›na yerlefltirirken, yerine oturdu¤undan emin olmak için mekik sap›n› içeri do¤ru itin.
- 5 -
BOLU-BEST ELEKTRON‹K-OSMAN KALAY
TABAKLAR MAH.CUMHUR‹YET CAD.NO:28/B
0374 218 12 25
BOLU-COfiKUN ELEKTR‹K BOB‹NAJ-AHMET COfiKUN
SEV‹LLER MAH.SAKARYA CAD.NO:27 GEREDE
0374 311 22 32
BURDUR-GÜRSES ELEKTRON‹K-AD‹L KURULAY
KONAK MH. GAZ‹ CD. BAKIRCI SK. NO:6/B
(0248) 234 07 21-(0248) 234 42 62
BURDUR-ALTAY ELEKTRON‹K-HÜSEY‹N ALTAY
O⁄UZHAN MH.O⁄UZHAN CAM‹‹ KARfiISI NO:34/B BUCAK
0248 325 12 90
BURSA-GÜVEN TEKN‹K-ÖZDEM ÖZGÜL
KÜPLÜPINAR MH. AYBER CD. NO:26 OSMANGAZ‹
0224 251 06 24
BURSA-AGUS ELEKTR‹K-AL‹ KAfi
HAMZABEY MH. PAZARYER‹ SK. NO:2/A M.K.PAfiA
0224 613 19 99
BURSA-2H TEKN‹K-HÜSEY‹N AYDEM‹R
CAM‹KEB‹R MH. GEML‹K CD. fiENOCAK ‹fiHANI NO:46
ORHANGAZ‹ 0224 572 46 88
BURSA-AC‹L TV-ÇET‹N ATAfi
DEM‹R SUBAfiI MH. FIRIN SK.NO:7 GEML‹K
(0224) 514 71 20
BURSA-ERER T‹CARET-ERTU⁄RUL ERDO⁄AN
ÖMERBEY MH. CAM‹ SK.SU APT.NO:30 MUDANYA
0224 544 86 16
BURSA-ÇA⁄DAfi ELEKTRON‹K-FAT‹H YAVAfi
HIDIR BAL‹ MH. AL‹ CAN CD. NO:6/B YEN‹fiEH‹R
(0224) 773 07 32
BURSA-AKYÜZ ELEKTRON‹K-FAHRETT‹N AKYÜZ
ÇIRPAN MH. UYSAL SK. NO:13/B OSMANGAZ‹
(0224) 254 60 76
BURSA-SERKAN TEKN‹K-SERKAN BAYEZ‹T
YEN‹CE MH. ANKARA CD. GAZ‹ AHMET TÜRKYILMAZ SK
ÇANAKKALE-TEKN‹K ELEKTRON‹K-S.SEM‹H KIVIRCIK
NO: 4 ‹NEGÖL 0224 713 97 73
ASAF PAfiA CAD.NO:56/B
ÇANAKKALE-YONCA ELEKTRON‹K-KEREM ‹R‹Ç
KEMALPAfiA MH. DE⁄‹RMENL‹K SK. NO:16/B MERKEZ
0286 214 00 40
- 78 -
ÇORUM-ÖMÜR ELEKTRON‹K-METE PALABIYIK
CENG‹ZTOPEL CD. NO:2/F ÇORUM
0364 224 68 09
ÇANKIRI-B‹LG‹ÇLER ELEKTRON‹K-EKREM B‹LG‹Ç
BU⁄DAY PAZARI SA‹MA⁄A S‹T.B BLOK NO:1
0376 213 48 19
ÇANAKKALE-TÜRKER ELEKTRON‹K-SAFFET TÜRKER
CUMHUR‹YET MH.ÇANAKKALE CD. NO:41 ÇAN
ÇANAKKALE-GÜVEN ELEKTR.-HÜSEY‹N KÜÇÜKBERBER
M.fiEF‹K AKER CD.KAM‹L ALAN PASAJI NO:10 GEL‹BOLU
0286 566 9070
(0286) 212 59 11 - (0286) 214 01 44
0286 416 13 89
ÇANAKKALE-SILA TEKN‹K-BAYRAM TOPÇU
‹ST‹KLAL CD. HAN SK. NO:4 B‹GA
(0286) 317 22 56
Page 7

BALIKES‹R-GARANT‹ SO⁄UTMA-‹LHAN KOCABAfi
MALKOC MAH.MÜFTÜ fiEVKET CAD.76.SOKNO:4/A GÖNEN
0266 762 58 53
BALIKES‹R-GÜRSES ELEKTRON‹K-ÖZCAN BALIKÇI
MALKOÇ MH.LÜTFÜ fiEVKET CD.NO:2/B GÖNEN
BALIKES‹R-D‹G‹TAL ELEK.-ÖZKAN & ÖZCAN ÖLÇ
17EYLÜL MAH. HACIKEfiFETT‹N CAD. NO:20/A BANDIRMA
(0266) 715 16 46
ANKARA-ARSLANLAR ELEKTRON‹K-TUNCAY OKUMUfi
GÜZELKENT MH. ÇARfiI ARYA NO:50 ERYAMAN
0312 279 16 41
ANKARA-GÖKSEL ELEKT-MUSTAFA ZEYNEL GÜNAY
21.CD. KARTALKAYA APT.NO:29/A KIRIKKONAKLAR
0312 496 42 53
ANTALYA-AKGÜL TEKN‹K SERV‹S -MEHMET Z‹YA AKGÜL
A. MEN. BUL. KAVAKLIKUYU CD. YED‹T. KAR. SALUR APT.
BALIKES‹R-HAL‹L KILIÇ-HAL‹L KILIÇ
YEN‹ ÇARfiI BASIN SOKAK VAKIF ‹fi HANI NO:20
(0266) 241 87 54 - (0266) 249 14 74
BALIKES‹R-ANIL SO⁄UTMA-MURAT ERTU⁄
GÜNAYDIN MAH.2. OKUL CAD.NO:16/A BANDIRMA
0266 762 01 28
BALIKES‹R-ATASOY SO⁄UTMA-M.KEMAL ATASOY
‹K‹Z ÇAY MH.PLAJ CD. NO:9/B EDREM‹T
(0266) 385 22 19
NO:9 KUMLUCA (0242) 887 53 80 - (0242) 887 64 72
ANTALYA-YÜCEL SO⁄UTMA-HÜSEY‹N DEM‹REL
HÜKÜMET CD. NO:54 ELMALI
(0242) 618 17 97
ANTALYA-ARIKAN SO⁄UTMA-YUSUF ARIKAN
fiEKERHANE MH. YAYLA YOLU CD.ÇINAL SK. NO:4/K
ANTALYA-B‹L-TEK SO⁄UTMA-S.HÜSEY‹N ÖZÇÖREKÇ‹
ALANYA 0242 519 51 70
0266 713 56 78
BALIKES‹R-U⁄UR TEKN‹K-fiAK‹R DUYGULU
MAHKEME MH. AKIN CD. NO:10/A BURHAN‹YE
(0266) 412 86 89
BALIKES‹R-UZAY ELEKTRON‹K-SUAT OLPAK
VEHB‹ BEY MAH.SELAN‹K PSJ.NO:2/B AYVALIK
ANTALYA-CANKALP ELEKTRON‹K-AYHAN CANKALP
TUZCULAR MH. ‹MARET SK. FARAÇLAR PSJ. NO:11
(0242) 242 31 35
ANTALYA-EKOL ELEKTRON‹K-SELAHATT‹N fiAH‹N
YEN‹ MH. DÖRTYOL CD. ALPASAR ‹fi MRK.NO:16/E KEMER
0242 814 20 53
A.PAZARCI MAH.FEVZ‹ PAfiA CAD.NO:133 MANAVGAT
B‹LEC‹K-EDEBAL‹ SO⁄UTMA-RECA‹ YILDIRICI
‹ST‹KLAL MH. REF‹KA ÖZTÜRK CD.NO:1/A MERKEZ
BATMAN-NEZ‹R fiENDUR-NEZ‹R fiENDUR
MEYDAN MH.CUMHUR‹YET CD.NO:48/A
0488 213 10 68
BATMAN-fiAH‹NLER ELEKTRON‹K-AHMET fiAH‹NLER
CUMHUR‹YET CD.fiAH‹NLER PSJ.NO:36
BARTIN-MARTI ELEKTRON‹K-TURAN TUTSAL
HENDEKYANI CD. ORTA MH. NO:101/B MERKEZ
0378 228 34 22
(0266) 212 11 58
(0242) 742 09 90
ARDAHAN-YILDIRIM ELEKTR‹K-CEMALETT‹N YILDIRIM
ATATÜRK CD. NO:69 MERKEZ
(0478) 211 28 58
0488 213 17 02
ARTV‹N-BALTA ELEKTR‹K-TEVF‹K TURHAN
GÜRSEL CD.TAKOZLAR APT ALTI-ARHAV‹
0466 312 21 59
ARTV‹N-BALTA ELEKTR‹K-T.TURHAN BALTAO⁄LU
GÜRSEL CD. TAKAZLAR APT.ALTI NO:10-C ARHAV‹
0466 312 21 59
0228 212 46 80
BAYBURT-ZAFER ELEKTRON‹K-ZAFER OCAKLI
CAM‹KEB‹R MAH. ULUCAM‹ CAD. NO:7
0458 211 41 40
B‹NGÖL-KARTAL ELEKTRON‹K-MEDEN‹ KARTAL
CUMHUR‹YET CD. NO:8 KARLIOVA
0426 511 26 39
B‹NGÖL-S‹MGE ELEKTRON‹K -A.MEL‹K BA⁄Ifi
YEN‹fiEH‹R MH.YEfi‹M SK.NO:14/C MERKEZ
ARTV‹N-ARTV‹N ELEKTRON‹K-MUSA YAZICI
HALKEV‹ CD.NO:7 MERKEZ
0466 212 10 82
AYDIN-ALTAY TEKN‹K-MUSTAFA ALTAY
HACI FEYZULLAH MH. ÜSTÜN ADA S‹T.NO:2 KUfiADASI
AYDIN-UZMAN ELEKTRON‹K-KAM‹L KARAHALLI
0256 612 32 22
ATATÜRK BULVARI ESK‹ ADL‹YE ALTI NO:73 D‹D‹M
AYDIN-ERD‹ ELEKTR‹KL‹ EV ALET.-NECAT‹ KARAHAYIT
H.ABAT MAH.111 SOK NO:5 C‹NE
(0256) 711 26 47
B‹TL‹S-AY BUZ TEKN‹K-MEHMET AY
CUMHUR‹YET CD. SÜPHAN PASAJI NO:73 TATVAN
(0434) 827 31 70
B‹TL‹S-U⁄UR SO⁄UTMA-ZÜLF‹KAR ÜZEL
TOK‹ KONUTLARI YUKARI ÇARfiI AHLAT
0434 412 41 72
B‹TL‹S-D‹ZAYN ELEKTR‹K-ÖZGÜR ‹VAK
NUR CD. EREM CENTER ‹fi MRK.MERKEZ
0434 226 74 43
B‹TL‹S-BETÜL ELEKTRON‹K-SUPH‹ DEM‹RKOL
BANKALAR CD. KASAPLAR ÜSTÜ KAT:2 NO:9 MERKEZ
(0434) 226 85 55
(0426) 213 77 56
AYDIN-BARIN ELEKTRON‹K-HASAN BARIN
ALTINTAfi MH. HÜRR‹YET CD. NO:161B NAZ‹LL‹
(0256) 315 43 21-(0256) 312 03 82
BALIKES‹R-ÖZER TEKN‹K-ERDAL BOZACIO⁄LU
CAM‹ VASAT MH. PARK CD. NO:12/A EDREM‹T
0266 373 12 44
AYDIN-GÜNAL ELEKTRON‹K-DURMUfi GÜNAL
KOÇLAR CD. NO:32/C SÖKE
0256 811 14 84
AYDIN-YILMAZ ELEKTRON‹K-ORHAN YILMAZ
KURTULUfi MH. GARAJ CD. NO.5/B MERKEZ
(0256) 212 00 35
0256 518 85 50
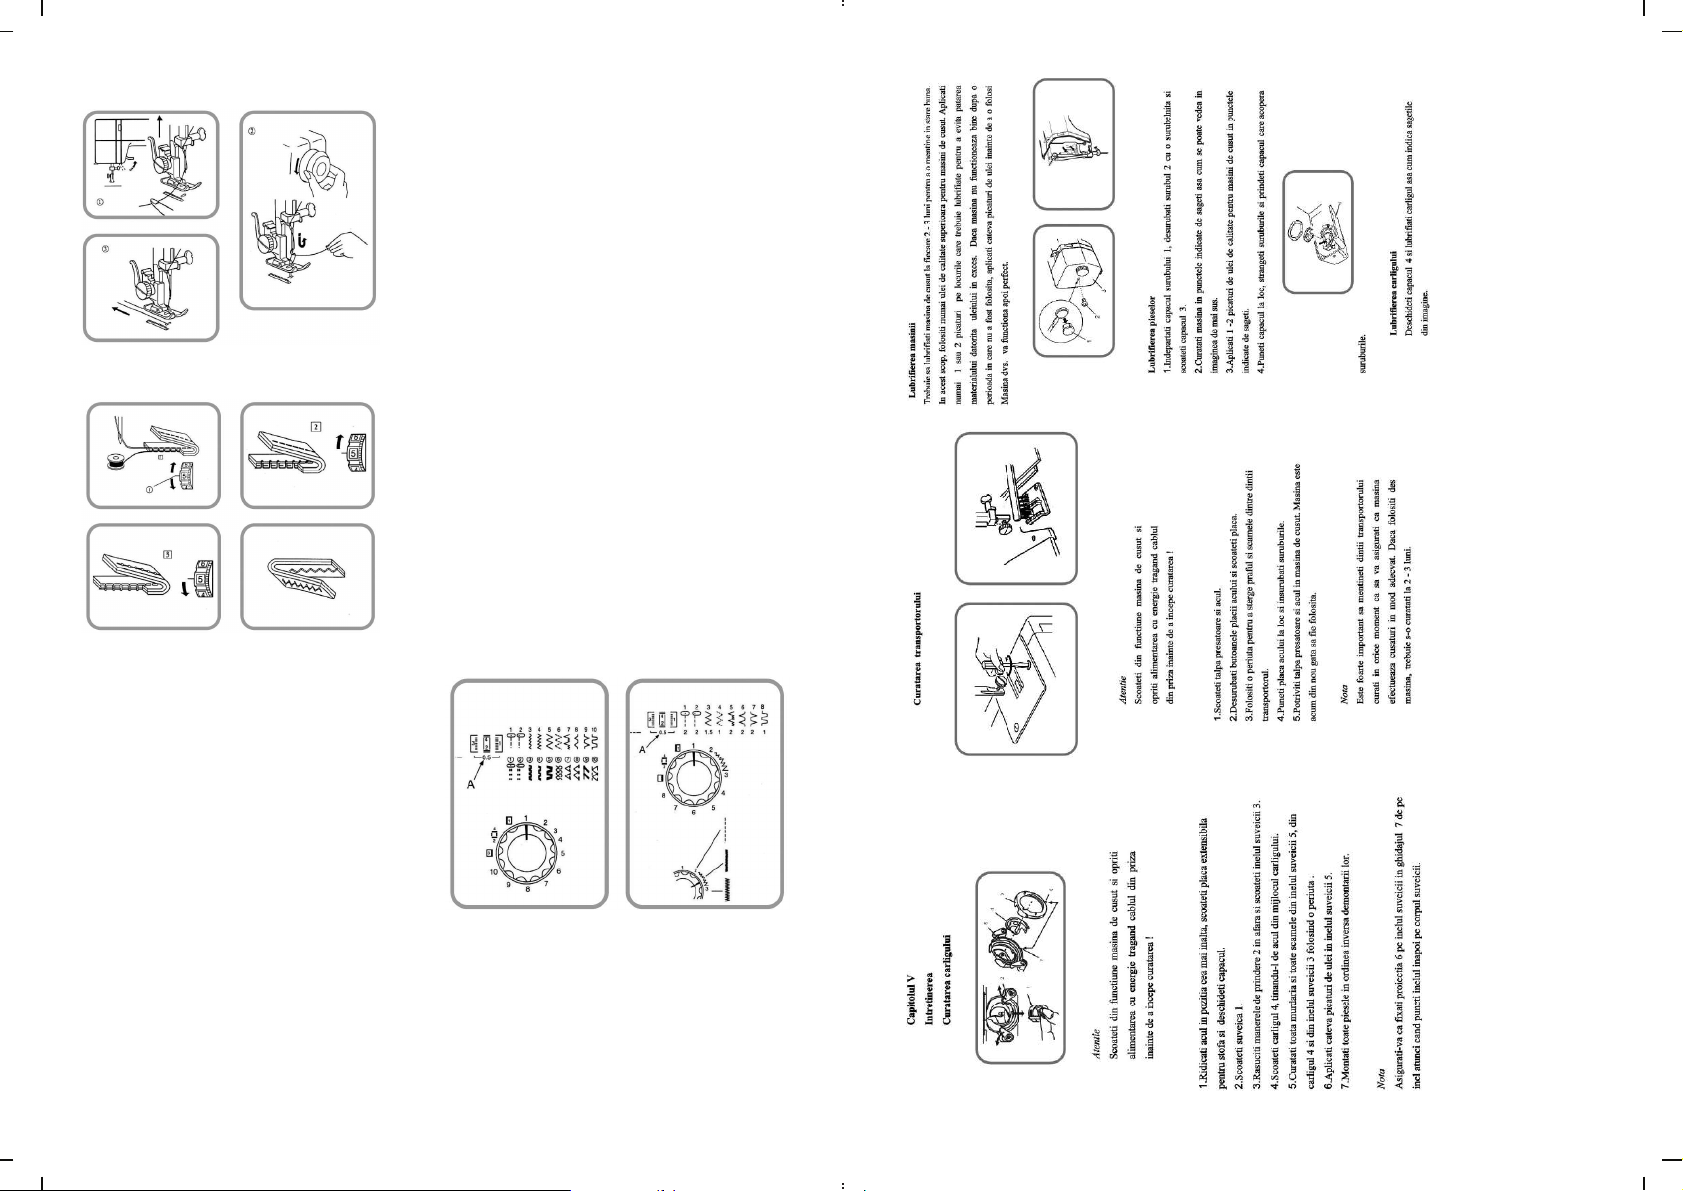
Makara Sarma
(1)Denge çark›n›, makineyle ba¤lant›s›n› keser gibi
sa¤a do¤ru d›flar› çekin.
(2)Makaradaki ipi, makara sar›c› germe diskine
do¤ru çekin.
(3)‹pli¤i masuran›n içindeki delikten geçirin ve
masuray› masura mandal›na yerlefltirin.
(4)Masuray› sa¤a do¤ru çevirin.
(5)Ayak pedal›n› afla¤› do¤ru indirirken, ipin
ucunu tutun. Birkaç dönüflten sonra durun. Masuray›
kapatmak için artan ipi kesin.
(6) Ayak pedal›n› yine afla¤› indirin. Masura dolana kadar ipi sar›n ve sonra makineyi durdurun.Masura mandal›n›
sola itin ve ipi kesin.
(7) Denge çark›n›n makineyle temas› için, sola do¤ru itin (orjinal konumuna getirin).
Uyar›: Sarma ifllemi bitti¤inde, masura mandal› sola itilmelidir.
‹pi Meki¤in ‹çinden Geçirme
(1) Masuray› meki¤e yerlefltirin. ‹pli¤in, ok iflaretiyle gösterilen
flekilde (saat yönünde) ç›kt›¤›ndan emin olun.
(2) ‹pli¤i, meki¤in yar›k k›sm›ndan çekin.
(3) ‹pli¤i, ç›k›fl deli¤inden masura gerginli¤i düzenleme yay›na do¤ru
çekin.
Not: ‹pli¤i yaklafl›k 10 cm. çekin.
ANKARA-ESPA ELEKTRON‹K-AHMET ERGÜZEL
HOfiDERE CD. NO:88/C YUKARI AYRINCI
0312 439 25 16
ANKARA-GARANT‹ MED‹KAL-AL‹ D‹K‹L‹TAfi
ATATÜRK MH.MELTEM SK.NO:32/19 S‹NCAN
0312 268 83 89
ANKARA-AKAY ELEKTRON‹K-AK‹F AKTAfi
A⁄RI-AKTAfi ELEKTRON‹K-SA‹D AKTAfi
SA‹D‹ NURS‹ CAD.ESK‹ OTOGAR KARfiISI NO:285
(0472) 216 13 40
AKSARAY-‹T‹NA ELEKTR‹K-HARUN DEM‹R
ESK‹ SANAY‹ CAD. HUZUR PANS‹YON YANI 1.SOK. NO:9/A
0382 212 63 99
AMASYA-ATAKAN ELEKTRON‹K-HULUS‹ ATAKAN
YÜZEVLER MAH.KUCUR PEHL‹VAN SOK.NO:39/B
0358 218 50 81
AMASYA-ÇALIfiKAN ELEKTRON‹K-fiEREF ÇALIfiKAN
ÖZEL ‹DARE ‹fi HANI NO:21 SULUOVA
0358 417 18 64
AMASYA-DEVRAN ELEKTRON‹K-MUSA GÜDEK
CAM‹‹ CED‹D MH.HACI RAHAT CD.NO:83 MERZ‹FON
0358 514 19 06
AMASYA-FLAfi ELEK.-MEHMET NECM‹ AÇIKER
YÜZEVLER MH.TORUMTAY SOK.NO:25 DEM‹RD‹fi APT
Cihangir Mh. Güvercin Cd. No:4 Haramidere Mevkii Avc›lar - ‹STANBUL
MERKEZ SERV‹S: DESER ELEKTRON‹K San. Tic. Ltd. fiti. (0212) 422 94 94
ADANA-ÖZER ELEKTRON‹K-ADEM BALIKÇI
OBALAR CAD.SAL‹H ZEK‹ BUGAY ‹fiHANI NO:11
0322 352 25 75
ADANA-DORUK SO⁄UTMA-MEHMET RUfiEN KIRAÇ
REfiAT BEY MAH.AV.MAHMUT ERO⁄LU CAD.NO:8 SEYHAN
0322 458 55 14
ADANA-DÜZGÜN T‹CARET-MEHMET DÜZGÜN
BARAJ YOLU 4.DURAK MEVS‹M APT.NO:4/1
(0322) 225 65 65 - (0322) 225 65 66
ADANA-DÜZOVA OYUN ALET.-MAHMUT AKKOÇ
K.SAAT MEYDANI H‹LAL ‹fi MER. BODRUM KAT NO:32 SEYHAN
(0322) 363 67 87
ADANA-DURAN SO⁄UTMA-DURAN AKKOÇ
CUM. MH. DEDEO⁄LU SK. S‹S APT. ZEM‹N KAT KOZAN
(0322) 516 57 78
ADANA-BEYAZ EfiYA TAM‹R VE SERV‹S-HÜSEY‹N DEM‹R
BÜYÜK KIRIM MH. 4.SK. NO:8/A CEYHAN
ANKARA-MERT TEKN‹K SERV‹S-ÖMER UYSAL
AKTEPE MH. 2.CD. NO:47/A KEÇ‹RÖREN
(0358) 212 33 71-(0358) 218 43 86
(0322) 613 17 77 - (0322) 613 79 43
0312 380 00 22
AMASYA-KUTUP TEKN‹K SO⁄-FAT‹H YENER
GÖKMEDRESE MH. M.K.P CD.NO:115/A MERKEZ
0358 212 61 66
ADANA-SER‹N ELEKTRON‹K-SEDAT SER‹N
MAHFESI⁄MAZ MH.KENAN EVREN BLV. SEYHAN
0322 233 74 84
ADIYAMAN-GÜRBÜZ SO⁄UTMA-ALPER GÜRBÜZ
ATATÜRK CD. KORUPINAR MH.HASTANE YOLU BESN‹
0416 318 10 81
ADIYAMAN-ÜNAL ELEKTRON‹K-MUSTAFA K‹NG‹R
SIRATUT MAH.CUMHUR‹YET CAD.NO:7/C
0416 216 75 56
KAfi‹FHOCA SK.NO:56/A fiEH‹TL‹K AB‹D‹NPAfiA
ADIYAMAN-KAR SO⁄UTMA-ENDER KARCIO⁄LU
CAM MAH.GAZ‹ CAD.NO:154 GÖLBAfiI
0416 782 22 97
ADIYAMAN-ELEK.EV ALETLER‹ HAST.-YAS‹N BOZAN
FAT‹H MH. ZAFER CD. NO:48 KAHTA
- 77 -
ANKARA-BEKS SERV‹S H‹ZMETLER‹-‹SA ÇEV‹K
SE⁄MENLER MH.CEMAL GÜRSEL CAD.NO:51/A GÖLBAfiI
ANKARA-AYDEM‹R ELEKTR‹K-YILMAZ SAK
CUMHUR‹YET MH.SELÇUK CD. NO:27/B POLATLI
ANKARA-U⁄UR TEKN‹K SERV‹S-U⁄UR YURTO⁄LU
MAMAK CD.ERD‹REN SK. 12/10 DEM‹RL‹BAHÇE MAMAK
(0312) 319 21 20-(0312) 362 95 15
ANKARA-ERDO⁄DU SO⁄UTMA-ESRA GÜN
ÇARfiI MH. DAMLADOL SK. NO:74/C YEN‹MAHALLE
0312 315 60 25
0535 863 91 02
ADIYAMAN-YILDIRIM SERV‹S-HÜSEY‹N POLAT
BAHÇEL‹VLER MH.177 SK. NO:2 ADIYAMAN
0416 214 40 83
0312 319 30 31
ANKARA-Y‹⁄‹T ELEKTRON‹K-YUSUF Y‹⁄‹T
M.Ç.M. 12. CADDE GÜLSUYU SK. NO:5/21 S‹NCAN
(0312) 264 10 31
AFYON-ATV ELEKTRON‹K-CEM‹L AKBULUT
AMBARYOLU ZAFER ÇARfiISI NO:13/4 AFYONKARAH‹SAR
(0272) 215 28 30
AFYON-YILMAZ SO⁄UTMA-TURGAY YILMAZ
YEN‹ MAH.PTT CAD.NO:12 EM‹RDA⁄
0272 441 29 20
AFYON-EM‹N ELEKTRON‹K-EM‹N TAfiKIRAN
(0312) 621 04 30
ANKARA-DO⁄AN TEKN‹K SERV‹S-DO⁄AN YILMAZ
M‹LL‹ EGEMENL‹K CD. NO:134/A BEYPAZARI
0312 762 89 19
ENST‹TÜ CD.NO:19 AFYON
0272 215 43 32
AFYON-FAT‹H ELK.EV ALT-FAT‹H ÇOMAK
CUMHUR‹YET MH.CEVAT AHET PAfiA CD.NO:3
(0272) 214 51 33
AFYON-ÖZLEM TEKN‹K-MEHMET ÇILA
ÇAKIR MH. HAMAM SK. NO:17 SANDIKLI
Makineye ‹plik Takma
Denge çark›n› ileri do¤ru çevirerek i¤neyi yukar› konuma getirin.
Bask› aya¤›n› yükseltin ve makaray› makara tutaca¤›na yerlefltirin (flekilde
gösterildi¤i gibi).‹pli¤i, makaran›n arka taraf›ndan çekin.
(1) ‹pli¤i, iplik tutma bobininden geçirin.
ANKARA-YÜCEL ELEKTRON‹K-YÜCEL TOKMAKCI
BA⁄LARBAfiI CAD.NO:107/A AB‹D‹NPAfiA
(0312) 365 14 14 - (0312) 365 25 25
(0312) 484 21 19 - (0312) 484 56 40
(2) ‹pli¤i tutun ve iplik germe diskinin içine çekin ve iplik platformundan geçirin.
(3) ‹pli¤i s›k›ca yukar› çekin ve iplik çekme kolunun deli¤ine sa¤ taraftan geçirin.
(4) Sonra ipli¤i afla¤› çekin ve iplik kancas›ndan geçirin.
(5) ‹pli¤i afla¤› çekin ve iplik çengelinden geçirin.
(6) ‹pli¤i, i¤ne deli¤ine önden arkaya do¤ru geçirin.
Not: ‹pli¤i daha kolay geçirebilmek için, ipli¤i keskin bir makasla kesin.
Afla¤›daki resimde ipli¤in tak›lmas› detayl› bir flekilde gösterilmektedir.
A⁄RI-ACELE-PEfi‹N ELEKTRON‹K-GAL‹P GÜLER
BUHARA SOK. NO:12 PATNOS
(0532) 227 06 68 - (0472) 616 46 08
0272 512 95 94
UYARI: E¤er ip yanl›fl veya eksik bir biçimde tak›l›rsa, masura bölümüne
ip sar›lmas› ve dikifl dikilememesi gibi bir durumla karfl›lafl›labilir.
- 6 -
Page 8
Afla¤›daki ‹pin Yukar›ya Ç›kar›lmas›
Üstteki ‹pli¤in Gerginlik Ayar›
(1) Bask› aya¤›n› kald›r›n ve ipli¤i sol elinizle üstten tutun.
(2) Denge çark›n› ok yönünde çevirmeye devam edin. Alttaki
ipli¤i yukar› çekebilmek için, ipli¤i üstten çekin.
(3) Her iki taraftaki ipli¤i de yaklafl›k 5cm ay›r›n ve onlar›
bask› aya¤›n›n alt›ndan arkaya do¤ru çekin.
Düz dikifl yaparken, üstteki ve alttaki ipli¤in her ikisinin de
kumafl›n iki kat› aras›nda dü¤ümlenmesi gerekir.
‹plik germe diskinin seçim dü¤mesini ayarlay›n.
(1) Ayarlama göstergesi
(2) Üstteki ipli¤in gerginli¤i daha fazlaysa, göstergeyi yukar›
çevirin.
(3) Üstteki ipli¤in gerginli¤i daha azsa, göstergeyi afla¤› çevirin.
Zigzag dikifl durumunda üstteki ipli¤in gerginli¤i;
Zigzag dikiflten en iyi sonucu elde etmek için, üstteki ipli¤in
gerginli¤i düz dikiflte oldu¤undan daha az olmal›d›r.
Üstteki iplik, tersen görünür olmal›d›r.
Model Seçim Butonu
Dikifl için istenilen boyut seçimi yap›lmadan önce i¤ne
denge çark› çevrilerek yukar›ya kald›r›l›r ve model seçim
butonundan istenilen desen seçimi yap›l›r.
Çift ‹¤neli Dikifl Seçimi
Çift i¤neli dikifl dikmek için, model seçimi (1)-(10)
aras›nda ayarlanmal›d›r.
Afla¤›daki ayarlama ile istedi¤iniz dikifl uzunlu¤u
seçilebilir.
"+" Yo¤un dikifl için artt›r›n.
"-" Seyrek dikifl için azalt›n.
Not : Seçim butonundaki 2 ve 3.nolar aras›nda, dikifl geniflli¤i de¤iflir (flekilde gösterildi¤i gibi).
- 7 -
- 76 -
Page 9
Dikifl Uzunlu¤u Seçim Butonu
En uygun dikifl uzunlu¤unu ayarlamak için seçim butonunu
çevirin.Numara büyüdükçe, dikifl uzunlu¤u artar.
Dü¤me deli¤i yaparken, do¤ru de¤er "......" fleklinde yap›lan
ayarlamad›r.Zigzag dikifl için, 0.5 ile 4 aras›ndaki de¤erler
kullan›labilir.
Do¤ru elastik dikifl de¤eri +(1)-(10) aras›nda olmal›d›r.
Elastik dikifl en iyi flekilde nas›l yap›l›r?
Elastik dikifl tatmin edici olmad›¤›nda, daha yo¤un dikifl için seçim
butonunu "-" yönünde ve daha seyrek dikifl için "+" yönünde
çevirmelisiniz.
Not : Seçim butonunu çevirirken, i¤ne durmufl flekilde ve kumafltan olabildi¤ince yüksek konumda olmal›d›r.
Ters Çevirme Butonu
E¤er ters çevirme butonu sürekli afla¤› bas›l› flekildeyse,
makine sürekli ters dikifl yapacakt›r.
Alt Besleme Mandal›
1. Kapa¤› aç›n.
2. Besleme mandal›n›, flaft› çekerek ve flekilde gösterildi¤i gibi ok iflaretleri
yönünde hareket ettirerek indirin. (2) Alt difl mandal›
3. Besleme mandal›n›, alt difl mandal›n› çekerek ve flekilde gösterildi¤i gibi
ok iflaretleri yönünde ve "A" iflaretine gelecek flekilde hareket ettirerek yukar›
kald›r›n.
Not: Al›fl›lm›fl dikifl için, tüm besleme mandallar› yukar› kald›r›lmal›d›r.
- 75 -
Bask› Aya¤› Seçim Butonu
fiekil1:Bask› aya¤› seçimi;
Koton pazen ve örgü streç tekstili için:1, Aplike dikifl, file kumafl ve nak›fl için: 2
Al›fl›lm›fl dikifl için: 3 fiifon, dantel, pamuk ve di¤er çeflitli ince materyaller için:3
- 8 -
Page 10
3.BÖLÜM
D‹K‹fi D‹KMEYE BAfiLAMA
Düz Dikifl
1- Model seçim butonu : 1 veya 2
2- Dikifl uzunlu¤u : 2 - 4
3- ‹¤ne ifli için bask› aya¤› : zigzag
4- ‹plik germe diskinin gerginli¤i : 2 - 6
Yukar›da belirtilen ayarlar› yapt›ktan sonra, bask› aya¤›n› yükseltin ve kumafl›
i¤ne platformunun ayak telinin yan›na koyun.Denge çark›n› ileri do¤ru çevirin ve
i¤neyi kumafl›n üstüne indirin. Bask› aya¤›n› indirin ve ipli¤in arka tarafta
kald›¤›ndan emin olun.
Ayak pedal›na bas›n. Kumafl, ayak teli boyunca ilerleyecektir ve besleme
mandal› taraf›ndan otomatik olarak ileri do¤ru hareket ettirilecektir.
‹pli¤i sonland›rmak için, lütfen ters çevirme butonuna bas›n ve birkaç ters dikifl
yap›n.
Kumafl› çekerek bask› aya¤›n› yükseltin ve ipli¤i arka tarafa çekin. Her iki ipli¤i
de bir makasla kesin. Daha sonra kullanmak üzere ipli¤i belli bir uzunlukta
b›rak›n.
Dikifl Yönünü De¤ifltirme
Dikifl iflleminden sonra, makineyi durdurun ve i¤nenin kumafl›n üstüne
inmesi için denge çark›n› çevirin.
Bask› aya¤›n› yükseltin.
Yönü istedi¤iniz gibi de¤ifltirmek için kumafl› çevirin.Dikifl dikmeye devam
etmek için bask› aya¤›n› indirin ve istenilen yönde dikifle devam edin.
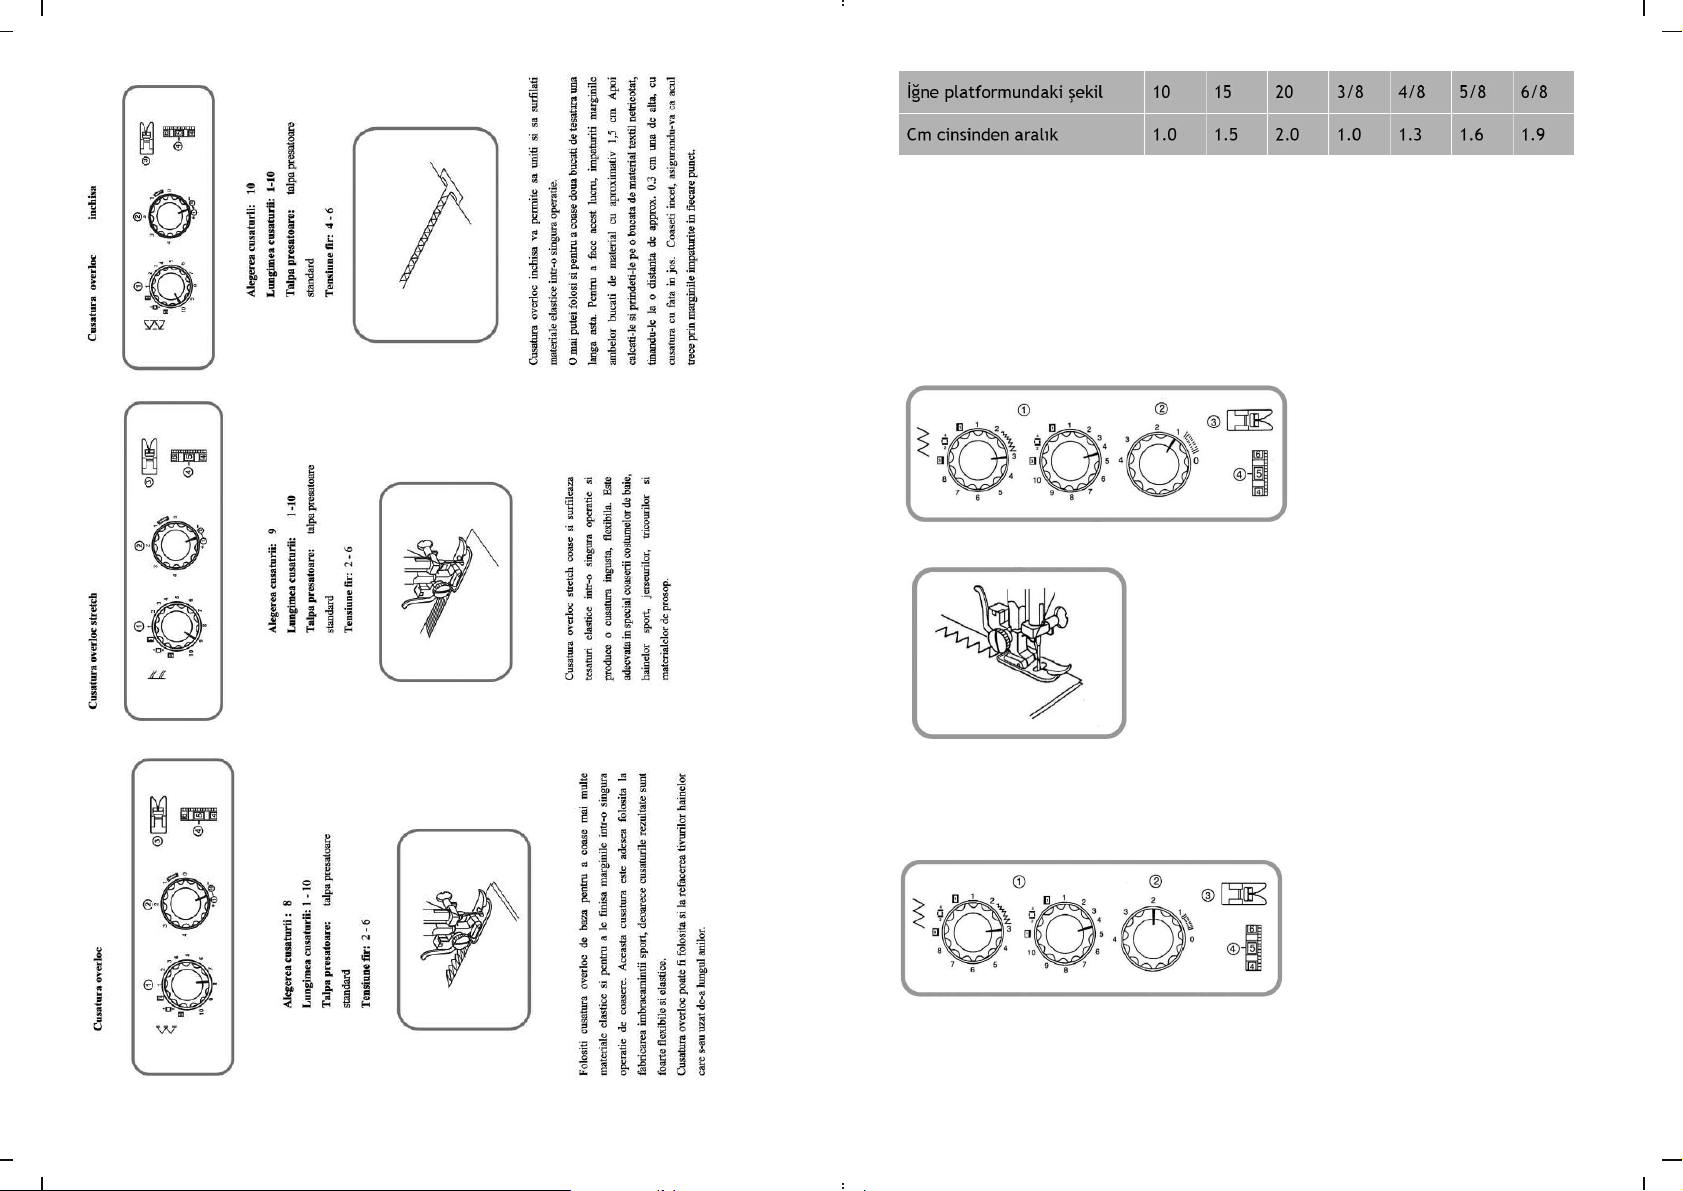
‹¤ne Platformunda Ayak Teli fieritleri
‹¤ne platformundaki ayak teli fleritleri, i¤ne ile iplik aras›ndaki geniflli¤i korumaya yard›mc› olur.
1- Ayak teli fleritleri
2- Köfleler
3- ‹¤ne platformu
4- ‹¤ne platformu deli¤i
5- ‹¤ne merkezine dikifl geniflli¤i
Afla¤›da belirtilen tablo ayak teli fleritleri ile i¤ne aras›ndaki mesafenin
uyumunu gösterir.
- 9 -
- 74 -
Page 11
Köfle Dikifli
Köfle dikifli yapmadan önce, kumafl›n kenarlar›ndan 1.6 cm’lik bir boflluk b›rak›larak dikifle bafllan›r.Kumafl›n
kenarlar› ile köfleleri hizaland›¤›nda makineyi durdurun ve i¤neyi indirmek için denge çark›n› ileri do¤ru çevirin.
Bask› aya¤›n› kald›r›n ve kumafl›n köfleleri ayak teli fleridi ile 1.6 cm hizalanana kadar kumafl›n yönünü i¤nenin
etraf›nda çevirirek de¤ifltirin.
Bask› aya¤›n› indirin ve yeni yönde dikmeye devam edin.
(2) Köfleden gelen iplik
Zigzag Dikifl
1- Model seçim butonu : 3- 5
2- Dikifl uzunlu¤u : 1 - 4
3- Bask› aya¤› : zigzag
4- ‹plik germe diski : 2 - 6
Yukar›da belirtilen ayarlar› yapt›ktan sonra bask› aya¤› indirilerek kumafl›n üzerine zigzag dikifli yap›l›r.
Basit zigzag dikifl genellikle kumafl kenar› k›v›rmak, dü¤me ili¤i ve elastik
k›vr›m yapmak için kullan›l›r.
- 73 -
4.BÖLÜM
KUMAfi D‹K‹M‹
1-Zigzag Overlok
1- Model seçim butonu : 3 - 6
2- Dikifl uzunlu¤u : 1 - 2
3- Bask› aya¤› : zigzag
4- ‹plik germe diski : 4 - 6
Yukar›da belirtilen ayarlar› yapt›ktan sonra bask› aya¤› indirilerek kumafl›n üzerine zigzag overlok uygulan›r.
- 10 -
Page 12
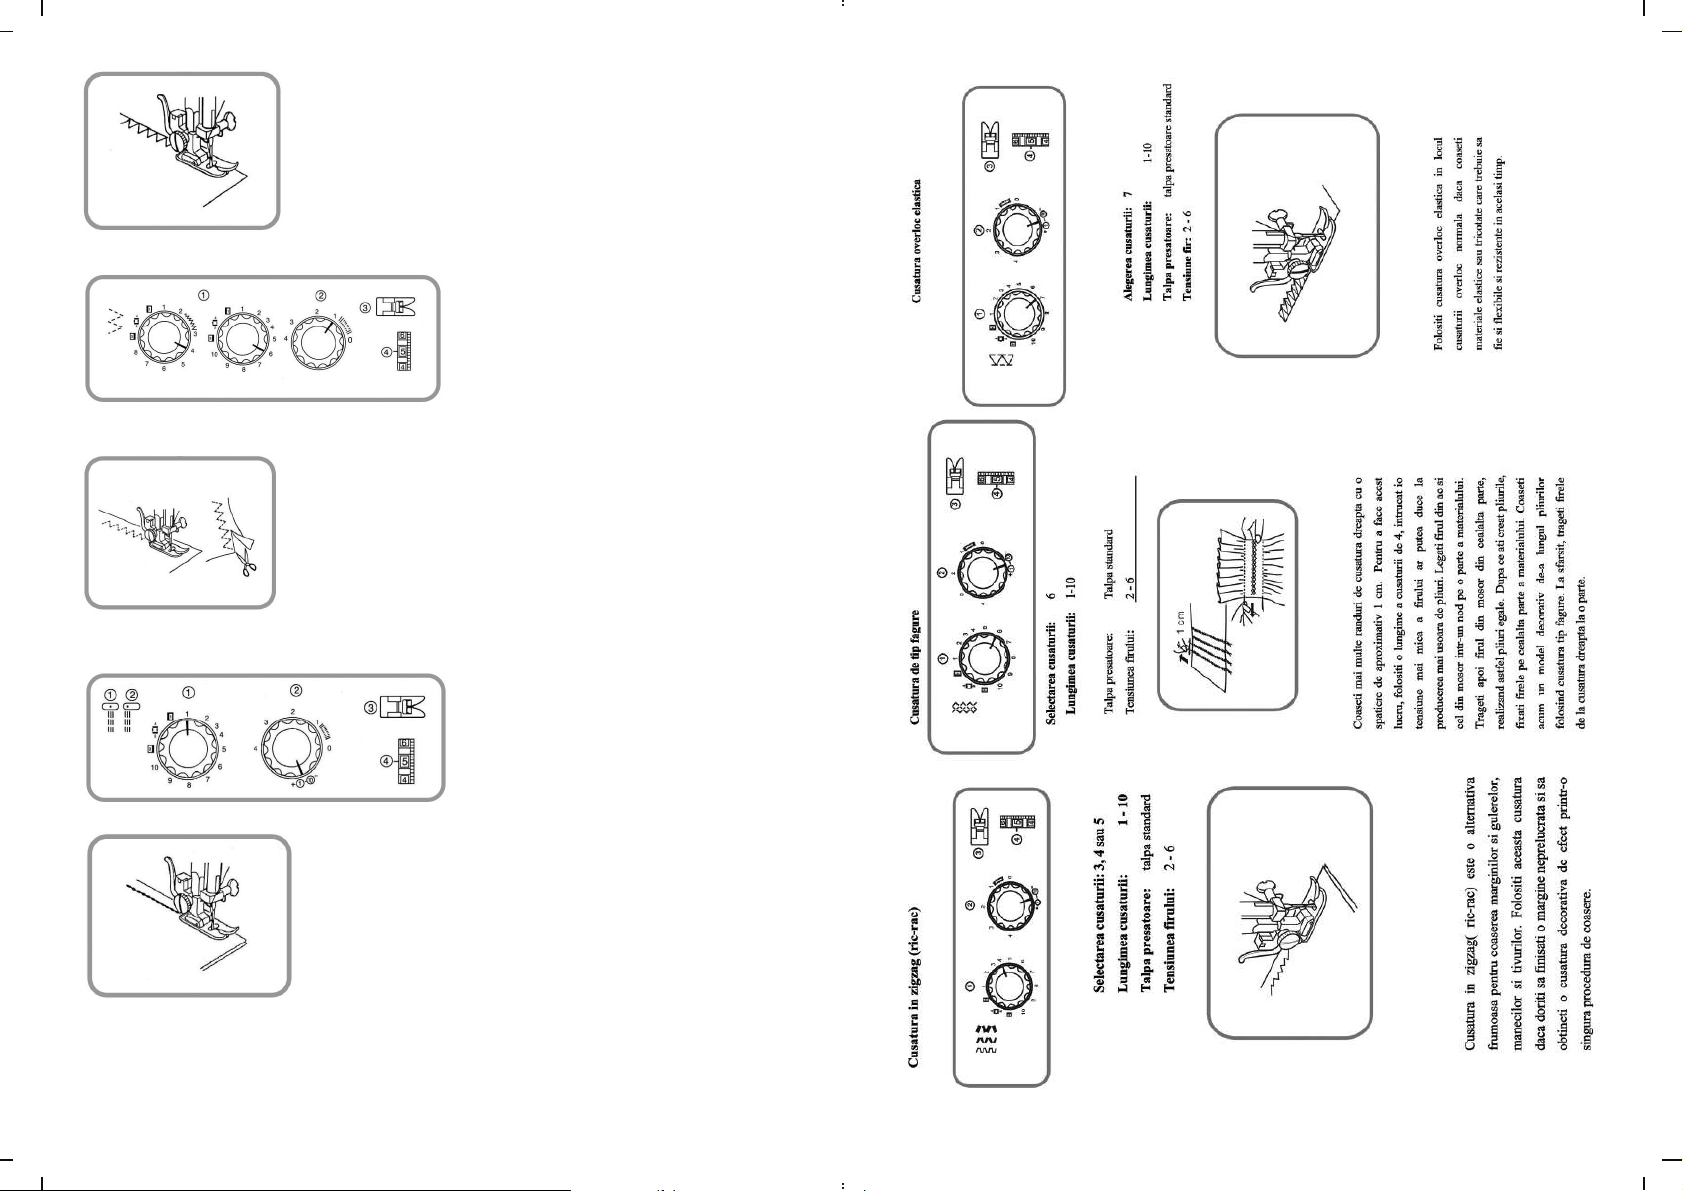
Bu dikifl, giysinin kenar›ndaki ipliklerin ayr›lmamas› amac›yla overlok
yapmak için kullan›l›r.
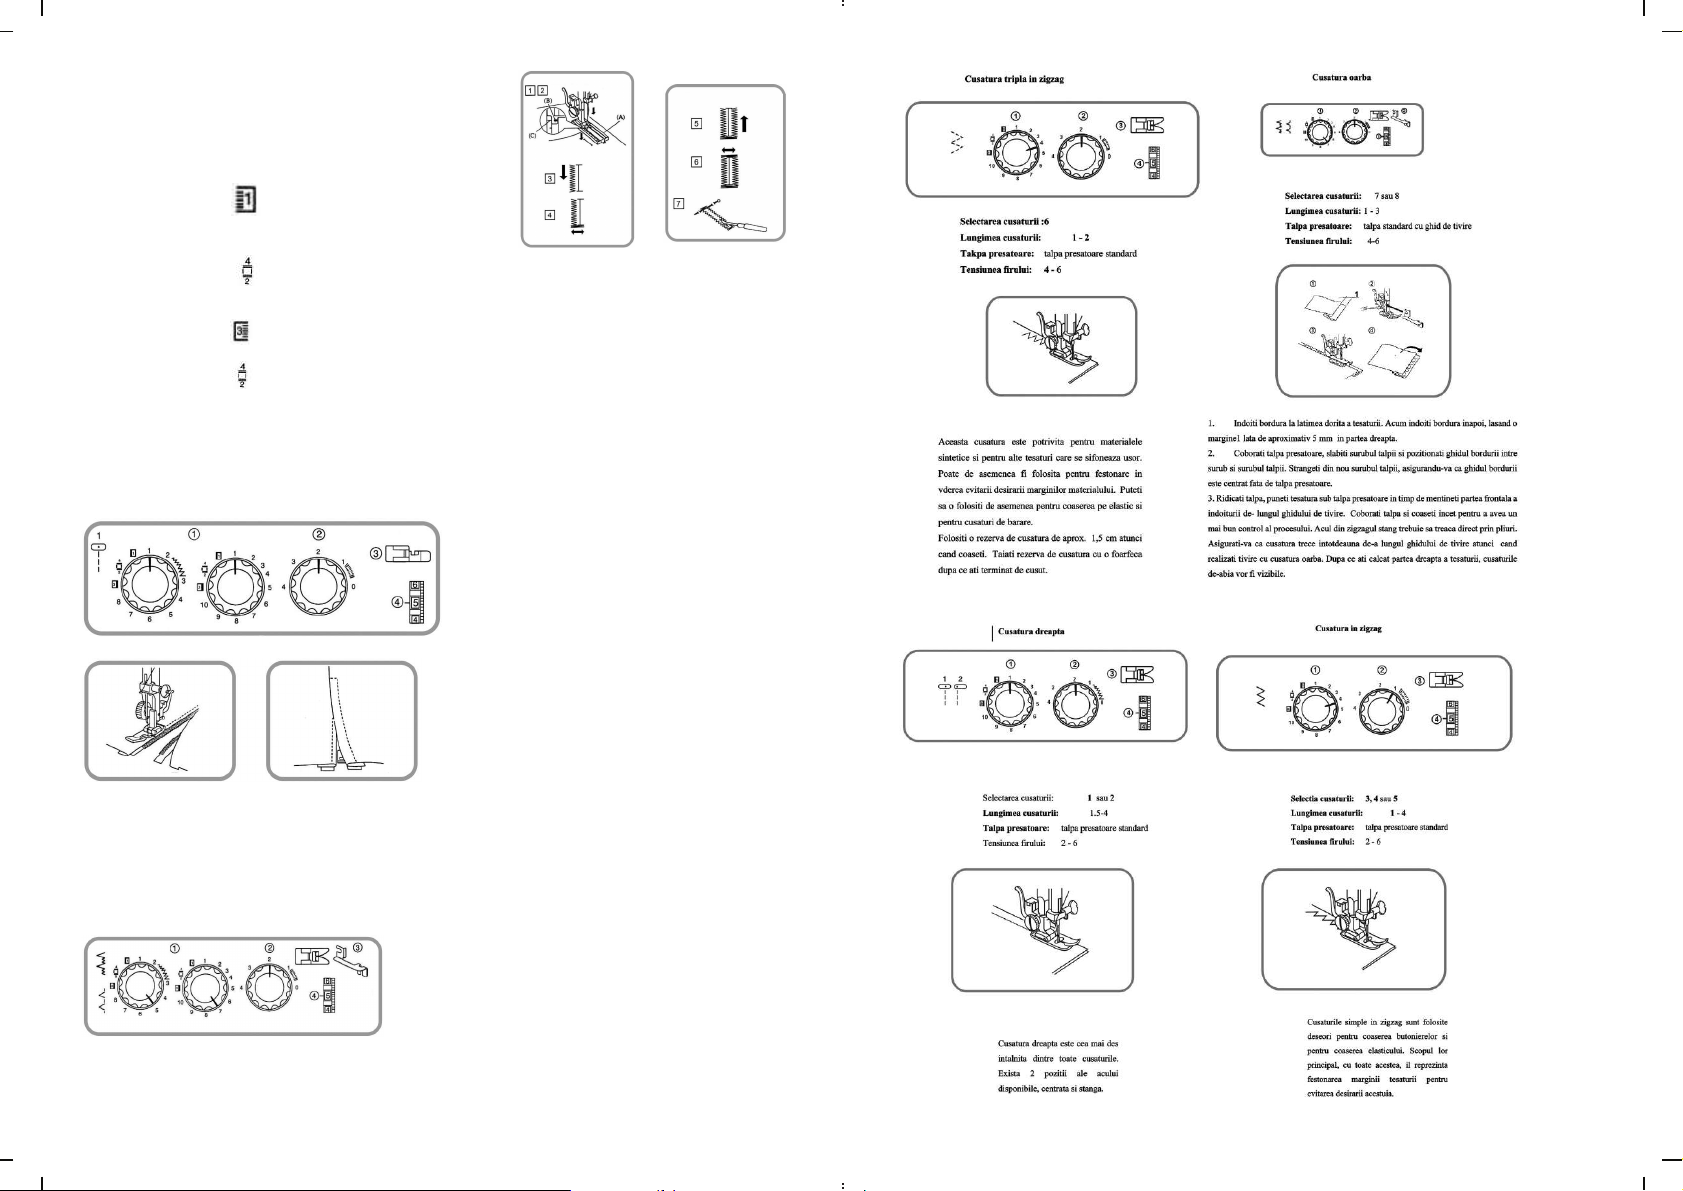
2-Üçlü Zigzag
1- Model seçim butonu : 6
2- Dikifl uzunlu¤u : 1 - 2
3- Bask› aya¤› : zigzag
4- ‹plik germe diski : 4 - 6
Yukar›da belirtilen ayarlar› yapt›ktan sonra bask› aya¤› indirilerek kumafl›n üzerine üçlü zigzag uygulan›r.
Bu dikifl, sentetik materyaller ve kolay katlanabilen di¤er materyaller için
kullan›labilir, ipliklerin ayr›lmas›n› önlemek amac›yla overlok yapmak,elastik
k›vr›mlar ve ekleme için de uygundur.
Dikifl iflleminden sonra, kenar k›v›rma dikiflinin 1.5 cm.lik bir k›sm› artar.
Artan bu k›sm› düzgün bir flekilde kesebilirsiniz.
Üçlü Çizgili Düz Dikifl
1- Model seçim butonu : 1 veya 2
2- Dikifl uzunlu¤u : +(1)-(10)
3- Bask› aya¤› : zigzag
4- ‹plik germe diski : 4 - 6
‹ki dikifl önde ve tek dikifl arkada oldu¤unda, dikifl daha s›k› olacakt›r.
Giysi parçalar› dikiflinden önce, i¤ne kullanarak iflaretleme yap›n. Bu
dikifl türü, giysilerin a¤ k›s›mlar›n›n dikifli için oldukça uygundur.
- 11 -
- 72 -
Page 13

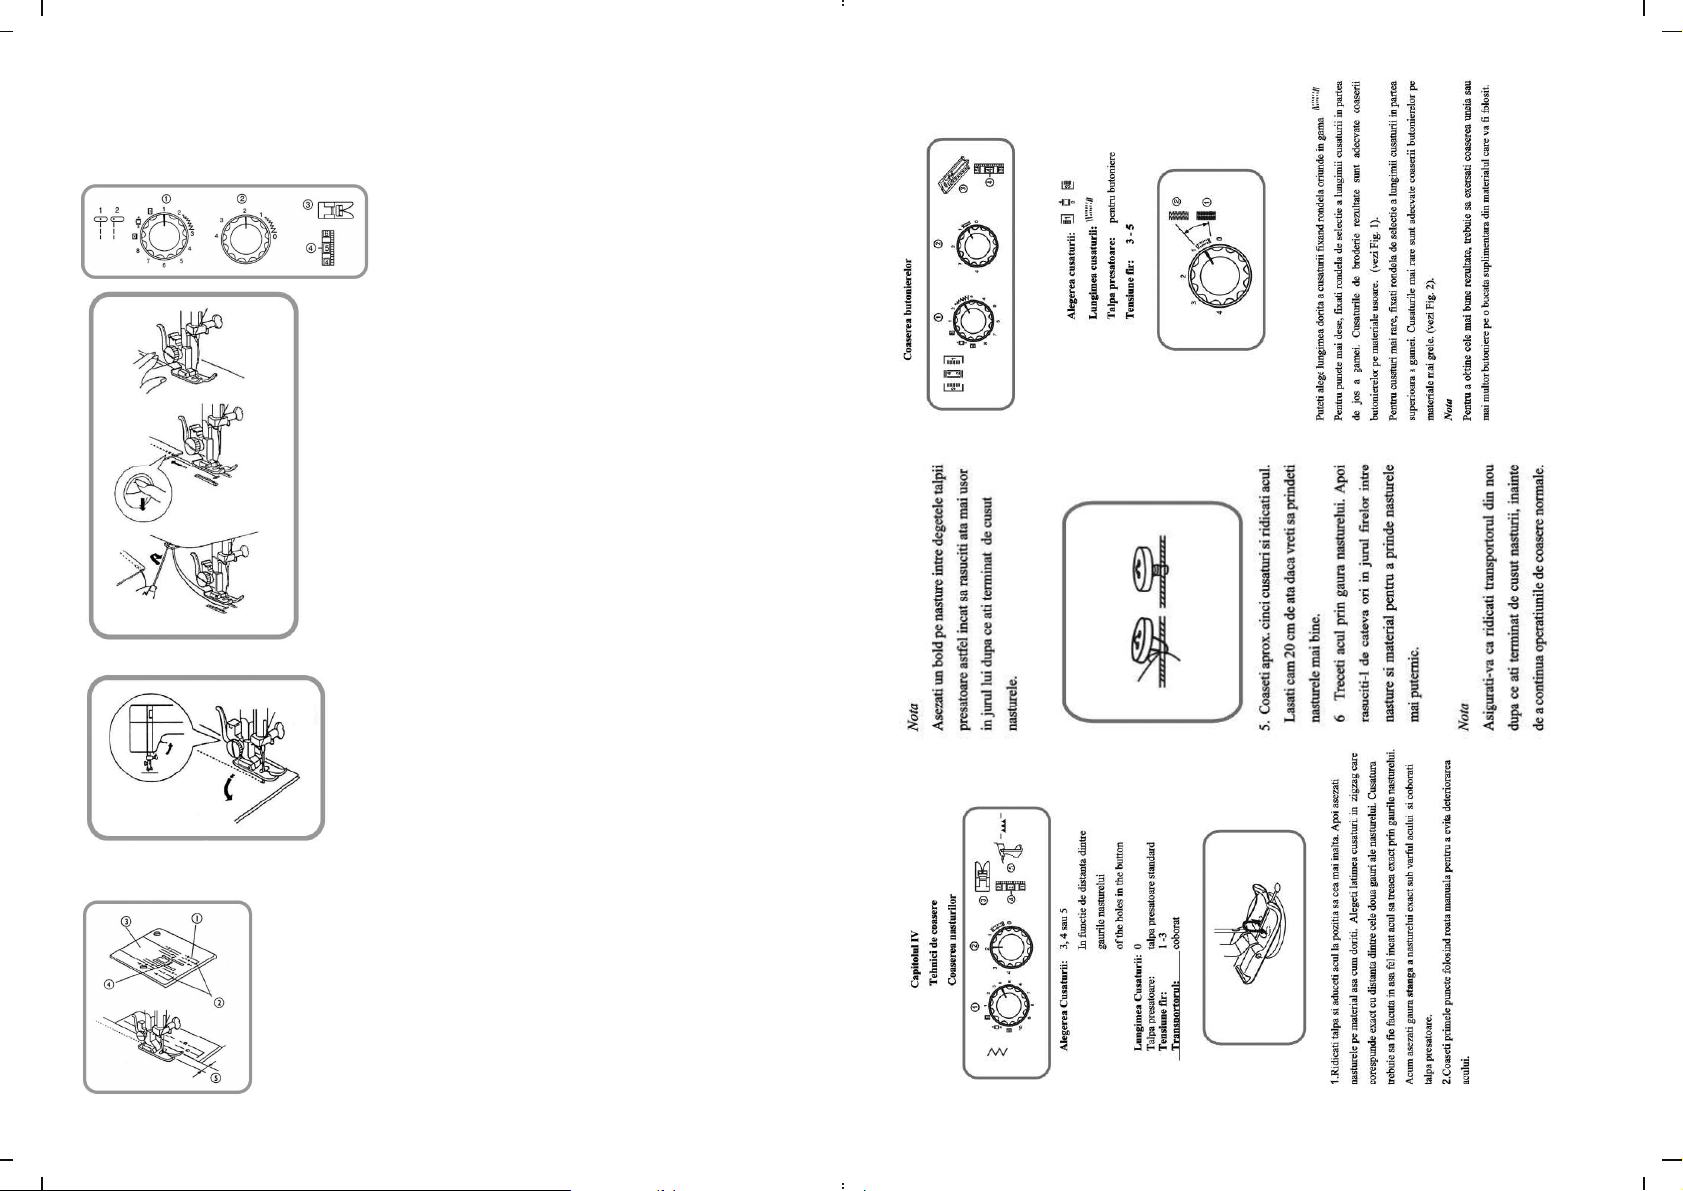
Dü¤me Dikme
1- Model seçim butonu : 4-5
2- Dikifl uzunlu¤u : 2
3- Dü¤me dikifli için bask› aya¤› yapar
4- ‹plik germe diskinin gerginli¤i : 2
5- Alt besleme mandal› afla¤› konumda olmal›d›r.
6- Dü¤meyi, flekilde gösterildi¤i gibi yerlefltirin.
Dü¤menin her iki deli¤ini, sol deli¤i direk olarak i¤nenin alt›na gelecek
flekilde yerlefltirerek delik yuvalar›yla hizalay›n ve bask› aya¤›n› indirin.
Yaklafl›k 5 dikifl at›n ve i¤neyi yükseltin.
Not: Dü¤me dikme iflleminden sonra alt besleme mandal› normal dikifl
için yukar› konuma getirilmelidir.
Dü¤menin daha s›k› olmas›n› sa¤lamak için, ipli¤i 20 cm. fazla
kesin. Üstteki ipli¤i, dü¤me deli¤inin alt›na indirin ve
ipli¤i dü¤menin alt›nda birkaç kere sar›n. ‹pli¤i arkaya geçirin ve bir
dü¤üm at›n.
‹lik Açma
- 71 -
1- Model seçim butonu : fiekil 1'e bak›n
2- Dikifl geniflli¤i : (0.5 - 1)
3- Bask› aya¤› : ‹lik açma
4- ‹plik germe diski gerginli¤i : 3 - 5
Dikifl geniflli¤i, dikifl uzunlu¤u varyasyonuna ba¤l› olarak, içinde 0 ve 1 aral›¤›nda seçilmelidir.
1- Daha s›k› dikifl için, seçim dü¤mesini "0" konumuna ayarlay›n.
Sarma ifl, hafif materyaller için uygundur.
2- Daha gevflek dikifl için, seçim dü¤mesini "1" konumuna getirin.
Gevflek dikifl, a¤›r materyaller için uygundur.
Not: En iyi sonucu elde etmek için, küçük kumafl parçalar›nda
deneme yap›n.
- 12 -
Page 14
1-Kumafl›n üzerine ili¤i dikkatle iflaretleyin.
2-Sürgüyü ileri itin (A), ilk iflaret (B) ile (C) iflaretinin hizas›n› koruyun.
Bask› aya¤›n›n üstündeki iflaret, kumafl›n üzerindeki iflaretle hizal›
olmal›d›r. Bask› aya¤›n› indirin.
3- Dikifl seçim dü¤mesini simgesine ayarlay›n. Dü¤melerin
önündeki iflaretlere gelene kadar ileri do¤ru dikmeye devam edin ve
sonra i¤neyi sol üstte b›rakarak dikifli durdurun.
4- Dikifl seçim dü¤mesini simgesinde çizgi 2 üzerine gelecek flekilde ayarlay›n ve 4-6 dikifl at›n. ‹¤neyi üstte
b›rakarak dikifli durdurun.
5- Dikifl seçim dü¤mesini simgesine ayarlay›n. Dü¤melerin arkas›ndaki iflaretlere gelene kadar geriye do¤ru
dikmeye devam edin ve sonra i¤neyi sa¤ üstte b›rakarak dikifli durdurun.
6- Dikifl seçim dü¤mesini simgesinde çizgi 2 üzerine gelecek flekilde ayarlay›n ve 4-6 dikifl at›n. ‹¤neyi üstte
b›rakarak dikifli durdurun.
7- Dikiflten sonra : ‹lik ipli¤i uçlar›n›n yanl›fll›kla kesilmemesi için, ilik deli¤inin arka delik bitimine bir i¤ne sokun. ‹li¤i bir
ilik kesicisiyle dikkatlice kesin.
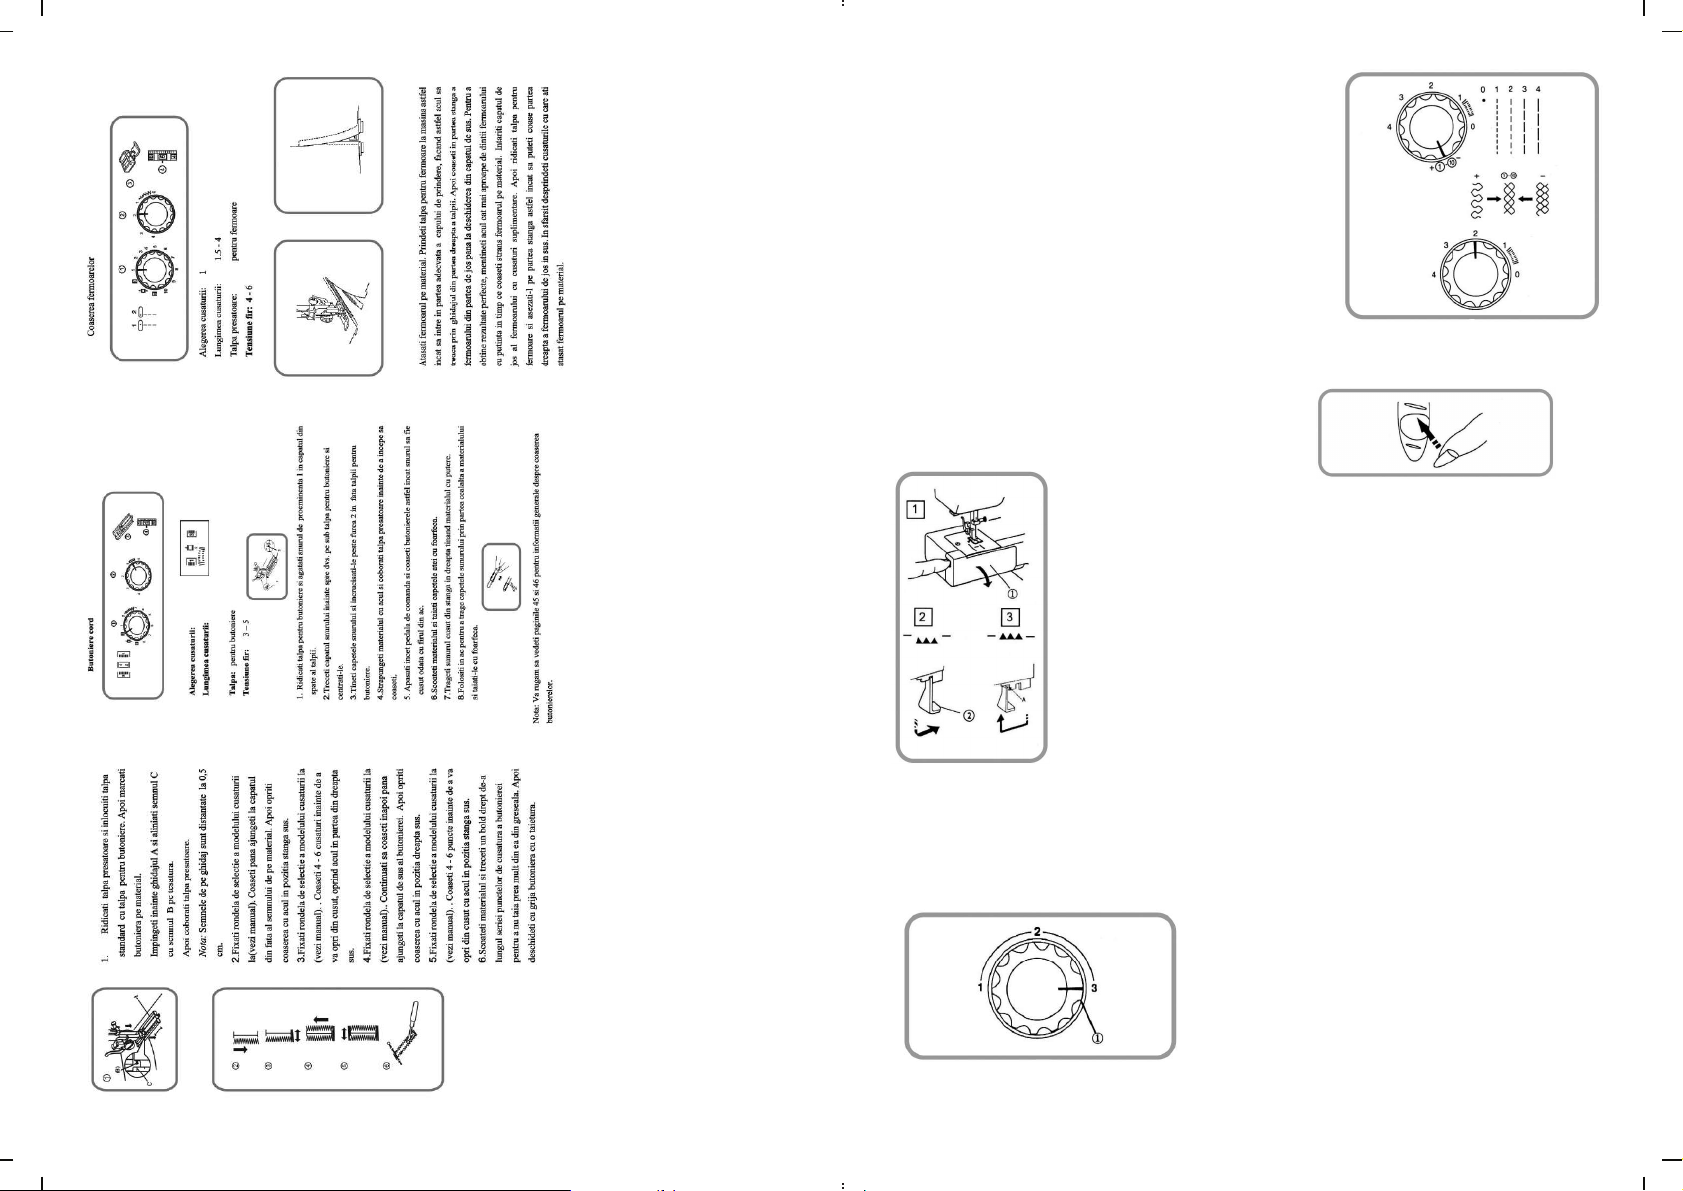
Fermuar Dikme
1- Model seçim dü¤mesi : 1
2- Dikifl uzunlu¤u : 1.5 - 4
3- Bask› aya¤› : Fermuar
4- ‹plik germe diski gerginli¤i : 4 - 6
Fermuar› tek bafl›na ya da kumafla i¤nelenmifl olarak bask› aya¤›n›n alt›na koyun. ‹pli¤i geriye çekin ve bask›
aya¤›n› indirin. Fermuar difllerini, i¤ne ucuna mümkün oldu¤unca yak›n tutarak sol taraf› dikin. Kumafl ve fermuar
ayn› anda ve s›k›ca dikilmelidir. Sonra kumafl› z›t yöne çevirin. Fermuar›n sa¤ taraf›n›n dikimi, sol taraf ile ayn›
olmal›d›r.
Gizli K›vr›m
(1) Model seçim dü¤mesi : 5 - 6
(2) Dikifl uzunlu¤u : 1 - 3
(3) Bask› aya¤› : Zigzag ve yön de¤ifltirme
mandal›
(4) ‹plik germe diski gerginli¤i : 4 - 6
- 13 -
- 70 -
Page 15

1- Kumafllar›n katlama metodu
2- Bask› aya¤›n› indirin, bask› aya¤› vidas›n› gevfletin ve yön de¤ifltirme
mandal›n›n ucunu vidan›n alt›na gelecek flekilde yerlefltirin. Yön de¤ifltirme
mandal›n›n bitifl ucunun bask› aya¤›n›n ortas›nda oldu¤undan emin
olduktan sonra viday› s›k›n.
3-Bask› aya¤›n› kald›r›n ve pliseler yön de¤ifltirme mandal›n›n bitifl ucuna
bakacak flekilde kumafllar› bask› aya¤›n›n alt›na yerlefltirin. Bask› aya¤›n›
indirin ve daha iyi bir kontrol sa¤lamak için yavaflça dikmeye bafllay›n.
Sol zigzag için i¤ne, pliselerin üzerine gelmelidir. Dikerken, pliselerin, yön
de¤ifltirme mandal›n›n bitifl ucunun kenar›na gelmesine dikkat edin
4-Kumafl›n sa¤ taraf› yukar›ya do¤ru ütülenirse dikifllerin görünmesi engellenir.
5.BÖLÜM
DEKORAT‹F D‹K‹fi
Kabuk (Shell) Dikifl
(1) Model seçim dü¤mesi : 7-9
(2) Dikifl uzunlu¤u : +(1)-(10)
(3) Bask› aya¤› : Zigzag
(4) ‹plik germe diski gerginli¤i : 6 - 8
Katlanan kumafl, bask› aya¤›n›n alt›na konmal›d›r ve kabuk (shell) dikifl için
i¤ne, kumafl›n sa¤ taraf›nda olmal›d›r.
- 69 -
Çift ‹¤ne Dikifli
(1) Model seçim dü¤mesi : 1 - 10
(2) Dikifl uzunlu¤u : 1 - 4
(3) Bask› aya¤› : Zigzag
(4) ‹plik germe diski gerginli¤i : 2 - 6
Afla¤›daki ayarlama ile istedi¤iniz dikifl uzunlu¤u seçilebilir.
"+" Yo¤un dikifl için artt›r›n.
"-" Seyrek dikifl için azalt›n.
A¤ fiekilli Dikifl
(1) Model seçim dü¤mesi : 6
(2) Dikifl uzunlu¤u : +(1)-(10)
(3) Bask› aya¤› : Zigzag
(4) ‹plik germe diski gerginli¤i : 4 - 6
- 14 -
Page 16

Pliseli taraf› 1 cm. boflluk b›rakarak düz dikin. Dikifl uzunlu¤u için
"4"ü seçin.‹pli¤i bir taraftan dü¤ümleyin.
Alttaki ipli¤i gerin ve eflit aral›klarla pliseler yap›n.Di¤er taraftaki ipli¤i
sabitleyin. Pliseler aras›nda a¤ ve dekoratif dikifl yap›n. Sonra, plise
dikifllerini ç›kar›n.
Not: Üst iplik bask›s›n› azaltmak, plise dekorasyonunu kolaylaflt›r›r.
Kutu fiekilli Esnek Dikifl
(1) Model seçim dü¤mesi : 10
(2) Dikifl uzunlu¤u : 1
(3) Bask› aya¤› : Zigzag
(4) ‹plik germe diski gerginli¤i : 4 - 6
Bu dikifller en çok çocuk giysilerinin kol bölgelerinde bulunan, 3 mm.den
fazla olan esnek kumafl dikifli için uygundur. Dikifl sonras› esnek ipleri
s›k›n.Bu dikifller ayr›ca iki ayr› kumafl› sa¤lam bir flekilde birlefltirmek için
kullan›l›r. Dikiflsiz kumafllar› katlay›n ve birbirlerine dikin.
Desen Dikifli
(1) Model seçim dü¤mesi : 3-5
(2) Dikifl uzunlu¤u : 0,5-1
(3) Bask› aya¤› : Zigzag
(4) ‹plik germe diski gerginli¤i : 1 - 4
(5) Bask› aya¤› gerginli¤i : 2
Desenleri s›k›ca kumafla yap›flt›r›n ya da çözülebilir dokusuz yüzeyli
(nonwoven) kumaflla ütüleyin.
Desenin etraf›n› dikin ve desen d›fl›ndaki fazlal›klar›n yok oldu¤undan
emin olun. Köflelere gelince i¤neyi kumafla geçirin. Bask› aya¤›n› kald›r›n
ve kumafl› sa¤a ya da sola yönlendirin.
- 15 -
- 68 -
Page 17

Not: Dikifl sonras›nda seçim dü¤mesini de¤ifltirin.
Kenar Birlefltirme
Her iki taraf› 1.5cm katlay›n ve ütüleyin.
Katlanan k›s›mlar 0.3 cm. aral›k b›rak›larak dokusuz yüzeyli (nonwoven)
kumaflla sabitlenmelidir. Her dikiflin katlama kenarlar›na geldi¤inden emin
olarak yavaflça dikin.
6.BÖLÜM
MAK‹NEN‹Z‹N BAKIMI
Mekik Yuvas› ve Parçalar›n›n Ç›kar›lmas›
Uyar›: Makinenizi kapat›n ve fiflini prizden çekin.
(1) Model seçim dü¤mesi : 10
(2) Dikifl uzunlu¤u : +(1 )- (10)
(3) Bask› aya¤› : Zigzag
(4) ‹plik germe diski gerginli¤i : 4 - 6
- 67 -
(1) Mekik
(2) Mekik kald›rma kolu
(3) Mekik halkas›
(4) Mekik yuvas›
(5) Mekik tafl›y›c›s›
(6) Orta mil
(7) Yuva
Mekik yuvas›n› ç›karma: ‹¤neyi en üst konuma getirin ve mekik kapa¤›n› aç›n. Meki¤i makineden ç›kar›n, mekik
kald›rma kolunu ortaya ç›kar›n ve mekik halkas›n› ç›kar›n.
Not: Besleme mandal›n› bir f›rça ile yumuflak ve kuru bez yard›m›yla temizleyin.
Mekik yuvas›n› yerine takmak için: Mekik orta i¤nesini tutun ve dikkatlice mekik tafl›y›c›s›na yerlefltirin. Mekik
halkas›n› yerine yerlefltirin ve orta milin mekik tafl›y›c›s›n›n ortas›nda bulunan yuvaya yerleflti¤inden emin
olun. Kald›rma kolunu sa¤a sola çevirerek mekik halkas›n› sabitleyin.
- 16 -
Page 18

Besleme Mandal›n›n Temizli¤i
Temizlemeden önce makinenizi kapat›n ve fiflini prizden çekin.
‹¤neyi ve bask› aya¤›n› ç›kart›n. Tornavida ile i¤ne platformunun sol yan›ndaki viday› ç›kart›n.
‹¤ne platformunu ç›kart›n. Besleme mandal› difllisini bir f›rça ile temizleyin ve i¤ne platformunu tekrar tak›n. Bask›
aya¤›n› yerlefltirince makineniz dikifl için haz›rd›r.
Not: Birinci s›n›f kalitede dikim için, s›k kullan›mlarda s›k s›k temizlik yap›lmal›d›r.
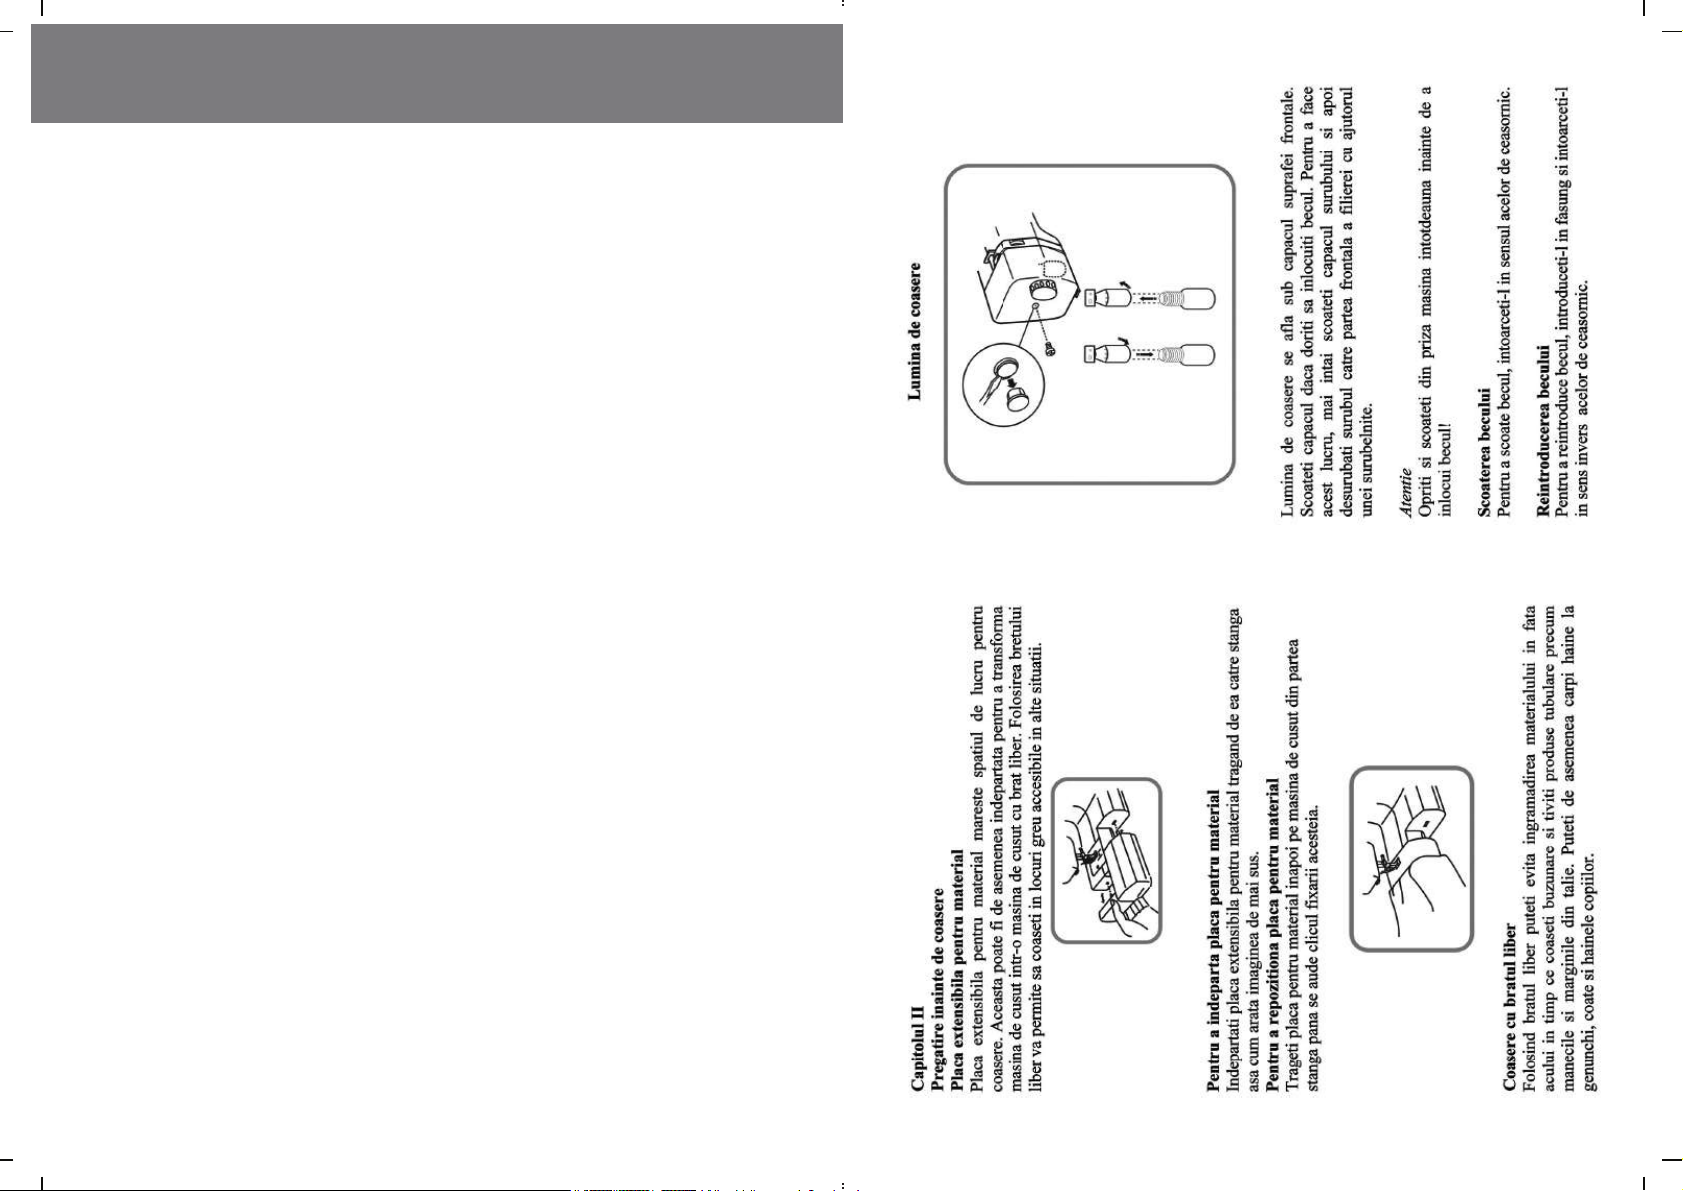
Makinenizin Ya¤lanmas›
Üst Arka K›s›mlar›n Ya¤lanmas›
Öncelikle vida kapa¤›n›, viday› ve üst
kapa¤› ç›kar›n.
Resimde gösterildi¤i flekilde ya¤lama
ifllemini gerçeklefltirin.
1- Vida kapa¤›
2- Vida
3- Üst kapak
4- Kapak
Not: Bir ya da iki damla ya¤ kullan›n, aksi halde kumafllar›n›z kirlenir.
E¤er makine uzun bir süre kullan›lmam›flsa ve düzgün çal›flm›yorsa birkaç damla ya¤ uygulayarak düzgün çal›flmas›
sa¤lan›r.
Meki¤in Ya¤lanmas›
Resimde gösterilen yerlerin ya¤lanmas› gerekmektedir.
- 17 -
- 66 -
Page 19
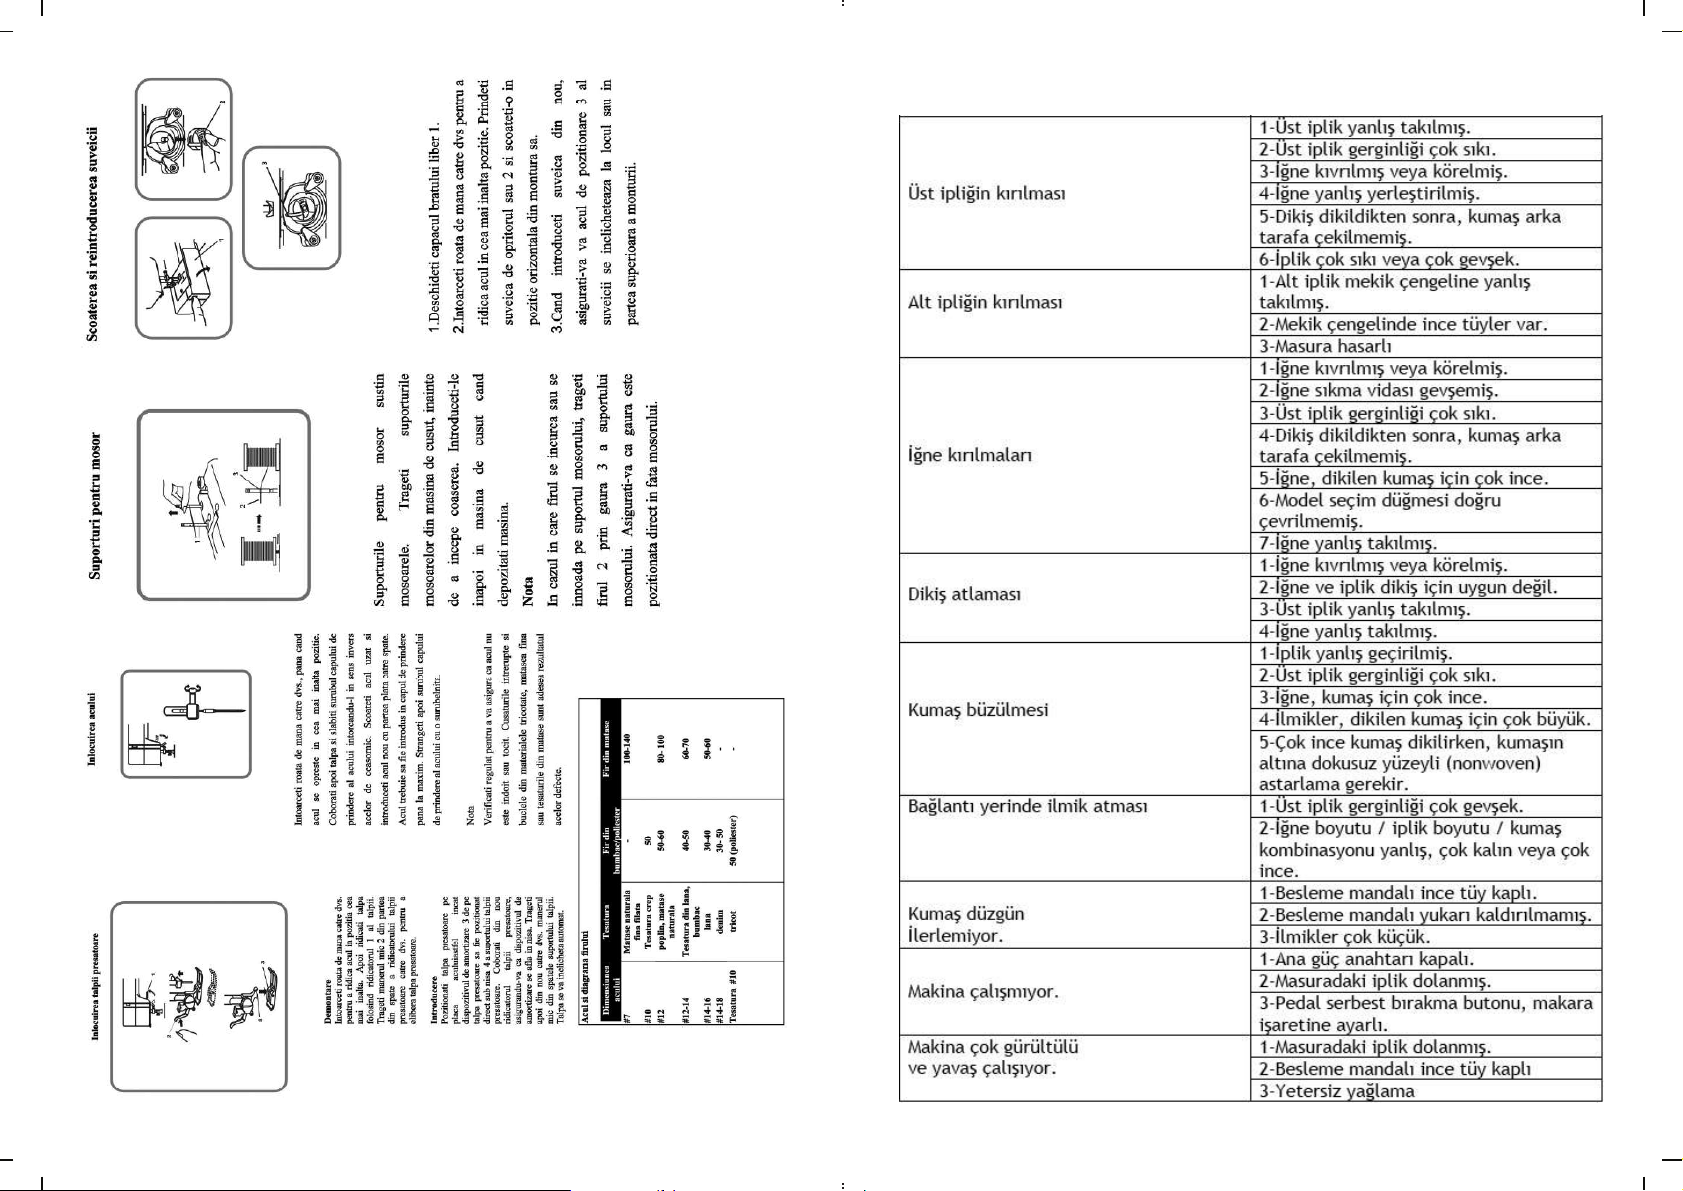
SORUN G‹DERME
- 65 -
- 18 -
Page 20
ENGLISH&DEUTSCH
WICHTIGE SICHERHEITSHINWEISE
Beim Gebrauch der Nähmaschine sollten grundlegende Sicherheitsvorkehrungen immer beachtet
werden, bitte lesen Sie daher alle Hinweise durch, bevor Sie die Nähmaschine in Gebrauch nehmen.
GEFAHR—Zum Schutz gegen elektrischen Schlag:
Beim Entfernen von Abdeckungen, beim Ölen der Nähmaschine oder während anderer, in dieser
•
Bedienungsanleitung genannter Wartungsarbeiten muss der Netzstecker der Nähmaschine immer
gezogen sein.
Die Nähmaschine nie unbeaufsichtigt lassen, solange sie am Stromnetz angeschIossen ist. Nach
•
Gebrauch und vor der Reinigung die Nähmaschine immer vom Stromnetz trennen.
Vor einem Glühlampenwechsel immer den Netzstecker ziehen. Nur Glühlampen des gleichen Typs
•
(15 W) verwenden.
WARNUNG - Zum Schutz gegen Verbrennungen, Feuer, elektrischen Schlag oder Verletzungen
von Personen:
Die Nähmaschine nicht als Spielzeug benutzen. Erhöhte Vorsicht ist angebracht, wenn die
•
Nähmaschine von Kindern oder in der Nähe von Kindern benutzt wird.
Diese Nähmaschine darf nur zu dem in dieser Bedienungsanleitung beschriebenen Zweck benutzt
•
werden. Es ist nur das hierin genannte, vom Hersteller empfohlene Zubehör zu verwenden.
Diese Nähmaschine nicht benutzen, falls Kabel oder Stecker beschädigt sind, sie nicht störungs
frei funktioniert, sie fallengelassen oder beschädigt wurde oder sie ins Wasser gefallen ist. Bringen
Sie die Nähmaschine in diesem Fall zum nächstgelegenen autorisierten Händler oder
entsprechenden Fachmann zur Überprüfung oder Reparatur.
Bei Gebrauch der Nähmaschine Lüftungsschlitze nicht blockieren und diese freihalten von Fusseln,
•
Staub- und Stoffrückständen.
Keine Gegenstände in Öffnungen an der Nähmaschine stecken oder in diese hineinfallen lassen.
•
Die Nähmaschine darf nicht Im Freien benutzt werden.
•
Die Nähmaschine nicht an Orten benutzen, wo Treibgasprodukte (Sprays) oder Sauerstoff
•
verwendet werden.
Zum Ausschalten Hauptschalter auf „0" stellen und den Netzstecker herausziehen.
•
Beim Trennen vom Stromnetz immer am Stecker und nicht am Kabel ziehen.
•
Finger von allen beweglichen Teilen fernhalten. Spezielle Vorsicht ist im Bereich der Nähnadel
•
angebracht.
Nur originale Stichplatten benutzen. Eine falsche Stichplatte kann zu Nadelbruch führen.
•
Keine krummen Nadeln verwenden.
•
Während des Nähens den Stoff weder ziehen noch schieben. Dies kann zu Nadelbruch führen.
•
Nähmaschine ausschalten bei Tätigkeiten im Bereich der Nadel wie Einfädeln, Nadel wechseln,
•
Einfädeln der Spule.
Nähfuß wechseln oder ähnlichen Tätigkeiten.
•
SICHERHEITSHINWEISE SORGFÄLTIG AUFBEWAHREN!
Diese Nähmaschine ist nur für den Haushaltsgebrauch bestimmt.
- 19 -
- 64 -
Page 21

IMPORTANT SAFETY INSTRUCTIONS
When using the sewing machine, basic safety precautions should always be followed, including
the following: Read all instruction before using.
DANGER
The sewing machine should never be left unattended when plugged in.
•
Always unplug this sewing machine from the electrical outlet immediately after using and before
•
cleaning.
Always unplug before changing the light bulb. Replace bulb with same type rated 15 watts.
•
WARNING
• Do not allow this machine to be used as a toy. Close attention is necessary when the sewing
machine is used by or near children.
• Use this sewing machine only for its intended use as described in this manual.
Use only aceessories recommended by the manufacturer as contained in this manual.
Never operate this sewing machine if it has a damaged cord or plug, if it is not working properly,
if it has been dropped or damaged, or dropped into water, Return the sewing machine to the
nearest authorized dealer or service center for examination, repair, electrical or mechanical
adjustment.
• Never operate the sewing machine with any of the air openings blocked. Keep the ventilation
openings of the sewing machine and foot controller free from the accumulation of lint, dust
and loose cloth.
• Never drop or insert any object into any openings.
• Do not use this machine outdoors.
• Do not operate this machine where areosol (spray) products are being usecl or where oxygen
is being administered.
• To disconnect, turn the main switch to the symbol" O " position which represents off, then
remove plug from outlet.
• Do not unplug by pulling on the cord. To unplug, grasp the plug and pull, not the cord.
• Keep fingers away from all moving parts. Special care is requirecl around the sewing machine
needle.
• Always use the proper needle plate. The wrong plate can cause the needle to break.
• Do not use a bent needle.
• Do not pull or push the fabric while stitching. It may deflect the needle causing it to break.
• Cut off the power position when making and adjustments in the needle area. such as threading
the needle, changing the needle, threading the bobbin, or changing the presser foot.
• Always unplug the sewing machine from the electrical outlet when removing covers, lubricating,
or when making any other user service adjustments mentioned in this instruction manual.
- To reduce the risk of electric shock:
- To reduce the risk of burns, fire, electric shock, or injury to persons:
- 63 -
SAVE THESE INSTRUCTIONS
This sewing machine is intended for household use.
- 20 -
Page 22
Chapter lI
Chapter lI
Preparation before Sewing
Preparation before Sewing
orbereitung der Näharbeit
orbereitung der Näharbeit
Kapitel II
V
Kapitel II
V
Externdable cloth plate
The extendable cloth plate can not nolyenlarge
working. Space while sewing but also can be easily
disassembled. The free-arm cloth plate can also be
Ausziehbarer Anschiebetisch
Der ausziehbare Anschiebetisch vergrößert
beim Nähen nicht nur den Arbeitsbereich
sondern kann auch problemlos abgenommen
used.
werden. Die Benutzung des Freiarms
ermöglicht das Nähen an
schwer zugänglichen
Stellen.
Disassembe the extendable cloth plate:
Disassembe the cloth plate as shown in the
illustration.
Entfernen des
ausziehbaren Anschiebetisches:
Nehmen Sie den Anschiebetisch ab, wie in der
Zeichnung dargestellt.
Fit over the cloth plate:
Join the extendable cloth plate (namely,platform
stiching)
Wiederanbringen des Anschiebetisches:
Verbinden Sie den Anschiebetisch wieder mit
der Nähmaschine (Steppen mit Nähtisch).
Vorteile und
Anwendungen
des Freiarm-Nähens
Merits and application of free-arm cloth
plate stitching
Vermeidung eines Stoffstaus vor der Nähnadel
beim Nähen von Taschen, Säumen und
Avoid cloth piled up in front of needle while sewing
pockets, tucks and waist edges. Sew sleeves, waist
Rundgeschlossenem Nähen von Ärmeln;
Taillenausschnitten und anderen gerundeten
edges, trouser legs or other roundshaped costumes.
Darn knees, elbows and children clothes.
Nähteilen. Ausbessern von Stellen an Knie und
Ellbogen sowie von Kinderkleidung.
ROMÂNA
1 Reverse button
Chapter I
Chapter I
Important Functlons / Name of parts:
1 Rückwärtstaste
Kapitel l
Kapitel l
Wichtige Funktionen / Hauptbestandteile:
2 Pattern selection dial
3 Stitch length selection dial
4 Bobbin winder stopper
5 Bobbin pin
6 Spool pin
7 Winder tension disc
8 Thread retainer bobbin
2 Stichmuster-Drehschalter
3 Stichlängen-Drehschalter
4 Spulengreifer
5 Spuler
6 Garnrollenhalter
7 Aufspul-Spannungsscheibe
8 Garnführung
9 Thread take-up lever
10 Thread tension disc
11 Bulb cover
12 Presser foot presser
13 Ripper
14 Sewing foot
9 Gelenkfadenhebel
10 Fadenspannungsscheibe
11 Lampenschutz
12 Nähfussdruck
13 Schneider
14 Nähfuss
15 Needle Plate
16 Extendable cloth plate (accessories case)
17 Handle
15 Stichplatte
16 Ausziehbarer Anschiebetisch ( Zubehörfach)
17 Tragegriff
18 Balance Wheel
19 Power
20 Foot Controller receptacle
18 Handrad
19 An / Aus Schalter
20 Fussanlasserbuchse
- 21 -
21 Needle clamp screw
22 Freearm cloth plate
23 Presser foot lever
21 Nadelhalterschraube
22 Freiarmtisch
23 Nähfusshebel
- 62 -
Page 23
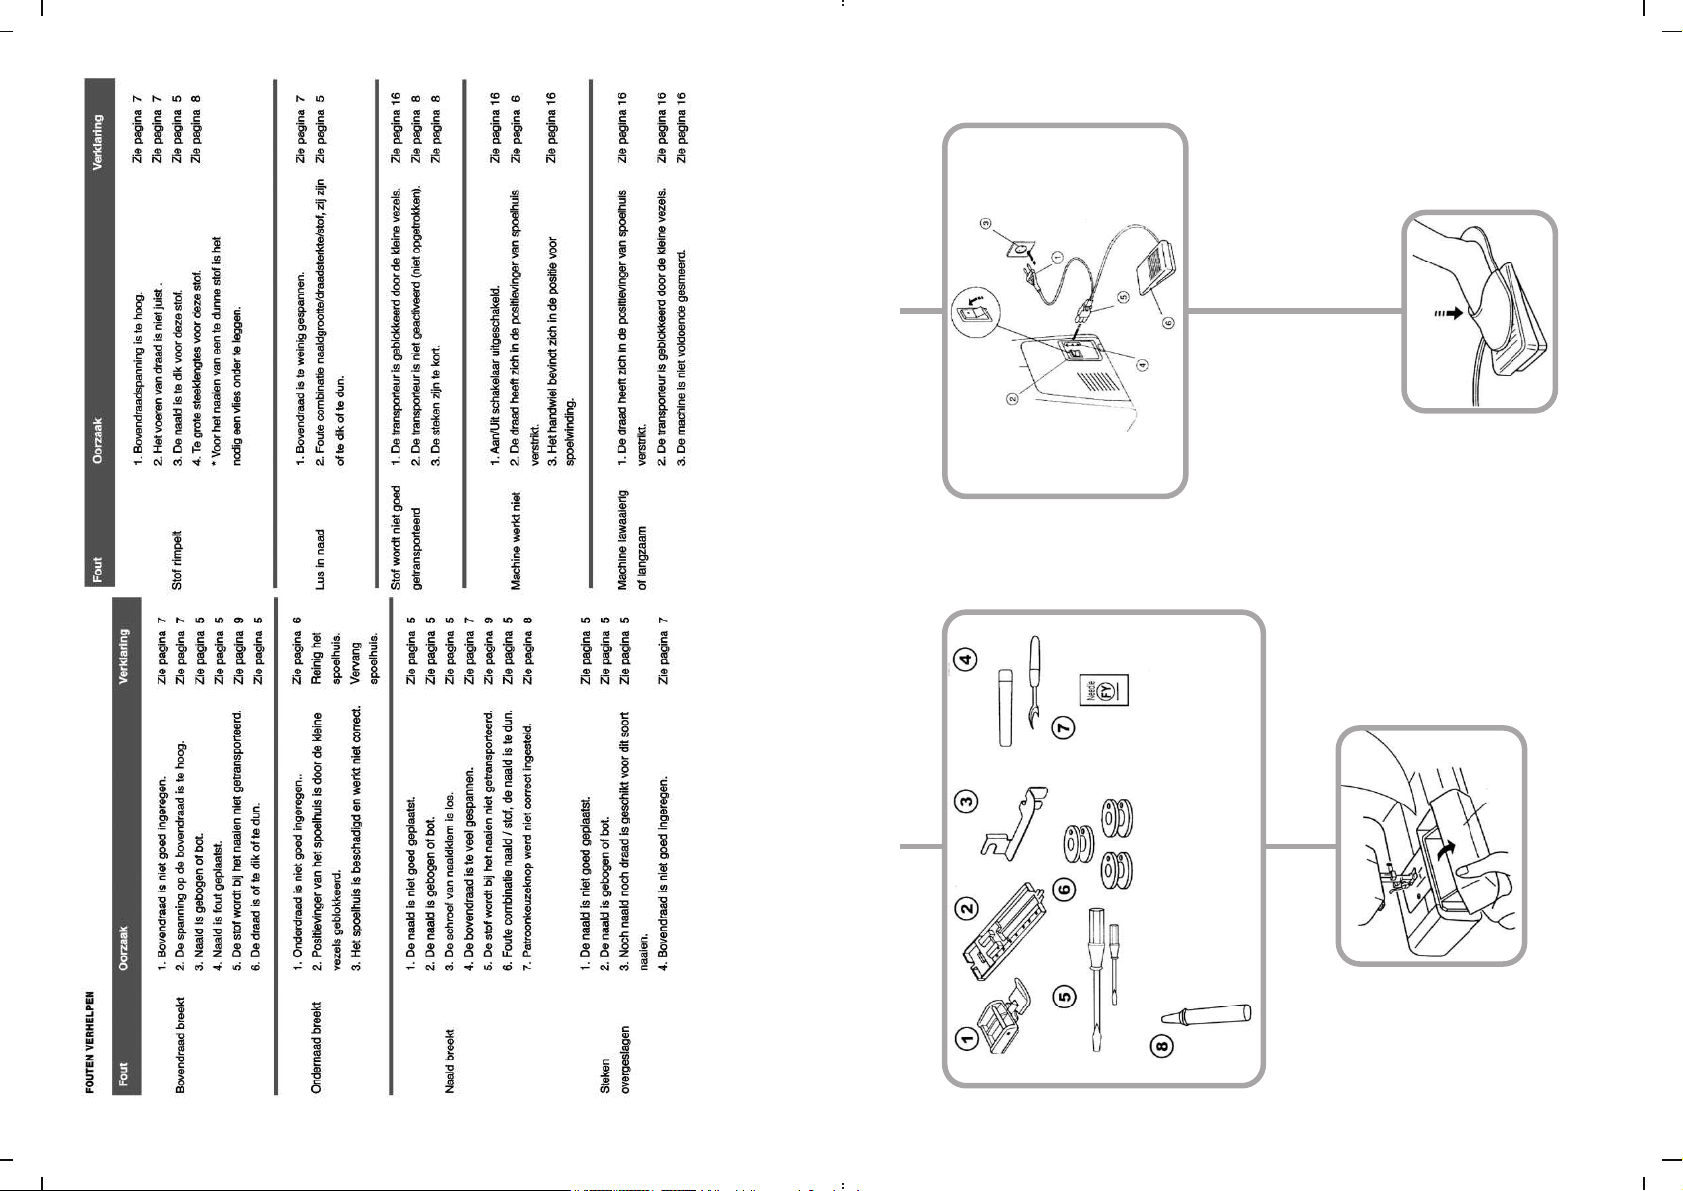
Power Supply
Power Supply
Stromversorgung
Stromversorgung
It is to be determined that the voltage and
frequency indicated on the machine
should be identical to the supply prior to
Bevor die Maschine mit dem Stromnetz
verbunden wird, ist sicherzustellen, dass
die Spannung und Frequenz, die auf der
connected to the power.
Maschine angegeben sind, identisch mit
der Spannung und Frequenz des
1.Connect machine plug (5) to, machine interface (4)
2.Connect attaching plug (1) to receptacle (3).
Stromnetzes sind.
3.Switch on sewing lamp with switch button (2).
1. Führen Sie den Stecker des Fußanlasserkabels (5)
(1) Attachplug (2) Switchbutton
- den Stecker zwischen Fußanlasser und Netzstecker- in
die entsprechende Buchse (4) an der Nähmaschine ein.
(3) Receptacle (4) Machine interface
(5) Machine plug (6) Foot controller
2. Verbinden Sie den Netzstecker (1) mit einer
Netzsteckdose (3).
1) Zipper foot
3. Schalten Sie das Nähmaschinenlicht ein indem Sie
2) Buttonhole foot
den Kippschalter (2) betätigen.
3) Deflector gate
Foot controller
Foot controller
Foot controller
may change speed of
(1) Netzstecker
(2) Kippschaller
(3) Netzsteckdose
(4) Buchse an Nähmaschine
4) Buttonhole cutter
5) Screw driver
6) Shuttle
sewing. The tighter the
switch is pressed, the faster
stitching goes.
(5) Stecker des Fußanlasserkabels
(6) Fußanlasser
Fußanlasser
7) Needle
8) Oil
Mit Hilfe des Fußanlassers
können Sie die Nähgeschwin-
digkeit bestimmen. Je weiter
der Fußanlasser nach unten
gedrückt wird, umso mehr
erhöht sich die Nähgeschwindigkeit.
- 61 -
Accessories
Accessories
Zubehör
Zubehör
- 22 -
1 ) Reißverschlussfuß
2) Knopflochfuß
3) Führungsschiene
4) Knopflochschneider
5) Schraubendreher
6) Spulen
7) Nadelsatz
8) Öl
Page 24

Attach
Attach
Remote and
Presser Foot
Remote and
Presser Foot
echseln des Nähfußes
echseln des Nähfußes
W
W
Removing:
Turn forward the balance wheel while raising
the needle to the highest position. Leveling up
the presser foot. Hold back the lever on the
Entfernen:
Bringen Sie die Nadel in die höchste Position,
indem Sie das Handrad auf sich zu bewegen.
Heben Sie dann den Nähfuß an. Lösen Sie den
foot bearer while releasing the presser foot.
Fuß, indem Sie den Nähfußhebel an der
Rückseite des Nähfußhalters anheben.
Installing:
Fit over the presser foot so that its plate dowel
is just opposite to the groove. Lower the pres-
Anbringen:
Legen Sie den gewünschten Nähfuß so auf die
ser foot lever and its presser foot will be fixed
Stichplatte, dass der Balken des Nähfußes sich
to the place.
genau gegenüber dem Nähfußhalter befindet.
Senken Sie den Nähfußhebel, der Nähfuß wird
so mit dem Nähfußhalter verbunden, und fixiert.
Sewing lamp
Sewing lamp
Nähmaschinenlicht
Nähmaschinenlicht
Sewing lamp
Sewing lamp hulb stands at the back of top
cover.Take the top cover when changing the bulb
(front screw).
! Note
Switch off the power before replacing a bulb.
Nähmaschinenlicht
Das Nähmaschinenlicht befindet sich am
Kopfende der oberen Abdeckung. Nehmen
Sie die obere Abdeckung ab, wenn Sie die
Glühbirne auswechseln möchten (Schraube
an der Vorderseite).
! Hinweis
- 23 -
Take out a bulb:
Schalten Sie die Nähmaschine vor dem
Hold it and screw off to the left.
Auswechseln der Glühbirne aus.
Fit over a bulb:
Hold it and screw on to the right.
Herausnehmen der Glühbirne:
Drehen Sie die Glühbirne nach links.
Einsetzen der Glühbirne:
Setzen Sie die Glühbirne ein und drehen Sie
sie nach rechts.
- 60 -
Page 25

Baumwollfaden Seidenfaden
t
t
Specification Specification
Pure Silk
Cotton
- 59 -
Übersicht Nadel und Faden
Übersicht Nadel und Faden
Changing the needle
Changing the needle
echseln der Nadel
echseln der Nadel
W
W
Nadelstärke Material Spezifikation Spezifikation
Nr. 60 (#7) Feinmaschige Seide 70-80 100-140
Nr. 70 (#10) Kreppgewebe
Nr. 80 (#12) Popelin, Naturseide 50-60 80-lOO
Nr. 80-9O (#12-14) Wollkleidung Baumwolle 40-50 60-70
Nr. 90-100 (#14-16) Wolle 30-40 50-60
Nr. 90-100 t#14-18) Jeansstoffe 30 45-50
Nähen von elast. Jerseystoff 70-80 100-140
Gewebe Nr. 70 (#10)
- 24 -
Thead and needle char
Thead and needle char
Needle size Material Cotton thread Silk thread
No.60(#7) Fine silk 70-80 1 00- 1 40
No.70(#10) Crepe
Turn forward the balance wheel while raising
the needle to the high level and lower the pres-
ser foot. Loosen the needle clamp bolt by tur-
ning it anti-clockwise.Remove the used needle
Bringen Sie die Nadel in die höchste Postion, indem
Sie das Handrad auf sich zu bewegen. Senken Sie
den Nähfuß. Lösen Sie die Nadelhalterschraube
durch drehen gegen den Uhrzeigersinn. Nehmen
No.80(#12) Poplin 50-6U 8O-100
and insert the new one with its flat side facing
the back. While inserting the needle, the needle
should be pressed as firmly as possible up into
the needle clamp, which should he tightened
Sie die gebrauchte Nadel aus der Nadelhalterung
und setzen Sie die neue Nadel so ein, dass die fla-
che Seite nach hinten zeigt. Beim Einsetzen muss
die Nadel bis zum Anschlag in die Nadelhalterung
No.80-90(#12-14) woolen, cloth 40-50 60-70
with a screwdriver.
Note!
Regular checking should be done to ensure that
geschoben werden, bitte ziehen Sie anschließend
die Nadelhalterschraube mit einem Schrauben-
dreher fest.
No.90-100(#14-16) Wool 30-40 50-60
the needle is never twisted or blunt. Knitting
materıals, lıne silk or silk fabrıcs may frequently
Hinweis!
Bitte überprüfen Sie in regelmäßigen Abständen,
No.90-100(#14-18) Jeans Materials 30 45-50
encounter knots and skipping stitches, which
are often caused by the damaged needles.
ob die Nadel noch gerade und scharf ist. Knoten
und Fehlstiche in Jerseystoffen, feinmaschiger
Elastic stitching
No.70(#10) Knitting Materials 70-80 100-140
Seide oder Seidengeweben werden häufig durch
beschädigte Nadeln verursacht.
Page 26

Remove and load the
bobbin case
Remove and load the
bobbin case
Herausnehmen und Einsetzen
der Spulenkapsel
Herausnehmen und Einsetzen
der Spulenkapsel
How to use spool holder
How to use spool holder
Spool holder is used lo hold spools.Pulling up the
spool holder when sewing.
Prees the spoolholder down, when the machine
Live the Cover
Öffnen Sie die Freiarmklappe
is packed
(1) Cover
Turn forward the balance wheel to raise the
needle. Hold on to the bobbin exit and pull out the
(1) Freiarmklappe
Bringen Sie die Nadel in die höchste Position,
indem Sie das Handrad auf sich zu bewegen.
Pressdown the machine when it is packed.
(1) upper tread (2) hole (fig.1)
bobbin case.
(2) Bobbin exit
Fassen Sie den Spulenkapselriegel und ziehen
Sie die Spulenkapsel aus dem Gehäuse
Instruction:
(fig.2)
Press the bobbin case handle to the innermost to
ensure joining when loading it into the bobbin
case.
(3) Bobbin case handle
(2) Spulenkapselriegel
Vergewissern Sie sich beim Wiedereinsetzen,
dass der Spulenkapselfinger fest in die
Aussparung oben im Gehåuse einrastet.
In case that the thread in use is easily
tangled with spool holder or knotted, you can
pull the thread through the hole as shown in the
ill ustration. While keeping the hole facing the
spool.
(3) Spulenkapselfinger
erwendung der Garnrollenhalter
erwendung der Garnrollenhalter
V
V
(fig.1) + (fig.2)
- 25 -
Die Garnrollenhalter dienen zur Aufnahme von
Garnrollen. Ziehen Sie die Garnrollenhalter vor
dem Nähen aus dem Gehäuse der Nähmaschine.
Versenken Sie die Garnrollenhalter im Gehäuse
der Maschine, bevor Sie die Nähmaschine
verstauen.
(1) Oberfaden (2) Öffnung im Garnrollenhalter
(fig.1)
Hinweis:
(fig.2)
Falls der verwendete Faden sich häufig um den
Garnrollenhalter wickelt oder verknotet, können
Sie den Faden durch die Öffnung im Garnrollen-
halter führen (siehe Abbildung oben); dabei sollte
die Öffnung in Richtung der Garnrolle zeigen.
-58 -
Page 27

Put thread into the
Put thread into the
bobbin case
bobbin case
2
(2) Pull thread into the slit of bobbin case.
(3) And then, pull thread through bobbin tension
regulator spring to the outlet hole.
Instruction: pull thread out about 10 cm.
Load bobbin in bobbin case. Make sure that the
thread is pulled out in the direction indicated by
the arrowhead (clockwise).
3
Einführen des Fadens
in die Spulenkapsel
Einführen des Fadens
in die Spulenkapsel
Aufspulen
Aufspulen
(1) Ziehen Sie das Handrad nach außen, um den Kontakt
zu unterbrechen.
1
(2) Führen Sie den Faden von der Garnrolle durch die
Aufspul-Spannungsscheibe.
(3) Führen Sie das Fadenende von innen durch die Öffnung
der Spule und setzen sie die Spule auf den
Spulenträgerarm.
(4) Drücken Sie die Spule nach rechts.
(5) Halten Sie das Fadenende fest und drücken Sie leicht
den Fußanlasser. Stoppen Sie, nachdern der Faden sich
(1) Setzen Sie die Spule in die Spulenkapsel.
Stellen Sie sicher, dass der Faden in Richtung
der Pfeilspitze verläuft (im Uhrzeigersinn).
(2) Ziehen Sie das Fadenende in den Schlitz
der Spulenkapsel.
(3) Ziehen Sie dann den Faden durch die
Spulenspannfeder hindurch zur Austrittsöffnung.
Hinweis: Lassen Sie ca. 10 cm Faden aus
der Spule heraushängen.
inding
inding
einige Male um die Spule gewickelt hat. Schneiden Sie das
überstehende Fadenende dicht von der Spule ab.
(6) Drücken Sie nun erneut den Fußanlasser und spulen
Sie solange Faden auf, bis die Spule voll ist. Stoppen Sie
dann die Maschine. Drücken Sie nun den Spulenträgerarm
nach links und schneiden Sie den Faden durch.
(7) Schieben Sie das Handrad nach innen (in die
Ausgangsposition), um den Kontakt wiederherzustellen.
Hinweis: Der Spulenträgerarm, muss nach links gedrückt
werden, wenn die Maschine zum Stilstand kommt.
W
W
(1) Pull out the balance wheel to the right so as to break
contact with machine
(2) Draw thread from the spool through the bobbin
winder tension disc.
(3) Pull thread through the hole in the bobbin and insert the
bobbin into the bobbin shaft.
(4) Turn the bobbin to the right.
(5) Hold the end of the thread and keep stepping down
the foot controller. Stop the after several turns.Cut the
excess thread close to the bobbin.
(6) Stop down again the foot controller. Wind thread
until the bobbin is full and stop the machine. Push the
shaft to the left and cut the thread.
(7) Push the balance wheel to the left to close contact
(to the original position).
Instruction: The bobbin shaft is to be pushed to
the left when the winding finished.
- 57 -
- 26 -
Page 28
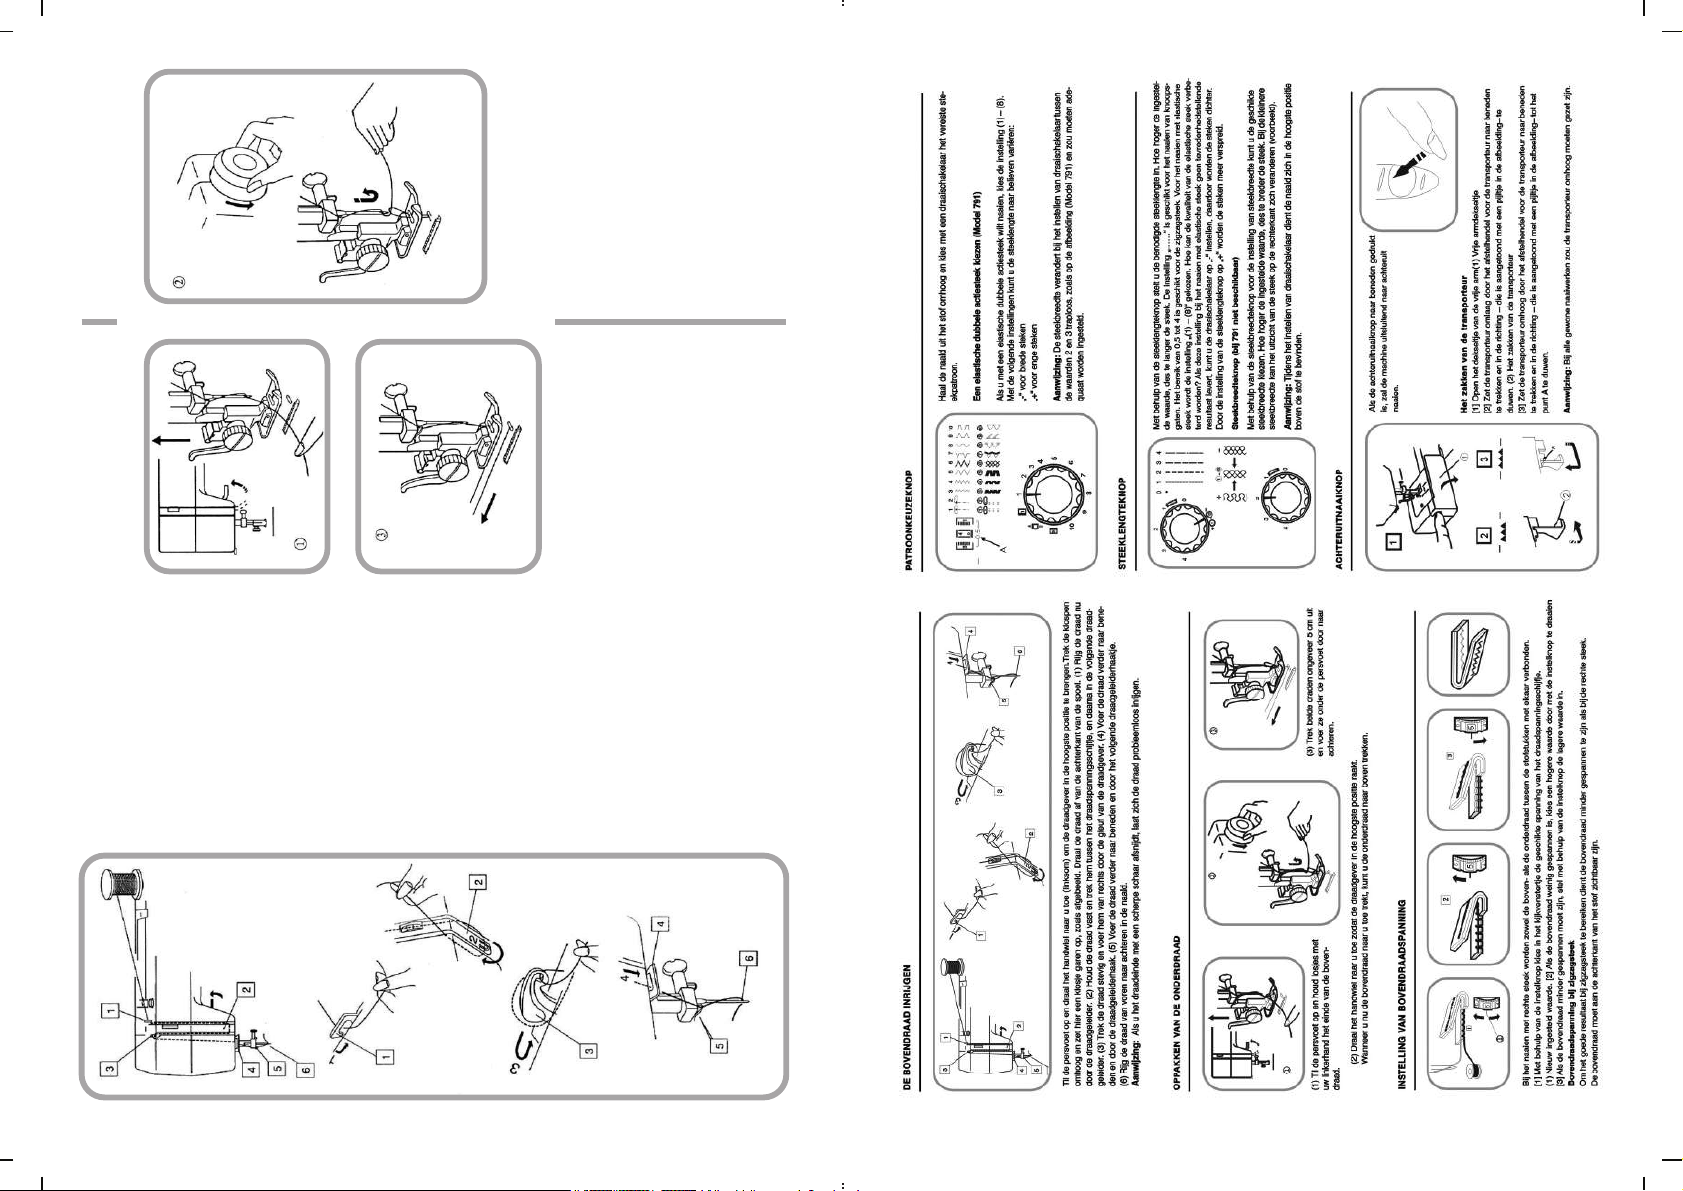
Draw up lower thread
Draw up lower thread
(1) Lift presser foot and hold the upper thread
lightly with your left hand.
(2) Keep turning forward the balance wheel until
thread take-up Iever is at its highest position.Pull
the upper thread so as to pull up the lower thread.
(3) Leave about 5 cm of both threads and pull
them under the presser foot then toward the back
of the presser foot. Leave 5 cm of both threads.
Heraufholen des Unterfadens
Heraufholen des Unterfadens
Einfädeln des Oberfadens
Einfädeln des Oberfadens
Heben Sie den Nähfuß an und bewegen Sie das
Handrad auf sich zu um den Gelenkfadenhebel in die
höchste Position zu bringen. Plazieren Sie eine Garn-
rolle auf dem Garnrollenhalter (siehe Abbildung).
Führen Sie den Faden von der Hinterseite der
Spule aus.
(1) Führen Sie den Faden durch den
Fadenvorspanner.
(2) Ziehen Sie den Faden in die Fadenspannungs-
scheibe und anschließend durch die nächste
Fadenführung.
(3) Ziehen Sie den Faden straff an und führen Sie ihn
von rechts durch die Öffnung des
Gelenkfadenhebels.
(4) Führen Sie dann den Faden nach unten und
durch den Fadenführungshaken.
(5) Führen Sie den Faden weiter nach unten und
Wenn Sie das Fadenende mit einer schar-
fen Schere abschneiden, lässt sich der Faden pro-
(6) Fädeln Sie die Nadel von vorne nach hinten ein.
Hinweis:
blemlos einfädeln.
durch den nächsten Fadenführungshaken.
- 27 -
Machine threading
Machine threading
Turning forward the balance wheel and move thread
take-up lever to the highest positon.
Raise presser foot and insert the spool into
spoolholder (as shown in the illustration).
(1) Heben Sie den Nähfuß an und halten Sie
Draw thread from the back side of the spool.
(1) Lead the thread through the pre-tension.
das Ende des Oberfadens locker in Ihrer Iinken
Hand.
(2) Hold the thread and pull it into the thread tension
disc and then past the thread plate.
(2) Bewegen Sie das Handrad solange auf sich
zu, bis sich der Gelenkfadenhebel in seiner
höchsten Position befindet. Ziehen Sie nun am
Oberfaden, um den Unterfaden heraufzuholen.
(3) Ziehen Sie beide Fäden etwa 5 cm heraus
und führen Sie beide Fäden unter dem Nähfuß
hindurch nach hinten.
Cut the thread with sharp scissors so
(3) Pull up the thread tightly and let it through the slit
of thread take-up lever from the right side.
(4) Then pull down thread and let it through the
thread hook.
(5) Pull down thread and let it go through the catch
the thread hook.
(6) Pull thread through needle hole from the front to
the back.
Instruction:
as to make easy threading.
- 56 -
Page 29

(Modell 790A)
Pattern selection dial
Pattern selection dial
)
(Modell
Stichmuster Drehschalter
Stichmuster Drehschalter
790
Needle is pulled out from fabric and the desired size
of stitching should he selected on the selection dial.
Bewegen Sie die Nadel aus dem Stoff und
wählen Sie mit dem Drehschalter das gewünschte
Width of stitch changes between
Select Double Action stitching (Model 790)
As for stitching Double Action stitching, its length
should be adjusted into (1)-(8).
Wıth the following adjustment, the length of stitch-
could be selected as you like.
" + " refers to thick stitch in Iength.
" - " refers to sparse stitch in length.
Instruction:
selection dial 2 and 3 should be different.(As shown
in illustration Model 790 / 790A).
)
790
Die Breite des Stichs verändert sich
Stichmuster.
Auswahl elastische Schrittnaht (Modell
Wählen Sie bitte die Einstellung (1)-(8), wenn Sie
eine elastische Schrittnaht nähen möchten.
Mit den folgenden Einstellungen können Sie
die Stichlänge beliebig variieren.
“ + ” Für weite Stiche
“ - ” Für enge Stiche
Hinweis:
bei einer Einstellung des Drehschalters zwischen 2
und 3 übergangslos.
(siehe Abbildung; Modell 790 / 790A)
- 55 -
ension adjustment
ension adjustment
T
of upper thread
T
of upper thread
Einstellen der
Oberfadenspannung
Einstellen der
Oberfadenspannung
- 28-
While doing straight stitching, both upper and
Beim Nähen mit Geradstich werden Ober- und
lower threads must be knotted between the two
layers of garment.
Unterfaden zwischen den Stoffstücken miteinan-
der verknüpft.
Adjust selection dial of thread tension disc within
the window.
(1) Regulated indicator
(2) The smaller the tension of upper thread is big-
Wählen Sie mit dem Einstellrad im Sichffenster
die geeignete Spannung für die Fadenspannungs-
scheibe aus.
(1) Neu eingestellter Wert
ger, turn up the ındıcator.
(3) The tension of upper thread ıs smaller, turn
down the indicator.
The tension of upper thread in case of
(2) Je niedriger der Zahlenwert umso niedriger ist
die Oberfadenspannung.
(3) Je höher der Zahlenwert, umso höher ist die
Oberfadenspannung.
zigzag stitching.
In order to achieve good effect of zigzagging, the
tension of upper thread should be less than that
of straight stitching.
Oberfadenspannung bei Zickzackstich
Zur Erzielung von guten Ergebnissen beim Nähen
mit Zickzackstich sollte die Oberfadenspannung
niedriger sein ais beim Nähen mit Geradstich. Der
The upper thread should be visible from the
reverse.
Oberfaden sollte auf der Rückseite des Nähteils
zu sehen sein.
Page 30

1. Open the cover
(1) Cover
pulling down the shaft and
moving it towards the direc-
tion inclicated by the arrow
head as shown in the
illustration.
(2) Lower teeth lever
3. Raise the feed dog by
pulling down the lower
teeth lever and moving it
towards the direction indi-
cated and reach "A" by the
arrowhead as shown in the
illustration.
Instruction: for ordinary
sewing, all the feed dog
2. Lower the feed dog by
shall be raised.
Reverse button
If the reverse button is always pressed down, the
machine will do reverse stitching all the time.
Reverse button
Halten Sie während des rückwärtsnähens die
Rückwärtstaste gedrückt.
Rückwärtstaste
Rückwärtstaste
Selection dial for length of stitch
Selection dial for length of stitch
Lower feed dog
Lower feed dog
ransporteurs
ransporteurs
Absenken des T
1. Öffnen Sie die Freiarmklappe
(1) Freiarmklappe
2. Senken Sie den
Absenken des T
Transporteur, indem Sie
den Transporteurhebel
nach unten drücken und in
die in der Abbildung durch
den Pfeil angewiesene
Richtung bewegen.
(2) Absenken des
Transporteurs
3. Heben Sie den Trans-
-Turn the selection dial with help adjust stitch to its
ideal length.
porteur, indem Sie den
Transporteurhebel
nach unten drücken und in
- The bigger the number is,the longer the stitch is.
„ …… ” is the correct range of adjustment for making
buton holes
die in der Abbildung “A”
durch den Pfeil angewiese-
-Range from 0.5 to 4 could be used for zigzag stitching
-The correct elastic stitch value should be (1)-(10).
ne Richtung bewegen.
How to make the elastic stitch better?
In case the elastic stitch turns out to be unsatisfactory,
you may turn the selection dial to “ - " and in this way,
Hinweis: Bei allen
gewöhnlichen Näharbeiten
stitches would be thicker while turning to “+" they would
be more sparse.
sollte der Transporteur
angehoben sein.
Instruction: while turning the selection dial. The nee-
dle should be stopped at a rather high position above
fabric.
Stichlängen-Drehschalter
Stichlängen-Drehschalter
(Modell 790)
(Modell 790A)
- 29 -
- Abhängig vom gewählten Stich kann es sein, dass Sie
für ein optimales Ergebnis die Stichlänge ändern
müssen.
- Je höher die Zahl, desto länger der Stich-
Die Einstellung „ …… ” eignet sich zum Nähen von
Knopflöchern.
- Der Bereich zwischen 0,5 bis 4 eignet sich für
Zickzackstich. Zum Nähen mit elastischem Stich wird
die Einstellung (1)-(10) gewählt.
Wie kann, die Qualität des elastischen Stichs verbessert
werden? Wenn diese Einstellung beim Nähen mit elas-
tischem Stich kein zufriedenstellendes Ergebnis liefert,
können Sie den Drehschalter auf “ - ” einstellen, auf
diese Weise werden die Stiche dichter, wenn Sie dage-
gen den Drehschalter auf die Position " + ” bewegen,
werden die Stiche weiter.
Hinweis: Beim betätigen des Drehschalters, sollte sich
die Nadel in ihrer höchsten Position über dem Stoff
befinden.
- 54 -
Page 31

NEDERLANDS
Chapter III Start Sewing
Chapter III Start Sewing
Aufnahme der
Aufnahme der
Kapitel III -
Näharbeit
Kapitel III -
Näharbeit
Straight stitching
Geradstich
(1) Pattern selection dial: 1 or 2
(1) Einstellung des Stichmuster-Drehschalters: 1 oder 2
(2) stitch length: 1.5 - 4
(3) presser foot for needlework: zigzag
(2) Stichlänge 1,5 - 4
(3) Nähtuß für die Näharbeit: Zickzackfuß
(4) pressure of thread tension disc: 2-6
Heben Sie den Nähfuß an und legen Sie den Stoff unter
den Nähfuß auf die Stichplatte, so dass die Stoffkante mit
einer der Markierungen auf der Stichplatte abschließt.
Bewegen Sie das Handrad auf sich zu, so dass sich die
Nadel in den Stoff senkt. Senken Sie den Nähfuß und
stellen Sie sicher, dass der Faden nach hinten gelegt
wurde. Drücken Sie auf den Fußanlasser. Der Stoff wird
durch den Transporteur automatisch entlang der Stich-
plattenmarkierung nach hinten befördert.
Betätigen Sie bitte die Rückwärtstaste und nähen Sie
einige Stiche in Rückwärtsrichtung, um das Fadenende
zu befestigen. Heben Sie den Nähfuß an und ziehen Sie
den Stoff heraus, führen Sie dabei Ober-und Unterfaden
nach hinten. Schneiden Sie beide Fäden mit der Schere
ab, lassen Sie dabei zur Vorbereitung der Nähmaschine
für die nächste Arbeit ausreichend lange Fadenenden
überstehen.
Raise presser foot and put cloth beside leg wire of needle
plate.Turn forward the balance wheel and lower the nee-
dle down into the fabric. Lower presser foot and make
sure that thread is placed backward. Step down fool con-
troller. Fabric will go along leg wire and is carned forward
automatically by feed dog.
In order to make end of thread firm, please press the
reverse stitch buton and do several reverse stitches.
Raise presser foot extract fabric and pull the thread back-
ward. Clip both threads with a cutter. Leave certain length
of thread for future use.
(4) Einstellung der Fadenspannungsscheibe. 2-6
- 53 -
Foot pressure selection dial
Foot pressure selection dial
Anpassung
Anpassung
Drehschalter zur
des Nähfußdrucks
Drehschalter zur
des Nähfußdrucks
For ordinary sewing, selection dial is present
at " 3 ". And its pressure drops to " 2 " when
Für alle gewöhnlichen Näharbeiten ist der
Nähfußdruck auf Stufe 3 voreingestellt. Der
sewing appliques, mesh fabrics and embroidery.
As for chiffon, lace, yarn and other miscellaneous
Nähfußdruck wird auf Stufe 2 eingestellt wenn
Applikationen und Stickereien angebracht werden
- 30 -
fine materials, you may put the dial to
oder Netzgewebe genäht wird.
" 3 ". Cotton flannel and braided stretch textile
Stellen Sie den Schaiter auf Stufe 3, wenn Sie
should be adjusted to " 1 ".
Chiffon, Spitzengewebe, Garn und andere feine
(1) Regulatory value indication
Mischgewebe verarbeiten. Baumwollflanell und
Stretchgewebe sollten mit Stufe 1 genäht werden.
(1 ) Anzeige der gewählten Stufe
Page 32

e on the
e on the
The strips of leg wir
needle plate
The strips of leg wir
needle plate
The Strips of leg wire on the needle plate is of great
ungen
ungen
wendung der Markier
wendung der Markier
er
er
V
auf der Stichplatte
V
Die Markierungen auf der Stichplatte sind von
auf der Stichplatte
help to maintaining width between the needle and
the thread.
Instruction: these data conforrn to the distance
between strips of leg wire and the needle.
großem Nutzen, um den Abstand der Naht zur
Kante beizubehalten.
Hinweis: Die folgenden Daten beziehen sich
auf den Abstand Strichplattenmarkierung.
(1) Strips of leg wire
(2) Comer
(3) Needle plate
(4) Hole of needle plate
(5) The width of sewing to the center of needle
Stichplattenmarkierungen
Eckmarkierung
Abstand der Kante zum Nadelöhr
(3) Stichplattezwischen Nadel und
(4) Stichloch
(1)
(2)
(5)
Right-angle stitch
Right-angle stitch
inkels
inkels
echten W
echten W
Figure on the needle plate 10 15 20 3/8 4/8 5/8 6/8
Spacing in cm 1.0 1.5 2.0 1.0 1.3 1.6 1.9
Zahl auf der Stichplatte 10 15 20 3/8 4/8 5/8 6/8
Abstand in cm 1.0 1.5 2.0 1.0 1.3 1.6 1.9
Nähen eines r
Nähen eines r
Beim Nähen eines rechten Winkels ist darauf zu achten, While doing right stitches, a space of
dass zum Stoffrand ein Abstand von 1,6 cm eingehalten wi rd.1.6 cm should bekept apart from
Halten Sie die Nähmaschine an, wenn d er Stoffrand sich the edge of fabric
auf gleicher Höhe mit der Eckmarkierung auf der Stichplatte When the edge of fabric is aligned with
befindet. Bewegen Sie das Handrad auf sich zu, so dass the corner. stop the machine and
die Nadel sich in den Stoff senkt. Heben Sie den Nahfuß und turn (forward) the balance wheel
drehen Sie den Stoff solange in die gewünschte Richtung, to lower the needle.
bis seine Kante mit der Stichplattenmarkierung Raise the presser foot, turn the fabric
1,6 cm abschließt. Senken Sie den Nähfuß und fahren Sie around the needle
aligned with the strip of leg wire of
1.6 cm. Lower the presser foot and sew
in the new direction.
(2) Thread from the corner
mit dem Nähen fort. (2) Faden Eckmarkierung to change direction until its edge is
Change sewing direction
Change sewing direction
Richtung ändern
Richtung ändern
Stop the machine, and turn the balance wheel to
bring the needle down into the fabric.
Raise the presser foot.
Turn the fabric to change direction as desired.
Lower the presser foot to resume sewing.
Stoppen sie die Nähmaschine und bewegen Sie
das Handrad auf sich zu, so dass die Nadel sich
in den Stoff senkt, Heben Sie den Nähfuß und
drehen Sie den Stoff in die gewünschte Richtung,
indem Sie die Nadel als Drehpunkt benutzen.
Senken Sie den Nähfuß und fahren Sie mit dem
Nähen fort.
- 31 -
- 52 -
Page 33
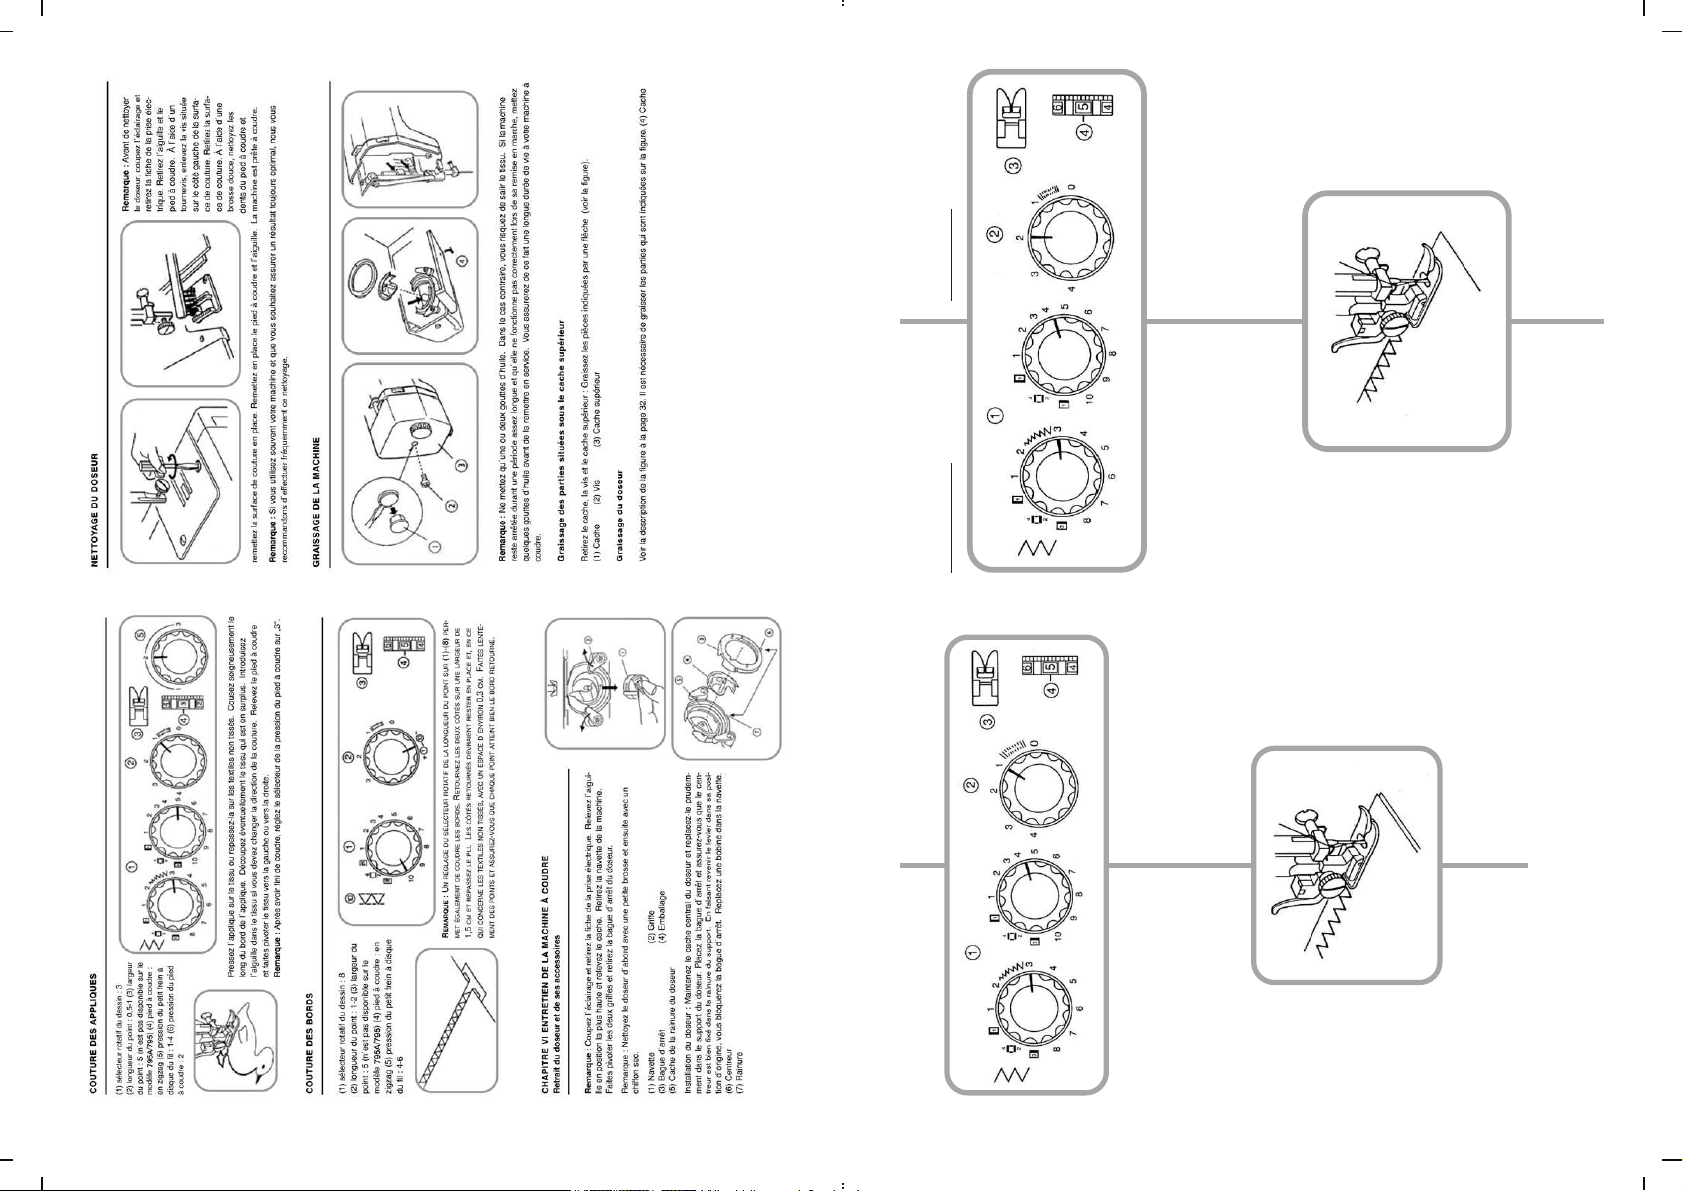
Chapter IV Clothes
stitching
Chapter IV Clothes
stitching
Überwendlingsstich Zigzag over-lock
Kapitel IV - Das Nähen
von Stoffen
Kapitel IV - Das Nähen
von Stoffen
(1) pattern selection dial:3 (model 790A)
(1) Stichmuster-Drehschalter: 3 (Modell 790A),
3-8 ( model 790 )
3-8 (Modell 790)
(2) stitch length: M1-2
(3) presser foot: zigzag
(2) Stichlänge: M1-2
(4) Nähfuß: Zickzackfuß
(4) thread tension disc:4-6
(5) Fadenspannungsscheibe: 4-6
The stitch is used for making over-lock so that
thread at the edge of cloth shall not fall apart.
Dieser Stich wird verwendet, wenn ein Übernähen
der Schnittkante des Stoffes gewünscht ist, um
ein Ausfransen des Stoffes zu verhindern.
-51 -
Zigzag Stitching
Zigzag Stitching
Zickzackstich
Zickzackstich
(1) pattern selection dial:3 (model 790A),
(1) Stichmuster-Drehschalter: 3 (Modell 790A),
3-5 (model 791)
3-5 (Modell 790)
(2) stitch length: 1 - 4
(3) presser foot: zigzag
(2) Stichlänge: 1 - 4
(3) Nähfuß: Zickzackfuß
Simple zigzag stitches are often used for hemming.
(4) thread tension disc: 2-6
(4) Fadenspannungsscheibe: 2-6
Making button holes and elastic bends.
Der einfache Zickzackstich wird häufig zum
Säumen, Herstellen von Knopflöchern
und zum Einnähen von Elastikbändern verwendet.
- 32 -
Page 34

riple stretch straight
riple stretch straight
T
stritching (Model 790)
T
stritching (Model 790)
Dreifach-Geradstich (Modell 790)
Dreifach-Geradstich (Modell 790)
(1) pattern selection dial: 1 or 2
(1) Stichmuster-Drehschalter: 1 oder 2
(2) stitch length: (1)-(8)
(3) presser foot: zigzag
(2) Stichlänge: (1)-(8)
(4) Nähfuß: Zickzackfuß
Two stitches forward and then one stitch backward
will make the stitching firm. Prior to stitching gar-
ment pıeces, make a sample by using pins. Such
Bei diesem Stich wird eine sehr feste Naht
stitches are most suitable for sewing crotches.
erzeugt, indem Sie die Nadel zwei Stiche vor-
wärts und einen Stich zurück bewegt. Stecken Sie
den Stoff mit Stecknadeln ab, bevor Sie Klei-
dungsstücke nähen. Diese Stichart eignet sich
insbesondere für Zwickelnähte.
(4) thread tension disc: 4-6
(5) Fadenspannungsscheibe: 4-6
riple zigzag
riple zigzag
T
T
Dreifach-Zickzackstich
Dreifach-Zickzackstich
790
790A
(1) pattern selection dial:3 (model 790A)
(1) Stichmuster-Drehschalter: 3 (Modell 791A),
3-8 ( model.790 )
3-8 (Modell 790)
(2) stitch length: M 1-2
(3) presser foot: zigzag
(2) Stichlänge: M 1-2
(3) Nähfuß: Zickzackfuß
(4) thread tension disc:4-6
(4) Fadenspannungsscheibe: 4-6
- 33 -
The stitch is used for synthetic materials and other materi-
Dieser Stich ist zum Nähen von Synthetikstoffen und
als that get folds easily.
anderen Materialien geeignet, die schnell falten bilden.
It also suits over-lock so as to avoid threads falling apart.
Er eignet sich auch als Überwendlingsstich, um das
It is fit for sewing elastic bends and darning.
A strip of hemming-stitch with 1.5 cm is to be left.
Ausfransen von Stoffen zu verhindern; außerdem kann
der Dreifach-zickzackstich zum Einnähen von
Cut off the strip of hemming-stitching after sewing.
Elastikbändern und für Ausbesserungsarbeiten benutzt
werden. Bitte lassen Sie einen 1,5 cm breiten Saum ste-
hen, diese Nahtzugabe wird nach dem Nähen
abgeschnitten.
- 50 -
Page 35

-Turn pattern selection dial
-turn the stitch width just up to the top of right
button hole. Make 5 stitches approximately and
raise the needle.
-Drehen Sie den Stichmuster-Drehschalter
Nähen Sie etwa fünf Stiche und heben Sie
die Nadel an.
To get a thicker button handle, cut the thread wıth
20 cm left. Bring the upper thread down through
the button hole and wind it around the button han-
Lassen Sie ein etwa 20 cm langes Fadenende
übrig wenn Sie einen festeren Knopfhals wün-
schen. Fädeln Sie den Oberfaden durch ein
dle for several turns.
Knopfloch nach unten und wickeln Sie den Faden
Draw the thread to the back and make a knot.
mehrmals um den Faden der den Knopf mit dem
Instruction: raise the teed dog again after sewing
buttons.
Nähgut verbindet um so einen Knopfhals zu
erzeugen. Ziehen Sie den Faden auf die
Stoffunterseite durch und verknoten Sie ihn.
Hinweis: Heben Sie den Transporteur nach dem
Annahen des Knopfes wieder an.
- 49 -
Button sewing
Button sewing
Knöpfe annähen
Knöpfe annähen
(aslong as fit for button sewing)
(1) Stitch selection dial: 3 (mod. 790A); 3-5 (mod. 790)
(2) Stitch length: could be adjusted to any figure
790A 790
3-5 (Modell 790)
(1) Stichmuster Drehschalter: 3 (Modell 790A),
(2) Stichlange: Nach Belieben
(3) Stitch wide: making presser foot for button sewing
(3) Stichbreite: Wählen Sie die Stichbreite, die sich
(4) Presser foot: button sewing
zum Annähen des Knopfes eignet
(See page 16)
(5) Tread tension disk presser: 1-3
(6) Tape the button over the marked position
(4) Nähfuß: Knopfannähfuß
(5) Fadenspannungsscheibe: 1-3
(6) Senken Sie den Transporteur (Siehe Seite 16)
Align both holes of the button with groove slots while
Legen Sie den Knopf an die gewünschte Stelle. Durch
placing the left button hole directly under the needle point.
eine auf den Knopfannähfuß gelegte Nähnadel bildet sich
Low presser foot
beim Nähen ein Steg, der ein späteres Umwickeln mit
Faden auf der Knopfunterseite erleichtert. Stellen Sie bei
den Modellen 790A / 790 den Stichmuster-Drehschalter
auf „2" ein. Richten Sie beide Knopflöcher entlang der
Rinnen aus und legen Sie das linke Knopfloch direkt
unter die Nadelspitze. Senken Sie den Knopfannähfuß.
- 34 -
Page 36
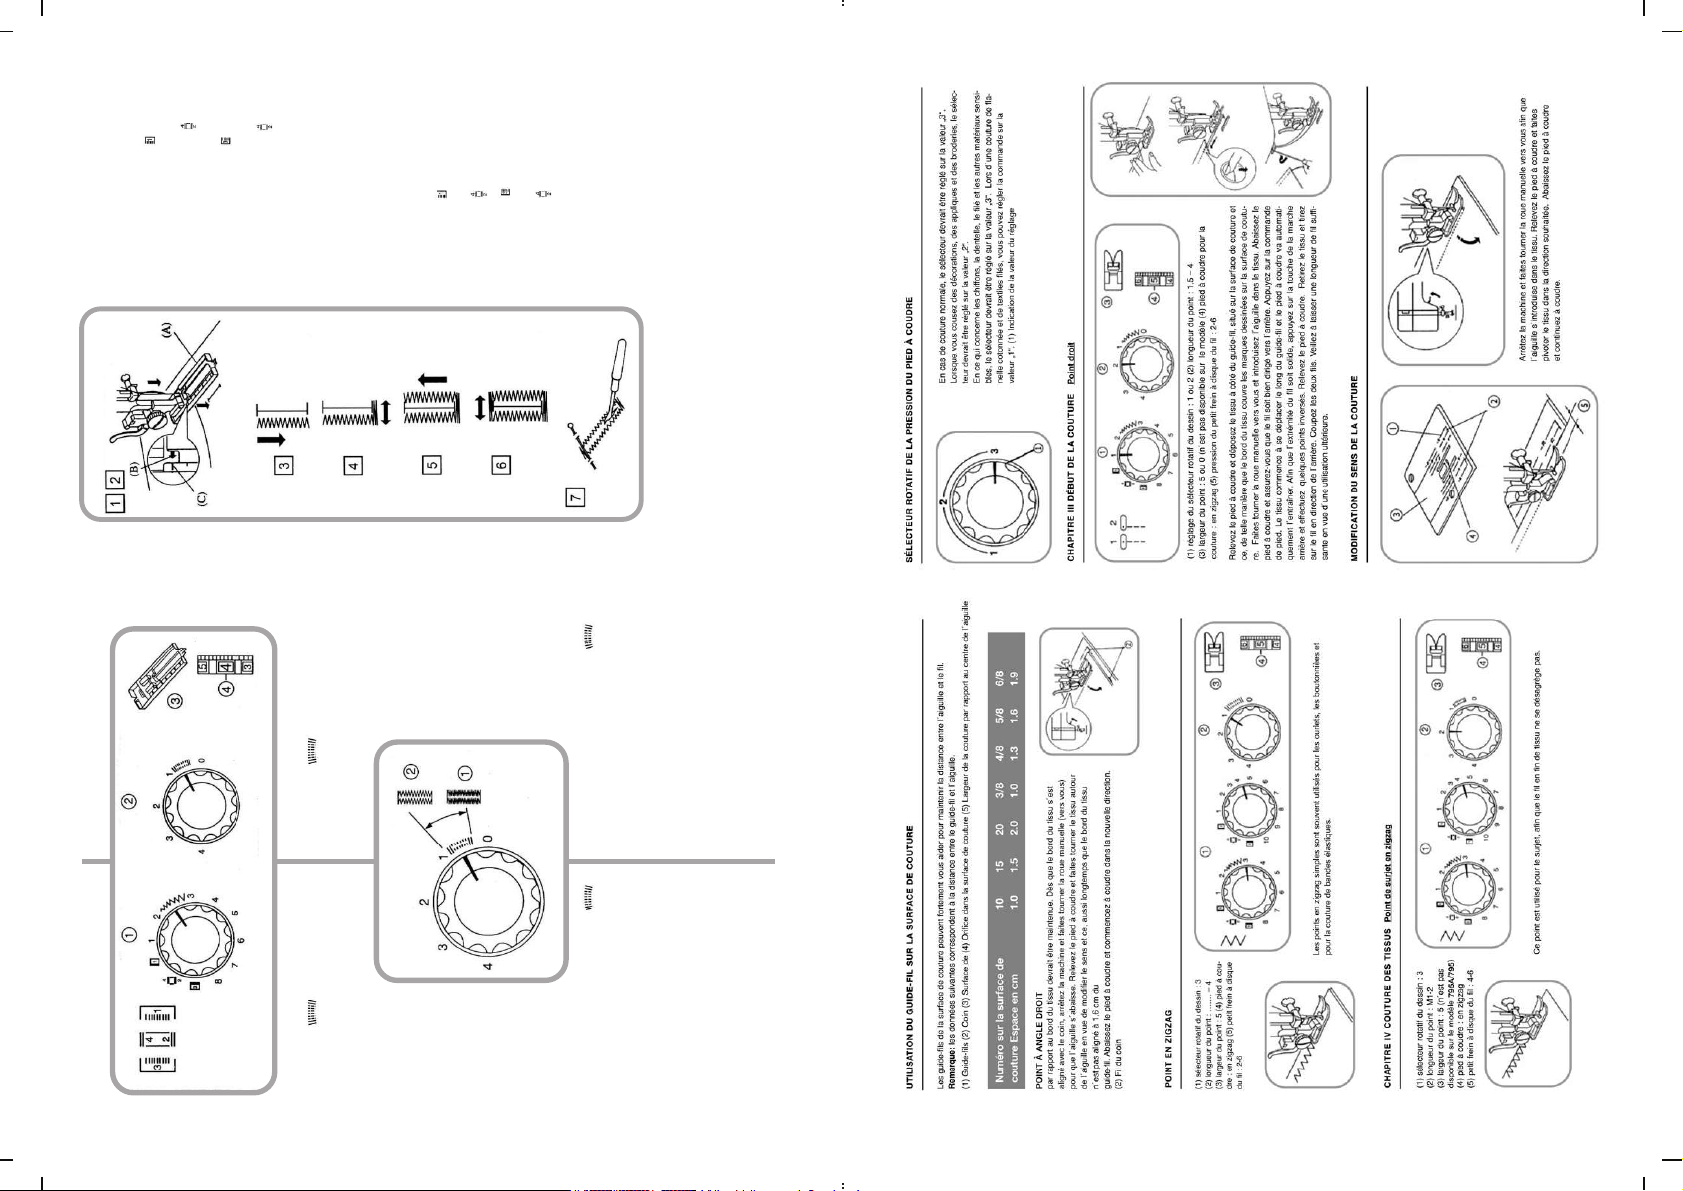
(1) Markieren Sie sorgfaltig die Position des Knopflochs auf dem Stoff.
(2) Ziehen Sie den Schlitten des Knopflochfußes (A) nach vorne und
bringen Sie die Markierung auf den Knopflochfuß (C) mit der Markierung
auf dem Stoff (B) in übereinstimmung. Senken Sie den Nähfuß.
Hinweis: Die Einheit der Markierungen auf dem Schlitten ist Zentimeter.
Buttonholes
Buttonholes
(3) Stellen Sie den Stichmuster-Drehschaller auf . Nähen Sie solange
vorwärts, bis Sie die vordere Knopflochmarkierung erreichen, halten Sie
dann die Nähmaschine an. Die Nadel muss sich dabei oben links befin-
den. (4) Stellen Sie den Stichmuster Drehschalter auf . Nähen Sie vier
bis sechs Stiche bevor Sie die Nähmaschine wieder anhalten. Die Nadel
muss sich dabei oben rechts befinden.
(5) Stellen Sie den Stichmuster-Drehschalter auf . Nähen Sie solange
rückwarts, bis Sie die hintere Knopflochmarkierung erreichen, halten Sie
dann die Nahmaschine an. Die Nadel muss sich dabei oben rechts befin-
den. (6) Stellen Sie den Stichmuster Drehschalter auf . Nähen Sie vier
bis sechs Stiche, bevor Sie die Nähmaschine wieder anhalten. Die Nadel
muss sich dabei oben links befinden.
(7) Entnehmen Sie den Stoff. wenn das Knopfloch fertig genäht ist.
Stecken Sie eine Nadel vor den hinteren Knopflochriegel, damit Sie ihn
beim Ausschneiden des Knopflochs nicht versehentlich durchtrennen.
Schneiden Sie das Knopfloch dann unter Verwendung des
Knopflochschneiders sorgfältig aus.
(1) Make the marks of buttonhole carefully on the material.
(2) Pull forward slide (A),keep the mark (C)on it in conformity to the initial
mark (B),The mark on the presser foot should be aligned with that of the
material Lower the presser foot.
Instruction: marks on the slide should be carved in cm.
(3) Adjust stitch selection dial to . Keep stitching forward until come to
the marks in front of the buttons and then stop sewing with needle
pausing at top left.
(4) Adjust stitch selection dial to . Make 4-6 stitches before stopping
sewing with needle pausing at top right.
(5) Adjust stitch selection dial to . Keep stitching backward until come
to the marks at the back of buitons and then stop sewing with needle
pausing at top right.
(6) Adjust stitch selection dial to . Make 4-6 stitches before stopping
sewing with needle pausing at top left.
(7) After sewing: buttonholes, take out fabrics. Insert a pin at the back
hole of buttonhole so that the end of thread of buttonhole will not be cut
off mis takely. Cut out the buttonhole carefully with a buttonhole cutter.
Stitch width is to be chosen arbitranly with in
between 0 and 1 range according to variation of
stitch length.
(1) For thicker stitching, adjust selection dial to "O".
Satin stitches suit lightweight material.
(2) For thicker stitching, adjust selection dial to "1”.
Loose stitches suit heavyweıght material.
Instructron: Make trial stıtchıng on some small
(1) satural pattern selection dial: see the drawing 1
(2) stitch length: (0,5-1)
(3) presser foot: making buttonholes
(4) thread tension disc tension: 3-5
cloth so as to find out the optimum effect.
Knopfloch nähen
Knopfloch nähen
(1) Stichmuster-Drehschalter: Siehe Zeichnung= 1
(2) Stichlänge: (0,5-1)
(3) Nähfuß: Knopflochfuß
(4) Fadenspannungsscheibe: 3-5
- 35 -
Die Stichbreite ist innerhalb des Bereichs
zwischen”0” und “1” abhängig von der Stichlänge
zu wählen.(1) Stellen Sie den Stichlängen-Dreh-
schalter auf „0'', wenn Sie dichtere Stiche wüns-
chen. Satinstich eignet sich zum Anbringen von
Knopflöchern auf dünnen Stoffen.(2) Stellen Sie
den Stichlängen-Drehschalter auf „1",wenn Sie
weniger dichte Stiche wünschen. Weniger dichte
Stiche eignen sich zum Anbringen von Knopf-
löchem auf dicken Stoffen
Hinweis: Es wird empfohlen, das Nähen eines
Knopfloches auf einem kleinen Stoffstück auszu-
probieren, um eln optimales Ergebnis zu erzielen.
- 48 -
Page 37
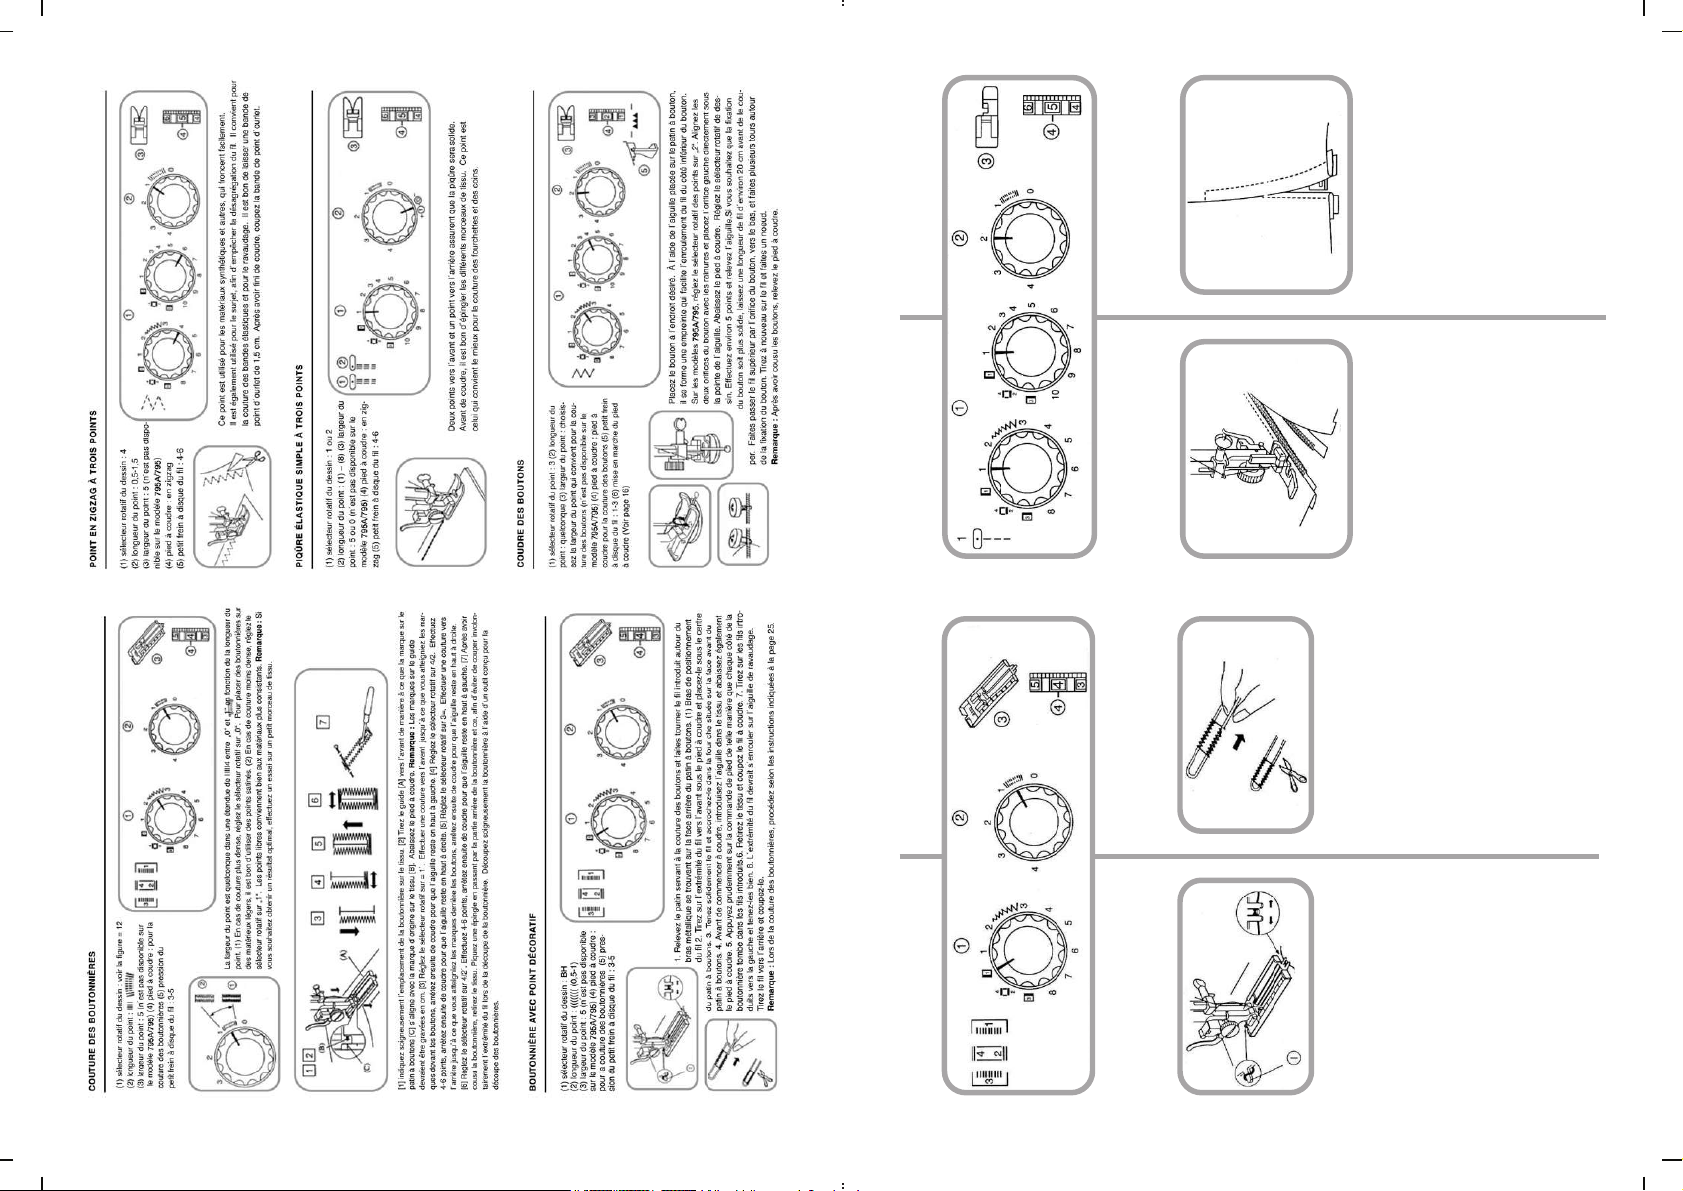
Zipper sewing
Zipper sewing
Einnähen eines
Reißverschlusses
Einnähen eines
Reißverschlusses
Buttonholes with
decorative stitching
Buttonholes with
decorative stitching
(1) pattern selection dial: 1
(2) stitch length: 1,5-4
(3) presser foot: zipper
(4) thread tension disc pressure: 4-6
(1) Stichmuster-Drehschalter: 1
(2) Stichlänge: 1,5-4
(3) Nähfuß: Reißverschlussfuß
(4) Fadenspannungsscheibe: 4-6
(1) pattern selection dial:BH
(2) stitch length: IIIIIIIIII (0,5-1)
(3) presser foot: making buttonholes
(4) thread tension disc tension: 3-5
Stick a zipper or needle it to the fabrics and place it
under foot plate. Draw the thread to be back and
lower the presser foot. Sew on the left sıde of the
zıpper by guıdıng the zipper teeth as close as pos-
sible to the needle drop. Fabrics and zipper should
be stitched tightly at the same time Pivot fabric to
the opposite side and the way to stitch the other
side of zipper should be identical to that of the left
side.
Legen Sie den Reißverschluss auf den Stoff oder
befestigen Sie ihn mit Stecknadeln. Plazieren Sie
den Reißverschluss unter dem
Reißverschlussfuß. Legen Sie den Faden nach
hinten und senken Sie den Nähfuß. Nähen Sie
auf der linken Seite des Reißverschlusses, dabei
sollte für ein optimales Ergebnis die Nadel so
nahe wie möglich an den Zähnen des
Reißverschlusses entlang geführt werden.
Vernähen Sie den Stoff gleichzeitig eng mit dem
Reißverschluss. Drehen Sie dann den Stoff herum
und nähen Sie die andere Seite des
Reißverschlusses wie für die linke Seite des
Reißverschlusses bereits beschrieben.
1. Raise the foot plate of buttonholes sewing hang the
laid in threads on the cam at the back of presser foot,
(1) Positioning cam
2. Draw forward the end of additional thread under the
presser foot and place it under the center of presser foot.
3. Hold tightly the additional thread and hook the fork in
front of the presscr foot.
4. Bring the neddle into the fabrics before starting sewing
and lower the presser foot.
5. Slowly step down foot controller buttonholes, with each
face of buttonholes encasing the laid-in threads
6.Take out fabrics and clip sewing thread.
7. Pull the laid-in threads from left side and hold it tightly.
8.The end of thread should be wound to darning needle.
Draw the thread to the back and clip.
Instruction: while cutting out buttonholes, pay attention
to the instruction on Page 25.
- 47 -
Knopflöcher mit Beilaufgarn
Knopflöcher mit Beilaufgarn
(1) Stichmuster-Drehschalter: BH
(2) Stichlänge: IIIIIIIIII (0,5-1)
(3) Nähfuß: Knopflochfuß
(4) Fadenspannungsscheibe: 3-5
- 36 -
1. Heben Sie den Knopflochfuß an und wickeln Sie die
eingelegten Fäden Über den Metallarm am hinteren
Ende des Knopflochfußes.
(1) Metallarm zur Positionierung der Fäden
2. Ziehen Sie das Ende der Fäden unter dem Knopf-
lochfuß nach vorne und führen Sie sie unter der Mitte
des Knopflochfußes zu sich hin.
3. Halten Sie die Fäden fest in der Hand und legen Sie
sie überkreuz in die Gabel am vorderen Ende des
Knopflochfußes.
4. Senken Sie die Nadel in den Stoff und senken Sie
den Nähfuß, bevor Sie mit dem Nähen beginnen
5. drücken Sie den Fußanlasser vorsichtig nach unten
und nähen Sie entlang der Knopflöcher, wobei die ein-
gelegten Fäden von den Stichen umfasst werden
müssen.
6. Entnehmen Sie den Stoff und durchtrennen Sie
den Nähfaden mit einer Schere.
7. Ziehen Sie die eingelegten Fäden von links und hal-
ten Sie das Nähgut fest.
8. Das Fadenende sollte auf eine Stopfnadel gewickelt
werden. Ziehen Sie den Faden nach hinten durch und
durchtrennen Sie ihn.
Hinweis: Beachten Sie beim Ausschneiden von
Knopflöchern bitte die Anweisungen auf Seite 25.
Page 38

Chapter V Decorative
stitching
Chapter V Decorative
stitching
Bogenstich Shell stitching
Kapitel V - Zierstiche
Kapitel V - Zierstiche
Folded cloth lace should be placed beside the pres-
ser foot and needle on the right of the cloth so as to
Zum Nähen von Bogenstich ist es ratsam, rechts
neben dem Stoff, neben den Nähfuß und die
work out shell stitching.
Nadel ein gefaltetes Stück Spitzengewebe zu
legen.
(1) pattern selection dial: 7 (mod.790A; 9 (mod. 790)
(2) stitch length: 2
(3) presser foot: zigzag
(4) thread tension disc pressure: 6-8
790A 790
9 (Mod.790)
(1) Stichmuster-Drehschalter: 6-7 (Mod.790 A);
(2) Stichlänge: 2
(3) Nähfuß: Zickzackfuß
(4) Fadenspannungsscheibe: 6-8
Blind hemming
Blind hemming
Blindstich
Blindstich
790
790A
(1) Pattern selection dial: 5-6 (mod.790A); 7-8 (mod. 790
(2) stitch length: 1-3
(1) Stichmuster-Drehschalter: 5-6 (Mod.790); 7-8 (Mod.790A)
(2) Stichlänge 1-3
(4) Nähfuß: Zickzackfuß, mit Führungsschiene
(3) presser foot: zigzag plus guiding plate
while keeping tucks facing the stopper of the guiding
plate. Lower the presser foot and stitch slowly in
order to command a better control.
The needle on the left zlgzag should be brought just
(1) Rückseite des Stoffes,
(2) 04 - 0,7 cm
2. Senken Sie den Nähfuß, lösen Sie die Feststellschraube
into tucks. Pay attention to the tucks, which are to
des Nähfußes und verankem Sie die Führungsschiene
zwischen der Schraube und dem Nähfußsteeg des
Nähfußes. Ziehen Sie die Schraube wieder fest und ver-
presser foot and push forward the guiding plate bet
ween the screw and foot plate groove. Fix the screw
and make sure that the stopper of guilding plate
2. Lower presser foot, release the screw of the fixed
should be installed in the middle of foot plate.
3. raisc the presser foot, place fabrics under the foot
1. Methode zur Faltung des Stoffes
(1) Back side of fabrics
(2) 0.4-0.7cm
(4) thread tension disc pressure: 4-6
(5) Fadenspannungsscheibe. 4-6
1. Folding method for fabrics
- 37 -
be placed at the side of stopper of guiding plate
gewissern Sie sich, dass die Führungsschiene fest in der
while sewing.
Mitte des Nähfußes sitzt.
3. Heben Sie den Nähfuß an, legen Sie den Stoff unter
its stitches are hardly to be perceived.
4. When rıght upper layer of cloth ıs ıroned upward,
den Nähfuß und richten Sie die Falte des Stoffes entlang
der Führungsschiene aus. Senken Sie den Nähfuß und
nähen Sie langsam, um eine bessere Kontrolle zu be-
kommen. Mit dem linken Einstich der Nadel beim Zick-
zackstich wird die Falte dicht an ihrer Kante entlang
genäht. Achten Sie darauf, dass die Falten beim Nähen
immer entlang der Fühnungsschiene entlang laufen.
wurde, sind die Einstiche kaum noch zu erkennen.
4. Nachdem die rechte, obere Stoffschicht gebügelt
- 46 -
Page 39

Reticulate stitching
Reticulate stitching
Modell 790 Model 790
Gitterstich
Gitterstich
Action stitching
Action stitching
Double
Double
(1) pattern selection dial: 4
(1) Stichmuster-Drehschalter: 4
(2) stitch length: 1-8
(3) presser foot: zigzag
(2) Stichlänge: (1)-(8)
(3) Nähfuß. Zickzackfuß
Straight stitch the tucked side with spacing of 1 cm.
Select "4” for its stitch length.
Knot the thread on one side.Tighten lower thread
and make tucks with even spaces.
Fıx the thread on the other side. Make a reticulate
and decoratıve stitching along the middle of tucks.
Then, extract the tuck stitches.
Instruction: Decrease upper thread tension will
(4) thread tension disc pressure: 4-6
(4) Fadenspannungescheibe: 4-6
(1) pattern selection dial: 1-8
(2) stitch length: 1-8
(3) presser foot: zigzag
(4) thread tension disc pressure: 2-6
With following adjustment, the stitch length could be
selected as you like.
Adjustment to " + " reters to thick stitch in length.
Adjustment to " - " refers to sparse stitch in length.
Nähen Sie den Stoff mit mehreren Reihen
Geradstich im Abstand von 1 cm. Wählen Sie die
Einstellung “4” als Stichlänge. Verknoten Sie auf
einer Seite jeweils Ober- und Unterfaden. Ziehen
make tuck decoration easy.
Sie von der anderen Seite aus am Unterfaden so
dass in regelmäßigen Abständen Falten entste-
hen. Fixieren Sie dann die Fäden auf der anderen
Seite. Nähen Sie mit dem Gitterstich ein dekorati-
ves Netzmuster quer über die Falten. Entfemen
Sie abschließend extakt die Hilfsfäden, die zur
Erzeugung der Falten dienten.
Hinweis: Eine verminderte Oberfadenspannung
erleichtert das Herstellen von Biesen.
- 45 -
Modell 790 Model 790
Elastische Schrittnaht
Elastische Schrittnaht
(1) Stichmuster-Drehschalter: 1-8
(2) Stichlänge: (1)-(8)
(3) Nähfuß. Zickzackfuß
- 38 -
(4) Fadenspannungescheibe: 2-6
Mit folgenden Einstellungen konnen Sie die
Stichlänge beliebig variieren,
Einstellung auf “ + " eignet sich für weite Stiche.
Einstellung auf “ - ” eignet sich für enge Stiche.
Page 40

Pad stitching
Pad stitching
Applizieren
Applizieren
790A 790
(1) pattern selection dial: 3 (mod.790A); 5 (mod.790)
(2) stitch length: 0,5-1
(3) presser foot: zigzag
5 (Mod. 790)
(1) Stichmuster-Drehschalter: 3 (Mod.790A);
(2) Stichlänge: 0,5-1
(4) thread tension disc pressure: 1-4
(5) presser foot presser: 2
(3) Nähfuß. Zickzackfuß
(4) Fadenspannungescheibe: 1-4
(5) Nähfußdruck: 2
Adhere tightly the decorative parts to the fabrics or
Heften Sie die Applikation auf den Stoff oder
iron it with solvable non-woven textiles. Stitch
around the decorative parts and make sure that
bügeln Sie sie auf. Nähen Sie sorgfältig entlang
der Schnittkante der Applikation. Schneiden Sie
suture beyond the decorative parts should disappe-
ar. Insert the needle into the cloth when encounte-
eventuell überstehenden Stoff außerhalb der Naht
ab. Senken Sie die Nadel in den Stoff, wenn Sie
ring corner. Raise the presser foot and pivot the
cloth to the left or right.
die Nährichtung ändern müssen.
Heben Sie den Nähfuß und drehen Sie den Stoff
Instruction: After sewing, adjust the selecıion dial
nach rechts oder links.
Hinweis: Stellen Sie nach dem Nähen den
FRANÇAIS
Nähfußdruck wieder auf "3”.
Box shaped elastic
stitching
Box shaped elastic
stitching
Elastikstich mit zwei
Einstichen
Elastikstich mit zwei
Einstichen
790A 790
(1) pattern selection dial: 8 (mod. 790A);10 (mod. 790)
(2) stitch length: 1
(3) presser foot: zigzag
10 (Mod. 790)
(1) Stichmuster-Drehschalter: 8 (Mod.790A);
(2) Stichlänge: 1
(4) thread tension disc pressure: 4-6
(3) Nähfuß. Zickzackfuß
(4) Fadenspannungescheibe: 4-6
- 39 -
The stitches are most suitable to sewing the elastic
Dieser Stich eignet sich hervorragend zum
cords over 3 mm of children's sleeves. Tighten the
Aufsteppen Elastikbändern mit einer Breite von
elastic cord after sewing.
Such stitches are aiso good to sewing heavyweight
mehr als 3 cm, welche beispielsweise in Ärmel
von Kinderkleidung genäht werden. Nähen Sie
Fold the two seamless fabrics and stitch them
das Elastikband nach Abschluss der
together.
Näharbeit fest. Außerdem eignet sich diese
Stichart gut zum Zusammennähen schwerer
Stoffe. Legen Sie beide Stoffe saumlos überei-
nander und nähen Sie die Stoffe zusammen.
- 44 -
Page 41

Explanation
Explanation
Cause
Cause
1. Upper thread tension is too tight. See Page 19
2.Threading is not correct See Page 17
Malfunction
Malfunction
Chapter VI Maintainance of
Machine
assemblies
Chapter VI Maintainance of
Machine
3.Needle is too thick for the fabric See Page 12
be sewn.
Non-woven lining under the cloth is re-
quired for very thin cloth to be stitched.
1.Upper thread pressure it too weak. See Page 19
2.The combination of needle size / thread See Page 12
too thin.
1.Feed dog is stained by fine hair. See Page 45
3.Stitching is too small. See Page 21
1.Main power switch is turned off. See Page 8
3.Clutch release switch ıs set at bobbin See Page 15
mark.
Fabric puckers 4.Stitches are too big to the cloth to See Page 21
Loop in seam. size / fabric is incorrect, either too thick or
Fabric does not feed propertly 2.Feed dog is not hoisted. See Page 22
Machine does not work. 2.thread in the hook is tangled. See Page 45
Insufficient oiling. See Page 46
artung der
artung der
Kapitel VI - W
Nähmaschine
Kapitel VI - W
Nähmaschine
Herausnehmen des Greifers und seiner Teile Remove the pendular shuttle and its
Machine is noisy and 1.thread in the hook is tangled. See Page 45
works slowly. 2.feed dog is stained by fine hair. See Page 45
Instruction: switch off lamp or pull plug out.
Take out the pendular shuttle: Raise needle to its
highest position and lift shuttle Gover. Remove the
bobbin case from the machine, Uncover shuttle lever
and draw out the shuffle retaining ring.
Instruction: clean the feed dog with a brush and
soft and dry rag
(1) Bobbin case (2) Shuttle lever
(3) Shuttle retaining ring (4) Pendular shuttle
(5) Shuttle carrıer
Installation of the pendular shuttle: hold shuttle cen-
ter pin and fit carefully black into the shuttle carrier.
Refit shuttle retaining ring and make sure that the
following Center pin is fixed in the Slot of the shuttle
canier. Lock retaining ring by turning levers back into
position. Refit bobbin case with bobbin
(6) Center pin (7) Slot
Hinweis: Schalten sie das Nähmaschinenlicht aus
und ziehen Sie den Netzstecker. Bringen Sie zum
Herausnehmen des Greifers die Nadel in die höchste
Position und öffnen Sie die Freiarmklappe. Entfernen
Sie die Spulenkapsel aus der Nähmaschine. Drehen
Sie die beiden Klemmriegel und entnehmen Sie den
Ringdeckel.
Hinweis: Reinigen Sie den Transporteur mit einer
Bürste und einem weichen sauberen Tuch.
(1) Spulenkapsel (2) Klemmriegel
(3) Ringdeckel (4) Kapselhaken
(5) Greiferbahngehäuse
Wiedereinsetzen des Greifers: Halten Sie den Ring-
deckel so dass der Ringdeckelsporn nach unten
weist und setzen Sie ihn vorsichtig wieder in das
Greiferbahngehäuse ein. Befestigen Sie den Ring-
deckel und stellen Sie sicher dass der Ringdeckel-
sporn wieder fest in der vorgesehenen Vertiefung im
Greiferbahngehäuse verankert ist. Fixieren Sie den
Ringdeckel indem Sie die Klemmriegel wieder in ihre
Ausgangsposition bringen. Setzen Sie die
Spulenkapsel mit der Spule wieder ein.
(6) Ringdeckelspom
(7) Vertiefung im Greiferbahngehäuse
Fehler Grund Erklärung
Fold in both sides with 1.5 cm each and iron it. The
folded sides should be fixed to non-woven textiles
with spacing of 0.3 cm. Slowly stitch and make sure
Hinweis: Auch eine Einstellung des Stichlängen-
Drehschalters ermöglicht das Nähen mit ge-
schlossenem Overlockstich. Schlagen Sie beide
that each stitch should reach the folding edges.
Stoffkanten ca. 1,5 cm ein und bügeln Sie die
Kanten glatt. Die Stoffe sollten mit der umgeschla-
genen Seite nach unten mit einem Abstand von
0,3 cm zueinander auf einem Trägervlies befestigt
werden. Nähen Sie langsam und stellen Sie
sicher dass jeder Einstich der Nadel die
Stoffkante erreicht.
(1) pattern selection dial: 10
(2) stitch length: 1-10
(3) presser foot: zigzag
(1) Stichmuster-Drehschalter: 10
(2) Stichlänge: 1-10
(3) Nähfuß. Zickzackfuß
(4) thread tension disc pressure: 4-6
(4) Fadenspannungescheibe: 4-6
- 40 -
Edge joint
Edge joint
1. Die Oberfadenspannung ist zu hoch. Siehe Seite 19
2. Die Fadenführung ist nicht richtig. Siehe Seite 17
4. Zu große Stichlänge für das Nähgut. Siehe Seite 21
Zum Nähen von sehr dünnen Stoffen
ist das Unterlegen eines Trägerflieses
notwendig.
1. Die Oberfadenspannung ist zu niedrig. Siehe Seite 19
Stoff wellt sich 3. Die Nähnadel ist zu dick für das Nähgut. Siehe Seite 12
dick oder zu dünn.
Schleife in der 2. Die Kombination Nadelgröße / Faden- Siehe Seite 12
Naht stärke / Stoff ist nicht richtig, entweder zu
1. Der Netzschalter ist ausgeschaltet Siehe Seite 8
Nähgut wird nicht 1. Der Transporteur ist durch feine Fasern blockiert. Siehe Seite 45
richtig 2. Der Transporteur ist nicht aktiviert Siehe Seite 22
transportiert 3. Die Stiche sind zu kurz. Siehe Seite 21
Maschine läuft 2. Der Faden hat sich im Spulenkapselfinger Siehe Seite 45
3. Das Handrad befindet sich in Spulstellung. Siehe Seite 15
nicht an verfangen.
1. Der Faden hat sich im Spulenkapselfinger
verfangen. Siehe Seite 45
Maschine ist laut 2. Der Transporteur ist durch feine Fasern blockiert. Siehe Seite 45
oder langsam 3. Unzureichende Schmierung. Siehe Seite 46
Modell 790 Model 790
Geschlossener Overlockstich
Geschlossener Overlockstich
- 43 -
Page 42

Oil the works
Oil the works
Instruction: Apply only
one or two drops of machi-
Ölen der
Maschine
Ölen der
Maschine
Hinweis: Verwenden Sie
ne oil, or cloth will be stai-
nur ein bis zwei Tropfen
ned. If the machine should
Nähmaschinenöl zum Ölen
not run well after being out
of use for a long period,
der Maschine, ansonsten
könnte ihr Nähgut
Explanation
Explanation
apply a few drops of oil
before running it and the
result will be the same as
the well thumbed condition
Oiling the back
Oiling the back
of top
of top
Oil the pendular shuttle
Remove the cover, screw and top cover
Oiling the parts as shown in the illustration.
(1) Cover (2) Screw (3) Top cover
Oil the pendular shuttle
Oiling is required for the positions marked in the
illustration
(4) Cover
Cause
Cause
1.Upper thread is not correctly installed. See Page l7
2.Upper thread tension is too tight. See Page 19
4.Needle is misplaced. See Page 11
5.Fabrics are not pulled backward after See Page 24
sewing.
6.Thread is either too thick or too thin. See Page 12
1.Lower thread is not threaded properly in See Page 16
eile unterhalb der
eile unterhalb der
Abdeckung
Abdeckung
Ölen der T
beschmutzen. Falls die
Maschine nach einer lan-
gen Ruhezeit nicht gut funk-
tioniert, verwenden Sie vor
Gebrauch einige Tropfen
Nähmaschinenöl, dadurch
erlangt die Maschine ihre volle Betriebsfähigkeit
zurück.
Ölen der T
oberen
oberen
Entfernen Sie die Schraubenabdeckung, die
Schraube und die obere Abdeckung. Ölen Sie die
mit einem Pfeil markierten Punkte, siehe Abbildung.
(1) Schraubenabdeckung (2) Schraube
(3) Obere Abdeckung
Ölen des Greifers
Ölen des Greifers
Ölen Sie den mit einem Pfeil markierten Punkt.
(4) Freiarmklappe
Malfunction
Malfunction
Obstacle avoidance
Obstacle avoidance
Upper thread breaks 3.Needle is bent or dull.
the shuttle hook.
Lower thread breaks 2.There is fine hair inside hook. Clean the bobbin
3.Bobbin is damaged. case
Replace bobbin
1.Needle is not correctly installed. See Page 11
2.Needle is bent or dull.
4.Upper thread tension is to tight. See Page 19
5.Fabrics are not pulled backward after See Page 24
sewing.
6.Needle is too thin to the cloth to be stitched. See Page 12
7.Pattern selection dial is not turned SeePage 20
properly.
1.Needle is incorrectly installed. See Page 11
3.Neither needle nor thread is fit for sewing. See Page 12
4.Upper threading is not correct. See Page 17
Needlebreaks 3.Needle clamp screw goes loose. See Page 11
Skipping stitch 2.Needle is bent or dull.
Cleaning the feed dog
Cleaning the feed dog
ransporteurs
ransporteurs
Reinigung des T
Reinigung des T
Switch off lamp and pull plug out before cleaning
the feed dog.
Schalten Sie das Nähmaschinenlicht aus und zie-
hen Sie den Netzstecker, bevor Sie mit der
Remove the needle and presser foot. Remove the
screw on the left hand side of the needle plate
Reinigung des Transporteurs beginnen. Entfernen
Sie Nadel und Nähfuß. Lösen Sie die Schraube
- 41 -
with the screwdriver.
Remove the needle plate. Clean the feed dog
auf der linken Seite der Stichplatte mit einem
Schraubendreher. Entfernen Sie die Stichplatte.
teeth with a brush and refit the needle plate.
Reinigen Sie den Transporteur mit einer feinen
Fit the presser foot and it is ready for sewing
Bürste und setzen Sie die Stichplatte wieder auf.
Befestigen Sie Nähfuß und die Nadel. die Ma-
Instruction: to obtain first rate effect of needle-
work. Frequent cleaning is required for frequent
use.
schine ist nun wieder einsatzbereit.
Hinweis: Bei häufigem Gebrauch der Nähma-
schine empfiehlt sich zur Erzielung von optimalen
Nähergebnissen eine regelmäßige Reinigung.
1. Der Oberfaden ist nicht richtig eingefädelt. Siehe Seite 17
Fehler Grund Erklärung
Fehlerbehebung
Fehlerbehebung
Oberfaden reißt 2. Die Oberfadenspannung ist zu hoch. Siehe Seite 19
3. Die Nähnadel ist verbogen oder stumpf.
4. Die Nähnadel wurde nicht richtig eingesetzt. Siehe Seite 11
5. Das Nähgut wird beim Nähen nicht transportiert. Siehe Seite 24
6. Der Faden ist entweder zu dick oder zu dünn. Siehe Seite 12
1. Die Unterfadenführung ist falsch. Siehe Seite 16
2. Der Spulenkapselfinger ist durch feine Fasern Reinigen Sie die
3. Die Spulenkapsel ist beschädigt und funktioniert Ersetzen Sie die
nicht Ordnungsgemäß. Spulenkapsel.
1. Die Nähnadel wurde nicht richtig eingesetzt. Siehe Seite 11
2. Die Nähnadel ist verbogen oder stumpf.
4. Die Oberfadenspannung ist zu hoch. Siehe Seite 19
5. Das Nähgut wird beim Nähen nicht transportiert. Siehe Seite 24
6. Die Nähnadel ist zu dünn für das Nähgut. Siehe Seite 12
7. Der Stichmuster-Drehschalter wurde nicht richtig Siehe Seite 20
eingestellt.
1. Die Nähnadel wurde nicht richtig eingesetzt. Siehe Seite 11
2. Die Nähnadel ist verbogen oder stumpf.
4. Der Oberfaden ist nicht richtig eingefädelt. Siehe Seite 17
Oberfaden reißt blockiert. Spulenkapsel
Nadel bricht 3. Die Nadelhalterschraube hat sich gelockert. Siehe Seite 11
Stiche werden 3. Weder Nadel noch Faden sind für das
ausgelassen Nähvorhaben geeignet Siehe Seite 12
- 42 -
 Loading...