

Page 1
SSI 6625 GARMENT STEAMER
INSTRUCTION MANUAL
EN
RU
Page 2

ENGLISH
SINBO SSI 6625 GARMENT STEAMER
INSTRUCTION MANUAL
Please read these instructions for use and have a good look at the illustration before
using the appliance
SAFETY INSTRUCTIONS
When using electrical appliances, basic safety precautions should always be followed.
• Do not place the product too close to any heat emitting appliances or in direct sunlight.
• Check that the voltage indicated on the data plate corresponds with that of the local
network before connecting the appliance to the mains power supply.
• Do not leave the appliance in water or any other liquids.
• It is imperative to unplug the appliance from the mains power supply after been used,
before cleaned and whilst being repaired.
• Close supervision is required when using this product near children.
• Never leave the appliance within reach of children.
• Repairs to electrical appliances should only be performed by a qualified electrician.
Improper repairs may place the user at serious risk.
• This appliance is intended for household use only and should not be used for industrial
purposes.
• Do not operate this appliance with a damaged plug or cord, after a malfunction, or after
being dropped or damaged in any way.
• Do not use this appliance for anything other than its intended uses.
• Steam produced by this unit is hot and pressurized. Care must be taken to avoid burns
or other injuries.
• Do not shake the appliance whilst in use to avoid hot water splashing out.
• Always ensure the unit has cooled thoroughly before re-filling with water, cleaning or
storing.
• Always disconnect the appliance from the mains power supply when filling or emptying
water. Ensure the water tank is emptied after each use before storing.
• Do not add chemicals or detergents to the water tank as they will damage the unit.
• The nozzle and accessories become hot during use. Do not touch the nozzle or attempt
to change the accessories whilst the appliance is use.
• Always hold the unit upright and do not fill to exceed the Max mark to avoid burns from
splashing water.
• Use the unit with extreme caution with a tilted angle not more than 35˚C in any direction
to avoid excess water spilling from the steam head.
• Always hold the unit away from the body and do not aim at people or animals.
• Do not operate the appliance if the steam opening is blocked.
• Always drain the remaining water from the appliance after each use to avoid mineral
build-up in the heating plate.
- 1 -
Page 3
• If the supply cord is damaged, it must be replaced by the manufacturer or its service
agent or a similarly qualified person in order to avoid a hazard.
This appliance is not intended for use by persons (including children) with reduced
physical, sensory or mental capabilities, or lack of experience and knowledge, unless
they have been given supervision or instruction concerning use of the appliance by a
person responsible for their safety.
Children should be supervised to ensure that they do not play with the appliance.
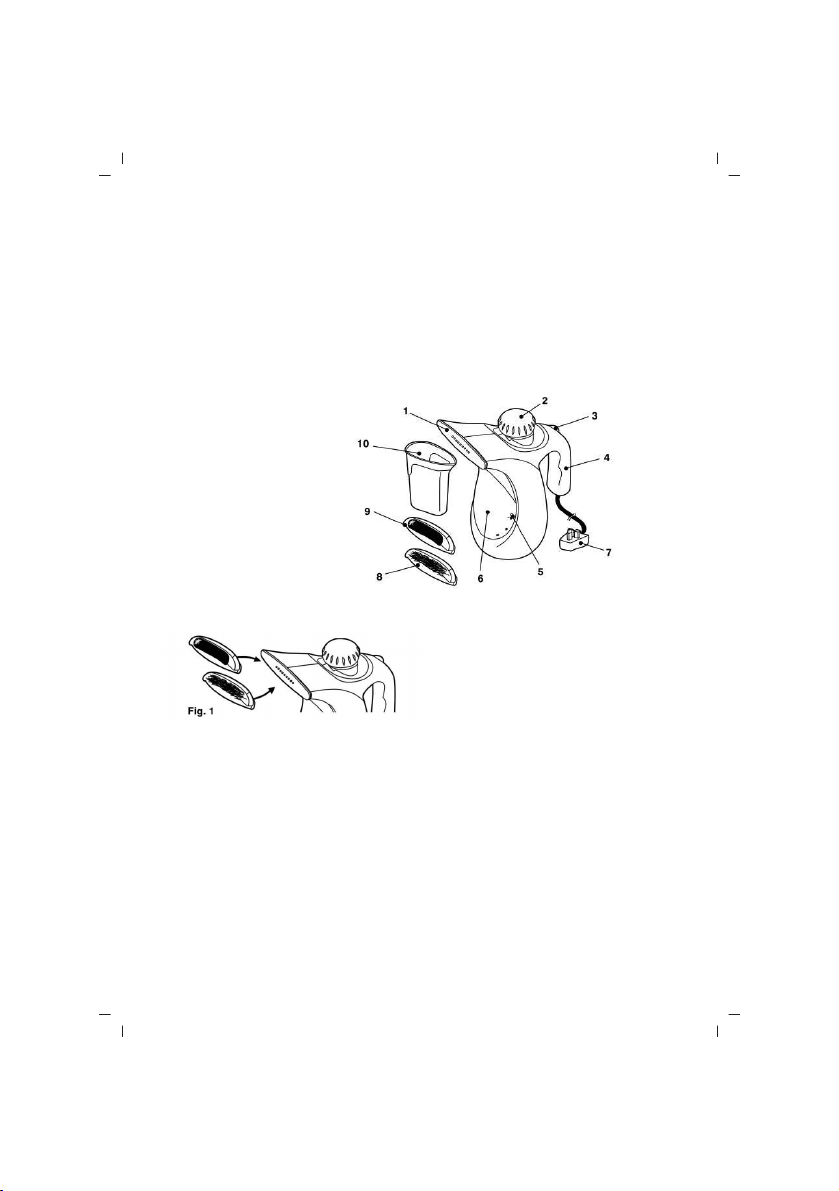
DESCRIPTION OF PARTS
1. Steam Nozzle
2. Water Tank Cap
3. On/Off Switch
4. Handle
5. Max Water level
6. Water Tank
7. Power Cord Set
8. Fabric Brush
9. Lint Remover
10. Measuring Cup
ACCESSORY ASSEMBLY
ACCESSORY ASSEMBLY
• This appliance is supplied with two practical accessories:
Fabric Brush-Smooth wrinkles and creases from fabrics
Lint Remover-Removes lint and loose threads from fabrics follow the steps below to
attach the accessories to the steam nozzle:
Ensure the unit is turned off and no steam emits from the nozzle.
• Choose the required attachment and slide onto the steam nozzle as shown in Fig.1.
• Ensure the holes on the steam nozzle are aligned with the open slots on the accessories
so that steam does not get blocked.
CAUTION: To avoid burns do not attach accessories to the nozzle whilst steam is
emitting.
- 2 -
Page 4

INSTRUCTION FOR USE
Filling the Water Tank
• Ensure the appliance is unplugged from the mains power supply.
• Place the Steamer on a flat, stable surface.
• Carefully unscrew and remove the water tank cap.
• Fill the water tank with water using the supplied measuring cup.
• Fill the tank with cold water to the desired time level ensuring not to exceed the
maximum mark indicated in the water tank window.
Max-15-Steaming for 15 Minutes
10-Steaming for 10 Minutes
5- Steaming for 5 Minutes
• Replace the water tank cap ensuring it is thoroughly tightened.
CAUTION:
• After each use, always allow the unit to cool for 15 minutes before filling cold water
and shooting steam from the fill hole.
• Extreme caution is required when pouring water into the water tank.
• Never fill water to exceed the Max fill line.
NOTE:
• Use of distilled or demineralized water is recommended to prolong the life of the
steamer.
• Use water only; do not use detergents or other chemical substances.
• Misuse will lead to an invalid guarantee.
Steaming Linens and Fabrics
• Ensure the water tank has been filled and that the desired accessory is connected and
then follow the steps below:
• Plug the unit into the mains power supply and switch it on if switchable.
• Switch the unit on and the button will illuminate to indicate the appliance is on.
• Steam will emit from the nozzle after approximately 2 minutes.
• Direct the steam nozzle with either one of the accessories towards the materials you
wish to steam.
• Keep the flow of steam focused on the material being steamed.
Using a slight back and forth motion over the area you are steaming further enhances
the process.
CAUTION: Always be sure that the Steam Nozzle and any other attachments are pointed
in safe direction away from the user, other people and animals when steam is emitting.
- 3 -
Page 5

Steaming Garments
• Place the garment on a clean rust-free hanger.
• Direct the steam nozzle towards the bottom of the garment.
• Steam will rise on both the inside and the outside of the fabric removing the wrinkles
and creases. Slowly slide the steam nozzle upwards from the bottom to the top of the
garment.
• Direct the steam nozzle away from the garment and smooth the fabric with your free
hand.
• Repeat as necessary until the garment is crease-free.
STORAGE
• Unplug the power cord from the mains power supply.
• Allow the unit to cool thoroughly (at least 60 minutes).
• Remove all attachments from the unit.
• Drain the remaining water from the water tank to minimize potential mineral buildup. Loosely replace the water tank cap but do not tighten as it may be difficult to unscrew
for future use.
• Store all accessories with the unit in a dry, cool location.
REMOVING MINERAL BUILD-UP
• Different water sources contain minerals and the sediment may cause mineral buildup in the steamer and affect the free flow of steam.
• NOTE: The best way to avoid mineral build-up is to use distilled or demineralized
water. If you are unable to do this, it is recommended to use the mineral build-up
removal procedure.
• Unplug the unit and allow it to cool completely (at least 60 minutes).
• Remove all accessories from the unit.
• Remove the water tank cap and drain any remaining water from the water tank.
• Using a measuring cup, prepare a mixture of 0.125l. vinegar and 0.125l.water.
• Slowly pour the mixture into the water tank.
• Allow the unit to stand for 1-2 hours.
• Drain the solution from the water tank.
• If the mineral build-up still remains in the unit, repeat the above steps until all buildup is removed.
• Rinse the water tank with fresh water, drain and repeat until the vinegar odor is
eradicated.
• Replace the water tank cap.
- 4 -
Page 6

SPECIFICATION
Unit Weight (Bare) : 0.7kg
Capacity : 150ml
Steam Output Time : 2 minutes
Steam Duration : 14 minutes
Voltage : AC230V, 50/60Hz
Power : 800W
TROUBLESHOOTING
Problem Possible Reasons Solution
Unit fails to heat Unit is not plugged in Plug into mains power supply
Switch is not activated Press the On/Off switch
The switch will illuminate
Unit heats up but Water tank is empty Refill the water tank accordingly
fails to steam Mineral build-up in the unit Follow the removing mineral
build-up guide
Thermo-fuse breakdown Take to a certified service center
Steam output is Mineral build-up in the unit It is normal for the unit to stop
intermittent steaming periodically for a few
seconds. If the steam remains off
for a longer period, follow the
removing mineral build-up guide.
RECYCLING
For environment protection do not throw out the unit and the batteries with usual
household waste after its service life expiration; apply to the specialized center for further
recycling. The waste generated during the disposal of the unit is subject to mandatory
collection and consequent disposal in the prescribed manner.
For further information about recycling of this product apply to a local municipal
administration, a disposal service or to the shop where you purchased this product.
Guarantee
Details regarding guarantee conditions can be obtained from the dealer from whom the
appliance was purchased. The bill of sale or receipt must be produced when making any
claim under the terms of this guarantee.
- 5 -
Page 7

Page 8

Page 9

Page 10

Page 11

Page 12

Page 13

- 12 -
Page 14

03-2019
- 13 -
Page 15

 Loading...