

Page 1
SSI 2880 ÜTÜ
KULLANMA KILAVUZU
TR
EN
FR
NL
DE
ES
RU
UA
HR
AR
Page 2
- 1 -
Page 3

De¤erli Müflterimiz,
Ürün seçiminde S‹NBO'yu tercih etti¤iniz için teflekkür ederiz.
Uzun ve verimli bir kullan›m için cihaz› kullanmadan önce bu k›lavuzu özellikle güvenlik
talimatlar›na dikkat ederek okuman›z› ve devaml› suretle saklaman›z› tavsiye ederiz.
Sayg›lar›m›zla,
Sinbo Küçük Ev Aletleri
SINBO SSI 2880 G‹YS‹ BUHARLAYICISI
KULLANIM KILAVUZU
Ask›l› buhar kontrollü Devre Anahtar›
Kullanmadan önce kullan›m k›lavuzunu mutlaka okuyunuz
AC230V 50Hz 2000W
Cihazla oynamamalarını güvenceye almak için çocuklar gözetim altında tutulmalıdır.
Bu ürün (çocuklar dahil ) fiziksel hassasiyeti az, zihinsel olarak yetersiz, deneyimsiz ve yeterli bilgiye
sahip olmadan yada kendilerinin güvenli¤inden sorumlu olan kifliler tarafından bu ürünü kullanmak
için gerekli talimatlar verilmemifl kiflilerin kullanımına uygun de¤ildir.
Isıl kesicinin istenmeden bafllangıç konumuna gelmesinden kaynaklanan bir tehlikeyi önlemek için,
bu cihaz bir zamanlayıcı gibi dıfl bir anahtarlama düzeni üzerinden beslenmeli veya yardımcı program
vasıtasıyla düzenli olarak devresi kapatılan ve açılan bir devreye ba.lanmalıdır.
Sıcakken veya so¤ukken ütü ve kordonu 8 yaflından küçük çocukların ulaflamayaca¤ı bir yerde
bulundurulmalıdır.
Children being supervised not to play with the appliance.
This appliance is not intended for use by persons (including children) with reduced physical,sensory
or mental capabilities, or lack of experience and knowledge, unless they havebeen given supervision
or instruction concerning use of the appliances by a personresponsible for their safety. Children
should be supervised to ensure that they do not play with the appliance.
Heat caused by the arrival of the cutter accidentally starting position to avoid a hazard, such as a
timer, this device
is fed via an external switching scheme on a regular basis or by means of the utility opened and closed,
and a circuit connected to the circuit
Hot or cold iron and cords should be out of reach of children under 8 years.
- 2 -
Page 4

ÖNEML‹ GÜVENL‹ TAL‹MATI
1. Cihaz› kullan›rken, daima temel önlemler al›nmal› ve izlenmelidir, bunlar afla¤›dakileri de
kapsamaktad›r:
2. Kullanmadan önce talimatlar› okuyun.
3. Cihaz› sadece amac›na uygun olarak kullan›n.
4. Bu ürün sadece ev içi kullan›m için tasarlanm›flt›r. Herhangi bir ticari kullan›m, uygun olmayan
kullan›m veya talimatlara uymama durumunda, üretici herhangi bir sorumluluk kabul etmez
ve bu durumlarda garanti geçerli olmayacakt›r.
5. Bu cihaz fiziksel, alg›sal veya zihinsel engeli olan insanlar (çocuklar dahil) veya yeterince
bilgi veya deneyimi olmayan insanlar taraf›ndan kullan›lacak flekilde tasarlanmam›flt›r, bunun
tek istisnas› birinin gözetiminde cihaz› kullanmalar› veya güvenliklerinden sorumlu kiflinin
kendilerine gereken kullan›m talimatlar›n› önceden ö¤retmesidir.
6. Çocuklar›n cihazla oynamamas› konusunda dikkat olunmal›d›r.
7. Cihaz prize tak›l›yken veya s›cakken bafl›nda kimse olmadan b›rakmay›n .
8. Cihaz› kordonu, prizi ,buhar hortumu bozukken , cihaz ar›zal› durumda çal›fl›rken veya
düflürülme esnas›nda ya da çeflitli flekillerde hasar gördükten sonra kullanmay›n.
9. Elektrik çarpmas› riskini ortadan kald›rmak için, cihaz› sökmeyin veya onu onarmaya kalkmay›n.
Cihaz› kontrol, onar›m veya ayarlama ifllemi için en yak›n yetkili servis noktas›na getirin.
10. Buhar ç›k›fllar›ndan ç›kan s›cak suyun temas› riskini azaltmak için, her kullan›m öncesinde
cihaz› vücudunuzdan uzakta tutup çal›flt›rmak suretiyle kontrol edin. Sadece yukar›-afla¤›
pozisyonda buhar verin. Asla buhar bafll›¤›n› yatay konumda kullanmay›n veya onu arkaya do¤ru
e¤meyin, bu suyun ç›k›fl›na neden olabilir.
11. Elektrik çarpmas› riskini azaltmak için, cihaz› suya veya di¤er herhangi s›v›ya dald›rmay›n.
Cihaz› prize takarken veya prizden çekerken daima kapal› olmas›na dikkat ediniz.
12. Prizden çekerken kordonu asla kablo bölümünden çekmeyin, bunun yerine fiflten tutup
çekin.
13. Kordonun s›cak yüzeylere dokunmas›na izin vermeyin. Cihaz› kald›rmadan önce onun
so¤umas›na izin verin. Saklarken kordonu cihaz›n alt›na rahat ve gevflek bir biçimde yerlefltirin.
14. Elektrik kablosunun sivri kenarlar veya s›cak yüzeylere temas etmesine izin vermeyin.
15. Cihaz çal›fl›rken hortum adaptörünün ba¤lant›s›n› yapmaya çal›flmay›n. Cihaz kullan›l›rken
hortum adaptörü ç›kar›l›rsa yanma riski ortaya ç›kabilir.
16. Suyla doldururken, boflalt›rken veya kullan›mda de¤ilken cihaz› daima elektrik prizinden
ç›kar›n.
17. Cihaz› hortumundan asmaya teflebbüs etmeyin.
18. Üretici taraf›ndan temin edilmemifl yabanc› aksesuarlar›n kullan›m› önerilmemektedir ve
bu, yang›n, elektrik çarpmas› veya yaralanmalara neden olabilir. S›cak parçalara, s›cak suya
veya buhara temas ya da dokunmadan ötürü yanmalar meydana gelebilir. Buharl› cihaz boflalt›m›
esnas›nda özenli ve dikkatli olun. Rezervuarda su kalm›fl olabilir.
19. Buhar› insanlara veya hayvanlara yöneltmeyin veya k›yafetler üzerinizde giyilmifl vaziyetteyken
buhara tutmay›n.
20. Bu cihaz sadece ev kullan›m› içindir.
ÖZEL TAL‹MATLAR
21. Bu 2000 wattl›k bir cihazd›r Devrenin afl›r› yüklenmesini önlemek için, ayn› devre üzerinde
yüksek voltajl› baflka bir cihaz kullanmay›n.
22. E¤er bir uzatma kablosu kesinlikle gerekliyse, nominal elektrik s›n›f› en az›ndan cihaz›n
elektrik s›n›f›yla ayn› seviyede olmal›d›r. Daha düflük amperaja göre ayarlanm›fl olan kordonlar
- 3 -
Page 5

afl›r› ›s›nabilir. Çekilmemesi veya tak›l›p düflülmemesi için kordonun derli toplu b›rak›lmas›
gerekir.
23. Buhar hortumunu kesmeyin veya uzatmaya teflebbüs etmeyin.
Önce çevrenin korunmas› !
Cihaz›n›z yeniden kazan›m ve geri dönüflüme tabi olan de¤erli malzemeler içermektedir.
• Kamusal at›k toplama ve atma merkezine b›rak›n.
ÜRÜN TANIMI:
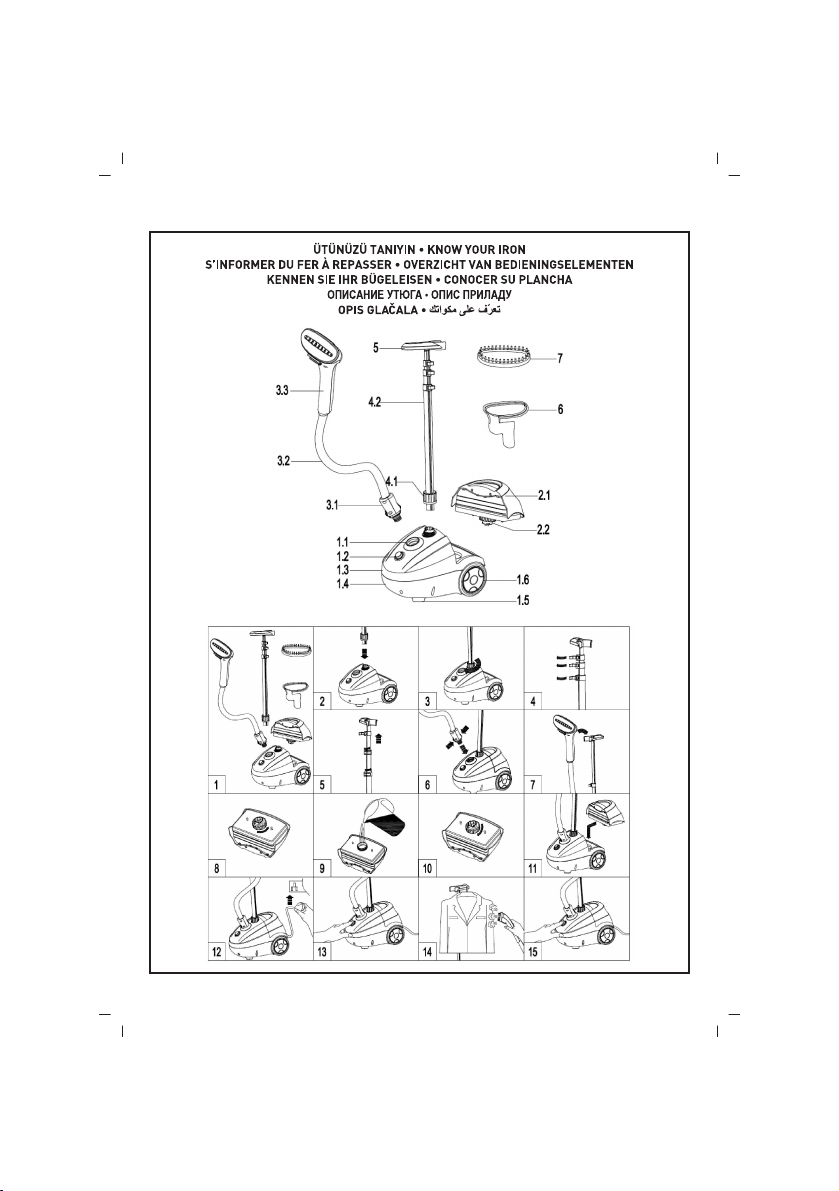
1.1 Buhar tüpü ayar›, 1.2 Devre Anahtar›, 1.3 Üst gövde, 1.4 Alt gövde, 1.5 Lastik ayak, 1.6
Tekerlek, 2.1 Tank sap›, 2.2 Tank, 2.3 Tank butonu, 3.1 Buhar tüpünün bafll›¤›, 3.2 Buhar tüpü
3.3 Tutma noktas›, 4.1 Braketli çubuk ayar›, 4.2 Afla¤›-yukar› hareketli Çubuk, 5. Braketin bafll›k
bölümü, 6. Pantolon buhar klipsi, 7. Kumafl f›rças›
KURULUM (KULLANIMDAN ÖNCE)
* Lütfen talimatlar› dikkatle okuyun.
* Ambalajlar›n tümünü ç›kar›n.
* Kurulum tamamlanmadan çal›flt›rmay›n veya prize takmay›n.
* Resme göre cihaz›n montaj›na bafllay›n, fiekil 1
* Teleskopik çubu¤u yerine yerlefltirin. fiekil 2
* Gövdeye yerlefltirmeden sonra butonun s›k›ca oturdu¤undan emin olun. fiekil 3.
* Teleskopik kovay› aç›n, alüminyum çubu¤u çekin. fiekil 4
* Kovay› s›k› bir konumda tutun.
* Buhar tüpünün bafll›k bölümünü deli¤ine yerlefltirin. fiekil6
* F›rçay› , f›rçan›n taban bölümüne oturtun. fiekil7
2. Ütüleme Talimatlar›
* Su dolum kapa¤›ndan suyu doldurun, su tank›n›n kapa¤›n› aç›n, suyu su tank›na doldurun.
fiekil8, fiekil9.
* S›cak su koymay›n.
* Su tank›n›n kapa¤›n› kapay›n, su tank›n› gövdeye yerlefltirin. fiekil 10,fiekil .11.
* Elektrik kordonunu çekin, fifli prize tak›n, Konta¤› aç›n. fiekil .12, fiekil13.
* Yaklafl›k bir dakika sonra, buhar gösterge lambas› yanar, (lütfen gösterge ›fl›¤›na bak›n)
* Buhar f›rças›n› tutun ve gövdeden buhar çubu¤unu ay›r›n, buhar f›rças›n›n nazikçe kumafla
dokunmas›n› sa¤lay›n, dikey olarak ütülemeye bafllay›n, fiekil 14, yukar›dan afla¤›.
* Kullan›m esnas›nda, buhar tüpünden biraz su ak›fl› olacakt›r, bu normaldir. Bu ses duyulunca,
tüpü yukar› çekin, bafll›k bölümünü buhar kazan›na geri yerlefltirin.
* Cihaz›n ömrünü uzatmak için, kullan›m sonras›nda su tank›ndaki suyu dökün, cihaz› 5 dakika
kuru olarak çal›flt›r›n, buhar kazan›n› kurutun, buhar kalmay›nca kapay›n.
3. Aksesuarlarla ilgili talimatlar
Unutmay›n: Aksesuar kullan›m›n› sadece dikey yönlü olarak yap›n, lütfen yatay ütüleme yapmay›n.
* Aksesuarlar› kullanmadan önce, lütfen talimat kullan›m k›lavuzunu okuyun, ilk kullan›mda
eski bir kumaflla deneme yap›n.
* Kumafl F›rças›
* F›rçan›n kullan›m› , buhar›n kumafla nüfuz etmesini sa¤lar, iyi bir ütü etkisi yarat›r.
- 4 -
Page 6

* Unutmay›n: kullan›m sonras› buhar kumafl›n›n so¤umas›n› sa¤lay›n.
* F›rça tak›l›rken, buhar f›rças› paneli yukar› yönlü olmal›d›r, f›rça aksesuarlar›na dikkatle bas›n,
s›k›ca yerine yerlefltirin.
* Ütülerken ifllem yukar›dan afla¤›ya fleklinde olmal›d›r.
* F›rça ç›kar›lmadan önce, lütfen güç kontrol Konta¤›n› kapay›n, buhar f›rças›ndan buhar
gelmeyince, f›rçay› ç›kar›n, paslanmaz çelik k›sma lütfen dokunmay›n, eliniz yanabilir.
* Pantolon buhar klipsi
* Klips ütülemeyi kolaylaflt›r›r.
* Klipsi buhar f›rças›na tak›n, yerine s›k›ca yerlefltirin.
* Buhar f›rças›n› tutun, klipsi aç›n.
* Kumafl› klips ve buhar f›rças› aras›na yerlefltirin.
* Tutma kolunu serbest b›rak›n, ütüleme yukar›dan afla¤›ya fleklinde olmal›d›r.
* Klips ç›kar›lmadan önce lütfen güç kontrol Konta¤›n› kapay›n, buhar f›rças›ndan buhar
gelmeyince f›rçay› ç›kar›n, paslanmaz çelik pedala lütfen dokunmay›n, eliniz yanabilir.
4. Saklama
* Kullan›m sonras›nda, gövdeden su tank›n› ç›kart›n, suyu su tank›na boflalt›n.
* 5 dakika çal›flt›rarak cihazlar›n kurumas›n› sa¤lay›n. Buhar kazan›n› kurutun.
* Elektrik kordonunu prizden çekin,(güç göstergesi off konumunda olacakt›r), elektrik kordonunu
çekin, kordonu toplama dü¤mesine bas›n, kordonu gövdeye geri sar›n.
* Uyar›: Lütfen so¤umadan önce buhar f›rças›na dokunmay›n, saklama öncesinde buhar kazan›n›
kurutun.
5. Temizlik
* Lütfen gövdeyi temizlemek için ›slak bir bez kullan›n. Ürünlerinizden her zaman iyi verim
alabilmek için, zamanlama ölçe¤ini temizleyin, süre kullan›m dönemine ba¤l›d›r. Su tank› y›lda
en az bir kez, 100 saattir. Ölçek göstergesinin temizlik süreci afla¤›dad›r:
• Su tank›n› ç›kar›n, ölçe¤i temiz suyla y›kay›n.
• Su tank›n›n taban butonunu aç›n, kar›fl›m› su tank›na dökün, temiz suyla temizleyin.
* Ölçe¤in temizlenmesinden sonra, at›k kald›¤›n› düflünürseniz ifllemi tekrarlay›n.
- 5 -
Page 7
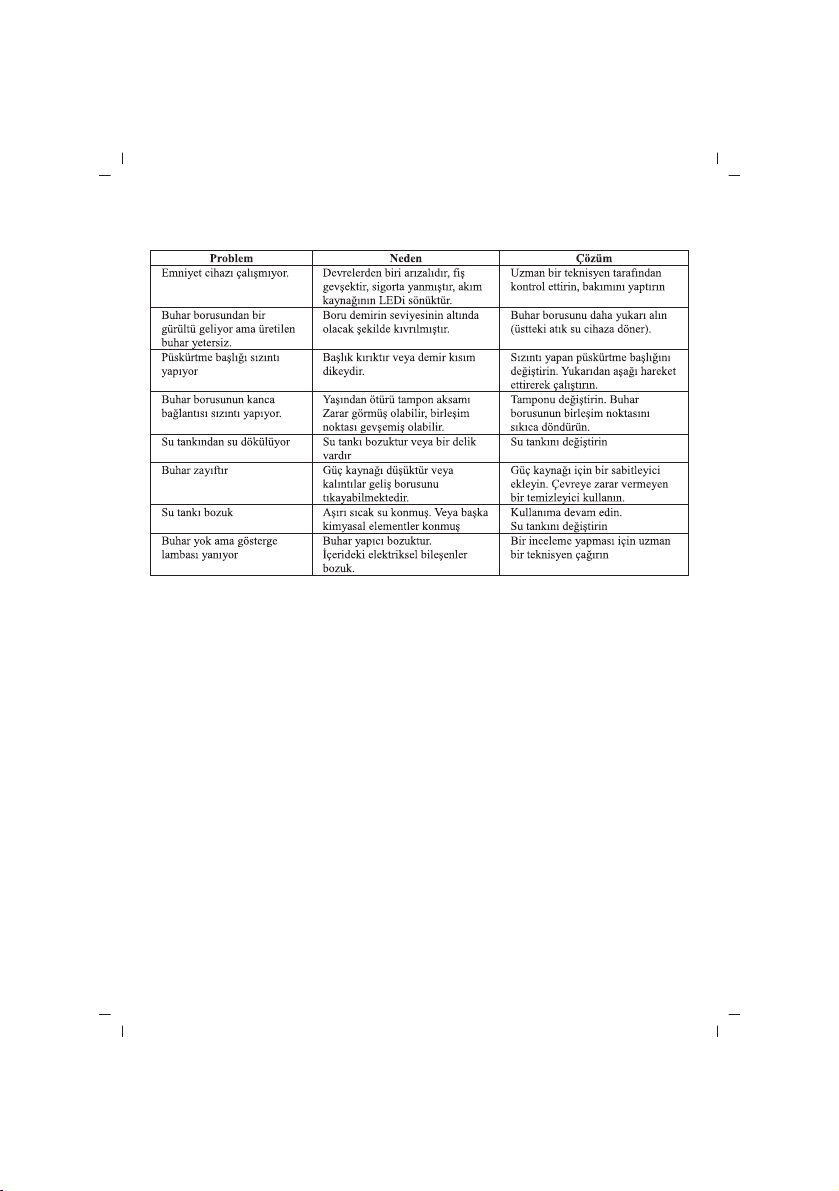
Sorun Giderme
- 6 -
Page 8

ENGLISH
SINBO SSI 2880 GARMENT STEAMER
INSTRUCTION MANUAL
Suspended steam iron controlled by switch
Read this manual before usage
AC230V 50Hz 2000W
IMPORTANT SAFETY
INSTRUCTIONS
1. When using your appliance, basic precautions should always be followed, including
the following:
2. Read all instructions before use.
3. Use appliance for its intended use only.
4. This product has been designed for domestic use only. Any commercial use,
inappropriate use or failure to comply with the instructions, the manufacturer accepts
no responsibility and the guarantee will not apply.
5. This appliance is not designed to be used by people (including children) with a physical,
sensory or mental impairment, or people without knowledge or experience, unless they
are supervised or given prior instructions concerning the use of the appliance by someone
responsible for their safety.
6. Children must be supervised to ensure that they do not play with the appliance.
7. Do not leave appliance unattended while plugged in or while it is still hot.
8. Do not operate any appliance with a damaged cord, plug or steam hose or after the
appliance malfunctions, or is dropped or damaged in any manner.
9. To reduce the risk of electric shock, do not disassemble or attempt to repair the
appliance. Return appliance to nearest authorized service center for examination, repair
or adjustment.
10. To reduce the risk of contact with hot water emitting from steam vents, check
appliance before each use by holding it away from your body and operating. Steam only
in an up and down vertical motion. Never use steam head in a horizontal position or tilt
into a backward position, this may result in water discharge.
11. To reduce the risk of electric shock, do not immerse the appliance in water or other
liquids. Appliance should always be turned off before plugging or unplugging.
12. Never pull on the cord to unplug from outlet, instead grasp plug and pull to unplug.
13. Do not allow cord to touch hot surfaces. Let appliance cool completely before putting
away. Loop cord loosely under the appliance when storing.
14. Do not let power cord contact sharp edges or hot surfaces.
15. Do not try to fasten the hose adapter during operation. Scalding may occur if the hose
adapter is removed while using the appliance.
16. Always unplug appliance from an electrical outlet when filling with water, emptying
or when not in use.
- 7 -
Page 9

17. Do not attempt to hang up the unit using the hose.
18. The use of foreign accessory attachments that are not supplied by manufacturer is
not recommended and may result in fire, electric shock or personal injury. Burns could
occur from touching hot parts, hot water or steam. Use care when you empty a steam
appliance. There may be hot water in the reservoir.
19. Do not direct steam at people, animals or steam clothes while they are being worn.
20. This appliance is intended for household use only.
SPECIAL INSTRUCTIONS
21. This is a 2000 watt appliance. To avoid a circuit overload, do not operate a high wattage
appliance on the same circuit.
22. If an extension cord is absolutely necessary, the marked electrical rating should be
at least as great as the electrical rating of the appliance. Cords rated for less amperage
may overheat. Care should be taken to arrange the cord so that it cannot be pulled or
tripped over.
23. Do not cut or attempt to extend the steaming hose.
Environment protection first !
Your appliance contains valuable materials which can be recovered or recycled.
• Leave it at a civic waste disposal centre.
PRODUCT DESCRIPTION:
1.1 Steam tube fixation, 1.2 Switch, 1.3 Upper housing, 1.4 Lower housing, 1.5 Rubber
foot, 1.6 Wheel, 2.1 Tank handle, 2.2 Tank, 2.3 Tank knob, 3.1 Steam tube head,
3.2 Steam tube, 3.3 Handle, 4.1 Bracket pole set, 4.2 Up and down pole, 5 Bracket head
6 Trousers steam clip, 7 Fabric Brush
INSTALLATION (BEFORE USE)
* Pls read the instruction carefully.
* Remove all the package.
* Do not power on or open before finish the install.
* Appliance knock down assembly picture, Fig. 1
* Put the telescopic pole insert the base. Fig. 2
* Make sure the knob tight after insert the body. Fig. 3.
* Open the telescopic buckle, pull the Aluminum pole. Fig .4
* Keep the buckle tight. Fig .5
* Put the steam tube tie-in insert the hole. Fig.6
* Put the steam brush on the brush fix base.Fig.7
2. Iron instruction
* Fill the water from the water filled cover, open the cover of water tank, fill the water
into water tank.Fig.8, Fig.9.
- 8 -
Page 10

* Do not fill hot water.
* Close the water tank cover, put the water tank on the body. Fig. 10,Fig .11.
* Pull the power cord, socket on, open the power switch. Fig .12, Fig.13.
* After around one minute ,steam indicate lamp on,( please notice the indicator)
* Hold steam brush and made the steam pole out of body, use steam brush touch the
cloth vertically gently start ironing, Fig .14, from upside to downside.
* During operate, steam tube will be some sound of water flow, this is normal. When
heard this sound, pull the tube upside, made the bead back to boiler.
* In order to extend the appliance life, after operating, dump the water inside the water
tank, make the appliance dry working 5 minutes, make the boiler dry, power off when
without steam .
3. Accessories instruction
Remind: When use the accessories, only can use at vertical direction, please don’t iron
at horizon direction.
* Before using the accessories, please read the instruction manual, first use, suggest
test with some old or waste cloth.
* Fabric Brush
* Use brush can make the steam infiltrate cloth, make good iron effect.
* Remind: install brush make the steam brush cool.
* When install brush, make steam brush panel upside, push brush accessories gently,
make the buckle tightly.
* When ironing, should be from top to end.
* Before remove the brush, please power off the power control switch, when there is no
steam from the steam brush, remove the brush, please note do not touch the stainless
steel panel, avoid scald hand.
* Trousers steam clip
* Clip can help iron hem and cockle easily.
* Install the clip on the steam brush, push it tightly to its position.
* Hold the steam brush, open the clip.
* Put the cloth between clip and steam brush.
* Release handle, made it clamp cloth, ironing from upside to downside.
* Before remove clip, please power off the power control switch, when there is no steam
from the steam brush, remove the brush, please note do not touch the stainless steal
panel, avoid scald hand.
4. Storage
* After using, remove the water tank from the body, dump the water in the water tank.
* Make the appliance dry working 5 minutes. Make the boiler dry.
* Power off the power switch,(power indicate lame will be off),remove the power cord,
press the cord rewind button, rewind the power cord into the body.
- 9 -
Page 11
* Warning: Please do not touch the steam brush before it cooling, make the boiler dry
before storage.
5. Cleaning
* Please use a wet rag clean the body. In order to make your product always have a good
capability, clean the scale untiming, the period depend on the using period. Water tank
at least once per year, or once per 100 hours. The process for clean the scale is as below:
• Remove the water tank wash the scale at water base with clean water.
• Open the water tank base knob, dump mixture in the water tank, wash with clean water.
* After clean the scale, if you think there is still scale, please repeat the above process.
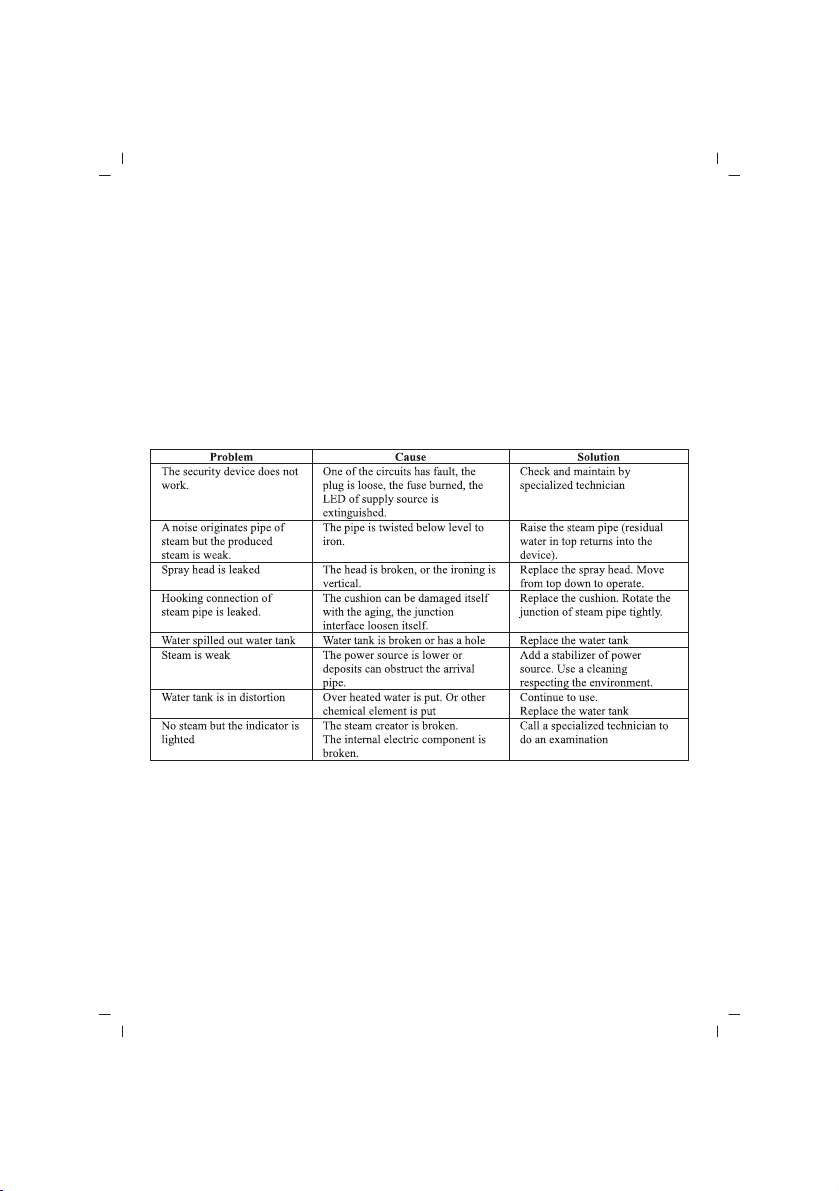
Trouble shooting
- 10 -
Page 12

FRANÇAIS
SINBO SSI 2880 DÉFROISSEUR VAPEUR
MODE D’EMPLOI
Défroisseur vapeur vertical avec l’interrupteur Marche - Arrêt
Lire attentivement toutes les instructions avant d’utiliser l’appareil.
230VAC 50Hz 2000W
CONSIGNES IMPORTANTES DE SÉCURITÉ
1. Lors d’utilisation des appareils électriques, les précautions fondamentales doivent
être toujours suivies y compris les suivantes :
2. Lire toutes les instructions avant d’utiliser l’appareil.
3. Ne pas utiliser cet appareil en dehors de son usage pour lequel qu’il a été conçu.
4. Cet appareil est destiné à un usage domestique et ne doit pas être utilisé à des fins
commerciales, non appropriées ou au cas de non respect aux instructions ,le fabricant
décline toute responsabilité et la garantie ne s'applique pas.
5. L'utilisation de cet appareil n'est pas destinée pour des personnes (Y compris les
enfants) souffrant d'une déficience de leur capacité sensorielle, mentale, ou encore ayant
une totale absence d'expérience. Sauf si une personne responsable de leur sécurité
supervise l'utilisation de l'appareil et donne les correctes instructions.
6. Les enfants doivent être surveillés pour s'assurer qu'ils ne jouent pas avec l'appareil.
7. Ne pas laisser l’appareil sans surveillance lorsqu’il est branché ou inutilisé.
8. Ne pas faire fonctionner l’appareil si sa fiche ou son cordon sont endommagés, ou
si l’appareil a été échappé ou endommagé.
9. Pour éviter les risques de chocs électriques, ne pas démonter ou réparer l’appareil.
Retourner l’appareil aux centres de service agrée pour être examiné, réparé ou ajusté.
10. Pour réduire le risque de contact avec l’eau chaude qui s’échappe des évents à
vapeur, vérifier l’appareil avant chaque usage en tenant la buse loin du corps et en
appuyant sur le bouton de vapeur. Utiliser la buse uniquement à la position verticale.
Ne jamais utiliser la buse horizontalement ou ne pas basculer vers l'arrière ,ça peut
causer le versement de l'eau.
11. Pour prévenir les chocs électriques, ne pas immerger l’appareil dans l’eau ou toute
autre liquide.Éteigner toujours l’appareil avant de brancher ou débrancher de la prise
de courant.
12. Ne jamais tirer sur le cordon pour débrancher l’appareil. Tirer plutôt sur la fiche
pour débrancher.
13. Ne pas laisser le cordon toucher des surfaces chaudes. Laisser l’appareil refroidir
avant d’enlever . Placer le cordon lâchement sous l’appareil avant de le ranger
14. Veiller à ce que le câble d’alimentation n’entre pas en contact avec les parties chaudes
et les bords tranchants.
15. Ne pas tenter de brancher l’adaptateur du cordon lorsque l’appareil est en marche
- 11 -
Page 13

sinon le risque de brûlure peut se produire si l’adaptateur du cordon est débranché
16. Débrancher toujours l’appareil de la prise murale pour le remplir d’eau ou le vider
et lorsqu’il n’est pas utilisé.
17. Ne pas accrocher l’appareil par son cordon.
18. L’Utilisation des accessoires non fournies par le fabricant n’est pas recommandée
et ça peut risquer d’incendie, de chocs électriques ou des blessures corporelles. Le
contact aux parties chaudes , à l’eau chaude ou à la vapeur peut causer des brûlures
corporelles. Etre prudent lors de la vidange. Le réservoir d'eau peut contenir d'eau.
19. Ne jamais pointer la buse en direction d’une personne ou d’un animal domestique
ou ne jamais utiliser le défroisseur sur des vêtements portés.
20. Usage domestique uniquement.
CONSIGNES SPÉCIALES
21. Cet appareil est de 2000 watts. Pour éviter une surcharge du circuit, ne pas utiliser
d'autre appareil à une tension élevée sur le même circuit.
22. Si une rallonge est absolument nécessaire , la classe de puissance nominale doit
être au moins du même niveau de la classe de puissance de l’appareil. Les cordons
adjustés selon les ampères inférieurs risquent de surchauffer. Ranger le cordon pour
éviter d’être tiré ou trébuché.
23. Ne pas tenter de couper ou prolonger le cordon vapeur.
Protection de l’environnement !
Cet appareil contient de nombreux matériaux qui sont soumis au recyclage.
• Livrez-le au centre de collecte et d’élimination publique des déchets.
DESCRIPTION DE L’APPAREIL:
1.1 Réglage du cordon vapeur, 1.2 Interrupteur Marche-Arrêt, 1.3 Corps Superieur,
1.4 Corps Inférieur, 1.5 Pied en caoutchouc, 1.6 Roue, 2.1 Poignée du réservoir d’eau
2.2 Réservoir d’eau, 2.3 Bouton de réservoir d’eau, 3.1 Tête du cordon vapeur, 3.2 Cordon
vapeur, 3.3 Poignée, 4.1 Languette de réglage, hauteur du tube téléscopique, 4.2 Tube
téléscopique, 5 Tête vapeur, 6 Clips vapeur pour pantalon, 7 Brosse pour tissu
d’ameublement
INSTALLATION (AVANT L’UTILISATION)
* Lire attentivement toutes les instructions.
* Retirez les emballages.
* Ne pas faire fonctionner ou brancher l’appareil avant l’installation complète.
* Installez l’appareil selon le schéma, Figure 1
* Remplacez le tube téléscopique à sa place, Figure 2
* Vérifiez que le bouton est bien placé après le remplacement sur le corps., Figure 3
* Ouvrez les clips , tirez le tube en aluminium, Figure 4
* Tenez le tube bien serré.
- 12 -
Page 14

* Placez la tête vapeur sur son support. Figure 6
* Inserrez la brosse sur son support, Figure 7
2. Instructions de Repassage
* Remplissez d’eau par le couvercle du réservoir, ouvrez le couvercle du réservoir d’eau,
remplissez d’eau dans le réservoir, Figure 8, Figure 9
* Ne pas remplir par l’eau chaude.
* Fermez le couvercle du réservoir, placez le réservoir sur le corps. Figure 10, Figure 11.
* Tirez le cordon d’alimentation, branchez la fiche à la prise murale ,appuyez sur l’interrupteur
marche- arrêt. Figure 12, Figure 13.
* Dans une minute, le témoin lumineux s'allume ,( voir le témoin lumineux)
* Prenez la tête vapeur et séparez le cordon vapeur du corps ,faites contacter la tête vapeur
sur le tissu, Commencez verticalement le repassage ,Figure 14, de haut en bas
* Pendant l’utilisation ,une petite quantité d’eau peut s’écouler par le tube vapeur ,ceci est tout
à fait normal. Tirez le tube vers le haut lorsque vous entendez ce bruit et repositionnez la tête
sur son support.
* Afin de prolonger la durée de vie de l’appareil ,Videz l’eau restante du réservoir après chaque
utilisation ,faites l’appareil fonctionner à sec pendant 5 minutes, séchez le réservoir de vapeur
,éteignez-le lorsque la vapeur est terminée.
3. Instructions des accessoires
Ne pas oublier: Utiliser uniquement les accessoires à la position verticale ,ne pas repasser
horizontalement.
* Lisez attentivement les instructions avant d'utiliser les accessoires ,faites un essai sur un
vieux tissu à la première utilisation.
* Brosse de tissu d’ameublement
* L’utilisation de la brosse permet la vapeur pénétrer dans le tissu, fournit un bon effet de
repassage.
* Ne pas oublier: Laisser le tissu de vapeur après l’utilisation.
* Positionnez la brosse vapeur de façon verticale en l’insérrant , appuyez fermement sur les
accessoires de la brossse, placez -la fermement à sa place.
* Repassez de haut en bas.
* Éteignez l’interrupteur Marche – Arrêt avant de retirez la brosse, retirez la brosse lorsque
la vapeur ne vient pas par la brosse vapeur, ne pas toucher la pédale en acier inox, ça peut
brûler vos mains.
* Clips de vapeur pour pantalon
* Le clips facilite le repassage.
* Placez le clips sur la brosse vapeur ,insérez fermement à sa place.
* Prenez la brosse vapeur, ouvrez le clips.
* Placez le tissu entre le clips et la brosse.
* Libérez la poignée, le repassage doit être de haut en bas.
* Éteignez l’interrupteur marche – arrêt avant de retirez le clips, retirez la brosse lorsque la
vapeur ne vient pas par la brosse vapeur, ne pas toucher la pédale en acier inox, ça peut brûler
vos mains.
- 13 -
Page 15
4. Rangement
* Après l’utilisation, retirez le réservoir d’eau du corps, videz l’eau dans le réservoir.
* Séchez l’appareil en le faisant fonctionner pendant 5 minutes. Séchez le réservoir de vapeur
* Débranchez le cordon d’alimentation de la prise murale( le voyant d’alimentation doit être à
la position Off ), tirez le cordon d’alimentation, appuyez sur le bouton d’enrouleur, re-enroulez
le cordon dans le corps.
* Avertissement: Ne pas toucher la tête vapeur lorsqu’elle est chaude , séchez le réservoir de
vapeur avant le rangement.
5. Nettoyage
* Nettoyez le corps par un chiffon humide. Nettoyez la minuterie afin d’obtenir une meilleure
efficacité de votre appareil, la durée dépend la période d’utilisation. Le réservoir d’eau est au
moins une fois par an , 100 heures. La durée de nettoyage de la minuterie est suivante :
• Retirez le réservoir, rincez la minuterie par l'eau propre.
• Ouvrez le bouton de la base du réservoir, videz le mélange dans le réservoir, rincez par l’eau
propre.
* S'il ya encore d’accumulation de minéraux après le nettoyage de minuterie , répétez le
processus.
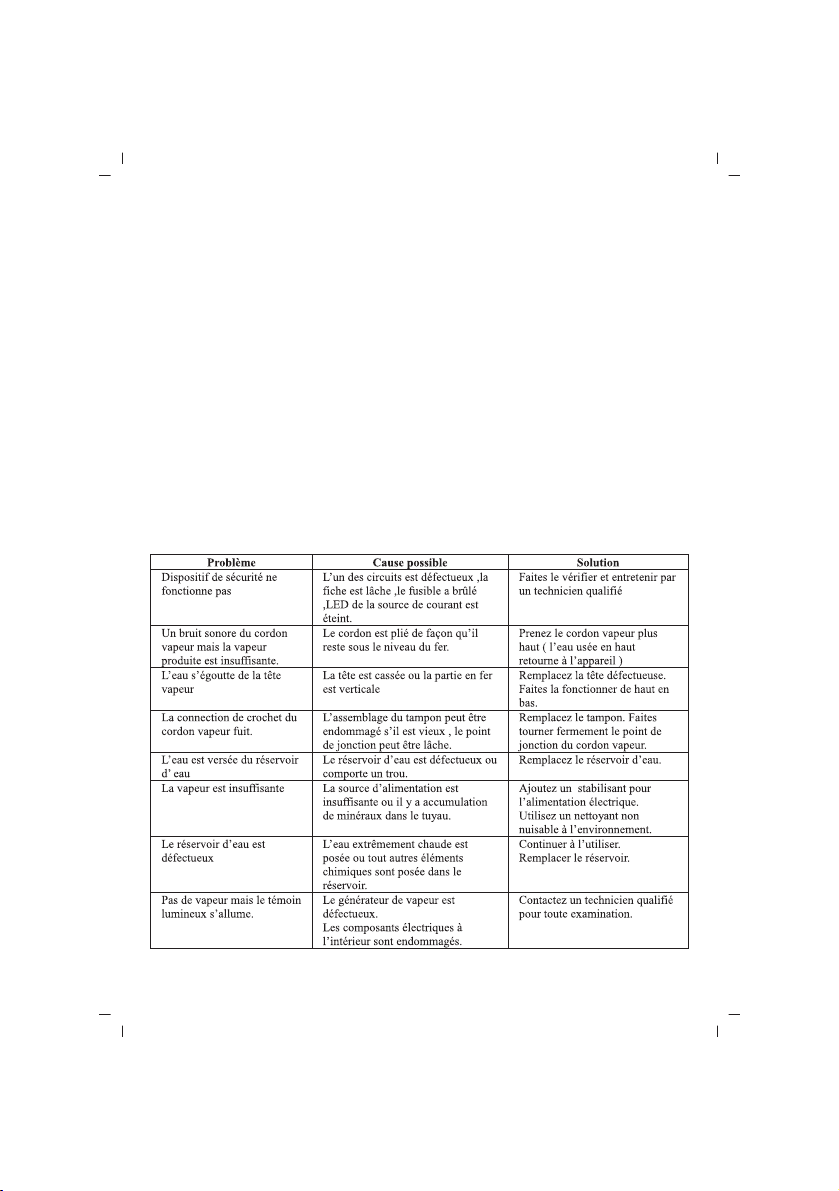
Résolution des problèmes
- 14 -
Page 16

NEDERLANDS
SINBO SSI 2880 KLEDINGSTOMER
GEBRUIKERSHANDLEIDING
Stoommachine met Aan-Uitknop en hanger.
Lees voor gebruik altijd de gebruikershandleiding.
AC230V 50Hz 2000W
BELANGRIJKE VEILIGHEIDSVOORSCHRIFTEN
1. Bij het gebruik van uw apparaat, dient u altijd de volgende essentiële veiligheidsvoorschriften
in acht te nemen:
2. Lees voor gebruik de voorschriften.
3. Gebruik het apparaat enkel voor het beoogde gebruik.
4. Dit apparaat is enkel voor huishoudelijk gebruik ontworpen. Bij elk commercieel gebruik,
oneigenlijk gebruik of het negeren van voorschriften, accepteert de fabrikant geen
verantwoordelijkheid en is de garantie in deze gevallen niet van toepassing.
5. Dit apparaat is niet bedoeld voor gebruik door personen (waaronder kinderen)
met verminderde lichamelijke, zintuiglijke of geestelijke vermogens, of die gebrek aan ervaring
of kennis hebben, tenzij iemand die verantwoordelijk is voor hun veiligheid toezicht op hen
houdt of hen heeft uitgelegd hoe het apparaat dient te worden gebruikt.
6. Houd voldoende toezicht om te beletten dat kinderen met het apparaat gaan spelen.
7. Laat het apparaat nooit onbeheerd achter met de stekker in het stopcontact of wanneer het
warm is.
8. Gebruik het apparaat niet wanneer het snoer, de stekker, de stoomslang ervan beschadigd
is, het apparaat niet normal werkt, gevallen is of op een andere wijze beschadigd is.
9. Ter voorkoming van elektrische schokken, haal het apparaat niet uit elkaar of probeer het
niet te repareren. Breng het apparaat ter controle, reparatie of herstel van de istellingen naar
de dichtsbijzijnde erkende servicedienst.
10. Ter voorkoming van contact met heet water uit de stoomventielen, dient u voor elk gebruik,het
apparaat op afstand van uw lichaam te houden tijdens het inschakelen van het apparaat. Geef
een stoomstoot enkel van boven naar beneden. Gebruik het stoommondstuk nooit in de horizontale
positie of buig deze niet naar achteren, anders kan er water uitstromen.
11. Om het risico op elektrische schokken te beperken, onderdompel het apparaat niet in water
of een andere vloeistof. Zorg ervoor dat het apparaat altijd uitgeschakeld is bij het steken van
de stekker in het stopcontact of bij het halen van de stekker uit het stopcontact.
12. Trek nooit aan het snoer om de stekker uit het stopcontact te halen, maar grijp in plaats
daarvan altijd de stekker vast.
13. Zorg ervoor dat het snoer niet in aanraking komt met hete oppervlakken. Laat het apparaat
afkoelen voordat u het gaat verplaatsen. Plaats het snoer ontspannen en losjes onder het
apparaat bij het opbergen.
14. Zorg ervoor dat het netsnoer niet in aanraking komt met scherpe hoeken of hete
oppervlakken.
15. Probeer niet de verbinding van de slangadapter te maken, wanneer het apparaat ingeschakeld
is. Het eruit halen van de slangadapter tijdens het gebruik van het apparaat kan brand veroorzaken.
16. Haal altijd de stekker van het apparaat uit het stopcontact bij het vullen met water, legen
en indien het apparaat niet gebruikt wordt.
- 15 -
Page 17

17. Probeer niet om het apparaat aan de slang op te hangen.
18. Gebruik van onderdelen, die door de fabrikant niet worden verkocht, wordt niet aanbevolen.
Deze kunnen immers brand, elektrische schokken en letsel veroorzalen. In aanraking komen
met hete onderdelen, heet water of stoom kan brandwonden veroorzaken. Bij het legen van het
apparaat , dient u extra alert te zijn, omdat in het apparaat nog water aanwezig kan zijn.
19. Richt de stoom niet op mensen of dieren of op kleiding, die u aan heeft.
20. Dit apparaat is enkel voor huishoudelijk gebruik bestemd.
BIJZONDERE VOORSCHRIFTEN
21. Dit is een 2000 Watt apparaat. Om overbelasting van de stroomkring te voorkomen, gebruik
in dezelfde stroomkring geen ander apparaat met een hoge spanning.
22. Indien een verlengsnoer absoluut noodzakelijk is, dan dient de nominale vermogensklasse
ten minste op het zelfde niveau te zijn als de vermogensklasse van het apparaat. Snoeren met
een lagere stroomsterkte kunnen oververhitten. Laat het snoer netjes opgeruimd achter om
trekken aan en struikelen over snoeren te voorkomen.
23. Probeer de stoompijp niet te snijden of te verlengen.
Milieubescherming gaat voor!
Uw apparaat bevat materialen die onderhevig zijn aan recycling en hergebruik.
• Breng het apparaat naar het centrum voor openbare afvalinzameling en –verwijdering.
BESCHRIJVING VAN HET PRODUCT:
1.1 Stoompijpregelaar, 1.2 Aan-Uitknop, 1.3 Bovenste frame, 1.4 Onderste frame, 1.5 Rubberen
voet, 1.6 Wiel, 2.1 Tankhandvat, 2.2 Tank, 2.3 Tankknop, 3.1 Stoompijpmondstuk, 3.2 Stoompijp,
3.3 Grijppunt, 4.1 Staafregelaar met beugel 4.2 Op en neer bewegende telescopische staaf, 5
Het kopgedeelte van de beugel 6 Broek stoomklem, 7 Stofborstel
MONTAGE (VOOR GEBRUIK)
* Lees de voorschriften aandachtig door a.u.b..
* Verwijder al het verpakkingsmateriaal.
* Schakel het apparaat niet in of steek de stekker niet in het stopcontact, indien de montage
ervan nog niet is voltooid.
* Begin met het monteren van het apparaat overeenkomstig de afbeeldingen. Afbeelding 1.
* Monteer de telescopische staaf op zijn plaats. Afbeelding 2
* Zorg ervoor dat de knop goed vastzit na het monteren van het frame. Afbeelding 3
* Maak de telescopische emmer open en trek de aluminium staaf eruit. Afbeelding 4
* Houd de emmer stevig vast.
* Steek het stoompijpmondstuk in de daarvoor bestemde opening. Afbeelding 6
* Maak het borstel vast aan het basisgedeelte. Afbeelding 7
2. Voorschriften voor het strijken
* Vul water via de vuldop, maak de dop van de watertank open en vul het water in de
watertank.Afbeelding 8, Afbeelding 9.
* Gebruik geen heet water.
* Sluit de dop van de watertank. Zet de watertank vast aan het frame. Afbeelding 10, Afbeelding
11.
- 16 -
Page 18

* Trek het netsnoer eruit, steek de stekker in het stopcontact en druk op de Aan-/Uitknop
Afbeelding12, Afbeelding 13.
* Ongeveer na een minuut zal het stoomindicatorlampje , (houd het indicatorlampje in de gaten
a.u.b).
* Houd het stoomborstel vast en ontkoppel de stoompijp van het frame. Raak op een milde wijze
met het stoomborstel het stof aan en begin verticaal (van boven naar beneden) te strijken.
Afbeelding 14
* Tijdens gebruik zal er een beetje water uit de stoompijp druppelen, hetgeen normaal is. Bij
het horen van dit geluid, verplaats de stoompijp iets omhoog en plaats het mondstuk weer terug
in de stoomketel.
* Om de levensduur van het apparaat te verlengen, leeg het water uit de watertank, laat het
apparaat 5 minuten droog werken, droog de stoomketel, schakel pas uit wanneer er geen stoom
meer aanwezig is.
3. Voorschriften met betrekking tot de onderdelen
Vergeet niet: Gebruik de onderdelen verticaal, strijk niet horizontaal.
* Lees -voor gebruik van de onderdelen- de gebruikershandleiding door a.u.b. Gebruik een oud
stof bij het eerste gebruik.
* Stofborstel
* Het gebruik van het borstel: zorgt ervoor dat de stoom in het stof dringt en heeft een goed
srijkeffect.
* Vergeet niet: Zorg ervoor dat het stof is afgekoeld na gebruik.
* Bij het vastzetten van het stoomborstel dient het stoomborstelpaneel naar boven gericht te
zijn. Maak het stevig vast.
* Het strijken dient van boven naar beneden plaats te vinden.
* Schakel de Aan-/Uitknop voor Vermogensregeling uit, voordat u de klem los gaat koppelen.
Ontkoppel het stoomborstel pas wanneer er geen stoom meer uit het borstel komt. Raak de
roestvrijstalen pedaal niet aan a.u.b, je kunt je handen eraan branden.
* Broek stoomklem
* Klem vergemakkelijkt het strijken.
* Maak de klem stevig vast aan het stoomborstel.
* Houd het stoomborstel vast en maak de klem open.
* Plaats de kleding tussen de klem en het stoomborstel.
* Laat het handvat vrij, het strijken dient van boven naar beneden plaats te vinden.
* Schakel de Aan-/Uitknop voor Vermogensregeling uit, voordat u de klem los gaat koppelen.
Ontkoppel het stoomborstel pas wanneer er geen stoom meer uit het borstel komt. Raak de
roestvrijstalen pedaal niet aan a.u.b, je kunt je handen eraan branden.
4. Het bewaren
* Haal na gebruik de watertank uit het frame en leeg de watertank.
* Zorg ervoor dat de onderdelen droog zijn door het apparaat 5 minuten te laten werken. Maak
de stoomketel droog.
* Haal de stekker uit het stopcontact (de vermogenindicator moet in de off-stand zijn), trek aan
het netsnoer en rol het netsnoer op in het frame door op de opwindknop te drukken.
* Waarschuwing›: Raak het stoomborstel niet aan voordat het is afgekoeld. Maak voor het
opbergen de stoomketel droog a.u.b.
- 17 -
Page 19

5. Het reinigen
* Gebruik voor het reinigen van het frame een vochtig doek a.u.b. Reinig de tijdindicator om uw
producten altijd op een efficiente wijze te kunnen gebruiken, tijd is afhankelijk van de
gebruiksperiode. De watertank is per jaar tenminste een keer 100 uur. Het reinigingsproces
van de tijdindicator is als volgt:
• Haal de watertank eruit en maak de indicator schoon met water.
• Open de onderste knop van de watertank, giet het mengsel in de watertank en maak met
schoon water schoon.
* Als u -na het schoonmaken van de indicator- van mening bent, dat er nog afval aanwezig is,
herhaal dan het reinigsproces.
Probleemoplosser
- 18 -
Page 20

DEUTSCH
SINBO SSI 2880 DAMPFGLÄTTER
GEBRAUCHSANWE‹SUNG
Aufhängbarer Dampfautomat mit An-Aus Taste
Lesen Sie sich vor dem Gebrauch unbedingt die Gebrauchsanweisung durch
AC230V 50Hz 2000W
W‹CHT‹GE S‹CHRHE‹TSANWE‹SUNGEN
1. Während der Bedienung des Gerätes, müssen alle grundlegenden Vorsichtsmaßnahmen
vorgenommen und überprüft werden, dies gilt auch für die nachstehenden:
2. Vor dem Gebrauch Anweisung durchlesen.
3. Benutzen Sie das Gerät nur für den dafür vorgesehen Zweck.
4. Dieses Gerät ist nur für den häuslichen Gebrauch entwickelt worden. Bei jeglichem
gewerblichen Gebrauch, unsachgemäßem Gebrauch oder bei Nichteinhaltung der Anweisungen,
übernimmt der Hersteller keinerlei Gewährleistungen und in solchen Fällen entfällt auch die
Gültigkeit der Garantie.
5. Dieses Gerät wurde nicht für den Gebrauch durch Menschen entwickelt, die eine körperliche,
motorische oder geistige Behinderung haben (Kinder inbegriffen) oder Menschen, die nicht
über genügend Wissen oder Erfahrung verfügen. Die einzige Ausnahme ist, dass beim Gebrauch,
diese Personen von einer Person beaufsichtigt werden oder sie zuvor über die erforderlichen
Gebrauchsanweisungen durch eine Verantwortungsperson unterrichtet wurden.
6. Sie sollten Kinder nicht mit dem Gerät spielen lassen.
7. Solange das Gerät in der Steckdose eingesteckt ist oder noch heiß ist, lassen Sie es niemals
unbeaufsichtigt.
8. Benutzen Sie kein Gerät, dessen Stromkabel, Netzstecker, Dampfschlauch beschädigt ist.
Benutzen Sie kein beschädigtes Gerät, das in Betrieb ist oder das gerade herunterfällt oder
nachdem es auf verschiedene Weisen Schaden genommen hat.
9. Um das Risiko von Stromschlägen auszuräumen, nehmen Sie das Gerät nicht auseinander
oder unternehmen Sie keinen Versuch, es selbst zu reparieren. Für die Kontrolle, Reparatur
oder Einstellungsarbeiten, bringen Sie das Gerät zum nächsten, zuständigen Kundendienst in
Ihrer Nähe.
10. Um das Risiko von Berührungen mit dem austretenden Dampf zu verringern, kontrollieren
Sie, vor jedem Einschalten, den genügenden Abstand zum Gerät. Drücken Sie lediglich in der
Auf- und Absenkposition auf die Dampftaste. Benutzen Sie den Dampfaufsatz niemals in der
waagerechten Stellung oder biegen Sie ihn nicht nach hinten, dies kann zu Wasserauslauf
führen.
11. Um das Risiko von Stromschlägen vorzubeugen, tauchen Sie das Gerät nicht in Wasser oder
in irgendeine andere Flüssigkeiten. Beim Ein- oder Ausstecken des Gerätes, achten Sie darauf,
dass das Gerät stets ausgeschaltet ist.
12. Beim Ausstecken ziehen Sie das Netzkabel nie an der Schnur, statt dessen greifen Sie zum
herausziehen den Netzstecker.
13. Vermeiden Sie Berührungen des Kabels mit heißen Oberflächen. Bevor Sie das Gerät
wegstellen, warten Sie, bis es abgekühlt ist. Nach dem Wegstellen, lagern Sie das Kabel leicht
und locker unter dem Gerät.
14. Achten Sie darauf, dass das Stromkabel nicht mit scharfen Kanten oder heißen Oberflächen
in Berührung kommt.
- 19 -
Page 21

15. Versuchen Sie nicht die Verbindung zum Schlauchadapter herzustellen, während das Gerät noch
eingeschaltet ist. Wenn der Schlauchadapter während des Betriebes des Gerätes herausgezogen
wird, können Verbrennungsrisiken auftreten.
16. Bei Auffüllen mit Wasser, beim Ausleeren oder wenn das Gerät gerade nicht gebraucht wird,
ziehen Sie es stets aus der Steckdose.
17. Versuchen Sie das Gerät nicht am Schlauch aufzuhängen.
18. Wir empfehlen, fremde Ersatzteile, die der Hersteller nicht mitgeliefert hat, nicht einzusetzen,
denn dies kann ein Grund für Brandschäden, Stromschläge oder Verletzungen darstellen. Es können
Verbrennungen auftreten, durch die Berührung oder den Kontakt zu heißen Einzelteilen, heißem
Wasser oder Dampf. Beim Entleeren von Dampfgeräten seien Sie besonders vorsichtig. Es kann
sich im Sammelbecken noch Wasser befinden.
19. Richten Sie den Dampf nie gegen Menschen oder Tiere oder benutzen Sie es nie zum Bügeln
von Kleidung in angezogenem Zustand.
20. Dieses Gerät ist nur für den haushaltlichen Gebrauch bestimmt.
SONDERANWE‹SUNGEN
21. Dies ist ein 2000-Watt-Gerät. Um eine Überbelastung der Schaltung zu vermeiden, benutzen Sie
kein Gerät mit hohem Spannungswert auf der gleichen Schaltung.
22. Wenn ein Verlängerungskabel unbedingt nötig ist, muß die Nennleistungsstufe mindestens mit
der Leistungsstufe des Gerätes übereinstimmen. Kabel, die auf niedrigere Stromstärke eingestellt
sind, könnten überhitzt werden. Damit das Kabel nicht gespannt oder damit man nicht daran
hängenbleibt und stürzt, muß das Kabel ordentlich aufbewahrt werden.
23. Kürzen Sie den Dampfschlauch nicht oder versuchen Sie ihn nicht zu verlängern.
Umweltschutz geht vor !
Ihr Gerät enthält wertvolles Material, das zur Wiederverwertung und zum Recycling gehört.
• Siehe unter öffentliche Sammel- und Abfallstellen für Sondermüll.
PRODUNKTBESCHRE‹BUNG:
1.1 Dampfrohr Anpassung, 1.2 An – Aus Taste, 1.3 Obergehäuse, 1.4 Untergehäuse, 1.5 Gummifuß
1.6 Räder, 2.1 Wasserbehältergriff, 2.2 Wasserbehälter, 2.3 Wasserbehälterknopf,
3.1 Dampfrohraufsatz, 3.2 Dampfrohr, 3.3 Haltegriff, 4.1 Saugröhre mit Einstell-klammer,
4.2 Teleskoprohr, 5 Klammeraufsatz, 6 Feststellschelle für Hosen, 7 Textilbürste
AUFBAU (VOR DEM GEBRAUCH)
* Bitte lesen Sie die Anleitungen aufmerksam durch.
* Nehmen Sie die gesamte Verpackung ab.
* Starten sie es nicht oder stecken Sie es nicht in die Steckdose ein, bevor der Aufbau vollendet ist.
* Beginnen Sie mit der Montage des Gerätes, nach den Anweisungen auf den Abbildungen, Abbildung
1.
* Setzen Sie das Teleskoprohr auf die dafür vorgesehene Stelle ein. Abbildung 2.
* Nach dem Einsatz am Gehäuse, vergewissern Sie sich davon, dass der Knopf fest einsitzt. Abbildung
3.
* Öffnen Sie den Teleskopeimer, ziehen Sie den Aluminiumstift. Abbildung 4.
* Stellen Sie den Eimer fest.
* Setzen Sie den Aufsatz des Dampfrohrs auf die Vorrichtung. Abbildung 6.
* Setzen Sie die Bürste in die dafür vorgesehene Vorrichtung ein. Abbildung 7.
2.Bügelanleitungen
* Füllen Sie das Wasser durch den Einfülldeckel für Wasser ein. Öffnen Sie den Deckel des
Wasserbehälters, füllen Sie das Wasser in den Wasserbehälter. Abbidung 8, Abbildung 9.
- 20 -
Page 22

* Füllen Sie kein heißes Wasser ein.
* Schließen Sie den Deckel des Wasserbehälters. Legen Sie den Wasserbehälter in das Gehäuse
ein. Abbildung 10, Abbildung 11.
* Ziehen Sie das elektrische Kabel heraus, stecken Sie den Netzstecker in die Steckdose, drücken
Sie die An/Aus Taste. Abbildung 12, Abbildung13.
* Nach etwa einer Minute leuchtet die Dampfkontrollleuchte auf (schauen Sie bitte auf die
Kontrollleuchte).
* Greifen Sie die Dampfbürste und nehmen Sie das Dampfrohr vom Gehäuse ab, sorgen Sie dafür,
das die Dampfbürste leicht auf dem Kleidungsstück aufliegt. Beginnen Sie mit dem Bügeln, indem
Sie sie senkrecht halten, von oben nach unten. Abbildung 14.
* Während des Gebrauches, wird etwas Wasser aus dem Dampfaufsatz austreten, dies ist normal.
Wenn ein Laut ertönt, heben Sie das Rohr nach oben, legen Sie den Aufsatz wieder in den Dampfkessel
zurück.
* Um die Lebensdauer des Gerätes zu verlängern, entleeren Sie nach dem Gebrauch, das Wasser
aus dem Wasserbehälter, lassen Sie das Gerät 5 Minuten trocken laufen, trocknen Sie den
Dampfauffangbehälter, schließen Sie ihn, wenn der Dampf abgelaufen ist.
3. Anweisungen zu den Einzelteilen
Nicht vergessen: Benutzen Sie die Einzelteile nur im senkrechten Zustand, bitte nicht im waagerechten
Zustand bügeln.
* Bevor Sie die Einzelteile gebrauchen, lesen Sie bitte die Gebrauchsanweisungen durch, beim
ersten Gebrauch testen Sie sie an einem gebrauchten Textil.
* Textilbürste
* Der Gebrauch der Bürste bewirkt, dass der Dampf einen Druck auf das Textil ausübt, erzeugt
somit eine guten Bügelwirkung.
* Nicht vergessen: Nach Gebrauch das eingedampfte Textil abkühlen lassen.
* Beim Anbringen der Bürste, Dampfbürstenschild muß nach oben zeigen, drücken Sie sanft auf
die Einzelteile der Bürste, legen Sie sie fest ein.
* Beim Bügeln sollten Sie von oben nach unten vorgehen.
* Vor dem Entfernen der Bürste, stellen Sie die An/Aus Taste auf Aus, wenn aus der Dampfbürste
kein Dampf hervortritt, nehmen Sie die Bürste ab, berühren Sie bitte den rostfreien Edelstahlteil
nicht, Sie könnten sich die Hand verbrennen.
* Feststellschelle für Hosen
* Die Schelle erleichtert das Bügeln.
* Stecken Sie die Schelle an die Dampfbürste, stecken Sie sie richtig fest.
* Halten Sie die Dampfbürste fest, öffnen Sie die Schelle.
* Legen Sie das Kleidungsstück zwischen Schelle und Dampfbürste ein.
* Lassen Sie den Haltegriff los, das Bügeln sollte von oben nach unten vorgenommen werden.
Bevor die Schelle abgenommen wird, schalten Sie bitte die An/Aus Taste aus. Wenn aus der
Dampfbürste kein Dampf hervortritt, nehmen Sie die Bürste ab, berühren Sie bitte das rostfreie
Edelstahlpedal nicht, Sie könnten sich die Hand verbrennen.
4. Aufbewahrung
* Nach Gebrauch entnehmen Sie den Wasserbehälter aus dem Gehäuse, entleeren Sie das Wasser
aus dem Wasserbehälter.
* Sorgen Sie dafür, dass die Geräte trocknen, in dem Sie sie 5 Minuten lang laufen lassen. Trocknen
Sie den Dampfkessel.
* Ziehen Sie das Elektrokabel aus der Steckdose,(Leistungsanzeige steht auf AUS), ziehen Sie das
elektrische Kabel heraus, drücken Sie auf die Kabel-Einrolltaste, wickeln Sie das Kabel wieder in
das Gehäuse zurück.
- 21 -
Page 23

* Hinweis: Bitte berühren Sie nicht die Dampfbürste vor dem Abkühlen. Trocknen Sie den Dampfkessel
bevor Sie es wegstellen.
5. Reinigung
* Bitte benutzen Sie ein nasses Tuch, um das Gehäuse zu reinigen. Um stets ein gutes Ergebnis aus
Ihren Produkten zu erhalten, reinigen Sie die Zeitskala, die Dauer hängt von dem Verwendungzeitraum
ab. Der Wassertank mindestens ein Mal im Jahr, 100 Stunden. Das Reinigungsverfahren für den
Maßindikator steht unten:
• Nehmen Sie den Wasserbehälter heraus, spülen Sie den Gradmesser mit klarem Wasser.
• Drücken Sie zum öffnen den Knopf des Wasserbehälters am Boden, schütten Sie die Mischung
in den Wasserbehälter, mit klarem Wasser spülen.
* Falls Sie nach der Reinigung vermuten, dass Reste vorhanden sind, wiederholen Sie den Vorgang.
Fehlerbehebung
- 22 -
Page 24

ESPANOL
SINBO SSI 2880 VAPORIZADOR DE ROPA
MANUAL DEL USO
Máquina vaporizadora con colgador, con botón de on/off (funcionar/apagar)
Antés de usar definitivamente leer el manual dep uso.
AC230V 50Hz 2000W
INSTRUCCIONES IMPORTANTES DE LA SEGURIDAD
1. Al usar el aparato deben ser tomadas las precauciones básicas y debe ser vigilada, estas
precauciones contienen también los siguientes:
2. Leer las instrucciones antés de usar.
3. Usar el aparato solamente de acuerdo con el objetivo del aparato.
4. Este aparato es diseñado solamente para uso doméstico. El fabricante no acepta ninguna
responsabilidad en caso de ser usado alguna vez con objeto comercial, un uso no apropriado
ú no cumplir con las instrucciones y no será válido la garantía del aparato.
5. Este aparato no es conveniente para el uso de las personas con falta de experiencia
conocimiento y minusválidas mentalmente (incluso los niños), la única excepción es informarles
sobre el uso anteriormente, dándoles instrucciones necesarias por una persona responsable
de la seguridad de dichas personas o usar estas personas el aparato bajo la vigilancia.
6. Debe ser cuidado para que no jueguen los niños con el aparato.
7. No dejar sin vigilancia el aparato mientrás está enchufado ó es caliente el aparato.
8. Al ser mal funcionado el cable de la energía, la ficha, la manguera para el vapor no usar el
aparato, no funcionar el aparato en situación averíada o el el momento de ser callado ú después
de ser dañado en diversas formas.
9. Para eliminar el riesgo del shock eléctrico no desmontar el aparato ú intentar a repararlo.
Llevar el aparato al punto del servicio técnico autorizado más cerca para controlar, repaqrar
o ajustar el aparato.
10. Para reducir el riesgo del contacto con la agua caliente salido de las apreturas del vapor,
controlar el aparato funcionándolo conservando la distancia con su cuerpo antés de cada uso.
Solamente dar vapor hacia la dirección arriba-abajo. Nunca usar la cabecera del vapor en la
posición horizontal o inclinarla hacia atrás, éso puede causar salida de agua.
11. Para reducir el riesgo del shock eléctrico no sumergir en agua o en otros líquidos. Tener
cuidado que esté en la posición apagado al enchufar o desenchufar el aparato.
12. Nunca tirar del cable de la energía mientrás enchufar el aparato, en lugar de éso tirarlo
de la ficha.
13. No permitir que el cable se tendrá en contacto con los superficies calientes. Permitir que
se enfríe antés de guardar el aparato. Colocar el cable de la energía debajo del aparato
cómodamente y en forma flojo.
14. No permitir que se toque el cable de la energía los superficies calurosos o con los lados
afilados.
15. No intentar a hacer la conección del adaptador de la manguera durante está funcionando.
Se puede aparecer el riesgo de quemar en caso de quitar el adaptador de la manguera al usarse
el aparato.
16. Desenchufar el aparato siempre al llenar con agua, vaciar o no está usado.
17. No intentar a colgar el aparato de su manguera.
- 23 -
Page 25

18. No se recomiendan usar los acesorios no conseguidos por el fabricante y éso puede causar
incendio, shock eléctrico ú sufrimiento de heridas. Se pueden ocurrir quemaduras por tocar
o tener contacto con las partes calurosas, agua caliente o vapor. Tener mucho cuidado mientrás
vaciar el aparato vaporizado. Se puede quear agua en el depósito.
19. No dirigir el vapor hacia los humanos o animales o no estar expuesto usted hacia el vapor
mientrás usted es vestido.
20. Este aparato es solamente para uso doméstico.
INSTRUCCIONES PARTICULARES
21. Éste es un aparato de 2000 watts. Para evitar que el aparato es cargado excesivo, no usar
otro aparaco con voltaje alto en el mismo circuito.
22. En caso de ser necesaria usar el cable para la extensión, el clase de la electricidad nominal
debe ser por lo menos igual al nivel de la clase de la electricidad del aparato. Los cables
ajustados de acuerdo con amperio más bajo se pueden calentarse excesivo. Debe ser dejado
doblado el cable para que no sea tirado ú esté unido a caerse.
23. No cortar la manguera del vapor o intentar a extenderla.
¡Anteriormente la protección medioambiental!
Su aparato contiene materiales valurosas que están expuestos al reciclo y readquisición.
• Dejar a los centros públicos para tirarlos y para la recolección de los residuos.
DEFINICIÓN DEL PRODUCTO:
1.1 Ajuste del tubo de vapor, 1.2 Botón de on/off, (funcionar/apagar), 1.3 Cuerpo superior
1.4 Cuerpo inferior, 1.5 Pie de caucho, 1.6 Rueda, 2.1 Mango del tanque, 2.2 Tanque,
2.3 Botón del tanque, 3.1 Cabecera del tubo parael vapor, 3.2 Tubo del vapor, 3.3 Punto para
coger, 4.1 Ajuste de la barra con, Braquetas, 4.2 Barra móvil Abajo-Arriba, 5 Sección de la
cabecera de la braqueta, 6 Clip para vapor de los pantalones, 7. Cepillo para la tela
INSTALACIÓN (ANTÉS DE USAR)
* Por favor leer las instrucciones con cuidado.
* Quitar todos los embalajes.
* No funcionar sin ser completado la instalación o enchufar el aparato.
* Empezar al montaje del aparato de acuerdo con el dibujo, Figura 1.
* Colocar la bara telescópica en su lugar. Figura 2.
* Estar seguro que el botón es fijado bien en su lugar después de montar bien en el cuerpo.
Figura 3.
* Abrir el depósito telescópico, tirar la bara de aluminio. Figura 4.
* Conservar la posición del depósito bien.
* Colocar la sección de la cabecera del tubo para el vapor en su apretura. Figura 6.
* Fijar el cepillo en la parte básica del cepillo. Figura 7.
2. Instrucciones para planchar
* Llenar agua por la tapa para llenar agua, abrir la tapa del tanque de agua, llebar la agua en
el tanque de agua. Figura 8, Figura 9.
* No poner agua caliente.
* Cerrar la tapa del tanque de agua, colocar el tanque de agua en el cuerpo. Figura 10, Figura
11.
- 24 -
Page 26

* Estirar el cable de la energía, enchufar el aparato, puslar al botón para on/off (funcionar/apagar).
Figura 12, Figura 13.
* Se enciende la luz indicadora aproximadamente después de un minuto, (Por favor mirar a la
luz indicadora)
* Coger el cepillo del vapor y separar la bara para el vapor del cuerpo, Adquirir que el cepillo
para el vapor toque suavemente a la tela, empezar a planchar verticalmente, Figura 14, de
arriba hacia abajo.
* En el momento del uso, se echará agua un poco, éso es normal. Al oir esta voz, tirar el tubo
hacia arriba, colocar otra vez la sección de la cabecera sobre el depósito para el vapor.
* Para que se use el aparato durante mucho tiempo, echar la agua en el tanque para agua
después de usar el aparato, funcionar el aparato durante 5 minutos seco, secar el depósito
para el vapor, apagar al no quedar más vapor.
3. Instrucciones relacionados con los acesorios
No olvidar: Usar los acesorios en la dirección vertical solamente, por favor no planchar en la
dirección horizontal.
* Antés de usar los acesorios, por favor leer el manual sobre las instrucciones para el uso, al
primer uso probar sobre una tela vieja.
* Cepillo para tela
* Uso del cepillo adquiere que el vapor se absorbe por la tela, causa una influencia de bien
planchado.
* No olvidar: Después del uso adquirir que la tela del vapor se enfríe.
* Al fijar el cepillo, debe ser la dirección del panel del cepillo para el vapor hacia arriba, puslar
con cuidado los acesorios del vapor, colocar bien en su lugar.
* El proceso debe ser de arriba hacia abajo al planchar.
* Antés de quitar el cepillo, por favor apagar el botón de on/off (funcionar/apagar) del control
de la energía, al no salir vapor del cepillo, quitar el cepillo, por favor no tocar la parte de acero
inoxidable, su mano puede quemar.
* Clip para el vapor de los pantolones
* El Clip facilita planchar.
* Fijar el clip sobre el cepillo para el vapor, colocarlo bien en su lugar.
* Coger bien el cepillo para el vapor, abrir el clip.
* Colocar la tela entre el clip y el cepillo para el vapor.
* Dejar libre el mango para coger, debe ser planchado de arriba hacia abajo.
* Antés de quitar el clip por favor apagar el botón de on/off (funcionar/apagar) del control de
la energía, al no salir vapor del cepillo, quitar el cepillo, por favor no tocar el pedal de acero
inoxidable, su mano puede quemar.
4. Guardar
* Después del uso, desmontar el tanque de agua del cuerpo, echar la agua en el tanque de
agua.
* Secar funcionando el aparato durante 5 minutos. Secar el depósito de vapor.
* Desenchufar el caple de la energía, (el indicador de la energía será en la posición de off),
desenchufar el cable, puslar al botón para recoger el cable, enrollar el cable de energía sobre
el cuerpo otra vez.
* Aviso: Por favor no tocar el cepillo del vapor antés de enfriarse, secar el depósito para el
vapor antés de guardar el aparato.
- 25 -
Page 27

5. Limpieza
* Por favor usar una tela mojada para limpiar el cuerpo. Siempre obtener un rendimiento bien
de sus productos es dependiente de la limpieza del analizador de tiempo, plazo es dependiente
del período de uso. El tanque debe ser limpiado al menos una vez anualmente durante 100
horas. El plazo de la limpieza para el indicador de la medida es como lo siguiente:
• Quitar el tanque de agua, lavar el analizador con agua limpia.
• Abrir el botón de la base del tanque, echar la mezcla en el tanque de agua, limpiar con agua
limpia.
* Después de limpiar el analizador, repetir el proceso en caso de ser pensado que se queden
residuos.
Eliminar los problemas
- 26 -
Page 28

Page 29

Page 30

Page 31

Page 32

No: 1-2880-27022013
- 31 -
Page 33

- 32 -
Page 34

Page 35

Page 36

Page 37

Page 38

1-2880-27022013
- 37 -
Page 39

- 38 -
Page 40

HRVATSKI
PARNI APARAT ZA ODJE´CU SINBO SSI 2880
UPUTE ZA UPORABU
Parni aparat sa vjeˇsalicom i butonom Uklju´ci - Isklju´ci
Prije upotrebe aparta obavezno proˇcitati upute za uporabu.
AC230V 50Hz 2000W
VAˇZNE SIGURNOSNE UPUTE
1. Pilikom koriˇs´cenja aparata uvjek treba preduzeti sigurnosne mjere ubrajaju´ci i dolje navedene:
2. Prıje upotrebe obavezno proˇcitati upute za uporabu.
3. Aparat koristiti sama sa ciljem za ˇsto je i namjenjen.
4. Aparat je dizajniran samo za koriˇs´cenje u ku´canstvu. U sluˇcaju koriˇs´cenja s trgovaˇckim ciljem
ili bilo kakavo nepridrˇzavanje upute o uporabi proizvoda proizvod¯a´c ne snosi bilo kakve obaveze
o datim garancijama.
5. Aparat se nesmje koristiti od strane osoba koji fizikˇci, psihiˇcki i mentalno se nesposobne
(ubrajaju´ci i djecu) ili osoba koje nemaju prethodno znanje ili iskustvo u vezi upotrebe aparata
ili u sluˇcaju kada pored tih osoba nije prisutno lice odgovorno za njhovu sigurnos i kojima
prethodno nisu date odgovaraju´ce instrukcije.
6. Budite paˇzlivi da se djece ne igraju aparatom.
7. U sluˇcaku kada je aparat prikluˇcen ili je u vru´cem stanju nesmje se ostaviti bez adakvatne
kontrole.
8. U sluˇcaju kada je naponski kabel, utiˇcnica, crijevo za paru u kvaru, ili vam je aparat ispao iz
ruku i u sluˇcaju kada je oˇsteˇcen se nesmje upotrebljavati.
9. Kako bi ste izbjegli strujni udar aparat nesmjete orvarati ili ga sami popravljati. Radi kontrole,
opravke ili njegovog podeˇsavanja obavezno obratite se ovlaˇs´cenom servisu.
10. Kako bi ste umanjili rizik dodira sa vrucom vodom koja se pojavljuje na mjestu izlaska pare
prije poˇcetka upotrebe, aparat aktivirajte ˇsto dalje od vaˇseg tjela, kontroliˇsu´ci njegov rad. Paru
koristiti samo u poloˇzaju gore-dolje. U niukojem sluˇcaju se glava za paru nesmje upotrebljavati
u horizontalan poloˇzaj, jer to moˇze biti razlog curenja vode.
11. Radi smanjenja rizika strujnog udara aparat se nesmje potapati u vodi ili druge teku´cine.
Kada je aparat prikljuˇcen ili prilikom njegovog iskljuˇcenja iz utiˇcnice uvjek treba biti u iskljuˇcenom
poloˇzaju.
12. Iskljucˇcuju´ci aparat iz utiˇcnice uvjek je potrebno jednom rukom drˇzati utikaˇc dok drugom
rukom utiˇcnicu.
13. Netreba dozvoliti da naponski kabel dodiruje vru´ce povrˇsine. Prije da se aparat spremi
potrebnoje omogu´citi njegovo hlad¯enje. Spremaju´ci aparat naponski kabal treba biti omotan
ispod aparata i u labavom poloˇzaju.
14. Netreba dozvoliti dodir naponskog kabela sa vru´cim i oˇstrim predmetima.
15. Dok aparat radi ne pokuˇsavati prikljuˇcenje adaptera za crijevo. U sluˇcaju da u toku rada
aparata izvadite adapter sa crijeva postoji rizik opekotine.
16. Kada aparat punite vodom ili nije u upotrebi obavezno se treba isljuˇciti iz izvora napajanja.
17. Aparat se nemje vjeˇsati pomo´cu crijeva.
18. Nije preporuˇcljiva uputreba pribora koji nije obezbjed¯en od strane proizvod¯aca. U suprotnom
moˇze do´ci do poˇzara, strujnog udara ili ozljeda. U sluˇcaju dodira sa vru´cim djelovima aparata,
vru´ce vode ili pare moˇze do´ci o ozljed¯ivanja. Budite paˇzljivi prilkom ispraˇznjenja aparata za
paru. Jer postoji mogu´cnost da je u rezervoaru otsala vode.
- 39 -
Page 41

19. Nemojte paru usmjeravati prema ljudima, ˇzivotinjama ili odje´ci koja je na vaˇsem tjelu.
20. Aparat se moˇze koristiti saamo za upotrebu u ku´canstvo.
POSEBNE UPUTE
21. Aparat je snage od 2000 W. Kako ne bi doˇslo do preoptere´cenja istog strujnog kruga na istoj
liniji se nesmje prikljuˇcivati aparat visoke potroˇsnje.
22. U sluˇcaju da je neizbjeˇzan produˇzni kabel potrebno je da zapremina kabela odgovara
zahtjevima aparata. U suprotnom moˇze do´ci do pregrejavanja naponskog kabela. Koko ne bi
doˇslo do oˇste´cenja naponskog kabele uvjek se treba spremiti na odgovaraju´ci na´cin.
23. Crijevo za paru nesjecati ili produˇzavati.
Kao prvo, zaˇstita okoliˇsa !
Aparat sadrˇzi vrijedne materijale koji se mogu upotrebiti za ponovnu proizvodnju.
• Aparat predati centrima specijalizovane za stare aparate.
OPIS PROIZVODA:
1.1 Podˇsavanje cijevi za paru, 1.2 Buton Ukljuˇci-Iskljuˇci, 1.3 Gornje tjelo, 1.4 Donje tjelo,
1.5 Gumeni podmetaˇc, 1.6 Kotaˇc, 2.1 Drˇzaˇc rezervoara, 2.2 Rezervoar, 2.3 Buton rezervoara
3.1 Glava cijevi za paru, 3.2 Cijev za paru, 3.3 Drˇzaˇc, 4.1 ˇStap za podeˇsavanje, 4.2 Pokretni ˇstap
Gore-Dolje, 5 Zaglavlje pokretnog ˇstapa, 6 Parni klips za hla´ce, 7 ˇCetka za tkaninu
INSTALIRANJE (PRIJE UPOTREBE)
* Molimo Vas da paˇzljivo proˇcitate upute.
* Odstranite kompletnu ambalaˇzu.
* Prije potpunog instaliranja aparat se nesmje prikljuˇcivati u utiˇcnici ili aktivirati.
* Na temelju prikaza poˇcnite instaliranje aparata, Prikaz 1.
* Postavite teleskopski ˇstap. Prikaz 2.
* Nakon pripajanja sa tjelom budite uvjereni da je buton ˇcvrsto postavljen na svom mjestu.
Prikaz 3.
* Otvorite teleskopski sud, povucite aluminijsku cijev. Prikaz 4.
* Sud drˇziti ˇcvrsto. Prikaz 5.
* Zaglavlje cijevi za paru postaviti u rupi. Prikaz 6.
* ˇCetku postaviti na dno namjenjeno za ˇcetku. Prikaz 7.
2. Upute o peglnju
* Pomo´cu poklopca za vodu dodajte vodu, otvorite poklopac rezervoara, vodom napunite rezervoar.
Prikaz 8, Prikaz 9.
* Netreba stavljati vru´cu vodu.
* Zatvorite poklopac rezervoara.Rezervoar za vodu prikaˇcite za tjelo aparata.Prikaz 10, Prikaz
11.
* Povucite naponski kabel, zatim ga prikljuˇcite na utiˇcnici. Pritisnite buton ukljuˇci-iskljuˇci. Prikaz
12, Prikaz 13.
* Od prilike za jednu minutu ukljuˇci´ce se indikatorske lampice za paru (molimo Vas obratite
paˇznju na lampicu)
* Drˇzite ˇcetku za paru i ˇstap za paru odvojite od tjela, obezbjedte lagan dodir ˇcetke za paru sa
odje´com, peglanje zapoˇcnite vertikalnim pokretima. Od navid¯e ka naniˇse. Prikaz 14.
* Prilikom upotrebe moˇze do´ci do slabog curenja vode sa cijevi za paru, ˇsto je i normalno. Kada
- 40 -
Page 42

ˇcujete ovaj zvuk crijevo potegnite naviˇse, zaglavlje ponovo prikaˇcite u kotao za paru.
* Radi ˇsto duˇzeg vijeka aparata nakon upotrebe obavezno isprazniti rezervoar sa vodom. Nakon
toga neka aparat u vremenu od 5 minuta radi na suho. Osuˇsite kotao i kada nestane para
iskljuˇcite aparat.
3. Upute u vezi sa priborom
Nezaboraviti: Pribor koristiti samo u vertikalnom poloˇzaju. Molimo Vas nepeglati u horizonntalnom
poloˇzaju.
* Prije upotrebe pribora obavezno proˇcitati upotu o uporabu. Prva upotreba neka bude na jednu
staru tkaninu ili odje´cu.
* ˇCetka za Tkaninu
* Upotreba ˇcetke obezbjed¯uje dodir pare sa tkaninom koja ´ce utjecati na savrˇseno peglanje.
* Nezaboraviti: Nakon upotrebe obezbjedite hlad¯enje ˇcetke za tkaninu.
* Kada je ˇcetka prikljuˇcena, panel ˇcetke treba biti u smjeru naviˇse. Paˇzljivo pritisnite na pribor
ˇcetke . Jako priˇcvrstiti.
* Peglanje izvesti sa gornji ka donji smjer.
* Prije vad¯enja ˇcetke obavezno iskljuˇciti buton Ukljuˇci-Iskljuˇci. ˇCim prestane dolazak pare
moˇzete izvaditi ˇcetku. Molimo Vas izbegavajte dodir sa djelovima od nerd¯ejuˇceg ˇcelika. Moˇze
do´ci do opekotina.
* Klips pare za hla´ce
* Klips olakˇsava peglanje.
* Klips ˇcvrsto postaviti na ˇcetku.
* Drze´ci ˇcetku za paru otvorite klips.
* Tkaninu smjestiti izmed¯u klipsa i ˇcetke za paru.
* Drˇsku pustiti slobodno.Peglanje vrˇsiti sa gornjeg ka donjem smjeru.
* Prije da klips izvadite obavezno iskljuˇciti buton Ukluˇci-Iskljuˇci. ˇCim prestane dolazak pare
moˇzete izvaditi ˇcetku. Molimo Vas izbegavajte dodir sa djelovima od nerd¯ejuˇceg ˇcelika. Moˇze
do´ci do opekotina.
4. Skladiˇstenje
* Nakon upotrebe, sa tjela aparat izvaditi vodu, vodu isprazniti u rezervoar za vodu.
* Obezbedite rad aparata u trajanju od 5 minuta da bi se osuˇsio,:Takod¯er osuˇsite i kotao za
paru.
* Naponski kabel iskljuˇcite iz utiˇcnice (pokazatelj napona bi´ce u poloˇzaju Off), izvucite naponski
kabel i pritiskum na buton omoguˇcite njegovo premotavanje.
* Napomena: Molimo Vas da ˇcetku za paru ne dodirujete dok je vru´ca, prije skaldiˇstenja osuˇsiti
kotao za paru.
5. ˇCiˇs´cenje
* Za ciˇs´cenje tjela aparata koristite vlaznu krpu. Kako bi aparat uvjek bio produktivan uvjek je
potrebno oˇcistiti vrijemensko mjerilo Vrijeme je vezano za period upotrebe. Rezervaor za vodu
najmanje u jednu godinu, je 100 sati. Proces ˇciˇs´cenja vrijemenskog mjerila je slijede´ci:
• Izvadite rezervoar za vodu. Mjerilo oprati ˇcistom vodom.
• Otvorite buton na dnu rezervoara, mjeˇsavinu doliti u rezervoar za vodu. Zatim oprati ˇcistom
vodom.
* Nakon ˇciˇs´cenja mjrerila ako ste miˇsljena da prljavˇstina nije odstranjena operaciju moˇzete
ponoviti.
- 41 -
Page 43

Rjeˇsavanje Problema
- 42 -
Page 44

- 43 -
Page 45

- 44 -
Page 46

- 45 -
Page 47

MÜfiTER‹ H‹ZMETLER‹
De¤erli Müflterimiz,
En uygun fiyata en iyi ürünü vermenin yan› s›ra; en iyi hizmeti vermenin de
önemli oldu¤una inan›yoruz. Bu nedenle siz bilinçli tüketicilere daha yak›n
olabilmek için, internet adresimizdeki eriflim formlar›n›n yan› s›ra, tüketici
dan›flma hattımızı da hizmetinize açm›fl durumday›z.
TÜKET‹C‹
DANIfiMA HATTI
444 66 86
Tüketici Dan›flma Hattımızı,
- Hafta içi her gün 08.00-18.00 saatleri aras›nda arayabilir; istek, öneri ve
flikayetlerinizi firmam›za iletebilirsiniz.
Tüketicinin Dikkatine:
Ürünlerimizle ilgili hizmetleri tam olarak alabilmek için afla¤›daki önerilere
uyman›z› rica ederiz:
1. Ürünü ald›¤›n›zda Garanti Belgesini mutlaka yetkili sat›c›n›za onaylatt›r›n›z.
2. Ürünü kullanma k›lavuzunda belirtilen hususlara göre kullan›n›z.
3. Ürününüzle ilgili hizmet talebiniz oldu¤unda yukar›daki telefon
numaralar›ndan, Tüketici Danıflma Hattına baflvurunuz.
4. Ürünü promosyon arac›l›¤› ile edinmiflseniz, ürüne ait garanti belgesini en
yak›n yetkili servisimize giderek onaylatt›r›n›z.
5. Teknik servisteki ifliniz bitti¤inde "Yetkili Servis Hizmet Fifli" almay›
unutmay›n›z. Alaca¤›n›z bu Hizmet Fifli, ileride ürününüzde meydana
gelebilecek herhangi bir sorunda size yarar sa¤layacakt›r.
www.sinbo.com.tr
0800 211 50 21
KAPIDAN KAPIYA
ÜCRETS‹Z
SERV‹S
Kap›dan Kap›ya Ücretsiz Servis Kampanyam›z dâhilinde Yurtiçi Kargo Firmas› ile iflbirli¤i içerindeyiz. Tüketicimiz
taraf›ndan sat›n al›nan ürünün fiyat› ne olursa olsun, Tüketicimiz ürün ile ilgili garanti kapsam›na giren herhangi
bir problem yaflad›¤›nda, 444 66 86 numaral› Tüketici Danıflma Hattımızı aramas› ve kay›t b›rakmas› yeterlidir.
Bu süreçten sonra Tüketicimizin ürünü ücretsiz olarak Yurtiçi Kargo taraf›ndan Tüketicimizin bulundu¤u adresten
al›n›p, 7* ifl günü içerisinde ürün çal›fl›r bir vaziyette, yine Tüketicimize Yurtiçi Kargo arac›l›¤› ile adresine teslim
edilmektedir. 7 ifl günü içerisinde sorunu çözülemeyen ürünler ise, yenisi ve/veya bir üst modeli ile de¤ifltirilmektedir.
Tüm bu süreçte Tüketicilerimizden hiçbir ücret talep edilmemektedir.
(*Ürünün servis garanti süresi, Yurtiçi Kargo ürünü Sinbo Fabrikas›’na teslim ettikten sonra bafllar.)
- 46 -
7 GÜNDE
TESL‹MAT
GARANT‹S‹
(*)
Page 48

- GARANT‹ fiARTLARI -
1) Garanti süresi,mal›n teslim tarihinden itibaren bafllar ve 2 y›ld›r.
2) Mal›n bütün parçalar› dahil olmak üzere tamam› Firmam›z›n garanti kapsam›ndad›r.
3) Mal›n garanti süresi içerisinde ar›zalanmas› durumunda, tamirde geçen süre garanti
süresine eklenir. Mal›n tamir süresi, 20 iflgününü geçemez. Bu süre mala iliflkin ar›zan›n
servis istasyonuna, servis istasyonunun olmamas› durumunda, mal›n sat›c›s›, bayii,
acentesi, temsilcili¤i, ithalatç›s› veya imalatç›s›-üreticisinden birine bildirim tarihinden
itibaren bafllar. Tüketicinin ar›za bildirimini; telefon, faks, e-posta, iadeli taahhütlü mektup
veya benzeri bir yolla yapmas› mümkündür. Ancak, uyuflmazl›k halinde ispat yükümlülü¤ü
tüketiciye aittir. Mal›n ar›zas›n›n 10 ifl günü içerisinde giderilememesi halinde, imalatç›üretici veya ithalatç›; mal›n tamiri tamamlan›ncaya kadar, benzer özelliklere sahip baflka
bir mal› tüketicinin kullan›m›na tahsis etmek zorundad›r.
4) Mal›n garanti süresi içerisinde gerek malzeme ve iflçilik, gerekse montaj hatalar›ndan
dolay› ar›zalanmas› halinde, iflçilik masraf›, de¤ifltirilen parça bedeli ya da baflka herhangi
bir ad alt›nda hiçbir ücret talep etmeksizin tamiri yap›lacakt›r.
5) Tüketicinin onar›m hakk›n› kullanmas›na ra¤men mal›n;
• Tüketiciye teslim edildi¤i tarihten itibaren, garanti süresi içinde kalmak kayd›yla, bir y›l
içerisinde en az dört defa veya imalatç›-üretici ve/veya ithalatç› taraf›ndan belirlenen
garanti süresi içerisinde alt› defa ar›zalanmas›n›n yan› s›ra, bu ar›zalar›n maldan
yararlanamamay› sürekli k›lmas›,
• Tamiri için gereken azami süresinin afl›lmas› ,
• Firman›n servis istasyonunun, servis istasyonunun mevcut olmamas› halinde s›rayla
sat›c›s›, bayii, acentesi temsilcili¤i ithalatç›s› veya imalatç›-üreticisinden birisinin
düzenleyece¤i raporla ar›zan›n tamirini mümkün bulunmad›¤›n›n belirlenmesi, durumlar›nda
tüketici mal›n ücretsiz de¤ifltirilmesini, bedel iadesi veya ay›p oranda bedel indirimi talep
edebilir.
6 ) Mal›n kullanma k›lavuzunda yer alan hususlara ayk›r› kullan›lmas›ndan kaynaklanan
ar›zalar garanti kapsam› d›fl›ndad›r.
7 ) Garanti Belgesi ile ilgili olarak ç›kabilecek sorunlar için Gümrük ve Ticaret Bakanl›¤›
Tüketicinin Korunmas› ve Piyasa Gözetimi Genel Müdürlü¤ü’ne baflvurabilir.
‹THALATÇI F‹RMA
DE‹MA ELEKTROMEKAN‹K ÜRÜNLER ‹NfiAAT SPOR MALZEMELER‹ ‹MALAT SAN. VE T‹C. A.fi.
Cihangir Mh. Güvercin Cd. No:4 Haramidere Mevkii Avcılar - ‹stanbul - Türkiye
Ça¤rı Merkezi: 444 66 86
www.sinbo.com.tr - info@sinbo.com.tr
- 47 -
Page 49

- SSI 2880 ÜTÜ -
- GARANT‹ BELGES‹ -
Garanti Belge No : 97032
SSHY Belge No : 35274
‹THALATÇI F‹RMA
Ünvanı : DE‹MA ELEKTROMEKAN‹K ÜRÜNLER‹ ‹Nfi. SPOR MALZ.
‹MALAT SAN. ve T‹C. A.fi.
Adresi : Cihangir Mah. Güvercin Cad. No:4 Haramidere Mevkii
Avc›lar / ‹STANBUL
Tel. : Ça¤rı Merkezi: 444 66 86
Yetkili Kifli :
Yönetim Kurulu Baflkan›
Ürünün Cinsi : ÜTÜ
Markası : S‹NBO
Modeli : SSI 2880
Alt Modeli : Bandrol ve Seri No :
Teslim Tarihi ve Yeri :
Garanti Süresi : 2 Yıldır
Azami Tamir Süresi : 20 ‹fl Günü
Kullanım Ömrü : Bakanl›kça belirlenen ve ilan edilen kullan›m ömrü 10 y›ld›r.
(Ürünün fonksiyonlar›n› yerine getirebilmesi için gereken yedek parça temin süresi)
SATICI F‹RMA
Ünvanı :
Adresi :
Tel.Fax :
Fatura Tarihi ve No :
Teslim Tarihi ve Yeri :
‹mza ve Kafle :
Bu bölüm, ürünü sat›n ald›¤›n›z Yetkili Sat›c› taraf›ndan imzalanacak ve kaflelenecektir.
Bu belgenin kullan›lmas›na; 4077 say›l› Tüketicinin Korunması Hakkında Kanun ve bu Kanun’a dayan›larak yürürlü¤e konulan Garanti Belgesi
Uygulama Esaslar›na Dair Yönetmelik uyar›nca, TC Gümrük ve Ticaret Bakanlı¤ı, Tüketicinin Korunması ve Piyasa Gözetimi Genel Müdürlü¤ü
tarafından izin verilmifltir.
Garanti Belge Onay Tarihi : 04/02/2011
Garanti Belge Vize Tarihi : 14/01/2013
SSHY Belge Onay Tarihi : 04/04/2012
- 48 -
Page 50

- TEDAR‹KÇ‹ F‹RMA / EXPORTER United Favour Development Limited
Unit B, 10/F Lee May Building 788-790
Nathan Road, Mongkok, Kowloon, HK.
- UYGUNLUK BEYANI / CE CONFORMITY Intertek Testing Services Hangzhou
16 No.1, Ave., Xiasha Economic Development
District, Hangzhou, China
HZ10050429-V1
EEE Yönetmeli¤ine uygundur.
Made in P.R.C.
‹mal Y›l› : 2013
 Loading...