

Page 1

STEAM IRON
INSTRUCTION MANUAL
SSI 2875 ÜTÜ
KULLANMA KILAVUZU
TR
EN
FR
NL
DE
ES
RU
UA
HR
AR
Page 2
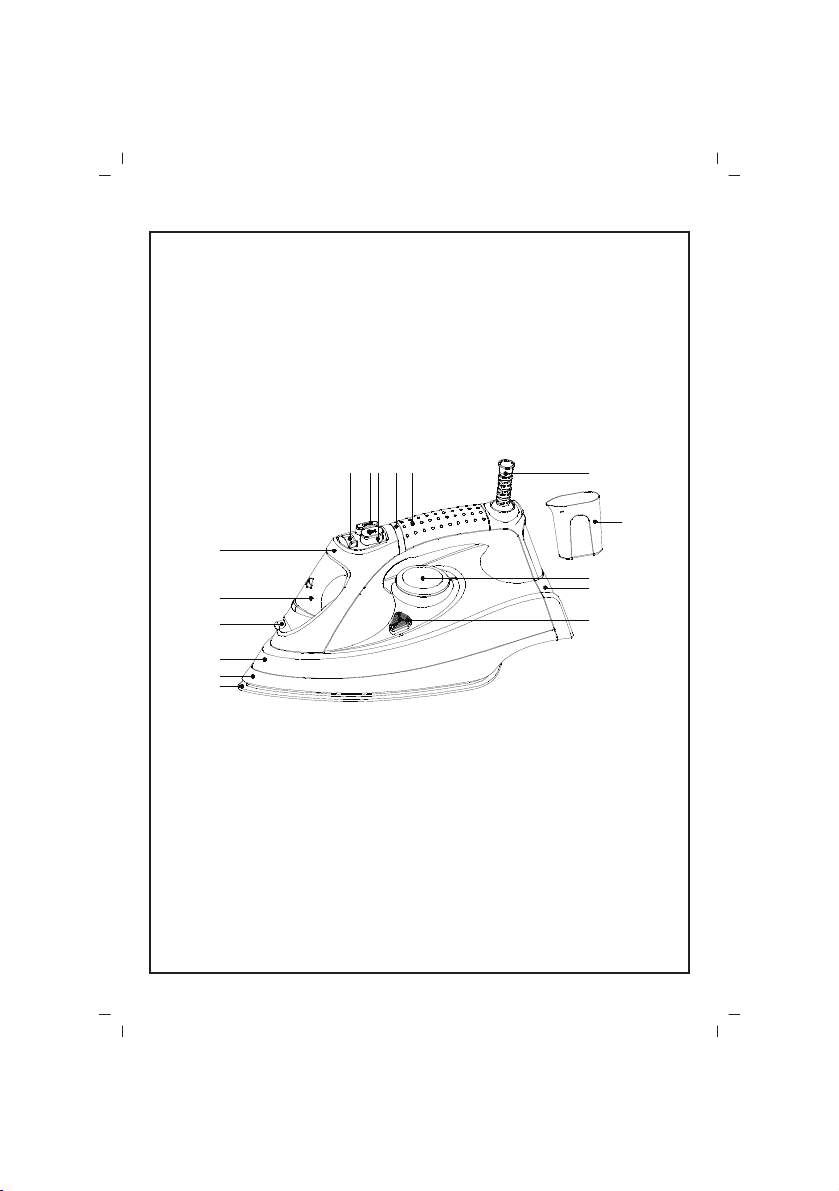
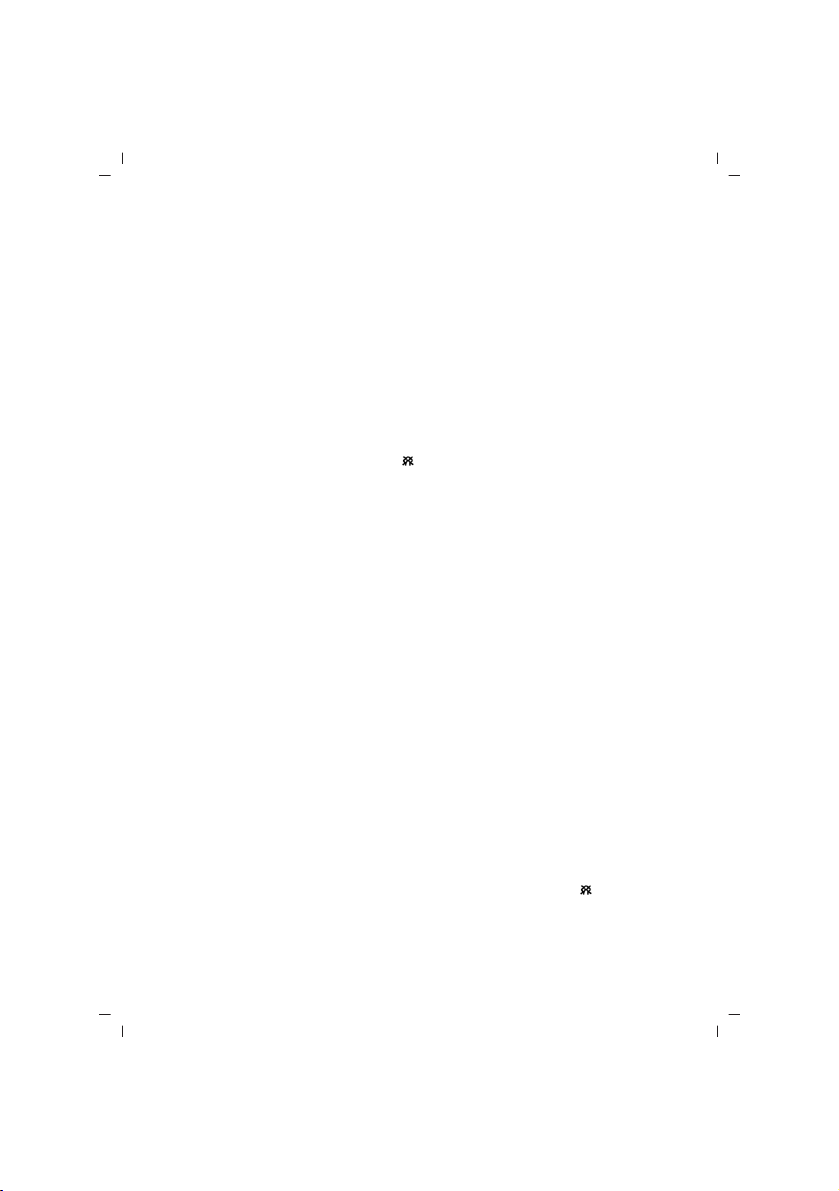
A
B
C
D
E
F
HG
I J K
L
M
N
O
P
- 1 -
Page 3

TÜRKÇE
De¤erli Müflterimiz,
Ürün seçiminde S‹NBO'yu tercih etti¤iniz için teflekkür ederiz.
Uzun ve verimli bir kullan›m için cihaz› kullanmadan önce bu k›lavuzu özellikle güvenlik
talimatlar›na dikkat ederek okuman›z› ve devaml› suretle saklaman›z› tavsiye ederiz.
Sayg›lar›m›zla
Sinbo Küçük Ev Aletleri
Cihazla oynamamalarını güvenceye almak için çocuklar gözetim altında tutulmalıdır.
Bu ürün (çocuklar dahil ) fiziksel hassasiyeti az, zihinsel olarak yetersiz, deneyimsiz ve yeterli bilgiye
sahip olmadan yada kendilerinin güvenli¤inden sorumlu olan kifliler tarafından bu ürünü kullanmak
için gerekli talimatlar verilmemifl kiflilerin kullanımına uygun de¤ildir.
Isıl kesicinin istenmeden bafllangıç konumuna gelmesinden kaynaklanan bir tehlikeyi önlemek için,
bu cihaz bir zamanlayıcı gibi dıfl bir anahtarlama düzeni üzerinden beslenmeli veya yardımcı program
vasıtasıyla düzenli olarak devresi kapatılan ve açılan bir devreye ba.lanmalıdır.
Sıcakken veya so¤ukken ütü ve kordonu 8 yaflından küçük çocukların ulaflamayaca¤ı bir yerde
bulundurulmalıdır.
Children being supervised not to play with the appliance.
This appliance is not intended for use by persons (including children) with reduced physical,sensory
or mental capabilities, or lack of experience and knowledge, unless they havebeen given supervision
or instruction concerning use of the appliances by a personresponsible for their safety. Children
should be supervised to ensure that they do not play with the appliance.
Heat caused by the arrival of the cutter accidentally starting position to avoid a hazard, such as a
timer, this device
is fed via an external switching scheme on a regular basis or by means of the utility opened and closed,
and a circuit connected to the circuit
Hot or cold iron and cords should be out of reach of children under 8 years.
- 2 -
Page 4

S‹NBO SSI 2875
BUHARLI ÜTÜ (SERAM‹K KAPLAMA ÜTÜ TABANI)
KULLANMA KULAVUZU
ÖZELL‹KLER:
• Kendi kendini kapatma özelli¤i
• Çift seramik kaplamal› ütü taban›
• Kuru/Sprey/Buhar/fiok Buhar/Dikey Buhar/Kireç Önleme/Kendi Kendini Temizleme/
Anti-Damlama Fonksiyonları
• Farkl› Kumafllar için ayarlanabilir s›cakl›k
• Sürekli buhar: 35g/min maks.
• fiok Buhar: 50g/dak.
• Sprey: 0.7g/püskürtme
• 350 ml. Su haznesi kapasitesi
• AC230V,50Hz, 2200W
ÜTÜNÜZÜ TANIYIN
A. ÜTÜ TABANI, B. ISI YALITIM TABAKASI, C. SU HAZNES‹, D. SPREY, E. SU G‹R‹fi KAPA⁄I
F. ÜST KAPAK, G. BUHAR KONTROL DÜ⁄MES‹, H. SPREY DÜ⁄MES‹, I. fiOK BUHAR DÜ⁄MES‹
J. P‹LOT IfiI⁄I KAPA⁄I, K. ÜST KAPLAMA LAST‹⁄‹, L. KORDON KILIFI, M. SU DOLDURMA KABI
N. SICAKLIK KONTROL DÜ⁄MES‹, O. ARKA KAPAK, P. KEND‹ KEND‹N‹ TEM‹ZLEME DÜ⁄MES‹
GÜVENL‹K UYARILARI
• Bakım, Onarım ve Kullanımda Uyulması Gereken Kurallar
• Ütü prize tak›l› iken gözetimsiz b›rak›lmamal›d›r.
• Su haznesi su ile doldurulmadan önce ütünün fifli prizden çekilmelidir.
• Su doldurma aç›kl›¤› ütünün kullan›m› süresince aç›lmamal›d›r.
• Ütü sabit bir yüzey üzerinde kullan›lmal› ve dinlendirilmelidir.
• Ütüyü dik konuma getirdi¤inizde ütünün konuldu¤u yüzeyin sabit oldu¤undan emin olun.
• Ütü e¤er düflürülmüflse ve hasarl› oldu¤una dair görülebilir bir belirtisi var veya s›zd›rma
yap›yorsa kullan›lmayacakt›r.
• E¤er güç kablosu zarar görmüfl ise, tehlikeden kaç›nmak için güç kablosu ,üreticisi veya
servisi veya benzer yetkili bir kifli taraf›ndan yenisi ile de¤ifltirilmelidir.
• Cihaz fiziksel , duyusal ve zihinsel yeterlilikleri olmayan kifliler(çocuklar dahil) taraf›ndan
güvenliklerin den sorumlu kiflinin denetimi veya talimat› olmaks›z›n kullan›lmamal›d›r.
• Çocuklar›n cihazla oynamamalar›ndan denetimle emin olunmal›d›r.
NOT:
• Bu cihaz sadece evsel kullan›m içindir. Kullan›m amac›na uygun olarak kullan›n›z.
• Ütünün voltaj›n›n evde kulland›¤›n›z voltajla ayn› olup olmad›¤›n› kontrol ediniz.
• Elektrik devresinin fazla yüklenmesini engellemek için bir baflka yüksek güçlü cihaz› ayn›
devrede kullanmay›z.
• Güç Kordonunun s›cak yüzeylere temas etmesine müsade etmeyiniz. Ütüyü saklamadan önce
tamamiyle so¤umas›n› sa¤lay›n›z.
• Elektrik çarpmas›n› önlemek için ütüyü su veya baflka bir s›v› içerisine dald›rmay›n›z.
• Kullan›mdan sonra s›cakl›k kontrol dü¤mesini “kapal›” veya “MIN” konumuna getirin.
• Kullanma k›lavuzunu sürekli olarak muhafaza ediniz. Ütünün 3. bir kifliye verilemesi halinde
lütfen kullanma k›lavuzunuda beraberinde verin.
- 3 -
Page 5

C‹HAZIN KULLANIMI
• Ba¤lantı veya Montajın Nasıl Yapılaca¤ını Gösterir fiema ile Ba¤lantı veya Montajın Kimin
Tarafından Yapılaca¤ına (tüketici, yetkili servis) iliflkin bilgiler
Ütünün ilk kullan›m›ndan önce, ütünün kendisine veya ütüleme taban›na yap›flt›r›lm›fl tüm
etiketleri, ç›kartmalar›, ve koruyucu folyoyu ç›kar›n.
SU ‹LE DOLDURMA
• Ütüyü doldurmadan önce fiflini prizden çekin
• Buhar dü¤mesini “0” veya “ ” konumuna getirin ve su girifl kapa¤›n› aç›n.
• Lütfen ütünüzü ilk kullan›m›nda normal musluk suyu ile doldurun.
• Ekledi¤iniz su doldurma kab›n› kullanarak su haznesi “MAX” doldurma seviyesine gelinceye
kadar temiz musluk suyu kullan›n.
• Sonraki dolumlarda da musluk suyu kullanabilirsiniz. Ancak, e¤er musluk suyu çok sert ise
distile edilmilmifl su kullan›m› tavsiye edilir.
• Hazneyi MAX göstergesinin üzerinde doldurmay›n.
• Su haznesine parfüm, sirke, kola , kireç önleyici, ütüleme katk› maddeleri, kimyasal yolla
kireci al›nm›fl su ve di¤er kimyasalar koymay›n.
SICAKLI⁄IN AYARLANMASI
Kumafl Sıcaklık Kontrolü
NAYLON/AKR‹L‹K/ASETAT •
‹PEK/RAYON/POL‹ESTER • •
YÜN/PAMUK • • •
KETEN MAX
• Ütüyü dik konuma getirin ve güç kordonunu prize tak›n
• ‹stenilen kumafl s›cakl›¤› ayar›na getirinceye kadar ütü s›cakl›k kontrol dü¤mesini çevirin.
Yukar›daki tabloyu bir k›lavuz olarak kullanman›z› tavsiye ederiz.
• Ütü taban›n›n ›s›nmakta oldu¤unu belirten s›cakl›k pilot ›fl›¤› yanacakt›r.
• Pilot ›fl›¤›n›n kapanmas› istenilen s›cakla¤a ulafl›ld›¤›n› gösterir.
• Ütüleme boyunca s›cakl›k pilot ›fl›¤› zaman zaman yan›p söncektir.
KURU ÜTÜLEME
• Kuru ütüleme için , buhar kontrol dü¤mesini “0” veya “ ” konumuna getirin. Bu su haznesinde
su olmas› halinde buhar ak›fl›n› kesecektir.
• ‹steniel kumafl/s›cakl›k ayar›n› seçmek için s›cakl›k kontrol dü¤mesini çevirin. Pilot gösterge
›fl›¤› yanacakt›r, ütüyü pürüzsüz ve sabit bir yüzey üzerine düfley olarak koyun.
• Pilot gösterge ›fl›¤› söndükten sonra ütülemeye bafllayabiliriz.
SPREY UYGULAMA
• Su haznesinde yeteri kadar su oldu¤undan emin olun.
• ‹nce bir su spreyi elde etmek için sprey dü¤mesine bas›n ve ütülemeye devam edin.
NOT: ‹pe¤e sprey uygulamay›n
- 4 -
Page 6

BUHARLI ÜTÜLEME
• S›cakl›k kontrol ve ütü üzerindeki tabloda belirtildi¤i gibi, buharl› ütüleme sadece “• • ” ile
“MAX” aras›ndaki yüksek s›cakl›ktaki ütülemelerde mümkündür.
• Su haznesinde yeteri kadar su oldu¤undan emin olun.
• Ütüyü dikey konuma getirin ve fifli prize tak›n.
• S›cakl›k kontrol dü¤mesini buhar bölgesi içerisindeki istenilen bölgeye ayarlay›n.
• Gösterge pilot ›fl›¤› kapan›p tekrar yand›¤›nda ütülemeye bafllayabilirsiniz.
• Buhar kontrol dü¤mesini gereken konuma getirin.
• D‹KKAT: Buhar› asla insanlara do¤ru tutmay›n. Yanmalar ve ciddi yaralanmalar meydan
gelebilir.
GÜÇLÜ(fiOK) BUHAR
• Su haznesinde yeteri kadar su oldu¤undan emin olun.
• S›cakl›k kontrol dü¤mesi “• • ” ile “MAX” aras›nda buhar ayar›na ayarland›¤› zaman , güçlü
buhar kullan›labilir.
• fiok buhar dü¤mesine bas›n, ütü taban› güçlü buhar› spreyleyecektir.
NOT:
• Buhar dü¤mesini sadece buharl› ütü, buhar s›cakl›¤›na veya maksimum s›cakl›¤a ulaflt›¤›nda
kullan›n.
• fiok buhar dü¤mesine ayn› anda 3 kere basmay›n. En iyi buhar ç›k›fl› için buhar dü¤mesine
en az 4 saniyelik aral›klarla bas›n.
• fiok buhar özeli¤i iste¤e göre Kuru veya Buharl› ütülemede kullan›labilir.
D‹KEY fiOK BUHARLAMA
• Dikey buharlama s›cakl›k kontrol dü¤mesi “• • ” ile “MAX “ aras›nda buhar ayar›na
ayarland›¤›nda dikey buharlama kullan›labilir.
• Basitçe, ürünü dikey olarak ütülenecek kumafl›n önünde kumafldan çok az uzakl›kta
konumland›r›n ve flok buhar dü¤mesine bas›n.
Not:
• Bu özellik özellikle ask›daki giysiler, perdeler ve duvara as›l› kumafl aksesuarlar›n
ütülenmesinde kullan›fll›d›r.
OTOMAT‹K ANT‹-CALC FONKS‹YONU
• Ütünüz kireç kal›nt›lar›n› azaltmak için anti-calc kartuflu içerir. Bu ütünüzün çal›flma ömrünü
oldukça yükseltir.
• Anti-calc kartuflu su haznesinin entegre bir parças›d›r ve yenilenmesine gerek yoktur.
OTOMAT‹K DAMLAMA ÖNLEME KONKS‹YONU
• Ütünüz anti-damalama fonksiyonuna sahiptir. Ütü s›cakl›¤›n çok düflük oldu¤u zamanlarda
ütü taban›ndan d›fla do¤ru su damlamas›n› önlemek için otomatik olarak çal›flmas›n› durdurur.
NOT: Buharlama aç›kken ,buharlama birkaç saniye için durabilir. Bu normal bir durumdur.
- 5 -
Page 7

OTOMAT‹K KEND‹ KEND‹N‹ TEM‹ZLEME FONKS‹YONU
• Kendi kendini temizleme fonksiyonunu her iki haftada bir bir kere kullan›n. E¤er bölgenizdeki
su çok sert ise, kendi kendini temizleme fonksiyonu daha s›k kullan›lmal›d›r.
• Ütünün fifle tak›l› olmad›¤›ndan emin olun.
• Buhar kontrol dü¤mesini KAPALI konumuna getirin.
• Su haznesini maksimum seviyesine kadar doldurun.
• Ütünün fiflini prize tak›n.
• Maksimum ütüleme s›cakl›¤›n› seçin.
• S›cakl›k pilot ›fl›¤› kapand›¤›nda ütünün fiflini çekin
• Ütüyü tutun ,kendi kendini temizleme dü¤mesine bas›n ve tutun ve ütüyü yavaflça sallay›n.
• 5-10 saniye sonra kendi kendini temizleme dü¤mesini b›rak›n.
• E¤er ütü hala çok miktarda kal›nt› içeriyorse kendi kendini temizleme prosesini tekrarlay›n.
NOT:
• Buhar ve kaynayan su ütü taban›ndan d›flar› ç›kacak ve kal›nt›lar ve küçük parçac›klar(e¤er
var ise) d›flar› at›lacakt›r.
• Kendi kendini temizleme dü¤mesine ütülüme yaparken basmay›n ve tutmay›n.
OTOMAT‹K KAPANMA FONKS‹YONU
• E¤er ütü bir süreli¤ine hareket ettirlimezi ise otomati kapanma fonksiyonu ütüyü kapatacakt›r.
• Oto-kapama pilot ›fl›¤› ütünün oto-kapama fonksiyonu taraf›ndan kapat›ld›¤›n› göstermek
için yan›p sönmeye (veya zil çalmaya ) bafllar.
• Ütüyü tekrar ›s›tmak için:
• Ütüyü tutun ve hafifçe hareket ettirin.
• Oto-kapama pilot ›fl›¤› yan›p sönmeyi sonland›racakt›r.(veya zil çalmay› durduracakt›r.) e¤er
ütü taban›n› ›s›s› ayarlanm›fl ütü s›cakl›¤›n›n alt›na düflerse s›cakl›k pilot ›fl›¤› yanacakt›r.
• E¤er ütüyü hareket ettirdikten sonra s›cakl›k pliot ›fl›¤› yanarsa, ütülemeye bafllamak için
›fl›¤›n kapanmas›n› bekleyin.
• Otomatik Kapama fonksiyonu gerçekleflti¤inde bir ses duyabilirsiniz.
KULLANIM HATALARINA ‹L‹fiK‹N B‹LG‹LER
Cihazınızı, beyan edilen voltaj ile çal›flt›r›n›z. Bulundu¤unuz yerin voltaj›n›n uygun olup olmad›¤›n›
kontrol ediniz.
Güç kablosunun ar›zalanmas› durumunda tehlikelerin önlenmesi için kablo üretici, servis
merkezi ya da benzer bir ehliyetli kifli taraf›ndan de¤ifltirilmelidir. Ar›za durumunda cihaz›
kendiniz sökmeye kalk›flmay›n›z, bak›m merkezimiz ya da sat›fl sonras› hizmet merkezimiz ile
ba¤lant›ya geçiniz.
Cihaz› kendiniz onarmaya kalk›flmay›n›z. Meydana gelebilecek ar›zalardan firmam›z kesinlikle
sorumlu de¤ildir, ve cihaz›n›z garanti kapsam› d›fl›nda ifllem görecektir.
TAfiIMA VE NAKL‹YE ESNASINDA
• Ürünü düflürmeyiniz,
• Darbelere maruz kalmamas›na özen gösteriniz,
• S›k›flmamas›na, ezilmemesine özen gösteriniz,
• Ambalaj üzerindeki iflaretlemelere uyunuz.
• Orjinal ambalajıyla taflımaya özen gösteriniz.
- 6 -
Page 8
ÇEVRE VE ‹NSAN SA⁄LI⁄I
Çevre korumas›na siz de katk›da bulunabilirsiniz!
Lütfen yerel düzenlemelere uymay› unutmay›n: Çal›flmayan elektrikli cihazlar›, uygun
elden ç›karma merkezlerine götürün.
Kullanım sırasında insan ve çevre sa¤lı¤ına tehlikeli veya zararlı olabilecek bir durum söz
konusu de¤ildir.
BAKIM ve TEM‹ZL‹K
• Tüketicinin Kendi Yapabilece¤i Bakım, Onarım veya Ürünün Temizli¤ine ‹liflkin Bilgiler
• Temizlemeye bafllamadan önce buhar kontrol dü¤mesini “0” veya “ ” konumuna ayarlay›n,
ütüyü prizden ç›kar›n ve cihaz›n tamamiyle so¤umas›n› sa¤lay›n ve nemli bir kumafl ile temizleyin,
su veya di¤er s›v›lar içerine dald›rmay›n.
• Normal olarak su haznesini su ile çalkalay›n, temizleme iflleminden sonra su haznesini
boflalt›n.
• E¤er giysileri yüksek s›cakl›klarda ütülüyorsan›z , ki bu giysi tablosunda tavsiye edilmez,
giysileriniz üzerinde yan›klar ve cihaz›n ütü taban›nda kal›nt›lar oluflabilir. Bu kal›nt›lar› ütü
taban›ndan uzaklaflt›rmak için eski bir giysiyi ütülemeniz önerilir.
• E¤er sprey kolas› kulland›ysan›z , ütü taban›n› kal›nt›lar›n oluflmas›n› engellemek için yumuflak
nemli bir kumafl ile ara ara siliniz.
• Kullan›mdan sonra buhar kontrol dü¤mesini “0” veya “ ” konumuna a getirin , fifli prizden
ç›kar›n, kalan suyu su haznesinden uzaklaflt›r›n ve ütüyü tamam›yle so¤uduktan sonra muhafaza
etti¤iniz yere kald›r›n.
• Ütünüzün d›fl k›s›mlar›n› ve taban›n› temizlemek için asla bulafl›k süngerleri , afl›nd›r›c› veya
kimyasal temizliyiciler veya çözücüler kullanmay›n. Bunu yapmak ütü yüzeylerini çizecek ve
/veya zarar verecektir.
BAKIM VE SERV‹S
• Periyodik Bakım Gerektirmesi Durumunda, Periyodik Bakımın Yapılaca¤ı Zaman Aralıkları
ile Kimin Tarafından Yapılması Gerekti¤ine ‹liflkin Bilgiler
Cihaz periyodik bak›m gerektirmez.
Her kullan›mdan sonra temizli¤inin yap›lmas›nda fayda vard›r.
BU ÜRÜNÜN DO⁄RU ‹MHASI
Bu iflaret bu ürünün tüm AB’de di¤er evsel at›klarla birlikte at›lmamas› gerekti¤ini gösterir.
Bu ürünün kontrolsüz bir flekilde çöpe at›lmas›ndan kaynaklanmas› muhtemel çevreye veya
insan sa¤l›¤›na olan zarar› önlemek için, malzeme kaynaklar›n›n sürdürülebilir olarak yeniden
kullan›m›n› teflvik edecek biçimde sorumluca geri kazand›r›n. Kullan›lm›fl cihaz›n› geri
döndürmek için , lütfen geri edinme ve toplama sistemlerini kullan›n veya sat›n ald›¤›n›z
perakendeci ile temasa geçin. Onlar çevre aç›s›ndan güvenli geri kazan›m için bu ürünü
alabilirler.
- 7 -
Page 9

ENGLISH
SINBO SSI 2875 STEAM IRON (CERAMIC COATED SOLEPLATE)
INSTRUCTION MANUAL
FEATURES:
• Auto shut-off function
• Double ceramic coating soleplate
• Dry/Spray/Steam/Burst steam/Vertical Steam/Anti-Scale/Self clean/Anti drip
• Adjustable temperature for different fabrics.
• Continuous steam: 35g/min max.
• Burst Steam: 50g/min
• Water spray: 0.7g/time
• Capacity of water tank is 350ml.
• AC230V, 50Hz, 2200W
KNOW YOUR IRON:
A. SOLEPLATE, B. HEAT ISOLATING PLATE, C. WATER TANK, D. SPRAY NOZZLE, E. WATER
INLET COVER, F. UPPER COVER, G. STEAM CONTROL KNOB, H. SPRAY BUTTON, I. BURST
STEAM BUTTON, J. PILOT LIGHT COVER, K. UPPER COVER RUBBER, L. CORD SLEEVE, M.
BEAKER, N. TEMPERATURE CONTROL KNOB, O. REAR COVER, P. SELF-CLEAN BUTTON
WARNING
• The iron must not be left unattended while it is connected to the supply mains
• The plug must be removed from the socket-outlet before the water reservoir is filled with
water.
• The filling aperture must not be opened during use.
• The iron must be used and rested on a stable surface.
• When placing the iron on its stand, ensure that the surface on which the stand is placed is
stable.
• The iron is not to be used if it has been dropped, if there are visible signs of damage or if it
is leaking.
• If the power cord is damaged, it must be replaced by the manufacturer or its service agent
or a similarly qualified person in order to avoid a hazard.
• The appliance is not intended for use by persons (including children) with reduced physical,
sensory or mental capabilities, or lack of experience and knowledge, unless they have been
given supervision or instruction concerning use of the appliance by a person responsible for
their safety.
• Children should be supervised to ensure that do not play with the appliance.
NOTE:
• This appliance is for household use only. Use iron only for its intended use.
• Please check the voltage of the iron if it is the same with the one in you home.
• To avoid a circuit overload, do not operate another high-wattage appliance on the same circuit.
• Do not allow cord to touch hot surfaces. Let iron cool completely before putting away.
• To protect against risk of electrical shock, do not immerse the iron in water or other liquids.
• After using, turn the temperature control knob off or to “MIN”.
• Always keep the instruction manual, in case the iron is passed to a third person, please hand
over the manual together.
- 8 -
Page 10
HOW TO USE
• Remove any labels, stickers or protective foil that may be attached to the body or soleplate
of the iron before first use.
• The iron may give off some smoke and emit an odor when you first use. This will cease after
a short while. It is safe and will hot harm the performance of the iron.
FILLING WITH WATER
• Remove the mains plug from the wall socket before filling the iron.
• Set the steam button to position “0” or “ ” and open the water inlet cover.
• Please fill your iron with normal tap water before using for the first time.
• Use the water beaker attached to fill clean tap water into water tank until “MAX” filling level.
• For refilling, you can also use tap water. However, if the water is very hard it is advisable to
use distilled water.
• Replace water inlet cover and dry the spilt water around the enclosure of the appliance.
• Do not fill the tank beyond the MAX indication.
• Do not put perfume, vinegar, starch, descaling agents, ironing additives chemically descaled
water or other chemicals in the water tank.
SETTING THE TEMPERATURE
Fabric Temperature control
NYLON/ACRYLIC/ACETATE •
SILK/RAYON/POLYESTER • •
WOOL/COTTON • • •
LINEN MAX
• Stand the iron on its heel and plug the power cord into wall socket.
• Turn the iron temperature control knob until you get the desired fabric/temperature setting.
We recommend using the above table as a guide.
• The temperature pilot light will light, indicating that the soleplate is heating up.
• When the pilot light goes out, the required temperature has been reached.
• The temperature pilot light will go on from time to time during ironing.
DRY IRONING
• For dry ironing, turn the steam control knob to “0”or “ ” .This will cut off the steam flow if
water is in the water tank.
• Turn the temperature control knob to select the desired fabric/temperature setting. The
indicator pilot light will light, put the iron on the smooth and stable place vertically.
• After the indicator pilot light goes out, you can begin to iron.
SPRAYING
• Ensure there is enough water in the water tank.
• Press the spray button to produce a fine spray of water nozzle and continue ironing.
NOTE: Do not spray silk.
- 9 -
Page 11

STEAM-IRONING
• As indicated on the temperature control and the table on the iron, steam-ironing is only
possible at higher ironing temperatures (between “• •” to “MAX”).
• Ensure that there is enough water in the water tank.
• Stand the iron on its end; Insert the main plug into the wall socket.
• Set the temperature control knob at the required position within the steam area.
• After the indicator pilot light has gone out and has come on again, you may start ironing.
• Turn the steam control knob to the required position.
• ATTENTION: Never direct the steam towards people. Burns or serious injury may occur.
STRONG (BURST) STEAM
• Ensure that there is enough water in the water tank.
• When the temperature control knob is set to steam setting (between “• •” to “MAX”) strong
steam can be used.
• Press the burst steam button, the soleplate will spray out strong steam.
NOTE:
• Only use the steam push button when the steam iron has reached the steam or maximum
temperature.
• Do not press this burst steam button more than 3 times at once. For optimal steam output,
leave an interval of at least four seconds between pressing the burst steam button.
• The burst steam feature can be used with Dry or Steam ironing as desired.
VERTICAL BURST OF STEAM
• When the temperature control knob is set to a steam setting (between “• •” to “MAX”) vertical
steam can be used.
• Simply hold the iron vertically, positioned in front with a slight distance from the item to be
steamed, and press the burst steam button.
NOTE:
• This is especially useful for getting wrinkles out of hanging clothes, curtains, wall hangings
ect.
AUTOMATIC ANTI-CALC FUNCTION
• Your iron contains an anti-calc cartridge to reduce scale deposits. This considerably prolongs
the operational life of your iron.
• The anti-calc cartridge is an integral part of the water tank and dose not needs to be replaced.
AUTOMATIC ANTI-DRIP FUNCTION
• Your iron have anti-drip function. The iron automatically stops generating steam when the
temperature is too low to prevent water form dripping out of the soleplate.
NOTE:
When the steam will be on, may be stop the steam several seconds, it is normal.
- 10 -
Page 12
SELF CLEAN FUNCTION
• Use the self clean function once every two weeks. If the water in your area is very hard, the
self clean function should be used more frequently.
• Make sure the iron is unplugged.
• Set the steam control knob to OFF position.
• Fill the water tank to the maximum level.
• Put the plug in the wall socket.
• Select the maximum ironing temperature.
• Unplug the iron when the temperature pilot light has gone out.
• Hold the iron over the sink press and hold the self clean button and gently shake the iron to
and fro.
• Release the self clean button after 5-10seconds.
• Repeat the self clean process if the iron still contains a lot of impurities.
NOTE:
• Steam and boiling water will come out of the soleplate impurities and flakes(if have)will be
flushed out.
• Do not push and hold the self clean button while ironing.
AUTO-SHUT-OFF FUNCTION
• The auto-shut-off function automatically switches off the iron if it has not been moved for a
while.
• The auto-off pilot light starts flashing (or the buzzer will start beeping) to indicate that the
iron has been switched off by the auto-shut-off function.
• To let the iron heat up again:
• Pick up the iron or move it slightly.
• The auto-off pilot light stop flashing (or the buzzer will stop beeping). if the temperature of
the soleplate has dropped below the set ironing temperature, the temperature pilot light will
turn on.
• If the temperature pilot light turns on after you have moved the iron, waiting until it goes out
before you start ironing.
• If the temperature pilot light does not go on after you move the iron, the soleplate still has
the right temperature and the iron is ready for use.
• When Auto-shut-off function happens you may hear a sound.
CARE AND CLEAN
• Before cleaning, set the steam control knob to the “0” or “ ”, unplug the iron from wall
socket, and allow the appliance completely cool down, and then clean with a damp cloth, do not
immerse the unit into water or other liquids.
• Regularly rinse the water tank with water, empty the water tank after clean.
• If ironing clothes with high temperature, which is not recommended on the garment table,
will cause burns to your clothes and residue left on the soleplate of the unit, it is proposed to
iron a old cloth to remove these residue from the soleplate.
• If you use spray starch, wipe the soleplate occasionally with a soft damp cloth to prevent the
build-up of deposits.
• After use, set the steam control knob to the “0” or “ ”, disconnect the unit from main socket,
- 11 -
Page 13

empty remaining water from water tank and then store the iron after it has been completely
cooled down.
• Never use scouring pads, abrasive or chemical cleaners, or solvents to clean the exterior or
soleplate of your iron. Doing so will scratch and/or damage the surface.
CORRECT DISPOSAL OF THIS PRODUCT
This marking indicates that this product should not be disposed with other household wastes
throughout the EU. To prevent possible harm to the environment or human health from
uncontrolled waste disposal, recycle it responsibly to promote the sustainable reuse of material
resources. To return your used device, please use the return and collection systems or contact
the retailer where the product was purchased. They can take this product for environmental
safe recycling.
- 12 -
Page 14

FRANÇAIS
SINBO SSI 2875 FER À REPASSER À VAPEUR(SEMELLE EN CÉRAMIQUE)
MODE D’EMPLOI
CARACTERISTIQUES:
* Semelle en double rêvetement céramique
* Fonction Sec/ pulverisé/ vapeur / jet vapeur/vapeur verticale/anti-calc / auto-nettoyage /antigoutte/ arrêt automatique
*Température réglable pour différents tissus
*Vapeur en continu : 35 g/min max
*Spray :07.g/pulvérisation
*Capacité de réservoir d’eau :350 ml
*AC230V,50Hz, 2200W
DESCRIPTION DE L’APPAREIL
A. SEMELLE • B. COUCHE D’ISOLATION THERMIQUE • C. RÉSERVOIR D’EAU • D. SPRAY • E.
COUVERCLE DE REMPLISSAGE D’EAU • F. COUVERCLE SUPÉRIEUR • G. BOUTON DE RÉGLAGE
VAPEUR •
H. BOUTON DE PULVÉRISATION • ‹. BOUTON DE JET de VAPEUR • J. COUVERCLE DE VOYANT
LUMINEUX
K. CAOUTCHOUC DE REVÊTEMENT SUPÉRIEUR • L. PASSE-CÂBLE • M. GOBELET DE
REMPLISSAGE
N. BOUTON DE RÉGLAGE DE LA TEMPÉRATURE • O. COUVERCLE ARRIÈRE • P. BOUTON
AUTO-NETTOYAGE
AVERTISSEMENT
* Ne pas laisser l’appareil sans surveillance lorsque l’appareil est branché
* Débrancher le fer à repasser de la prise de courant avant de remplir le réservoir avec de l’eau
* Ne pas ouvrir l’orifice de remplissage pendant l’utilisation
* Le fer à repasser doit être utilisé et reposé sur une surface stable
* Lorsque le fer est remis sur son repose-fer, s’assurer que la surface qui supporte le reposefer est stable.
* N’utilisez jamais votre fer s’il est tombé ou s’il a été endommagé ou en cas de fuite.
* Si le câble d’alimentation est endommagé, il doit être remplacé par votre revendeur, son
service après-vente ou une personne de qualification similaire afin d’éviter un danger.
* Cet appareil n’est pas prévu pour être utilisé par des personnes (y compris les enfants) dont
les capacités physiques, sensorielles ou mentales sont réduites, ou des personnes dénuées
d’expérience ou de connaissance, sauf si elles ont pu bénéficier, par l’intermédiaire d’une
personne responsable de leur sécurité, d’une surveillance ou d’instructions préalables concernant
l’utilisation de l’appareil.
* Il convient de surveiller les enfants pour s’assurer qu’ils ne jouent pas avec l’appareil
REMARQUE
* Ce fer est prévu pour une utilisation domestique uniquement. N’utilisez jamais l’appareil pour
une autre fonction que celle pour laquelle il est destiné.
* Avant la première utilisation, vérifiez que la tension de votre réseau électrique correspond
bien à celle mentionnée sur la plaque signalétique de votre fer.
* Pour éviter un court-circuit, ne branchez pas un autre appareil sur la même prise électrique
- 13 -
Page 15
* Ne laissez pas la prise ou le cordon entrer en contact avec des surfaces chaudes. Laissez le
fer refroidir complètement avant de le ranger.
* Pour éviter tout risque d’électrocution, n’immergez jamais le fer dans l’eau ou tout autre
liquide.
* Lorsque vous avez fini le repassage , mettez le bouton de réglage de la température sur le
MIN ou ‘Arrêt’.
* Concervez ce mode d’emploi.Si cet appareil sera utilisé par un tiers, joindre le mode d’emploi
METTRE L’APPAREIL EN SERVICE
Avant la première utilisation, retirez toutes les étiquettes, autocollants et le film protecteur
collés sur l’appareil ou la semelle
REMPLISSAGE DU RÉSERVOIR
* Débranchez votre fer avant de le remplir
* Tournez le bouton de vapeur vers “0” ou “
* Remplissez le fer par l’eau du robinet pour le première utilisation
* En utilisant le gobelet de remplissage, mettez l’eau propre du robinet jusqu’au niveau ‘ MAX
‘ de reservoir
* Vous pouvez mettre l’eau du robinet pour les remplissages suivants mais si l’eau est trop
dure ,il est recommandé d’utiliser l’eau distilée
* Ne pas remplir le réservoir sur l’indicateur MAX
* Ne pas mettre de parfum, de vinaigre, de colle, de anti-calc, des matières additives de
repassage , d’eau non calcaire par voie chimique et d’autres produits chimiques dans le réservoir
RÉGLAGE DE LA TEMPÉRATURE
Tissus Contrôle de la Température
Synthétiques/ Acrylique/ Acétate •
Soie/Rayon/Polyester • •
Laine/Coton • • •
Lin MAX
* Posez le fer verticalement et branchez le cordon d’alimentation.
* Tournez le bouton de côntrole de la température jusqu’au réglage de la témperature de tissu
souhaité. Nous recommandons de voir le tableau ci-dessus comme guide.
* Le voyant lumineux va s’allumer pour indiquer que la semelle est en train de se réchauffer
* Il s’éteindra quand la semelle sera suffisamment chaude
* Pendant le repassage, le voyant lumineux de température s’allume et s’éteint de temps en
temps
REPASSER À SEC
* Pour le repassage à sec, tournez le bouton de contrôle de vapeur à “0” ou “
le débit de vapeur s’il existe l’eau dans le réservoir.
* Tournez le bouton de contôle de la température pour choisir le réglage de tissu/ température
souhaité. Le voyant lumineux va s’allumer. Posez le fer à la verticale sur une surface lisse et
stable.
* Commencez le repassage quand le voyant lumineux s’éteint
” et ouvrez le couvercle de remplissage d’eau.
” ,Ceci va couper
- 14 -
Page 16

LA FONCTION SPRAY
* Vérifiez s’il y a de l’eau dans le réservoir avant d’utiliser ce
bouton.
* Pour obtenir une pulvérisation fine,appuyez sur le bouton de pulvérisation et continuer à
repasser
REMARQUE
* Ne pas appliquer le spray sur la soie
LA FONCTION VAPEUR
* Comme il est indiqué au tableau sur le contrôle de la température et le fer , la fonction vapeur
est uniquement utilisable au repassage à haute température entre et “• •” -“MAX”.
* Veillez bien à ce que le réservoir contient assez d’eau.
* Posez le fer à la position verticale et branchez la fiche à la prise de courant.
* Réglez le bouton de contrôle de la température à l’emplacement souhaité dans la zone de
vapeur.
* Quand le témoin lumineux s’éteint et s’allume ,vous pouvez commencer le repassage
* Tournez le bouton de contrôle de vapeur à la position nécessaire.
* ATTENTION:Ne jamais maintenir la vapeur vers les autres. Ceci peut causer des brûlures
et des blessures graves.
VAPEUR PUISSANT ( JET DE VAPEUR)
* Veillez bien à ce que le réservoir contient assez d’eau
* Jet de vapeur peut être utilisé lorsque le bouton de contrôle de la température est réglé entre
“• •” et “MAX”
* Appuyez sur le bouton jet de vapeur, la semelle va pulvériser le jet de vapeur.
REMARQUE
* Utiliser le bouton de vapeur uniquement lorsque le fer à repasser atteint à la température
de vapeur ou à la température maximale
* Ne pas appuyer sur le bouton de jet de vapeur 3 fois en même temps.Pour obtenir le vapeur
optimal, appuyez sur le bouton de vapeur pendant au moins 4 secondes d’intervalle
* La fonction de jet de vapeur peut être utilisé au repassage à sec ou à vapeur selon le souhait.
* ATTENTION : Ne jamais maintenir le vapeur vers les autres. Cela peut causer des brûlures
et des blessures graves
JET DE VAPEUR VERTICAL
* Le vapeur vertical peut être utilisé lorsque le bouton de contrôle de la température est réglé
au réglage de vapeur entre “• •” et “MAX “
* Simplement, posez verticalement le fer un peu loin du tissu et appuyez sur le bouton de jet
de vapeur.
* ATTENTION : Ne jamais maintenir le vapeur vers les autres. Cela peut causer des brûlures
et des blessures graves
Remarque : Cette fonctionnalité est particulièrement utilisable pour repasser les vêtements
suspendus, les rideaux et les accessories en tissu suspendues sur le mur.
- 15 -
Page 17

FONCTION ANTI-CALCAIRE AUTOMATIQUE
* Votre appareil comprend la cartouche anti-calcaire pour réduire le tartre.Cette cartouche
prolonge la durée de vie de votre fer.
* La cartouche anti-calcaire est une pièce intégrante de réservoir d’eau et ne nécessite pas de
renouveler.
FONCTION ANTI-GOUTTE
* Votre fer a la fonction d’anti –goutte. Cette fonction arrête automatiquement le fonctionnement
du fer pour éviter la fuite de l’eau de la semelle vers l’exterieur lorsque la température du fer
est trop basse.
REMARQUE: La vapeur peut arrêter pendant quelques secondes lorsque la vapeur est active.Ceci
est tout à fait normale.
FONCTION AUTO-NETTOYAGE
* Faites fonctionner l’auto-nettoyage une fois par deux semaines.Si l’eau est trop dure, faites
le fonctionner plus souvent.
* Veillez bien à ce que l’appareil n’est pas branché.
* Tournez le bouton de contrôle de vapeur à la position ARRET
* Remplissez le réservoir d’eau jusqu’au niveau maximum.
* Branchez la fiche de l’appareil à la prise de courant.
* Sélectionnez la température maximum.
* Débranchez la fiche lorsque le voyant lumineux de température s’éteint.
* Tenez le fer, appuyez sur le bouton auto-nettoyage et en appuyant sur le bouton ,secouez
doucement le fer.
* Relâchez le bouton auto-nettoyage après 5-10 secondes.
* Si le fer contient encore une grande quantité de résidus, répétez le processus d’auto-nettoyage.
REMARQUE:
* La vapeur et l’eau bouillante sortent de la semelle et les résidus et les petites particules (le
cas échéant) seront éjectés.
* Ne pas appuyer et maintenir sur le bouton auto-nettoyage pendant le repassage
FONCTION ARRÊT- AUTOMATIQUE
* La fonction arrêt-automatique coupe l’alimentation si le fer reste immobile pendant un certain
temps.
* Le voyant lumineux d’arrêt-automatique clignote (ou sonne l’alarm) pour afficher que la
fonction arrêt-automatique coupe l’alimentation du fer.
* Pour rechauffer le fer :
* Maintenez le fer et bougez –le doucement
* Le voyant lumineux d’arrêt-automatique cesse de clignoter (ou cesse de sonner l’alarm).Si
la température de la semelle diminue en dessous de la température de repassage réglée, le
voyant lumineux de la température s’allume.
* Si le voyant lumineux de la température s’allume après avoir bougé le fer, attendez que le
voyant lumineux s’éteigne avant de commencer le repassage.
* Vous pouvez entendre un son lorsque la fonction d’arrêt automatique se produit.
- 16 -
Page 18
ENTRETIEN ET NETTOYAGE
* Avant de commencer le nettoyage, réglez le bouton de contrôle de vapeur à “0” ou “
débranchez l’appareil et laissez le refroidir et nettoyez avec un tissu humide. Ne pas immerger
le fer dans de l’eau ou tout autre liquide.
* Rincez le reservoir avec l’eau, videz –le après le nettoyage
* Si vous repassez les vêtements à la temperature élevée ( n’est pas recommandé au tableau
de vêtements ) ,ça peut causer aux brûlures sur les vêtements et aux traces sur la semelle de
l’appareil. Pour effacer ces traces, il est recommandé de repasser un vêtement vieux.
* Si vous avez utilisé le colle de spray , essuyez parfois la semelle de fer avec un tissu doux et
humide afin d’empêcher les traces.
* Après l’utilisation, tournez le bouton de contrôle de vapeur à “0” ou “
videz le réservoir d’eau et laissez le refroidir complètement et enfin rangez- le
* Pour nettoyer la semelle ou les parties extérieures du fer à repasser, ne jamais utiliser les
éponges à vaiselle, les nettoyants chimiques ou abrasifs ou les solvants. Cela va tracer et / ou
causer des dommages sur les surfaces du fer à repasser
ELIMINATION APPROPRIÉE DE CET APPAREIL
Ce logo apposé sur le produit signifie que cet appareil ne doit pas être éliminé par les ordures
ménagères à travers le UE. La présence de substances dangereuses dans les équipements
électriques et électroniques peut avoir des effets potentiels sur l’environnement et la santé
humaine dans le cycle de retraitement de ce produit. En tant que consommateur final, votre
rôle est primordial dans le cycle de réutilisation, de recyclage et les autres formes de valorisation
de cet équipement électrique et électronique. Des systèmes de reprise et de collecte sont mis
à votre disposition par les collectivités locales (déchetteries) et les distributeurs.
Vous avez l’obligation d’utiliser les systèmes de collecte sélective mis à votre disposition.
”, débrancez l’appareil,
”
- 17 -
Page 19

NEDERLANDS
SINBO SSI 2875 STOOMSTRIJKIJZER (STRIJKIJZERZOOL BEDEKT MET KERAMIEK)
GEBRUIKSAANWIJZING
EIGENSCHAPPEN:
* Strijkijzerzool dat bedekt is met dubbele keramieken
* Droog/Spray/Stoom/Shock Stoom/Verticale Stoom/Kalkvoorkoming/Zichzelf Schoonmaken/Anti
Druppelen/Automatische Sluitfuncties.
* Verstelbaar temperatuur voor de verschillende stoffen
* Continu stoom:35g/min max.
* Shock Stoom: 50g/min.
* Spray:07.g/spuiten
* 350 ml. Capaciteit waterreservoir
* AC230V,50Hz, 2200W
UW STRIJKIJZER KENNEN
A. STRIJKIJZERZOOL • B. WARMTEISOLATIELAAG • C. WATERRESERVOIR • D. SPRAY
E. DE KLEP VAN WATERINGANG • F. BOVENSTE KLEP • G. STOOMCONTROLEKNOP •
H. SPRAYKNOP • ‹. SHOCK STOOM KNOP • J. DE KLEP VAN PILOOTLAMP • K. ELASTIEK VAN
BOVENSTE BEDEKKING • L. CORDON OVERKLEED • M. WATERVULBEKER •
N. WARMTECONTROLEKNOP • O. ACHTERSTE KLEP • P. ZICHZELF SCHOONMAAKKNOP
WAARSCHUWING
* Als de stekker van het strijkijzer in het stopcontact zit moet het niet zonder toezicht gelaten
worden.
* De stekker van het strijkijzer moet uit het stopcontact gehaald worden voordat het waterreservoir
gevuld is met water.
* Watervulopening moet niet geopend worden gedurende het gebruik van het strijkijzer.
* Het strijkijzer moet op een vaste oppervlakte gebruikt worden en laten rusten.
* Als u het strijkijzer recht houdt moet de oppervlakte waar het strijkijzer is gelegd vast zijn.
* Als het strijkijzer is laten vallen en als het een aanwijzing heeft dat gezien kan worden omtrent
dat het beschadigd is of als het lekt moet het niet gebruikt worden.
* Als de krachtkabel beschadigd is, moet de krachtkabel vervangen worden met een nieuwe
door de producent of de service ervan of door een soortgelijke bevoegde persoon om te vermijden
van het gevaar.
* Het apparaat moet niet gebruikt worden door de personen (inclusief de kinderen) die geen
lichamelijke, emotionele en geestelijke genoegzaamheden hebben zonder toezicht of opdracht
van de persoon die verantwoordelijk is voor de veiligheid van hun.
* U moet zeker zijn van door toezicht dat de kinderen niet met het apparaat spelen.
NOTITIE
* Dit apparaat is alleen voor thuis gebruik. Gebruikt u als geschikt aan de doelstelling van het
gebruik.
* Controleert u of de voltage van het strijkijzer hetzelfde is als de voltage dat u thuis gebruikt.
* Om overdadig opgeladen worden van de elektriciteitsschakeling te voorkomen gebruikt u
geen andere apparaat met hogere kracht op dezelfde schakeling .
* Laat u de krachtsnoer niet de warme oppervlakten aanraken. Laat u het strijkijzer helemaal
afkoelen voordat u het strijkijzer opbergt.
- 18 -
Page 20

* Om de elektriciteitsopslag te voorkomen het strijkijzer niet in het water of in een andere
vloeistof bedrukken.
* Na het gebruik de warmtecontroleknop op positie “uit” of “MIN” brengen.
* De gebruiksaanwijzing altijd bewaren. Als u het strijkijzer aan een 3.persoon geeft alstublieft
ook de gebruiksaanwijzing erbij geven.
HOE WORDT HET GEBRUIKT
Voor het eerste gebruik van het strijkijzer, alle etiketten en beschermende folio’s die zijn geplakt
aan het strijkijzer zelf of aan de strijkijzerzool eruithalen.
MET WATER VULLEN
* Voordat u het strijkijzer aanvult trekt u de stekker ervan uit het stopcontact.
* De stoomknop op positie “0” of “
* Alstublieft uw strijkijzer bij het eerste gebruik aanvullen met normale kraanwater.
* Door de beker te gebruiken waarmee u ekstra water aanvult, gebruikt u schone kraanwater
tot het waterreservoir komt op aanvulniveau “MAX”.
* U kunt bij latere vullingen ook kraanwater gebruiken. Maar, als het kraanwater te hard is
wordt aangeraden om gedistilleerd water te gebruiken.
* Het reservoir niet vullen boven de wijzer MAX.
* In het waterreservoir geen parfum, azijn, cola, kalk preventie, contributiemiddelen van het
strijken, water waarbij door chemische wijze de kalk ervan is genomen en andere chemische
middelen indoen.
INSTELLEN VAN DE TEMPERATUUR
Stof Temperatuurcontrole
NYLON/ACRYLIC/ACETATE •
ZIJDE/RAYON/POLYESTER • •
WOLLEN/KATOEN • • •
LINNEN MAX
* Het strijkijzer recht houden en de krachtsnoer in het stopcontact doen
* Tot het gebracht is tot de afstelling van de temperatuur van de gewenste stof, draait u de
temperatuurcontroleknop. Wij raden u aan om de hierboven gegeven tabel als een handleiding
te gebruiken.
* De temperatuurpilootlamp zal gaan branden die vermeld dat het strijkijzerzool warm wordt
* Laat zien dat de warmte is bereikt waarbij het uitgaan van de Pilootlamp is verzocht.
* Gedurende het strijken zal de temperatuurpilootlamp af en toe aan en uitgaan.
DROOGSTRIJKEN
* Voor droogstrijken brengt u de stoomcontroleknop op positie “0” of “
waterreservoir zal de stoom de stroom verbreken.
* Om de gewenste stof-/temperatuurafstelling te kiezen draait u de temperatuurcontoleknop.
De pilot indicator lamp zal gaan branden, het strijkijzer op een gladde en vaste oppervlakte
rechtop leggen.
* U kunt beginnen met strijken nadat de piloot indicator lamp is uitgegaan.
” brengen en opent u de klep van wateringang.
”. Als er water is in dit
- 19 -
Page 21

SPRAYTOEPASSING
* U moet zeker zijn van of er voldoende water is in het waterreservoir.
* Om een dunne waterspray te kunnen verkrijgen drukt u op de sprayknop en gaat u door met
strijken.
NOTITIE
* Geen spray toepassen aan de zijde
STOOMSTRIJKEN
* Zoals er vermeld is bij de tabel van temperatuurcontrole en op het strijkijzer, is het stoomstrijken
alleen mogelijk bij hogere warmtestrijken tussen “• •” en “MAX”.
* U moet zeker zijn van of er genoeg water is in het waterreservoir.
* Het strijkijzer rechtop houden en steekt u de stekker in het stopcontact.
* De temperatuurcontroleknop afstellen op het gewenste gebied in het stoomgebied.
* U kunt beginnen met strijken als de indicator piloot lamp uitgaat en opnieuw brandt.
* De stoomcontroleknop op de noodzakelijke positie brengen.
* ATTENTIE: De stoom nooit naar de mensen toe houden. Er kunnen verbrandingen en belangrijke
gewond rakingen ontstaan.
KRACHTIGE (SHOCK) STOOM
* U moet zeker zijn van of er genoeg water is in het waterreservoir.
* Als de temperatuurcontroleknop afgesteld wordt op de stoomafstelling tussen “• • ” en “MAX”,
kan er krachtige stoom gebruikt worden.
* Drukken op de Shock stoomknop, dan zal de strijkijzerzool de krachtige stoom spreien.
NOTITIE
* U gebruikt de stoomknop alleen als het stoomstrijkijzer de stoomtemperatuur of de maximum
temperatuur heeft bereikt.
* Op de shock stoomknop gelijktijdig niet 3 keer drukken. Voor de beste stoomuitgang drukken
op de stoomknop met minimale intervallen van 4 seconden.
* Het eigenschap van shock stoom kan volgens de wens gebruikt worden bij droog- of
stoomstrijken.
* ATTENTIE: De stooom nooit naar de mensen toe houden. Er kunnen verbrandingen en
belangrijke verwond rakingen ontstaan.
VERTICALE SHOCK STOMEN
* Als de verticale stoom temperatuurcontroleknop tussen “• •” en “MAX “ afgesteld wordt op
stoomafstelling kan er verticale strijken gebruikt worden.
* Het apparaat makkelijk verticaal voor de stof die gestrijkt moet worden op een hele kleine
afstand van de stof positioneren en drukken op de shock stoomknop.
* ATTENTIE: De stooom nooit naar de mensen toe houden. Er kunnen verbrandingen en
belangrijke verwond rakingen ontstaan.
Notitie:
* Dit eigenschap is vooral bruikbaar bij het strijken van de hangende kledingen, gordijnen en
aan de muur hangende stof accessoires.
- 20 -
Page 22

AUTOMATISCHE ANTI-KALK FUNCTIE
* Uw strijkijzer bevat anti-kalk kardoes om de kalkresten te verminderen. Dit verhoogd behoorlijk
de houdbaarheid van uw produkt.
* Anti-kalk kardoes is een integratie onderdeel van het waterreservoir en u hoeft het niet te
vernieuwen.
AUTOMATISCHE FUNCTIE DAT VOORKOMT DRUPPELEN
* Uw strijkijzer heeft anti-druppel functie. Als de temperatuur van het strijkijzer heel laag is
om het druppelen van het water naar buiten van de strijkzool te voorkomen zal automatisch de
werking ervan laten stoppen.
NOTITIE: Als het stomen aan staat kan het stomen voor een paar seconden stoppen. Dit is een
normale situatie.
AUTOMATISCH ZICHZELF SCHOONMAAKFUNCTIE
* De zichzelf schoonmaakfunctie één keer in twee weken gebruiken. Als het water in het gebied
heel hard is, moet de knop van zichzelf schoonmaken nog vaker gebruikt worden.
* U moet zeker zijn van dat de stekker van het strijkijzer niet in het stopcontact zit.
* De stoomcontroleknop op de posite UIT brengen.
* Het waterreservoir vullen tot maximum niveau.
* De stekker van het strijkijzer in het stopcontact steken.
* De maximum strijktemperatuur kiezen.
* Als de temperatuur piloot lamp uitgaat trekt u de stekker van het strijkijzer uit.
* Het strijkijzer vasthouden en drukken op de zichzelf schoonmaakknop en gedrukt houden en
het strijkijzer langzaam schudden.
* Na 5-10 seconden laat u de zichzelf schoonmaakknop los.
* Als het strijkijzer nog steeds veel overblijfselen inhoudt dan zichzelf schoonmaakproces
herhalen.
NOTITIE:
* De stoom en het gekookt water zal naar buiten komen van de strijkzool en zullen de overblijfsels
en kleine stukken (als er is) eruit gegooid worden.
* Niet op de zichzelf schoonmaakknop drukken en niet gedrukt houden tijdens het strijken.
AUTOMATISCHE UIT FUNCTIE
* Als het strijkijzer voor een tijdje niet gebruikt wordt zal de automatische uit functie het strijkijzer
sluiten.
* De piloot lamp van automatisch uitdoen zal beginnen met aan en uitgaan (of te bellen) om te
laten zien dat het gesloten is door automatische uit functie.
* Om het strijkijzer opnieuw te verwarmen:
*Het strijkijzer vasthouden en langzaam laten bewegen.
*De piloot lamp van automatisch uitdoen zal het aan en uitgaan beeindigen. (of het zal bellen
laten beeindigen). Als de temperatuur van de strijkzool beneden de afgestelde strijktemperatuur
valt zal de temperatuur piloot lamp gaan branden.
* Als de temperatuur piloot lamp brandt nadat het strijkijzer beweegd, wacht u totdat de lamp
is uitgegaan om te beginnen met strijken.
* U kunt een geluid horen als de automatische uitdoen functie is verwezenlijkt.
- 21 -
Page 23

ONDERHOUD en REINIGING
* Voordat u begint met schoonmaken stelt u de stoomcontroleknop af op positie “0” of “
stekker van het strijkijzer uit het stopcontact trekken en verzorgen dat het apparaat helemaal
is verkoeld en dan met een vochtige stof schoonmaken, niet bedrukken in een water of in andere
vloeistoffen.
* Op een normale wijze het waterreservoir met water omspoelen, na de schoonmaak functie
het waterreservoir leeg maken.
* Als u de kledingen op hoge temperaturen strijkt, dit wordt niet aangeraden op de kledingtabel,
kunnen er op uw kledingen brandingen en op de strijkzool van uw apparaat overblijfsels ontstaan.
Om deze overblijfsels van de strijkzool te verwijderen wordt aangeraden een oude kleding te
strijken.
* Als u spray cola hebt gebruikt, met een zachte vochtige stof af en toe schoonmaken om het
ontstaan van de resten op de strijkzool te voorkomen.
* Na het gebruik de stoomcontroleknop op positie “0” of “
stopcontact trekken, het overgebleven water uit het waterreservoir verwijderen en het strijkijzer
op de bewaarplaats zetten nadat het helemaal is verkoeld.
* Om de buitenkant en de zool van uw strijkijzer schoon te maken nooit afwassponsen, bijtende
of chemische reinigingsmiddelen of oplossers gebruiken. Als dit gedaan wordt zal het de
oppervlakten van het strijkijzer krassen en/of beschadigen.
DEZE IS DE JUISTE VERNIETIGING VAN HET PRODUKT
Dit teken laat zien dat dit produkt in hele Europese Unie niet samen met de andere thuisresten
wordt weggegooid. Om de beschadiging van de omgeving of van de gezondheid van de mensen
te voorkomen dat mogelijk veroorzaakt is door dat dit produkt zonder controle in de prullenbak
is gegooid, de opnieuw gebruiking van de materiaalbronnen als voortzetten terug krijgen als
verantwoordelijk op aanmoedigende wijze. Om uw gebruikte apparaat terug te draaien, alstublieft
de systemen gebruiken van het terug krijgen en verzamelen of contact opnemen met de
kleinhandelaar waar u het gekocht heeft. Zij kunnen dit produkt nemen voor de veilige terug
krijging volgens de omgeving.
” brengen, de stekker uit het
”, de
- 22 -
Page 24

DEUTSCH
SINBO SSI 2875 DAMPFBÜGELEISEN (MIT KERAMIK BESCHICHTETE BÜGELSOHLE)
GEBRAUCHSANWEISUNG
MERKMALE:
• Auto Abschaltung
• Doppelkeramik beschichtete Bügelsohle
• Trocken/Spray/Dampf/Dampfshuss/vertikaler Dampf/Kalkverhütung/Selbstreinigung/AntiTropfen.
• Einstellbare Temperatur für verschiedene Stoffarten
• Konstantdampf: 35 g/min-max.
• Dampfstoß: 50 g/min.
• Spray: 0.7 g/Versprühung
• 350 ml. Wassertank
• AC230V, 50Hz, 2200W
KENNEN SIE IHR BÜGELEISEN
A. BÜGELSOHLE, B. WÄRME-ISOLATION-EBENE, C. WASSERTANK, D. SPRAY, E. WASSER-
EINFÜLL-DECKEL, F. OBERE DECKEL, G. DAMPFKONTROLLE-TASTE, H. SPRÜHTASTE, I.
DAMPF-STOß-TASTE, J. PILOT-LEUCHTE- GEHÄUSE, K. OBERE BESCHICHTUNG GUMMI, L.
KABELAUFWICKLUNG, M. WASSER-FÜLLUNG BEHÄLTER, N. TEMPERATUR-KONTROLLE
TASTE, O. RÜCKSEITE, P. SELBST-REINIGUNG-TASTE
WARNUNG
• Lassen Sie das Bügeleisen nicht unbeaufsichtigt, solange es am Netz angeschlossen ist.
• Ziehen Sie den Stecker aus der Steckdose, bevor Sie den Wassertank füllen
• Wassereinguss Öffnung darf bei der Verwendung nicht geöffnet sein.
• Das Bügeleisen muss auf eine stabile Oberfläche verwendet und gestellt werden.
• Stellen Sie sicher, dass die Oberfläche wo das Bügeleisen in einer aufrechten Position gestellt
wird, ist stabil.
• Das Bügeleisen darf nicht mehr benutzt werden, wenn es hingefallen ist, wenn es sichtbare
Beschädigungen oder Leckage aufweist.
• Wenn das Netzkabel beschädigt ist, muss es zur Vermeidung der Gefahr bei der Hersteller,
einer Dienststelle oder von einer autorisierten Person ausgetauscht werden.
• Das Gerät darf bei den Benutzern (einschl. Kinder) mit eingeschränkten physischen,
sensorischen oder psychischen Fähigkeiten (einschließlich Kinder) ohne Aufsicht von einer
verantwortlichen Person nicht verwendet werden.
• Es muss sichergestellt sein dass die Kinder nicht mit dem Gerät spielen.
HINWEISE
• Dieses Gerät ist nur für den Gebrauch im Haushalt bestimmt. Verwenden Sie in
Übereinstimmung mit dem Zweck.
• Prüfen Sie, ob die Betriebsspannung mit der örtlichen Netzspannung übereinstimmt.
• Verwenden Sie keine andere Geräte mit hohe Spannung um den Stromkreis nicht zu
überbelasten.
• Lassen Sie das Netzkabel nicht mit heißer Oberflächen in Kontakt kommen. Kühlen Sie das
Bügeleisen vollständig ab, bevor sie es aufbewahren.
- 23 -
Page 25

• Tauchen Sie das Bügeleisen niemals in Wasser oder anderen Flüssigkeiten um einen
elektrischen Schlags zu vermeiden.
• Wenn der Bügelvorgang beendet ist, stellen Sie die Temperaturkontrolle Taste auf "AUS"
oder "MIN"-Position.
• Bewahren Sie die Gebrauchsanweisung ständig und wenn Sie das Bügeleisen an andere
Personen verleihen, geben Sie die Gebrauchsanweisung mit.
DAS GERÄT BENUTZEN
Bevor Inbetriebnahme, bitte entfernen Sie alle Etiketten, Aufkleber und die Schutzfolien die auf
dem Bügeleisen oder der Bügelsohle angebracht sind.
WASSER FÜLLEN
• Bevor Sie das Bügeleisen füllen, trennen Sie bitte den Stecker aus der Steckdose ab.
• Stellen Sie die Dampf Taste auf "0" oder " " Position und öffnen Sie den Deckel der WasserEinfüllöffnung.
• Bitte füllen Sie Ihr Bügeleisen mit normalem Leitungswasser im ersten Gebrauch.
• Füllen Sie das Wassertank bis zum "MAX" Füllstand mit sauberem Leitungswasser mit der
Hilfe des Bechers.
• Sie können auch für spätere Füllungen das Leitungswasser benutzen. Jedoch, falls das
Leitungswasser zu hart ist, dann wird destilliertes Wasser empfohlen.
• Füllen Sie den Wassertank nicht über die MAX-Anzeige.
• Füllen Sie kein Parfüm, Essig, Wäschesteife, Entkalkungsmittel, Bügelzusätze oder andere
Chemikalien in den Wassertank.
EINSTELLEN DER TEMPERATUR
Stoff Temperaturregelung
NYLON/ACRYL-ACETAT •
SEIDE, VISKOSE UND POLYESTER • •
WOLLE/BAUMWOLLE • • •
FLACHS MAX
• Stellen Sie das Bügeleisen in aufrechten Position und stecken Sie das Netzkabel in die
Steckdose
• Drehen Sie die Temperaturregelungstaste bis auf die gewünschte Stoff-Temperatur-Einstellung.
Wir empfehlen, die obige Tabelle als eine Anleitung zu verwenden.
• Die Temperatur-Pilot-Leuchte wird leuchten um zu zeigen, dass die Bügelsohle erhitzt.
• Das Verlöschen der Pilot-Leuchte gibt an, dass die gewünschte Temperatur erreicht ist.
• Die Temperatur-Pilot-Leuchte wird während das Bügeln von Zeit zu Zeit blinken,.
TROCKENBÜGELN
• Für das Trockenbügeln, stellen Sie die Dampf-Stoß-Taste auf "0" oder " " Zeichen. Falls im
Wassertank noch Wasser vorhanden ist, das wird den Dampf-Stoß sperren.
• Drehen Sie die Temperatur-Kontrolle-Taste um die gewünschte Stoff/Hitze-Einstellung
auszuwählen. Die Pilot-Statusanzeige leuchtet auf; stellen Sie das Bügeleisen auf eine stabile,
ebene Fläche in einer aufrechter Position.
• Nachdem löschen der Pilot-Anzeigeleuchte, können Sie mit dem Bügeln anfangen.
- 24 -
Page 26

SPRAY-ANWENDUNG
• Stellen Sie sicher, dass es genügend Wasser im Wassertank vorhanden ist.
• Um einen feinen Wasser-Spray zu erhalten, drücken Sie auf die Spray-Taste und bügeln Sie
weiter.
HINWEIS: Wenden Sie kein Spray an die Seide.
DAMPFBÜGELN
• Wie in der Temperatur-Kontrolle und Tabelle auf dem Bügeleisen bestimmt ist, das Dampfbügeln
ist nur in einer Hochtemperatur zwischen "• •" und "MAX" möglich.
• Stellen Sie sicher, dass es genügend Wasser im Wassertank vorhanden ist.
• Stellen Sie das Bügeleisen in der aufrechten Position und stecken Sie den Stecker in die
Steckdose.
• Stellen Sie Temperatur-Kontrolle-Taste auf die gewünschte Dampfzone.
• Nachdem löschen und wieder leuchten der Pilot-Anzeigeleuchte, können Sie mit dem Bügeln
anfangen.
• Stellen Sie Dampf-Kontrolle-Taste auf die gewünschte Position.
• Achtung: Richten Sie den Dampfstoß niemals auf Personen! Das könnte Verbrennungen
und schweren Verletzungen verursachen.
DAMPFSTOSS
• Stellen Sie sicher, genügend Wasser im Wassertank vorhanden ist.
• Wenn die Temperatur-Kontrolle-Taste auf eine Position zwischen "• •" und "MAX" eingestellt
ist, Dampfstoß kann verwendet werden.
• Drücken Sie Dampfstoß-Taste, die Bügelsohle wird eine starke Dampf-Spray erzeugen.
HINWEIS
• Benutzen Sie die Dampftaste nur wenn das Dampfbügeleisen die Dampf-Temperatur bzw.
die maximale Temperatur erreicht hat.
• Drücken Sie die Dampftaste nicht 3 mal in einer gleichen Zeit. Für die beste Dampfleistung,
drücken Sie die Dampftaste mit Intervallen von mindestens 4-Sekunden.
• Dampfstoß kann beim Trocken-, oder Dampfbügeln verwendet werden.
VERTIKALE DAMPFSTOSS
• Wenn die Temperatur-Kontrolle-Taste auf eine Position zwischen "• • " und "MAX" eingestellt
ist, vertikaler Dampfstoß kann verwendet werden.
• Halten Sie einfach das Produkt vertikal eng vor dem Stoff zu bügeln, und drücken Sie auf die
Dampfstoß-Taste.
HINWEIS:
• Diese Funktion ist vor allem für aufgehängte Kleidungen, Vorhänge und Gewebe an der Wand
nützlich.
AUTOMATISCHE ANTI-KALK-FUNKTION
• Ihr Bügeleisen enthält eine Anti-Kalk-Kartusche um die Kalkspuren zu reduzieren. Dies
verlängert die Funktionstüchtigkeit Ihres Bügeleisens wesentlich.
• Anti- Kalk-Kartusche ist einer integrierten Teil des Wassertanks und benötigt keine Erneuerung.
- 25 -
Page 27

AUTOMATISCHE TROPFEN- EINDÄMMUNG- FUNKTION
• Ihr Bügeleisen hat eine Anti-Tropfen-Funktion. Bei niedrigere Temperaturen stoppt das
Bügeleisen automatisch um Wassertropfen von der Bügelsohle nach außen zu verhindern.
HINWEIS:
Während die Dämpfung, der Dampf kann für ein paar Sekunden stoppen. Dies ist üblich.
AUTOMATISCHE SELBST-REINIGUNG-FUNKTION
• Wenden Sie die Selbstreinigungsfunktion einmal alle zwei Wochen an. Wenn Ihre lokale
Wasser sehr hart ist, sollte Selbstreinigungsfunktion häufiger verwendet werden.
• Vergewissern Sie sich, dass das Bügeleisen nicht angeschlossen ist.
• Stellen Sie die Dampf-Kontrolle-Taste auf AUS Position.
• Füllen Sie den Wassertank bis zum maximalen Punkt.
• Stecken Sie den Netzstecker des Bügeleisens in die Steckdose ein.
• Wählen Sie die maximale Bügel-Temperatur.
• Wenn die Temperatur-Pilot-Leuchte auslöscht, trennen Sie den Stecker aus der Steckdose
ab.
• Halten Sie das Bügeleisen; drücken und halten Sie auf die Selbstreinigungstaste und schütteln
Sie das Bügeleisen sanft.
• Nach 5 bis 10 Sekunden, lassen Sie die Selbstreinigungstaste los.
• Wenn das Bügeleisen noch viele Rückstände hat, wiederholen Sie Selbstreinigungsprozess.
HINWEIS:
• Dampf und kochendes Wasser wird aus der Bügelsohle heraustreten und die Rückstände und
kleine Partikeln werden (sofern vorhanden) ausgeworfen.
• Drücken Sie die Selbstreinigungstaste nicht während des Bügeln und halten Sie nicht gedrückt.
AUTOMATISCHE STROMABSCHALTUNG
• Wenn das Bügeleisen für eine Weile nicht bewegt ist, wird die automatische
Abschaltungsfunktion das Bügeleisen ausschalten.
• Auto-Abschaltung Pilot-Leuchte blinkt oder (es klingelt) um zu zeigen dass das Bügeleisen
durch die Auto-Abschaltungsfunktion ausgeschaltet ist.
• Um das Bügeleisen wieder zu heizen:
• Halten und bewegen das Bügeleisen.
• Auto-Abschaltung Pilot-Leuchte hört auf zu blinken (oder Klingeln wird stoppen). Wenn die
Temperatur der Bügelsohle ist unter der eingestellten Temperatur, die Temperatur PilotLeuchte leuchtet.
• Wenn nach der Bewegung des Bügeleisens die Temperatur Pilot-Leuchte leuchtet, warten
Sie bis Diese löscht um mit dem Bügeln anzufangen.
• Wenn die Auto-Abschaltung eintritt, kann man einen Ton hören.
WARTUNG und REINIGUNG
• Bevor Sie mit der Reinigung beginnen, stellen Sie die Dampf-Kontrolle-Taste auf "0" oder
"
", trennen Sie das Bügeleisen aus der Steckdose ab und kühlen Sie das Gerät ab und reinigen
Sie mit einem feuchten Tuch; tauchen sie nicht ins Wasser oder in anderen Flüssigkeiten.
• Spülen Sie den Wassertank mit normalem Wasser, leeren Sie den Wassertank nach der
Reinigung.
- 26 -
Page 28

• Wenn Sie die Kleidung bei hohen Temperaturen bügeln, obwohl das in der Kleidungtabelle
nicht empfohlen ist, dass diese, Brände auf Ihre Kleidungen und Rückstände auf der Bügelsohle
können auftreten. Es wird empfohlen eine alte Kleidung zu bügeln um diese Rückstände von
der Bügelsohle zu entfernen.
• Wenn Sie Spraystärke verwendet haben, reinigen Sie die Bügelsohle mit einem weichen,
feuchten Tuch um das Entstehen der Rückstände zu verhindern.
• Nach der Verwendung, stellen Sie die Dampf-Kontrolle-Taste auf "0" oder " ", trennen Sie
das Bügeleisen aus der Steckdose ab und kühlen Sie das Gerät ab und entleeren Sie das
verbleibende Wasser aus dem Wassertank und räumen Sie das Bügeleisen auf nach dem es
völlig abgekühlt ist.
• Verwenden Sie niemals Abwasch-Schwämme, abrasive oder chemische Reinigungsmittel
oder Lösungsmittel um die äußeren Teile und Bügelsohle zu reinigen. Das wird die Oberflächen
des Bügeleisens einkratzen und/oder beschädigen.
DIE KORREKTE ENTSORGUNG DIESES PRODUKTS
Dieses Zeichen weist darauf hin dass dieses Produkt sollte in aller EU-Ländern nicht zusammen
mit anderen Hausmüll entsorgt werden. Bringen Sie es zum Recycling zu einer offiziellen
Sammelstelle, so dass die nachhaltige Wiederverwendung von Ressourcen gefördert ist. Auf
diese Weise helfen Sie, die Umwelt und menschliche Gesundheit zu schonen. Bitte verwenden
Sie die Recycling und Sammelstellen oder kontaktieren Sie mit dem Einzelhändler, wo Sie es
gekauft haben, um das Gerät zurückzugeben. Sie können dieses Produkt für umweltfreundliche
Recycling zurücknehmen.
- 27 -
Page 29

ESPANOL
SINBO SSI 2875 PLANCHA VAPOR CON DOBLE RECUBRIMIENTO CERÁMICO
MANUAL DE USO
CARACTERÍSTICAS:
* Base con doble recubrimiento cerámico
* Funciones: Seco/Pulverización/Vapor/Vapor a presión /Vapor en Vertical/Antical /Autolimpieza
/Anti-Goteo/Autoapagado.
* Temperatura ajustable para diferentes tipos de tejidos
* Vapor continuo:35grs/min. máx.
* Vapor a presión: 50grs./min.
* Pulverización: 0.7 grs/pulverización
* Capacidad del depósito del agua: 350 mls.
* AC230V,50Hz, 2200W
CONOZCA SU PLANCHA DE ROPA
A. BASE DE LA PLANCHA, B. PLACA DE AISLAMIENTO DEL CALOR, C. DEPÓSITO DEL AGUA,
D. SALIDA DEL VAPOR PULVERIZADO, E. TAPA DE LA ENTRADA DEL DEPÓSITO DEL AGUA
F. TAPA SUPERIOR, G. BOTÓN PARA EL CONTROL DEL VAPOR, H. BOTÓN PARA VAPOR
PULVERIZADO, ‹. BOTÓN PARA VAPOR A PRESIÓN, J. PILOTO DE LUZ, K. MANGO RECUBIERTO
DE GOMA, L. CABLE, M. VASO PARA LLENAR EL DEPÓSITO DEL AGUA, N. BOTÓN PARA EL
CONTROL DE LA TEMPERATURA, O. TAPA POSTERIOR, P. BOTÓN PARA LA AUTOLIMPIEZA
AVISO
* No deje desatendida la plancha mientrás esté enchufada a la toma eléctrica.
* Debe desenchufar la plancha antes de llenar el depósito de agua.
* No abra la tapa del depósito del agua mientras esté usando la plancha.
* La plancha debe de usarse y dejarse sobre una superficie lisa y estable.
* Al colocar la plancha en su soporte, asegúrese de que éste está sobre una superficie lisa y
estable.
* La plancha no se debe de utilizar si ha sufrido una caída, si tiene una avería visible o si gotea.
* Si el cable suministrado está dañado debe ser reemplazado por el fabricante, un agente de
servicio autorizado o un técnico cualificado para así evitar cualquier riesgo.
* Este aparato no está diseñado para ser utilizado por personas (incluidos niños) con discapacidad
física, sensorial o mental, o sin experiencia, a menos que sean supervisados o les haya dado
instrucciones de uso una persona responsable de su seguridad.
* Los niños deben ser supervisados para asegurarse de que no juegan con el aparato eléctrico.
NOTA
* Este aparato es dolo para uso doméstico. No utilice este producto excepto para aquello para
lo que ha sido diseñado..
* Por favor compruebe que la potencia de la plancha es la misma que la instalada en su hogar.
* Para evitar un sobrecalentamiento, no conecte ningún otro aparato de elevada potencia en
el mismo circuito eléctrico.
* Evite que el cable entre en contacto con superficies calientes. Deje que la plancha se enfríe
completamente antes de guardarla.
* Para evitar una descarga eléctrica no sumerja la plancha en agua ni en ningún otro líquido.
* Ajustar el botón de control de la temperatura en “apagado” o “MÍN” después de usarla.
- 28 -
Page 30

* Conserve el manual de uso. En caso de entregar la plancha a una tercera persona entregar
el manual de uso también.
¿CÓMO UTILIZAR LA PLANCHA?
* Antes de empezar a utilizar la plancha, quite cualquier etiqueta o capa de protección que
pueda haber en la base de la plancha o en cualquier parte de ella.
* Es posible que cuando la encienda por primera vez salga un poco de humo o incluso huela
un poco. Después de un momento parará. Es seguro y no afectará el funcionamiento de la
plancha.
LLENAR CON AGUA
* Desenchufe la plancha antes de llenarla con agua.
* Ajuste el botón del vapor en la posición de “0”o “ ” y abra la tapa de entrada del depósito
del agua.
* Por favor llene su plancha con agua normal del grifo en su primer uso.
* Utilice el vaso de agua suministrado en la caja y llénelo con agua del grifo y llene el depósito
del agua hasta que alcance al nivel “MÁX”.
* Puede usar también agua del grifo cuando tenga que volver a llenar el depósito, pero en caso
de que el agua sea dura se recomienda usar agua destilada.
* Tape la entrada del depósito del agua y seque el agua que se haya derramado.
* No llene el depósito más allá del indicador de MÁX.
* No ponga perfume, vinagre, almidón, anti-cal, sustancias aditivas para planchar, agua
químicamente destilada ni otras sustancias químicas en el depósito del agua.
AJUSTE DE LA TEMPERATURA
Tejido Control de la Temperatura
NYLON/ACRÍLICO/ACETATO •
SEDA/RAYÓN/POLIESTER • •
LANA/ALGODÓN • • •
LINO MÁX
* Poner la plancha en posición vertical y enchufar el cable a la toma de corriente.
* Girar el botón de control de la temperatura de la plancha hasta ajustarlo a la temperatura
deseada según el tejido a planchar. Le recomendamos que use como guía la tabla de arriba.
* El piloto de luz de la temperatura se encenderá indicando que la base se está catentándo.
* Cuando el piloto de la luz se apague indicará que se ha alcanzado la temperatura deseada.
* El piloto de luz de la temperatura se encenderá y apagará de vez en cuando durante el
planchado.
PLANCHADO EN SECO
* Para planchar en seco, ajustar el botón de control del vapor a “0” ó “ ”. Esto cortará la salida
del vapor en caso de que haya agua en el depósito del agua.
* Girar el botón de control de la temperatura de la plancha hasta ajustarlo a la temperatura
deseada según el tejido a planchar. El piloto de luz se encenderá, ponga la plancha verticalmente
sobre una superficie lisa y estable.
* Después de apagarse la luz del piloto puede empezar a planchar.
- 29 -
Page 31

APLICACIÓN DE LA PULVERIZACIÓN
* Asegúrese de que hay suficiente agua en el depósito de agua.
* Pulse el botón de pulverización para obtener una suave pulverización de agua y continue
planchando.
NOTA
* No aplicar pulverización sobre la seda.
PLANCHADO CON VAPOR
* Es posible planchar con vapor solamente con temperaturas altas (entre “• •” y “MAX”) como
es epresado en la tabla sobre la plancha de ropa y el control de la temperatura.
* Asegúrese de que hay suficiente agua en el depósito de agua
* Ponga la plancha en posición vertical y enchúfela a la toma de corriente.
* Ajuste el botón de control de la temperatura en la posición deseada dentro del área del vapor.
* Puede empezar a planchar una vez el piloto indicador de luz se haya apagado y encendido
otra vez.
* Ajuste el botón de control del vapor a la posición deseada.
* Atención: Nunca encare el vapor hacia las personas. Podrían quemarse o herirse seriamente.
PLANCHADO CON VAPOR A PRESIÓN
* Asegúrese de que hay suficiente agua en el depósito de agua.
* Se puede usar la función de planchado con vapor a presión cuando haya seleccionadao la
posición de vapor entre “• •” y “máx”.
* Pulse el botón de vapor a presión, el vapor saldrá a presión por la base de la plancha.
NOTA
* Usar el botón para el vapor la plancha del vapor al alcanzar a la temperatura máxima o la
temperatura del vapor.
* No puslar al botón para el vazpor de shock a la vez tres veces. Pulsar al botón para el vapor
con intervalos de cuatro segundos mínimo para la mejor salida de vapor.
* La característica del vapor de shock se puede usar cuando se plancha con vapor o seco según
su deseo.
* OJO: Nunca dirigirse el vapor hacia las personas. Se pueden ocurrir sufrimientos de las
heridas en serio y quemas.
VAPORIZACIÓN VERTICAL A PRESIÓN
* Se puede usar la vaporización vertical al ajustar el botón del control de la temperatura en la
posición de entre “• •” y “MÁX”.
* Simplemente sujete la plancha verticalmente a cierta distancia de la prenda a planchar y
pulse el botón de vapor a presión.
* OJO: Nunca encare el vapor hacia las personas. Podrían quemarse o herirse seriamente.
NOTA:
* Esta función es muy útil particularmente para planchar prendas que están colgadas, como
cortinas y acesorios de tela colgados en la pared.
- 30 -
Page 32

FUNCIÓN AUTOMÁTICA DE ANTI-CAL
* Su plancha contiene un cartucho de anti-cal para disminuir los residuos de cal. Ésto ayuda
a que el funcionamiento de su plancha se prolongue durante más tiempo.
* El cartucho de Anti-cal es una pieza integrada en el depósito de agua y no necesita ser
renovado.
FUNCIÓN AUTOMÁTICA DE ANTI-GOTEO
* Su plancha tiene una función de anti-goteo. La plancha dejará de sacar vapor cuando la
temperatura sea demasiado baja, de esta manera evitará que la base de la plancha gotee.
NOTA:
Aunque se haya seleccionado la función de vapor, puede que el vapor pare de salir unos
segundos, es normal.
FUNCIÓN DE AUTOLIMPIEZA
* Use la función de autolimpieza una vez cada dos semanas. En caso de que el agua de su zona
sea muy dura, se aconseja usar esta función con más frecuencia.
* Asegúrese de que la plancha no está enchufada a la toma eléctrica.
* Ajuste el botón de control del vapor en la posición de APAGADO (Off).
* Llene el depósito de agua hasta el nivel máximo.
* Enchufe la plancha a la toma eléctrica.
* Seleccione la temperatura máxima.
* Desenchufe la plancha cuando el piloto de luz de la temperatura se haya apagado.
* Sujete la plancha sobre una pila, pusle sin parar el botón de autolimpieza y mueva la plancha
ligeramente.
* Suelte el botón de autolimpieza después de 5-10 segundos.
* Repita este proceso si la plancha continúa teniendo muchas impurezas.
NOTA:
* Saldrá vapor y agua muy caliente por la base de la plancha, también impurezas en caso de
haberlas.
* No pulse el botón de autolimpieza durante el proceso de planchado.
FUNCIÓN DE APAGADO AUTOMÁTICO
* La función de autoapagado se activará apagando la plancha si ésta no ha sido utilizada durante
un tiempo.
* El piloto de la luz de la función de autoapagado empezará a parpadear ( o un timbre empezará
a sonar ) cuando la plancha se apague a través de la función de atuoapagado.
* Para que la plancha se caliente otra vez:
*Coja la plancha o muévala ligeramente.
*El piloto de luz de la función de autoapagado parará de parpadear (o el timbre parará de sonar).
Si la temperatura de la base de la placha ha descendido por debajo de la temperatura seleccionada
anteriormente, el piloto de luz de la temperatura se encenderá.
*Si el piloto de luz de la temperatura se enciende después de mover la plancha, espere a que
se apague antes de empezar a planchar.
* Si el piloto de luz de la temperatura no se enciende después de mover la plancha, la base de
- 31 -
Page 33

la plancha aún tiene la temperatura seleccionada anteriormente y la plancha está lista para
usar.
* Puede que oiga un sonido cuando se active la función de autoapagado.
MANTENIMIENTO Y LIMPIEZA
* Antes de empezar su limpieza, ajuste el botón de control del vapor en la posición “0” o “ ”.
Desenchufe la plancha de la toma de corriente y deje que la plancha se enfríe completamente.
Entonces límpiela con una tela húmeda. No sumerja la plancha en agua ni en ningún otro
líquido.
* Aclare el depósito de agua periódicamente con agua normal, y vacie el tanque de agua después
de su limpieza.
* Si plancha prendas con una temperatura no recomendada en la tabla anterior puede que
queme el tejido, dejando restos del quemado en la base de la plancha. En este caso se recomienda
limpiar la base planchando un trozo de tela para poder quitar estos restos.
* Si usa almidón, limpie la base de la plancha de vez en cuando con una tela húmeda para evitar
que se acumulen residuos ella.
* Después de su uso ajuste el botón de control del vapor en la posición de “0” o “ ”. Desenchufe
la plancha de la toma eléctrica, vacie el agua restante del depósito de agua y guarde la plancha
después de que se haya enfriado completamente.
* Nunca use estropajos, limpiadores abrasivos, sustancias químicas ni disolventes para limpiar
la parte exterior y base de la plancha. Si lo hace dañará y/o rallará la superficie.
ELIMINACIÓN CORRECTA DE ESTE PRODUCTO
Este signo significa que este producto no se debe tirar junto con los residuos domésticos de
acuerdo a la UE. Con el objeto de evitar posibles daños a la salud pública y al medioambiente
por deshechos de residuos incontrolados, recicle de forma responsable para promover la
reutilización de recursos sostenibles. Cuando vaya a tirar este producto, llévelo a la tienda
donde lo compró. Ellos podrán recoger este producto para reciclarlo teniendo en cuenta la
seguridad medioambiental.
- 32 -
Page 34

- 33 -
Page 35

- 34 -
Page 36

- 35 -
Page 37

- 36 -
Page 38

- 37 -
Page 39

No: 1-2875-14062013
- 38 -
Page 40

- 39 -
Page 41

- 40 -
Page 42

- 41 -
Page 43

- 42 -
Page 44

- 43 -
Page 45

1-2875-14062013
- 44 -
Page 46

- 45 -
Page 47

HRVATSKI
SINBO SSI 2875 PARNO GLAˇCALO(KERAMIˇCKA PODNICA)
UPUTSTVO ZA UPORABU
KARAKTERISTIKE:
• Funkcija Automatskog Zaustavljanja
• Podnica za glaˇcanje sa dvoslojnom keramiˇckom navlakom
• Suho/Sprej/Para/Ekstra para/Okomita para/Funkcija protiv kamenca/Funkcija samoˇciˇs´cenja/Funkcija protiv kapanja
• Podesiva temperatura za razne vrste tkanina
• Konstantna para: 35g/min max.
• Ekstra para: 50g/min.
• Sprej: 0.7g/prskanje
• Kapacitet spremnika za vodu 350 ml.
• AC230V,50Hz, 2200W
OPIS GLAˇCALA
A. PODNICA GLAˇCALA, B. TOPLOTNI IZOLACIJSKI SLOJ, C. SPREMNIK ZA VODU, D. SPREJ
E. POKLOPAC ULAZA ZA VODU, F. GORNJI POKLOPAC, G. GUMB ZA KONTROLU PARE, H. GUMB
ZA SPREJ, I. GUMB ZA EKSTRA PARU, J. POKLOPAC PILOT LAMPICE, K. GORNJA GUMENA
NAVLAKA, L. NAVLAKA ZA KABEL, M. POSUDA ZA VODU, N. GUMB ZA KONTROLU TEMPERATURE
O. STRAˇZNJI POKLOPAC, P. GUMB ZA SAMO-ˇCIˇS´CENJE
UPOZORENJE
• Glaˇcalo ukljuˇceno u izvor za napajanje ne ostavljajte bez nadzora.
• Prije usipanja vode u spremnik za vodu izvucite utikaˇc iz utiˇcnice.
• Otvor za punjenje vode ne treba otvarati tijekom uporabe glaˇcala.
• Glaˇcalo rabite i odlaˇzite na ravnu i stabilnu povrˇsinu.
• Kada glaˇcalo stavljate u okomit poloˇzaj uvjerite se da je povrˇsina na koju spuˇstate glaˇcalo
stabilna.
• Ne rabite glaˇcalo koje je palo na pod i glaˇcalo na kom postoje vidna oˇste´cenja ili curenje.
• Za izbjegavanje svake vrste opasnosti oˇste´ceni kabel za napajanje treba da zamjeni proizvod¯aˇc
ili ovlaˇsteni servisni centar.
• Glaˇcalo ne treba da rabe osobe s fiziˇckim, psihiˇckim i mentalnim oˇste´cenjem (ukljuˇcuju´ci i
djecu) bez nadzora osobe koja moˇze snositi odgovornost za sigurnu uporabu ured¯aja.
• Uvjerite se da se glaˇcalo nalazi na sigurnom mjestu i da nije dostupno djeci. Zabranite djeci
da se igraju s glaˇcalom.
NAPUTAK
• Ovaj ured¯aj je namjenjen samo za ku´cansku uporabu. Rabite samo u tu svrhu.
• Provjerite da li napon glaˇcala odgovara naponu u vaˇsem domu.
• Za izbjegavanje preoptere´cenosti strujnog kola, glaˇcalo ne ukljuˇcujte na utiˇcnicu na koju su
ve´c ukljuˇceni neki visoko-naponski elektriˇcni ured¯aji.
• Zaˇstitite kabel od kontakta s vru´cim povrˇsinama. Prije odlaganja saˇcekajte da se glaˇcalo u
potpunosti ohladi.
• Za izbjegavanje strujnog udara glaˇcalo ne uranjajte u vodu ili neke druge teku´cine.
• Nakon uporabe glaˇcala gumb za regulaciju temperature podesite u poziciju “iskljuˇceno” ili
“MIN”.
- 46 -
Page 48

• Uputstvo za uporabu saˇcuvajte i za budu´ce potrebe. Ukoliko glaˇcalo predajete nekoj 3.osobi
molimo vas da joj obavezno date i ovo uputstvo za uporabu.
NAˇCIN RUKOVANJA
Prije prve uporabe glaˇcala uklonite sve naljepnice sa glaˇcala i zaˇstitnu foliju sa podnice ili
glaˇcala.
PUNJENJE VODE
• Prije usipanja vode u glaˇcalo izvucite utikaˇc iz utiˇcnice.
• Gumb za paru podesite u poziciju “0” ili “ ”i otvorite poklopac otvora za ulaz vode.
• Molimo vas da kod prve uporabe glaˇcala koristite normalnu vodu iz vodovoda.
• Za sipanje vode u glaˇcalo koristite posudu za vodu i spremnik za vodu napunite ˇcistom vodom
iz vodovoda do oznake za “MAX”oznaku.
• I kasnije moˇzete koristiti vodu iz vodovoda. Med¯utim ukoliko je voda iz vaˇseg vodovoda mnogo
tvrda preporuˇcujemo vam uporabu destilirane vode.
• Vodu nikada ne sipajte iznad oznake za MAX razinu vode.
• U spremnik za vodu ne sipajte parfem, ocat, ˇstirku, sredstvo za kamenac, pomo´cna sredstva
za glaˇcanje, vodu oˇciˇs´cenju kemijskim putem od kamenca i druge kemikalije.
PODEˇSAVANJE TEMPERATURE
Tkanina Kontrola temperature
NAJLON/AKRIL/ACETAT •
SVILA/RAJON/POLIESTER • •
VUNA/PAMUK • • •
LAN MAX
• Glaˇcalo postavite u okomit poloˇzaj i kabel za napajanje umetnite u utiˇcnicu.
• Gumb za kontrolu temperature podesite u ˇzeljenu poziciju prema tkanini koju ˇzelite glaˇcati.
Preporuˇcujemo vam da gornju tabelu koristite kao vodiˇc za to.
• Dok se glaˇcalo zagrijava do ˇzeljene temperature bi´ce upaljena pilot lampica.
• Kada se pilot lampica iskljuˇci znaˇci da je glaˇcalo postiglo ˇzeljenu temperaturu.
• Tijekom glaˇcanja pilot lampica ´ce se povremeno paliti i gasiti.
SUHO GLAˇCANJE
• Za suho glaˇcanje gumb za paru podesite u poziciju “0” ili “ ”. Na taj naˇcin ´cete prekinuti
ispust pare iz glaˇcala iako se u spremniku nalazi voda.
• Gumb za kontrolu temperature podesite u ˇzeljenu poziciju prema tkanini koju ˇzelite glaˇcati.
Upali´ce se pilot lampica. Glaˇcalo postavite na ravnu i stabilnu povrˇsinu u okomit poloˇzaj.
• Kada se pilot lampica ugasi moˇzete poˇceti sa glaˇcanjem.
KORIˇSTENJE SPREJA
• Uvjerite se da se u spremniku za vodu nalazi dovoljna koliˇcina vode.
• Pritisnite na gumb za sprej i nastavite sa glaˇcanjem.
NAPUTAK: Sprej ne koristite za svilu.
- 47 -
Page 49

PARNO GLAˇCANJE
• Kao ˇsto je navedeno na gumbu za kontrolu temperature i u tabeli za glaˇcanje, parno glaˇcanje
je mogu´ce vrˇsiti samo na visokim temperaturama izmed¯u “• • ” i “MAX”.
• Uvjerite se da se u spremniku za vodu nalazi dovoljna koliˇcina vode.
• Glaˇcalo postavite u okomit poloˇzaj i umetnite utikaˇc u utiˇcnicu.
• Gumb za kontrolu temperature podesite na temperaturu koja odgovara glaˇcanju na paru.
• Kada se pilot lampica ugasi i ponovno upali moˇzete poˇceti sa glaˇcanjem.
• Gumb za kontrolu pare podesite u odgovaraju´cu poziciju.
• POZOR: Paru nipoˇsto ne usmjeravajte prema ljudima. To je opasno i moˇze uzrokovati opekline
i ozbiljne ozljede na koˇzi.
SNAˇZNA(EKSTRA) PARA
• Uvjerite se da se u spremniku za vodu nalazi dovoljna koliˇcina vode.
• Gumb za kontrolu temperature podesite u poziciju izmed¯u oznaka “• •” i “MAX” , tada moˇzete
koristiti funkciju za ekstra paru.
• Pritisnite na gumb za ekstra paru, iz podnice ´ce iza´ci snaˇzna para.
NAPUTAK:
• Gumb za paru rabite samo kod parnog glaˇcanja, ispusta ekstra pare ili kada postignete
maksimalnu temperaturu.
• Gumb za ekstra paru ne pritiskajte istovremeno viˇse od 3 puta. Za najbolji izlaz pare na gumb
za paru pritisnite u razmacima od 4 sekunde.
• Ekstra paru moˇzete koristiti po ˇzelji za Suho i Parno glaˇcanje.
• POZOR: Paru nipoˇsto ne usmjeravajte prema ljudima. Moˇze do´ci do opeklina i ozbiljnih
ozljeda koˇze.
OKOMITA EKSTRA PARA
• Okomitu ekstra paru moˇzete koristiti kada je gumb za kontrolu temperature podeˇsen na
temperaturu izmed¯u postavki “• •” i “MAX “.
• Glaˇcalo drˇzite u okomitom poloˇzaju u blizini odje´ce koju ˇzelite glaˇcati i pritisnite na gumb za
ekstra paru.
• POZOR: Paru nipoˇsto ne usmjeravajte prema ljudima. Moˇze do´ci do opeklina i ozbiljnih
ozljeda koˇze.
Naputak:
• Ova funkcija je korisna za glaˇcanje odje´ce na vjeˇsalici, stora i ukrasnih tkanina okaˇcenih na
zidu.
AUTOMATSKA FUNKCIJA PROTIV KAMENCA
• Za smanjenje naslaga od kamenca unutar glaˇcala nalazi se anti-calc uloˇzak. Zahvaljuju´ci ovoj
funkciji produˇzava se izdrˇzljivost glaˇcala.
• Anti-calc uloˇzak je sastavni dio glaˇcala koji se nalazi unutar spremnika za vodu i nema potrebe
za njegovom zamjenom.
AUTOMATSKA FUNKCIJA PROTIV KAPANJA
• Glaˇcalo posjeduje funkciju protiv kapanja. Kada je temperatura glaˇcala jako niska da ne bi
doˇslo do kapanja vode iz podnice ova funkcija automatski sprijeˇcava kapanje.
- 48 -
Page 50

NAPUTAK:
Kada je gumb za paru otvoren ispust pare moˇze biti zaustavljen na nekoliko sekundi. To je
normalno stanje.
FUNKCIJA AUTOMATSKOG SAMO-ˇCIˇS´CENJA
• Funkciju samo-ˇciˇs´cenja koristite jedanput u dva tjedna. Ako je voda u oblasti u kojoj ˇzivite jako
tvrda u tom sluˇcaju ovu funkciju koristite ˇceˇs´ce.
• Uvjerite se da glaˇcalo nije ukljuˇceno u izvor za napajanje.
• Gumb za kontrolu pare podesite u poziciju ISKLJUˇCENO.
• Spremnik za vodu napunite do oznake za maksimalnu razinu vode.
• Umetnite utikaˇc u utiˇcnicu.
• Odaberite postavku za maksimalno.
• Kada se ugasi pilot lampica izvucite utikaˇc iz utiˇcnice.
• Drˇzite glaˇcalo, pritisnite na gumb za samo-ˇciˇs´cenje i drˇzite pritisnuto. Glaˇcalo lagano protresite
lijevo-desno.
• Nakon 5-10 sekundi odpustite gumb za samo-ˇciˇs´cenje.
• Ako u vaˇsem glaˇcalu joˇs uvijek ima velikih naslaga kamenca ponovite funkciju samo-ˇciˇs´cenja.
NAPUTAK:
• Para i kljuˇcala voda ´ce iza´ci vani a skupa sa njima i naslage i mali komadi kamenca(ako ih
ima).
• Gumb za samo-ˇciˇs´cenje ne pritiskajte tijekom glaˇcanja.
FUNKCIJA AUTOMATSKOG ISKLJUˇCENJA
• Ako glaˇcalo niste rabili izvjesno vrijeme funkcija za automatsko iskljuˇcenje ´ce iskljuˇciti glaˇcalo.
• Pilot lampica automatskog-iskljuˇcenja poˇce´ce da treperi (ili zvoni).
• Za ponovno zagrijavanje glaˇcala:
• Uzmite glaˇcalo i lagano ga prodrmajte.
• Pilot lampica za automatsko-iskljuˇcenje ´ce prestati da treperi( ili zvoni). Ako se temperaura
podnice glaˇcala smanji ispod podeˇsene temperature upali´ce se pilot lampica za temperaturu.
• Ako nakon pomjeranja glaˇcala pilot lampica za temperaturu bude gorjela saˇcekajte da se ona
ugasi i onda poˇcnite s glaˇcanjem.
• Kod aktiviranja funkcije automatskog iskljuˇcenja moˇzete ˇcuti glas.
ˇCIˇS´
CENJE i ODRˇZAVANJE
• Prije poˇcetka ˇciˇs´cenja gumb za kontrolu pare podesite u poziciju “0” ili “ ”, iskljuˇcite glaˇcalo
iz utiˇcnice i saˇcekajte da se u potpunosti ohladi. Oˇcistite vlaˇznom krpom. Ne uranjajte u vodu
ili neke druge teku´cine.
• Spremnik za vodu isperite vodom a nakon ˇciˇs´cenja ispraznite svu vodu iz glaˇcala.
• Ako vaˇsu odje´cu glaˇcate na visokoj temperaturi, mada to nije preporuˇceno u tabeli za glaˇcanje
tkanina, moˇze do´ci do gorenja odje´ce i pojave mrlja na podnici glaˇcala. Za uklanjanje naslaga
sa podnice glaˇcala preporuˇcujemo vam da poˇcnete sa glaˇcanjem neke stare odje´ce koju ne
nosite.
• Ako ste koristili ˇskrob za tkaninu podnicu povremeno ˇcistite vlaˇznom krpom kako ne bi doˇslo
do formiranja naslaga na njoj.
• Nakon uporabe gumb za kontrolu pare podesite u poziciju “0” ili “ ”, izvucite utikaˇc iz utiˇcnice,
- 49 -
Page 51

ispraznite ostatak vode iz spremnika i prije odlaganja glaˇcala saˇcekajte da se u potpunosti
ohladi.
• Za ˇciˇs´cenje vanjske povrˇsine glaˇcala i podnice nipoˇsto ne rabite spuˇzvu za sud¯e, abrazivna i
kemijska sredstva za ˇciˇs´cenje ili otapala. U suprotnom ´ce do´ci do oˇste´cenja povrˇsine glaˇcala.
PRAVILNO ZBRINJAVANJE OVOG PROIZVODA
Simbol prekriˇzene kante oznaˇcava da ovaj proizvod ne treba zbrinjavati skupa sa ostalim
ku´canskim otpadom na nivou cijele EU. Za sprijeˇcavanje mogu´ceg nanoˇsenja ˇstete okoliˇsu i
zdravlju ljudi zbog nekontroliranog zbrinjavanja ovog proizvoda, molimo vas da postupite na
odgovoran naˇcin kako biste omogu´cili recikliranje ovog proizvoda i iskoriˇstavanje njegovih
dijelova u druge svrhe. Za recikliranje dotrajalih ured¯aja molimo vas da stare elektriˇcne i
elektronske ured¯aje predate u sabirne centre ili stupite u kontakst s prodavcem . Oni mogu
uzeti dotrajale proizvode i omogu´citi njihovo sigurno recikliranje.
- 50 -
Page 52

SINBO SSI 2875
- 51 -
Page 53

- 52 -
Page 54

- 53 -
Page 55

- 54 -
Page 56

- 55 -
Page 57

- GARANT‹ fiARTLARI -
1) Garanti süresi,mal›n teslim tarihinden itibaren bafllar ve 2 y›ld›r.
2) Mal›n bütün parçalar› dahil olmak üzere tamam› Firmam›z›n garanti kapsam›ndad›r.
3) Mal›n garanti süresi içerisinde ar›zalanmas› durumunda, tamirde geçen süre garanti
süresine eklenir. Mal›n tamir süresi, 20 iflgününü geçemez. Bu süre mala iliflkin ar›zan›n
servis istasyonuna, servis istasyonunun olmamas› durumunda, mal›n sat›c›s›, bayii,
acentesi, temsilcili¤i, ithalatç›s› veya imalatç›s›-üreticisinden birine bildirim tarihinden
itibaren bafllar. Tüketicinin ar›za bildirimini; telefon, faks, e-posta, iadeli taahhütlü mektup
veya benzeri bir yolla yapmas› mümkündür. Ancak, uyuflmazl›k halinde ispat yükümlülü¤ü
tüketiciye aittir. Mal›n ar›zas›n›n 10 ifl günü içerisinde giderilememesi halinde, imalatç›üretici veya ithalatç›; mal›n tamiri tamamlan›ncaya kadar, benzer özelliklere sahip baflka
bir mal› tüketicinin kullan›m›na tahsis etmek zorundad›r.
4) Mal›n garanti süresi içerisinde gerek malzeme ve iflçilik, gerekse montaj hatalar›ndan
dolay› ar›zalanmas› halinde, iflçilik masraf›, de¤ifltirilen parça bedeli ya da baflka herhangi
bir ad alt›nda hiçbir ücret talep etmeksizin tamiri yap›lacakt›r.
5) Tüketicinin onar›m hakk›n› kullanmas›na ra¤men mal›n;
• Tüketiciye teslim edildi¤i tarihten itibaren, garanti süresi içinde kalmak kayd›yla, bir y›l
içerisinde en az dört defa veya imalatç›-üretici ve/veya ithalatç› taraf›ndan belirlenen
garanti süresi içerisinde alt› defa ar›zalanmas›n›n yan› s›ra, bu ar›zalar›n maldan
yararlanamamay› sürekli k›lmas›,
• Tamiri için gereken azami süresinin afl›lmas› ,
• Firman›n servis istasyonunun, servis istasyonunun mevcut olmamas› halinde s›rayla
sat›c›s›, bayii, acentesi temsilcili¤i ithalatç›s› veya imalatç›-üreticisinden birisinin
düzenleyece¤i raporla ar›zan›n tamirini mümkün bulunmad›¤›n›n belirlenmesi, durumlar›nda
tüketici mal›n ücretsiz de¤ifltirilmesini, bedel iadesi veya ay›p oranda bedel indirimi talep
edebilir.
6 ) Mal›n kullanma k›lavuzunda yer alan hususlara ayk›r› kullan›lmas›ndan kaynaklanan
ar›zalar garanti kapsam› d›fl›ndad›r.
7 ) Garanti Belgesi ile ilgili olarak ç›kabilecek sorunlar için Gümrük ve Ticaret Bakanl›¤›
Tüketicinin Korunmas› ve Piyasa Gözetimi Genel Müdürlü¤ü’ne baflvurabilir.
‹THALATÇI F‹RMA
DE‹MA ELEKTROMEKAN‹K ÜRÜNLER ‹NfiAAT SPOR MALZEMELER‹ ‹MALAT SAN. VE T‹C. A.fi.
Cihangir Mh. Güvercin Cd. No:4 Haramidere Mevkii Avcılar - ‹stanbul - Türkiye
Ça¤rı Merkezi: 444 66 86
www.sinbo.com.tr - info@sinbo.com.tr
- 56 -
Page 58

- SSI 2875 ÜTÜ -
- GARANT‹ BELGES‹ -
Garanti Belge No : 97032
SSHY Belge No : 35274
‹THALATÇI F‹RMA
Ünvanı : DE‹MA ELEKTROMEKAN‹K ÜRÜNLER‹ ‹Nfi. SPOR MALZ.
‹MALAT SAN. ve T‹C. A.fi.
Adresi : Cihangir Mah. Güvercin Cad. No:4 Haramidere Mevkii
Avc›lar / ‹STANBUL
Tel. : Ça¤rı Merkezi: 444 66 86
Yetkili Kifli :
Yönetim Kurulu Baflkan›
Ürünün Cinsi : ÜTÜ
Markası : S‹NBO
Modeli : SSI 2875
Alt Modeli : Bandrol ve Seri No :
Teslim Tarihi ve Yeri :
Garanti Süresi : 2 Yıldır
Azami Tamir Süresi : 20 ‹fl Günü
Kullanım Ömrü : Bakanl›kça belirlenen ve ilan edilen kullan›m ömrü 10 y›ld›r.
(Ürünün fonksiyonlar›n› yerine getirebilmesi için gereken yedek parça temin süresi)
SATICI F‹RMA
Ünvanı :
Adresi :
Tel.Fax :
Fatura Tarihi ve No :
Teslim Tarihi ve Yeri :
‹mza ve Kafle :
Bu bölüm, ürünü sat›n ald›¤›n›z Yetkili Sat›c› taraf›ndan imzalanacak ve kaflelenecektir.
Bu belgenin kullan›lmas›na; 4077 say›l› Tüketicinin Korunması Hakkında Kanun ve bu Kanun’a dayan›larak yürürlü¤e konulan Garanti Belgesi
Uygulama Esaslar›na Dair Yönetmelik uyar›nca, TC Gümrük ve Ticaret Bakanlı¤ı, Tüketicinin Korunması ve Piyasa Gözetimi Genel Müdürlü¤ü
tarafından izin verilmifltir.
Garanti Belge Onay Tarihi : 04/02/2011
Garanti Belge Vize Tarihi : 14/01/2013
SSHY Belge Onay Tarihi : 04/04/2012
- 57 -
Page 59

MÜfiTER‹ H‹ZMETLER‹
De¤erli Müflterimiz,
En uygun fiyata en iyi ürünü vermenin yan› s›ra; en iyi hizmeti vermenin de
önemli oldu¤una inan›yoruz. Bu nedenle siz bilinçli tüketicilere daha yak›n
olabilmek için, internet adresimizdeki eriflim formlar›n›n yan› s›ra, tüketici
dan›flma hattımızı da hizmetinize açm›fl durumday›z.
TÜKET‹C‹
DANIfiMA HATTI
444 66 86
Tüketici Dan›flma Hattımızı,
- Hafta içi her gün 08.00-18.00 saatleri aras›nda arayabilir; istek, öneri ve
flikayetlerinizi firmam›za iletebilirsiniz.
Tüketicinin Dikkatine:
Ürünlerimizle ilgili hizmetleri tam olarak alabilmek için afla¤›daki önerilere
uyman›z› rica ederiz:
1. Ürünü ald›¤›n›zda Garanti Belgesini mutlaka yetkili sat›c›n›za onaylatt›r›n›z.
2. Ürünü kullanma k›lavuzunda belirtilen hususlara göre kullan›n›z.
3. Ürününüzle ilgili hizmet talebiniz oldu¤unda yukar›daki telefon
numaralar›ndan, Tüketici Danıflma Hattına baflvurunuz.
4. Ürünü promosyon arac›l›¤› ile edinmiflseniz, ürüne ait garanti belgesini en
yak›n yetkili servisimize giderek onaylatt›r›n›z.
5. Teknik servisteki ifliniz bitti¤inde "Yetkili Servis Hizmet Fifli" almay›
unutmay›n›z. Alaca¤›n›z bu Hizmet Fifli, ileride ürününüzde meydana
gelebilecek herhangi bir sorunda size yarar sa¤layacakt›r.
www.sinbo.com.tr
0800 211 50 21
KAPIDAN KAPIYA
ÜCRETS‹Z
SERV‹S
Kap›dan Kap›ya Ücretsiz Servis Kampanyam›z dâhilinde Yurtiçi Kargo Firmas› ile iflbirli¤i içerindeyiz. Tüketicimiz
taraf›ndan sat›n al›nan ürünün fiyat› ne olursa olsun, Tüketicimiz ürün ile ilgili garanti kapsam›na giren herhangi
bir problem yaflad›¤›nda, 444 66 86 numaral› Tüketici Danıflma Hattımızı aramas› ve kay›t b›rakmas› yeterlidir.
Bu süreçten sonra Tüketicimizin ürünü ücretsiz olarak Yurtiçi Kargo taraf›ndan Tüketicimizin bulundu¤u adresten
al›n›p, 7* ifl günü içerisinde ürün çal›fl›r bir vaziyette, yine Tüketicimize Yurtiçi Kargo arac›l›¤› ile adresine teslim
edilmektedir. 7 ifl günü içerisinde sorunu çözülemeyen ürünler ise, yenisi ve/veya bir üst modeli ile de¤ifltirilmektedir.
Tüm bu süreçte Tüketicilerimizden hiçbir ücret talep edilmemektedir.
(*Ürünün servis garanti süresi, Yurtiçi Kargo ürünü Sinbo Fabrikas›’na teslim ettikten sonra bafllar.)
- 58 -
7 GÜNDE
TESL‹MAT
GARANT‹S‹
(*)
Page 60

- TEDAR‹KÇ‹ F‹RMA / EXPORTER United Favour Development Limited
Unit B, 10/F Lee May Building 788-790
Nathan Road, Mongkok, Kowloon, HK.
- UYGUNLUK BEYANI / CE Intertek Testing Services Hangzhou
16 No.1, Ave., Xiasha Economic Dev.
District, Hangzhou, China
EEE Yönetmeli¤ine uygundur.
AEEE Yönetmeli¤ine uygundur.
Made in P.R.C.
‹mal Y›l› : 2013
 Loading...