

Page 1
STEAM IRON
INSTRUCTION MANUAL
SSI 2871 ÜTÜ
KULLANMA KILAVUZU
TR
EN
FR
NL
DE
ES
RU
UA
HR
AR
Page 2
- 1 -
Page 3

TÜRKÇE
De¤erli Müflterimiz,
Ürün seçiminde S‹NBO'yu tercih etti¤iniz için teflekkür ederiz.
Uzun ve verimli bir kullan›m için cihaz› kullanmadan önce bu k›lavuzu özellikle güvenlik
talimatlar›na dikkat ederek okuman›z› ve devaml› suretle saklaman›z› tavsiye ederiz.
Sayg›lar›m›zla
Sinbo Küçük Ev Aletleri
Cihazla oynamamalarını güvenceye almak için çocuklar gözetim altında tutulmalıdır.
Bu ürün (çocuklar dahil ) fiziksel hassasiyeti az, zihinsel olarak yetersiz, deneyimsiz ve yeterli bilgiye
sahip olmadan yada kendilerinin güvenli¤inden sorumlu olan kifliler tarafından bu ürünü kullanmak
için gerekli talimatlar verilmemifl kiflilerin kullanımına uygun de¤ildir.
Isıl kesicinin istenmeden bafllangıç konumuna gelmesinden kaynaklanan bir tehlikeyi önlemek için,
bu cihaz bir zamanlayıcı gibi dıfl bir anahtarlama düzeni üzerinden beslenmeli veya yardımcı program
vasıtasıyla düzenli olarak devresi kapatılan ve açılan bir devreye ba.lanmalıdır.
Sıcakken veya so¤ukken ütü ve kordonu 8 yaflından küçük çocukların ulaflamayaca¤ı bir yerde
bulundurulmalıdır.
Children being supervised not to play with the appliance.
This appliance is not intended for use by persons (including children) with reduced physical,sensory
or mental capabilities, or lack of experience and knowledge, unless they havebeen given supervision
or instruction concerning use of the appliances by a personresponsible for their safety. Children
should be supervised to ensure that they do not play with the appliance.
Heat caused by the arrival of the cutter accidentally starting position to avoid a hazard, such as a
timer, this device
is fed via an external switching scheme on a regular basis or by means of the utility opened and closed,
and a circuit connected to the circuit
Hot or cold iron and cords should be out of reach of children under 8 years.
- 2 -
Page 4

SINBO SSI 2871 BUHARLI ÜTÜ
KULLANIM KILAVUZU
Cihaz›n›z› kullanmadan önce lütfen bu talimatlar› sonuna kadar okuyunuz ve resmi iyice inceleyiniz.
BAfiLICA TEKN‹K PARAMETRELER
AC230V, 50Hz, 2000W
• Sürekli buhar ç›k›fl›: 25g/min
• Buhar püskürtme: 50g/min
• Püskürtme hacmi:10g/zaman
1. ÖZELL‹KLER‹ VE YAPISI
Ürünün s›cakl›k ayar›, spreyleme, kuru ütüleme, de¤iflken buhar, flok buhar vb. gibi birçok fonksiyonu
vard›r; fl›k d›fl görünüm, yüksek ›s›tma verimi, kolay kullan›m, güçlü k›r›fl›k giderme, emek ve zaman
tasarrufu sa¤lama gibi özelliklere sahiptir.
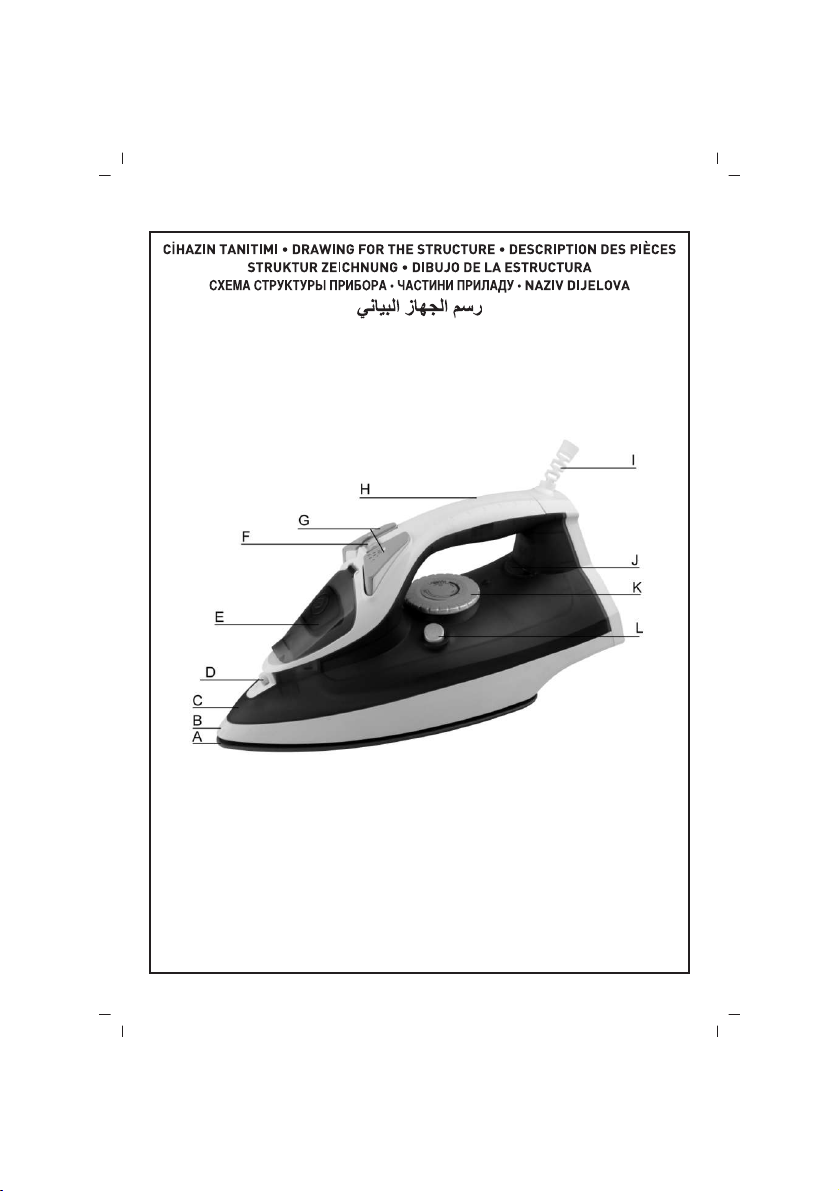
A. Taban, B. Etek, C. Su haznesi, D. Püskürtme deli¤i, E. Su doldurma kapa¤›, F. Buhar dü¤mesi,
G. Püskürtme & fiok buhar dü¤mesi, H. Tutma sap›, I. Kablo k›l›f›, J. Gösterge ›fl›¤›, K. S›cakl›k ayar›
dü¤mesi, L. Kendi kendini temizleme dü¤mesi
GÜVENL‹K UYARILARI
• Bakım, Onarım ve Kullanımda Uyulması Gereken Kurallar
Elektrikli cihazlar› kullan›rken afla¤›da bahsedilen temel güvenlik önlemlerine daima uyulmal›d›r:
BÜTÜN TAL‹MATLARI OKUYUNUZ
• Ütü fifle tak›l›yken kullan›c› ütünün yan›ndan ayr›lmamal›d›r..
• Su haznesini doldurmadan önce cihaz›n›z›n elektrik kablosunun fiflini prizden çekiniz.
• Ütü dengeli bir ütü masas› üzerinde kullan›lmal›d›r.
• Ütü dengeli bir yüzey üzerinde kulan›lmal› ve b›rak›lmal›d›r.
• Ütüyü bir yüzey üzerine koyarken yüzeyin dengeli oldu¤undan emin olunuz.
• Güç kablosunun ar›zalanmas› durumunda tehlikelerin önlenmesi için kablo üretici, servis yetkilisi ya
da benzer bir ehliyetli kifli taraf›ndan de¤ifltirilmelidir.
• Ütü yere düfltü¤ü takdirde ya da gözle görülür bir hasar ya da s›z›nt› olmas› durumunda kesinlikle
kullan›lmamal›d›r. Kullan›lmadan önce ütünün üretici veya yetkili servise gönderilmesi gerekir..
• Bu cihaz, cihazlar›n kullan›lmas›nda güvenlik aç›s›ndan sorumluluk üstlenebilecek bir kiflinin gözetimi
ve yönlendirmesi olmadan fiziksel, duyusal ya da zihinsel engeli olan kifliler (çocuklar dahil), bu konuda
bilgi ya da deneyim sahibi olmayan kifliler taraf›ndan kullan›lmamal›d›r.
• Çocuklar›n cihazla oynamas›na engel olmak için yeterli gözetim yap›lmal›d›r.
• Bu cihaz buhar üretti¤i için kullan›m s›ras›nda çok dikkatli olunmal›d›r.
• S›cak yüzeylere dokunmay›n›z. Sadece tutacak ve dü¤meleri kullan›n›z.
• Elektrik floku riskine karfl› kabloyu, fifli veya cihazlar› suya veya di¤er s›v›lara sokmay›n›z.
• Cihaz çocuklar taraf›ndan veya yanlar›nda kullan›rken yak›n gözetim gerekmektedir.
• Kullan›lmad›¤› zamanlarda veya temizleme iflleminden önce cihaz›n fiflini prizden ç›kar›n›z. Yerine
kald›rmadan önce cihaz›n›z›n so¤umas›n› bekleyiniz.
• Kordonu ya da fifli hasar gören veya ar›zalanan, düflen ya da baflka bir flekilde zarar gören hiçbir cihaz›
çal›flt›rmay›n›z. Böyle durumlarda kontrol edilmesi, onar›m› veya ayarlar›n›n yap›lmas› için cihaz›n›z›
en yak›n yetkili servise götürünüz.
• Cihaz›n üreticisi taraf›ndan tavsiye edilmeyen aksesuar ve parçalar›n kullan›lmas› yaralanmalara
sebebiyet verebilir.
• Cihaz›n›z› aç›khava ortamlar›nda kullanmay›n›z.
- 3 -
Page 5

• Kordonun, masan›n veya tezgah›n kenarlar›na tak›lmamas›na, ya da s›cak yüzeylere temas etmemesine
dikkat ediniz.
• Cihaz›n›z› s›cak gaz veya elektrikli ocaklar›n›n veya ›s›t›c›lar›n üzerine ya da yak›n›na koymay›n›z.
• Ba¤lant›y› kesmek için fifli prizden ç›kar›n›z. Ütüyü kald›rmadan önce iyice so¤umas›n› bekleyiniz.
• Ütünüzü yerine kald›r›rken kordonunu gevflekçe ütünün etraf›na sar›n›z
• S›cak metal parçalar, s›cak su ya da buharla temas yan›klara neden olabilir. Ütüyü ters çevirirken
dikkatli olunuz - haznesinde s›cak su kalm›fl olabilir.
• E¤er mutlaka bir uzatma kablosu kullan›lmas› gerekiyorsa 10 amperlik bir kablo kullan›lmal›d›r.
• Cihaz›n›z› tasarlanan kullan›m amac› d›fl›nda baflka hiçbir amaçla kullanmay›n›z. Bu cihaz sadece
evsel kullan›m içindir.
C‹HAZIN KULLANIMI
• Ba¤lantı veya Montajın Nasıl Yapılaca¤ını Gösterir fiema ile Ba¤lantı veya Montajın Kimin Tarafından
Yapılaca¤ına (tüketici, yetkili servis) iliflkin bilgiler
‹LK KULLANIMDAN ÖNCE YAPILMASI GEREKENLER
• Ütünün baz› k›s›mlar› ya¤ ile kaplanm›fl olabilece¤inden ütü ilk kez çal›flt›r›ld›¤›nda bir miktar duman
ç›kabilir. K›sa bir süre sonra bu durum ortadan kalkacakt›r.
• Cihaz› kullanmaya bafllamadan önce taban plakas› üzerinde bulunan etiketi ya da koruyucu tabakay›
sökünüz ve yumuflak bir bez yard›m›yla taban› siliniz.
• Taban›n›n pürüzsüz olmas›n› sa¤lay›n›z: metal cisimlere sürtünmesine izin vermeyiniz (ör: ütü
masas›n›n tutaca¤›, dü¤meler, fermuarlar)
• Saf yün kumafllar (%100 yün) buharl› yöntemle ütülenebilir. Buhar ayar dü¤mesinin konumunu
de¤ifltirerek ütüyü buhars›z olarak da kullanabilirsiniz, yünlü kumafllar› kumafl›n üzerine bir bez koyarak
ütülemeniz tavsiye edilir.
SICAKLIK AYARI
• Ütülenecek kumafl›n etiketinde bulunan ütüleme talimat›na bak›n›z (etikette bir ütü resmiyle gösterilir.
Ütü resminin üzerindeki noktalar›n say›s› do¤ru s›cakl›¤› belirtmektedir. S›cakl›k ayar dü¤mesi ve
afla¤›daki tabloda bulunan bilgileri dikkate al›n›z). Bu ütüleme talimat›n› mutlaka dikkate al›n›z.
• Ütüleme talimat› yoksa ve kumafl›n türünü bilmiyorsan›z afla¤›daki bilgileri uygulay›n›z. Tablo yaln›zca
kumafl›n malzemesine yöneliktir ve kumafl üzerine uygulanm›fl parlatmalar›, ifllemeleri vb. dikkate
almaz.
• Üzerinde iflleme, pile, cila bulunan kumafllar için en ideal yöntem düflük s›cakl›kla ütülemektir.
• ‹lk olarak, kumafllar› ütüleme s›cakl›klar›na göre ay›r›n›z: Yünlüleri ayr›, pamuklular› ayr› ütüleyiniz.
Ütünün ›s›nmas› so¤umas›ndan daha h›zl› gerçekleflir. Bu nedenle ilk olarak sentetik lifli kumafllar gibi
en düflük s›cakl›k gerektiren kumafllar› ütüleyiniz. Daha sonra daha yüksek s›cakl›k gerektiren kumafllara
geçiniz.
• S›cakl›k ayar dü¤mesini iflaretli k›s›m ilgili seçene¤e gelecek flekilde çeviriniz.
Kumafl S›cakl›k Kontrolü Etiket üzerindeki talimat
MIN Sentetikler Düflük s›cakl›k Mutlaka dikkate al›nmal›d›r
• ‹pek Normal s›cakl›k Mutlaka dikkate al›nmal›d›r
•• Yün Normal s›cakl›k Mutlaka dikkate al›nmal›d›r
••• Pamuk Normal & yüksek s›cakl›k Mutlaka dikkate al›nmal›d›r
MAX Keten Yüksek s›cakl›k Mutlaka dikkate al›nmal›d›r
SU DOLDURMA
• Fifli prizden ç›kar›n›z.
- 4 -
Page 6

• Su haznesine doldurma deli¤inden su doldurunuz.
• Su çok kireçliyse yaln›zca dam›t›lm›fl ya da demineralize su kullanman›z tavsiye edilir. Kimyasal olarak
kireçten ar›nd›r›lm›fl su kullanmay›n›z.
• Ütüyü kulland›ktan sonra içinde kalan suyu boflalt›n›z.
Fonksiyonlar›n Aç›klamas›
Kuru Ütüleme:
Buhar kontrol dü¤mesini minimum konumuna getirip s›cakl›k ayar› dü¤mesiyle uygun s›cakl›¤›
ayarlad›¤›n›zda kuru ütüleme yapabilirsiniz
Püskürtme:
Püskürtme dü¤mesine bast›¤›n›zda püskürtme deli¤inden buhar püskürtülür. Bu ifllem s›ras›nda su
tank›n›n içinde yeterli miktarda su bulundu¤undan emin olunuz.
Buharl› Ütüleme:
1. Buharl› ütüleme fonksiyonunu kullanmak için buhar kontrol dü¤mesini minimum ve s›cakl›k ayar
dü¤mesini “…” veya “max” konumlar›na getiriniz.
2. Gösterge ›fl›¤› sönünce buhar ayar dü¤mesini uygun konuma getirdi¤inizde buhar püskürtülmeye
bafllar bu aflamada ütüleme ifllemine geçebilirsiniz.
fiok Buharla Ütüleme:
Ütü taban›ndan flok buhar püskürtülmesi için s›cakl›k ayar dü¤mesini “…” veya “max” konumuna
getirdikten sonra flok buhar dü¤mesine bas›n›z.
Kendi Kendini Temizleme:
• Ütü düzenli olarak kullan›l›yorsa taban›n›n temizlenmesini sa¤layan kendi kendini temizleme ifllemi
y›lda iki kez uygulanmal›d›r..
Yap›lmas› gerekenler:
1. Su haznesini suyla doldurup ütünün fiflini prize tak›n›z;
2. S›cakl›¤› “MAX” seviyesine ayarlay›n›z ve kendi kendini temizleme dü¤mesine yaklafl›k 1 dakika
boyunca bas›n›z;
3. Tabanda kalan suyu kurutmak için ütüyü prize tak›l› tutunuz.
4. Kendi kendini temizleme ifllemini akan sular› toplamak için bir lavabo üzerinde gerçeklefltiriniz. Aksi
takdirde s›cak su üzerinize s›çrayabilir.
Damlama önleme fonksiyonu:
Bu ütü damlama önleme özelli¤iyle donat›lm›flt›r: S›cakl›k çok düflük oldu¤unda ütü buhar özelli¤ini
otomatik olarak durdurarak tabandan su damlamas›n› engeller.
KULLANIM HATALARINA ‹L‹fiK‹N B‹LG‹LER
Cihazınızı, beyan edilen voltaj ile çal›flt›r›n›z. Bulundu¤unuz yerin voltaj›n›n uygun olup olmad›¤›n› kontrol
ediniz.
Güç kablosunun ar›zalanmas› durumunda tehlikelerin önlenmesi için kablo üretici, servis merkezi ya
da benzer bir ehliyetli kifli taraf›ndan de¤ifltirilmelidir. Ar›za durumunda cihaz› kendiniz sökmeye
kalk›flmay›n›z, bak›m merkezimiz ya da sat›fl sonras› hizmet merkezimiz ile ba¤lant›ya geçiniz.
Cihaz› kendiniz onarmaya kalk›flmay›n›z. Meydana gelebilecek ar›zalardan firmam›z kesinlikle sorumlu
de¤ildir, ve cihaz›n›z garanti kapsam› d›fl›nda ifllem görecektir.
- 5 -
Page 7

TAfiIMA VE NAKL‹YE ESNASINDA
• Ürünü düflürmeyiniz,
• Darbelere maruz kalmamas›na özen gösteriniz,
• S›k›flmamas›na, ezilmemesine özen gösteriniz,
• Ambalaj üzerindeki iflaretlemelere uyunuz.
• Orjinal ambalajıyla taflımaya özen gösteriniz.
ÇEVRE VE ‹NSAN SA⁄LI⁄I
Çevre korumas›na siz de katk›da bulunabilirsiniz!
Lütfen yerel düzenlemelere uymay› unutmay›n: Çal›flmayan elektrikli cihazlar›, uygun
elden ç›karma merkezlerine götürün.
Kullanım sırasında insan ve çevre sa¤lı¤ına tehlikeli veya zararlı olabilecek bir durum söz konusu
de¤ildir.
BAKIM ve TEM‹ZL‹K
• Tüketicinin Kendi Yapabilece¤i Bakım, Onarım veya Ürünün Temizli¤ine ‹liflkin Bilgiler
1. Temizlik ifllemine bafllamadan önce ütünüzün fiflini prizden çekiniz. Ütünüz iyice so¤uduktan sonra
temizli¤ini yapabilirsiniz.
2. Taban› yumuflak ve ›slak bir bezle düzgünce siliniz bu ifllem s›ras›nda taban›n herhangi bir metal
yüzeyle temas etmemesine özen gösteriniz.
3. Bir kürdan yard›m›yla püskürtme deli¤inde biriken kireç tortular›n› temizleyiniz.
4. Su haznesinin içini s›kl›kla y›kay›n›z. Önce hazneyi suyla doldurunuz ve ütüyü sallay›n›z, sonra
haznedeki suyu su doldurma deli¤inden d›flar› boflalt›n›z.
5. Üründe hasara veya renk de¤iflimine neden olabilece¤inden güçlü asit ve alkali kimyasallar
kullanmay›n›z.
6. Her kullan›mdan sonra su haznesi içinde kalan suyu boflalt›n›z ve ütünüzü dik pozisyonda muhafaza
ediniz..
BAKIM VE SERV‹S
• Periyodik Bakım Gerektirmesi Durumunda, Periyodik Bakımın Yapılaca¤ı Zaman Aralıkları ile Kimin
Tarafından Yapılması Gerekti¤ine ‹liflkin Bilgiler
Cihaz periyodik bak›m gerektirmez.
Her kullan›mdan sonra temizli¤inin yap›lmas›nda fayda vard›r.
BU ÜRÜNÜN DO⁄RU ‹MHASI
Bu iflaret bu ürünün tüm AB’de di¤er evsel at›klarla birlikte at›lmamas› gerekti¤ini gösterir. Bu ürünün
kontrolsüz bir flekilde çöpe at›lmas›ndan kaynaklanmas› muhtemel çevreye veya insan sa¤l›¤›na olan
zarar› önlemek için, malzeme kaynaklar›n›n sürdürülebilir olarak yeniden kullan›m›n› teflvik edecek
biçimde sorumluca geri kazand›r›n. Kullan›lm›fl cihaz›n› geri döndürmek için , lütfen geri edinme ve
toplama sistemlerini kullan›n veya sat›n ald›¤›n›z perakendeci ile temasa geçin. Onlar çevre aç›s›ndan
güvenli geri kazan›m için bu ürünü alabilirler.
- 6 -
Page 8
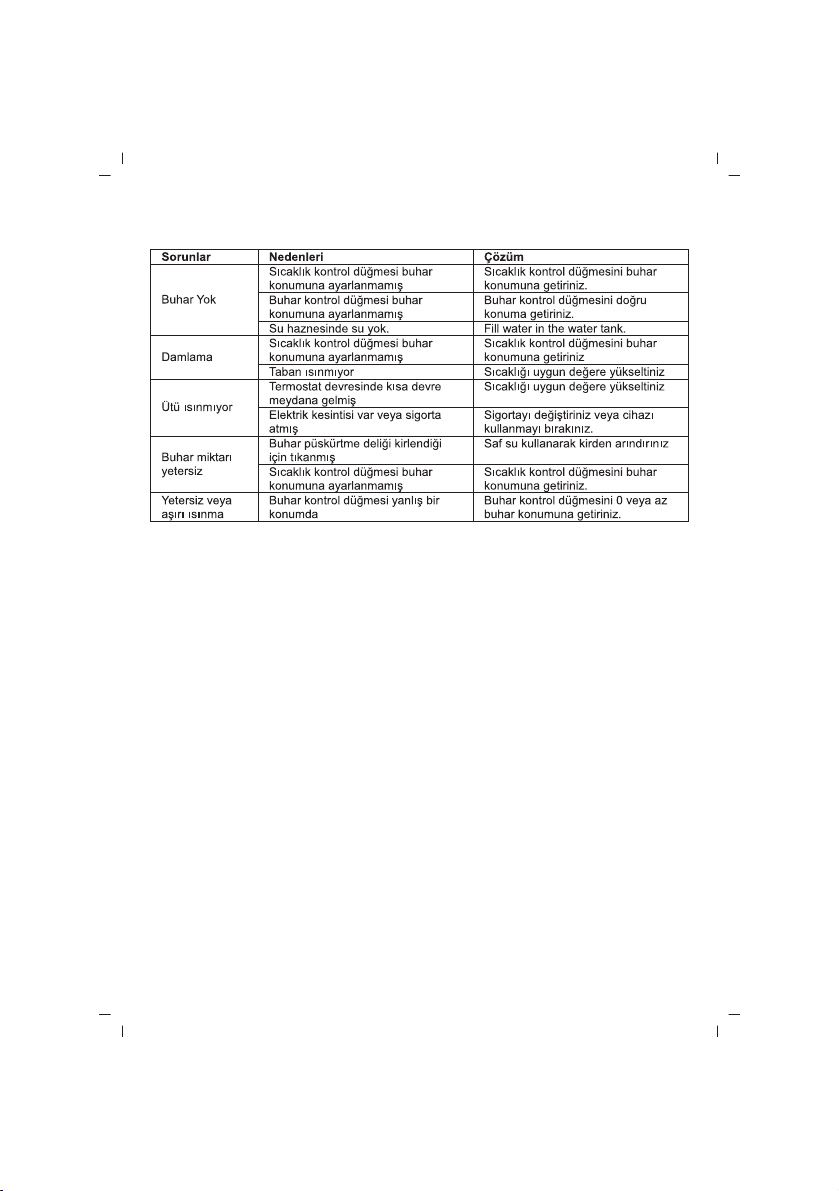
BAS‹T BAKIM YÖNTEMLER‹:
Yukardaki yöntemleri denemenize karfl›n buharl› ütünüzün çal›flmamas› durumunda inceleme ve onar›m
için ütünüzü lütfen yetkili servise gönderiniz.
NOT: HER KULLANIMDAN SONRA BUHARLI ÜTÜNÜZÜN TABANINI MUTLAKA KURUTUNUZ.
- 7 -
Page 9

ENGLISH
SINBO SSI 2871 STEAM IRON
USER MANUAL
Please read these instructions for use and have a good look at the illustration before using the appliance
1. CHARACTERISTICS AND STRUCTURE
The product has many functions such as temperature regulating, spraying, dry ironing, variable steam,
bursting steam, etc. And it with characteristics: luxury shape, high heating efficiency, easy using, good
ironing result, work saving and time saving, and so on.
A. Soleplate, B. Skirt, C. Water tank, D. Spraying nozzle, E. Water inlet cover, F. Steam knob, G. Spray
& Burst steam button, H. Handle, I. Cord cover, J. Light indicator, K. Temp Knob, L. Self clean button
MAIN TECHNICAL PARAMETERS
AC230V, 50 Hz, 2000W
• Continuous steam output :25g/min
• Steam boost: 50g/min
• Spray volume:10g/time
2. IMPORTANT SAFEGUARDS
When using electrical appliances, basic safety precautions should always be followed, including the
following:
READ ALL INSTRUCTIONS
• The user must not leave the iron unattended while connected to the supply.
• The plug of the supply cord must be removed from the socket-outlet before the water reservoir is
filled with water.
• The iron shall be used on a stable ironing board.
• The iron must be used and rested on a stable surface.
• When placing the iron on its stand, ensure that the surface on which the stand is placed is stable.
• If the supply cord is damaged, it must be replaced by the manufacturer or its service agent or a
similarly qualified person in order to avoid a hazard.
• The iron shall not be used if the iron has been dropped at any time, or if there are visible signs of
damage or if the iron is leaking. The iron shall be sent to the manufacturer or his qualified service agent
before further use.
• This appliance is not intended for use by persons (including children) with reduced physical, sensory
or mental capabilities, or lack of experience and knowledge, unless they have been given supervision
or instruction concerning use of the appliance by a person responsible for their safety.
• Children should be supervised to ensure that they do not play with the appliance.
• Care should be taken when using the appliance due to the emission of steam.
• Do not touch hot surfaces. Use handle or knobs.
• To protect against electrical shock, do not immerse cord, plugs, or appliances in water or other liquid.
• Close supervision is necessary when any appliance is used by or near children.
• Unplug from outlet when not in use and before cleaning. Allow to cool before storing
• Do not operate any appliance with a damaged cord or plug or after the appliance malfunctions, or has
been damaged in any manner. Return appliance to the factory for examination, repair or adjustment.
• The use of accessory attachments not recommended by the appliance manufacturer may cause
injuries.
• Do not use outdoors
• Do not let cord hang over the edge of the table or counter, or touch hot surfaces.
- 8 -
Page 10

• Do not place on or near a hot gas or electric burner, or in a heated oven.
• To disconnect. Remove plug from outlet. Let iron cool completely before putting away.
• Loop cord loosely around iron when storing.
• Burns can occur from touching hot metal parts, hot water, or steam. Use caution when turning the
iron upside down, there may be hot water in the water tank.
• If an extension cord is absolutely necessary, a 10 ampere cord should be used.
• Do not use this appliance for anything else other than its intended use. This appliance is for household
use only.
3. HINTS BEFORE FIRST USE
• Some parts of the iron have been slightly greased and as a result the iron might smoke slightly when
switched ‘ON’ for the first time. After a short while, this will cease.
• Before using for the first time remove any sticker or protective foil from the soleplate with a soft
cloth.
• Keep the soleplate smooth: do not scratch against metal objects (e.g. rack of ironing board, buttons,
zippers)
• Pure woolen fabrics (100% wool) may be pressed with the iron set to a steam position. Preferably
select steam selector position and use a dry pressing cloth.
4. SETTING THE TEMPERATURE
• Always check first to see whether ironing instructions are attached to the article to be ironed (they
can be found on a label showing a drawing of an iron. The numbers of dots indicate the correct
temperature. Refer to the indications on the temperature dial and in the table below). Follow these
ironing instructions in all cases.
• If ironing instructions are missing but you do know the kind of fabric, then see the below. The table
is valid for the actual materials and do not concern any applied finish, gloss etc.
• Textile to which some kind of finish has been applied (gloss, wrinkle relief etc.) can best be ironed
on somewhat lower temperatures.
• Sort the fabrics out according to ironing temperature first: wool with wool, cotton with cotton, etc.
The iron heats up quicker than it cool downs. Therefore, start ironing the articles requiring the lowest
temperature such as those made of synthetic fibres. Then progress to higher ones.
• Turn the temperature control knob round until it is opposite the setting pointer.
Textile Temperature control Instruction on label
MIN Synthetics Low temperature Always Refer
• Silk Normal temperature Always Refer
•• Wool Normal temperature Always Refer
••• Cotton Normal & high temperature Always Refer
MAX linen High temperature Always Refer
5. HOW TO FILL WITH WATER
• Remove the plug from the stock
• Fill the water through the filling opening into the water tank.
• If the water is very hard, it is advised to use distilled water or demineralized water only. Do not use
chemically descaled water.
• Pour out the remaining water after use.
- 9 -
Page 11

6. FUNCTIONS DESCRIPTION
Dry ironing:
Turn the steam control to minimum position ,set the temperature control to the suitable position, you
can dry ironing.
Spraying:
Press the spraying button, steam will be sprayed out from the spraying nozzle. At that time, you should
keep enough water in the water tank.
Steam ironing:
1. Use steam ironing, turn the steam control to minimum position and set the temperature control at
the “…”or “max” position.
2. After the indicator goes out, turn the steam control to the suitable position, steam will be sprayed,
ironing can start.
Bursting steam:
Set the temperature control at the “…”or “max” position, then press down the bursting steam button,
the base plate will spray out bursting steam.
Self cleaning:
The function of self clean is to clean the soleplate when you use this iron about half of year.
You must be:
1. Fill the iron and plug in;
2. When the temperature attaches “MAX”, press the self clean-Button for about 1 minute;
3. Plug into power in order to dry the water in soleplate off
4. Conduct self cleaning only with a basin to collect all water. Otherwise the hot water will be spilled
maybe over the user.
Anti-drip:
This iron is equipped with a drip stop function: the iron automatically stops steaming when the
temperature is too low to prevent water from dripping out of the soleplate.
7. CLEAN & MAINTENANCE
1. Before cleaning, please pull out the plug first and then wash the steam iron after cooling.
2. Please scrub the soleplate with soft wet cloth and keep it level and smooth avoiding mental-friction.
3. Scrub incrustation off the spraying nozzle with toothpick.
4. Wash the inside of the water tank frequently. First fill water, then sway it and finally pour out water
through the water filling mouth.
5. Don’t use strong acid or alkali so as not to damage the frame and produce phenomenon of changing
color.
6. Pour out water in the water tank completely after using every time, and store it upright.
- 10 -
Page 12
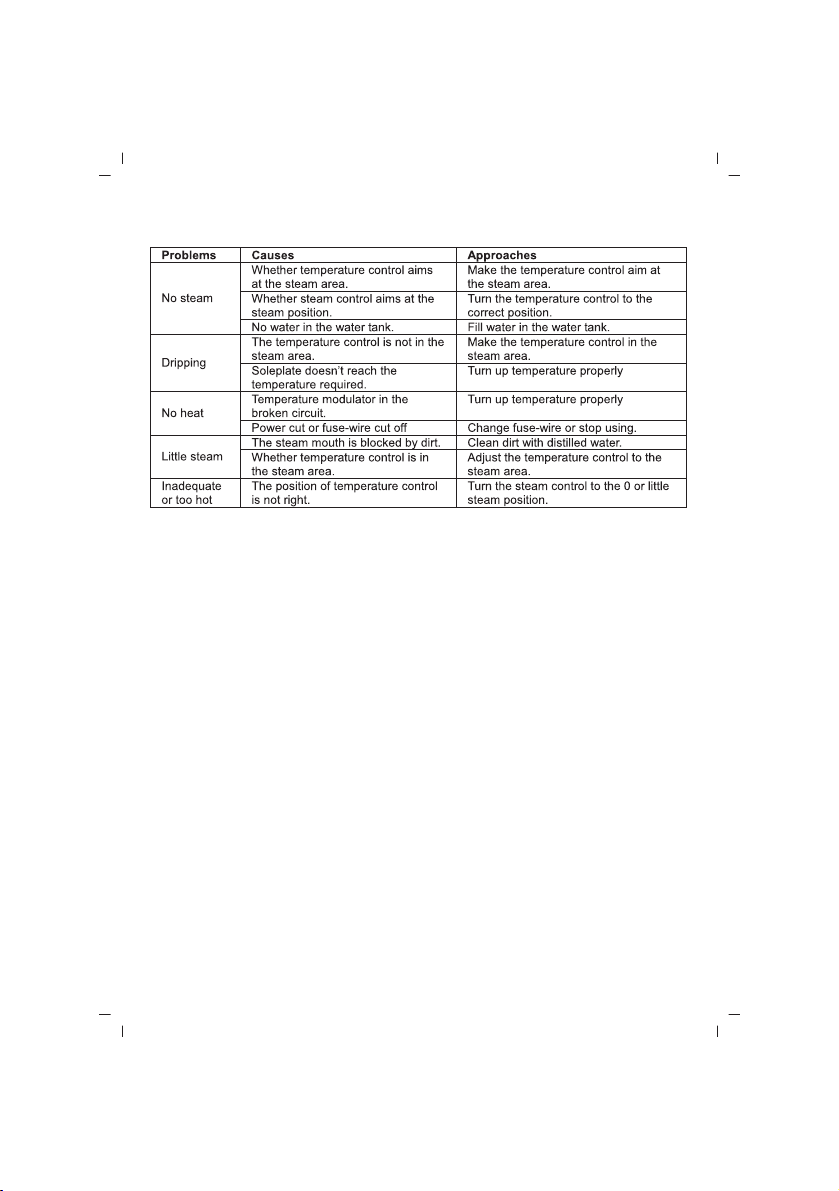
SIMPLE MAINTENANCE METHODS:
After approaches above, the steam iron is still not at work, please send it to the distributor for examining
and repairing.
NOTE : THE SOLEPLATE OF STEAM IRON MUST TO BE DRIED AFTER USE
- 11 -
Page 13

FRANÇAIS
SINBO SSI 2871 FER À REPASSER À VAPEUR
MANUEL D’UTILISATION
Lire toutes les instructions avant d’utiliser l’appareil et voir attentivement les figures.
1. DESCRIPTIONS
Le fer est doté de nombreuses fonctions tels que le réglage de température, spray, repassage à sec,
vapeur variable, jet de vapeur etc; et une variété de caractéristiques ainsi qu’un apparence élégante,
une efficacité de chauffage élevée , une utilisation facile, l’élimination des faux plis, l’économie de
travail et de temps.
A. Semelle, B. Bord, C. Réservoir, D. Spray, E. Orifice de remplissage du réservoir d’eau, F. Bouton de
vapeur, G. Bouton de spray & jet de vapeur, H. Poignée, I. Passe -câble, J. Témoin lumineux, K. Bouton
de réglage de température, L. Bouton auto -nettoyage
CARACTERISTIQUES TECHNIQUES
AC230V, 50Hz, 2000W
• Continue stoomproductie: 25g/min
• Steam boost: 50g/min
• Volume de pulvérisation:10g/temps
2. CONSIGNES IMPORTANTES DE SÉCURITÉ
Lors d’utilisation des appareils électriques y compris les précautions suivantes de sécurité de base
devraient être toujours considérés :
LIRE TOUTES LES INSTRUCTIONS AVANT D’UTILISER L’APPAREIL
• Ne pas laisser l’appareil sans surveillance lorsqu’il est branché.
• Débrancher la fiche de la prise de courant avant de remplir le réservoir d’eau.
• Utiliser le fer à repasser sur une planche à repasser stable.
• Utiliser et entreposer le fer à repasser sur une surface stable.
• Assurer d’entreposer le fer à repasser sur une surface stable.
• Si le cordon d’alimentation est endommagé, il doit impérativement être remplacé par le fabricant,
le centre de service agrée ou une personne de qualification similaire afin d’éviter tout danger.
• Ne pas utiliser l’appareil si le fer à repasser est accidentalement tombé ou si l’appareil a été
endommagé de quelque façon que ce soit ou s’il existe la fuite d’eau. Contacter tout de suite le fabricant
ou le centre de service agrée.
• Cet appareil n’est pas prévu pour être utilisé par des personnes (y compris les enfants) dont les
capacités physiques, sensorielles ou mentales sont réduites, ou des personnes dénuées d’expérience
ou de connaissance, sauf si elles ont pu bénéficier, par l’intermédiaire d’une personne responsable
de leur sécurité, d’une surveillance ou d’instructions préalables concernant l’utilisation de l’appareil.
• Une surveillance proche est nécessaire lorsque l’appareil est utilisé à proximité ou par des enfants.
• Veuillez être prudent pendant l’utilisation à cause de dégagement de vapeur.
• Ne pas toucher les surfaces surchauffées de l’appareil. Utiliser uniquement la poignée et les boutons.
• Ne pas plonger le cordon, la fiche ou l’appareil dans l’eau ou toute autre liquide afin d’éviter le choc
d’électrique.
• Une proche surveillance est nécessaire lorsque l’appareil est utilisé à proximité ou par des enfants.
• Débrancher la fiche de la prise de courant lorsque vous n’utilisez pas l’appareil ou avant le nettoyage.
Laisser l’appareil refroidir avant de l’entreposer.
• Ne pas utiliser l’appareil si le cordon d’alimentation ou la fiche est endommagé, si le fer à repasser
- 12 -
Page 14

est accidentalement tombé ou si l’appareil a été endommagé de quelque façon que ce soit. Contacter
tout de suite le centre de service agrée pour toute la réparation ,l’examination ou le réglage.
• Utilisation des accessoires non recommandées par le fabricant peuvent causer des brûlures.
• Ne pas utiliser l’appareil à l’extérieur.
• Ne pas pendre le cordon d’alimentation sur le rebord d’une table ou d’un plan de travail et veillez a
ce qu’il n’entre pas en contact avec des surfaces chaudes.
• Ne pas placer l’appareil sur ou a proximité d’une source de chaleur électrique ou de gaz ou dans un
four surchauffé.
• Débrancher la fiche de la prise pour la séparer de la source d’alimentation. Laisser complètement
refroidir le fer à repasser avant d’entreposer.
• Lorsque vous rangez le fer à repasser enrouler le cordon autour de l’appareil de façon lâche.
• Le contact avec les pièces métalliques surchauffées, avec de l’eau bouillante ou la vapeur d’eau peut
causer des brûlures. Veuillez être prudent lorsque vous inversez le fer à repasser à vapeur, le réservoir
du fer à repasser peut contenir l’eau bouillante
• Si le rallonge est absolument nécessaire, utilisez un câble de 10 ampères.
• Ne pas utiliser le fer à repasser hors de son but. Cet appareil est uniquement destiné à un usage
domestique.
3. CONSEILS AVANT LA PREMIERE UTILISATION
• Certaines parties du fer à repasser ont été graissé et lorsque vous utilisez l’appareil pour la première
fois, une légère fumée peut être degagée.Ceci est tout à fait normal et après une courte période expire.
• Avant la première utilisation, ôtez le film protecteur ou l’étiquette sur la semelle avec un chiffon
humide.
• Maintenir la semelle lisse, ne pas la gratter avec des objets métalliques ( étageres de planche à
repasser, boutons, fermeture éclair )
• Les tissus de laine pure (100% laine ) peuvent être repassés avec le fer à repasser réglé à vapeur.
Vous pouvez sélectionner la position du bouton de vapeur à sec et il est recommandé d’utiliser un
chiffon sec à repasser.
4. REGLAGE DE LA TEMPERATURE
• Chaque fois, vérifier les instructions de repassage sur les vêtements.( vous pouvez les trouver sur
la partie indiquée avec le figure de repassage sur les étiquettes. Les nombres des points affichent la
température correcte.Profitez des indicateurs sur l’échelle de température et dans le tableau-ci
dessous.) Dans tous les cas, utiliser les informations de repassage suivantes :
• Si les informations de repassage sont absentes mais vous connaissez le type du tissu, voir le tableau
suivant. Ce tableau est applicable pour les matériaux réels et non pour les substances appliquées
comme la dorure, le polissage etc
• Les tissus avec toute retouche (dorure, gaufrer à plis )peuvent être repassés de la meilleure façon
à des températures plus basses.
• Vous devez tout d’abord trier le linge par textile (laine avec laine, coton avec coton, etc.)..Le fer à
repasser chauffe plus vite qu’il ne se refroidit. Commencez parrepasser le linge qui demande la
température la plus basse puis, augmentez progressivement la température au fil des changements
de textile du linge, jusqu’à la température maximum.
• Tournez le bouton de réglage de température à l’option suivante sur la partie marquée.
Type de tissu Réglage de Température Instruction sur l’étiquette
MIN Synthétiques Basse Température A prendre en considération
• Soie Température normale A prendre en considération
•• Laine Température normale A prendre en considération
- 13 -
Page 15

••• Coton Température Normale & Haute A prendre en considération
MAX Lin Haute température A prendre en considération
5. REMPLIR DE L’EAU
• Débrancher la fiche de la prise de courant.
• Remplir de l’eau par l’orifice du réservoir.
• Si l’eau est trop dure, il est recommandé d’utiliser uniquement de l’eau distillée ou purifiée des
minéraux. Ne pas utiliser de l’eau chimiquement purifiée.
• Après utilisation, versez l’eau restante.
6. Descriptions des Fonctions :
Repassage à Sec:
Vous pouvez faire le repassage à sec lorsque vous tournez le bouton de vapeur à la position minumum
et vous réglez la température appropriée par le bouton de réglage de la température.
Spray:
Pressez le bouton spray plusieurs fois pour activer la pompe pendant que vous repassez. Vérifiez s’il
y a de l’eau dans le réservoir avant d’utiliser ce
bouton.
Repassage à Vapeur:
1. Tournez le bouton de vapeur à la position minumum et le bouton de réglage de la température à la
position “…” ou “max” pour utiliser la fonction de repassage à vapeur.
2. Quand le témoin lumineux s’éteint, tournez le bouton de vapeur à la position appropriée et vous
pouvez commencer le repassage à vapeur.
Repassage à Jet de Vapeur:
Pour la pulvérisation de jet de vapeur de la semelle,appuyez sur le bouton de jet de vapeur après avoir
tourné le bouton de réglage de la température à la position “…” ou “max”
Fonction auto-nettoyage:
• Pour prolonger la durée de vie de votre fer, faites fonctionner l’auto-nettoyage deux fois par an.
Explications:
1. Remplissez le réservoir avec l’eau et branchez la fiche du fer à la prise de courant.
2. Réglez la température au niveau de “MAX” et appuyez pendant 1 minute sur le bouton d’auto-nettoyage
3. Maintenez branché le fer afin de sécher l’eau restée dans la semelle.
4. Faites le processus d’auto-nettoyage sur le lavabo pour recueillir l’eau coulée (attention aux projections
d’eau ) .
Fonction anti –goutte:
Cet appareil est doté la fonction d’anti-goutte: Quand la température est trop basse , le fer s’arrête
automatiquement la fonction d’anti-goutte et empêche les fuites d’eau de la semelle.
7. Nettoyage et Entretien
1. Avant tout nettoyage, assurez-vous que le fer est débranché et complètement refroidi.
2. Essuyer la semelle à l’aide d’un chiffon doux et humide et garder la semelle du fer lisse : éviter de
la mettre en contact avec des objets métalliques.
3. Nettoyer les dépôts calcaires accumulés dans le trou de spray à l’aide d’un cure-dent.
4. Rincer souvent l’intérieur du réservoir d’eau. Premièrement, remplir le réservoir avec de l’eau et
- 14 -
Page 16
secouer le fer ,ensuite évacuer l’eau restante par l’orifice de remplissage d’eau.
5. Ne pas utiliser d’acide fort et de chimiques alcalins qui peuvent causer des dommages ou de
décolaration au produit.
6. Evacuer l’eau restante dans le réservoir après chaque utilisation et ranger le fer à la position verticale.
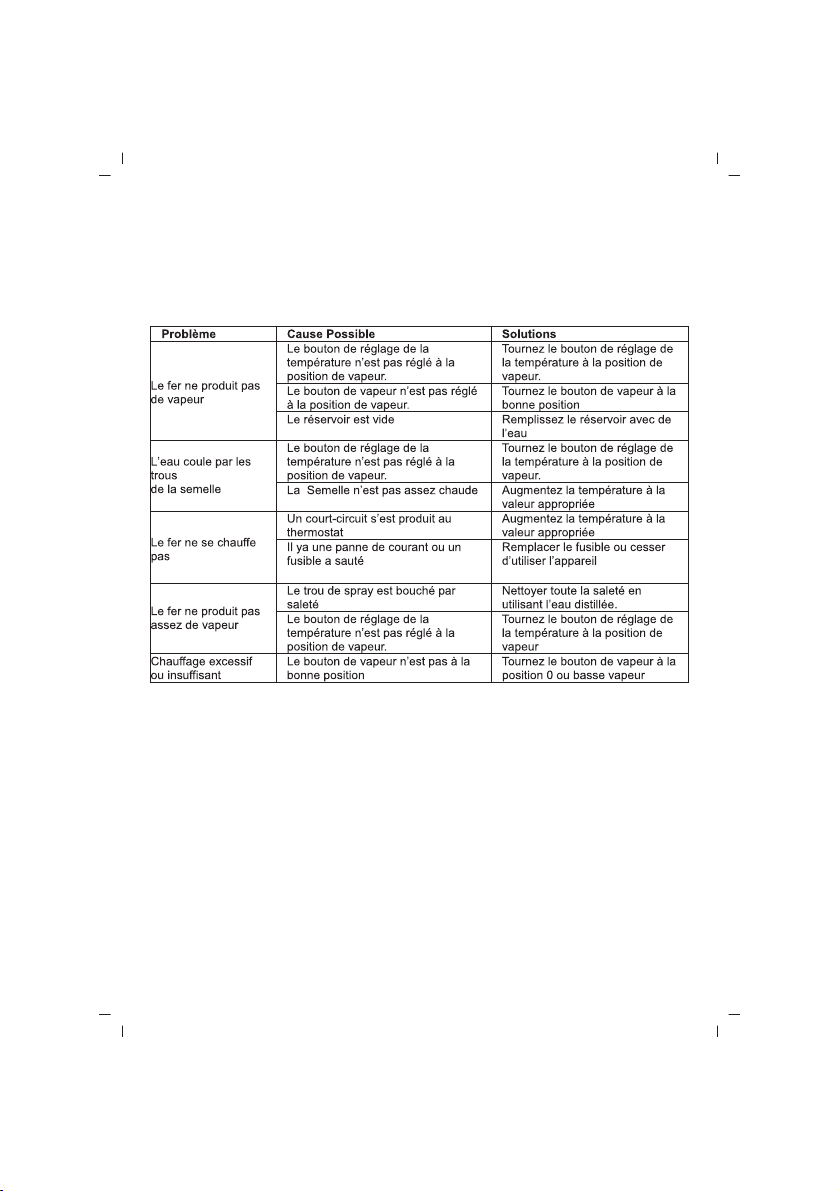
Méthodes Simples d’Entretien:
Si les méthodes ci –dessus sont insuffisants, adressez-vous à un centre service agréé pour toute la
réparation et l’examination.
REMARQUE: SÉCHER CERTAINEMENT LA SEMELLE DU FER APRÈS CHAQUE UTILISATION
- 15 -
Page 17

NEDERLANDS
SINBO SSI 2871 STOOMSTRIJKIJZER
GEBRUIKSAANWIJZING
Voordat u uw apparaat gebruikt alstublieft deze richtlijnen helemaal lezen en de foto goed bekijken.
1. EIGENSCHAPPEN EN STRUCTUUR
Het product heeft heel veel functie als temperatuurafstelling, spray doen, droog strijken, veranderlijke
stoom, chock stoom enz; heeft eigenschappen als een keurige uiterlijk, hogere verwarmingsopbrengst,
eenvoudige gebruik, krachtige kreukel verwijdering, verzorging van werk en tijd bezuiniging.
A. Zool, B. Voeteneind, C. Waterreservoir, D. Spuitgat, E. Deksel van water invullen , F. Stoomknop
G. Spuit- & Chock stoomknop, H. Handvat, I. Kabelovertrek, J. Indicator lamp, K.
Temperatuurinstellingsknop, L. Zichzelf reinigingsknop
BELANGRIJKSTE TECHNISCHE PARAMETERS
AC230V, 50Hz, 2000W
• Continue stoomproductie: 25g/min
• Steam boost: 50g/min
• Spuitinhoud:10g/tijd
2. BELANGRIJKE VEILIGHEIDSMAATREGELEN
Tijdens het gebruik van de electriciteitsapparaten moet er altijd de hieronder vermelde basis
veiligheidsmaatregelen nagekomen worden:
ALLE RICHTLIJNEN LEZEN
• Als de stekker in het stopcontact zit moet de gebruiker het strijkijzer niet verlaten..
• Voordat u het waterreservoir heeft ingevuld trekt u de stekker uit het stopcontact van de electriciteitskabel
van uw apparaat.
• Het strijkijzer moet gebruikt worden op een evenwichtige strijkplank.
• Het strijkijzer moet op een evenwichtige oppervlakte gebruikt en gelaten worden.
• Als u het strijkijzer op een oppervlakte zet moet u zeker zijn van of de oppervlakte evenwichtig is.
• Als de krachtkabel defect is geraakt moet de kabel door een producent, bevoegde service of door een
soortgelijke bevoegde persoon vervangen worden om de gevaren te voorkomen.
• Als het strijkijzer op de grond is gevallen of er een schade of lekkage is dat u kan zien moet absoluut
niet gebruikt worden. Voor het gebruik moet het strijkijzer gestuurd worden naar de producent of naar
de bevoegde service..
• Dit apparaat moet niet gebruikt worden door personen (inclusief de kinderen) die lichamelijke,
zinnelijke of geestelijke hindernis hebben, door personen die hierover geen kennis of ervaring hebben
zonder toezicht en richting van een persoon die volgens veiligheid verantwoordelijkheid kan aannemen
bij het gebruik van de apparaten.
• Er moet een voldoende toezicht gehouden worden om het spelen met het apparaat van de kinderen
te voorkomen.
• Omdat dit apparaat stoom produceert moet er tijdens het gebruik heel voorzichtig zijn.
• Niet de warme oppervlakten aanraken. Alleen de handvat en de knoppen gebruiken.
• Tegen het risico van electriciteitschock de kabel, stekker of de apparaten niet in water of in andere
vloeistoffen bedrukken.
• Als het apparaat door de kinderen of bij de kinderen wordt gebruikt is er van dichtbij toezicht nodig.
• Als het apparaat niet gebruikt wordt of voor de reinigingsprocedure trekt u de stekker uit het
stopcontact. Voordat u het apparaat op de plaats zet wacht u totdat het apparaat is verkoeld.
• Het apparaat niet laten werken waarbij de cordon of de stekker ervan is beschadigd of defect is
- 16 -
Page 18

geraakt, of die gevallen is of op een andere manier beschadigd is. Bij soortgelijke situaties uw apparaat
naar de dichtsbijzijnde service brengen om het te controleren, te repareren of de afstellingen ervan
te doen.
• Het gebruik van de accessoires en de onderdelen die niet worden aangeraden door de producent van
het apparaat kan gewond rakingen veroorzaken.
• U apparaat niet gebruiken in openlucht sfeer.
• U moet voorzichtig zijn dat de cordon niet de zijkanten van de tafel of de toonbank of de warme
oppervlakten aanraakt.
• Uw apparaat niet zetten dichtbij of op de warme gasovens, electriciteitsovens of verwarmers..
• Om de aansluiting te verbreken de stekker uit het stopcontact trekken. Voordat u het strijkijzer op
de plaats zet wacht u totdat het verkoeld is.
• Bij het op de plaats zetten van het strijkijzer de cordon ervan los omwinden aan de omgeving van het
strijkijzer.
• Warme metalen onderdelen kunnen met warme water of stoom door aanraak verbrandingen
veroorzaken.
U moet voorzichtig zijn als u het strijkijzer omgekeerd draait – er kan in het reservoir warme water zijn.
• Als er absoluut een verlengkabel gebruikt moet worden moet er een kabel van 10 ampere gebruikt
worden.
• Uw apparaat niet gebruikten voor doelen buiten het geplande gebruiksdoel. Dit apparaat is alleen
voor het thuis gebruik.
3. DEGENE DIE GEDAAN MOETEN WORDEN VOOR HET EERSTE KEER GEBRUIK
• Omdat sommige gedeelten van het strijkijzer met olie bedekt kan worden, als het strijkijzer twee keer
is gestart kan er een beetje rook eruit komen.
• Voordat u begint het apparaat te gebruiken het etiket of de beschermende laag eruithalen die bevinden
op de zoolplaat en met een zachte stof de zool schoonmaken.
• U moet zorgen dat de zool spiegelglad is: u laat het de metalen voorwerpen niet wrijven (bijvoorbeeld:
handvat van strijkplank, knopen, ritsen)
• Zuiver wollen stoffen (100% wol) kunnen met stoomwijze gestreken worden. U kunt het strijkijzer ook
zonder stoom gebruiken door de stand van stoominstelknop te veranderen, u wordt aangeraden de
wollen stof te strijken door op de stof een doekje te zetten.
4. TEMPERATUURAFSTELLING
• Kijkt u naar de strijkrichtlijnen die bevinden op het etiket van de stof dat gestreken moet worden (het
wordt op het etiket met een foto van een strijkijzer laten zien. De aantal punten op de foto van het
strijkijzer vermelden de juiste temperatuur. Temperatuurafstellingsknop en de gegevens die bevinden
op de hieronder vermelde tabel in acht nemen). Deze strijkrichtlijnen absoluut in acht nemen.
• Als er geen strijkrichtlijnen zijn en als u niet weet wat voor soort stof het is past u de hieronder
vermelde gegevens toe. De tabel is alleen gericht op de materiaal van de stof en neemt het polijsten
en de handwerken die op de stof zijn toegepast niet in acht.
• De stoffen die erop handwerk en lak hebben is de beste methode deze op lage temperatuur te strijken.
• Als eerst de stoffen volgens de strijktemperatuur scheiden: de wollen en katoenen stoffen apart
strijken. Het warm worden van het strijkijzer gebeurt sneller dan verkoelen.Hierdoor als eerst de stoffen
strijken die de laagste temperatuur nodig hebben voor het strijken als synthetische draderige stoffen.
Later de stoffen strijken die hogere temperaturen nodig hebben om te strijken.
• De temperatuurafstellingsknop draaien zodat het aangewezen gedeelte op de betreffende keuze
komt.
- 17 -
Page 19

Stof Temperatuur controle Richtlijnen op het etiket
MIN Synthetisch Lage temperatuur Moet absoluut in acht genomen worden
• Zijde Normale temperatuur Moet absoluut in acht genomen worden
•• Wollen Normale temperatuur Moet absoluut in acht genomen worden
••• Katoenen Normale & hoge temperatuur Moet absoluut in acht genomen worden
MAX Linnenweefsel Hoge temperatuur Moet absoluut in acht genomen worden
5. WATER INVULLEN
• De stekker van het apparaat uit het stopcontact trekken.
• In het waterreservoir water invullen via invulgat.
• Als het water veel kalkhoudend is wordt aangeraden alleen een gedistilleerd of gedemineraliseerd
water te gebruiken. Geen water gebruiken die chemisch van kalk is gezuiverd.
• Nadat u het strijkijzer heeft gebruikt het water dat erin zit leeggieten.
6. Verklaring van Functies
Droogstrijken:
U kunt droogstrijken doen door de stoomcontroleknop op minimum stand te brengen en met de
temperatuurafstellingsknop de juiste temperatuur af te stellen
Spuiten:
Als u op de spuitknop drukt zal er uit de spuitgat een stoom gespoten worden.
U moet van zeker zijn of er voldoende water is in de watertank tijdens deze procedure.
Stoomstrijken:
1. Om de functie stoomstrijken te kunnen gebruiken brengt u de stoomcontroleknop op minimum stand
en de temperatuurafstellingsknop op stand “…” of op stand “max”.
2. Als de indicator lamp is uitgegaan en als u dan de stoominstellingsknop op de juiste positie brengt
zal het beginnen een stoom te spuiten en u kunt op deze stap overgaan tot strijken.
Strijken met Shock stoom:
Om van de zool van het strijkijzer een shock stoom te kunnen spuiten drukt u op de shock stoomknop
nadat u de temperatuurafstellingsknop op positie “…” of op positie “max” brengt.
Zichzelf reinigen:
• Als het strijkijzer regelmatig wordt gebruikt moet zichzelf reinigen, dat verzorgt dat de zool is gereinigd,
twee keer per jaar toegepast worden..
Diegene die gedaan moeten worden:
1. Het waterreservoir met water invullen en de stekker van het strijkijzer uit het stopcontact trekken;
2. De temperatuur afstellen op niveau “MAX” en op de zichzelf reinigingsknop ongeveer 1 minuten
drukken.
3. Om het water dat is gebleven op de zool te drogen houdt u de stekker van het strijkijzer in het
stopcontact.
4. De procedure van zichzelf reinigen doet u in een wastafel om de stromende water bijeen te brengen.
Functie om druppeling te voorkomen:
Deze strijkijzer is uitgerust met het eigenschap druppeling te voorkomen: Als de temperatuur heel laag
is zal het strijkijzer het druppelen van water uit de zool voorkomen door het stoom eigenschap
automatisch te laten stoppen.
- 18 -
Page 20

7. Reiniging en Onderhoud
1. Voordat u begint met het schoonmaken trekt u de stekker van het strijkijzer uit het stopcontact. U
kunt het strijkijzer reinigen als het helemaal verkoeld is.
2. De zool van het strijkijzer met een zachte en een natte doekje netjes schoonmaken en verzorgt u dat
de zool niet een een of andere metalen oppervlakte aanraakt tijdens deze procedure.
3. Met behulp van een tandenstoker reinigt u de kalkprutten in de spuitgatten.
4. Het binnenkant van het waterreservoir vaak wassen. Eerst het waterreservoir met water invullen en
het strijkijzer schudden, later het water dat in het reservoir zit uit het waterinvulgat naar buiten gieten.
5. Omdat het bij het product schade of kleur verandering kan veroorzaken geen krachtige zuur en alkalichemie gebruiken
6. Na elk gebruik het water in het waterreservoir leeggieten en houdt u uw strijkijzer op een rechte
positie..
EENVOUDIGE ONDERHOUDSSYSTEMEN:
Terwijl u de hierboven vermelde systemen heeft toegepast uw stoomstrijkijzer niet werkt alstublieft
uw strijkijzer brengen naar een bevoegde service voor onderzoek en reparatie.
NOTITIE: NA ELK GEBRUIK DE ZOOL VAN UW STOOMSTRIJKIJZER ABSOLUUT DROGEN.
- 19 -
Page 21

DEUTSCH
SINBO SSI 2871 DAMPFBÜGELEISEN
GEBRAUCHSANWEISUNG
Bevor Sie das Gerät benutzen, lesen Sie bitte diese Gebrauchsanweisung vorsichtig durch und besichtigen
Sie die Zeichnung.
1. EIGENSCHAFTEN UND BILDUNG
Das Produkt hat viele Funktionen wie Temperatur Regelung, Sprühen, Trockenes Bügeln, wechselnder
Dampf, Schock Dampf und besitzt die Eigenschaften wie z.B. ein elegantes Aussehen, hohe Heizung
Ergebnis, leichter Verbrauch, kräftige Wellung Entfernung und Zeit und Arbeit Gewinn.
A. Base, B. Seitenrock, C. Wasserbehälter, D. Sprühen Loch, E. Wasser Erfüllung Deckel, F. Dampf
Taste, G. Sprühen & Schock Dampf Taste, H. Halter, I. Kabel Mantel, J. Anzeige Licht, K. Temperatur
Regelung Taste, L. Selbstreinigung Taste
HAUPTTECHNISCHE PARAMETER
AC230V, 50Hz, 2000W
• Kontinuierliche Dampfleistung: 25g/min
• Dampfstoß: 50g/min
• Spritzen Volume:10g/zeit
2. WICHTIGE SICHERHEITSHINWEISE
Wenn Sie elektrische Geräte benutzen, achten Sie auf die unten geschriebenen grundlegenden
Sicherheitshinweise:
LESEN SIE ALLE ANWEISUNGEN DURCH
• Wenn das Bügeleisen an der Steckdose gesteckt wurde, sollen Sie es nicht allein lassen.
• Bevor Sie den Wasserbehälter einfüllen, ziehen Sie das elektrische Kabel aus der Steckdose.
• Sie sollen das Bügeleisen auf einem ausgleichenden Bügeltisch verwenden.
• Das Bügeleisen soll auf einer ausgleichenden Fläche verwendet und gelassen werden.
• Seien Sie sicher, dass die Fläche, auf die Sie das Gerät setzen ausgeglichen ist.
• Wenn die Leistung Kabel beschädigt wird, soll sie von einem Fachmann, Hersteller oder qualifizierender
Person gewechselt werden um die Gefahr zu verhindern.
• Wenn das Bügeleisen auf den Boden gefallen ist oder einen Merkmalen Schaden oder Leckage hat,
benutzen Sie es niemals. Vor der Benutzung sollen Sie es zu einem Service bringen.
• Dieses Gerät dürfen Personen, die physikalisch, mental oder sensorisch behindert sind, nicht verwendet
werden. Besonders ohne Beobachtung der Personen, die Verantwortung nehmen dürfen(auch Kinder).
Personen, die keine Erfahrung von diesen Geräten haben, dürfen sie nicht benutzen.
• Damit die Kinder das Bügeleisen nicht verwenden, soll genügende Beobachtung gemacht werden.
• Seien Sie vorsichtig mit dem Gerät, denn es produziert Dampf.
• Berühren Sie heiße Fläche nicht. Benutzen Sie nur Halter oder Tasten.
• Stecken Sie das Kabel, den Stecker oder das Gerät nicht ins Wasser oder in andere Flüssigkeiten
gegen einen Schock Gefahr.
• Kinder, die neben diesem Gerät spielen, sollen nah beobachtet werden.
• Wenn Sie das Gerät nicht benutzen oder vor der Reinigung ziehen Sie den Stecker aus der Steckdose.
Warten Sie bis das Gerät sich abkühlt bevor Sie es wegräumen.
• Setzen Sie Geräte mit beschädigten Kabel oder Stecker oder beschädigte Teile nie in Betrieb. Bringen
Sie in diesen Fällen das Gerät zu einem Servicecenter.
• Benutzen von nicht empfohlenen Zubehörteilen von dem Hersteller kann Verletzungen verursachen.
- 20 -
Page 22

• Niemals benutzen Sie das Gerät auf offenen Plätzen.
• Seien Sie vorsichtig, dass das Kabel nicht an Tischecken gehängt bleibt oder warme Fläche berührt.
• Lassen Sie Ihr Gerät nicht neben Ofen mit warmen Gasen oder mit Elektrik arbeiten.
• Um den Kontakt zu beenden, ziehen Sie den Stecker aus der Steckdose. Bevor Sie das Bügeleisen
wegräumen, warten Sie bis es sich abkühlt.
• Als Sie das Gerät wegräumen, wickeln Sie das Kabel locker um das Gerät.
• Warme metallische Teile, warmes Wasser oder Dampf können Körperteile verletzen. Seien Sie
vorsichtig, wenn Sie das Gerät umdrehen. Es kann im Behälter warmes Wasser geblieben sein.
• Wenn es unbedingt eine Verlängerung Kabel benutzt werden soll, benutzen Sie Kabel mit 10 A.
• Benutzen Sie Ihr Gerät nur für eingebaute Zwecke. Niemals verwenden Sie es für andere Zwecke wie
z.B. zu hause.
3. DINGE,DIE SIE VOR DEM ERSTEN BETRIEB MACHEN SOLLEN
• Manche Teile des Gerätes können mit Öl bedeckt werden. Weniger Dampf kann bei dem ersten
Verbrauch rauskommen. Nach kurzer Zeit wird das beenden.
• Bevor Sie das Bügeleisen benutzen, nehmen Sie den Schutz Fläche raus und reinigen Sie ihn mit
einem Tuch.
• Machen Sie den Boden des Gerätes glatt, damit es die metallischen Materialien(wie Halter, Tasten
oder Reißverschlüsse) nicht berührt.
• Pure Stoffe aus Wolle (100% Wolle) dürfen Sie mit einem Dampf Operation bügeln. Wenn Sie die Lage
der Taste für die Regelung des Dampfes ändern, können Sie das Bügeleisen auch ohne Dampf Funktionen
benutzen. Wir empfehlen Ihnen, dass Sie wollen artige Stoffe mit einem Tuch darüber bügeln.
4. REGELUNG VON DEM TEMPERATUR
• Schauen Sie auf die Etikette des Stoffes, den Sie aufbügeln wollen.(Auf der Etikette werden Sie das
Bild eines Bügeleisens sehen.)Die Zahlen der Punkte auf dem Bild des Bügeleisens werden die richtige
Temperatur zeigen. Beachten Sie die Regelungstaste für die Temperatur und die untenliegende Tabelle.
Nehmen Sie diese Gebrauchsanweisung vorsichtig auf.
• Wenn es keine Hinweise für das Bügeln gibt oder wenn Sie die Art des Stoffes nicht wissen, verwenden
Sie die unten liegenden Informationen. Die Tabelle ist nur gültig für das Material von dem Stoff. Sie
achtet nicht auf Fackel oder Verarbeitungen auf der Fläche von dem Stoff.
• Für Stoffe mit Verarbeitung, Falten oder Politur ist die beste Methode zum Bügeln geringe Temperaturen.
• Erstens gruppieren Sie Stoffe nach Bügeln Temperaturen. Bügeln Sie Wollen getrennt und Baumwollen
getrennt. Das Bügeleisen erwärmt sich leichter als es sich abkühlt. Darum bügeln Sie erstens synthetische
Stoffe, die für das Bügeln geringe Temperaturen benötigen. Danach nehmen Sie Stoffe für hohe
Temperaturen.
• Drehen Sie die Regelung Taste für die Temperatur bis zur gezeichneten Stelle.
Stoff Temperatur Regelung Hinweise auf der Etiketten
MIN Synthetisch Geringe Temperatur Unbedingt geachtet werden.
• Seife Normale Temperatur Unbedingt geachtet werden.
•• Wolle Normale Temperatur Unbedingt geachtet werden.
••• Baumwolle Normale & hohe Temperatur Unbedingt geachtet werden.
MAX Leinen Hohe Temperatur Unbedingt geachtet werden
5. EINFÜLLEN VOM WASSER
• Ziehen Sie den Stecker aus der Steckdose.
• Füllen Sie den Wasserbehälter durch das Wasserloch mit Wasser ein.
• Wenn das Wasser zu viel Kalk enthält, benutzen Sie destilliertes Wasser. Benutzen Sie Wasser ohne
Kalk niemals.
- 21 -
Page 23

• Nach dem Verbrauch leeren Sie Wasser in dem Behälter.
6. Erläuterung Von Funktionen
Trockenes Bügeln:
Nachdem Sie die Regelung Taste für Dampf in den Zustand minimal gebracht haben und die Temperatur
geregelt haben, können Sie trocken bügeln.
Spritzen:
Wenn Sie die Taste für das Spritzen drücken, kommt aus dem Loch Dampf. Seien Sie sicher, dass es
im Wassertank Wasser gibt.
Bügeln mit Dampf:
1. Für Bügeln mit Dampf bringen Sie die Taste für die Regelung vom Dampf zu dem Zustand minimal
und die Taste für die Regelung von der Temperatur zu dem Zustand “……“ oder “max“.
2. Wenn das Anzeige Licht erlöscht und die Taste für die Regelung vom Dampf im richtigen Zustand
steht, können Sie mit Aufbügeln weitermachen.
Bügeln mit Schock Dampf:
Damit aus dem Boden des Bügeleisens Dampf kommt, bringen Sie die Regelung Taste für die Temperatur
zur Stelle“…“ oder „“max“. Dann drücken Sie den Schock Dampf Taste.
Selbstreinigung:
• Wenn das Bügeleisen regelmäßig verwendet wird, soll es zwei Mal in einem Jahr selbstreinigt werden.
Sie sollen machen:
1. Füllen Sie den Wasserbehälter mit Wasser ein und stecken Sie den Stecker in die Steckdose;
2. Regeln Sie die Temperatur zur Stelle“MAX“ und drücken Sie die Selbstreinigung Taste 1 Minute lang;
3. Damit Wasser im Boden des Bügeleisens trocknet, lassen Sie das Bügeleisen an der Steckdose.
4. Damit Sie das fließende Wasser sammeln können, machen Sie die Selbstreinigung im Waschbecken.
Sonst kann das heiße Wasser auf Sie springen.
Verhinderung der Funktionen dampfen:
Dieses Bügeleisen ist eingebaut für die Funktion dampfen: Wenn die Temperatur zu gering ist, füllt das
Bügeleisen den Dampf Eigenschaft automatisch und verhindert, dass Wasser aus dem Boden vom
Bügeleisen fließt.
7. Reinigung und Pflege
1. Vor der Reinigung ziehen Sie den Stecker des Bügeleisens aus der Steckdose. Nach der Abkühlung
können Sie das Gerät reinigen.
2. Putzen Sie den Boden von dem Bügeleisen mit einem weichen und feuchten Tuch und achten Sie
darauf, dass der Boden keinen Kontakt mit einer metallischen Fläche hat.
3. Reinigen Sie mit Hilfe einer Nadel den Rest von den Kalktropfen in dem Spritzen Loch.
4. Waschen Sie den Inhalt von dem Wasserbehälter ständig .Zuerst füllen Sie den Wasserbehälter mit
Wasser und leeren Sie das Wasser im Behälter aus dem Loch.
5. Benutzen Sie bei der Reinigung keine schwere Säuren oder Alkali Chemikalien denn diese können
das Produkt beschädigen oder als Farbenänderung wirken.
6. Nach jedem Verbrauch leeren Sie den Wasserbehälter und räumen Sie ihn in senkrechter Richtung
weg.
- 22 -
Page 24

LEICHTE PFLEGE HINWEISE:
Bringen Sie Ihr Bügeleisen zu einem Servicepunkt für Kontrolle und Reparatur wenn es nicht arbeitet
obwohl Sie alle die oben genannten Hinweise versucht haben.
ANMERKUNG: NACH JEDEM VERBRAUCH TROCKNEN SIE DEN BODEN IHRES BÜGELEISENS
- 23 -
Page 25

ESPANOL
SINBO SSI 2871 PLANCHA DE ROPA VAPORIZADA
MANUAL DE USO
Por favor leer completamente estas instrucciones antés de usar su aparato y revisar bien el imagen.
1. CARACTERÍSTICAS Y ESTRUCTURA
El producto tiene muchas funciones como ajuste de temperatura, pulverización, plancar seco, vapor
variable, vapor de shock y asimilados; tiene características como aspecto externo elegante, capacidad
superior de calentamiento, uso fácil, eliminar arrugas con fuerza, adquisición de ahorro para tiempo
y esfuerzo.
A. Base, B. Ladera, C. Depósito de agua, D. Agujero de la pulverización, E. Tapa para llenar agua,
F. Botón para vapor, G. Botón de la pulverización y vapor de shock, H. Mango para coger, I. Cubierta
del cable, J. Luz indicadora, K. Botón para el ajuste de la temperatura, L. Botón para limpiar sí mismo
PRINCIPALES PARAMETROS TÉCNICOS
AC230V, 50Hz, 2000W
• Salida de vapor continuo: 25g/min
• Golpe de vapor: 50 g/min
• Volumen de la pulverización: 10 grs/tiempo
2. PRECAUCIONES IMPORTANTES DE LA SEGURIDAD
Durante el uso de los aparatos eléctricos, debe cumplir con las precauciones de seguridad básicas
contenidos los siguientes.
LEER TODAS LAS INSRUCCIONES
• No debe dejar sin control la plancha de ropa vaporizada mientrás estaba enchufado.
• Antés de llenar el depósito de agua desenchufar el cable de su aparato.
• La plancha de ropa vaporizada debe se usar sobre una tabla balanceada de plancha.
• La Plancha de ropa vaporizada debe usar y conservar en un superficie fijo.
• Estar seguro que el superficie sea balanceado al colocar la plancha de ropa sobre un superficie.
• En caso de ser dañado el cable de energía debe cambiar por el fabricante o personal de servicio ú
por una persona con igual calificación para proteger de cualquier peligro.
• En caso de ser caído en cualquiera forma la plancha de ropa o encontrar señales claras de daño
sobre la mísma o encontrar escape de agua, no debe usar la plancha de ropa. Debe enviar al servicio
técnico autorizado ú al fabricante la plancha de ropa antés de usar más.
• Este producto no es conveniente usar por las personas con capacidad menor física, percepcional o
mental (incluso también los niños) o personas falta de cono cimiento y experiencia sin dar información
sobre su uso por la persona responsible de la seguridad de dichas personas sin vigilancia.
• Controlar bien para evitar que los niños no jueguen con el aparato.
• Se debe tener mucho cuidado durante el uso de este aparato por motivo de ser producido vapor por
el aparato.
• No tener contacto con los superficies calurosos. Solamente usar el mango y los botones.
• No sumergir en agua ú otros líquidos el cable, la ficha o aparatos para protegerse ante el riesgo del
shock eléctrico.
• Se necesita vigilancia cerca durante el uso por los niños el aparato ú durante el uso cerca de los
niños.
• Desenchufar la plancha de ropa antés de limpiar y no estar usado la mísma. Esperar que se enfñe
antés de ponerlo en su lugar.
- 24 -
Page 26

• No funcionar los aparatos con cable dañado ú con ficha o que funcionan averíado ú dañado en alguna
forma. En estos casos llevar el aparato al servició técnico autorizado más cerca para investigar, reparar
o ajustar el aparato.
• Uso de los acesorios no recomendados por su fabricante del aparato puede causar sufrimientos de
heridas.
• No usar el aparato a fuera.
• Tener cuidado que no se toque el cable los superficies calientes o las esquinas del mostrador o de
la mesa de planchar.
• No poner el aparato en el hogar caliente, sobre o cerca de calentador electrico ú con gas.
• Para separarse de la fuente de energía, desenchufarlo. Antés de ponerlo en otro lugar, esperar que
se enfríe la plancha de ropa completamente.
• Enrollar el cable suelto alrededor de la plancha de ropa durante su conservación.
• Pueden ocurrir sufrimientos de heridas por motivo de tocar las partes calientes metálicas, agua
caliente o vapor. Tomar medidas para volver alrevés la plancha de ropa; puede quedar agua caliente
en el depósito de agua.
• En caso de ser necesaria el cable de la extensión, debe usar un cable de 10 amperes.
• No usar el aparato fuera de su objetivo del uso para ningún objetivo. Este aparato es para uso domestic.
2. HAY QUE HACER ANTÉS DEL PRIMER USO:
• Algunas partes de la plancha de ropa son lubricados parcialmente y en el resultado de éso la plancha
de ropa puede echar una poca cantidad de humo la función por primera vez el uso de la mísma. Después
de poco tiempo desaparecerá este caso.
• Antés del uso quitar el folio ú etiquela sobre la base protective y limpiar la base por medio de una
tela suave.
• Conservar la base de la plancha de ropa sin pequeñas partículas: No rascar con objetos metálicos
(Por ejemplo: mostrador de la mesa de planchar, botones, cremalleras).
• Las telas de pura lana (lana 100 %) deben planchar con plancha de ropa ajustada en la posición del
vapor. Usted puede usar esta planca de ropa sin vapor modificando la posición del botón para el ajuste
de vapor. Se recomienda que usted planchará las telas de lana poniendo un trozo de tela sobre la tela
de la lana.
3. AJUSTE DE LA TEMPERATURA
• Controlar las instrucciones de planchar sobre el producto que se planchará (sobre las etiquetas de
los productos pueden encontarse en las partes indicadas por la plancha de ropa. Las cantidades de
los puntos muestran el calor correcto. Aprovecharse de las indicaciones en la table siguente y sobre
la escala de la temperatura). Definitivamente tener en consideración esta intrucción sobre el proceso
de la plancha.
• En caso de no tener los datos de planchar pero conocer el tipo de tela, consultar lo siguiente. La table
es válida par a las materials reales y no preocuparse por cualquier dorado, cera y asimilados aplicados.
• Las telas sobre las que fue aplicado cualquier retocado (dorado, relieve arrugado y asimilados) pueden
planchar lo major en temperaturas más bajas.
• Ante todo, separarse las telas de acuerdo con sus temperaturas de planchar: las telas de lana con
las de lana, las telas de algodón con las de algodón y asimilados. La plancha de ropa calienta más
rápido que enfríe. Por este motive empezar a planchar con las telas compuestas por fibras sintéticas
que necesitan temperaturas bajas. Después continuar con las que necesitan temperaturas más altas.
• Girar el botón de la temperature hasta que sea en la posición contraria completamente del punto de
inicio.
- 25 -
Page 27

Tela Control de la Temperatura Instrucción sobre la etiqueta
MIN Sintéticas Temperatura Baja Definitivamente debe ser tenido en consideración
• Ceda Temperatura Normal Definitivamente debe ser tenido en consideración
•• Lana Temperatura Normal Definitivamente debe ser tenido en consideración
••• Algodón Temperatura Normal y Alta Definitivamente debe ser tenido en consideración
MAX Lino Temperatura Alta Definitivamente debe ser tenido en consideración
5. LLENAR AGUA
• Desenchufar la ficha.
• Llenar agua en el depósido de agua por el agujero para llenar agua.
• En caso de ser muy calcáreo la agua, se recomienda que se use agua demineralizada o destilada
solamente. No usar agua filtrada químicamente.
• Vaciar el restante de la agua después de usar la plancha de ropa.
6. Explicación de las funciones
Planchar seco:
Usted puede hacer la plancha seca al ajustar ta temperatura conveniente girando el botón para el
control del vapor hacia la posición mínima.
Pulverización:
Al pulsar el botón para la pulverización, se pulveriza vapor del agujero para el vapor. Estar seguro que
se encuentra agua suficiente en el depósito de agua durante este proceso..
Planchar vaporizado:
1. Para usar la función de planchar vaporizado, girar el botón para el control del vapor y el botón para
ajustar la temperatura hacia las posiciones “…” o “máx”.
2. Al apagar la luz indicagora, al girar el botón para el ajuste del vapor, se inicia pulverizar el vapor,
en este caso usted puede empezar al proceso de planchar.
Planchar con vapor de shock:
Pulsar al botón para el vapor de shock después de ajustar el botón para el ajuste de la temperatura
hacia la posición “…” o “máx” para la pulverzación del vapor de shock de la base de la plancha de ropa.
Limpiar sí mismo:
• En caso de ser usado regularmente la plancha, s edebe aplicar el proceso de limpiar sí mismo dos
veces al año que adquiere la limpieza de la base.
Hay que hacer:
1. Llenar el depósito de agua de la plancha de ropa con agua y enchufarla;
2. Ajustar la temperatura en el nivel “MÁX” y pulsar al botón para limpiar sí mismo durante 1 (un)
minuto aproximadamente;
3. Dejar la plancha de ropa enchufada para secar la agua restante sobre la base.
4. Realizar el proceso de limpiar sí pismo sobre un lávabo para recolectar las aguascorrientes. En caso
contrario se puede echar agua caliente hacia usted. Aksi takdirde s›cak su üzerinize s›çrayabilir.
Función para evitar el goteo:
Presente plancha de ropa es equipado con la característica para evitar el goteo: Al ser muy bajo la
temperatura, la plancha de ropa evita gotear agua de la base apagándo automáticamente la característica
de vapor.
- 26 -
Page 28

7. Limpieza y mantenimiento:
1. Antés de empezar al proceso de la limpieza, desenchufar su plancha de ropa. Usted puede limpiar
su plancha de ropa después de secar su plancha completamente.
2. Limpiar la base con un trozo de tela suave y majada. Tener mucho cuidado que la base no contacta
algún superficie metálico durante este proceso.
3. Limpiar los residuos de cal acumulados en el agujero de la pulverización por medio de palillo de
dientes.
4. Lavar con frecuancia la parte interna del depósito de agua. Llenar primero el depósito con agua y
mover la plancha de ropa, después vaciar la agua llenada por el agujero de llenar agua.
5. No usar sustancias alcalinas y ácidos fuertes por motivo de que podrán causar daños o cambio de
color sobre el producto.
6. Después de cada uso vaciar la agua restante en el depósito de agua y conservar su plancha de ropa
en una posición vertical.
MÉTODOS SIMPLES DEL MANTENIMIENTO:
En caso de no ser funcionado su plancha vaporizada de ropa a pesar de que sean intentado los métodos
expresados arriba, enviar su plancha vaporizada de ropa por favor al servicio técnico autorizado para
investigarla y repararla.
NOTA: DEFINITIVAMENTE SECAR LA BASE DE SU PLANCHA VAPORIZADA DE ROPA DESPUÉS DE
CADA USO.
- 27 -
Page 29

Page 30

Page 31

Page 32

Page 33

No: 1-2871-20022014
- 32 -
Page 34

- 33 -
Page 35

Page 36

Page 37

Page 38

Page 39

1-2871-20022014
- 38 -
Page 40

- 39 -
Page 41

HRVATSKI
SINBO SSI 2871 PARNO GLAˇCALO
UPUTE ZA UPORABU
Prije poˇcetka uporabe ured¯aja molimo vas da temeljno proˇcitate sve upute za uporabu i saˇcuvate ih za
budu´ce potrebe.
1. SPECIFIKACIJE I STRUKTURA
Glaˇcalo ima viˇse funkcija kao ˇsto su podeˇsavanje temperature, prskanje, suho glaˇcanje, promjenjiva
para, ekstra para i sl.; osim toga glaˇcalo je modernog izgleda, ima visoku uˇcinkovitost grijanja, jednostavno
je za uporabu, uklanjanja velike i tvrdokorne nabore i ˇstedi vaˇse vrijeme i trud.
A. Podnica, B. Plastiˇcna zaˇstita, C. Spremnik za vodu, D. Otvor za sprej, E. Poklopac za punjenje vode
F. Gumb za paru, G. Gumb za prskanje(sprej) & Ekstra paru, H. Ruˇcka za drˇzanje, I. Uvodnica kabela
J. Lampica, K. Termostat, L. Gumb za samoˇciˇs´cenje
OSNOVNI TEHNIˇCKI PARAMETRI
AC230V, 50Hz, 2000W
• Neprestana para izlaza: 25g/min
• Parna pojaˇcanja: 50g
• Obujam spreja:10g/vrijeme
2. BITNA SIGURNOSNA UPOZORENJA
Kod uporabe elektriˇcnih ured¯aja uvijek se treba pridrˇzavati osnovnih mjera predostroˇznosti ukljuˇcivˇsi
i donje:
PROˇCITAJTE SVE UPUTE
• Nipoˇsto se ne treba odvajati od glaˇcala ukljuˇcenog u izvor za napajanje.
• Prije punjenja spremnika za vodu izvucite utikaˇc iz utiˇcnice.
• Glaˇcalo rabite na ravnoj i stabilnoj dasci za glaˇcanje.
• Glaˇcalo uvijek rabite i odlaˇzite na stabilnu povrˇsinu.
• Kada glaˇcalo spuˇstate na neku povrˇsinu uvjerite se da je ta povrˇsina ravna i stabilna.
• Za izbjegavanje svake vrste opasnosti oˇste´ceni kabel za napajanje treba da zamjeni proizvod¯aˇc kabela,
ovlaˇsteni servisni centar ili struˇcna osoba.
• Nipoˇsto ne treba rabiti glaˇcalo koje je palo na pod i na kom postoji oˇcigledna vrsta kvara, kao ni glaˇcalo
iz kojeg curi voda. Prije poˇcetka uporabe glaˇcalo treba odnijeti na pregled kod proizvod¯aˇca ili u ovlaˇsteni
servisni centar.
• Ovaj ured¯aj ne treba da rabe osobe s fiziˇckim, psihiˇckim i mentalnim invaliditetom (ukljuˇcuju´ci i djecu)
bez nadzora osobe koja moˇze snositi odgovornost za sigurnu uporabu ured¯aja. Isto tako ured¯aj ne treba
da rabe neiskusne i osobe koje nisu dovoljno upu´cene u naˇcin njegove uporabe.
• Budite jako oprezni kod uporabe glaˇcala u blizini djece i zabranite djeci da se igraju sa ured¯ajem.
• Budite jako oprezni kada rabite glaˇcalo jer ono proizvodi vrelu paru.
• Ne dodirujte vru´ce povrˇsine. Uvijek uzimajte za ruˇcku i dodirujte samo gumbove.
• Za izbjegavanje rizika od strujnog udara kabel, utikaˇc ili ured¯aj ne uranjajte u vodu ili neke druge
teku´cine.
• Uporaba glaˇcala u blizini i od strane djece zahtjeva veliki nadzor.
• Kada ne rabite ili prije ˇciˇs´cenja obavezno izvucite utikaˇc iz utiˇcnice. Prije odlaganja glaˇcala saˇcekajte
da se ono ohladı.
• Elektriˇcne ured¯aje ili aparate sa oˇste´cenim kabelom ili utikaˇcem, ured¯aje koji su pali na pod ili su
oˇste´ceni na neki drugi naˇcin nipoˇsto ne treba rabiti. U tom sluˇcaju ured¯aj je potrebno odnijeti na kontrolu,
popravku ili podeˇsavanje u najbliˇzi ovlaˇsteni servisni centar.
- 40 -
Page 42

• Uporaba pribora i dijelova koje ne preporuˇcuje proizvod¯aˇc moˇze uzrokovati ozljedu.
• Ured¯aj ne rabite na otvorenim povrˇsinama.
• Kabel za napajanje ne smije visiti preko stola ili radne povrˇsine jer postoji opasnost od zapinjanja za
kabel i pada. Kabel zaˇstitite od kontakta s vru´cim povrˇsinama.
• Ured¯aj ne stavljajte na ili u blizini toplog plinskog ili elektriˇcnog ˇstednjaka.
• Za prekid napajanja izvucite utikaˇc iz utiˇcnice. Prije odlaganja glaˇcala saˇcekajte da se dobro ohladı.
• Kada glaˇcalo odlaˇzete kabel lagano obmotajte oko glaˇcala i tako odloˇzite.
• Kontakt sa vru´cim metalnim dijelovima, toplom vodom i parom moˇze izazvati opekline. Budite jako
oprezni kada glaˇcalo okre´cete naopako- u spremniku se moˇze zadrˇzati topla voda.
• Ako je neophodna uporaba produˇznog kabela rabite kabel od 10 ampera.
• Ured¯aj ne rabite u neke druge svrhe osim u svrhu za koju je dizajniran. Ovaj ured¯aj je namjenjen samo
za ku´cansku uporabu.
3. ˇSTO TREBA URADITI PRIJE PRVE UPORABE
• Poˇsto su neki od dijelova glaˇcala premazani uljem kod prve uporabe iz glaˇcala moˇze iza´ci malo dima.
Ovo stanje ´ce nestati za kratko vrijeme.
• Prije poˇcetka uporabe ured¯aja molimo vas da naljepnicu ili etiketu koja se nalazi na proizvodu uklonite
i mekom krpom oˇcistite podnicu.
• Omogu´cite da podnica bude ˇcista i glatka: glaˇcalom ne prelazite preko metalnih dijelova (npr.: metalno
postolje daske za glaˇcanje, gumbovi, zatvaraˇci)
• Tkanine od ˇciste vune (100 % vuna) moˇzete glaˇcati sa parom. Promjenom pozicije gumba za paru
glaˇcalo moˇzete koristiti i bez pare. Preporuˇcujemo vam da kada glaˇcate vunene tkanine preko njih
stavite tanku krpu od gaze.
4. POSTAVKA TOPLINE
• Pogledajte u upute za glaˇcanje koje se nalaze na etiketi tkanine koju ˇzelite glaˇcati (prikazano sa slikom
glaˇcala. Na slici glaˇcala nalaze se toˇcke koje pokazuju temperaturu koja odgovara za glaˇcanje. Uzmite
u obzir informacije koji se nalaze na termostatu i u dolje prikazanoj tabeli). Obavezno se pridrˇzavajte
ovih uputa za glaˇcanje.
• Ukoliko se na tkanini ne nalazi etiketa sa uputama za glaˇcanje a nije vam poznata vrsta tkanine koju
glaˇcate, pridrˇzavajte se donjih uputa. Tabela je pripremljena samo na osnovu vrste tkanine i nisu uzete
u obzir tkanine sa vezovima, reljefima i sliˇcnim aplikacijama. • Glaˇcanje tkanina sa aplikacijama,
vezovima i sl. treba vrˇsiti na niskim temperaturama.
• Najprije tkanine grupiˇsite prema vrsti i potrebnoj temperaturi za glaˇcanje. Posebno glaˇcajte vunene
a posebno pamuˇcne ttkanine. Zagrijavanje glaˇcala je brˇze od njenog hlad¯enja. Prema tome prvo poˇcnite
sa glaˇcanjem sintetiˇckih tkanina koje zahtjevaju najniˇzu temperaturu. Nakon toga nastavite sa tkaninama
za ˇcije glaˇcanje je potrebna ve´ca temperatura.
• Termostat podesite u poziciju koja odgovara temperaturi potrebnoj za glaˇcanje odabrane tkanine.
Tkanina Temperatura Upute na etiketi
MIN Sintetika Niska temperatura Obavezno uzmite u obzir
• Svila Normalna temperatura Obavezno uzmite u obzir
•• Vuna Normalna temperatura Obavezno uzmite u obzir
••• Pamuk Normalna & visoka temperatura Obavezno uzmite u obzir
MAX Lan Visoka temperatura Obavezno uzmite u obzir
5. PUNJENJE
• Izvucite utikaˇc iz utiˇcnice.
• Kroz otvor za sipanje vode naspite vodu u spremnik.
- 41 -
Page 43

• Ako u vodi ima veliki procenta kamenca koristite samo destilaranu ili demineralizovanu vodu. Ne
rabite vodu koja je kemijski oˇciˇs´cena od kamenca.
• Nakon uporabe molimo vas da prospete ostatak vode iz glaˇcala.
6. Objaˇsnjenje funkcija
Suho glaˇcanje:
Gumb za kontrolü pare podesite u poziciju minimalno a termostat na postavku koja odgovara suhom
glaˇcanju.
Prskanje:
Pritiskom na gumb za prskanje iz otvora za sprej izlazi´ce voda. Kada koristite ovu funkciju provjerite
da li se u spremniku za vodu nalazi dovoljno vode.
Parno glaˇcanje:
1. Za koriˇstenje funkcije parnog glaˇcanja gumb za kontrolu pare podesite na postavku minimalno a
termostat na postaku “…” ili “max”.
2. Nakon gaˇsenja lampcice i podeˇsavanja gumba za kontrolü pare u potrebnu poziciju iz glaˇcala ´ce
poˇceti da izlazi para i moˇzete poˇceti sa glaˇcanjem.
Glaˇcanje sa ekstra parom:
Za ispust ekstra pare iz podnice glaˇcala termostat podesite na postavku “…” ili “max” i pritisnite na
gumb za ekstra paru.
Funkcija samoˇciˇs´cenja:
• Ako uredno koristite glaˇcalo potrebno je dva puta godiˇsnje primjeniti funkciju samoˇciˇs´cenja koja
omogu´cava ˇciˇs´cenje podnice glaˇcala od prljavˇsite.
Ono ˇsto je potrebno uraditi:
1. Napunite spremnik za vodu i umetnite utikaˇc u utiˇcnicu.
2. Termostat podesite na razinu za “MAX” temepraturu i gumb za samoˇciˇs´cenje drˇzite pritisnut oko 1
minute;
3. Da bi se podnica glaˇcala osuˇsila od vode koja je izaˇsla iz spremnika glaˇcalo treba da bude ukljuˇceno
u struju;
4. Funkiciju samoˇciˇs´cenja obavljajte iznad umivaonika za sakupljanje vode koja izlazi iz glaˇcala. U
protivnom se moˇzete isprskati toplom vodom.
Funkcija protiv kapanja:
Ovaj proizvod je opremljen funkcijom protiv kapanja: Kada je temperatura glaˇcanja jako niska glaˇcalo
automatski zaustavlja funkciju pare i sprijeˇcava da kroz otvore na podnici glaˇcala izlazi para.
7. ˇCiˇs´cenje i Odrˇzavanje
1. Prije poˇcetka ˇciˇs´cenja izvucite utikaˇc iz utiˇcnice. ˇCiˇs´cenje glaˇcala vrˇsite tek kada se glaˇcalo dobro
ohladı.
2. Podnicu glaˇcala uredno ˇcistite mekom i vlaˇznom krpom i pri tom pazite da podnica ne dod¯e u kontakt
sa nekom metalnom povrˇsinom.
3. Uporabom ˇcaˇckalice uklonite naslage kamenca nakupljene u otvorima za izlaz pare.
4. ˇCesto perite unutarnjost spremnika za vodu. Spremnik za vodu napunite vodom i glaˇcalo protresite,
zatim kroz otvor za sipanje vode prospite vodu iz spremnika.
5. Ne koristite jake kiseline i alkalne kemikalije koje mogu uzrokovati promjenu boje i izazvati oˇste´cenje
na proizvodu.
- 42 -
Page 44

6. Nakon svake uporabe ispraznite vodu iz spremnika i glaˇcalo odloˇzite u okomitom poloˇzaju.
JEDNOSTAVNE METODE ODRˇZAVANJA:
Ukoliko vaˇse parno glaˇcalo i nakon primjene gore navedenih metoda ne bude uredno radilo molimo vas
da ga odnesete na pregled i kontrolu u ovlaˇsteni servisni centar.
NAPOMENA: NAKON SVAKE UPORABE OBAVEZNO POSUˇSITE PODNICU PARNOG GLAˇCALA.
- 43 -
Page 45

- 44 -
25
50
10
Page 46

- 45 -
Page 47

- 46 -
Page 48

- GARANT‹ fiARTLARI -
1) Garanti süresi,mal›n teslim tarihinden itibaren bafllar ve 2 y›ld›r.
2) Mal›n bütün parçalar› dahil olmak üzere tamam› Firmam›z›n garanti kapsam›ndad›r.
3) Mal›n garanti süresi içerisinde ar›zalanmas› durumunda, tamirde geçen süre garanti
süresine eklenir. Mal›n tamir süresi, 20 iflgününü geçemez. Bu süre mala iliflkin ar›zan›n
servis istasyonuna, servis istasyonunun olmamas› durumunda, mal›n sat›c›s›, bayii,
acentesi, temsilcili¤i, ithalatç›s› veya imalatç›s›-üreticisinden birine bildirim tarihinden
itibaren bafllar. Tüketicinin ar›za bildirimini; telefon, faks, e-posta, iadeli taahhütlü mektup
veya benzeri bir yolla yapmas› mümkündür. Ancak, uyuflmazl›k halinde ispat yükümlülü¤ü
tüketiciye aittir. Mal›n ar›zas›n›n 10 ifl günü içerisinde giderilememesi halinde, imalatç›üretici veya ithalatç›; mal›n tamiri tamamlan›ncaya kadar, benzer özelliklere sahip baflka
bir mal› tüketicinin kullan›m›na tahsis etmek zorundad›r.
4) Mal›n garanti süresi içerisinde gerek malzeme ve iflçilik, gerekse montaj hatalar›ndan
dolay› ar›zalanmas› halinde, iflçilik masraf›, de¤ifltirilen parça bedeli ya da baflka herhangi
bir ad alt›nda hiçbir ücret talep etmeksizin tamiri yap›lacakt›r.
5) Tüketicinin onar›m hakk›n› kullanmas›na ra¤men mal›n;
• Tüketiciye teslim edildi¤i tarihten itibaren, garanti süresi içinde kalmak kayd›yla, bir y›l
içerisinde en az dört defa veya imalatç›-üretici ve/veya ithalatç› taraf›ndan belirlenen
garanti süresi içerisinde alt› defa ar›zalanmas›n›n yan› s›ra, bu ar›zalar›n maldan
yararlanamamay› sürekli k›lmas›,
• Tamiri için gereken azami süresinin afl›lmas› ,
• Firman›n servis istasyonunun, servis istasyonunun mevcut olmamas› halinde s›rayla
sat›c›s›, bayii, acentesi temsilcili¤i ithalatç›s› veya imalatç›-üreticisinden birisinin
düzenleyece¤i raporla ar›zan›n tamirini mümkün bulunmad›¤›n›n belirlenmesi, durumlar›nda
tüketici mal›n ücretsiz de¤ifltirilmesini, bedel iadesi veya ay›p oranda bedel indirimi talep
edebilir.
6 ) Mal›n kullanma k›lavuzunda yer alan hususlara ayk›r› kullan›lmas›ndan kaynaklanan
ar›zalar garanti kapsam› d›fl›ndad›r.
7 ) Garanti Belgesi ile ilgili olarak ç›kabilecek sorunlar için Gümrük ve Ticaret Bakanl›¤›
Tüketicinin Korunmas› ve Piyasa Gözetimi Genel Müdürlü¤ü’ne baflvurabilir.
‹THALATÇI F‹RMA
DE‹MA ELEKTROMEKAN‹K ÜRÜNLER ‹NfiAAT SPOR MALZEMELER‹ ‹MALAT SAN. VE T‹C. A.fi.
Cihangir Mh. Güvercin Cd. No:4 Haramidere Mevkii Avcılar - ‹stanbul - Türkiye
Ça¤rı Merkezi: 444 66 86
www.sinbo.com.tr - info@sinbo.com.tr
- 47 -
Page 49

- SSI 2871 ÜTÜ -
- GARANT‹ BELGES‹ -
Garanti Belge No : 97032
SSHY Belge No : 35274
‹THALATÇI F‹RMA
Ünvanı : DE‹MA ELEKTROMEKAN‹K ÜRÜNLER‹ ‹Nfi. SPOR MALZ.
‹MALAT SAN. ve T‹C. A.fi.
Adresi : Cihangir Mah. Güvercin Cad. No:4 Haramidere Mevkii
Avc›lar / ‹STANBUL
Tel. : Ça¤rı Merkezi: 444 66 86
Yetkili Kifli :
Yönetim Kurulu Baflkan›
Ürünün Cinsi : ÜTÜ
Markası : S‹NBO
Modeli : SSI 2871
Alt Modeli : Bandrol ve Seri No :
Teslim Tarihi ve Yeri :
Garanti Süresi : 2 Yıldır
Azami Tamir Süresi : 20 ‹fl Günü
Kullanım Ömrü : Bakanl›kça belirlenen ve ilan edilen kullan›m ömrü 10 y›ld›r.
(Ürünün fonksiyonlar›n› yerine getirebilmesi için gereken yedek parça temin süresi)
SATICI F‹RMA
Ünvanı :
Adresi :
Tel.Fax :
Fatura Tarihi ve No :
Teslim Tarihi ve Yeri :
‹mza ve Kafle :
Bu bölüm, ürünü sat›n ald›¤›n›z Yetkili Sat›c› taraf›ndan imzalanacak ve kaflelenecektir.
Bu belgenin kullan›lmas›na; 4077 say›l› Tüketicinin Korunması Hakkında Kanun ve bu Kanun’a dayan›larak yürürlü¤e konulan Garanti Belgesi
Uygulama Esaslar›na Dair Yönetmelik uyar›nca, TC Gümrük ve Ticaret Bakanlı¤ı, Tüketicinin Korunması ve Piyasa Gözetimi Genel Müdürlü¤ü
tarafından izin verilmifltir.
Garanti Belge Onay Tarihi : 04/02/2011
Garanti Belge Vize Tarihi : 14/01/2013
SSHY Belge Onay Tarihi : 04/04/2012
- 48 -
Page 50

MÜfiTER‹ H‹ZMETLER‹
De¤erli Müflterimiz,
En uygun fiyata en iyi ürünü vermenin yan› s›ra; en iyi hizmeti vermenin de
önemli oldu¤una inan›yoruz. Bu nedenle siz bilinçli tüketicilere daha yak›n
olabilmek için, internet adresimizdeki eriflim formlar›n›n yan› s›ra, tüketici
dan›flma hattımızı da hizmetinize açm›fl durumday›z.
TÜKET‹C‹
DANIfiMA HATTI
444 66 86
Tüketici Dan›flma Hattımızı,
- Hafta içi her gün 08.00-18.00 saatleri aras›nda arayabilir; istek, öneri ve
flikayetlerinizi firmam›za iletebilirsiniz.
Tüketicinin Dikkatine:
Ürünlerimizle ilgili hizmetleri tam olarak alabilmek için afla¤›daki önerilere
uyman›z› rica ederiz:
1. Ürünü ald›¤›n›zda Garanti Belgesini mutlaka yetkili sat›c›n›za onaylatt›r›n›z.
2. Ürünü kullanma k›lavuzunda belirtilen hususlara göre kullan›n›z.
3. Ürününüzle ilgili hizmet talebiniz oldu¤unda yukar›daki telefon
numaralar›ndan, Tüketici Danıflma Hattına baflvurunuz.
4. Ürünü promosyon arac›l›¤› ile edinmiflseniz, ürüne ait garanti belgesini en
yak›n yetkili servisimize giderek onaylatt›r›n›z.
5. Teknik servisteki ifliniz bitti¤inde "Yetkili Servis Hizmet Fifli" almay›
unutmay›n›z. Alaca¤›n›z bu Hizmet Fifli, ileride ürününüzde meydana
gelebilecek herhangi bir sorunda size yarar sa¤layacakt›r.
www.sinbo.com.tr
0800 211 50 21
KAPIDAN KAPIYA
ÜCRETS‹Z
SERV‹S
Kap›dan Kap›ya Ücretsiz Servis Kampanyam›z dâhilinde Yurtiçi Kargo Firmas› ile iflbirli¤i içerindeyiz. Tüketicimiz
taraf›ndan sat›n al›nan ürünün fiyat› ne olursa olsun, Tüketicimiz ürün ile ilgili garanti kapsam›na giren herhangi
bir problem yaflad›¤›nda, 444 66 86 numaral› Tüketici Danıflma Hattımızı aramas› ve kay›t b›rakmas› yeterlidir.
Bu süreçten sonra Tüketicimizin ürünü ücretsiz olarak Yurtiçi Kargo taraf›ndan Tüketicimizin bulundu¤u adresten
al›n›p, 10• ifl günü içerisinde ürün çal›fl›r bir vaziyette, yine Tüketicimize Yurtiçi Kargo arac›l›¤› ile adresine teslim
edilmektedir. 10 ifl günü içerisinde sorunu çözülemeyen ürünler ise, yenisi ve/veya bir üst modeli ile de¤ifltirilmektedir.
Tüm bu süreçte Tüketicilerimizden hiçbir ücret talep edilmemektedir.
(•Ürünün servis garanti süresi, Yurtiçi Kargo ürünü Sinbo Fabrikas›’na teslim ettikten sonra bafllar.)
- 49 -
10 GÜNDE
TESL‹MAT
GARANT‹S‹
(•)
Page 51

- TEDAR‹KÇ‹ F‹RMA / EXPORTER United Favour Development Limited
Unit B, 10/F Lee May Building 788-790
Nathan Road, Mongkok, Kowloon, HK.
- UYGUNLUK BEYANI / CE Bureau Veritas LCIE CHINA
Building 4, No. 518, Xin Zhuan Road,
CaoHejing, Songjiang High-Tech Park
Shanghai
EEE Yönetmeli¤ine uygundur.
AEEE Yönetmeli¤ine uygundur.
Made in P.R.C.
‹mal Y›l› : 2014
 Loading...