

Page 1
www.sinbo.com.tr
SSI 2869 BUHARLI ÜTÜ
KULLANMA KILAVUZU
TR
EN
FR
NL
DE
ES
RU
UA
HR
AR
Page 2

De¤erli Müflterimiz,
Ürün seçiminde S‹NBO'yu tercih etti¤iniz için teflekkür ederiz.
Uzun ve verimli bir kullan›m için cihaz› kullanmadan önce bu k›lavuzu özellikle güvenlik
talimatlar›na dikkat ederek okuman›z› ve devaml› suretle saklaman›z› tavsiye ederiz.
Sayg›lar›m›zla,
Sinbo Küçük Ev Aletleri
SINBO SSI 2869 BUHARLI ÜTÜ
KULLANIM KILAVUZU
Cihazla oynamamalarını güvenceye almak için çocuklar gözetim altında tutulmalıdır.
Bu ürün (çocuklar dahil ) fiziksel hassasiyeti az, zihinsel olarak yetersiz, deneyimsiz ve yeterli bilgiye
sahip olmadan yada kendilerinin güvenli¤inden sorumlu olan kifliler tarafından bu ürünü kullanmak
için gerekli talimatlar verilmemifl kiflilerin kullanımına uygun de¤ildir.
Isıl kesicinin istenmeden bafllangıç konumuna gelmesinden kaynaklanan bir tehlikeyi önlemek için,
bu cihaz bir zamanlayıcı gibi dıfl bir anahtarlama düzeni üzerinden beslenmeli veya yardımcı program
vasıtasıyla düzenli olarak devresi kapatılan ve açılan bir devreye ba.lanmalıdır.
Sıcakken veya so¤ukken ütü ve kordonu 8 yaflından küçük çocukların ulaflamayaca¤ı bir yerde
bulundurulmalıdır.
Children being supervised not to play with the appliance.
This appliance is not intended for use by persons (including children) with reduced physical,sensory
or mental capabilities, or lack of experience and knowledge, unless they havebeen given supervision
or instruction concerning use of the appliances by a personresponsible for their safety. Children
should be supervised to ensure that they do not play with the appliance.
Heat caused by the arrival of the cutter accidentally starting position to avoid a hazard, such as a
timer, this device
is fed via an external switching scheme on a regular basis or by means of the utility opened and closed,
and a circuit connected to the circuit
Hot or cold iron and cords should be out of reach of children under 8 years.
- 1 -
Page 3

SINBO SSI 2869 BUHARLI ÜTÜ
KULLANIM KILAVUZU
(Kullanmadan önce talimat› dikkatlice okuyunuz ve saklay›n›z)
UYARI:
1. Bu cihaz kapasitesi yeterli, deneyimli ve sa¤duyulu kiflilerin kullan›m› için amaçlanm›flt›r. Güvenlik
bak›m›ndan yetersiz olan kiflilerin cihaz› kullanmak için koruyucular› taraf›ndan gözetilmeleri gerekir.
Çocuklar›n cihazla oynamamalar› için gözetilmeleri gerekir.
2. Ütü ana güç kayna¤›na ba¤l›yken bafl›bofl b›rak›lmamal›d›r.
3. Ütünün sabit bir yüzeyde kullan›lmas› ve b›rak›lmas› gerekir.
4. Ütüyü herhangi bir yere yerlefltirirken yüzeyin sabit oldu¤undan emin olunuz.
5. E¤er düflürülmüflse, gözle görülür hasar veya s›z›nt› iflareti varsa ütünün kullan›lmamas› gerekir.
6. Su rezervuar› suyla doldurulmadan önce fiflinin prizden çekilmesi gerekir (buharl› ütüler ve su
püskürtme için araçlar› birlefltiren ütüler)
Spesifikasyonlar
* Yap›flmaz taban plakas›
* Kuru /püskürtmeli/buharl›/dikey/buhar patlamal›
* Kendi-kendine temizleme fonksiyonu
* De¤iflken buhar kontrol
* Gösterge ›fl›¤›yla 360 derece f›rdöndü kablo
* Ayarlanabilir s›cakl›k kontrol
* Su tank› kapasitesi:150ml
* Normal buhar h›z›: 20g/dak
* Buhar püskürtme: 35g
* AC230V, 50Hz, 2000W
Güvenlik Talimat›
1. ‹lk defa kullanmadan önce lütfen cihaz›n üzerindeki voltaj de¤erlendirmesinin evinizdeki ana flebeke
voltaj›na karfl›l›k gelip gelmedi¤ini kontrol ediniz.
2. K›sa süreli¤ine bile olsa ütüyü b›rak›rken cihaz›n fiflini çekti¤inizden emin olunuz ve ütünün uç taraf›
üzerinde durmas›n› sa¤lay›n›z. Lütfen ütüyü çocuklar›n eriflimden uzak bir yerde b›rak›n›z.
3. Ütü kullan›ld›¤›nda yüksek s›cakl›¤a eriflecektir, kesinlikle elinizi de¤dirmeyiniz veya kazadan kaç›nmak
için yan›c› ürüne yak›n tutmay›n›z.
4. Dikkat: Ütüyü suyla doldurmadan önce cihaz›n fiflini prizden ç›kart›n›z.
5. Ütüyü kesinlikle suya veya di¤er s›v›ya dald›rmay›n›z.
6. E¤er kabloda herhangi bir hasar varsa lütfen ütüyü özel tamir yetkilimize götürünüz.
7. Sudaki tortu veya mineral kireç oluflmas›na sebep olacak ve buhar giriflini t›kayacakt›r bu yüzden
dam›t›lm›fl su kullan›lmas› tavsiye edilir.
8. Kimyasal olarak kireçten ar›nd›r›lm›fl su kullanmay›n›z.
9. D›flar› ç›kan buhar s›cakt›r ve bu yüzden tehlikelidir. Buhar› kesinlikle insanlara do¤ru tutmay›n›z.
10. Ütünün sabit yüzeyde kullan›lmas› ve b›rak›lmas› gerekir.
11. Ütüyü herhangi bir yere yerlefltirirken yüzeyin sabit oldu¤undan emin olunuz.
12. Kablosundan tutup çekmeyiniz veya tafl›may›n›z ya da kabloyu keskin kenarlar ve köfleler etraf›ndan
çekmeyiniz. Kabloyu ›s›nm›fl yüzeylerden uzak tutunuz.
13. Ütü düflürülmüflse veya herhangi bir hasar ya da s›z›nt› belirtisi varsa ütünün kullan›lmamas› gerekir.
- 2 -
Page 4
‹lk kullan›mla ilgili uyar›lar:
1. Ütü ya¤lanm›flt›r bundan dolay› ilk defa aç›ld›¤›nda ütü hafifçe duman ç›karabilir. K›sa bir süre sonra
bu durum sona erecektir.
2. ‹lk defa kullanmadan önce taban plakas›ndan herhangi bir etiketi veya koruyucu folyoyu ç›kart›n›z.
Tabak plakas›n› yumuflak bir bezle temizleyiniz.
3. Taban plakas›n› düzgün muhafaza ediniz: metal maddelerle sert temastan kaç›n›n›z.
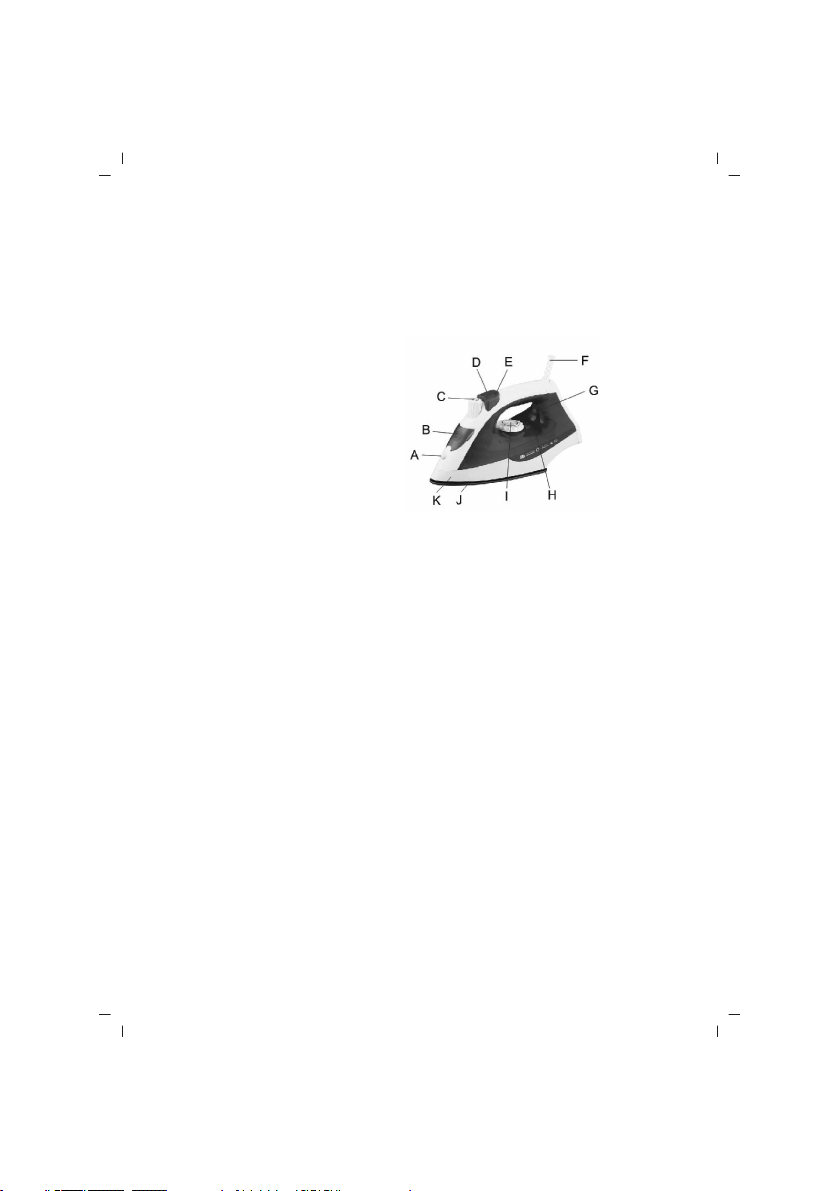
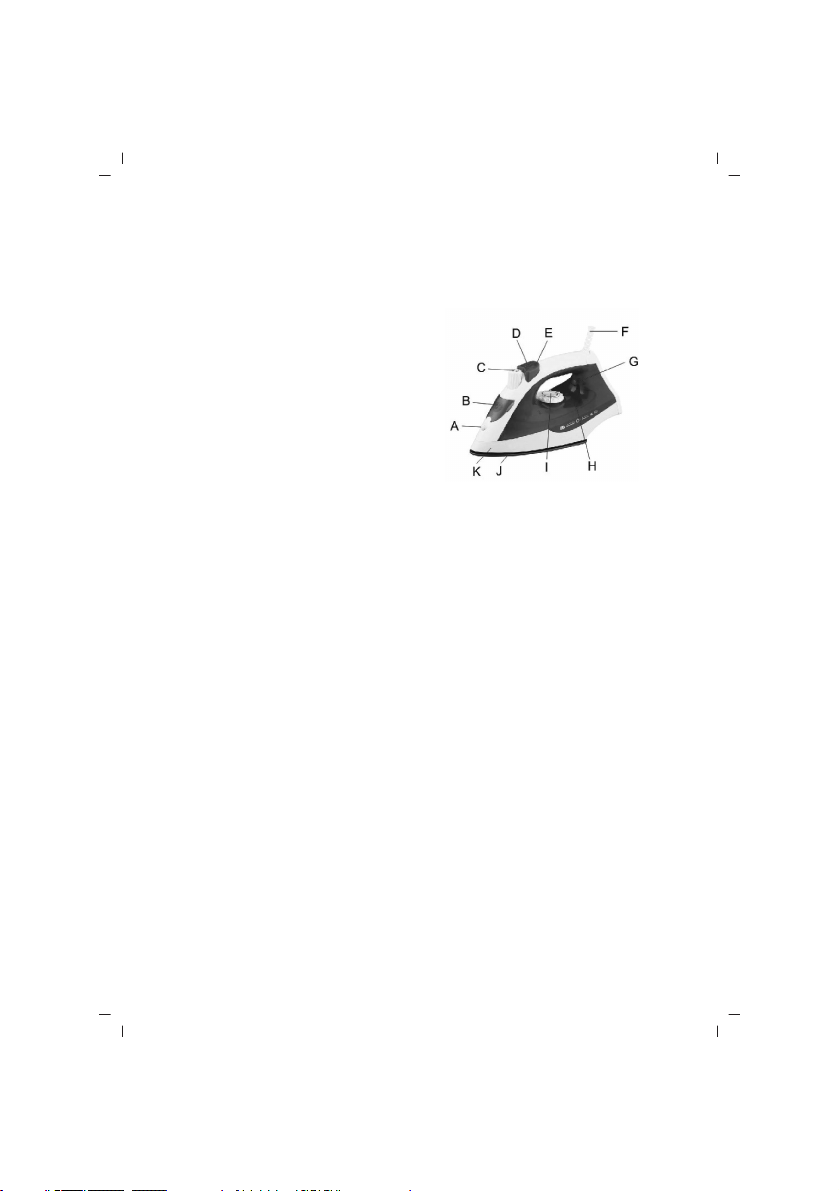
Bileflen ‹smi
A. Püskürtme Nozülü
B. Su Doldurma Girifli
C. Buhar Kontrol Dü¤mesi
D. Buhar Patlama Butonu
E. Püskürtme Butonu
F. Güç Kablosu Koruyucu
G. Gösterge Ifl›¤›
H. Su Tank›
I. Termostat ‹bresi
J. Tabak Plakas›
K. Süpürgelik
Suyla Doldurma:
Ütünün fiflten çekildi¤inden ve termostat ibresinin MIN konumunda oldu¤undan emin olunuz. Ütüyü
taban dayana¤›na yerlefltiriniz, yaklafl›k 45 derecelik aç›yla ileri do¤ru e¤iniz ve su-doldurma girifline
su tank›n›n MAX konumuna kadar su dökünüz.
Dikey Buhar
“Buhar Patlamas›” da ütüyü dikey konumda tutarken uygulanabilir, bu durum elbiselerden, perdelerden
vb sarkan k›r›fl›kl›klar› gidermek için faydal› olacakt›r.
Kuru Ütüleme
1. Buhar kontrol butonunu O(=Buhar Yok) konumuna getiriniz.
2. Çeflitli elbiselerin etiketlerini y›kamayla ilgili olarak ütülemeye ba¤lamak için do¤ru ütüleme s›cakl›¤›n›
ayarlay›n›z.
Buharl› Ütüleme
1. Ütüye suyu, su-doldurma metotlar›na göre doldurunuz.
2. Cihaz› fifle tak›n›z.
3. E¤er s›cakl›k göstergesine göre MAX konuma termostat ibresi ayarlan›rsa, buharl› ütüleme yap›labilir,
aksi takdirde taban plakas›ndan su s›zabilir.
4. Gösterge ›fl›¤› sönene kadar s›cakl›¤›n haz›r oldu¤unu gösterir.
5. Buhar kontrol butonunu do¤ru olarak ayarlay›n›z, buhar ç›k›fl›n› buhar kontrol butonunu geriye
çevirerek ayarlay›n›z ve ileri do¤ru çevirerek buhar ç›k›fl›n› azalt›n›z.
Dikkat: Sentetik Kumafl, Naylon, Sentetik ‹pek ve ‹pek buharl› ütüde kullan›lmaz, aksi takdirde yüzey
cilas› zarar görebilir.
Buhar Patlamas›
Bu fonksiyon sert k›r›fl›kl›klar ve a¤›r kumafllarda ifle yarar. ‘’Buhar Patlamas›’’ butonuna basarak yo¤un
bir buhar patlamas› taban plakas›ndan yay›l›r, bu durum inatç› k›r›fl›kl›klar› gidermede çok faydal›
olabilir. Buhar patlamas› sadece yüksek ütüleme s›cakl›¤› ile kullan›labilir. En iyi sonuç için buhar
butonuna basma ifllemleri aras›nda 5 saniyelik bekleme yap›lmal›d›r. Taban plakas›ndan suyun s›zmas›na
- 3 -
Page 5
engel olmak için 5 saniyeden fazla süreyle buhar butonuna sürekli basmay›n›z. Ayr›ca, buhar patlama
fonksiyonunu uygulamadan önce en az bir dakika zaman aral›¤› sa¤lay›n›z.
Püskürtme Metotlar›:
Herhangi bir s›cakl›kta püskürtme butonuna birkaç kere basarak elbiseler nemlendirilebilir. Su tank›nda
yeterince su oldu¤undan emin olunuz.
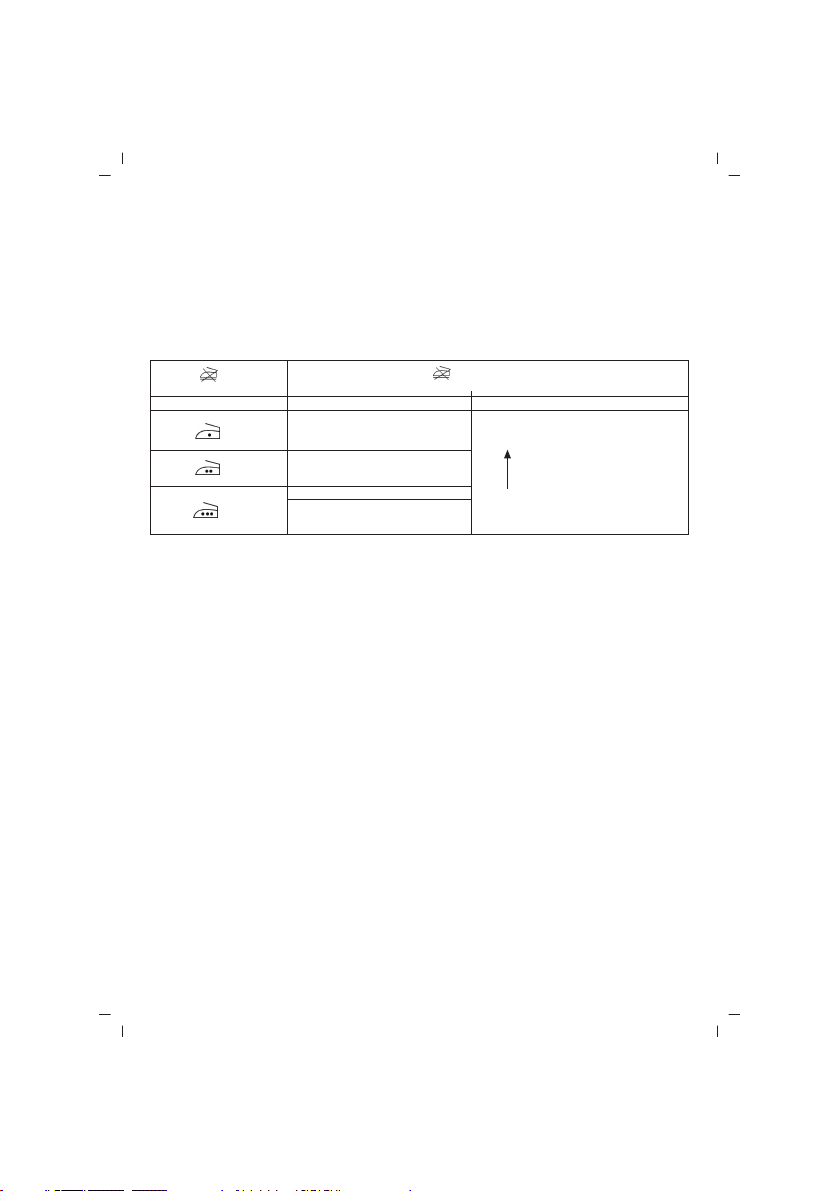
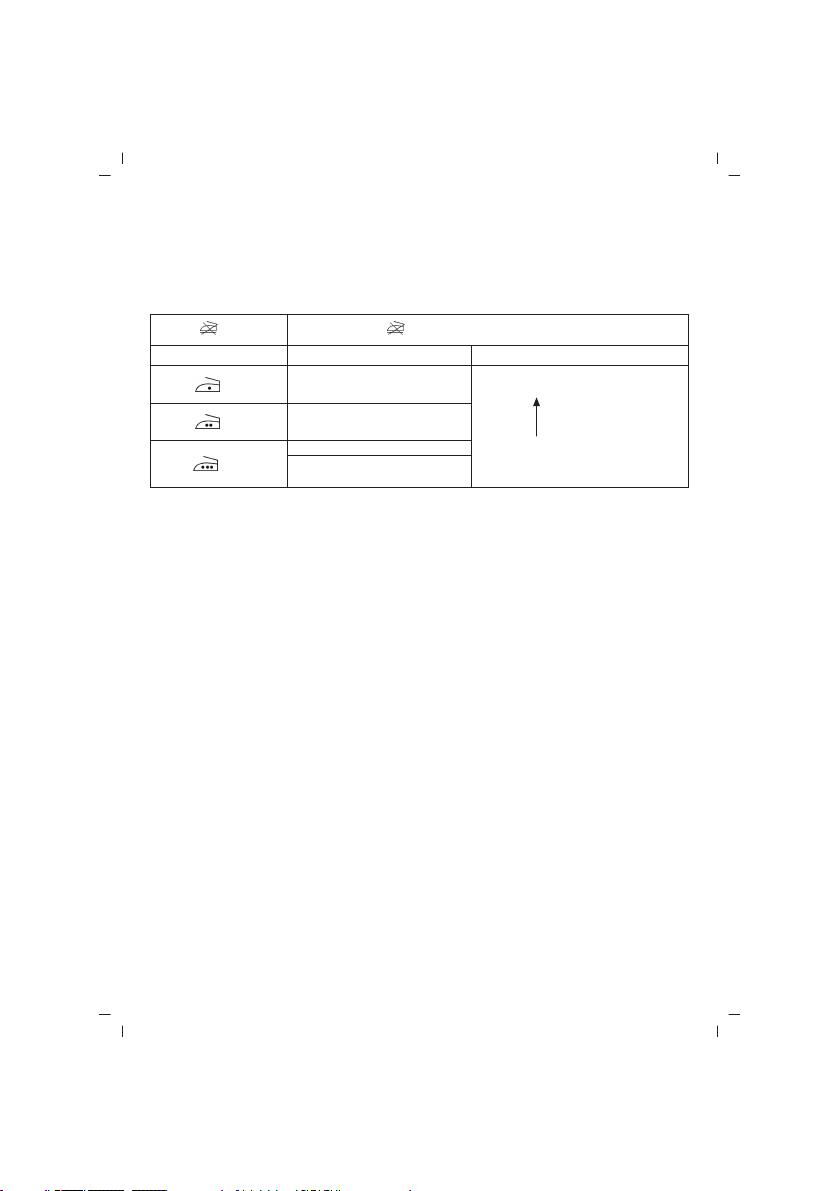
Kumafl Türü ve Termostat düflmesi ibre flekli:
Dikkat Lütfen etiket üzerindeki iflaretinin bu malzemenin ütülenmemesi
Etiketteki Talimat Kumafl Türü Termostat ‹bresi
Temizleme ve Bak›m:
Temizleme öncesinde fifli prizden ç›kart›n›z ve ütünün yeterince so¤umas›n› sa¤lay›n›z.
1. Taban plakas›n› nemli bir bezle ve afl›nd›r›c› olmayan bir (s›v›) temizleyici ile siliniz.
2. E¤er fiber taban plakas›na yap›flm›fl ise taban plakas›n› temizlemek için sirkeli nemli bir bez kullan›n›z.
3. Taban plakas›na zarar vermekten kaç›nmak için kesinlikle kuvvetli asit veya alkali kullanmay›n›z.
4. E¤er kireç buhar giriflini t›karsa, lütfen kireci bir kürdanla ç›kart›n›z; taban plakas›n›n yüzeyine zarar
vermeyiniz.
5. Ütüyü uç taraf› üzerinde duracak flekilde b›rak›n›z ve yeterince so¤umas›n› sa¤lay›n›z ve bu arada
kutudan ç›kan herhangi bir suyu dökünüz, buhar dü¤mesini “O” konumuna getiriniz.
gerekti¤ini gösterdi¤ine dikkat ediniz.
Naylon
‹pek MIN
Yün
Pamuk
Keten MAX
- 4 -
Page 6
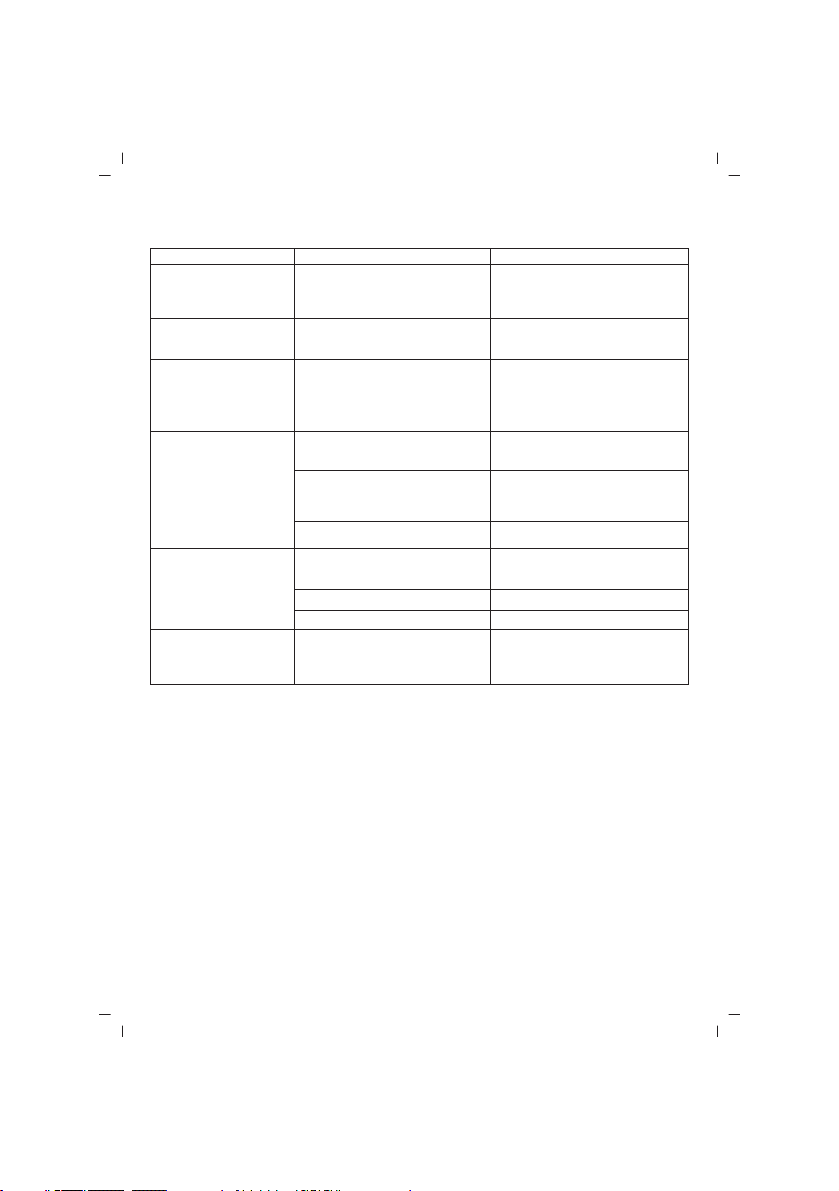
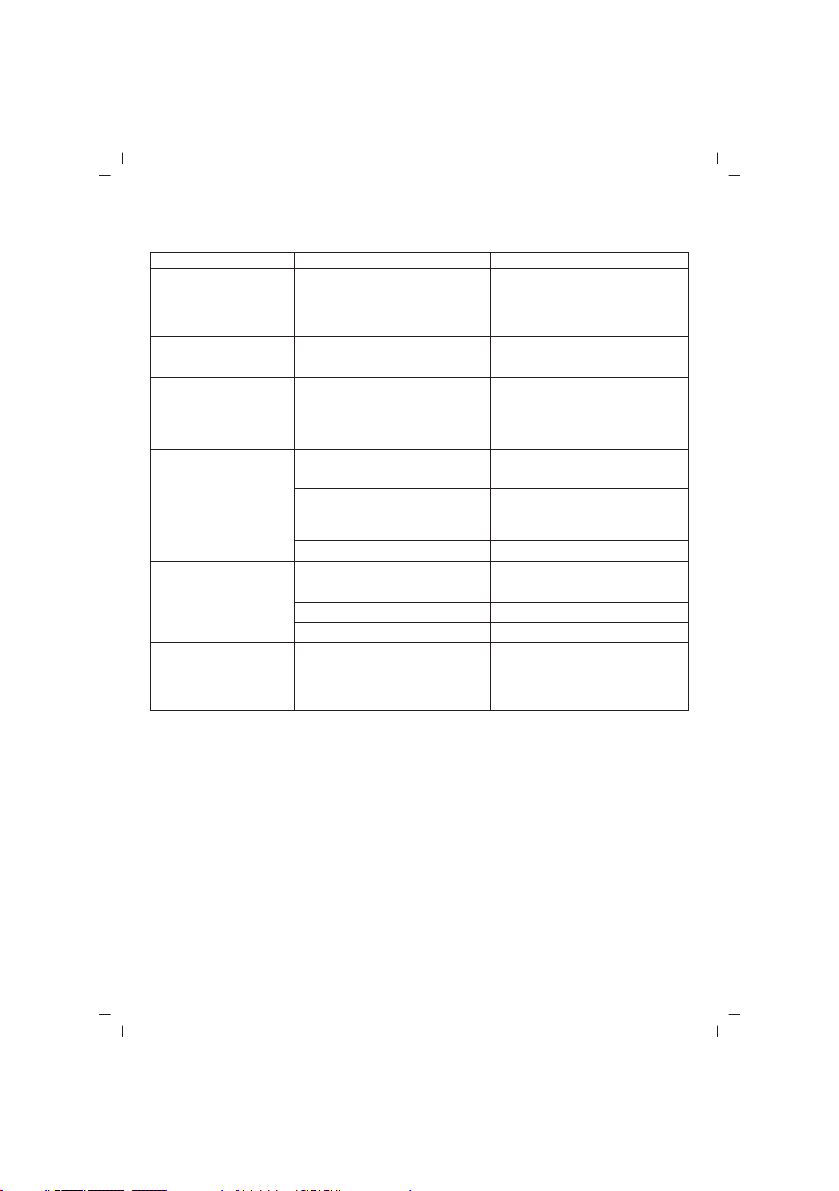
Basit Tamir Metotlar›
Sorun Olas› Sebepler Önlem
Yeterince ›s›nm›yor veya
çok ›s›n›yor
Buhar yok veya s›z›nt›
var
Buhar patlamas› veya
dikey buhar yok
Taban plakas›ndan su
s›z›yor
Buhar az
Püskürtme yok ‹çinde yeterince bas›nç veya hava
Termostat ibresi yanl›fl çevrilmifl
veya fiflten çekilmifl
Termostat ibresi MIN olarak
ayarlanm›fl
(Dikey) buhar patlama fonksiyonu
çok k›sa süre içinde çok s›k
kullan›lm›fl. Ütü yeterince s›cak
de¤il
Termostat ibresini buhar aral›¤›
d›fl›na ayarlanm›fl
Is› hala yeterli de¤il Buhar kontrol butonunu sadece
Su max konum üzerinde Kalan suyu dökünüz
Buhar kontrol butonunun do¤ru
yerde oldu¤unu kontrol ediniz
Buhar girifli t›kal› Girifli dam›t›lm›fl suyla temizleyiniz
Su tank›nda çok az su var Kutuya su doldurunuz
yok
Termostat ibresini do¤ru konuma
getiriniz ve ütünün fiflte olup
olmad›¤›n› kontrol ediniz
Termostat ibresini gereken konuma
getiriniz.
Yatay konumda ütülemeye devam
ediniz ve tekrar buhar patlama
fonksiyonunu (dikey) kullanmadan
önce bir süre bekleyiniz
Termostat ibresini buhar aral›¤›na
göre ayarlay›n›z
gösterge ›fl›¤› kapand›ktan sonra
aç›n›z.
Buhar kontrol butonunu do¤ru
yere getiriniz.
Püskürtme nozülüne elle bast›r›n›z
ve püskürtme butonun birkaç kez
sürekli olarak itiniz.
- 5 -
Page 7

ENGLISH
SINBO SSI 2869 STEAM IRON
INSTRUCTION MANUAL
(Read the instructions carefully before use and keep it)
WARNING:
1. The appliance is intended fro use by persons with disposing capacity, experiences and common
sense. For those persons who are lack of guarantee in safety, they must be supervised by their custodians
to use the appliance. Children should be supervised to ensure that they do not play with the appliance.
2. The iron must not be left unattended while it is connected to the supply mains
3. The iron must be used and rested on a stable surface
4. When placing the iron on its stand, ensure that the surface on which the stand is placed stable
5. The iron is not to be used if it has been dropped, if there are visible signs of damage or it is leaking.
6. The plug must be removed from the socket-outlet before the water reservoir is filled with water(for
steam irons and irons incorporating means for spray water)
Specifications
* Nonstick soleplate
* Dry/spray/steam/vertical/burst steam
* Self-cleaning function
* Variable steam control
* 360 degree swivel cord guard with indicate light
* Adjustable temperature control
* Water tank capacity:150ml
* Continious steam rate: 20g/min
* Steam boost: 35g
* AC230V, 50Hz, 2000W
Safety Instructions
1. Before using for the first time, please check if the voltage rating on the type plate corresponds to
the mains voltage in your home.
2. Make sure to unplug the appliance from the socket when leaving the iron even for a short while, and
stand the iron on its end. Please leave the iron away from the touch of children.
3. The iron will be of high temperature when used, never touch it with hand or close to the flammable
product in order to avoid the accident.
4. Caution: Unplug the appliance from the socket before filling the iron with water.
5. Never immerse the iron in water or other liquid.
6. Please send the iron to our special repair agent for repair if any damage on cord.
7. Deposit or Mineral in the water will lead to generate the scales and block the seam hole, therefore
it is advisable to use distilled water.
8. Do not use chemically descaled water.
9. The ejected steam is hot and therefore hazardous. Never direct the steam towards people.
10. The iron must be used and rested on a stable surface
11. When placing the iron on its stand, ensure that the surface on which the stand is placed is stable.
12. Do not pull or carry by cord, use cord as a handle, close a door on the cord, or pull cord around
sharp edges or corners, Keep cord away from heated surfaces
13. The iron is not to be used if it has been dropped ,if there are visible signs of damage or if it is leaking
Cautions of the first use:
1. The iron has been greased, and as a result, the iron may slightly smoke when switched on for the
- 6 -
Page 8
first time. After a short while, this will cease.
2. Before using for the fist time, remove any sticker or protective foil from the soleplate. Clean the
soleplate with a soft cloth.
3. Keep the soleplate smooth: avoid hard contact with metal objects.
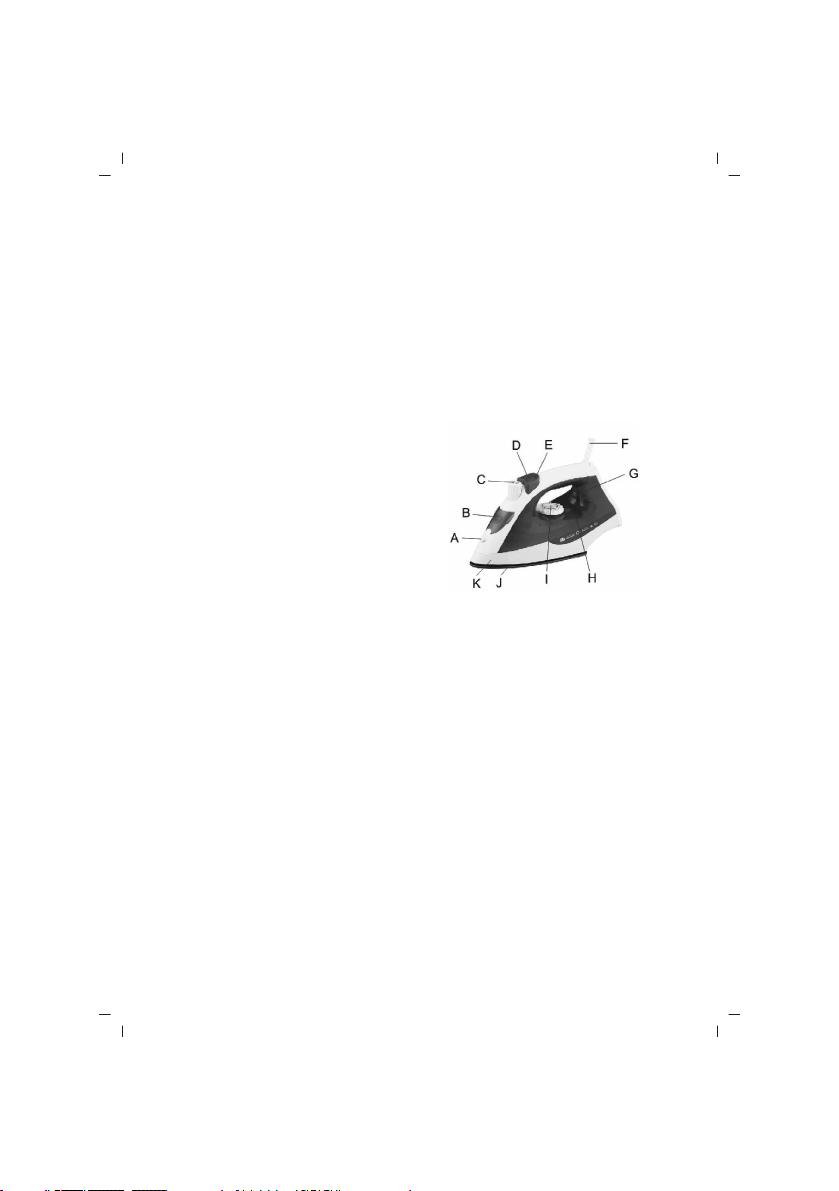
Component Name
A. Spray Nozzle
B. Water Filling Opening
C. Steam Control Knob
D. Burst of Steam Button
E. Spray Button
F. Power Cord Protector
G. Indicator light
H. Water Tank
I. Thermostat Dial
J. Sole plate
K. Skirt
Filling with Water:
Make sure iron is unplugged and the thermostat dial is in the MIN position. Place iron on the heel rest,
tilt forward approximately 45 angle and pour water into the water-filling opening to the MAX position
of the water tank.
Vertical Steam
“Burst of Steam” can also be applied when holding the iron in vertical position, this is useful for removing
creases from hanging clothes, curtains ,etc.
Dry Ironing
1. Set the steam control button to position O(=No Steam)
2. As per washing label of various clothes, set the correct ironing temperature to begin a ironing.
Steam Ironing
1. Fill water in the iron as per the water-filling methods.
2. Plug the appliance in the socket.
3. If only set thermostat dial to MAX position as per the temperature indicator, steam iron will be
available, otherwise water may leak from the soleplate.
4. It indicates that the temperature has been ready until the indicator light goes off.
5. Set the steam control button correctly, increase steam output by turning the steam control button
back and decrease steam output by forward.
Caution: Synthetic Fabric, Nylon, Synthetic Silk and Silk cannot use the steam iron, otherwise it will
damage the finish of surface.
Burst of Steam
This function works well for tough wrinkles and heavy fabrics. By pressing “Burst of Steam” button,
an intense burst of steam is emitted from the soleplate, this can be very useful when removing stubborn
creases. The shot of steam facility can be used only while ironing with high ironing temperature. For
optimal result, there should be 5 seconds rest between presses of the steam button. To prevent leaking
water from the soleplate does not press the steam button continuously for more than 5 seconds. Also
allow at least one minute interval before applying this burst of steam function.
- 7 -
Page 9
Spraying Methods:
At any temperature by pressing the spray button a couple of times, the laundry can be damped down.
Ensure that there is enough water in the water tank.
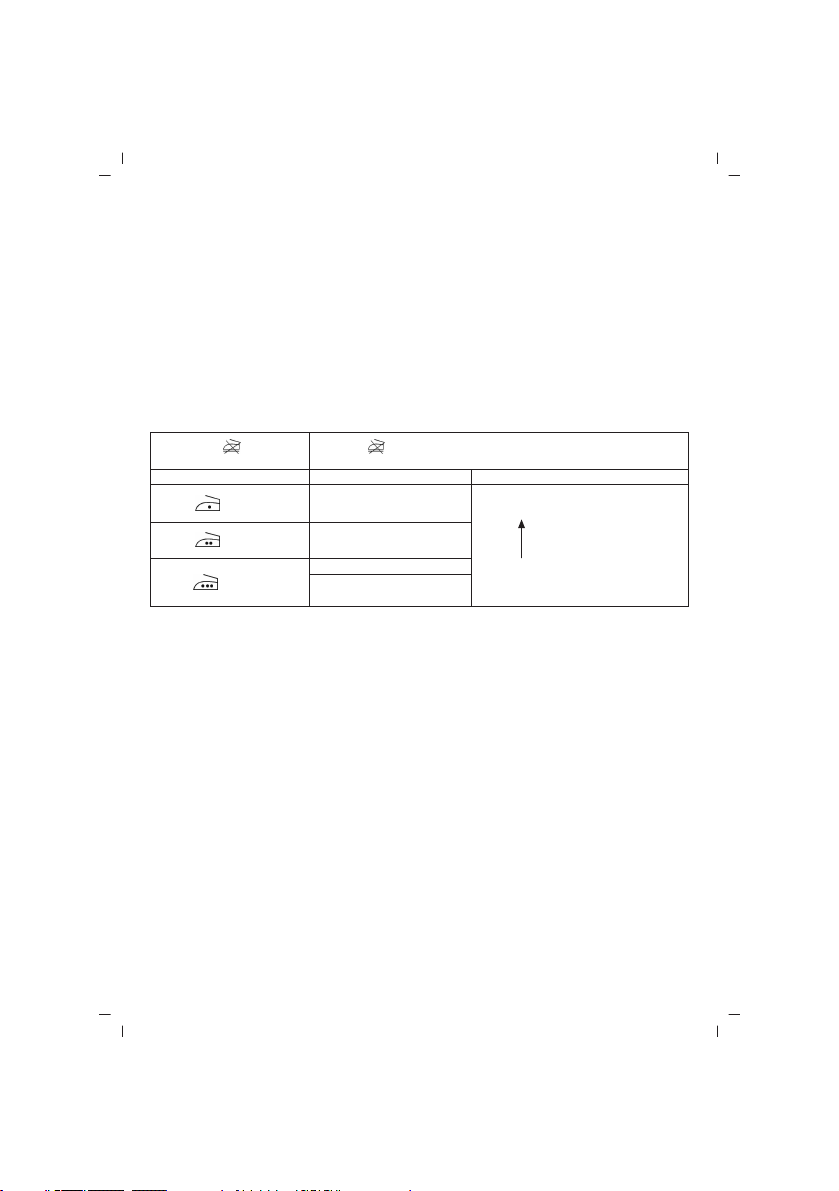
Type of Fabric and Thermostat knob Dial Form:
Caution Please note that on the label means that this article may not ironed.
Instructions on Label Type of Fabric Thermostat Dial
Nylon
Wool
Cotton MAX
Cleaning and Maintenance:
Before cleaning, remove the plug from the socket and allow the iron to cool down sufficiently.
1. Wipe off the soleplate with a damp cloth and a non-abrasive (liquid) cleaner.
2. If the fiber is adhered to the soleplate, use a damp cloth with vinegar to wipe off the soleplate.
3. Never use strong acid or alkali in order to avoid damaging the soleplate.
4. If the scale blocks the steam hole, please remove the scale with toothpick; do not damage the surface
of soleplate.
5. Stand the iron on its end and let it cool down sufficiently, and meantime pour any remaining water
out of the box, set the steam knob to position “O”.
Silk MIN
Linen
- 8 -
Page 10

Simple Repair Methods
Problem Possible Reasons Measurement
Not enough heat or Too
heat
No steam or Leakage The thermostat dial has been set to
No burst of steam or no
vertical steam
Leaking water from
Soleplate
Little Steam
No Spraying No enough pressure or air inside Press the spray nozzle by hand,
Rotate thermostat dial improperly
or unplugging
MIN
The (vertical) burst of steam
function has been used too often
within a very short period. The iron
is not hot enough
Set the thermostat dial out of steam
range.
The heat is still not enough. Open steam control button only after
The water is over than max position
Check if the steam control button
is in proper location.
Steam hole is blocked. Clean hole with distilled water.
Too little water in the water tank Fill water into the box
Correct Thermostat dial in position
and check if the iron is plugged.
Set the thermostat dial to the
required position.
Continue ironing in horizontal
position and wait a while before
using the (vertical) burst of steam
function again
Set the thermostat dial as per steam
range.
the indicator light goes off.
Pour out the remaining water
Set the steam control button to the
proper location.
and push the spray button several
times continuously.
- 9 -
Page 11

FRANÇAIS
SINBO SSI 2869 FER A REPASSER A VAPEUR
MODE D’EMPLOI
(Lire attentivement ce mode d'emploi avant d’utiliser l’appareil et conservez-le pour y réferer
ultérieurement)
AVERTISSEMENT:
1. Cet appareil n'est pas prévu pour être utilisé par des personnes (y compris les enfants) dont les
capacités physiques, sensorielles ou mentales sont réduites, ou des personnes dénuées d'expérience
ou de connaissance, sauf si elles ont pu bénéficier, par l'intermédiaire d'une personne responsable de
leur sécurité, d'une surveillance ou d'instructions préalables concernant l'utilisation de l'appareil. Il
convient de surveiller les enfants pour s'assurer qu'ils ne jouent pas avec l'appareil.
2. Ne laissez pas l'appareil sans surveillance lorsqu'il est branché ou à proximité des enfants.
3. Placez et utilisez cet appareil sur une surface stable.
4. Vérifiez si la surface est stable avant de placer l’appareil.
5. Ne pas utiliser l'appareil si vous l’avez laissé tomber ou si l’appareil a été dommagé de quelque
façon que ce soit.
6. Débrancher la fiche du fer de la prise de courant avant de remplir le réservoir avec de l’eau. ( le fer
a vapeur et le fer combine des outils de pulvérisation d’eau.)
Spécifications
* Semelle anti-adhésive
* Sec/spray/vapeur/vertical/jet vapeur
* Auto-nettoyage
* Contrôle de vapeur variable
* Câble rotatif à 360 degrés avec le voyant lumineux
* Contrôle de température réglable
* Capacité de réservoir:150ml
* Débit de vapeur: 20g/min
* Débit de jet vapeur: 35g
* AC230V, 50Hz, 2000W
Consignes de Sécurité
1. Avant de brancher votre appareil, assurez-vous que la tension électrique de votre domicile correspond
à celle indiquée sur la plaque signalétique de l’appareil.
2. Veillez à débrancher la fiche du fer même pendant pour une courte période et laissez le fer sur son
dos. Gardez l’appareil hors de la portée des enfants.
3. Le fer atteint des températures élevées lorsqu’il fonctionne, gardez vos mains ou maintenez-les loin
du fer chaud afin d’éviter tout accident.
4. Attention: Débranchez la fiche du fer de la prise avant de remplir le réservoir.
5. Ne jamais immerger le fer dans l’eau ou toute autre liquide.
6. Si le câble d’alimentation est endommagé, contactez notre service agrée.
7. Les résidus ou le minéral de l’eau provoque la formation de calcaire et vont bloquer l'entrée de de
vapeur, il est recommandé d'utiliser de l'eau distillée.
8. Ne pas utiliser d’eau purifiée chimiquement du calcaire.
9. La vapeur est chaude et donc dangereuse. Ne jamais maintenir la vapeur vers les autres.
10. Placez et utilisez cet appareil sur une surface stable
11. Vérifiez si la surface est stable avant de placer l’appareil.
- 10 -
Page 12
12. Ne pas tirer ou porter le fer par son cordon ou ne pas tirer le cordon autour des arêtes et des coins
vives. Garder le cordon loin des surfaces chauffées.
13. Ne pas utiliser l'appareil si vous l’avez laissé tomber ou si l’appareil a été dommagé de quelque
façon que ce soit.
Avertissement avant la première utilisation:
1. Le fer pourrait émettre une fumée légère parce qu’il est lubrifié. Cette situation va terminer dans
un court délai.
2. Retirez toute étiquette ou feuille de protection de la semelle avant la première utilisation. Nettoyez
la semelle avec un chiffon doux.
3. Gardez la semelle d’une façon correcte : évitez le contact dur avec des matériaux métalliques.
DESCRIPTION DE L’APPAREIL
A. Sortie spray
B. Orifice de remplissage du réservoir d’eau
C. Bouton de réglage vapeur
D. Bouton de jet vapeur
E. Bouton spray
F. Cordon d'alimentation
G. Témoin lumineux
H. Réservoir d’eau
I. Réglage de température
J. Semelle
K. Corps inférieur
Remplir de l’eau:
Débranchez la fiche de la prise murale et tournez le bouton de réglage de température à la position
MIN. Placez le fer sur son dos et penchez-le vers l’avant à un angle d’environ 45 degrés et versez l’eau
dans le réservoir par l'orifice de remplissage du réservoir d'eau jusqu'à MAX.
Vapeur Verticale
Applicable quand le fer est à la position verticale et “bouton de jet vapeur “est actif, cela est utile pour
résoudre les rides pendantes des vêtements et des rideaux.
Repassage Sec
1. Réglez le bouton de contrôle de vapeur à la position O ( Non Vapeur )
2. Réglez la température de repassage convenable selon les étiquettes de repassage des vêtements.
Repassage à Vapeur
1. Remplir le réservoir selon les méthodes de remplissage.
2. Branchez la fiche à la prise.
3. Si vous réglez la température à la position MAX selon l’indicateur de température, sinon la semelle
pourrait fuire de l’eau
4. Quand le voyant lumineux s’éteint, le fer à prêt pour le repassage.
5. Réglez correctement le bouton de vapeur, réglez la sortie de vapeur en tournant le bouton de contrôle
de vapeur vers l’arrière et diminuez la sorite de vapeur en tournant le bouton vers l’avant.
Attention: Le repassage à vapeur ne peut pas être utilisé pour les tissus synthétiques, nylon, soie
synthétique et soie, sinon la finition de surface pourrait être endommagé.
- 11 -
Page 13
Jet vapeur
Cette fonction est utile dans les rides durs et les tissus lourds. Lorsque vous appuyez sur le bouton
de jet vapeur, une vapeur puissante est émise par la semelle, cela peut être très utile pour éliminer
les rides tenaces. Le jet vapeur peut être utilisé uniquement avec la haute température de repassage.
Pour obtenir des meilleurs résultat, laisses 5 secondes d’intervalle pour appuyer sur le bouton de
nouveau. Ne pas appuyer sur le bouton de vapeur lus de 5 secondes afin d’éviter la fuite de l’eau de
la semelle. En outre laissez au moins une minute d’intervalle avant d’appliquer la fonction de jet vapeur.
Méthodes de pulvérisation:
Appuyez quelques fois sur le bouton spray à n’importe quelle température pour humidifier les vêtements.
Vérifiez qu’il y a assez d’eau dans le réservoir.
Type de tissus et la Température:
Attention Ce signe sur l’étiquette signifie que ce matériel ne doit pas être
Contrôle de la température Tissus Température
Nylon
Laine
Lin MAX
Nettoyage et Entretien:
Débranchez l’appareil et laissez-le refroidir avant le nettoyage.
1. Nettoyez la semelle avec un chiffon humide et un nettoyant non abrasif ( liquide)
2. Si la fibre est collée à la semelle, utilisez un chiffon humide et à vinaigre pour la nettoyer.
3. Ne jamais utiliser d'acide ou d'alcali afin d'éviter d'endommager la semelle.
4. Si le calcaire bloque l’entrée de vapeur, nettoyez le calcaire avec un cure-dent, ne pas endommager
la surface de la semelle.
5. Placez le fer sur son dos et laissez le refroidir, versez l’eau du réservoir et tournez le bouton de
vapeur à la position “0”.
repassé.
Soie MIN
Coton
- 12 -
Page 14
Méthodes Simples pour la Réparation
Problèmes Causes Possibles Solutions
Réchauffage non suffisant
ou surchauffage
Pas de vapeur ou il y a
une fuite
Pas de jet vapeur ni
vapeur verticale
Fuite par la semelle
Vapeur est insuffisante
Pas de pulvérisation Pas assez de pression ou de l’air
Bouton de température est mal
réglé ou l’appareil est débranché
Le bouton de température est réglé
à MIN
Fonction de jet vapeur ( verticale)
est utilisé trop souvent dans un
temps très court. Le fer n’est pas
suffisamment chaud.
Le bouton de température est réglé
hors d’intervalle de vapeur
La température n’est pas encore
suffisante
L’Eau est sur le niveau max Versez l’eau restante
Vérifiez si le bouton de contrôle de
vapeur est à la position correcte
Entrée de vapeur est bloquée Nettoyez l’entrée par l’eau distillée
Très peu d’eau dans le réservoir Remplir de l’eau dans le réservoir
dans le fer
Réglez le bouton de température à
la position correcte et vérifiez si
l'appareil est branché à la prise de
courant
Réglez le bouton à la position
correcte
Continuez à repasser à la position
horizontale et attendez avant
d’utiliser de nouveau la fonction de
jet vapeur(verticale)
Réglez le bouton de température
selon intervalle de vapeur
Tournez le bouton de contrôle de
vapeur seulement après éteindre le
voyant lumineux
Réglez le bouton de contrôle de
vapeur à la position correcte
Appuyez sur la sortie spray avec
la main et appuyez constamment
sur le bouton de pulvérisation à
plusieurs reprises.
- 13 -
Page 15

NEDERLANDS
SINBO SSI 2869 STOOMSTRIJKIJZER
GEBRUIKSAANWIJZING
(Vòòr het gebruik voorzichtig de gebruiksaanwijzing lezen en bewaren)
WAARSCHUWING:
1. Dit apparaat is gepland voor het gebruik van de personen waarbij hun capaciteit genoeg zijn, die
ervaring hebben en die gezonde verstand hebben. De personen die onvoldoende zijn betreft de veiligheid
moeten onder toezicht worden genomen door hun beschermers om het apparaat te kunnen gebruiken.
De kinderen moeten onder toezicht worden gehouden om niet te laten spelen met het apparaat.
2. Als het strijkijzer is aangesloten aan de hoofdenergiekabel moet het niet zelfstandig gelaten worden.
3. Het strijkijzer moet op een vaste oppervlakte gebruikt en gelaten worden.
4. U moet tijdens het plaatsen van het strijkijzer op een een of andere plaats er zeker zijn van dat de
oppervlakte stabiel is.
5. Als het stijkijzer is laten vallen en als er een aanwijzing is van zienderogen beschadiging of lekkage
moet het niet gebruikt worden.
6. Voordat het waterreservoir met water is gevuld moet de stekker uit het stopcontact getrokken worden
(stoomstrijkijzers en de strijkijzers die de gereedschappen verbinden voor het waterspuiten).
Specificaties
* Ongeplakte zoolplaat
* Droge/spuit/stoom/verticale ontploffing stoom
* Zelfreinigingsfunctie
* Variabele stoomcontrole
* 360 graden wispelturige kabel met indicatorlamp
* Verstelbare warmtecontrole
* Watertankcapaciteit:150ml
* Normale stoomsnelheid: 20g/dak
* Ontploffing stoomsnelheid: 35g
* AC230V, 50Hz, 2000W
Veiligheidsinstructie
1. Vòòr het eerste gebruik controleert u alstublieft of de voltage waardering op het apparaat past aan
de voltage van de hoofdleiding thuis.
2. Zelfs voor een korte tijd moet u er zeker van zijn dat u de stekker van het apparaat uit het stopcontact
heeft getrokken en verzorgd u dat het strijkijzer op haar puntje staat. Alstublieft het strijkijzer buiten
bereik van kinderen houden.
3. Als het strijkijzer wordt gebruikt zal het hoge temperatuur bereiken, absoluut niet met uw hand
aanraken of niet dichtbij het brandende product houden om te vermijden van het ongeval.
4. Attentie: Voordat u het strijkijzer met water vult haalt u de stekker van het apparaat uit het stopcontact.
5. Het strijkijzer absoluut niet in water of in andere vloeistof bedrukken.
6. Als er aan de kabel een een of andere schade bevindt, alstublieft het strijkijzer naar onze speciale
reparatiebevoegde brengen.
7. De prut of de mineraal in het water zal het bestaan van kalk veroorzaken en zal de ingang van stoom
verstoppen, hierdoor wordt het gebruik van gedistalleerd water aangeraden.
8. Geen water gebruiken dat chemisch gezuiverd is van kalk.
9. De stoom die eruit komt is heet en is daarom gevaarlijk. De stoom absoluut niet richting de mensen
houden.
- 14 -
Page 16

10. Het strijkijzer moet op een stabiele oppervlakte gebruikt en gelaten worden.
11. Tijdens het plaatsen van het strijkijzer op een een of andere plaats moet u er zeker van zijn van dat
de oppervlakte stabiel is.
12. Niet aan de kabel van het strijkijzer trekken of dragen door ervan vast te houden of niet aan de
kabel trekken bij de omgeving van snijdende kanten of hoeken. De kabel op afstand houden van de
verwarmde oppervlakten.
13. Als het strijkijzer is laten vallen of als er een een of andere aanwijzing van beschadiging of lekkage
is moet het strijkijzer niet gebruikt worden.
Waarschuwingen over het eerste gebruik:
1. Het strijkijzer is ingesmeerd en kan er hierdoor een beetje rook eruit komen als het voor de eerste
keer wordt aangezet. Na een korte tijd zal deze situatie beeindigen.
2. Vòòr het eerste gebruik de een of andere etiket of de beschermfolie eruit halen van de zoolplaat. De
schotelplaat met een zachte doekje schoonmaken.
3. De zoolplaat correct bewaren: vermijden van het aanraken met metalen materialen.
Componentnaam
A. Spuitnozzle
B. Watervulingang
C. Stoomcontroleknop
D. Stoom ontploffingsknop
E. Spuitknop
F. Energiekabel beschermer
G. Indicatorlamp
H. Watertank
I. Thermostaatwijzer
J. Schotelplaat
K. Plint
Met water vulling:
U moet er zeker zijn van dat de stekker van het strijkijzer uit het stopcontact is getrokken en dat de
thermostaatwijzer op positie MIN staat. Het strijkijzer op de zoolsteun plaatsen, naar voren buigen met
een opening van ongeveer 45 graden en in water vulingang tot de positie van MAX van watertank water
gieten.
Verticale Stoom
Ook “Stoomontploffing” kan toegepast worden tijdens het houden van het strijkijzer op verticale positie,
deze situatie zal nuttig zijn om de kreukels te laten verwijderen die naar beneden hangen vanuit de
kledingen, gordijnen, enz.
Droog Strijken
1. De stoomcontroleknop op positie O(=Geen stoom) brengen.
2. De juiste strijktemperatuur instellen om de etiketten van de verschillende kledingen aan te sluiten
aan het strijken betreffende het wassen.
Stoomstrijken
1. Het water invullen in het strijkijzer volgens de methoden van watervulling.
2. De stekker van het apparaat in het stopcontact doen.
3. Als de thermostaatwijzer wordt afgesteld op positie MAX volgens de temperatuurindicator, kan er
stoomstrijken gedaan worden, anders kan er water doorlekken uit de zoolplaat.
- 15 -
Page 17

4. Laat zien dat de temperatuur klaar is totdat de indicatorlamp uitgaat.
5. Stoomcontroleknop juist afstellen, de stoomuitgang afstellen door de stoomcontroleknop terug te
draaien en door deze naar voren te draaien vermindert u de stoomuitgang.
Attentie: Synthetische Stof, Nylon, Synthetische Zijde en Zijde wordt niet gebruikt bij stoomstrijkijzer,
anders kan de lak van de oppervlakte beschadigd worden.
Stoomstrijkijzer
Deze functie is bruikbaar bij zware kreukels en stoffen. Door te drukken op de knop “Stoomontploffing”
wordt er een intensieve stoomontploffing verspreid uit de zoolplaat, deze situatie kan heel nuttig zijn
bij het verwijderen van de moeilijke kreukels. Stoomontploffing kan alleen gebruikt worden met hoge
strijktemperatuur. Voor het beste resultaat moet er 5 seconden gewacht worden tussen de procedures
van het drukken op de stoomknop. Om de waterlekking uit de zoolplaat te voorkomen niet voortdurend
meer dan 5 seconden op de stoomknop drukken. Tevens, vòòr de toepassing van de functie van
stoomontploffing verzorgd u een interval van minimaal één minuut.
Spuitmethoden:
Op een een of andere temperatuur kunnen de kledingen bevochtigd worden door een paar keer te
drukken op de spuitknop. U moet er zeker zijn van dat er genoeg water is in de watertank.
Wijzersoort van het vallen van de Thermostaat en Soort Stof:
Attentie Let u alstublieft op dat het teken op het etiket laat zien dat dit materiaal
De Instructie op het
Etiket Soort Stof Thermostaatwijzer
Zijde MIN
Wol
Linnen MAX
Reiniging en Verzorging:
Vòòr de reiniging de stekker uit het stopcontact halen en verzorgd u dat het strijkijzer voldoende
afgekoeld is.
1. De zoolplaat met een vochtige doekje en met een niet bijtende (vloeistof) reiniger schoonmaken.
2. Als de fiber op de zoolplaat is geplakt gebruikt u een vochtige doekje met azijn om de zoolplaat te
reinigen.
3. Om te vermijden van de beschadiging van de zoolplaat gebruikt u absoluut geen sterke zuur of alkali.
4. Als de kalk de stoomingang verstopt, alstublieft de kalk met een tandenstoker eruit halen; niet de
oppervlakte van de zoolplaat beschadigen.
5. Het strijkijzer laten staan zodat het op zijn drie kanten kan staan en verzorgd u dat het voldoende
is afgekoeld en ondertussen het water dat uit de bak komt gieten en de stoomknop op positie “O”
brengen.
niet gestreken moet worden.
Nylon
Katoen
- 16 -
Page 18

Eenvoudige Reparatie Methoden
Probleem Mogelijke Redenen Maatregel
Wordt niet heet genoeg of
wordt te heet
Er is geen stoom of er
is lekkage
Er is geen verticale stoom
of stoomontploffing
Er lekt water door uit
de zoolplaat
Weinig stoom
Geen spuiten Er bevindt geen voldoende druk of
De thermostaatwijzer is verkeerd
gedraaid of het is uit het stopcontact
gehaald.
De thermostaatwijzer is als MIN
ingesteld
De functie van (verticale)
stoomontploffing is te veel gebruikt
in een hele korte tijd. Het strijkijzer
is niet heet genoeg.
De thermostaatwijzer is afgesteld
buiten de stoomopening
Het is nog steeds niet heet genoeg De stoomcontroleknop openen
Het water is boven de positie max Het overgebleven water gieten
Controleert u of de
stoomcontroleknop op de juiste
plaats is
De stoomingang is verstopt De ingang schoonmaken met
Er is te weinig water in watertank De bak met water vullen
lucht erin
De thermostaatwijzer op de juiste
positie brengen en controleert u of
de stekker van het strijkijzer in het
stopcontact zit
De thermostaatwijzer op de vereiste
positie brengen.
Gaat u door met het strijken op
horizontale positie en wacht u een
tijdje voordat u opnieuw de (verticale)
functie van stoomontploffing
gebruikt.
Stelt u de thermostaatwijzer af
volgens de stoomopening
alleen als de indicatorlamp is
uitgegaan.
De stoomcontroleknop op de juiste
plaats brengen.
gedistilleerd water
Met hand drukken op de spuitnozzle
en de spuitknop een paar keer
voortdurend duwen.
- 17 -
Page 19

DEUTSCH
SINBO SSI 2869 DAMPFBÜGELEISEN
BEDIENUNGSANLEITUNG
(Lesen Sie diese Anleitung vor dem Benutzen des Gerätes und aufbewahren)
VORSICHT:
1. Dieses Gerät ist für die Benutzung von befugten, bewussten und verständlichen Personen entworfen
und hergestellt. Die Benutzung des Gerätes von den Personen, die mangelhaft im Bezug auf Sicherheit
sind, ist nur unter Aufsicht erlaubt. Um sicherstellen zu können, dass die Kinder mit dem Gerät nicht
spielen, müssen sie überwacht werden.
2. Das Bügeleisen darf nicht ohne Aufsicht herum stehen lassen.
3. Das Bügeleisen darf nur auf einem stabilen Fläche benutzt und gelassen werden.
4. Wenn Sie das Bügeleisen auf einem Platz legen, stellen Sie sicher, dass es auf einem stabilen Fläche
steht.
5. Wenn das Gerät untergefallen ist bzw. ein sichtbares Schaden oder eine Leckage aufweist, darf es
nicht weiter benutzt werden
6. Vor dem Befüllen des Wasserbehälters muss der Stecker aus der Steckdose abgezogen werden (Das
Bügeleisen, das die Apparate für Wassersprühen gemeinsam benutzen)
Technische Daten
* Grundplatte, antihaft
* trocken/spritzen/Dampf/senkrecht/ ausbruch Dampf
* Selbstreinigungsfunktion
* Variable Dampfsteuerung
* 360° drehbare Kabel mit Anzeigeleuchte
* Einstellbare Temperaturregelung
* Kapazität des Wasserbehälters: 150ml
* Normale Dampfgeschwindigkeit: 20g/Min.
* Ausbruch Dampfgeschwindigkeit: 35g
* AC230V, 50Hz, 2000W
Sicherheitsanweisung
1. Vor dem ersten Benutzen, bitte stellen Sie sicher, dass die Spannungwert auf dem Gerät mit dem
Spannungswert in Ihrem Haus übereinstimmt.
2. Sogar beim kurzzeitigen Stehenlassen des Bügeleisens, ziehen Sie unbedingt den Stecker aus der
Steckdose aus und lassen Sie es auf vorderen Teil stehen. Bewahren Sie das Bügeleisen auf einem
Platz auf, wo die Kinder keine Zugriff haben.
3. Das Bügeleisen erreicht beim Benutzen sehr hohe Temperatur, deswegen sollten Sie es nicht
berühren bzw. halten Sie es von brennbarem Material fern, um ein Unfall zu vermeiden.
4. Achtung: Vor der Wasserbefüllung des Bügeleisens, sollte der Stecker des Gerätes aus der Steckdose
abgezogen werden.
5. Das Bügeleisen sollte nicht ins Wasser bzw. in die andere Flüssigkeiten eingetaucht werden.
6. Im Falle eines Schadens am Kabel, sollten Sie das Bügeleisen zu autorisierten Service bringen.
7. Da die Rückstände bzw. Mineralien im Wasser Verkalkung verursachen und in solchen Fälle verstopft
die Dampfeingang, muss destilliertes Wasser gefüllt werden.
8. Verwenden Sie kein Wasser, das chemisch raffiniert ist.
9. Austretender Dampf ist sehr heiss und gefährlich. Richten Sie den Dampf niemals zu den Menschen.
10. Das Bügeleisen darf nur auf einem stabilen Fläche benutzt und gelassen werden.
- 18 -
Page 20

11. Wenn Sie das Bügeleisen auf einem Platz legen, stellen Sie sicher, dass es auf einem stabilen
Fläche steht.
12. Das Gerät darf nicht an seinem Kabel gezogen oder getragen werden. Und das Kabel sollte nicht
um scharfen Kanten oder Ecken gezogen werden. Halten Sie das Kabel von heissen Flächen fern.
13. Wenn das Gerät untergefallen ist bzw. irgendein Schaden oder eine Leckage aufweist, darf es nicht
weiter benutzt werden.
Hinweise zu erster Benutzung:
1. Da das Bügeleisen geölt ist, kann bei erster Benutzung ein Dunst hervorkommen. Kurze Zeit später
wird es nicht mehr der Fall sein.
2. Vor dem ersten Benutzung ziehen Sie das Etiket bzw. Schutzfolie von dem Grundplatte ab. Reinigen
Sie die Grundplatte mit weichem Tuch.
3. Bewahren Sie die Grundplatte richtig auf: Vermeiden Sie feste Berührung mit metallischen Stoffen.
Name der Bauteile
A. Spritzdüse
B. Füllmündung für Wasser
C. Dampfkontrollknopf
D. Knopf für Dampfausfuhr
E. Spritzknopf
F. Netzkabel Schutz
G. Anzeigeleuchte
H. Wasserbehälter
I. Thermostatzeiger
J. Grundplatte
K. Sockel
Wasserfüllung:
Stellen Sie sicher, dass der Stecker ausgezogen ist und Thermostatzeiger MIN-Stellung steht. Stellen
Sie das Bügeleisen auf dem Grundeinheit und es muss ca. mit der Winkel von 45º nach vorne schräg
sein und füllen Sie den Wasserbehälter bis MAX-Marke auf.
Senkrechter Dampf
"Dampfausbruch " kann beim Senkrechtstellung des Bügeleisens geführt werden. Dies ist für das
Bügeln von Kleidungen und Vorhänge, die hängend stehen, gut geeignet sein.
Trocken Bügeln
1. Bringen Sie den Dampfkontrollknopf auf Stellung 0 (= kein Dampf).
2. Um die Richtigen Temperatur für das Bügeln einzustellen, sehen Sie auf den Etiketten für
Bügelntemperatur von verschiedenen Kleidungen.
Bügeln mit Dampf
1. Füllen Sie das Bügeleisen nach der Verfahren für Wasserfüllen auf.
2. Verbinden Sie das Gerät an das Strom.
3. Wenn nach der Temperaturanzeige der Thermostatszeiger auf MAX steht, kann das Bügeln mit Dampf
geführt werden, sonst könnte von Grundplatte Wasser ausrinnen.
4. Das Auslöschen von Anzeigeleuchte deutet auf Bereitschaft des Bügeleisens hin.
5. Dampfkontrollknopf richtig einstellen. Dampfausbruch durch das Rückdrehen von Dampfkontrollknopf
einstellen und durch Vorwärtsdrehen mindern Sie den Dampfausgang.
- 19 -
Page 21

Achtung: Beim Dampfbügeleisen dürfen Synthetischer Stoff, Nylon, Kunstseide und Seide nicht
verwendet werden, da die Oberfläche beschädigt werden kann.
Dampfausbruch
Diese Funktion ist für schwierige Falten und schwere Stoffe gut geeignet. Durch das Drücken von
"Dampfausbruch"-Knopf wird von Grundplatte ein intensive Dampfstoss abgestrahlt und es ist sehr
gut für das Bügeln von schwierige Falten. Dampfausbruch kann nur in Begleitung von hohe
Bügelntemperatur verwendet werden. Um das beste Ergebnis zu erreichen, muss man in jeden 5
Sekunden den Dampfknopf drücken. Um zu vermeiden, dass es von dem Grundplatte Wasser ausrinnen,
sollte man nicht länger als 5 Sekunden den Dampfknopf drücken. Ausserdem, vor dem Aufführen von
Dampfausbruch-Funktion geben Sie min. 1 Minuten Zeitabstand.
Spritzungsverfahren:
Bei irgend einem Temperatur kann man durch das Drücken von Spritzknopf die Kleidungen nass
machen. Stellen Sie sicher, dass im Wasserbehälter genug Wasser vorhanden ist.
Stoffart und Niederstellung von Thermostatzeiger:
Achtung Bitte die Marke auf dem Etiket deutet hin, dass diese Stoff
Anweisung auf dem Etiket Stoffart Thermostatzeiger
Nylon MIN
Wolle
Leinen MAX
Reinigung und Pflege:
Vor dem Reinigen ziehen Sie das Bügeleisen aus der Steckdose ab und lassen Sie genugend Zeit zum
Abkühlen.
1. Den Grundplatte mit nassem Tuch und nicht scheuernden Reinigungsmittel (Flüssigkeit) abwischen.
2. Wenn auf dem Grundplatte Faser geklebt sind, benutzen Sie zum Reinigen ein mit Essig benetztem
Tuch.
3. Um zu vermeiden, dass der Grundplatte geschadet ist, benutzen Sie keine starke Säure oder alkalische
Mitteln.
4. Wenn das Kalk Dampfeingang blockieren sollte, entfernen Sie Kalk mit einem Zahnstocher; Bitte die
Oberfläche von Grundplatte nicht beschädigen.
5. Belassen Sie das Bügeleisen auf dem Vorderenseite und lassen Sie es genügend abkühlen. Und
dazwischen schütteln Sie das Wasser aus dem Schachtel aus und bringen Sie Dampfknopf auf Stellung
"0".
nicht gebügelt werden darf.
Seide
Baumwolle
- 20 -
Page 22

Einfaches Instandsetzungsverfahren
Problem Mögliche Ursachen Massnahmen
Nicht heiss genug oder
sehr heiss
Kein Dampf oder
Leckage vorhanden
Kein Dampfausbruch oder
kein senkrechter Dampf
Auf dem Grundplatte ist
Leckage
Dampf ist geringer
Keine Spritzung Vorhandene Druck oder Luft ist
Thermostatszeiger ist auf falsche
Richtung gedreht oder von
Steckdose abgezogen
Der Thermostatszeiger ist auf MIN
eingestellt
(Senkrecht) DampfausbruchFunktion ist in kürzeren Zeit zu viele
Male im Betrieb genommen. Das
Bügeleisen ist nicht heiss genug
Thermostatszeiger ist ausserhalb
von Dampfintervall eingestellt
Temperatur ist immer noch nicht
genug
Wasser ist über MAX-Stellung Überschüssiges Wasser abschütten
Kontrollieren Sie, ob der
Dampfkontrollknopf auf richtiger
Stellung steht
Dampfeingang ist verstopft Den Eingang mit destilliertem
Im Wasserbehälter ist zu wenig
Wasser
mangelhaft
Bringen Sie Thermostatzeiger auf
richtige Stellung und kontrollieren
Sie ob das Bügeleisen an Strom
verbunden ist
Den Thermostatszeiger auf richtige
Stellung bringen.
Bügeln Sie weiter im horizontalen
Stellung und warten Sie einige
Minuten vor dem Wiederbenutzen
von Dampfausbruch-Funktion
(senkrecht).
Stellen Sie den Thermostatszeiger
gemäss dem Dampfintervall ein
Nach dem die Anzeigeleuchte
gelöscht ist, drehen Sie den
Dampfkontrollknopf auf.
Bringen Sie den Dampfkontrollknopf
auf richtiger Stellung.
Wasser reinigen
Füllen Sie in den Behälter mit
Wasser auf
Drücken Sie auf Spritzdüse mit Hand
und Spritzknopf einige Male dauernd
schieben
- 21 -
Page 23

ESPANOL
SINBO SSI 2869 PLANCHA DE ROPA CON VAPOR
MANUAL DEL USO
(Antés de usar, leer la instrucción con cuidado y conservarla)
AVISO:
1. Presente aparato es diseñado para usar por las personas cuyas capacidades sean suficientes, con
experiencia y con sentido común. Las personas no suficientes por la seguridad se deben por los
protectores para usar el aparato. Los niños se deben vigilar para que no se jueguen con el aparato.
2. La plancha de ropa no debe ser dejado sin vigilancia al ser conectado con la fuente principal de la
epergía.
3. La plancha de ropa debe ser usado en un superficie fijo y dejado sobre el mismo.
4. Estar seguro que sea fijo el superficie a colocarse sobre cualquier lugar.
5. En caso de ser caído, de ser encontrado daño claro observado ú señal de escape la plancha de ropa
no se necesita usar.
6. Antés der llenado el depósito de agua con agua, se debe desenchufar (Planchas de ropa vaporizadas
y planchas de ropa que reunen los medios para la pulverización de agua)
Especificaciones
* Placa de base no pegado
* seco /pulverizado/vaporizado/vertical/explotado el vapor
* función para limpiar sí mismo
* Variable control del vapor
* Cable giratorio 360 grados con luz indicadora
* Control ajustable de la temperatura
* Capacidad del tanque de agua:150mls
* Velocidad normal del vapor: 20grs/min
* Velocidad de la explotación del vapor: 35g
* AC230V, 50Hz, 2000W
Instrucción de la seguridad
1. Antés del primer uso por favor controlar que el voltaje sobre el aparato sea igual con el voltaje de
la red en su vivienda.
2. Estar seguro que usted fue desenchufado la plancha de ropa aunque sea dejado por poco tiempo y
adquirir que se queda sobre la parte apuntado de la plancha de ropa. Por favor guardar la distancia
entre los niños y la plancha del vapor.
3. Al ser usado la plancha del vapor, alcanzará a la temperatura alta, Definitivamente no tocar con su
mano ú no apuntar cerca del producto flamado para evitar los accidentes.
4. Ojo: Antés de llenar la plancha de ropa con la agua, desenchufar el aparato.
5. Definitivamente no sumergir el aparato en la agua o en otro líquido.
6. En caso de ser averíado el cable en cualquiera forma, por favor llevar la plancha de ropa a nuestro
autorizado para su reparación.
7. El residuo en agua o la mineral se causará constituir cal y bloqueará la entrada del vapor, por este
motivo se recomienda que se usará agua destilada.
8. No usar agua donde fue filtrado químicamente el cal.
9. El vapor que sale a fuera es caliente y por este motivo es peligroso. Definitivamente no apuntar el
vapor hacia los humanos.
10. Se necesita que el producto se usará sobre un superficie plano.
11. Estar seguro que la plancha es colocado sobre un superficie fijo.
- 22 -
Page 24

12. No tirar cogiendo de su cable de la energía o transportarlo ú tirar el cable de la energía alrededor
de los bordes y esquinas finos. Guardar la distancia entre el cable de la energía y los superficies
calentados.
13. En caso de ser caído la plancha de ropa o ser observado señal de escape o un daño alguno, la
plancha de ropa no debe ser usado.
Los avisos relacionados con el primer uso:
1. La plancha de ropa es lubricado por este motivo al primer funcionamiento de la plancha de ropa, se
puede echar un poco humo. Después de poco tiempo se terminará esta situación.
2. Antés del primer uso quitar el folio protector o cualquier etiqueta de la placa de la base. Limpiar con
una tela suave la placa del plato.
3. Taban plakas›n› düzgün muhafaza ediniz: metal maddelerle sert temastan kaç›n›n›z.
Nombre del componente
A. Boquilla de la pulverización
B. Entrada para llenar agua
C. Botón del control para el vapor
D. Botón para la explosión del vapor
E. Botón para la pulverización
F. Protector del cable de alimentación
G. Luz indicadora
H. Tanque de agua
I. Indicador de la termostata
J. Placa del plato
K. Rodapié
Llenar con agua:
Estar seguro de ser desenchufado la plancha de ropa y la indicadora de la termostata está en la posición
MIN. Colocar la plancha de ropa sobre el soporte de la base, inclinar con 45 grados aproximadamente
hacia adelante 45 y echar agua hasta la posición MAX del tanque de agua.
Vapor vertical
“Explosión del vapor” se puede explotar tabién se puede aplicar al coger la plancha de ropa en la
posición vertical, Esta situación será útil para eliminar las arrugas colgados de los vestidos, cortinas
y asimilados.
Planchar seco
1. Ajustar el botón para controlar el vapor a la posición de O(=No hay vapor).
2. Ajustar la correcta temperatura de planchar correspondiente de las etiquetas de varios vestidos
relacionado con lavar los mismos.
Planchar vaporizado
1. Llenar la plancha de ropa con agua de acuerdo con los métodos de llenar agua.
2. Enchufar el aparato.
3. En caso de ser ajustado de acuerdo con la indicadora de la temperatura en la posición MAX la
indicadora de la termostata, se puede planchar vaporizado en caso contrario se puede escapar agua
de la placa de base.
4. Al apagar la luz indicadora, se indica la temperatuta sea listo.
5. Ajustar el botón para controlar el vapor correctamente, Ajustar el botón para controlar el vapor
girándolo hacia atrás, reducir la salida del vapor al girar el botón hacia adelante.
- 23 -
Page 25

Ojo: No se usa la plancha de ropa para Tela sintética, Nilón, ceda sintética y ceda, en caso contrario
la cera del superficie se podrá dañar.
Explosión del vapor
Esta función es útil para las telas pesadas y sobre las arrugas duras. Pulsándo al botón ‘’Explosión del
vapor” una explosión intensificada se extiende de la base de la base, esta situación puede ser muy útil
para eliminar las arrugas resistentes. La explosión del vapor solamente se puede usar con temperatura
alta para planchar. Para el mejor resultado se debe esperar durante 5 segundos entre los procesos
del puslar al botón. Para evitar el escape de agua por la placa de la base no puslar más de 5 segundos
continuamente al botón para la salida del vapor. Además, adquirir un intérvalo de tiempo mínimo de
un minuto antés de la aplicación de la función de la explosión del vapor.
Métodos de la Pulverización:
Los vestidos se pueden mojar pulsándo unas veces al botón para pulverización en cualquiera temperatura.
Estar seguro que el tanque de agua contiene una cantidad suficiente de agua.
Tipo de Tela y forma de la indicadora de la reducción de la termostata:
Ojo Por favor tener cuidado que el señal sobre la etiqueta
Instrucción sobre la etiqueta Tipo de la Tela Indicadora de la Termostata
Nilón MÍN
Lana
Algodón MÁX
Limpieza y Mantenimiento:
Desenchufar el aparato antés de la limpieza y adquirir que la plancha de ropa se enfríe suficientemente.
1. Limpiar la placa con una tela mojada y con un limpiador (líquido).
2. En caso de ser pegado fibre sobre la placa de la base, usar una tela mojada con vinagre para limpiar
la placa de la base.
3. Para evitar a dañar la placa de la base, definitivamente no usar ácidos fuertes o sustancias alcalinas.
4. En caso de ser bloqueado la entrada del vapor por cal, por favor quitar el cal por medio de palillo
de dientes; no dañar sobre el superficie de la base de la placa.
5. Dejar la plancha en forma de quedarse sobre la parte de la punta y adquirir que se enfríe
suficientemente y echar cualquier agua salida de la caja, ajustar el botón del vapor hacia la posición
“O”.
expresa que no debe ser planchado esta material.
Ceda
Lino
- 24 -
Page 26

Métodos simples de la Reparación
Problema Causas posibles Precaución
No se calienta
suficientemente
o calienta excesivamente
No hay vapor o hay
escape
No hay explosión del
vapor o vapor vertical
Agua se escapa por la
placa de la base
El vapor es menos
No hay Pulverización No hay aire o presión suficiente a
La indicadora de la termostata se
ha girado erróneamente o
desenchufado
La indicadora de la Termostata es
ajustado como MÍN
La función para la explosión del
vapor (vertical) es usado con
frecuencia en poco tiempo. La
plancha no es caliente suficiente
La indicadora de la Termostata es
ajustado a fuera del intervalo del
vapor
La temperatura todavía no es
suficiente
La agua es sobre el nivel máximo Echar el resto de la agua.
Controlar que el botón para
controlar el vapor está en el lugar
correcto
La entrada del vapor es bloqueado Limpiar la entrada con agua
Hay muy poca agua en el tanque
de agua
dentro
Ajustar la indicadora de la
termostata en posición correcta y
controlar que si la plancha de ropa
es enchufado ú no
Ajustar la indicadora de la
termostata en la posición
correspondiente.
Continuar a planchar en la posición
horizontal y esperar durante un
tiempo antés de usar otra vez la
función (vertical) de la explosión.
Ajustar la indicadora de la
termostata de acuerdo con el
intervalo del vapor.
Funcionar el botón para el control
del vapor solamente después de ser
apagado la luz indicadora.
Ajustar el botón para controlar el
vapor hacia el lugar correcto.
destilada.
Llenar agua en la caja.
Presionar con su mano sobre la
boquilla para la pulverización y
empujar continuamente el botón
para la pulverización.
- 25 -
Page 27

Page 28

Page 29

Page 30

Page 31

No: 1-2869-17022014
- 30 -
Page 32

- 31 -
Page 33

Page 34

Page 35

Page 36

Page 37

1-2869-17022014
- 36 -
Page 38

- 37 -
Page 39

HRVATSKI
SINBO SSI 2869 PARNO GLAˇCALO
UPUTE ZA UPORABU
(Prije uporabe paˇzljivo proˇcitati i spremiti ovu uputu o uporabi)
UPOZORENJE:
1. Aprat je proizveden s ciljem uporabe od strane osoba sa potrebnim kapacitetom, iskustvom i zdravim
razumom. Osobe koje nisu dovoljno sigurne aparat mogu korisitit uz prismotru osoba odgovornih za
njihovu sigurnost. Aparat trebe biti pod prismotrom kako djece se ne bi s njime igrala.
2. U sluˇcaju kada je glaˇcalo prikluˇceno nesmje biti bez prismotre.
3. Glaˇcalo trebe koristiti i odlagati na stabilnoj povrˇsini.
4. Prilikom odlaganja aparata budite uvjereni da je povrˇsina stabilna.
5. U sluˇcaju da je pao ili na sebe nosi vidljiva oˇste´cenja ili ima tragova curenja aparat se nesmje koristiti.
6. Prije punjenja spremnika za vodu aparat treba iskljuˇciti iz utiˇcnice (parna glaˇcala i parna glaˇcala sa
postajom).
Tehniˇcki podaci
* Neljepljiva povrˇcina ploˇce
* Suho / rsaprskavaju´ce/ parno /vertikalno / eksplozino parno
* Funcija samoˇciˇs´cenja
* Promenljıva kontrola pare
* 360 sutpnjeva okretni kabel sa indikatorom
* Podeˇsavaju´ca kontrola temperature
* Kapacitet spremnika za vodu :150ml
* Normalna brzina pare : 20g/min
* Eksplozivna brzina pare : 35g
* AC230V, 50Hz, 2000W
Sigurnosne Upute
1. Prije prve uporabe molimo Vas provjerite i uporedite vrijednosti napona naznaˇcenih na aparatu sa
naponom elektriˇcne mreˇze koju koristite u Vaˇsem domu.
2. I kada glaˇcalo odlaˇzete na kratko vrijeme budite uvjereni da je naponski vod iskljuˇcen i da aparat
stoji na svoje tri strane. Molimo Vas da glaˇcalo odloˇzite na mjestu udaljeno od dohvata djece.
3. Tijekom koriˇstenja glaˇcala on ´ce dosti´ci visoku temperaturu, u niukojem sluˇcaju nesmjete dodirivati
vru´ce dijelove a da bi ste sprijeˇcili rizik od poˇzara izbjegavajte koriˇstenje aparata u sredinama u kojima
su zapaljiva sredstva.
4. Oprez: Prije punjenja glaˇcala s vodom iskljuˇcite utikaˇc iz utiˇcnice.
5. U niukojem sluˇcaju aparat nesmje imati dodir sa vodom ili drugim te´cnostima.
6. U sluˇcaju da na vodnom kabelu je vidno oˇste´cenje molimo Vas da radi opravke glaˇcalo predate
ovlaˇs´cenoj osobi.
7. Radi spreˇcavanja pojave mineralnih segmenta i kamenaca koji mogu zˇcepiti rupice za paru
preporuˇcujemo koriˇstenje destilirane vode.
8. Ne koristiti vodu kojoj je kemiksim putem odstranjen kamenac.
9. Para je vruˇca i u sebe nosi rizik. U niukojem sluˇcaju para se nesmje usmjeravati u ljude.
10. Proizvod treba koristiti i odlagati na stabilnoj povrˇsini.
11. Postavljanjem proizvoda na bilo koje mjesto budite uvjereni da je povrˇsina stabilna.
12. Vodni kabel se nesmje razvlaˇciti, spre´cite dodir vodnog kabela sa oˇstrim rubovima- Vodni kabel
treba ˇcuvati ˇsto dalje od toplih povrˇsina.
13. U sluˇcaju da je glaˇcalo palo ili na sebi nosi vidna oˇcte´cenja ili curenja aparat se nesmje koristiti.
- 38 -
Page 40

Upozorenja tijekom prve uporabe:
1. Glaˇcalo je namazano s toga prilikom prvog ukljuˇcenja sa glaˇcala pojavi ´ce se odredˇzeni dim. Ova
pojava ´ce za krtko vrijeme nestati.
2. Prije prve uporabi sa podloge aparata skinuti etikete i zaˇstitne folije.Podlogu aparata oˇcistiti mekanom
krpom.
3. Podloˇznu ploˇcu ˇcuvajte pravilno:izbjegavajte njen dodir sa ˇcvrstim metalnim predmetima.
Naziv Komponeneta
A. Mlaznica za Rasprˇsivanje
B. Mjesto za Punjenje s Vodom
C. Kontrolni Buton za Paru
D. Buton za Ekspolozivnu Paru
E. Buton za Rasprˇsivanje
F. Protector kabel za napajanje
G. Indikator
H. Spremnik za Vodu
I. Termostat
J. Sloj Ploˇce
K. Starnica
Punjenje s Vodom:
Budite uvjereni da je utikaˇc aparata iskljuˇcen iz utiˇcnice i da je termostat postavljen na poloˇzaju MIN.
Glaˇcalo postavite na naslon podloge, u poloˇzaju od 45 stupnjeva sa ulaza za punjenje vodom aparat
napuniti vodom do MAX nivoa.
Vertikalna Para
Primjena “Eksplozija Pare” moguc´caje kada je glaˇcalo u vertikalnom poloˇzaju. Ovo moˇze biti od pomo´ci
tijekom glaˇcanja odjeˇce, zavjesa i drugih tkanina u vise´cem poloˇzaju.
Suho Glaˇcanje
1. Kontrolni buton pare postaviti u boloˇzaju O(= Nema Pare).
2. Na temleju etiketa odjeˇca i tkanina odredite porebnu temperaturu za glaˇcanje.
Parno Glaˇcanje
1. Vodu u glaˇcalu napuniti na temelju metoda za punjenje vode.
2. Utikaˇc aparata ukljuˇcite u utiˇcnicu.
3. Podeˇsavanjem termostata u poloˇzaju MAX na temelju indikatora temperature moˇze se koristiti
glaˇcanje na paru, u suprotnom do´ci ´ce do curenja vode s podloge glaˇcala.
4. Sve do gaˇsenja indikator pokazuje spremnost temperature za glaˇcanje.
5. Pravilno podesite kontrolni buton za paru, izlaznu paru podesite pomo´cu okretanja kontrolnog butona
za paru, okretanjem unazad smanji´cete izlaznu mo´c pare.
Paˇznja: Sintetiˇcka Tkanina, Najlon, Sintetiˇcka Svila i Svila se nesmje glaˇcati pomo´cu pare, u suprotnom
do´ci ´ce do oste´cenja povrˇsine podloge glaˇcala.
Eksplozija Pare
Ova mogu´cnost je od velike pomo´ci kod ve´ce zguˇzvanih tkanina. Pritiskom na buton za “Eksploziju
Pare” sa podloˇzne ploˇce do´ci´ce do pojave i ˇsirenja velike koliˇcine pare. Pomo´cu nje mogu´ce je glaˇcanje
veoma zguˇzvanih odjeˇca i tkanina. Parnu Eksploziju mogu´ce je koristiti samo kod glaˇcanja sa visokom
temperatrurom.Za najbolji uˇcinak izmed¯u operacija pritiskivanja na butonu za paru potrebna je pauza
u trajanju od 5 sekundi. Kako bi speˇcili curenja sa podloˇzne ploˇce izbjegavajte pritiskivanje butona za
- 39 -
Page 41

paru duˇze od 5 sekundi. Takod¯er prije primjene opracije eksplozije pare obezbjedite razmak vrijemena
u trajanju od jedne minute.
Metode Rasprˇsivanja:
S pritiskom na buton za rasprˇsivanje u stanju bilo koje temperature do´ci ´ce do navlaˇzivanja odje´ce.
Budite uvjereni da je spemnik za vodu pun.
Poloˇzaj Termostata i izbor Vrste Tkanina:
Paˇznja Ne zaboraviti da ovaj znak na etiketi odje´ce pokazuje da se ova odje´ce
Upute na Etiketi Vrsta Tkanine Poloˇzaj Termostata
Svila
Vuna
MAX
ˇ
Ciˇs´cenje i Odrˇzavanje:
Prije radnje ˇciˇs´cenja aparata iskljuˇcite utikaˇc sa utiˇcnice i ostavite da se aparat ohladi.
1. Podlogu ploˇce oˇcistiti sa vlaˇznom krpom i (te´cnosti) bez abraziva.
2. U sluˇcaju da je na podlozi ploˇce doˇslo do naljepljaja, istu odstraniti pom´cu krpe umoˇcenu u ocat.
3. Kako ne bi ste oˇstetili podlogu ploˇce tijekom ˇciˇs´cenja se nesmje koristiti sredstva koje sadrˇze kislinu
i sliˇcne kemikalije.
4. U sluˇcaju da je doˇslo do zaˇcepljenja rupica za paru kamence treba odstraniti ˇcaˇckalicom; bez da
oˇstetite pologu ploˇce glaˇcala.
5. Glaˇcalo odloˇzite tako da bude naslonjeno sa svoje tri stranice, saˇcakati njegovo hlad¯enje, u
med¯uvrijemenu ispraznite vodu sa spremnika i buton za paru postavite u poloˇzaju”O”.
nesmje glaˇcati.
Najlon MIN
Pamuk
Platno
- 40 -
Page 42

Jednostavne Metode za Popravak
Problem Mogu´ci Razlozi Mjera
Nedovoljno ile
previsoko ugrijavanje
Nema pare ili curi Poloˇzaj termostata je na MIN Termostat postavite na pravilno
Nema eksplozija
pare ili vertikalne pare
Sa podloˇzne ploˇce curi
voda
Para je mala
Nema rasprˇsivanja Unutar nema dovoljno tlaka i zraka. Mlaznicu za rasprˇsivanje pritisnite
Termostat je pogreˇsno postavljen
ili utikaˇc aparata nije ukljuˇcen.
Funkcija (Vertikalna) eksplozija pare
u jako kratkom intervalu je
koriˇs´cena preˇcesto. Glaˇcalo nije
dovoljno vru´ce.
Termostat je podeˇsen izvan poloˇzaja
za paru.
Joˇs uvjek temperatura nije
dovoljna.
Voda je iznad nivoa MAX Ispraznite preostalu vodu.
Provjerite dali je kontrolni buton
pare na pravilno mjesto.
Za´cepljen je ulaz pare. Ulaz oˇcistite destiliranom vodom.
U spremniku je malo vode Spremnik napuniti vodom.
Termostat postavite u odgovarajuˇcem
poloˇzaju i provjerite dali je utikaˇc
glaˇcala prikljuˇcen u utiˇcnici.
mjesto.
Nastavite sa glaˇcanjem u vertikalnom
poloˇzaju i prije ponovnog koriˇstenja
eksplozivne pare (vertikalno)
potrebno je saˇcekati izvesno vrijeme.
Termostat podesite skaldno sa
poloˇzajem pare.
Kontrolni buton za paru otvoriti samo
nakon gaˇsenja indikatora.
Kontrolni buton za paru postaviti na
pravilnom mjestu.
rukom i nekoliko puta u odred¯enim
intervalima pritisnite buton za
rasprˇsivanje.
- 41 -
Page 43

- 42 -
Page 44

- 43 -
Page 45

- 44 -
Page 46

- 45 -
Page 47

MÜfiTER‹ H‹ZMETLER‹
De¤erli Müflterimiz,
En uygun fiyata en iyi ürünü vermenin yan› s›ra; en iyi hizmeti vermenin de
önemli oldu¤una inan›yoruz. Bu nedenle siz bilinçli tüketicilere daha yak›n
olabilmek için, internet adresimizdeki eriflim formlar›n›n yan› s›ra, tüketici
dan›flma hattımızı da hizmetinize açm›fl durumday›z.
TÜKET‹C‹
DANIfiMA HATTI
444 66 86
Tüketici Dan›flma Hattımızı,
- Hafta içi her gün 08.00-18.00 saatleri aras›nda arayabilir; istek, öneri ve
flikayetlerinizi firmam›za iletebilirsiniz.
Tüketicinin Dikkatine:
Ürünlerimizle ilgili hizmetleri tam olarak alabilmek için afla¤›daki önerilere
uyman›z› rica ederiz:
1. Ürünü ald›¤›n›zda Garanti Belgesini mutlaka yetkili sat›c›n›za onaylatt›r›n›z.
2. Ürünü kullanma k›lavuzunda belirtilen hususlara göre kullan›n›z.
3. Ürününüzle ilgili hizmet talebiniz oldu¤unda yukar›daki telefon
numaralar›ndan, Tüketici Danıflma Hattına baflvurunuz.
4. Ürünü promosyon arac›l›¤› ile edinmiflseniz, ürüne ait garanti belgesini en
yak›n yetkili servisimize giderek onaylatt›r›n›z.
5. Teknik servisteki ifliniz bitti¤inde "Yetkili Servis Hizmet Fifli" almay›
unutmay›n›z. Alaca¤›n›z bu Hizmet Fifli, ileride ürününüzde meydana
gelebilecek herhangi bir sorunda size yarar sa¤layacakt›r.
www.sinbo.com.tr
0800 211 50 21
KAPIDAN KAPIYA
ÜCRETS‹Z
SERV‹S
Kap›dan Kap›ya Ücretsiz Servis Kampanyam›z dâhilinde Yurtiçi Kargo Firmas› ile iflbirli¤i içerindeyiz. Tüketicimiz
taraf›ndan sat›n al›nan ürünün fiyat› ne olursa olsun, Tüketicimiz ürün ile ilgili garanti kapsam›na giren herhangi
bir problem yaflad›¤›nda, 444 66 86 numaral› Tüketici Danıflma Hattımızı aramas› ve kay›t b›rakmas› yeterlidir.
Bu süreçten sonra Tüketicimizin ürünü ücretsiz olarak Yurtiçi Kargo taraf›ndan Tüketicimizin bulundu¤u adresten
al›n›p, 10* ifl günü içerisinde ürün çal›fl›r bir vaziyette, yine Tüketicimize Yurtiçi Kargo arac›l›¤› ile adresine teslim
edilmektedir. 10 ifl günü içerisinde sorunu çözülemeyen ürünler ise, yenisi ve/veya bir üst modeli ile de¤ifltirilmektedir.
Tüm bu süreçte Tüketicilerimizden hiçbir ücret talep edilmemektedir.
(*Ürünün servis garanti süresi, Yurtiçi Kargo ürünü Sinbo Fabrikas›’na teslim ettikten sonra bafllar.)
- 46 -
10 GÜNDE
TESL‹MAT
GARANT‹S‹
(*)
Page 48

- GARANT‹ fiARTLARI -
1) Garanti süresi,mal›n teslim tarihinden itibaren bafllar ve 2 y›ld›r.
2) Mal›n bütün parçalar› dahil olmak üzere tamam› Firmam›z›n garanti kapsam›ndad›r.
3) Mal›n garanti süresi içerisinde ar›zalanmas› durumunda, tamirde geçen süre garanti
süresine eklenir. Mal›n tamir süresi, 20 iflgününü geçemez. Bu süre mala iliflkin ar›zan›n
servis istasyonuna, servis istasyonunun olmamas› durumunda, mal›n sat›c›s›, bayii,
acentesi, temsilcili¤i, ithalatç›s› veya imalatç›s›-üreticisinden birine bildirim tarihinden
itibaren bafllar. Tüketicinin ar›za bildirimini; telefon, faks, e-posta, iadeli taahhütlü mektup
veya benzeri bir yolla yapmas› mümkündür. Ancak, uyuflmazl›k halinde ispat yükümlülü¤ü
tüketiciye aittir. Mal›n ar›zas›n›n 10 ifl günü içerisinde giderilememesi halinde, imalatç›üretici veya ithalatç›; mal›n tamiri tamamlan›ncaya kadar, benzer özelliklere sahip baflka
bir mal› tüketicinin kullan›m›na tahsis etmek zorundad›r.
4) Mal›n garanti süresi içerisinde gerek malzeme ve iflçilik, gerekse montaj hatalar›ndan
dolay› ar›zalanmas› halinde, iflçilik masraf›, de¤ifltirilen parça bedeli ya da baflka herhangi
bir ad alt›nda hiçbir ücret talep etmeksizin tamiri yap›lacakt›r.
5) Tüketicinin onar›m hakk›n› kullanmas›na ra¤men mal›n;
• Tüketiciye teslim edildi¤i tarihten itibaren, garanti süresi içinde kalmak kayd›yla, bir y›l
içerisinde en az dört defa veya imalatç›-üretici ve/veya ithalatç› taraf›ndan belirlenen
garanti süresi içerisinde alt› defa ar›zalanmas›n›n yan› s›ra, bu ar›zalar›n maldan
yararlanamamay› sürekli k›lmas›,
• Tamiri için gereken azami süresinin afl›lmas› ,
• Firman›n servis istasyonunun, servis istasyonunun mevcut olmamas› halinde s›rayla
sat›c›s›, bayii, acentesi temsilcili¤i ithalatç›s› veya imalatç›-üreticisinden birisinin
düzenleyece¤i raporla ar›zan›n tamirini mümkün bulunmad›¤›n›n belirlenmesi, durumlar›nda
tüketici mal›n ücretsiz de¤ifltirilmesini, bedel iadesi veya ay›p oranda bedel indirimi talep
edebilir.
6 ) Mal›n kullanma k›lavuzunda yer alan hususlara ayk›r› kullan›lmas›ndan kaynaklanan
ar›zalar garanti kapsam› d›fl›ndad›r.
7 ) Garanti Belgesi ile ilgili olarak ç›kabilecek sorunlar için Gümrük ve Ticaret Bakanl›¤›
Tüketicinin Korunmas› ve Piyasa Gözetimi Genel Müdürlü¤ü’ne baflvurabilir.
‹THALATÇI F‹RMA
DE‹MA ELEKTROMEKAN‹K ÜRÜNLER ‹NfiAAT SPOR MALZEMELER‹ ‹MALAT SAN. VE T‹C. A.fi.
Cihangir Mh. Güvercin Cd. No:4 Haramidere Mevkii Avcılar - ‹stanbul - Türkiye
Ça¤rı Merkezi: 444 66 86
www.sinbo.com.tr - info@sinbo.com.tr
- 47 -
Page 49

- SSI 2869 ÜTÜ -
- GARANT‹ BELGES‹ -
Garanti Belge No : 97032
SSHY Belge No : 35274
‹THALATÇI F‹RMA
Ünvanı : DE‹MA ELEKTROMEKAN‹K ÜRÜNLER‹ ‹Nfi. SPOR MALZ.
‹MALAT SAN. ve T‹C. A.fi.
Adresi : Cihangir Mah. Güvercin Cad. No:4 Haramidere Mevkii
Avc›lar / ‹STANBUL
Tel. : Ça¤rı Merkezi: 444 66 86
Yetkili Kifli :
Yönetim Kurulu Baflkan›
Ürünün Cinsi : ÜTÜ
Markası : S‹NBO
Modeli : SSI 2869
Alt Modeli : Bandrol ve Seri No :
Teslim Tarihi ve Yeri :
Garanti Süresi : 2 Yıldır
Azami Tamir Süresi : 20 ‹fl Günü
Kullanım Ömrü : Bakanl›kça belirlenen ve ilan edilen kullan›m ömrü 10 y›ld›r.
(Ürünün fonksiyonlar›n› yerine getirebilmesi için gereken yedek parça temin süresi)
SATICI F‹RMA
Ünvanı :
Adresi :
Tel.Fax :
Fatura Tarihi ve No :
Teslim Tarihi ve Yeri :
‹mza ve Kafle :
Bu bölüm, ürünü sat›n ald›¤›n›z Yetkili Sat›c› taraf›ndan imzalanacak ve kaflelenecektir.
Bu belgenin kullan›lmas›na; 4077 say›l› Tüketicinin Korunması Hakkında Kanun ve bu Kanun’a dayan›larak yürürlü¤e konulan Garanti Belgesi
Uygulama Esaslar›na Dair Yönetmelik uyar›nca, TC Gümrük ve Ticaret Bakanlı¤ı, Tüketicinin Korunması ve Piyasa Gözetimi Genel Müdürlü¤ü
tarafından izin verilmifltir.
Garanti Belge Onay Tarihi : 04/02/2011
Garanti Belge Vize Tarihi : 14/01/2013
SSHY Belge Onay Tarihi : 04/04/2012
- 48 -
Page 50

- TEDAR‹KÇ‹ F‹RMA / EXPORTER United Favour Development Limited
Unit B, 10/F Lee May Building 788-790
Nathan Road, Mongkok, Kowloon, HK.
- UYGUNLUK BEYANI / CE CONFORMITY Bureau Veritas LCIE China
Building 4, No. 518, Xin Zhuan Road, Cao
Hejing, Songjiang High-Tech Park, Shanghai
China
EEE Yönetmeli¤ine uygundur.
AEEE Yönetmeli¤ine uygundur.
Made in P.R.C.
‹mal Y›l› : 2014
 Loading...