

Page 1
SSI 2858 BUHARLI ÜTÜ
KULLANMA KILAVUZU
TR
EN
FR
NL
ES
RU
AR
HR
Page 2

G‹R‹fi
De¤erli Müflterimiz,
Ürün seçiminde S‹NBO'yu tercih etti¤iniz için teflekkür ederiz.
Uzun ve verimli bir kullan›m için cihaz› kullanmadan önce bu k›lavuzu özellikle güvenlik
talimatlar›na dikkat ederek okuman›z› ve devaml› suretle saklaman›z› tavsiye ederiz.
Sayg›lar›m›zla,
Sinbo Küçük Ev Aletleri
Yaln›zca ev içi kullan›ma yöneliktir.
Ütüyü kullanmaya bafllamadan önce lütfen bu talimat› dikkatli bir flekilde okuyunuz.
Kullan›m Talimat›
Buharl› ütünüzü kullanmaya bafllamadan önce lütfen bu kullan›m k›lavuzunu dikkatli bir
flekilde okuyarak cihaz› tan›y›n›z. Bu k›lavuzu baflvuru kayna¤› olarak saklay›n›z.
- TEDAR‹KÇ‹ F‹RMA / EXPORTER United Favour Development Limited
Unit B, 10/F Lee May Building 788-790
Nathan Road, Mongkok, Kowloon, HK.
- UYGUNLUK BEYANI / CE TÜV Rheinland LGA Products GmbH
Tillystraße 2, 90431 Nürnberg
Made in China
‹mal Y›l› : 2010
This appliance is not intended for use by persons (including children) with reduced physical,
sensory or mental capabilities, or lack of experience and knowledge, unless they have
been given supervision or instruction concerning use of the appliances by a person
responsible for their safety. Children should be supervised to ensure that they do not play
with the appliance.
This appliance is intended to be used in household and similar applications such as:
- staff kitchen areas in shops, offices and other working environments;
- farm houses;
- by clients in hotels, motels and other residential type environments;
- bed and breakfast type environments.
Germany
S50180562 0001
EEE Yönetmeli¤ine uygundur.
Bu ürün (çocuklar dahil ) fiziksel hassasiyeti az, zihinsel olarak yetersiz, deneyimsiz ve
yeterli bilgiye sahip olmadan yada kendilerinin güvenli¤inden sorumlu olan kifliler tarafından
bu ürünü kullanmak için gerekli talimatlar verilmemifl kiflilerin kullanımına uygun de¤ildir.
- 1 -
Page 3
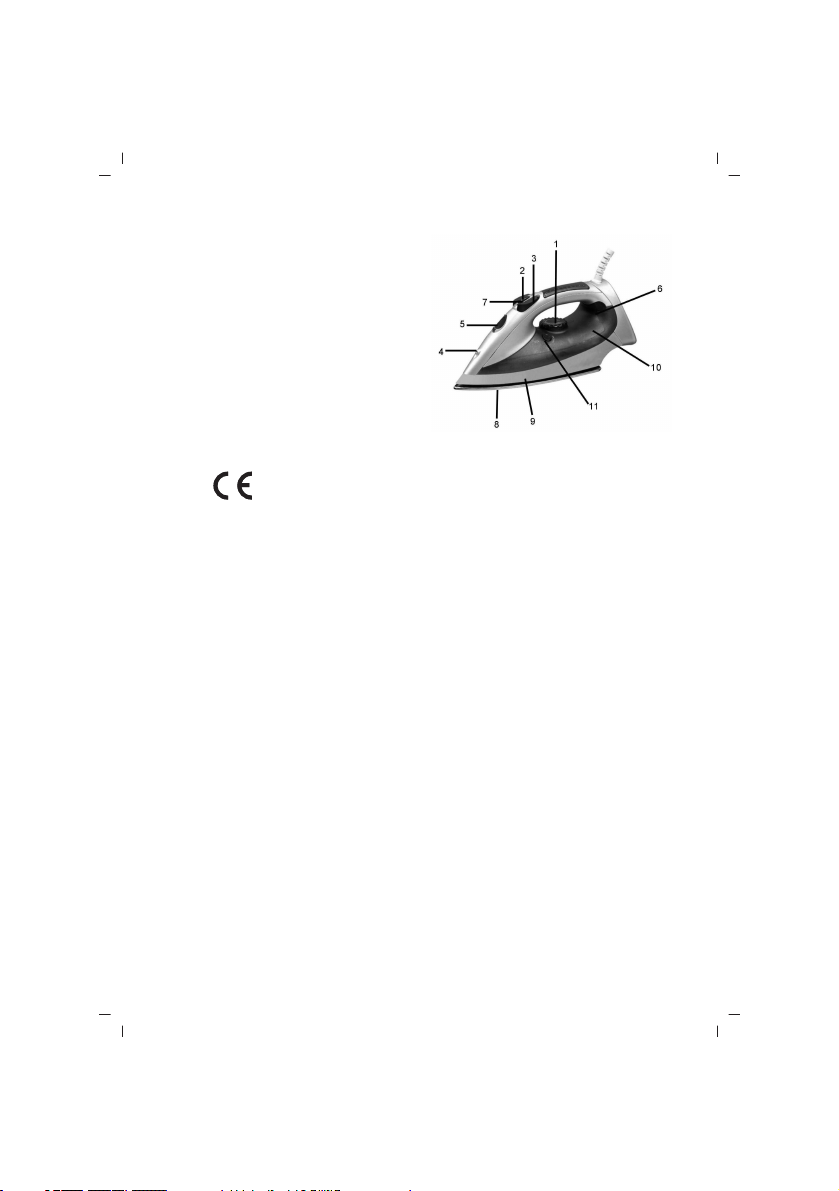
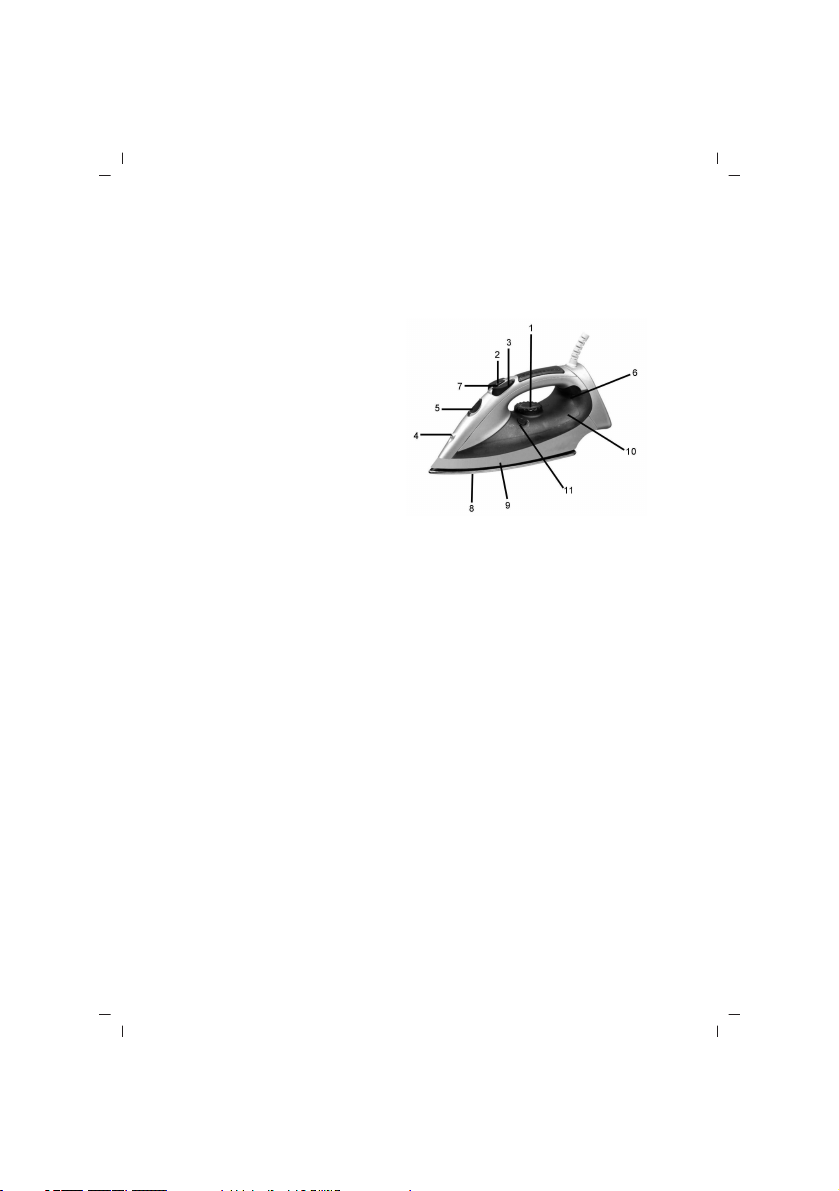
C‹HAZIN TANITIMI
1. S›cakl›k Kontrolü
2. fiok buhar dü¤mesi
3. Sprey dü¤mesi
4. Sprey ucu
5. Su girifli
6. Pilot lamba
7. Buhar kontrol dü¤mesi
8. Taban
9. Gövde
10. Su haznesi
11. Kendi kendini temizleme dü¤mesi
AC 230V , 50Hz, 2000W
Bu cihaz kalite belgesine haizdir.
EN 60335-1, EN 60335-2-3, EN 50366
Kullanım Ömrü 7 yıldır.
Made in China
D‹KKAT!!
Ürünün üzerinde bulunan iflaretlemelerde veya ürünle verilen di¤er bas›l› dökümanlarda
beyan edilen de¤erler, ilgili standartlara göre laboratuar ortam›nda elde edilen
de¤erlerdir.Bu de¤erler, ürünün kullan›m ve ortam flartlar›na göre de¤iflebilir.
ÖNEML‹ GÜVENL‹K UYARILARI
• Bakım, Onarım ve Kullanımda Uyulması Gereken Kurallar
1. Cihaz› ilk defa kullanmaya bafllamadan önce tüm talimat› dikkatli bir flekilde okuyunuz.
2. Cihaz› kayna¤›na ba¤lamadan önce cihaz›n etiketinde yazan voltaj düzeyinin evinizdeki
voltaj düzeyiyle ayn› oldu¤undan emin olunuz.
3. Bu ürünü tasarlanm›fl kullan›m amac› d›fl›nda kullanmay›n›z.
4. Bu ütü güç kayna¤›na ba¤lanmadan ya da güç kayna¤›ndan ayr›lmadan önce kapal›
duruma getirilmelidir. Fifli prizden ç›karmak için kabloyu çekmeyiniz.
5. Ütü herhangi bir flekilde ar›zaland›ysa ürünü kullanmay›n›z. Kablosu ya da fifli
ar›zalanm›fl olan bir ütüyü kullanmaya kalk›flmay›n›z. Güç kablosunu ya da di¤er parçalar›
kendiniz de¤ifltirmeye kalk›flmay›n›z - Yard›m için Müflteri Hizmetleri bölümüyle ba¤lant›ya
geçiniz.
6. Ütü prize tak›l›yken kesinlikle yan›ndan ayr›lmay›n›z.
7. Su haznesini doldurmadan önce fifli prizden ç›kar›n›z (buharl› ütüler ve su püskürten
ütüler için geçerlidir).
8. Ütü dengeli bir yüzey üzerinde kullan›lmal› ve b›rak›lmal›d›r.
- 2 -
Page 4
ÖNEML‹ GÜVENL‹K UYARILARI
9. Ütüyü bir yüzey üzerine koyarken yüzeyin dengeli oldu¤undan emin olunuz.
10. Ütü yere düfltü¤ü takdirde ya da gözle görülür bir hasar ya da s›z›nt› durumunda
kesinlikle kullan›lmamal›d›r.
11. Bu cihaz, gözetim ya da yönlendirme yap›lmaks›z›n fiziksel, çocuklar ya da fiziksel,
duyusal, zihinsel engeli olan kifliler, bu konuda bilgi ya da deneyim sahibi olmayan
kifliler taraf›ndan kullan›lmamal›d›r.
12. Çocuklar›n cihazla oynamas›na izin vermeyiniz.
TAfiIMA ESNASINDA
• Ürünü düflürmeyiniz,
• Darbelere maruz kalmamas›n› sa¤lay›n›z,
• S›k›flmamas›n›, ezilmemesini sa¤lay›n›z,
• Ambalaj üzerindeki iflaretlemelere uyunuz.
• Orjinal ambalajıyla taflımaya özen gösteriniz.
ÇEVRE VE ‹NSAN SA⁄LI⁄I
Çevre korumas›na siz de katk›da bulunabilirsiniz!
Lütfen yerel düzenlemelere uymay› unutmay›n: Çal›flmayan elektrikli cihazlar›,
uygun elden ç›karma merkezlerine götürün
Kullanım sırasında insan ve çevre sa¤lı¤ına tehlikeli veya zararlı olabilecek bir durum
söz konusu de¤ildir.
C‹HAZIN KULLANIMI
• Ba¤lantı veya Montajın Nasıl Yapılaca¤ını Gösterir fiema ile Ba¤lantı veya Montajın
Kimin Tarafından Yapılaca¤ına (tüketici, yetkili servis) iliflkin bilgiler
Cihaz›n›zla birlikte gelen aksesuarları kolayl›kla kendiniz tak›p ç›kartabilirsiniz.
Olası bir arıza durumunda cihazın içini açmayınız. En yak›n yetkili servise baflvurunuz.
PÜSKÜRTME
Bu fonksiyon istenildi¤i zaman kullan›labilir ve kullan›m s›kl›¤› ütünün s›cakl›¤›n›
etkilemez.
• Ütüye su doldurunuz.
• Püskürtme ucunu giysiye do¤rultunuz.
• Püskürtme Dü¤mesine Bas›n›z (3)
BUHARLA ÜTÜLEME
Bu fonksiyon yaln›zca yüksek s›cakl›klarda kullan›labilir.
Orta ya da azami buhar ayar› yap›labilir.
• Ütüye su doldurunuz.
• Ütüyü dik konuma getiriniz.
• Ütünün fiflini prize tak›n›z.
• S›cakl›k ayar dü¤mesini (l) "••"."•••" ya da MAX konumuna getiriniz.
- 3 -
Page 5

BUHARLA ÜTÜLEME
• Pilot lamba söndükten ayarlanan s›cakl›¤a ulafl›lm›fl demektir ve ütü kullan›ma haz›rd›r.
• Buhar ayar dü¤mesini (7) istedi¤iniz konuma getirdikten sonra tabandaki deliklerden
buhar ç›kmaya bafllayacakt›r.
Uyar›: Geleneksel buharl› ütüleme iflleminde seçili s›cakl›k çok düflük oldu¤u takdirde
ütünün taban›ndan su s›z›nt›s› olabilir. Bu durumda s›cakl›k ayar dü¤mesini (1) tavsiye
edilen konuma getiriniz. Gerekli s›cakl›¤a ulafl›ld›ktan sonra buhar yeniden ç›kmaya
bafllayacakt›r.
fiOK BUHAR
Bu özellik inatç› k›r›fl›kl›klar›n düzeltilmesi için ekstra buhar ç›k›fl› sa¤lar.
• Ütüye su doldurunuz.
• S›cakl›k ayar dü¤mesini “MAX” konumuna getiriniz.
• Ütü kullan›ma haz›rd›r.
• fiok Buhar dü¤mesine (2) bir kez bas›n›z
• Buhar kumafl›n içine iflleyerek k›r›fl›kl›klar›n giderilmesini sa¤layacakt›r.
• ‹natç› k›r›fl›kl›klar›n bulunmas› durumunda buhar ayar dü¤mesine yeniden basmadan
önce birkaç saniye bekleyiniz.
Tüm k›r›fl›kl›klar genellikle bu ifllem üç kez tekrarland›ktan sonra giderilir.
BUHARSIZ ÜTÜLEME
• Ütünün fiflini prize tak›n›z.
• Buhar dü¤mesini (7) “0” konumuna getiriniz.
• S›cakl›k ayar dü¤mesini (1) kullanarak s›cakl›¤› ayarlay›n›z..
• Pilot lamba söndükten sonra gerekli s›cakl›¤a ulafl›lm›flt›r. Ütü kullan›ma haz›rd›r.
ÜTÜNÜN YEN‹DEN ISINMASINI BEKLEME:
Ütüyü kald›r›n›z ya da hafifçe oynat›n›z.
K›rm›z› termostat lambas› sönecektir. Taban›n s›cakl›¤› ayarlanm›fl olan ütüleme
s›cakl›¤›n›n alt›na düfltü¤ünde pilot lamba yanmaya bafllar.
Ütü hareket ettirildi¤inde pilot lamba yanar, ütüleme ifllemine tekrar bafllamadan önce
lamban›n sönmesini bekleyiniz.
Ütüyü hareket ettirdikten sonra pilot lamba yanm›yorsa ütünün taban› halen do¤ru
s›cakl›k seviyesinde demektir ve ütü kullan›ma haz›rd›r.
Notlar:
• Ütünün baz› k›s›mlar› ya¤ ile kaplanm›fl olabilece¤inden ütü ilk kez çal›flt›r›ld›¤› s›rada
bir miktar duman ç›kabilir. Bu durum k›sa bir süre sonra ortadan kalkacakt›r.
• Ütüyü kullanmaya bafllamadan önce taban ve gövde üzerindeki koruyucu film tabakas›n›
sökmeyi unutmay›n›z. Taban› yumuflak bir bezle silerek temizleyiniz.
• Ütüyü kullanmaya bafllamadan önce taban ve su haznesinin tamamen temiz oldu¤undan
emin olmak için ütüyü kullan›lmayan bir kumafl parças› üzerinde test ediniz.
- 4 -
Page 6

C‹HAZIN KULLANIMI
SU SEÇ‹M‹
• Bu ütü yaln›zca normal musluk suyu ile kullan›lmal›d›r.
• Bölgenizdeki su afl›r› kireçliyse dam›t›lm›fl ya da demineralize su kullanman›z tavsiye
edilir.
• Ütüye kimyasal olarak kireçten ar›nd›r›lm›fl su ya da baflka s›v›lar doldurmay›n›z.
SU DOLDURMA
• Buhar Ayar dü¤mesini “0” konumuna getiriniz ve S›cakl›k Ayar dü¤mesini OFF (Kapal›)
konumuna getiriniz.
• Ütünün fiflini prizden ç›kar›n›z ve ütünün so¤umas›n› bekleyiniz.
• Su giriflinden (5) içeri su doldurmaya bafllay›n›z.
-Su haznesini “MAX” iflaretli azami seviyeye kadar doldurunuz.
Etiket Kumafl Türü ‹plik Türü
• Sentetik Akrilik
•• Sentetik Asetat
•• Sentetik Bak›r
•• ‹pek ‹pek
•• Yün Yün
••• Pamuk Pamuk
Keten Keten
SICAKLI⁄I AYARLAMA
• Fifli prize tak›n›z ve ütüyü dik konuma getiriniz.
• S›cakl›k ayar dü¤mesini (1) istedi¤iniz s›cakl›k ayar›na getiriniz.
• ‹stedi¤iniz s›cakl›¤a ulafl›ld›¤›nda pilot lamba sönecektir. Pilot lamba, seçili olan
s›cakl›¤›n korunmas› için zaman zaman yan›p sönecektir.
Modakrilik
Polipropilen
Poliüretan
Triasetat
Poliamid (Naylon)
Polyester
Viskonlar (Rayon)
KULLANIM HATALARINA ‹L‹fiK‹N B‹LG‹LER
Cihazınızı, beyan edilen voltaj ile çal›flt›r›n›z.Bulundu¤unuz yerin voltaj›n›n uygun olup
olmad›¤›n› kontrol ediniz.
Güç kablosunun ar›zalanmas› durumunda tehlikelerin önlenmesi için kablo üretici, servis
merkezi ya da benzer bir ehliyetli kifli taraf›ndan de¤ifltirilmelidir. Ar›za durumunda cihaz›
kendiniz sökmeye kalk›flmay›n›z, bak›m merkezimiz ya da sat›fl sonras› hizmet merkezimiz
- 5 -
Page 7

TEM‹ZL‹K VE BAKIM
ile ba¤lant›ya geçiniz.
Cihaz› kendiniz onarmaya kalk›flmay›n›z. Meydana gelebilecek ar›zalardan firmam›z
kesinlikle sorumlu de¤ildir, ve cihaz›n›z garanti kapsam› d›fl›nda ifllem görecektir.
TEM‹ZL‹K VE BAKIM
• Tüketicinin Kendi Yapabilece¤i Bakım, Onarım veya Ürünün Temizli¤ine ‹liflkin Bilgiler
1. S›cakl›k Ayar Dü¤mesini KAPALI konuma getiriniz, ütünün fiflini çekiniz ve so¤umas›n›
bekleyiniz.
2. Taban üzerindeki kal›nt›lar ve art›klar sirkeli su kar›fl›m›na bat›r›lm›fl bir bez yard›m›yla
silinerek ç›kar›labilir.
3. Cihaz›n gövdesi nemli bir bez yard›m›yla silinmeli ve kuru bir bezle kurulanarak
parlat›lmal›d›r.
4. Taban› temizlemek için kesinlikle afl›nd›r›c› temizlik malzemeleri kullanmay›n›z.
5. Taban›n yüzeyini çizilmelere karfl› koruyunuz, metal cisimlerle temas etmesine izin
vermeyiniz.
6. Ütüleme ifllemini bitirdikten sonra ya da ütünün bafl›ndan ayr›l›yorken:
- buhar ayar dü¤mesini (7) “0” konumuna getiriniz ve S›cakl›k Ayar Dü¤mesini OFF
(Kapal›) konuma getiriniz - ütüyü dik konuma getiriniz - ütünün fiflini prizden çekiniz.
7. Ütü yaparken çocuklar›n ütüyle ya da güç kablosuyla temas etmesine izin vermeyiniz.
8. Ütüyü ya da güç kablosunu suya ya da baflka s›v›lara sokmay›n›z.
9. S›cak metal parçalar, s›cak su ya da buharla temas etmeyiniz. Parçalar çok ›s›n›p
yan›klara neden olabilir. Ütüyü ters çevirirken dikkatli olunuz: Parçalar çok ›s›n›p
yan›klara neden olabilir. Ütüyü ters çevirirken dikkatli olunuz: Su haznesinde s›cak su
kalm›fl olabilir.
Fiflin ve kablonun ütünün taban›yla temas etmesine izin vermeyiniz. Ütüyü kald›rmadan
önce tamamen so¤umas›n› bekleyiniz. Ütünün güç kablosunu kablo bölümüne sar›n›z
1. Ütüyü özenli bir flekilde muhafaza ediniz.
2. Ütüye su doldururken ya da boflalt›rken ütünün fiflini mutlaka prizden çekiniz.
3. Bu ütü yaln›zca evde kullan›ma yöneliktir
BU KULLANIM KILAVUZUNU BAfiVURU KAYNA⁄I OLARAK MUHAFAZA ED‹N‹Z
KEND‹ KEND‹N‹ TEM‹ZLEME ÖZELL‹⁄‹
Kireç ve kirleri temizlemek için kendi kendini temizleme özelli¤ini kullanabilirsiniz.
Kendi kendini temizleme ifllemini iki haftada bir uygulay›n›z. Yaflad›¤›n›z yerin suyu çok
kireçliyse kendi kendini temizleme ifllemi daha s›k yap›lmal›d›r.
a. Cihaz›n prize tak›l› olmad›¤›ndan emin olunuz.
b. Buhar ayar dü¤mesini “0” konumuna getiriniz.
c. Su haznesini azami seviyeye kadar doldurunuz.
d. Azami ütüleme s›cakl›¤›n› seçiniz.
e. Fifli prize tak›n›z.
f. Turuncu renkli s›cakl›k pilot lambas› söndü¤ünde fifli prizden çekiniz.
- 6 -
Page 8

TEM‹ZL‹K VE BAKIM
g. Ütüyü lavabonun üstünde tutunuz, kendi kendini temizleme dü¤mesini bas›l› tutunuz
ve ütüyü sallay›n›z.
(Ütünün taban›ndan buhar ve kaynak su ç›kmaya bafllayacakt›r. Kirler ve kireç parçalar›
d›flar› at›lacakt›r.)
h. Haznedeki tüm su tükenene kadar dü¤meyi bas›l› tutunuz. Ütüde halen çok miktarda
kir bulunuyorsa kendi kendini temizleme ifllemini tekrarlay›n›z.
• Periyodik Bakım Gerektirmesi Durumunda, Periyodik Bakımın Yapılaca¤ı Zaman
Aralıkları ile Kimin Tarafından Yapılması Gerekti¤ine ‹liflkin Bilgiler
Cihaz periyodik bak›m gerektirmez.
Düzenli olarak temizli¤inin yapılmasında fayda vardır.
SATIfi SONRASI SERV‹S H‹ZMETLER‹
Bu cihaz kullan›c› taraf›ndan de¤ifltirilebilen parçalara sahip de¤ildir. Ünitenin çal›flmamas›
durumunda flu ad›mlar› izleyin.
1. Talimatlar›n do¤ru biçimde izlendi¤ini denetleyin.
2. Ana kayna¤›nda ifllevselli¤ini denetleyin.
Cihaz hâlâ çal›flm›yorsa, sat›n ald›¤›n›z yere geri götürün.
Güç kablosu hasar örmüflse, tehlikeleri önlemek için, cihaz üreticisine iade edilmelidir.
Kendi kendinize tamir etmeye KALKIfiMAYIN.
fiu talimatlar› izleyin:
1. Dikkatlice, tercihen orijinal kutusuna paketleyin.
Ünitenin temiz oldu¤undan emin olun.
2. Tüm yaz›flmalarda, ad›n›z›, adresinizi ve ürünün model numaras›n› belirtin.
3. ‹ade etme nedeninizi belirtin.
4. Garanti kapsam›ndaysa, nereden, ne zaman al›nd›¤›n› belirtin ve sat›n alma kan›t›n›
ekleyin (örn. kasa fifli).
- 7 -
Page 9
ENGLISH
SINBO SSI 2858 STEAM IRON
INSTRUCTION MANUAL
AC 230V , 50Hz, 2000W
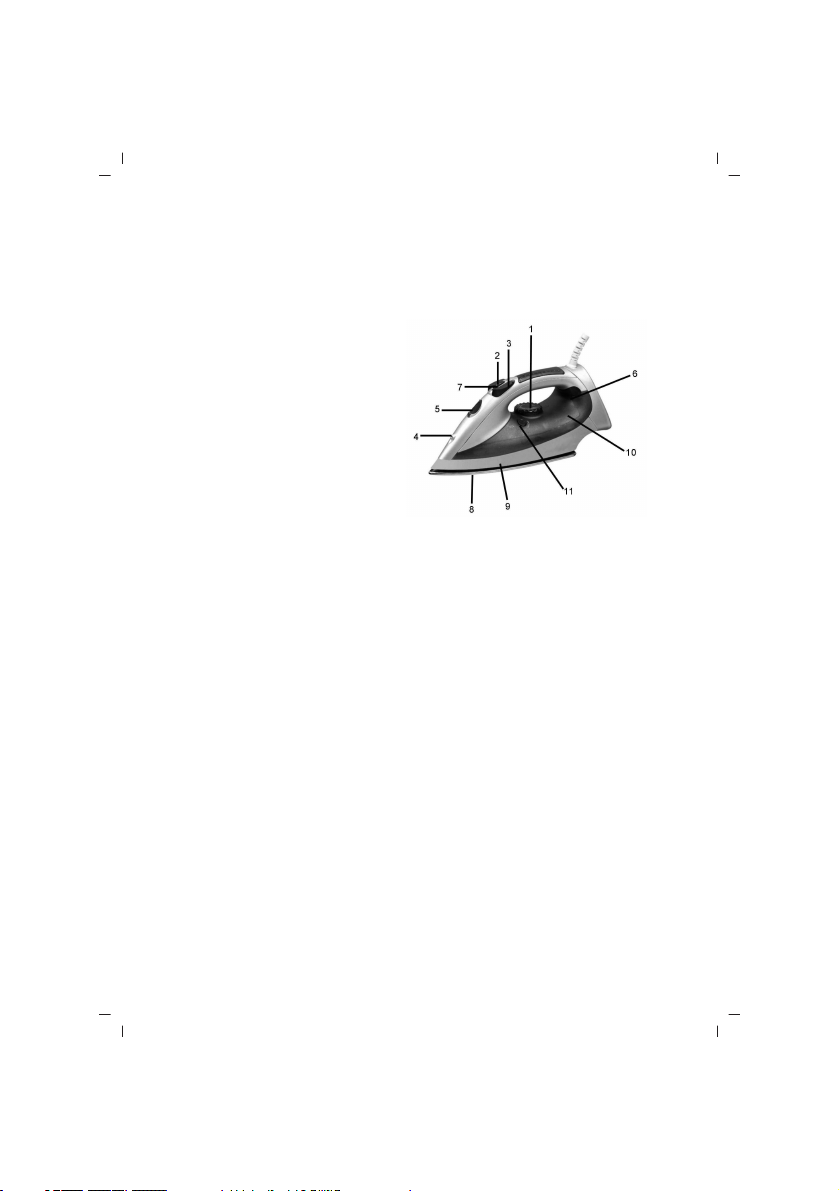
Parts Name
1. Temperature Control
2. Burst of steam button
3. Spray button
4. Spray nozzle
5. Water inlet
6. Pilot light
7. Steam control knob
8. Soleplate
9. Housing
10. Water tank
11. Self-clean button
IMPORTANT SAFEGUARDS
1. Please read all instruction carefully before using the appliance for the time.
2. Before connecting the appliance, check if the voltage indicated on the rating plate
corresponds with mains voltage in your home.
3. Do not use appliance for anything other than intended use.
4. The iron should always be switched off before connecting or disconnecting from the
power supply. Do not pull on the cord to disconnect the plug form the wall socket.
5. Do not use the iron if it is damaged in any way. Do not operate the iron with a damaged
cord or plug. Do not replace the power cord or any other parts by yourself-contact
Customer Support for assistance.
6. The iron must not be left unattended while it is connected to the supply mains.
7. The plug must be removed form the socket-outlet before the water reservoir is filled
with water (for steam irons and irons incorporating means for spraying water).
8. The iron must be used and rested on a stable surface.
9. When placing the iron on its stand, ensure that the surface on which the stand is
placed is stable.
10. The iron is not to be used if it has been dropped, if there are visible signs of damage
or if it is leaking.
11. The appliance is not be used by children or persons with reduced physical, sensory
or mental capabilities or lack of experience and knowledge, unless thy have been given
supervision or instruction.
12. Children being supervised not to play with appliance.
- 8 -
Page 10

SPRAYING
This function can be used any time and it dose not affect the ironing temperature.
• Fill water into the iron.
• Aim the nozzle towards the garment.
• Press the Spray Button (3)
STEAM IRONING
This function can be used only at higher ironing temperature.
For moderate steam or MAX for maximum steam
• Fill water into the iron.
• Stand the iron upright.
• Connect the iron to a suitable mains supply outlet.
• Turn the temperature control (l) to the "••"."•••" or MAX setting.
• The pilot light turns off when the required temperature is reached the iron is ready
for use.
• Turn the steam knob (7) to the required position, steam starts coming
out form the holes in the sole plate.
Notice: With conventional steam ironing, water may leak form the sol plate if too low
a temperature has been select. If this happens, turn the temperature control (1) to the
advised position. Steam will recommence as soon as the appropriate temperature has
be reached.
BURST OF STEAM
This function provides an extra amount of steam to remove stubborn wrinkles.
• Fill the iron with water.
• Turn the temperature control to the position "MAX"
• The iron is ready for use
• Press the Burst of Steam button (2) once
• Steam will penetrate into the garment removing the wrinkles
• Wait a few seconds before pressing the steam control knob again when there are
stubborn wrinkles
Usually all wrinkles can be removed within three pressings
DRY IRONING
• Connect the iron to a suitable mains supply outlet
• Ensure that the steam control knob (7) is in position"0"
• Select the setting on the temperature control (1).
• When the pilot light turns off, the required temperature is reached. The iron is ready
for use.
TO LET THE IRON HEAT UP AGAIN:
Pick up the iron or move it slightly
- 9 -
Page 11

TO LET THE IRON HEAT UP AGAIN
The red shot-off pilot goes out. If the temperature of the soleplate dropper below the
set ironing temperature, the temperature pilot goes on.
If the pilot light goes on after you have move the iron, wait for it to go out before you
start ironing.
If the pilot light does not go on after you move the iron, the soleplate still has right
temperature and iron is ready for use.
SELF-CLEAN FUNCTION
You can use the self-clean function to remove scale and impurities
Use the self-clean function once every two weeks. If the water in your area is very
hard, the self-clean function should be used more frequently.
a. Make sure the appliance is unplugged
b. Set the steam control knob to position "O"
c. Fill the water tank to maximum level.
d. Select the maximum ironing temperature.
e. Put the plug in the well socket.
f. Unplug the iron when the amber temperature pilot light has gone out.
g. Hold the iron over the sink, press and hold the self-clean button and gently shake
the iron and fro.
(Steam and boiling water will come out of the soleplate. Impurities and flakes if any will
be flushed out.)
h. Release the self-clean button as soon as all water in the tank has been used up.
Repeat the self-clean process if the iron still contains a lot of impurities.
CARE AND CLEANING
1. Turn the Temperature Control Dali to OFF, then disconnect the iron from the wall
outlet and it cool down completely.
2. Deposits and other residues on the sole plate can be removed with a cloth soaked
in a vinegar/water solution.
3. The casing may the wiped with a damp cloth and then polished with a dry one.
4. Never use any abrasives to clean the sole plate.
5. Keep the sole plate smooth; avoid contact with metal objects.
6. When you have fished ironing or when you are leaving iron unattended:
-turn the steam control knob (7) to position "0", and the Temperature Control
Dali to OFF -stand the iron up right, -disconnect the iron from the wall outlet.
7. Do not allow children to touch the iron or the power cord when ironing.
8. Do nor immerse the iron or the cord into water or any other liquid.
9. Do not touch hot metal parts, hot water or steam. There parts become hot and may
cause bums. Take care if you turn the iron upside downs: there parts become hot and
may cause bums. Take care if you turn the iron upside downs: there may be not hot
water in the tank.
- 10 -
Page 12

FILLING WITH WATER
The plug and cord should not be allowed to touch the sole plate. Let the iron cool down
completely before taking it away. Roll the power cord around the
1. Iron for storage.
2. Disconnect the iron form the wall outlet while filling with water or when emptying
the water after use.
3. The iron is for household use only.
SAVE THE INSTRUCTION MANUAL FOR FUTURE REFERRNCE
Notes:
• Some parts of the iron have been slightly greased and as a result, the iron may smoke
slightly when switched on for the first time. It will not happen again after a tow uses.
• Before using for the first time remove any protective films or stickers from the sole
plate and the cabinet. Clean the sole place with a soft cloth.
• When using the iron for the first time, test it on an old piece of fabric to ensure that
the sole plate and water tank are completely clean.
CHOICE OF WATER
• This iron can be used with normal tap water.
• If the water in your area is particularly hard, it is advisable to use distilled or deminer
alized water
• Do not use chemically descaled water or any other liquids for refilling.
HOW TO FILL IN WATER
• Set the Steam Control knob "0"and the Temperature Control Dali to OFF.
• Unplug the iron from the wall outlet, and wait for the iron to cool down.
• Pour water into the water inlet (5).
-Fill up to the maximum level "MAX" of the water tank.
SETTING THE TEMPERATURE
• Insert the plug in the wall socket and stand the iron upright.
• Turn the temperature control knob (1) to the desired temperature setting.
• The desired temperature has been reached when the pilot light has turned off. The
pilot light will turn on and off form time to time, indicating that the selected temperature
is being maintained.
- 11 -
Page 13
NOTE
Label Kind of Textile Fibre Material
• Synthetic Acrylic
•• Synthetic Acetate
•• Synthetic Cupro
•• Silk Silk
•• Wool Wool
••• Cotton Cotton
Linen Linen
Modacryl
Polyprophylene
Polyurethane
Triacetate
Polyamide(Nylon)
Polyester
Viscoses(Ray on)
- 12 -
Page 14
FRANÇAIS
SINBO SSI 2858 FER À REPASSER À VAPEUR
MODE D'EMPLOI
AC 230V , 50Hz, 2000W
Noms des Pièces
1. Contrôle de température
2. Bouton de vapeur choc
3. Bouton de spray
4. Embout de spray
5. Entrée d’eau
6. Témoin lumineux
7. Bouton de contrôle de vapeur
8. Semelle
9. Corps
10. Réservoir d’eau
11. Bouton d’auto-nettoyage
CONSIGNES IMPORTANTES DE SÉCURITÉ
1. Lisez le manuel en entier avec attention avant de commencer à utiliser l’appareil
pour la première fois.
2. Assurez-vous que le niveau de voltage indiqué sur l’étiquette de l’appareil est identique
au niveau de voltage de votre résidence avant de brancher l’appareil à la source
d’alimentation.
3. N’utilisez pas ce produit à des fins autres que celles pour les quelles il est conçu.
4. Ce fer doit être positionné sur « arrêt » avant d’être branché à la source d’alimentation
ou avant d’être débranché de la source d’alimentation. Ne tirez pas le cordon pour
débrancher la fiche de la prise.
5. N’utilisez pas le fer à repasser s’il a fait panne d’une façon ou d’une autre. Ne tentez
pas d’utiliser un fer à repasser dont le cordon ou la fiche est en panne. Ne tentez pas
de remplacer vous-même le cordon d’alimentation ou les autres pièces – pour recevoir
de l’aide, mettez-vous en contact avec le département de Service Clientèle.
6. Ne vous absentez jamais lorsque le fer est branché à la prise.
7. Débranchez la fiche électrique avant de remplir le réservoir d’eau. (Valable pour les
fers à vapeur et les fers pulvérisant de l’eau).
8. Le fer à repasser doit être utilisé et laissé sur une surface équilibrée.
9. Lorsque vous apposez le fer à repasser sur une surface, assurez-vous que cette
surface est stable.
10. Le fer ne doit absolument pas être utilisé s’il est tombé parterre, s’il possède un
dommage visible ou en cas de suintement.
11. Cet appareil n’est pas prévu pour être utilisé par des personnes (y compris les
enfants) dont les capacités physiques, sensorielles ou mentales sont réduites, ou des
- 13 -
Page 15

CONSIGNES IMPORTANTES DE SÉCURITÉ
personnes dénuées d’expérience ou de connaissance, sauf si elles ont pu bénéficier,
par l’intermédiaire d’une personne responsable de leur sécurité, d’une surveillance ou
d’instructions préalables concernant l’utilisation de l’appareil.
12. Il convient de bien surveiller les enfants pour s’assurer qu’ils ne jouent pas avec
l’appareil.
PULVÉRISATION
Cette fonction peut être utilisée lorsque souhaitée et la fréquence d’utilisation n’a aucun
effet sur la température du fer.
• Remplissez de l’eau dans le fer.
• Orientez l’embout de pulvérisation vers le vêtement.
• Appuyez sur le bouton de pulvérisation (3).
REPASSAGE À VAPEUR
Cette fonction peut être utilisée uniquement à des hautes températures.
Un réglage de vapeur moyen ou maximum peut être effectué.
• Remplissez de l’eau dans le fer.
• Positionnez le fer perpendiculairement.
• Branchez la fiche du fer à la prise.
• Positionnez le bouton de réglage de température (l) sur "••"."•••" ou MAX.
• Une fois que le témoin lumineux s’est éteint, cela signifie que la température réglée
est obtenue et le fer est prêt à l’emploi.
• La vapeur commencera à sortir des trous de la semelle une fois que vous aurez
positionné le bouton de réglage de vapeur (7) tel que vous le désirez.
Avertissement: Lors de l’opération de repassage à vapeur traditionnel, il se peut que
de l’eau suinte à la semelle du fer si la température choisie est très basse. En pareil
cas, positionnez le bouton de réglage de température (1) telle que conseillée. La vapeur
commencera à sortir de nouveau une fois que la température nécessaire est obtenue.
VAPEUR CHOC
Cette fonction fournit de la vapeur en extra pour lisser les froissures tenaces.
• Remplissez de l’eau dans le fer.
• Positionnez le bouton de réglage de température sur “MAX”.
• Le fer est prêt à l’emploi.
• Appuyez sur le bouton de Vapeur choc (2) une ou deux fois.
• La vapeur supprimera les froissures en s’imprégnant dans le textile.
• En cas de présence de froissures tenaces, attendez quelques secondes avant de
réappuyer sur le bouton de réglage de vapeur.
Toutes les froissures disparaissent généralement lorsque cette opération est répétée
trois fois.
- 14 -
Page 16

REPASSAGE SANS VAPEUR
• Branchez la fiche du fer à la prise de courant.
• Positionnez le bouton de vapeur (7) sur “0”.
• Ajustez la température en vous servant du bouton de réglage de température (1).
• lorsque le témoin lumineux s’éteint, cela veut dire que la température nécessaire est
acquise. Le fer à repasser est prêt à l’emploi.
ATTENTE DU RÉCHAUFFAGE DU FER :
Soulevez le fer ou faites-le légèrement bouger.
La lampe rouge de thermostat va s’éteindre. Le témoin lumineux commencera à
s’allumer lorsque la température de la semelle descendra au-dessous de la température
de repassage réglée.
Le témoin lumineux s’allumera lorsque le fer bougera, attendez que la lampe s’éteigne
avant de recommencer à l’opération de repassage.
Si le témoin lumineux ne s’allume pas après avoir fait bouger le fer à repasser cela
veut dire que la semelle du fer est toujours à la bonne température et que le fer est
prêt à l’emploi.
FONCTION D’AUTO-NETTOYAGE
Pour nettoyer les calcaires et les saletés, vous pouvez utiliser la fonction d’autonettoyage. Appliquez l’opération d’auto-nettoyage une fois toues les deux semaines. Si
l’eau de votre résidence est très calcique, l’opération d’auto-nettoyage doit s’effectuer
plus souvent.
a. Assurez-vous que l’appareil n’est pas branché à la prise.
b. Positionnez le bouton de réglage de vapeur sur “0”.
c. Remplissez le réservoir d’eau jusqu’au maximum niveau.
d. Sélectionnez la température de repassage maximum.
e. Branchez le fiche à la prise.
f. Débranchez la fiche de la prise lorsque le témoin lumineux de couleur orange s’éteint.
g. Tenez le fer sur le lavabo, maintenez le bouton d’ d’auto-nettoyage appuyé et secouez
le fer.
(De la vapeur et de l’eau commencera à sortir de la semelle du fer à repasser. Les
saletés et les pièces de calcaires vont s’évacuer à l’extérieur).
h. Maintenez le bouton appuyé jusqu'à ce que l’eau entière qui se trouve dans le réservoir
soit terminée. S’il se trouve toujours beaucoup de saleté sur le fer, répétez l’opération
d’ d’auto-nettoyage.
ENTRETIEN ET NETTOYAGE
1. Positionnez le bouton de réglage de température sur ARRÊT, débranchez la fiche
électrique du fer à repasser et attendez qu’il refroidisse.
2. Les restes et les traces qui sont sur la semelle peuvent être enlevés en étant essuyés
avec un chiffon trempé dans un mélange d’eau au vinaigre.
- 15 -
Page 17

ENTRETIEN ET NETTOYAGE
3. Le corps de l’appareil doit être frotté à l’aide d’un chiffon humide et lustré avec un
chiffon sec.
4. N’utilisez jamais de matériels de nettoyage abrasifs pour nettoyer la semelle.
5. Protégez la surface de la semelle contre les rayures, ne permettez pas qu’elle soit
en contact avec des objets en métal.
6. Une fois terminé l’opération de repassage ou lors de l’absence du lieu de repassage:
- Positionnez le bouton de réglage de vapeur (7) sur “0” et le bouton de réglage de
température sur OFF (Arrêt) – mettez le fer à la position perpendiculaire- débranchez
la fiche du fer de la prise.
7. Lorsque vous faites du repassage, ne permettez pas les enfants être en contact avec
le fer à repasser ou le cordon d’alimentation.
8. N’immergez pas le fer ou le cordon d’alimentation dans l’eau ou dans tout autre
liquide.
9. Ne contactez pas les pièces chaudes en métal, l’eau chaude ou la vapeur. Les pièces
peuvent chauffer beaucoup et causer des brûlures. Soyez prudent lorsque vous retournez
le fer à l’envers: il se peut que de l’eau chaude soit restée dans le réservoir d’eau.
Ne permettez pas la fiche et le cordon se mettre en contact avec l semelle du fer.
Attendez que le fer refroidisse complètement avant de ne le ranger. Enroulez le cordon
d’alimentation du fer autour du compartiment de cordon.
1. Préservez le fer à repasser d’une façon soigneuse.
2. Débranchez absolument la fiche du fer de la prise lorsque vous y remplissez de l’eau
ou vous en déversez de l’eau.
3. Ce fer est destiné uniquement à l’usage domestique.
CONSERVEZ CE MODE D'EMPLOI POUR VOUS Y RÉFÉRER ULTÉRIEUREMENT
Remarques:
• Étant donné que certaines parties du fer peuvent être couvertes d’huile, il se peut
que le fer dégage un peu de fumée lors du premier fonctionnement. Cela disparaitra
après une courte durée.
• Avant de commencer à utiliser le fer à repasser, n’oubliez pas de décoller la couche
de bande protectrice se trouvant sur la semelle et le corps. Nettoyez la semelle en la
frottant avec un chiffon doux.
• Avant de commencer à utiliser le fer à repasser, pour s’assurer que la semelle et le
réservoir d’eau sont complètement propres, testez le fer sur un morceau de textile
duquel vous ne faites pas usage.
CHOIX D’EAU
• Ce fer à repasser doit être utilisé uniquement avec ne l’eau normale du robinet.
• Dans le cas où l’eau de votre région est trop calcique, nous vous conseillons d’utiliser
de l’eau distillée ou de l’eau déminéralisée.
• Ne versez pas de l’eau chimiquement décalcifiée ou d’autres liquides.
- 16 -
Page 18

REMPLISSAGE D’EAU
• Positionnez le bouton de réglage de vapeur sur “0” et le bouton de réglage de
température sur OFF (Arrêt)
• Débranchez la fiche du fer de la prise et attendez que le fer refroidisse.
• Commencez à remplir de l’eau à travers l’entrée d’eau (5).
- Remplissez le réservoir d’eau jusqu'au maximum niveau marqué avec le signe de
“MAX”.
Étiquette Type du Textile Type du fil
• Synthétique Acrylique
•• Synthétique Acétate
•• Synthétique Cuire
•• Soie Soie
•• Laine Laine
••• Coton Coton
Lin Lin
RÉGLAGE DE TEMPÉRATURE
• Branchez la fiche à la prise et positionnez le fer de façon perpendiculaire.
• Mettez le bouton de réglage de température (1) au niveau que vous désirez.
• Le témoin lumineux s’éteindra lorsque la température que vous aurez choisie sera
obtenue. Le témoin lumineux s’allumera et s’éteindra de temps à autres pour protéger
la température choisie.
Modacrylique
Polypropylène
Polyuréthane
Triacétate
Polyamide (Nylon)
Polyester
Viscose (Rayon)
- 17 -
Page 19

NEDERLANDS
SINBO SSI 2858 STOOMSTRIJKIJZER
GEBRUIKSAANWIJZING
AC 230V , 50Hz, 2000W
Onderdelen
1. Temperatuur regelknop
2. Stoom stootknop
3. Sproeiknop
4. Sproeikop
5. Vulopening van waterreservoir
6. Indicatielampje
7. Stoom regelknop
8. Strijkzool
9. Behuizing
10. Waterreservoir
11. Zelfreinigingsknop
BELANGRIJKE VEILIGHEIDSVOORSCHRIFTEN
1. Lees aandachtig de volledige handleiding voordat u het apparaat in gebruik neemt.
2. Controleer of de voltage die vermeld is op het typeplaatje overeenkomt met de
plaatselijke netspanning, voordat u het apparaat op de stroombron aansluit.
3. Gebruik het strijkijzer uitsluitend voor het bestemde doel.
4. Het strijkijzer moet uitgeschakeld zijn voordat u het op de stroombron aansluit of
van de stroombron ontkoppelt. Trek nooit aan het snoer, grijp altijd de stekker vast.
5. Gebruik het apparaat niet als het snoer, de stekker of het apparaat zelf defect is of
beschadigd. Tracht nooit zelf het snoer of andere delen van het apparaat te vervangen.
Contacteer de Klantenservice voor alle werkzaamheden van nazicht en herstel.
6. Laat het strijkijzer nooit achter met de stekker in het stopcontact.
7. Neem de stekker uit het stopcontact vooraleer het waterreservoir te vullen (voor
stoom- en sproeistrijkijzers)
8. Het strijkijzer moet altijd op een stabiele bodem gebruikt en achtergelaten worden.
9. Controleer altijd of een oppervlak stabiel is voordat u het strijkijzer erop neerzet.
10. Gebruik het strijkijzer in geen geval als het gevallen en zichtbaar beschadigd is of
als het lekt.
11. Dit apparaat mag niet gebruikt worden door kinderen of personen met lichamelijke,
zintuiglijke of geestelijke handicap of gebrek aan kennis en ervaring, tenzij onder toezicht
en leiding van een persoon die instaat voor een veilig gebruik.
12. Houd voldoende toezicht om te beletten dat kinderen met het apparaat gaan spelen.
SPROEIEN
Deze functie kunt u op elk gewenst ogenblik gebruiken zonder dat de temperatuur van
- 18 -
Page 20

SPROEIEN
de strijkzool wordt beïnvloed.
• Vul het reservoir met water.
• Richt de sproeikop op het kledingstuk dat wordt gestreken.
• Druk op de sproeiknop (3)
STOOMSTRIJKEN
Deze functie kan alleen bij hoge temperaturen worden gebruikt.
De stoomknop is afstelbaar op middelmatig en hoog stoomvolume .
• Vul het reservoir met water.
• Zet het strijkijzer rechtop.
• Steek de stekker in het stopcontact.
• Zet de temperatuur regelknop (l) in de "••"."•••" of MAX stand.
• Als het indicatielampje dooft betekent dit dat de ingestelde temperatuur bereikt is en
dat het strijkijzer gebruiksklaar is.
• Zodra u de stoom regelknop (7) in de gewenste stand heeft gezet zal stoom ontsnappen
uit de stoomgaatjes in de strijkzool
Opgelet: Bij het traditioneel stoomstrijken kan de strijkzool beginnen lekken als de
temperatuur te laag is. Zet in dat geval de temperatuur regelknop (1) in de aanbevolen
stand. Zodra het strijkijzer de vereiste temperatuur heeft bereikt zal er opnieuw stoom
ontsnappen.
STOOMSTOOT
Deze functie laat toe door extra stoomuitlaat hardnekkige kreukels glad te strijken,
• Vul het reservoir met water.
• Zet de temperatuur regelknop in de “MAX” stand.
• Het strijkijzer is gebruiksklaar.
• Druk een keer op de stoomstoot knop (2).
• De stoom zal door de stof dringen zodat de kreukels kunnen worden gladgestreken.
• Ingeval van hardnekkige kreukels moet u enkele seconden wachten vooraleer u
opnieuw op de stoomstoot knop drukt.
Herhaal deze bewerking indien nodig. Gewoonlijk zijn na hoogstens drie stoomstoten
alle kreukels verdwenen
STRIJKEN ZONDER STOOM
• Steek de stekker in het stopcontact.
• Zet de stoom regelknop (7) in de “0” stand.
• Stel de temperatuur regelknop (1) op de gewenste temperatuur.
• Als de ingestelde temperatuur wordt bereikt dooft het indicatielampje en is uw
strijkijzer gebruiksklaar.
- 19 -
Page 21

STRIJKEN ZONDERSTOOM
WACHTEN TOT HET STIJKIJZER OPNIEUW DE GEWENSTE TEMPERATUUR BEREIKT:
Licht het strijkijzer op en beweeg het lichtjes heen en weer.
Het rode thermostaatlampje zal uitgaan als het strijkijzer de gewenste temperatuur
heeft. Het lampje zal opnieuw branden als de temperatuur van de strijkzool onder de
ingestelde strijktemperatuur is gedaald.
Als u het ijzer heen en weer beweegt en het indicatielampje brandt , wacht dan tot het
weer uitgaat voordat u begint te strijken. Als het lampje niet gaat branden als u het
strijkijzer heen en weer beweegt betekent dit dat de temperatuur van het strijkzool
voldoende is en dat uw strijkijzer klaar is om te worden gebruikt.
ZELFREINIGINGSFUNCTIE
De zelfreinigingsfunctie verwijdert kalk en onreinheden uit de strijkzool. Tenzij het
water in uw regio te hard is, zal het voldoende zijn om de twee weken van deze functie
gebruik te maken.
a. Vergewis u ervan dat het strijkijzer niet op de stroombron is aangesloten.
b. Zet de stoom regelknop in de “0” stand.
c. Vul het reservoir tot het maximum niveau.
d. Zet de temperatuur regelknop in hoogste stand.
e. Steek de stekker in het stopcontact.
f. Wacht tot het indicatielampje dooft en neem de stekker uit het stopcontact.
g. Houd het strijkijzer horizontaal boven een lavabo en schud het heen en weer terwijl
u de zelfreinigingsknop ingedrukt houdt. (Er zal water en stoom uit de strijkzool komen
terwijl kalk en bevuiling worden verwijderd).
h. Houd de knop ingedrukt tot al het water uit het reservoir verwijderd is. Als er nog
een hoeveelheid kalk en bevuiling in het reservoir is overgebleven kunt u deze bewerking
herhalen.
REINIGING EN ONDERHOUD
1. Zet de temperatuur regelknop op UIT, haal de stekker uit het stopcontact en wacht
tot het strijkijzer is afgekoeld.
2. Op de strijkzool achtergebleven kalksporen en bevuiling kunnen verwijderd worden
met een doek bevochtigd met azijnwater.
3. Reinig de behuizing met een vochtige doek en wrijf vervolgend droog en glanzend
met een droge doek.
4. Gebruik in geen geval bijtende of schurende reinigingsproducten.
5. Bescherm de strijkzool tegen krassen door contact met metalen voorwerpen.
6. Als u gedaan hebt met strijken of voordat u het strijkijzer achterlaat:
- zet de stoom regelknop (7) op “0” en de temperatuur regelknop op OFF (Uit) – plaats
het strijkijzer rechtop en neem de stekker uit het stopcontact.
7. Ingeval er kinderen in de buurt zijn terwijl u het strijkijzer gebruikt, let erop dat ze
het apparaat of het snoer niet aanraken.
- 20 -
Page 22

REINIGING EN ONDERHOUD
8. Dompel het strijkijzer, het snoer of de stekker niet in water of in een andere vloeistof.
9. Vermijd alle contact met hete metaaldelen, heet water en stoom om geen brandwonden
op te lopen en wees voorzichtig als u het strijkijzer ondersteboven keert voor het geval
er nog warm water in het reservoir is overgebleven.
Zorg ervoor dat het snoer en de stekker niet met de hete strijkzool in aanraking komen.
Wacht met opbergen tot het strijkijzer volledig is afgekoeld. Wind het snoer losjes rond
het strijkijzer om het op te bergen.
1. Berg het strijkijzer zorgvuldig op.
2. Neem altijd de stekker uit het stopcontact voor het vullen of legen van het reservoir.
3. Dit strijkijzer is uitsluitend bedoeld voor huishoudelijk gebruik.
BEWAAR DEZE GEBRUIKSHANDLEIDING ALS NASLAGBRON
Opmerkingen:
• Doordat sommige delen van dit strijkijzer in de fabriek lichtjes zijn ingevet, kan er
bij de eerste opwarming een weinig rookvorming voorkomen. Dit is een normaal
verschijnsel van voorbijgaande aard.
• Vergeet niet de beschermende film van de strijkzool te verwijderen vooraleer u het
strijkijzer in gebruik neemt. Reinig vervolgens met een zachte doek.
• Wij raden u aan het strijkijzer eerst op een oude lap te beproeven om zeker te zijn dat
de strijkzool en het reservoir volledig schoon zijn.
WATERKEUZE
• Dit strijkijzer is bedoeld voor gebruik met gewoon leidingwater.
• Ingeval de water in uw regio te hard is raden wij u echter aan gedestilleerd of
gedemineraliseerd water te gebruiken.
• Vul het reservoir niet met chemisch ontkalkt water of met andere vloeistoffen.
HET RESERVOIR VULLEN
• Zet de stoom regelknop in de “0” stand en de Temperatuur regelknop op OFF (Uit).
• Haal de stekker uit het stopcontact en wacht tot het strijkijzer is afgekoeld.
• Doe water in het reservoir via de vulopening (5).
- Vul het reservoir maar let erop de “MAX” peilaanduiding niet te overschrijden.
- 21 -
Page 23

TEMPERETUURREGELING
Label Aard van het weefsel Aard van vezel
• Synthetisch Acryl
•• Synthetisch Acetaat
•• Synthetische Koper
•• Zijde Zijde
•• Wol Wol
••• Katoen Katoen
Linnen Linnen
TEMPERATUURREGELING
• Steek de stekker in het stopcontact en zet het strijkijzer rechtop.
• Zet de temperatuur regelknop (1) in de gewenste warmtestand.
• Als de vereiste temperatuur bereikt is zal het indicatielampje doven. Het zal tijdens
het strijken aan- en uitgaan hetgeen erop wijst dat de ingestelde temperatuur op peil
wordt gehouden.
Modacryl
Polipropyleen
Polyuretaan
Triacetaat
Polyamide (Nylon)
Polyester
Viscose (Rayon)
- 22 -
Page 24

ESPANOL
SINBO SSI 2858 PLANCHA A VAPOR
GUÍA DEL USO
AC 230V , 50Hz, 2000W
Nombres de las Piezas
1. Control de la temperatura
2. Botón del vapor choque
3. Botón de espray
4. Extremo de espray
5. Entrada de agua
6. Luz pilota
7. Botón de control del vapor
8. Suelo
9. Cuerpo
10. Cisterna de agua
11. Botón de limpiar automáticamente
NORMAS IMPORTANTES DE LA SEGURIDAD
1. Antes de empezar a utilizar la máquina por la primera vez lee toda de la instrucción
cuidadamente.
2. Antes de conectar la máquina a la fuente tiene que estar seguro que el voltaje de la
máquina y de su casa son los mismos.
3. No utilice este producto para un objeto excepto el objeto de su diseño.
4. Tiene que hacer la plancha apagada antes de conectar a la fuente de energía o tirar
desde la fuente de energía. Para desenchufar la máquina no tire por el cable.
5. Si la plancha se avería por cualquier motivo no utiliza el producto. No intenta utilizar
la plancha, si su cable o enchufe se avería. No intente cambiar las piezas como el cable
de energía usted mismo. Para la ayuda consulta al departamento del Servicio de Clientes.
6. No deje la plancha sola cuando la plancha está enchufada.
7. Antes de llenar la cisterna de agua desenchúfela. (es válido para las planchas a vapor
y que escupen agua)
8. La plancha se debe utilizar y dejar encima de una superficie equilibrada.
9. Cuando se fija la plancha encima de una superficie, tiene que estar seguro que la
superficie está equilibrada.
10. Si la plancha se cae al suelo o si hay una avería o escape visible, no se utiliza nunca.
11. Esta máquina no se debe utilizar por las personas minusválidas físicamente,
psicológicamente o por los niños o las personas sin experiencia o información sobre
la máquina.
12. No permite que los niños juegan con la máquina.
-23 -
Page 25

ESCUPIR
Esta función se puede utilizar cualquier tiempo y la frecuencia no influye la temperatura
de la plancha.
* Llene la plancha por el agua.
* Dirige el extremo de escupir hacia la ropa.
* Pulse el botón de escupir (3)
PLANCHAR POR VAPOR
Esta función solo se debe utilizar por las temperaturas altas.
Se puede hacer la configuración del vapor medio o máximo.
* Llene la plancha por el agua.
* Lleve la plancha a la posición vertical.
* Enchufe la plancha.
* Lleve el botón de la configuración de la temperatura (I) a la posición de “..”, “…” o
MAX.
* Cuando la luz pilota se apaga, se significa que se llega a la temperatura configurada
y la plancha está lista.
* Después de llevar el botón de configuración del vapor (7) se empieza a salir vapor
desde los huecos del suelo.
Aviso: Si la temperatura es baja en el proceso de planchar a vapor tradicional, se puede
ocurrir el escape de agua del suelo. En este caso lleve el botón de la configuración de
la temperatura (1) a la posición recomendada. Después de llegar la temperatura
necesaria el vapor empieza a salir otra vez.
VAPOR DE CHOQUE
Suministra la salida extra de vapor para la rectificación las arrugas obstinadas.
* Llene la plancha por agua.
* Lleve el botón de la configuración de la temperatura a la posición de “MAX”.
* La plancha está lista para el uso.
* Pulse el botón del vapor de choque (2) por una vez.
* El vapor suministra eliminar las arrugas por influir la tela.
* Si hay las arrugas obstinadas antes de pulsar el botón de la configuración del vapor
otra vez espere por unos segundos.
Generalmente todas las arrugas se eliminan después de realizar estos tres procesos.
PLANCHAR POR VAPOR
* Enchufe la plancha.
* Lleve el botón de vapor (7) a la posición de “0”.
* Configure el botón de la configuración de la temperatura (1) por utilizar la temperatura.
* Después de apagar la luz pilota se significa que se llega la temperatura necesaria.
La plancha está lista.
- 24 -
Page 26

ESPERAR EL CALENTAMIENTO DE LA PLANCHA DE NUEVO
Levante la plancha o haga mover un poco.
La luz roja del termostato apaga. Cuando la temperatura configurada del suelo se baja
debajo de la temperatura de planchar empieza a iluminar la luz pilota.
Cuando la plancha se hace mover la luz pilota ilumina, antes de empezar al proceso
de planchar, espere que la luz se apaga.
Después de mover la plancha si la luz pilota no se ilumina se significa que el suelo de
plancha está en el nivel de la temperatura correcta y la plancha está lista.
PROPIEDAD DE LIMPIAR AUTOMATICAMENTE
Para limpiar la cal y las suciedades puede utilizar la propiedad de limpiar
automáticamente.
Aplique el proceso de la limpieza automática cada dos semanas. Si el agua del lugar
en que usted vive incluye mucha cal, tiene que hacer el proceso de la limpieza automática
más frecuentemente.
a. Tiene que estar seguro que la máquina no está enchufada.
b. Lleve el botón de la configuración del vapor a la posición de “0”.
c. Llene la cisterna de agua hasta el nivel máximo.
d. Elige la temperatura máxima de planchar.
e. Enchufe la máquina.
f. Desenchufe cuando la luz pilota de la temperatura con el calor de naranja.
g. Coge la plancha encima del lavabo, deje el botón de la limpieza automática pulsado
y haga mover la plancha.
(Se sale vapor y agua hervido desde el suelo de la plancha. Las suciedades y piezas de
cal se sale a la fuera.)
h. Deje pulsado el botón hasta que el agua dentro de la cisterna se finaliza. Si hay
mucha suciedad en la plancha aun, repite el proceso de la limpieza automática.
MANTENIMIENTO Y LIMPIEZA
1. Lleve el botón de la configuración de la temperatura a la posición de APAGADO,
desenchufe la plancha y espere que se enfría.
2. Se puede limpiar los residuos encima del suelo por un paño que se mojado por
mezcla de agua y vinagre.
3. El cuerpo de la máquina se debe limpiar por un paño húmedo y pulir por utilizar un
paño seco.
4. Para limpiar el suelo no utiliza los materiales abrasivos de la limpieza nunca.
5. Guarde la superficie del suelo contra los rayos, no permite que se toque a los
materiales metálicos.
6. Después de finalizar el proceso de planchar o cuando está dejando la plancha sola:
* Lleve el botón de configuración del vapor a la posición de “0” y el botón de la
configuración de la temperatura a la posición de OFF (Apagado). Levante la plancha y
desenchufe la plancha.
- 25 -
Page 27

MANTENIMIENTO y LIMPIEZA
7. Cuando está planchando no permite que los niños toquen la plancha o el cable de
energía.
8. No mete la plancha o cable de energía en el agua u otro líquido.
9. No toque las piezas metálicas caliente, agua caliente o el vapor. Las piezas se puede
causar a los quemados. Tenga cuidado cuando girando la plancha. Las piezas pueden
calentarse y se pueden causar a los quemados. Tenga cuidado cuando girando la
plancha. Se puede quedar el agua caliente dentro de la cisterna de agua.
No permite que el enchufe y el cable toque el suelo de la plancha. Antes de levantar
la plancha espere que se enfríe totalmente. Enrolle el cable de energía al encaje del
cable.
1. Guarde la plancha cuidadamente.
2. Desenchufe la plancha para llenar y verter la plancha por agua.
3. La plancha es solo para el uso domestico.
GUARDE ESTE GUÍA DEL USO PARA CONSULTAR EN EL FUTURO.
Notas:
* Cuando se hace funcionar la plancha por la primera vez se puede salir un poco de
humo porque algunas partes de la plancha puede tener aceite. Este caso se desaparecido
en poco tiempo.
* Antes de empezar a utilizar la plancha no olvide la placa de film protector encima del
suelo y cuerpo. Limpie el suelo por un paño suave.
* Antes de empezar a utilizar la plancha para estar seguro que el suelo y la cisterna
de agua está limpio prueba la plancha encima de una tela que no se utiliza.
ELECCIÓN DE AGUA
* Esta plancha solo se debe utilizar por el agua normal del grifo.
* Se recomienda utilizar el agua destilado o desmineralizado, si el agua tiene mucha
cal.
* No llene el agua purificado de la cal u otros líquidos.
LLENAR EL AGUA
* Lleve el botón de la configuración del vapor a la posición de “0” y lleve el botón de la
configuración de temperatura a la posición de OFF (Apagado).
* Desenchufe la plancha y espere que se enfríe.
* Empieza a llenar agua desde la entrada de agua (5).
* Llena la cisterna de agua hasta el nivel máxima signada con “MAX”
- 26 -
Page 28

NOTA
Etiqueta Tipo de Tela Tipo de hilo
• Sintético Acrílico
•• Sintético Acetato
•• Sintético Cobre
•• Seda Seda
•• Tela Tela
••• Algodón Algodón
Lino Lino
Modacrílico
Polipropileno
Poliuretano
Triacetato
Poliamida (Naylon)
Polyester
Visconos (Rayon)
- 27 -
Page 29

- 28 -
Page 30

- 29 -
Page 31

- 30 -
Page 32

- 31 -
Page 33

- 32 -
Page 34

- 33 -
Page 35

- 34 -
Page 36

- 35 -
Page 37

- 36 -
Page 38

HRVATSKI
SINBO SSI 2858 PARNO GLAˇCALO
UPUTE ZA UPORABU
AC 230V , 50Hz, 2000W
Dijelovi
1. Regulator temperature
2. Gumb za ekstra paru
3. Gumb za sprej
4. Vrh spreja
5. Otvor za vodu
6. Pilot lampica
7. Gumb za regulaciju pare
8. Podnica
9. Ku´ciˇste
10. Spremnik za vodu
11. Gumb za samoˇciˇs´cenje
BITNA SIGURNOSNA UPOZORENJA
1. Prije prve uporabe ured¯aja paˇzljivo proˇcitajte sve upute za uporabu.
2. Prije nego ured¯aj poveˇzete na izvor za napajanje provjerite da li napon naznaˇcen na
informacijskoj naljepnici odgovara naponu u vaˇsem domu.
3. Ured¯aj ne koristite u neke druge svrhe osim one za koju je dizajniran.
4. Prije nego glaˇcalo prikljuˇcite na izvor za napajanje ili prije prekida veze sa izvorom
za napajanje, regulator podesite u poziciju iskljuˇceno. Ne vucite za kabel kada iskljuˇcujete
ured¯aj iz utiˇcnice ve´c uhvatite za glavu utikaˇca.
5. Ne koristite glaˇcalo s bilo kojom vrstom kvara. Nikada ne koristite glaˇcalo s oˇste´cenim
kabelom ili utikaˇcem. Ne pokuˇsavajte sami opraviti ili zamjeniti kabel za napajanje ili
druge dijelove glaˇcala. Obratite se za pomo´c odjelu -Sluˇzba za korisnike.
6. Nipoˇsto se ne odvajajte od glaˇcala ukljuˇcenog u struju.
7. Prije usipanja vode u spremnik za vodu izvucite utikaˇc iz utiˇcnice. (Odnosi se na parna
glaˇcala i glaˇcala s prskalicom/sprejom).
8. Glaˇcalo treba koristiti i odlagati na ravnoj i stabilnoj povrˇsini.
9. Prije nego ˇsto glaˇcalo postavite na neku povrˇsinu uvjerite se da je ta povrˇsina stabilna.
10. Nipoˇsto ne treba koristiti glaˇcalo koje je palo na pod ili ako na njemu postoji neko
vidljivo oˇste´cenje.
11. Ovaj ured¯aj ne treba da koriste osobe s fiziˇckim, psihiˇckim i mentalnim
invaliditetom(ukljuˇcuju´ci i djecu) bez nadzora osobe koja moˇze snositi odgovornost za
sigurnu uporabu ured¯aja. Isto tako ured¯aj ne treba da koriste neiskusne i osobe koje
nisu dovoljno upu´cene u naˇcin njegove uporabe.
12. Zabranite djeci da se igraju s ured¯ajem.
- 37 -
Page 39

PRSKANJE
Ovu funkciju moˇzete koristiti po ˇzelji i uˇcestalost koriˇstenja ne utjeˇce na temperaturu
glaˇcala.
• Uspite vodu u glaˇcalo.
• Vrh prskalice usmjerite prema odje´ci.
• Pritisnite na gumb prskalica/spej (3).
PARNO GLAˇCANJE
Ovu funkciju moˇzete koristiti samo kod visokih temperatura.
Postavku pare moˇzete podesiti na srednju ili maksimalnu.
• Uspite vodu u glaˇcalo.
• Glaˇcalo postavite u okomit poloˇzaj.
• Umetnite utikaˇc glaˇcala u utiˇcnicu.
• Gumb za regulaciju temperature (l) podesite u poziciju "••"."•••" ili MAX.
• Kada se pilot lampica iskljuˇci znaˇci da je glaˇcalo dostiglo podeˇsenu temperaturu i
spremno je za uporabu.
• Gumb za regulaciju pare (7) podesite u ˇzeljenu poziciju i kroz otvore na podnici glaˇcala
poˇce´ce da izlazi para.
Upozorenje: Ako je regulator temperature podeˇsen na jako nisku temperature kod
tradicionalnog parnog glaˇcanja iz glaˇcala moˇze curiti voda. U tom sluˇcaju regulator
temperature(1) odmah podesite na viˇsu temperaturu. Kada glaˇcalo dostigne potrebnu
temperaturu iz njega ´ce poˇceti da izlazi para.
EKSTRA PARA
Ova funkcija omogu´cava izlaz ekstra pare za glaˇcanje tvrdokornih nabora.
• Uspite vodu u glaˇcalo.
• Gumb za regulaciju temperature podesite u poziciju “MAX”.
• Glaˇcalo je spremno za uporabu.
• Pritisnite jedanput na gumb za ekstra paru (2).
• Ekstra para prodire kroz tkaninu i olakˇsava uklanjanje nabora.
• Ukoliko ne budete uspjeli upotpunosti ukloniti tvrdokorne nabore, saˇcekajte par
sekundi prije nego ponovno pritisnete na gumb za eksra paru. Obiˇcno svi nabori nestanu
nakon tre´ceg puta.
GLAˇCANJE BEZ PARE
• Umetnite utikaˇc u utiˇcnicu.
• Gumb za paru(7) podesite u poziciju “0”.
• Uporabom regulatora za temperaturu (1) podesite temperaturu glaˇcanja.
• Kada se ugasi pilot lampica glaˇcalo je spremno za uporabu.
- 38 -
Page 40

ˇ
CEKANJE DA SE GLAˇCALO PONOVNO ZAGRIJE
Podignite glaˇcalo ili ga lagano pomjerite.
Ugasi´ce se crvena termostat lampica. Ako temperatura podnice padne ispod podeˇsene
temperature pilot lampica ´ce poˇceti da svijetli.
Pomjeranjem glaˇcala pilot lampica ´ce svijetliti. Prije ponovnog poˇcetka glaˇcanja saˇcekajte
da se lampica ugasi.
Ako u vrijeme pomjeranja glaˇcala pilot lampica i dalje svijetli znaˇci da je temperatura
podnice joˇs uvijek ista i da je glaˇcalo spremno za uporabu.
FUNKCIJA SAMO-ˇCIˇS´CENJA
Za uklanjanje kamenca i prljavˇstine moˇzete koristiti funkciju samo-ˇciˇs´cenja.
Funkciju samo-ˇciˇs´cenja treba prakticirati jedanput u dva tjedna. Ako voda oblasti u kojoj
ˇzivite sadrˇzi veliku koliˇcinu kamenca onda ovu funkciju trebate primjeniti ˇceˇs´ce.
a. Uvjerite se da glaˇcalo nije ukljuˇceno u utiˇcnicu.
b. Gumb za regulaciju pare podesite u poziciju “0”.
c. Spremnik za vodu napunite vodom do oznake za max.razinu.
d. Regulator temperature podesite u max. poziciju.
e. Umetnite utikaˇc u utiˇcnicu
f. Kada se pilot lampica naranˇcaste boje ugasi izvucite utikaˇc iz utiˇcnice.
g. Glaˇcalo stavite iznad umivaonika ili sudopere. Pritisnite na tipku za samoˇciˇs´cenje i
protresite glaˇcalo.
(Iz podnice glaˇcala poˇce´ce da izlazi para i vrela voda. Skupa sa njima izbaci´ce se
prljavˇstina i ostaci kamenca iz glaˇcala.)
h. Tipku za samo-ˇciˇs´cenje drˇzite pritisnutu sve dok ne izad¯e sva voda iz glaˇcala. Ako se
unutar glaˇcala joˇs uvijek nalazi velika koliˇcina prljavˇstine ponovite funkciju samoˇciˇs´cenja.
ˇCIˇS´
CENJE I ODRˇZAVANJE
1. Regulator za temperature podesite u poziciju ISKLJUˇCENO, izvucite utikaˇc iz utiˇcnice
i saˇcekajte da se glaˇcalo ohladi.
2. Ostatke prljavˇsite na podnici moˇzete oˇcistiti krpom umoˇcenom u rastvor s ocatom.
3. Ku´ciˇste glaˇcala ˇcistite vlaˇznom krpom i posuˇsite suhom krpom.
4. Za ˇciˇs´cenje podnice glaˇcala nipoˇsto ne koristite abrazivna sredstva za ˇciˇs´cenje.
5. Zaˇstitite podnicu od ogrebotina i od kontakta s metalnim predmetima.
6. Po zavrˇsetku glaˇcanja ili kada se odvajate od ukljuˇcenog glaˇcala:
- gumb za regulaciju pare(7) podesite u poziciju “0” i i gumb za regulaciju temperature
podesite u poziciju OFF (Iskljuˇceno) ‡ glaˇcalo postavite u okomit poloˇzaj- izvucite utikaˇc
iz utiˇcnice.
7. Zabranite djeci da se igraju s glaˇcalom ili kabelom za napajanje u vrijeme glaˇcanja.
8. Glaˇcalo ili kabel za napajanje ne uranjajte u vodu ili neke druge teku´cine.
9. Ne dodirujte vru´ce dijelove metala, vru´cu vodu ili paru. Dijelovi se mogu jako zagrijati
i to moˇze izazvati ozbiljne opekline na koˇzi. Budite jako oprezni kod izvrtanja glaˇcala:
- 39 -
Page 41

ˇCIˇS´
CENJE I ODRˇZAVANJE
U spremniku za vodu moˇze biti vode.
Zaˇstitite utikaˇc i kabel od kontakta s vru´com podnicom glaˇcala. Prije odlaganja glaˇcala
saˇcekajte da se upotpunosti ohladi. Kabel za napajanje omotajte oko glaˇcala u dijelu
koji je namjenjen za namatanje kabela.
1. Glaˇcalo odlaˇzite oprezno.
2. Kada u glaˇcalo uspipate vodu ili praznite vodu iz njega izvucite utikaˇc iz utiˇcnice.
3. Ovo glaˇcalo je namjenjeno samo za ku´cansku uporabu.
SAˇCUVAJTE OVE UPUTE ZA UPORABU I ZA BUDU´CE POTREBE
Napomene:
• Neki dijelovi glaˇcala su premazani uljem. Kod prve uporabe iz glaˇcala moˇze iza´ci malo
dima. Ovo stanje ´ce nestati nakon kra´ceg vremena.
• Prije poˇcetka koriˇstenja glaˇcala ne zaboravite ukloniti zaˇstitnu traku koja se nalazi
na podnici glaˇcala. Podnicu oˇcistite mekom vlaˇznom krpom.
• Prije poˇcetka koriˇstenja glaˇcala, kako bi se uvjerili da je spremnik za vodu upotpunosti
ˇcist, glaˇcalo isprobajte na nekom nepotrebnom komadu tkanine.
IZBOR VODE
• Za ovo glaˇcalo koristite samo normalnu vodu iz vodovoda.
• Ako voda u vaˇsoj oblasti sadrˇzi veliku koliˇcinu kamenca preporuˇcujemo vam da koristite
destiliranu ili demineraliziranu vodu.
• U glaˇcalo ne sipajte kemijski preˇciˇs´cenu vodu od kamenca ili neke druge teku´cine.
USIPANJE VODE
• Gumb za paru podesite u poziciju “0” i gumb za regulaciju temperature podesite u
OFF (Iskljuˇceno).
• Izvucite utikaˇc iz utiˇcnice i saˇcekajte da se glaˇcalo ohladi.
• Poˇcnite usipati vodu kroz otvor za usipanje vode (5).
-Glaˇcalo napunite do oznake za “MAX” razinu.
- 40 -
Page 42

PODEˇSAVANJE TEMPERATURE
Etiketa Vrsta tkanine Vrsta konca
• Sintetika Akril
•• Sintetika Acetat
•• Sintetika Bakar
•• Svila Svila
•• Vuna Vuna
••• Pamuk Pamuk
Lan Lan
PODEˇSAVANJE TEMPERATURE
• Umetnite utikaˇc u utiˇcnicu i glaˇcalo postavite u okomit poloˇzaj.
• Gumb za regulaciju temperature (1) podesite u ˇzeljenu postavku.
• Nakon ˇsto glaˇcalo postigne zadatu temperaturu pilot lampica ´ce se ugasiti. Pilot
lampica ´ce se povremeno paliti-gasiti ˇsto ukazuje da glaˇcalo odrˇzava podeˇsenu
temperaturu.
Modakril
Polipropilen
Poliuretan
Triacetat
Poliamid (Najlon)
Poliester
Viskoza (Rajon)
- 41 -
Page 43

ADANA-SEYHAN-DORUK SO⁄UTMA -REfiATBEY MAH. AV. MEHMET ERO⁄LU CAD. NO:8-TEL.:0322 458 55 14 ADANA-KOZAN-DURAN SO⁄UTMA-
YETK‹L‹ SERV‹SLER L‹STES‹
CUMHUR‹YET MH. DEDEO⁄LU SK. S‹S. APT.- TEL.:0322 516 57 78 ADANA-SEYHAN-DÜZOVA ELEKTR‹K - KÜÇÜK SAAT MEYDANI HILAL HAN IS MRK NO
32 - TEL.:0322 363 67 87 ADANA-SEYHAN-ÖZER ELEKTRON‹K - OBALAR CAD. SAL‹H ZEK‹ BUGAY ‹fi HANI NO:11 - TEL.:0322 352 25 75 ADANA-SEYHAN-
SER‹N ELEKTRON‹K - MAHFESI⁄MAZ MH. KENAN EVREN BULV. 21.SK. KAROL S‹T. E BLOK NO:2/A - TEL.:0322 233 74 84 ADANA-CEYHAN-URANYUM
ELEKTRON‹K - ‹NÖNÜ BULVARI NO: 172 - TEL.:0322 611 29 95 ADANA-CEYHAN-CEYHAN ELEKTRON‹K - BÜYÜKKIRIM MH. MEHMET fiER‹F Y‹⁄‹T CD.
4.SK. NO:3/B TEL. : 0322 613 45 96 ADIYAMAN-YILDIRIM SERV‹S - BAHÇEL‹EVLER MH. 177 SK. NO:2 - TEL.:0416 214 40 83 ADIYAMAN-KAHTA-ELK.
EV ALET. TAM‹RC‹S‹-FAT‹H MH. ZAFER CD. NO:20 - TEL.:0416 725 99 89 ADIYAMAN-ÜNAL ELEKTRON‹K-BAHÇEL‹EVLER MAH. ESK‹ KAHTA CAD.
NO:11/A-TEL.:0416 216 75 56 ADIYAMAN-BEYAZ EfiYA TAM‹R‹-ÇATI MH. BADEM SK. NO:11 BESN‹ TEL.: 0416 318 32 00 AFYON-EM‹N ELEKTRON‹K-
ENST‹TÜ CAD. NO:19-TEL.:0272 215 43 32 AFYON-D‹NAR-GÖKÇEO⁄LU ELEKTR‹K-EMN‹YET MH. YEN‹YOL CD. 146 BLOK NO:4-TEL.: 0272 353 53 44 A⁄RI-
PATNOS-ACELE PEfi‹N ELEKTRON‹K-BUHARA SOK. NO:12-TEL.:0472 616 46 08 A⁄RI-ÖZPAK ELEKTRONIK-ESKI VAN CAD NO: 341 Ömer Hamam Yan›TEL.:0472 216 53 14 AKSARAY-‹T‹NA ELEKTR‹K-TAfi PAZARI MH. fiEH‹T HAT‹P UÇKUN SK. ESK‹ TERM‹NAL ÇIKIfiI NO:9/A-TEL.:0382 212 63 99 AMASYA-
KUTUP TEKN‹K SO⁄UTMA-GÖKMEDRESE MAH. M.K.P. CAD. HAM‹TBATIR APT. NO:115/A-TEL.:0358 212 61 66 AMASYA-SULUOVA-ÇALIfiKAN ELEKTRON‹K-
ÖZEL ‹DARE ‹fi HANI NO:121-TEL.:0358 417 18 64 AMASYA-FLAfi ELEKTRON‹K-YÜZEVLER MAH.TORUMTAY SOK. NO:25 DEM‹RD‹fi APT. ALTI-TEL.:0358
212 33 71 ANKARA-PURSAKLAR-DEM‹R TEKN‹K-MERKEZ MH. MEL‹KfiAH CD.NO:11/A-TEL.:0312 328 1122 ANKARA-YEN‹MAHALLE-ERDO⁄DU SO⁄UTMA-
ÇARfiI MH. DAMLADOL SK. NO:74/C-TEL.:0312 315 60 25 ANKARA-KEÇ‹ÖREN-VEFA ELEKTRON‹K-PINARBAfiI MH. AfiIK PAfiA CD. NO: 67/C-TEL.:0312
380 42 30 ANKARA-MAMAK-YÜCEL ELEKTRON‹K-ASIM GÜNDÜZ CD. 20/D-TEL.:0312 365 14 14 ANKARA-ÇANKAYA-GÖKSEL ELEKTRON‹K-21.CD.
KARTAL KAYA APT. NO:29/A KIRKKONAKLAR-TEL.:0312 496 42 53 ANKARA-ÇANKAYA-ATC ‹LET‹fi‹M-SELAN‹K CAD. NO: 31/3-TEL.: 0312 419 82 70
ANKARA-GÖLBAfiI-BEKS SERV‹S H‹ZMETLER‹-SE⁄MENLER MAH. CEMAL GÜRSEL CAD. NO:51/A-TEL.:0312 484 21 19 ANKARA-BEYPAZARI-DO⁄AN
TEKN‹K-KAYHAN GÜVEN CD. NO:22/C-TEL.:0312 762 89 19 ANKARA-S‹NCAN-Y‹⁄‹T TEKN‹K ONARIM-M.Ç.M. 12. CADDE GÜLSUYU SK. NO:5/21-TEL.:0312
264 10 31ANKARA-KEÇ‹ÖREN-MERT TEKN‹K SERV‹S-ÖZYURT CD. NO:27/A AKTEPE-TEL.: 0312 380 00 22 ANKARA-ERYAMAN-ARSLANLAR ELEKTRON‹K-
GÜZELKENT MAH.ÇARfiI ARYA 511 SK. NO:40-TEL.:0312 279 16 41 ANTALYA-KUMLUCA-AKGÜL TEKN‹K SERV‹S H‹ZMETLER‹-ADNAN MENDERES
BULV.KAVAKLI KUYU CAD. YED‹TEPELER KAR.SULAR APT.NO:9-TEL.:0242 887 53 80 ANTALYA-CANKALP ELEKTRON‹K-TUZCULAR MAH. ‹MARET SOK.
FARAÇLAR PASJ.NO:11-TEL.:0242 242 31 35 ANTALYA-MANAVGAT-ÖNAL ‹LET‹fi‹M-AfiA⁄I PAZARCI MH. ‹BRAH‹M SÖZEN CD. fiELALE PSJ.NO: 18 1006
SK. TEL.:0242 742 35 36 ANTALYA-ALANYA-Ç‹NTAfi ELEKTRON‹K-SARAY MH. ATATÜRK CD. HACI HAMD‹ O⁄LU SK.NO: 20/A-TEL.:0242 513 88 85
ANTALYA-MERKEZ-BÜYÜKGEB‹Z ELEKTROMEKAN‹K GÜVENL‹K-MUSTAFA GÖKSU-KIZILSARAY MH. DOLAPLIDERE CD. 80 SK. ÇAKMAK ‹fi HANI NO:
8/5-6 TEL. :0242 243 33 90 ARDAHAN-YILDIRIM ELEKTR‹K-ATATÜRK CAD.NO:69-TEL.:0478 211 28 58 ARTV‹N-ARTV‹N ELEKTR‹K-HALKEVI CADDESI
NO: 12-TEL.: 0466 212 10 82 AYDIN-YILMAZ ELEKTRON‹K-KURTULUS MH. GARAJ CD. NO:5/B-TEL.:0256 212 00 35 AYDIN-SÖKE-ÖZLEM ELEKTRON‹K-
YEN‹ CAM‹ MH. SEK‹LER CD. NO: 47-TEL.:0256 518 26 40 AYDIN-NAZ‹LL‹-BARIN ELEKTRON‹K-ALTINTAfi MH. HÜRR‹YET CD. NO:161 B-TEL.: 0256 315
43 21 BALIKES‹R-BANDIRMA-ANIL SO⁄UTMA-GÜNAYDIN MAH. 2.OKUL CAD.NO:16/A-TEL.:0266 713 56 78 BALIKES‹R-EDREM‹T-ÖZER TEKN‹K-CAM‹
VASAT MH. PARK CD. NO:12/A-TEL.:0266 373 12 44 BALIKES‹R-BURHAN‹YE-U⁄UR TEKN‹K SO⁄UTMA-MAHKEME MH. M‹THATPAfiA CD. NO: 68-TEL.:0266
412 86 89 BALIKES‹R-KILIÇ ELEKTRON‹K-YEN‹ ÇARfiI BASIN SOK. NO: 4/B-TEL.:0266-241 87 54 BALIKES‹R-GÖNEN-GÜRSES ELEKTRON‹K-MALKOÇ
MAH.MÜFTÜ fiEVKET CAD. 76.SOK. NO:2/B-TEL.:0266 762 01 28 BALIKES‹R-BANDIRMA-D‹J‹TAL ELEKTRON‹K-17 EYLÜL MAH.HAVUZLU BAHÇE
SK.NO:8/A-TEL.:0266 715 16 46 BALIKES‹R-ERDEK-MERT TEKN‹K-YALI MH. HÜKÜMET CD. NO:55-TEL.:0266 845 61 10-97 BARTIN-MARTI ELEKTRON‹K-
HENDEKYANI CAD. ORTA MAH.101/B - BARTIN-TEL.:0378 228 34 22 BATMAN-fiAH‹NLER ELEKTRON‹K-CUMHUR‹YET CD. NO:20 2000 ‹fi MERKEZ‹
KARfiISI-TEL.:0488 213 17 02 B‹LEC‹K-EDEBAL‹ TEKN‹K-‹ST‹KLAL MH V.REF‹K A ÖZTÜRK CD NO: 1/A-TEL.:0228 212 46 80 B‹NGÖL-KARLIOVA-MEHMET
KARTAL - KARTAL ELEKTRON‹K-CUMHUR‹YET CD. NO:8-TEL.:0426 511 26 39 B‹NGÖL-S‹MGE ELEKTRON‹K- YEN‹fiEH‹R MH. YEfi‹M SK. BO⁄ATEK‹N
APT ALTI NO:14/C-TEL.:0426 213 77 56 B‹TL‹S-AHLAT-U⁄UR SO⁄UTMA-TOK‹ KONUTLARI YUKARI ÇARfiI-TEL.:0434 412 41 72 B‹TL‹S-D‹ZAYN ELEKTR‹K-
NUR CAD. EREM CENTER ‹fi MERKEZ‹KAT:2 NO:5-TEL.:0434 226 74 43 BOLU-BEST ELEKTRON‹K-TABAKLAR MAH.CUMHUR‹YET CAD.NO:28/B-TEL.:0374
218 12 25 BURSA-OSMANGAZ‹-AKYÜZ ELEKTRON‹K-ÇIRPAN MH. UYSAL SK. NO:13/B-TEL.:0224 254 60 76 BURSA-GEML‹K-AC‹L TV TAM‹R SERV‹S‹-
DEM‹R SUBAfiI MH. FIRIN SK. NO:7-TEL.:0224 514 71 20 BURSA-MUDANYA-ER T‹CARET-ÖMERBEY MH. CAM‹ SK. SU APT. NO:30-TEL.:0224 544 86 16
BURSA-MUSTAFAKEMALPAfi-AGUfi ELEKTR‹K-HAMZABEY MAHALLESI PAZARYERI SOKAK NO: 2/A-TEL.:0224 613 19 99 BURSA-‹NEGÖL-S.B.S
ELEKTRON‹K-OSMAN‹YE MH.DERE SK. N:25/D-TEL.:0224 715 48 94 BURSA-KARACABEY-GÜRKAN T‹CARET-RUNGUÇPAfiA MH. 14. SK. NO:11-TEL.:
0224 676 66 80 BURSA-N‹LÜFER-ÖZME TEKN‹K-KARAMAN MH. BAYINDIR SK. NO:4/B CARREFOUR KARfiISI-TEL.: 0224 249 12 48 ÇANAKKALE-ÇANTÜRKER ELEKTRON‹K-CUMHUR‹YET MAH. ÇANAKKALE CAD.NO:41-TEL.:0286 416 13 89 ÇANAKKALE-GEL‹BOLU-GÜVEN ELEKTRON‹K-YAZICIZADE
MAH. M‹RALAY fiEF‹K AKER CAD. 2. SOK NO:4 / A TEL.:0286 566 90 70 ÇANAKKALE-MERKEZ-SAM ELEKTRON‹K-‹SMETPAfiA MH. ARSLANCA SK.TEL.:0286 212 35 59 ÇANKIRI-B‹LG‹ÇLER ELEKTRON‹K-BUGDAY PAZARI MH. A.TALAT ONAY BULVARI SAIM A⁄A S‹T. B/BLOK TEL.:0376 213 48 19 ÇORUM-
H‹T‹T SO⁄UTMA-YEN‹YOL MH. MÜFTÜ AHMET GÖKEfiME SK. NO: 5 / I-TEL.:0364 225 70 58 ÇORUM-U⁄UR ELEKTRON‹K-ÜÇTUTLAR MAH. FAT‹H CAD.
5.SOK.EYÜP SULTAN APT. NO:1/C-TEL.:0364 227 44 91 ÇORUM-ÖMÜR ELEKTRON‹K-CENG‹ZTOPEL CAD. NO:2/F-TEL.:0364 224 68 09 ÇORUM-ALACA-
EROL ELEKTRON‹K-AYHAN MH. ANKARA CD. NO:18-TEL.:0364 411 42 03 ÇORUM-GÜNDÜZ BEYAZ EfiYA SERV‹S‹-SUNGURLU-SUNGURO⁄LU MH. ÇANKIRI
CD. NO: 46-TEL.:0364 311 31 13 DEN‹ZL‹-KARDELEN SO⁄UTMA-EMEK CD. NO: 30-TEL.:0258 241 67 31 DEN‹ZL‹-ÖZ ELEKTRON‹K-ÇAYBAfiI CD. ÜNAL
APT. NO: 28-TEL.:0258 261 29 25 DEN‹ZL‹-MERKEZ-ÇA⁄LAYAN SO⁄UTMA-TOPRAKLIK MH. TURAN GÜNEfi CD.NO:34 TEL. : 0258 242 85 86 D‹YARBAKIR-
B‹SM‹L-fiIK ELEKTR‹K-KURTULUfi MH. AHMET AR‹F BULVARI NO: 19/F-TEL.:0412 415 05 94 D‹YARBAKIR-‹LKADIM T‹CARET-BATIKENT S‹T. A/5 BLOK
ALTI NO:1 SA⁄LIK OCA⁄I YANIBA⁄LAR-TEL.:0412 235 70 89 D‹YARBAKIR-AZ‹Z ELEKTRON‹K-HATBOYU CD. 469. SK. GÜNEfi 2 APT. NO:3/B-TEL.:0412
223 33 46 D‹YARBAKIR-S‹LVAN-DIGITAL ELEKTRONIC-KALE MH. SAM‹ SEÇK‹N CD. NO:9/B-TEL.:0412 711 44 14 D‹YARBAKIR-JAPON RECEP-YENI MAH
19 MAYIS CAD NO74-TEL.:0412 511 24 10 D‹YARBAKIR-BA⁄LAR-AZ‹Z ELEKTRON‹K-HATBOYU CD. 469 SK. NO:3/B-TEL.: 0412 236 81 10 DÜZCE-ENSAR
TEK SU S‹STEMLER‹-AZM‹N‹LL‹ MH. AYDINPINAR CD. SERHAT SK.NO:1/B-TEL.:0380 514 34 12 DÜZCE-BULUfi ELEKTRON‹K-CED‹D‹YE MAH. M‹MAR
S‹NAN CAD.-TEL.: 0380 514 66 81 ED‹RNE-UZUNKÖPRÜ-GÜVEN TEKN‹K-GAZ‹ CAD. YUSUF SOK. YURDACAN PASAJI NO:7-TEL.:0284 513 89 66 ED‹RNE-
YILDIZ SO⁄UTMA-1.MURAT MH. GÜNGÖR MAZLUM CAD. SERHAT S‹TES‹ B/BLOK 35/A-TEL.:0284 235 37 63 ED‹RNE-KEfiAN-MUTLU TEKN‹K-YUKARI
ZAFER‹YE MH. ‹LYASBEY CD. NO:32/B-TEL.:0284 715 22 71ELAZI⁄-ÖZDEV TEKN‹K -‹ZZETPAfiA MAH.KAZIM BAYER CAD.NO:24/A-TEL.:0424 238 51 67
ELAZI⁄-YILMAZ BOB‹NAJ-YEN‹ MAH. KEMAL fiEDELE CAD. NO: 12/E-TEL.:0424 212 08 96 ELAZI⁄-GÜNEfi ELEKTRON‹K-KÜLTÜR MAH. VAL‹ FAHR‹BEY
CAD.NO:113/D-TEL.:0424 233 10 18 ERZ‹NCAN-AYDINLAR ELEKTR‹K-‹NÖNÜ MAH. MERKEZ ÇARfiISI 15.SK NO:5 -TEL.:0446 223 59 76 ERZ‹NCAN-
REFAH‹YE-B‹LG‹N ELEKTRON‹K-ERZ‹NCAN CAD. BELED‹YE ‹fi HANI-TEL.:0446 611 26 10 ERZURUM-OLTU-GÜVEN ELEKTRON‹K-Z‹YABEY CAD. BELED‹YE
PSJ. NO:6-TEL.:0442 816 42 23 ERZURUM-AT‹LAY ELEKTRON‹K-KONGRE CAD. HASIRHAN PASJ. NO:87-TEL.:0442 213 30 60 ERZURUM-‹SP‹R-YILMAZ
ELEKTRON‹K-Z‹YAPAfiA CD. AfiA⁄I MH. NO:186-TEL.:0442 451 40 95 ESK‹fiEH‹R-ARZU ELEKTRON‹K-DEL‹KL‹TAfi MH. GÜRMAN SOK. NO:37/B-TEL.:0222
234 87 15 ESK‹fiEH‹R-S‹VR‹H‹SAR-DERMAN ELEKTRON‹K-CAM‹KEB‹R MH. YUNUSEMRE CD. NO:7-TEL.:0222 711 22 60 GAZ‹ANTEP-ELEKTR‹KL‹ EV
ALETLER‹ TAM‹RC‹S‹-MÜTERC‹M ASIM CAD. KÖRÜKÇÜ SOK. NO:8/A-TEL.:0342 231 00 73 GAZ‹ANTEP-ISLAH‹YE-YILMAZ SO⁄UTMA-AYDINLIK MH. GÖZ
CAD.ÜNLÜ S‹TES‹ NO: 2-TEL.:0342 862 12 20 GAZ‹ANTEP-‹K‹ZO⁄LU ELEKTRON‹K-BEY MAH. EBLEHAN ÇARfiISI NO:12/A-TEL.:0342 230 71 00 GAZ‹ANTEP-
- 42 -
Page 44

N‹Z‹P-ÇAPAN TEKN‹K-CUMHUR‹YET MAH. MERMER SOK. NO:10-TEL.:0342 517 51 66 G‹RESUN-BULANCAK-YÜKSEL SO⁄UTMA-‹HSAN‹YE MH. CEMAL
YETK‹L‹ SERV‹SLER L‹STES‹
GÜRSEL. CD. NO: 257-TEL.:0454 318 17 28 G‹RESUN-U⁄UR ELEKTRON‹K-HACI HÜSEY‹N MH. GAZ‹ CD. NO: 185 / 1-TEL.:0454 212 00 90 GÜMÜfiHANEGÜMÜfiHANE SERV‹S‹-HASANBEY MH. HASANBEY CD.NO:17/A-TEL.:0456 213 51 54 HATAY-SAMANDA⁄-GÜNEfi ELEKTR‹K-ATATÜRK MAH. ‹SKELE
CAD. HAYÜK PSJ NO:38-TEL.:0326 512 71 04 HATAY-KIRIKHAN-SEREN MAK‹NA-BARBAROS MAH. BOZTEPE CAD. NO:23/B-TEL.:0326 344 32 49 HATAYANTAKYA-SER‹ SO⁄UTMA-KURTULUfi CD. NO:51/C-TEL.:0326 213 28 32 HATAY-ERZ‹N-YEL‹Z BOB‹NAJ-MUSTAFAL‹ MH. ‹STASYON CD. NO: 143-
TEL.:0326 68148 32 HATAY-REYHANLI-BAfi TEKN‹K SO⁄UTMA-ATATÜRK CD. DÖ⁄ÜCÜLER ‹fiHANI NO:1 -TEL.:0326 413 44 04 HATAY-REYHANLI-ÖZ ‹fi
SO⁄UTMA-CUMHUR‹YET MH. TAYFUR SÖKMEN CD. NO:26/B TEL. : 0326 413 21 22 HATAY-DÖRTYOL-FAT‹H ELEKTRON‹K-SANAY‹ MH. EVREN CD. YEN‹
S‹NEMA KARfiISI NO:15 - TEL.:0326 712 86 46 HATAY-‹SKENDERUN-GÜL‹STAN ELEKTRON‹K-KURTULUfi MH. fi.O⁄UZ YENER CD. NO:64/C-TEL.:0326
613 50 64 I⁄DIR-PARLAK TEKN‹K-TOPÇULAR CD. NO:34-TEL.:0476 227 47 51 ISPARTA-ÖZSOYLAR SO⁄UTMA-YAYLA MAH. ‹SMETPAfiA CAD. NO: 60 fi‹FA
TIP MERKEZ‹ ALTI-TEL.:0246 223 13 61 ‹ÇEL-ERDEML‹-ESEN ELEKTR‹K-MERKEZ MAH. ATATÜRK CAD. NO:11-TEL.:0324 515 68 87 ‹ÇEL-MEZ‹TL‹-
AKN‹SAN SO⁄UTMA&ELEKTRON‹K-GMK.BUL. FAT‹H MH. 18 SK.ÖZÜDO⁄RU S‹T. 3/A-TEL.:0324 359 64 34 ‹ÇEL-PINAR ELEKTRON‹K-MAHMUD‹YE MH.
108. CD. NO:32/B-TEL.:0324 336 82 98 ‹ÇEL-TARSUS-MERT ELEKTRON‹K-GAZ‹LER MAH. ATATÜRK BULV. NO:119-TEL.:0324 626 83 98 ‹ÇEL-TARSUS-
TEKN‹K ‹fi ELEKTR‹K T‹C.-ATATÜRK CAD. U⁄UR ‹fi HANI NO:1-TEL.:0324 6242797 ‹ÇEL-ANAMUR-ÇEL‹K ELEKTRON‹K-BAHÇE MH. ORMAN ‹fiLETMES‹
ALTI NO:61/B-TEL.:0324 814 85 90 ‹ÇEL-HAKAN ELEKTRON‹K-BAHÇEL‹EVLER MH. 1809 SK. D‹NL‹ APT.ALTI NO:3/B-TEL.:0324 328 03 25 ‹ÇEL-S‹L‹FKE-
SADIK ELEKTR‹K-GÖKSU MAH. O⁄UZKAAN CAD. DERYALAR APT.NO:22/B-TEL.:0324 714 05 54 ‹STANBUL-ATAfiEH‹R-VURAL ELEKTRON‹K-KARAMAN
Ç‹FTL‹K YOLU NO:12(ESK‹ PTT HAST. KARfiISI) ‹ÇERENKÖY TEL. : 0216 575 63 35 ‹STANBUL-fi‹fiL‹-YILKA T‹CARET-SEYMEN SOK. NO:27/A KURTULUfiTEL.:0212-233 80 53 ‹STANBUL-KÜÇÜKÇEKMECE-ÇA⁄DAfi SERV‹S-CENNET MAH.Y.KEMAL BEYATLI CAD.NO:14/D-TEL.:0212 579 35 30 ‹STANBUL-
ZEYT‹NBURNU-KARDEfiLER SO⁄UTMA-SEY‹T N‹ZAM MAH. fiEH‹T ERKAN ALYANAK SOK.NO:11-TEL.:0212 546 57 36 ‹STANBUL-ESENLER-YILDIRIM
ELEKTRON‹K-KAZIM KARABEK‹R MAH. 2.SOK. NO:10 -TEL.:0212 611 10 76 ‹STANBUL-EM‹NÖNÜ-IRMAK DIfi T‹CARET-TAHTAKALE CD. TAHTAKALE
T‹CARET MERKEZ‹ NO:34 2.BODRUM NO:204 -TEL.:0212 520 55 80 ‹STANBUL-ÜMRAN‹YE-GÜL-SER TEKN‹K SERV‹S-NAMIK KEMAL MH. SÜTCÜ ‹MAM
CD. SÜTÇÜ ÇIKMAZI NO:6/1- TEL.:0216 335 60 19 ‹STANBUL-ÜMRAN‹YE-GÖZDE ELEKTRON‹K-ATATÜRK MH. ALEMDA⁄ CD. YILDIZ SK. NO:12/A-TEL.:
0216 329 57 03 ‹STANBUL-MALTEPE-GÜR TEKN‹K SERV‹S-BA⁄DAT CD. BOLAYIR SK. NO:3/A-TEL.:0216 352 25 20 ‹STANBUL-BEYL‹KDÜZÜ-SC ELEKTRON‹K-
GÜZELYURT MH. M‹MAR S‹NAN CD. NO:71-TEL.:0212 852 34 45 ‹STANBUL-GAZ‹OSMANPAfiA-DEDEO⁄LU ELEKTR‹K-2124 SOK NO:4 SULTANÇ‹FTL‹⁄‹TEL.:0212 594 50 91 ‹STANBUL-TUZLA-AKIN ISI TEKN‹K SERV‹S-YAYLA MH. F.ÇAKMAK CD. ‹SMA‹L A⁄A SK. NO:11 TEL.:0216 395 66 62 ‹STANBUL-
SARIYER-H‹SAR SERV‹S 1-NUR‹PAfiA CD NO\48A BA⁄LAR MEVK‹ YEN‹KÖY-TEL.:0212 223 27 96 ‹STANBUL-SARIYER-H‹LAL SO⁄UTMA-KAPTAN SK.
NO:2-TEL.:0212 218 45 61 ‹STANBUL-BÜYÜKÇEKMECE-AYGÜL DEKORASYON-19 MAYIS MH. OSMAN GAZ‹ CD. NO: 7-TEL.:0212 881 33 18 ‹STANBUL-
GAZ‹OSMANPAfiA-ÇAM TEKN‹K-ISLAMBEY MAH NECIP FAZIL CAD 257 SK NO:25-TEL.:0212 597 86 62 ‹STANBUL-KÜÇÜKÇEKMECE-YILDIZ ELEKTR‹K
SO⁄UTMA-HALKALI CD. ANADOLU PSJ. NO: 185-TEL.:0212 580 76 02 ‹STANBUL-KÜÇÜKÇEKMECE-BATI TEKN‹K-GÜLTEPE MH. DEL‹ORMAN CD. NO:75
SEFAKÖY-TEL.:0212 599 36 79 ‹STANBUL-BAYRAMPAfiA-ÖZKAN ELEKTRON‹K-KARTALTEPE MH. B‹LGEHAN CD. NO:36-TEL.:0212 564 33 46 ‹STANBULGAZ‹OSMANPAfiA-TOROS ELEKTRON‹K-MERKEZ MH. BA⁄LAR CD. NO:77-TEL.:0212 563 50 38 ‹STANBUL-fi‹fiL‹-CHIP ELEKTRON‹K-BOZKURT CAD.NO:
235-TEL.:0212 231 65 43 ‹STANBUL-GÜNGÖREN-YÜKSEL ELEKTRON‹K-M.FEVZ‹ ÇAKMAK MAH.‹NÖNÜ CAD.NO: 138-TEL.:0212-504 61 42 ‹STANBULBEYO⁄LU-TOLGA ELEKTRON‹K-CAM‹ KEB‹R MH. DEREBOYU CAD. NO:28 KASIMPAfiA-TEL.:0212 235 65 34 ‹STANBUL-AVCILAR-NUR ELEKTRON‹K-
DEN‹ZKÖfiKLER MAH.DERYA SOK. NO:36/1-TEL.:0212 694 12 82 ‹STANBUL-BA⁄CILAR-ÇA⁄LAYAN ELEKTRON‹K-‹STOÇ 25.ADA NO.:109-TEL.:0212 659
92 49 ‹STANBUL-KADIKÖY-UMUT ELEKTRON‹K-HAL‹TA⁄A CAD. CELAL MUHTAR SOK. NO:20/2-TEL.:0216 346 39 78 ‹STANBUL-ZEYT‹NBURNU-UZMAN
ELEKTRON‹K-YEN‹DO⁄AN MH. 42.SK NO:50-TEL.:0212 582 36 37 ‹STANBUL-KADIKÖY-MICROSYSTEM ELEKTRON‹K-1. ORTA SK. NO:18/1 GÖZTEPETEL.:0216 411 91 50 ‹STANBUL-MALTEPE-BEYDA⁄I TEKN‹K ELEKTRON‹K-BA⁄LARBAfiI MAH. ‹NÖNÜ CAD.-TEL.:0216 457 63 34 ‹STANBUL-BA⁄CILAR-
KUMRU ELEKTRON‹K-KEMALPAfiA MAH. NAMIK KEMAL CAD. NO: 126-TEL.:0212 429 34 19 ‹STANBUL-BAKIRKÖY-‹K‹ZLER ELEKTRON‹K-SAKIZA⁄A
MH. BERR‹NC‹N‹ SK. NO:16/A-TEL.:0212 543 85 83 ‹STANBUL-ÜSKÜDAR-KÖYLÜBAY ELEKTRON‹K-ALBAY HÜSAMETT‹N ERTÜRK SK. NO:7/A ÇENGELKÖY
TEL.:0216 318 35 13 ‹STANBUL-ÜSKÜDAR-AKÇEL‹K T‹CARET-M‹MAR S‹NAN MH. ‹SMA‹L DÜMBÜLLÜ SK. NO:9/A TEL.:0216 342 99 22 ‹STANBUL-
KADIKÖY-TELV‹D ELEKTRON‹K-MAZHAR OSMAN SOK FERAH APT NO:24/A FENERYOLU-TEL.:0216 414 66 00 ‹STANBUL-‹K‹TELL‹-BARIfi TEKN‹K-
ATATÜRK MH. ‹K‹TELL‹ CD. DURAK SK. NO:18 TEL. : 0212 471 04 76 ‹STANBUL-K.ÇEKMECE-ENG‹N ELEKTRON‹K-TEVF‹K BEY MH. MERKEZ CD.
ORK‹DE SOK. NO: 3 /1-TEL.:0212 598 44 76 ‹STANBUL-BAHÇEL‹EVLER-SEV-CAN DAYANIKLI TÜK.MALLARI.-YILDIRIM BEYAZIT CD .ZAFER MH. TÜRKBEY‹
SK. NO:6/2-3-TEL.:0212 552 45 87 ‹STANBUL-fi‹fiL‹-IfiIK ELEKTRON‹K-AYAZA⁄A MASLAK ATATÜRK CD NO: 25-TEL.:0212 289 76 94 ‹STANBUL-PEND‹K-
GÖKHAK ELEKTRON‹K-BATI MH. SABR‹ TAfiKIN CD. SEB‹L SK. NO:4/1 TEL. : 0216 354 07 00 ‹STANBUL-G.O.PAfiA-ATILIM ELEKTRON‹K-CEBEC‹ MAH.
2472 SOK: NO:14/A SULTANÇ‹FTL‹⁄‹- TEL.:0212 475 85 62 ‹STANBUL-GÜNGÖREN-NUR ELEKTR‹K ELEKTRON‹K-MERKEZ MH. ASALET CD. NO: 22/DTEL.:0212 641 42 09 ‹STANBUL-BEYKOZ-ULUDO⁄AN ELEKTRON‹K-KAYABAfiI ÇIKMAZI NO: 4/B PAfiABAHÇE-TEL.:0216 322 85 85 ‹STANBUL-KARTAL-
ÖZO⁄LU ELEKTRON‹K-KIZILAY BULVARI CD. BAHADIR SK. 4/A-TEL.:0216 387 18 87 ‹STANBUL-FAT‹H-SOYLU TEKN‹K-HIRKA‹ fiER‹F CAM‹ ARKASI ESK‹
AL‹PAfiA CD. NO: 26-TEL.:0212 631 85 88 ‹STANBUL-FAT‹H-IRMAK DIfi T‹CARET-HACI KADIN CD. NO:15 K.M. PAfiA TEL.: 0212 589 75 27 ‹STANBUL-
S‹L‹VR‹-PDS ELEKTRON‹K-P.M. PAfiA MH. HACI PERVANE CD. NO:35/B -TEL.:0212 728 76 75 ‹STANBUL-GÜLTEPE-B‹L‹M ELEKTRON‹K-HARMANTEPE
MH. ABD‹ ‹PEKÇ‹ CD. NO:14/D -TEL.:0212 278 72 27 ‹ZM‹R-KARfiIYAKA-AYSER ELEKTR‹KL‹ EV ALETLER‹-ZÜBEYDE HANIM CADDES‹ NO:87/A-TEL.:0232
366 19 19 ‹ZM‹R-BERGAMA-GEZG‹N SERV‹S-K.KEMALBEY CAD. NO:82-84-TEL.:0232 633 35 15 ‹ZM‹R-KONAK-TUNCA ELEKTR‹K-76 SK 10/A GÜZELYALITEL.:0232 246 40 62 ‹ZM‹R-ÇAMD‹B‹-KUDRET ELEKTRON‹K-BURAK RE‹S CAD. NO: 239/A-TEL.:0232 435 81 36 ‹ZM‹R-MENEMEN-AY ELEKTRON‹K-DR.
SELAHATT‹N ÖZKURT CD. NO:22/B-TEL.:0232 832 02 31 ‹ZM‹R-KONAK-S‹STEM ELEKTRON‹K-2414 SK. NO:10 GÜLTEPE-TEL.:0232 469 72 69 ‹ZM‹R-
KARfiIYAKA-LEVENT ELEKTR‹K LABORATUVARI-1710 SK. NO:70/B ESHOT SOKA⁄I-TEL.:0232 381 14 42 ‹ZM‹R-KARfiIYAKA-ASMERKEZ T‹CARET-ESK‹
TRAMVAY CD. 1675. SK. NO:78/1B ALAYBEY-TEL.:0232 364 33 73 ‹ZM‹R-BORNOVA-ACEM ELEKTRON‹K-552/2 SK. NO: 4/A-TEL.:0232 339 73 31 ‹ZM‹R-
KONAK-KILIÇ ELEKTRON‹K-BARBAROS HAYRETT‹N PAfiA CD. NO:62/1 LEVENT-TEL.:0232 433 15 19 ‹ZM‹R-URLA-‹LTER ELEKTRON‹K-‹ZM‹R 75. YILl
CADDES‹NO:81/C-D-TEL.:0232 754 44 44 ‹ZM‹R-BUCA-ÇA⁄LAR ELEKTRON‹K-670/1 SK. NO:57/B-TEL.:0232 276 27 77 ‹ZM‹R-YEfi‹LYURT-UMUT ELEKTR‹K
& ELEKTRON‹K-YILDIZ CAD. NO: 152/A-TEL.:0232 244 65 77 ‹ZM‹R-ÖDEM‹fi-MURAT ELEKTRON‹K-UMURBEY MH. SANAY‹ S‹T. 9.SK NO: 10 -TEL.:0232
544 41 98 KAHRAMANMARAfi-AKSUNGUR ELEKTR‹K-UZUNOLUK CAD. 20.SOKAK NO:20/A-TEL.:0344 212 77 50 KAHRAMANMARAfi-KALE ELEKTRON‹K-
FEVZ‹PAfiA MH. UZUNLUK CD.-TEL.: 0344 225 07 94 KARABÜK-SAFRANBOLU-MEHMET SA⁄LAM - GÖKAY TEKN‹K-‹NÖNÜ MH. ESK‹ BA⁄LAR SK. NO:13TEL.:0370 712 24 97 KARABÜK-ACAR ELEKTRON‹K-VAKIF ‹fi HANI KAT:2 EMN‹YET MÜDÜRLÜ⁄Ü YANI-TEL.:0370 424 32 00 KARAMAN-ÖZ AS SO⁄UTMA-
ABBAS MH. MUT CD. NO: 82/A TEL. : 0338 214 56 74 KARS-AYDIN ELEKTRON‹K-KAZIM KARABEK‹R ‹fiHANI KAT:2 NO: 125 -TEL.:0474 212 87 82
KASTAMONU-TAfiKÖPRÜ-DE⁄‹fi‹M ELEKTR‹K-TABAKHANE MH. ATATÜRK CD. NO:55/A-TEL.:0366 417 42 04 KASTAMONU-TOSYA-DO⁄Ufi ELEKTRON‹K-
VAKIF SK. 15/A-TEL.:0366 313 42 59 KASTAMONU-HARUN TELEKOMÜN‹KASYON-‹NÖNÜ MAHALLES‹ AFfi‹NBEY SOKAK NO:8/B-TEL.:0366 212 33 66
KAYSER‹-MEL‹KGAZ‹-AKTÜRK BEYAZ EfiYA SERV‹S‹-AYDINLIKEVLER MH.FIRAT CD.KR‹STAL APT.A-B NO.17 TEL.:0352 332 08 25 KAYSER‹-MEL‹KGAZ‹AKIfi ELEKTRON‹K-ÇORAKÇILAR MH. CENG‹Z TOPEL CD.NO:20/B-TEL.:0352 320 14 00 KAYSER‹-DEVEL‹-U⁄UR SO⁄UTMA-HARMAN MAHALLES‹ BELED‹YE
PASAJ‹ ÜZER‹ NO: 15-TEL.:0352 621 56 31 KAYSER‹-SÖNMEZ ELEKTRON‹K-CAM‹ KEB‹R MAH. BASMANE SOK. NO:16/A-TEL.:0352 231 69 62 KAYSER‹ZERO COMPUTER-SAHAB‹YE MH. METE CD. fiAH‹R SATO⁄LU SK. SATO⁄LU AP D: 1-TEL.:0352 232 15 34 KIRIKKALE-MERKEZ-BULUT ELEKTR‹K
- 43 -
Page 45

B‹LG‹SAYAR-B.HAYRETT‹N CAD. NO:9/C-TEL.:0318 212 31 73 KIRKLAREL‹-MERKEZ-BUSE ELEKTRON‹K-KARACA ‹BRAH‹M MH. KAPAN CAM‹ SK. ACUN
YETK‹L‹ SERV‹SLER L‹STES‹
PSJ. NO:23-TEL.:0288 212 73 57 KIRKLAREL‹-LÜLEBURGAZ-BUSE ELEKTRON‹K-YILMAZ MH. ESK‹ KIRKLAREL‹ CD. EFSANE DÜ⁄ÜN SALONU YANI
NO:36/A TEL.: 0288 412 88 92 KIRfiEH‹R-GARANT‹ ELEKTRON‹K-ANKARA CD. C‹NGÖZ BEBE ARKASI YA⁄MUR ‹fiHANI NO:9/B-TEL.:0386 214 02 18 K‹L‹S-
FLAfi ELEKTRON‹K-fiEH‹TLER PARKI KARfiISI NO:63/1-TEL.: 0348 814 55 28 KOCAEL‹-DORUK TEKN‹K H‹Z. -KARABAfi MH. CENG‹Z TOPEL CD. MÜNECC‹M
AR‹F SK. NO:6/A -TEL.:0262 331 11 66 KOCAEL‹-KARAMÜRSEL-KILINÇ ELEKTRON‹K-‹NÖNÜ CD. M.YASEF SK. NO:10/M-TEL.:0262 452 55 55 KOCAEL‹-
D‹LOVASI-SAMET ELEKTRON‹K-BA⁄DAT CAD NO: 42/2-TEL.:0262 754 79 86 KOCAEL‹-DARICA-KARDEfiLER ELEKTRON‹K-KAZIM KARABEK‹R MH.
MEVALANA CAD. NO: 1/A-TEL.:0262 656 27 88 KOCAEL‹-GEBZE-YILDIRIM ELEKTRON‹K-H. HAL‹L MH. 1209 SK. NO:13/C-TEL.:0262 641 35 88KONYA-
BEYfiEH‹R-SELV‹ SO⁄UTMA-HACI ARMA⁄AN MH. ANTALYA CD. NO:108/F-TEL.:0332 512 40 10 KONYA-SELÇUKLU-SAF‹R SO⁄UTMA-FER‹T PAfiA MH.
GÜNEY SK. NO:3/F KULE S‹TE C‹VARI-TEL.:0332 236 36 75 KONYA-ERKAM SO⁄UTMA-KARAKURT MH. FURKAN DEDE CD.ASBAfiKAN SK. NO:13/BTEL.:0332 350 00 32 KONYA-ÖZCAN SO⁄UTMA VE ISITMA LTD fiT‹-N‹fiANTAfiIMH. HULUS‹ BAYBAL CD. NO:36/A-TEL.:0332 236 33 37 KONYA-SELÇUKLU-
KONSEY SOGUTMA VE ISITMA-KÜÇÜK ‹HSAN‹YE MH. fiA‹R GUBAR‹ SK.B‹NSA S‹TES‹ ALTI NO : 15 TEL.:0332 321 21 22 KONYA-AKfiEH‹R-EROL
ELEKTRON‹K-MEYDAN MAH. ÇOCUK PARKI KOD NO:38-TEL.:0332 812 61 12 KONYA-MERAM-GÜRKAN TEKN‹K-‹HT‹YARETT‹N MH.SIRÇALI MEDRESE
CAD.‹BN‹B‹B‹ SK. NO:1/B-TEL.:0332-351 02 03 KONYA-SEYD‹fiEH‹R-TUNCER ELEKTRON‹K-KIBRIS CD. NO:26-TEL.:0332 582 93 92 KONYA-DURMAZLAR
ELEKTR‹K-ANKARA-KONYA CAD. NO:67-TEL.:0332 673 28 48 KONYA-ERE⁄L‹-ERDEM‹R TEKN‹K-ÜÇ GÖZ MH. KIBRIS CD.EL‹T APT. NO:3 TEL.: 0332 713
02 53 KÜTAHYA-EL‹FO⁄LU ELEKTR‹K-FAT‹H SULTAN MEHMET BULVARI DUAGÜR CAM‹‹ ALTI 43/B-TEL.:0274 226 32 80 MALATYA-YUVAM ELEKTRON‹K-
‹ST‹KLAL MH. FUZUL‹ CD.‹MAMO⁄LU SK. NO:1-TEL.:0422 322 52 88 MALATYA-HAL‹M ELEKTRON‹K-SARAY MH. DEVECEL SK. NO:3-TEL.:0422 321 86
08MAN‹SA-SOMA-GÜRMAK TEKN‹K-KURTULUfi MH. ‹DMAN SK. NO:47/A-TEL.:0236 613 66 56 MAN‹SA-SAL‹HL‹-AYKAR SO⁄UTMA- BEfiEYLÜL MH.
BELED‹YE CD. NO:TEL.:243-0236 714 88 68 MAN‹SA-AY ELEKTRON‹K MAN‹SA fiB.-YARHASANLAR MAH. ESK‹ HASA⁄A 2306 SOK.NO: 18/A-TEL.:0236
237 30 62-63 MAN‹SA-BURCU ELEKTRON‹K-TUNCA MAH. KURTULUfi CAD. NO:54-TEL.:0236-234 57 42 MAN‹SA-TURGUTLU-EM‹N ELEKTRON‹K-ALTAY
MH. SEV‹NÇ SK. NO:25-TEL.:0236 313 28 35 MAN‹SA-SARUHANLI-fiEN SO⁄UTMA-ATATÜRK MH. 7 EYLÜL CD. NO: 21/B-TEL.:0236 357 12 00 MAN‹SA-
KULA-ERDAL KARAHAN-TERMO D‹NAM‹K-CAM‹‹ CED‹T MH. 62 SK. NO:67-TEL.:0236 816 70 99 MARD‹N-M‹DYAT-SA⁄LAM ELEKTRON‹K-ESNAF
SANATKARLAR KRED‹ KOOP. KARfiISI 2.CD.NO:56-TEL.:0482 462 33 90 MARD‹N-KIZILTEPE-‹BRAH‹MO⁄LU ISITMA-fiANLIURFA CAD. ECE PASAJI NO:7TEL.:0482 312 55 99 MARD‹N-DER‹K-UZAY ELEKTRON‹K-BELED‹YE MEYDANI NO:36-TEL.:0482 251 34 35 MARD‹N-YEN‹fiEH‹R-MERKEZ TEKN‹K-
KARAYOLLARI ARKASI BARIfi CAD GÜNAYDIN APT ALTI-TEL.:0482 212 83 06 MARD‹N-NUSAYB‹N-BÜDÜN ELEKTRON‹K-ZEYNEL AB‹D‹N MH. Ç‹LEK SK
NO: 1/B-TEL.:0482 415 61 98 MU⁄LA-FETH‹YE-ANADOLU TEKN‹K SERV‹S-ÖLÜDEN‹Z YOLU ÜZER‹ BAHA fiIKMAN CD.NO:157-TEL.:0252 611 39 12 MU⁄LA-
M‹LAS-AFfi‹N YILDIRIM - TEKN‹K SO⁄UTMA-HACI ‹LYAS MAH. PAZAR SOK.NO:14-TEL.:0252 512 14 45 MU⁄LA-YATA⁄AN-ASTEKN‹K ISITMA SO⁄UTMA
SERV‹S‹-YEN‹ MH. 152. SK. NO:8-TEL.:0252 572 56 31 MU⁄LA-DALAMAN-ÖZKAN TEKN‹K SO⁄UTMA-MERKEZ MAHALLES‹ ATATÜRK CD.NO:56-TEL.:0252
692 25 25 MU⁄LA-ELBO ELEKTR‹K ELEKTRON‹K-ORHAN‹YE MH. HÜRR‹YET CAD. NO:1/6-TEL.:0252 214 18 84 MU⁄LA-DATÇA-MEL‹H ELEKTRON‹K-
‹SKELE MH. AMBARCA CD. NO:17-TEL.:0252 712 02 30 MU⁄LA-MARMAR‹S-‹LKSEL ELEKTRON‹K-YEN‹ YOL CD. N0:51/9-TEL.:0252 412 62 60 MU⁄LA-
URLA-STAR ELEKTRON‹K-‹N‹fiD‹B‹ CAD NO 1/C AKYAKA BELDES‹-TEL.:0252 243 40 42 MUfi-HAfi‹MO⁄LU EK‹C‹ ELEKTRON‹K-HAfi‹MO⁄ULLARI EK‹C‹
‹fi HANI BELED‹YE CD.NO:20/A-TEL.:0436 212 38 80 N‹⁄DE-HUZUR ELEKTR‹K-ILHANLI MAH ÖZKUL MARKET KARSISI ÖZKILIÇ AP ALTI NO: 43-TEL.:0388
233 54 05 ORDU-TEK ISITMA SO⁄UTMA-SAKARYA MAH YENI KUMRU CAD NO: 111-TEL.:0452 423 84 49 ORDU-HAZAR SO⁄UTMA-YEN‹ MAH. 26.SOK
NO:17-TEL.:0452 214 04 49 ORDU-ÜNYE-STAR TEKN‹K-KALEDERE MH. 20TEMMUZ CD. NO:16-TEL.:0452 324 82 51 ORDU-MERKEZ-M‹KRO ELEKTRON‹K-
YEN‹ MH. 319 SK. NO:18 -TEL.: 0452 223 13 49 OSMAN‹YE-MODERN ELEKTRON‹K-ORTAOKUL CD. K‹fi‹O⁄LU ÇARfiISI NO:15-TEL.:0328 812 82 84 R‹ZE-
ÇAYEL‹-ÖZER TEKN‹K- MAKSUT ÖZER-EMNIYET MÜD.KARfiISI fiA‹RLER YOLU ÜZERI NO:3/2B-TEL.:0464 532 63 81 R‹ZE-CEVAH‹R ELEKTRON‹K-TOPHANE
MAH. ATATÜRK CAD. ‹fi PASAJI-TEL.:0464 213 16 17 SAKARYA-ADAPAZARI-ÇINAR ELEKTRON‹K-KÖMÜR PAZARI CAD. NO: 15 A-TEL.:0264 271 39 12
SAMSUN-ÇARfiAMBA-ÖZKAN SO⁄UTMA-ORTA MH. TUNCAY KOCABAfi SK. NO:85-TEL.:0362 832 28 90 SAMSUN-BAFRA-KARATAfi T‹CARET-KIZILIRMAK
MH. F.ÇAKMAK SK. NO:18/A-TEL.: 0362 543 04 91 SAMSUN-GÜLTEK‹N SERV‹S-ATATÜRK BULVARI NO.285-TEL.:0362 437 33 82 SAMSUN-DEN‹Z
ELEKTRON‹K-KADIKÖY MH. OSMAN‹YE CD. NO: 68-TEL.:0362 432 44 80 S‹‹RT-ERYILMAZ ELEKTRON‹K-CUMHUR‹YET CAD. NO:25 ULUCAM‹ KARfiISITEL.:0484 224 03 92 S‹NOP-ADA EV ALETLER‹-CAM‹ KEB‹R MH. TÜTÜNCÜ SK. NO: 16-TEL.:0368 260 12 64 S‹NOP-AYANCIK-YILKAY SO⁄UTMA-YALI
MH. DR.AZM‹ HAMZAO⁄LU CD. NO:46-TEL.:0368 613 52 12 S‹NOP-BOYABAT-ÖZTÜRK BEYAZ EfiYA BAKIM SERV‹S-GÖKDERE MH.YUSUF KEMAL BEY
CD.NO:24-TEL.:0368 315 61 21 S‹VAS-EKOL ELEKTRON‹K-H‹KMET IfiIK CD.NALBANTLAR BAfiI KAVfiA⁄I NO:1/D-TEL.:0346 223 44 96 fiANLIURFA-SURUÇ-
IfiIK SO⁄UTMA TEKN‹KERL‹⁄‹-D‹K‹L‹ MH. Z‹YARET CD. NO:10-TEL.:0414 612 17 25 fiANLIURFA-AKTAfi ELEKTRON‹K-ASFALT CD. N0.22/F-TEL.:0414
217 14 87 fiANLIURFA-B‹REC‹K-YARAfiIR SO⁄UTMA-MEYDAN MAH 10 TEMMUZ CAD KÖPRÜ ÇIKIfiI NO : 9-TEL.:0414 652 36 38 fiIRNAK-S‹LOP‹-ABAY
ELEKTRON‹K-2. CADDE S‹EMENS BAY‹‹ KARfiISI-TEL.:0486 518 50 99 fiIRNAK-ULUDERE-ÜRÜN ELEKTRON‹K-CUMHUR‹YET CD. PTT YANI-TEL.:0486
351 28 22 TEK‹RDA⁄-HAYRABOLU-POYRAZ TEKN‹K-H‹SAR MAH. ADELET SK. NO:24-TEL.:0282 315 55 48 TEK‹RDA⁄-SARAY-BATI TEKN‹K-YEN‹ MH.
TAKS‹M CD. NO:9 TEL.:0282 768 69 34 TEK‹RDA⁄-MURATLI-AKAN ELEKTRON‹K-MURAD‹YE MH. NAZIM SAV CD. NO:30/A-TEL.:0282 361 28 17 TEK‹RDA⁄-
ÇORLU-FULL TEKN‹K-MUH‹TT‹N MH. F‹K‹R SK. NO:12/B-TEL.:0282 652 28 68 TEK‹RDA⁄-ARI ELEKTRON‹K-AYDO⁄DU MH. fiEH‹TLER CD. NO: 33/ATEL.:0282 263 40 61 TEK‹RDA⁄-MALKARA-KER‹MO⁄ULLARI T‹CARET-YEN‹MAHALLE GÜLDESTE SOK. NO: 4/B-TEL.:0282 427 16 61 TEK‹RDA⁄-
ÇERKEZKÖY-ÇA⁄RI ELEKTRON‹K-G.O. PAfiA MH. SAYAR SK. KARDEfiLER APT. NO:5 -TEL.:0282 726 02 66 TOKAT-ERBAA-H‹DRO ELEKT‹R‹K-CUMHUR‹YET
MH. GAZ‹ BULVARI NO:144-TEL.:0356 715 56 01 TOKAT-C‹HAN ELEKTRON‹K-G.O.PAfiA BULVARI S‹VAS CAD. NO:290/A- TEL.:0356 214 00 74 TOKAT-
TURHAL-GÜÇLÜ SO⁄UTMA-CELAL MH. TUNA SK. NO:11-TEL.: 0356 276 39 66 TOKAT-CEM TEKN‹K SO⁄UTMA-SO⁄UKPINAR MH. GOP BULVARI 241/A
GÖKÇE PASAJI NO:14-TEL.:0356 212 37 57 TRABZON-ÇIRAK TEKN‹K-FAT‹H MH. AYASOFYA CD. NO: 57 MÜZE KARfiISI-TEL.:0462 229 66 44 TRABZON-
AKÇAABAT-ATOM ELEKTR‹K-ORTA MH. ERENLER SK. NO:5 -TEL.:0462 228 12 58 TRABZON-YET-SAN ELEKTRON‹K-FAT‹H MH. FAT‹H CD. COfiKUNER
PASAJI NO:2/B-TEL.:0462 223 15 04 TRABZON-ARAKLI-fiENGÜL TEKN‹K-BA⁄KUR ÇARfiISI NO: 10 / A-TEL.:0462 721 74 11 UfiAK-MERKEZ-KOÇ SO⁄UTMA-
‹fiL‹CE MH. ADAfi SK. NO:29/E -TEL.:0284 513 89 66 VAN-ERC‹fi-ÖZKANAT TAM‹RAT-EMN‹YET KARAKOL ARKASI NO:3-TEL.:0432 351 95 40 VAN-EB‹NÇ
TEKN‹K-SIHKE CAD ATEfi SOK. NO 10-TEL.:0432 214 31 37 VAN-BURHAN AYDIN - ÖZ USTA TAM‹RAT-KÜLTÜR MERKEZ‹ C‹VARI DEM‹RC‹LER 1. SK.
NO:1/C-TEL.:0432 216 34 58 YALOVA-ALTINOVA-DO⁄AN TEKN‹K SO⁄UTMA-CUMHUR‹YET MH.MERKEZ DURAK KARfiISI NO:29A-TEL.:0226 461 26 21
YALOVA-TINAZTEPE ELEKTR‹K-‹STANBUL CD. BORA SK. NO: 14-TEL.:0226 812 01 60 YOZGAT-AKDA⁄MADEN‹-AYDIN SO⁄UTMA-AHISHAVI MH. 2.
HANLAR SK. NO :10-TEL.:0354 314 64 12 YOZGAT-ÖNDER ELEKTRON‹K-UN PAZARI NO:14-TEL.:0354 212 79 67 YOZGAT-SORGUN-KARDEfiLER
ELEKTRON‹K-CUMHUR‹YET CD. NO:29 1/C-TEL.:0354 415 45 79 ZONGULDAK-KRD ERE⁄L‹-UZMAN ELEKTRON‹K-ERDEM‹R CAD NO:130-TEL.:0372 316
31 28 ZONGULDAK-MERKEZ-EMEK ELEKTRON‹K-PAP‹LA ‹fi HANI ZEM‹N KAT NO:9 SO⁄UKSU-TEL.:0372 251 67 31
- 44 -
Page 46

MÜfiTER‹ H‹ZMETLER‹
De¤erli Müflterimiz,
En uygun fiyata en iyi ürünü vermenin yan› s›ra; en iyi hizmeti vermenin de
önemli oldu¤una inan›yoruz. Bu nedenle siz bilinçli tüketicilere daha yak›n
olabilmek için, internet adresimizdeki eriflim formlar›n›n yan› s›ra, tüketici
dan›flma hatlar›m›z› da hizmetinize açm›fl durumday›z.
TÜKET‹C‹
DANIfiMA HATTI
444 66 86
MERKEZ
TEKN‹K SERV‹S
(0212) 422 94 94
www.sinbo.com.tr
Dan›flma Hatlar›m›z›,
- Hafta içi her gün 08.30-18.00 saatleri aras›nda arayabilir; istek, öneri ve
flikayetlerinizi firmam›za iletebilirsiniz.
Tüketicinin Dikkatine:
Ürünlerimizle ilgili hizmetleri tam olarak alabilmek için afla¤›daki önerilere
uyman›z› rica ederiz:
1. Ürünü ald›¤›n›zda Garanti Belgesini mutlaka yetkili sat›c›n›za onaylatt›r›n›z.
2. Ürünü kullanma k›lavuzu esaslar›na göre kullan›n›z.
3. Ürününüzle ilgili hizmet talebiniz oldu¤unda yukar›daki telefon
numaralar›ndan, Tüketici ‹liflkileri Merkezi'ne baflvurunuz.
4. Ürünü promosyon arac›l›¤› ile edinmiflseniz, ürüne ait garanti belgesini en
yak›n yetkili servisimize giderek onaylatt›r›n›z.
5. Teknik servisteki ifliniz bitti¤inde "Hizmet Fifli" almay› unutmay›n›z.
Alaca¤›n›z bu fifl, ileride ürününüzde meydana gelebilecek herhangi bir
sorunda size yarar sa¤layacakt›r.
6. Cihaz›n›z ilk çal›flt›rmada çal›flm›yor veya ar›zal› ise, size en yak›n S‹NBO
Yetkili Servisine baflvurabilir veya S‹NBO Dan›flma Hatlar›ndan yard›m
alabilirsiniz.
- 45 -
Page 47

- GARANT‹ fiARTLARI -
1. Garanti süresi, mal›n teslim tarihinden itibaren bafllar ve 2 y›ld›r.
2. Mal›n bütün parçalar› dahil(kullan›m hatalar›ndan kaynaklanan k›r›lmalar hariç) olmak üzere tamam› firmam›z›n
garantisi kapsam›ndad›r.
3. Mal›n garanti süresi içerisinde ar›zalanmas› durumunda, tamirde geçen süre garanti süresine eklenir. Mal›n tamir
süresi en fazla 30 ifl günüdür. Bu süre, mala iliflkin ar›zan›n servis istasyonuna servis istasyonunun olmamas›
durumunda, mal›n sat›c›s›, bayii, acentas›,temsilcili¤i, ithalatç›s› veya imalatç›s›-üreticisinden birisine bildirim tarihinden
itibaren bafllar. Mal›n ar›zas›n›n 15 ifl günü içerisinde giderilmemesi halinde, imalatç›-üretici veya ithalatç›; mal›n
tamiri tamamlan›ncaya kadar, benzer özelliklere sahip baflka mal› tüketicinin kullan›m›na tahsis etmek zorundad›r.
4. Mal›n garanti süresi içerisinde, gerek malzeme ve iflçilik, gerekse montaj hatalar›ndan dolay› ar›zalanmas› halinde,
iflçilik masraf›, de¤ifltirilen parça bedeli ya da baflka herhangi bir ad alt›nda hiçbir ücret talep etmeksizin tamiri
yap›lacakt›r.
5. Tüketicinin onar›m hakk›n› kullanmas›na ra¤men mal›n;
-Tüketiciye teslim edildi¤i tarihten itibaren, belirlenen garanti süresi içinde kalmak kayd›yla,bir y›l içerisinde; ayn›
ar›zan›n ikiden fazla tekrarlanmas› veya farkl› ar›zalar›n dörtten fazla meydan gelmesi veya belirlenen garanti süresi
içerisinde farkl› ar›zalar›n toplam›n›n alt›ndan fazla olması unsurlar›n›n yan›s›ra, bu ar›zalar›n maldan yararlanamamay›
sürekli k›lmas›,
-Tamiri için gereken azami sürenin afl›lmas›,
-Firman›n servis istasyonunun, servis istasyonunun mevcut olmamas› halinde s›rayla sat›c›s›, bayii, acentesi temsilcili¤i,
ithalatç›s› veya imalatç› - üreticisinden birisine düzenleyece¤i raporla ar›zan›n tamirine mümkün bulunmad›¤›n›n
belirlenmesi,durumlar›nda, tüketici mal›n ücretsiz de¤ifltirilmesini, bedel iadesi veya ay›p oran›nda bedel indirimi
talep edebilir.
6. Mal›n kullanma k›lavuzunda yer alan hususlara ayk›r› kullan›lmas›ndan kaynaklanan ar›zalar garanti kapsam›
d›fl›ndad›r.
7. Garanti Belgesi ile ilgili olarak ç›kabilecek sorunlar için Sanayi ve Ticaret Bakanl›¤› Tüketicinin ve Rekabetin
Korunmas› Genel Müdürlü¤ü’ne baflvurulabilir.
‹THALATÇI F‹RMA
DE‹MA ELEKTROMEKAN‹K ÜRÜNLER ‹NfiAAT SPOR MALZEMELER‹ ‹MALAT SAN. VE T‹C. A.fi.
Cihangir Mh. Güvercin Cd. No:4 Haramidere Mevkii Avcılar - ‹stanbul - Türkiye
Tel : (0212) 422 94 94 & Fax : (0212) 422 03 49
www.sinbo.com.tr - info@sinbo.com.tr
- 46 -
Page 48

- SSI 2858 ÜTÜ -
- GARANT‹ BELGES‹ -
Garanti Belge No : 65135
SSHY Belge No : 25551
‹THALATÇI F‹RMA
Ünvanı : DE‹MA ELEKTROMEKAN‹K ÜRÜNLER‹ ‹Nfi. SPOR MALZ.
‹MALAT SAN. ve T‹C. A.fi.
Adresi : Cihangir Mah. Güvercin Cad. No:4 Haramidere Mevkii
Avc›lar / ‹STANBUL
Tel. : 0212 422 94 94 & Fax: 0212 422 03 49
Yetkili Kifli :
Yönetim Kurulu Baflkan›
Ürünün Cinsi : ÜTÜ
Markası : S‹NBO
Modeli : SSI 2858
Alt Modeli : Bandrol ve Seri No :
Teslim Tarihi ve Yeri :
Garanti Süresi : 2 Yıldır
Azami Tamir Süresi : 30 ‹fl Günü
Kullanım Ömrü : Bakanl›kça belirlenen ve ilan edilen kullan›m ömrü 7 y›ld›r.
(Ürünün fonksiyonlar›n› yerine getirebilmesi için gereken yedek parça temin süresi)
SATICI F‹RMA
Ünvanı :
Adresi :
Tel.Fax :
Fatura Tarihi ve No :
Teslim Tarihi ve Yeri :
‹mza ve Kafle :
Bu bölüm, ürünü sat›n ald›¤›n›z Yetkili Sat›c› taraf›ndan imzalanacak ve kaflelenecektir.
Bu belgenin kullan›lmas›na; 4077 say›l› Tüketicinin Korunması Hakkında Kanun ve bu Kanun’a dayan›larak yürürlü¤e konulan Garanti Belgesi
Uygulama Esaslar›na Dair Tebli¤ uyar›nca, TC Sanayi ve Ticaret Bakanl›¤› Tüketicinin ve Rekabetin Korunmas› Genel Müdürlü¤ü tarafından
izin verilmifltir.
Garanti Belge Onay Tarihi : 30/01/2009
SSHY Belge Onay Tarihi : 30/03/2010
- 47 -
 Loading...