

SINBO SSI 2856 User Manual [es, fr, en]

SSI 2856 BUHARLI ÜTÜ
KULLANMA KILAVUZU
TR
EN
FR
NL
ES
RU
AR
HR
G‹R‹fi
De¤erli Müflterimiz,
Ürün seçiminde S‹NBO'yu tercih etti¤iniz için teflekkür ederiz.
Uzun ve verimli bir kullan›m için cihaz› kullanmadan önce bu k›lavuzu özellikle güvenlik
talimatlar›na dikkat ederek okuman›z› ve devaml› suretle saklaman›z› tavsiye ederiz.
Sayg›lar›m›zla,
Sinbo Küçük Ev Aletleri
Yaln›zca ev içi kullan›ma yöneliktir.
Ütüyü kullanmaya bafllamadan önce lütfen bu talimat› dikkatli bir flekilde okuyunuz.
Kullan›m Talimat›
Buharl› ütünüzü kullanmaya bafllamadan önce lütfen bu kullan›m k›lavuzunu dikkatli bir
flekilde okuyarak cihaz› tan›y›n›z. Bu k›lavuzu baflvuru kayna¤› olarak saklay›n›z.
- TEDAR‹KÇ‹ F‹RMA / EXPORTER United Favour Development Limited
Unit B, 10/F Lee May Building 788-790
Nathan Road, Mongkok, Kowloon, HK.
- UYGUNLUK BEYANI / CE TÜV Rheinland LGA Products GmbH
Tillystraße 2, 90431 Nürnberg
Made in China
‹mal Y›l› : 2010
This appliance is not intended for use by persons (including children) with reduced physical,
sensory or mental capabilities, or lack of experience and knowledge, unless they have
been given supervision or instruction concerning use of the appliances by a person
responsible for their safety. Children should be supervised to ensure that they do not play
with the appliance.
This appliance is intended to be used in household and similar applications such as:
- staff kitchen areas in shops, offices and other working environments;
- farm houses;
- by clients in hotels, motels and other residential type environments;
- bed and breakfast type environments.
Germany
S50180562 0001
EEE Yönetmeli¤ine uygundur.
Bu ürün (çocuklar dahil ) fiziksel hassasiyeti az, zihinsel olarak yetersiz, deneyimsiz ve
yeterli bilgiye sahip olmadan yada kendilerinin güvenli¤inden sorumlu olan kifliler tarafından
bu ürünü kullanmak için gerekli talimatlar verilmemifl kiflilerin kullanımına uygun de¤ildir.
- 1 -
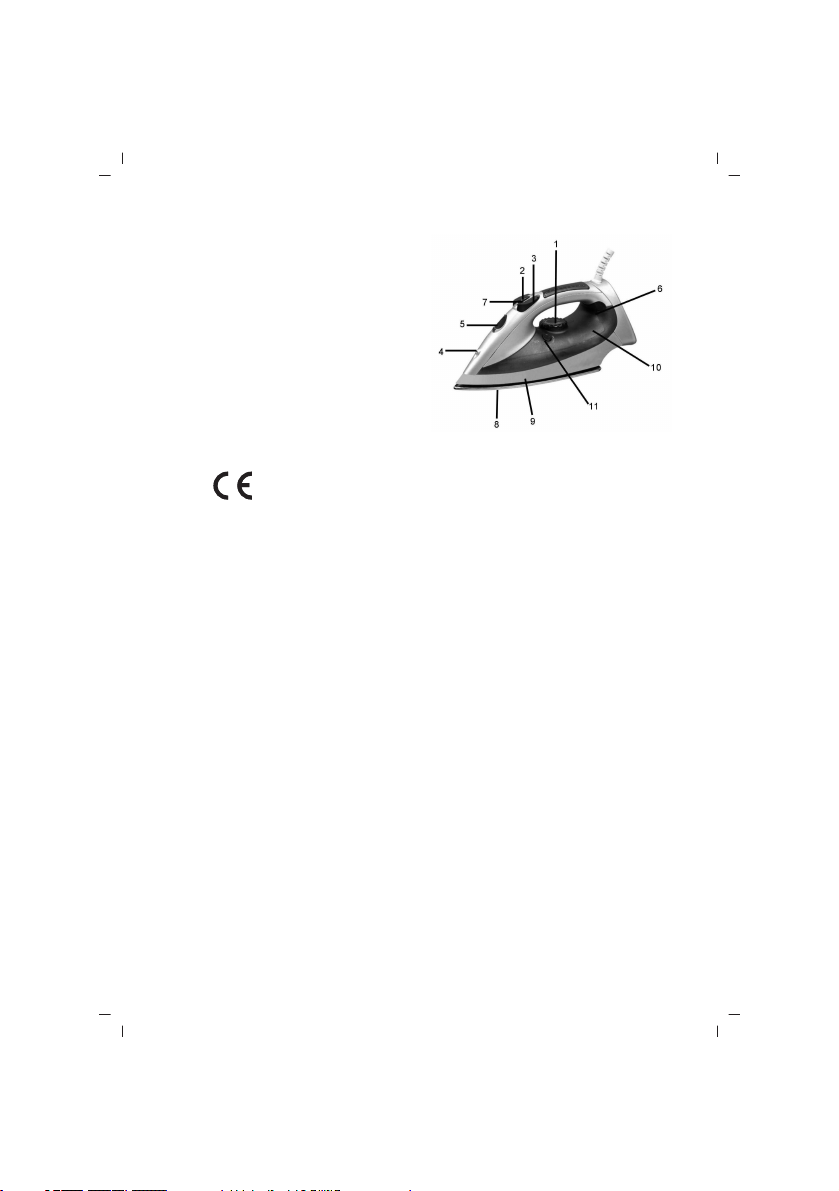
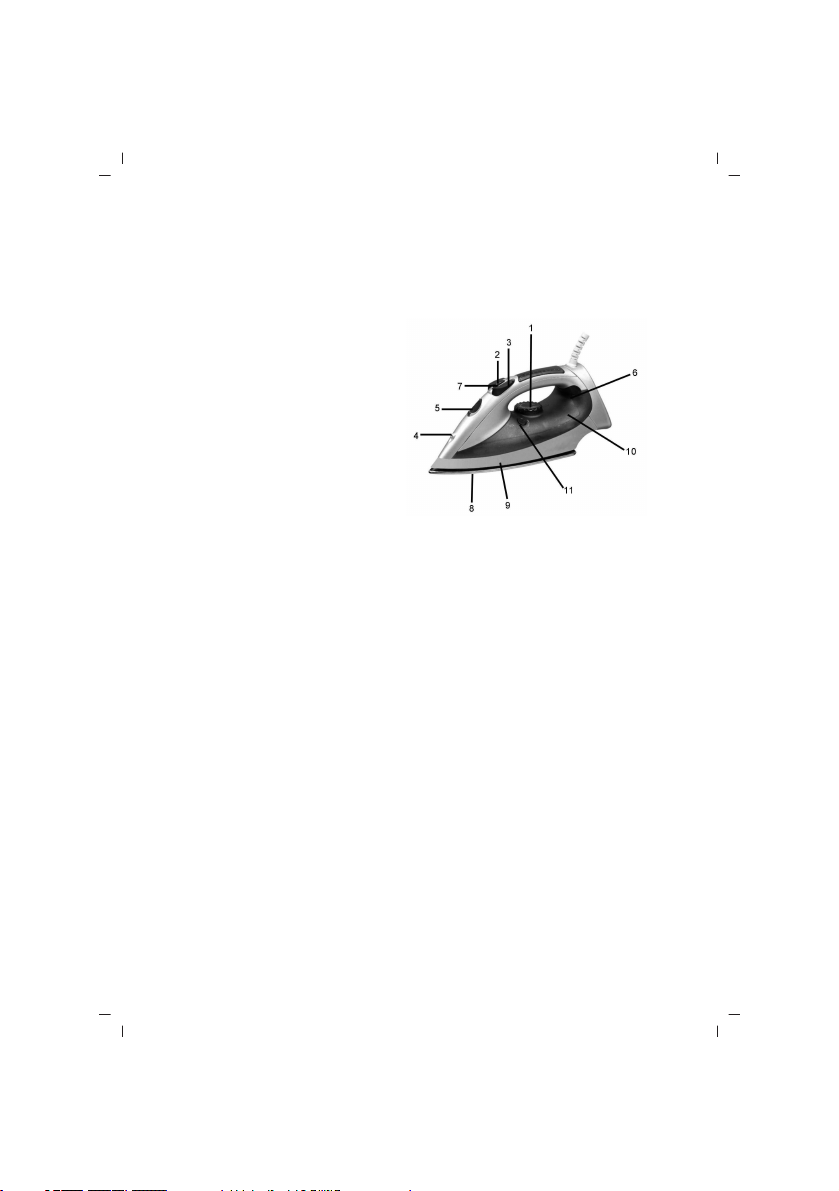
C‹HAZIN TANITIMI
1. S›cakl›k Kontrolü
2. fiok buhar dü¤mesi
3. Sprey dü¤mesi
4. Sprey ucu
5. Su girifli
6. Pilot lamba
7. Buhar kontrol dü¤mesi
8. Taban
9. Gövde
10. Su haznesi
11. Kendi kendini temizleme dü¤mesi
AC 230V , 50Hz, 2000W
Bu cihaz kalite belgesine haizdir.
EN 60335-1, EN 60335-2-3, EN 50366
Kullanım Ömrü 7 yıldır.
Made in China
D‹KKAT!!
Ürünün üzerinde bulunan iflaretlemelerde veya ürünle verilen di¤er bas›l› dökümanlarda
beyan edilen de¤erler, ilgili standartlara göre laboratuar ortam›nda elde edilen
de¤erlerdir.Bu de¤erler, ürünün kullan›m ve ortam flartlar›na göre de¤iflebilir.
ÖNEML‹ GÜVENL‹K UYARILARI
• Bakım, Onarım ve Kullanımda Uyulması Gereken Kurallar
1. Cihaz› ilk defa kullanmaya bafllamadan önce tüm talimat› dikkatli bir flekilde okuyunuz.
2. Cihaz› kayna¤›na ba¤lamadan önce cihaz›n etiketinde yazan voltaj düzeyinin evinizdeki
voltaj düzeyiyle ayn› oldu¤undan emin olunuz.
3. Bu ürünü tasarlanm›fl kullan›m amac› d›fl›nda kullanmay›n›z.
4. Bu ütü güç kayna¤›na ba¤lanmadan ya da güç kayna¤›ndan ayr›lmadan önce kapal›
duruma getirilmelidir. Fifli prizden ç›karmak için kabloyu çekmeyiniz.
5. Ütü herhangi bir flekilde ar›zaland›ysa ürünü kullanmay›n›z. Kablosu ya da fifli
ar›zalanm›fl olan bir ütüyü kullanmaya kalk›flmay›n›z. Güç kablosunu ya da di¤er parçalar›
kendiniz de¤ifltirmeye kalk›flmay›n›z - Yard›m için Müflteri Hizmetleri bölümüyle ba¤lant›ya
geçiniz.
6. Ütü prize tak›l›yken kesinlikle yan›ndan ayr›lmay›n›z.
7. Su haznesini doldurmadan önce fifli prizden ç›kar›n›z (buharl› ütüler ve su püskürten
ütüler için geçerlidir).
8. Ütü dengeli bir yüzey üzerinde kullan›lmal› ve b›rak›lmal›d›r.
- 2 -
ÖNEML‹ GÜVENL‹K UYARILARI
9. Ütüyü bir yüzey üzerine koyarken yüzeyin dengeli oldu¤undan emin olunuz.
10. Ütü yere düfltü¤ü takdirde ya da gözle görülür bir hasar ya da s›z›nt› durumunda
kesinlikle kullan›lmamal›d›r.
11. Bu cihaz, gözetim ya da yönlendirme yap›lmaks›z›n fiziksel, çocuklar ya da fiziksel,
duyusal, zihinsel engeli olan kifliler, bu konuda bilgi ya da deneyim sahibi olmayan
kifliler taraf›ndan kullan›lmamal›d›r.
12. Çocuklar›n cihazla oynamas›na izin vermeyiniz.
TAfiIMA ESNASINDA
• Ürünü düflürmeyiniz,
• Darbelere maruz kalmamas›n› sa¤lay›n›z,
• S›k›flmamas›n›, ezilmemesini sa¤lay›n›z,
• Ambalaj üzerindeki iflaretlemelere uyunuz.
• Orjinal ambalajıyla taflımaya özen gösteriniz.
ÇEVRE VE ‹NSAN SA⁄LI⁄I
Çevre korumas›na siz de katk›da bulunabilirsiniz!
Lütfen yerel düzenlemelere uymay› unutmay›n: Çal›flmayan elektrikli cihazlar›,
uygun elden ç›karma merkezlerine götürün
Kullanım sırasında insan ve çevre sa¤lı¤ına tehlikeli veya zararlı olabilecek bir durum
söz konusu de¤ildir.
C‹HAZIN KULLANIMI
• Ba¤lantı veya Montajın Nasıl Yapılaca¤ını Gösterir fiema ile Ba¤lantı veya Montajın
Kimin Tarafından Yapılaca¤ına (tüketici, yetkili servis) iliflkin bilgiler
Cihaz›n›zla birlikte gelen aksesuarları kolayl›kla kendiniz tak›p ç›kartabilirsiniz.
Olası bir arıza durumunda cihazın içini açmayınız. En yak›n yetkili servise baflvurunuz.
PÜSKÜRTME
Bu fonksiyon istenildi¤i zaman kullan›labilir ve kullan›m s›kl›¤› ütünün s›cakl›¤›n›
etkilemez.
• Ütüye su doldurunuz.
• Püskürtme ucunu giysiye do¤rultunuz.
• Püskürtme Dü¤mesine Bas›n›z (3)
BUHARLA ÜTÜLEME
Bu fonksiyon yaln›zca yüksek s›cakl›klarda kullan›labilir.
Orta ya da azami buhar ayar› yap›labilir.
• Ütüye su doldurunuz.
• Ütüyü dik konuma getiriniz.
• Ütünün fiflini prize tak›n›z.
• S›cakl›k ayar dü¤mesini (l) "••"."•••" ya da MAX konumuna getiriniz.
- 3 -

BUHARLA ÜTÜLEME
• Pilot lamba söndükten ayarlanan s›cakl›¤a ulafl›lm›fl demektir ve ütü kullan›ma haz›rd›r.
• Buhar ayar dü¤mesini (7) istedi¤iniz konuma getirdikten sonra tabandaki deliklerden
buhar ç›kmaya bafllayacakt›r.
Uyar›: Geleneksel buharl› ütüleme iflleminde seçili s›cakl›k çok düflük oldu¤u takdirde
ütünün taban›ndan su s›z›nt›s› olabilir. Bu durumda s›cakl›k ayar dü¤mesini (1) tavsiye
edilen konuma getiriniz. Gerekli s›cakl›¤a ulafl›ld›ktan sonra buhar yeniden ç›kmaya
bafllayacakt›r.
fiOK BUHAR
Bu özellik inatç› k›r›fl›kl›klar›n düzeltilmesi için ekstra buhar ç›k›fl› sa¤lar.
• Ütüye su doldurunuz.
• S›cakl›k ayar dü¤mesini “MAX” konumuna getiriniz.
• Ütü kullan›ma haz›rd›r.
• fiok Buhar dü¤mesine (2) bir kez bas›n›z
• Buhar kumafl›n içine iflleyerek k›r›fl›kl›klar›n giderilmesini sa¤layacakt›r.
• ‹natç› k›r›fl›kl›klar›n bulunmas› durumunda buhar ayar dü¤mesine yeniden basmadan
önce birkaç saniye bekleyiniz.
Tüm k›r›fl›kl›klar genellikle bu ifllem üç kez tekrarland›ktan sonra giderilir.
BUHARSIZ ÜTÜLEME
• Ütünün fiflini prize tak›n›z.
• Buhar dü¤mesini (7) “0” konumuna getiriniz.
• S›cakl›k ayar dü¤mesini (1) kullanarak s›cakl›¤› ayarlay›n›z..
• Pilot lamba söndükten sonra gerekli s›cakl›¤a ulafl›lm›flt›r. Ütü kullan›ma haz›rd›r.
ÜTÜNÜN YEN‹DEN ISINMASINI BEKLEME:
Ütüyü kald›r›n›z ya da hafifçe oynat›n›z.
K›rm›z› termostat lambas› sönecektir. Taban›n s›cakl›¤› ayarlanm›fl olan ütüleme
s›cakl›¤›n›n alt›na düfltü¤ünde pilot lamba yanmaya bafllar.
Ütü hareket ettirildi¤inde pilot lamba yanar, ütüleme ifllemine tekrar bafllamadan önce
lamban›n sönmesini bekleyiniz.
Ütüyü hareket ettirdikten sonra pilot lamba yanm›yorsa ütünün taban› halen do¤ru
s›cakl›k seviyesinde demektir ve ütü kullan›ma haz›rd›r.
Notlar:
• Ütünün baz› k›s›mlar› ya¤ ile kaplanm›fl olabilece¤inden ütü ilk kez çal›flt›r›ld›¤› s›rada
bir miktar duman ç›kabilir. Bu durum k›sa bir süre sonra ortadan kalkacakt›r.
• Ütüyü kullanmaya bafllamadan önce taban ve gövde üzerindeki koruyucu film tabakas›n›
sökmeyi unutmay›n›z. Taban› yumuflak bir bezle silerek temizleyiniz.
• Ütüyü kullanmaya bafllamadan önce taban ve su haznesinin tamamen temiz oldu¤undan
emin olmak için ütüyü kullan›lmayan bir kumafl parças› üzerinde test ediniz.
- 4 -

C‹HAZIN KULLANIMI
SU SEÇ‹M‹
• Bu ütü yaln›zca normal musluk suyu ile kullan›lmal›d›r.
• Bölgenizdeki su afl›r› kireçliyse dam›t›lm›fl ya da demineralize su kullanman›z tavsiye
edilir.
• Ütüye kimyasal olarak kireçten ar›nd›r›lm›fl su ya da baflka s›v›lar doldurmay›n›z.
SU DOLDURMA
• Buhar Ayar dü¤mesini “0” konumuna getiriniz ve S›cakl›k Ayar dü¤mesini OFF (Kapal›)
konumuna getiriniz.
• Ütünün fiflini prizden ç›kar›n›z ve ütünün so¤umas›n› bekleyiniz.
• Su giriflinden (5) içeri su doldurmaya bafllay›n›z.
-Su haznesini “MAX” iflaretli azami seviyeye kadar doldurunuz.
Etiket Kumafl Türü ‹plik Türü
• Sentetik Akrilik
•• Sentetik Asetat
•• Sentetik Bak›r
•• ‹pek ‹pek
•• Yün Yün
••• Pamuk Pamuk
Keten Keten
SICAKLI⁄I AYARLAMA
• Fifli prize tak›n›z ve ütüyü dik konuma getiriniz.
• S›cakl›k ayar dü¤mesini (1) istedi¤iniz s›cakl›k ayar›na getiriniz.
• ‹stedi¤iniz s›cakl›¤a ulafl›ld›¤›nda pilot lamba sönecektir. Pilot lamba, seçili olan
s›cakl›¤›n korunmas› için zaman zaman yan›p sönecektir.
Modakrilik
Polipropilen
Poliüretan
Triasetat
Poliamid (Naylon)
Polyester
Viskonlar (Rayon)
KULLANIM HATALARINA ‹L‹fiK‹N B‹LG‹LER
Cihazınızı, beyan edilen voltaj ile çal›flt›r›n›z.Bulundu¤unuz yerin voltaj›n›n uygun olup
olmad›¤›n› kontrol ediniz.
Güç kablosunun ar›zalanmas› durumunda tehlikelerin önlenmesi için kablo üretici, servis
merkezi ya da benzer bir ehliyetli kifli taraf›ndan de¤ifltirilmelidir. Ar›za durumunda cihaz›
kendiniz sökmeye kalk›flmay›n›z, bak›m merkezimiz ya da sat›fl sonras› hizmet merkezimiz
- 5 -

TEM‹ZL‹K VE BAKIM
ile ba¤lant›ya geçiniz.
Cihaz› kendiniz onarmaya kalk›flmay›n›z. Meydana gelebilecek ar›zalardan firmam›z
kesinlikle sorumlu de¤ildir, ve cihaz›n›z garanti kapsam› d›fl›nda ifllem görecektir.
TEM‹ZL‹K VE BAKIM
• Tüketicinin Kendi Yapabilece¤i Bakım, Onarım veya Ürünün Temizli¤ine ‹liflkin Bilgiler
1. S›cakl›k Ayar Dü¤mesini KAPALI konuma getiriniz, ütünün fiflini çekiniz ve so¤umas›n›
bekleyiniz.
2. Taban üzerindeki kal›nt›lar ve art›klar sirkeli su kar›fl›m›na bat›r›lm›fl bir bez yard›m›yla
silinerek ç›kar›labilir.
3. Cihaz›n gövdesi nemli bir bez yard›m›yla silinmeli ve kuru bir bezle kurulanarak
parlat›lmal›d›r.
4. Taban› temizlemek için kesinlikle afl›nd›r›c› temizlik malzemeleri kullanmay›n›z.
5. Taban›n yüzeyini çizilmelere karfl› koruyunuz, metal cisimlerle temas etmesine izin
vermeyiniz.
6. Ütüleme ifllemini bitirdikten sonra ya da ütünün bafl›ndan ayr›l›yorken:
- buhar ayar dü¤mesini (7) “0” konumuna getiriniz ve S›cakl›k Ayar Dü¤mesini OFF
(Kapal›) konuma getiriniz - ütüyü dik konuma getiriniz - ütünün fiflini prizden çekiniz.
7. Ütü yaparken çocuklar›n ütüyle ya da güç kablosuyla temas etmesine izin vermeyiniz.
8. Ütüyü ya da güç kablosunu suya ya da baflka s›v›lara sokmay›n›z.
9. S›cak metal parçalar, s›cak su ya da buharla temas etmeyiniz. Parçalar çok ›s›n›p
yan›klara neden olabilir. Ütüyü ters çevirirken dikkatli olunuz: Parçalar çok ›s›n›p
yan›klara neden olabilir. Ütüyü ters çevirirken dikkatli olunuz: Su haznesinde s›cak su
kalm›fl olabilir.
Fiflin ve kablonun ütünün taban›yla temas etmesine izin vermeyiniz. Ütüyü kald›rmadan
önce tamamen so¤umas›n› bekleyiniz. Ütünün güç kablosunu kablo bölümüne sar›n›z
1. Ütüyü özenli bir flekilde muhafaza ediniz.
2. Ütüye su doldururken ya da boflalt›rken ütünün fiflini mutlaka prizden çekiniz.
3. Bu ütü yaln›zca evde kullan›ma yöneliktir
BU KULLANIM KILAVUZUNU BAfiVURU KAYNA⁄I OLARAK MUHAFAZA ED‹N‹Z
KEND‹ KEND‹N‹ TEM‹ZLEME ÖZELL‹⁄‹
Kireç ve kirleri temizlemek için kendi kendini temizleme özelli¤ini kullanabilirsiniz.
Kendi kendini temizleme ifllemini iki haftada bir uygulay›n›z. Yaflad›¤›n›z yerin suyu çok
kireçliyse kendi kendini temizleme ifllemi daha s›k yap›lmal›d›r.
a. Cihaz›n prize tak›l› olmad›¤›ndan emin olunuz.
b. Buhar ayar dü¤mesini “0” konumuna getiriniz.
c. Su haznesini azami seviyeye kadar doldurunuz.
d. Azami ütüleme s›cakl›¤›n› seçiniz.
e. Fifli prize tak›n›z.
f. Turuncu renkli s›cakl›k pilot lambas› söndü¤ünde fifli prizden çekiniz.
- 6 -

TEM‹ZL‹K VE BAKIM
g. Ütüyü lavabonun üstünde tutunuz, kendi kendini temizleme dü¤mesini bas›l› tutunuz
ve ütüyü sallay›n›z.
(Ütünün taban›ndan buhar ve kaynak su ç›kmaya bafllayacakt›r. Kirler ve kireç parçalar›
d›flar› at›lacakt›r.)
h. Haznedeki tüm su tükenene kadar dü¤meyi bas›l› tutunuz. Ütüde halen çok miktarda
kir bulunuyorsa kendi kendini temizleme ifllemini tekrarlay›n›z.
• Periyodik Bakım Gerektirmesi Durumunda, Periyodik Bakımın Yapılaca¤ı Zaman
Aralıkları ile Kimin Tarafından Yapılması Gerekti¤ine ‹liflkin Bilgiler
Cihaz periyodik bak›m gerektirmez.
Düzenli olarak temizli¤inin yapılmasında fayda vardır.
SATIfi SONRASI SERV‹S H‹ZMETLER‹
Bu cihaz kullan›c› taraf›ndan de¤ifltirilebilen parçalara sahip de¤ildir. Ünitenin çal›flmamas›
durumunda flu ad›mlar› izleyin.
1. Talimatlar›n do¤ru biçimde izlendi¤ini denetleyin.
2. Ana kayna¤›nda ifllevselli¤ini denetleyin.
Cihaz hâlâ çal›flm›yorsa, sat›n ald›¤›n›z yere geri götürün.
Güç kablosu hasar örmüflse, tehlikeleri önlemek için, cihaz üreticisine iade edilmelidir.
Kendi kendinize tamir etmeye KALKIfiMAYIN.
fiu talimatlar› izleyin:
1. Dikkatlice, tercihen orijinal kutusuna paketleyin.
Ünitenin temiz oldu¤undan emin olun.
2. Tüm yaz›flmalarda, ad›n›z›, adresinizi ve ürünün model numaras›n› belirtin.
3. ‹ade etme nedeninizi belirtin.
4. Garanti kapsam›ndaysa, nereden, ne zaman al›nd›¤›n› belirtin ve sat›n alma kan›t›n›
ekleyin (örn. kasa fifli).
- 7 -
ENGLISH
SINBO SSI 2856 STEAM IRON
INSTRUCTION MANUAL
AC 230V , 50Hz, 2000W
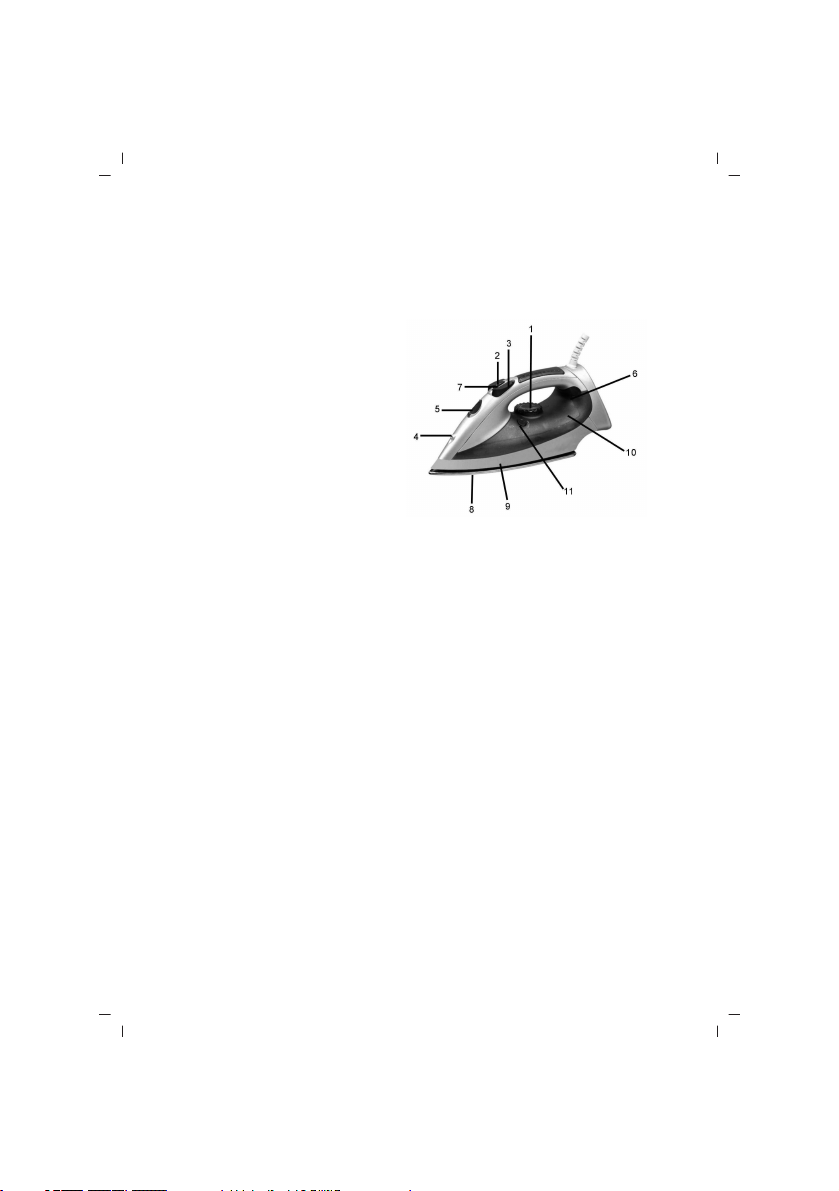
Parts Name
1. Temperature Control
2. Burst of steam button
3. Spray button
4. Spray nozzle
5. Water inlet
6. Pilot light
7. Steam control knob
8. Soleplate
9. Housing
10. Water tank
11. Self-clean button
IMPORTANT SAFEGUARDS
1. Please read all instruction carefully before using the appliance for the time.
2. Before connecting the appliance, check if the voltage indicated on the rating plate
corresponds with mains voltage in your home.
3. Do not use appliance for anything other than intended use.
4. The iron should always be switched off before connecting or disconnecting from the
power supply. Do not pull on the cord to disconnect the plug form the wall socket.
5. Do not use the iron if it is damaged in any way. Do not operate the iron with a damaged
cord or plug. Do not replace the power cord or any other parts by yourself-contact
Customer Support for assistance.
6. The iron must not be left unattended while it is connected to the supply mains.
7. The plug must be removed form the socket-outlet before the water reservoir is filled
with water (for steam irons and irons incorporating means for spraying water).
8. The iron must be used and rested on a stable surface.
9. When placing the iron on its stand, ensure that the surface on which the stand is
placed is stable.
10. The iron is not to be used if it has been dropped, if there are visible signs of damage
or if it is leaking.
11. The appliance is not be used by children or persons with reduced physical, sensory
or mental capabilities or lack of experience and knowledge, unless thy have been given
supervision or instruction.
12. Children being supervised not to play with appliance.
- 8 -

SPRAYING
This function can be used any time and it dose not affect the ironing temperature.
• Fill water into the iron.
• Aim the nozzle towards the garment.
• Press the Spray Button (3)
STEAM IRONING
This function can be used only at higher ironing temperature.
For moderate steam or MAX for maximum steam
• Fill water into the iron.
• Stand the iron upright.
• Connect the iron to a suitable mains supply outlet.
• Turn the temperature control (l) to the "••"."•••" or MAX setting.
• The pilot light turns off when the required temperature is reached the iron is ready
for use.
• Turn the steam knob (7) to the required position, steam starts coming
out form the holes in the sole plate.
Notice: With conventional steam ironing, water may leak form the sol plate if too low
a temperature has been select. If this happens, turn the temperature control (1) to the
advised position. Steam will recommence as soon as the appropriate temperature has
be reached.
BURST OF STEAM
This function provides an extra amount of steam to remove stubborn wrinkles.
• Fill the iron with water.
• Turn the temperature control to the position "MAX"
• The iron is ready for use
• Press the Burst of Steam button (2) once
• Steam will penetrate into the garment removing the wrinkles
• Wait a few seconds before pressing the steam control knob again when there are
stubborn wrinkles
Usually all wrinkles can be removed within three pressings
DRY IRONING
• Connect the iron to a suitable mains supply outlet
• Ensure that the steam control knob (7) is in position"0"
• Select the setting on the temperature control (1).
• When the pilot light turns off, the required temperature is reached. The iron is ready
for use.
TO LET THE IRON HEAT UP AGAIN:
Pick up the iron or move it slightly
- 9 -

TO LET THE IRON HEAT UP AGAIN
The red shot-off pilot goes out. If the temperature of the soleplate dropper below the
set ironing temperature, the temperature pilot goes on.
If the pilot light goes on after you have move the iron, wait for it to go out before you
start ironing.
If the pilot light does not go on after you move the iron, the soleplate still has right
temperature and iron is ready for use.
SELF-CLEAN FUNCTION
You can use the self-clean function to remove scale and impurities
Use the self-clean function once every two weeks. If the water in your area is very
hard, the self-clean function should be used more frequently.
a. Make sure the appliance is unplugged
b. Set the steam control knob to position "O"
c. Fill the water tank to maximum level.
d. Select the maximum ironing temperature.
e. Put the plug in the well socket.
f. Unplug the iron when the amber temperature pilot light has gone out.
g. Hold the iron over the sink, press and hold the self-clean button and gently shake
the iron and fro.
(Steam and boiling water will come out of the soleplate. Impurities and flakes if any will
be flushed out.)
h. Release the self-clean button as soon as all water in the tank has been used up.
Repeat the self-clean process if the iron still contains a lot of impurities.
CARE AND CLEANING
1. Turn the Temperature Control Dali to OFF, then disconnect the iron from the wall
outlet and it cool down completely.
2. Deposits and other residues on the sole plate can be removed with a cloth soaked
in a vinegar/water solution.
3. The casing may the wiped with a damp cloth and then polished with a dry one.
4. Never use any abrasives to clean the sole plate.
5. Keep the sole plate smooth; avoid contact with metal objects.
6. When you have fished ironing or when you are leaving iron unattended:
-turn the steam control knob (7) to position "0", and the Temperature Control
Dali to OFF -stand the iron up right, -disconnect the iron from the wall outlet.
7. Do not allow children to touch the iron or the power cord when ironing.
8. Do nor immerse the iron or the cord into water or any other liquid.
9. Do not touch hot metal parts, hot water or steam. There parts become hot and may
cause bums. Take care if you turn the iron upside downs: there parts become hot and
may cause bums. Take care if you turn the iron upside downs: there may be not hot
water in the tank.
- 10 -

FILLING WITH WATER
The plug and cord should not be allowed to touch the sole plate. Let the iron cool down
completely before taking it away. Roll the power cord around the
1. Iron for storage.
2. Disconnect the iron form the wall outlet while filling with water or when emptying
the water after use.
3. The iron is for household use only.
SAVE THE INSTRUCTION MANUAL FOR FUTURE REFERRNCE
Notes:
• Some parts of the iron have been slightly greased and as a result, the iron may smoke
slightly when switched on for the first time. It will not happen again after a tow uses.
• Before using for the first time remove any protective films or stickers from the sole
plate and the cabinet. Clean the sole place with a soft cloth.
• When using the iron for the first time, test it on an old piece of fabric to ensure that
the sole plate and water tank are completely clean.
CHOICE OF WATER
• This iron can be used with normal tap water.
• If the water in your area is particularly hard, it is advisable to use distilled or deminer
alized water
• Do not use chemically descaled water or any other liquids for refilling.
HOW TO FILL IN WATER
• Set the Steam Control knob "0"and the Temperature Control Dali to OFF.
• Unplug the iron from the wall outlet, and wait for the iron to cool down.
• Pour water into the water inlet (5).
-Fill up to the maximum level "MAX" of the water tank.
SETTING THE TEMPERATURE
• Insert the plug in the wall socket and stand the iron upright.
• Turn the temperature control knob (1) to the desired temperature setting.
• The desired temperature has been reached when the pilot light has turned off. The
pilot light will turn on and off form time to time, indicating that the selected temperature
is being maintained.
- 11 -
NOTE
Label Kind of Textile Fibre Material
• Synthetic Acrylic
•• Synthetic Acetate
•• Synthetic Cupro
•• Silk Silk
•• Wool Wool
••• Cotton Cotton
Linen Linen
Modacryl
Polyprophylene
Polyurethane
Triacetate
Polyamide(Nylon)
Polyester
Viscoses(Ray on)
- 12 -
FRANÇAIS
SINBO SSI 2856 FER À REPASSER À VAPEUR
MODE D'EMPLOI
AC 230V , 50Hz, 2000W
Noms des Pièces
1. Contrôle de température
2. Bouton de vapeur choc
3. Bouton de spray
4. Embout de spray
5. Entrée d’eau
6. Témoin lumineux
7. Bouton de contrôle de vapeur
8. Semelle
9. Corps
10. Réservoir d’eau
11. Bouton d’auto-nettoyage
CONSIGNES IMPORTANTES DE SÉCURITÉ
1. Lisez le manuel en entier avec attention avant de commencer à utiliser l’appareil
pour la première fois.
2. Assurez-vous que le niveau de voltage indiqué sur l’étiquette de l’appareil est identique
au niveau de voltage de votre résidence avant de brancher l’appareil à la source
d’alimentation.
3. N’utilisez pas ce produit à des fins autres que celles pour les quelles il est conçu.
4. Ce fer doit être positionné sur « arrêt » avant d’être branché à la source d’alimentation
ou avant d’être débranché de la source d’alimentation. Ne tirez pas le cordon pour
débrancher la fiche de la prise.
5. N’utilisez pas le fer à repasser s’il a fait panne d’une façon ou d’une autre. Ne tentez
pas d’utiliser un fer à repasser dont le cordon ou la fiche est en panne. Ne tentez pas
de remplacer vous-même le cordon d’alimentation ou les autres pièces – pour recevoir
de l’aide, mettez-vous en contact avec le département de Service Clientèle.
6. Ne vous absentez jamais lorsque le fer est branché à la prise.
7. Débranchez la fiche électrique avant de remplir le réservoir d’eau. (Valable pour les
fers à vapeur et les fers pulvérisant de l’eau).
8. Le fer à repasser doit être utilisé et laissé sur une surface équilibrée.
9. Lorsque vous apposez le fer à repasser sur une surface, assurez-vous que cette
surface est stable.
10. Le fer ne doit absolument pas être utilisé s’il est tombé parterre, s’il possède un
dommage visible ou en cas de suintement.
11. Cet appareil n’est pas prévu pour être utilisé par des personnes (y compris les
enfants) dont les capacités physiques, sensorielles ou mentales sont réduites, ou des
- 13 -

CONSIGNES IMPORTANTES DE SÉCURITÉ
personnes dénuées d’expérience ou de connaissance, sauf si elles ont pu bénéficier,
par l’intermédiaire d’une personne responsable de leur sécurité, d’une surveillance ou
d’instructions préalables concernant l’utilisation de l’appareil.
12. Il convient de bien surveiller les enfants pour s’assurer qu’ils ne jouent pas avec
l’appareil.
PULVÉRISATION
Cette fonction peut être utilisée lorsque souhaitée et la fréquence d’utilisation n’a aucun
effet sur la température du fer.
• Remplissez de l’eau dans le fer.
• Orientez l’embout de pulvérisation vers le vêtement.
• Appuyez sur le bouton de pulvérisation (3).
REPASSAGE À VAPEUR
Cette fonction peut être utilisée uniquement à des hautes températures.
Un réglage de vapeur moyen ou maximum peut être effectué.
• Remplissez de l’eau dans le fer.
• Positionnez le fer perpendiculairement.
• Branchez la fiche du fer à la prise.
• Positionnez le bouton de réglage de température (l) sur "••"."•••" ou MAX.
• Une fois que le témoin lumineux s’est éteint, cela signifie que la température réglée
est obtenue et le fer est prêt à l’emploi.
• La vapeur commencera à sortir des trous de la semelle une fois que vous aurez
positionné le bouton de réglage de vapeur (7) tel que vous le désirez.
Avertissement: Lors de l’opération de repassage à vapeur traditionnel, il se peut que
de l’eau suinte à la semelle du fer si la température choisie est très basse. En pareil
cas, positionnez le bouton de réglage de température (1) telle que conseillée. La vapeur
commencera à sortir de nouveau une fois que la température nécessaire est obtenue.
VAPEUR CHOC
Cette fonction fournit de la vapeur en extra pour lisser les froissures tenaces.
• Remplissez de l’eau dans le fer.
• Positionnez le bouton de réglage de température sur “MAX”.
• Le fer est prêt à l’emploi.
• Appuyez sur le bouton de Vapeur choc (2) une ou deux fois.
• La vapeur supprimera les froissures en s’imprégnant dans le textile.
• En cas de présence de froissures tenaces, attendez quelques secondes avant de
réappuyer sur le bouton de réglage de vapeur.
Toutes les froissures disparaissent généralement lorsque cette opération est répétée
trois fois.
- 14 -
 Loading...