

Page 1

SMX 2735 KARIfiTIRICI
KULLANMA KILAVUZU
TR
EN
FR
DE
ES
RU
UA
AR
HR
RO
AC230V, 50Hz, 300W
Page 2
De¤erli Müflterimiz,
S‹NBO El Mikser Setini tercih etti¤iniz için teflekkür ederiz. Cihaz›n›z modern görünümlü
kullan›m› kolay bir üründür.
Cihaz›n›zdan maksimum verimi almak ve güvenlikli kullan›m için lütfen afla¤›daki uyar›lar›
ve kullan›m kulavuzunu dikkatlice okuyunuz.
C‹HAZ YALNIZCA EV ‹Ç‹ KULLANIM ‹Ç‹N ÜRET‹LM‹fiT‹R.
Sayg›lar›m›zla,
Sinbo Küçük Ev Aletleri
‹mal Y›l› : 2012
Made in Turkey
EEE Yönetmeli¤ine uygundur.
Cihazla oynamamalarını güvenceye almak için çocuklar gözetim altında tutulmalıdır.
Bu ürün (çocuklar dahil ) fiziksel hassasiyeti az, zihinsel olarak yetersiz, deneyimsiz ve yeterli bilgiye
sahip olmadan yada kendilerinin güvenli¤inden sorumlu olan kifliler tarafından bu ürünü kullanmak
için gerekli talimatlar verilmemifl kiflilerin kullanımına uygun de¤ildir.
Children being supervised not to play with the appliance.
This appliance is not intended for use by persons (including children) with reduced physical, sensory
or mental capabilities, or lack of experience and knowledge, unless they have been given supervision
or instruction concerning use of the appliances by a person responsible for their safety. Children
should be supervised to ensure that they do not play with the appliance.
- 1 -
Page 3
ÖNEML‹ UYARILAR
• Bakım, Onarım ve Kullanımda Uyulması Gereken Kurallar
Elektrikli cihaz kullan›lmadan önce afla¤›da belirtilen temel güvenlik kurallar›na mutlaka
uyulmas› gerekmektedir:
1. Talimat›n tamam›n› okuyunuz ve baflvuru kayna¤› olarak saklay›n›z.
2. fiebeke ç›k›fl voltaj›n›n mikserin üzerindeki etikette belirtilen voltaj düzeyine uygun
olmas›n› kontrol ediniz.
3. Güç kablosunun ar›zalanmas› durumunda elektrik floku tehlikesinin önlenmesi için
kablo üretici, servis yetkilisi ya da benzer bir ehliyetli kifli taraf›ndan de¤ifltirilmelidir.
4. Kullan›m s›ras›nda mikserin yan›ndan ayr›lmay›n›z.
5. Bu cihaz çocuklar taraf›ndan kullan›lmamal›d›r.
6. Cihaz kullan›lmad›¤› zamanlarda, herhangi bir parça takmadan ya da ç›karmadan veya
temizlik ifllemine giriflilmeden önce fiflten çekilmelidir.
7. Hareketli parçalarla temas etmeyiniz. Yaralanma riskini önlemek ve mikserin hasara
u¤ramamas› için cihaz çal›fl›yorken ellerinizi, giysilerinizi, ›spatula gibi di¤er mutfak
gereçlerini ç›rpma aparat›ndan uzak tutunuz.
8. Elektrik flokuna maruz kalmamak için mikseri suya ya da herhangi baflka bir s›v›ya
sokmay›n›z. Bu durum yaralanmaya ya da cihaz›n ar›zalanmas›na neden olabilir.
9. Mikseri tasarlanm›fl kullan›m amac› d›fl›nda kullanmay›n›z.
10. Kablonun masa ya da tezgah kenar›ndan sarkmamas› ya da ocak gibi s›cak yüzeylerle
temas etmemesi gerekir.
11. Bu cihaz, cihazlar›n kullan›lmas›nda güvenlik aç›s›ndan sorumluluk üstlenebilecek
bir kiflinin gözetimi ve yönlendirmesi olmadan fiziksel, duyusal ya da zihinsel engeli olan
kifliler (çocuklar dahil), bu konuda bilgi ya da deneyim sahibi olmayan kifliler taraf›ndan
kullan›lmamal›d›r.
12. Çocuklar›n cihazla oynamas›na engel olmak için yeterli gözetim yap›lmal›d›r.
13. Aç›k alanlarda kullanmay›n›z.
YALNIZCA EV ‹Ç‹ KULLANIMA YÖNEL‹KT‹R
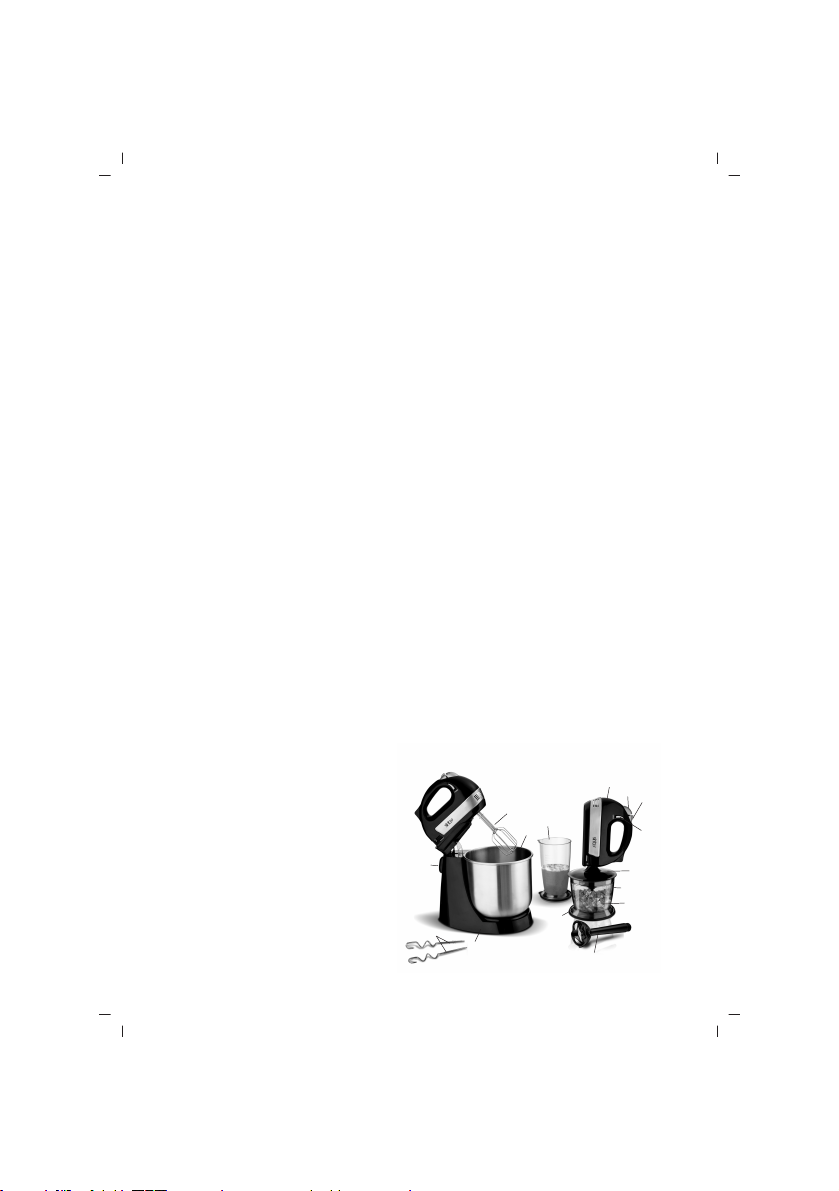
M‹KSER‹N‹Z‹ TANIYIN
1. Mikser
2. Aparat Ç›karma Dü¤mesi
3. Kademe Dü¤mesi
4. Turbo Dü¤mesi
5. Do¤ray›c› Kase Kapa¤›
6. Do¤ray›c› Kase
7. Bݍak
8. Do¤ray›c› Kase Altl›¤›/Kapa¤›
9. Parçalay›c›/Kar›flt›r›c› Çubuk
10. Kar›flt›rma Kab›
11. Ç›rpma Aparat›
12. Büyük Kase
13. Yo¤urma Aparat›
14. Mikser Kilitleme Dü¤mesi
15. Taban
- 2 -
11
10
12
14
13
15
1
2
3
4
5
6
8
7
9
Page 4
C‹HAZIN ÖZELL‹KLER‹
1. 5 h›zl›
2. Emniyet kilitli turbo özelli¤i, Turbo özellik sadece cihaz çal›fl›rken devreye girer
3. Emniyet kilitli uç b›rakma butonu: cihaz çal›fl›rken bloke olmaktad›r
4. Çelik hamur kar›flt›r›c›lar, ç›rp›c›lar, do¤ray›c›/parçalay›c›, çubuk kar›flt›r›c› ve ölçüm
kab› dâhildir
5. Ayakl›kl›, kâseli ç›rp›c›
6. AC230V,50Hz 300W
D‹KKAT!!
Ürünün üzerinde bulunan iflaretlemelerde veya ürünle verilen di¤er bas›l› dökümanlarda
beyan edilen de¤erler, ilgili standartlara göre laboratuar ortam›nda elde edilen de¤erlerdir.
Bu de¤erler, ürünün kullan›m ve ortam flartlar›na göre de¤iflebilir.
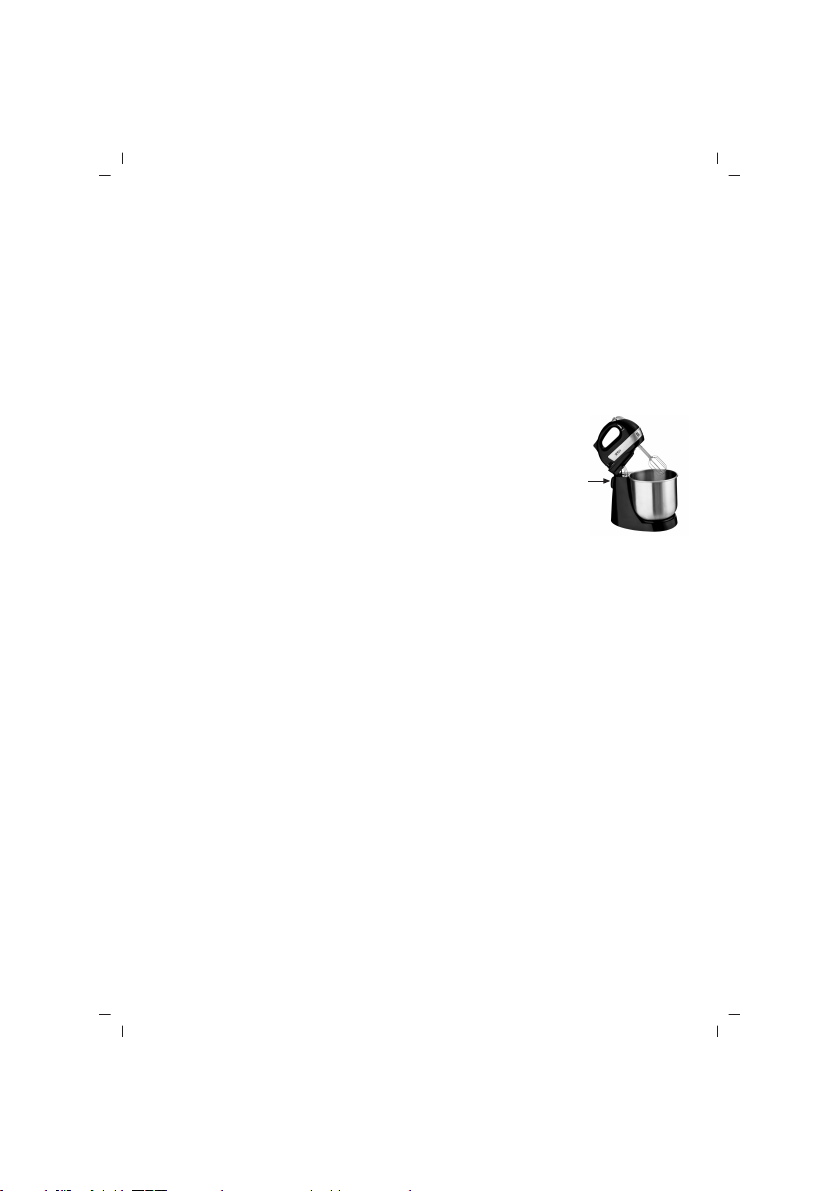
M‹KSER‹ KULLANMADAN ÖNCE YAPILMASI GEREKENLER:
Sapl›/ayakl› mikseri monte etmeye bafllamadan önce güç kablosunun prize tak›l›
olmad›¤›ndan ve h›z ayar dü¤mesinin “0” konumda oldu¤undan emin olunuz.
1. El mikserini destek aya¤›na tak›n›z, el mikserini ay›rmak için cihaz› ileri do¤ru itiniz.
Kafa kilitleme dü¤mesini (A) bas›l› tutarken mikserin kafas›n› yat›r›n›z.
2. Miksere do¤ru ç›rpma ya da yo¤urma aparat›n› tak›n›z. Yo¤urma aparat›n› hamur
yo¤urmak, ç›rpma aparat›n› yumurta ve benzer malzemeleri ç›rpmak için kullan›n›z.
Not: Ç›rpma aparatlar› birbirinin ayn›s› oldu¤u için soketlerden herhangi birine tak›labilirler.
Yo¤urma aparatlar›nda pullardan biri büyük sokete, di¤eri de küçük sokete tak›lmal›d›r.
‹ki yo¤urma aparat› ters flekilde tak›lamaz.
3. Büyük kaseyi yerine yerlefltiriniz.
4. Cihaz›n kafas›n› ve ç›rpma/yo¤urma aparatlar›n› kar›flt›rma kasesine indiriniz, cihaz›n
kafas›n› afla¤› indirmek için cihaz› bir elinizle tutarken di¤er elinizle kafa kilitleme
dü¤mesine bas›n›z. Cihaz›n kafas› do¤ru pozisyona ulaflt›¤›nda bir ‘klik’ sesi iflitilecektir.
A
C‹HAZIN KULLANIMI
• Ba¤lantı veya Montajın Nasıl Yapılaca¤ını Gösterir fiema ile Ba¤lantı veya Montajın
Kimin Tarafından Yapılaca¤ına (tüketici, yetkili servis) iliflkin bilgiler
Olası bir arıza durumunda cihazın içini açmayınız. En yak›n yetkili servise baflvurunuz.
1. Cihaz›n 0 konumuna ayarl› oldu¤undan emin olduktan sonra fifli prize tak›n›z.
2. H›z ayar dü¤mesini istedi¤iniz ayara getiriniz, 5 ayar seçene¤i bulunmaktad›r. Cihaz
çal›flmaya bafllayacakt›r ve turbo Dü¤mesine bast›¤›n›zda h›z %25 artacakt›r.
- 3 -
Page 5

C‹HAZIN KULLANIMI
Uyar›: Cihaz› kullan›rken kâsenin içine b›çak, metal kafl›k, çatal ve bunun gibi cisimler
sokmay›n›z.
3. Cihaz tek seferde en fazla 3 dakika boyunca kullan›lmal›d›r ve arka arkaya iki kullan›m
aras›nda en az 1 dakika beklenmelidir. Mayal› hamur yo¤ururken en iyi sonucu elde
etmek için h›z ayar dü¤mesi ilk baflta yavafl h›za ayarlaman›z ve daha sonra h›z› artt›rman›z
tavsiye edilir.
4. Kar›flt›rma ifllemi tamamland›ktan sonra h›z ayar dü¤mesini 0 konumuna getiriniz ve
fifli prizden çekiniz.
5. Kafa kilitleme dü¤mesini bas›l› tutunuz ve mikserin kafas› yat›k durumda sabitlenene
kadar mikserin kafas›n› geriye do¤ru yat›r›n›z.
6. Gerekiyorsa ç›rpma ya da yo¤urma aparatlar›n›n üstünde kalan malzemeyi plastik ya
da tahta bir ›spatula yard›m›yla temizleyiniz.
7. Ç›rpma/yo¤urma aparat›n› tek elinizle tutunuz ve di¤er elinizle ç›karma dü¤mesine
s›k›ca basarak ç›rpma/yo¤urma aparat›n› sökünüz.
Dikkat: Aksesuarlar› ç›karmak için ç›karma dü¤mesine basmadan önce h›z ayar dü¤mesi
s›f›r konumuna getirilmelidir. Cihaz çal›fl›yorken kesinlikle Ç›karma dü¤mesine basmay›n›z.
8. El mikseri destek aya¤›ndan ayr› olarak kullan›labilir.
KULLANIM HATALARINA ‹L‹fiK‹N B‹LG‹LER
Cihazınızı, beyan edilen voltaj ile çal›flt›r›n›z.Bulundu¤unuz yerin voltaj›n›n uygun olup
olmad›¤›n› kontrol ediniz.
Güç kablosunun ar›zalanmas› durumunda tehlikelerin önlenmesi için kablo üretici, servis
merkezi ya da benzer bir ehliyetli kifli taraf›ndan de¤ifltirilmelidir. Ar›za durumunda cihaz›
kendiniz sökmeye kalk›flmay›n›z, bak›m merkezimiz ya da sat›fl sonras› hizmet merkezimiz
ile ba¤lant›ya geçiniz.
Cihaz› kendiniz onarmaya kalk›flmay›n›z. Meydana gelebilecek ar›zalardan firmam›z
kesinlikle sorumlu de¤ildir, ve cihaz›n›z garanti kapsam› d›fl›nda ifllem görecektir.
TAfiIMA VE NAKL‹YE ESNASINDA
• Ürünü düflürmeyiniz,
• Darbelere maruz kalmamas›n› sa¤lay›n›z,
• S›k›flmamas›n›, ezilmemesini sa¤lay›n›z,
• Ambalaj üzerindeki iflaretlemelere uyunuz.
• Orjinal ambalajıyla taflımaya özen gösteriniz.
ÇEVRE VE ‹NSAN SA⁄LI⁄I
Bu iflaret, ürünün AB genelinde di¤er ev at›klar›yla birlikte elden ç›kar›lmamas›
gerekti¤ini göstermektedir. Çevre ve insan sa¤l›¤›n›n kontrolsüz flekilde elden
ç›kar›lm›fl olan at›klar nedeniyle zarar görmesini önlemek amac›yla,
malzemekaynaklar›n›n sürdürülebilir yeniden kullan›m›n› sa¤lamak için cihaz›n geri
dönüflümünü sa¤lay›n›z. Kullan›lm›fl cihazlar›n›z› lütfen iade ve toplama merkezlerine
ulaflt›r›n›z ya da ürünün sat›n al›nd›¤› ma¤azayla ba¤lant›ya geçiniz. Bu yerler ürünü
teslim al›p çevreye duyarl› bir flekilde geri dönüflümlerini sa¤layabilirler.
- 4 -
Page 6

TEM‹ZL‹K VE BAKIM
TEM‹ZL‹K
• Tüketicinin Kendi Yapabilece¤i Bakım, Onarım veya Ürünün Temizli¤ine ‹liflkin Bilgiler
1. Cihaz› temizlemeye bafllamadan önce fiflini prizden ç›kar›n ve so¤umaya b›rak›n›z.
2. Gövdenin d›fl yüzeyini ve Taban› nemli bir bezle siliniz ve yumuflak kuru bir bezle
parlat›n›z.
3. Güç kablosunun üzerine bulaflm›fl olabilecek malzeme kal›nt›lar›n› silerek temizleyiniz.
4. Kar›flt›rma kâsesini, ç›rpma ve yo¤urma aparatlar›n› s›cak sabunlu suyla y›kay›n›z ve
kurulay›n›z. Ç›rpma aparatlar›, kar›flt›rma kâsesi ve yo¤urma aparatlar› bulafl›k makinesinde
y›kanabilir.
BAKIM
• Periyodik Bakım Gerektirmesi Durumunda, Periyodik Bakımın Yapılaca¤ı Zaman
Aralıkları ile Kimin Tarafından Yapılması Gerekti¤ine ‹liflkin Bilgiler
Cihaz periyodik bak›m gerektirmemektedir.Düzenli temizli¤inin yap›lmas›nda fayda vard›r
MALZEME HAZIRLAMAYA YÖNEL‹K ‹PUÇLARI
1. Tereya¤› ve yumurta gibi buzdolab›nda bekleyen malzemeler kar›flt›rma ifllemine
bafllanmadan önce oda s›cakl›¤›na gelmelidirler. Bu malzemeleri buzdolab›ndan önceden
ç›kar›n›z.
2. Ç›rpma ifllemi gere¤inden fazla yap›lmamal›d›r. Kar›fl›mlar› elinizdeki tarifte belirtilen
oranda ç›rpmaya/kar›flt›rmaya dikkat ediniz. Kuru malzemeler yaln›zca harmanlanana
kadar kar›flt›r›lmal›d›r. Bu malzemeler için daima düflük h›z kullan›n›z.
3. Yumurtalar›n kabuklar›n›n ya da bozuk yumurtalar›n di¤er malzemelerle kar›flmas›n›
önlemek için yumurtalar› ilk önce ayr› bir kaba k›r›n›z ve kar›fl›ma daha sonra ekleyiniz.
4. Mutlaka ilk olarak düflük h›zda kar›flt›rmaya bafllay›n›z. Tarifte tavsiye edilen h›za yavafl
yavafl ulafl›n›z.
5. ‹klim koflullar›n› dikkate al›n›z. Gerekli kar›flt›rma süreleri ve elde edilen sonuçlar
mevsimsel s›cakl›k de¤ifliklikleri, malzemelerin s›cakl›klar› ve dokular›na ba¤l› olarak
zaman zaman de¤iflebilir.
Bakanl›kça belirlenen ve ilan edilen kullan›m ömrü 7 y›ld›r.
- 5 -
Page 7
ENGLISH
IMPORTANT SAFEGUARDS
Before using the electrical appliances, the following basic precautions should always be
taken into consideration:
1. Read the Instruction Manual thoroughly before using the device and keep it for future
references.
2. Before using the device, check if the voltage of the network (the voltage of your wall
outlet) correspond the voltage rates indicated on the label of the mixer.
3. If the supply cord is damaged, it must be replaced by the manufacturer or its service
agent or a similarly qualified person in order to avoid a hazard.
4. Do not leave mixer unattended while it is operating.
5. This device should not be used by children.
6. Unplug from outlet while not in use, before putting on or taking off parts, and before
cleaning.
7. Avoid contacting to the moving parts. Keep hands, clothing, as well as spatulas and
other utensils away from beaters during operation to reduce the risk of injury to persons,
and/or damage to the mixer.
8. Do not immerse cord or the body of mixer into water as this would give rise to electric
shock. This may also cause injury and/or damage to the mixer.
9. Do not use the mixer except its intended use.
10. Do not let cord hang over edge of table or counter or get in touch with hot surfaces
such as ovens.
11. This appliance is not intended for use of persons (including children) with reduced
physical, sensory or mental capabilities, or lack of experience and knowledge, unless
they have been given supervision or instruction concerning use of the appliances by a
person responsible for their safety.
12. Children should be supervised to ensure that they do not play with the appliance.
13. Do not use outdoor.
HOUSEHOLD USE ONLY
KNOW YOUR MIXER
1. Mixer
2. Apparatus Eject Button
3. Speed Selector
4. Turbo Button
5. Chopper Bowl Lid
6. Chopper Bowl
7. Blade
8. Chopper Bowl Base/Lid
9. Chopper / Mixer Stick
10. Mixer Bowl
11. Beater Apparatus
12. Large Bowl
13. Dough Molding Apparatus
14. Mixer Locking Button
15. Base
14
13
- 6 -
11
10
12
15
1
2
3
4
5
6
8
7
9
Page 8

KNOW YOUR MIXER
1. 5 speeds
2. Turbo function with safety device. Turbo function only works when the appliance is
operating
3. Eject button with safety device: blocked while the appliance is functioning
4. Steel dough hooks and beaters, chopper, stick blender, measuring cup included
5. Stand mixer with bowl
6. AC230V,50Hz 300W
STEPS TAKEN BEFORE USING THE MIXER
Before using the handle/stand mixer, be sure the power cord is unplugged from the
power outlet and the speed selector is in the OFF (“0”) position.
1. Place the hand mixer to the stand, to separate the hand mixer
push forward. While pressing the head locking button (A) bend
the mixer head.
2. Affix the right mixing or beating apparatus. Dough hooks are
only used for mixing and kneading dough, mixer apparatus are
only used for mixing and beating eggs and similar materials.
Note: Beaters can be inserted in either socket, as the beaters are identical. For dough
hooks, the one with washer can only be inserted into the big socket and the other one
can only be inserted into small socket. The two dough hooks cannot be inserted reverse
sockets.
3. Place the larger bowl its cradle.
4. Lower the head and mixing / beater apparatus to the mixer bowl, to do this, while you
are holding the device at one hand, press the locking button with the other. When the
head reaches right position, a “click” sound will be heard.
USING YOUR MIXER
1. Ensure that the unit is at the OFF position, and then plug in the power source.
2. Turn the speed selector to your desired setting, there are 5 different speed settings.
The device will start to operate. When you press the turbo button, the speed will increase
25 %.
Caution: Do not place knife, metal spoon, fork or similar objects into the bowl while using
the device.
3. When using the device, the max operation period of each time shall not exceed 3
minutes and there should be minimum 1 minute rest time between two consecutive
cycles. When kneading yeast dough, it is suggested that the speed selector is adjusted
to a low speed first and then the speed should be increased to achieve the best results.
4. When mixing is completed, turn the speed selector to OFF position, unplug the cord
from power outlet.
5. Press the head locking button and bend the head of the mixer till it fixes in horizontal
position.
- 7 -
A
Page 9

USING YOUR MIXER
6. If necessary you can scrape the excess food particles from the beaters or dough hooks
by rubber or wooden spatula.
7. Hold the beaters/dough hooks with one hand and press the Eject button firmly down
with the other hand, remove the beater/dough hooks.
Caution: Before pressing the eject button to remove the apparatus, the speed button
should be placed to OFF (“0”) position. While the device is operating, definitely do not
press the eject button.
8. The hand mixer can be used separately from the stand base.
Cleaning and Maintenance
1. Unplug the appliance and wait it completely cool down before clean.
2. Wipe over the outside surface of the head with a dampened cloth and polish with a
soft dry cloth.
3. Wipe any excess food particles from the power cord.
4. Wash the mixer bowl, beaters and dough hooks in warm soapy water and wipe dry.
The beaters, mixer bowl and dough hooks may be washed in the dishwasher.
COOKERY TIPS
1. Refrigerated ingredients, for example butter and eggs should be at room temperature
before mixing begins. Taken from the refrigerator such kind of materials previously.
2. Do not over-beat. Be careful that you only mix/blend mixtures at the rate recommended
in your recipe. Fold into dry ingredients only until just combined. Always use the low
speed.
3. To eliminate the possibility of shells or deteriorated-off eggs in your recipe, break
eggs into separate container first, then add to the mixture.
4. Always start mixing at slow speeds. Gradually increase to the recommended speed
as stated in the recipe.
5. Climatic conditions should be taken into consideration. The required mixing time and
the results achieved may vary by seasonal temperature fluctuations, temperature of
ingredients and their textures.
- 8 -
Page 10
FRANÇAIS
SMX 2735 MIXEUR AVEC BOL
MODE D’EMPLOI
Lisez attentivement ces instructions avant d’utiliser l’appareil et conservez-les pour pouvoir
les consulter lorsque vous en aurez besoin.
CONSIGNES DE SECURITÉ IMPORTANTES
Lors de l'utilisation des appareils électriques, les précautions de base doivent être toujours
suivies y compris les suivantes :
1. Lisez attentivement toutes les instructions et conservez le pour pouvoir consulter lorsque
vous en aurez besoin.
2. Avant de brancher votre appareil, assurez-vous que la tension électrique de votre domicile
correspond à celle indiquée sur la plaque signalétique de l’appareil.
3. Si le cordon d'alimentation est endommagé, il doit être remplacé par votre revendeur, son
service après-vente ou une personne de qualification similaire afin d'éviter tout danger
4. Ne laissez pas l'appareil sans surveillance lorsqu'il est branché.
5. Cet appareil ne doit pas être utilisé par des enfants.
6. Arrêtez et débranchez toujours l’appareil de la prise de courant lorsque vous ne l'utilisez
pas, avant d’installer ou de retirer des accessoires et avant de le nettoyer.
7. Ne contactez pas de pièces mobiles. Gardez les mains ,les vêtements et les ustensiles hors
du récipient lors du mixage des aliments afin de réduire le risque de blessures corporelles ou
d’endommager l’appareil.
8. N’immergez pas le mixeur dans l’eau ou tout autre liquide. Ceci peut causer des blessures
corporelles ou de dysfonctionnement de l’appareil
9. Ne pas utiliser le mixeur hors de son but.
10. Ne laissez pas pendre le câble d’alimentation sur le rebord d’une table ou d’un plan de
travail et veillez à ce qu’il n’entre pas en contact avec des surfaces chaudes.
11. Cet appareil n'est pas prévu pour être utilisé par des personnes (y compris les enfants) dont
les capacités physiques, sensorielles ou mentales sont réduites, ou des personnes dénuées
d'expérience ou de connaissance, sauf si elles ont pu bénéficier, par l'intermédiaire d'une
personne responsable de leur sécurité, d'une surveillance ou d'instructions préalables concernant
l'utilisation de l'appareil.
12. Il convient de surveiller les enfants pour s'assurer qu'ils ne jouent pas avec l'appareil.
13. Ne pas utiliser l’appareil à l’extérieur.
USAGE DOMESTIQUE UNIQUEMENT
DESCRIPTION DU MIXEUR
1. Mixeur
2. Bouton de Déverrouillage des pièces
3. Bouton de vitesse
4. Bouton ‘Turbo’
5. Couvercle du bol hachoir
6. Bol Hachoir
7. Lame couteau
8. Couvecle / Base du bol hachoir
9. Axe Mélangeur/ Éminceur
- 9 -
11
10
12
14
13
15
1
2
3
4
5
6
8
7
9
Page 11
DESCRIPTION DU MIXEUR
10. Bol Mélangeur
11. Fouets
12. Grand Bol
13. Outil de Pétrissage
14. Bouton de verrouillage de mixeur
15. Base
AVANT DE METTRE EN MARCHE :
Avant d’assemblage, assurez vous que le cable d’alimentation est débranché et le bouton de
vitesse est à la position ‘0’.
1. Insérrez le mixeur manuel au pied d’appui, pour séparer le mixeur manuel poussez l’appareil
en avant.En maintenant appuyé sur le bouton de verrouillage (A), baissez la tête du mixeur.
2. Insérrez l’outil de fouet ou de pétrissage vers le mixeur.Utilisez l’outil
de pétrissage pour pétrir la pâte, et l’outil de fouet pour fouetter l’oeufs
et les aliments similaires.
Remarque: Puisque les outils de fouet sont identiques, ils peuvent être
montés l’un des embouts quelconque.Pour les outils de pétrissage,
la grande branche doit être installée dans le grand embout et la petite
branche dans le petit embout. Les deux outils de pétrissage ne peuvent
pas être installés à l’envers.
3. Placez le grand bol à sa place.
4. Baissez la tête de l’appareil et les outils de fouet/pétrissage dans le bol mélangeur, pour
baisser la tête, en maintenant l’appareil avec une main, appuyez sur le bouton de verrouillage
avec l’autre main.Quand la tête atteint à la position correcte, vous allez entendre un ‘clic’.
UTILISATION du MIXEUR
1. Après s’être assuré que l’appareil est réglé à la position ‘0’, branchez la fiche à la prise.
2. Réglez le bouton de vitesse à la vitesse souhaitée, il ya 5 choix de vitesse. L’appareil va
démarrer et quand vous appuyez sur le bouton ‘ turbo’, la vitesse va augmenter de 25%.
Avertissement: En utilisant l’appareil, ne pas mettre les objets dans le bol tels que le couteau,la
cuillère métallique,la fourchette etc.
3. L'appareil doit être utilisé pendant 3 minutes au maximum en continu,faites une pause de
1 minutes au minumum avant d’utiliser à nouveau. Pour avoir de meilleurs résultats en pétrissant
la pâte à levain, il est recommandé de régler premièrement le bouton de vitesse à la vitesse
lente et ensuite augmenter la vitesse.
4. Réglez le bouton de vitesse à la position 0 après le mélange est terminé et débranchez la
fiche de la prise.
5. Maintenez appuyé sur le bouton de déverrouillage et baissez la tête du mixeur vers l’arrière
jusqu’elle se fixe.
6. Si nécessaire, nettoyez le matériel restant sur ??les outils de fouet ou de pétrissage avec
l'aide d'une spatule en plastique ou en bois.
7. Tenez l’outil de fouet/pétrissage avec une main et retirez l’outil de fouet/ pétrissage en
appuyant sur le bouton de déverrouillage avec l’autre main.
Attention: Avant de appuyer sur le bouton de déverrouillage pour retirer les accessoires, le
bouton de vitesse doit être réglé à la position ‘0’.Ne jamais appuyez sur le bouton de déverrouillage
pendant que l’appareil est en marche.
8. Le mixeur manuel peut être utilisé séparément du pied d’appui.
A
- 10 -
Page 12

NETTOYAGE ET ENTRETIEN
1. Arrêtez et débranchez l’appareil de la prise de courant et laissez refroidir avant de procéder
à son nettoyage.
2. Essuyez la surface extérieure du corps et la base avec un chiffon humide et polissez avec un
chiffon doux et sec.
3. Nettoyez en essuyant le matériel restant sur le cordon d'alimentation
4. Lavez le bol mélangeur, les outils de fouet et de pétrissage avec l’eau savonneuse et puis
sèchez –les. Vous pouvez les passer au lave-vaisselle.
Attention: Ne jamais utiliser de produits abrasifs pour nettoyer le bol en acier inoxydable
Conseils pour la préparation du matériel
1. Les aliments tels que la beurre et les oeufs en attente au réfrigérateur doivent venir à la
température ambiante avant de commencer le processus de mélange. Enlevez ces matériaux
du réfrigérateur à l'avance.
2. Le processus de fouetter ne devrait pas être trop. Faites attention de les fouetter/ mélanger
selon le taux indiqué dans votre recette.Mélanger les aliments secs juste assez pour mêler.
Utilisez toujours une vitesse lente pour ces aliments.
3. Afin d'éviter toute confusion des coquilles d'œufs ou des oeufs cassés avec d'autres matériaux,
d’abord cassez les oeufs dans un autre bol, puis ajoutez les dans le mélange.
4. Commencez absolument par mélanger à la vitesse lente.Atteignez lentement à la vitesse
recommandée à la recette.
5. Prenez en compte les conditions climatiques. La durée nécessaire de mélange et les résultats
obtenus peuvent varier de temps en temps selon les changements de température saisonniers,
les températures et les textures des aliments.
- 11 -
Page 13

DEUTSCH
SMX 2735 HANDRÜHRER-SET
BEDIENUNGSANLEITUNG
Bitte lesen Sie die Bedienungsanleitung vor der Benutzung aufmerksam durch und bewahren
Sie sie für späteres Nachschlagen auf.
Wichtige Sicherheitshinweise
Bei der Benutzung elektrischer Geräte sind grundlegende Sicherheitshinweise zu beachten.
1. Bitte lesen Sie die Bedienungsanleitung vor der Benutzung aufmerksam durch und bewahren
Sie sie für späteres Nachschlagen auf.
2. Prüfen Sie, dass die auf dem Typenschild angegebene Netzspannung der vorhandenen
Stromversorgung entspricht.
3. Ein defektes Netzkabel darf nur vom Hersteller unserem Kundendienst oder einer ähnlich
qualifizierten Person durch ein gleichwertiges Kabel ersetzt werden, um Gefährdungen zu
vermeiden.
4. Lassen Sie das Gerät nicht unbeaufsichtigt.
5. Das Gerät ist für die Benutzung von Kindern nicht geeignet.
6. Schalten Sie das Gerät bei Nichtgebrauch, beim Austausch der Zubehörteile, zur Reinigung
aus und ziehen Sie den Netzstecker.
7. Vermeiden Sie jegliche Berührungen mit sich bewegenden Teilen. Halten Sie Hände,
Kleidungsstücke, sowie Teigschaber oder andere Küchenhelfer unbedingt fern von den rotierenden
Rühreinsätzen. Verletzungsgefahr!
8. Tauchen Sie das Gerät, das Netzkabel und den Netzstecker niemals in Wasser oder andere
Flüssigkeiten. Es besteht Lebensgefahr durch Stromschlag!
9. Verwenden Sie das Gerät nur für den vorgesehen Verwendungszweck.
10. Achten Sie darauf, dass das Netzanschlusskabel nicht über die Tischkante bzw. die
Arbeitsplatte hängt und dass es nicht mit heißen Oberflächen in Berührung kommt.
11. Das Gerät ist nicht dafür bestimmt, durch Personen (einschliesslich Kinder) mit
eingeschränkten physischen, sensorischen oder geistigen Fähigkeiten oder mangels Erfahrung
und/oder mangels Wissen benutzt zu werden, es sei denn, sie werden durch eine für ihre
Sicherheit zuständige Person beaufsichtigt oder erhielten von ihr Anweisungen, wie das Gerät
zu benutzen ist.
12. Kinder sollten beaufsichtigt werden, um sicherzustellen, dass Sie nicht mit dem Gerät
spielen.
13. Verwenden Sie das Gerät nicht im Freien.
Dieses Gerät ist nur für den Gebrauch im Haushalt bestimmt.
DEN MIXER KENNENLERNEN
1. Handmixer
2. Knopf zum Lösen der Knethaken
3. Stufenwahlschalter
4. TURBO- Taste
14
5. Deckel
6. Schüssel
7. Messer
13
15
8. Schüsselunterteil
- 12 -
11
10
12
1
2
3
4
5
6
8
7
9
Page 14

DEN MIXER KENNENLERNEN
9. Stabmixer
10. Mixbecher
11. Schwingbesen
12. Rührschüssel
13. Knethaken
14. Lasche zum Lösen des Mixers
15. Mixständer
VOR DEM ERSTEN GEBRAUCH
Stellen Sie den Stufenwahlschalter auf „0/AUS“ und stellen Sie sicher, dass der Mixer vom Netz
getrennt ist.
1. Den Mixer auf den Mixständer setzen. Ziehen Sie das Gerät ab,
während Sie die Lasche zur Entriegelung des Oberteils drücken.
2. Dem Mixer Knethaken oder Rührbesen einsetzen. Verwenden Sie
die Knethaken für Teigwaren und die Rührbesen z.B. für Eier.
Hinweis: Pressen Sie das Ende der Rührbesen in die dafür vorgesehenen
Öffnungen des Mixers, bis diese einrasten. Bitte beachten Sie, dass
eine der Knethaken, für grosse Öffnung und der Andere für die kleine
Öffnung der Mixer bestimmt ist.
3. Den Edelstahl-Rührschüssel einsetzen.
4. Den Mixer, mit Knethaken bzw. Rührbesen eingesetzt, nach unten klappen. Klappen Sie den
Mixer nach unten bis das Gerät einrastet, während Sie die Lasche zur Entriegelung des Oberteils
drücken.
BEDIENUNG
1. Vergewissern Sie sich, dass der Stufenwahlschalter auf “0/AUS“ gestellt ist. Stecken Sie den
Netzstecker in die Steckdose.
2. Sie können am Handmixer mit dem Stufenwahlschalter verschiedene Geschwindigkeiten
einstellen (5 Stufen). Nun ist das Gerät in Betrieb gesetzt. Wenn Sie die Turbo-Taste betätigen,
so wird die Geschwindigkeit um 25 % erhöht.
WARNUNG: Halten Sie niemals Fremdkörper (Beispiel: Kochbesteck) in die Rührschüssel.
3. Das Gerät ist maximal 3 Minuten in Betrieb zu setzen. Falls Sie den Mixer erneut benutzen
möchten, warten Sie 1 Minute bis das Gerät sich abkühlt. Wenn Sie mit Teigwaren arbeiten, ist
es zu empfehlen, dass Sie die Geschwindigkeit stufenweise erhöhen.
4. Möchten Sie den Mixvorgang beenden, schalten Sie den Stufenwahlschalter auf „0“ und
trennen Sie das Gerät vom Netz.
5. Nach der Beendigung drücken Sie erneut die Lasche zur Entriegelung des
Mixerständeroberteils und klappen den Mixer nach oben.
6. Gegebenenfalls können Sie die Rührbesen/Knetehaken mit Hilfe eines Holz-/Plastikspachtels
reinigen.
7. Drücken Sie den Knopf zum Lösen der Knethaken/Rührbesen. Durch leichtes Ziehen können
diese nun entnommen werden.
ACHTUNG: Zum Lösen der Knethaken/Rührbesen stellen Sie den Stufenwahlschalter auf“0/AUS“.
Drücken Sie niemals den Knopf zum Lösen der Knethaken/Rührbesen, wenn das Gerät
eingeschaltet ist.
8. Der Mixer ist auch ohne Mixerstände zu gebrauchen.
- 13 -
A
Page 15

REINIGUNG UND PFLEGE
1. Ziehen Sie vor jeder Reinigung den Netzstecker aus der Steckdose und ggf. warten bis das
Gerät sich abkühlt.
2. Zur äusseren Reinigung des Gerätes benutzen Sie nur ein feuchtes Spültuch. Anschliessend
können Sie mit einem feuchten und trockenen Tuch polieren.
3. Bei Bedarf reinigen Sie auch das Netzkabel.
4. Abnehmbare Teile die mit Teig in Berührung gekommen sind (Knetwerkzeug und
Rührschüssel), können Sie in einem Spülbad reinigen. Diese können auch in der Spülmaschine
gereinigt werden.
ACHTUNG: Benutzen Sie keine scharfen oder scheuernden Reinigungsmittel um die EdelstahlRührschüssel zu reinigen.
TIPPS ZUR ANWENDUNG
1. Zutaten wie Butter und Eier sollen vor Arbeit im Raumtemperatur aufbewahrt werden. Daher
nehmen Sie diese vorher aus der Kühlschrank.
2. Der Mixvorgang soll nicht länger durchgeführt werden als nötig. Rühren Sie die Menge der
Zutaten so, wie in Ihren Rezept es vorgeschrieben sind. Für trockene Zutaten wählen Sie immer
die niedrigen Geschwindigkeit.
3. Um zu vermeiden, dass Eierschalen und verdorbenes Ei in die Rührschüssel gelangt, dass
Ei ausserhalb der Rührschüssel schlagen.
4. Die Geschwindigkeit unbedingt stufenweise erhöhen.
5. Bitte beachten Sie auf die Temperaturbedingungen, da die Rührzeit davon abhängig ist.
- 14 -
Page 16

ESPANOL
SMX 2735 BATIDORA CON PIE
INSTRUCCIÓN DE USO
Antés de usar el aparado conservar este manual para consultar en el futuro leyéndolo hasta
el final.
REGLAS IMPORTANTES DE SEGURIDAD
Absolutamente deben tener en consideración las precauones básicas siguientes durante el uso
los aparatos eléctricos:
1. Leer toda la instrucción y conservar la para consultar en el futuro.
2. Controlar que el voltaje de la salida de la red es concordado con el nivel del voltaje expresado
en la etiqueta sobre la batidora.
3. En caso de ser averíado el cable de energía, el cable debe cambiar por el fabricante, autorizado
del servicio ú por una persona similar capacidado para evitar el peligro del shock eléctrico.
4. No dejar a solas la batidora durante el uso.
5. Este aparato no debe usar por los niños.
6. El aparato debe desenchufar durante no está usado, antés de montar ó desmontar una parte
ó intentar al proceso de la limpieza.
7. No tener en contacto con las partes móviles. Para evitar el riesgo del sufrimiento de heridas
y no ser dañado el aparato, guardar la distancia de sus manos, su ropa, otros utencilios de
cocina como espatula con el equipo de batidor.
8. No sumergir la batidora en agua o cualquier otro líquido para no estar expuesto al shock
elétrico. Este caso se puede causar sufrimiento de heridas ó averiarse el aparato.
9. No usar este aparato fuera del objetivo del mismo.
10. El cable no debe colgar de la mesa ó del borde del mostrador ó no debe tener en contacto
con superficies calientes como el horno.
11. Este aparato no tiene que usar por personas minusválidas físicamente, mentalmente ó
sentimentalmente (incluso los niños), por las personas que no tiene conocimiento ú experiencia
sin la vigilancia y orientación que se podrá encargado de responsabilidad de la seguridad sobre
el uso de los aparatos.
12. Hay que realizar vigilancia suficiente para evitar los niños que se juegan con el aparato.
13. No usar en campos abiertos.
SOLAMENTE ES PARA USO DOMÉSTICO
CONOCER SU BATIDORA
1. Batidora.
2. Botón para quitar equipos.
3. Botón de nivel.
4. Botón de turbo.
5. Tapa de la tazón de picadura.
6. Tazón de picadura.
7. Cortador.
8. Base/Tapa de la tazón de picadura.
9. Barra para despedazar/mezclar.
10. Olla para mezclar.
11. Equipo de batidor.
14
13
- 15 -
11
10
12
15
1
2
3
4
5
6
8
7
9
Page 17

CONOCER SU BATIDORA
12. Tazón Grande.
13. Equipo de amazadura.
14. Botón de cerradura de la batidora.
15. Base.
ANTÉS DE USAR LA BATIDORA HAY QUE HACER:
Antés de empezar a la batidora de mango/de pie, estar seguro que no es enchufado el cable
de energía y el botón para ajustar la velocidad es en la posición “0”.
1. Fijar la batidora de mano al pie de soporte, empujar a delante el aparato para separar la
batidora de mano. Bajar la cabeza de la batidora pulsando al botón de la cerradura de la cabeza
(A).
2. Fijar el equipo correcto de batidor o de amazadura a la batidora.
Usar el equipo de amazadura para amazar masa, el equipo de batimiento
para batir. Huevos y materiales similares.
Nota: Los equipos de batimiento son iguales por este motivo se pueden
fijar en cualquiera de las entradas. Uno de los equipos de amazadura
tiene que fijar en la entrada grande, el otro en la entrada pequeña.
Los dos equipos de amazadura no se pueden fijar alrevés.
3. Colocar la tazón grande en su lugar.
4. Bajar la cabeza del aparato y los equipos de batimiento/amazadura en la tazón para mezclar,
cogiendo el aparato con una mano para bajar la cabeza del aparato abajo, pulsa al botón de
ceradura de la cabeza con otra mano. Se va a oir una voz de “clic” al alcanza a la posición
correcta la cabeza del aparato.
USO DE SU BATIDORA
1. Enchufar después de estar seguro que es ajustado el aparato a la posición de “o”.
2. Ajustar el botón de ajuste para la velocidad, encuentran 5 oportunidades de ajuste. El aparato
empezará a funcionarse y al puslar el botón turbo la velocidad acelera a la proporción de 25
%.
Aviso: No sumergir objetos como cuchillo, cucharra metálica, tenedor y similares en la tazón
durante el uso del aparato.
3. El aparato teine que usarse durante tres (3) minutos máximo en una vez y debe esperarse
mínimo 1 minuto entre dos usos repetidos. Se recomienda que ajusta la velocidad lento al
principio y aumenta más tarde durante la amazadura de masa con levadura para obtener el
mejor resultado.
4. Después de ser completado el proceso de mezcla, ajustar el botón para la velocidad a la
posición “0” y desenchufar el aparato.
5. Dejar pulsado al botón de la cerradura de la cabeza y levantar atrás la cabeza de la batidora
hasta que ser fijado en posición levantada la cabeza de la batidora.
6. En caso necesario, limpia materiales restantes sobre los equipos de batidor y amazadura
por medio de una espatula de madera
7. Coger con una mano el equipo de batidor/amazadura y desmontar el equipo de
batidor/amazadura pulsando fuertemente al botón para quitar con otra mano. Para desmontar
la barra dezpedazadora/mezcladora, se debe hacer fuera de sevicio el botón para quitar, coger
la barra despedazadora/mezcladora se desmonta la batidora girando a la dirección contraria
del reloj.
- 16 -
A
Page 18

USO DE SU BATIDORA
¡Ojo!: Antés de puslar al botón para quitar los acesorios para desmontarlos debe girar el botón
para ajustar la velocidad hasta la posición cero. Definitivamente no puslar al botón para quitar
el aparato.
8. La batidora de mano se puede usar separada del pie de soporte.
Limpieza y Mantenimiento.
1. Antés empezar a limpiar el aparato, desenchufarlo y dejarlo a enfriarse.
2. Limpiar la parte extrema del cuerpo y la base con una tela mojada y abrillantar con una tela
suave seca.
3. Limpiar los residuos de materiales posiblemente ensuciados sobre el cable de energía.
4. Lavar con agua caliente jabonoso los equipos de batidor y amazadura y secarlos. Los equipos
batidor/amazadura se pueden lavarse en lavaplatos.
¡Ojo!: Absolutamente no usar materiales de limpieza desgastados para limpiar la tazón de
acero inoxidable.
CLUEDOS PARA LA PREPARACIÓN
1. Las materiales como mantequilla y huevos conservados en la nevera, tienen que alcanzar
a la temperatura de medioambiente antés del inicio de mezcla. Sacar estas mateiales de la
nevera anteriormente.
2. El proceso del batimiento no debe realizar más que sea necesaia. Tener cuidado para
batir/mezclar las mezcla no más que sea expresado en la receta que tiene. Las materiales
secos solamente deben mezclar hasta que sean mezclados. Siempre usar baja velocidad para
mezclar estas materiales.
3. Primero cascar en una olla separada de ellos o huevos deteriorados se mezclarán con otras
materiales y agregarlos a la mezcla más tarde.
4. Absolutamente empeza a mezclar en baja velocidad al pricipio. Alcanzar a la velocidad
recomendada en la receta lentamente.
5. Tener en consideración las condiciones climáticas. A veces los plazos necesarios para mezclar
y los resultados obtenidos pueden cambiar de acuerdo con las diferencias entre las temperaturas
estacionales, temperaturas de las materiales y sus tejidos.
- 17 -
Page 19

1
2
11
10
12
3
4
- 18 -
14
13
15
8
5
6
7
9
Page 20

- 19 -A- 20 -
Page 21

Page 22

No: 2-2735-08032012
- 21 -
Page 23

- 22 -
Page 24

1
2
11
10
12
3
4
- 23 -
14
13
15
8
5
6
7
9
Page 25

- 24 -A- 25 -
Page 26

Page 27

:2-2735-08032012
- 26 -
Page 28

- 27 -
Page 29

SMX 2735
1
2
11
10
12
3
4
14
13
15
8
5
6
7
9
- 28 -
Page 30

- 29 -A- 30 -
Page 31

Page 32

HRVATSKI
SMX 2735 STOLNI MIKSER
UPUTSTVO ZA UPORABU
Prije poˇcetka uporabe aparata temeljno proˇcitajte ovo uputstvo za uporabu i saˇcuvajte ga za
budu´ce potrebe.
BITNA SIGURNOSNA UPOZORENJA
Kod uporabe elektriˇcnih aparata obavezno treba uzeti u obzir sljede´ce osnovne sigurnosne
mjere predostroˇznosti:
1. Proˇcitajte sve upute i saˇcuvajte ih za budu´ce potrebe.
2. Provjerite da li napon u vaˇsoj strujnoj mreˇzi odgovara naponu naznaˇcenom na informacijskoj
naljepnici koja se nalazi na proizvodu.
3. Za izbjegavanje opasnosti od strujnog udara oˇste´ceni kabel za napajanje treba da zamjeni
proizvod¯aˇc kabela, ovlaˇsteni servisni centar ili struˇcna osoba.
4. Ne odvajajte se od miksera ukljuˇcenog u izvor za napajanje.
5. Djeca ne treba da rade ovaj aparat.
6. Kada aparat nije u uporabi, prije postavljanja ili odvajanja bilo kog dijela ili prije ˇciˇs´cenja
obavezno izvucite utikaˇc iz utiˇcnice.
7. Ne dodirujte dijelove u pokretu. Za izbjegavanje rizika od ozljede i oˇste´cenja miksera tijekom
rada aparata ruke, odje´cu, spatulu i druga kuhinjska pomagala drˇzite dalje od kontakta sa
metlicama za mijeˇsanje/gnjeˇcenje.
8. Za izbjegavanje rizika od strujnog udara mikser ne uranjajte u vodu ili neke druge teku´cine.
To stanje moˇze uzrokovati ozljedu ili kvar aparata.
9. Mikser ne rabite u neke druge svrhe osim u svrhu za koju je dizajniran.
10. Kabel ne smije visiti preko oˇstrih rubova stola ili radne povrˇsine. Zaˇstite kabel od kontakta
s vru´cim povrˇsinama.
11. Ovaj aparat ne treba da rabe osobe s fiziˇckim, psihiˇckim i mentalnim invaliditetom (ukljuˇcuju´ci
i djecu) bez nadzora osobe koja moˇze snositi odgovornost za sigurnu uporabu aparata. Isto tako
aparat ne treba da rabe neiskusne i osobe koje nisu dovoljno upu´cene u naˇcin njegove uporabe.
12. Neophodan je briˇzan nadzor djece i zabranite djeci da se igraju s aparatom.
13. Ne rabite na otvorenim povrˇsinama.
SAMO ZA KU´CANSKU UPORABU
OPIS MIKSERA
1. Mikser
2. Gumb za izbacivanje metlica
3. Gumb za stupnjeve brzine
4. Turbo Gumb
5. Poklopac posude za sjeckanje
6. Posuda za sjeckanje
7. Noˇz
8. Postolje/poklopac posude za sjeckanje
9. ˇStap za sitnjenje/mijeˇsanje
10. Posuda za mijeˇsanje
11. Metlice za mijeˇsanje
12. Velika posuda
- 31 -
11
10
12
14
13
15
1
2
3
4
5
6
8
7
9
Page 33

OPIS MIKSERA
13. Metlice za gnjeˇcenje
14. Gumb za zakljuˇcavanje miksera
15. Baza/Postolje
PRIJE POˇCETKA UPORABE MIKSERA:
Prije poˇcetka sklapanja ˇstapnog/stolnog miksera uvjerite se da utikaˇc miksera nije umetnut u
utiˇcnicu i da se gumb za podeˇsavanje brzine nalazi u poziciji “0”.
1. Ruˇcni mikser postavite na postolje/bazu aparata. Za odvajanje miksera sa postolja gurnite
naprijed. Pritisnite na gumb za zakljuˇcavanje glave miksera (A) i poloˇzite glavu miksera.
2. U mikser umetnite metlice za mijeˇsanje ili gnjeˇcenje. Metlice za gnjeˇcenje rabite za mijeˇsanje
tjesta a metlice za mijeˇsanje rabite za mijeˇsanje jaja i sliˇcnih sastojaka.
Napomena: Metlice za mijeˇsanje su iste i moˇzete ih umetnuti u bilo
koji otvor na mikseru. Jedna metlica za gnjeˇcenje moˇze da ud¯e samo
u desni a druga samo u lijevi otvor na mikseru. Metlice za gnjeˇcenje
ne moˇzete umetnuti u mikser na suprotan naˇcin
3. Veliku posudu postavite na svoje mjesto.
4. Glavu miksera sa postavljenim metlicama za mijeˇsanje/gnjeˇcenje
spustite u posudu za mijeˇsanje. Za spuˇstanje glave miksera jednom
rukom uhvatite za glavu miksera a drugom rukom pritisnite na gumb
za zakljuˇcavanje. Kada glava miksera dod¯e u odgovaraju´cu poziciju oglasi´ce se zvuk “klik”.
RUKOVANJE MIKSEROM
1. Uvjerite se da se aparat nalazi u poziciji 0 i nakon toga umetnite utikaˇc u utiˇcnicu.
2. Gumb za odabir brzine podesite u ˇzeljenu poziciju. Postoji 5 postavki brzine. Aparat ´ce poˇceti
da radi i pritiskom na gumb Turbo brzina se pove´cava za 25%.
Upozorenje: Tijekom rada aparata u posudu za mijeˇsanje ne ubacujte noˇz, metalnu kaˇsiku,
vilicu i sliˇcne objekte.
3. Aparat treba koristiti najduˇze 3 minute u kontinuitetu i izmed¯u dvije uzastopne uporabe treba
praviti pauzu od najmanje 1 minute. Za postizanje najboljih rezultata kod pripreme tijesta s
kvascem mijeˇsanje poˇcnite sa niskom brzinom i postepeno je pove´cavajte.
4. Nakon mijeˇsanja sastojaka gumb za odabir brzine podesite u poziciju 0 i izvucite utikaˇc iz
utiˇcnice.
5. Pritisnite na gumb za zakljuˇcavanje glave miksera i podignite glavu miksera u uspravan
poloˇzaj.
6. Po potrebi viˇsak hrane zadrˇzane na metlicama uklonite uz pomo´c plastiˇcne ili drvene spatule.
7. Jednom rukom uzmite metlice za mijeˇsanje/gnjeˇcenje a drugom rukom ˇcvrsto pristisnite na
gumb za izbacivanje metlica i izvadite metlice iz miksera.
Pozor: Prije izbacivanja metlica iz miksera uvjerite se da se gumb za odabir brzine nalazi u
poziciji 0. Nipoˇsto ne pritiskajte na gumb za izbacivanje metlica tijekom rada miksera.
8. Ruˇcni mikser moˇzete rabiti i posebno, bez postolja.
ˇ
Ciˇs´cenje i Odrˇzavanje
1. Prije poˇcetka ˇciˇs´cenja izvucite utikaˇc iz utiˇcnice i saˇcekajte da se aparat ohladi.
2. Vanjsku povrˇsinu miksera i postolje oˇcistite vlaˇznom krpom i posuˇsite mekom suhom krpom.
3. Ostatak hrane koja se zadrˇzala na kabelu za napajanje uklonite vlaˇznom krpom.
- 32 -
A
Page 34

ˇCIˇS´
CENJE I ODRˇZAVANJE
4. Posudu za mijaˇsenje sastojaka, metlice za mijeˇsanje i gnjeˇcenje operite u toploj vodi s
deterdˇzentom i posuˇsite. Metlice za mijeˇsanje, posudu za mijeˇsanje i metlice za gnjeˇcenje
moˇzete prati i u perici za pranje posud¯a.
Pozor: Za ˇciˇs´cenje posude od nehrd¯aju´ceg ˇcelika nipoˇsto ne rabite abrazivna sredstva za ˇciˇs´cenje.
SAVJETI ZA PRIPREMU SASTOJAKA ZA MIJEˇSANJE
1. Sastojke poput putera i jaja, koje treba ˇcuvati u hladnjaku, prije mijeˇsanja treba izvaditi iz
hladnjaka i ostaviti na sobnoj temperaturi.
2. Da ne bi doˇslo do mijeˇsanja ljuske ili pokvarenih jaja sa ostalim sastojcima, jaja prvo polupajte
u nekoj drugoj posudi i nakon toga dodajte ostalim sastojcima.
3. Mijeˇsanje ne treba da traje duˇze od potrebnog. Smjesu treba mijeˇsati prema uputama
navedenim u receptu. Suhe sastojke treba mijeˇsati samo dok se sjedine, pomjeˇsaju. Ove sastojke
uvijek mijeˇsajte na niskoj brzini.
4. Mijeˇsanje uvijek poˇcnite na niskoj brzini. Polako pove´cavajte brzinu sve dok ne dod¯ete do
potrebne brzine.
5. Uzmite u obzir klimatske uvjete. Vrijeme potrebno za mijeˇsanje sastojaka i dobijeni rezultati
povremeno mogu pokazati promjenjivost u zavisnosti od sezonskih promjena temperature,
toplote i strukture sastojaka.
- 33 -
Page 35

ROMÂN
- 34 -
1
2
11
10
12
14
13
15
8
3
4
5
6
7
9
Page 36

- 35 -
Page 37

- 36 -
A
Page 38

- 37 -
Page 39

- GARANT‹ fiARTLARI -
1-) Garanti süresi,mal›n teslim tarihinden itibaren bafllar ve 2 y›ld›r.
2-) Mal›n bütün parçalar› dahil olmak üzere tamam› Firmam›z›n garanti kapsam›ndad›r.
3-) Mal›n garanti süresi içerisinde ar›zalanmas› durumunda, tamirde geçen süre garanti
süresine eklenir. Mal›n tamir süresi, 20 iflgününü geçemez. Bu süre mala iliflkin ar›zan›n
servis istasyonuna, servis istasyonunun olmamas› durumunda, mal›n sat›c›s›, bayii,
acentesi, temsilcili¤i, ithalatç›s› veya imalatç›s›-üreticisinden birine bildirim tarihinden
itibaren bafllar. Tüketicinin ar›za bildirimini; telefon, faks, e-posta, iadeli taahhütlü mektup
veya benzeri bir yolla yapmas› mümkündür. Ancak, uyuflmazl›k halinde ispat yükümlülü¤ü
tüketiciye aittir. Mal›n ar›zas›n›n 10 ifl günü içerisinde giderilememesi halinde, imalatç›üretici veya ithalatç›; mal›n tamiri tamamlan›ncaya kadar, benzer özelliklere sahip baflka
bir mal› tüketicinin kullan›m›na tahsis etmek zorundad›r.
4-) Mal›n garanti süresi içerisinde gerek malzeme ve iflçilik, gerekse montaj hatalar›ndan
dolay› ar›zalanmas› halinde, iflçilik masraf›, de¤ifltirilen parça bedeli ya da baflka herhangi
bir ad alt›nda hiçbir ücret talep etmeksizin tamiri yap›lacakt›r.
5-) Tüketicinin onar›m hakk›n› kullanmas›na ra¤men mal›n;
- Tüketiciye teslim edildi¤i tarihten itibaren, garanti süresi içinde kalmak kayd›yla, bir
y›l içerisinde en az dört defa veya imalatç›-üretici ve/veya ithalatç› taraf›ndan belirlenen
garanti süresi içerisinde alt› defa ar›zalanmas›n›n yan› s›ra, bu ar›zalar›n maldan
yararlanamamay› sürekli k›lmas›,
-Tamiri için gereken azami süresinin afl›lmas› ,
-Firman›n servis istasyonunun, servis istasyonunun mevcut olmamas› halinde s›rayla
sat›c›s›, bayii, acentesi temsilcili¤i ithalatç›s› veya imalatç›-üreticisinden birisinin
düzenleyece¤i raporla ar›zan›n tamirini mümkün bulunmad›¤›n›n belirlenmesi,
durumlar›nda tüketici mal›n ücretsiz de¤ifltirilmesini, bedel iadesi veya ay›p oranda bedel
indirimi talep edebilir.
6-) Mal›n kullanma k›lavuzunda yer alan hususlara ayk›r› kullan›lmas›ndan kaynaklanan
ar›zalar garanti kapsam› d›fl›ndad›r.
7-) Garanti Belgesi ile ilgili olarak ç›kabilecek sorunlar için TC Gümrük ve Ticaret Bakanl›¤›
Tüketicinin Korunmas› ve Piyasa Gözetimi Genel Müdürlü¤ü’ne baflvurabilir.
‹MALATÇI F‹RMA
DE‹MA ELEKTROMEKAN‹K ÜRÜNLER ‹NfiAAT SPOR MALZEMELER‹ ‹MALAT SAN. VE T‹C. A.fi.
Cihangir Mh. Güvercin Cd. No:4 Haramidere Mevkii Avcılar - ‹stanbul - Türkiye
Tel : (0212) 422 94 94 & Fax : (0212) 422 03 49
www.sinbo.com.tr - info@sinbo.com.tr
- 38 -
Page 40

- SMX 2735 KARIfiTIRICI -
- GARANT‹ BELGES‹ -
Garanti Belge No : 105029
SSHY Belge No : 25551
‹MALATÇI F‹RMA
Ünvanı : DE‹MA ELEKTROMEKAN‹K ÜRÜNLER‹ ‹Nfi. SPOR MALZ.
‹MALAT SAN. ve T‹C. A.fi.
Adresi : Cihangir Mah. Güvercin Cad. No:4 Haramidere Mevkii
Avc›lar / ‹STANBUL
Tel. : 0212 422 94 94 & Fax: 0212 422 03 49
Yetkili Kifli :
Yönetim Kurulu Baflkan›
Ürünün Cinsi : KARIfiTIRICI
Markası : S‹NBO
Modeli : SMX 2735
Alt Modeli : Bandrol ve Seri No :
Teslim Tarihi ve Yeri :
Garanti Süresi : 2 Yıldır
Azami Tamir Süresi : 20 ‹fl Günü
Kullanım Ömrü : Bakanl›kça belirlenen ve ilan edilen kullan›m ömrü 7 y›ld›r.
(Ürünün fonksiyonlar›n› yerine getirebilmesi için gereken yedek parça temin süresi)
SATICI F‹RMA
Ünvanı :
Adresi :
Tel.Fax :
Fatura Tarihi ve No :
Teslim Tarihi ve Yeri :
‹mza ve Kafle :
Bu bölüm, ürünü sat›n ald›¤›n›z Yetkili Sat›c› taraf›ndan imzalanacak ve kaflelenecektir.
Bu belgenin kullan›lmas›na; 4077 say›l› Tüketicinin Korunması Hakkında Kanun ve bu Kanun’a dayan›larak yürürlü¤e konulan Garanti Belgesi
Uygulama Esaslar›na Dair Yönetmelik uyar›nca, TC Gümrük ve Ticaret Bakanlı¤ı, Tüketicinin Korunması ve Piyasa Gözetimi Genel Müdürlü¤ü
tarafından izin verilmifltir.
Garanti Belge Onay Tarihi : 07/09/2011
SSHY Belge Onay Tarihi : 30/03/2010
- 39 -
 Loading...