

Page 1
SMX 2725 KARIfiTIRICI
KULLANMA KILAVUZU
TR
EN
FR
NL
DE
ES
RU
UA
HR
AR
Page 2

De¤erli Müflterimiz,
Ürün seçiminde S‹NBO'yu tercih etti¤iniz için teflekkür ederiz.
Uzun ve verimli bir kullan›m için cihaz› kullanmadan önce bu k›lavuzu özellikle güvenlik
talimatlar›na dikkat ederek okuman›z› ve devaml› suretle saklaman›z› tavsiye ederiz.
Sayg›lar›m›zla,
Sinbo Küçük Ev Aletleri
- TEDAR‹KÇ‹ F‹RMA / EXPORTER United Favour Development Limited
Unit B, 10/F Lee May Building 788-790
Nathan Road, Mongkok, Kowloon, HK.
- UYGUNLUK BEYANI / CE Intertek Testing Services Shenzhen Ltd.
Guangzhou Branch
Block E, No.7-2 Guang Dong Software
Science Park,Caipin Rd., Guangzhou
Science City, GETDD, Guangzhou, China
EEE Yönetmeli¤ine uygundur.
AEEE Yönetmeli¤ine uygundur.
Made in P.R.C.
‹mal Y›l› : 2013
Cihazla oynamamalarını güvenceye almak için çocuklar gözetim altında tutulmalıdır.
Bu ürün (çocuklar dahil ) fiziksel hassasiyeti az, zihinsel olarak yetersiz, deneyimsiz ve yeterli bilgiye
sahip olmadan yada kendilerinin güvenli¤inden sorumlu olan kifliler tarafından bu ürünü kullanmak
için gerekli talimatlar verilmemifl kiflilerin kullanımına uygun de¤ildir.
Children being supervised not to play with the appliance.
This appliance is not intended for use by persons (including children) with reduced physical, sensory
or mental capabilities, or lack of experience and knowledge, unless they have been given supervision
or instruction concerning use of the appliances by a person responsible for their safety. Children
should be supervised to ensure that they do not play with the appliance.
- 1 -
Page 3

ÖNEML‹ UYARILAR
• Bakım, Onarım ve Kullanımda Uyulması Gereken Kurallar
Elektrikli cihazlar› kullan›rken afla¤›daki temel güvenlik önlemlerini mutlaka göz önünde
bulundurman›z gerekmektedir:
1. Talimat›n tamam›n› okuyunuz ve baflvuru kayna¤› olarak saklay›n›z.
2. fiebeke ç›k›fl voltaj›n›n mikserin üzerindeki etikette belirtilen voltaj düzeyine uygun
olmas›n› kontrol ediniz.
3. Güç kablosunun ar›zalanmas› durumunda elektrik floku tehlikesinin önlenmesi için
kablo üretici, servis yetkilisi ya da benzer bir ehliyetli kifli taraf›ndan de¤ifltirilmelidir.
4. Kullan›m s›ras›nda mikserin yan›ndan ayr›lmay›n›z.
5. Bu cihaz çocuklar taraf›ndan kullan›lmamal›d›r.
6. Cihaz kullan›lmad›¤› zamanlarda, herhangi bir parça takmadan ya da ç›karmadan veya
temizlik ifllemine giriflilmeden önce fiflten çekilmelidir.
7. Hareketli parçalarla temas etmeyiniz. Yaralanma riskini önlemek ve mikserin hasara
u¤ramamas› için cihaz çal›fl›yorken ellerinizi, giysilerinizi, ›spatula gibi di¤er mutfak
gereçlerini ç›rpma aparat›ndan uzak tutunuz.
8. Elektrik flokuna maruz kalmamak için mikseri suya ya da herhangi baflka bir s›v›ya
sokmay›n›z. Bu durum yaralanmaya ya da cihaz›n ar›zalanmas›na neden olabilir.
9. Mikseri tasarlanm›fl kullan›m amac› d›fl›nda kullanmay›n›z.
10. Kablonun masa ya da tezgah kenar›ndan sarkmamas› ya da ocak gibi s›cak yüzeylerle
temas etmemesi gerekir.
11. Bu cihaz, cihazlar›n kullan›lmas›nda güvenlik aç›s›ndan sorumluluk üstlenebilecek
bir kiflinin gözetimi ve yönlendirmesi olmadan fiziksel, duyusal ya da zihinsel engeli olan
kifliler (çocuklar dahil), bu konuda bilgi ya da deneyim sahibi olmayan kifliler taraf›ndan
kullan›lmamal›d›r.
12. Çocuklar›n cihazla oynamas›na engel olmak için yeterli gözetim yap›lmal›d›r.
13. Aç›k alanlarda kullanmay›n›z.
YALNIZCA EV ‹Ç‹ KULLANIMA YÖNEL‹KT‹R
C‹HAZIN ÖZELL‹KLER‹
• 5 hız seçene¤i
• Güvenlik cihazlı turbo ifllevi: turbo ifllevi yalnızca cihaz çalıflıyorken devreye girer
• Güvenlik cihazlı çıkarma dü¤mesi: cihaz çalıflıyorken kilitlenir
• Çelik yo¤urma ve çırpma aksesuarları dahil
• Tabanlı ve paslanmaz çelik kaseli
• AC230V, 50 Hz, 300W
D‹KKAT!!
Ürünün üzerinde bulunan iflaretlemelerde veya ürünle verilen di¤er bas›l› dökümanlarda
beyan edilen de¤erler, ilgili standartlara göre laboratuar ortam›nda elde edilen de¤erlerdir.
Bu de¤erler, ürünün kullan›m ve ortam flartlar›na göre de¤iflebilir.
- 2 -
Page 4
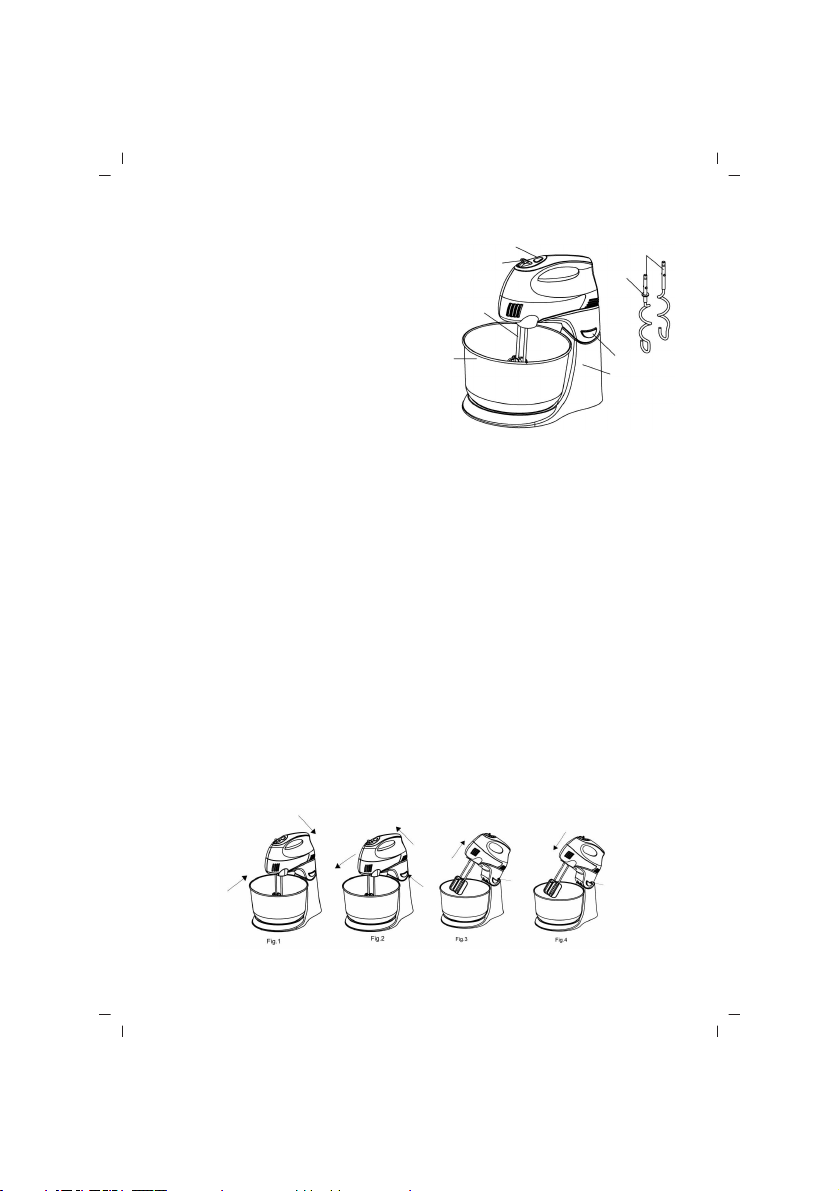
C‹HAZIN TANITIMI
1. Turbo dü¤mesi
2. H›z Dü¤mesi/Ç›karma Dü¤mesi
3. Ç›rpma aparat›
4. Paslanmaz çelik kase
5. Yo¤urma aparat›
6. Pul
7. Kafa kilitleme dü¤mesi
8. Taban
C‹HAZIN KULLANIMI ‹LE ‹LG‹L‹ B‹LG‹LER
• Ba¤lantı veya Montajın Nasıl Yapılaca¤ını Gösterir fiema ile Ba¤lantı veya Montajın
Kimin Tarafından Yapılaca¤ına (tüketici, yetkili servis) iliflkin bilgiler
Olası bir arıza durumunda cihazın içini açmayınız. En yak›n yetkili servise baflvurunuz.
M‹KSER‹ KULLANMADAN ÖNCE YAPILMASI GEREKENLER:
Sapl›/ayakl› mikseri monte etmeye bafllamadan önce güç kablosunun prize tak›l›
olmad›¤›ndan ve h›z ayar dü¤mesinin “0” konumda oldu¤undan emin olunuz.
1. El mikserini fiekil 1’de gösterilen flekilde destek aya¤›na tak›n›z, el mikserini ay›rmak
için cihaz› gösterilen yönde itiniz (fiekil 2) kafa kilitleme dü¤mesini bas›l› tutarken mikserin
kafas›n› yat›r›n›z (fiekil 3).
2. Miksere do¤ru ç›rpma ya da yo¤urma aparat›n› tak›n›z. Yo¤urma aparat›n› hamur
yo¤urmak, ç›rpma aparat›n› yumurta ve benzer malzemeleri ç›rpmak için kullan›n›z.
Not: Ç›rpma aparatlar› birbirinin ayn›s› oldu¤u için soketlerden herhangi birine tak›labilirler.
Yo¤urma aparatlar›nda pullardan biri büyük sokete, di¤eri de küçük sokete tak›lmal›d›r.
‹ki yo¤urma aparat› ters flekilde tak›lamaz.
3. Paslanmaz çelik kaseyi yerine yerlefltiriniz.
4. Cihaz›n kafas›n› ve ç›rpma/yo¤urma aparatlar›n› kar›flt›rma kasesine indiriniz, cihaz›n
kafas›n› afla¤› indirmek için cihaz› bir elinizle tutarken di¤er elinizle kafa kilitleme
dü¤mesine bas›n›z (fiekil 4), Cihaz›n kafas› do¤ru pozisyona ulaflt›¤›nda bir ‘klik’ sesi
iflitilecektir.
4
1
2
3
5
6
7
8
- 3 -
Page 5

C‹HAZIN KULLANIMI
1. Cihaz›n 0 konumuna ayarl› oldu¤undan emin olduktan sonra fifli prize tak›n›z.
2. H›z ayar dü¤mesini istedi¤iniz ayara getiriniz, 6 ayar seçene¤i bulunmaktad›r. Cihaz
çal›flmaya bafllayacakt›r ve turbo Dü¤mesine bast›¤›n›zda h›z %25 artacakt›r.
Uyar›: Cihaz› kullan›rken kasenin içine b›çak, metal kafl›k, çatal ve bunun gibi cisimler
sokmay›n›z.
3. Cihaz tek seferde en fazla 5 dakika boyunca kullan›lmal›d›r ve arka arkaya iki kullan›m
aras›nda en az 10 dakika beklenmelidir. Mayal› hamur yo¤ururken en iyi sonucu elde
etmek için h›z ayar dü¤mesi ilk baflta yavafl h›za ayarlaman›z ve daha sonra h›z› artt›rman›z
tavsiye edilir.
4. Kar›flt›rma ifllemi tamamland›ktan sonra h›z ayar dü¤mesini 0 konumuna getiriniz ve
fifli prizden çekiniz.
5. Kafa kilitleme dü¤mesini bas›l› tutunuz ve mikserin kafas› yat›k durumda sabitlenene
kadar mikserin kafas›n› geriye do¤ru yat›r›n›z.
6. Gerekiyorsa ç›rpma ya da yo¤urma aparatlar›n›n üstünde kalan malzemeyi plastik ya
da tahta bir ›spatula yard›m›yla temizleyiniz.
7. Ç›rpma/yo¤urma aparat›n› tek elinizle tutunuz ve di¤er elinizle ç›karma dü¤mesine
s›k›ca basarak ç›rpma/yo¤urma aparat›n› sökünüz.
Dikkat: Aksesuarlar› ç›karmak için ç›karma dü¤mesine basmadan önce h›z ayar dü¤mesi
s›f›r konumuna getirilmelidir. Cihaz çal›fl›yorken kesinlikle Ç›karma dü¤mesine basmay›n›z.
8. El mikseri destek aya¤›ndan ayr› olarak kullan›labilir.
KULLANIM HATALARINA ‹L‹fiK‹N B‹LG‹LER
Cihazınızı, beyan edilen voltaj ile çal›flt›r›n›z.Bulundu¤unuz yerin voltaj›n›n uygun olup
olmad›¤›n› kontrol ediniz.
Güç kablosunun ar›zalanmas› durumunda tehlikelerin önlenmesi için kablo üretici, servis
merkezi ya da benzer bir ehliyetli kifli taraf›ndan de¤ifltirilmelidir. Ar›za durumunda cihaz›
kendiniz sökmeye kalk›flmay›n›z, bak›m merkezimiz ya da sat›fl sonras› hizmet merkezimiz
ile ba¤lant›ya geçiniz.
Cihaz› kendiniz onarmaya kalk›flmay›n›z. Meydana gelebilecek ar›zalardan firmam›z
kesinlikle sorumlu de¤ildir, ve cihaz›n›z garanti kapsam› d›fl›nda ifllem görecektir.
TAfiIMA VE NAKL‹YE ESNASINDA
• Ürünü düflürmeyiniz,
• Darbelere maruz kalmamas›n› sa¤lay›n›z,
• S›k›flmamas›n›, ezilmemesini sa¤lay›n›z,
• Ambalaj üzerindeki iflaretlemelere uyunuz.
• Orjinal ambalajıyla taflımaya özen gösteriniz.
ÇEVRE VE ‹NSAN SA⁄LI⁄I
Bu iflaret, ürünün AB genelinde di¤er ev at›klar›yla birlikte elden ç›kar›lmamas›
gerekti¤ini göstermektedir. Çevre ve insan sa¤l›¤›n›n kontrolsüz flekilde elden
ç›kar›lm›fl olan at›klar nedeniyle zarar görmesini önlemek amac›yla, malzeme
- 4 -
Page 6

ÇEVRE VE ‹NS AN SA⁄LI⁄I
kaynaklar›n›n sürdürülebilir yeniden kullan›m›n› sa¤lamak için cihaz›n geri dönüflümünü
sa¤lay›n›z. Kullan›lm›fl cihazlar›n›z› lütfen iade ve toplama merkezlerine ulaflt›r›n›z ya da
ürünün sat›n al›nd›¤› ma¤azayla ba¤lant›ya geçiniz. Bu yerler ürünü teslim al›p çevreye
duyarl› bir flekilde geri dönüflümlerini sa¤layabilirler.
TEM‹ZL‹K
• Tüketicinin Kendi Yapabilece¤i Bakım, Onarım veya Ürünün Temizli¤ine ‹liflkin Bilgiler
1. Cihaz› temizlemeye bafllamadan önce fiflini prizden ç›kar›n ve so¤umaya b›rak›n›z.
2. Gövdenin d›fl yüzeyini ve Taban› nemli bir bezle siliniz ve yumuflak kuru bir bezle
parlat›n›z.
3. Güç kablosunun üzerine bulaflm›fl olabilecek malzeme kal›nt›lar›n› silerek temizleyiniz.
4. Kar›flt›rma kasesini, ç›rpma ve yo¤urma aparatlar›n› s›cak sabunlu suyla y›kay›n›z ve
kurulay›n›z. Ç›rpma aparatlar›, kar›flt›rma kasesi ve yo¤urma aparatlar› bulafl›k makinesinde
y›kanabilir.
Dikkat: Paslanmaz çelik kaseyi temizlemek için kesinlikle afl›nd›r›c› temizlik malzemeleri
kullanmay›n›z.
BAKIM
• Periyodik Bakım Gerektirmesi Durumunda, Periyodik Bakımın Yapılaca¤ı Zaman
Aralıkları ile Kimin Tarafından Yapılması Gerekti¤ine ‹liflkin Bilgiler
Cihaz periyodik bak›m gerektirmemektedir.Düzenli temizli¤inin yap›lmas›nda fayda vard›r.
MALZEME HAZIRLAMAYA YÖNEL‹K ‹PUÇLARI
1. Tereya¤› ve yumurta gibi buzdolab›nda bekleyen malzemeler kar›flt›rma ifllemine
bafllanmadan önce oda s›cakl›¤›na gelmelidirler. Bu malzemeleri buzdolab›ndan önceden
ç›kar›n›z.
2. Ç›rpma ifllemi gere¤inden fazla yap›lmamal›d›r. Kar›fl›mlar› elinizdeki tarifte belirtilen
oranda ç›rpmaya/kar›flt›rmaya dikkat ediniz. Kuru malzemeler yaln›zca harmanlanana
kadar kar›flt›r›lmal›d›r. Bu malzemeler için daima düflük h›z kullan›n›z.
3. Yumurtalar›n kabuklar›n›n ya da bozuk yumurtalar›n di¤er malzemelerle kar›flmas›n›
önlemek için yumurtalar› ilk önce ayr› bir kaba k›r›n›z ve kar›fl›ma daha sonra ekleyiniz.
4. Mutlaka ilk olarak düflük h›zda kar›flt›rmaya bafllay›n›z. Tarifte tavsiye edilen h›za yavafl
yavafl ulafl›n›z.
5. ‹klim koflullar›n› dikkate al›n›z. Gerekli kar›flt›rma süreleri ve elde edilen sonuçlar
mevsimsel s›cakl›k de¤ifliklikleri, malzemelerin s›cakl›klar› ve dokular›na ba¤l› olarak
zaman zaman de¤iflebilir.
- 5 -
Page 7

SATIfi SONRASI H‹ZMETLER‹
Bu cihaz kullan›c› taraf›ndan de¤ifltirilebilen parçalara sahip de¤ildir. Ünitenin çal›flmamas›
durumunda flu ad›mlar› izleyin.
1. Talimatlar›n do¤ru biçimde izlendi¤ini denetleyin.
2. Ana kayna¤›nda ifllevselli¤ini denetleyin.
Cihaz hâlâ çal›flm›yorsa, sat›n ald›¤›n›z yere geri götürün.
Güç kablosu hasar görmüflse, tehlikeleri önlemek için, cihaz üreticisine iade edilmelidir.
Kendi kendinize tamir etmeye KALKIfiMAYIN.
fiu talimatlar› izleyin:
1. Dikkatlice, tercihen orijinal kutusuna paketleyin.
Ünitenin temiz oldu¤undan emin olun.
2. Tüm yaz›flmalarda, ad›n›z›, adresinizi ve ürünün model numaras›n› belirtin.
3. ‹ade etme nedeninizi belirtin.
4. Garanti kapsam›ndaysa, nereden, ne zaman al›nd›¤›n› belirtin ve sat›n alma kan›t›n›
ekleyin (örn. kasa fifli).
- 6 -
Page 8
ENGLISH
SINBO SMX 2725 STAND MIXER
INSTRUCTION MANUAL
Read this booklet thoroughly before using and save it for future reference.
IMPORTANT SAFEGUARDS
When using electrical appliances, basic safety precautions should always be followed,
including the following:
1. Read all instructions and save it for future reference.
2. Make sure that you outlet voltage corresponds to the stated on the rating label of the
mixer.
3. If the supply cord is damaged, it must be replaced by the manufacturer or its service
agent or a similarly qualified person in order to avoid a shock hazard.
4. Do not leave mixer unattended while it is operating.
5. The appliance can not be operated by children.
6. Unplug from outlet while not in use, before putting on or taking off parts and before
cleaning.
7. Avoid contacting with moving parts. Keep hands, clothing, as well as spatulas and
other utensils away from beaters during operation to reduce the risk of injury to persons
or damage to the mixer.
8. To protect against risk of electrical shock, do not put mixer in water or other liquid.
This may cause personal injury or damage to the product.
9. Do not use mixer for other than intended use.
10. Do not let cord hang over edge of table or counter or touch hot surfaces, including
the stove.
11. This appliance is not intended for use by persons (including children) with reduced
physical, sensory or mental capabilities, or lack of experience and knowledge, unless
they have been given supervision or instruction concerning use of the appliances by a
person responsible for their safety.
12. Children should be supervised to ensure that they do not play with the appliance.
13. Do not use outdoors.
HOUSEHOLD USE ONLY
KNOW YOUR MIXER
1. Turbo button
2. Speed adjustor/Ejector button
3. Beater
4. Stainless steel bowl
5. Dough hook
6. Washer
7. Headlock button
8. Base
4
- 7 -
1
2
3
5
6
7
8
Page 9
BEFORE USING MIXER
Before assembling the hand/stand mixer, be sure the power cord is unplugged from the
power outlet and the speed selector is in the “0” position.
1. Attach the hand mixer to the stand as illustrate in Fig.1, for detaching the hand mixer,
push the hand mixer in the arrow indicated direction (Fig.2), And hold the head of mixer to
tilt position while pressing the headlock button (Fig.3).
2. Assemble proper beaters or dough hooks into mixer. Dough hooks are only used for
mixing dough and beaters are only used for beating eggs or similar food.
Note: Beaters can be inserted in either socket, as the beaters are identical. For dough
hooks, the one with washer can only be inserted into the big socket and the other one can
only be inserted into small socket. The two dough hooks cannot be inserted in reverse.
3. Place the stainless mixing bowl on position.
4. To lower the head and beaters/dough hooks into the mixing bowl, depress the headlock
button while holding the head with the other hand and ease the head down (Fig.4), A click
sound will be heard when the head has reached the correct position.
USING YOUR MIXER
1. Ensure that the unit is at the 0 setting, then plug in the power source.
2. Turn the speed selector to your desired setting, there is 6 setting. the appliance will start
working and the speed will increase 25% if the Turbo Button depressed at any time.
Warning: Do not stick knife, metal spoons, fork and so on into bowl when operating.
3. The max operation time per time shall not exceed 5 minutes and minimum 10 minutes
rest time must be maintained between two consecutive cycles. When kneading yeast dough,
suggest the speed selector first use a low speed and then use high speed to achieve the
best results.
4. When mixing is completed, turn the speed selector to 0 setting, unplug the cord from
power outlet.
5. Hold down the headlock button and ease the head of the mixer back until the mixer head
is locked into the tilt position.
6. If necessary you can scrape the excess food particles from the beaters or dough hooks
by rubber or wooden spatula.
7. Hold the beaters/dough hooks with one hand and press the Ejector button firmly down
with the other hand, remove the beater/dough hooks.
Caution: The speed selector must be at zero position before pressing down Ejector button
to remove accessories. Never pressing the Ejector button when the appliance is operating.
8. The hand mixer can be used separately without the stand in position.
- 8 -
Page 10

CLEANING AND MAINTENANCE
1. Unplug the appliance and wait it completely cool down before clean.
2. Wipe over the outside surface of the head and base with a dampened cloth and polish
with a soft dry cloth.
3. Wipe any excess food particles from the power cord.
4. Wash the mix bowl, beaters and dough hooks in warm soapy water and wipe dry. The
beaters, mix bowl and dough hooks may be washed in the dishwasher.
Caution: Never use abrasive cleaner to clean the stainless bowl.
COOKERY TIPS
1. Refrigerated ingredients, ie. butter and eggs should be at room temperature before
mixing begins. Set these ingredients out ahead of time.
2. Do not over-beat. Be careful that you only mix/blend mixtures until recommended in
your recipe. Fold into dry ingredients only until just combined. Always use the low speed.
3. To eliminate the possibility of shells or deteriorated-off eggs in your recipe, break
eggs into separate container first, then add to the mixture.
4. Always start mixing at slow speeds. Gradually increase to the recommended speed
as stated in the recipe.
5. Climatic conditions. Seasonal temperature changes, temperature of ingredients and
their texture variation from area to area all play a part in the required mixing time and
the results achieved.
FEATURES
• 5 speeds
•Turbo function with safety device: the turbo functioning only
works when the appliance is function
• Eject button with safety device: blocked while the appliance is operating
•Steel dough hooks and beaters included
• With base and stainless steel bowl
• AC230V, 50 Hz, 300W
ENVIRONMENTAL DISPOSING
You can help protect the environment!
Please remember to respect the local regulations, hand in the non-working
electrical equipments to an appropriate waste disposal center.
- 9 -
Page 11

FRANÇAIS
SINBO SMX 2725 MIXEUR À PIED
MODE D'EMPLOI
Veuillez lire attentivement ce manuel en entier avant de commencer à utiliser l’appareil
et gardez-le pour vous y référer ultérieurement.
CONSIGNES DE SÉCURITÉ IMPORTANTES
Avant toute utilisation de l’appareil électrique, vous devez absolument respecter les
règles principales de sécurité citées ci-dessous :
1. Lisez les instructions en entier et conservez ce manuel pour une consultation future.
2. Vérifiez si le voltage de sortie de réseau correspond bien au niveau de voltage indiqué
sur l’étiquette qui se trouve au dessous du mixeur.
3. En cas de dysfonctionnement du cordon d’alimentation, afin d’éviter les dangers de
choc électrique ; le cordon doit être remplacé par le fabricant, l’autorisé de service ou
une personne similaire autorisée.
4. Ne vous absentez pas pendant que le mixeur est en marche.
5. Cet appareil ne doit pas être utilisé par les enfants.
6. La fiche de l’appareil doit être débranchée lorsque l’appareil n’et pas en usage, ou
avant de monter ou de démonter une pièce ou avant de s’engager au nettoyage.
7. Ne vous contactez pas avec les pièces mobiles. Afin d’éviter tout risque de blessure
et d’endommagement du mixeur, tenez vos mains, vos vêtements et les objets de cuisine
tels que les spatules ou d’autres, à distance de l’équipement de battement lorsque
l’appareil est en état de fonctionnement.
8. Pour éviter de subir un choc électrique, n’immergez pas le mixeur dans l’eau ou dans
un autre liquide quelconque. Cela peut causer une blessure ou une panne d’appareil.
9. N’utilisez pas le mixeur à des fins d’usage pour les quelles il n’est pas prévu.
10. Le cordon ne doit pas pendre du bord de la table ou de l’établi, et ne doit ni être en
contact avec des surfaces chaudes telles que des tables de cuisson.
11. Cet appareil n’est pas prévu pour être utilisé par des personnes (y compris les enfants)
dont les capacités physiques, sensorielles ou mentales sont réduites, ou des personnes
dénuées d’expérience ou de connaissance, sauf si elles ont pu bénéficier, par l’intermédiaire
d’une personne responsable de leur sécurité, d’une surveillance ou d’instructions
préalables concernant l’utilisation de l’appareil.
12. Il convient de bien surveiller les enfants pour s’assurer qu’ils ne jouent pas avec
l’appareil.
13. N’utilisez pas dans des espaces libres.
DESTINÉ UNIQUEMENT À L’USAGE DOMESTIQUE
- 10 -
Page 12
PRENEZ CONNAISSANCE DE VOTRE MIXEUR
1. Bouton Turbo
2. Bouton de vitesse/Bouton éjecteur
3. Équipement de battement
4. Bol en acier inoxydable
5. Équipement de pétrissage
6. Timbre
4
7. Bouton de verrouillage de tête
8. Semelle
À FAIRE AVANT UTILISATION DU MIXEUR:
Avant de commencer à monter le mixeur à manche/pied assurez-vous que le cordon
d’alimentation n’est pas branché à la prise et que le bouton de réglage de vitesse est
positionné sur “0”.
1. Montez le mixeur a main sur le pied de support tel que décrit dans l’illustration 1,
pour détacher le mixeur à main poussez l’appareil dans le sens tel qu’indiqué (illustration
2) allongez la tête du mixeur en restant appuyé sur le bouton de verrouillage de tête
(illustration 3).
2. Montez le bon équipement de battement ou de pétrissage au mixeur. Utilisez
l’équipement de pétrissage pour pétrir de la pâte, et l’équipement de battement pour
battre des œufs ou des matériels similaires.
Remarque: Étant donné que les équipements de battements sont identiques, ils peuvent
être montés à n’importe des douilles. L’un des timbres de l’équipement de pétrissage
doit être monté à la grande douille, et l’autre doit être monté à la petite douille. Deux
équipements de pétrissage ne se montent pas de façon à l’envers.
3. Installez le bol en acier inoxydable à sa place.
4. Faites descendre la tête de l’appareil et les équipements de battement/pétrissage
dans le bol de mixage, pour faire descendre la tête de l’appareil en bas appuyez d’une
main sur le bouton de verrouillage de tête pendant que vous tenez l’appareil de l’autre
main (illustration 4). Un son de clique va s’entendre lorsque la tête de l’appareil aura
trouvé sa position correcte.
1
2
3
5
6
7
8
- 11 -
Page 13

L’USAGE DE VOTRE MIXEUR
1. Branchez la fiche à la prise après vous être assuré d’avoir positionné l’appareil sur
0.
2. Positionnez le bouton de réglage de vitesse au niveau que vous désirez, il se trouve
6 choix de niveaux. L’appareil commencera à fonctionner et la vitesse augmentera de
25% lorsque vous appuierez sur le bouton Turbo.
Avertissement: N’introduisez pas de couteau, de cuillère en métal, de fourchette ou
aucun objet similaire dans le bol lors de l’utilisation de l’appareil.
3. L’appareil doit être utilisé pendant maximum 5 minutes en une fois et vous devez
attendre au moins 10 minutes entre 2 usages à la file. Lors d’un pétrissage d’une pâte
à levure, pour obtenir les meilleurs résultats, il est conseillé de régler le bouton de
réglage de vitesse au ralenti au début et de faire accélérer plus tard.
4. Une fois que l’opération de mixage est terminée, positionnez le bouton de réglage de
vitesse sur 0 et débranchez la fiche de la prise.
5. Restez appuyé sur le bouton de verrouillage de tête et allongez la tête du mixeur vers
l’arrière jusqu'à ce qu’elle soit fixée en état allongé.
6. Nettoyez, si nécessaire, les matériels qui restent sur les équipements de battement
et de pétrissage à l’aide d’une spatule en plastique ou en bois.
7. Saisissez d’une main l’équipement de battement/pétrissage et démontez-le en pressant
fortement le bouton éjecteur.
Attention: Le bouton de réglage de vitesse doit être positionné sur 0 avant d’appuyer sur
le bouton éjecteur pour retirer les accessoires. N’appuyez jamais sur le bouton éjecteur
pendant que l’appareil est en marche.
8. Le mixeur à main peut être utilisé indépendamment de son pied de support.
NETTOYAGE ET ENTRETIEN
1. Avant tout nettoyage de l’appareil, débranchez la fiche de la prise et laissez refroidir.
2. Essuyez la surface extérieure du corps et la semelle avec un chiffon humide et faites
briller avec un chiffon doux et sec.
3. Nettoyez le cordon d’alimentation en essuyant les restes qui ont pu se mêler dessus.
4. Lavez le bol de mixage, les équipements de battement/pétrissage avec de l’eau chaude
savonneuse et essuyez. Les équipements de battement, le bol de mixage et les équipements
de pétrissage peuvent être lavés au lave-vaisselle.
Attention: N’utilisez jamais de produits de nettoyage abrasifs pour nettoyer le bol en
acier inoxydable.
INDICES DE PRÉPARATION DE MATÉRIEL
1. Les matériels qui restent dans le frigidaire comme le beurre ou les œufs, doivent être
mis en température ambiante avant que vous commenciez à l’opération de mixage. Faites
sortir ces matériels du frigidaire à l’avance.
2. L’opération de battement ne doit pas être exécutée pendant une durée plus longue
que nécessaire. Prenez soin de battre/mixer les mélanges selon les taux indiqués dans
- 12 -
Page 14

INDICES DE PRÉPARATION DE MATÉRIEL
vos recettes. Les matériels secs doivent être mixés seulement jusqu'à ce qu’ils se
mélangent. Préférez toujours une vitesse lente pour ces matériels.
3. Afin d’éviter que la croûte de l’œuf ou que des œufs périmés se mêlent aux autres
matériels, cassez les œufs d’abord dans un bol séparé puis ajoutez ceci dans le mélange
seulement plus tard.
4. Commencez toujours à mélanger à une vitesse lente d’abord. Parvenez graduellement
à la vitesse qui est conseillée dans la recette.
5. Prenez les conditions climatiques en considération. Les durées de mélanges nécessaires
et les résultats obtenus peuvent varier de temps en temps dépendant des différences
de température climatiques, des températures des matériels et de leurs textures.
APPAREIL RESPECTUEUX DE ’ENVIRONNEMENT
Vous pouvez aider à protéger l’environnement !
Veuillez vous rappeler de respecter les régulations locales : Disposez des appareils
électriques qui ne fonctionnent plus dans un centre de tri approprié.
- 13 -
Page 15

NEDERLANDS
SINBO SMX 2725 MIXER OP ONDERSTEL
GEBRUIKSHANDLEIDING
Neem deze handleiding aandachtig door voordat u dit product in gebruik neemt en bewaar ze
als naslabron.
BELANGRIJKE VEILIGHEIDSINSTRUCTIES
Bij het gebruik van elektrische apparaten moeten altijd volgende veiligheidsregels in acht
worden genomen:
1. Lees alle instructies aandachtig en bewaar de handleiding als naslagbron.
2. Controleer of de voltage die op het typeplaatje van het apparaat is vermeld, overeenstemt
met uw plaatselijke netspanning.
3. Ingeval het snoer beschadigd is moet het om alle gevaar te vermijden worden vervangen
door de fabrikant, een bevoegde service of geschoold vakman.
4. Laat de mixer nooit onbeheerd achter terwijl hij in werking is.
5. Het apparaat mag niet door kinderen worden gebruikt.
6. Neem de stekker uit het stopcontact na elk gebruik, voordat u hulpstukken monteert of
demonteert en vóór reiniging.
7. Vermijd alle contact met bewegende delen; houd uw handen en kledij zowel als spatels en
ander keukengerei uit de buurt van bewegende delen terwijl de mixer in werking is, teneinde
persoonlijk letsel en beschadiging van het apparaat te voorkomen.
8. Dompel de mixer, snoer of stekker nooit in water of een andere vloeistof om elektrische
schok, persoonlijk letsel en beschadiging van het apparaat te voorkomen.
9. Gebruik de mixer uitsluitend voor het bestemde doel.
10. Laat het snoer niet over de rand van tafel of aanrecht hangen of in aanraking komen met
hete oppervlakken.
11. Dit apparaat mag niet gebruikt worden door kinderen of personen met een lichamelijke,
zintuiglijke of geestelijke handicap of gebrek aan kennis en ervaring, tenzij onder toezicht en
leiding van een persoon die verantwoordelijk is voor hun veiligheid.
12. Er moet voldoende toezicht gehouden worden om te beletten dat kinderen met het apparaat
spelen.
13. Gebruik niet buitenhuis.
UITSLUITEND VOOR HUISHOUDELIJK GEBRUIK
LEER UW MIXER KENNEN
1. Turboknop
2. Snelheid regelknop/ Uitwerpknop
(voor hulpstukken)
3. Kloppers
4. Roestvrijstalen mengkom
5. Deeghaken
6. Ring
7. Knop voor vergrendeling van mixerkop
8. Onderstel
- 14 -
4
1
2
3
5
6
7
8
Page 16

VOORDAT U DE MIXER GEBRUIKT
Vergewis u ervan dat de stekker uit het stopcontact is en de snelheidsregeling in de 0
stand staat vooraleer u de handmixer/ staande mixer monteert.
1. Bevestig de handmixer op het onderstel zoals afgebeeld in Fig. 1 . Om de handmixer
van het onderstel te nemen, duw de mixer in de richting van de pijl (Fig.2) en til de kop
van de mixer op terwijl u op de kopvergrendelknop indrukt (Fig.3).
2. Monteer naar behoeven de gewenste hulpstukken op de mixer, de deeghaken om
deeg te bereiden, de kloppers om eieren en dergelijke voedingswaren te kloppen .of te
mixen.
Opmerking: De kloppers zijn identiek en kunnen in beide openingen gemonteerd worden.
De deeghaken zijn verschillend; de haak met de ring past alleen in de grote opening, de
andere in de kleine opening. Ze kunnen niet onderling worden omgewisseld.
3. Plaats de RVS mengkom in het onderstel.
4. Druk de knop van de kopvergrendeling in en duw met de andere hand voorzichtig de
kop van de mixer omlaag zodat kloppers/deeghaken in de mengkom komen (Fig.4). U
zult een klikje horen als de mixerkop zich in de juiste stand vastzet.
GEBRUIK VAN UW MIXER
1. Vergewis u ervan dat het apparaat uitgeschakeld is (0 stand) en steek de stekker in
het stopcontact.
2. Er zijn 6 snelheidsstanden. Zet de regelknop in de gewenste stand om het apparaat
in werking te zetten. Door de turboknop in te drukken kan de snelheid ten alle tijde 25%
worden verhoogd.
Opgelet: Steek geen mes, metalen lepel, vork of dergelijke in de mengkom terwijl het
apparaat functioneert.
3. Laat het apparaat nooit langer dan 5 minuten onafgebroken functioneren en wacht
vervolgens 10 minuten om de motor te laten afkoelen voordat u het opnieuw aanzet. Om
deeg te bereiden is het aangeraden op lage stand te beginnen en de snelheid geleidelijk
op te voeren; op die manier bekomt u de beste resultaten.
4. Zet de snelheid regelknop in de 0 stand en neem de stekker uit het stopcontact zodra
de bewerking voltooid is.
5. Houd de vergrendelknop van het kopstuk ingedrukt terwijl u de kop van de mixer
langzaam achterwaarts optilt tot het apparaat in opwaartse stand vastklik.
6. Deeg en voedselresten kunt u eventueel van de deeghaken en kloppers schrapen met
- 15 -
Page 17

GEBRUIK VAN UW MIXER
behulp van een rubberen of houten spatel.
7. Om de kloppers / deeghaken uit de mixer te halen, houd ze vast met één hand terwijl
u met de andere hand flink op de uitwerpknop (ontgrendelknop voor hulpstukken) drukt.
Verwijder de kloppers / deeghaken.
Opgelet: Ontgrendel en verwijder de hulpstukken alleen terwijl het apparaat is
uitgeschakeld (0 stand). Druk nooit op de uitwerpknop als het apparaat in werking is.
8. De hand mixer kan ook afzonderlijk gebruikt worden zonder onderstel.
Reiniging en Onderhoud
1. Neem de stekker uit het stopcontact en wacht tot het apparaat volledig afgekoeld is
voordat u het gaat reinigen.
2. Maak de buitenzijde van het kopstuk en het onderstel schoon met een vochtige doek
en wrijf droog met een zachte doek.
3. Verwijder voedselspatten en resten van het elektrisch snoer.
4. Was de mengkom, kloppers en deeghaken in warm zeepwater en droog ze goed af.
De mengkom, kloppers en deeghaken mogen in de vaatwasser gewassen worden.
Opgelet: Gebruik nooit een schurend of bijtend reinigingsmiddel om de RVS kom schoon
te maken.
NUTTIGE WENKEN BIJ HET KOKEN
1. Laat gekoeld bewaarde voedingswaren zoals boter en eieren eventjes opwarmen tot
kamertemperatuur voordat u ze met de mixer bewerkt. Neem ze een tijdje van te voren
uit de koelkast.
2. Laat niet langer kloppen dan nodig; volg wat dit betreft de instructies van uw recept.
Droge ingrediënten het laatst toevoegen en nog eventjes mengen op lage snelheid.
3. Om te vermijden dat er eierschalen of een bedorven ei in uw bereiding terecht komen
is het aan te raden de eieren een voor een in een apart schaaltje te breken voordat u ze
bij het mengsel voegt.
4. Begin altijd te mengen op lage snelheid. Voer de snelheid geleidelijk op naargelang
de aanbevelingen in uw recept.
5. Klimaatomstandigheden; seizoengebonden en locale temperatuur- wijzigingen, aard
en temperatuur van de ingrediënten zijn factoren die een rol spelen in de vereiste meng of kloptijd en het bekomen resultaat.
MILIEUVRIENDELIJKE AFVALVERWERKING
U kunt helpen om het milieu te beschermen!
Denk a.u.b aan de lokale voorschriften: lever niet werkende elektrische apparaten
in bij een geschikt afvalverwerkingcentrum.
- 16 -
Page 18

DEUTSCH
SINBO SMX 2725 HANDMIXER
BEDIENUNGSANLEITUNG
WICHTIGE SICHERHEITSHINWEISE
Bei der Anwendung Elektrogeräten sind folgende Sicherheitsmassnahmen unbedingt zu
beachten:
1. Lesen Sie vor Inbetriebnahme dieses Gerätes sorgfältig die Bedienungsanleitung. Bitte
bewahren Sie diese Anleitung gut auf.
2. Prüfen Sie ob die Netzspannung, die sie benutzen wollen, mit der des Gerätes übereinstimmt.
Die Angaben dazu finden Sie auf dem Typenschild des Gerätes.
3. Aus Gründen der elektrischen Sicherheit darf ein defektes Netzkabel nur vom Hersteller,
unserem Kundendienst oder einer ähnlich qualifizierten Person durch ein gleichwertiges Kabel
ersetzt werden.
4. Beaufsichtigen Sie das Gerät im Betrieb.
5. Das Gerät ist nicht für die Benutzung durch Kinder geeignet.
6. Ziehen Sie immer den Netzstecker aus der Steckdose, wenn Sie die Arbeit mit dem Mixer
beendet haben und bevor Sie das Gerät zur Reinigung zerlegen.
7. Vermeiden Sie jegliche Berührungen mit sich bewegenden Teilen. Um Verletzungen zu
vermeiden, halten Sie sich Ihre Finger und andere Gegenstände von inbetriebgesetzten Mixer
fern.
8. Aus Gründen der elektrischen Sicherheit, das Gerät nicht in Wasser oder andere Füssigkeiten
tauchen. Es kann Schaden im Gerät verursachen.
9. Benutzen Sie das Gerät nur für den vorgesehenen Zweck.
10. Niemals das Netzkabel über die Tisch- oder Tresenkante hängen lassen. Halten Sie das
Netzkabel von heissen Oberflächen fern.
11. Das Gerät ist nicht für die unbeaufsichtigte Benutzung durch Kinder oder gebrechliche
Menschen geeignet.
12. Niemals das Gerät unbeaufsichtigt betreiben und beachten, dass die Kinder mit dem Gerät
nicht spielen.
13. Benutzen Sie das Gerät nicht im Freien.
DAS GERÄT IST AUSSCHLIESSLICH FÜR DEN PRIVATEN GEBRAUCH BESTIMMT
DEN SINBO-MIXER KENNENLERNEN
1. Turbo-Taste
2. Stufenwahlschalter-/Knopf zum
Lösen der Knethaken/Rührbesen
3. Rührbesen
4. Edelstahl-Rührschüssel
5. Knethaken
6. Tellerscheibe
7. Lasche zur Entriegelung des Oberteils
8. Mixständer
4
1
2
3
5
6
7
8
- 17 -
Page 19

VOR DEM ERSTEN GEBRAUCH
Stellen Sie den Stufenwahlschalter auf „0/AUS“ und stellen Sie sicher, dass der Mixer
vom Netz getrennt ist.
1. Den Mixer auf den Mixständer setzen (Abb. 1). Ziehen Sie das Gerät wie in Abb. 2 und
Abb. 3 ab, während Sie die Lasche zur Entriegelung des Oberteils drücken.
2. Dem Mixer Knethaken oder Rührbesen einsetzen. Verwenden Sie die Knethaken für
Teigwaren und die Rührbesen z.B. für Eier.
Hinweis: Pressen Sie das Ende der Rührbesen in die dafür vorgesehenen Öffnungen des
Mixers, bis diese einrasten. Bitte beachten Sie, dass eine der Knethaken, für grosse
Öffnung und der Andere für die kleine Öffnung der Mixer bestimmt ist.
3. Den Edelstahl-Rührschüssel einsetzen.
4. Den Mixer, mit Knethaken bzw. Rührbesen eingesetzt, nach unten klappen. Klappen
Sie den Mixer nach unten bis das Gerät einrastet, während Sie die Lasche zur Entriegelung
des Oberteils drücken (Abb. 4).
BEDIENUNG
1. Vergewissern Sie sich, dass der Stufenwahlschalter auf “0/AUS“ gestellt ist. Stecken
Sie den Netzstecker in die Steckdose.
2. Sie können am Handmixer mit dem Stufenwahlschalter verschiedene Geschwindigkeiten
einstellen (6 Stufen). Nun ist das Gerät in Betrieb gesetzt. Wenn Sie die Turbo-Taste
betätigen, so wird die Geschwindigkeit um 25 % erhöht.
WARNUNG: Halten Sie niemals Fremdkörper (Beispiel: Kochbesteck) in die Rührschüssel.
3. Das Gerät ist maximal 5 Minuten in Betrieb zu setzen. Falls Sie den Mixer erneut
benutzen möchten, warten Sie 10 Minuten bis das Gerät sich abkühlt. Wenn Sie mit
Teigwaren arbeiten, ist es zu empfehlen, dass Sie die Geschwindigkeit stufenweise
erhöhen.
4. Möchten Sie den Mixvorgang beenden, schalten Sie den Stufenwahlschalter auf „0“
und trennen Sie das Gerät vom Netz.
5. Nach der Beendigung drücken Sie erneut die Lasche zur Entriegelung des
Mixerständeroberteils und klappen den Mixer nach oben.
6. Gegebenenfalls können Sie die Rührbesen/Knetehaken mit Hilfe eines Holz/Plastikspachtels reinigen.
7. Drücken Sie den Knopf zum Lösen der Knethaken/Rührbesen. Durch leichtes Ziehen
können diese nun entnommen werden.
- 18 -
Page 20

BEDIENUNG
ACHTUNG: Zum Lösen der Knethaken/Rührbesen stellen Sie den Stufenwahlschalter
auf“0/AUS“. Drücken Sie niemals den Knopf zum Lösen der Knethaken/Rührbesen, wenn
das Gerät eingeschaltet ist.
8. Der Mixer ist auch ohne Mixerstände zu gebrauchen.
Reinigung und Pflege
1. Ziehen Sie vor jeder Reinigung den Netzstecker aus der Steckdose und ggf. warten
bis das Gerät sich abkühlt.
2. Zur äusseren Reinigung des Gerätes benutzen Sie nur ein feuchtes Spültuch.
Anschliessend können Sie mit einem feuchten und trockenen Tuch polieren.
3. Bei Bedarf reinigen Sie auch das Netzkabel.
4. Abnehmbare Teile die mit Teig in Berührung gekommen sind (Knetwerkzeug und
Rührschüssel), können Sie in einem Spülbad reinigen. Diese können auch in der
Spülmaschine gereinigt werden.
ACHTUNG: Benutzen Sie keine scharfen oder scheuernden Reinigungsmittel um die
Edelstahl-Rührschüssel zu reinigen.
TIPPS ZUR ANWENDUNG
1. Zutaten wie Butter und Eier sollen vor Arbeit im Raumtemperatur aufbewahrt werden.
Daher nehmen Sie diese vorher aus der Kühlschrank.
2. Der Mixvorgang soll nicht länger durchgeführt werden als nötig. Rühren Sie die Menge
der Zutaten so, wie in Ihren Rezept es vorgeschrieben sind. Für trockene Zutaten wählen
Sie immer die niedrigen Geschwindigkeit.
3. Um zu vermeiden, dass Eierschalen und verdorbenes Ei in die Rührschüssel gelangt,
dass Ei ausserhalb der Rührschüssel schlagen.
4. Die Geschwindigkeit unbedingt stufenweise erhöhen.
5. Bitte beachten Sie auf die Temperaturbedingungen, da die Rührzeit davon abhängig
ist.
- 19 -
Page 21

ESPANOL
SINBO SMX 2725 BATIDORA CON PEDESTAL
NORMAS IMPORTANTES DE LA SEGURIDAD
Cuando está utilizando las máquinas eléctricas tiene que tener en cuenta las siguientes
precauciones básicas de la seguridad absolutamente:
1. Lee la instrucción absolutamente y guarde como una fuente de consultación.
2. Controle que el nivel del voltaje que se muestra en la etiqueta del producto está
conforme con el voltaje del sistema.
3. En el caso de los averías del cable de energía para evitar el choque de la electricidad,
el cable se debe cambiar por el productor, competente del servicio u otra persona
cualificada similar.
4. No deje sola la batidora durante el funcionamiento.
5. No se debe utilizar cerca de los niños.
6. Si la máquina no se está utilizando, antes de montar o desmontar un accesorio, tiene
que desenchufarla.
7. No toque a las piezas móviles. Para evitar el riesgo de herirse y los daños de batidora,
cuando la máquina está funcionándose, guarda sus manos, ropas, espátula u otras cosas
de la cocina fuera del aparato de batir.
8. Para evitar el choque de electricidad, no mete la batidora en el agua u otro líquido.
Este caso puede causar a los heridos o daños de la máquina.
9. No utilice la batidora excepto su objeto del diseño.
10. El cable no se debe colgar de los bordes de mesa o encimera o no se debe tocar a
las superficies calientes.
11. Esta máquina no se debe utilizar por las personas no informadas o experimentadas
de este asunto, minusválidos físicos, mentales o sentimentales (incluso los niños) sin
vigilancia de una persona que se puede tener la responsabilidad.
12. Hay que hacer la vigilancia suficiente para evitar que los niños juegan con la máquina.
13. No utilice en la fuera.
ES SOLO PARA EL USO DOMESTICO.
INTRODUCCIÓN DE SU BATIDORA
1. Botón turbo
2. Botón de velocidad/desmontar
3. Aparato de batir
4. Escudilla de acero inoxidable
5. Aparato de amasadura
6. Arandela
7. Botón de cerrar la cabeza
8. Suelo
- 20 -
1
2
3
4
5
6
7
8
Page 22

LAS COSAS QUE SE TIENE QUE HACER ANTES DE UTILIZAR LA BATIDORA
Antes de montar la batidora con pedestal/mango, tiene que estar seguro que el cable
de energía no está enchufado y el botón de velocidad está en la posición de “0”.
1. Monte la batidora de mano al pedestal de apoyo como se muestra en la figura 1, para
separar la batidora empuje la máquina a la dirección como se muestra (Figura 2) y
acuesta la cabeza de batidora cuando está pulsando el botón de cerrar la cabeza (Figura
3).
2. Monte el aparato correcto de batir o amasadura a la batidora. Utilice el aparato de
amasadura para amasar pasta y aparato de batir para batir huevo u materiales similares.
NOTA: Puede montar los aparatos de batir a cualquier socket porque son los mismos.
Para montar el aparato de amasadura, tiene que montar una de las arandelas al socket
grande y la otra arandela al socket pequeño. No puede montar dos aparatos de amasadura
contrariamente.
3. Fije la escudilla de acero inoxidable a su lugar.
4. Baja la cabeza y los aparatos de batir/amasadura a la escudilla de mezclar, para bajar
la cabeza de la máquina, cuando está cogiendo la máquina por una mano, pulse el botón
de cerrar la cabeza por la otra mano (Figura 4), se sale un sonido de “click” cuando la
cabeza de máquina llega a la posición correcta.
USO DE SU BATIDORA
1. Después de estar seguro que la máquina está en la posición de “0”, enchufe la máquina.
2. Lleve el botón del ajuste de velocidad a cualquier configuración, hay 6 opciones de la
configuración. La máquina empieza a funcionarse y cuando se pulsa el botón turbo, la
velocidad se aumenta por 25%.
Aviso: Cuando está utilizando la máquina, no mete las materiales como cuchillo, cuchara
o tenedor.
3. La máquina se puede utilizar 5 minutos por máximo en una vez y entre dos usos
seguidos tiene que esperar por 10 minutos. Para amasar pasta leuda se recomienda
configurar la velocidad baja y luego aumentar la velocidad.
4. Después de finalizar el proceso de mezclar lleve el botón del ajuste de velocidad a la
posición “0” y desenchufe la máquina.
5. Deja pulsado el botón de cerrar la cabeza y acueste la cabeza de batidora hasta que
se fija en posición acostada.
6. Si se necesita, limpie los materiales que se quedan encima de los aparatos de batir
- 21 -
Page 23

LIMPIEZA y MANTENIMIENTO
o amasadura mediante una espátula de madera o plástica.
7. Coge el aparato de batir/amasadura por una mano y desmonte el aparato de
batir/amasadura por pulsar el botón de desmontar por la otra mano.
Atención: Para desmontar los accesorios antes de pulsar el botón de desmontar tiene
que llevar el botón de ajuste de la velocidad a la posición de cero. Cuando la máquina
está funcionándose, no pulsa el botón de desmontar nunca.
8. La batidora de mano se puede utilizar separadamente del pedestal de apoyo.
Limpieza Y Mantenimiento
1. Antes de empezar a limpiar la máquina, desenchufe y deja a enfriarse.
2. Limpie la superficie externa del cuerpo y el suelo por un paño húmedo y pule por un
paño seco.
3. Limpie los residuos de los materiales que se pueden quedar encima del cable de
energía.
4. Lave la escudilla de mezclar, aparatos de batir y amasadura por el agua enjabonado
caliente y seque. Aparatos de batir, escudilla de mezclar y aparatos de amasadura se
pueden lavar en lavavajillas.
Atención: Para limpiar la escudilla de acero inoxidable no utilice los materiales abrasivos
de la limpieza nunca.
INDICIOS PARA PREPARAR LOS MATERIALES
1. Antes de empezar a mezclar los materiales que se esperan en frigorífico como
mantequilla y huevo tiene que venir a la temperatura de casa. Saque estos materiales
del frigorífico antes de mezclar.
2. No se debe hacer el proceso de batir más de la necesidad. Tenga en cuenta que
batir/mezclar los materiales según la receta que tiene. Los materiales secos se deben
mezclar solo hasta que se hace pequeño. Para estos materiales utilice la velocidad baja
siempre.
3. Para evitar que las cortezas de los huevos o huevos malos se mezclan con otros
materiales, rompe los huevos primero en una escudilla y añade a la mezcla luego.
4. Siempre empieza a mezclar con la velocidad baja. Llega la velocidad que se recomienda
en la receta lentamente.
5. Tenga en cuenta las condiciones climáticas. Las duraciones y los resultados obtenidos
se pueden cambiar depende de los cambios climáticos de la temperatura, temperaturas
de los materiales y sus estructuras.
GUARDE ESTAS INSTRUCCIONES PARA CONSULTAR
El signo de basura que tiene un singo de X encima de la basura se significa que
tiene que tirar la máquina que finaliza su vida del uso en una forma sensible al
medioambiente. Puede consultar a las autoridades locales para la información
sobre llevar el producto al centro de reciclaje.
- 22 -
Page 24

1
2
3
5
6
- 23 -
4
7
8
Page 25

- 24 -
Page 26

- 25 -
Page 27

No: 1-2725-18112013
- 26 -
Page 28

- 27 -
Page 29

1
2
3
5
6
- 28 -
4
7
8
Page 30

- 29 -
Page 31

- 30 -
Page 32

1-2725-18112013
- 31 -
Page 33

- 32 -
Page 34

1
2
3
5
6
4
7
8
- 33-
Page 35

- 34 -
Page 36

- 35 -
Page 37

HRVATSKI
SINBO SMX 2725 STOLNI M‹KSER
UPUTSTVO ZA UPORABU
Prije poˇcetka uporabe ured¯aja temeljno proˇcitajte ovo uputstvo za uporabu i saˇcuvajte ga za
budu´ce potrebe.
BITNI SIGURNOSNI NAPUTCI
Prije poˇcetka uporabe elektriˇcnih ured¯aja potrebno se pridrˇzavati sljede´cih temeljnih sigurnosnih
naputaka:
1. Proˇcitajte sve upute za uporabu i saˇcuvajte za budu´ce potrebe.
2. Provjerite da li napon u vaˇsoj strujnoj mreˇzi odgovara vrijednostima napona naznaˇcenim na
etiketi koja se nalazi na mikseru.
3. Za izbjegavanje svake vrste opasnosti oˇste´ceni kabel treba da opravi ili zamjeni proizvod¯aˇc
kabela, tehniˇcar u ovlaˇstenom servisnom centru ili neka struˇcna osoba.
4. Ne odvajajte se od miksera u vrijeme rada.
5. Djeca ne smiju koristiti ovaj ured¯aj.
6. Kada ured¯aj ne rabite, prije montiranja ili odvajanja bilo kog dijela kao i prije poˇcetka ˇciˇs´cenja
izvucite utikaˇc iz utiˇcnice.
7. Ne dodirujte dijelove u pokretu. Za izbjegavanje rizika od ozljede kao i da ne bi doˇslo do kvara
miksera, ruke, odje´cu, spatulu i drugi kuhinjski pribor drˇzite dalje od metlica ukljuˇcenog ured¯aja.
8. Za izbjegavanje rizika od strujnog udara mikser ne uranjajte u vodu ili neke druge teku´cine.
To stanje moˇze uzrokovati ozljede ili kvar ured¯aja.
9. Mikser ne rabite u neke druge svrhe osim one za koju je dizajniran.
10. Kabel ne smije visiti preko rubova stola ili radne povrˇsine. Kabel zaˇstitite od kontakta s
vru´cim povrˇsinama.
11. Ovaj ured¯aj nije pogodan za uporabu od strane osoba sa fiziˇckim, psihiˇckim i mentalnim
invaliditetom (ukljuˇcuju´ci i djecu) bez nadzora osobe koja moˇze snositi odgovornost za sigurnu
uporabu ured¯aja. Ured¯aj ne treba da rabe neiskusne i osobe koje nisu dovoljno upu´cene u naˇcin
njegove uporabe.
12. Uporaba ured¯aja u blizini djece zahtjeva poseban nadzor. Zabranite djeci da se igraju s
ured¯ajem.
13. Mikser ne rabite na otvorenim povrˇsinama.
SAMO ZA KU´CANSKU UPORABU
OPIS MIKSERA
1. Turbo gumb
2. Gumb za brzinu /izbacivanje metlica
3. Metlice za mijeˇsanje
4. Posuda od nehrd¯aju´ceg ˇcelika
5. Metlice za tijesto
6. Razmaknica
7. Gumb za zakljuˇcavanje ku´ciˇsta
8. Baza
4
1
2
3
5
6
7
8
- 36 -
Page 38

PRIJE POˇCETKA UPORABE MIKSERA
Prije montiranja ruˇcnog/stolnog miksera uvjerite se da kabel za napajanje nije umetnut
u utiˇcnicu i da se gumb za postavku brzine nalazi u poziciji “0”.
1. Ruˇcni mikser, kao ˇsto je prikazano na slici 1, postavite na stalak, a za odvajanje ruˇcnog
miksera ured¯aj gurnite u prikazanom smjeru (slika2). Pritisnite gumb za zakljuˇcavanje
ku´ciˇsta i poloˇzite mikser (slika 3).
2. Umetnite u mikser metlice za mijeˇsanje/gnjeˇcenje. Metlice za gnjeˇcenje rabite za
tijesto a metlice za mijeˇsanje za butanje jaja i sliˇcnih sastojaka.
Napomena: Metlice za mjeˇsanje su iste i moˇzete ih umetnuti u bilo koji utor za metlice
na mikseru. Metlice za gnjeˇcenje su razliˇcite, jednu umetnite u ve´ci a drugu u manji utor.
Metlice za gnjeˇcenje ne moˇzete umetnuti u suprotna mjesta.
4. Ku´ciˇste miksera zajedno sa metlicama za mijeˇsanje/gnjeˇcenje spustite u posudu za
mijeˇsanje. Jednom rukom spustite ku´ciˇste miksera ka dolje a drugom rukom pritisnite
na gumb za zakljuˇcavanje glave miksera (slika 4). Kada ku´ciˇste miksera dod¯e u pravu
poziciju ˇcu´ce se zvuk “klik”.
RUKOVANJE MIKSEROM
1. Uvjerite se da se gumb za brzinu nalazi u poziciji 0 i nakon toga umetnite utikaˇc u
utiˇcnicu.
2. Gumb za podeˇsavanje brzine podesite u ˇzeljenu brzinu. Mikser ima 6 brzina. Ured¯aj
´ce poˇceti da radi a pritiskom na Turbo gumb brzina ´ce biti uve´cana za 25%.
Upozorenje: U vrijeme rada ured¯aja u posudu za mijeˇsanje ne ubacujte noˇz, metalnu
ˇzlicu, vilicu i sliˇcne objekte.
3. Ured¯aj najviˇse rabite 5 minuta u kontinuitetu. Izmed¯u dvije uzastopne uporabe treba
da prod¯e najmanje 10 minuta. Za postizanje najboljih rezultata kod mijeˇsanja tijesta s
kvascem savjetujemo vam da poˇcnete sa niskom brzinom i da postupno pove´cavate
brzinu.
4. Kada zavrˇsite sa mijeˇsanjem gumb za podeˇsavanje brzine podesite u poziciju 0 i izvucite
utikaˇc iz utiˇcnice.
5. Gumb za zakljuˇcavanje glave miksera drˇzite pritisnut i glavu miksera poloˇzite unazad
dok se glava miksera ne fiksira u leˇze´ci poloˇzaj
6. Po potrebi sastojke koji su se zadrˇzali na metlicama za mijeˇsanje/gnjeˇcenje uklonite
uz pomo´c plastiˇcne ili drvene spatule.
7. Jednom rukom uhvatite metlice za mijeˇsanje/gnjeˇcenje a drugom rukom ˇcvrsto
- 37 -
Page 39

RUKOVANJE M‹KSEROM
pritisnite na gumb za izbacivanje i odvojite metlice za mijeˇsanje/gnjeˇcenje od miksera.
8. Pozor: Prije izbacivanja metlica provjerite da li se gumb za brzinu nalazi u poziciji 0.
Tijekom rada ured¯aja nipoˇsto ne pritiskajte na tipku za izbacivanje.
9. Ruˇcni mikser moˇzete koristiti odvojeno od stalka.
ˇ
Ciˇs´cenje i Odrˇzavanje
1. Prije poˇcetka ˇciˇs´cenja izvucite utikaˇc iz utiˇcnice i saˇcekajte da se ured¯aj ohladi.
2. Vanjsku povrˇsinu ku´ciˇsta miksera i bazu oˇcistite vlaˇznom krpom i posuˇsite.
3. Ostatak hrane zadrˇzan na kabelu za napajanje oˇcistite vlaˇznom krpom.
4. Posudu za mijeˇsanje, metlice za mijeˇsanje/gnjeˇcenje operite u toploj vodi s blagim
deterdˇzentom. Metlice za mijeˇsanje/gnjeˇcenje i posudu za mijeˇsanje moˇzete prati u
perilici za sud¯e.
Pozor: Za ˇciˇs´cenje posude od nehrd¯aju´ceg ˇcelika nipoˇsto ne rabite abrazivna sredstva
za ˇciˇs´cenje.
SAVJETI ZA PRIPREMU SASTOJAKA
1. Prije poˇcetka butanja maslaca i jaja iz hladnjaka saˇcekajte da ovi sastojci postignu
sobnu temperaturu. Ove sastojke izvadite malo ranije iz hladnjaka.
2. Da biste izbjegli mijeˇsanje ljuske od jaja ili pokvarenih jaja sa ostalim sastojcima
savjetujemo vam da jaja polupate u posebnoj posudi i nakon toga dodate ostalim sastojcima.
3. Mijeˇsanje/mu´cenje sastojaka ne treba vrˇsiti viˇse od potrebnog. Povedite raˇcuna da
mijeˇsanje/gnjeˇcenje sastojaka vrˇsite onoliko koliko je naznaˇceno u receptu. Suhe sastojke
mijeˇsajte samo dok se izmjeˇsaju. Za ovu vrstu sastojaka uvijek rabite najniˇzu postavku
brzine.
4. Uzmite u obzir klimatske uvjete. Potrebno vrijeme mijeˇsanja i dobijeni rezultati
povremeno mogu pokazati varijabilnost ovisno od sezonske temperature, temperature
i teksture sastojaka.
5. Mijeˇsanje obavezno poˇcnite sa niskom brzinom i postupno pove´cavajte brzinu sve do
postizanja preporuˇcene brzine.
- 38 -
Page 40

MÜfiTER‹ H‹ZMETLER‹
De¤erli Müflterimiz,
En uygun fiyata en iyi ürünü vermenin yan› s›ra; en iyi hizmeti vermenin de
önemli oldu¤una inan›yoruz. Bu nedenle siz bilinçli tüketicilere daha yak›n
olabilmek için, internet adresimizdeki eriflim formlar›n›n yan› s›ra, tüketici
dan›flma hattımızı da hizmetinize açm›fl durumday›z.
TÜKET‹C‹
DANIfiMA HATTI
444 66 86
Tüketici Dan›flma Hattımızı,
- Hafta içi her gün 08.00-18.00 saatleri aras›nda arayabilir; istek, öneri ve
flikayetlerinizi firmam›za iletebilirsiniz.
Tüketicinin Dikkatine:
Ürünlerimizle ilgili hizmetleri tam olarak alabilmek için afla¤›daki önerilere
uyman›z› rica ederiz:
1. Ürünü ald›¤›n›zda Garanti Belgesini mutlaka yetkili sat›c›n›za onaylatt›r›n›z.
2. Ürünü kullanma k›lavuzunda belirtilen hususlara göre kullan›n›z.
3. Ürününüzle ilgili hizmet talebiniz oldu¤unda yukar›daki telefon
numaralar›ndan, Tüketici Danıflma Hattına baflvurunuz.
4. Ürünü promosyon arac›l›¤› ile edinmiflseniz, ürüne ait garanti belgesini en
yak›n yetkili servisimize giderek onaylatt›r›n›z.
5. Teknik servisteki ifliniz bitti¤inde "Yetkili Servis Hizmet Fifli" almay›
unutmay›n›z. Alaca¤›n›z bu Hizmet Fifli, ileride ürününüzde meydana
gelebilecek herhangi bir sorunda size yarar sa¤layacakt›r.
www.sinbo.com.tr
0800 211 50 21
KAPIDAN KAPIYA
ÜCRETS‹Z
SERV‹S
Kap›dan Kap›ya Ücretsiz Servis Kampanyam›z dâhilinde Yurtiçi Kargo Firmas› ile iflbirli¤i içerindeyiz. Tüketicimiz
taraf›ndan sat›n al›nan ürünün fiyat› ne olursa olsun, Tüketicimiz ürün ile ilgili garanti kapsam›na giren herhangi
bir problem yaflad›¤›nda, 444 66 86 numaral› Tüketici Danıflma Hattımızı aramas› ve kay›t b›rakmas› yeterlidir.
Bu süreçten sonra Tüketicimizin ürünü ücretsiz olarak Yurtiçi Kargo taraf›ndan Tüketicimizin bulundu¤u adresten
al›n›p, 10• ifl günü içerisinde ürün çal›fl›r bir vaziyette, yine Tüketicimize Yurtiçi Kargo arac›l›¤› ile adresine teslim
edilmektedir. 10 ifl günü içerisinde sorunu çözülemeyen ürünler ise, yenisi ve/veya bir üst modeli ile de¤ifltirilmektedir.
Tüm bu süreçte Tüketicilerimizden hiçbir ücret talep edilmemektedir.
(•Ürünün servis garanti süresi, Yurtiçi Kargo ürünü Sinbo Fabrikas›’na teslim ettikten sonra bafllar.)
- 39 -
10 GÜNDE
TESL‹MAT
GARANT‹S‹
(•)
Page 41

- GARANT‹ fiARTLARI -
1) Garanti süresi,mal›n teslim tarihinden itibaren bafllar ve 2 y›ld›r.
2) Mal›n bütün parçalar› dahil olmak üzere tamam› Firmam›z›n garanti kapsam›ndad›r.
3) Mal›n garanti süresi içerisinde ar›zalanmas› durumunda, tamirde geçen süre garanti
süresine eklenir. Mal›n tamir süresi, 20 iflgününü geçemez. Bu süre mala iliflkin ar›zan›n
servis istasyonuna, servis istasyonunun olmamas› durumunda, mal›n sat›c›s›, bayii,
acentesi, temsilcili¤i, ithalatç›s› veya imalatç›s›-üreticisinden birine bildirim tarihinden
itibaren bafllar. Tüketicinin ar›za bildirimini; telefon, faks, e-posta, iadeli taahhütlü mektup
veya benzeri bir yolla yapmas› mümkündür. Ancak, uyuflmazl›k halinde ispat yükümlülü¤ü
tüketiciye aittir. Mal›n ar›zas›n›n 10 ifl günü içerisinde giderilememesi halinde, imalatç›üretici veya ithalatç›; mal›n tamiri tamamlan›ncaya kadar, benzer özelliklere sahip baflka
bir mal› tüketicinin kullan›m›na tahsis etmek zorundad›r.
4) Mal›n garanti süresi içerisinde gerek malzeme ve iflçilik, gerekse montaj hatalar›ndan
dolay› ar›zalanmas› halinde, iflçilik masraf›, de¤ifltirilen parça bedeli ya da baflka herhangi
bir ad alt›nda hiçbir ücret talep etmeksizin tamiri yap›lacakt›r.
5) Tüketicinin onar›m hakk›n› kullanmas›na ra¤men mal›n;
• Tüketiciye teslim edildi¤i tarihten itibaren, garanti süresi içinde kalmak kayd›yla, bir y›l
içerisinde en az dört defa veya imalatç›-üretici ve/veya ithalatç› taraf›ndan belirlenen
garanti süresi içerisinde alt› defa ar›zalanmas›n›n yan› s›ra, bu ar›zalar›n maldan
yararlanamamay› sürekli k›lmas›,
• Tamiri için gereken azami süresinin afl›lmas› ,
• Firman›n servis istasyonunun, servis istasyonunun mevcut olmamas› halinde s›rayla
sat›c›s›, bayii, acentesi temsilcili¤i ithalatç›s› veya imalatç›-üreticisinden birisinin
düzenleyece¤i raporla ar›zan›n tamirini mümkün bulunmad›¤›n›n belirlenmesi, durumlar›nda
tüketici mal›n ücretsiz de¤ifltirilmesini, bedel iadesi veya ay›p oranda bedel indirimi talep
edebilir.
6) Mal›n kullanma k›lavuzunda yer alan hususlara ayk›r› kullan›lmas›ndan kaynaklanan
ar›zalar garanti kapsam› d›fl›ndad›r.
7) Garanti Belgesi ile ilgili olarak ç›kabilecek sorunlar için Gümrük ve Ticaret Bakanl›¤›
Tüketicinin Korunmas› ve Piyasa Gözetimi Genel Müdürlü¤ü’ne baflvurabilir.
‹THALATÇI F‹RMA
DE‹MA ELEKTROMEKAN‹K ÜRÜNLER ‹NfiAAT SPOR MALZEMELER‹ ‹MALAT SAN. VE T‹C. A.fi.
Cihangir Mh. Güvercin Cd. No:4 Haramidere Mevkii Avcılar - ‹stanbul - Türkiye
Ça¤rı Merkezi: 444 66 86
www.sinbo.com.tr - info@sinbo.com.tr
- 40 -
Page 42

- SMX 2725 KARIfiTIRICI -
- GARANT‹ BELGES‹ -
Garanti Belge No : 105029
SSHY Belge No : 35274
‹THALATÇI F‹RMA
Ünvanı : DE‹MA ELEKTROMEKAN‹K ÜRÜNLER‹ ‹Nfi. SPOR MALZ.
‹MALAT SAN. ve T‹C. A.fi.
Adresi : Cihangir Mah. Güvercin Cad. No:4 Haramidere Mevkii
Avc›lar / ‹STANBUL
Tel. : Ça¤rı Merkezi: 444 66 86
Yetkili Kifli :
Yönetim Kurulu Baflkan›
Ürünün Cinsi : KARIfiTIRICI
Markası : S‹NBO
Modeli : SMX 2725
Alt Modeli : Bandrol ve Seri No :
Teslim Tarihi ve Yeri :
Garanti Süresi : 2 Yıldır
Azami Tamir Süresi : 20 ‹fl Günü
Kullanım Ömrü : Bakanl›kça belirlenen ve ilan edilen kullan›m ömrü 7 y›ld›r.
(Ürünün fonksiyonlar›n› yerine getirebilmesi için gereken yedek parça temin süresi)
SATICI F‹RMA
Ünvanı :
Adresi :
Tel.Fax :
Fatura Tarihi ve No :
Teslim Tarihi ve Yeri :
‹mza ve Kafle :
Bu bölüm, ürünü sat›n ald›¤›n›z Yetkili Sat›c› taraf›ndan imzalanacak ve kaflelenecektir.
Bu belgenin kullan›lmas›na; 4077 say›l› Tüketicinin Korunması Hakkında Kanun ve bu Kanun’a dayan›larak yürürlü¤e konulan Garanti Belgesi
Uygulama Esaslar›na Dair Yönetmelik uyar›nca, TC Gümrük ve Ticaret Bakanlı¤ı, Tüketicinin Korunması ve Piyasa Gözetimi Genel Müdürlü¤ü
tarafından izin verilmifltir.
Garanti Belge Onay Tarihi : 07/09/2011
Garanti Belge Vize Tarihi : 23/08/2013
SSHY Belge Onay Tarihi : 04/04/2012
- 41 -
 Loading...