

Page 1
SKS 4515 MUTFAK TERAZ‹S‹
KULLANMA KILAVUZU
TR
EN
FR
NL
ES
RU
HR
AR
Page 2
G‹R‹fi
De¤erli Müflterimiz,
Ürün seçiminde S‹NBO'yu tercih etti¤iniz için teflekkür ederiz.
Uzun ve verimli bir kullan›m için cihaz› kullanmadan önce bu k›lavuzu güvenlik
talimatlar›na dikkat ederek okuman›z› ve devaml› suretle saklaman›z› tavsiye ederiz.
Sayg›lar›m›zla,
Sinbo Küçük Ev Aletleri
S‹NBO SKS 4515 MUTFAK TARTISI
KULLANIM TAL‹MATI
• Otomatik kapanma
• Saat Fonksiyonu
• Kapasite: 3kg
• 1 g hassasiyet
• Dara fonksiyonu
Kullan›mdan Önce
Mutfak tart›s›n› kullanmaya bafllamadan önce bu kullan›m k›lavuzunu sonuna kadar
okuyup muhafaza ediniz.
This appliance is not intended for use by persons (including children) with reduced physical, sensory
or mental capabilities, or lack of experience and knowledge, unless they have been given supervision
or instruction concerning use of the appliances by a person responsible for their safety. Children
should be supervised to ensure that they do not play with the appliance.
Bu ürün (çocuklar dahil ) fiziksel hassasiyeti az, zihinsel olarak yetersiz, deneyimsiz ve yeterli bilgiye
sahip olmadan yada kendilerinin güvenli¤inden sorumlu olan kifliler tarafından bu ürünü kullanmak
için gerekli talimatlar verilmemifl kiflilerin kullanımına uygun de¤ildir.
This appliance is intended to be used in household and similar applications such as:
- staff kitchen areas in shops, offices and other working environments;
- farm houses;
- by clients in hotels, motels and other residential type environments;
- bed and breakfast type environments.
- 1 -
Page 3

TARTILAR HAKKINDA B‹LG‹
Çeflitli tart› türleri vard›r:
Geleneksel mekanik tart› yayl› bir mekanizma arac›l›¤›yla a¤›rl›k ölçümü yapar - yap›lan
ölçümün sonucu ibre ile gösterilir. Dijital tart› da mekanik tart› gibi çal›fl›r, ama yap›lan
ölçümün sonucu ekran üzerinde görüntülenir. Modern elektronik tart›lar tartma ifllemini
elektronik bir sensör arac›l›¤›yla gerçeklefltirir ve a¤›rl›¤› elektronik olarak ekrana aktar›r.
Elektronik tart›lar›n mekanik ya da dijital tart›lara k›yasla en büyük avantaj› tartma
ifllemini daha hassas bir flekilde yapabilmeleridir. Mekanik ve dijital tart›lar kullan›lan
yaylar›n afl›nmas› nedeniyle zamanla hassasl›klar›n› kaybederler.
Lütfen elektronik tart›lar›n büyük s›cakl›k dalgalanmalar›na duyarl› olduklar›n› unutmay›n›z.
Tart› so¤uk oldu¤u takdirde yap›lan ölçüm hassas olmayabilir. Bu tart› en iyi performans›
normal oda s›cakl›¤›nda göstermektedir.
Pillerin de¤ifltirilmesi ve tak›lmas›
Bu tart› 2 adet AAA pille çal›fl›r.
Lütfen tart›y› kullanmaya bafllamadan önce normal oda s›cakl›¤›na gelmesini bekleyiniz.
Pilleri cihaza takmak için tart›n›n arkas›ndaki küçük kapa¤› ç›kar›n›z. Piller pil yuvas›na
yerlerine tam oturacak flekilde tak›lmal›d›r- pillerin cihaza do¤ru yönde tak›ld›¤›ndan
emin olunuz. Kapa¤› yerine geri tak›n›z. Pil seviyesi düflük oldu¤unda ve pillerin
de¤ifltirilmesi gerekti¤inde cihaz›n ekran›nda “Lo” uyar›s› görüntülenir.
Tart›y› duvara monte etme
Bu tart› duvara ya da sa¤lam olan herhangi bir dikey yüzeye monte edilebilecek flekilde
tasarlanm›flt›r. Bu tart›n›n üst k›sm›nda bir ve alt k›sm›nda bir olmak üzere toplam iki
adet montaj deste¤i bulunmaktad›r. Tart›y› duvara monte etmeden önce pilleri takmay›
unutmay›n›z. Duvara ya da baflka bir yüzeye delik açmadan önce aç›lacak deliklerin do¤ru
olmas› için ürünle birlikte verilen flablonu kullan›n›z. Tart›y› iki adet vidayla sabitleyiniz,
vidalar›n do¤ru flekilde tak›lm›fl oldu¤undan emin olunuz. Aksi takdirde yük ve yer çekimi
nedeniyle cihaz yerinden ç›kabilir.
Saatin ayarlanmas›
Bu tart› 24-saat format›nda bir saat ile donat›lm›flt›r ve cihaz tartma ifllemi
gerçeklefltirmiyorken ekran üzerinde saat bilgisi görüntülenir. Tart›y› kullanmaya
bafllamadan önce saati ayarlay›n›z.
Saat, MODE tuflu birkaç saniye boyunca bas›l› tutularak ayarlan›r. Tufla bas›ld›ktan sonra
saat rakamlar› yan›p sönmeye bafllar. TARE (DARA) tuflunu kullanarak saati ayarlay›n›z
- do¤ru saat rakamlar› ekranda görüntülendi¤inde MODE tufluna basarak ayar› onaylay›n›z.
Daha sonra dakika rakamlar› yan›p sönmeye bafllar. TARE tuflunu kullanarak dakikay›
ayarlay›n›z ve do¤ru dakika rakamlar› ekranda görüntülendi¤inde MODE tufluna basarak
ayar› onaylay›n›z. TARE tuflu bas›l› tutuldu¤unda rakamlar daha h›zl› de¤iflir.
- 2 -
Page 4

TARTMA
Tartma kolunu afla¤› indiriniz ve tart›y› çal›flt›rmak için AÇMA/KAPAMA tufluna hafifçe
bas›n›z. Birkaç saniye sonra tart›n›n ekran›nda “0” mesaj› görüntülenecektir. Daha sonra
MODE tufluna basarak ölçü birimini seçiniz (tartma ifllemi s›ras›nda MODE tufluna basarak
ölçü birimini de¤ifltirebilirsiniz). Tart› flimdi kullan›ma haz›rd›r. Tart›, en fazla 3 kg olan
a¤›rl›klar› tartabilir.
S›f›rlama
Bu mutfak terazisi tüm malzemelerin ayn› kase içerisinde üst üste tart›labilmesi için
pratik bir s›f›rlama fonksiyonuna sahiptir. ‹lk malzemeyi tartt›ktan sonra TARE tufluna
k›sa bir süre basarak tart›y› s›f›rlayabilirsiniz. Tart› yeniden “0”› gösterdi¤inde s›f›rlanm›flt›r
ve bir sonraki malzemenin tart›lmas›na haz›rd›r. Her malzemeyi tartt›ktan sonra tart›y›
s›f›rlamay› unutmay›n›z.
En son tart›lan malzeme s›f›rlama iflleminden sonra ç›kar›ld›¤› takdirde ç›kar›lan
malzemenin a¤›rl›¤› bafl›nda - iflaretiyle görüntülenir. Tart› TARE tufluna bas›larak yeniden
s›f›rlan›r. Tart›ya afl›r› yükleme yap›ld›¤› takdirde (3 kg’den daha a¤›r bir yük) ekranda
“err” mesaj› görüntülenecektir. Fazla malzemeleri tart›dan ç›kar›n›z ve s›f›rlama yapmak
için DARA tufluna bas›n›z. Tart› yeni tartma ifllemine haz›r olacakt›r.
Cihaz› kapatma
Tart›, kullan›lmad›¤› zaman pilden tasarruf yapmak için yaklafl›k 60 saniye sonra otomatik
olarak kapal› konuma gelir.
Tart› ayn› zamanda AÇMA/KAPAMA dü¤mesine bas›larak da otomatik olarak kapat›labilir.
Temizlik ve bak›m
Cihaz›n yüzeyi su ve deterjanla nemlendirilmifl yumuflak bir bez yard›m›yla silinerek
temizlenmelidir. Daha sonra kuru bir bez ya da ka¤›t havluyla kurulanmal›d›r. Cihaz›n
yüzeyini çizebilecek güçlü ve afl›nd›r›c› temizlik malzemeleri kullanmay›n›z. Tart›y› suya
ya da herhangi bir baflka s›v›ya sokmay›n›z. Tart›y› ocak ya da radyatör gibi ›s› kaynaklar›n›n
yak›n›na koymay›n›z.
Yaln›zca yeni ve uygun boylarda piller kullan›n›z. Tart›n›n elektronik devrelerine zarar
verebilecekleri için eskimifl pilleri cihaz›n içinden ç›kar›n›z. Bu tart› yaln›zca evde kullan›ma
yöneliktir, ölçüm hatalar› nedeniyle meydana gelen zararlar için tazminat talep edilemez.
Tart›n›n tasarlanan amac› d›fl›nda ya da kullan›m k›lavuzunda belirtilmeyen flekilde
kullan›lmas› halinde kullan›c› do¤acak tüm sonuçlardan tamamen kendisi sorumlu
olacakt›r. Böylesi bir durumda cihazda ya da baflka bir fleyde meydana gelen hasar garanti
kapsam›nda de¤erlendirilmez.
- 3 -
Page 5

ÇEVREYE SAYGI
Çevrenin korunmas› ve pillerin elden ç›kar›lmas›
Pilleri elden ç›kar›rken çevreye sayg›l› bir flekilde hareket ediniz. Kullan›lm›fl piller s›radan
evsel at›klarla birlikte elden ç›kar›lmamal›d›r. Pilleri yetkili toplama noktalar›na b›rakarak
elden ç›kar›n›z. Eskimifl pillerde asit s›z›nt›s› meydana gelebildi¤i için pillerin çok eski
ve y›pranm›fl olmad›¤›ndan emin olunuz. Pillerin üzerlerinde belirtilmifl olan son kullan›m
tarihini kontrol ediniz.
Ürünü elden ç›karmadan önce pilleri ç›karmay› unutmay›n›z.
Cihaz›n elden ç›kar›lmas›
Resmi düzenlemeler elektrikli ve elektronik cihazlar›n yeniden kullan›m ya
da geri dönüflüm için toplanmalar›n› flart koflmaktad›r. Üzerlerinde ayr›
flekilde toplanmas› gerekti¤ine dair iflaret bulunan elektrikli ve elektronik
donan›mlar belediyenin at›k toplama noktalar›na götürülmelidir.
Garanti
Garantiye yönelik talepler yürürlükteki kanuna göre yap›l›r. Herhangi bir garanti talebi
gerçeklefltirmek için kafleli faturan›n ibraz edilmesi gerekir. Cihaz, sat›n al›nd›¤› ma¤azaya
iade edilebilir.
Teknik veriler
• Sinbo SKS 4515
• Asgari a¤›rl›k 5 g, azami a¤›rl›k 3 kg, 1 gram hassasiyet
• Bu cihaz elektronik at›k olarak elden ç›kar›lmal›d›r
• S›f›rlama fonksiyonu
• Dijital LCD ekran
• 60 saniye kullan›lmad›¤› takdirde otomatik olarak kapanma
• 2 adet AAA pil (ürüne dahildir)
• Tart› hassasl›¤›: +/- %1.0
• Saat hassasl›¤›: Günde +/- 1 dakika
Bu cihaz kalite belgesine haizdir.
EN 61000-6-1, EN 61000-6-3
Kullanım Ömrü 10 yıldır.
Made in China
D‹KKAT!!
Ürünün üzerinde bulunan iflaretlemelerde veya ürünle verilen di¤er bas›l› dökümanlarda
beyan edilen de¤erler, ilgili standartlara göre laboratuar ortam›nda elde edilen
de¤erlerdir.Bu de¤erler, ürünün kullan›m ve ortam flartlar›na göre de¤iflebilir.
- 4 -
Page 6

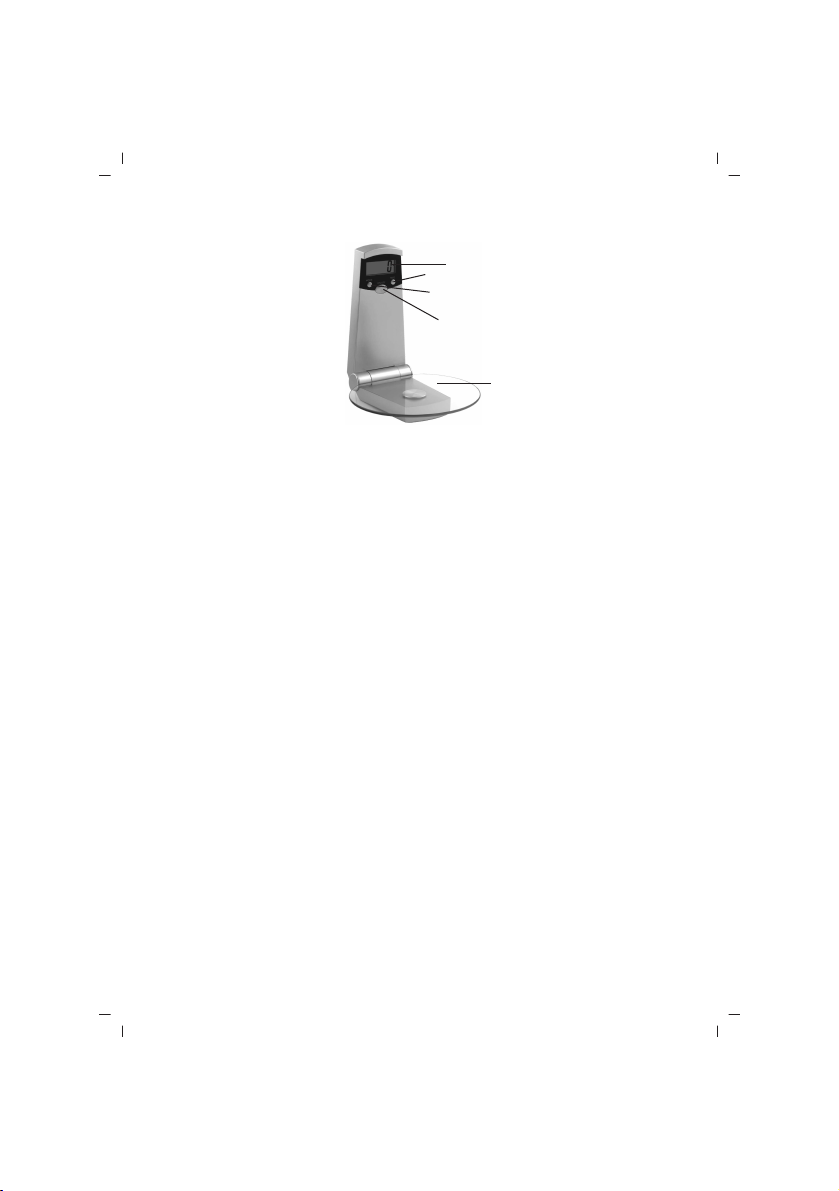
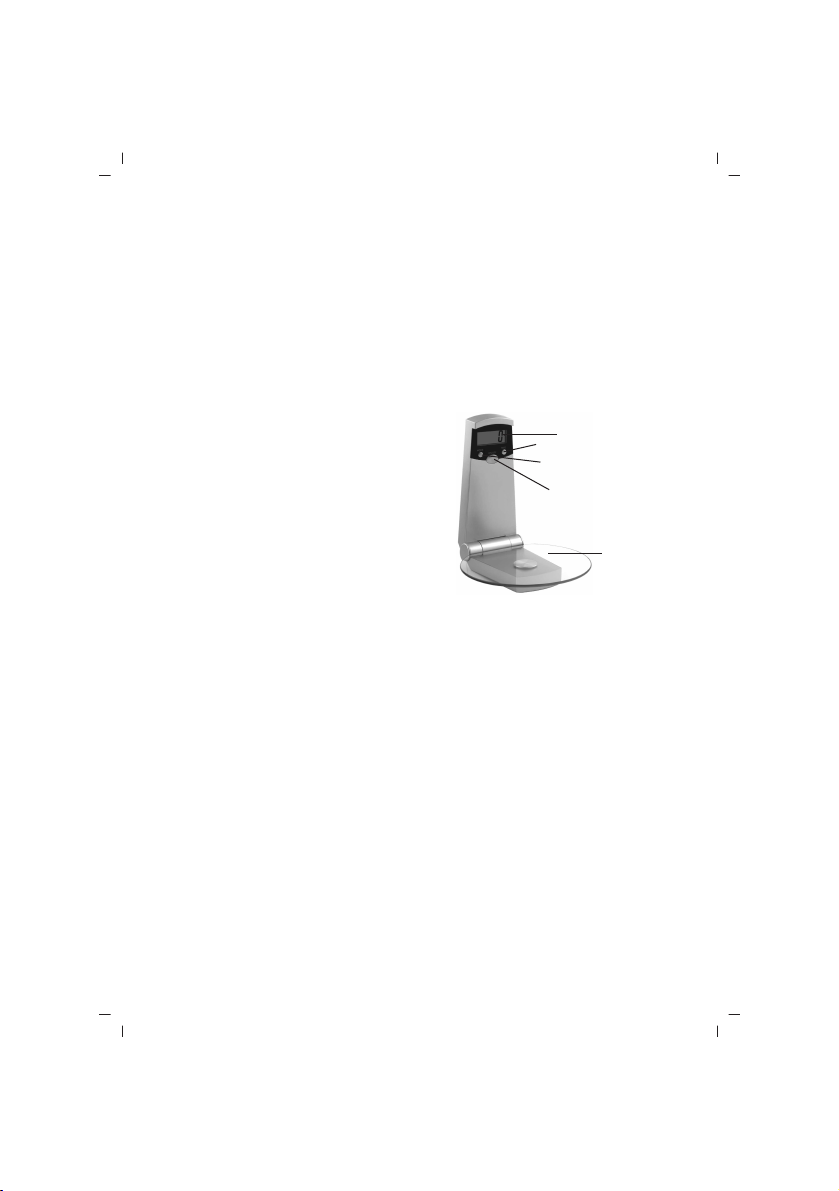
C‹HAZIN TANITIMI
4
2
3
1
5
SATIfi SONRASI H‹ZMETLER‹
Bu cihaz kullan›c› taraf›ndan de¤ifltirilebilen parçalara sahip de¤ildir. Ünitenin çal›flmamas›
durumunda flu ad›mlar› izleyin.
1. Talimatlar›n do¤ru biçimde izlendi¤ini denetleyin.
2. Ana kayna¤›nda ifllevselli¤ini denetleyin.
Cihaz hâlâ çal›flm›yorsa, sat›n ald›¤›n›z yere geri götürün.
Güç kablosu hasar örmüflse, tehlikeleri önlemek için, cihaz üreticisine iade edilmelidir.
Kendi kendinize tamir etmeye KALKIfiMAYIN.
fiu talimatlar› izleyin:
1. Dikkatlice, tercihen orijinal kutusuna paketleyin.
Ünitenin temiz oldu¤undan emin olun.
2. Tüm yaz›flmalarda, ad›n›z›, adresinizi ve ürünün model numaras›n› belirtin.
3. ‹ade etme nedeninizi belirtin.
4. Garanti kapsam›ndaysa, nereden, ne zaman al›nd›¤›n› belirtin ve sat›n alma kan›t›n›
ekleyin (örn. kasa fifli).
Cihaz›n Tan›t›m›
1. Açma/Kapama Dü¤mesi
2. Dara dü¤mesi
3. Mod Tuflu
4. LCD Ekran
5. Platform
TAfiIMA ESNASINDA
• Ürünü düflürmeyiniz,
• Darbelere maruz kalmamas›n› sa¤lay›n›z,
• S›k›flmamas›n›, ezilmemesini sa¤lay›n›z,
• Ambalaj üzerindeki iflaretlemelere uyunuz.
- 5 -
Page 7

ENGLISH
SINBO SKS 4515 KITCHEN SCALE
INSTRUCTION MANUAL
• Automatic Switch Off
• Clock Function
• Capacity: 3kgs
• 1 g increments
• Tare Function
Before use
Before the kitchen scale is taken into use for the first time, please read this instruction
manual thoroughly and keep it for future use.
About scales
There are several types of scales:
The traditional mechanical scale that estimates the weight on the basis of spring action
– subsequently the weight can be read from a dial. The digital scale which is in fact also
a mechanical scale with the exception that weight measurements are read from a display.
The modern electronic scale which performs weighing by means of an electronic sensor
and converts the weight electronically for display reading. The advantage of the electronic
scale over the mechanical or digital scales is first and foremost that it performs far more
accurate weight measurements – and will continue to do so. The mechanical and digital
scales become increasingly inaccurate over time, partly due to worn springs in these
types of scales.
Please note that electronic scales are sensitive to major temperature swings. Inaccuracies
may occur if the scale is cold. The scale consequently works best at normal room
temperature.
Replacement and insertion of batteries
The scale requires 2 type AAA batteries which must be inserted before the scale is taken
into use.
Please allow the scale to adapt to normal room temperature before use.
To insert batteries remove the small door on the back of scale. The batteries can now
be inserted or replaced by placing them in the battery compartment so that the batteries
are firmly fixed – make sure that the batteries are inserted the right way. The door is
then re-attached. When battery replacement is required, “Lo” will appear on the display.
Mounting the scale on a wall
The scale is designed for wall mounting or mounting on any firm, vertical surface. The
- 6 -
Page 8

MOUNTING THE SCALE ON A WALL
scale is equipped with one wall mount bracket at the top and another at the bottom on
the back of the scale. Remember to insert the batteries before the scale is mounted on
a wall. Use the enclosed template for drilling holes in the wall or other surface to ensure
that the holes are drilled correctly in relation to each other. Make sure that the scale is
mounted on both screws, and that the screws are sufficiently well mounted. Otherwise
the weight might fall down during use due to load and gravity.
Setting the clock
The scale is equipped with a 24-hour clock which can be read from the display when the
scale is not in use as a weighing instrument. Consequently, the time should be set before
the scale is taken into use.
The time is set by pressing and holding the MODE button for a few seconds. Subsequently,
the hour digits start flashing. Set the hours using the TARE button – when the required
hour digits appear on the display, confirm by pressing MODE. The minute digits then
start flashing. Set the minutes using the TARE button again and confirm by pressing
MODE when the required minute digits appear. The digits will change more rapidly if the
TARE button is held.
Weighing
Fold the weighing lever downwards and press the ON/OFF button lightly to activate the
scale. After a few seconds the scale display reads “0”. Then select measurement unit
by pressing MODE (it is also possible to shift between measurement units during weighing
by pressing MODE). The scale is now ready for use. The scale can weigh up to a maximum
of 3 kg.
Resetting
This kitchen scale is equipped with a practical reset function which enable all ingredients
to be weighed directly in the same bowl, one at a time. When you have finished weighing
the first ingredient, the scale is reset by a quick tap on the TARE button. When the scale
reads “0” again, it is reset and ready for weighing the next ingredient. Remember to
reset after weighing each ingredient.
If the most recently weighed ingredient is removed again after resetting, its weight will
be displayed with a negative sign. The scale is reset again by pressing TARE. If the scale
is overloaded (a load of more than 3 kg), the display will read “err”. Remove the surplus
ingredients from the scale and press TARE for resetting. The scale will then be ready
for weighing again.
Switch-off
To save battery life the scale automatically switches off following approximately 60
seconds of non-use.
The scale can also be switched off manually by pressing the ON/OFF button.
- 7 -
Page 9

CLEANING AND MAINTENANCE
The surface can be wiped clean using a soft cloth moistened with water and a mild
detergent. Wipe dry using a dry cloth or paper towel. Never use strong, abrasive cleaners
as these may scratch the surface. The scale may not be immersed in water or other
liquids. Do not place the scale near strong heat sources such as cookers or radiators.
Only use new, appropriately sized batteries. Always remove exhausted batteries as these
may leak chemicals which cause damage to the scale’s electronic circuits. The scale is
designed for private household use only, and any losses caused by measurement or
reading errors will not be compensated.
If the scale is used for any other purpose than the intended, or if it is not used in accordance
with the instruction manual, the user is completely responsible for any consequences.
Any resulting damage or other to the product is not covered by warranty.
Protecting the environment and disposing of batteries
Respect the environment when you replace batteries. Exhausted batteries are not ordinary
household waste. They should be disposed of at authorized collection points. Make sure
that the batteries are not too old or worn out as there is a risk that they might leak acid.
Check the expiry date on the batteries.
Remember to remove the batteries before disposing of the product.
Disposing of the appliance
Legislation requires that all electrical and electronic equipment must be collected
for reuse and recycling. Electrical and electronic equipment marked with the
symbol indicating separate collection of such equipment must be returned to a
municipal waste collection point.
Warranty
Claim according to valid law. Machine stamped receipt shall be enclosed if one wishes
to make a complaint. The appliance shall be returned to the store where it was purchased.
Technical data
• Sinbo SKS 4515
• Minimum weight 5 g, maximum weight 3 kg with 1 g interval
• The appliance must be disposed of as electronic waste
• Reset function
• LCD digital display
• Automatic switch-off after approx. 60 seconds of non-use
• 2 type AAA batteries (included)
• Scale accuracy: +/- 1.0 %
• Clock accuracy: +/- 1 minute per day
- 8 -
Page 10
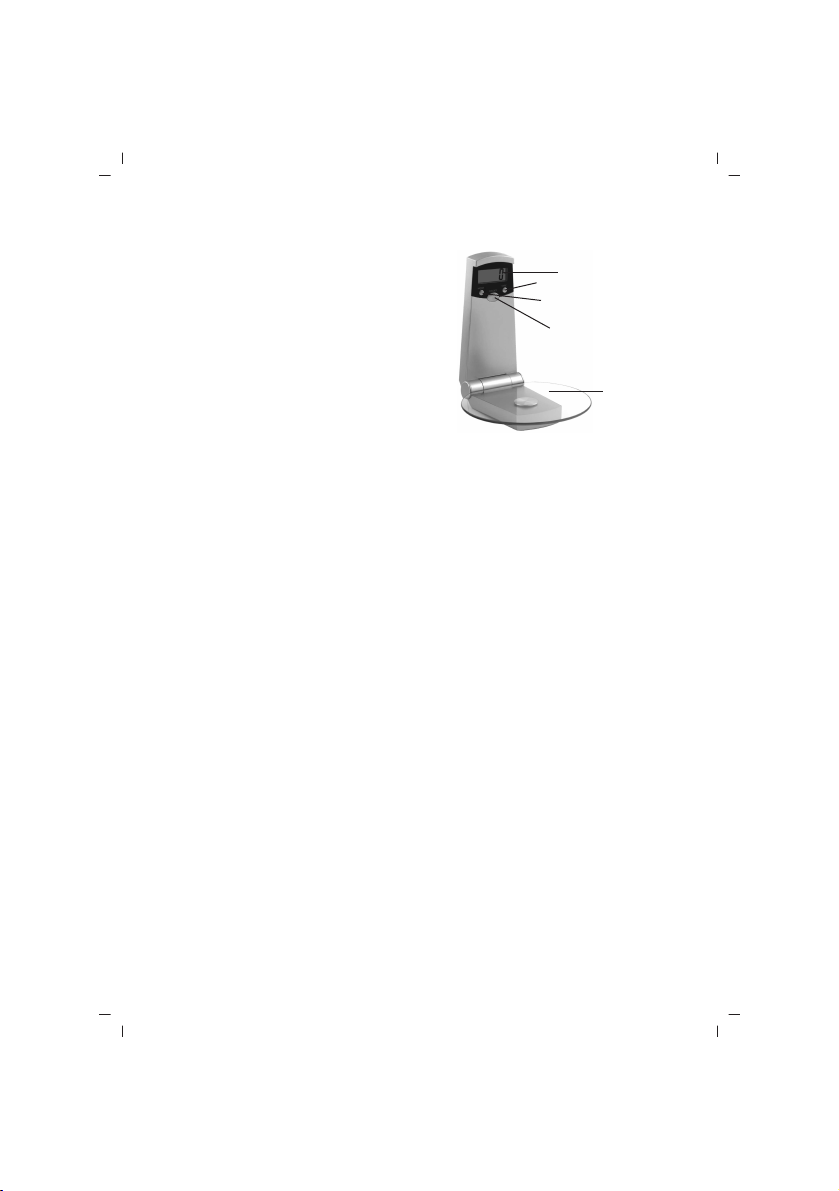
1. On/Off Button
2. Tare Button
3. Mode Button
4. LCD Display
5. Platform
PARTS DESCRIPTION
4
2
3
1
5
- 9 -
Page 11

FRANÇAIS
SINBO SKS 4515 BALANCE DE CUISINE
MODE D'EMPLOI
• Arrêt Automatique
• Fonction d’horloge
• Capacité: 3kg
• 1 g de sensibilité
• Fonction de Tare
Avant l’utilisation
Avant de commencer à utiliser la balance de cuisine, veuillez lire attentivement ce manuel
en entier et le conserver.
Les Bascules
Il existe différents types de bascules:
Une bascule traditionnelle mécanique effectue le mesurage de poids avec un mécanisme
à ressort – le résultat du mesurage effectué est indiqué avec une aiguille. Une bascule
digitale fonctionne aussi comme une bascule mécanique, seulement le résultat du
mesurage effectué est indiqué sur l’écran. Les bascules électroniques modernes effectuent
l’opération de pesage avec le moyen d’un capteur et transfère le poids à l’écran
électroniquement. Le plus grand avantage de bascules électroniques comparées aux
bascules mécaniques ou aux bascules digitales est celui de pouvoir effectuer l’opération
de pesage plus sensiblement. Les bascules mécaniques et digitales perdent leur sensibilité
avec le temps en raison de l’érosion des ressorts utilisés.
Veuillez ne pas oublier que les bascules électroniques sont sensibles aux grandes
fluctuations de température. Le mesurage effectué peut ne pas être sensible dans le
cas où la bascule est froide. Cette bascule montre sa meilleure performance à une
température ambiante normale.
Remplacement et Insertion des Piles
Cette balance fonctionne avec 2 unités de piles AAA.
Veuillez attendre que la balance arrive à une température ambiante normale avant de
commencer à l’utiliser.
Retirez le petit couvercle qui se trouve derrière la balance pour insérer les piles dans
l’appareil. Les piles doivent être placées dans le compartiment de piles de façon bien
installée dedans. Assurez-vous que les piles sont mises dans le sens de l’appareil.
Replacez le couvercle à sa place. L’avertissement de “Lo” s’affichera sur l’écran de
l’appareil lorsque le niveau de piles est bas et que les piles doivent être remplacées.
- 10 -
Page 12

MONTAGE DE LA BALANCE AU MUR
Cette balance est conçue de façon à pouvoir être montée au mur ou sur une surface
verticale quelle conque qui est solide. Il se trouve 2 supports de montage sur cette
balance dont l’un est sur la partie supérieure, et l’autre sur la partie inférieure. N’oubliez
pas d’insérer les piles avant de monter la balance au mur. Avant de percer le mur ou
une autre surface, utilisez le gabarit fourni avec le produit pour assurer que les trous
que vous allez faire soient correctes. Fixez la balance avec deux unités de vis, assurezvous que les vis sont montées correctement. Dans le cas contraire l’appareil peut se
détacher de sa place en raison du poids et de la gravité.
Réglage de l’horloge
Cette balance est équipée d’une horloge de format de 24 heures, l’information de l’heure
sera affichée sur l’écran pendant que l’appareil ne réalise pas d’opération de pesage.
Réglez l’heure avant de commencer à utiliser la balance.
L’heure est réglée en maintenant appuyée la touche de MODE pendant quelques secondes.
Une fois la touche pressée, les chiffres de l’heure commencent à clignoter. Réglez l’heure
en utilisant la touche de TARE – Validez le réglage en appuyant sur la touche de MODE
une fois que les chiffres corrects d’heure sont affichés. Ensuite, les chiffres de minutes
commencent à clignoter. Réglez les minutes en utilisant la touche de TARE et validez
le réglage en appuyant sur la touche de MODE une fois que les chiffres corrects de
minutes sont affichés. Les chiffres changent plus vite lorsque la touche de TARE est
maintenue appuyée.
Pesage
Faites descendre le bras de pesage et appuyez légèrement sur la touche de Marche/Arrêt
pour mettre la balance en marche. Le message de “0” apparaîtra sur l’écran de la balance
quelques secondes plus tard. Ensuite, sélectionnez l’unité de mesurage en pressant la
touche de MODE (Vous pouvez changer l’unité de mesurage en pressant la touche de
MODE lors de l’opération de pesage). La balance est maintenant prête à l’emploi. La
balance peut peser les poids de maximum de 3 kg.
Réinitialisation
Cette balance de cuisine dispose d’une fonction pratique de réinitialisation servant à
peser chaque matériel dans le même bol et de suite. Vous pouvez réinitialiser la balance
en appuyant sur la touche de TARE après avoir pesé le premier matériel. La balance est
réinitialisée lorsqu’elle montre le “0” à nouveau et est prête pour le pesage du matériel
suivant. N’oubliez pas de réinitialiser la balance après avoir pesé chaque matériel.
Dans le cas où le dernier matériel est retiré après la réinitialisation, le poids du matériels
qui est retiré sera affiché avec le signe de – devant. La balance se réinitialise à nouveau
en pressant la touche de TARE. Dans le cas où une surcharge est exercée sur la balance
(un poids plus lourd que 3 kg), le message de “err” sera affiché. Retirez les matériels
en trop de la balance et pressez la touche de TARE pour faire une réinitialisation. La
balance sera prête pour la nouvelle opération de pesage.
- 11 -
Page 13

ARRÊT DE L’APPAREIL
Pendant que la balance n’est pas utilisée, en vue d’économiser des piles, elle se positionne
automatiquement sur la situation d’arrêt 60 secondes plus tard. La balance peut en
même temps être arrêtée automatiquement en appuyant sur la touche de Marche/Arrêt.
Nettoyage et entretien
La surface de l’appareil doit être nettoyée à l’aide d’un chiffon doux humidifié avec de
l’eau et du détergent. Ensuite, elle doit être essuyée avec un tissu sec ou une serviette
en papier. N’utilisez pas de produits de nettoyage puissants et abrasifs pouvant
endommager la surface de l’appareil. N’immergez pas la balance dans l’eau ou dans
d’autres liquides. N’apposez pas la balance à proximité des sources de chaleur telles
que la table de cuisson ou le radiateur.
Utilisez uniquement des piles neuves qui sont à des dimensions correctes. Enlevez les
piles usées qui sont dans l’appareil étant donné que cela peut endommager les circuits
électroniques de la balance. Cette balance est destinée uniquement à l’usage domestique.
Aucun recours d’indemnité ne peut être fait en ce qui concerne les dommages survenus
en raison des erreurs de mesurage.
L’usager sera lui-même entièrement responsable des résultats pouvant se produire en
raison de l’usage de la balance à des fins pour les quelles elle n’est pas prévue ou en
raison de l’utilisation non conforme au mode d’emploi. En pareil cas, un dommage
d’appareil ou d‘une autre chose ne s’évalue pas dans les limites de garantie.
La protection de l’environnement et l’élimination des piles
Agissez de façon respectueuse envers l’environnement lorsque vous éliminez les piles.
Les piles usées ne doivent pas être jetées telles que les ordures ménagères ordinaires.
Mettez les piles au rebut en les déposant aux points de collectes autorisés. Étant donné
que les piles usées peuvent fuir de l’acide, assurez-vous que les piles ne sont pas trop
vieilles ou usagées. Vérifiez la date d’expiration inscrite sur les piles. N’oubliez pas de
retirer les piles avant de vous défaire du produit.
Mise au rebut de l’appareil
Les réglementations officielles stipulent la collection des appareils électriques
et électroniques pour la réutilisation ou le recyclage. Les équipements électriques
et électroniques portant le signe indiquant qu’ils doivent être collectés de façon
séparée doivent être remis aux points de collectes de déchets de la municipalité.
Garantie
Les demandes relatives à la garantie s’effectuent selon les lois en vigueurs. Pour réaliser
une demande quelle conque de garantie, la facture avec le cachet dessus doit être
présentée. L’appareil se rend au magasin d’où il a été acheté.
- 12 -
Page 14

DONNÉES TECHNIQUES
• Sinbo SKS 4515
• Poids minimum 5 g, poids maximum 3 kg, Sensibilité 1 gramme
• Cet appareil doit être mis au rebut tel qu’un déchet électronique
• Fonction de réinitialisation
• Écran digital LCD
• Arrêt automatique lorsqu’il n’est pas utilisé pendant 60 secondes.
• 2 unités de piles AAA piles (incluses dans le produit)
• Sensibilité de pesage: +/- %1.0
• Sensibilité d’horloge: +/- 1 minute par jours
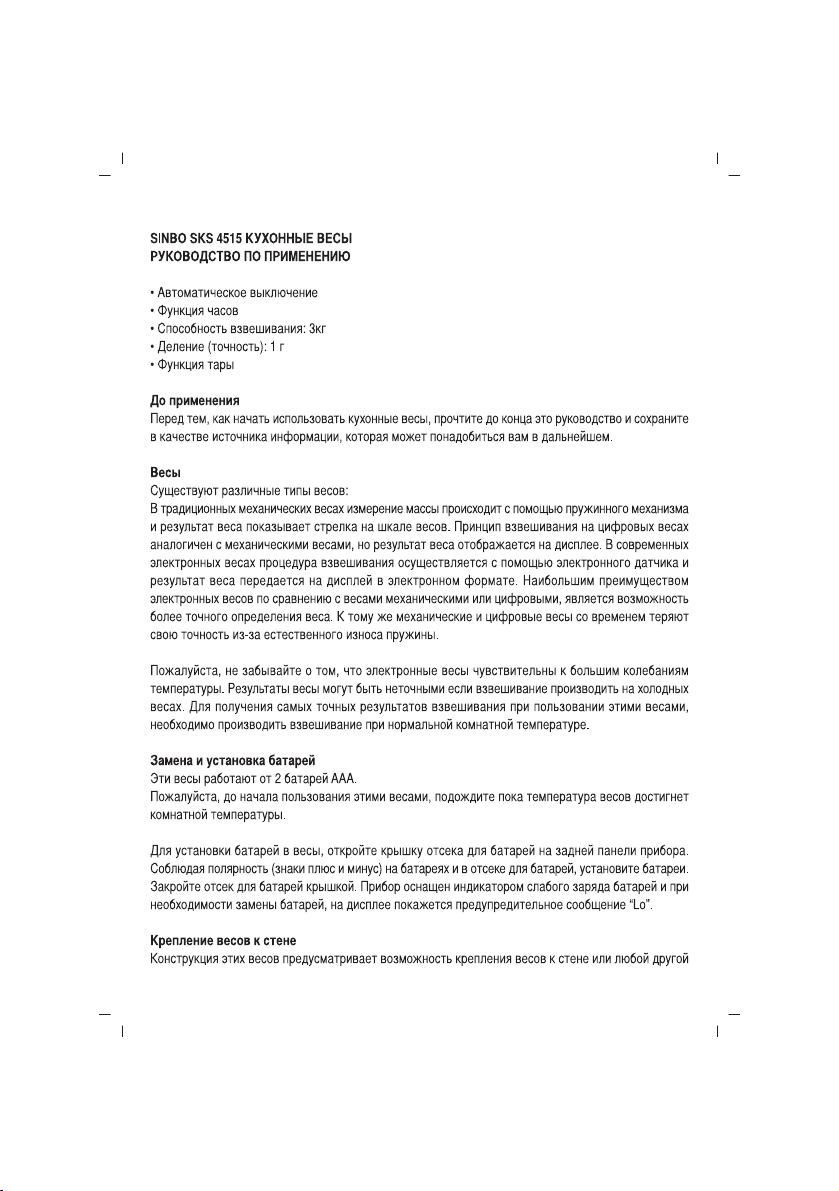
Description de l’appareil
1. Bouton de Marche/Arrêt
2. Bouton de Tare
3. Touche de Mode
4. Écran LCD
5. Plate-formes
2
3
1
4
5
- 13 -
Page 15

NEDERLANDS
S‹NBO SKS 4515 KEUKENWEEGSCHAAL
GEBRUIKSHANDLEIDING
• Automatische uitschakeling
• Uurfunctie
• Capaciteit: 3kg
• gevoeligheid 1 g
• Tarra functie
Voor ingebruikname
Neem de volledige handleiding aandachtig door vooraleer u de weegschaal in gebruik
neemt en bewaar ze als naslagbron.
Weegschalen
Er zijn verschillende soorten weegschalen:
De traditionele mechanische weegschaal meet het gewicht door middel van een
veersysteem en toont het aan met een wijzer. Een digitale weegschaal functioneert zoals
een mechanische weegschaal maar toont het meetresultaat op een scherm. Bij moderne
elektronische weegschalen gebeurt het meten door middel van een elektronische sensor
en verschijnt het resultaat op een scherm. Het voornaamste voordeel van elektronische
weegschalen vergeleken met mechanische en digitale weegschalen is dat ze een veel
nauwkeuriger meten. De precisie van mechanische en digitale weegschalen vermindert
bovendien na verloop van tijd, doordat de veer gaandeweg verslijt en aan gevoeligheid
verliest.
Vergeet niet dat elektronische weegschalen gevoelig zijn voor grote
temperatuurschommelingen. Het is mogelijk dat uw weegschaal in een koude omgeving
iets minder nauwkeurig weegt, bij normale kamertemperatuur zal ze echter optimaal
functioneren.
Plaatsen en vervangen van de batterijen
Deze weegschaal werkt met 2 AAA batterijen.
Wacht met het gebruik tot de weegschaal de normale kamertemperatuur heeft bereikt.
Om de batterijen te plaatsen opent u het deksel van het batterijenvakje aan de achterzijde
van het apparaat. Let erop dat u de batterijen degelijk in het vakje plaatst met de polen
in de juiste richting en sluit het deksel. Als de batterijen niet correct geplaatst zijn of
(bijna) leeg zijn, verschijnt de melding “Lo” op het scherm.
De weegschaal aan de wand monteren
Deze weegschaal kan aan een muur of een gelijkaardig stevig vertikaal oppervlak worden
- 14 -
Page 16

DE WEEGSCHAAL AAN DE WAND MONTEREN
gemonteerd. De weegschaal beschikt over twee montagesteunen, één bovenaan, één
onderaan. Vergeet niet de batterijen te installeren voordat u de weegschaal aan de wand
bevestigt. Maak gebruik van het meegeleverd sjabloon om zeker te zijn dat de gaatjes
die u in de muur of een ander oppervlak gaat boren, op de juiste plaats zitten. Monteer
de weegschaal met twee schroeven. Vergewis u ervan dat ze degelijk zijn aangebracht
en goed vast zitten, om te voorkomen dat het apparaat loskomt onder invloed van gewicht
en zwaartekracht.
Uurregeling
Deze weegschaal is uitgerust met een klok in 24-uur formaat en als het apparaat is
ingeschakeld maar niet wordt gebruikt, verschijnen de uurgegevens op het scherm.
Regel het uur als volgt:
Houd de MODUS toets enkele seconden ingedrukt tot de cijfers van het uur beginnen te
knipperen. Gebruik de TARRA toets om het uur te regelen – als de juiste cijfers op het
scherm verschijnen drukt u op de MODUS toets ter bevestiging. Vervolgens beginnen de
cijfers te knipperen die de minuten aantonen; regel door middel van de TARRA toets en
bevestig door op de MODUS toets te drukken. Als u de TARRA toets ingedrukt houdt
wisselen de cijfers op het scherm sneller.
Wegen
Klap het weegplateau omlaag en druk lichtjes op de AAN/UIT toets om de weegschaal
in te schakelen. Na enkele seconden verschijnt er een “0” melding op het scherm. Druk
vervolgens op de MODUS toets om de meeteenheid te selecteren (tijdens het weegproces
kunt u door op de MODUS toets te drukken de gewichtseenheid veranderen) Uw
weegschaal is nu gebruiksklaar. U kunt met deze weegschaal maximaal tot 3 kg gewicht
meten.
Terug op nul zetten (doorwegen)
Deze weegschaal beschikt over een praktische doorweeg functie die u toelaat de
ingrediënten te wegen die u achtereenvolgens in een kom doet. Nadat u het eerste
ingrediënt gewogen hebt drukt u op de TARRA toets om de weegschaal opnieuw op “0”
te zetten. Nu kan het volgende ingrediënt gewogen worden. Doe zo voort en vergeet niet
na elke weging de schaal weer op “0” te zetten.
Als u het laatst gewogen product, nadat de weegschaal naar “0” herzet is van de schaal
neemt, verschijnt het gewicht met een – teken op het scherm. Als u vervolgens op de
TARRA toets drukt wordt de schaal weer naar “0” herzet. Als de weegschaal overmatig
belast is (meer dan 3 kg totaal gewicht) wordt u gewaarschuwd door de “err” melding
op het scherm. Neem in dat geval de last van de weegschaal en druk op de TARRA toets
om de schaal naar “0” te herzetten.
- 15 -
Page 17
UITSCHAKELING VAN HET APPARAAT
Om de batterijen te sparen wordt de weegschaal, in geval ze niet gebruikt wordt, na ca.
60 seconden automatisch uitgeschakeld.
U kunt de weegschaal ook zelf uitschakelen door middel van de AAN/UIT toets.
Reiniging en Onderhoud
Reinig de weegschaal met een zachte, met water en een weinig detergent bevochtigde
doek en droog af met een droge doek of keukenpapier. Gebruik geen schurende of
bijtende schoonmaakmiddelen om het oppervlak van de schaal niet te beschadigen.
Dompel de weegschaal nooit in water of in een andere vloeistof. Installeer deze weegschaal
niet in de buurt van een vuur, radiator of andere warmtebron.
Gebruik uitsluitend nieuwe batterijen van het juiste formaat. Neem oude batterijen uit
het apparaat want zij kunnen beschadiging van de elektronische schakelingen veroorzaken.
Deze weegschaal is uitsluitend bedoeld voor huishoudelijk gebruik. Schade die voortvloeit
uit foutieve meting wordt niet vergoed.
De gebruiker draagt alle verantwoordelijkheid voor de gevolgen van het gebruik van de
weegschaal voor andere doelen of op een andere wijze dan beschreven in deze handleiding.
Beschadiging van de weegschaal of andere schade zullen in dit geval niet door de garantie
gedekt of vergoed worden.
Bescherming van het milieu en afvoeren van batterijen
Eerbiedig het milieu bij het verwijderen van de batterijen. Batterijen horen niet bij de
normale huishoudelijke afval maar moeten ingeleverd worden op de hiervoor bestemde
verzamelpunten. Bij oude batterijen kunnen zuurlekken ontstaan. Let op de uiterste
gebruiksdatum die op de batterijen vermeld staat en neem die in acht.
Vergeet niet de batterijen te verwijderen vooraleer u zich van het apparaat ontdoet.
Afvoeren van het apparaat.
Officiële regelgeving beveelt dat elektrische en elektronische apparaten die niet
meer gebruikt worden, moeten worden afgegeven op verzamelpunten voor
hergebruik of herverwerking. Elektrische en elektronische apparaten die het
symbool van afzonderlijke inzameling dragen, moeten ingeleverd worden op de plaatsen
die hiervoor door de gemeentelijke autoriteiten voorzien zijn.
Waarborg
Vorderingen in het kader van de waarborg zijn onderworpen aan de geldige wettelijke
bepalingen. Aanspraak op het recht van waarborg kan alleen gebeuren mits voorlegging
van een afgestempeld factuur of aankoopbewijs. U kunt het apparaat inleveren bij uw
leverancier.
- 16 -
Page 18
TECHNISCHE SPECIFICATIES
• Sinbo SKS 4515
• Weegbereik : min. 5 g. – max. 3 kg, gevoeligheid 1 gram
• Dit apparaat moet als elektronische afval worden afgevoerd
• Terug op “0” zetten - doorweeg functie
• Digitaal LCD scherm
• Automatische uitschakeling naar ca. 60 seconden.
• 2 stuks AAA batterijen (meegeleverd)
• Weegnauwkeurigheid: +/- %1.0
• Uur nauwkeurigheid : +/- 1 minuut per dag
Beschrijving van het apparaat
1. Aan/Uit toets
2. Tarra toets
3. Modus Toets
4. LCD Scherm
5. Weegplateaus
- 17 -
4
2
3
1
5
Page 19

ESPANOL
SINBO SKS 4515 BALANZA DE COCINA
GUÍA DEL USO
• Apagar automáticamente
• Función de reloj
• Capacidad: 3kg
• Función de tara
Antes de Utilizar
Antes de empezar a utilizar la balanza de cocina lee esta instrucción del uso y guárdela.
Balanzas
Hay varias balanzas:
La balanza mecánica tradicional hace la medición mediante el sistema de muelle, el
resultado de la medición se indica por aguja. Las balanzas digitales se funcionan como
las mecánicas pero el resultado de medición se indica en la pantalla. Las balanzas
electrónicas modernas realizan la medición mediante un sensor electrónico y transmite
el peso a la pantalla electrónicamente. La ventaja de las balanzas eléctricas según las
balanzas mecánicas o digitales es hacer la medición más sensiblemente. Las balanzas
mecánicas o digitales pierdan su sensibilidad porque el muelle se deforma en el tiempo.
Por favor no olvide que las balanzas electrónicas son sensibles a los cambios grandes
de la temperatura. Si la balanza es fría la medición no se puede ser sensible. Esta balanza
indica el mejor resultado en la temperatura de habitación.
Cambiar y Montar las Pilas
Esta balanza se funciona por 2 pilas de AAA.
Por favor antes de empezar a utilizar la balanza espere que se llegue a la temperatura
de habitación.
Para montar las pilas a la máquina, desmonte la tapa pequeña que está tras de la
máquina. Las pilas se deben montar al encaje de pila correctamente. Tiene que estar
seguro que las pilas se montan en la dirección correcta. Monte la tapa. Si el nivel de pila
es baja y se necesita cambiar las pilas, se muestra el aviso de “Lo”.
Montar la balanza al muro
Esta balanza se ha configurada en la forma para montar en la cualquier superficie
vertical. Esta balanza tiene dos apoyo de montaje, uno en la parte superior y otro en
inferior. Antes de montar la balanza al muro no olvide fijar las pilas. Antes de hacer
hueco en el muro u otra superficie para los huecos correctos utilice el esquema que se
viene con el producto. Fije la balanza por dos tornillos, tenga en cuenta que los tornillos
están fijados correctamente. Si no, la máquina se desmonte por la carga y gravedad.
- 18 -
Page 20

CONFIGURACIÓN DEL RELOJ
Esta balanza tiene un reloj de la forma de 24-horas y si la máquina no hace el proceso
de medición, se muestra la información de reloj en la pantalla. Antes de empezar a
utilizar la balanza, configure el reloj.
El reloj se configura por pulsar el botón de MODE por unos segundos. Después de pulsar
el botón los números del reloj se empiezan a iluminar. Configura el reloj por utilizar el
botón de TARE (TARA). Cuando se muestra los números correctos del reloj, confirme
por pulsar el botón de MODE. Luego los números de minuto se empiezan a iluminar.
Configure el minuto por utilizar el botón de TARE y cuando se muestra los números
correctos en la pantalla, confirme por pulsar el botón de MODE. Los números se cambian
más rápido si se deja pulsado el botón de TARE.
Pesar
Haga bajar el brazo de pesar y para hacer funcionar la balanza pulse el botón de
ABRIR/APAGAR. Después de unos segundos se muestra el mensaje de “0” en la pantalla
de balanza. Luego por pulsar el botón de MODE elige la unidad de medición (puede
cambiar la unidad de medición durante el proceso de medición por pulsar el botón de
MODE). La balanza está lista para utilizar. La balanza se puede pesar los pesos máximo
3kg.
Volver a Cero
Esta balanza tiene una función de volver a cero prácticas para pesar todos los materiales
en la misma caja. Después de pesar el primer material puede hacer cero la balanza por
pulsar el botón de TARE. Cuando la balanza se muestra “0” significa que la balanza se
ha hecho cero y está listo para pesar el material siguiente. Después de pesar cada
material no olvide hacer cero la balanza.
Después del proceso de volver a cero ultimo se muestra el peso del material tirado se
muestra con su signo. La balanza se vuelve a cero por pulsar el botón de TARE. Si se
carga la balanza excesivamente (más de 3kg) se muestra el mensaje de “err” en la
pantalla. Tire los materiales excesivos desde la balanza y para volver a cero pulse el
botón de TARA. La balanza estará lista para la nueva medición.
Apagar la máquina
Si no se utiliza la balanza para el ahorro de las pilas se apaga después de 60 segundos
aproximadamente.
Además la balanza se puede apagar automáticamente por pulsar el botón de
ABRIR/APAGAR.
Limpieza y Mantenimiento
La superficie de la máquina se debe limpiar por un paño humedecido por agua y detergente.
- 19 -
Page 21
LIMPIEZA Y MANTENIMIENTO
Luego tiene que secarla por un paño seco o toalla de papel. No utilice los materiales
abrasivos que se pueden deformar la superficie de la máquina. No mete la balanza en
el agua u otro líquido. No ponga la balanza cerca de las fuentes de calor como horno o
radiador.
Solo utilice las pilas en los tamaños apropiados. Tire las pilas viejas porque se pueden
dañar los circuitos electrónicos de la balanza. Esta balanza es solo para el uso domestico,
por las faltas de medición no se puede demandar indemnización.
Por el uso para los objetos excepto indicados en el guía y su objeto de diseño, el usuario
tiene todos los responsabilidades ocurridas. En este caso los daños de la máquina u otro
material no se pueden considerar en el entorno de garantía.
Protección de Medioambiente y Tirar las pilas
Para tirar las pilas haga con la sensibilidad medioambiental. Las pilas utilizadas no se
deben tirar con los residuos domésticos. Tire las pilas por llevarlas al centro de acumular
autorizado. Tiene que estar seguro que las pilas no son tan viejos porque se puede ocurrir
escape de acido. Controle la fecha de último uso de las pilas.
Para tirar el producto no olvide tirar las pilas.
Tirar el producto
Las disposiciones oficiales para el re-uso y reciclaje de las máquinas eléctricas
y electrónicas, tienen la condición de acumularlas. Si las máquinas eléctricas
o electrónicas tienen el signo que se significa acumular separadamente se deben
llevar a los puntos de acumular los residuos del ayuntamiento.
Garantía
Las peticiones sobre la garantía se hacen según la ley vigente. Para realizar una petición
de garantía tiene que mostrar la factura con el sello. La máquina se puede revolver a
la tienda que se ha comprado.
Datos Técnicos
• Sinbo SKS 4515
• Peso mínimo 5g, peso máximo 3kg, 1 g de sensibilidad.
• Esta máquina se debe tirar como residuo electrónico.
• Función de volver a cero.
• Pantalla digital de LCD
• Apagar automáticamente si no se utilizar por 60 segundos.
• 2 pilas de AAA (se incluye)
• Sensibilidad de la balanza: +/- %1.0
• Sensibilidad de reloj: +/-1minuto en el día.
- 20 -
Page 22
INTRODUCCIÓN DE LA MÁQUINA
1. Botón de Abrir/Apagar
2. Botón de Tara
3. Botón de Mode
4. Pantalla de LCD
5. Plataforma
4
2
3
1
5
- 21 -
Page 23
RUSSIAN
- 22 -
Page 24
- 23 -
Page 25
- 24 -
Page 26

- 25 -
4
2
3
1
5
Page 27

HRVATSKI
SINBO SKS 4515 KUHINJSKA VAGA
UPUTE ZA UPORABU
• Automasko iskljuˇcenje
• Funkcija sata
• Kapacitet: 3kg
• Preciznost 1 g
• Tara funkcija
Prije prve uporabe
Prije poˇcetka uporabe kuhinjske vage temeljno proˇcitajte ove upute za uporabu i saˇcuvajte
ih za budu´ce potrebe.
Vage
Postoje razne vrste vaga:
Tradicionalna mehaniˇcka vaga koja mjerenje vrˇsi putem mehanizma opruge - mjerni
rezultat se pokazuje iglom. Digitalna vaga radi na istom principu kao i mehaniˇcka ali je
mjerni rezultat prikazan na zaslonu. Moderna elektronska vaga mjerenje vrˇsi putem
elektronskog senzora i mjerni rezultat daje na zaslonu. Najve´ca prednost elektronskih
vaga u odnosu na mehaniˇcke ili digitalne vage je mnogo preciznija mogu´cnost mjerenja.
Zbog oˇste´cenja opruga koje koriste mehaniˇcke i digitalne vage vremenom moˇze do´ci do
gubitka preciznosti.
Molimo vas da ne zaboravite da su elektronske vage osjetljive na velike promjene
temperature. Ako je vaga hladna izvrˇseno mjerenje ne´ce biti precizno. Vaga najbolju
performansu pokazuje na sobnoj temperaturi.
Zamjena i umetanje baterija
Ova vaga radi uz pomo´c dvije AAA baterije.
Molimo vas da prije poˇcetka uporabe vage saˇcekate da postigne sobnu temperaturu.
Podignite mali poklopac pretinca za baterije koji se nalazi na straˇznjoj strani vage.
Umetnite baterije u pretinac za baterije. Uvjerite se da su baterije pravilno postavljene.
Vratite poklopac pretinca za baterije. Ako su baterije oslabile i potrebno ih je zamjeniti
na zaslonu ´ce se pojaviti upozoravaju´ca poruka “Lo”.
Montiranje vage na zid
Ova vaga je dizajnirana tako da se moˇze montirati na zid ili neku drugu vertikalnu povrˇsinu.
Vaga posjeduje dva nosaˇca za montiranje na zid jedan u gornjem i jedan u donjem dijelu.
Prije montiranja vage na zid ne zaboravite umetnuti baterije. Za pravilno buˇsenje rupa
u zidu ili na nekoj drugoj povrˇsini koristite ˇsablon koji je priloˇzen skupa sa proizvodom.
Vagu priˇcvrstite uz pomo´c dva vijka i uvjerite se da ste vijke pravilno postavili. U suprotnom
zbog teˇzine i gravitacije moˇze do´ci do odvajanja ured¯aja.
- 26 -
Page 28

PODEˇSAVANJE VREMENA
Ova vaga je opremljena satom u formatu 24 sata i kada ne vrˇsite vaganje na zaslonu se
oˇcitava vrijeme. Prije poˇcetka uporabe vage podesite sat.
Sat podesite tako ˇsto ´cete tipku MODE drˇzati pritisnutu nekoliko sekundi. Nakon pritiska
na tipku MODE na zaslonu ´ce poˇceti da trepere znamenke sata. Uporabom tipke TARE
podesite sat. Kada se na zaslonu pojavi stvarno vrijeme pritisnite na tipku MODE za
potvrdu. Nakon toga poˇce´ce da trepere znamenke za minute. Uporabom tipke TARE
podesite minute i za potvrdu pritisnite na tipku MODE. Pritiskom na tipku TARE brojke
´ce se mjenjati mnogo brˇze.
Vaganje
Spustite platformu za vaganje i lagano pritisnite na tipku za UKLJˇCITI/ISKLJUˇCITI(ON/OFF).
Nakon nekoliko sekundi na zaslonu vage pojavi´ce se poruka “0”. Nakon toga pritisnite
na tipku MODE i odaberite mjernu jedinicu. (pritiskom na tipku MODE za vrijeme vaganja
moˇzete promjeniti mjernu jedinicu). Vaga je spremna za uporabu. Vaga moˇze vagati
maksimalno 3 kg.
Resetovanje
Ova kuhinjska vaga posjeduje praktiˇcnu funkciju resetovanja za vaganje viˇse stvari jedne
na drugoj u istoj posudi. Nakon vaganja prvih sastojaka kratko pritisnite na tipku TARE
i resetujte vagu. Vaga je ponovo resetovana na “0” i spremna za sljede´ce vaganje. Ne
zaboravite da nakon svakog vaganja resetujete vagu.
Ako posljednje sastojske koje ste vagali izvadite nakon resetovanja pokaza´ce se teˇzina
izdvojenih sastojaka. Pritisnite na tipku TARE i ponovno resetujte vagu. Kod preoptere´cenja
vage (preko 3 kg) na zaslonu ´ce se pojaviti poruka “err”. Sklonite viˇsak materijala s vage
i za resetovanje pritisnite na tipku TARE. Vaga ´ce biti spremna za novo vaganje.
Iskljuˇcenje ured¯aja
Kada vagu ne koristite u cilju uˇstede baterija nakon 60 sekundi vaga ´ce se automatski
iskljuˇciti. U isto vrijeme vagu moˇzete automatski iskljuˇciti pritiskom na tipku
UKLJUˇCITI/ISKLJUˇCITI.
ˇ
Ciˇs´cenje i odrˇzavanje
Ured¯aj moˇzete oˇcistiti mekanom krpicom umoˇcenom u rastvor blagog deterdˇzenta.
Nakon toga posuˇsite suhom krpom ili papirnim rupcem. Za ˇciˇs´cenje vage ne koristite
abrazivna sredstva koja mogu oˇsteti njenu povrˇsinu. Vagu ne uranjajte u vodu i neke
druge teku´cine. Vagu ne postavljajte u blizini izvora toplote kao ˇsto su ˇstednjak i radijator.
Koristite iskljuˇcivo nove i odgovaraju´ce baterije. Izvadite dotrajale baterije iz ured¯aja jer
one mogu nanijeti ˇstetu elektronskim spojevima. Ova vaga je namjenja samo za ku´cansku
uporabu. Ne moˇze se zahtjevati odˇsteta zbog ˇstete uzrokovane pogreˇsnim vaganjem.
- 27 -
Page 29

POSTUPAK VAGANJA
Sve posljedice izazvane uporabom vage u svrhe za koje nije dizajnirana ili na naˇcin koji
nije opisan u ovim uputama za uporabu snosi korisnik. Oˇste´cenja vage uzrokovana ovim
stanjima nisu obuhva´cena u okviru jamstva.
Zaˇstita okoliˇsa i zbrinjavanje baterija
Zbrinjavanjem dotrajalih baterija potrebno je povesti raˇcuna o zaˇstiti ˇzivotnog okoliˇsa.
Istroˇsene baterije ne treba bacati skupa s ostalim ku´canskim otpadom. Istoˇsene baterije
predajte u sabirne centre. Stare baterije mogu ispustiti kiselinu pa stoga treba provjeriti
da li se radi o jako ostarjelim i dotrajalim baterijama. Provjerite rok trajanja baterija koji
je utisnut na njima. Prije zbrinjavanja starog ured¯aja ne zaboravite izvaditi baterije iz
njega.
Zbrinjavanje starog ured¯aja
Zvaniˇcna ured¯enja zahtjevaju prikupljanje starih elektriˇcnih i elektronskih ured¯aja
u cilju njihove reciklaˇze i ponovne uporabe. Elektriˇcnu i elektronsku opremu na
kojoj se nalaze simboli za posebno sakupljanje treba predati u op´cinske sabirne
centre.
Jamstvo
Zahtjevi vezani za jamstvo ostvaruju se u skladu sa vaˇze´cim zakonom. Za ostvarenje bilo
kog zahtjeva u okviru jamstva potrebno je priloˇziti raˇcun sa peˇcatom. Ured¯aj se moˇze
vratiti trgovini u kojoj je kupljen.
Tehniˇcki podaci
• Sinbo SKS 4515
• Minimalna teˇzina 5 g, maksimalna teˇzina 3 kg, preciznost 1 gram
• Ovaj ured¯aj treba zbrinuti kao elektronski otpad
• Funkcija resetovanja
• Digitalni LCD zaslon
• Automatsko iskljuˇcenje za 60 sekundi
• 2 baterije AAA (priloˇzene)
• Preciznost vage: +/- %1.0
• Preciznost sata: Dnevno +/- 1 minuta
Opis Ured¯aja
1. Gumb za ukljuˇciti/iskljuˇciti
2. Gumb Tara
3. Gumb Mode
4. LCD zaslon
5. Platformas
-28 -
4
2
3
1
5
Page 30

- 29 -
Page 31

- 30 -
Page 32
- 31 -
Page 33

4
2
3
1
5
- 32 -
Page 34

YETK‹L‹ SERV‹SLER L‹STES‹
ADANA-SEYHAN-DORUK SO⁄UTMA -REfiATBEY MAH. AV. MEHMET ERO⁄LU CAD. NO:8-TEL.:0322 458 55 14 ADANA-KOZAN-DURAN
SO⁄UTMA-CUMHUR‹YET MH. DEDEO⁄LU SK. S‹S. APT.- TEL.:0322 516 57 78 ADANA-SEYHAN-DÜZOVA ELEKTR‹K - KÜÇÜK SAAT
MEYDANI HILAL HAN IS MRK NO 32 - TEL.:0322 363 67 87 ADANA-SEYHAN-ÖZER ELEKTRON‹K - OBALAR CAD. SAL‹H ZEK‹ BUGAY ‹fi
HANI NO:11 - TEL.:0322 352 25 75 ADANA-SEYHAN-SER‹N ELEKTRON‹K - MAHFESI⁄MAZ MH. KENAN EVREN BULV. 21.SK. KAROL S‹T.
E BLOK NO:2/A - TEL.:0322 233 74 84 ADANA-CEYHAN-URANYUM ELEKTRON‹K - ‹NÖNÜ BULVARI NO: 172 - TEL.:0322 611 29 95
ADANA-CEYHAN-CEYHAN ELEKTRON‹K - BÜYÜKKIRIM MH. MEHMET fiER‹F Y‹⁄‹T CD. 4.SK. NO:3/B TEL. : 0322 613 45 96 ADIYAMANYILDIRIM SERV‹S - BAHÇEL‹EVLER MH. 177 SK. NO:2 - TEL.:0416 214 40 83 ADIYAMAN-KAHTA-ELK. EV ALET. TAM‹RC‹S‹-FAT‹H MH.
ZAFER CD. NO:20 - TEL.:0416 725 99 89 ADIYAMAN-ÜNAL ELEKTRON‹K-BAHÇEL‹EVLER MAH. ESK‹ KAHTA CAD. NO:11/A-TEL.:0416
216 75 56 ADIYAMAN-BEYAZ EfiYA TAM‹R‹-ÇATI MH. BADEM SK. NO:11 BESN‹ TEL.: 0416 318 32 00 AFYON-EM‹N ELEKTRON‹K-ENST‹TÜ
CAD. NO:19-TEL.:0272 215 43 32 AFYON-D‹NAR-GÖKÇEO⁄LU ELEKTR‹K-EMN‹YET MH. YEN‹YOL CD. 146 BLOK NO:4-TEL.: 0272 353 53
44 A⁄RI-PATNOS-ACELE PEfi‹N ELEKTRON‹K-BUHARA SOK. NO:12-TEL.:0472 616 46 08 A⁄RI-ÖZPAK ELEKTRONIK-ESKI VAN CAD
NO: 341 Ömer Hamam Yan›-TEL.:0472 216 53 14 AKSARAY-‹T‹NA ELEKTR‹K-TAfi PAZARI MH. fiEH‹T HAT‹P UÇKUN SK. ESK‹ TERM‹NAL
ÇIKIfiI NO:9/A-TEL.:0382 212 63 99 AMASYA-KUTUP TEKN‹K SO⁄UTMA-GÖKMEDRESE MAH. M.K.P. CAD. HAM‹TBATIR APT. NO:115/ATEL.:0358 212 61 66 AMASYA-SULUOVA-ÇALIfiKAN ELEKTRON‹K-ÖZEL ‹DARE ‹fi HANI NO:121-TEL.:0358 417 18 64 AMASYA-FLAfi
ELEKTRON‹K-YÜZEVLER MAH.TORUMTAY SOK. NO:25 DEM‹RD‹fi APT. ALTI-TEL.:0358 212 33 71 ANKARA-YEN‹MAHALLE-ERDO⁄DU
SO⁄UTMA-ÇARfiI MH. DAMLADOL SK. NO:74/C-TEL.:0312 315 60 25 ANKARA-KEÇ‹ÖREN-VEFA ELEKTRON‹K-PINARBAfiI MH. AfiIK
PAfiA CD. NO: 67/C-TEL.:0312 380 42 30 ANKARA-MAMAK-YÜCEL ELEKTRON‹K-ASIM GÜNDÜZ CD. 20/D-TEL.:0312 365 14 14 ANKARAÇANKAYA-GÖKSEL ELEKTRON‹K-21.CD. KARTAL KAYA APT. NO:29/A KIRKKONAKLAR-TEL.:0312 496 42 53 ANKARA-ÇANKAYA-ATC
‹LET‹fi‹M-SELAN‹K CAD. NO: 31/3-TEL.: 0312 419 82 70 ANKARA-GÖLBAfiI-BEKS SERV‹S H‹ZMETLER‹-SE⁄MENLER MAH. CEMAL
GÜRSEL CAD. NO:51/A-TEL.:0312 484 21 19 ANKARA-BEYPAZARI-DO⁄AN TEKN‹K-KAYHAN GÜVEN CD. NO:22/C-TEL.:0312 762 89 19
ANKARA-S‹NCAN-Y‹⁄‹T TEKN‹K ONARIM-M.Ç.M. 12. CADDE GÜLSUYU SK. NO:5/21-TEL.:0312 264 10 31
ANKARA-KEÇ‹ÖREN-MERT TEKN‹K SERV‹S-ÖZYURT CD. NO:27/A AKTEPE-TEL.: 0312 380 00 22 ANKARA-ERYAMAN-ARSLANLAR
ELEKTRON‹K-GÜZELKENT MAH.ÇARfiI ARYA 511 SK. NO:40-TEL.:0312 279 16 41 ANKARA-KIZILAY-ARTUKLU ELEKTR‹KL‹ EV ALETLER‹-
SAKARYA CD. ÖRNEK ‹fiHANI NO:8/70 TEL. : 0312 435 83 55 ANTALYA-KUMLUCA-AKGÜL TEKN‹K SERV‹S H‹ZMETLER‹-ADNAN
MENDERES BULV.KAVAKLI KUYU CAD. YED‹TEPELER KAR.SULAR APT.NO:9-TEL.:0242 887 53 80 ANTALYA-CANKALP ELEKTRON‹K-
TUZCULAR MAH. ‹MARET SOK. FARAÇLAR PASJ.NO:11-TEL.:0242 242 31 35 ANTALYA-MANAVGAT-ÖNAL ‹LET‹fi‹M-AfiA⁄I PAZARCI
MH. ‹BRAH‹M SÖZEN CD. fiELALE PSJ.NO: 18 1006 SK. TEL.:0242 742 35 36 ANTALYA-ALANYA-Ç‹NTAfi ELEKTRON‹K-SARAY MH.
ATATÜRK CD. HACI HAMD‹ O⁄LU SK.NO: 20/A-TEL.:0242 513 88 85 ANTALYA-MERKEZ-BÜYÜKGEB‹Z ELEKTROMEKAN‹K GÜVENL‹K-
MUSTAFA GÖKSU-KIZILSARAY MH. DOLAPLIDERE CD. 80 SK. ÇAKMAK ‹fi HANI NO: 8/5-6 TEL. :0242 243 33 90 ARDAHAN-YILDIRIM
ELEKTR‹K-ATATÜRK CAD.NO:69-TEL.:0478 211 28 58 ARTV‹N-ARTV‹N ELEKTR‹K-HALKEVI CADDESI NO: 12-TEL.: 0466 212 10 82 AYDINYILMAZ ELEKTRON‹K-KURTULUS MH. GARAJ CD. NO:5/B-TEL.:0256 212 00 35 AYDIN-SÖKE-ÖZLEM ELEKTRON‹K-YEN‹ CAM‹ MH.
SEK‹LER CD. NO: 47-TEL.:0256 518 26 40 AYDIN-NAZ‹LL‹-BARIN ELEKTRON‹K-ALTINTAfi MH. HÜRR‹YET CD. NO:161 B-TEL.: 0256 315
43 21 BALIKES‹R-BANDIRMA-ANIL SO⁄UTMA-GÜNAYDIN MAH. 2.OKUL CAD.NO:16/A-TEL.:0266 713 56 78 BALIKES‹R-EDREM‹T-ÖZER
TEKN‹K-CAM‹ VASAT MH. PARK CD. NO:12/A-TEL.:0266 373 12 44 BALIKES‹R-BURHAN‹YE-U⁄UR TEKN‹K SO⁄UTMA-MAHKEME MH.
M‹THATPAfiA CD. NO: 68-TEL.:0266 412 86 89 BALIKES‹R-KILIÇ ELEKTRON‹K-YEN‹ ÇARfiI BASIN SOK. NO: 4/B-TEL.:0266-241 87 54
BALIKES‹R-GÖNEN-GÜRSES ELEKTRON‹K-MALKOÇ MAH.MÜFTÜ fiEVKET CAD. 76.SOK. NO:2/B-TEL.:0266 762 01 28 BALIKES‹RBANDIRMA-D‹J‹TAL ELEKTRON‹K-17 EYLÜL MAH.HAVUZLU BAHÇE SK.NO:8/A-TEL.:0266 715 16 46 BALIKES‹R-ERDEK-MERT TEKN‹K-
YALI MH. HÜKÜMET CD. NO:55-TEL.:0266 845 61 10-97 BARTIN-MARTI ELEKTRON‹K-HENDEKYANI CAD. ORTA MAH.101/B - BARTINTEL.:0378 228 34 22 BATMAN-fiAH‹NLER ELEKTRON‹K-CUMHUR‹YET CD. NO:20 2000 ‹fi MERKEZ‹ KARfiISI-TEL.:0488 213 17 02 B‹LEC‹K-
EDEBAL‹ TEKN‹K-‹ST‹KLAL MH V.REF‹K A ÖZTÜRK CD NO: 1/A-TEL.:0228 212 46 80 B‹NGÖL-KARLIOVA-MEHMET KARTAL - KARTAL
ELEKTRON‹K-CUMHUR‹YET CD. NO:8-TEL.:0426 511 26 39 B‹NGÖL-S‹MGE ELEKTRON‹K- YEN‹fiEH‹R MH. YEfi‹M SK. BO⁄ATEK‹N APT
ALTI NO:14/C-TEL.:0426 213 77 56 B‹TL‹S-AHLAT-U⁄UR SO⁄UTMA-TOK‹ KONUTLARI YUKARI ÇARfiI-TEL.:0434 412 41 72 B‹TL‹S-D‹ZAYN
ELEKTR‹K-NUR CAD. EREM CENTER ‹fi MERKEZ‹KAT:2 NO:5-TEL.:0434 226 74 43 BOLU-BEST ELEKTRON‹K-TABAKLAR MAH.CUMHUR‹YET
CAD.NO:28/B-TEL.:0374 218 12 25 BURSA-OSMANGAZ‹-AKYÜZ ELEKTRON‹K-ÇIRPAN MH. UYSAL SK. NO:13/B-TEL.:0224 254 60 76
BURSA-GEML‹K-AC‹L TV TAM‹R SERV‹S‹-DEM‹R SUBAfiI MH. FIRIN SK. NO:7-TEL.:0224 514 71 20 BURSA-MUDANYA-ER T‹CARET-
ÖMERBEY MH. CAM‹ SK. SU APT. NO:30-TEL.:0224 544 86 16 BURSA-MUSTAFAKEMALPAfi-AGUfi ELEKTR‹K-HAMZABEY MAHALLESI
PAZARYERI SOKAK NO: 2/A-TEL.:0224 613 19 99 BURSA-‹NEGÖL-S.B.S ELEKTRON‹K-OSMAN‹YE MH.DERE SK. N:25/D-TEL.:0224 715
48 94 BURSA-KARACABEY-GÜRKAN T‹CARET-RUNGUÇPAfiA MH. 14. SK. NO:11-TEL.: 0224 676 66 80 BURSA-N‹LÜFER-ÖZME TEKN‹K-
KARAMAN MH. BAYINDIR SK. NO:4/B CARREFOUR KARfiISI-TEL.: 0224 249 12 48 ÇANAKKALE-ÇAN-TÜRKER ELEKTRON‹K-CUMHUR‹YET
MAH. ÇANAKKALE CAD.NO:41-TEL.:0286 416 13 89 ÇANAKKALE-GEL‹BOLU-GÜVEN ELEKTRON‹K-YAZICIZADE MAH. M‹RALAY fiEF‹K
AKER CAD. 2. SOK NO:4 / A TEL.:0286 566 90 70 ÇANAKKALE-MERKEZ-SAM ELEKTRON‹K-‹SMETPAfiA MH. ARSLANCA SK.-TEL.:0286
212 35 59 ÇANKIRI-B‹LG‹ÇLER ELEKTRON‹K-BUGDAY PAZARI MH. A.TALAT ONAY BULVARI SAIM A⁄A S‹T. B/BLOK TEL.:0376 213 48
19 ÇORUM-H‹T‹T SO⁄UTMA-YEN‹YOL MH. MÜFTÜ AHMET GÖKEfiME SK. NO: 5 / I-TEL.:0364 225 70 58 ÇORUM-U⁄UR ELEKTRON‹K-
ÜÇTUTLAR MAH. FAT‹H CAD. 5.SOK.EYÜP SULTAN APT. NO:1/C-TEL.:0364 227 44 91 ÇORUM-ÖMÜR ELEKTRON‹K-CENG‹ZTOPEL CAD.
NO:2/F-TEL.:0364 224 68 09 ÇORUM-ALACA-EROL ELEKTRON‹K-AYHAN MH. ANKARA CD. NO:18-TEL.:0364 411 42 03 ÇORUM-GÜNDÜZ
BEYAZ EfiYA SERV‹S‹-SUNGURLU-SUNGURO⁄LU MH. ÇANKIRI CD. NO: 46-TEL.:0364 311 31 13 DEN‹ZL‹-KARDELEN SO⁄UTMA-EMEK
CD. NO: 30-TEL.:0258 241 67 31 DEN‹ZL‹-ÖZ ELEKTRON‹K-ÇAYBAfiI CD. ÜNAL APT. NO: 28-TEL.:0258 261 29 25 DEN‹ZL‹-MERKEZ-
ÇA⁄LAYAN SO⁄UTMA-TOPRAKLIK MH. TURAN GÜNEfi CD.NO:34 TEL. : 0258 242 85 86 D‹YARBAKIR-B‹SM‹L-fiIK ELEKTR‹K-KURTULUfi
MH. AHMET AR‹F BULVARI NO: 19/F-TEL.:0412 415 05 94 D‹YARBAKIR-‹LKADIM T‹CARET-BATIKENT S‹T. A/5 BLOK ALTI NO:1 SA⁄LIK
OCA⁄I YANIBA⁄LAR-TEL.:0412 235 70 89 D‹YARBAKIR-AZ‹Z ELEKTRON‹K-HATBOYU CD. 469. SK. GÜNEfi 2 APT. NO:3/B-TEL.:0412 223
33 46 D‹YARBAKIR-S‹LVAN-DIGITAL ELEKTRONIC-KALE MH. SAM‹ SEÇK‹N CD. NO:9/B-TEL.:0412 711 44 14 D‹YARBAKIR-JAPON
- 33 -
Page 35

YETK‹L‹ SERV‹SLER L‹STES‹
RECEP-YENI MAH 19 MAYIS CAD NO74-TEL.:0412 511 24 10 D‹YARBAKIR-BA⁄LAR-AZ‹Z ELEKTRON‹K-HATBOYU CD. 469 SK. NO:3/BTEL.: 0412 236 81 10 DÜZCE-ENSAR TEK SU S‹STEMLER‹-AZM‹N‹LL‹ MH. AYDINPINAR CD. SERHAT SK.NO:1/B-TEL.:0380 514 34 12
DÜZCE-BULUfi ELEKTRON‹K-CED‹D‹YE MAH. M‹MAR S‹NAN CAD.-TEL.: 0380 514 66 81 ED‹RNE-UZUNKÖPRÜ-GÜVEN TEKN‹K-GAZ‹
CAD. YUSUF SOK. YURDACAN PASAJI NO:7-TEL.:0284 513 89 66 ED‹RNE-YILDIZ SO⁄UTMA-1.MURAT MH. GÜNGÖR MAZLUM CAD.
SERHAT S‹TES‹ B/BLOK 35/A-TEL.:0284 235 37 63 ED‹RNE-KEfiAN-MUTLU TEKN‹K-YUKARI ZAFER‹YE MH. ‹LYASBEY CD. NO:32/BTEL.:0284 715 22 71ELAZI⁄-ÖZDEV TEKN‹K -‹ZZETPAfiA MAH.KAZIM BAYER CAD.NO:24/A-TEL.:0424 238 51 67 ELAZI⁄-YILMAZ BOB‹NAJ-
YEN‹ MAH. KEMAL fiEDELE CAD. NO: 12/E-TEL.:0424 212 08 96 ELAZI⁄-GÜNEfi ELEKTRON‹K-KÜLTÜR MAH. VAL‹ FAHR‹BEY CAD.NO:113/DTEL.:0424 233 10 18 ERZ‹NCAN-AYDINLAR ELEKTR‹K-‹NÖNÜ MAH. MERKEZ ÇARfiISI 15.SK NO:5 -TEL.:0446 223 59 76 ERZ‹NCAN-
REFAH‹YE-B‹LG‹N ELEKTRON‹K-ERZ‹NCAN CAD. BELED‹YE ‹fi HANI-TEL.:0446 611 26 10 ERZURUM-OLTU-GÜVEN ELEKTRON‹K-
Z‹YABEY CAD. BELED‹YE PSJ. NO:6-TEL.:0442 816 42 23 ERZURUM-AT‹LAY ELEKTRON‹K-KONGRE CAD. HASIRHAN PASJ. NO:87TEL.:0442 213 30 60 ERZURUM-‹SP‹R-YILMAZ ELEKTRON‹K-Z‹YAPAfiA CD. AfiA⁄I MH. NO:186-TEL.:0442 451 40 95 ESK‹fiEH‹R-ARZU
ELEKTRON‹K-DEL‹KL‹TAfi MH. GÜRMAN SOK. NO:37/B-TEL.:0222 234 87 15 ESK‹fiEH‹R-S‹VR‹H‹SAR-DERMAN ELEKTRON‹K-CAM‹KEB‹R
MH. YUNUSEMRE CD. NO:7-TEL.:0222 711 22 60 GAZ‹ANTEP-ELEKTR‹KL‹ EV ALETLER‹ TAM‹RC‹S‹-MÜTERC‹M ASIM CAD. KÖRÜKÇÜ
SOK. NO:8/A-TEL.:0342 231 00 73 GAZ‹ANTEP-ISLAH‹YE-YILMAZ SO⁄UTMA-AYDINLIK MH. GÖZ CAD.ÜNLÜ S‹TES‹ NO: 2-TEL.:0342 862
12 20 GAZ‹ANTEP-‹K‹ZO⁄LU ELEKTRON‹K-BEY MAH. EBLEHAN ÇARfiISI NO:12/A-TEL.:0342 230 71 00 GAZ‹ANTEP-N‹Z‹P-ÇAPAN
TEKN‹K-CUMHUR‹YET MAH. MERMER SOK. NO:10-TEL.:0342 517 51 66 G‹RESUN-BULANCAK-YÜKSEL SO⁄UTMA-‹HSAN‹YE MH. CEMAL
GÜRSEL. CD. NO: 257-TEL.:0454 318 17 28 G‹RESUN-U⁄UR ELEKTRON‹K-HACI HÜSEY‹N MH. GAZ‹ CD. NO: 185 / 1-TEL.:0454 212 00
90 GÜMÜfiHANE-GÜMÜfiHANE SERV‹S‹-HASANBEY MH. HASANBEY CD.NO:17/A-TEL.:0456 213 51 54 HATAY-SAMANDA⁄-GÜNEfi
ELEKTR‹K-ATATÜRK MAH. ‹SKELE CAD. HAYÜK PSJ NO:38-TEL.:0326 512 71 04 HATAY-KIRIKHAN-SEREN MAK‹NA-BARBAROS MAH.
BOZTEPE CAD. NO:23/B-TEL.:0326 344 32 49 HATAY-ANTAKYA-SER‹ SO⁄UTMA-KURTULUfi CD. NO:51/C-TEL.:0326 213 28 32 HATAY-
ERZ‹N-YEL‹Z BOB‹NAJ-MUSTAFAL‹ MH. ‹STASYON CD. NO: 143-TEL.:0326 68148 32 HATAY-REYHANLI-BAfi TEKN‹K SO⁄UTMA-ATATÜRK
CD. DÖ⁄ÜCÜLER ‹fiHANI NO:1 -TEL.:0326 413 44 04 HATAY-REYHANLI-ÖZ ‹fi SO⁄UTMA-CUMHUR‹YET MH. TAYFUR SÖKMEN CD.
NO:26/B TEL. : 0326 413 21 22 HATAY-DÖRTYOL-FAT‹H ELEKTRON‹K-SANAY‹ MH. EVREN CD. YEN‹ S‹NEMA KARfiISI NO:15 - TEL.:0326
712 86 46 HATAY-‹SKENDERUN-GÜL‹STAN ELEKTRON‹K-KURTULUfi MH. fi.O⁄UZ YENER CD. NO:64/C-TEL.:0326 613 50 64 I⁄DIR-
PARLAK TEKN‹K-TOPÇULAR CD. NO:34-TEL.:0476 227 47 51 ISPARTA-ÖZSOYLAR SO⁄UTMA-YAYLA MAH. ‹SMETPAfiA CAD. NO: 60 fi‹FA
TIP MERKEZ‹ ALTI-TEL.:0246 223 13 61 ‹ÇEL-ERDEML‹-ESEN ELEKTR‹K-MERKEZ MAH. ATATÜRK CAD. NO:11-TEL.:0324 515 68 87
‹ÇEL-MEZ‹TL‹-AKN‹SAN SO⁄UTMA&ELEKTRON‹K-GMK.BUL. FAT‹H MH. 18 SK.ÖZÜDO⁄RU S‹T. 3/A-TEL.:0324 359 64 34 ‹ÇEL-PINAR
ELEKTRON‹K-MAHMUD‹YE MH. 108. CD. NO:32/B-TEL.:0324 336 82 98 ‹ÇEL-TARSUS-MERT ELEKTRON‹K-GAZ‹LER MAH. ATATÜRK
BULV. NO:119-TEL.:0324 626 83 98 ‹ÇEL-TARSUS-TEKN‹K ‹fi ELEKTR‹K T‹C.-ATATÜRK CAD. U⁄UR ‹fi HANI NO:1-TEL.:0324 6242797
‹ÇEL-ANAMUR-ÇEL‹K ELEKTRON‹K-BAHÇE MH. ORMAN ‹fiLETMES‹ ALTI NO:61/B-TEL.:0324 814 85 90 ‹ÇEL-HAKAN ELEKTRON‹K-
BAHÇEL‹EVLER MH. 1809 SK. D‹NL‹ APT.ALTI NO:3/B-TEL.:0324 328 03 25 ‹ÇEL-S‹L‹FKE-SADIK ELEKTR‹K-GÖKSU MAH. O⁄UZKAAN
CAD. DERYALAR APT.NO:22/B-TEL.:0324 714 05 54 ‹STANBUL-ATAfiEH‹R-VURAL ELEKTRON‹K-KARAMAN Ç‹FTL‹K YOLU NO:12(ESK‹
PTT HAST. KARfiISI) ‹ÇERENKÖY TEL. : 0216 575 63 35 ‹STANBUL-fi‹fiL‹-YILKA T‹CARET-SEYMEN SOK. NO:27/A KURTULUfi-TEL.:0212233 80 53 ‹STANBUL-KÜÇÜKÇEKMECE-ÇA⁄DAfi SERV‹S-CENNET MAH.Y.KEMAL BEYATLI CAD.NO:14/D-TEL.:0212 579 35 30 ‹STANBUL-
ZEYT‹NBURNU-KARDEfiLER SO⁄UTMA-SEY‹T N‹ZAM MAH. fiEH‹T ERKAN ALYANAK SOK.NO:11-TEL.:0212 546 57 36 ‹STANBULESENLER-YILDIRIM ELEKTRON‹K-KAZIM KARABEK‹R MAH. 2.SOK. NO:10 -TEL.:0212 611 10 76 ‹STANBUL-EM‹NÖNÜ-IRMAK DIfi
T‹CARET-TAHTAKALE CD. TAHTAKALE T‹CARET MERKEZ‹ NO:34 2.BODRUM NO:204 -TEL.:0212 520 55 80 ‹STANBUL-ÜMRAN‹YE-GÜLSER TEKN‹K SERV‹S-NAMIK KEMAL MH. SÜTCÜ ‹MAM CD. SÜTÇÜ ÇIKMAZI NO:6/1- TEL.:0216 335 60 19 ‹STANBUL-ÜMRAN‹YE-GÖZDE
ELEKTRON‹K-ATATÜRK MH. ALEMDA⁄ CD. YILDIZ SK. NO:12/A-TEL.: 0216 329 57 03 ‹STANBUL-MALTEPE-GÜR TEKN‹K SERV‹S-BA⁄DAT
CD. BOLAYIR SK. NO:3/A-TEL.:0216 352 25 20 ‹STANBUL-GAZ‹OSMANPAfiA-DEDEO⁄LU ELEKTR‹K-2124 SOK NO:4 SULTANÇ‹FTL‹⁄‹TEL.:0212 594 50 91 ‹STANBUL-TUZLA-AKIN ISI TEKN‹K SERV‹S-YAYLA MH. F.ÇAKMAK CD. ‹SMA‹L A⁄A SK. NO:11 TEL.:0216 395 66
62 ‹STANBUL-SARIYER-H‹SAR SERV‹S 1-NUR‹PAfiA CD NO\48A BA⁄LAR MEVK‹ YEN‹KÖY-TEL.:0212 223 27 96 ‹STANBUL-BÜYÜKÇEKMECE-
AYGÜL DEKORASYON-19 MAYIS MH. OSMAN GAZ‹ CD. NO: 7-TEL.:0212 881 33 18 ‹STANBUL-GAZ‹OSMANPAfiA-ÇAM TEKN‹K-ISLAMBEY
MAH NECIP FAZIL CAD 257 SK NO:25-TEL.:0212 597 86 62 ‹STANBUL-KÜÇÜKÇEKMECE-YILDIZ ELEKTR‹K SO⁄UTMA-HALKALI CD.
ANADOLU PSJ. NO: 185-TEL.:0212 580 76 02 ‹STANBUL-BAYRAMPAfiA-ÖZKAN ELEKTRON‹K-KARTALTEPE MH. B‹LGEHAN CD. NO:36TEL.:0212 564 33 46 ‹STANBUL-GAZ‹OSMANPAfiA-TOROS ELEKTRON‹K-MERKEZ MH. BA⁄LAR CD. NO:77-TEL.:0212 563 50 38 ‹STANBUL-
fi‹fiL‹-CHIP ELEKTRON‹K-BOZKURT CAD.NO: 235-TEL.:0212 231 65 43 ‹STANBUL-GÜNGÖREN-YÜKSEL ELEKTRON‹K-M.FEVZ‹ ÇAKMAK
MAH.‹NÖNÜ CAD.NO: 138-TEL.:0212-504 61 42 ‹STANBUL-BEYO⁄LU-TOLGA ELEKTRON‹K-CAM‹ KEB‹R MH. DEREBOYU CAD. NO:28
KASIMPAfiA-TEL.:0212 235 65 34 ‹STANBUL-AVCILAR-NUR ELEKTRON‹K-DEN‹ZKÖfiKLER MAH.DERYA SOK. NO:36/1-TEL.:0212 694
12 82 ‹STANBUL-BA⁄CILAR-ÇA⁄LAYAN ELEKTRON‹K-‹STOÇ 25.ADA NO.:109-TEL.:0212 659 92 49 ‹STANBUL-KADIKÖY-UMUT
ELEKTRON‹K-HAL‹TA⁄A CAD. CELAL MUHTAR SOK. NO:20/2-TEL.:0216 346 39 78 ‹STANBUL-ZEYT‹NBURNU-UZMAN ELEKTRON‹K-
YEN‹DO⁄AN MH. 42.SK NO:50-TEL.:0212 582 36 37 ‹STANBUL-KADIKÖY-MICROSYSTEM ELEKTRON‹K-1. ORTA SK. NO:18/1 GÖZTEPETEL.:0216 411 91 50 ‹STANBUL-MALTEPE-BEYDA⁄I TEKN‹K ELEKTRON‹K-BA⁄LARBAfiI MAH. ‹NÖNÜ CAD.-TEL.:0216 457 63 34
‹STANBUL-BA⁄CILAR-KUMRU ELEKTRON‹K-KEMALPAfiA MAH. NAMIK KEMAL CAD. NO: 126-TEL.:0212 429 34 19 ‹STANBUL-fi‹fiL‹KASVA ELEKTRON‹K-MEC‹D‹YE CAD. ‹MAM FEYZULLAH SOK. NO:2/B -TEL.:0212 211 33 11 ‹STANBUL-BAKIRKÖY-‹K‹ZLER ELEKTRON‹K-
SAKIZA⁄A MH. BERR‹NC‹N‹ SK. NO:16/A-TEL.:0212 543 85 83 ‹STANBUL-ÜSKÜDAR-KÖYLÜBAY ELEKTRON‹K-ALBAY HÜSAMETT‹N
ERTÜRK SK. NO:7/A ÇENGELKÖY TEL.:0216 318 35 13 ‹STANBUL-ÜSKÜDAR-AKÇEL‹K T‹CARET-M‹MAR S‹NAN MH. ‹SMA‹L DÜMBÜLLÜ
SK. NO:9/A TEL.:0216 342 99 22 ‹STANBUL-KADIKÖY-TELV‹D ELEKTRON‹K-MAZHAR OSMAN SOK FERAH APT NO:24/A FENERYOLUTEL.:0216 414 66 00 ‹STANBUL-‹K‹TELL‹-BARIfi TEKN‹K-ATATÜRK MH. ‹K‹TELL‹ CD. DURAK SK. NO:18 TEL. : 0212 471 04 76 ‹STANBUL-
K.ÇEKMECE-ENG‹N ELEKTRON‹K-TEVF‹K BEY MH. MERKEZ CD. ORK‹DE SOK. NO: 3 /1-TEL.:0212 598 44 76 ‹STANBUL-BAHÇEL‹EVLERSEV-CAN DAYANIKLI TÜK.MALLARI.-YILDIRIM BEYAZIT CD .ZAFER MH. TÜRKBEY‹ SK. NO:6/2-3-TEL.:0212 552 45 87 ‹STANBUL-fi‹fiL‹-
- 34 -
Page 36

YETK‹L‹ SERV‹SLER L‹STES‹
IfiIK ELEKTRON‹K-AYAZA⁄A MASLAK ATATÜRK CD NO: 25-TEL.:0212 289 76 94 ‹STANBUL-PEND‹K-GÖKHAK ELEKTRON‹K-BATI MH.
SABR‹ TAfiKIN CD. SEB‹L SK. NO:4/1 TEL. : 0216 354 07 00 ‹STANBUL-G.O.PAfiA-ATILIM ELEKTRON‹K-CEBEC‹ MAH. 2472 SOK: NO:14/A
SULTANÇ‹FTL‹⁄‹- TEL.:0212 475 85 62 ‹STANBUL-GÜNGÖREN-NUR ELEKTR‹K ELEKTRON‹K-MERKEZ MH. ASALET CD. NO: 22/DTEL.:0212 641 42 09 ‹STANBUL-BEYKOZ-ULUDO⁄AN ELEKTRON‹K-KAYABAfiI ÇIKMAZI NO: 4/B PAfiABAHÇE-TEL.:0216 322 85 85
‹STANBUL-KARTAL-ÖZO⁄LU ELEKTRON‹K-KIZILAY BULVARI CD. BAHADIR SK. 4/A-TEL.:0216 387 18 87 ‹STANBUL-FAT‹H-SOYLU
TEKN‹K-HIRKA‹ fiER‹F CAM‹ ARKASI ESK‹ AL‹PAfiA CD. NO: 26-TEL.:0212 631 85 88 ‹STANBUL-FAT‹H-IRMAK DIfi T‹CARET-HACI KADIN
CD. NO:15 K.M. PAfiA TEL.: 0212 589 75 27 ‹STANBUL-S‹L‹VR‹-PDS ELEKTRON‹K-P.M. PAfiA MH. HACI PERVANE CD. NO:35/B -TEL.:0212
728 76 75 ‹STANBUL-GÜLTEPE-B‹L‹M ELEKTRON‹K-HARMANTEPE MH. ABD‹ ‹PEKÇ‹ CD. NO:14/D -TEL.:0212 278 72 27 ‹ZM‹R-BERGAMA-
GEZG‹N SERV‹S-K.KEMALBEY CAD. NO:82-84-TEL.:0232 633 35 15 ‹ZM‹R-KONAK-TUNCA ELEKTR‹K-76 SK 10/A GÜZELYALI-TEL.:0232
246 40 62 ‹ZM‹R-ÇAMD‹B‹-KUDRET ELEKTRON‹K-BURAK RE‹S CAD. NO: 239/A-TEL.:0232 435 81 36 ‹ZM‹R-MENEMEN-AY ELEKTRON‹K-
DR. SELAHATT‹N ÖZKURT CD. NO:22/B-TEL.:0232 832 02 31 ‹ZM‹R-KONAK-S‹STEM ELEKTRON‹K-2414 SK. NO:10 GÜLTEPE-TEL.:0232
469 72 69 ‹ZM‹R-KARfiIYAKA-LEVENT ELEKTR‹K LABORATUVARI-1710 SK. NO:70/B ESHOT SOKA⁄I-TEL.:0232 381 14 42 ‹ZM‹R-
KARfiIYAKA-ASMERKEZ T‹CARET-ESK‹ TRAMVAY CD. 1675. SK. NO:78/1B ALAYBEY-TEL.:0232 364 33 73 ‹ZM‹R-BORNOVA-ACEM
ELEKTRON‹K-552/2 SK. NO: 4/A-TEL.:0232 339 73 31 ‹ZM‹R-KONAK-KILIÇ ELEKTRON‹K-BARBAROS HAYRETT‹N PAfiA CD. NO:62/1
LEVENT-TEL.:0232 433 15 19 ‹ZM‹R-URLA-‹LTER ELEKTRON‹K-‹ZM‹R 75. YILl CADDES‹NO:81/C-D-TEL.:0232 754 44 44 ‹ZM‹R-BUCAÇA⁄LAR ELEKTRON‹K-670/1 SK. NO:57/B-TEL.:0232 276 27 77 ‹ZM‹R-YEfi‹LYURT-UMUT ELEKTR‹K & ELEKTRON‹K-YILDIZ CAD. NO:
152/A-TEL.:0232 244 65 77 ‹ZM‹R-ÖDEM‹fi-MURAT ELEKTRON‹K-UMURBEY MH. SANAY‹ S‹T. 9.SK NO: 10 -TEL.:0232 544 41 98
KAHRAMANMARAfi-AKSUNGUR ELEKTR‹K-UZUNOLUK CAD. 20.SOKAK NO:20/A-TEL.:0344 212 77 50 KAHRAMANMARAfi-KALE
ELEKTRON‹K-FEVZ‹PAfiA MH. UZUNLUK CD.-TEL.: 0344 225 07 94 KAHRAMANMARAfi-ELB‹STAN-DEM‹RO⁄LU SO⁄UTMA-GÜNEfiL‹
MH. TERM‹NAL CD. NO:30-TEL.:0344 413 60 67 KARABÜK-SAFRANBOLU-MEHMET SA⁄LAM - GÖKAY TEKN‹K-‹NÖNÜ MH. ESK‹ BA⁄LAR
SK. NO:13-TEL.:0370 712 24 97 KARABÜK-ACAR ELEKTRON‹K-VAKIF ‹fi HANI KAT:2 EMN‹YET MÜDÜRLÜ⁄Ü YANI-TEL.:0370 424 32 00
KARAMAN-ÖZ AS SO⁄UTMA-ABBAS MH. MUT CD. NO: 82/A TEL. : 0338 214 56 74 KARS-AYDIN ELEKTRON‹K-KAZIM KARABEK‹R ‹fiHANI
KAT:2 NO: 125 -TEL.:0474 212 87 82 KASTAMONU-TAfiKÖPRÜ-DE⁄‹fi‹M ELEKTR‹K-TABAKHANE MH. ATATÜRK CD. NO:55/A-TEL.:0366
417 42 04 KASTAMONU-TOSYA-DO⁄Ufi ELEKTRON‹K-VAKIF SK. 15/A-TEL.:0366 313 42 59 KASTAMONU-HARUN TELEKOMÜN‹KASYON-
‹NÖNÜ MAHALLES‹ AFfi‹NBEY SOKAK NO:8/B-TEL.:0366 212 33 66 KAYSER‹-MEL‹KGAZ‹-AKTÜRK BEYAZ EfiYA SERV‹S‹-AYDINLIKEVLER
MH.FIRAT CD.KR‹STAL APT.A-B NO.17 TEL.:0352 332 08 25 KAYSER‹-MEL‹KGAZ‹-AKIfi ELEKTRON‹K-ÇORAKÇILAR MH. CENG‹Z TOPEL
CD.NO:20/B-TEL.:0352 320 14 00 KAYSER‹-DEVEL‹-U⁄UR SO⁄UTMA-HARMAN MAHALLES‹ BELED‹YE PASAJ‹ ÜZER‹ NO: 15-TEL.:0352
621 56 31 KAYSER‹-SÖNMEZ ELEKTRON‹K-CAM‹ KEB‹R MAH. BASMANE SOK. NO:16/A-TEL.:0352 231 69 62 KAYSER‹-ZERO COMPUTER-
SAHAB‹YE MH. METE CD. fiAH‹R SATO⁄LU SK. SATO⁄LU AP D: 1-TEL.:0352 232 15 34 KIRIKKALE-KARDEfiLER ELEKTRON‹K-GÜZELTEPE
MH. CELAL AT‹K CD. NO:4/B-TEL.:0318 224 47 42 KIRKLAREL‹-MERKEZ-BUSE ELEKTRON‹K-KARACA ‹BRAH‹M MH. KAPAN CAM‹ SK.
ACUN PSJ. NO:23-TEL.:0288 212 73 57 KIRKLAREL‹-LÜLEBURGAZ-BUSE ELEKTRON‹K-YILMAZ MH. ESK‹ KIRKLAREL‹ CD. EFSANE
DÜ⁄ÜN SALONU YANI NO:36/A TEL.: 0288 412 88 92 KIRfiEH‹R-GARANT‹ ELEKTRON‹K-ANKARA CD. C‹NGÖZ BEBE ARKASI YA⁄MUR
‹fiHANI NO:9/B-TEL.:0386 214 02 18 K‹L‹S-FLAfi ELEKTRON‹K-fiEH‹TLER PARKI KARfiISI NO:63/1-TEL.: 0348 814 55 28 KOCAEL‹-DORUK
TEKN‹K H‹Z. -KARABAfi MH. CENG‹Z TOPEL CD. MÜNECC‹M AR‹F SK. NO:6/A -TEL.:0262 331 11 66 KOCAEL‹-KARAMÜRSEL-KILINÇ
ELEKTRON‹K-‹NÖNÜ CD. M.YASEF SK. NO:10/M-TEL.:0262 452 55 55 KOCAEL‹-D‹LOVASI-SAMET ELEKTRON‹K-BA⁄DAT CAD NO: 42/2-
TEL.:0262 754 79 86 KOCAEL‹-DARICA-KARDEfiLER ELEKTRON‹K-KAZIM KARABEK‹R MH. MEVALANA CAD. NO: 1/A-TEL.:0262 656 27
88 KOCAEL‹-GEBZE-YILDIRIM ELEKTRON‹K-H. HAL‹L MH. 1209 SK. NO:13/C-TEL.:0262 641 35 88KONYA-BEYfiEH‹R-SELV‹ SO⁄UTMA-
HACI ARMA⁄AN MH. ANTALYA CD. NO:108/F-TEL.:0332 512 40 10 KONYA-SELÇUKLU-SAF‹R SO⁄UTMA-FER‹T PAfiA MH. GÜNEY SK.
NO:3/F KULE S‹TE C‹VARI-TEL.:0332 236 36 75 KONYA-ERKAM SO⁄UTMA-KARAKURT MH. FURKAN DEDE CD.ASBAfiKAN SK. NO:13/BTEL.:0332 350 00 32 KONYA-ÖZCAN SO⁄UTMA VE ISITMA LTD fiT‹-N‹fiANTAfiIMH. HULUS‹ BAYBAL CD. NO:36/A-TEL.:0332 236 33 37
KONYA-SELÇUKLU-KONSEY SOGUTMA VE ISITMA-KÜÇÜK ‹HSAN‹YE MH. fiA‹R GUBAR‹ SK.B‹NSA S‹TES‹ ALTI NO : 15 TEL.:0332 321
21 22 KONYA-AKfiEH‹R-EROL ELEKTRON‹K-MEYDAN MAH. ÇOCUK PARKI KOD NO:38-TEL.:0332 812 61 12 KONYA-MERAM-GÜRKAN
TEKN‹K-‹HT‹YARETT‹N MH.SIRÇALI MEDRESE CAD.‹BN‹B‹B‹ SK. NO:1/B-TEL.:0332-351 02 03 KONYA-SEYD‹fiEH‹R-TUNCER ELEKTRON‹K-
KIBRIS CD. NO:26-TEL.:0332 582 93 92 KONYA-DURMAZLAR ELEKTR‹K-ANKARA-KONYA CAD. NO:67-TEL.:0332 673 28 48 KONYA-
ERE⁄L‹-ERDEM‹R TEKN‹K-ÜÇ GÖZ MH. KIBRIS CD.EL‹T APT. NO:3 TEL.: 0332 713 02 53 KÜTAHYA-EL‹FO⁄LU ELEKTR‹K-FAT‹H SULTAN
MEHMET BULVARI DUAGÜR CAM‹‹ ALTI 43/B-TEL.:0274 226 32 80 MALATYA-YUVAM ELEKTRON‹K-‹ST‹KLAL MH. FUZUL‹ CD.‹MAMO⁄LU
SK. NO:1-TEL.:0422 322 52 88 MALATYA-HAL‹M ELEKTRON‹K-SARAY MH. DEVECEL SK. NO:3-TEL.:0422 321 86 08MAN‹SA-SOMA-
GÜRMAK TEKN‹K-KURTULUfi MH. ‹DMAN SK. NO:47/A-TEL.:0236 613 66 56 MAN‹SA-SAL‹HL‹-AYKAR SO⁄UTMA- BEfiEYLÜL MH.
BELED‹YE CD. NO:TEL.:243-0236 714 88 68 MAN‹SA-AY ELEKTRON‹K MAN‹SA fiB.-YARHASANLAR MAH. ESK‹ HASA⁄A 2306 SOK.NO:
18/A-TEL.:0236 237 30 62-63 MAN‹SA-BURCU ELEKTRON‹K-TUNCA MAH. KURTULUfi CAD. NO:54-TEL.:0236-234 57 42 MAN‹SA-
TURGUTLU-EM‹N ELEKTRON‹K-ALTAY MH. SEV‹NÇ SK. NO:25-TEL.:0236 313 28 35 MAN‹SA-AKH‹SAR-AKIN ELEKTRON‹K-PAfiA MAH.
7.SOK. NO:25BELED‹YE ARKASI-TEL.:0236 413 50 53 MAN‹SA-SARUHANLI-fiEN SO⁄UTMA-ATATÜRK MH. 7 EYLÜL CD. NO: 21/BTEL.:0236 357 12 00 MAN‹SA-KULA-ERDAL KARAHAN-TERMO D‹NAM‹K-CAM‹‹ CED‹T MH. 62 SK. NO:67-TEL.:0236 816 70 99 MARD‹N-
M‹DYAT-SA⁄LAM ELEKTRON‹K-ESNAF SANATKARLAR KRED‹ KOOP. KARfiISI 2.CD.NO:56-TEL.:0482 462 33 90 MARD‹N-KIZILTEPE‹BRAH‹MO⁄LU ISITMA-fiANLIURFA CAD. ECE PASAJI NO:7-TEL.:0482 312 55 99 MARD‹N-DER‹K-UZAY ELEKTRON‹K-BELED‹YE MEYDANI
NO:36-TEL.:0482 251 34 35 MARD‹N-YEN‹fiEH‹R-MERKEZ TEKN‹K-KARAYOLLARI ARKASI BARIfi CAD GÜNAYDIN APT ALTI-TEL.:0482
212 83 06 MARD‹N-NUSAYB‹N-BÜDÜN ELEKTRON‹K-ZEYNEL AB‹D‹N MH. Ç‹LEK SK NO: 1/B-TEL.:0482 415 61 98 MU⁄LA-FETH‹YE-
ANADOLU TEKN‹K SERV‹S-ÖLÜDEN‹Z YOLU ÜZER‹ BAHA fiIKMAN CD.NO:157-TEL.:0252 611 39 12 MU⁄LA-M‹LAS-AFfi‹N YILDIRIM TEKN‹K SO⁄UTMA-HACI ‹LYAS MAH. PAZAR SOK.NO:14-TEL.:0252 512 14 45 MU⁄LA-YATA⁄AN-ASTEKN‹K ISITMA SO⁄UTMA SERV‹S‹-
YEN‹ MH. 152. SK. NO:8-TEL.:0252 572 56 31 MU⁄LA-DALAMAN-ÖZKAN TEKN‹K SO⁄UTMA-MERKEZ MAHALLES‹ ATATÜRK CD.NO:56TEL.:0252 692 25 25 MU⁄LA-ELBO ELEKTR‹K ELEKTRON‹K-ORHAN‹YE MH. HÜRR‹YET CAD. NO:1/6-TEL.:0252 214 18 84 MU⁄LA-DATÇA-
- 35 -
Page 37

YETK‹L‹ SERV‹SLER L‹STES‹
MEL‹H ELEKTRON‹K-‹SKELE MH. AMBARCA CD. NO:17-TEL.:0252 712 02 30 MU⁄LA-MARMAR‹S-‹LKSEL ELEKTRON‹K-YEN‹ YOL CD.
N0:51/9-TEL.:0252 412 62 60 MU⁄LA-URLA-STAR ELEKTRON‹K-‹N‹fiD‹B‹ CAD NO 1/C AKYAKA BELDES‹-TEL.:0252 243 40 42 MUfi-
HAfi‹MO⁄LU EK‹C‹ ELEKTRON‹K-HAfi‹MO⁄ULLARI EK‹C‹ ‹fi HANI BELED‹YE CD.NO:20/A-TEL.:0436 212 38 80 N‹⁄DE-HUZUR ELEKTR‹K-
ILHANLI MAH ÖZKUL MARKET KARSISI ÖZKILIÇ AP ALTI NO: 43-TEL.:0388 233 54 05 ORDU-TEK ISITMA SO⁄UTMA-SAKARYA MAH YENI
KUMRU CAD NO: 111-TEL.:0452 423 84 49 ORDU-HAZAR SO⁄UTMA-YEN‹ MAH. 26.SOK NO:17-TEL.:0452 214 04 49 ORDU-ÜNYE-STAR
TEKN‹K-KALEDERE MH. 20TEMMUZ CD. NO:16-TEL.:0452 324 82 51 ORDU-MERKEZ-M‹KRO ELEKTRON‹K-YEN‹ MH. 319 SK. NO:18 TEL.: 0452 223 13 49 OSMAN‹YE-MODERN ELEKTRON‹K-ORTAOKUL CD. K‹fi‹O⁄LU ÇARfiISI NO:15-TEL.:0328 812 82 84 OSMAN‹YE-
DÜZ‹Ç‹-TERMO SO⁄UTMA-UZUNBANI MAH. UZUNBANI CAD. NO: 31 / A-TEL.:0328 876 25 60 R‹ZE-ÇAYEL‹-ÖZER TEKN‹K- MAKSUT
ÖZER-EMNIYET MÜD.KARfiISI fiA‹RLER YOLU ÜZERI NO:3/2B-TEL.:0464 532 63 81 R‹ZE-CEVAH‹R ELEKTRON‹K-TOPHANE MAH. ATATÜRK
CAD. ‹fi PASAJI-TEL.:0464 213 16 17 SAKARYA-ADAPAZARI-ÇINAR ELEKTRON‹K-KÖMÜR PAZARI CAD. NO: 15 A-TEL.:0264 271 39 12
SAMSUN-ÇARfiAMBA-ÖZKAN SO⁄UTMA-ORTA MH. TUNCAY KOCABAfi SK. NO:85-TEL.:0362 832 28 90 SAMSUN-BAFRA-KARATAfi
T‹CARET-KIZILIRMAK MH. F.ÇAKMAK SK. NO:18/A-TEL.: 0362 543 04 91 SAMSUN-GÜLTEK‹N SERV‹S-ATATÜRK BULVARI NO.285-
TEL.:0362 437 33 82 SAMSUN-DEN‹Z ELEKTRON‹K-KADIKÖY MH. OSMAN‹YE CD. NO: 68-TEL.:0362 432 44 80 S‹‹RT-ERYILMAZ
ELEKTRON‹K-CUMHUR‹YET CAD. NO:25 ULUCAM‹ KARfiISI-TEL.:0484 224 03 92 S‹NOP-ADA EV ALETLER‹-CAM‹ KEB‹R MH. TÜTÜNCÜ
SK. NO: 16-TEL.:0368 260 12 64 S‹NOP-AYANCIK-YILKAY SO⁄UTMA-YALI MH. DR.AZM‹ HAMZAO⁄LU CD. NO:46-TEL.:0368 613 52 12
S‹NOP-BOYABAT-ÖZTÜRK BEYAZ EfiYA BAKIM SERV‹S-GÖKDERE MH.YUSUF KEMAL BEY CD.NO:24-TEL.:0368 315 61 21 S‹VAS-EKOL
ELEKTRON‹K-H‹KMET IfiIK CD.NALBANTLAR BAfiI KAVfiA⁄I NO:1/D-TEL.:0346 223 44 96 fiANLIURFA-SURUÇ-IfiIK SO⁄UTMA
TEKN‹KERL‹⁄‹-D‹K‹L‹ MH. Z‹YARET CD. NO:10-TEL.:0414 612 17 25 fiANLIURFA-AKTAfi ELEKTRON‹K-ASFALT CD. N0.22/F-TEL.:0414
217 14 87 fiANLIURFA-B‹REC‹K-YARAfiIR SO⁄UTMA-MEYDAN MAH 10 TEMMUZ CAD KÖPRÜ ÇIKIfiI NO : 9-TEL.:0414 652 36 38 fiIRNAKS‹LOP‹-ABAY ELEKTRON‹K-2. CADDE S‹EMENS BAY‹‹ KARfiISI-TEL.:0486 518 50 99 fiIRNAK-ULUDERE-ÜRÜN ELEKTRON‹K-CUMHUR‹YET
CD. PTT YANI-TEL.:0486 351 28 22 TEK‹RDA⁄-HAYRABOLU-POYRAZ TEKN‹K-H‹SAR MAH. ADELET SK. NO:24-TEL.:0282 315 55 48
TEK‹RDA⁄-SARAY-BATI TEKN‹K-YEN‹ MH. TAKS‹M CD. NO:9 TEL.:0282 768 69 34 TEK‹RDA⁄-MURATLI-AKAN ELEKTRON‹K-MURAD‹YE
MH. NAZIM SAV CD. NO:30/A-TEL.:0282 361 28 17 TEK‹RDA⁄-ÇORLU-FULL TEKN‹K-MUH‹TT‹N MH. F‹K‹R SK. NO:12/B-TEL.:0282 652
28 68 TEK‹RDA⁄-ARI ELEKTRON‹K-AYDO⁄DU MH. fiEH‹TLER CD. NO: 33/A-TEL.:0282 263 40 61 TEK‹RDA⁄-MALKARA-KER‹MO⁄ULLARI
T‹CARET-YEN‹MAHALLE GÜLDESTE SOK. NO: 4/B-TEL.:0282 427 16 61 TEK‹RDA⁄-ÇERKEZKÖY-ÇA⁄RI ELEKTRON‹K-G.O. PAfiA MH.
SAYAR SK. KARDEfiLER APT. NO:5 -TEL.:0282 726 02 66 TOKAT-ERBAA-H‹DRO ELEKT‹R‹K-CUMHUR‹YET MH. GAZ‹ BULVARI NO:144TEL.:0356 715 56 01 TOKAT-C‹HAN ELEKTRON‹K-G.O.PAfiA BULVARI S‹VAS CAD. NO:290/A- TEL.:0356 214 00 74 TOKAT-TURHAL-GÜÇLÜ
SO⁄UTMA-CELAL MH. TUNA SK. NO:11-TEL.: 0356 276 39 66 TOKAT-CEM TEKN‹K SO⁄UTMA-SO⁄UKPINAR MH. GOP BULVARI 241/A
GÖKÇE PASAJI NO:14-TEL.:0356 212 37 57 TRABZON-ÇIRAK TEKN‹K-FAT‹H MH. AYASOFYA CD. NO: 57 MÜZE KARfiISI-TEL.:0462 229
66 44 TRABZON-AKÇAABAT-ATOM ELEKTR‹K-ORTA MH. ERENLER SK. NO:5 -TEL.:0462 228 12 58 TRABZON-YET-SAN ELEKTRON‹K-
FAT‹H MH. FAT‹H CD. COfiKUNER PASAJI NO:2/B-TEL.:0462 223 15 04 TRABZON-ARAKLI-fiENGÜL TEKN‹K-BA⁄KUR ÇARfiISI NO: 10 /
A-TEL.:0462 721 74 11 VAN-ERC‹fi-ÖZKANAT TAM‹RAT-EMN‹YET KARAKOL ARKASI NO:3-TEL.:0432 351 95 40 VAN-EB‹NÇ TEKN‹K-
SIHKE CAD ATEfi SOK. NO 10-TEL.:0432 214 31 37 VAN-BURHAN AYDIN - ÖZ USTA TAM‹RAT-KÜLTÜR MERKEZ‹ C‹VARI DEM‹RC‹LER
1. SK. NO:1/C-TEL.:0432 216 34 58 YALOVA-ALTINOVA-DO⁄AN TEKN‹K SO⁄UTMA-CUMHUR‹YET MH.MERKEZ DURAK KARfiISI NO:29ATEL.:0226 461 26 21 YALOVA-TINAZTEPE ELEKTR‹K-‹STANBUL CD. BORA SK. NO: 14-TEL.:0226 812 01 60 YOZGAT-AKDA⁄MADEN‹-
AYDIN SO⁄UTMA-AHISHAVI MH. 2. HANLAR SK. NO :10-TEL.:0354 314 64 12 YOZGAT-ÖNDER ELEKTRON‹K-UN PAZARI NO:14-TEL.:0354
212 79 67 YOZGAT-SORGUN-KARDEfiLER ELEKTRON‹K-CUMHUR‹YET CD. NO:29 1/C-TEL.:0354 415 45 79 ZONGULDAK-KRD ERE⁄L‹-
UZMAN ELEKTRON‹K-ERDEM‹R CAD NO:130-TEL.:0372 316 31 28 ZONGULDAK-MERKEZ-EMEK ELEKTRON‹K-PAP‹LA ‹fi HANI ZEM‹N
KAT NO:9 SO⁄UKSU-TEL.:0372 251 67 31
- ONLINE YETK‹L‹ SERV‹SLER L‹STES‹ -
"Yetkili servislerimizin güncellenmifl haldeki listesine
www.sinbo.com.tr internet adresinden ulaflabilirsiniz."
- 36 -
Page 38
- GARANT‹ fiARTLARI -
1. Garanti süresi, mal›n teslim tarihinden itibaren bafllar ve 2 y›ld›r.
2. Mal›n bütün parçalar› dahil(kullan›m hatalar›ndan kaynaklanan k›r›lmalar hariç) olmak üzere tamam› firmam›z›n
garantisi kapsam›ndad›r.
3. Mal›n garanti süresi içerisinde ar›zalanmas› durumunda, tamirde geçen süre garanti süresine eklenir. Mal›n tamir
süresi en fazla 30 ifl günüdür. Bu süre, mala iliflkin ar›zan›n servis istasyonuna servis istasyonunun olmamas›
durumunda, mal›n sat›c›s›, bayii, acentas›,temsilcili¤i, ithalatç›s› veya imalatç›s›-üreticisinden birisine bildirim tarihinden
itibaren bafllar. Mal›n ar›zas›n›n 15 ifl günü içerisinde giderilmemesi halinde, imalatç›-üretici veya ithalatç›; mal›n
tamiri tamamlan›ncaya kadar, benzer özelliklere sahip baflka mal› tüketicinin kullan›m›na tahsis etmek zorundad›r.
4. Mal›n garanti süresi içerisinde, gerek malzeme ve iflçilik, gerekse montaj hatalar›ndan dolay› ar›zalanmas› halinde,
iflçilik masraf›, de¤ifltirilen parça bedeli ya da baflka herhangi bir ad alt›nda hiçbir ücret talep etmeksizin tamiri
yap›lacakt›r.
5. Tüketicinin onar›m hakk›n› kullanmas›na ra¤men mal›n;
-Tüketiciye teslim edildi¤i tarihten itibaren, belirlenen garanti süresi içinde kalmak kayd›yla,bir y›l içerisinde; ayn›
ar›zan›n ikiden fazla tekrarlanmas› veya farkl› ar›zalar›n dörtten fazla meydan gelmesi veya belirlenen garanti süresi
içerisinde farkl› ar›zalar›n toplam›n›n alt›ndan fazla olması unsurlar›n›n yan›s›ra, bu ar›zalar›n maldan yararlanamamay›
sürekli k›lmas›,
-Tamiri için gereken azami sürenin afl›lmas›,
-Firman›n servis istasyonunun, servis istasyonunun mevcut olmamas› halinde s›rayla sat›c›s›, bayii, acentesi temsilcili¤i,
ithalatç›s› veya imalatç› - üreticisinden birisine düzenleyece¤i raporla ar›zan›n tamirine mümkün bulunmad›¤›n›n
belirlenmesi,durumlar›nda, tüketici mal›n ücretsiz de¤ifltirilmesini, bedel iadesi veya ay›p oran›nda bedel indirimi
talep edebilir.
6. Mal›n kullanma k›lavuzunda yer alan hususlara ayk›r› kullan›lmas›ndan kaynaklanan ar›zalar garanti kapsam›
d›fl›ndad›r.
7. Garanti Belgesi ile ilgili olarak ç›kabilecek sorunlar için Sanayi ve Ticaret Bakanl›¤› Tüketicinin ve Rekabetin
Korunmas› Genel Müdürlü¤ü’ne baflvurulabilir.
‹THALATÇI F‹RMA
DE‹MA ELEKTROMEKAN‹K ÜRÜNLER ‹NfiAAT SPOR MALZEMELER‹ ‹MALAT SAN. VE T‹C. A.fi.
Cihangir Mh. Güvercin Cd. No:4 Haramidere Mevkii Avcılar - ‹stanbul - Türkiye
Tel : (0212) 422 94 94 & Fax : (0212) 422 03 49
www.sinbo.com.tr - info@sinbo.com.tr
- 37 -
Page 39
- TERAZ‹ (MUTFAK TERAZ‹S‹) -
- GARANT‹ BELGES‹ -
Belge No: 85905 Belge Onay Tarihi : 28/06/2010
‹THALATÇI F‹RMA
Ünvanı : DE‹MA ELEKTROMEKAN‹K ÜRÜNLER‹ ‹Nfi. SPOR MALZ.
Adresi : Cihangir Mah. Güvercin Cad. No:4 Haramidere Mevkii
Tel. : 0212 422 94 94 & Fax: 0212 422 03 49
Yetkili Kifli :
Ürünün Cinsi : Terazi (Mutfak Terazisi
Markası : S‹NBO
Modeli : Tüm Modeller ‹çin Geçerlidir.
Alt Modeli : SKS 4515
Bandrol ve Seri No :
Teslim Tarihi ve Yeri :
Garanti Süresi : 2 Yıldır
Azami Tamir Süresi : 30 ‹fl Günü
Kullanım Ömrü : -
SATICI F‹RMA
Ünvanı :
Adresi :
Tel.Fax :
Fatura Tarihi ve No :
Teslim Tarihi ve Yeri :
‹mza ve Kafle :
Bu bölüm, ürünü sat›n ald›¤›n›z Yetkili Sat›c› taraf›ndan imzalanacak ve kaflelenecektir.
Bu belgenin kullan›lmas›na; 4077 say›l› Tüketicinin Korunması Hakkında Kanun ve bu Kanun’a dayan›larak yürürlü¤e konulan Garanti Belgesi
Uygulama Esaslar›na Dair Tebli¤ uyar›nca, TC Sanayi ve Ticaret Bakanl›¤› Tüketicinin ve Rekabetin Korunmas› Genel Müdürlü¤ü tarafından
izin verilmifltir.
‹MALAT SAN. ve T‹C. A.fi.
Avc›lar / ‹STANBUL
Yönetim Kurulu Baflkan›
- 38 -
Page 40
MÜfiTER‹ H‹ZMETLER‹
De¤erli Müflterimiz,
En uygun fiyata en iyi ürünü vermenin yan› s›ra; en iyi hizmeti vermenin de
önemli oldu¤una inan›yoruz. Bu nedenle siz bilinçli tüketicilere daha yak›n
olabilmek için, internet adresimizdeki eriflim formlar›n›n yan› s›ra, tüketici
dan›flma hatlar›m›z› da hizmetinize açm›fl durumday›z.
TÜKET‹C‹
DANIfiMA HATTI
444 66 86
Dan›flma Hatlar›m›z›,
- Hafta içi her gün 08.30-18.00 saatleri aras›nda arayabilir; istek, öneri ve
flikayetlerinizi firmam›za iletebilirsiniz.
Tüketicinin Dikkatine:
Ürünlerimizle ilgili hizmetleri tam olarak alabilmek için afla¤›daki önerilere
uyman›z› rica ederiz:
1. Ürünü ald›¤›n›zda Garanti Belgesini mutlaka yetkili sat›c›n›za onaylatt›r›n›z.
2. Ürünü kullanma k›lavuzu esaslar›na göre kullan›n›z.
3. Ürününüzle ilgili hizmet talebiniz oldu¤unda yukar›daki telefon
numaralar›ndan, Tüketici ‹liflkileri Merkezi'ne baflvurunuz.
4. Ürünü promosyon arac›l›¤› ile edinmiflseniz, ürüne ait garanti belgesini en
yak›n yetkili servisimize giderek onaylatt›r›n›z.
5. Teknik servisteki ifliniz bitti¤inde "Hizmet Fifli" almay› unutmay›n›z.
Alaca¤›n›z bu fifl, ileride ürününüzde meydana gelebilecek herhangi bir
sorunda size yarar sa¤layacakt›r.
6. Cihaz›n›z ilk çal›flt›rmada çal›flm›yor veya ar›zal› ise, size en yak›n S‹NBO
Yetkili Servisine baflvurabilir veya S‹NBO Dan›flma Hatlar›ndan yard›m
alabilirsiniz.
MERKEZ
TEKN‹K SERV‹S
(0212) 422 94 94
- 39 -
www.sinbo.com.tr
Page 41
Made in P.R.C.
‹mal Y›l› : 2010
- TEDAR‹KÇ‹ F‹RMA / EXPORTER United Favour Development Limited
Unit B, 10/F Lee May Building 788-790
Nathan Road, Mongkok, Kowloon, HK.
- UYGUNLUK BEYANI / CE TÜV SÜD Product Service GmbH
Zertifizierstelle, Ridlerstrasse 65
80339 München Germany
E8N 08 12 68757 002
EEE Yönetmeli¤ine uygundur.
 Loading...