

Page 1
SK 7321 SU ISITICI (KETTLE)
KULLANMA KILAVUZU
TR
EN
FR
NL
DE
ES
RU
UA
AR
HR
Page 2
De¤erli Müflterimiz,
Ürün seçiminde S‹NBO'yu tercih etti¤iniz için teflekkür ederiz.
Uzun ve verimli bir kullan›m için cihaz› kullanmadan önce bu k›lavuzu özellikle güvenlik
talimatlar›na dikkat ederek okuman›z› ve devaml› suretle saklaman›z› tavsiye ederiz.
Sayg›lar›m›zla,
Sinbo Küçük Ev Aletleri
Cihazla oynamamalarını güvenceye almak için çocuklar gözetim altında tutulmalıdır.
Bu ürün (çocuklar dahil ) fiziksel hassasiyeti az, zihinsel olarak yetersiz, deneyimsiz ve yeterli bilgiye
sahip olmadan yada kendilerinin güvenli¤inden sorumlu olan kifliler tarafından bu ürünü kullanmak
için gerekli talimatlar verilmemifl kiflilerin kullanımına uygun de¤ildir.
• Bu cihazın, afla¤ıda belirtilen yerler gibi, ev ve benzeri uygulamalarda kullanılması amaçlanır.
(IEC 60335-2-15/A2):
• Dükkânlarda, bürolarda ve di¤er çalıflma ortamlarındaki personele ait mutfak alanları,
• Çiftlik evleri
• Müflteriler tarafından, motellerde, otellerde kullanılan yerler ve di¤er mesken tipi çevreler,
• Yatma yerleri ve kahvaltı yapılan ortamlar.
Children being supervised not to play with the appliance.
This appliance is not intended for use by persons (including children) with reduced physical, sensory
or mental capabilities, or lack of experience and knowledge, unless they have been given supervision
or instruction concerning use of the appliances by a person responsible for their safety. Children
should be supervised to ensure that they do not play with the appliance.
This appliance is intended to be used in household and similar applications such as:
(IEC 60335-2-15/A2)
- staff kitchen areas in shops, offices and other working environments;
- farm houses;
- by clients in hotels, motels and other residential type environments;
- bed and breakfast type environments.
- 1 -
Page 3

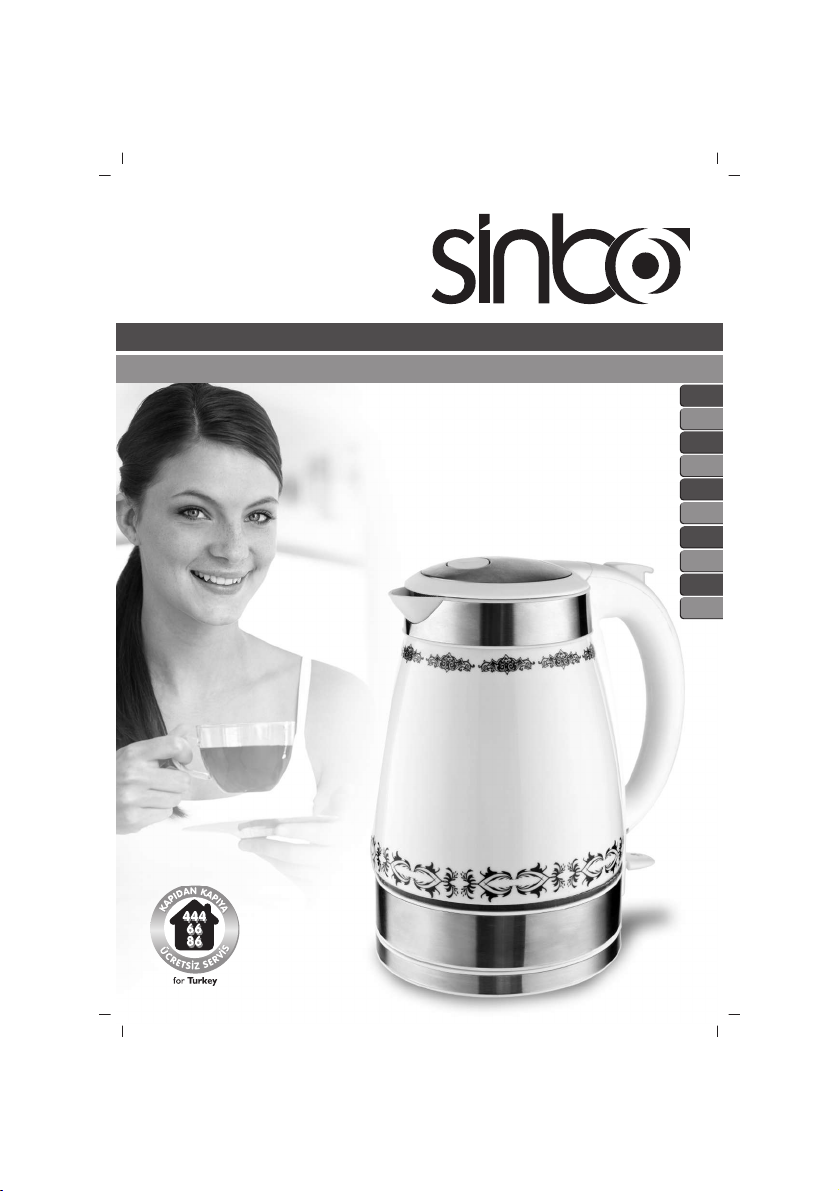
C‹HAZIN ÖZELL‹KLER‹
Nominal voltaj : AC230V, 50Hz
Güç : 2000W
Kapasite : 1.7L
Bu cihaz afla¤›daki koflullarda alt›nda depolanmal› ve kullan›lmal›d›r: s›cakl›k +5˚C'den
az, ba¤›l nem %80 fazla olmamal›d›r; havadaki sald›rgan bozukluklara izin verilmemelidir.
Üretici ürünlerini gelifltirmek için sürekli çal›flt›¤›ndan tasar›m ve teknik spesifikasyonlar
önceden bildirilmeden de¤iflikli¤e tabidir.
D‹KKAT!!
Ürünün üzerinde bulunan iflaretlemelerde veya ürünle verilen di¤er bas›l› dökümanlarda
beyan edilen de¤erler, ilgili standartlara göre laboratuar ortam›nda elde edilen
de¤erlerdir.Bu de¤erler, ürünün kullan›m ve ortam flartlar›na göre de¤iflebilir.
ÖNEML‹ GÜVENL‹K UYARILARI
• Bakım, Onarım ve Kullanımda Uyulması Gereken Kurallar
1. Elektrik tehlikelerine karfl› koruma için ana hat fiflini, güç taban›n› veya su ›s›t›c›s›n›
suya veya herhangi bir di¤er s›v›ya bat›rmay›n›z. Banyoda veya herhangi bir di¤er su
kayna¤› yak›n›nda kullanmay›n›z. D›fl mekânda kullanmay›n›z.
2. S›cak yüzeylerine dokunmay›n›z. Saplar›n› veya dü¤melerini kullan›n›z.
3. Su kaynarken kapa¤›n› açmay›n›z.
4. Yavaflça su dökerken dikkatli olunuz ve su ›s›t›c›s›n› afl›r› doldurmay›n›z.
5. Kaynad›ktan sonra su kayda de¤er bir süreyle s›cak kalabilir ve bir hafllama tehlikesi
arz edebilir. Su ›s›t›c›s›n›, güç taban›n› ve ana hat kablolar›n› mutfak tezgâhlar›ndan ve
çocuklar›n erifliminden uzak tutunuz.
6. Ana hat kablolar›n›n masa veya mutfak tezgâh› ya da kazayla s›k›flabilece¤i ya da
devrilebilece¤i herhangi bir yerden sarkmas›na izin vermeyiniz.
7. Herhangi bir cihaz çocuklar›n yak›n›nda kullan›ld›¤›nda yak›ndan gözetim gereklidir.
8. Kullan›mda de¤ilken, yeniden konumland›rmadan ve temizlemeden önce güç taban›n›n
fiflinin duvar soketinden çekiniz. Su ›s›t›c›s›n›n temizleme veya depolama öncesinde
so¤umas›n› sa¤lay›n›z.
9. Su ›s›t›c›s›n› açmadan önce kapa¤›n›n kapal› oldu¤undan emin olunuz aksi takdirde
kapanmayabilir.
10. Su ›s›t›c›s›n›n açmadan önce güç taban› üzerine do¤ru olarak yerlefltirildi¤inden emin
olunuz.
11. Su ›s›t›c›s›nda en az bir kupa su olmad›kça açmay›n›z aksi takdirde zarar verebilirisiniz.
12. Seviye göstergesi üzerinde (1.7 litre) maksimum iflaret alt› k›sm›n›n üzerine ç›kmay›n›z.
13. Doldurma veya su dökme öncesinde su ›s›t›c›s›n› güç taban›ndan ç›kart›n›z.
14. Su ›s›t›c›s›n›, güç taban›n› veya ana hat kablolar›n› herhangi bir s›cak yüzey, s›cak
plaka, s›cak raf veya ocak üzerine yerlefltirmeyiniz.
- 2 -
Page 4
ÖNEML‹ GÜVENL‹K UYARILARI
15. Su ›s›t›c›s›n› su ›s›tma d›fl›nda herhangi bir amaç için kullanmay›n›z.
16. Su ›s›t›c›s›n› sadece verilen güç taban›yla kullan›n›z (ve bu ifllemin tersiyle)
17. Zarar görmüfl kordon veya fifli olan cihaz› veya ar›za sonras›nda herhangi bir cihaz›
ya da bir flekilde ar›za yapm›fl olan bir cihaz› kullanmay›n›z. E¤er ana hat kablolar› zarar
görürse, servis departman›ndan özel bir kabloyla de¤ifltirilmesi gerekir.
18. Açmadan önce kapa¤›n kapal› oldu¤undan emin olunuz.
• Uyar›: Kettle afl›r› flekilde dolduruldu¤u takdirde kaynayan su d›flar› s›çrayabilir.
YALNIZCA EV ‹Ç‹ KULLANIMA YÖNEL‹KT‹R
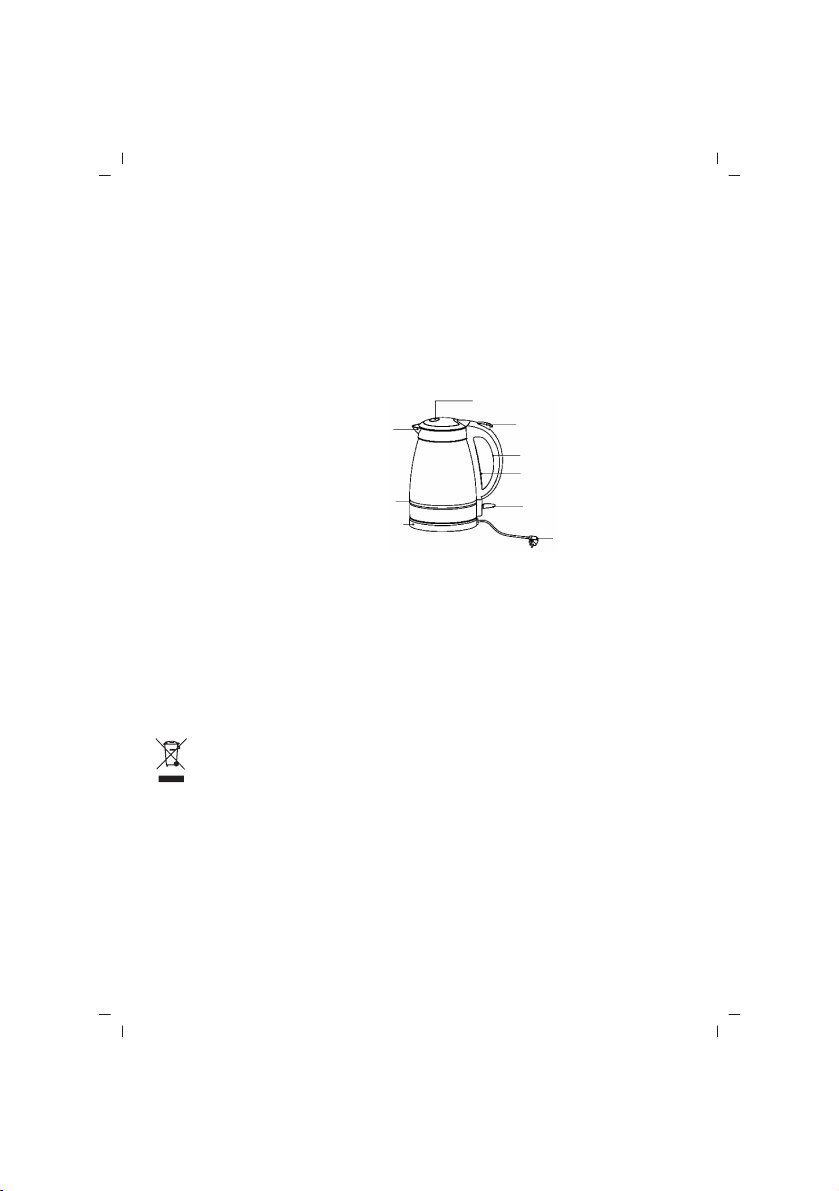
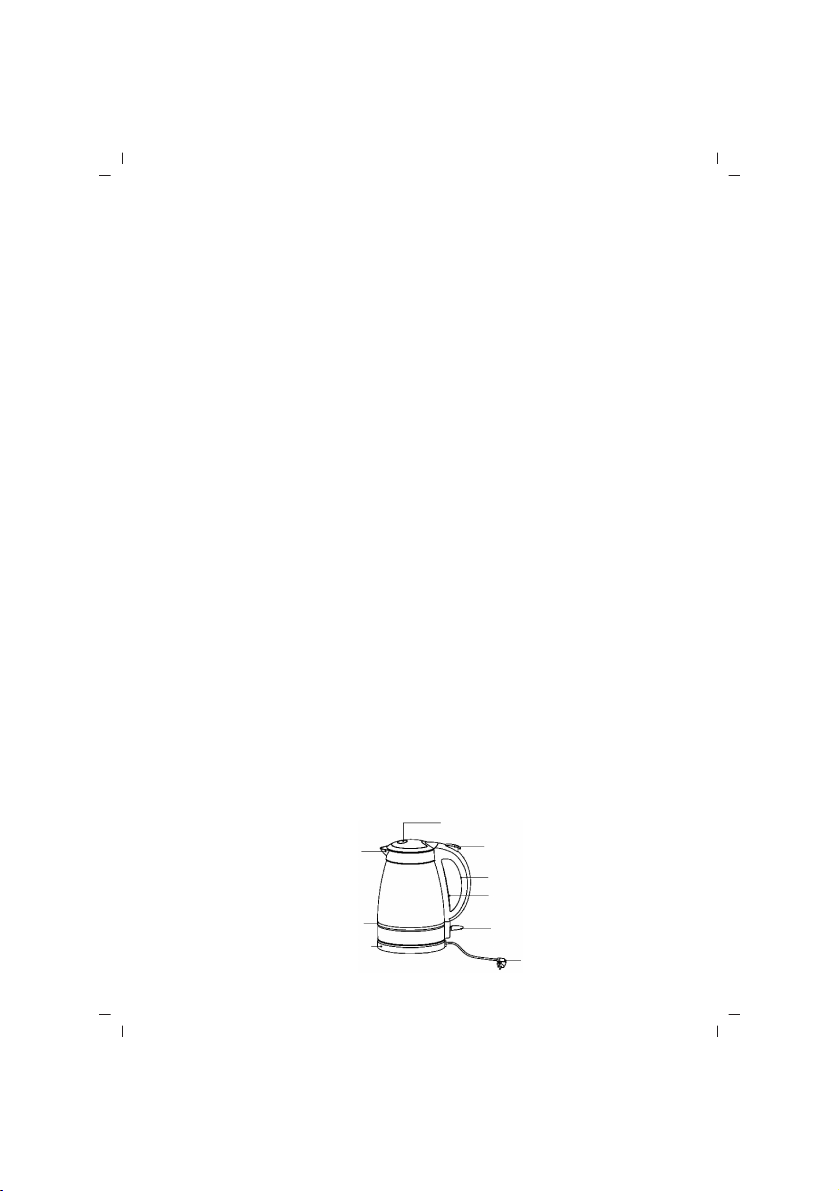
C‹HAZ TANIMI
1. A¤›z
2. Kapak
3. Kapa¤›n basmal› butonu
4. Sap
5. AÇMA/KAPAMA dü¤mesi
6. Su seviyesi göstergesi
7. Kordonsuz Güç Taban›
8. Güç Göstergesi
9. Güç Kordonu
TAfiIMA VE NAKL‹YE ESNASINDA
• Ürünü düflürmeyiniz,
• Darbelere maruz kalmamas›n› sa¤lay›n›z,
• S›k›flmamas›n›, ezilmemesini sa¤lay›n›z,
• Ambalaj üzerindeki iflaretlemelere uyunuz.
• Orjinal ambalajıyla taflımaya özen gösteriniz.
ÇEVRE VE ‹NSAN SA⁄LI⁄I
Çevre korumas›na siz de katk›da bulunabilirsiniz!
Lütfen yerel düzenlemelere uymay› unutmay›n: Çal›flmayan
elektrikli cihazlar›, uygun elden ç›karma merkezlerine götürün.
Kullanım sırasında insan ve çevre sa¤lı¤ına tehlikeli veya zararlı olabilecek bir durum
söz konusu de¤ildir.
KULLANIM ÖNCES‹NDE
Su ›s›t›c›s›ndan ve güç taban›ndan tüm paketleme malzemelerini ç›kart›n›z. Su ›s›t›c›s›n›
ilk defa kullanmadan önce veya uzun süre kullan›m d›fl› kald›¤›nda maksimum iflaretine
kadar doldurunuz ve kaynat›n›z ve sonra kaynayan suyu ç›kart›n›z ve su ›s›t›c›s›n› so¤uk
suyla durulay›n›z.
1
8
7
2
3
4
6
5
9
- 3 -
Page 5

C‹HAZIN KULLANIMI
• Ba¤lantı veya Montajın Nasıl Yapılaca¤ını Gösterir fiema ile Ba¤lantı veya Montajın
Kimin Tarafından Yapılaca¤ına (tüketici, yetkili servis) iliflkin bilgiler
Konumland›rma
* Güç taban›n› mümkün oldu¤unda duvar soketine yak›n olarak konumland›r›n›z.
* Ana hat kablosunun herhangi bir çal›flma yüzeyinden sarkmayacak ve kazayla
s›k›flmayacak flekilde yönlendiriniz. Ana hat kablosunu güç taban› alt›ndaki kordon
depolamas› etraf›na sararak k›salt›n›z ve kordon ç›k›fl kesiminden taban içine getiriniz.
Kapa¤›n aç›lmas›
Su ›s›t›c›s›n› güç taban›ndan ç›kart›n›z (9). E¤er bilmeden dü¤meye (7) bas›l›rsa, <KAPALI>
konuma geçecektir.
Uyar›: E¤er su ›s›t›c›s›n› yeni kaynam›flsa, kapak aç›l›r aç›lmaz kaçacak olan buharla dolu
olacakt›r.
Sap›n› bir elle s›k›ca tutunuz, di¤er elle kapak dü¤mesini tutunuz ve kapa¤› düz yukar›
çekiniz. Su ›s›t›c›s›ndan ayr›l›r ayr›lmaz buhardan ç›kart›n›z.
Doldurma
* Kapa¤› aç›n›z ve kapak deli¤iyle su ›s›t›c›s›n› doldurunuz.
* Su seviyesi göstergesindeki seviyeyi izleyiniz. En az bir kupa su kullanman›z gerekir
ancak su seviyesi maksimum iflaret alt›nda olmal›d›r.
* Su ›s›t›c›s›n› afl›r› doldurmay›n›z. E¤er su ›s›t›c›s› afl›r› doldurulursa, kaynayan suyun
d›flar› ç›kma riski olacakt›r.
* Kapa¤› yerine tak›n›z ve afla¤› bast›r›n›z. Tam olarak dolu oldu¤unu kontrol ediniz; aksi
takdirde su ›s›t›c›s› kaynad›¤›nda kapanmayabilir.
Açma
* Dü¤menin ''KAPALI'' konumda oldu¤unu kontrol ediniz (su ›s›t›c›s›n› taban›ndan kald›r›n›z
ve tekrar yerine koyunuz).
* Güç taban›n› duvar soketine tak›n›z. E¤er gerekirse soketi aç›n›z. Herhangi bir su
dökmemeye dikkat ederek su ›s›t›c›s›n› nazikçe güç taban›na yerlefltiriniz.
* Dü¤meyi afla¤› bast›r›n›z. Dü¤me yanacakt›r ve su ›s›t›c›s› ›s›nmaya bafllayacakt›r.
* Su, su ›s›t›c›s›n› otomatik olarak kapatacakt›r, dü¤me ''KAPALI'' konuma gelecek ve
›fl›k sönecektir.
Kapatma
* E¤er su kaynamadan önce su ›s›t›c›s›n› kapatman›z gerekirse, güç taban›n›n ön k›sm›ndan
kald›r›n›z ve tekrar yerine koyunuz. Dü¤me ''KAPALI'' konuma geçecektir.
GENEL
* Su ›s›t›c›s›n› tabandan kald›rd›¤›n›zda taban›n yüzeyinde nem görebilirsiniz. Su ›s›t›c›s›n›
- 4 -
Page 6

C‹HAZIN KULLANIMI
otomatik olarak kapatmak için kullan›lan, yo¤unlaflan ve su ›s›t›c›s›n› alt taraf›ndaki
deliklerden ç›kmas›na izin verilen buhar budur. Geriye do¤ru kald›rmay›n›z çünkü bu
durum kontrol alan›ndaki buhar deli¤inden su geçmesine izin verebilir. Bu durum meydana
gelecek olursa, su ›s›t›c›s›n›n kullanmadan önce so¤utulmas› gerekecektir.
* S›çrama riskinden kaç›nmak için suyu yavaflça dökünüz ve su ›s›t›c›s›n› afl›r› sarmay›n›z.
YANLIfi KULLANIM
1. Su ›s›t›c›s›n› en az bir kupa su içerene kadar açmay›n›z. Bu türde yanl›fl kullan›m
eleman›n ömrünü k›saltacakt›r.
2. E¤er su ›s›t›c›s› yeterince suyu yokken kazayla aç›l›rsa, kaynama-kurutma cihaz›
otomatik olarak kapatacakt›r. Eleman s›cak olmayaca¤› ve püskürme meydana gelece¤i
için doldurmadan önce su ›s›t›c›s› so¤uyana kadar bekleyiniz.
KULLANIM HATALARINA ‹L‹fiK‹N B‹LG‹LER
Cihazınızı, beyan edilen voltaj ile çal›flt›r›n›z.Bulundu¤unuz yerin voltaj›n›n uygun olup
olmad›¤›n› kontrol ediniz.
Güç kablosunun ar›zalanmas› durumunda tehlikelerin önlenmesi için kablo üretici, servis
merkezi ya da benzer bir ehliyetli kifli taraf›ndan de¤ifltirilmelidir. Ar›za durumunda cihaz›
kendiniz onarmaya kalk›flmay›n›z. Meydana gelebilecek ar›zalardan firmam›z kesinlikle
sorumlu de¤ildir, ve cihaz›n›z garanti kapsam› d›fl›nda ifllem görecektir.
TEM‹ZL‹K VE BAKIM
• Tüketicinin Kendi Yapabilece¤i Bakım, Onarım veya Ürünün Temizli¤ine ‹liflkin Bilgiler
Temizlik
1. Su ›s›t›c›s›n› kapat›n›z (güç taban›ndan kald›r›n›z), duvar soketinden güç taban›n›n fiflini
ç›kart›n›z ve temizleme öncesinde su ›s›t›c›s›n›n tamamen so¤umas›n› sa¤lay›n›z.
2. Su ›s›t›c›s›n›n d›fl ve iç yüzeylerini nemli bir bezle y›kay›n›z. E¤er gerekirse bir miktar
ev içi deterjan kullanabilirsiniz. Filtreyi temizlemek için ''Su filtresi'' alt›na bak›n›z. E¤er
su ›s›t›c›s›n› içinde deterjan kullan›n yaz›s›n› görürseniz, deterjan kulland›ktan sonra
kalan tüm izleri ç›kartmak için tam olarak durulama yap›n›z.
3. Tüm konektörlerin ve soketlerin kuru oldu¤undan emin olunuz.
Su ›s›t›c›s›n› veya güç taban›n› suya veya herhangi bir di¤er s›v›ya bat›rmay›n›z.
Sert veya afl›nd›r›c› temizleyiciler veya solventler kullanmay›n›z.
Su içinde veya bulafl›k makinesinde temizlenmemelidir.
Kireç çözme
Kireç birikmesi çal›flma ömrünü azaltarak eleman›n afl›r› ›s›nmas›na sebep olacakt›r. Su
kaynamadan önce su ›s›t›c›s›n› kapatarak emniyet kesiminin erkenden çal›flmas›na sebep
olacakt›r.
Eleman su ›s›t›c›s›n›n alt›na monte edildi¤inden, kirecin tutunaca¤› herhangi bir kenar
veya oyuk yoktur. Sadece görülebilece¤i ve ilgilenebilece¤i yerler olan su ›s›t›c›s›n›n
duvarlar› veya zemininde birikebilir.
- 5 -
Page 7

TEM‹ZL‹K VE BAKIM
Kireç birikmesini minimize etme:
1. Her bir kullan›m sonras›nda su ›s›t›c›s›n› boflalt›n›z; suyun su ›s›t›c›s›n› içinde gece
boyunca kalmas›na izin vermeyiniz; s›radan çeflme suyu yerine filtrelenmifl su kullan›n›z.
2. Plastik-gövdeli ürünlerde kullan›m için uygun olan özel bir kireç çözücü markas›
kullanarak su ›s›t›c›s›n›n kirecini düzenli olarak çözünüz. Çok sert su kireç çözme
alanlar›nda bu ifllem ayda bir kez gerekli olabilir.
3. Kireç çözerken, kireç çözücüsünün paketi üzerindeki talimata uyunuz. Kireç çözme
ifllemi bitti¤inde su ›s›t›c›s›n› boflalt›n›z ve temiz suyla birkaç kere durulay›n›z ve sonra
temiz suyla doldurup kaynat›n›z ve suyu ç›kart›n›z. Bu ifllem su ›s›t›c›s›n› içinde herhangi
bir kimyasal madde art›¤›n›n kalmamas›n› sa¤layacakt›r.
Lütfen dikkat: Kireç birikmesiyle ilgili hatalarla garanti süresi içinde iade edilen ürünler
tamir ücretine tabi olacakt›r.
Su filtresi
Suda ask›da kalan kireç parçac›klar› suyun sertli¤ine ba¤l› olarak bulutlu veya ya¤l› bir
görünüm verebilir.
Su ›s›t›c›n›za tak›lm›fl olan filtre bu parçalar›n içece¤inize geçmesine engel olacakt›r.
Filtrenin temiz tutuldu¤undan ve tortulardan ar›nm›fl oldu¤undan emin olman›z gerekir
aksi takdirde su ›s›t›c›n›z›n performans› ters olarak etkilenebilir, içecekleriniz kireç
parçac›klar› içerebilir ve su ›s›t›c›s› içindeki su bulutlu gibi görünebilir.
Filtreyi her ne zaman içinde kalm›fl fark edilebilir tortular olursa ve özellikle de su dökme
ifllemi herhangi bir flekilde etkilenirse temizlemeniz gerekir.
BAKIM
• Periyodik Bakım Gerektirmesi Durumunda, Periyodik Bakımın Yapılaca¤ı Zaman
Aralıkları ile Kimin Tarafından Yapılması Gerekti¤ine ‹liflkin Bilgiler
Cihaz periyodik bak›m gerektirmez.
Her kullan›mdan sonra temizli¤inin yap›lmas›nda fayda vard›r.
- 6 -
Page 8
ENGLISH
SINBO SK 7321 KETTLE
INSTRUCTION MANUAL
READ ALL THE INSTRUCTIONS BEFORE USING
IMPORTANT SAFEGUARDS
When using electrical appliance, basic safety precautions should always be followed, including the
following:
1. To protect against electrical hazards do not immerse the mains plug, power base, or kettle in water
or any other liquid. Do not use in the bathroom or near any source of water. Do not use outdoors.
2. Do not touch hot surfaces. Use handles or knobs.
3. Do not open the lid while the water is boiling.
4. Take care when pouring pour slowly, and do not overfill the kettle.
5. Water can remain hot for a considerable time after boiling and can present a scald hazard. Keep the
kettle, the power base, and the mains lead away from the edge of worktops and out of the reach of
children.
6. Do not allow the mains lead to hang over the edge ot the table or worktop, or any where it may be
accidentally caught or tripped over.
7. Close supervision is necessary when any appliance is used near children.
8. Unplug the power base from the wall socket when not in use, before repositioning and before cleaning.
Allow the kettle to cool down fully before cleaning and before storing away.
9. Ensure that the lid is closed before switching the kettle on, otherwise it may not switch off.
10. Check that the kettle is properly located on the power base before switching it on.
11. Do not switch on unless the kettle contains at least 1 cupful of water, otherwise you may damage
it.
12. Do not fill above the bottom of the max mark on the water level indicator (1.7 Liter)
13. Remove the kettle from its power base before filling or pouring.
14. Do not place the kettle, power base or mains lead on or near any hot surface, hotplate, hot hob or
burner.
15. Do not use the kettle for any purpose other than heating water.
16. Use the kettle only with power base supplied (and vice versa)
17. Do not operate any appliance with a damaged cord or plug, or after the appliance malfunctions. Or
has been damaged in an manner. If the mains lead is damaged, it must be replaced be a special lead
available from the Service department
18. Ensure that the lid is closed before switch
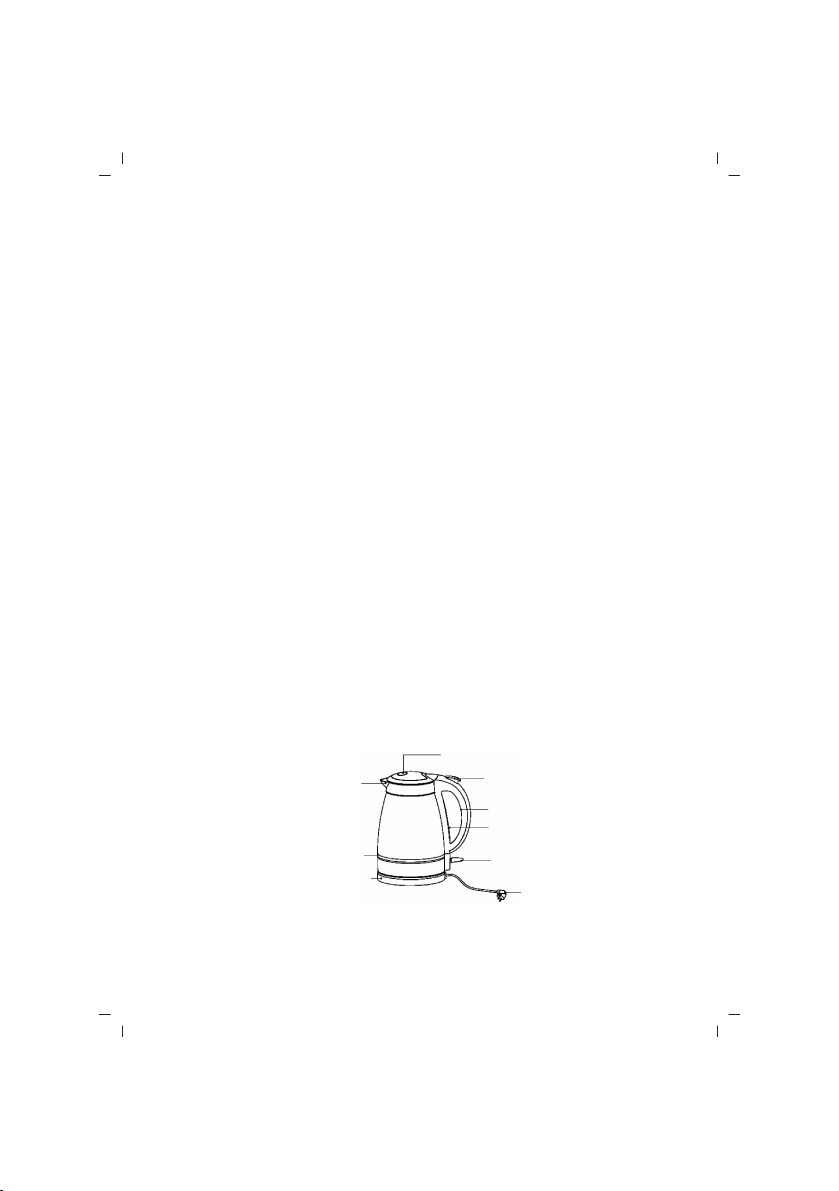
APPLIANCE DESCRIPTION
1. Spout
2. Lid
3. Push Button of Lid
4. Handle
5. ON/OFF Switch
6. Water level Indicator
7. Cordless Power Base
8. Power Indicator
9. Power Cord
BEFORE USE
Remove all packaging from the kettle and its power base. Before using the kettle for the first time, or
if it has been out of use for a long time, fill to the max mark and boil, then discard the boiled water and
rinse the kettle out with cold water.
1
8
7
2
3
4
6
5
9
- 7 -
Page 9

HOW TO USE
Positioning
* Position the power base as close to a wall socket as possible.
* Route the mains lead so that it dose not overhang the work surface, and cannot be caught accidentally.
Shorten the mains lead by winding it round the cord storage area under the power base, and bring it
out of the cord exit cut into the base.
Opening the lid
Remove the kettle from the power base (9).If the switch (7)has been pushed down inadvertently, it will
spring up, into the OFF position.
Warning: If the kettle has just boiled, it will be full of steam, which will escape as soon as the lid is
opened.
Hold the handle firmly in one hand, grip the lid knob in the other, and pull the lid straight up. As soon
as it separates from the kettle, move it out of the steam.
Filling
* Open the lid and fill the kettle via the lid aperture.
* Watch the level in the water level indicator. You must use at least one cup of water, but the water
level must be below the max mark.
* Do not overfill the kettle. If the kettle is overfilled, there is a risk that boiling water may be ejected.
* Replace the lid and press it down. Check that it is fully closed; otherwise the kettle may not switch
off when it boils.
Switching on
* Check that the switch is in the “OFF” position (lifts the kettle from the power base and set it down
again).
* Plug the power base into the wall socket. If necessary, switch the socket on. Gently position the kettle
on the power base, taking care not to spill any water.
* Press the switch down. The switch will light up, and the kettle will start to heat up.
* When the water has boiled the kettle will switch off automatically, the switch will return to the “OFF”
position and the light will go out.
Switching off
* If you need to switch the kettle off at any time before the water boils, simply lift it front the power
base and set it down again. The switch will pop up, into the “OFF” position
GENERAL
* When you lift the kettle from the base, you may see moisture on the surface of the base. This is the
steam used to switch the kettle off automatically, which then condenses and is allowed to escape via
vents in the underside of the kettle, do not lift it backwards, as this may allow water to pass through
the steam aperture on to the control area. Should this occur, the kettle must be allowed to dry before
use.
* To avoid the risk of splashing, pour slowly and do not over-tilt the kettle.
MISUSE
1. Do not switch the kettle on unless it contains at least one cup of water. Misuse of this kind will shorten
the life of the element.
2. If the kettle is accidentally switched on when it does not contain sufficient water, a boil-dry device
will automatically switch it off. Wait until the kettle has cooled down before filling, as the element will
be hot and spitting may occur
- 8 -
Page 10

CARE AND CLEANING
Cleaning
1. Switch the kettle off (lift it from the power base), unplug the power base from the wall socket and
let the kettle cool down completely before cleaning.
2. Wash the outside and inside surfaces of the kettle with a damp cloth. If necessary, you may use a
little household detergent. To clean the filter, see “Water filter” below. If you use detergent inside the
kettle, rinse thoroughly afterwards to remove all trace if the detergent.
3. Ensure that all connectors and sockets are kept dry.
Do not immerse the kettle or power base in water or any other liquid.
Do not use harsh or abrasive cleaners or solvents.
It should not be cleaned into water or it can not be cleaned by the dishwasher.
Descaling
Scale build-up will cause the element to overheat, reducing its working life. It may also cause the safety
cut out to operate prematurely, switching the kettle off before the water boils
As the element is mounted beneath the kettle, there are no awkward nooks and crannies for the scale
to get a foothold. It can build up only on the walls and floor of the kettle, where it can be seen and dealt
with.
To minimize scale build-up:
1. Empty the kettle after each use; do not allow water to stand in the kettle overnight; use filtered water
instead of ordinary tap water.
2. Descale the kettle regularly using a proprietary brand of descaler suitable for use in plastic-bodied
products. In areas of very hard water descaling may be necessary as often as once a month.
3. When decaling, follow the instructions on the packet of descaler. When descaling has finished, empty
the kettle and rinse it out several times with fresh water, then fill with fresh water, boil. And discard
the water. This should ensure the no chemical residues are left in the kettle.
Please note: Products returned during the guarantee period with faults that are directly related to
scale built-up will be subject to a repair charge.
Water filter
The scale particles that remain suspended in the water may give it a cloudy or greasy appearance,
depending on the hardness of the water.
The filter fitted to your kettle will prevent these parties passing into your drink. You must ensure that
the filter is kept clean and clear of deposits otherwise the performance of your kettle may be adversely
affected, your drinks may contain scale particles, and the water inside the kettle may look cloudy.
You should clean the filter whenever there are any noticeable deposits left on it, and especially if pouring
is affected in any way.
SPECIFICATIONS
Rated voltage : AC230V, 50Hz
Power : 2000W
Capacity : 1.7L
This appliance is to be stored and used under the following conditions: temperature-not less than +5˚C
relative humidity-not greater than 80%;aggressive impurities in the air: not allowable.
As the manufacturer is constantly working on improvement of its products, the design and technical
specifications are subject to change without prior notice.
- 9 -
Page 11

FRANÇAIS
SINBO SK 7321 BOUILLOIRE
MODE D’EMPLOI
LIRE ATTENTIVEMENT TOUTES LES INSTRUCTIONS AVANT D’UTILISER L’APPAREIL
CONSIGNES DE SÉCURITÉ IMPORTANTES
Lors de l'utilisation des appareils électriques, les précautions de base doivent être toujours suivies :
1. Ne pas immerger l’appareil ou le câble d’alimentation ou la plaque chauffante dans l'eau ou tout
autre liquide afin d’éviter toute risque du choc électrique.Ne pas l’utiliser dans la salle de bain ou à
proximité de tout autre source de l’eau. Ne pas utiliser à l’extérieur.
2. Ne pas toucher les surfaces chaudes, utilisez les poignées.
3. Ne pas ouvrir le couvercle lorsque l’eau est en ébullition.
4. Verser lentement l’eau et ne pas trop remplir la bouilloire.
5. Après que l’eau bouillie, elle peut rester chaude pendant une période remarquable et peut répresenter
un danger de brûlure. Placer la bouilloire, la plaque chauffante et les cordons de la ligne principale
à l’écart des enfants et les plans de travail.
6. Ne laissez pas pendre le câble d’alimentation sur le rebord d’une table ou d’un plan de travail.
7. Une surveillance proche est nécessaire lors d’utilisation d’un appareil à proximité des enfants
8. Débrancher toujours la fiche de la plaque chauffante de la prise de courant après l’utilisation ou
avant le nettoyage ou le repositionnement..Laisser l’appareil refroidir avant le stockage ou le nettoyage.
9. Vérifier que le couvercle soit fermé avant d’allumer la bouilloire, sinon l’appareil ne peut pas s’allumer.
10. Vérifier que vous avez bien placé la bouilliore sur sa plaque chauffante avant de l’allumer.
11. Ne pas faire fonctionner la bouilloire sans y mettre au moins d’une tasse d’eau sinon vous risquez
d’endommager l’appareil.
12. Ne pas dépasser la remarque maximale sur l’indicateur du niveau d’eau (1.7 litres)
13. Retirer la bouilloire de la plaque chauffante avant de la remplir ou de verser de l’eau.
14. Ne pas placer la bouilloire, la plaque chauffante ou les cordons de la ligne principale sur une surface
ou une source chaude.
15. Ne pas utiliser la bouilloire hors de son but.
16. Utiliser la bouilloire uniquement avec sa plaque chauffante fournis(et vice versa )
17. Ne pas utiliser l’appareil si le câble d’alimentation est endommagé, si l’appareil a été endommagé
de quelque façon que ce soit ou en cas de mauvais fonctionnement. Si le cordon d'alimentation est
endommagé, il doit être remplacé par votre revendeur, son service après-vente ou une personne de
qualification similaire afin d'éviter tout danger
18. Vérifier que le couvercle soit fermé avant de faire fonctionner l’appareil.
DESCRIPTION DE L’APPAREIL
1. Bec verseur
2. Couvercle
3. Bouton-poussoir de couvercle
4. Poignée
5. Bouton de Marche /Arrêt
6. Indicateur du niveau d’eau
7. Plaque Chauffante sans fil
8. Indicateur d’alimentation
9. Cordon d’alimentation
AVANT DE MISE EN MARCHE
Retirez tous les emballages de la bouilloire et la plaque chauffante. Avant la première utilisation ou
lorsque l’appareil n’est pas utilisé pendant une longue période, remplissez la bouilloire jusqu’à
l’indicateur maximum et la faire bouillir et puis versez l’eau bouillante et rincez la bouilloire à l’eau
froide.
1
8
7
2
3
4
6
5
9
- 10 -
Page 12

MODE D’EMPLOI
Positionner La Bouilloire
* Positionnez la plaque chauffante autant que possible le plus près à une prise murale.
* Positionnez le câble d’alimentation de façon qu’il ne pend pas sur le rebord d’une table ou d’un plan
de travail.Raccourcir le cordon d’alimentation en l’enroulant autour du rangement du cordon au desous
de la plaque chauffante et mettez le cordon dans la plaque chauffante par la partie de la sortie du
cordon.
Ouverture du Couvercle
Retirez la bouilloire de la plaque chauffante (9), Si vous appuyez accidentalement sur le bouton(7),
l’appareil va tourner à la position ‘ARRET’.
Avertissement: Si l’eau est encore bouillie ,la bouilloire sera rempli avec de vapeur.
Tenez la poignée avec une main, tenez le bouton de couvercle avec l’autre main et retirez le couvercle
vers le haut.Videz le vapeur quand vous retirez la bouilloire de la plaque chauffante.
Remplissage
* Ouvrir le couvercle et remplir de l’eau par le bec verseur
* Suivre le niveau de l’indicateur du niveau d’eau.Utilisez au moins d’une tasse d’eau mais le niveau
de l’eau doit être sous la remarque de maximum.
* Ne pas trop remplir la bouilloire. Si la bouilloire est surchargée, l’eau bouillante risque de déborder.
* Placez le couvercle à sa place et appuyez sur le couvercle. Vérifiez si le couvercle est bien placé sinon
il ne ferme pas lorsque la bouilloire fonctionne.
Démarrer L’Appareil
* Vérifiez que si le bouton est à la position ‘ARRET’( soulevez la bouilloire de sa plaque chauffante et
remettez en place)
* Branchez la plaque chauffante à la prise murale,si nécessaire allumez la prise. Placez la bouilloire
sur sa plaque chauffante.
* Appuyez sur le bouton vers le bas. Le voyant lumineux va s’allumer et la bouilloire va fonctionner.
* L’eau bouillante va automatiquement éteindre la bouilloire, le bouton va tourner à la position ‘ARRET’
et le voyant lumineux va s’éteindre.
Éteindre L’Appareil
* Si vous avez besoin d’ éteindre la bouilloire avant de l’eau bout, soulever par l’avant de la plaque
chauffant et la remettre en place. Le bouton va tourner à la position ‘ARRET’.
GÉNÉRAL
* Vous pouvez voir l’humidité sur la surface de la plaque chauffante quand vous retirez la bouilloire.Cette
vapeur concentrée est utilisée pour l’arrêt automatique de la bouilloire et sort par les trous au fond
de la bouilloire.Ne pas soulever vers l’arrière car ceci peut permettre à l’eau de passer à travers les
trous de vapeur.Dans ce cas, vous devez laisser la bouilloire refroidir avant d ‘utiliser à nouveau.
* Versez l’eau lentement et ne secouez pas la bouilloire afin d’éviter le risque d’éclaboussures.
UNE MAUVAISE UTILISATION
1. Ne pas faire fonctionner l’appareil jusqu’à ce qu’il comprenne au moins une verre d’eau. Ce type
d’utilisation va raccourcir la durée de vie de l’appareil.
2. Si la bouilloire s’allume accidentalement quand il n’existe pas assez de l’eau dans le réservoir,
l’appareil s’éteint automatiquement . Attendez jusqu’à ce que la bouilloire refroidi avant de remplir
d’eau.
- 11 -
Page 13

ENTRETIEN et NETTOYAGE
Nettoyage
1. Arrêtez la bouilloire ( retirez-la de la plaque chauffante ), débranchez la fiche de la prise murale de
courant et laissez l’appareil complètement refroidir.
2. Nettoyez les surfaces intérieures et extérieures de l’appareil à l’aide d’un chiffon humide.Si nécessaire,
utilisez un peu de détergent ménager. Voir la partie ‘Filtre d’eau ‘ pour nettoyer la filtre. Si vous utilisez
le détergent, rincez complètement pour supprimer toutes les traces de détergent.
3. Assurez vous que tous les connecteurs et les prises de courant soient secs.
Ne pas immerger la bouilloire ou la plaque chauffante dans de l’eau ou tout autre liquide.
Ne pas utiliser les produits nettoyants corrosifs ou abrasifs ou des solvants.
Ne pas passer par la lave-vaisselle ou par l’eau courante.
Détartrer
L’Accumulation du calcaire cause la surchauffe de l’appareil et réduit la durée de vie et en éteignant
la bouilloire avant que l’eau bout fait la sécurité
fonctionner.
La plaque chauffante est monté sous la bouilloire, donc le calcaire peut s’accumuler dans la surface
intérieure ou sur le fond.
Minimiser l’accumulation du calcaire:
1. Vider la bouilloire après chaque utilisation, ne pas laisser l’eau dans l’appareil pendant toute la nuit
et utiliser l’eau filtrée plutôt que de l’eau de robinet.
2. Détartrer périodiquement le calcaire de la bouilloire, en utilisant un détartrage approprié aux
bouilloires avec le corps en plastique.Ce processus peut être nécessaire une fois par mois pou les
calcaires durs.
3. Suivre les instructions sur l’emballage du détartrage. Quand le processus du détartrage est terminé,
videz la bouilloire et rincez plusieurs fois avec de l’eau et puis faire bouillir en remplissant avec de
l’eau propre et enfin videz l’eau. Ce processus empêchera le résidu d’une substance chimique dans
la bouilloire.
Attention: Les appareils seront soumis au frais de réparation à cause des dommages liés à
l’accumulation du calcaire dans la période de garantie.
Filtre d’eau
En fonction de la dureté de l’eau, les particules du calcaire peuvent donner une apparence huilée
Le filtre installé à la bouilloire ,va empêcher les particules de passer à l’eau Assurez vous que le filtre
soit propre et exempte des restes du calcaire sinon la performance de votre bouilloire peut négativement
affecter, les boissons peuvent contenir des particules du calcaire ou l’eau à l’intérieure de la bouilloire
ne serait pas claire.
Nettoyer le filtre chaque fois que vous voyez les tartres et surtout si le versement de l’eau est affecté
en aucune manière.
SPÉCIFICATIONS
Tension Nominale : AC230V, 50Hz
Puissance : 2000W
Capacité : 1.7L
Cet appareil doit être stocké et utilisé dans les conditions suivantes : la température ne doit pas être
moins de +5˚C et l’humidité plus de 80%, il faut protéger l’appareil contre les événements météorologiques.
Pour que le fabricant travaille en permanence à améliorer les produits, la conception et les spécifications
techniques sont soumis à changement sans préavis.
- 12 -
Page 14
NEDERLANDS
SINBO SK 7321 WATERVERWARMER
GEBRUIKSAANWIJZING
VOOR HET GEBRUIK HELE RICHTLIJN LEZEN
BELANGRIJKE VEILIGHEIDSMAATREGELEN
Tijdens het gebruiken van het elektriciteitsapparaat inclusief de hieronder genoemden moeten de basis
veiligheidsmaatregelen altijd nageleefd zijn:
1. Voor de bescherming tegen elektriciteitsgevaren de stekker van de basisleiding, krachtvloer of de
waterverwarmer niet in het water of in een een of andere vloeistof bedrukken. Niet in buitenplaatsen
gebruiken.
2. Niet de warme oppervlakten aanraken. De handvaten of de knoppen ervan gebruiken.
3. Tijdens het koken van het water niet de deksel openen.
4. Voorzichtig zijn tijdens het zachtjes gieten van water en de waterverwarmer niet te veel vullen.
5. Nadat het is gekookt kan het water met een aanzienlijke tijd warm blijven en er kan een kookgevaar
blijken. De waterverwarmer, krachtvloer en de kabels van de basisleiding afhouden van de keuken
toonbanken en van het bereik van de kinderen.
6. Laat u de kabels van basisleidingen niet naar beneden hangen van de tafel of van de keuken toonbank
of van een een of andere plaats waar deze per ongeluk kan vastzitten of omvallen.
7. Als er een een of andere apparaat dichtbij de kinderen worden gebruikt is er van dichtbij toezicht
nodig.
8. Als het niet in gebruik is, de stekker van de krachtvloer uit het stopcontact trekken zonder het opnieuw
te positioneren en voor de reiniging ervan. Verzorgd u dat de waterverwarmer koud wordt voor de
reiniging of de opslag ervan.
9. U moet zeker zijn van of de deksel van de waterverwarmer dicht is anders kan het niet dicht worden..
10. U moet zeker zijn van of de waterverwarmer juist is geplaatst op de krachtvloer voor het openen.
11. De waterverwarmer niet aandoen als er minimaal geen een beker water erin zit anders kunt u het
beschadigen.
12. Op de niveauaanwijzer (1.7 liter) niet boven de maximum peil gaan.
13. Voor de vulling of voor het gieten van water haalt u de waterverwarmer uit de krachtvloer.
14. De waterverwarmer, krachtvloer of de kabels van de basisleiding niet plaatsen op een één of andere
warme oppervlakte, warme plaat, warme rek of op de oven.
15. De waterverwarmer buiten het koken van water niet gebruiken voor een één of andere doel.
16. De waterverwarmer alleen met de gegeven krachtvloer gebruiken (en met het omgekeerde van
deze behandeling)
17. Niet gebruiken het apparaat die beschadigde kabel of stekker heeft of een één of andere apparaat
na de storing of een apparaat die op een één of andere manier defect is geraakt. Als de kabels van de
basisleiding beschadigd worden, moeten deze vervangen worden met een speciale kabel van de service
deppartement.
18. Voor het aandoen van het apparaat moet u zeker zijn van of de deksel dicht is.
BESCHRIJVING VAN HET APPARAAT
1. Begin/Mond
2. Deksel
3. Drukknop van de deksel
4. Handvat
5. AAN/UIT knop
6. De wijzer van waterniveau
7. Krachtvloer zonder kabel
8. Krachtwijzer
9. Krachtkabel
1
8
7
2
3
4
6
5
9
- 13 -
Page 15

VOOR HET GEBRUIK
Alle pakmaterialen eruit halen van de waterverwarmer en van de krachtvloer. Voordat u de
waterverwarmer voor het eerst gebruikt of als het voor lange tijd niet gebruikt is vullen met water tot
de maximum teken en het water koken en later het gekookt water eruit gieten en de waterverwarmer
met koud water afspoelen.
GEBRUIKSWIJZE
Positioneren
* De krachtvloer als mogelijk positioneren dichtbij het stopcontact.
* De kabel van de basisleiding richten zodat het niet naar beneden hangt van een één of andere
werkoppervlakte en zodat het per ongeluk niet vastzit. De kabel van de basisleiding verkorten door
deze te winden om de kabelopslag onder de krachtvloer en in de vloer brengen vanuit de uitgansnee
van de kabel.
Het openen van de deksel
De waterverwarmer uit de krachtvloer halen (9). Als er zonder weten op de knop (7) wordt gedrukt, zal
het overgaan op stand <UIT>.
Waarschuwing: Als het waterverwarmer de water pas heeft gekookt, zal het vol met stoom zijn die zal
ontsnappen diret als de deksel wordt geopend.
De handvat met een hand stevig vasthouden, met de andere hand de knop van de deksel vasthouden
en de deksel recht naar boven trekken. Meteen nadat het gescheiden is van de waterverwarmer uit de
stoom halen.
Vullen
* De deksel openen en met de gat aan de deksel de waterverwarmer vullen.
* Het niveau volgen in de wijzer van het waterniveau. U moet minimaal een beker water gebruiken maar
het waterniveau moet onder het maximum peil staan.
* De waterverwarmer niet te veel vullen. Als de waterverwarmer te veel wordt gevuld, kan er een risico
ontstaan van dat het gekookt water naar buiten komt.
* De deksel op de plaats zetten en naar beneden drukken. Controleren of het helemaal gevuld is; anders
kan de waterverwarmer nadat het gekookt heeft niet dicht gaan.
Aanzetten
* Controleren of de knop op stand “UIT” staat (de waterverwarmer van de vloer nemen en opnieuw op
de plaats zetten).
* De stekker van de krachtvloer in het stopcontact aan de muur steken. Als nodig het stopcontact
openen. Voorzichtig te zijn om geen één of andere water te gieten de waterverwarmer zachtjes op de
krachtvloer zetten.
* De knop naar beneden drukken. De knop zal branden en zal de waterverwarmer beginnen warm te
worden.
* Het water zal de waterverwarmer automatisch uit laten gaan, de knop zal op de positie “UIT” staan
en het licht zal uitgaan.
Uitzetten
* Als u voordat het water is gekookt de waterverwarmer uit moet zetten, van de voorkant van de
krachtvloer optillen en weer op de plaats zetten. De knop zal op de positie “UIT” staan.
ALGEMEEN
* Als u de waterverwarmer van de krachtvloer optilt kunt u op de oppervlakte van de vloer vocht zien.
De stoom die gebruikt wordt om de waterverwarmer automatisch uit te zetten, die gecondenseerd
wordt en die toestemming krijgt om vanuit de gaten te komen aan de onderkant van de waterverwarmer
is deze stoom. Niet naar achteren tillen want deze situatie kan toestemming geven voor het doorlopen
van water vanuit de stoomgat in de controleruimte. Als deze situatie gebeurt, moet de waterverwarmer
- 14 -
Page 16

ALGEMEEN
voor het gebruik koud laten worden.
* Om te vermijden van het risico van opspatting, het water langzaam gieten en de waterverwarmer niet
te veel omsingelen.
ONJUISTE GEBRUIK
1. De waterverwarmer niet aanzetten totdat het minimaal één beker water bevat. Soortgelijke onjuiste
gebruik zal de houdbaarheid van de element verkorten.
2. Als de waterverwarmer zonder voldoende water te bevatten per ongeluk wordt aangezet, de kookverdroger zal het apparaat automatisch uitzetten. Omdat de element niet warm zou zijn en spuiten zal
ontstaan wachten totdat de waterverwarmer koud wordt voordat het met water gevuld wordt.
ONDERHOUD EN REINIGING
Reiniging
1. De waterverwarmer uitzetten (van de krachtvloer nemen), de stekker van de krachtvloer uit het
stopcontact trekken en verzorgd u dat de waterverwarmer helemaal koud is geworden voor de reiniging.
2. De binnen- en buitenkant van de waterverwarmer met een vochtige doekje reinigen. Als nodig kunt
u een beetje wasmiddel gebruiken. Om de filter schoon te maken kijkt u onder de titel “waterfilter”.
Als u ziet dat er vermeld is “gebruikt u wasmiddel in de waterverwarmer”, om alle overgebleven sporen
te verwijderen nadat een wasmiddel is gebruikt moet u helemaal afspoelen.
3. U moet zeker zijn van of alle connectoren en stopcontacten droog zijn.
De waterverwarmer of de krachtvloer niet in een water of één of andere vloeistof bedrukken.
Een harde of verslijtende schoonmaakmiddelen of oplosmiddelen niet gebruiken.
Moet niet in water of in de afwasmachine schoongemaakt worden.
Kalkoplossing
De opstapeling van de kalk zal de houdbaarheid van de element verminderen en zal het te veel verwarmen
van de element veroorzaken. Als de waterverwarmer uit is gezet voor het koken van water zal het
veroorzaken dat de veiligheidsverbreking vroegtijdig werkt.
Omdat de element gemonteerd is onder de waterverwarmer, is er geen één of andere kantje of gaatje
waar de kalk zich kan vestigen. Kan zich alleen opstapelen aan de muur of op de vloer van de
waterverwarmer waar zij gezien kan worden en interesse voor heeft.
Verkleinen van de kalkopstapeling:
1. Na elk gebruik maakt u de waterverwarmer leeg; laat u het water niet de hele nacht in de
waterverwarmer; gebruikt u gefiltreerd water in plaats van normale leidingwater.
2. Lost u regelmatig de kalk van de waterverwarmer door een speciale merk te gebruiken van kalkoplosser
die geschikt is voor het gebruik bij producten met Plastische-structuur. Bij een harde kalkoplosplaatsen
kan deze behandeling één keer per maand noodzakelijk worden.
3. Tijdens het oplossen van de kalk past u zich aan aan de richtlijnen op het pakket van de kalkoplosser.
Als de procedure van de kalkoplossing is beeindigd maakt u de waterverwarmer leeg en met schoon
water een paar keer afspoelen en later met een schoon water vullen en koken en het water eruit gieten.
Deze procedure zal verzorgen dat er geen overblijfsel meer is van een één of andere chemische middelen
in de waterverwarmer.
Aandacht alstublieft:De producten die binnen de garantieperiode worden teruggestuurd met de
fouten van kalkopstapeling zullen onderworpen worden aan de reparatieprijs.
Waterfilter
De kalkstukken die in het water onopgelost zijn gebleven zullen afhankelijk aan de hardheid van het
water een bewolkte of vettige beeld geven.
De filter die is vastgezet in de waterverwarmer zal voorkomen dat deze stukken niet overgaan in uw
- 15 -
Page 17

WATERFILTER
drinken. U moet zeker zijn van of de filter schoon is gehouden of gezuiverd is van de prutten anders
kan de performans van uw waterverwarmer omgekeerd beinvloed worden, uw drinken kunnen
kalkstukken bevatten en het water in de waterverwarmer kan bewolkt eruit zien.
SPECIFICATIES
Nominaal voltage : AC230V, 50Hz
Kracht : 2000W
Capaciteit : 1.7L
Deze apparaat moet onder de hieronder gegeven voorwaarden bewaard en gebruikt worden: de
temperatuur moet niet onder +5˚C zijn, de vocht die afhankelijk is moet niet hoger zijn dan %80; geen
toestemming geven voor de aanvallende storingen in de lucht.
Omdat de producent voortdurend werkt om haar producten te ontwikkelen zijn de conceptie en technische
specificaties onderworpen aan de verandering zonder van te voren door te geven.
- 16 -
Page 18

DEUTSCH
SINBO SK 7321 WASSERKOCHER
GEBRAUCHSANWEISUNG
VOR DER VERWENDUNG LESEN SIE DIESE GEBRAUCHSANWEISUNG DURCH
WICHTIGE SICHERHEIT MAßNAHMEN
Sie sollen die unten geschriebenen Maßnahmen immer anpassen wenn Sie dieses Gerät benutzen.
1. Irgendeinen elektrischen Schock zu vermeiden sollen Sie die Hauptleitung Stecker, die Leistungsbase
und den Wasserkocher niemals ins Wasser oder in irgendeine Flüssigkeit tauchen. Verwenden Sie
dieses Gerät nicht in der Nähe von dem Badezimmer oder irgendeiner Wasserquelle. Benutzen Sie den
Wasserkocher an äußeren Plätzen.
2. Berühren Sie warme Flächen nicht. Halten Sie das Gerät von Haltern oder Tasten.
3. Wenn das Wasser gekocht wird, öffnen Sie niemals den Deckel.
4. Wenn Sie langsam Wasser gießen, seien Sie vorsichtig. Niemals füllen Sie den Wasserkocher
übermäßig.
5. Nachdem das Wasser gekocht wird, kann es für eine Zeit warm bleiben. Seien Sie vorsichtig gegen
eine Gefahr. Bewahren Sie den Wasserkocher, die Leistungsbase und die Hauptleitung Kabel weg von
dem Küchetisch und den Plätzen, wo Kinder spielen auf.
6. Niemals erlauben Sie, dass das Kabel an einem Tisch gehängt bleibt. Es kann fälschlich an irgendeinen
Platz gehängt bleiben. Seien Sie vorsichtig.
7. Immer beobachten Sie das Gerät wenn Sie neben Kindern benutzt wird.
8. Ziehen Sie den Stecker der Leitungsbase immer von dem Sockel der Wand heraus wenn Sie das
Gerät nicht benutzen oder wenn Sie es platzieren. Vor der Reinigung sollen Sie das gleiche tun. Vor der
Reinigung und Speicherung des Wasserkochers soll das Gerät gekühlt werden.
9. Bevor Sie den Wasserkocher öffnen, seien Sie sicher, dass der Deckel von dem Gerät geschlossen
ist. Andernfalls kann das Gerät nicht gestoppt werden.
10. Seien Sie sicher, dass der Wasserkocher über die Leistungsbase richtig eingestellt wurde bevor
Sie das Gerät einschalten
11. Niemals schalten Sie den Wasserkocher ein und seien Sie immer sicher, dass sich im Behälter von
dem Gerät am wenigstens ein Glas Wasser befindet. Andernfalls kann diese Operation den Wasserkocher
schädigen.
12. Niemals füllen Sie das Gerät mehr als das untere Teil von dem Anzeige von der maximalen
Wasserebene(1,7 l)
13. Wenn Sie das Gerät füllen oder Wasser davon gießen, nehmen Sie den Wasserkocher von der
Leistungsebene heraus.
14. Niemals platzieren Sie den Wasserkocher, die Leistungsbase oder das Kabel auf einen warmen
Platz, Herd oder auf ein warmes Regal.
15. Benutzen Sie den Wasserkocher nicht für andere Zwecke außerhalb Wasser kochen
16. Benutzen Sie den Wasserkocher nur mit mitgegebener Leistungsebene. (und mit der Operation
rückwärts)
17. Benutzen Sie beschädigte Geräte, beschädigte Kabel oder Stecker niemals. Wenn die Hauptkabel
geschädigt wurden, ändern Sie diese mit den neuen, die Sie von den Servicemännern erhalten können.
18. Seien Sie sicher, dass der Deckel geschlossen ist bevor Sie den Wasserkocher öffnen.
BESCHREIBUNG VON DEM GERÄT
1. Eingang
2. Deckel
3. Die gedrückte Taste von dem Deckel
4. Halter
5. ÖFFNEN/SCHLIEßEN Taste
6. Anzeige von der Wasserebene
7. Leistungsbase ohne Kabel
8. Anzeige von der Leistung
9. Leistungskabel
1
8
7
2
3
4
6
5
9
- 17 -
Page 19

VOR DER VERWENDUNG
Nehmen Sie alle Packungsmaterialien von dem Gerät aus dem Kocher und der Leistungsbase. Wenn
Sie den Wasserkocher seit langer Zeit nicht benutzt haben oder erst Mal in Betrieb einsetzen, füllen
Sie das Gerät bis die maximale Markierung von der Wasserebene und kochen Sie mit dem Gerät Wasser.
Danach nehmen Sie das warme Wasser heraus und waschen Sie das Gerät mit kaltem Wasser.
VERWENDUNGSWEISE
Platzieren
* Platzieren Sie (wenn es möglich ist) den Wasserkocher neben den Wandsockel.
* Geben Sie das Kocherkabel die Richtung, dass es nicht an einem Tisch gehängt bleibt oder fälschlich
verklemmt. Verkürzen Sie das Kabel drehend um den Kabelstock unter der Leistungsbase. Bringen
Sie es von dem Kabelaustritt zum Inneren von der Base.
Öffnen von dem Deckel
Nehmen Sie den Wasserkocher von der Leistungsbase(9). Wenn Sie unbewusst die Taste (7) drücken,
wird die Maschine in die Position <GESCHLOSSEN> kommen.
Warnung: Wenn der Wasserkocher neu gekocht ist, wird es mit heißem Wasser gefüllt sein gleich Sie
den Deckel öffnen.
Halten Sie den Halter mit einer Hand eng und mit der anderen den Deckel Taste. Ziehen Sie den Deckel
eben nach oben. Nach dem Trennen von dem Kocher ziehen Sie den Behälter aus dem Dampf.
WASSER FÜLLEN
* Öffnen Sie den Deckel und füllen Sie durch das Deckelloch den Wasserkocher.
* Verfolgen Sie durch die Anzeige von der Wasserebene den Level von dem Wasser. Sie sollen wenigstens
ein Glas Wasser füllen aber jedes Mal soll der Level unter der Markierung der maximalen Wasserebene
bleiben.
* Niemals füllen Sie den Wasserkocher übermäßig. Wenn Sie das tun, besteht das Risiko, dass das
gekochte Wasser nach draußen fließt.
* Setzen Sie den Deckel an seine Stelle und drücken Sie nach unten. Überprüfen Sie, dass der Behälter
voll ist. Andernfalls kann der Wasserkocher nicht geschlossen werden trotz die Operation beendet
worden ist.
Öffnen
* Seien Sie sicher, dass die Taste zur Position “GESCHLOSSEN“ gekommen ist.(nehmen Sie den
Wasserkocher von der Base heraus und setzen Sie ihn zurück ein.)
* Stecken Sie die Leistungsbase in die Wandsockel. Wenn es nötig ist, öffnen Sie die Sockel. Achten
Sie darauf, dass kein Wasser gegossen wird und setzen Sie den Wasserkocher sanft zur Base ein.
* Drücken Sie die Taste nach unten. Die Lampe wird leuchten und der Wasserkocher beginnt zu kochen.
* Das Wasser schließt den Wasserkocher automatisch. Die Taste kommt zur Position “GESCHLOSSEN“
und die Lampe wird erlöschen.
Schließen
* Wenn Sie den Wasserkocher schließen sollen bevor das Wasser gekocht wird, nehmen Sie die
Leistungsbase von vorne heraus und setzen Sie ihn wieder ein. Die Taste wird zur Position“
GESCHLOSSEN“ kommen.
ALLGEMEIN
* Wenn Sie den Wasserkocher von der Base herausnehmen, werden Sie auf der Fläche Feuchtigkeit
sehen. Diese Feuchtigkeit ist der Dampf, der den Wasserkocher automatisch schließt, konzentriert
und den Wasserkocher von den Löchern auf der unteren Seite der Maschine lässt. Halten Sie das Gerät
nicht nach rückwärts, weil diese Operation erlaubt, dass der Dampf durch das kontrollierte Loch nach
außen geht. Falls diese Situation passiert, soll die Maschine vor Verwendung gekühlt werden.
* Um das Springen Risiko zu vermeiden, sollen Sie Wasser vorsichtig gießen und wickeln Sie den
Wasserkocher nicht übermäßig.
- 18 -
Page 20

FALSCHER GEBRAUCH
1. Setzen Sie den Wasserkocher nicht in Betrieb falls dieser wenigstens ein Glas Wasser enthält. Solcher
falsche Gebrauch wird die Lebenszeit von dem falschen Gebrauchelement verkürzen.
2. Falls der Wasserkocher fälschlich geöffnet wird wenn er kein Wasser enthält, wird Kochens-Trocknen
das Gerät automatisch schließen. Weil das Element nicht heiß wird und das Springen verursacht, warten
Sie bis der Wasserkocher abkühlt.
PFLEGE UND REINIGUNG
Reinigung
1. Schließen Sie den Wasserkocher (nehmen Sie ihn von der Base heraus) ziehen Sie den Stecker der
Leistungsbase aus der Wandsockel. Warten Sie bis der Wasserkocher vollständig abkühlt vor der
Reinigung.
2. Waschen Sie die außen und inner Flächen des Wasserkochers mit einem feuchten Tuch. Wenn es
nötig wird, können Sie eine Menge Waschmittel für den Haushalt benutzen. Für die Reinigung von dem
Filter schauen Sie unter den “Wasserfilter“. Wenn es dort eine Markierung gibt, dass der Wasserkocher
auch mit Waschmittel gereinigt werden kann, waschen Sie ihn nach jeder Reinigung vollständig bis
jedes Fleck verschwindet.
3. Seien Sie sicher, dass alle Stecker und Sockel trocken sind.
4. Tauchen Sie den Wasserkocher oder die Leistungsbase niemals ins Wasser oder in eine Flüssigkeit.
Benutzen Sie keine ätzende oder harte Reinigungsmittel oder andere Solvente.
Der Wasserkocher darf nicht im Wasser oder in dem Geschirrspüler geputzt werden.
Lösung von dem Kalkwasser
Das Kalkwasser verursacht, dass der Wasserkocher überhitzt und verkürzt die Lebenszeit vom dem
Element in dem Kocher. Bevor das Wasser gekocht wird, wird es den Kocher schließen und verursacht,
dass der Kocher zu früh arbeitet.
Das Kalkwasser kann nicht an einem Platz oder an einer Höhle halten weil das Element in das untere
Teil von dem Kocher montiert ist. Es wird an den Wänden oder Boden von dem Kocher sammeln.
Minimieren von dem gesammelten Kalkwasser :
1. Nach jeder Verwendung leeren Sie den Wasserkocher. Niemals lassen Sie das Wasser eine Nacht
lang im Kocher. Verwenden Sie kein normales Wasser sondern immer gefiltertes Wasser
2. Lösen regelmäßig das Kalkwasser indem Sie ein günstiges Waschmittel für die Kunststoff Geräte
benutzen. Widerholen Sie diese Operation ein Mal in dem Monat an Plätzen, wo das Kalkwasser sehr
hart ist.
3. Anpassen Sie der Gebrauchsanweisung auf dem Paket von diesem Lösungsmittel immer. Nach der
Lösungsoperation leeren Sie den Wasserkocher. Danach waschen Sie das Gerät mehrmals. Füllen Sie
den Kocher mit sauberem Wasser und kochen Sie das Wasser. Diese Operation möglicht, dass in dem
Kocher kein Rest von irgendeinem chemischen Stoff bleibt.
Bitte Achtung: Fehler, die wegen Sammlung vom Kalkwasser auftreten, werden in der Garantie des
Geräts akzeptiert und diese Geräte werden mit den neuen geändert.
Wasserfilter
Die Teile von dem Kalkwasser bleiben in dem Wasser gehängt und das verursacht ein bewölktes und
öliges Aussehen
Der Wasserfilter verhindert, dass diese Teilchen in Ihr Getränk eindringen. Seien Sie sicher, dass der
Filter sauber ist und von Sedimenten gereinigt worden ist. Andernfalls kann die Performanz Ihres
Gerätes schlecht beeindruckt werden. Ihre Getränke können die Teilchen vom Kalkwasser erhalten.
Das Wasser in dem Kocher wird ein bewölktes Aussehen haben.
Sie sollen den Filter auch reinigen wenn in dem Filter Sedimente einsammeln oder das Leeren vom
Wasser schlecht beeinflusst wird.
- 19 -
Page 21

SPEZIFIKATIONEN
Nominal Spannung : AC230V, 50Hz
Leistung : 2000W
Kapazität : 1.7L
Dieses Gerät soll nach den unten geschriebenen Bedingungen gespeichert oder gebraucht werden. Die
Temperatur soll immer weniger als +5°C sein und relative Luftfeuchtigkeit soll nicht mehr als 80%
sein.
Die Hersteller arbeiten immer um ihre Produkte zu verbessern. Die technischen Spezifikationen sind
zu den Veränderungen unterlegt.
- 20 -
Page 22

ESPANOL
SINBO SK 7321 CALENTADOR DE AGUA
INSTRUCCIÓN DEL USO
ANTÉS DE USARLO LEER TODA LA ISTRUCCIÓN
MEDIDAS IMPORTANTES DE LA SEGURIDAD
Se deben obedecer siempre las medidas básicas de seguridad incluso los siguientes durante el uso
de los aparatos eléctricos:
1. Para proteger ante los peligros de la electricidad, no sumergir la ficha de la línea principal, la base
de la energía o el calentador de agua en agua o en cualquier ortro líquido. No usar en el cuarto de baño
ú cerca de cualquier otro fuente de agua. No usarlo a fuera.
2. No tocar sus superficies calurosas. Usar sus mangos o botones.
3. No abrir la tapa mientrás está hirviendo la agua.
4. Tener cuidado mientrás echando agua poco a poco y no llenar el calentador de agua mucho.
5. Después de ser hervido la agua se puede conservar durante un tiempo rezonable y puede causar un
peligro de hervimiento. Guardar la distancia del calentador de agua, la base de la energía, cables de
la línea principal, entre los niños y del mostrador de la cocina.
6. No Permitir que las cables de la línea principal se cuelgan de cualquier lugar accidentalmente
apretado como mostrador de la cocina o que puede ser derrumbado.
7. En caso de ser usado cualquier aparato cerca de los niños se necesita que sea vigilado cerca.
8. Cuando no es usado, antés de ser posicionado otra vez y limpiado, desenchufar el cable la base de
la energía de la pared. Enfríar el calentador de agua antés de la limpieza o del almacenamiento.
9. Antés de funcionar el calentador de agua, estar seguro que sea cerrado la tapa. En caso contrario
no puede apagarse.
10. Antés de abrir el calentador de agua, estar seguro que el calentador de agua es colocado sobre la
base de la energía correctamente.
11. No abrir el calentador de agua sin contener mínimo una copa de agua sino puede usted dañarse.
12. No exceder la marca máxima sobre el indicador del nivel (1.7 litros).
13. Antés de llenar o echar agua quitar el calentador de agua de su base de la energía.
14. No colocar el calentador de agua, la base de la energía o los cables de la línea principal sobre algún
superficie calurosa, placa caliente, mostrador o fogón calurosa.
15. No usar el calentador de agua por cualquier otro objetivo fuera del calentamiento de agua.
16. Usar el calentador de agua solamente con la base de la energía llegado (y al conttrario)
17. No usar el aparato cuyo cable o enchufe son dañados o después de la avería cualquier aparato ú
el aparato averíado una forma. En caso de ser dañado los cables de la línea principal, debe recambiar
por un cable particular del departamento del servicio.
18. Antés de funcionar estar seguro que sea cerrado la tapa.
DENOMINACIÓN DEL APARATO
1. Boca
2. Tapa
3. Botón de la tapa en que se pulsa
4. Mango
5. Botón de FUNCIONAR/APAGAR
6. Indicador del nivel de agua
7. Base de la energía sin cable
8. Indicador de la energía
9. Cable de la energía
ANTES DEL USO
Sacar todas las materiales del embalaje del calentador de agua y de la base de la energía. Antés de
usar el calentador de agua por primera vez o no es usado durante largo plazo, llenarlo hasta el nivel
máximo y hervirlo y después echar la agua hervida y aclarar el calentador de agua con agua fría.
1
8
7
2
3
4
6
5
9
- 21 -
Page 23

FORMA DEL USO
Posicionamiento
* Posicionar la base de la energía cerca posible del enchufe de la pared.
* Dirigir el cable de la línea principal en forma de no ser colgado de ningún campo de trabajo o apretado
accidentalmente. Cortar el cable de la línea principal enrollando alrededor del almacén de la base de
la energía y ponerlo dentro de la base.
Abrir la tapa
Quitar el calentador de agua de la base de la energía (9). En caso de ser pulsado accidentalmente al
botón (7), pasará a la posición <APAGADO>.
Aviso: En caso de ser hervido recién el calentador, Estará lleno con vapor que se escapará abriéndo
la tapa.
Coger el mango fuerte con una mano, coger con otra mano el botón de la tapa y tirar recto arriba la
tapa. Quitar el vapor separándo del calentador de agua.
Llenar
* Abrir la tapa y llenar el calentador de agua por el agujero de la tapa.
* Vigilar el nivel del indicador para el nivel de agua. Es necesario mínimo usar una copa de agua pero
el nivel de agua debe estar bajo de la marca máxima.
* No llenar el calentador de agua excesivo. En caso de ser llenado excesivo el calentador de agua,
ocurrirá el riesgo de escaparse fuera agua hervido.
* Fijar la tapa en su lugar y puslar hacia abajo. Controlar que es lleno completamente; en caso contrario
el calentador no podrá apagarse cuando está hervido.
Abrir
* Controlar que el botón está en la posición ''APAGADO” (Levantar el calentador de agua de su base y
ponerlo en su lugar otra vez).
* Enchufar la base de la energía en el enchufe de la pared. En caso de ser necesario, funcionar el
enchufe. Colocar el calentador de agua cortésmente sobre la base de la energía teniendo cuidado para
echar agua.
* Pulsar al botón hacia abajo. Encenderá la luz del botón y empezará a calentarse el calentador de
agua.
* La agua apagará el calentador de agua automáticamente, el botón alcanzará a la posición ''APAGADO
y la luz se apagará.
Cerrar
* En caso de ser apagado que la agua está hervido, levantar de la parte delantera de la base de la
energía y colocarlo otra vez en su lugar. El botón pasará en la posición ''APAGADO”.
EN GENERAL
* Usted puede observar que es humidificado la base al levantar el calentador de agua de la base. Éste
es el vapor usado para apagar automáticamente el calentador de agua, densificado y permitido que
salga de los agujeros en la parte superior del calentador. No levantar hacia atrás porque este caso
puede permitir que pasa agua por el agujero del vapor en el campo del control. En caso de ocurrir éso,
se necesitará que se enfríe el calentador de agua antés del uso.
* Para evitar ante la salpica de agua echar la agua despacio y no mover mucho el calentador de agua.
USO ERRÓNEO
1. No funcionar el calentador de agua hasta contener mínimo una copa de agua. Este tipo del uso
erróneo reducirá la vida del aparato.
2. En caso de ser funcionado el calentador de agua accidentalmente no contenido agua suficiente,
Hervimiento-secamiento apagará el aparato automáticamente. Esperar hasta que se enfríe el calentador
de agua antés de llenarlo porque no será caliente el elemento y se ocurrirá pulverización.
- 22 -
Page 24

MANTENIMIENTO Y LIMPIEZA
Limpieza
1. Apagar el calentador de agua (levantar de la base de la energía), desenchufar la base de la energía
del enchufe de la pared y adquirir que se enfría completamente el calentador de la agua antés de la
limpieza.
2. Limpiar los superficies externos e internos del calentador de agua con una tela mojada. En caso de
ser necesaria pueden usar un poco de detergente doméstico. Para limpiar el filtro consultar debajo
del ''Filtro de agua”. En caso de ver la frase usar detergente dentro del calentador de agua, aclarar
completamente para eliminar todos los residuos después de usar el detergente.
3. Estar seguro que estén secos todos los conectores y enchufes.
No sumergir el calentador de agua o la base de la energía en agua o en cualquier otro líquido.
No usar limpiadores duros o desgastados o disolventes.
No debe limpiarse en agua o en lavavajillas.
Disolución de Cal
Acumulación de cal causará el calentamiento excesivo del elemento reduciéndo su vida del funcionamiento.
Causará el funcionamiento temprano de la parte de la seguridad apagándo el calentador de agua antés
de ser hervido la agua.
No se encuentra cualquier lado ú canal que coge cal cuando el elemento no está montado debajo del
calentador de agua. Solamente puede acumularse en las paredes y en la base del calentador de agua,
lugares que pueden ser vigilado e interesado.
Minimalizar la acumulaciónde Cal:
1. Vaciar el calantador de agua después de cada uso; no perpitir que se quedará la agua en el calentador
de agua durante toda la noche; Usar agua filtrado en lugar de agua ordinaria del grifo.
2. En los productos con cuerpo de plástico disolver regularmente el cal del calentador de agua usando
una marcaparticular conveniente. En lugares con agua muy fuerte este proceso se necesitará una vez
mensualmente.
3. Seguir las instrucciones sobre el paquete del disolvente de cal durante el proceso de la disolución
de cal. Al final del proceso de la disolución de cal, vaciar el calentador de agua y aclarar con agua limpia
unas veces y después hervir llenando con agua limpia y echar la agua. Este proceso eliminará algunos
residuos de la material química dentro del calentador de agua.
Atención por favor: Los productos devueltos dentro del plazo de la garantía relacionado con los
errores de la acumulación de cal, estarán dependiente de los honorarios de la reparación.
Filtro de agua
Las piezas de cal flotantes en el agua pueden dar una apariencia de opaca o aceitosa de acuerdo con
la dureza de la agua.
Un filtro jijado en su calentador de agua evitará pasar estas piezas en su bebida. Usted debe estar
seguro que el filtro conserva su limpieza y que bloqueado los residuos, en caso contrario el
comportamiento de su calantador de agua puede influir negativamente, sus bebidas contienen piezas
de cal y la agua en el calantador de agua aparece como opaco. Siempre es necesario limpiar el filtro
cuando se encuentrarán residuos observados y particularmente echamiento de agua influido en alguna
forma.
ESPECIFICACIONES
Voltaje Nominal : AC230V, 50Hz
Energia : 2000W
Capacidad : 1.7Lts.
Este aparato debe ser almacenado y usado bajo siguientes condiciones: Temperatura no debe ser
menos de +5 ˚C, Humedad dependiente más de 80 %.No se deben permitir las deficiencias aéreas
peligrosas.
El diseño y las técnicas específicas hacen dependientes de modificaciónes in avisar anteriormente por
motivo que el fabricante trabaja continuamente para mejorarse sus productos.
- 23 -
Page 25

Page 26

Page 27

Page 28

No: 1-7321-31052012
- 27 -
Page 29

- 28 -
Page 30

Page 31

Page 32

Page 33

1-7321-31052012
- 32 -
Page 34

- 33 -
Page 35

1
8
7
- 34 -
2
3
4
6
5
9
Page 36

- 31 -
Page 37

- 31 -
Page 38

HRVATSKI
SINBO SK 7321 KUHALO ZA VODU
UPUTSTVO ZA UPORABU
PRIJE POˇCETKA UPORABE PROˇCITAJTE SVE UPUTE ZA UPORABU
BITNA SIGURNOSNA UPOZORENJA
Kada rabite elektriˇcne ured¯aje uvijek imajte u vidu osnovne mjere opreza ukljuˇcuju´ci i sljede´ce:
1. Za izbjegavanje rizika od strujnog udara utikaˇc, postolje za napajanje ili kuhalo za vodu ne uranjajte
u vodu ili neke druge teku´cine. Ne rabite u kupaonici ili u blizini nekih drugih izvora vode. Ne rabite na
vanjskim povrˇsinama.
2. Ne dodirujte vru´ce povrˇsine. Uvijek uzimajte za ruˇcke ili drˇske.
3. Ne otvarajte poklopac kuhala tijekom kljuˇcanja vode.
4. Budite oprezni i lagano sipajte vodu. Kuhalo za vodu nikada ne treba prepuniti vodom.
5. Voda ´ce nakon kljuˇcanja joˇs jedno vrijeme ostati u toplom stanju. Budite jako oprezni, postoji opasnost
od opeklina. Kuhalo za vodu, postolje za napajanje i kabel drˇzite van djeˇcijeg dohvata.
6. Kabel za napajanje ne smije visiti preko rubova stola ili radne povrˇsine. Ne dozvolite da kabel visi jer
sluˇcajno moˇzete zakuˇciti za njega i oboriti kuhalo.
7. Uporaba bilo kog ured¯aja u blizini djece zahtjeva veliki oprez.
8. Kada ured¯aj nije u uporabi, prije ponovnog postavljanja i ˇciˇs´cenja izvucite utikaˇc iz utiˇcnice. Prije
ˇciˇs´cenja ili odlaganja saˇcekajte da se kuhalo za vodu upotpunosti ohladi.
9. Prije pokretanja kuhala za vodu uvjerite se da je poklopac zatvoren, u suprotnom moˇze se desiti da
ne moˇze da se zatvori.
10. Prije pokretanja kuhala uvjerite se da je pravilno postavljen na bazu za napajanje.
11. Nipoˇsto ne ukljuˇcujte kuhalo bez vode. U kuhalu treba da se nalazi najmanje jedna ˇcaˇsa vode. U
protivnom moˇze do´ci do oˇste´cenja kuhala.
12. Voda u kuhalu ne treba da prelazi oznaku za maksimalnu razinu vode(1.7 litar).
13. Kada sipate ili praznite vodu, kuhalo odvojite od podnice za napajanje.
14. Kuhalo za vodu, postolje za napajanje ili kabel za napajanje ne stavljajte na ili u blizini vru´cih povrˇsina
ili ˇstednjaka.
15. Kuhalo za vodu ne rabite u neke druge svrhe osim u svrhu za koju je namjenjen.
16. Kuhalo za vodu rabite samo sa originalnim postoljem za napajanje(i obrnuto).
17. Ne rabite ured¯aj s oˇste´cenim kabelom ili utikaˇcem ili ured¯aj na kom postoji bilo koja vrsta kvara.
Oˇste´ceni kabel za napajanje treba da zamjeni struˇcna osoba u ovlaˇstenom servisnom centru.
18. Prije ukljuˇcenja uvjerite se da je poklopac kuhala za vodu zatvoren.
OPIS DIJELOVA
1. Kljun
2. Poklopac
3. Gumb za otvaranje poklopca
4. Ruˇcka
5. Tipka za UKLJUˇCITI/ISKLJUˇCITI
6. Indikator razine vode
7. Postolje za napajanje
8. Indikator rada
9. Kabel za napajanje
PRIJE POˇCETKA UPORABE
Uklonite sav ambalaˇzni materijal koji senalazi na kuhalu i postolju za napajanje. Prije prve uporabe
kuhala za vodu ili nakon duˇze pauze u koriˇstenju, kuhalo napunite vodom do oznake za maksimalnu
razinu i prokuhajte. Prokuhanu vodu prospite i kuhalo za vodu isperite hladnom vodom.
1
8
7
2
3
4
6
5
9
- 32 -
Page 39

RUKOVANJE
Pozicioniranje
* Postolje za napajanje po mogu´cnosti smjestite u blizini utiˇcnice.
* Kabel za napajanje smjestite tako da ne visi preko rubova radne povˇsine ili stola i da se ne zakuˇci.
Kabel za napajanje moˇzete pohraniti u dio za pohranjivanje kabela koji se nalazi sa donje strane postolja
i tako izvu´ci samo potrebnu duljinu kabela.
Otvaranje poklopca
Kuhalo za vodu uklonite sa postolja za napajanje (9). Ukoliko sluˇcajno pritisnete na tipku (5), ono ´ce se
automatski prebaciti u poziciju <ISKLJUˇCENO>.
Upozorenje: Budite jako oprezni kada otvarate poklopac kuhala u kom se nalazi vrela voda je para koja
izlazi iz kuhala je vru´ca. Postoji rizik od opekline. Jednom rukom ˇcvrsto uzmite za ruˇcku a drugom
pritisnite na gumb za otvaranje poklopca i podignite poklopac. Udaljite se od kuhala i para ´ce iza´ci vani.
Punjenje kuhala vodom
* Podignite poklopac i napunite kuhalo vodom.
* Obratite pozornost na indikator razine vode. U kuhalo morate nasuti najmanje jednu ˇcaˇsu vode ali ne
smijete prelaziti oznaku za maksimalnu razinu vode.
* Kuhalo za vodu ne smijete prepuniti vodom. Ako je kuhalo za vodu prepunjeno tijekom kljuˇcanja voda
´ce curiti vani iz kuhala.
* Vratite poklopac na svoje mjesto i pritisnite ka dolje. Provjerite da li je kuhalo napunjeno vodom jer
u protivnom se moˇze desiti da se kuhalo ne iskljuˇci kada dostigne toˇcku vreliˇsta.
Ukljuˇciti
* Provjerite da li se tipka nalazi u poziciji “ISKLJUˇCENO” (podignite kuhalo sa postolja za napajanje i
ponovno stavite).
* Postolje za napajanje ukljuˇcite u izvor za napajanje. Po potrebi ukljuˇcite utiˇcnicu. Pazite da ne prospete
vodu i kuhalo paˇzljivo stavite na postolje za napajanje.
* Tipku za ukljuˇciti pritisnite ka dolje. Upali´ce se indikator rada i voda ´ce poˇceti da se grije.
* Kada voda dostigne toˇcku vreliˇsta kuhalo za vodu ´ce se automatski iskljuˇciti, a tipka ´ce se vratiti u
poziciju ''ISKLJUˇCENO'' i lampica ´ce se ugasiti.
Iskljuˇciti
* Ukoliko kuhalo ˇzelite iskljuˇciti prije nego voda prokuha, podignite kuhalo sa prednje strane postolja
za napajanje i ponovno vratite na svoje mjesto. Tipka ´ce se vratiti u poziciju “ISKLJUˇCENO”.
OP´CE
* Podizanjem kuhala sa podnice za napajanje na povrˇsini podnice moˇzete primjetiti malo vlage. To je
koncentrirana para koja sluˇzi za automatsko iskljuˇcenje kuhala za vodu i koja izlazi kroz otvore koji se
nalaze na dnu podnice. Ne podiˇzite kuhalo unatrag jer ovo stanje moˇze usloviti da para prod¯e kroz
otvore na mjestu na kom se nalazi kontrola. Ukoliko dod¯e do toga prije ponovne uporabe saˇcekajte da
se kuhalo ohladi.
* Za izbjegavanje rizika od prskanja
* Za izbjegavanje rizika od prskanja vodu lagano sipajte i kuhalo ne tresite previˇse.
POGREˇSNA UPORABA
1. Ne ukljuˇcujte kuhalo ukoliko u njemu nema bar jedna ˇcaˇsa voda. Pogreˇsna uporaba ove vrste moˇze
smanjiti vijek trajanja grija´ceg elementa.
2. Ako se kuhalo u kom nema dovoljno vode sluˇcajno ukljuˇci, ured¯aj za zaˇstitu od rada na suho ´ce
automatski iskljuˇciti kuhalo. Zbog toga ˇsto ne´ce do´ci do grijanja grija´ceg elemeta i do´ci ´ce do prskanja
prije ponovnog sipanja vode treba saˇcekati da se kuhalo potpuno ohladi.
- 33 -
Page 40

ˇCIˇS´
ˇ
Ciˇs´cenje
1. Iskljuˇcite kuhalo za vodu (podignite sa podnice za napajanje), izvucite utikaˇc iz utiˇcnice i prije poˇcetka
ˇciˇs´cenja saˇcekajte da se kuhalo upotpunosti ohladi.
2. Vanjsku i unutarnju povrˇsinu kuhala za vodu oˇcistite vlaˇznom krpom. Po potrebi moˇzete rabiti manju
koliˇcinu ku´canskog deterdˇzenta. Za ˇciˇs´cenje filtera pogledajte u dio “Filter za vodu”. Ukoliko za ˇciˇs´cenje
kuhala rabite deterdˇzent molimo vas da kuhalo nakon pranja dobro isperete vodom.
3. Uvjerite se da su svi kontakti i prikljuˇcci suhi. Kuhalo za vodu ili kabel za napajanje ne uranjajte u
vodu ili neke druge teku´cine.
Ne rabite tvrda ili abrazivna sredstva za ˇciˇs´cenje ili razrijed¯ivaˇce.
Kuhalo za vodu nipoˇsto ne perite u vodi ili stroju za pranje sud¯a.
Uklanjanje kamenca
Naslage kamenca umanji´ce radni vijek ured¯aja i uzrokova´ce pregrijavanje grija´ceg elementa. U tom
sluˇcaju kuhalo ´ce se iskljuˇciti prije nego voda prokuha i do´ci ´ce do preranog aktiviranja sigurnosnog
prekidaˇca.
Montiranjem grija´ceg elementa ispod dna kuhala ne´ce biti kuta ili ˇzlijeba na kom ´ce se formirati naslage
kamenca. Naslage kamenca mogu se formirati samo na dnu ili zidovima unutraˇsnjosti kuhala.
Smanjenje formiranja naslaga kamenca:
1. Nakon svake uporabe ispraznite vodu iz kuhala; ne dozvolite da se voda zadrˇzava unutar kuhala
tijekom no´ci; umjesto vode iz vodovoda rabite filtriranu vodu.
2. Uporabom specijalnih sredstava za uklanjanje kamenca koji se mogu primjeniti na proizvodima s
plastiˇcnim ku´ciˇstem, moˇzete redovno uklanjati naslage kamenca iz kuhala za vodu. Ako se radi o tvrdim
naslagama kamenca ovaj postupak treba primjeniti jedanput mjeseˇcno.
3. Kod uporabe sredstva za uklanjanje kamenca pridrˇzavajte se uputa navedenih na paketu proizvoda.
Nakon uklanjanja naslaga kamenca ispraznite kuhalo i isperite ˇcistom vodom. Nakon toga kuhalo
napunite ˇcistom vodom i prokuhajte. Ovu vodu prospite. Na taj naˇcin sprijeˇci´cete zadrˇzavanje bilo kakvih
kemijskih tvari unutar kuhala za vodu.
Pozor: Proizvodi koji se u okviru trajanja jamstva vrate zbog greˇske uzrokovane zbog naslaga kamenca
podlegnu´ce troˇskovima popravke.
Filter za vodu
ˇ
Cestice kamenca suspendirane u vodi, u zavisnosti od tvrdo´ce vode mogu dati masan ili mutan izgled
vode.
Filter postavljen u kuhalu za vodu sprijeˇcava prelaz ovih ˇcestica u vodu. Uvjerite se da je filter ˇcist i
oˇciˇs´cen od naslaga kamenca. U protivnom ´ce do´ci do smanjenja performanse kuhala, u pripremljenim
napitcima bi´ce ˇcestica kamenca i voda iz kuhala ´ce biti mutna.
Filter treba uvijek ˇcistiti i uklanjati naslage kamenca. To posebno treba uˇciniti ukoliko primjetite da
postoji problem i smetnja prilikom sipanja vode.
SPECIFIKACIJE
Nazivni napon : AC230V, 50Hz
Snaga : 2000W
Kapacitet : 1.7L
Ovaj ured¯aj treba rabiti i odlagati pod sljede´cim uvjetima: temperatura treba da bude ispod +5˚C', a
relativna vlaˇznost zraka ne smije biti iznad 80%; ne treba dozvoliti agresivne poreme´caje u zraku.
Proizvod¯aˇc koji stalno radi na usavrˇsavanju svojih proizvoda moˇze bez prethodne najave izvrˇsiti promjene
u dizajnu i tehniˇckim specifikacijama.
CENJE I ODRˇZAVANJE
- 34 -
Page 41

- GARANT‹ fiARTLARI -
1) Garanti süresi,mal›n teslim tarihinden itibaren bafllar ve 2 y›ld›r.
2) Mal›n bütün parçalar› dahil olmak üzere tamam› Firmam›z›n garanti kapsam›ndad›r.
3) Mal›n garanti süresi içerisinde ar›zalanmas› durumunda, tamirde geçen süre garanti
süresine eklenir. Mal›n tamir süresi, 20 iflgününü geçemez. Bu süre mala iliflkin ar›zan›n
servis istasyonuna, servis istasyonunun olmamas› durumunda, mal›n sat›c›s›, bayii,
acentesi, temsilcili¤i, ithalatç›s› veya imalatç›s›-üreticisinden birine bildirim tarihinden
itibaren bafllar. Tüketicinin ar›za bildirimini; telefon, faks, e-posta, iadeli taahhütlü mektup
veya benzeri bir yolla yapmas› mümkündür. Ancak, uyuflmazl›k halinde ispat yükümlülü¤ü
tüketiciye aittir. Mal›n ar›zas›n›n 10 ifl günü içerisinde giderilememesi halinde, imalatç›üretici veya ithalatç›; mal›n tamiri tamamlan›ncaya kadar, benzer özelliklere sahip baflka
bir mal› tüketicinin kullan›m›na tahsis etmek zorundad›r.
4) Mal›n garanti süresi içerisinde gerek malzeme ve iflçilik, gerekse montaj hatalar›ndan
dolay› ar›zalanmas› halinde, iflçilik masraf›, de¤ifltirilen parça bedeli ya da baflka herhangi
bir ad alt›nda hiçbir ücret talep etmeksizin tamiri yap›lacakt›r.
5) Tüketicinin onar›m hakk›n› kullanmas›na ra¤men mal›n;
• Tüketiciye teslim edildi¤i tarihten itibaren, garanti süresi içinde kalmak kayd›yla, bir y›l
içerisinde en az dört defa veya imalatç›-üretici ve/veya ithalatç› taraf›ndan belirlenen
garanti süresi içerisinde alt› defa ar›zalanmas›n›n yan› s›ra, bu ar›zalar›n maldan
yararlanamamay› sürekli k›lmas›,
• Tamiri için gereken azami süresinin afl›lmas› ,
• Firman›n servis istasyonunun, servis istasyonunun mevcut olmamas› halinde s›rayla
sat›c›s›, bayii, acentesi temsilcili¤i ithalatç›s› veya imalatç›-üreticisinden birisinin
düzenleyece¤i raporla ar›zan›n tamirini mümkün bulunmad›¤›n›n belirlenmesi, durumlar›nda
tüketici mal›n ücretsiz de¤ifltirilmesini, bedel iadesi veya ay›p oranda bedel indirimi talep
edebilir.
6 ) Mal›n kullanma k›lavuzunda yer alan hususlara ayk›r› kullan›lmas›ndan kaynaklanan
ar›zalar garanti kapsam› d›fl›ndad›r.
7 ) Garanti Belgesi ile ilgili olarak ç›kabilecek sorunlar için Gümrük ve Ticaret Bakanl›¤›
Tüketicinin Korunmas› ve Piyasa Gözetimi Genel Müdürlü¤ü’ne baflvurabilir.
‹THALATÇI F‹RMA
DE‹MA ELEKTROMEKAN‹K ÜRÜNLER ‹NfiAAT SPOR MALZEMELER‹ ‹MALAT SAN. VE T‹C. A.fi.
Cihangir Mh. Güvercin Cd. No:4 Haramidere Mevkii Avcılar - ‹stanbul - Türkiye
Tel : (0212) 422 94 94 & Fax : (0212) 422 03 49
www.sinbo.com.tr - info@sinbo.com.tr
- 35 -
Page 42

- SK 7321 SU ISITICI (KETTLE) -
- GARANT‹ BELGES‹ -
Garanti Belge No : 103632
SSHY Belge No : 35274
‹THALATÇI F‹RMA
Ünvanı : DE‹MA ELEKTROMEKAN‹K ÜRÜNLER‹ ‹Nfi. SPOR MALZ.
‹MALAT SAN. ve T‹C. A.fi.
Adresi : Cihangir Mah. Güvercin Cad. No:4 Haramidere Mevkii
Avc›lar / ‹STANBUL
Tel. : 0212 422 94 94 & Fax: 0212 422 03 49
Yetkili Kifli :
Yönetim Kurulu Baflkan›
Ürünün Cinsi : SU ISITICI (KETTLE)
Markası : S‹NBO
Modeli : SK 7321
Alt Modeli : Bandrol ve Seri No :
Teslim Tarihi ve Yeri :
Garanti Süresi : 2 Yıldır
Azami Tamir Süresi : 20 ‹fl Günü
Kullanım Ömrü : Bakanl›kça belirlenen ve ilan edilen kullan›m ömrü 7 y›ld›r.
(Ürünün fonksiyonlar›n› yerine getirebilmesi için gereken yedek parça temin süresi)
SATICI F‹RMA
Ünvanı :
Adresi :
Tel.Fax :
Fatura Tarihi ve No :
Teslim Tarihi ve Yeri :
‹mza ve Kafle :
Bu bölüm, ürünü sat›n ald›¤›n›z Yetkili Sat›c› taraf›ndan imzalanacak ve kaflelenecektir.
Bu belgenin kullan›lmas›na; 4077 say›l› Tüketicinin Korunması Hakkında Kanun ve bu Kanun’a dayan›larak yürürlü¤e konulan Garanti Belgesi
Uygulama Esaslar›na Dair Yönetmelik uyar›nca, TC Gümrük ve Ticaret Bakanlı¤ı, Tüketicinin Korunması ve Piyasa Gözetimi Genel Müdürlü¤ü
tarafından izin verilmifltir.
Garanti Belge Onay Tarihi : 22/07/2011
SSHY Belge Onay Tarihi : 04/04/2012
- 36 -
Page 43

MÜfiTER‹ H‹ZMETLER‹
De¤erli Müflterimiz,
En uygun fiyata en iyi ürünü vermenin yan› s›ra; en iyi hizmeti vermenin de
önemli oldu¤una inan›yoruz. Bu nedenle siz bilinçli tüketicilere daha yak›n
olabilmek için, internet adresimizdeki eriflim formlar›n›n yan› s›ra, tüketici
dan›flma hattımızı da hizmetinize açm›fl durumday›z.
TÜKET‹C‹
DANIfiMA HATTI
444 66 86
Tüketici Dan›flma Hattımızı,
- Hafta içi her gün 08.00-18.00 saatleri aras›nda arayabilir; istek, öneri ve
flikayetlerinizi firmam›za iletebilirsiniz.
Tüketicinin Dikkatine:
Ürünlerimizle ilgili hizmetleri tam olarak alabilmek için afla¤›daki önerilere
uyman›z› rica ederiz:
1. Ürünü ald›¤›n›zda Garanti Belgesini mutlaka yetkili sat›c›n›za onaylatt›r›n›z.
2. Ürünü kullanma k›lavuzunda belirtilen hususlara göre kullan›n›z.
3. Ürününüzle ilgili hizmet talebiniz oldu¤unda yukar›daki telefon
numaralar›ndan, Tüketici Danıflma Hattına baflvurunuz.
4. Ürünü promosyon arac›l›¤› ile edinmiflseniz, ürüne ait garanti belgesini en
yak›n yetkili servisimize giderek onaylatt›r›n›z.
5. Teknik servisteki ifliniz bitti¤inde "Yetkili Servis Hizmet Fifli" almay›
unutmay›n›z. Alaca¤›n›z bu Hizmet Fifli, ileride ürününüzde meydana
gelebilecek herhangi bir sorunda size yarar sa¤layacakt›r.
KAPIDAN KAPIYA
ÜCRETS‹Z
SERV‹S
Kap›dan Kap›ya Ücretsiz Servis Kampanyam›z dâhilinde Yurtiçi Kargo Firmas› ile iflbirli¤i içerindeyiz. Tüketicimiz
taraf›ndan sat›n al›nan ürünün fiyat› ne olursa olsun, Tüketicimiz ürün ile ilgili garanti kapsam›na giren herhangi
bir problem yaflad›¤›nda, 444 66 86 numaral› Tüketici Danıflma Hattımızı aramas› ve kay›t b›rakmas› yeterlidir.
Bu süreçten sonra Tüketicimizin ürünü ücretsiz olarak Yurtiçi Kargo taraf›ndan Tüketicimizin bulundu¤u adresten
al›n›p, 7* ifl günü içerisinde ürün çal›fl›r bir vaziyette, yine Tüketicimize Yurtiçi Kargo arac›l›¤› ile adresine teslim
edilmektedir. 7 ifl günü içerisinde sorunu çözülemeyen ürünler ise, yenisi ve/veya bir üst modeli ile de¤ifltirilmektedir.
Tüm bu süreçte Tüketicilerimizden hiçbir ücret talep edilmemektedir.
(*Ürünün servis garanti süresi, Yurtiçi Kargo ürünü Sinbo Fabrikas›’na teslim ettikten sonra bafllar.)
MERKEZ
TEKN‹K SERV‹S
(0212) 422 94 94
- 37 -
www.sinbo.com.tr
0800 211 50 21
7 GÜNDE
TESL‹MAT
GARANT‹S‹
(*)
Page 44

- TEDAR‹KÇ‹ F‹RMA / EXPORTER United Favour Development Limited
Unit B, 10/F Lee May Building 788-790
Nathan Road, Mongkok, Kowloon, HK.
- UYGUNLUK BEYANI / CE CONFORMITY SGS-CSTC Standards Technical Services
Co., Ltd.
198 Kezhu Rd., Scientech Park, Guangzhou
Economic&Technology Development District
Guangzhou, Guangdong, China
LVD GZES1105002931HS
EEE Yönetmeli¤ine uygundur.
Made in P.R.C.
‹mal Y›l› : 2012
 Loading...