

Page 1

www.simrad.co
m
TECHNOLOGY FOR
SUS
TAINABLE FISHERIE
S
Instruction Manual
Simrad WBT Mini
Miniature wideband echo sounder transceiver
Page 2

Page 3

MiniatureWidebandEchoSounder
Thepurposeofthismanualistoprovidethedescriptionsandprocedures
requiredtoinstall,operateandmaintaintheSimradWBTMini.This
manualisintendedforallusersoftheWBTMini.
Note
YoumustneversettheWBTMinito"ping"unlessthetransduceris
submergedinwater .
SimradWBTMini
Transceiver
InstructionManual
425197/B
December2018©KongsbergMaritimeAS
Page 4

Documentinformation
•Product:SimradWBTMini
•Document:InstructionManual
•Documentpartnumber:425197
•DocumentISBNnumber:N/A
•Revision:B
•Dateofissue:6December2018
Copyright
TheinformationcontainedinthisdocumentremainsthesolepropertyofKongsbergMaritimeAS.Nopartof
thisdocumentmaybecopiedorreproducedinanyformorbyanymeans,andtheinformationcontainedwithin
itisnottobecommunicatedtoathirdparty,withoutthepriorwrittenconsentofKongsbergMaritimeAS.
Warning
Theequipmenttowhichthismanualappliesmustonlybeusedforthepurposeforwhichitwasdesigned.
Improperuseormaintenancemaycausedamagetotheequipmentand/orinjurytopersonnel.Y oumustbe
familiarwiththecontentsoftheappropriatemanualsbeforeattemptingtooperateorworkontheequipment.
KongsbergMaritimedisclaimsanyresponsibilityfordamageorinjurycausedbyimproperinstallation,
useormaintenanceoftheequipment.
Disclaimer
KongsbergMaritimeASendeavourstoensurethatallinformationinthisdocumentiscorrectandfairlystated,
butdoesnotacceptliabilityforanyerrorsoromissions.
Supportinformation
Ifyourequiremaintenanceorrepair,contactyourlocaldealer.Youcanalsocontactususingthefollowing
address:simrad.support@simrad.com.Ifyouneedinformationaboutourotherproducts,visithttps:
//www.simrad.com.Onthiswebsiteyouwillalsondalistofourdealersanddistributors.
KongsbergMaritimeAS
www.kongsberg.com
Page 5

InstructionManual
Tableofcontents
ABOUTTHISMANUAL..................................................................5
SIMRADWBTMINI......................................................................6
Systemdescription..................................................................................................................7
Systemdiagram.......................................................................................................................8
PowerSupplyUnit..................................................................................................................9
Supportinformation..............................................................................................................10
USINGTHEWBTMINIINEK80MODE.......................................12
AboutEK80mode................................................................................................................13
DeningtheIPaddressonthePCnetworkadapterforcommunicationwiththeWBT
Mini..................................................................................................................................13
Obtainingandinstallingthesoftwarelicense.......................................................................14
Installingoneormoretransducers........................................................................................16
Installingtransceiverchannels..............................................................................................19
Disconnectingtransceiverchannels......................................................................................21
USINGTHEWBTMINIINAUTONOMOUSMODE.........................23
AboutAutonomousmode.....................................................................................................24
SwitchingbetweenAutonomousmodeandEK80mode......................................................25
Installingthesoftwaredriverfortheserialinterfacecable...................................................26
RemovingtheUSBashdrivefromtheWBTMini............................................................27
InsertingtheUSBashdriveintheWBTMini...................................................................29
InstallingthesoftwaredriverfortheUSBashdrive..........................................................31
WakinguptheWBTMinifromSleepstate..........................................................................32
INSTALLATION..........................................................................34
InstallingtheWBTMini.......................................................................................................35
Aboutthedrawingsinthedrawingle.................................................................................36
413455WBTMinidimensions.............................................................................................37
CABLELAYOUTANDINTERCONNECTIONS.................................39
Cableplan.............................................................................................................................40
ListofWBTMinicables......................................................................................................42
Connectors............................................................................................................................43
EthernetandDCpowerconnector..............................................................................43
Transducerconnectors.................................................................................................45
Seriallineconnector....................................................................................................47
425197/B
3
Page 6

SimradWBTMini
Cabledrawingsandspecications........................................................................................49
EthernetandDCpowercable(description)................................................................49
Seriallineinterfacecableandconnector(description)...............................................50
Extensioncable(description)......................................................................................52
DCpowercable(description)......................................................................................53
SPAREPARTSANDCONSUMABLES............................................54
Orderingsparepartsandconsumables.................................................................................55
Listofconsumables..............................................................................................................56
Siliconegrease(Sparepart).........................................................................................56
Listofspareparts..................................................................................................................57
USBashdrive(Sparepart).......................................................................................57
O-ring82.27x1.78mm(Sparepart)..........................................................................58
EthernetandDCpowercable(Sparepart)..................................................................58
TransducerconnectorMCIL4M(Sparepart)..............................................................59
TransducerconnectorMCIL8M(Sparepart)..............................................................59
Seriallineinterfacecable(Sparepart)........................................................................60
Extensioncable(Sparepart)........................................................................................61
TECHNICALSPECIFICATIONS....................................................62
4
425197/B
Page 7

Aboutthismanual
Aboutthismanual
Thepurposeofthismanualistoprovidethedescriptions,proceduresanddetailedparameter
explanationsrequiredtoallowforsafeandefcientuseoftheSimradWBTMini.
Targetaudience
ThismanualisintendedforallusersoftheWBTMini.Duetothenatureofthedescriptions
andthelevelofdetailprovidedbythismanual,itiswellsuitedforthosewhoare-orwish
tobe-expertusers.
Weassumethatyouarefamiliarwiththebasicacousticprinciplesofsoundinwater.We
alsoexpectthatyouhavesomeexperiencewithmultibeam,split-beamand/orsingle-beam
echosoundersinscienticapplications.
Registeredtrademarks
Observetheregisteredtrademarksthatapply.
Simrad
ofKongsbergMaritimeASinNorwayandothercountries.
Windows
othercountries.
Wewantyourfeedback
WewanttoimproveWBTMinicontinuously.Wealsowantourend-userdocumentationto
becomprehensiveandrelevant.Y oucanhelp.Pleaseprovidecomments,suggestionsor
constructivecriticismtoanyofoursupportofces.
®
,SIMRAD
®
isaregisteredtrademarkofMicrosoftCorporationintheUnitedStatesand
®
andtheSimrad
®
logoareeitherregisteredtrademarks,ortrademarks
425197/B
5
Page 8

SimradWBTMiniInstructionManual
Topics
Systemdescription,page7
Systemdiagram,page8
SimradWBTMini
PowerSupplyUnit,page9
Supportinformation,page10
6
425197/B
Page 9
SimradWBTMini
Systemdescription
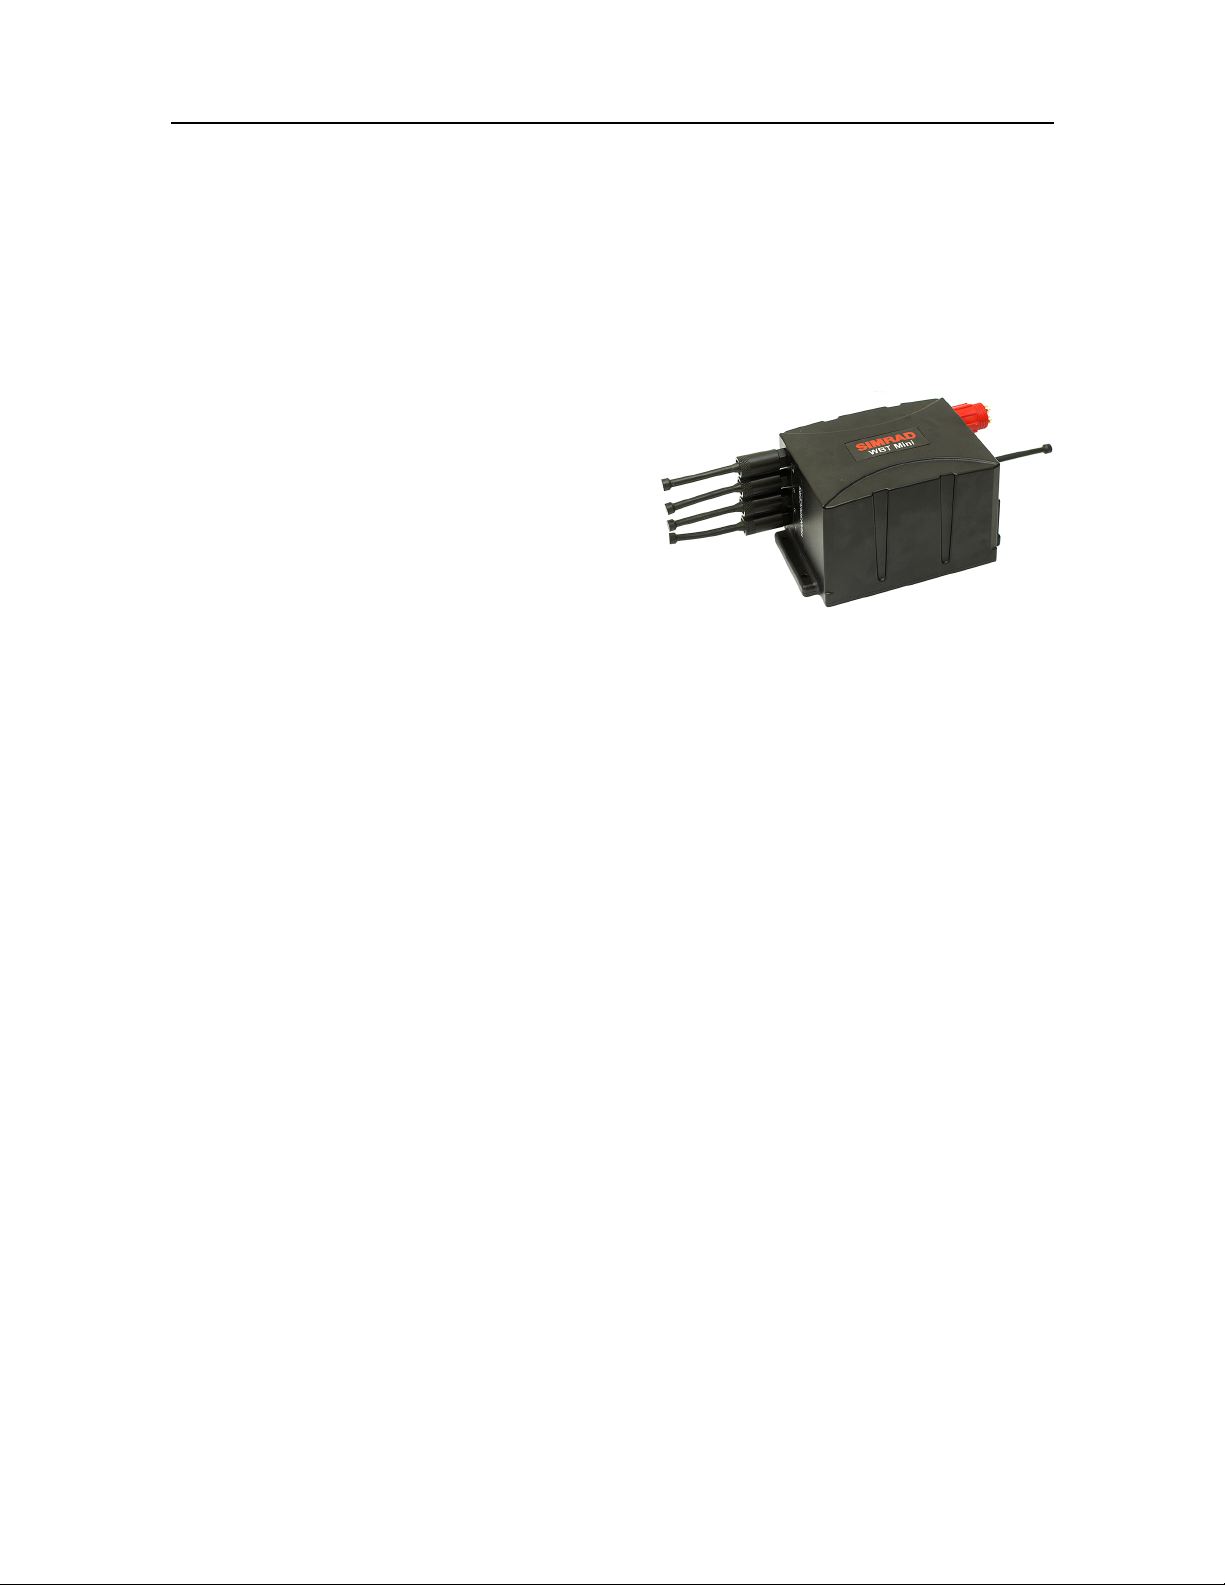
TheWBTMiniisacompactversionofthehighlyefcientWidebandTransceiver(WBT)
usedbymarineresearchvesselsallaroundtheworld.Itscompactsizeandenergy-efcient
designmakesitperfectforinstallationonawiderangeofplatforms.
ThetransceiverelectronicsintheWBTMini
havethelinearFM(chirp)andCWpulse
formssimilartotheWidebandTransceiver.
Itcontainsfourindividualtransceiverchannels
withmultiplexingfunctionality.Thisallows
forgreatexibilitywhenyousetupasystem
withvarioussplit-beamorsingle-beam
transducercongurations.
TheWBTMiniiscontainedinasplash-proof
cabinet.Therobustdesignallowslong-termdeploymentinchallengingenvironments.The
WBTMinicanbeoperatedintwodifferentmodes;EK80modeorAutonomousmode.
EK80mode
InEK80mode,theWBTMiniisusedwithacomputerrunningtheEK80echosounder
software.TheEK80softwareprovidesfullreal-timecontroloftheWBTMiniusingthe
Ethernetinterface.WhenusedinEK80mode,theRA Wechosounderdataarerecorded
directlytothecomputerdisk(s).
ThismoderequiresoneormoreEK80softwarelicenses.
Autonomousmode
InAutonomousmode,theWBTMiniisprogrammedtoperformapredenedmission.A
missionwillnormallyrecorddataoveraperiodoftimeusingspecicacousticsettings.
ThemissionplanisdesignedusingtheEKMissionPlannerprogram,anddownloadedto
theWBTMinibeforethemissionstarts.
Thehigh-resolutionRAWdataarestoredinternallyonahigh-capacityUSBashdrive
andretrievedafterthemissioniscompleted.
TheAutonomousmodeisanoptionthatcanbepurchasedseparately.
Theinternalstoragecapacitydependsonyouroperationalsettings.Witha70kHztransducer
operatingatCWandcollectingdataat100mrange,thediskcanstoreapproximately
9,000,000pings.
425197/B
7
Page 10
SimradWBTMiniInstructionManual
Relatedtopics
Systemdiagram,page8
PowerSupplyUnit,page9
UsingtheWBTMiniinEK80mode,page12
UsingtheWBTMiniinAutonomousmode,page23
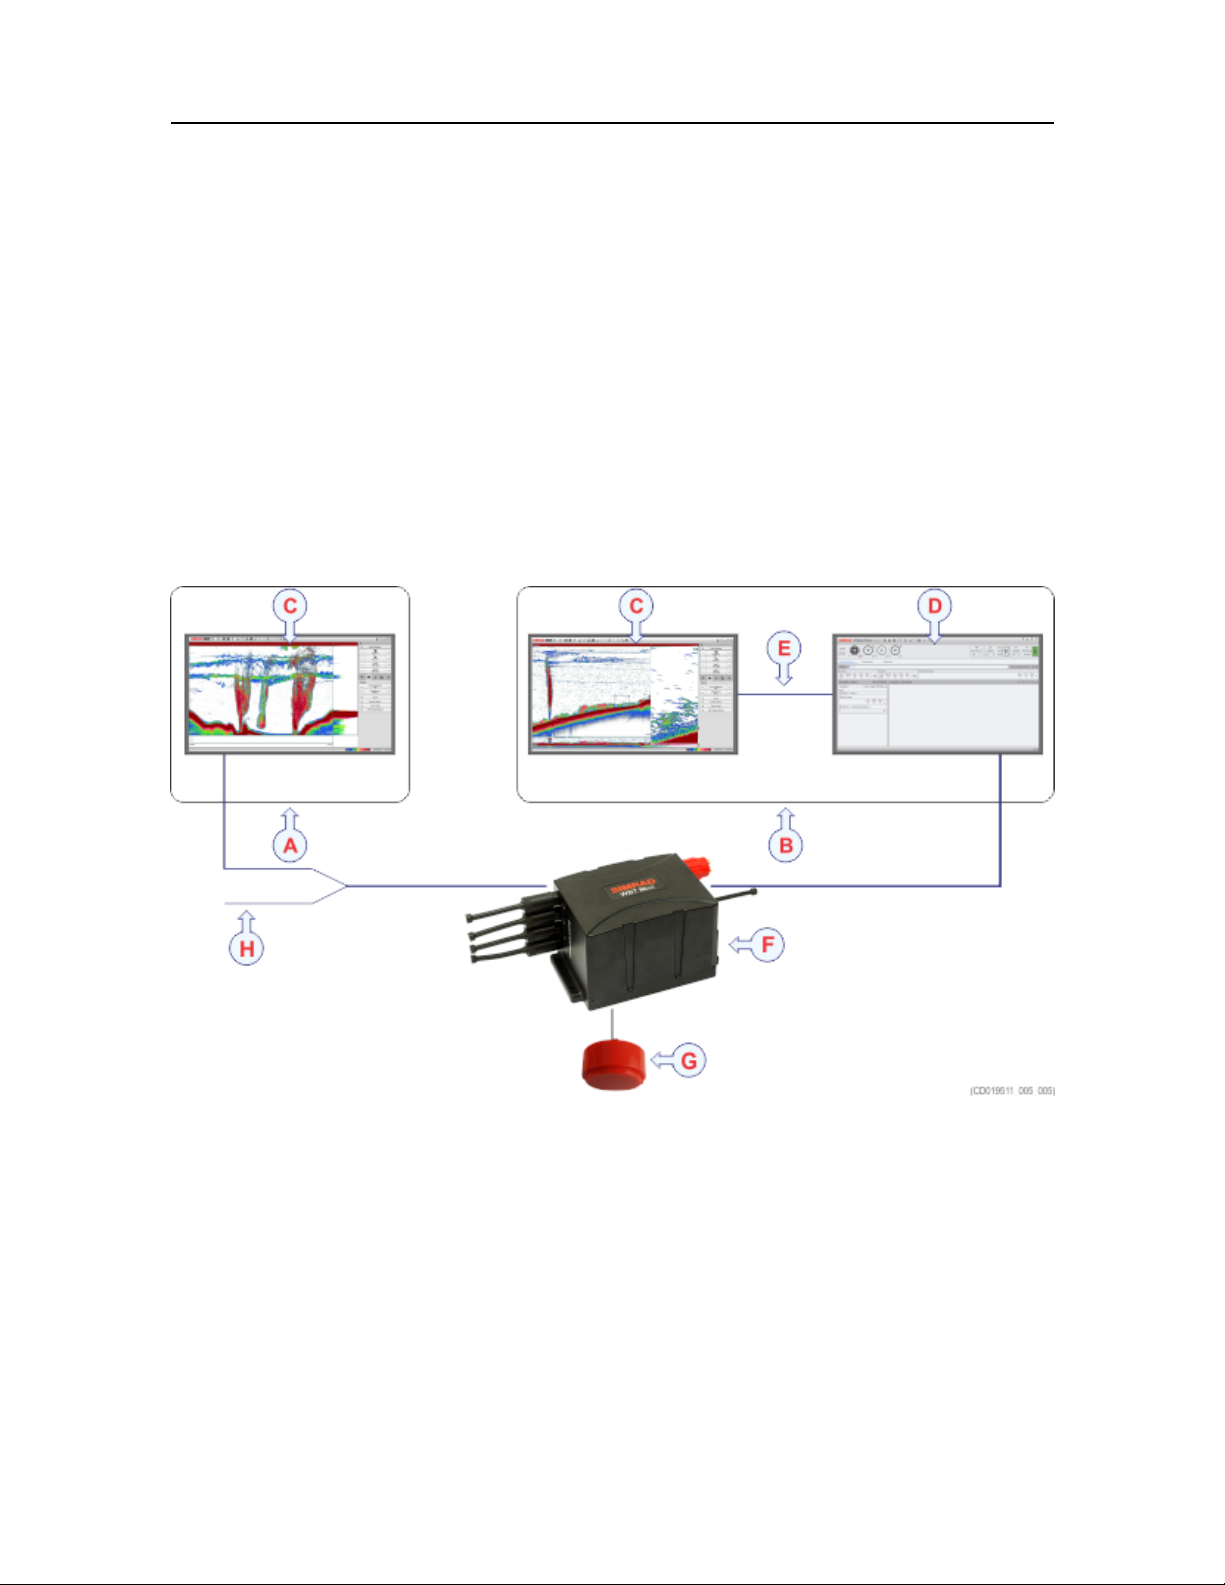
Systemdiagram
ThesystemdiagramidentiesthemaincomponentsofabasicWBTMinisystem.Only
themainconnectionsbetweentheunitsareshown.Inthispublication,thecomputeris
referredtoasthePC.
AEK80mode
BAutonomousmode
CPC(EK80)
DPC(EKMissionPlanner)
ECalibrationandreplay
FWBTMini
GTransducer
HPower
8
425197/B
Page 11

SimradWBTMini
TheWBTMinicanbeoperatedintwodifferentmodes;EK80modeorAutonomousmode.
InEK80mode,theWBTMiniisconnectedtothePCwithadual-purposeconnectorfor
EthernetandDCpower.
InAutonomousmode,theWBTMiniisconnectedtothePCwithaserialcable.Theserial
cableisusedtodownloadthemissionplan.ForpowerconnectioninAutonomousmode,
youusethedual-purposecable(EthernetandDCpower),oryoucanmakeadedicated
powercable.
Relatedtopics
Systemdescription,page7
PowerSupplyUnit,page9
PowerSupplyUnit
TheWBTMinirequiresanexternalpowersupplyoffering12to15VDC,minimum2.5A.
Note
MakesurethatyourpowersupplymeetstheWBTMinirequirements.Thevoltagemustnot
dropbelow+12VDC.Ifthesupplypoweristoolow ,theWBTMinimaymalfunction.
Ifyouneedtousealongpowercable,calculatethevoltagedropinthecableassuming
acurrentconsumptionof2.5A.
TheWBTMinicanalsobepoweredbyahigh-capacitybattery.Thebatterymustbeplaced
closetotheWBTMinitominimizepowerlossinthecable.
Relatedtopics
Systemdescription,page7
Systemdiagram,page8
425197/B
9
Page 12

SimradWBTMiniInstructionManual
Supportinformation
IfyouneedtechnicalsupportforyourSimradWBTMiniyoumustcontactyourlocaldealer,
oroneofoursupportdepartments.Alistofallourofcesanddealersisprovidedonour
website.Y oucanalsocontactourmainsupportofceinNorway.
Norway(mainofce)
•Companyname:KongsbergMaritimeAS/Simrad
•Address:Strandpromenaden50,N-3190Horten,Norway
•Telephone:+4733034000
•Telefax:+4733042987
•Website:https://www .simrad.no
•E-mailaddress:simrad.support@simrad.com
Spain
•Companyname:SimradSpainS.L.U
•Address:PartidaAtalayes20,03570Villajoyosa,Spain
•Telephone:+34966810149
•Telefax:+34966852304
•Website:http://www.simrad.es
•E-mailaddress:simrad.spain@simrad.com
France
•Companyname:SimradFrance
•Address:5ruedeMenMeur,29730Guilvinec,France
•Telephone:+33298582388
•Telefax:+33298582388
•Website:http://www.simrad.fr
•E-mailaddress:simrad.france@simrad.com
10
425197/B
Page 13

SimradWBTMini
USA
•Companyname:KongsbergUnderwaterTechnologyInc/SimradFisheries
•Address:1921033rdAveW ,Lynnwood,W A98036,USA
•Telephone:+14257121136
•Telefax:+14257121193
•Website:https://www .simrad.com
•E-mailaddress:sh.usa.support@simrad.com
Malaysia
•Companyname:KongsbergMaritimeMalaysiaSdn.Bhd
•Address:Unit27-5SignatureOfces,TheBoulevard,MidValleyCity,LingkaranSyed
Putra,59200KualaLumpur,Malaysia
•Telephone:+6564117488
•Telefax:+60322013359
•Website:https://www .simrad.com
•E-mailaddress:simrad.asia@simrad.com
Korea
•Companyname:KongsbergMaritimeKoreaLtd
•Address:#1101-HarborT ower,113-1,Nampodong6-Ga,Jung-Gu,Busan600-046Korea
•Telephone:+82-51-242-9933
•Telefax:+82-51-242-9934
•Website:https://www .simrad.com
•E-mailaddress:simrad.korea@simrad.com
China
•Companyname:KongsbergMaritimeChinaLtd
•Address:555ChuanqiaoRoad,China(Shanghai)PilotFreeTradeZone,201206,China
•Telephone:+86-21-3127-9888
•Telefax:+86-21-3127-9555
•Website:https://www .simrad.com
•E-mailaddress:simrad.china@simrad.com
425197/B
11
Page 14

SimradWBTMiniInstructionManual
UsingtheWBTMiniinEK80
Topics
mode
AboutEK80mode,page13
DeningtheIPaddressonthePCnetworkadapterforcommunicationwiththeWBT
Mini,page13
Obtainingandinstallingthesoftwarelicense,page14
Installingoneormoretransducers,page16
Installingtransceiverchannels,page19
Disconnectingtransceiverchannels,page21
12
425197/B
Page 15

UsingtheWBTMiniinEK80mode
AboutEK80mode
WhenusedinEK80mode,theWBTMiniiscontrolledbytheSimradEK80Scientic
echosounderprogram.
TheEK80softwareprovidesfullreal-timecontroloftheWBTMiniusingtheEthernet
interface.WhenusedinEK80mode,theRA Wechosounderdataarerecordeddirectly
tothecomputerdisk(s).
ThismoderequiresoneormoreEK80softwarelicenses.
Tip
FormoreinformationabouttheEK80userinterfaceandfunctionality,refertotheEK80
ReferenceManualorcontext-sensitiveonlinehelp.
Relatedtopics
UsingtheWBTMiniinEK80mode,page12
DeningtheIPaddressonthePCnetworkadapterforcommunicationwiththeWBT
Mini,page13
Installingoneormoretransducers,page16
Installingtransceiverchannels,page19
Disconnectingtransceiverchannels,page21
DeningtheIPaddressonthePCnetwork
adapterforcommunicationwiththeWBTMini
ThecommunicationbetweenthePCandtheWBTMiniismadeusingahigh-speedEthernet
cable.Ifmorethanonetransceiverisused,anEthernetswitchisadded.IntheEK80
software,thenecessaryIPaddressisgeneratedautomatically.
Prerequisites
ThisprocedureismadefortheMicrosoft
®
Windows
youarefamiliarwiththisoperatingsystem.
Context
AslongasyoudonotchangethePCtoanothercomputer,orreplacethenetworkadapterin
yourPC,youwillonlyneedtodothisonce.
Procedure
1ClosealltheprogramsthatarerunningonthePC.
425197/B
®
7operatingsystem.Itisassumedthat
13
Page 16

SimradWBTMiniInstructionManual
2OpentheNetworkandSharingCenterdialogbox.
aInthebottom-leftcornerofyourdesktop,selecttheWindows
bOntheright-handsideoftheStartmenu,selectControlPanel.
cObservethattheControlPanelopens.
dSelectNetworkandSharingCenter.
(IftheControlPanelisshownwithcategories,selectViewnetworkstatusand
tasks.)
eOntheleft-handmenu,selectChangeadaptersettings.
fClickonceonyournetworkadaptertoselectit,thenright-clickandselect
Propertiesontheshortcutmenu.
gOnthelistofconnections,selectInternetProtocol4(TCP/IPv4),andthen
Properties.
3SelectUsethefollowingIPaddress,andtypetheIPaddressandnetworkmask.
®
Startbutton.
•IPaddress:157.237.15.12(Recommended)
•Subnetmask:255.255.255.0
YoucanleaveSubnetmaskblankandselectOK.Whenyouseeanerrormessagesaying
thatthemessagesubnetmaskismissing,selectOKagain.Adefaultsubnetmask
isthenautomaticallygenerated.
4SelectOKtosavethechosensettings,thencloseallthedialogboxes.
Furtherrequirements
IfyoulaterneedtochangetheIPaddress,alwayspowercycletheWBTMinibeforeyou
starttheEK80program.
Relatedtopics
UsingtheWBTMiniinEK80mode,page12
Obtainingandinstallingthesoftwarelicense
TooperatetheWBTMiniinEK80modeyouneedavalidsoftwarelicense.Beforeyoucan
usetheWBTMiniyoumustobtaina"licensestring"andinstallitonyourPC.Withouta
licenseyouwillnotbeabletocommunicatewiththetransceiver.
Prerequisites
ThisprocedureassumesthattheEK80softwarehasbeensuccessfullyinstalledonthePC.
14
425197/B
Page 17

UsingtheWBTMiniinEK80mode
Context
Thesoftwarelicenseisa32characterhexadecimalstringbasedonthetransceiver’sserial
number.Itdenesseveralkeyparametersthatcontrolthefunctionalityandbehaviourofthe
transceiver(s)youuse.Eachsoftwarelicensecode"unlocks"onetransceiverforoperational
usewithasetofpredenedproperties.
ThesoftwarelicenseisnotlinkedtothephysicalPC.Youcanthereforeeasilymovethe
softwarefromonecomputertoanother,justremembertomakeacopyofthelicensestring.
InordertoobtainasoftwarelicenseyoumustcontactaSimraddealerordistributor.You
canalsousetherequestformonhttp://www.simrad.com/support,orcontactoursupport
departmentdirectly.
Note
Onceyoureceiveyoursoftwarelicensestring(s),donotlosethem.W esuggestthatyoucopy
theinformationintoatextle(forexampleNotepad),andaddrelevantinformation.Place
thetextleonthePCdesktop,andmakesurethatbackupcopiesaremade.
Procedure
1Obtainthenecessaryinformationaboutyourtransceiver(s)andtransducer(s).Write
down:
aTheserialnumberforeachtransceiver.
bThebeamtype.
cWhichtransducersyouhaveconnectedtoeachtransceiver.
2SendthenecessaryinformationtooneofSimrad'sdealersordistributors.
Youcanalsousetherequestformonhttp://www.simrad.com/support,orcontactour
supportdepartmentdirectly.
Youcanusethefollowinge-mailaddress:
•purchase.order@simrad.com
Oncethesoftwarelicensestring(s)havebeenreturnedtoyou(mostlikelybye-mail),you
caninstallthelicensesintothesoftware.
3OpentheSetupmenu.
4OntheSetupmenu,selectInstallation.
ObservethattheInstallationdialogboxopens.Thisdialogboxcontainsanumberof
pagesthatyouselectfromthemenuontheleftside.
5OntheleftsideoftheInstallationdialogbox,selectSoftwareLicense.
425197/B
15
Page 18

SimradWBTMiniInstructionManual
6SelectTypeLicenseString,andtypethelicensestringintothedialogbox.
Ifyouhavereceivedthelicensestringonanelectronicformat(e-mailortextle),
youcancopythestringfromthesourcedocumentandpasteitintotheTypeLicense
Stringdialogbox.
7SelectOKtosavethelicensestringandclosetheT ypeLicenseStringdialogbox.
8VerifythatthelicensestringisplacedintheCurrentlyactivelicenseslist.
Ifnecessary ,selectthelicensestringontheleftside,andclickthearrowbutton[>]to
moveittotheCurrentlyactivelicenseslist.
9SelectApplyandthenClosetosavealltheparametersandclosetheInstallationdialog
box.
Installingoneormoretransducers
ThetransducersyouwishtousewiththeWBTMinimustbe"installed"intheEK80
programasapartofthesoftwareconguration.Whichtransducerstousedependsonthe
numberoftransceiversinyoursystem,andthelicensesyouhaveforthese.Unlessyou
replaceabrokentransducer,oraddanew,youonlyneedtodothisonce.
Prerequisites
ItisassumedthattheEK80softwarehasbeeninstalled,andthatallrelevantlicensestrings
havebeenapplied.Y ouneedtoknowthetypeandserialnumberofeachtransducerthat
youwishtoinstall.
Context
EachtransducerisaddedusingtheTransducerInstallationpage.TheTransducerInstallation
pageislocatedintheInstallationdialogbox.
YoucanonlychooseatransducerfromtheModellist.Thelistisgeneratedfromasystem
leonyourPC.ItcontainsallthetransducersthatarecompatiblewiththeWBTMini,
butsincethesoftwareiscommonforseveralsystemstheremayalsobenon-compatible
transducersinthelist.Thelistalsoincludestechnicalspecicationsforeachtransducer.Y ou
cannotseethisinformation,butitisusedbytheEK80tosetuptheoperationalparameters.
ThisallowstheWBTMinitooptimizeitsperformancefortheindividualtransducermodels.
Ifyoucannotndyourtransduceronthelist,contactyoudealertoupgradetherelevant
softwarecomponentintheEK80.
16
425197/B
Page 19

UsingtheWBTMiniinEK80mode
Note
JustmakingchangesandselectingOKatthebottomofthepagewillnotinstallanything.
Selectwhattoinstall,denetherelevantparameters,andthenselectAdd.
Thetransducerinstallationdialogboxismadeforxedinstallationonlargevessels.Not
alloftheparametersarerelevantforsmallervesselsandportableapplication.Refertothe
onlinehelpformoreinformationonparametersnotmentionedhere.
Procedure
1OpentheSetupmenu.
2OntheSetupmenu,selectInstallation.
ObservethattheInstallationdialogboxopens.Thisdialogboxcontainsanumberof
pagesthatyouselectfromthemenuontheleftside.
3OntheleftsideoftheInstallationdialogbox,selectTransducerInstallation.
4SelectthetransduceryouwishtoinstallfromtheModellist.
Note
Makesurethatyouselectatransducerthatissupportedbyyourcurrentlicense.
5Inserttheserialnumber.
Thisserialnumberisveryimportant,becauseyouwillneeditasareference
identicationwhentheWBTMiniiscalibrated.SomenewSimradtransducerswith
built-in"intelligence"willautomaticallyprovidethisserialnumber.
6TypethenameyouwishtouseintotheCustomNamebox.
Typeanynamethatyouwishtousetoidentifythetransducer.Thenameyouselect
willonlybeusedtoidentifythetransducerinotherdialogboxes.Itisnotusedinthe
echodatathatyouexport.Ifyoudonothaveacomputerkeyboardconnectedtoyour
WBTMinisystem,selecttheKeyboardbuttontoopenanon-screenkeyboard.
7Selectmountingmethod.
8Specifytheorientationofthetransducerbeam.
9Ifrelevantforyourtransducerinstallation,providetheaccuratephysicallocationofthe
transducerwithreferencetothevessel’scoordinatesystem.
Usethecentreofthetransducerfaceasreference,anddenetheoffsetvaluesrelated
totheShipOrigo.
425197/B
17
Page 20

SimradWBTMiniInstructionManual
aSelecttheoffsetvalueintheX-axis(fore-and-aftdirection)fromtheShipOrigin.
AdjustwithapositivevalueforXifthetransducerislocatedaheadoftheship
origin.
bSelecttheoffsetvalueintheY-axis(athwartship)fromtheShipOrigin.Adjust
withapositivevalueforYifthetransducerislocatedonthestarboard
oftheshiporigin.
cSelecttheoffsetvalueintheZ-axis(vertical)fromtheShipOrigin.Adjustwitha
positivevalueforZifthetransducerislocatedunder
theshiporigin.
10SelectAddtosavetheinformationyouhaveprovided.
ThetransducerisaddedtothelistintheInstalledT ransducersbox.
11Repeatforeachtransducerthatyouwishtoinstall.
12ContinueyourworkintheInstallationdialogbox,orselectOKtocloseit.
Result
side
Onceatransducerhasbeeninstalled,itislistedintheInstalledT ransducersbox.Toseethe
informationyouhavecollectedaboutthetransducer,selecttherelevanttransducerinthelist.
TheEditfunctionalityontheTransducerInstallationpagemakesitpossibletochange
theinformationyouhaveprovidedforthetransducer.Youcannotchangethemodel
identicationandtheserialnumber.Thecustomnameisusedseveralplacesintheuser
interface,anditcanbechanged.
TheRemovefunctionalityontheTransducerInstallationpagemakesitpossibletodeletethe
informationyouhaveprovidedforthetransducer.Thereisno"undo"functionality.
Relatedtopics
UsingtheWBTMiniinEK80mode,page12
Installingtransceiverchannels,page19
18
425197/B
Page 21

UsingtheWBTMiniinEK80mode
Installingtransceiverchannels
InordertousetheWBTMini,theEK80PCmustbeconnectedtooneormoreWBTMini
transceivers,andeachofthemmustinturnbeconnectedtooneormoretransducers.Each
channelmustbeinstalledbeforeitcanbeputtouse.Inthiscontext,thephrasechannelis
usedasacommontermtoidentifythecombinationoftransceiver,transducerandoperating
frequency.
Prerequisites
ItisassumedthattheEK80softwarehasbeeninstalled,andthatallrelevantlicensestrings
havebeenapplied.TheWBTMiniisinstalledasspeciedinthismanual.
•Allcablesareconnectedandtested.
•Eachtransceiverispoweredup.
•Thesoftwarelicenseforeachtransceiverisinstalledandactivated.
•TheEthernetadapterinthePCissetupwithauniqueIPaddress.
•AllrelevanttransducersareinstalledusingtheTransducerpage.
Context
TheTransceiverInstallationparameterscontroltheinstallationanddisconnectionof
transceivers.Everytimethepageisopened,theEK80softwareautomaticallyperformsa
searchontheEthernetnetworkfortransceivers.
ThelistintheupperpartontheTransceiverInstallationpageshowsyouanoverviewofthe
transceiversandchannelsthatarecurrentlyavailable.Inthiscontext,thephrasechannelis
usedasacommontermtoidentifythecombinationoftransceiver,transducerandoperating
frequency.Eachchannelisidentiedbythetransceivertypeandserialnumberandthe
transducer(s)inuse.Thecurrentstatusforeachchannelisalsoprovided.
•Busy:Thechannelisalreadyinuse,probablybyanotherechosounderonthesame
network.Youcannotconnecttothischannel.
•Installed:ThischannelisconnectedtoyourEK80system.
•Lost:Thischannelcannotbeused.
•Available:Thischannelisvacantandreadyforuse.
Note
WhenyouworkintheInstallationdialogbox,youmustalwaysselectApplytothechanges
madeonapage.Youmustdothisbefore
425197/B
youcontinueyourworkonadifferentpage.
19
Page 22

SimradWBTMiniInstructionManual
Procedure
1OpentheSetupmenu.
2OntheSetupmenu,selectInstallation.
ObservethattheInstallationdialogboxopens.Thisdialogboxcontainsanumberof
pagesthatyouselectfromthemenuontheleftside.
3OntheleftsideoftheInstallationdialogbox,selectTransceiver.
4Installthechannels(s).
aObservethatthetransceiver(s)youhaveconnectedtothePCarelisted.
Eachtransceiverisidentiedwithtypeandserialnumber.Theavailablechannels
oneachtransceiverarelistedseparately.
bForeachchannel,choosewhichtransducertoconnectto.
Thelistoftransducersavailableforinstallationisdenedbythoseyouinstalled
ontheT ransducerpage.
Note
Thisisacriticaltask.Makesurethatthecorrecttransducerisselected.
cObservethatthestatusfortherelevantfrequencychannelschangetoInstalled.
Tip
Ifnotransceiversarelisted:
•SelectBrowseintheTransceiverBrowsingbox,andopentheLocalIPAddressbox.
SelectthecorrectaddressfortheEthernetadapteryouareusing.Thiswillmakethe
EK80programsearchthenetworkforavailabletransceivers.
•Checkthateachtransceiverhasbeenturnedon.
•VerifythattheEthernetcommunicationbetweentheunitsisoperational.
•IfyouareusinganEthernetswitch,makesurethatitworks.
5Atthebottomofthepage,selectApplytosaveyoursettings.
6Repeatuntilallthechannelshavebeeninstalled.
7ContinueyourworkintheInstallationdialogbox,orselectOKtocloseit.
20
425197/B
Page 23

UsingtheWBTMiniinEK80mode
Result
Whenallchannelshavebeeninstalled,youcanstartnormaloperation.
Caution
YoumustneversettheWBTMinito"ping"unlessthetransducerissubmergedinwater.
Relatedtopics
UsingtheWBTMiniinEK80mode,page12
Disconnectingtransceiverchannels
AWBTMinitransceiverchannelcanbedisconnectedfromtheEK80PC.Thisistypically
usefulifthetransceiverismeanttobeusedbyanotherPConanotherechosoundersystem.
Itisalsousefulifyouhavealargenumberofchannelsandwanttoreducethenumber
ofechogramviewsinyourpresentation.
Context
TheTransceiverInstallationparameterscontroltheinstallationanddisconnectionof
transceivers.Everytimethepageisopened,theEK80softwareautomaticallyperformsa
searchontheEthernetnetworkfortransceivers.
ThelistintheupperpartontheTransceiverInstallationpageshowsyouanoverviewofthe
transceiversandchannelsthatarecurrentlyavailable.Inthiscontext,thephrasechannelis
usedasacommontermtoidentifythecombinationoftransceiver,transducerandoperating
frequency.Eachchannelisidentiedbythetransceivertypeandserialnumberandthe
transducer(s)inuse.Thecurrentstatusforeachchannelisalsoprovided.
•Busy:Thechannelisalreadyinuse,probablybyanotherechosounderonthesame
network.Youcannotconnecttothischannel.
•Installed:ThischannelisconnectedtoyourEK80system.
•Lost:Thischannelcannotbeused.
•Available:Thischannelisvacantandreadyforuse.
Note
WhenyouworkintheInstallationdialogbox,youmustalwaysselectApplytothechanges
madeonapage.Youmustdothisbefore
youcontinueyourworkonadifferentpage.
425197/B
21
Page 24

SimradWBTMiniInstructionManual
Procedure
1OpentheSetupmenu.
2OntheSetupmenu,selectInstallation.
ObservethattheInstallationdialogboxopens.Thisdialogboxcontainsanumberof
pagesthatyouselectfromthemenuontheleftside.
3OntheleftsideoftheInstallationdialogbox,selectTransceiver.
4Disconnecttherequestedfrequencychannels(s).
aObservethatthetransceiver(s)youhaveconnectedtothePCarelisted.
Eachtransceiverisidentiedwithtypeandserialnumber.Theavailablechannels
oneachtransceiverarelistedseparately.
bWritedownwhichtransducersyouareusingoneachchannel.
cForeachchannelyouwanttodisconnect,settransducertoNone.
dObservethatthestatusoftherelevantfrequencychannelschangestoAvailable.
5Atthebottomofthepage,selectApplytosaveyoursettings.
6ContinueyourworkintheInstallationdialogbox,orselectOKtocloseit.
Result
Youcannotusethedisconnectedchannels.Ifyouwanttousethemagain,eachmust
bereinstalled.
Relatedtopics
UsingtheWBTMiniinEK80mode,page12
22
425197/B
Page 25

UsingtheWBTMiniinAutonomousmode
UsingtheWBTMiniin
Autonomousmode
Topics
AboutAutonomousmode,page24
SwitchingbetweenAutonomousmodeandEK80mode,page25
Installingthesoftwaredriverfortheserialinterfacecable,page26
RemovingtheUSBashdrivefromtheWBTMini,page27
InsertingtheUSBashdriveintheWBTMini,page29
InstallingthesoftwaredriverfortheUSBashdrive,page31
WakinguptheWBTMinifromSleepstate,page32
425197/B
23
Page 26

SimradWBTMiniInstructionManual
AboutAutonomousmode
WhenusedinAutonomousmode,theWBTMiniissetupbytheSimradEKMission
Plannerprogram.TheEKMissionPlannerisalsousedtoswitchbetweenthetwomodes.
NotethatAutonomousmodeisanoptionthatmustbespecieduponpurchase.Itisalso
possibletoupgradeaWBTMinitoautonomousmodeatalaterstage.
InAutonomousmode,theWBTMiniisprogrammedtoperformapredenedmission.A
missionwillnormallyrecorddataoveraperiodoftimeusingspecicacousticsettings.
ThemissionplanisdesignedusingtheEKMissionPlannerprogram,anddownloadedto
theWBTMinibeforethemissionstarts.
WhenusedinAutonomousmode,thehigh-resolutionRA Wdataarestoredinternallyona
high-capacityUSBashdriveandretrievedafterthemissioniscompleted.Theinternal
storagecapacitydependsonyouroperationalsettings.Witha70kHztransduceroperating
atCWandcollectingdataat100mrange,thediskcanstoreapproximately9,000,000pings.
Datarecordingmodes
AcousticdatacanberecordedinNormalorHighSpeedmode.
•InNormalmodetheprocessingisdoneinreal-timeintheWBTMini.
•HighSpeedmodewilltypicallygiveanimprovementof20to30percentinpingrate
comparedtoNormalmode,butthedatamustbepost-processedbeforefurtheranalysis
cantakeplace.Thispost-processingfunctionalityisprovidedbytheEKMissionPlanner
program.
Todistinguishlesthatarealreadyprocessedfromlesthatneedtobepost-processed,
thoserecordedinNormalmodehavetheextension.rawwhereasthoserecordedinHigh
Speedmodehavetheextension.ra_.
Sleepstate
AWBTMiniinAutonomousmodewillautomaticallygoto"sleep"ifitisnotconnected
totheEKMissionPlannersoftware.IftheWBTMiniisinSleep(powersave)state,
connectingcantakeuptooneminute.InAutonomousmode,theWBTMiniissetupto
enterSleepstatebetweeneachdatacollectionsequence.Thisisdonetosavebatterypower.
Moreinformation
Formoreinformationabouttheuserinterfaceandfunctionality ,refertotheSimradEK
MissionPlannerReferenceManualorcontext-sensitiveonlinehelp.
24
425197/B
Page 27

UsingtheWBTMiniinAutonomousmode
Relatedtopics
UsingtheWBTMiniinAutonomousmode,page23
Installingthesoftwaredriverfortheserialinterfacecable,page26
RemovingtheUSBashdrivefromtheWBTMini,page27
InsertingtheUSBashdriveintheWBTMini,page29
InstallingthesoftwaredriverfortheUSBashdrive,page31
WakinguptheWBTMinifromSleepstate,page32
SwitchingbetweenAutonomousmodeand EK80mode
ThetransceivercanbeoperatedinAutonomousorEK80mode.InAutonomousmode,the
WBTMiniisprogrammedtoperformapredenedmission.InEK80mode,thetransceiver
isusedwithacomputerrunningtheEK80scienticechosounderprogram.Ifnecessary,
youcaneasilyswitchfromonemodetotheother.
Prerequisites
•Adriverfortheserialinterfacecableisinstalled.
•TheseriallineinterfacecableisconnectedbetweenthecomputerandtheWBTMini.
Context
WhenusedinEK80mode,thetransceiveriscontrolledbytheEK80scienticechosounder
program.ThismoderequiresoneormoreEK80softwarelicenses.
Procedure
1ConnecttotheWBTMini.
aSelecttheTransceivertabtoopentheT ransceiverpage.
bSelecttheserialportyouwishtouseforcommunication.
cSelecttheNormalModebuttontoactivateNormalmodeifitisnotalready
activated.
425197/B
25
Page 28

SimradWBTMiniInstructionManual
dSelectConnect.
OncetheWBTMiniisconnected,thelabelchangestoDisconnect.Theserial
numberandthebatteryvoltageoftheWBTMiniareshown.Inthebottomright
cornerofthepresentation,theConnectoriconswitchestogreencolour.
Tip
IftheWBTMiniisinSleep(powersave)state,connectingcantakeuptoone
minute.
2SelecttheOperatingModebuttontoswitchbetweenAutonomousmodeandEK80mode.
Note
TheiconisbluewhenAutonomousmodeisactivated.
Installingthesoftwaredriverfortheserial interfacecable
Acustom-madeserialinterfacecablewithabuilt-incommercialUSB-to-serialline
converterisusedwhentheautonomoustransceiveris"programmed"withamissionplan.
ThecableismanufacturedbyKongsbergMaritime.Beforeyoucanusethiscable,the
requiredsoftwaredrivermustbeinstalledonyourcomputer.
Prerequisites
Forthistaskyouneedthededicatedsoftwaredriver.
Context
YoucanndthesoftwaredriverontheUSBashdrivethatwasprovidedwithyourWBT
Minisystem.Youcanalsodownloadthedriverfromthemanufacturer’swebsite.
•Manufacturer:FTDIChip
•Manufacturer’swebsite:http://www.ftdichip.com
Tondthecorrectdriver,searchfor"D2XX"drivers.
Forinstallationdetails,refertotherelevantdocumentationprovidedbythemanufacturer.
Themanufacturer’sdocumentationisalsoincludedontheUSBashdrive.
26
425197/B
Page 29

UsingtheWBTMiniinAutonomousmode
Procedure
1Downloadthesoftwaredriverandtheinstallationguide.
2Turnonthecomputer.
3Donot
4Installthesoftwaredriverasdescribedintheinstallationguide.
Result
Oncethesoftwaredriverhasbeeninstalled,plugintheserialinterfacecable.Youcannow
communicatewiththetransceiver.
Relatedtopics
UsingtheWBTMiniinAutonomousmode,page23
inserttheserialinterfacecable.
RemovingtheUSBashdrivefromtheWBT
Mini
TheUSBashdriveisinsertedandextractedthroughadedicatedaccesspanelontheWBT
Mini.
Prerequisites
WheneveryouneedtoopenaWBTMiniforpartsreplacementorotherkindofmaintenance,
youmustdothisinaprotectedenvironment.Makesurethatyouhaveenoughworking
spaceandthecorrecttools.
Thefollowingspecialtoolisrequiredforthistask:
•Torxscrewdriver(T10)
Context
TheUSBashdrivecontainingtherecordeddataislocatedinadedicatedcompartment.
Anaccesspanelisusedtoclosethecompartmentandpreventmoistureingression.The
accesspanelisttedwithanO-ring.Toopenandclosetheaccesspanel,youneedatorx
screwdriverwithaT10head.
Note
Donotopenandclosetheaccesspanelunlessyoualsotightenitproperly.
DonotremovetheUSBashdrive,ordisconnectthesupplypower,whiletheWBTMiniis
recordingdataduringanactivemission.
425197/B
27
Page 30

SimradWBTMiniInstructionManual
YoucanonlyusetheUSBashdriveprovidedbyKongsbergMaritimewiththeWBTMini.
TheUSBashdriveprovidedisexclusivelyselected,testedandformattedforusewiththe
WBTMini.TheuseofanotherUSBashdrive-evenifitisidenticaltothedeviceprovided
-mayreducetheoperationalqualityandtheperformanceofthesystem.
Procedure
1DisconnectthepowercablefromtheWBT
Mini.
Tip
Insteadofdisconnectingthepower ,youcanset
theWBTMinitoSleepstate.
2Opentheaccesspanel
3RemovetheUSBashdrive.
4Closetheaccesspanelimmediatelytopreserve
theO-ring.
5ConnectthepowercabletotheWBTMini.
Furtherrequirements
TheUSBashdriveprovidedfordatastorageisformattedwithLinuxEXT2.T oreadthe
USBashdriveonyourPC,adedicateddrivermustbeinstalled.The"ext2fsd"driver
requiredtoreadtheUSBashdriveisprovidedwiththeWBTMini.Y oumustinstallthe
driverfortheUSBashdrivebefore
Note
youinserttheUSBashdrive.
DonotattempttocommunicatewiththeUSBashdriveuntilthe"ext2fsd"driverhasbeen
installedonthePC.ThismaycauseinadvertentformattingoftheUSBashdriveasa
Windowsdevice.FormattedasaWindowsdevice,theUSBashdrivecannotbeusedin
theWBTMini.
Relatedtopics
UsingtheWBTMiniinAutonomousmode,page23
28
425197/B
Page 31

UsingtheWBTMiniinAutonomousmode
InsertingtheUSBashdriveintheWBTMini
TheUSBashdriveisinsertedandextractedthroughadedicatedaccesspanelontheWBT
Mini.
Prerequisites
WheneveryouneedtoopenaWBTMiniforpartsreplacementorotherkindofmaintenance,
youmustdothisinaprotectedenvironment.Makesurethatyouhaveenoughworking
spaceandthecorrecttools.
Thefollowingspecialtoolisrequiredforthistask:
•Torxscrewdriver(T10)
Thefollowingsparepartsand/orconsumablesmayberequiredforthesetasks:
•USBashdrive
•O-ring82.27x1.78mm
•Siliconegrease:ParkerSuper-O-Lube
Context
TheUSBashdrivecontainingtherecordeddataislocatedinadedicatedcompartment.
Anaccesspanelisusedtoclosethecompartmentandpreventmoistureingression.The
accesspanelisttedwithanO-ring.Toopenandclosetheaccesspanel,youneedatorx
screwdriverwithaT10head.
Note
Donotopenandclosetheaccesspanelunlessyoualsotightenitproperly.
425197/B
29
Page 32

SimradWBTMiniInstructionManual
Procedure
1DisconnectthepowercablefromtheWBT
Mini.
Tip
Insteadofdisconnectingthepower ,youcanset
theWBTMinitoSleepstate.
2Opentheaccesspanel
3InserttheUSBashdrive.
Note
YoucanonlyusetheUSBashdriveprovided
byKongsbergMaritimewiththeWBTMini.
TheUSBashdriveprovidedisexclusively
selected,testedandformattedforusewiththeWBTMini.TheuseofanotherUSB
ashdrive-evenifitisidenticaltothedeviceprovided-mayreducetheoperational
qualityandtheperformanceofthesystem.
4CarefullyinspecttheO-ringfordents,nicksorotherdamages.
IfyoususpectthattheO-ringisdamaged,replaceit.
5ApplyathinlmofsilicongreaseontheO-ring.(ParkerSuper-O-Lube)
6Closetheaccesspanel.
7ConnectthepowercabletotheWBTMini.
Furtherrequirements
TheUSBashdriveprovidedfordatastorageisformattedwithLinuxEXT2.T oreadthe
USBashdriveonyourPC,adedicateddrivermustbeinstalled.The"ext2fsd"driver
requiredtoreadtheUSBashdriveisprovidedwiththeWBTMini.Y oumustinstallthe
driverfortheUSBashdrivebefore
Note
youinserttheUSBashdrive.
DonotattempttocommunicatewiththeUSBashdriveuntilthe"ext2fsd"driverhasbeen
installedonthePC.ThismaycauseinadvertentformattingoftheUSBashdriveasa
Windowsdevice.FormattedasaWindowsdevice,theUSBashdrivecannotbeusedin
theWBTMini.
Relatedtopics
UsingtheWBTMiniinAutonomousmode,page23
30
425197/B
Page 33

UsingtheWBTMiniinAutonomousmode
InstallingthesoftwaredriverfortheUSBash
drive
InordertoreadthecontentoftheUSBashdriveonthePC,adedicatedsoftwaredriver
mustbeinstalled.
Prerequisites
Forthistaskyouneedthededicatedsoftwaredriver.
Context
TheUSBashdriveprovidedfordatastorageisformattedwithLinuxEXT2.T oreadthe
USBashdriveonyourPC,adedicateddrivermustbeinstalled.The"ext2fsd"driver
requiredtoreadtheUSBashdriveisprovidedwiththeWBTMini.Y oumustinstallthe
driverfortheUSBashdrivebefore
youinserttheUSBashdrive.
Note
DonotattempttocommunicatewiththeUSBashdriveuntilthe"ext2fsd"driverhasbeen
installedonthePC.ThismaycauseinadvertentformattingoftheUSBashdriveasa
Windowsdevice.FormattedasaWindowsdevice,theUSBashdrivecannotbeusedin
theWBTMini.
YoucanndthesoftwaredriverontheUSBashdrivethatwasprovidedwithyourWBT
Minisystem.
Formoreinformationaboutthe"ext2fsd"driver,refertotheprojectwebsiteat
http://www.ext2fsd.com/.
Procedure
1TurnonthePC.
2ClosealltheprogramsonthePC.
3Donot
4Downloadthesoftwaredriver.
5Installthesoftwaredriver.
inserttheUSBashdrivefromtheWBTMini.
Result
Oncethesoftwaredriverhasbeeninstalled,youcancommunicatewiththeUSBashdrive.
425197/B
31
Page 34

SimradWBTMiniInstructionManual
Note
YoucanonlyusetheUSBashdriveprovidedbyKongsbergMaritimewiththeWBTMini.
TheUSBashdriveprovidedisexclusivelyselected,testedandformattedforusewith
theWBTMini.
TheuseofanotherUSBashdrive-evenifitisidenticaltothedeviceprovided-may
reducetheoperationalqualityandtheperformanceofthesystem.
Relatedtopics
UsingtheWBTMiniinAutonomousmode,page23
WakinguptheWBTMinifromSleepstate
Ifyoudonotintendtouseyourbattery-poweredWBTMiniforawhile,youcansetit
toSleepstatetosavepower.TheWBTMiniwillremaininSleepstateuntilyousenda
wake-upcommand,oryoureconnecttoit.
Prerequisites
TheseriallineinterfacecableisconnectedbetweenthePCandtheWBTMini.
Context
WhileinSleepstate,theWBTMiniwillnotcollectanydata.Ifyouhavedownloadeda
missionplan,itwillbekeptinthememory,butitwillnotbeexecuted.
Torunamissionplan,theWBTMinimustbeactivated.Whenamissionplanisactive,
theWBTMiniwillsleepbetweentheactivepartsofthemission.InAutonomousmode,
theWBTMiniissetuptoenterSleepstatebetweeneachdatacollectionsequence.Thisis
donetosavebatterypower.
Thefollowingmethodscanbeusedto"wakeup"theWBTMini:
AConnecttotheWBTMini.
BSelecttheWakebutton.
Procedure
1IftheWBTMiniisnotconnected:
aStarttheEKMissionPlannerprogram.
bConnecttotheWBTMini.
1SelecttheT ransceivertabtoopentheTransceiverpage.
32
425197/B
Page 35

UsingtheWBTMiniinAutonomousmode
2Selecttheserialportyouwishtouseforcommunication.
3SelectConnect.
OncetheWBTMiniisconnected,thelabelchangestoDisconnect.Theserial
numberandthebatteryvoltageoftheWBTMiniareshown.Inthebottomright
cornerofthepresentation,theConnectoriconswitchestogreencolour.
2IftheWBTMiniisconnected:
aSelecttheTransceivertabtoopentheT ransceiverpage.
bSelecttheWakebutton.
cVerifythattheKeepAliveiconinthelowerrightcornerofthepresentationturns
green.
Relatedtopics
UsingtheWBTMiniinAutonomousmode,page23
425197/B
33
Page 36

SimradWBTMiniInstructionManual
Topics
InstallingtheWBTMini,page35
Aboutthedrawingsinthedrawingle,page36
Installation
413455WBTMinidimensions,page37
34
425197/B
Page 37

InstallingtheWBTMini
TheWBTMinicanbepositionedinanylocationprovidedthattheenvironmental
requirementsaremet.Thephysicallengthofthecableslimitthedistancebetweeneach
transducerandtheWBTMini.
Prerequisites
AsuitablelocationfortheWBTMinimustbedenedpriortoinstallation.
Youmustbeequippedwithastandardsetoftools.Thistoolsetmustcomprisethenormal
toolsforelectronicandelectromechanicaltasks.Thisincludesdifferentscrewdrivertypes,
pliers,spanners,acablestripper,asolderingiron,etc.Eachtoolmustbeprovidedinvarious
sizes.W erecommendthatalltoolsaredemagnetizedtoprotectyourequipment.
Context
Theunitcanbemountedinanydirectionandonanysurfaceprovidedthattheenvironmental
requirementsaremet.
Installation
Procedure
1Preparethelocationandthenecessarytools.
2Makesurethatthechosenlocationmeetstheinstallationrequirements.
3PlacetheWBTMiniintheselectedposition.
4Securetheunitusingfour5mmbolts.
5Connectthecables.
Note
Whenyouconnectthecables,makesurethattheyareallproperlysecured,andable
towithstandthevibrationandmovementsofthevessel.
Relatedtopics
Installation,page34
413455WBTMinidimensions,page37
Cablelayoutandinterconnections,page39
425197/B
35
Page 38

SimradWBTMiniInstructionManual
Aboutthedrawingsinthedrawingle
Relevantdrawingsrelatedtotheinstallationand/ormaintenanceoftheWBTMiniare
providedforinformationpurposesonly.
Note
Thesedrawingsareforinformationandplanningpurposesonly.Informationmaybe
omitted.Observethesourcedrawingsforadditionaldetails.
Thedrawingsarenottoscale.Unlessotherwisespecied,allmeasurementsarein
millimetres.TheoriginalinstallationdrawingsareavailableinPDFand/orAutoCad'sDWG
format.Theoriginaldrawingscanbedownloadedfromourwebsite.
https://www.simrad.com
Somedrawingsanddocumentsarenotavailablefromourwebsite.Thesecanbedownloaded
fromtheSimradDealerClub.
https://www.simrad.com/sdc
Theinstallationshipyardmustprovideallnecessarydesignandinstallationdrawings,as
wellastherelevantworkstandardsandmountingprocedures.
Ifrequired,alldocumentsprovidedbytheshipyardforthephysicalinstallationofthe
WBTMinimustbeapprovedbythevessel’snationalregistryandcorrespondingmaritime
authorityand/orclassicationsociety.Suchapprovalmustbeobtainedbeforethe
installationcanbegin.Theshipownerandshipyarddoingtheinstallationareresponsible
forobtainingandpayingforsuchapproval.
Relatedtopics
Installation,page34
36
425197/B
Page 39

Installation
413455WBTMinidimensions
DownloadthesourcedrawingfromtheWBTMinipagesonhttps://www.simrad.com.
425197/B
37
Page 40

SimradWBTMiniInstructionManual
Relatedtopics
Installation,page34
InstallingtheWBTMini,page35
38
425197/B
Page 41

Cablelayoutandinterconnections
Cablelayoutand
interconnections
Topics
Cableplan,page40
ListofWBTMinicables,page42
Connectors,page43
Cabledrawingsandspecications,page49
425197/B
39
Page 42

SimradWBTMiniInstructionManual
Cableplan
Thecablesusedforastandardinstallationareshown.Thecommercialcablesusedbyeach
PCarenotincluded.AtestcableforEthernetandpowerisincludedinthedelivery.This
cableisintendedforlabtestingonly.Itisnotintendedforuseintheeld.
APC(EK80mode)
BPC(Autonomousmode)
CWBTMini
DTransducer
Note
MakesurethatyourpowersupplymeetstheWBTMinirequirements.Thevoltagemustnot
dropbelow+12VDC.Ifthesupplypoweristoolow ,theWBTMinimaymalfunction.
Ifyouneedtousealongpowercable,calculatethevoltagedropinthecableassuming
acurrentconsumptionof2.5A.
EK80Mode
Usethefollowingcables:C1A,C1B,C4
InEK80mode,theWBTMiniisconnectedtothePCwithadual-purposeconnectorfor
EthernetandDCpower.
40
425197/B
Page 43

Cablelayoutandinterconnections
AutonomousMode
Usethefollowingcables:C2,C3(C1B),C4
InAutonomousmode,theWBTMiniisconnectedtothePCwithaserialcable.Theserial
cableisusedtodownloadthemissionplan.Y oucanalsouseitinInteractivemodeto
controloperationduringamission,andtoretrieveprocesseddatafromtheWBTMini.For
powerconnectioninAutonomousmode,youusethedual-purposecable(EthernetandDC
power),oryoucanmakeadedicatedpowercable.
Relatedtopics
Cablelayoutandinterconnections,page39
ListofWBTMinicables,page42
425197/B
41
Page 44

SimradWBTMiniInstructionManual
ListofWBTMinicables
Asetofcablesisrequiredtoconnectthesystemunitsandtotherelevantpowersupply.The
commercialcablesusedbyeachPCarenotincluded.
Cable
C1A
C1B
C2
C3
C4
Type
EthernetandDC
powercable
InEK80mode,theWBTMiniisconnectedtothePCwithadual-purposeconnector
forEthernetandDCpower.MakesurethatyourpowersupplymeetstheWBTMini
requirements.Thevoltagemustnotdropbelow+12VDC.
SerialcableFromPCtoWBTMini
InAutonomousmode,theWBTMiniisconnectedtothePCwithaserialcable.Theserial
cableisusedtodownloadthemissionplan.
DCpowercableFromPowerSupplytoWBTMini
ForpowerconnectioninAutonomousmode,youusethedual-purposecable(EthernetandDC
power),oryoucanmakeadedicatedpowercable.Makesurethatyourpowersupplymeets
theWBTMinirequirements.Thevoltagemustnotdropbelow+12VDC.
TransducercableFromWBTMinitotransducer
Thetransducercableisprovidedwiththetransducer.Ifyouneedtosplicethetransducer
cabletomakeitlonger,observetheinformationintheend-userdocumentationforthe
relevanttransducer.
From/ToMinimumrequirements
FromWBTMinitoPCandDC
poweroutlet
Relatedtopics
Cablelayoutandinterconnections,page39
Cableplan,page40
Connectors,page43
Cabledrawingsandspecications,page49
2x0.75mm²
42
425197/B
Page 45

Cablelayoutandinterconnections
Connectors
Topics
EthernetandDCpowerconnector,page43
Transducerconnectors,page45
Seriallineconnector,page47
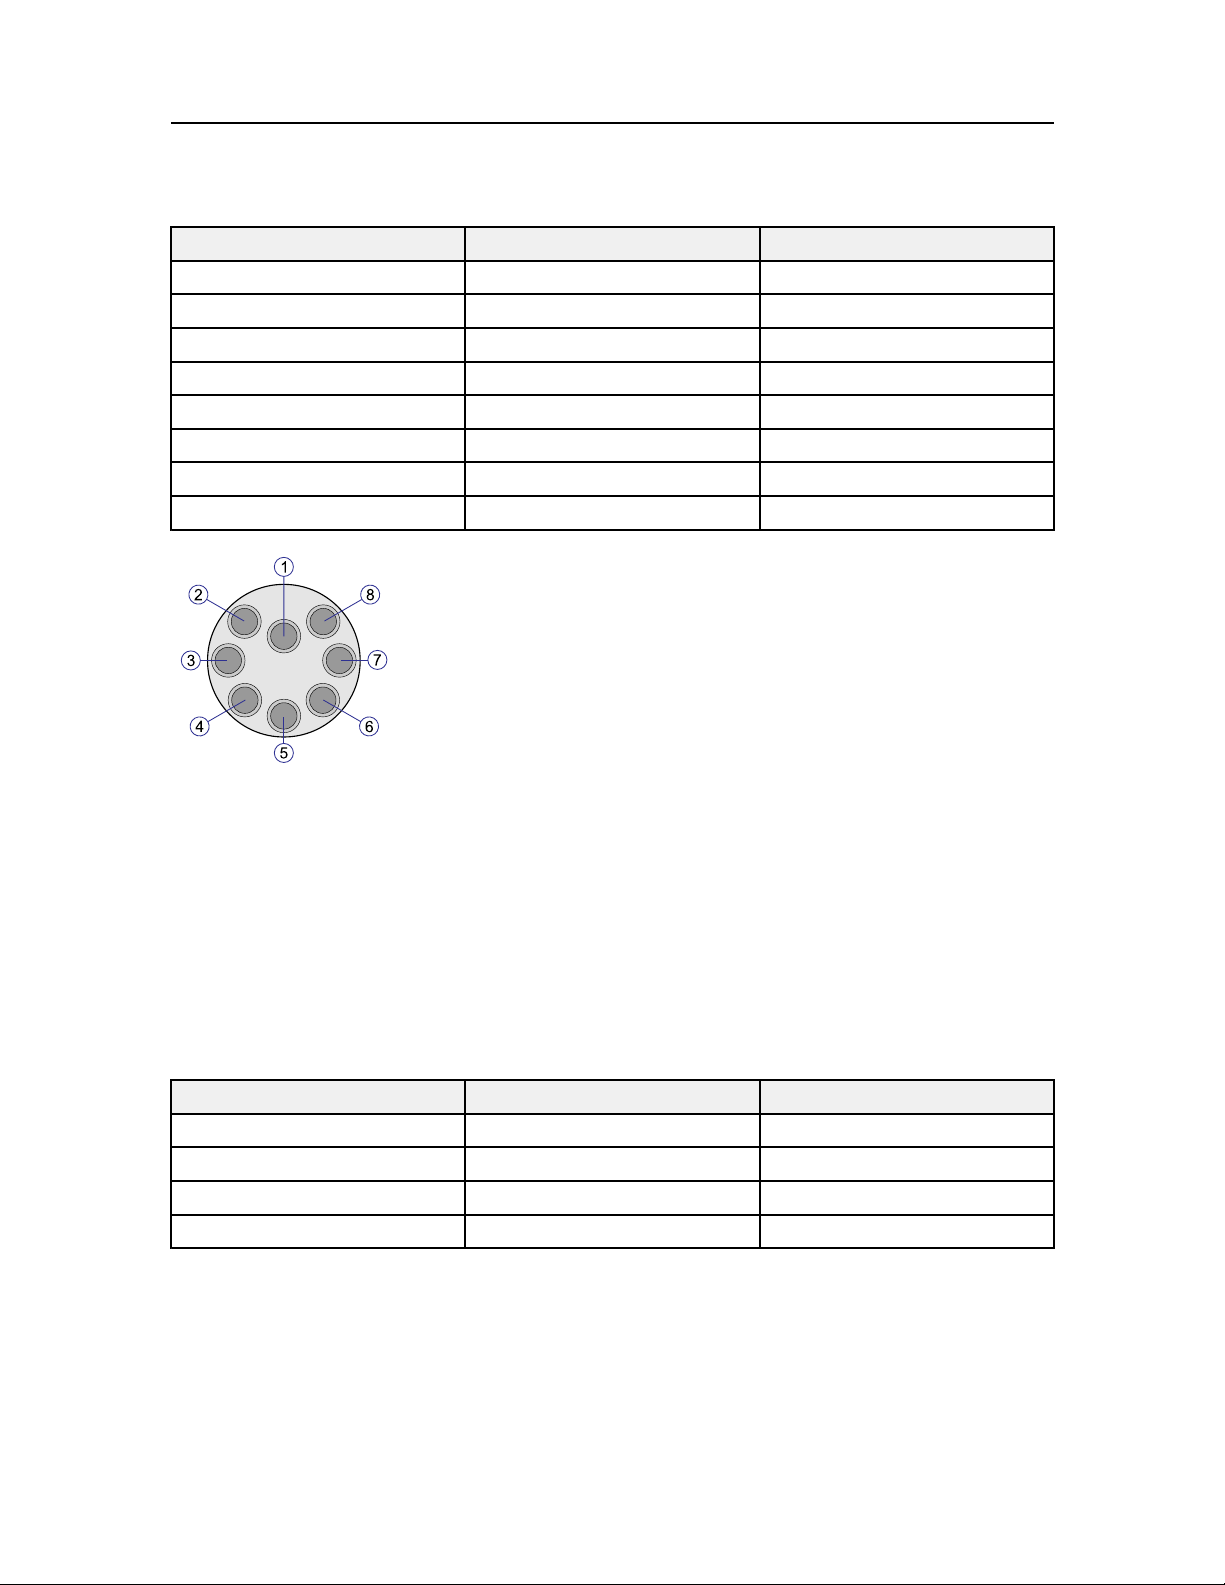
EthernetandDCpowerconnector
ToconnectEthernetandDCpowertotheWBTMini,youwillneedacablettedwitha
suitableDIL13Ffemaleconnector.ThemalesocketismanufacturedbyMacArtneywith
typeidenticationDBH13MAS.
ThefemaleplugusedonthepowerandEthernetcableismanufacturedbyMacArtneyasa
partoftheir"SubConnEthernetseries".ItstypeidenticationisDIL13F.
•Manufacturer:MacArtney
•Manufacturer’swebsite:https://www.macartney.com
MacArtneyconnector
PinnumberCablecolourSignalnameRJ45
1
2
3
4*Brown*N/C
5*Brown/White*N/C
6*Blue*N/C
7*Blue/White*N/C
8*Orange*Ethernet
9*Orange/White*Ethernet
10*Green*Ethernet
11*Green/White*Ethernet
12
13Green
Black
(Screen)
WhiteGround
RedN/C
*Twistedpairs:4/5,6/7,8/9+10/11
+15VDC
Screen
8
7
4
5
2
1
6
3
N/C
425197/B
43
Page 46

SimradWBTMiniInstructionManual
Thisisthepincongurationforamalesocket,asseentowardsthesocket(faceview).
RJ45Ethernetconnector
Relatedtopics
Cablelayoutandinterconnections,page39
EthernetandDCpowercable(description),page49
DCpowercable(description),page53
EthernetandDCpowercable(Sparepart),page58
44
425197/B
Page 47

Cablelayoutandinterconnections
Transducerconnectors
The8-pintransducersocketsaremanufacturedbyMacArtneywithtypeidentication
MCBH8F.Eachsocketsupportsfourtransducersectors.The4-pintransducersocketsare
manufacturedbyMacArtneywithtypeidenticationMCBH4F.
Transducersocket1isthedefaultsocketwhenthe
multiplexingfunctionalityisnot
split-beamtransducerwithfoursectors.Thefour-pin
socket(3)maybeusedtoconnectasingle-beamtransducer
ifyoursplit-beamtransducerhasonlythreesectors.
used.Itsupportsa
Ifyouwishtousethemultiplexingfunctionality,connect
thesecondtransducertosocket2.Itsupportsasplit-beam
transducerwithfoursectors.Thefour-pinsocket(4)
maybeusedtoconnectasingle-beamtransducerifyour
split-beamtransducerhasonlythreesectors.
Tip
WhenworkinginEK80mode,thesoftwarelicenseinthe
EK80programcontrolshowthetransducerisconnected.
OntheSetupmenu,selectInstallation.Ontheleftside
oftheInstallationdialogbox,selectSoftwareLicense.
TheLicenseDetailstextboxexplainswhichtransceiver
channelsthatareused.Eachchannelavailableislistedwiththerelevantoperational
frequencyandpowercapacity.
MacArtneyconnectorMCIL8F
Transducersocket1isthedefaultsocketwhenthemultiplexingfunctionalityisnot
Itsupportsasplit-beamtransducerwithfoursectors.Ifyouwishtousethemultiplexing
functionality,connectthesecondtransducertosocket2.
used.
The8-pinmaleconnectorusedonthetransducercableismanufacturedbyMacArtneyas
apartoftheir"SubConnMicroCircular"series.ItstypeidenticationisMCIL8M.The
connectorisprovidedwithanopen-endedcable.
425197/B
45
Page 48
SimradWBTMiniInstructionManual
Pinnumber
11+
21–
32+
42–Green
5
63–
7
84–
Transducersector
3+Orange
4+
Cablecolour
White/Black
Red/Black
Thisisthepincongurationforafemalesocket,asseentowardsthesocket(faceview).
Black
White
Red
Blue
MacArtneyconnectorMCIL4M
Thefour-pinsocketsmaybeusedtoconnectsingle-beamtransducersifthesplit-beam
transducersconnectedtosockets1and2haveonlythreesectors.
The4-pinmaleconnectorusedonthetransducercableismanufacturedbyMacArtneyas
apartoftheir"SubConnMicroCircular"series.ItstypeidenticationisMCIL4M.The
connectorisprovidedwithanopen-endedcable.
Pinnumber
14+
24–
3
4
Transducersector
N/CRed
N/C
Cablecolour
Black
White
Green
46
425197/B
Page 49

Cablelayoutandinterconnections
Thisisthepincongurationforafemalesocket,asseentowardsthesocket(faceview).
Relatedtopics
Cablelayoutandinterconnections,page39
TransducerconnectorMCIL4M(Sparepart),page59
TransducerconnectorMCIL8M(Sparepart),page59
Seriallineconnector
The8-pinserialcommunicationsocketismanufacturedbyMacArtneywithtype
identicationMCBH8F.ThesocketsupportsstandardserialRS-422communication.
The8-pinmaleconnectorusedontheseriallinecableismanufacturedbyMacArtneyas
apartoftheir"SubConnMicroCircular"series.ItstypeidenticationisMCIL8M.The
connectorisprovidedwithanopen-endedcable.
Pinconguration
PinnumberCablecolourSignalname
1
2
3
4Green
5
6
7
8
Black
White
Red
Orange
BlueN/C
White/BlackN/C
Red/BlackN/C
RxD+
RxD-
TxD-
TxD+
Ground
425197/B
47
Page 50

SimradWBTMiniInstructionManual
Thisisthepincongurationforafemalesocket,asseentowardsthesocket(faceview).
Seriallineinterfacecables
Aready-madecableisavailable.TheserialinterfacecableismanufacturedbyKongsberg
MaritimeusingacommercialUSB-to-serialconverter.Itisterminatedwithan8-pin
MCIL8Msubseaconnector.Thecableisapproximately2.5metreslong.
Anextensioncableisalsoavailable.
Relatedtopics
Cablelayoutandinterconnections,page39
Seriallineinterfacecableandconnector(description),page50
Extensioncable(description),page52
Seriallineinterfacecable(Sparepart),page60
Extensioncable(Sparepart),page61
48
425197/B
Page 51

Cablelayoutandinterconnections
Cabledrawingsandspecications
Topics
EthernetandDCpowercable(description),page49
Seriallineinterfacecableandconnector(description),page50
Extensioncable(description),page52
DCpowercable(description),page53
EthernetandDCpowercable(description)
AdedicatedEthernetandpowercableisavailable.ThecableisttedwithasuitableDIL13F
femaleconnector.Thelengthis2metres.
AEthernetconnector
425197/B
49
Page 52

SimradWBTMiniInstructionManual
BMacArtneyconnectorDIL13F
CThisisthepincongurationforafemaleplug,asseentowardstheplug(faceview).
Tip
AtestcableforEthernetandpowerisincludedinthedelivery.Thiscableisintendedforlab
testingonly.Itisnotintendedforuseintheeld.
Relatedtopics
Cablelayoutandinterconnections,page39
EthernetandDCpowerconnector,page43
EthernetandDCpowercable(Sparepart),page58
Seriallineinterfacecableandconnector(description)
The8-pinserialcommunicationsocketismanufacturedbyMacArtneywithtype
identicationMCBH8F.ThesocketsupportsstandardserialRS-422communication.
The8-pinmaleconnectorusedontheseriallinecableismanufacturedbyMacArtneyas
apartoftheir"SubConnMicroCircular"series.ItstypeidenticationisMCIL8M.The
connectorisprovidedwithanopen-endedcable.
MacArtneyconnector
PinnumberCablecolourSignalname
1
2
3
4Green
5
6
7
8
Black
White
Red
Orange
BlueN/C
White/BlackN/C
Red/BlackN/C
RxD+
RxD-
TxD-
TxD+
Ground
50
425197/B
Page 53

Cablelayoutandinterconnections
Thisisthepincongurationforafemalesocket,asseentowardsthesocket(faceview).
Seriallineinterfacecables
Aready-madecableisavailable.TheserialinterfacecableismanufacturedbyKongsberg
MaritimeusingacommercialUSB-to-serialconverter.Itisterminatedwithan8-pin
MCIL8Msubseaconnector.Thecableisapproximately2.5metreslong.
Anextensioncableisalsoavailable.Thiscablecanbeusedtoincreasethereachofthe
serialand/ortransducercables
AMacArtneyconnectorMCIL8M&MCDLSF
BMouldedsplices
CUSBtoRS-422Converter
DThisisthepincongurationforamaleplug,asseentowardstheplug(faceview).
Relatedtopics
Cablelayoutandinterconnections,page39
Seriallineconnector,page47
Seriallineinterfacecable(Sparepart),page60
Extensioncable(Sparepart),page61
425197/B
51
Page 54

SimradWBTMiniInstructionManual
Extensioncable(description)
TheextensioncableismanufacturedbyMacArtney.Oneendisttedwithan8-pin
MCIL8M(male)connector.TheotherendisttedwithanMCIL8F(female)connector.
Thelengthis10meters.
AMacArtneyconnectorMCIL8M&MCDLSM
BMacArtneyconnectorMCIL8F&MCDLSF
CThisisthepincongurationforamaleplug,asseentowardstheplug(faceview).
DThisisthepincongurationforafemaleplug,asseentowardstheplug(faceview).
Relatedtopics
Cablelayoutandinterconnections,page39
Seriallineconnector,page47
Seriallineinterfacecable(Sparepart),page60
Extensioncable(Sparepart),page61
52
425197/B
Page 55

Cablelayoutandinterconnections
DCpowercable(description)
ForpowerconnectioninAutonomousmode,youusethedual-purposecable(Ethernetand
DCpower),oryoucanmakeadedicatedpowercable.
AMacArtneyconnectorDIL13F
BThisisthepincongurationforafemaleplug,asseentowardstheplug(faceview).
Minimumcablerequirements
•Conductors:2x0.75mm²
•Screen:None
•Voltage:15V
•Maximumouterdiameter:Notapplicable
Relatedtopics
Cablelayoutandinterconnections,page39
EthernetandDCpowerconnector,page43
EthernetandDCpowercable(Sparepart),page58
425197/B
53
Page 56

SimradWBTMiniInstructionManual
Sparepartsandconsumables
Topics
Orderingsparepartsandconsumables,page55
Listofconsumables,page56
Listofspareparts,page57
54
425197/B
Page 57

Sparepartsandconsumables
Orderingsparepartsandconsumables
Tomaketheorderprocessasshortandefcientaspossible,youmustprovideaccurate
informationabouttheproduct,thepartyouneed,andyourself.
Thefollowinginformationmustbeprovidedwithyourorder:
•Partnameand/ordescription
•Ourpartnumber
•Numberofitemsrequired
•Yourshipmentaddress
•Nameofcontactperson
•Preferredshipmentmethod
•Requireddateofdeliveryfromus
Forcertainspareparts(typicallycompleteunits,printedcircuitboardsandsoftware)the
vesselnameisalsouseful,asthisallowsustoupdateourvesseldatabase.Feelfreetoadd
additionalinformationrelatedtotheorder.
Toorderasparepart,contactoneofourdealersordistributors.Alistofcompanynames
canbefoundonourwebsite.
•https://www.simrad.com
425197/B
55
Page 58

SimradWBTMiniInstructionManual
Listofconsumables
Topics
Siliconegrease(Sparepart),page56
Siliconegrease(Sparepart)
ParkerSuper-O-Lubeisasiliconeuidrecommendedforusewithallrubbermaterials.Only
athinlmofSuper-O-Lubeshouldbeusedwithsiliconerubbertopreventsealdamage.
•Partname:ParkerSuper-O-Lube
•Partnumber:654-077261
•Numberinuse:N/A
•Recommendednumberinspare:1
•Truemanufacturer:Parker(http://www.parker.com)
Relatedtopics
Sparepartsandconsumables,page54
56
425197/B
Page 59

Listofspareparts
Topics
USBashdrive(Sparepart),page57
O-ring82.27x1.78mm(Sparepart),page58
EthernetandDCpowercable(Sparepart),page58
TransducerconnectorMCIL4M(Sparepart),page59
TransducerconnectorMCIL8M(Sparepart),page59
Seriallineinterfacecable(Sparepart),page60
Extensioncable(Sparepart),page61
Sparepartsandconsumables
USBashdrive(Sparepart)
YoucanonlyusetheUSBashdriveprovidedbyKongsbergMaritimewiththeWBTMini.
TheUSBashdriveprovidedisexclusivelyselected,testedandformattedforusewiththe
WBTMini.TheuseofanotherUSBashdrive-evenifitisidenticaltothedeviceprovided
-mayreducetheoperationalqualityandtheperformanceofthesystem.
•Partname:USBashdrive
•Partnumber:429105
•Numberinuse:1
•Recommendednumberinspare:1
(TheUSBashdriveshowninthephotowasthetypeusedatthetimeof
writing.Asacommercialitem,themakeandmodelcanbereplacedwithout
priornotice.)
TheUSBashdriveprovidedfordatastorageisformattedwithLinux
EXT2.ToreadtheUSBashdriveonyourPC,adedicateddrivermust
beinstalled.The"ext2fsd"driverrequiredtoreadtheUSBashdriveis
providedwiththeWBTMini.YoumustinstallthedriverfortheUSBash
drivebefore
Donot
beeninstalledonthePC.ThismaycauseinadvertentformattingoftheUSBashdriveas
aWindowsdevice.FormattedasaWindowsdevice,theUSBashdrivecannotbeused
intheWBTMini.
youinserttheUSBashdrive.
attempttocommunicatewiththeUSBashdriveuntilthe"ext2fsd"driverhas
425197/B
57
Page 60

SimradWBTMiniInstructionManual
Relatedtopics
Sparepartsandconsumables,page54
O-ring82.27x1.78mm(Sparepart)
ThisO-ringismanufacturedfromNitrilebutadienerubber(NBR)withhardness"70Shore
A".Itmustnotbesubjectedtosunshine,ortotemperaturesbelow–30°C.Theinside
diameteris:82.27mm.
•Partname:O-ring82.27x1.78NBR70A
•Partnumber:414071
•Numberinuse:1
•Recommendednumberinspare:1
•Truemanufacturer:OttoOlsen
AS(http://www.oo.no)
•Truemanufacturer’spartnumber:
82.27x1.78NBR70A
Relatedtopics
Sparepartsandconsumables,page54
EthernetandDCpowercable(Sparepart)
AdedicatedEthernetandpowercableisavailable.Thelengthis2metres.Thecableistted
withasuitableDIL13Ffemaleconnector.
•Partname:EthernetandDCpowercable
•Partnumber:420784
•Numberinuse:1
•Recommendednumberinspare:1
•Truemanufacturer:Kongsberg
Maritime(https://www.km.kongsberg.com)
Relatedtopics
EthernetandDCpowerconnector,page43
EthernetandDCpowercable(description),page49
DCpowercable(description),page53
Sparepartsandconsumables,page54
58
425197/B
Page 61

Sparepartsandconsumables
TransducerconnectorMCIL4M(Sparepart)
The4-pinmaleconnectorusedonthetransducercableismanufacturedbyMacArtneyas
apartoftheir"SubConnMicroCircular"series.ItstypeidenticationisMCIL4M.The
connectorisprovidedwithanopen-endedcable.
•Transducerconnector
•Partnumber:370-099207(0.6mcableisincluded.)
•Partnumber:421261(5mcableisincluded.)
•Truemanufacturer:MacArtney(https://www.macartney.com)
•Truemanufacturer’spartnumber:MCIL4M
Relatedtopics
Transducerconnectors,page45
Sparepartsandconsumables,page54
TransducerconnectorMCIL8M(Sparepart)
The8-pinmaleconnectorusedonthetransducercableismanufacturedbyMacArtneyas
apartoftheir"SubConnMicroCircular"series.ItstypeidenticationisMCIL8M.The
connectorisprovidedwithanopen-endedcable.
•Partname:Transducerconnector
•Partnumber:370-099033(0.6mcableisincluded.)
•Partnumber:394539(5mcableisincluded.)
•Numberinuse:1(foreachtransducer)
•Recommendednumberinspare:0
•Truemanufacturer:MacArtney(https://www.macartney.com)
•Truemanufacturer’spartnumber:MCIL8M
Relatedtopics
Transducerconnectors,page45
Sparepartsandconsumables,page54
425197/B
59
Page 62

SimradWBTMiniInstructionManual
Seriallineinterfacecable(Sparepart)
TheserialinterfacecableismanufacturedbyKongsbergMaritimeusingacommercial
USB-to-serialconverter.Itisterminatedwithan8-pinMCIL8Msubseaconnector.The
cableisapproximately2.5metreslong.
•Partname:Seriallineinterfacecable
•Partnumber:404024
•Numberinuse:1
•Recommendednumberinspare:1
•Truemanufacturer:KongsbergMar-
itime(https://www .km.kongsberg.com)
Relatedtopics
Seriallineconnector,page47
Seriallineinterfacecableandconnector(description),
page50
Extensioncable(description),page52
Sparepartsandconsumables,page54
60
425197/B
Page 63

Sparepartsandconsumables
Extensioncable(Sparepart)
TheextensioncableismanufacturedbyMacArtney.Thelengthis10meters.Oneendis
ttedwithan8-pinMCIL8M(male)connector.TheotherendisttedwithanMCIL8F
(female)connector.
•Partname:Extensioncable10m(MacArtney
MCIL8M/MCIL8F)
•Partnumber:423127
•Numberinuse:1
•Recommendednumberinspare:0
•Truemanufacturer:MacArtney(https://www.macartney.com)
•Truemanufacturer’spartnumber:KS199-1-10000
Relatedtopics
Seriallineconnector,page47
Seriallineinterfacecableandconnector(description),page50
Extensioncable(description),page52
Sparepartsandconsumables,page54
425197/B
61
Page 64

SimradWBTMiniInstructionManual
Technicalspecications
Theseperformancespecicationssummarizethemainfunctionalandoperational
characteristicsoftheWBTMini.
Allspecicationsaremaximumratings.Wearecontinuouslyworkingtoimprovethe
qualityandperformanceofourproducts.Thetechnicalspecicationsmaybechanged
withoutpriornotice.
Performancespecications
•Frequencyrange:30–500kHz
•Pulseduration:64–2048µs
•Pulseforms:CW+FM(Linearupsweep)
•Transmitpower:1000W@55Ω(Maximum)
•Numberofchannels:4(Withmultiplexer:8)
•Transduceroptions:Single-beam/Split-beam
•Memorycapacity(Autonomousmode):512GB
Ahigh-qualityUSBashdriveisused.
Weightandoutlinedimensions
•Outlinedimensions:
–Depth:145mm
–Width:289mm
–Height:127mm
•Weight:5.4kg
Powerrequirements
•Voltagerequirement:12–16VDC
•Powerconsumption:
62
425197/B
Page 65

Technicalspecications
–Normaloperation:
∗38kHz:6W
∗120kHz:3W
∗333kHz:3W
Powerconsumptionismeasuredusingmaximumoutputpowertoonetransducer,1
mspulseduration,andtwopingspersecond.
–Passive:2W
–Standby:<0.02W(Autonomousmode)
•Maximumcurrent:2.5A(Peak)
Environmentalrequirements
•Operationaltemperature:-15to55°C
•Storagetemperature:-20to70°C
•Ingressprotection(IP)rating:IP67
•Enclosurematerial:Aluminium
Compasssafedistance
•Makeandmodel:SimradWBTMini
•Standardcompass:200cm
•Othercompass:140cm
425197/B
63
Page 66

©2018KongsbergMaritime
Page 67

Page 68

Simrad WBT Mini Miniature wideband echo sounder transceiver
Instruction Manual
 Loading...