

Page 1

Manual
Simrad HT50/
Axis 50 GMDSS
Handheld VHF Radio
Page 2

Page 3
CONTENTS
1. General
1.1 Introduction
2. Operation
2.1 Controls
2.2 Selecting Alternative Channel Sets
2.3 Disable / Enable Key Beep
2.4 Removing and Attaching Battery
2.5 Charger Options
2.6 Charging of Batteries
2.7 Notes on Charging
2.8 Battery Level Indicator
3. Appendix
3.1 Licensing
3.2 Antenna
3.3 Transmission Range
3.4 Frequency of Channels
3.5 Battery Life Guidelines
3.6 Fault Finding
3.7 Spares & Accessories
3.8 Specification & Dimensions
3.9 Service & Warranty
Page 2
The technical data, information and illustrations contained in this publication were to the best of our knowledge correct at the time of going to print. We reserve the
right to change specifications, equipment, installation and maintenance instructions without notice as part of our policy of continuous development and improvement.
No part of this publication may be reproduced, stored in a retrieval system or transmitted in any form, electronic or otherwise without prior permission from Simrad
Navico Ltd.
No liability can be accepted for any inaccuracies or omissions in the publication, although every care has been taken to make it as complete and accurate as possible.
29/11/99 MDL
© 1999 Simrad Navico Ltd
For service and advice please contact the main Simrad dealer in your country of residence.
E03766 Issue 1.1
Page 3
Page 5
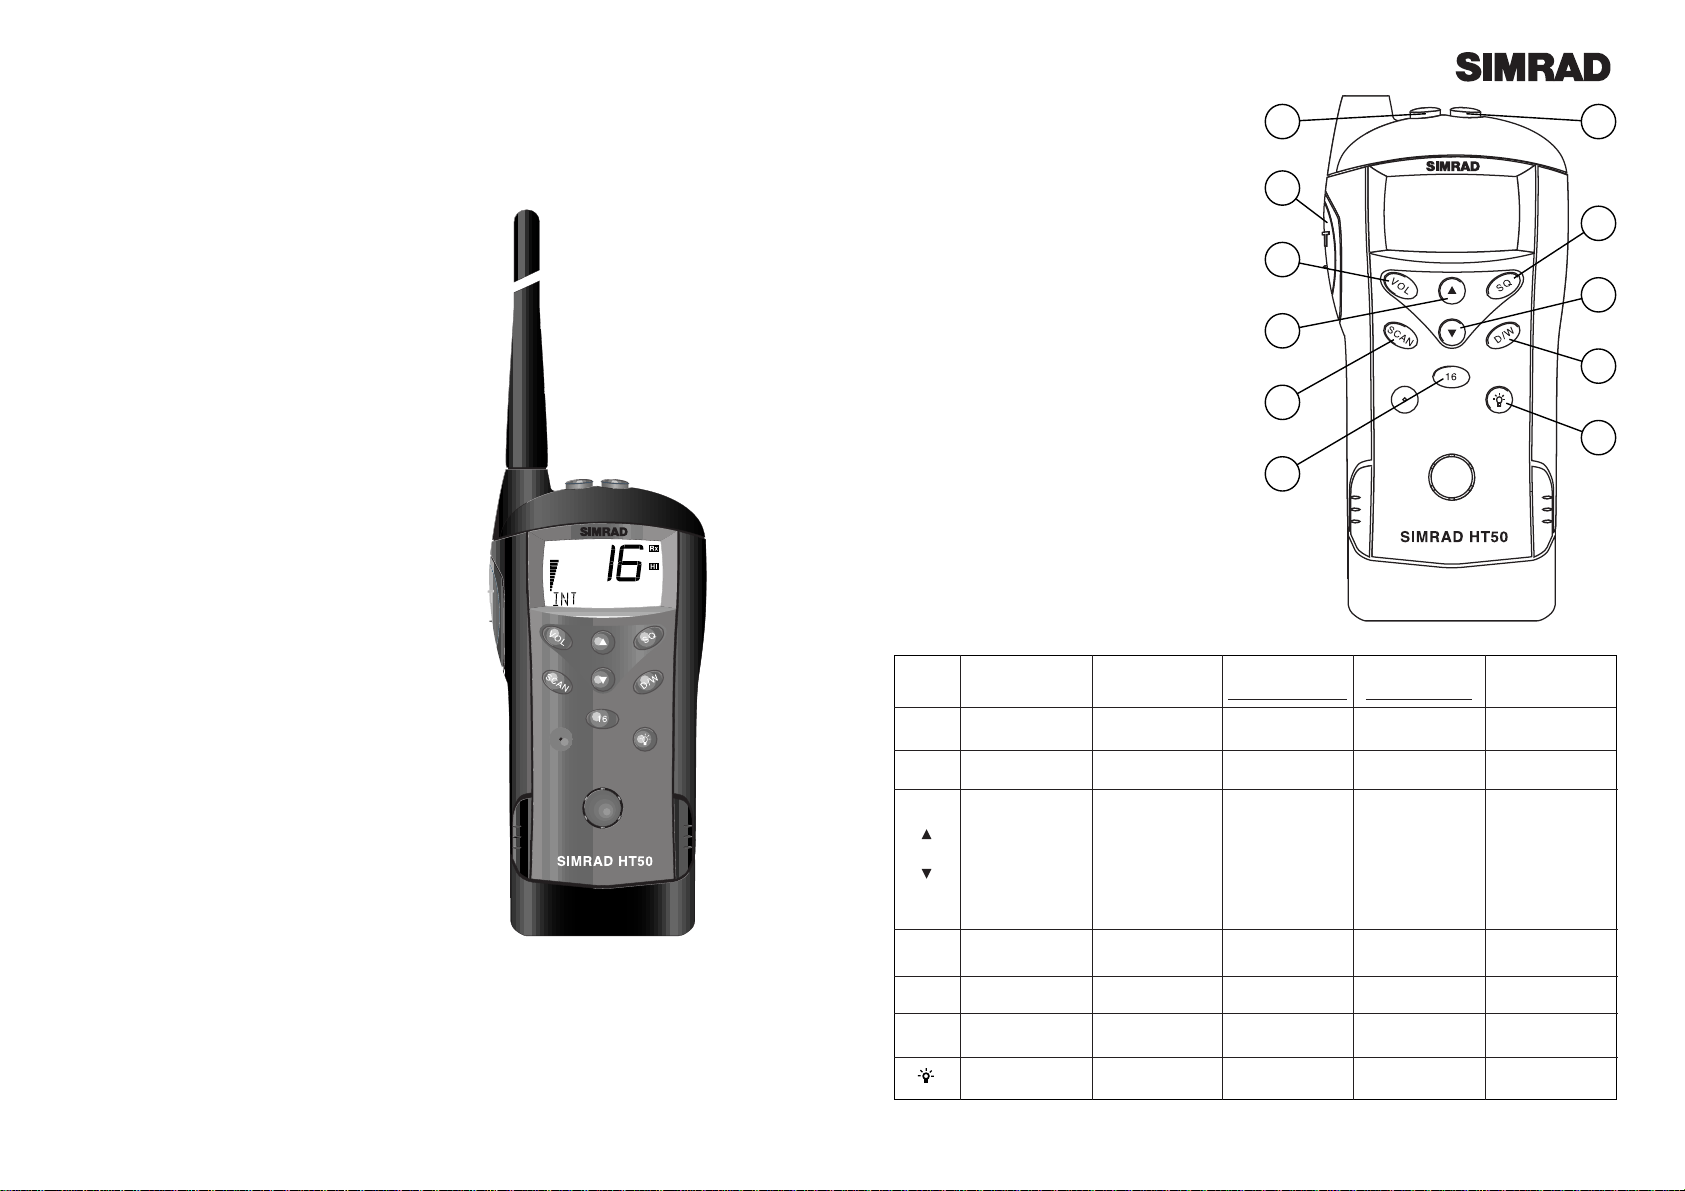
Fig 2.1 - HT50 Controls
Page 4
1 General
1.1 Introduction
The Simrad waterproof handheld VHF comprises two models -
The HT50 VHF radio is designed for leisure
and light commercial use and meets or exceeds
stringent International Regulations EN301-178.
The Axis 50 model for GMDSS convention vessels conforms to Pan European specification
ETS300-225 for the use of radios for Safety at Sea
Both models are waterproof to IP67 standard.
Please note that regulations vary from country
to country. Simrad sets are also approved
specifically by the countries in which they are
sold. Consequently, there may be differences
in the programming of sets bought in different
countries, and therefore in their associated
manuals. If using outside the country of purchase, it is vital to check that the set conforms
to local regulations before use.
Thank you for choosing Simrad
If you are pleased with your radio we hope you
will be interested in our range of marine electronic equipment, which is manufactured to
the same high standards as the HT50. Please
contact your nearest Simrad Agent for a catalogue showing our increasing range of high
tech navigational instruments, autopilots and
VHF radio sets.
Simrad operate a policy of continual development and reserve the right to alter and
improve the specification of their products
without notice.
Axis
®
is a Registered Trade Mark of
Simrad Navico Ltd
HT50 waterproof handheld VHF
1 2
3
4
6
8
10
2 Operation
2.1 Controls
The location of the controls for the HT50 are
shown in Fig 2.1 -
Function
1 On/off
2 High/Low power
3 PTT (Push To Talk)
4 Volume mode select
5 Squelch mode select
6 Up key
7 Down key
8 Scan mode
9 Dual /Tri watch
10 Select Priority / Personal channel
11 Backlight on/off & Light Mode select
Pressing and holding certain keys will access
additional functions. These are indicated by a
double beep, or a triple beep if held for longer
(see table below).
5
7
9
11
Key
VOL
SQ
SCAN
D/W
16
1 x Press
Select Volume
Mode
Select Squelch
Mode
Standard Mode
Channel Up/Down
Volume Mode
Volume Up/Down
Squelch Mode
Squelch Up/Down
Light Mode
Light level Up/Down
Memory Scan
Dual Watch
Select Channel 16
Select Light Mode
Backlight On/Off
2 x Press
Add / Delete
channel from
memory scan
Hold During
Power Up
Select secondary
channel set*
Disable / Enable
First Key Beep
* If available
Press & Hold
Double Beep
Scan All Channels
Tri Watch
Select Personal
Channel
Press & Hold
Triple Beep
Inhibit /Enable
selected channel
from scan
Set Personal
Channel
Page 4

Page 7Page 6
On/Off (1)
Press to turn the HT50 on. To turn off, press
and hold the key for approximately 2 seconds.
This is to avoid accidental power off.
Hi/Lo (2)
Toggles between high and low transmit power
(see specification section 3.8). Use the low setting over short ranges to preserve battery life.
VOL - Volume (4)
SQ - Squelch (5)
Press to select Volume or Squelch mode then use
the and keys to adjust the level.
The display will show “VOL” or “SQL” for 3
seconds - if or are not pressed within this
time, their function will revert to channel select.
/ (6 & 7)
These keys will change the selected channel.
Pressing VOL, SQ or , then / within 3 sec-
onds will adjust the volume, squelch or backlighting level respectively. The bargraph will
indicate the level selected.
SCAN mode (8)
Scans through the channels stored in the channel memory (display shows MEM SCAN).
• Select channel and press twice to add/delete
to memory scan (display shows ENT or DEL
respectively). The icon indicates that the
selected channel is included in memory scan.
• Press and hold until double beep sounds to
scan all channels (display shows SCAN).
• Press and hold until triple beep sounds to
inhibit/enable selected channel from scan (display shows INH or ENA respectively). The
icon indicates the selected channel is inhibited.
D/W - Dual Watch / Triwatch (9)
Press to select Dual Watch of selected channel
and Ch16. Display shows D/W.
• Press and hold until double beep sounds for
Triwatch - selected channel, personal channel
and Ch 16. Display shows T/W.
16 -Channel 16 / Personal Channel (10)
Press to select channel 16.
• Press and hold until double beep to select
personal channel (display shows )
• Press and hold for three beeps to set selected
channel as the personal channel.
- Backlight (11)
Press to turn on and off. Use / to adjust the
backlighting level (5 levels available). The bargraph indicates the backlighting level selected.
• The battery save function turns the backlighting off if no key is pressed after 20 seconds. Press any key (except or ) to turn
light on again.
2.2 Selecting Alternative Channel Sets
In countries where it is permitted, holding
VOL down while turning the radio on will
enable the radio to operate on a secondary
set of channels (Fig 2.3).
Where the display will normally show INT
(International channel set) on the bottom line,
this will show USA for USA channels, CAN for
Canadian channels etc.
• Channel sets available will depend on which
country the radio is programmed for use in.
This function will only be available if permitted in
the country of purchase. Please enquire with
your national licensing authority for details of
permitted channel sets.
• The radio will revert to International channels if it is switched off then on again.
2.3 Disable / Enable Key Beep
The HT50 beeps every time a key is pressed to
confirm operation. To disable key beep, press
and hold SQ while turning the set on. Repeat
this procedure to turn the key beep on again.
• Second level functions (such as All Channel
Scan, Triwatch etc) will still be indicated by a
beep, even if the key beep is disabled.
KEEP VOL HELD DOWN
Fig 2.3 - Selecting alternative channel set
a
b
c
d
f
g
i
e
Fig 2.2 - HT50 display functions
a Bar graph -
Power up Battery level
Standby Battery level
Transmit Battery Level
Volume Mode Volume Level
Squelch Mode Squelch Level
pressed Backlight level
b Personal channel indicator
c Channel selected
d Receiving or transmitting indicator
e High or Low power indicator
f Function indicator
g Selected channel stored in memory
h Channel inhibited from scan
i Scan mode selected
h
Page 5

Page 9Page 8
2.4 Removing and Attaching Battery
There are two battery options for each model.
These are not interchangeable between the
two models - use only the specified batteries :
HT50
NC07 700mAh NiCad Battery
NH12 1200mAh NiMH Battery
Axis 50 GMDSS
NC08 850mAh NiCad Battery
LTB3 Lithium Battery (Non rechargeable)
To remove the battery, lift the two locking clips
holding the battery pack in place (Fig 2.4).
When attaching the battery pack, ensure the
two locating pegs on the top of the battery are
located into the slots in the radio and that the
two locking clips have both engaged.
The set is fully waterproof even with the battery
removed, but it is recommended that any moisture on the top of the battery or in the battery
compartment is wiped clear before attaching to
prevent the water creating a conductive path
between the contacts and reducing battery life.
2.5 Charger Options
The HT50 is supplied as standard with a 12v
drop in trickle charger TC50 that will accept the
whole radio, or the battery alone (Fig 2.5). This
charger will run from a standard 12v marine
supply (12.6v - 15.5v), or from 110/220/240v
mains with an appropriate optional
adaptor/power supply. Charging with the
trickle charger takes approximately 12-16
hours. There is also a rapid charger available
(RC50) which will charge the battery within 1
1
/
2
hours.
2.6 Charging of Batteries
To charge the NiCad and NiMH battery packs,
insert the battery or radio into the charger
ensuring that excess moisture is wiped clear
from the contacts on the back of the battery
pack. The TC50 will trickle charge the battery
to full capacity. The RC50 will rapid charge the
battery until it is fully charged and will then
automatically switch to maintenance charge.
Fig 2.4 - Battery pack removal
Fig 2.5 - Battery charger
2.7 Notes on Charging
• NiCad batteries are supplied uncharged and
need charging before use.
• Charge the battery up to full charge when not
in use, although it may lose some of its charge
after several months of storage.
• Do not charge at temperatures below 0ºC or
above 40ºC.
• T urn off if charging battery while fitted to the
radio.
• Always try to fully discharge the battery
before recharging - repeated recharging of the
battery while it is partly discharged may create
a ‘memory effect’, preventing the battery reaching full charge.
• Dispose of used batteries carefully. The contents of the batteries could be harmful to the
environment.
• Never expose to a naked flame.
• IMPORTANT : The Lithium battery pack
(available only with the Axis 50 GMDSS
model) are not rechargeable, and under no
circumstances should any attempt be made
to recharge these batteries. Replacement
lithium cells can be re-ordered from your
local Simrad Agent, quoting part No. LTB3.
2.8 Battery Level Indicator
Except when adjusting the Volume or Squelch,
the bar graph on the display shows the battery
charge level (Fig 2.7). This indicates the voltage at the battery terminals, not necessarily the
charge stored. Ten or nine bars indicate a fully
charged battery, three or four bars mean the
battery is almost drained.
• When using a lithium battery pack, the low
level battery indicator may flash under transmit conditions. This does not necessarily
reflect the charge level remaining in the battery,
as it is due to the different voltage characteristics of a Lithium battery pack under load.
Replacement and spare batteries are available
from your local Simrad Agent. Please quote
the relevant part number.
Fig 2.7 - Battery level indicator
Fig 2.6 - Charging Options
12v DC
AC
Mains
Page 6

Page 11
3.2 Antenna
The antenna for the radio is fitted to the unit via a robust screw fitting to an M6 threaded socket
on the top of the radio. This system is more rugged than a traditional BNC connector, so the
radio’s drop-proof integrity is not compromised by the antenna fixing.
While the radio is drop-proof and very robust, damage to the antenna such as bending or kinking
may adversely affect the transmission efficiency of the unit, which may lead to overloading of the
power module. Damaged antennae should be replaced immediately.
Replacement antennae can be purchased from authorised Simrad Service Agents. Please refer to
section 3.7 for more details on spare parts and accessories available.
3.3 Transmission Range
Because VHF signals travel in a straight line and are not reflected back off the ionosphere as lower
frequency signals are, the range of VHF signals is limited to ‘line of sight’, beyond which the other
vessel passes behind the curve of the Earth. Therefore, the range will increase greatly the higher
above sea level the antenna is, as Fig 3.1 illustrates (assuming maximum transmission power is
used):
Therefore, the typical range of a handheld radio such as this one used at sea level will be approximately 8 Km (5 Miles). This will increase as height above sea level increases, or if the other radio
user’s antenna is at a greater height - note that the range between the yacht with the antenna
mounted on a 9 M (30 Ft) mast and the handheld user increases to 13-16 Km (8-10 Miles).
Page 10
3 Appendix
3.1 Licensing
Prior to use check the national licensing requirements for the operator.
In the UK license applications and queries should be made to the following authority -
Wray Castle
Ship Radio Licensing
PO Box 5
Ambleside
LA22 0BF
Tel - 015394 34662
A set may only be operated by, or under the supervision of a holder of a Certificate of
Competence and Authority to Operate. This involves a simple examination and an annual
license renewal fee. The VHF only certificate is administered by the Royal Yachting Association -
Royal Yachting Association
RYA House
Romsey Road
Eastleigh
Hants, SO5 4YA
Tel - 01703 629962
Holders of the Restricted Certificate of Competence in Radio-telephony (which covers
MF/HF SSB etc), do not need a separate VHF certificate.
In all other countries, please contact your regional authority for information.
30 m/
100 ft
Mast
9 m/
30 ft
Mast
87 km / 65 M
13-16 km
8-10 M
20 km / 12 M
8 km / 5 M
20-26 km / 12-16 M
46-53 km / 29-33 M
Cherbourg Isle of Wight
Endeavour
Niton
Fig 3.1 - VHF transmission range
Page 7

Page 13
3.4 Frequency of Channels
Axis 50 GMDSS models are fitted with simplex channels only.
Channel 70 is restricted for DSC (Digital Selective Calling) use only and is therefore not available
on the HT50 or Axis 50 VHF radio.
Channel 0 will only be made available in the UK to Coastguard users with written authorisation.
Page 12
Ai Based on - 5% Transmit at 5 Watts setting of r.f. output power (1.4 Amp)
5% Receive at 200mWatts Audio (0.15Amps)
90% Receiver squelched (0.02Amps)
Aii Based on - 5% Transmit at 1Watt setting of r.f output power (0.8Amp)
5% Receive at 200mWatts Audio (0.15Amps)
90% Receiver squelched (0.02Amps)
B Based on - 10% Transmit at 5Watt setting of r.f. output power (1.4 Amp)
10% Receiver at 250mWatts Audio (0.15Amps)
80% Receiver squelched (0.02Amps)
Charge Held While Stored
The Following Data is Approximate:
BATTERY PACK Typical Life of fully charged pack at 25°C
Duty Cycle Ai Duty Cycle Aii Duty Cycle B
700mAh NiCad 7.6 hrs 12 hrs 4.2 hrs
1200mAh NimH 12 hrs 20 hrs 7 hrs
3.5 Battery Life Guidelines
• New batteries should be fully (trickle)
charged and fully discharged several times to
acheive full capacity.
T o a large extent, the battery life will depend on
the usage, or Duty Cycle of the radio - i.e the
battery will be drained much quicker if the
radio is transmitting continually than if it is
just receiving. Additionally, if the radio is set to
High Power (5 watts*), the power drain will be
considerably greater than if transmitting on
Low Power (1 watt*)
* Standard power settings.
Battery Pack Duration
At 25 ºC At 45ºC
700mAh NiCad Up to 50% Charge 4-6 Months 4 Weeks
850mAh NiCad Up to 50% Charge 4-6 Months 4 Weeks
1200mAh NimH Up to 50% Charge 4 Months 4 Weeks
Values predicted from calculation -
Page 8

Page 14
3.6 Fault Finding
Symptom Possible Cause Remedy
Unit will not switch on • Battery not charged • Re-charge battery
• Battery not attached correctly • Ensure battery is fully
to radio engaged (see section 2.4)
Scan or Memory Scan is • Noise on the channel is • Increase squelch level
locking on a channel holding the scan • Inhibit channel from scan
without a signal
Dual Watch not being • Priority channel selected • Select a working channel
entered (normally Ch16)
Cannot change channel • Dual Watch (D/W) engaged • Exit Dual Watch
Certain channel numbers • Some channels are restricted • Consult your national
are not obtainable and programmed out depend- authority for permitted
ing on country of purchase channels in your region
Will not transmit • Scanning or D/W function active • Exit D/W or Scan
Will not transmit on 5W • Low voltage when full transmit- • Battery charge low -
but OK on 1W ting current is drawn recharge the battery
• Some channels are restricted to • Consult your national
low power transmission only authority
Transmissions persistently • Damaged antenna • Replace antenna
weak
These simple checks should be carried out before seeking technical assistance and may save time
and expense.
Before contacting your servicing agent please obtain the radio’s serial number and the software
iteration - this is shown in the large digits on the display for 2 seconds after the radio is turned
on.
Page 15
3.7 Spares & Accessories
The following spares and accessories are available from authorised Simrad Agents. Alist of dealers is included with this unit. Please quote Part No. when ordering.
ANT3
Spare Antenna
Axis 50 GMDSS Batteries -
NC08
850 mAh NiCad Battery Pack
LTB3
Lithium Battery Pack
(Non rechargeable)
HT50 Batteries -
NC07
700 mAh NiCad Battery Pack
NH12
1200 mAh NimH Battery Pack
TC50
Trickle Charger
RC50
Rapid Charger
MAT50:U (UK)
MAT50:E (Euro)
MAT50:A (USA)
Mains Adaptors for TC50
MAR50:U (UK)
MAR50:E (Euro)
MAR50:A (USA)
Mains Adaptors for RC50
Page 9

Page 16 Page 17
3.8 Technical Specification
Electrical
Channel Capability 54 international channels 1-28, 60-69, 71-88
Up to 10 private channels*
UK : includes M (previously 37) and M2
USA : includes 0, 29, 89, 75, 76, Wx1-10 receive only.
Scandinavia : leisure or fishing channels as appropriate.
Canada : Canadian and USA channels.
GMDSS sets have simplex channels only - 06, 08-17, 67-69, 71-74, 77
Frequency Range 155-163Mhz
Operating Temperature Range -20ºC - +60ºC
Output Power HT50 - 1 & 5 Watts Axis 50 GMDSS - 1 & 2.5 Watts
Harmonic and Spurious Emissions <.25µW Tx, <1nW Rx
Sensitivity 0.5µV for 20 dB SINAD
Selectivity 70 dB (±25 kHz)
Intermodulation 70 dB
Channel Spacing 25kHz
Blocking 90dB
Spurious Response 70dB
Audio Output Power Max 0.4 Watt
Current Consumption Squelched <25mA
Receive typically 125mA
Transmit 5 Watts 1.4A
1 Watt 0.8A
Weight 400g including battery pack
* Contact local Simrad Agent for further details of channel programming etc.
Environmental
Waterproof To a depth of 1m fully submersed, including a 45ºC thermal shock
Will withstand petrol, diesel and other fuel oils.
Drop Resistance Will withstand a drop from 1m on to a hard surface on any face.
68mm (2.7 in) 80mm (3.2 in)
3.9 Service & Warranty
Your radio should seldom need servicing, although it will benefit from an application of silicone
or Teflon grease to the battery contacts and antenna socket each season.
This unit is guaranteed for 2 years from date of retail sale. If it is necessary to have the unit
repaired, return it carriage prepaid to the agent in the country of purchase with a copy of the
receipted invoice showing the date of purchase. Where possible, return all the components unless
you are certain that you have located the source of the fault. If the original packing is not available, ensure that it is well cushioned in packing; the rigours of freight handling can be very different from the loads encountered in the marine environment for which the unit is designed.
IMPORTANT - The HT50 / Axis50 is a sealed waterproof unit. To create and maintain its
waterproof integrity it was assembled in a controlled environment using special equipment.
The radio is not a user maintainable unit, and UNDER NO CIRCUMSTANCES should the
unit be opened, except by authorised Simrad Service Agents. Unauthorised opening of the
unit will invalidate the warranty.
145mm (5.8 in)
42mm (1.7 in)
320mm (12.8 in)
70mm (2.8 in)
96mm (3.8 in)
Page 10

Page 11

Manufacturer:
Simrad Navico
Star Lane, Margate
Kent CT9 4NP
United Kingdom
Telephone: +44 (0) 1843 290290
Telefax: +44 (0) 1843 290471
E-Mail: simrad-navico.co.uk
WORLDWIDE MANUFACTURER OF M ARINE ELECTRONICS
 Loading...