

Page 1

CAUTION!
Use of solvent based or chemical cleaners on the
displays will result in damage and invalidate the
warranty
h1000 pilot
installation
manual
HB-1000I-02 English
WARNING!
An autopilot is a very useful navigational aid, but DOES NOT under any
circumstance replace a human navigator.
Do not use automatic steering when:
x
In heavy traffic areas or in narrow waters
x
In poor visibility or extreme sea conditions
x
When in areas where use of an autopilot is prohibited by law
When using an autopilot:
x
Do not leave the helm unattended
x
Do not place any magnetic material or equipment near magnetic or
fluxgate compass used in the autopilot system
x
Verify at regular intervals course and position of vessel
x
Always switch OFF the autopilot in due time to avoid hazardous
situations
Page 2

h1000 pilot
contents 1
h1000 pilot display 4
description 4
siting the pilot head 4
mounting procedure 5
panel mounting 5
h1000 compass unit 6
description 6
siting the compass unit 6
mounting procedure 6
rudder reference unit (rru) 7
description 7
key points when installing the rru 7
linear feedback unit 11
rudder drive options 12
ram drive unit 12
description 12
hydraulic linear drives 12
contents
contents
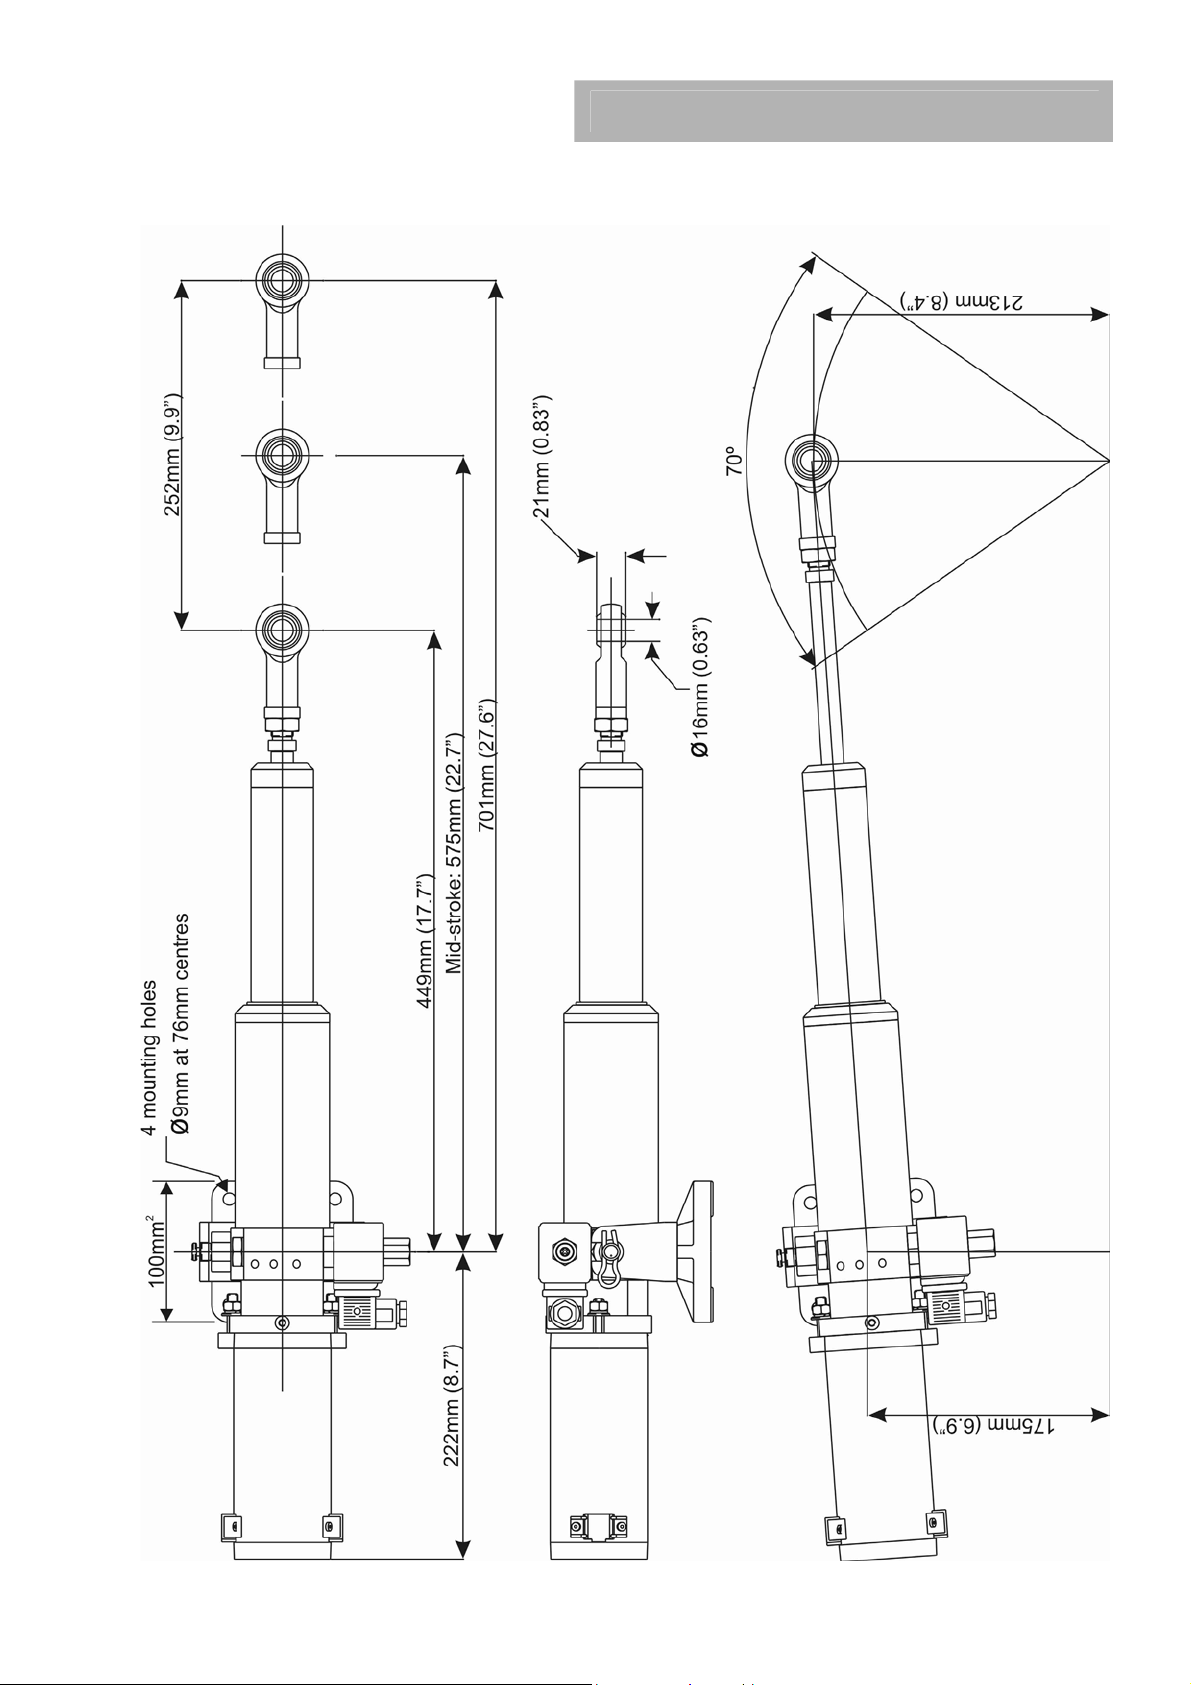
hydraulic ram drive dimensions (T0-12V) 14
hydraulic ram drive dimensions (T1-12V, T2-12V, T2-24V) 15
size 3 hydraulic ram drive dimensions, 24V 17
ram drive unit installation 19
key points on installation 19
layout of typical ram drive unit 20
ram mounted parallel to vessel’s centre-line 21
key points on installation 22
mounting a hydraulic linear ram on a vertical bulkhead 22
vertical bulkhead installation 23
splitting the ram drive unit 24
type 1 and type 2 units 24
type 3 units 24
hydraulic drive pumps 25
description 25
pump data 25
key points on installation 25
hydraulic drive pump dimensions 26
type 1 and 2 26
type 3 26
hydraulic drive pump installation 27
Page 1
Page 3

contents
contents
h1000 pilot
hydraulic drive pump installation examples 28
single station system example 28
dual station system example 28
dual station system with bypass example 29
dual station pressurised system example 29
advanced control processor unit (acp) 30
description 30
siting the acp 30
mounting procedure 30
cable and connection information 31
emc compliance 31
general wiring notes 31
all rudder drives – heavy duty power cables 32
linear drives – clutch/valve cables 32
acp unit terminal details 32
wire colour coding and abbreviations 32
wiring connections 33
clutch voltage selection 33
acp dip switch location 34
h1000 and alarm connections 35
hand-held, mob and joystick 36
hydraulic ram drive connections 37
ram solenoid wiring details 38
hydraulic pump connections 39
continuous drive connections 40
direct paddle input connection 41
linear feedback connection 42
non-b&g paddle connection 43
furuno ad10 heading connection 44
optional accessories 46
hand-held controller 46
description 46
siting the hand-held unit 46
mounting procedure 46
man overboard button (mob) 47
description 47
siting the man overboard alarm button 47
mounting procedure 47
acp joystick 48
description 48
siting the joystick 48
mounting procedure 48
Page 2
Page 4

h1000 pilot
h1000 pilot calibration 49
pilot installation checklist 49
drive unit and steering system 49
linear hydraulic rams 49
size 3 ram installation checklist 49
hydraulic pumps 49
rotary drives 49
rudder reference unit installation 50
linear feedback unit installation 50
compass installation 50
electronics installation 50
speed calibration 51
calibrating the pilot 53
pilot calibration parameters 53
dockside calibration 53
selecting the boat type 54
setting the rudder end stops 54
setting the port rudder stop 54
setting the starboard rudder stop 54
selecting the rudder drive type 54
hardovertime 55
waterline length 55
magnetic dip angle 56
magnetic dip angle compensation chart 56
joystick control 56
seatrial calibration 57
compass calibration 58
engaging the h1000 pilot 61
setting the rudder midships position 61
boat lag 61
setting the boat lag value 62
boat lag value table 62
automatic rudder gain 62
checking the automatic rudder gain learning 62
manual rudder gain 63
rudder gain value table 63
contents
contents
trouble shooting 61
uncalibrated 61
no rudder position 61
no drive selected 62
no boat speed 62
no heading data 62
no nmea information 63
nmea data unstable 63
poor wind data 63
current trip limit 63
no pilot detected 63
pilot not steering a straight course 64
Page 3
Page 5

description/installation
h1000 pilot display
h1000 pilot
description
The h1000 pilot display is designed to be mounted above or below decks. The display head allows
control of the pilot and by installing multiple display heads, gives control at any station. It can be
connected to all other h1000 Instruments via the Fastnet
and navigational system.
Caution: it is essential that the pilot is calibrated before operati on. Details are given in the calibration
section of this manual.
In an integrated system, boat speed is supplied from the h1000 Speed/Depth Interface and wind speed
and wind angle from the h1000 Wind Interface via Fastnet
Compass and Wind modes. When a CND or NMEA position fixer is connected to the system, Navigate
mode becomes available. NMEA data is connected to the Universal Interface and then broadcast
across Fastnet
The display heads are supplied with a clip-in mounting bracket, which allows for easy installation.
Access from behind is not necessary to secure the unit in place. However to prevent theft or if removal
of the unit is not required, then locking studs and thumbnuts are supplied to allow for permanent
fixing.
2
and used by the pilot.
2
connectors to provide an integrated autopilot
2
. These allow the pilot to operate in the
siting the pilot display head
h1000 instruments are designed for mounting above or below decks. Select a display site that is:
x
At a convenient position within easy reach and view of the helmsman.
x
On a smooth and flat surface.
x
At a safe distance of 100mm (4") from any compasses.
x
Protected from physical damage.
x
Accessible from behind for fitting locking studs if required.
Page 4
Page 6

h1000 pilot
description/installation
mounting procedure
panel mounting
Ensure that the display is installed on a flat surface, and there is sufficient room behind the panel to
accommodate the fixings and connections. Using the template supplied, cut a hole in the panel in the
desired position.
Fix the mounting bracket into the hole using the screws supplied.
Note
: the sealing ring is fitted to the unit during manufacture, its purpose is to prevent moisture
penetration and reduce the effects of any vibration transmitted through the instrument panel.
Press the Pilot Display firmly into the mounting bracket; an audible ‘clic k’ will indicate that the case
is correctly located.
Secure the unit to the instrument panel by fitting the studs and thumbnuts supplied.
Caution
: To avoid damaging the casing, fixing studs must only be tightened ‘finger-tight’.
Mounting
Bracket
Sealing Ring
(Fitted at Manufacture)
Pilot Display
Unit
Protective
Cover
Page 5
Page 7

description/installation
h1000 compass unit
h1000 pilot
description
The h1000 compass is an electronic fluxgate for use with all h10 00 systems. The unit is housed in a
sealed casing constructed of high impact plastic. It is therefore suitable for on or below deck mounting.
If installed in a vessel with a steel or reinforced concrete hull it may be necessary to install the
compass unit outside the magnetic screening affect of the hull and super-structure.
Two Fastnet² connectors are provided at the base of the unit. These connectors allow connection to the
rest of the system for the supply of power and data.
siting the compass unit
Mount the compass upright on a flat vertical bulkhead where it will be:
x
A safe distance from external magnetic interference:
3m (10ft) from VHF, RDF, loudspeakers, depth sounders, engines, or power cables carrying
heavy current.
x
3m (10ft) from radar and SSB equipment.
x
Externally mounted on steel vessels.
x
Protected from physical damage.
x
Protected from water ingress (particularly bilge water).
x
Optimum positioning: as low as possible to minimise effect of pitching and rolling of boat.
mounting procedure
x
Secure the unit in the selected site using the non-magnetic self-tapping screws provided.
x
Route the Fastnet
e.g. engine starter, trim-tabs, etc.
x
Secure cables in place with cable clips or tie-wraps.
x
Avoid bending the cable through a tight radius, especially near the connector as this may damage
the wires inside the cable.
Page 6
2
cable to the rest of the system avoiding other cables carrying heavy currents,
Page 8

h1000 pilot
rudder reference unit (rru)
description/installation
description
The Rudder Reference Unit (rru) is a sealed, high specification potentiometer in a robust casing,
providing rudder position information to the pilot computer unit. The operating arm is constructed from
aluminium with three positions pre-drilled for the adjustable drag-link. The drag-link has ball-joints at
each end which connect the unit operating arm to the tiller arm or steering quadrant. The unit base has
four holes to allow for mounting. The unit is supplied with 10m (30ft) of 3-core screened cable.
key points when installing the rru
x
General consideration must be given to the steering system and its geometry before starting the
RRU installation. Many factors must be contemplated for a practical solution. The information
given here is for guidance only, although where a maximum or a minimum value is given these
must be adhered to.
x
Mount the rru on a flat surface next to the tiller arm or steering quadrant; construct a small
platform if necessary.
x
D o not lengthen the drag-link arm as this can transmit excessive vibration loads to the rru and
will invalidate the warranty.
x
The unit operating arm can be rotated through 360q; the mid-point of the potentiometer travel is
when the operating arm is opposite the cable entry point.
x
When the rudder is moved from hardover port to hardover starboard the rru arm should swing
through a minimum of 90q. This will ensure that there is sufficient voltage swing to the autopilot.
Page 7
Page 9

description/installation
h1000 pilot
rudder reference unit
Measure the voltage difference between the green and blue wires of the rru; there should be a
minimum of 1V d.c. change from hardover to hardover.
Note: If there is less than a 1V d.c. change the pilot will not commission
x
After installation check full movement of the steering system ensuring that there is no fouling
between the steering gear, rru parts and drive unit.
x
Ensure that there is no backlash in the linkage between the rru and the st eering gear, otherwise
incorrect operation of the autopilot will occur.
The example shown overleaf is a plan view of a typical system with a tiller arm and quadrant. When
viewed in elevation, the ram drive arm and rudder reference unit drag-link must not be more than ±9
from horizontal. Ideally, all components should be horizontally aligned as this prevents excessive
stress during operation.
.
q
Page 8
Page 10

h1000 pilot
description/installation
rudder reference unit
Page 9
Page 11

description/installation
h1000 pilot
rudder reference unit
The RRU can be mounted in a variety of positions and orientations depending on the layout of the
steering system.
If the maximum rudder angle is less than 90q then the position of the RRU or the drag-link must be
adjusted so that the operating arm of the RRU swings through a minimum of 90.
1V minimum
variation
90° MINIMUM RRU ANGLE
Page 10
Page 12

h1000 pilot
description/installation
rudder reference unit
The rudder hardover angle should only be limited by th e rudder stop s, not the rru li nkage or pilo t drive
unit. Check that when hardover, the rru arm and drag-link do not form a straight line. If this occurs the
steering system could become damaged or jammed endangering the boat and crew. This fault can
easily be rectified, by adjusting the position of the RRU.
linear feedback unit
Where installation of the conventional rudder reference unit is difficult or physically impossible, a
linear feedback unit (SEN-RUD-LFB) can be used. The linear feedback unit comprises of a tube
approximately 23mm (7/8 inch) in diameter and 300mm (12 inch) long. This assembly is attached to the
top of the B&G Blue Ram Types T1 or T2. Each end of the linear feedback unit has a small rose-joint
which is attached to corresponding pillars on the ram, the ros e-joints are retained using washers and
spring clips.
LINEAR
FEEDBACK
UNIT
Page 11
Page 13

description/installation
h1000 pilot
rudder drive options
warning
Accurate performance of the yacht’s steering system is crucial to the safety of you and your crew. B&G
always recommend that an Authorised B&G Dealer performs the installation of autopilot drive units.
caution
In line with B&G’s policy of continuous product improvement, drive units are regularly updated.
Installation data included with your drive unit will replace installation data contained in this manual.
Before undertaking any shipwright work onboard the yacht, it is essential that the installation data in
this manual be verified against your drive unit. If in doubt, consult your authorised B&G Dealer for
technical assistance. B&G cannot accept liability for differences that may occur between the drive unit
and this User Manual.
ram drive unit
description
A hydraulic pump driven from the dc electric supply combines a compact reversible pump and a
hydraulic cylinder assembly for use on boats without hydraulic steering systems. Three sizes of ram
drive units are available giving a wide range of thrust to suit all vessel types and sizes.
hydraulic linear drives
The Type 1 and Type 2 rams combine motor, pump and hydra ulic cyli nder as one unit, referred to as a n
actuator. Type 3 rams are supplied split into a separate motor/pump unit, reservoir and hydraulic
cylinder, connected by 1m (3ft) hoses. The Type 3 motor/pump unit can be mounted on a vertical
bulkhead.
.
Note: Longer hoses for the Type 3 system are available, please contact your dealer.
Ram Drive Type RAM-T0-12V RAM-T1-12V
Motor Supply 12V dc 12V dc 12 or 24V dc 24V dc
Solenoid Valve
Supply
Peak Thrust 300 kg force
Peak Current 20A @ 12V 20A @ 12V 25A @ 12 or 24V 17A @ 24V
Maximum
Stroke
Rod Diameter 12mm
Tiller Arm for
70q Rudder
Maximum
Torque
Weight 5.8 kg
Helm to Helm
Time
Extend
Retract
12V dc
1.25A (max)
(660 lbs force)
203mm
(8")
(0.472”)
178mm
(7")
545 Nm
(4823.65 lb.ins)
(12.7 lbs 6oz)
10.1sec
9.9 sec
(200kg force)
12V dc
1.25A (max)
680 kg force
(1496 lbs force)
254mm
(10")
16mm
(0.623”)
214mm
(8.4")
1427 Nm
(12574 lb.ins)
7 kg
(15 lbs 6oz)
15.7 sec
13.4 sec
(200kg force)
RAM-T2-12V
RAM-T2-24V
12 or 24V dc
1.25A (max)
680 kg force
(1496 lbs force)
254mm
(10”)
16mm
(0.623")
214mm
(8.4")
1427 Nm
(12566 lb.ins)
7 kg
(15 lbs 6oz)
11.9 sec
10.2 sec
(200kg force)
RAM-T3-24V
24V dc
0.8A (max)
1062 kg force
(2342 lbs force)
305mm
(12")
20mm
(0.623")
257mm
(10.16")
2688 Nm
(23780 lb.ins)
10.3 kg
(22lbs 11oz)
14.6 sec
12.6 sec
(200kg force)
Page 12
Page 14

h1000 pilot
description/installation
rudder drive options
The following tables indicate the tiller arm length required for the different types of drives.
RAM T0 Hydraulic Linear Drive
RAM–T0–12V
½ Max. Rudder
Angle
q
35
RAM T1 and T2 Hydraulic Linear Drives
RAM-T1-12V
RAM-T2-12V
RAM-T2-24V
½ Max. Rudder
Angle
q
35
RAM T3 Split Hydraulic Linear Drive
RAM - T3-24V
½ Max. Rudder
Angle
q
35
Midstroke
429mm (16.9”)
Tiller Arm
178mm (7.0”)
Midstroke
575mm (22.6”)
Tiller Arm
214mm (8.4”)
Midstroke
755mm (29.7”)
Tiller Arm
257mm (10.2”)
Page 13
Page 15

description/installation
hydraulic ram drive dimensions (RAM-T0-12V)
Midstroke 429mm (16.9")
Stroke Length 203mm (8.0")
o
Movement
360
4 off Mounting Holes
9mm Dia. at 76mm Centres
223mm
h1000 pilot
76mm 66.7mm
82mm
14mm
76mm
100mm
125.6mm
73.3mm
9mm
2
16mm
12mm Dia. -0
+0.018mm
Page 14
Page 16
h1000 pilot
hydraulic ram drive dimensions (T1-12V, T2-12V, T2-24V)
description/installation
Page 15
Page 17
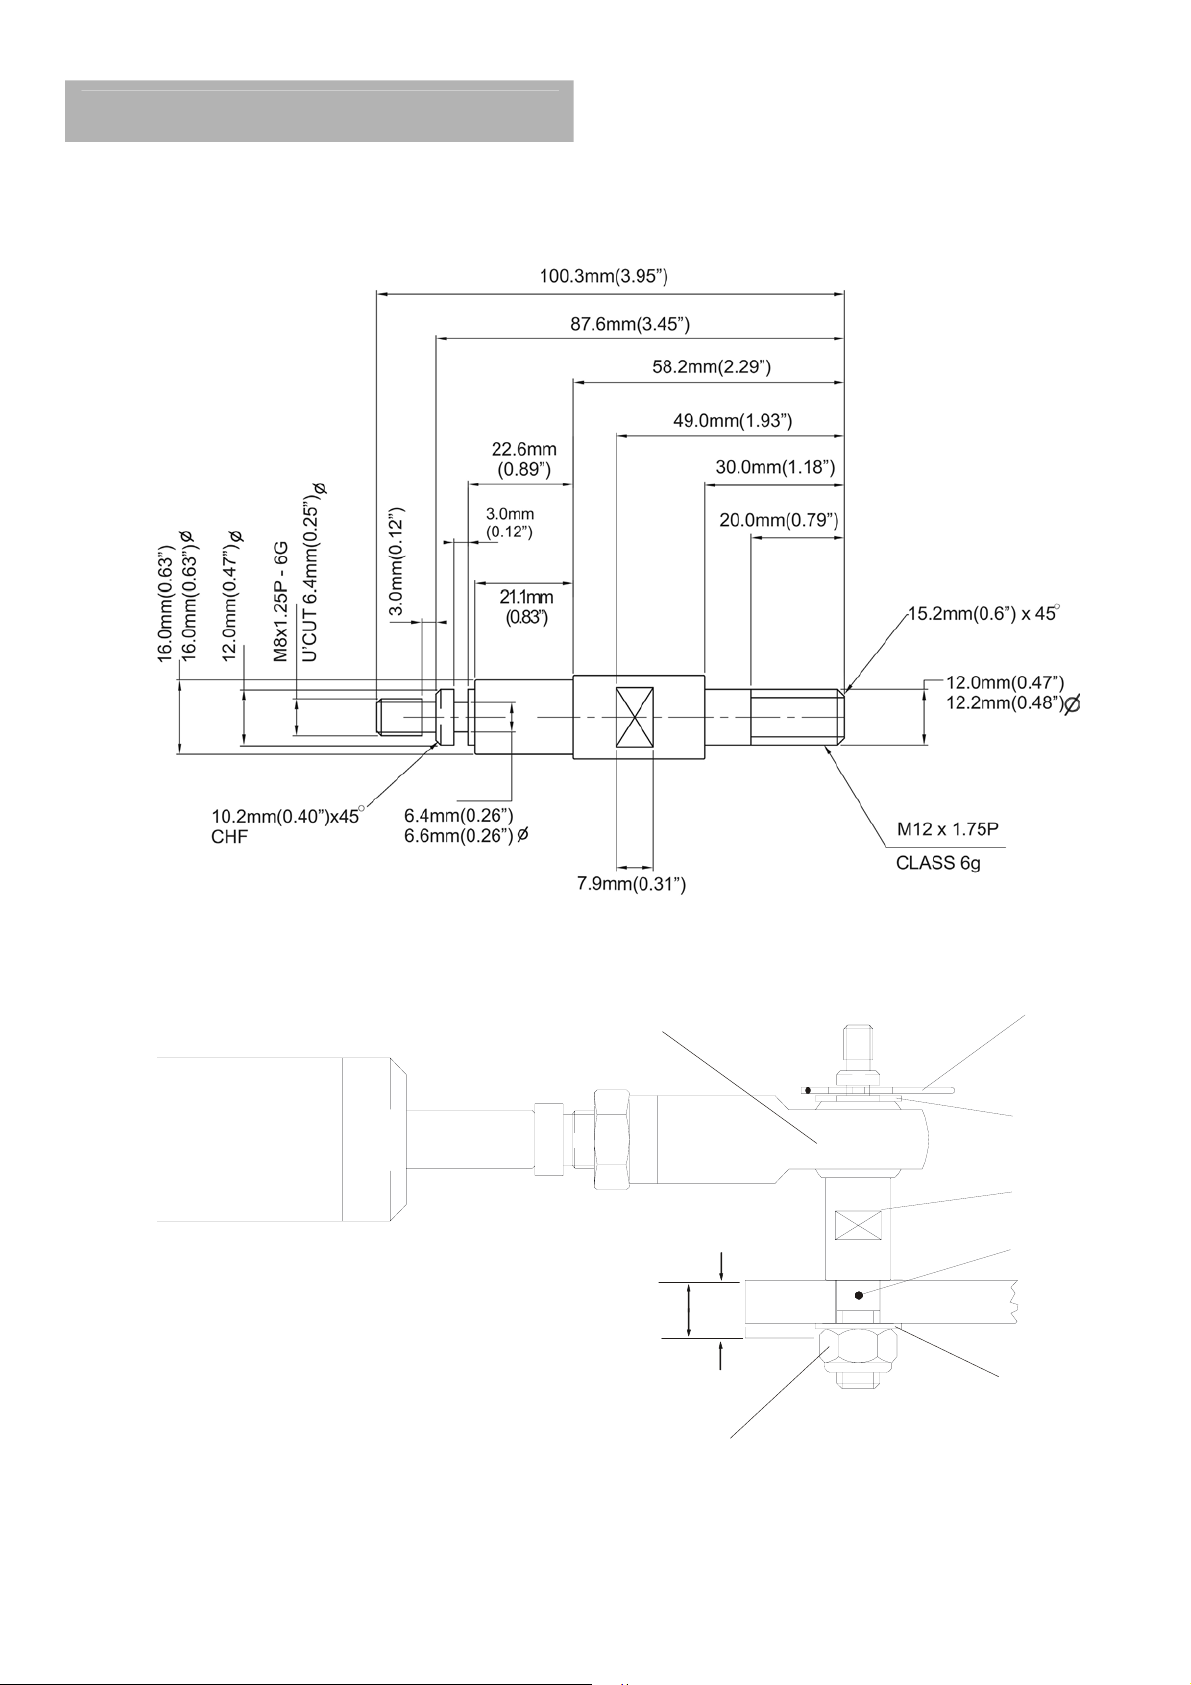
description/installation
type 1 and 2 rose joint and am bolt detail
h1000 pilot
RECOMMENDED
QUADRANT THICKNESS
ROD END
16MM
MAX
12MM
MIN
NUT TORQUE - 27NM
20 Ft.Ib
‘R’ CLIP
WASHER
TILLER BOLT
R
3773
LOCTITE
WASHER
Page 16
Page 18

h1000 pilot
description/installation
size 3 hydraulic ram drive dimensions, 24V
Page 17
Page 19

description/installation
type 3 ram bolt detail
h1000 pilot
Page 18
Page 20

h1000 pilot
‘
description/installation
ram drive unit installation
Note
: General consideration must b e given to the steering system and its geometry before starting
the installation. Many factors must be contemplated for a practical solution; the information
given here is for guidance only, although where a maximum or minimum value is given this
must be adhered to. It is essential that the unit be installed in a fully functional steering
system, with no backlash or stiffness when operating. Rectify any steering problems before
installation of the ram drive unit or the autopilot will not function correctly.
key points on installation
x
Check that the steering gear is in good condition. Rectify any steering defects prior to installation
of the ram.
x
The ram drive unit must be secured onto a flat, rigid base. It maybe necessary to construct a
platform section for the mounting plate. For angled rudderstocks, an angled platform section will
have to be constructed.
x
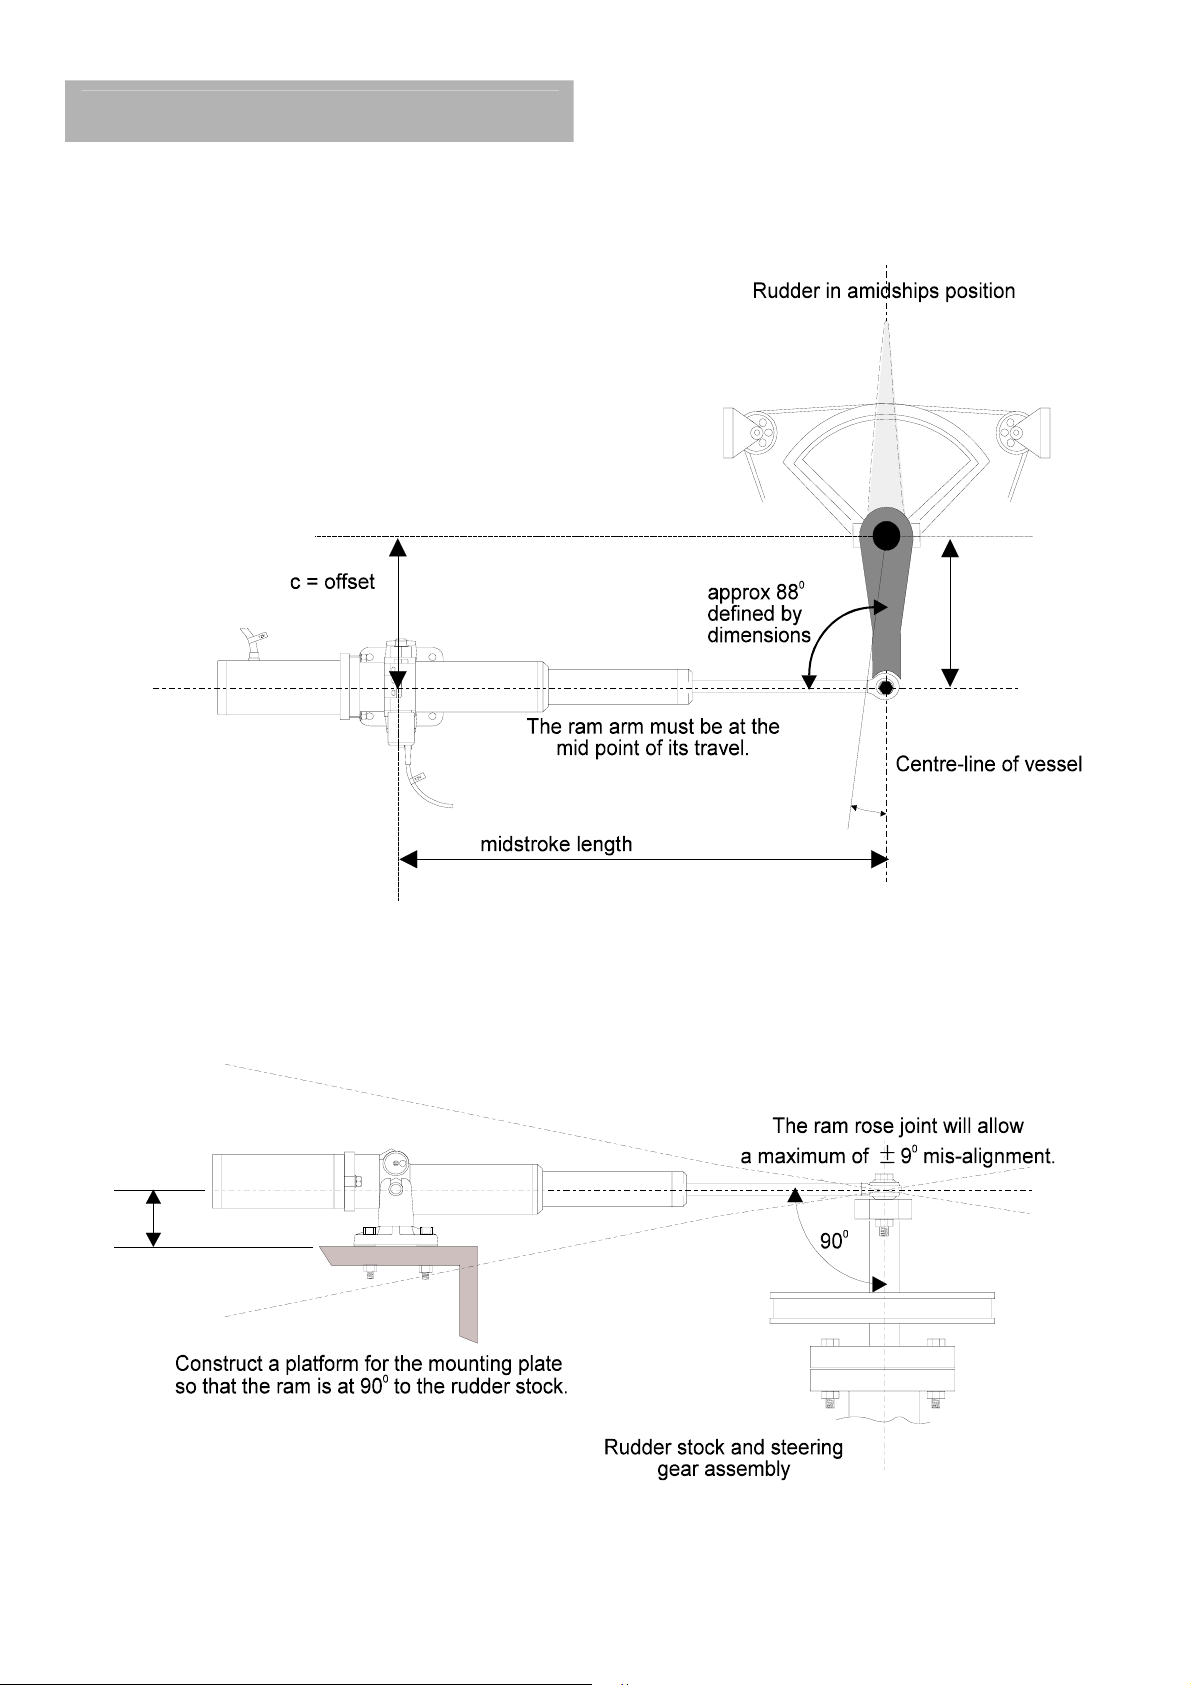
All setting-up and aligning of the ram drive unit with the steering system should be carried out
with the rudder in the amidships position and the ram arm at the centre point of its travel.
x
The angle between the ram arm and the tiller arm should be as shown in the following diagrams.
x
The ram arm should ideally be at right angles to the rudderstock. The ball-joint on the end of the
ram arm will allow a
MAXIMUM
of ±9qof vertical misalignment.
Caution: For Type 3 Ram Reservoir Installation, do not turn the black reservoir tap on or attempt to
move the piston rod until all of the following are completed:
x
The base foot of the ram and pump has been bolted into position.
x
The reservoir has been fixed to a bulkhead above the ram and pump.
x
The sealed reservoir transit cap has been replaced by the breather cap supplied.
x
The reservoir has been filled with the oil supplied.
When the checks listed above have been verified, the reservoir tap can be switched to the ‘
allowing the oil to flow between the reservoir and the pipe. (Tap “ON” position is in-line with the pipe).
ON
’ position
Page 19
Page 21
description/installation
layout of a typical ram drive unit
h1000 pilot
b=tillerarm
length
a=half max rudder angle
d
Page 20
Page 22

h1000 pilot
description/installation
ram mounted parallel to vessel’s centre-line
Page 21
Page 23

description/installation
h1000 pilot
ram mounted parallel to vessel’s centre-line
key points on installation
x
Make sure that the rudder a ngle is limited by the rudder stops and not t he limit of travel of the
ram arm. Failure to comply will damage the unit and invalidate the warranty.
x
Make sure that there is sufficient space at each end for the ram arm to extend fully. The ram
stroke length is given in the tables on Page 13 of this manual.
x
Check for full movement and security of the steering gear before applying any power to the
autopilot system. Refer to the installation checklist in the calibration section of this handbook.
mounting a hydraulic linear ram on a vertical bulkhead
Due to the restricted movement of the ram mounting foot base (+14q/-10q for the Size 1 and 2 rams and
5q for the Size 3 ram), it is important that the maximum rudder angle is carefully measured a nd the
+
positioning of the ram, tiller arm length and offset are carefully followed from the diagrams on the
following page.
Caution: Failure to comply with these dimensions may cause premature failure of the ram and
place great stress on the structure of the vessel.
Note
: The Size 1 and 2 Linear Rams may be mounted in any orientation, without the need to fit an
external reservoir. The Size 3 Linear Rams requires an external reservoir which must be
positioned such that the reservoir is always higher than the drive unit at all normal angles of
heel.
Care must be taken to ensure that the connecting pipes are not in anyway kinked or turned
through any tight bends.
Page 22
Page 24

h1000 pilot
5
description/installation
vertical bulkhead installation
b= tiller arm
=d
5
a=half max rudder angle
Page 23
Page 25

description/installation
h1000 pilot
splitting the ram drive unit
Note: when dealing with any hydraulic system great care must be taken to ensure that a high
degree of cleanliness is observed and no dirt, moisture or foreign objects are allowed to
enter the system. When filli ng or topping up the external reservoir only use a good quality
ISO 10 hydraulic oil e.g., Q8 Dynobear 10 (10cSt at 40
It is not possible to split the following linear drives:
x
RAM-T0-12V
x
RAM-T1-12V
x
RAM-T2-12V
x
RAM-T2-24V
0
C).
type 0, type 1 and type 2 units
Comprise a combined ram/pump, reservoir and hydraulic cylinder. These units cannot be split.
type 3 units
Are supplied as split units, connected by 1m (3ft) hoses. These can be supplied with quick connect
couplings and pre-filled hoses. These units do not need to be bled.
types 3 units with longer hoses are available from your dealer.
Note:
Page 24
Page 26

h1000 pilot
description/installation
hydraulic drive pumps
description
The reversible hydraulic drive pump has a small high-speed pump driven by a 12V o r 24V dc permanent
magnet motor. The pump has pilot check valves to prevent back driving and a pilot operated reservoir
valve to enable the unit to drive balanced or unbalanced cylinders. The unit has port and starboard
¼ inch BSP service ports and a ¼ inch BSP reservoir port.
pump data
Hydraulic Pump Type PMP-T1-12V PMP-T2-12V PMP-T3-24V
Pump Type Reversible
dc motor
Supply Voltage 12V dc 12V dc 24V dc
Typical Operating Current
Range
Maximum Pressure 1000 psi 1000 psi 1000 psi
Maximum Flow Rate
at continuous duty motor
loading
Cylinder Capacity 100cc to 300cc
Weight 3 kg
5A to 17.5A 5A to 22.5A 6A to 17.5A
750 cc/min
3
(46 in
/min)
(6.1 to 18.3 in
(6.6 lbs)
3
)
Reversible
dc motor
1420 cc/min
(87 in3/min)
275cc to 550cc
(16.8 to 33.6in3)
3 kg
(6.6 lbs)
Reversible
dc motor
1980 cc/min
(121 in3/min)
525cc to 750cc
(32 to 46in3)
4 kg
(8.8 lbs)
key points on installation
x
A position should be chosen convenient for the steering system hydraulic delivery lines.
x
The site should be rigid and flat to prevent excess vibration.
x
Shielded from the direct effects of the elements.
x
Minimise the lengths of the hydraulic lines from the pump to the cylinder and where possible, the
pump motor supply cables.
Page 25
Page 27

description/installation
hydraulic drive pump dimensions
h1000 pilot
type 1 and 2
80mm
(3.15)
88.9mm
(3.5)
centres
105mm
(4.13)
4 holes I 7.0mm
(0.28)
240 mm
(9. 45)
50.8mm
(2.00)
centres
type 3
Page 26
Page 28

h1000 pilot
description/installation
hydraulic drive pump installation
Note: When dealing with any hydraulic system great care must be taken to ensure that a high
degree of cleanliness is observed and no dirt, moisture or foreign objects are allowed to
enter the system. When bleeding your hydraulic steering system only use a good quality
ISO10 hydraulic oil, e.g. Q8 Dynobear or equivalent (10cSt at 40
The procedure for installing the hydraulic drive pump is as follows:
1. Drain the steering system from the lowest point, usually at a cylinder coupling.
2. Fit T-pieces into the port and starboard delivery lines, couple the lines to the appropriate service
ports of the pump using flexible hydraulic hose.
3. Couple the reservoir port to the reservoir/balance line from the helm units. A low pressure,
transparent plastic tube can be used.
Note: Ensure that this line rises gradually with no down turns.
0
C).
4. Refill the steering system as recommended by the manufacturer, using clean hydraulic fluid.
5. Fill the cylinder by temporarily removing the cylinder couplings and hoses at each end. Refit the
hoses securely.
6. Starting at the highest helm unit, fill the helm reservoir.
7. Slowly turn the steering wheel two turns to port and then to starboard, checking the level of flui d
in the helm unit reservoir at all times.
8. Next, turn the wheel fully in one direction until a slight pressure i s felt, continuously monitor the
reservoir level.
9. Repeat in the opposite direction and continue in this manner until topping up is no longer
necessary.
10. When satisfied that the steering is fully bled manually, apply power to the pump unit.
11. Turning the wheel fully from lock to lock will cause the pump to self-purge.
12. Check the fluid level in the helm unit reservoir.
13. When the system appears to be fully functional, with the pump running and the helm hardover
check for leaks.
14. Secure all hoses and cables to prevent damage.
Page 27
Page 29

description/installation
hydraulic drive pump installation examples
single station system example
h1000 pilot
dual station system example
Page 28
Page 30

h1000 pilot
hydraulic drive pump installation examples
dual station system with bypass example
description/installation
dual station pressurised system example
Page 29
Page 31

description/installation
advanced control processor unit
h1000 pilot
description
The Advanced Control Processor (ACP) Unit contai ns all the electronics for t he autopilot operation and
control of the rudder drive options. It is designed to be mounted on a vertical, flat, smooth surface. The
unit has a hinged lid to provide easy access to the electrical connections.
siting the acp unit
x
It is recom mend ed that the ACP unit be mounted with the cable entries dow nwards. It must not be
mounted with the cable entries uppermost as water may run down the cables and into the unit.
x
Ensure that there is sufficient space to allow the unit to be hinged open to make connections to
terminals inside, and that the hinges of the two halves of the case may be slid apart.
x
Select a position sheltered from the direct effects of the environment and from physical damage.
x
Do not mount the unit within 1m (3ft) of engines, starter motors and cables, and other cables
carrying heavy currents, etc., or 3m (10ft) of Radar or SSB installation cables.
mounting procedure
x
Undo the two screws at the corner of the unit, and open fully.
x
The hinges are designed to come apart. This enables the electronics to be split from the base of
the unit; i.e. the connection and terminal blocks.
x
Disconnect the cables between the two halves of the casing.
x
Firmly push the two halves of the computer unit apart.
x
Using the base of the unit as a template, mark the positions of the three mounting screw holes.
x
Using the self-tapping screws provided secure the base of the unit in position.
x
Push the two halves of the unit together again and reconnect the cables.
Page 30
Page 32

h1000 pilot
description/installation
acp unit installation
cable and connection information
emc compliance
B&G equipment is designed to be operated in leisure craft. Every care has been taken in its design and
testing to ensure compliance with the European EMC Directive, provided it is installed and operated in
accordance with the instructions as supplied, and the units and cables used are unmodified. Specific
attention is drawn to the requirements to maintain cable separation, where stated.
Transmissions from poorly installed or maintained Single Sideband equipment may adversely affect the
functioning of this equipment. On vessels fitted with SSB, it is essential that such equipment is
installed following good installation practice and as recommended by the manufacturer.
general wiring notes
x
Do not apply power to the pilot system until all units are connected and the wiring has been
checked.
x
Where spade connectors are supplied, always use the correct crimping tool to attach them to the
cable. This is extremely important where high currents are to be passed; i.e. rudder drive unit
supply cables.
x
Keep supply cables as short as possible to reduce the possibility of a voltage drop in the cables.
x
Always fit a fuse or circuit breaker in supply cables. It is recommended that heavy-duty power
cables are protected by a 25A MCB.
x
Clearly identify each cable to prevent incorrect connection.
x
Cables that have a screening braid must have the screen connected as shown on the connection
diagrams.
x
All Pilot cables should be routed at least 1m (3ft) from cables or components that carry or
generate high currents; e.g. alternators, starter motors, trim-tab cables, etc.
x
To minimise interference avoid routing Pilot cables alongside high power radio or radar cables.
x
To prevent damage to cabling always secure in position using cable clips or tie-wraps. Where
cables pass through bulkheads always protect the cable from chafing by fitting grommets.
x
Do not allow cables to rest in the bilges where prolonged immersion in water, fuel, etc. may
occur.
x
Always fit splash covers and lids on processors, computer units and junctions boxes, where
supplied.
Page 31
Page 33

description/installation
pilot drive unit cables
all rudder drives - heavy duty power cables
h1000 pilot
Total Cable Length B&G Cable
Copper Area Cable Gauge
Part No.
Up to 8m (26ft) 135-0A-128 4.0mm² 12 awg
Up to 12m (40ft) Not available 6.0mm² 10 awg
Up to 20m (65ft) Not available 10.0mm² 7 awg
linear drives - clutch/valve cables
Up to 9m (30ft) 135-0C-096 0.5mm² 22 awg
Up to 15m (50ft) 135-0B-096 0.5mm² 22 awg
acp unit terminal details
1A
-
+
DRIVE
SUPPLY
SUPPLY
IN OUT
-
DRIVE
+
BR
BL
SLV
R
BL
SLV
BL
R
SLV
C+
C-
D+
D-
SLV
CLUTCHMOBALARM
BLK
PADDLE
G
R
AD10 OUTPUT
SLV
R
W
BR
G
V
BL
Y
BLK
SLV
R
G
SLV
BL
R
JOYSTICK HANDHELD
R
BL
SLV
G
W
Y
BR
R
BLK
SLV
R
RUDDER
G
BL
SLV
wire colour coding and abbreviations
Wiring Colours
R Red V Violet
BLK Black Y Yellow
BL Blue O Orange
BR Brown W White
G Green SLV Silver (Not Used)
Page 32
Page 34

h1000 pilot
description/installation
clutch voltage selection
The h1000 pilot computer unit can output different clutch/solenoid voltages depending upon the size of
rudder drive unit fitted. The clutch/solenoid valve is only required for rams or rotary drive units. This is
achieved by setting dip-switches on the computer drive PCB. Access to the switches is obtained by
removing the four screws holding the computer PCB into the lid of the computer unit and then carefully
lifting the PCB clear.
Set the switches as per the table below. The default setting is 9V, switch 4 ON, which is suitable for Size
0, 1, and 2 12V rams.
Dip Switch Clutch Voltage Drive Size / Type
1 24V 24V Rotary
2 18V Size 2 and 3, 24V Rams
3 12V 12V Rotary
4 9V Size 0, 1 or 2 12V Rams
Page 33
Page 35

description/installation
acp dip switch location
h1000 pilot
Note:
When reassembling the computer unit ensure that the connector in the top left-hand corner
of the PCB engages correctly.
Page 34
Page 36

h1000 pilot
description/installation
h1000 and alarm connections
Red (+12v)
Blue (0v)
-
DRIVE
SUPPLY
-
+
DRIVE
SUPPLY
IN OUT
+
BR
BL
SLV
R
BL
SLV
BL
R
SLV
C+
CD+
D-
SLV
h1000
1A
R
BL
SLV
-
R
BLK
G
W
BL
ALARM
Y
SLV
BLK
G
R
SLV
R
W
BR
G
V
BL
Y
BLK
SLV
R
G
SLV
BL
R
BL
SLV
G
W
BR
BLK
SLV
G
BL
SLV
R
Y
R
R
h1000
ON OFF
-10 +10
MODE
-
Blue
Red
+
Alarm Unit
130-PK-10
Page 35
Page 37

description/installation
hand-held, mob and joystick
BR
BL
CLUTCHMOBALARMAD10
SLV
R
BL
SLV
BL
R
-
+
DRIVE
SUPPLY
IN OUT
-
+
DRIVE
SUPPLY
SLV
C+
D+
SLV
C-
PADDLEGYRO-STABILISED COMPASS
D-
1A
SLV
BLK
SLV
BLK
SLV
h1000 pilot
BR
BL
BLK
SLV
SLV
BL
R
W
G
V
Y
R
G
R
R
BL
SLV
G
W
Y
BR
R
BLK
SLV
R
RUDDER
G
BL
JOYSTICK HANDHELD
SLV
R
BL
R
G
W
BL
Y
G
R
Man Overboard
Button (MOB)
302-00-007
Handheld Controller
PLHH-ACP
Joystick and Button
545-00-060
Page 36
Page 38

h1000 pilot
description/installation
hydraulic ram drive connections
Heavy Duty
Power Supply
Black
-
Red
+
Circuit Breaker
DRIVE
SUPPLY
IN OUT
-+
DRIVE
SUPPLY
-
BR
+-
SLV
BL
1A
CLUTCH
R
RUDDER
G
BL
SLV
Rudder Reference Unit
RRF-ACP
Red
Black
Solenoid
Connector
Hydraulic Ram Drive:
RAM-T0-12V
RAM-T1-12V
RAM-T2-12V
RAM-T2-24V
RAM-T3-24V
Page 37
Page 39

description/installation
h1000 pilot
ram solenoid wiring details
the following information applies to the size 0, 1, 2 and 3 blue rams only.
1. Remove the solenoid wiring connector by unscrewing the centre screw.
2. Remove the screw from the connector housing.
3. Remove the rubber gasket.
4. Use a small screwdriver through the screw hole to carefully push against the connector block. This
will push the front of the connector block out ready for wiring.
5. Run the cable through the cable entry in the cover and then connect as follows:
Pin 1: Blue Wire
Pin 2: Brown Wire
6. The cable screen must be cut back and sleeved.
Refit the two halves of the connector together, tighten the plastic cable clamp nut, replace the rubber
seal and fit the connector onto the solenoid using the centre screw to fully secure it.
Page 38
Page 40

h1000 pilot
A
A
A
A
A
description/installation
hydraulic pump connections
Heavy Duty
Power Supply
Black
-
DRIVE
SUPPLY
IN
-+-+
DRIVE
SUPPLY
OUT
-
SLV
SLV
SLV
SLV
BR
BL
R
BL
BL
R
C+
C-
D+
D-
R
UT
BL
C
H
SLV
R
M
O
BLK
G
L
W
BL
R
Y
SLV
BLK
P
D1
G
D
R
DL
SLV
E
BR
BLK
SLV
SLV
R
W
G
V
BL
Y
R
G
BL
R
R
BL
SLV
H
G
N
W
D
H
Y
BR
R
BLK
SLV
JO
R
YS
R
TI
G
U
C
BL
D
D
SLV
1A
CL
Rudder Reference Unit
RRF-ACP
Red
+
Circuit Breaker
Hydraulic Pump
RAM-T1-12V
RAM-T2-12V
RAM-T3-24V
Page 39
Page 41

description/installation
h1000 pilot
continuous drive unit connections
These are general wiring instructions only, showing the implem entation of the ACP outputs to drive the
continuous drive pump solenoid valves. The continuous drive pump motor will also require a heavyduty supply, which is not provided. However, suitable units can be obtained from your dealer. Clutch
output is used to control the motor supply.
Note
: The ram solenoid must be designed to operate at the same voltage as the pump.
DRIVE
SUPPLY
IN
-
+
DRIVE
SUPPLY
OUT
-
1A
BLK
SLV
SLV
R
W
BR
G
V
BL
Y
R
G
BL
R
CLUTCHMOBALARMAD10
PADDLEGYRO-STABILISED COMPASS
SLV
BLK
SLV
BLK
SLV
R
BL
R
G
W
BL
Y
G
R
BR
+
SLV
SLV
SLV
SLV
BL
R
BL
BL
R
C+
C-
D+
D-
R
BL
SLV
G
W
Y
BR
R
BLK
SLV
R
RUDDER
G
JOYSTICK HANDHELD
BL
SLV
Rudder Reference Unit
RRF-ACP
Heavy Duty
Power Supply
Red
+
Black
Red
Circuit Breaker
Black
-
Continuous Drive Pump
Solenoid Valves
Page 40
PORT
STBD
RELAY
Circuit Breaker
RAM
SOLENOID(S)
Heavy Duty
Power Supply
Red
+
Black
-
Page 42

h1000 pilot
-
+
DRIVE
SUPPLY
IN OUT
-
+
DRIVE
SUPPLY
description/installation
direct paddle input connection
1A
BR
BL
SLV
R
BL
SLV
BL
R
SLV
C+
C-
D+
D-
SLV
CLUTCHMOBALARMAD10
PADDLEGYRO-STABILISED COMPASS
R
BL
SLV
R
BLK
G
W
BL
Y
SLV
BLK
G
R
SLV
R
W
BR
G
V
BL
Y
BLK
SLV
R
G
SLV
BL
R
RUDDER
JOYSTICK HANDHELD
R
BL
SLV
G
W
Y
BR
R
BLK
SLV
R
G
BL
SLV
Please consult your dealer for
the specific speed sensor and
housing suitable for your vessel
Cut back unused wires
Page 41
Page 43

description/installation
h1000 pilot
linear feedback connection
When the linear feedback unit is used, connect the linear feedback unit to the h1000 pilot terminals
using the diagram and reference table below.
Heavy Duty
Power Supply
Black
-
Red
+
Circuit Breaker
DRIVE
SUPPLY
IN OU T
-+
Black
DRIVE
SUPPLY
-
Red
+-
Solenoid
Connector
SLV
SLV
SLV
SLV
1A
BR
BL
R
BL
BL
R
C+
C-
D+
D-
R
BL
CLUTCHMOBALARMAD10
SLV
R
BLK
G
W
BL
Y
SLV
BLK
PADDLEGYRO-STABILISED COMPASS
G
R
SLV
BLK
SLV
SLV
R
W
BR
G
V
BL
Y
R
G
BL
R
R
BL
SLV
G
W
Y
BR
R
BLK
SLV
R
RUDDER
Y
JOYSTICK HANDHELD
BL
SLV
Linear Rudder Reference Unit
SEN-RUD-LFB
Hydraulic Ram Drive
RAM-T1-12V, RAM-T 2-12V, RAM-T2-24V , RAM-T3-24V
h1000 Processor Colours Function Linear Feedback Colours
Red +5V Supply Red
Blue 0V Supply Black
Green Signal (Wiper) Yellow
Page 42
Page 44

h1000 pilot
description/installation
non-B&G paddle connection
Any non-B&G speed sensor used with this system must have a speed signal output from a hall- effect
device giving positive pulses of 12V maximum.
1. Locate the cable from the speed sensor to the instrument input.
2. Cut cable (if necessary) and insert a junction box (B&G part no. 288-00-001). Connect like colour
to like colour.
3. Use a length of 2-core screened cable (B&G part no. 135-0B-098 9m/30ft) to connect the speed
signal and ground of the paddle sensor to the speed input of the ACP computer unit.
4. Calibrate the speed input in accordance with the instructions given in the Speed Calibration
section of the h1000 System User manual.
Non B&G Display
Non B&G
Paddle Unit
ACP Boat Speed
Terminals
Green Speed signal input Red wire
Red Not used Not used
Black Ground Blue wire
Silver Screen Screen
Function Cable
135-0B-098
Page 43
Page 45

description/installation
furuno ad10 heading connection
h1000 pilot
1A
-
+
DRIVE
SUPPLY
IN OUT
-
+
DRIVE
SUPPLY
C+
C-
D+
D-
SLV
AD10
Cut back unused wires
Furuno AD10
Output Cable
Furuno AD10 Compatible Display
Page 44
Page 46

h1000 pilot
description/installation
INTENTIONALLY LEFT BLANK
Page 45
Page 47

description/installation
hand-held controller
h1000 pilot
description
The hand-held remote controller is a weatherproof unit that has six function b uttons and a status LED
to indicate the operating mode of the autopilot. The unit provides palm-of-the-hand control of the pilot.
The cable has a 10m (30ft) straight section, plus a coiled length that extends from 1m to 3m.
siting the hand-held unit
x
At a convenient position within easy reach by the crew.
x
Ensure at all times the hand-held remote controller's cable cannot become snagged on any
moving parts; e.g. throttle controls.
mounting procedure
x
Heavy-duty self-adhesive Velcro® strip is supplied with the unit.
x
Clean and de-grease the site, stick the Velcro® firmly in place.
Page 46
Page 48

h1000 pilot
optional devices
man overboard button (mob)
description
The man overboard (MOB) button is a large, red, weatherproof press-switch supplied with 15m (45ft) of
two-core screened cable. Operation of this button will start the MOB sequence of operations, if fitt ed,
an audible alarm will sound when the button is pressed.
siting the man overboard alarm button
•
Select a suitable bulkhead, easily accessible to all crew in an emergency.
mounting procedure
•
With a 32mm (1¼") hole-cutter, cut a clearance hole for the button body.
•
Remove the nut and washer, then carefully feed the cable through the hole ensuring that the
sealing gasket is in place to prevent moisture ingress.
•
From behind the bulkhead, feed the washer and nut over the cabl e and tighten the nut onto the
switch body.
Page 47
Page 49

optional devices
acp joystick
h1000 pilot
description
The joystick allows direct control of the rudder vi a the autopilot control electronics. The unit is deckmountable, allowing it to be used both above a nd below decks. A 10m (30ft) 3-core screened cabl e is
used to connect the unit directly into the h1000 ACP unit.
Joystick steering is engaged and disengaged with the separate red button, whic h should b e moun ted in
the same manner as the MOB button, at a location close to the position selected for mounting the
joystick. The lever can only be moved to port or to starboard.
siting the joystick unit
•
At a convenient position within easy reach of the helmsman.
mounting procedure
•
To ensure correct steering sense the unit is marked with two indents. The unit must be installed
with these forward.
•
The unit requires at least 65mm (2.5") clearance behind the selected mounting position.
•
Use a 40mm (1 9/16") hole cutter for the joystick body.
•
Ensure the gasket is fitted under the joystick body flange.
•
Secure in place with the self-tapping screws supplied.
•
Route the cable to the ACP unit. Connect as per instruction detailed in the relevant section of this
manual.
Page 48
Page 50

h1000 pilot
calibration
h1000 pilot calibration
pilot installation checklist
Before the h1000 pilot can be used, it is necessary to set and calibrate various parameters. The
checklist below should be used prior to the calibration of the autopi lot. This will ensure that the entir e
system is correct before applying power.
drive unit and steering system
1. Drive unit securely fixed to a rigid part of the boat structure... ...................................................
2. Gauge of power cable is appropriate .............................................................................................
linear hydraulic rams
1. Boat end stops must limit the rudder movement, not the stroke of the hydraulic ram or RRU
2. Split pin that holds the pivot pin in the mounting foot is secure..................................................
3. Absence of oil leaks........................................................................................................................
4. Correct diameter bolt in universal ball joint, correct size hole in tiller.......................................
5. Ram free to move side to side & up and down..............................................................................
U
U
U
U
U
U
U
size 3 ram installation check list
1. The base foot of the ram and pump have been firmly bolted into position..................................
2. The reservoir has been fixed to a bulkhead above the ram and pump........................................
3. The sealed reservoir transit cap has been replaced by the breather cap supplied....................U
4. The reservoir has been switched to the ON position ....................................................................
6. Additional reservoir fitted (Size 3 only) ..........................................................................................
7. Reservoir at highest point (Size 3 only)..........................................................................................
Tap “ON” position is in line with the pipe.
The piston rod can now be extended or retracted and the pump run.
U
U
U
U
U
hydraulic pumps
1. Absence of oil leaks........................................................................................................................
2. Absence of air in the hydraulic steering........................................................................................
U
U
rotary drives
1. No backlash or excessive slackness in chain ...............................................................................
U
Page 49
Page 51

calibration
h1000 pilot
h1000 pilot calibration
rudder reference unit installation
1. Base securely fixed to boat structure............................................................................................
2. Arm securely fixed to boss.............................................................................................................
3. Ball joint securely fixed to arm......................................................................................................U
4. Linkage has not been over extended .............................................................................................
5. No slack or backlash in the linkage...............................................................................................
6. Linkage does not foul when rudder moved hardover to hardover...............................................
7. Arm moves through at least 90
at least 1V difference between the end stops) .............................................................................
8. Ball-joint securely fixed to quadrant/tiller ....................................................................................
0
when rudder moved hardover to hardover (there must be
linear feedback unit installation
1. Ensure that the linear feedback unit is attached correctly to the linear actuator
using the bracket kit supplied........................................................................................................
2. Ensure that the ram stroke does not exceed the stroke of the linear feedback unit..................
U
U
U
U
U
U
U
U
U
compass installation
1. Clear of sources of magnetic interference, including power cables to other equipment.
If in doubt, check 1m around with a small hand compass. Look on the other side of the
bulkhead! ........................................................................................................................................
2. Fitted as near to centre of motion of boat as other factors allow, aft of centre preferred
because usually less motion than fore of centre..........................................................................U
U
electronics installation
1. Cables secure..................................................................................................................................
2. Cables undamaged .........................................................................................................................
3. No loose bits of wire.......................................................................................................................
4. Screens connected in accordance with wiring instructions and sleeved where appropriate ....
U
U
U
U
Page 50
Page 52

h1000 pilot
g
g
g
g
calibration
speed calibration
Speed calibration sets the units of measurement, damping and speed calibration factor
units
Boat speed values can be shown in knots, kph or mph. To change the units, highlight Unit and press
ENTER. Using the UP/DOWN keys, highlight the desired choice and press ENTER to memorise.
damping
Boat speed damping allows you to slow down the response of speed readings in rou
by adjustin
damping, set th e v a l ue to 9.
adjustment
Speed adjustment calibration is necessary to compensate for hull shape and paddlewheel location on
your boat. For accurate speed and log readings, it is essential that the paddlewheel is calibrated.
adjustment - auto
This procedure will automatically calibrate the boat speed and lo
method for most boats. This procedure requires the boat to make consecutive runs, under power at a
constant speed, over a known distance.
Select two markers that are easily identifiable on the
flow is at a minimum. Measure and record the distance between the markers on the chart.
It is recommended that three runs are carried out, this accounts for tidal efforts, and improves accuracy.
However, a t ime shou ld se lect ed when th e curre nt is a t a min imum , i.e . sl a ck w ater betwe en t ide s.
1) From the
then press the ENTER key to confirm.
2) If necessary, adju st the Run Length to correspond with your measured distance an d then highlight OK,
and press ENTER to accept.
the damping value from 0 to 9. For minimum damping, set the value to 0, for maximum
readings ,and is the recommended
round and on a chart, and where the effects of tidal
Speed Calibration Menu
, highlight Adjustment , choose auto from the drop-down box, and
her conditions
3) The display will now show
speed, press ENTER when the boat is in line with the start of your measured distance. The display will
now change to show Run 1 with end highlighted.
4) When the boat is in line with the second marker of your measured distance, press the ENTER key to
temporarily halt the calibr ation.
5) Maintaining your constant boat speed, turn the boat through 180qin preparation for your second run
along the measured distance. When the boat is in line with the second marker, press the
resume the calibration procedure. The display will now show
6) When the boat is in line with the first marker, press the ENTER key. This will temporarily halt the
calibration procedure.
7) Repeat the procedure detailed above for
8) Upon completion of Run 3, highlight accept all and press ENTER. The system will now automatically
calculate the new boat speed and update the r ead ings according ly.
Run 1
and start will be highlighted. Maintaining the boat at your constant
Run 2
and start will now be shown on the screen.
ENTER
RUN 2
and end will be h ighlighted.
Run 3
.
key to
Page 51
Page 53

calibration
g
g
g
g
speed calibration
adjustment – ref
h1000 pilot
Reference speed adjustment, allows for quick and easy calibration of your boat speed readin
known calibrated source; for example, speed over the
a calibrated log.
1) From the Speed Calibration Menu, highlight Adjustment , select ref from the drop-down box and
press ENTER to select. The display will now show the Reference Speed page.
2) If speed over the
automatically detect this and display this value on the scr een with the message
accept this value, simply highlight OK and press the ENTER key.
3) If speed over the ground is not available, simply hi
UP/DOWN and ENTER keys, adjust the value to the known reference boat speed.
4) Next, highlight OK and press ENTER to complete the operation.
round data is available on the system from a GPS, the h1000 will
round from a GPS or alongside another boat with
hlight the speed value and, using the
s against a
from SOG
. To
sea temperature units
Sea temperature information can be shown in qc or qf. To change the units, highlight Sea temp and
press ENTER. Using the UP/DOWN keys, highlight the desired choice, and press the ENTER key to
memorise.
Page 52
Page 54

h1000 pilot
Secu
y
O
calibration
calibrating the pilot
Calibration
With the system ON, press ENTER and select
calibration
calibration menu
Calibration
Speed
Depth
Wind
Compass
Pilot dockside
Pilot sea trial
rit
K
The procedures for calibration can be divided into two
sections. The first is carried out at the dockside
(Dockside Calibration) and the second is carried out
or checked during the course o f a sea trial (Sea Trial
Calibration).
pilot calibration parameters
The following is a list of the pilot calibration parameters that must be set for successful pilot
operation.
Boat type Select boat type: sail, power planing, power displacement
Rudder stop port Set port rudder stop position
Rudder stop stbd Set starboard rudder stop position
Drive type Select drive type connected to pilot
Hardover time Measures the hardover port to hardover starboard time
Waterline length Set the waterline length of the boat
Dip angle Set the magnetic dip angle
Joystick control Set the joystick steering mode: normal, proportional
Rudder amidships Set the rudder amidships position
Boat lag Set the boat lag value
Rudder gain Set the rudder gain value
dockside calibration
The following parameters must be set prior to a pilot
sea trial. The procedures to do this are described in
this section of the manual:
x
Boat type
x
Rudder stop port
x
Rudder stop stbd
x
Drive type
x
Hardover time
x
Waterline length
x
Joystick control
Page 53
Page 55

calibration
dockside calibration
Dockside
Boat type
Rudder stop port
Rudder stop stbd
À
h1000 pilot
selecting the boat type
There are three selections available:
x sail:
x power disp.:
x power planing:
setting the rudder end stops
Before the h1000 pilot can be used, it must know the
position of the rudder end stops.
for all sail boats.
for power boats with displacement
hulls.
for power boats with planing
hulls.
Dockside
Boat type
Rudder stop port
Rudder stop stbd
À
Dockside
Boat type
Rudder stop port
Rudder stop stbd
À
Dockside
Rudder drive type
Rudder hardover time
Boat waterline length
Magnetic dip angle
Joystick control OK
setting the port rudder stop
Move the rudder to the hard over port position. Press
ENTER
the
position.
key and select
set
to store the port
setting the starboard rudder stop
Move the rudder to the hardover starboard position.
Press the ENTER key and select set to store the
starboard position.
selecting the rudder drive type
Depending upon the type of rudder drive unit fitted,
the pilot controls the rudder drive motor in different
ways. This optimises the autopilot steering response.
There are four selections available:
normal
1.
drives, all sizes and voltages.
2. pedestal Pedestal drive motors fitted by some
steering gear manufacturers.
3. outdrive Outdrive drive units and continuous
drive units.
special
4.
Ram drives, hydraulic pumps, rotary
Proportional drive systems.
Page 54
Page 56

h1000 pilot
Dockside
Rudder drive type
Rudder hardover time
Boat waterline length
Magnetic dip angle
Joystick control OK
calibration
dockside calibrations
hardover time
To finish the rudder end stop calibration procedure
the autopilot must calculate the rudder hardover p ort
to hardover starboard time.
The following points must observed before carrying
out the procedure:
x If the boat is equipped with hydraulic power
assisted steering the engines must be running
when setting the rudder end stops and
measuring the hardover time.
x Move rudder to midships position.
Highlight the ‘START’ command.
x
Keep clear of the wheel.
x
x Press the ENTER key to start test.
The rudder hardover to hardover time can only be
calculated with the boat stationary.
If during the hardover timing, the rudder does not
Dockside
Rudder drive type
Rudder hardover time
Boat waterline length
Magnetic dip angle
Joystick control OK
move, check:
x
The boat speed is less than 3 knots.
x
The rudder reference unit must move through an
angle of at least 90
from hardover to hardover.
x
The output variation from the rudder reference
unit is greater than 1V from hardover port to
hardover starboard.
x
Refer to the installation section for the rudder
reference unit and check the installation.
x
The separate power supply to the ACP control
unit is switched on.
0
when the wheel is turned
waterline length
Boat waterline length must be entered into the
autopilot for it to steer accurately. This value can be
entered in metres or feet.
Page 55
Page 57

calibration
h1000 pilot
dockside calibration
magnetic dip angle (for boats faster than 20 knots only)
All magnetic compasses are effected by ‘Northerly turning errors’ in the Northern Hemisphere or
‘Southerly turning errors’ in the Southern Hemisphere, which increase with boat speed and magnetic
dip angle in higher latitudes. These can cause heading instability at boat speeds greater than 20 knots
when steering with an autopilot. By entering the dip value indicated on the compensation chart, the
autopilot will be able to correct for these errors and improve the heading stability. Use the minimum
value necessary to stabilise the heading.
magnetic dip angle compensation chart
joystick control
Dockside
Rudder drive type
Rudder hardover time
Boat waterline length
Magnetic dip angle
Joystick control OK
Page 56
The joystick is an optional device that allows direct control
of the rudder. There are two joystick operating modes
available to the helmsman:
Normal: the rudder moves in the direction of the joystick.
When the joystick returns to the central position the rudder
movement stops. The greater the movement of the joystick,
the faster the response of the rudder.
Proportional: the position of the rudder follows the
position of the joystick. When the joystick returns to the
central position the rudder returns to its initial position.
Note:
autopilot should not be used to steer the boat.
Until all parameters have been set or checked the
Page 58

h1000 pilot
calibration
seatrial calibration
The following parameters should be set and checked during the initial sea trial.
x
Compass Swing
x
Rudder Amidships
x
Boat Lag
x
Rudder Gain
The sea trial calibration should be carried out in open water on a calm day. The procedures for the
remainder of the calibration involve continual course and speed changes. It is very important to
maintain a constant lookout at all times. Use proper seamanship when clearing turns to ensure the
calibration is carried out safely.
The autopilot will be initially operating from the factory default values for boat lag and rudder gain.
During the sea trial the pilot learning algorithm will automatically set and adjust the value for rudder
gain. The values for boat lag and rudder gain will be checked and adjusted to finely tune the autopilot
steering performance when necessary. The d efault values are automatically set depending upon the
type of vessel selected under boat type.
Page 57
Page 59

calibration
g
g
g
g
g
g
g
g
h1000 pilot
compass calibration
The Compass Calibration Menu sets the heading offset, damping, and swing parameters for the
h1000 fluxgate compass.
compass offset
The compass off set electronic ally compensa tes for fixed errors (mi sali
sensor and the direction of the boat. These erro rs will occur since the compass can be mounted in
any orientation within the boat.
To accurately enter a compass offset, the boat’s actual headin
reference the h1000 flux
from a chart.
To enter the compass offset value, highlight Compass from the Compass Calibration Menu and
press
between +180q and -180q.
Example:
To facilitate this procedure,
immediately be seen.
compass damping
ENTER
x
x
x
. Adjust the value using the
Boat’s actual heading is 076
h1000 display shows 092
The compass offset entered should be -016
ate against a calibrated bowl compass, or follow a known transit referenced
q
q
live heading
UP/DOWN
is shown on the screen so that the effects of the offset can
and
q
ENTER
keys. The value entered should be
nment) between the fluxgate
must be known, for example:
Compass dampin
adjusting the damping value from 0 to 9. For minimum dampin
damping value if the readings are too unstable in rough weather.
compass swing
The swin
are unique to your boat. The swin
minimal wind and waves, and away from traffic, which may require the procedure to be aborted.
The swing proc edure requi res t he boa t to b e tur ned th rough a co mplet e 360q turn, at a speed of less
than 5 knots, at about 2qper second. The entire process should take about three minutes to
complete.
To swing the compass, highlight Swing and press ENTER. The Compass Swing page will now be
displayed with start highlighted. With the boat settled on its turn, press the ENTER key to start the
swing.
The display will now show two bargraphs. The first is the
the boat has been turned through 360q. The second is the
should not be allowed to fill completely.
After completion of the swing, the message
swing, the procedure can be aborted by selecting abort and pressing the ENTER key.
procedure allows the compass to learn the effects of any magnetic deviation errors that
allows you to slow down the response of compass readings in rougher weather by
, set the value to 0. Increase the
should be performed out in open water, on a calm day, with
passed
or
Progress
Turn rate
failed
bar, which will fill completely after
bar, which, for optimum results,
will be shown. At any sta
e during the
Page 58
Page 60

h1000 pilot
calibration
compass calibration
passed
Note:
shown under the
Swing title when a
successful compass
swing has been stored
is
Page 59
Page 61

calibration
h1000 pilot
seatrial calibration
Notes:
x
On the initial sea trial
x
Always maintain a proper lookout
x
If in doubt, disengage the autopilot with the red OFF key on any pilot display or hand-held
controller, and return to manual steering
DO NOT EXCEED 15 KNOTS
Page 60
Page 62

h1000 pilot
calibration
seatrial calibration
engaging the h1000 pilot
1. Steer the boat onto a suitable heading and allow time for the boat to settle on this course.
2. Select Compass Mode by repeatedly pressing the MODE key.
3. Press the ON key on any h1000 pilot display or hand-held controller.
4. The autopilot will now be steering the boat on the selected heading.
5. Alter course in multiple increments using the 10q and rotary knob buttons on any h1000 pilot
display or hand-held controller.
Press the red
OFF
key to disengage the autopilot and return to manual steering.
Boat Lag Incorrect
setting the rudder amidships position
Due to hull design and steering characteristics, the best
rudder amidships position can only be set when underway
at normal cruising speed. Adjust the amidships position as
follows:
1. Steer the boat into the wind and maintain a steady
course.
2. Boats with twin engines must have the engine revs
balanced.
3. Boats with trim tabs must have them in the normal
cruising position.
4. Select Rudder midships from the Sea Trial menu and
choose set from the drop down menu.
boat lag
Boat lag is the time taken for the boat to respond to
changes in helm. For example, heavy displacement hulls
require a larger value for boat lag.
Boat Lag Correct
1. Engage the autopilot as previously explained in Initial
Pilot Sea Trial.
2. At a reasonably slow cruising speed (do not exceed 15
knots) change course by 90
3. Observe the autopilot steering performance. The boat
should turn onto the new heading with minimal
overshoot (a slight overshoot is acceptable).
4. If the overshoot is consistently more than 5
course changes in both directions increase the boat
lag value in steps of 0.1 until the overshoot is
corrected.
5. It is easier to observe overshoot than undershoot,
hence if no overshoot is observed decrease the boat
lag in steps of 0.1 until a small overshoot is seen.
6. Use the smallest value of boat lag to stop overshoot.
in each direction.
for
Page 61
Page 63

calibration
h1000 pilot
seatrial calibration
setting the boat lag value
The autopilot must be disengaged to adjust the
boat lag value.
boat lag value table
Boat Type Default Value Typical Value
Sail Boats 0.30 0.3 to 1.0
Power Boats 0.50 0.3 to 1.0
automatic rudder gain
When the h1000 pilot is part of an integrated h1000 system, boat speed data is supplied via the
Speed/Depth Interface unit. This allows the autopilot to automatically ‘learn’ the correct value for
rudder gain by monitoring boat speed and rate of turn. The rate of turn will be approximately 7.5q per
second.
If there is no direct speed input or the speed is being set by the manual speed band selections, then the
rudder gain value must be entered manually. Refer to
Manual Rudder Gain
.
checking the automatic rudder gain learning
1. Steer the boat onto a suitable heading and allow time for the boat to settle on this course.
2. Select
3. Press the ON key on any h1000 pilot display or hand-held controller.
4. The autopilot will now steer the boat on the selected heading.
At a speed not exceeding 15 knots
5.
multiple presses of the 10q course change buttons on any h1000 pilot display or hand-held
controller. This enables the autopilot to learn the rudder gain value.
6. When the autopilot has learnt the rudder gain val ue, the rate of turn will be approximately 7.5q per
second. (To estimate the rate of turn the display is updated every 1 second, therefore the heading
display should jump in 7q to 8q steps.)
7. Press the red OFF key to disengage the autopilot and return to manual steering.
Compass M o d e
by repeatedly pressing the
, make at least six large course changes of at least 120q, by
MODE
key.
Page 62
Page 64

h1000 pilot
calibration
seatrial calibration
manual rudder gain
1. Steer the boat onto a suitable heading and allow time for the boat to settle on this course.
2. Select Compass Mode by repeatedly pressing the MODE key.
3. Press the ON key on any h1000 pilot display or hand-held controller.
4. The autopilot will now steer the boat on the selected heading.
5. At a speed not exceeding 15 knots
the 10q course change buttons on any h1000 pilot display or hand-held controller.
6. Observe and estimate the rate of turn. It should be approximately 7q to 8q per second. (To estimate
the rate of turn th e display is upd ated every 1 second, therefo re the headi ng display should j ump
in 7q to 8q steps).
7. Observe the performance of the pilot when changing course.
8. If the rudder gain value is too low, the autopilot will understeer, causing sluggish steering. If the
rudder gain value is too high, the autopilot will oversteer, causing erratic steering and excessive
rudder movements. In high-speed boats, this could cause a jerky response and dangerous rates
of turn.
9. Adjust th e rudder g ain value fo r best ste ering perf ormance. Use the minimum value neces sary to
maintain a good response to course changes and course keeping without excessive rudder
movement.
, make course changes of at least 120q, by multiple pres ses of
setting the rudder gain manually
The autopilot must be disengaged and
calibration
mode selected to adjust the rudder gain value.
Sea Trial
rudder gain value table
Boat Type Default Value Typical Values
Sail Boats 2.00 1.50 to 2.20
Power Boats 0.80 0.70 to 1.00
Note: the default value is selected by setting boat type and rudder drive type during calibration.
Page 63
Page 65

h1000 pilot
troubleshooting
troubleshooting
trouble shooting introduction
The pilot control unit is continually monitoring the h1000 pilot and h1000 system for correct operation.
If an error is detected the pilot display will show an overlaid error message, and the system alarm
buzzer will sound if connected. To silence the alarm press any of the keys on the pilot display or any
h1000 display.
uncalibrated
fault description: Rudder not calibrated or memory has been corrupted.
check list:
1. Has rudder ever been successfully calibrated?
x
Yes, go to 4.
x
No, go to 2.
2. Set rudder port and starboard positions. Move helm, does rudder indicator work?
x
Yes, go to 4.
x
No, go to 3.
3. Rudder indicator will not work until port and starboard positions have been entered. The
difference in the signal from the rudder reference unit at the port end stop and the starboard end
stop must be at least 1.0V. Check rudder reference installation and then repeat 2.
4. If rudder has previously been successfully calibrated then fault is due to memory corruption. This
may be due to memory backup battery failure, or severe interference; e.g. lightning.
5. Recalibrate pilot and contact the nearest B&G dealer for advice.
no rudder position
fault description: Signal from the rudder reference unit is outside the limits set during calibration.
check list:
1. Check installation of rudder reference unit for slack or loose fittings.
2. Check wiring and the signal from the rudder reference with a volt meter at the pilot computer
terminals. The voltage supply to the rudder reference should be 4.5 to 5.0V (between red-blue).
With someone moving the helm, the signal measured between (blue-green) should change
smoothly. If the signal is incorrect, suspect a faulty rudder reference unit. Note, the difference
between the signal voltages measured at the two end stops must be at least 1.0V.(e.g. blue –green
voltage minus red -green voltage must be greater than 1.0V).
3. Set pilot display to show digital rudder angle in degrees. Move helm to port and starboard end
stops, check that the indicated rudder angle is 40q (+
installation to determine and rectify the reason for the end stop position changing and then reenter the end stop calibration values.
4. Move helm slowly from end stop to end stop. Check that indicated rudder angle counts from 40
one side to 40q the other side without "missing" a count.
5. If the fault is always at the same rudder angle, suspect a faulty rudder reference unit.
6. If the fault is at different rudder angles suspect a fault in the wiring, the connections to the pilot
computer, or the pilot computer electronics.
2q). If not, check the rudder reference
q
Page 61
Page 66

troubleshooting
h1000 pilot
troubleshooting
no drive detected
fault description: The pilot attempted to move the rudder, but did not sense any change in rudder
position, or, when the pilot attempted to move the rudder, it moved in the wrong
direction.
check list
1. Is the heavy duty power supply circuit breaker for the autopilot drive switched on?
2. Check installation, look for any slack or loose fixings in the drive sys tem or the rudder reference
3. Move the helm, does the rudder indicator work, if not, check installation of rudder reference unit
RAM-T1-12V 12V, 15A
RAM-T1-12V 12V, 15A
RAM-T2-12V 12V, 25A
RAM-T2-24V 24V, 25A
RAM-T3-24V 24V, 25A
4. If the fault only occ urs intermittently or under heavy loads, use power steer mode to move rudder
:
as the helm is moved.
as detailed above.
x
Disconnect clutch from pilot electronics and test operation when connected directly to power
supply.
x
Check correct power is applied: 2A maximum
x
Check that the dip switches in the ACP computer unit are set correctly for the rudder drive
unit.
x
Check correct power is applied:
while restricting movement by holding wheel. Fault only occurri ng under these conditions could
be due to:
x
Excessive motor current.
x
Too much slack or backlash in drive or fixing to tiller, possibly due to air in hydraulic system.
no boat speed
fault description: The boat is stationary or moving very slowly (less than 1.5 knots) or the speed
sensor is not working.
check list
1. If boat speed for pilot comes from instrument system, check speed shown h1000 display or pilot
2. If boat speed connected directly to pilot, check connections.
3. Check boat speed sensor for correct operation.
:
display.
no heading data
fault description
ACP has stopped or become unreliable.
check list:
1. Check heading display on pilot display unit.
2. Check connections from compass sensor to the h1000 Fastnet
3. Check gyro sensor and wiring if compass data is from an external device.
4. Check NMEA heading data and wiring if compass data is from an external device.
Page 62
: Compass data from the h1000 compass NMEA (via Fastnet
2
.
2
) or gyro input into the
Page 67

h1000 pilot
troubleshooting
troubleshooting
no nmea information
fault description: The pilot has stopped receiving waypoint data from the position fixer.
check list:
1. Check cross track error display on pilot display or h1000 display.
2. Check connections to pilot system.
3. Check operation of position fixer. Has NMEA output been selected and enabled? Has autopilot
output been enabled? Does the position fixer have a fix? Refer to position fixer manual.
nmea data unstable
fault description
than 0.3Nm.
check list
1. Check cross track error on display for stability.
2. Check operation of position fixer, especially signal and noise levels. Refer to position fixer
:
manual.
: The value of cross track error data being received has suddenly changed by more
poor wind data
fault description: There is no valid wind data being received via the h1000 Fastnet2 databus, or the
wind speed is less than 1 knot.
check list:
1. Check wind functions on h1000 digital display or pilot display.
2. Check masthead unit connections to instrument system.
3. Check NMEA connections to NMEA interface if wind source comes from another instrument.
current trip limit
fault description: The voltage or current limit circuit for the drive motor or the clutch has tripped.
x
x
check list:
1. Check installation and wiring for short circuits.
2. Check current to clutch; maximum available 2A.
3. Check maximum current to drive motor is less than 25A.
12/24V drive motor: 25A
Clutch: 2A
no pilot detected
fault description: No regular messages being received by pilot display from pilot computer unit; i.e.
either the display is not receiving or the pilot computer is not transmitting.
check list:
1. If other displays show pilot data, check installation of pilot display or suspect faulty pilot display.
2. If no pilot data on any display, check installation of pilot computer or suspect faulty pilot
computer.
3. Check installation of h1000 Fastnet
2
cable.
Page 63
Page 68

troubleshooting
troubleshooting
pilot not steering a straight course
h1000 pilot
fault description
The pilot seems unable to steer straight, it continually overcorrects course errors; the wake has an "S"
like appearance as the boat first steers several degrees off-course to port followed by several degrees
off course to starboard.
check list:
1. Drive unit: check for any slack or backlash in the drive system.
2. Rudder reference: check for any slack or backlash in the assembly and associated linkages.
3. Boat speed: check that the boat speed input is operating correctly.
4. Settings: read the calibration section carefully and check that the settings are appropriate for
the type of boat.
5. Rudder gain: make large course changes using the pilot. If the gain value is correct the rate of
turn should be between 6q and 8q per second. Adjust if necessary.
6. Boat lag: a boat lag value, which is too small for the boat, can cause instability. Try increasing
the value.
7. Check location of compass sensor in vessel. Ensure that the sensor is not affected by the
proximity of cables carrying heavy currents, loudspeaker magnets or ferrous metals.
:
Page 64
 Loading...