

Page 1

GN70/MX610/MX612
11
QuickStart Guide
The front panel
2
1 3
MENU
PAGE
EN
10
8
POS NAV HDG AIS
4
5 6
MOB
ENT
ESC
7
USB
12
13
USB
9
No. Description
1 PAGE. Press to bring up dierent screen pages every time this key is pressed or to
change tab in the settings and tools menu.
2 MENU. Press to bring up the quick menu dialog box.
3 PWR/Light.
Short press - to turn ON the unit.
Momentary press brings up the backlight and night view controls.
Series of short presses will cycle through 6 levels of display brilliance.
Long Press - to turn power o.
4 Rotary knob. In menus; turn to select menu item and adjust value, press to conrm.
Rotate to scroll through the menu icons or numbers in the virtual keypad.
Press the center of the knob to select menu item or accept entry. Same entry action when
you press the ENT key.
5 CLR. In menus; press to return to previous menu level. Press to escape or back out of the
menu or data entry.
6 ENT. In menus; press to conrm menu selection/enter next menu level. The same action
as pressing the center of the rotary knob.
7 MOB. Press once to save position in a vacant waypoint, press and hold for Man-Over-
Board calculation.
8 POS. Press to display the present postion Lat/Long, SOG, COG, Time.
9 NAV . Press to display the navigation information (RNG, BRG, COG, SOG, XTE).
10 HDG. Press to display the compass rose heading.
11 AIS. Press to display the PLOT/AIS screen.
12 USB. Press to display the les contained in the USB (MX610/MX612 only).
13 USB connector (MX610/MX612 only).
Page 2
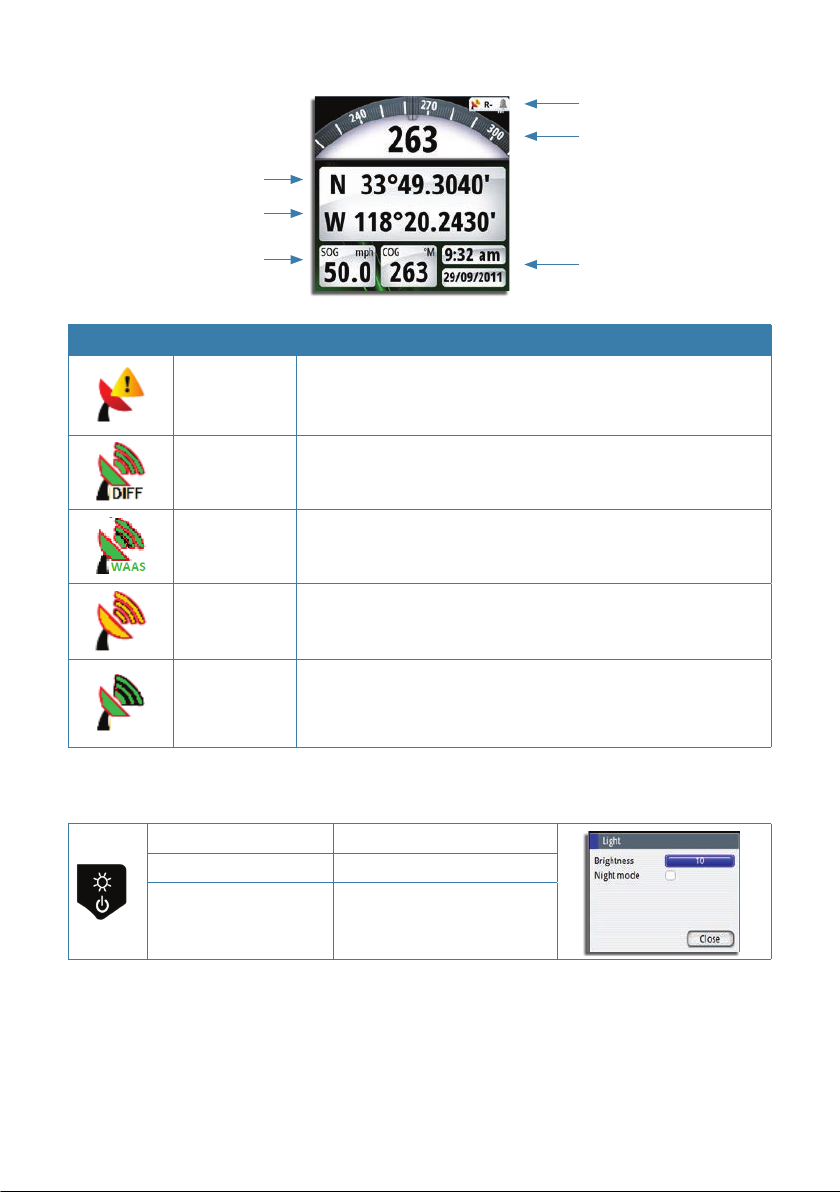
The display screen
Latitude
Longitude
Status icon
Heading repeater
Speed and Course
Icon Description Denition
No Position
x
DGPS Position
DGPS Position
Good GPS
position
Good GPS
position
Not tracking satellites (no position update). This is normal
the very 1st time you turn on the unit. It takes a few seconds
to get a x.
Position Fix is dierentially corrected using RTCM corrections
from beacon stations. This is the normal operating condition.
Position accuracy is less than 2 meters.
Position Fix is augmented using the WAAS signal correction.
Position accuracy is less than 5 meters.
GPS Position x is good but the RTCM correction signal is
temporarily not available. When DGPS mode menu is set to
either Beacon or WAAS.
Good GPS position x indication when unit is operated in
autonomous GPS only mode DGPS mode setting is OFF.
The power key
UTC/Local
Date/Time
• Press and hold: Turn unit on/o
• Single press: Display light dialog
• Repeated presses:
Toggle preset brightness
levels
¼ Note: If the key is held after the display is turned o, a Power failure alarm will be activated.
Press any other key on the unit to silence the alarm.
Page 3
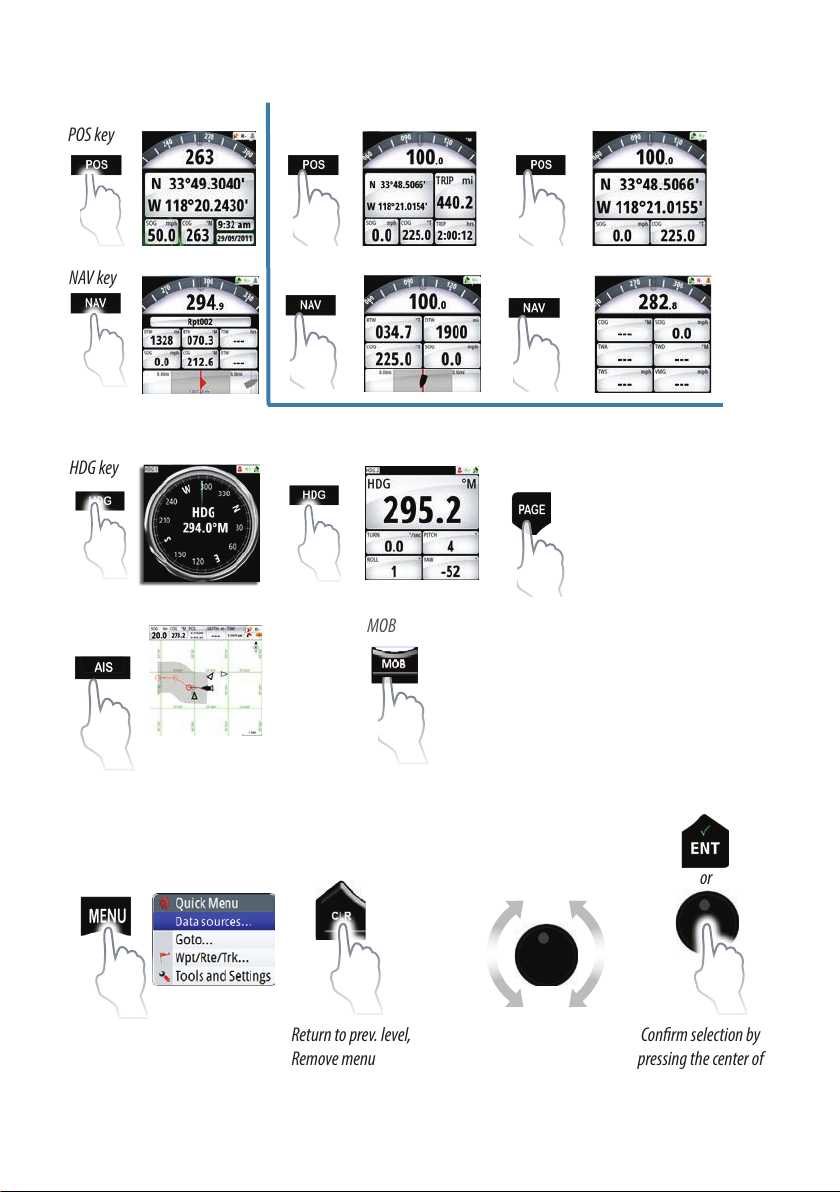
Hot keys
POS key
NAV key
GN70/MX61x screen MX610/MX612 only screens
HDG key
AIS/PLOT
Menus
Show Quick menu
MOB/Mark
Return to prev. level,
Remove menu
PAGE
1* Press to show the dierent
page screeens
2* Press to change tab under
the MENU screen.
1* Saves poition L/L to the nect vacant wapoint
2* Press and hold for 5 seconds, to calculate MOB
or
Select menu item,
Adjust value
Conrm selection by
pressing the center of
knob or ENT key
Page 4

Creating/Editing Waypoint
1. Press the MOB key momentarily, L/L of vessel will be saved in
the next vacant waypoint.
2. To edit or enter a new waypoint manually, press the MENU
key to bring up the quick menu.
3. Scroll to Wpt/Rte/Trk then press ENT. The waypoint list
screen will be shown.
4. Highlight the desired waypoint number (or New Waypoint)
then press ENT.
5. The “Edit Waypoint” dialog screen will appear showing the
WPT #, L/L of the vessel.
6. Turn the rotary knob to highlight the L/L eld, then press ENT.
7. Move the cursor by highlighting the right (or left) arrow on the
virtual keypad then press ENT several times to position the
cursor to the desired digit.
8. Turn the knob to the new number then press the ENT key.
9. Repeat the process to change other digits.
10. To nish entry, turn the knob to OK key and press ENT.
11. Turn the knob to highlight SAVE button and press the ENT key.
12. Press the ESC or any hot keys to exit.
¼ Note: Other waypoint parameters can also be changed like the way-point name/number, icon
symbol, icon color, alarm radius and depth.
Creating/Editing Route
1. To create (or edit) a route, press the MENU key to bring up the
quick menu.
2. Scroll to Wpt/Rte/Trk then press ENT.
3. Press the PAGE key to change the tab to ROUTES.
4. Turn the knob to highlight “New Ro...” (or desired Route number to edit) then press ENT
to bring up the “New Route” dialog screen.
5. The Route # eld will be highlighted. You may change the route number to a name if
desired by pressing the ENT key. The virtual alphanumeric keypad will become available.
Enter a new name or number then highlight the Enter key then press ENT.
6. Turn the knob to highlight the The “Select Waypoint” dialog box will show listing avail-
able waypoints or you can make a new waypoint.
7. Turn the knob to scroll to the desired waypoint number then press ENT to select it.
8. Repeat step 6 until all the route points are complete.
9. Press the ESC key.
10. Turn the knob to SAVE the route entry then press the ENT key.
11. Press the ESC or any hot keys to exit.
¼ Note: Other actions can be performed, like: Start - to start the route going forward (or
reverse), Delete- to delete entry or Cancel - to cancel without saving).
Page 5

Creating/Editing Tracks
1. To create (or edit) a track, press the MENU key to bring up the
quick menu.
2. Scroll to Wpt/Rte/Trk then press ENT.
3. Press the PAGE key several times to change the tab to TRACKS.
4. Turn the knob to highlight “New Track...” (or desired Track number to edit) then press ENT
to bring up the “Edit Track” dialog box..
5. The Track # eld will be highlighted. You may change the number with a name if you
wish or change other settings by turning the knob until the eld is highlighted and then
press the ENT key.
6. A track can be made into a route by highlighting the “Create Route” button and press ENT.
7. To delete a track, move the highlight to “Delete” button and press ENT.
GOTO
1. From any hot key screen, press the MENU key.
2. Scroll to “GOTO...”, then press ENT.
3. From here, you can Cancel navigation, Restart from here, Waypoint,
Route and coordinates.
4. Scroll to “Waypoint...” then press the ENT. The list of waypoint will be shown.
5. Scroll to the desired waypoint number, press ENT.
6. Press the NAV key to display the RNG, BTW and other navigation information.
Setting up the AIS (PLOT) screen
1. Press the AIS hot key.
2. Press the MENU key to bring up the Quick Menu.
3. Scroll to Display Options, press E NT.
4. A list of setups will be shown.
5. Place check mark on which feature you want to appear on the AIS/
PLOT screen.
6. To zoom in, turn the rotary knob clockwise. To zoom out, turn the
knob CCW.
PLOT with Range Rings
and AIS targets
PLOT with Route
Page 6

Alarms
Alarm Settings dia log screen
List of alarm messages
Alarm name Trigger Condition
No GPS Fix No position x available from the smart antenna
No dierential x No DGPS x. GPS x only
RAIM (R- or R?)
(Receiver Autonomous
Integrity Monitoring)
Shallow water Depth less than limit
Deep water Depth greater than limit
Anchor Vessel drifts away from the anchor radius
Low boat speed limit Boat speed below the limit
XTE (Cross Track Error) Vessel drifts out of the crosstrack zone
Waypoint radius Vessel enters the radius of the waypoint
Arrival Vessel arrives at waypoint
High voltage Input voltage above the limit
Low voltage Input voltage below the limit
Depth data missing No heading data from data source
Heading missing No heading data from data source
Dangerous vessel AIS target within the limit
AIS vessel lost AIS target is outside of limit
Vessel message Received an AIS message
The position solution exceeded 100 meter error (R-) or when
not enough satellites available (R?). RAIM safe condition is
indicated with R+.
¼ Note: There is no time-out on the alarm message or siren. These remain until you
acknowledge it by pressing the ENT key or the center of the rotary knob or until the reason for
the alarm is removed.
Page 7

Settings
Option Result
ACK Stops the siren and removes the alarm dialog. The
alarm icon will remain active, and the alarm will be
included in the alarm listing
Mute Mutes the siren locally. The alarm dialog remains on
the display
MMSI - sets the vessel’s own MMSI#. Required for AIS.
Icon lter - controls which vessels are shown on the
chart and radar.
Dangerous vessels - controls the CPA and TCPA limits
which triggers the dangerous vessel alarm.
Settings - shows the alarm dialog. Use to enable/
disable alarms and adjust levels.
Siren enabled - controls the internal buzzer and
external alarm output.
Enable RAIM - check (enabled), no check (disabled).
RAIM Alarm: On/O.
RAIM protection radius = 10/100 mtr.
Lat/Long Oset: oset value between center of ship to
antenna position.
DGPS Mode: Select dierential GPS mode.
WAAS PRN Number: Auto/Manual.
Method: Rhumbline or Great Circle calculation.
Arrival Radius: Arrival range limit [0.1 NM (default)]
XTE Limit: Cross-Track error limit [0.1 NM (default)]
Coordinate system: controls the format for
coordinates.
Datum: Controls the datum used for calculation of
coordinates [WGS84 (default)]
Magnetic Variation: can be set manually for current
location. When set to Auto, the local magnetic variation
is calculated.
Page 8

Sources - select the source or data.
Device list -
network.
Diagnostics- shows the status of N2K network.
SimNet Groups - controls the Simnet group for shared
settings.
Damping - controls the damping of heading, wind,
boat speed and depth.
Calibrate Water Speed - shows calibrating dialog box
for this vessel’s speed through water.
NMEA 2000 - newly created wpts can be send to and
receive from other N2K devices.
NMEA 2000 Over Ethernet - shows the IP address and
port settings for NMEA 0183 data over Ethernet (LAN).
Speed Log pulses - enable and congure speed log
pulses.
Text Size - controls the size of the text used for menus,
dialogs, etc.
Key beeps - controls the loudness of beeper when keys
are pressed.
Time - controls the time zone oset and format of date
and time.
Tracks - shows the track list screen.
Logging Type - controls when the tracks are recorded.
They can be xed, at time interval, xed distance
interval or at automatic rate.
shows all N2K devices connected in
Distance unit - Nautical Miles, Kilometers or Miles.
Distance small - when distance calculation is below
1 mile, it will change the unit either in feet, meters or
yards.
Speed - knots, kph or mph.
Wind speed - knots, kph, mph or m/s.
Depth - meters, feet or fathom.
Heading - magnetic or true.
*988-10369-001*
 Loading...