


USB PhotoReader
for CompactFlash &
SmartMedia Cards
STI-CFRDR/USB, STI-SMRDR/USB
USB CompactFlashTM Reader, USB SmartMediaTM Reader
User Manual
for Windows 98 & Apple Computers

Page 2
Preface
Thank you for purchasing Simple Technology products. The USB Series
card readers are designed to read and write CompactFlash and SmartMedia
cards when connected to IBM PC/AT-compatible computers equipped with
a USB port running Windows98 or later operating systems or Apple G3,
G4 and iMac computers. (Card compatibility will vary with the specific
card reader model.) To get the most from your card reader, carefully read
the instructions found in this manual before use.
Features:
♦ The card reader is equipped with a USB port (Universal Serial Bus),
the most advanced PC interface for peripherals.
♦ The card reader does not require any external power spply.
♦ The USB CompactFlash PhotoReader (Labeled Type I) is compatible
with Type I CompactFlash Cards.
♦ The USB CompactFlash PhotoReader (Labeled Type I & II) is compatible
with Type I & Type II CompactFlash Cards.
♦ The USB SmartMedia PhotoReader is compatible with SmartMedia
Cards
1. Changes may be made to this product or manual without notification.
2. This manual may not be copied in part, or in whole without express permission.
3. While Simple Technology aims to manufacture its readers to the highest standards, and make its readers compatible with the widest
variety of CompactFlash cards, and computer systems, some incompatibilities may arise. Depending on your system configuration,
USB compatibility may vary. Please look to our web site at http://www.simpletech.com.
MS-DOS and Microsoft Windows are trademarks of Microsoft Corporation.
IBM PC/AT is a trademark of IBM Corporation.
Apple, G3, G4 and iMac are trademarks of the Apple Computer Corporation.

Page 3
Table of Contents
Preface. .......................................................................................... 2
Safety Precautions........................................................................ 4
1. Compatible Systems & OS..................................................... 5
2. Installation Procedure. ........................................................... 5
2.1. Connecting to a Computer. .......................................... 6
2.2. Software Installation for Windows 98 ........................ 8
2.2.1. Installation for Type I CF Readers..................... 9
2.2.2. Installation for Type I/II CF Readers.............. 14
2.2.3. Installation for SM Readers .............................. 19
2.3. Uninstalling the Software in Windows 98 ............... 24
2.4. Software Installation for Apple . ............................... 26
3. Basic Operations. .................................................................. 27
Inserting the Card. ............................................................. 27
Removing the Card. ........................................................... 27
4.1. Using PhotoReader with Windows 98............................. 28
Copying Files. ..................................................................... 28
Formatting Cards. .............................................................. 28
4.2. Using PhotoReader with Apple . ...................................... 29
Copying Files. ..................................................................... 29
Formatting Cards. .............................................................. 29
5. Troubleshooting with Windows 98. ................................... 30
6. Specifications. ........................................................................ 31
7. Technical Support. ................................................................ 32

Page 4
Safety Precautions
Please read carefully
This manual is intended to inform you and any other persons who may use this device of possible
dangers and safety instructions, in order to help you maximize your enjoyment of this product, and
to protect you and your equipment from damage.
⋅ Although this manual should cover all possible situations, if you encounter a problem, or
have questions not addressed in the manual, please contact your dealer or our technical
support immediately.
⋅ Simple Technology cannot accept liability for accidents or damage caused through the improper use of
this product
Warning
⋅ Never remove the plastic case from this unit. Some components inside operate at high
voltages and can cause severe electrical shock, if touched.
⋅ Make sure that no liquid is spilled or leaks into this unit and that no metal or inflammable
objects fall inside since this can cause fire, shock, malfunctioning or accidents.
■ Proper Places for Use and Storage
⋅ Do not use or store the unit in an excessively hot or cold place.
⋅ Do not use or store the unit in a dusty place or in direct sunlight.
⋅ In order to prevent possible failures, do not use or store the unit in a place subject to
excessive vibration or in an unstable place.
⋅ Do not place the unit close to a system which generates strong magnetic fields (motor,
transformer, television, loudspeaker, magnet, etc.) to prevent malfunction.
⋅ Do not close vents that may cause internal temperature to rise.
⋅ Do not use in an enclosed (unventilated) area.
■ Precautions for Transportation
⋅ Disconnect cables and remove any PC cards before transporting the unit.
⋅ Use the cardboard box in which the unit was initially packed.
⋅ This is a precision device. Do not subject to excessive shock or vibration.
■ Maintenance of the Plastic Case
⋅ Do not use thinner, benzene, insecticide, or other volatile substances to clean the case, as
this may cause deterioration and delamination of the paint.
⋅ Clean the plastic case and front panel with a soft cloth. Remove severe dirt with a soft cloth
moistened with a small amount of neutral detergent diluted with water. Wipe dry after cleaning.
CompactFlash Cards
Due to the vagueness of some PCMCIA/JEIDA specifications, card products currently on the markets can differ in some aspects important for compatibility, while still conforming to the standard.
Some commercial cards may be incompatible with hardware or software drivers for the reader/
writer.

Page 5
The PhotoReader requires IBM PC/AT-compatible computers with USB
port running on Windows 98 or later opeating systems. The PhotoReader
is also compatible with Apple G3, G4 and iMac computers running 8.0 or
later operating systems.
1. Compatible Systems & OS
The card reader will not work with older Windows versions. There will be no upgrade
service available at Microsoft Corporation. ["If you have an older Windows version,
you must upgrade to a more recent version. Microsoft does not offer patches for older
Windows versions for compatibility with the card reader."]
Before connecting the card reader,
turn on your computer and start the operating system.
Install the device drivers
Installation is complete.
USB CompactFlash PhotoReader is ready to use.
Restart the computer.
Insert the CompactFlash or SmartMedia Card.
Windows
A "removable disk" drive letter will appear under
"My Computer". Generally, the last available drive
letter will be assigned to the USB PhotoReader.
Apple
The card will be displayed as an icon.
Connect the card reader to the computer
using the USB cable
Follow the guidelines below when installing your card reader.
2. Installation Procedure
Page 6
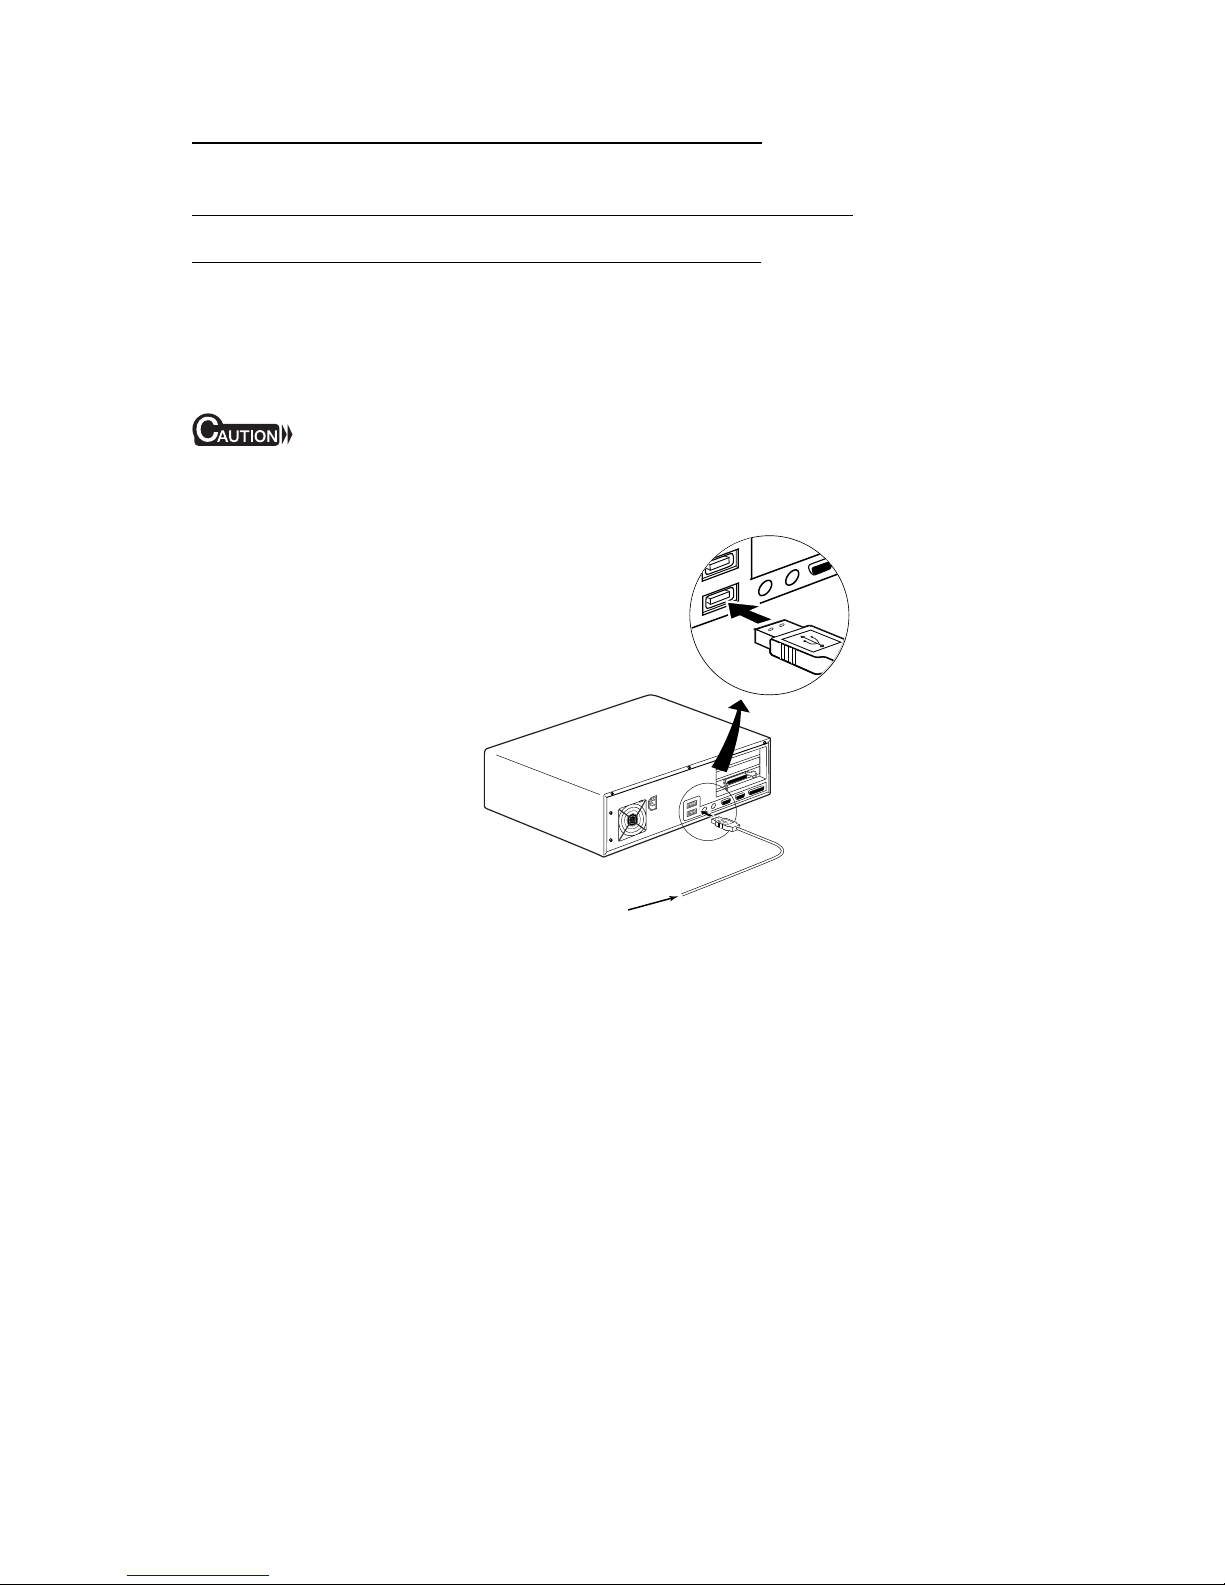
2A. Connecting to a Computer
Connect the USB PhotoReader to the computer
(using without other peripheral devices)
Connect the USB PhotoReader to the USB port located at the back of the
computer. Make sure the cable ends are firmly connected.
Be careful not to confuse the upper and lower parts of the connector. Do not force
connections, as this may damage the computer or the card reader.
Note: The USB cable from the USB PhotoReader may be plugged into the
computer while the computer is running.
Under Windows 98 operating system, as soon as the USB PhotoReader is
connected, you will see a window displaying the message New Hardware
Found. Proceed to next section for instructions on software installation.
Enlarged View
USB cable from the USB PhotoReader

Page 7
Connect the USB PhotoReader to the computer
through USB hub (using with other peripheral devices)
Connect a USB hub (purchased separately) to your computer's USB port.
Then connect the USB PhotoReader to a port on the USB hub. Make sure
the connections are secured firmly.
Note: The USB cable from the USB PhotoReader may be plugged into the
computer while the computer is running.
Under Windows 98 operating system, as soon as the USB PhotoReader is
connected, you will see a window displaying the message New Hardware
Found. Proceed to next section for instructions on software installation.
Enlarged View
Enlarged View
USB cable from the USB PhotoReader

Page 8
2.1. Software Installation for Windows 98
After you connect the USB PhotoReader to the computer as explained in
the previous chapter, insert the CD containing the software device drivers.
Check and make sure whether your CF USB PhotoReader is compatible
with "Type I CF Cards" or both "Type I & Type II CF Cards" (Check the
label on the device). Proceed to the following sections of the manual for
software installation instructions.
For USB CompactFlash PhotoReader compatible with Type I CompactFlash
Cards, proceed to chapter 2.1.1.
For USB CompactFlash PhotoReader compatible with Type I & Type II
CompactFlash Cards, proceed to chapter 2.1.2.
For USB SmartMedia PhotoReader compatible with SmartMedia Cards,
proceed to chapter 2.1.3.
Page 9
2.1.1. Software Installation for USB CF
PhotoReaders compatible with Type I CF Cards
under Windows 98
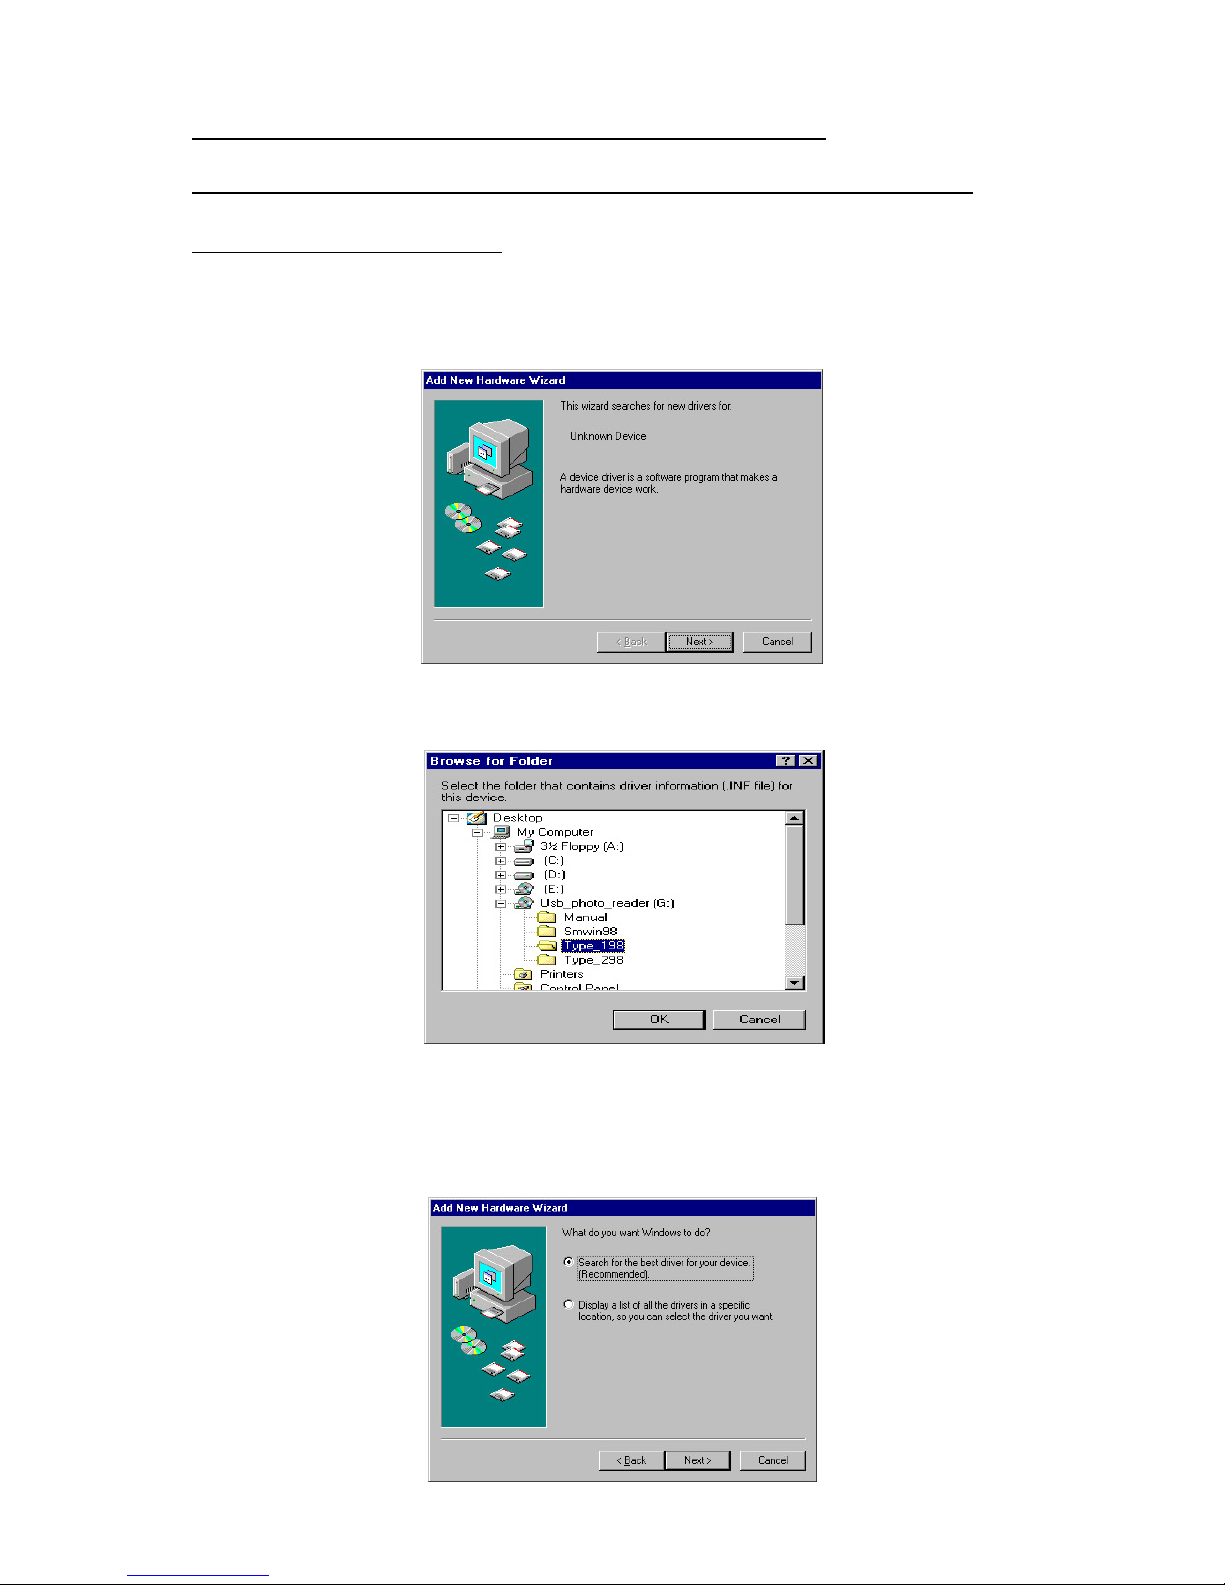
1. After you connect the USB PhotoReader to the computer as explained
in the previous chapter, the following window is displayed. Click Next
to continue.
2. The Add new hardware wizard searches for the new drivers and the
following screen is displayed. Click Next to continue.
3. The Add new hardware wizard displays the following screen. Use the
default recommended option. The windows will search for the best
driver for the device. Click Next to continue.
Page 10
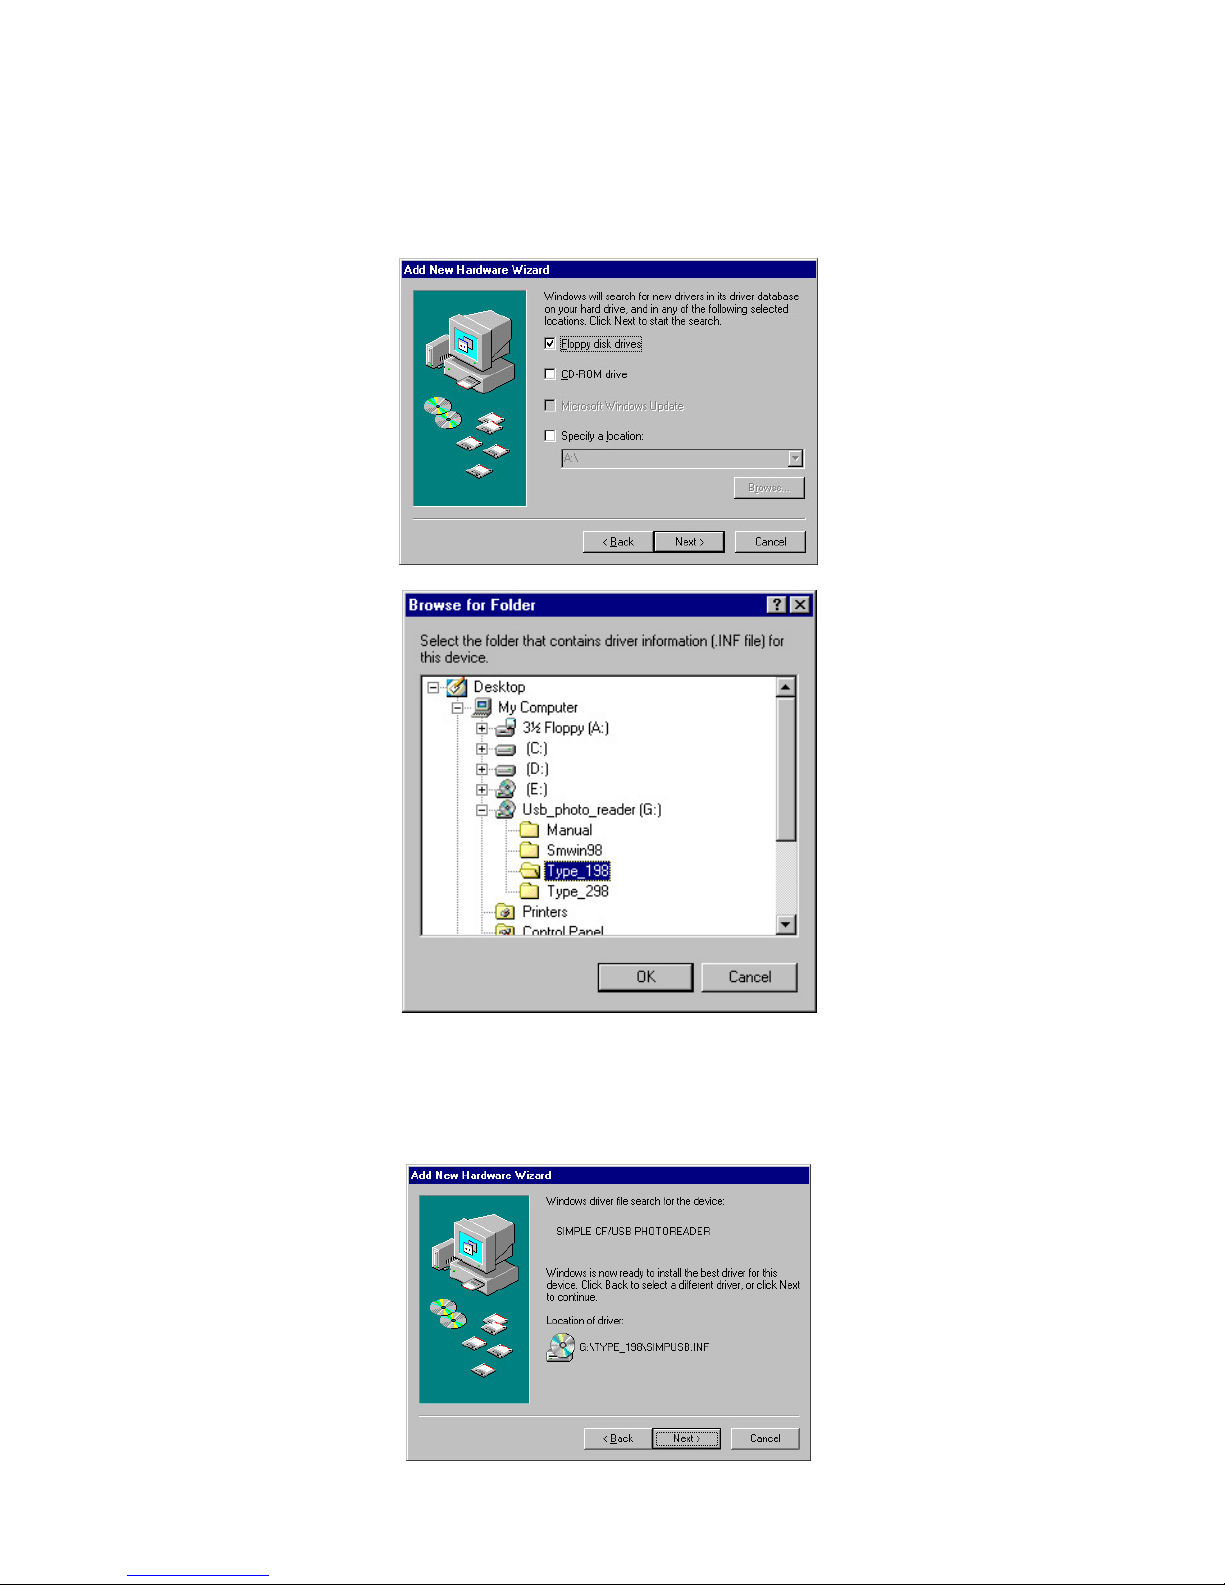
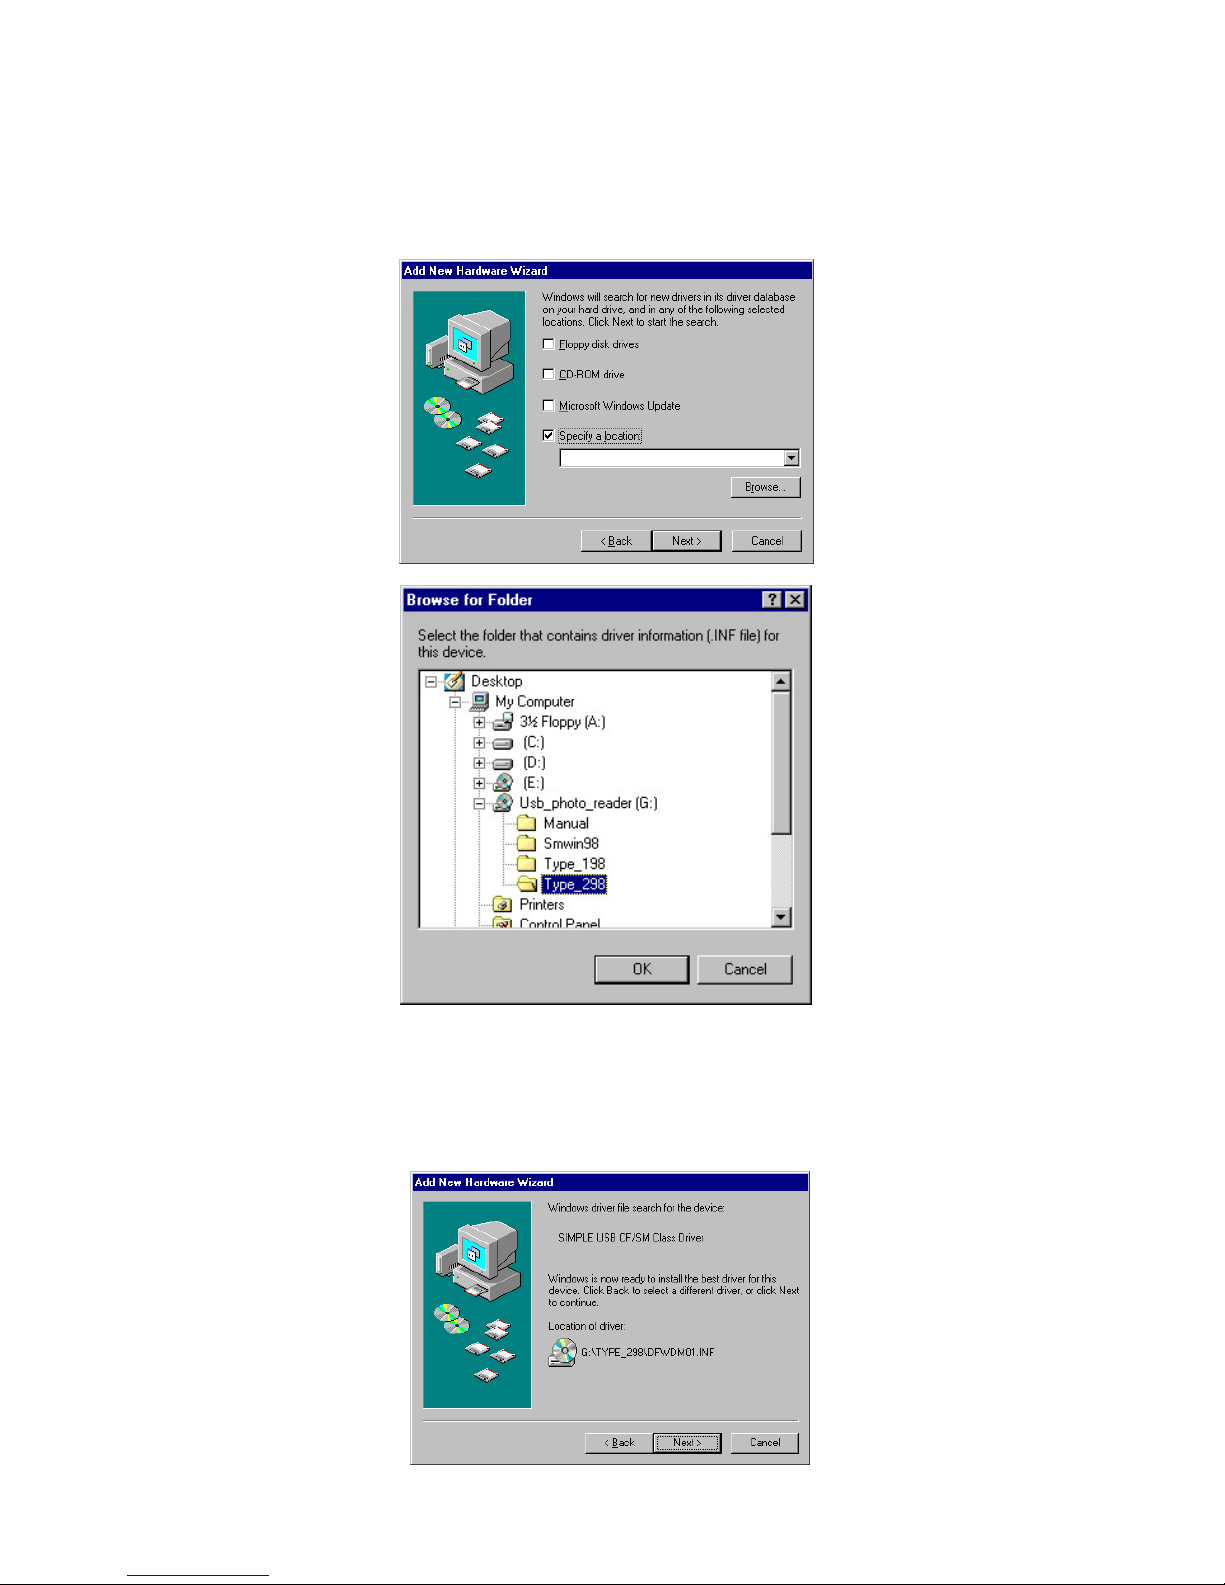
4. Windows will prompt you to insert the disk containing the device driver.
Insert the Software Installation CD-ROM in the CD-ROM drive and
click Next to continue. Check the Specify a location, click on the Browse
button, choose Type_I98 and click OK.
5. The Add new hardware wizard will find the device driver "SIMPLE
SM/CF USB PHOTOREADER" and the screen similar to the following
is displayed. Click Next to continue.

Page 11
7. Now, the Add new hardware wizard will display the following screen.
Click Next to continue.
8. The Add new hardware wizard displays the following screen. Use the
default recommended option. The windows will search for the best
driver for the device. Click Next to continue.
6. When the windows finishes installing the device driver, the following
window is displayed. Click Finish to continue.
Page 12
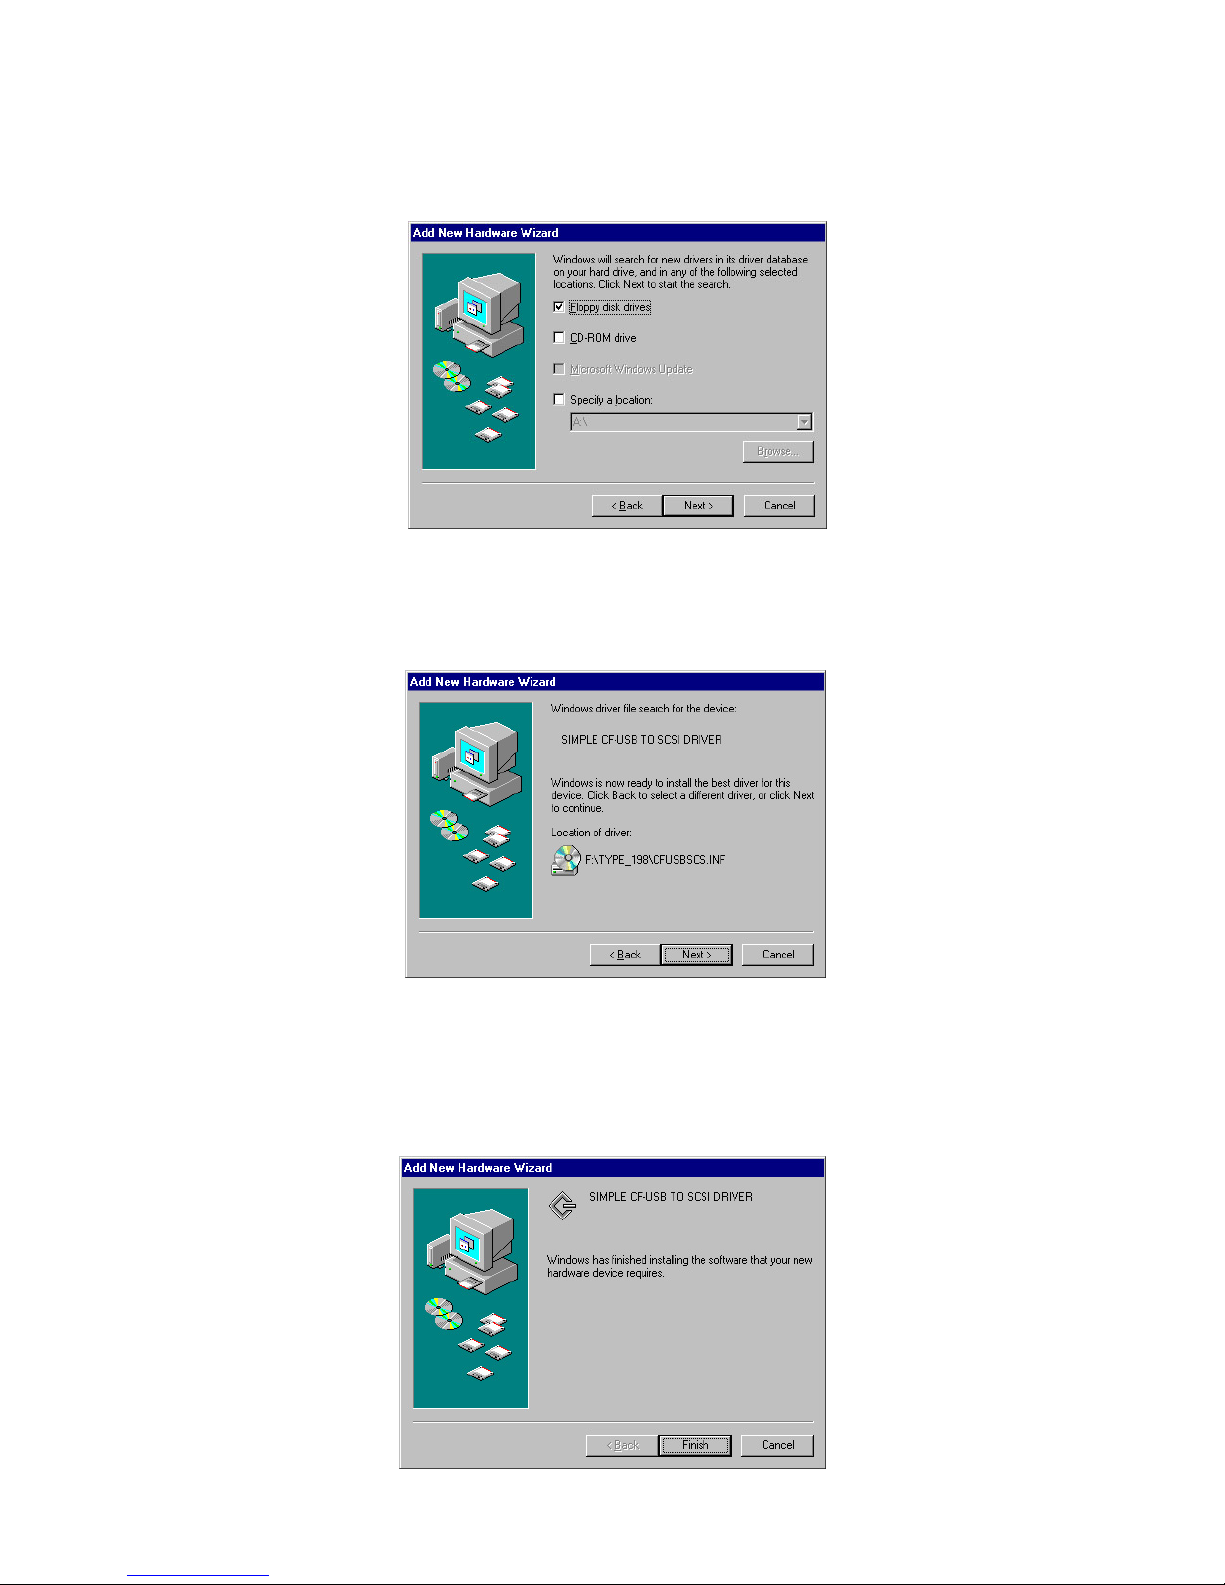
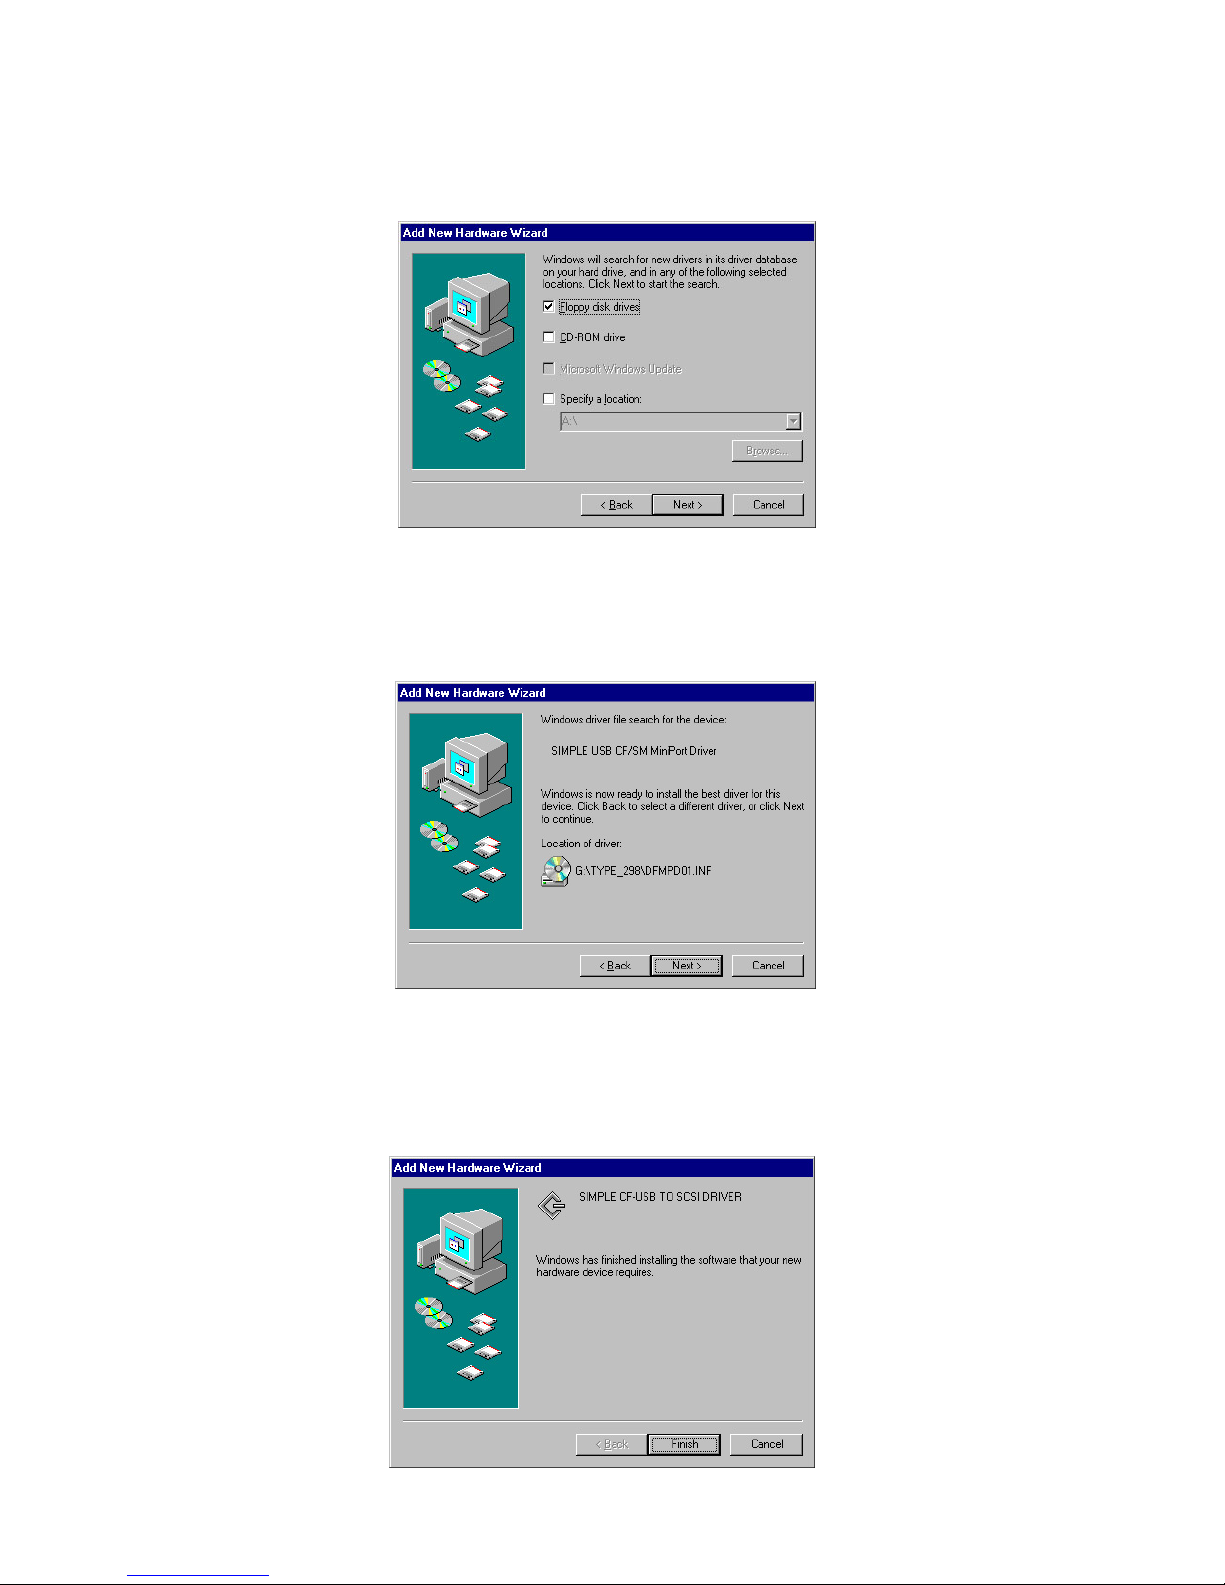
10. The Add new hardware wizard will find the device driver "SIMPLE
CF/SM-USB TO SCSI DRIVER" and the following screen is displayed.
Click Next to continue.
11. When the windows finishes installing the device driver, you will see
the following display. Click Finish to complete the driver installation.
Now, the USB PhotoReader is ready to use.
9. Windows will prompt you to insert the disk containing the device driver.
Insert the Software Installation CD-ROM in the CD-ROM drive and
click Next to continue. Make sure CD-ROM box is ticked.
Page 13
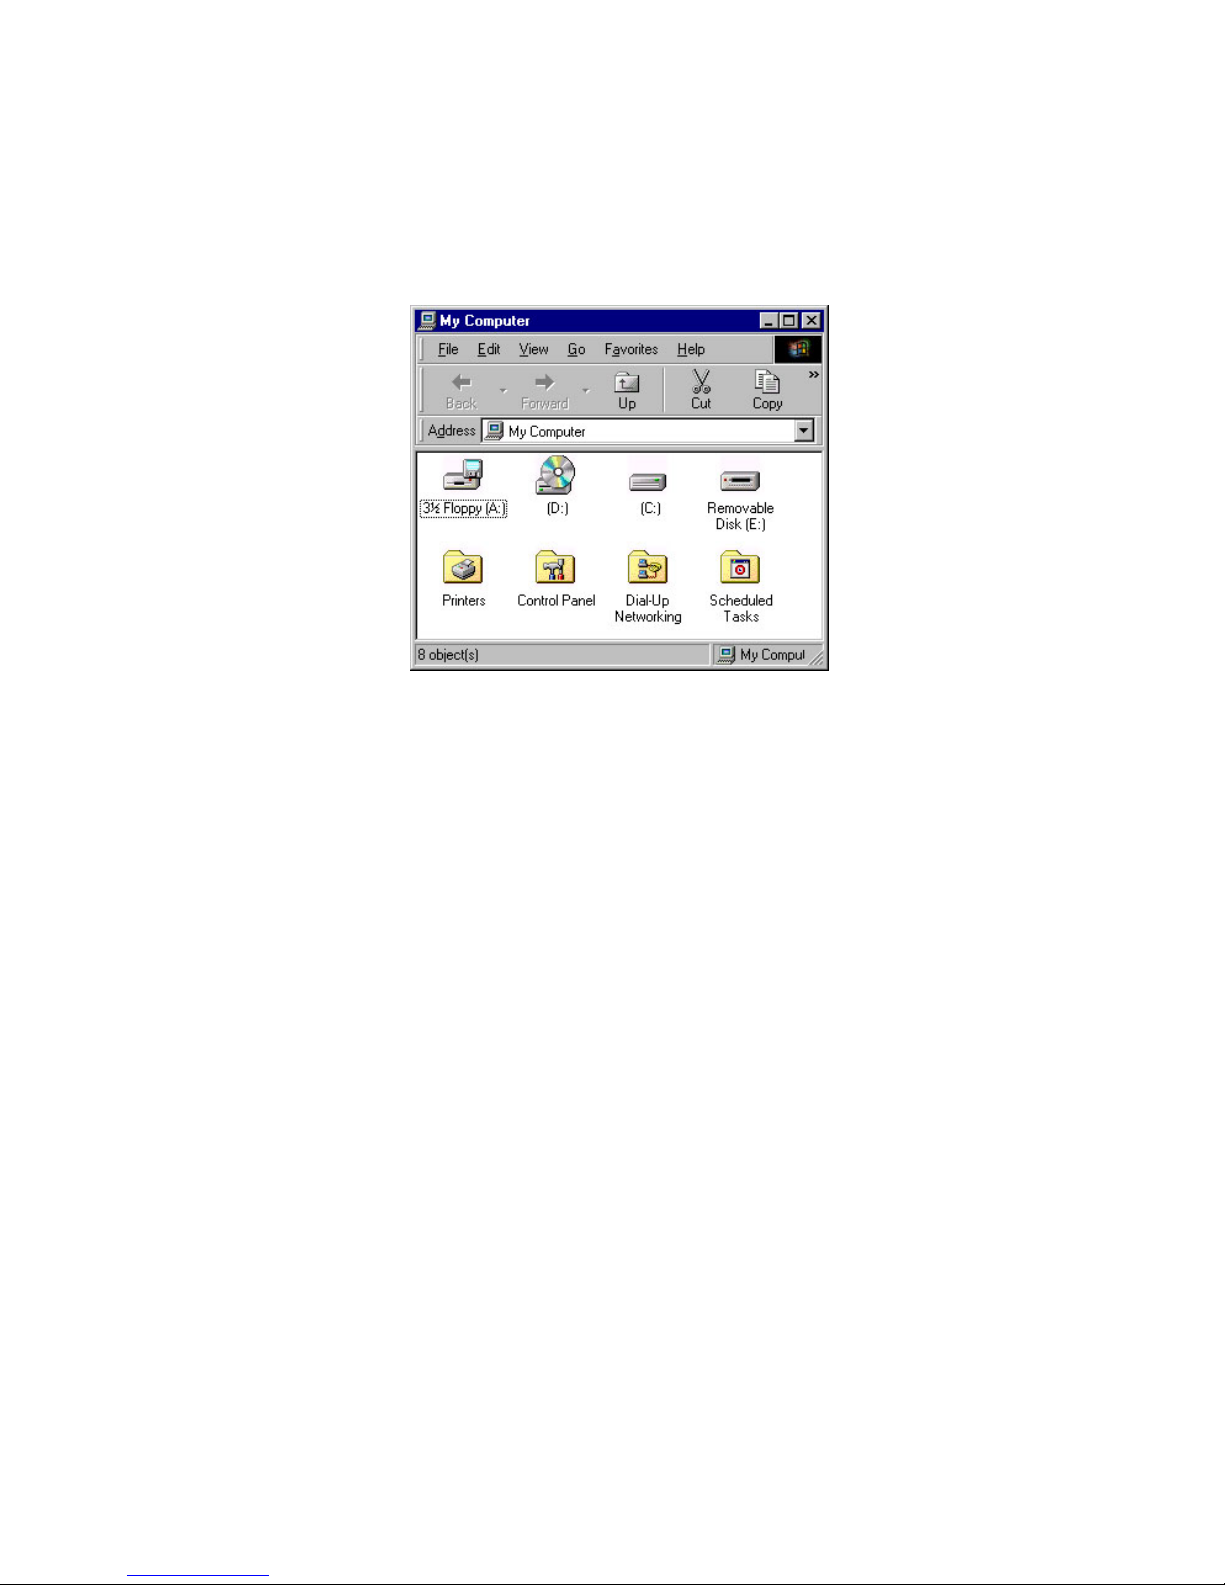
To verify the installation, insert the CompactFlash or the SmartMedia
Card. Double click on "My Computer" icon. The USB PhotoReader will
be displayed as a "Removable Disk". The drive letter assigned may
vary. Generally, the last available drive letter is assigned to the USB
PhotoReader.

Page 14
2.1.2. Software Installation for USB CF
PhotoReaders compatible with Type I & Type II
CF Cards under Windows 98
1. After you connect the USB PhotoReader to the computer as explained
in the previous chapter, the following window is displayed. Click Next
to continue.
2. The Add new hardware wizard searches for the new drivers and the
following screen is displayed. Click Next to continue.
3. The Add new hardware wizard displays the following screen. Use the
default recommended option. The windows will search for the best
driver for the device. Click Next to continue.
Page 15
4. Windows will prompt you to insert the disk containing the device driver.
Insert the Software Installation CD-ROM in the CD-ROM drive and
click Next to continue. Check Specify a location, click on the Browse
button, choose Type_II98 and click OK.
5. The Add new hardware wizard will find the device driver "SIMPLE
SM/CF USB PHOTOREADER" and the screen similar to the following
is displayed. Click Next to continue.

Page 16
7. Now, the Add new hardware wizard will display the following screen.
Click Next to continue.
8. The Add new hardware wizard displays the following screen. Use the
default recommended option. The windows will search for the best
driver for the device. Click Next to continue.
6. When the windows finishes installing the device driver, the following
window is displayed. Click Finish to continue.
Page 17
10. The Add new hardware wizard will find the device driver "SIMPLE
CF/SM-USB TO SCSI DRIVER" and the following screen is displayed.
Click Next to continue.
11. When the windows finishes installing the device driver, you will see
the following display. Click Finish to complete the driver installation.
Now, the USB PhotoReader is ready to use.
9. Windows will prompt you to insert the disk containing the device driver.
Insert the Software Installation CD-ROM in the CD-ROM drive and
click Next to continue. Make sure CD-ROM box is ticked.
Page 18
To verify the installation, insert the CompactFlash or the SmartMedia
Card. Double click on "My Computer" icon. The USB PhotoReader will
be displayed as a "Removable Disk". The drive letter assigned may
vary. Generally, the last available drive letter is assigned to the USB
PhotoReader.

Page 19
2.1.3. Software Installation for USB PhotoReaders
compatible with SmartMedia Cards under
Windows 98
1. After you connect the USB PhotoReader to the computer as explained
in the previous chapter, the following window is displayed. Click Next
to continue.
2. The Add new hardware wizard searches for the new drivers and the
following screen is displayed. Click Next to continue.
3. The Add new hardware wizard displays the following screen. Use the
default recommended option. The windows will search for the best
driver for the device. Click Next to continue.

Page 20
4. Windows will prompt you to insert the disk containing the device driver.
Insert the Software Installation CD-ROM in the CD-ROM drive and
click Next to continue. Check on Specify a location, click on the Browse
button, choose SMwin98 and click OK.
5. The Add new hardware wizard will find the device driver "SIMPLE
SM/CF USB PHOTOREADER" and the screen similar to the following
is displayed. Click Next to continue.

Page 21
7. Now, the Add new hardware wizard will display the following screen.
Click Next to continue.
8. The Add new hardware wizard displays the following screen. Use the
default recommended option. The windows will search for the best
driver for the device. Click Next to continue.
6. When the windows finishes installing the device driver, the following
window is displayed. Click Finish to continue.

Page 22
10. The Add new hardware wizard will find the device driver "SIMPLE
CF/SM-USB TO SCSI DRIVER" and the following screen is displayed.
Click Next to continue.
11. When the windows finishes installing the device driver, you will see
the following display. Click Finish to complete the driver installation.
Now, the USB PhotoReader is ready to use.
9. Windows will prompt you to insert the disk containing the device driver.
Insert the Software Installation CD-ROM in the CD-ROM drive and
click Next to continue. Make sure CD-ROM box is ticked.

Page 23
To verify the installation, insert the CompactFlash or the SmartMedia
Card. Double click on "My Computer" icon. The USB PhotoReader will
be displayed as a "Removable Disk". The drive letter assigned may
vary. Generally, the last available drive letter is assigned to the USB
PhotoReader.

Page 24
2.2. Uninstalling the Software in Windows98
In case you need to uninstall the device driver, follow the procedure
listed below.
1. Double-click My Computer. Then double-click Control Panel. The
window shown below will appear. Double-click on Add/Remove
Programs icon.
2. Highlight Simple USB CF/SM Drives and click on Add/Remove.

Page 25
3. You will see the following display. Click Yes to continue with the
uninstallation of the software.
4. After the uninstallation is complete, windows will prompt you to
reboot for the uninstallation to take effect. Click Yes to reboot the
system. The uninstallation of the software is complete.

Page 26
2.3. Software Installation for Apple
1. Connect the USB Card Reader to the USB port of the computer and start
the computer.
2. Open the Software Installation CD-ROM.
3. Double click Reader to install the USB device driver. You will see the
following display which warns you that the computer must be restarted
after installation. Click Yes to install the device driver.
4. After the installation is complete, the following message is displayed.
Click Restart to restart the computer. The installation is complete.
Now, you are ready to use the PhotoReader.

Page 27
3. Basic Operations
This section explains how to use various types of cards. Before proceeding,
make sure device drivers for your reader are installed.
Inserting the Card
CompactFlash Card
Position the card with the front side facing upward and insert. Press and
make sure that the card is inserted firmly.
SmartMedia Card
Position the card with the connector side facing downwards and insert.
Press and confirm that the card is inserted firmly.
Be careful to insert the card in the proper direction. Inserting a card upside down or
forcing it may result in damage to your card reader and consequent loss of data.
Removing the Card
CompactFlash Card
Make sure you are not accessing the data before pulling out the
CompactFlash card. Then push the eject button and remove the card.
SmartMedia Card
Make sure you are not accessing the data before pulling out the SmartMedia
card. Then pull and remove the card.␣␣␣␣␣␣␣␣␣␣
When the access light is flickering, this indicates that the card reader is still reading or
writing data. Removing the card in this state can result in permanent data loss.
Inserting CompactFlash Card
Inserting SmartMedia Card

Page 28
4.1. Using PhotoReader with Windows 98
Copying Files
Formatting Cards
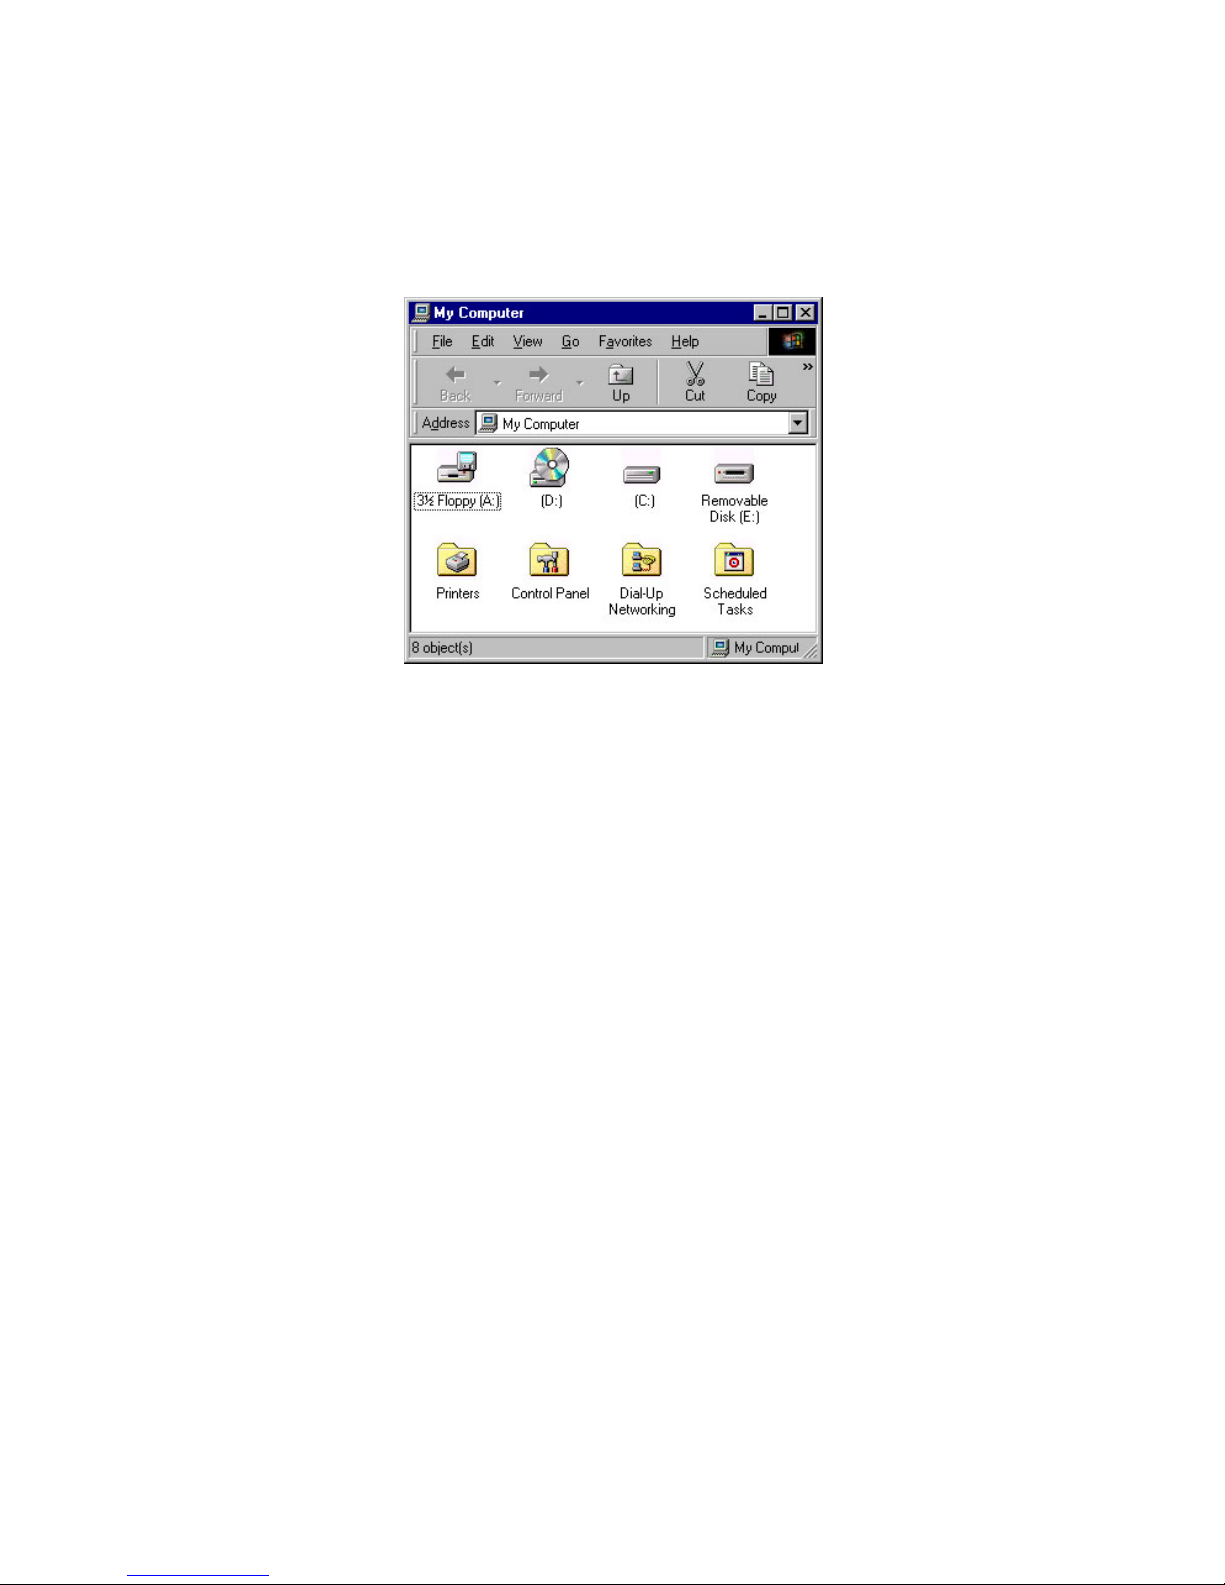
Start Windows 98, double-click the My Computer icon to open the My
Computer window. There, you will see a Removable Disk icon. (The
specific drive letter assigned to the PhotoReader will vary (D, E, and so
on), depending on your particular system configuration).
You may now copy files from your card reader to the hard disk as you
would from a floppy disk. Drag the icons for the data to be copied and
release the mouse button over the destination disk.
Most cards are factory formatted. Formatting cards for Windows 98 may
result in your digital camera being unable to recognize a card. Do Not
format cards in this way, if you intend to use the cards in your digital
camera. Format cards when you intend to use them to exchange data
between USB Series readers or between readers and notebook computers.
To format cards, follow the steps below:
1. Right click on the Removable Disk icon. Choose the desired format
from the display menu.
2. The dialog box shown below appears. Select Ordinary Format and press
the Start button.
3. Once format is complete, the card is ready for use.

Page 29
4.2. Using PhotoReader with Apple
Copying Files
After the computer has restarted, insert the CompactFlash or
SmartMedia Card into the USB PhotoReader. The Card will be displayed
as an icon as shown below. Now, you are ready to use the Card as a
removable storage device. You can copy the files simply by dragging
the icon for the files.
When you want to remove the Card, first make sure you are not accessing the data in the Card. Then drag the icon for the Card into the Trash.
You will see the following display. Click OK and remove the Card from
the USB PhotoReader.
Formatting Cards
Most Cards are factory formatted. Formatting Cards inside the USB
PhotoReader in Mac OS may result in your digital camera being unable
to recognize the card. Format the Cards in the USB PhotoReader, only
when you intend the use the cards only to exchange data between different USB Readers or between USB readers and notebook computers.
To format a Card in the USB PhotoReader, highlight the icon representing the USB PhotoReader and click Erase Disk from apple's Spe-
cial menu at the top of the screen. A window similar to the following
will be displayed. Click Erase to format the Card. Once the Card is formatted, the card is ready to use.

Page 30
5. Troubleshooting with Windows 98
Symptom
Corrective Action
The Device Drivers
have not been properly
installed.
The card is not inserted
correctly in the card
reader.
Refer to the "Installing the
Device Driver" section in
this manual, and make sure
device drivers are correctly
installed.
Check the direction in which
the card is inserted and
reinsert.
The light does
not come on.
Windows 98 does not
recognize this reader.
* Check the USB cable connections,
making sure they are plugged in
properly.
* If the reader was connected to a
hub, plug it directly into your
computer's USB port. Is it
recognized?
The Windows 95
version does not
support USB.
Upgrade to Windows 98.
The card is not
recognized (The
"Removable
Disk" icon does
not appear in the
"My Computer"
window.)
Cause

Page 31
Part Number STI-CFRDR/USB, STI-SMRDR/USB
Compatible cards CompactFlash Cards, SmartMedia Cards
Compatible OS Windows 95/98, Mac OS (G3, G4 & iMac)
Host Interface USB port (Universal Serial Bus)
Transfer Rate Max. 1.5 MB/Second
Power Requirement 100 VAC
Power Consumption 0.2A
Dimensions 90 mm (W) x 22 mm (D) x 98 mm (H)
Weight (Main unit) Approx. 85 g
Operating Environment Temperature during use: +5ºC to +40ºC
Humidity during use: 20% to 80%
(Without condensation)
6. Specifications
* Specifications are subject to change without notice.
Federal Communications Commission
This equipment has been tested and found to comply with the limits for a Class B digital device, pursuant to Part
15 of the FCC Rules. Three limits are designed to provide reasonable protection. This equipment generates, uses
and can radiate radio frequency energy, and if not installed and used in accordance with the instructions,may
caurce harmful interference to radio communications. However, there is no guarantee that interference will not
occur in a particular installation. If this equipment does cause harmful interference to radio or television reception,
which can be determined by turning the equipment off and on, the user is encouraged to try to correct the
interference by one or more of the followingmeasures:
• Reorient or relocate the receiving antenna.
• Increase the separation between the equipment and receiver.
• Connect the equipment into an outlet on a circuit different from that to witch the receiver is connected.
• Consult the dealer or an experienced radio/TV technician for help.
• Shielded interface cables must be used in order to comply with emission limits. Specfications not expressly approved
by the party responsible for compliance could void the user's authority to operate the equipment.

Page 32
7. Technical Support
Questions regarding this product may be answered by contacting Simple
Technology Technical Support as indicated below. Please read this user
manual and consult the "Troubleshooting section" of this manual before
contacting us for assistance.
Tel : 949-476-1180 or
800-4SIMPLE (800-474-6753) (Only for USA and Canada)
Fax : 949-476-1209
EMail : support@simpletech.com
Web: http://www.simpletech.com
3001 Daimler St.,
Santa Ana, CA 92705
http://www.simpletech.com
Document Number: 61600-00034-003
 Loading...