


Mammoth Series MMS02
Military-grade IP68 water resistant and dust proof external 2.5" drive enclosure with USB 3.1 Gen 2

Installation and system optimization guide:
The following manual and guides were carefully prepared by the SilverStone engineering team to help you maximize the potential of your SilverStone product. Please keep this manual for future reference when upgrading or performing maintenance on your system. A copy of this manual can also be downloaded from our website at:
 Product Overview
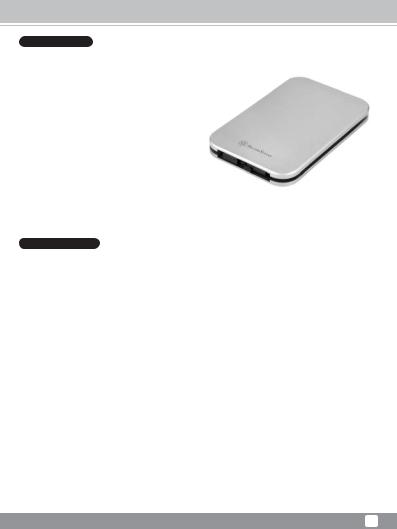
  P.1
P.1
 Package Content
  P.2
P.2
 Installation Guide
  P.3
P.3
 FAQ
FAQ  P.15
P.15
Warranty Information
Mammoth Series MMS02
Product Overview
 Introduction
The MMS02 is a military-grade external 2.5" drive enclosure with USB 3.1 Gen 2 capability. Its beautiful all-aluminum and surprisingly svelte protective enclosure is certified for IP68 standard so it is dust proof and water resistant. Despite the extraordinary durability, there are no sacrifices in performance as the MMS02 supports UASP in addition to its already speedy USB 3.1 Gen 2 interface. If you are looking for a stylish enclosure that can protect your drive in the harshest environment possible, the MMS02 is the one to get.
 Specifications
|
Model No. |
SST-MMS02C |
|
|
Enclosure material |
Aluminum |
|
|
Color |
Charcoal |
|
|
Ingress protection |
IP6X |
|
|
|
Dustproof: No ingress of dust; complete protection against contact (dust tight) |
|
|
|
IPX8 |
|
|
|
Water resistant: Soaking in 1.5 meter deep fresh water for 60 minutes |
|
|
Controller |
VIA VL715 |
|
|
HDD size support |
7mm or 9.5mm 2.5" SATA HDD / SSD |
|
|
HDD interface |
SATA III / II / I |
|
|
Enclosure interface |
USB 3.1 Type-C (compatible with USB 3.1 Gen 1 / 2.0 / USB 1.1) |
|
|
Transfer speed |
USB 3.1 Gen 2 up to 10Gbps |
|
|
Support OS |
Microsoft Windows 10/8.1/8/7/VISTA (32-bits, 64-bits) or future release versions |
|
|
|
Mac OS 10.8 or future release versions |
|
|
Extra function |
UASP |
|
|
USB Cable length |
460mm |
|
|
Environment |
Operating Temperature: 5°C ~ 35°C |
|
|
|
Operating Humidity: 20%RH ~ 80%RH |
|
|
|
Storage Temperature: -20°C ~ 50°C |
|
|
|
Storage Humidity: 20%RH ~ 80%RH |
|
|
Net Weight |
400g ± 20g |
|
|
Dimension |
105mm (W) x 16mm (H) x 164.5mm (D) |
|
|
|
4.13" (W) x 0.63" (H) x 6.48" (D) |
|
|
|
|
|
1

Mammoth Series MMS02
Package Content
A |
B |
C |
D |
E |
F |
|
|
|
|
A.MMS02 enclosure with USB Type-C to Type-C cable / B. Screwdriver / C. Anti-vibration pad / D. Screws / E. User manual /
F.Footpads
A.MMS02-Gehäuse mit USB-Typ-C-zu-Typ-C-Kabel / B. Schraubendreher / C. Vibrationsdämpfendes Polster / D. Schrauben /
E.Bedienungsanleitung / F. Standpolster
A.Boîtier MMS02 avec câble USB Type-C vers Type-C / B. Tournevis / C. Tampon anti-vibrations / D. Vis / E. Manuel de l'utilisateur /
F.Patins de pieds
A.Carcasa MMS02 con cable USB Tipo-C a Tipo-C / B. Destornillador / C. Almohadilla anti vibración / D. Tornillos / E. Manual de usuario /
F.Patas de goma
A.Box MMS02 con cavo USB da Tipo C a Tipo C / B. Cacciavite / C. Gommini antivibrazione / D. Viti / E. Manuale d’uso / F. Piedini
A. Корпус MMS02 с кабелем USB Type-C - Type-C / B. Отвёртка / C. Антивибрационные прокладки / D. Винты /
E.Руководство пользователя / F. Ножки
A.USB Type-C Type-C / B. / C. / D. / E. / F.
A.USB Type-C Type-C / B. / C. / D. / E. / F.
A.MMS02 USB Type-C Type-C / B. / C. / D. / E. /
A.USB C C MMS02 / B. / C. / D. /
E./ F.
2

Mammoth Series MMS02
Installation Guide
 When mounting a hard drive, please be mindful of static electricity as it can cause device malfunction. Please touch other metal objects to discharge or wear antistatic gloves before handling hard drive.
 If hard drive already contains data, please backup it up before installation to prevent data loss.
 After installation if you cannot see your HDD / SSD in the operating system, please go to disk management to initialize your HDD / SSD.
 Bitte ergreifen Sie bei der Installation eines Datenträgers entsprechende Maßnahmen wegen statischer Elektrizität, da diese das Gerät beschädigen kann. Berühren Sie zum Entladen andere metallische Objekte oder legen Sie ein Antistatik-Armband an, bevor Sie den Datenträger installieren.
 Falls der Datenträger bereits Daten enthält, sichern Sie diese zur Vermeidung von Datenverlust bitte vor der Installation.
 Falls Sie Ihre Festplatte / SSD im Betriebssystem nach der Installation nicht sehen können, rufen Sie bitte die Datenträgerverwaltung zur Initialisierung Ihrer Festplatte / SSD auf.
 Lors du montage d'un disque dur, veuillez être attentif à l'électricité statique car elle peut causer un dysfonctionnement de l'appareil. Veuillez toucher d'autres objets métalliques pour vous décharger ou porter des gants antistatiques avant de manipuler le disque dur.
  Si le disque dur contient déjà des données, veuillez le sauvegarder avant l'installation pour éviter la perte des données.
 Après l'installation, si vous ne voyez pas votre disque dur / SSD dans le système d'exploitation, veuillez accéder à la gestion des disques pour initialiser votre disque dur / SSD.
 Cuando monte un disco duro, por favor tenga cuidado con la electricidad estática, ya que puede causar una avería. Por favor, toque otros objetos de metal para descargarse o lleve guantes antiestáticos antes de manejar el disco duro.
 Si el disco duro ya contiene datos, por favor haga una copia de seguridad antes de la instalación para evitar pérdida de datos.
 Tras la instalación si no puede ver su HDD / SSD en el sistema operativo, por favor vaya al administrador de discos para inicializar su HDD / SSD.
 Quando si installa un disco rigido, prestare attenzione all’elettricità statica in quanto può causare guasti al dispositivo. Toccare altri oggetti metallici per scaricare l’energia statica, oppure indossare guanti antistatici prima di maneggiare il disco rigido.
 Se il disco rigido contiene già dati, eseguire il backup prima dell'installazione per evitare la perdita dei dati.
 Dopo l'installazione, se non si riesce a vedere l'HDD / SSD nel sistema operativo, andare alla gestione del disco per inizializzare l'HDD / SSD.
 При установке накопителя, пожалуйста, избегайте статического электричества, так как оно может привести к возникновению неисправности. Пожалуйста, прикоснитесь к другим металлическим устройствам или используйте антистатические перчатки при установке накопителя.
 Если на вашем накопителе имеются какие-либо данные, то пере установкой сделайте резервное копирование, чтобы предотвратить потерю информации.
 Если после установки вы не видите свой HDD / SSD в операционной системе, то перейдите в раздел управления дисками, чтобы инициализировать свой накопитель.


 HDD / SSD HDD / SSD


 HDD / SSD HDD / SSD


 HDD / SSD HDD / SSD
 . ..
. ..
 , .
, .
 HDD / SSD HDD / SSD .
3

Mammoth Series |
MMS02 |
Installation Guide |
|
01 |
A |
|
A |
Use included screwdriver to remove the screws for opening the MMS02 enclosure A: Screw / Seal ring
Entfernen Sie zum Öffnen des MMS02-Gehäuses die Schrauben mit dem mitgelieferten Schraubendreher A: Schraube / Dichtungsring
Utilisez le tournevis fourni pour retirer les vis afin d'ouvrir le boîtier MMS02
A: Vis / Joint d'étanchéité
Use el destornillador incluido para retirar los tornillos y abrir la carcasa MMS02
A: Tornillo / Anillo
Utilizzare il cacciavite incluso per rimuovere le viti per l'apertura del box MMS02
A: Vite / Anello di tenuta
Используйте прилагаемую отвёртку, чтобы выкрутить винты и открыть корпус MMS02 A: Винт / Уплотнительное кольцо
MMS02 A: /
MMS02 A: /
MMS02
A: /
MMS02 A: /
4
 Loading...